| Distinguished - BHPian
Join Date: Sep 2008 Location: Bombay
Posts: 4,423
Thanked: 9,581 Times
| Re: A Winch Test
Came across this brilliant article here: http://www.4x4training.com/Articles/...lkThrough.html
and http://www.4x4training.com/Articles/...Winching2.html
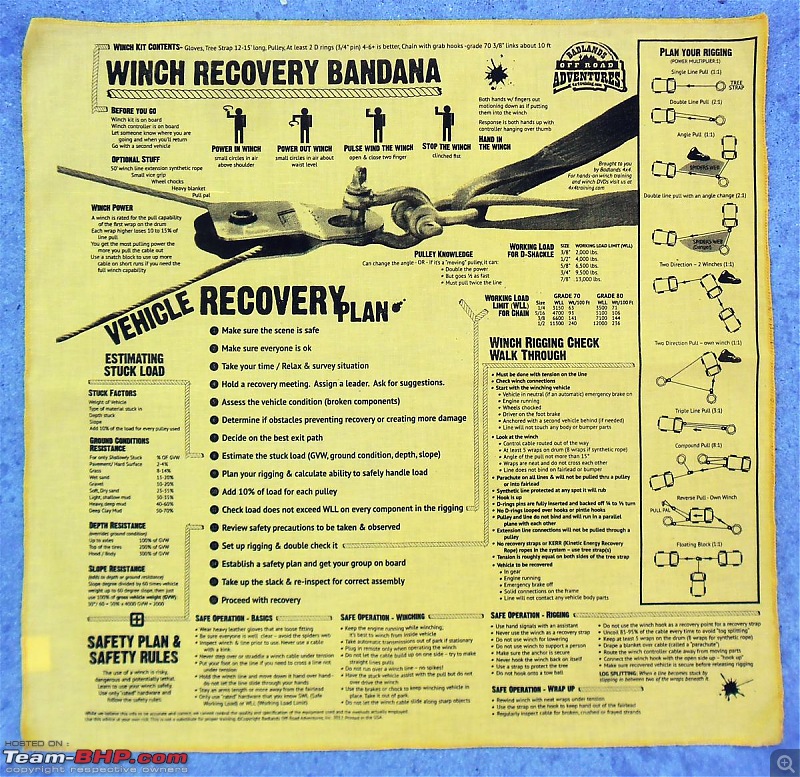
Thought i'd share it from there: Quote:
If you spend any significant amount of time in difficult terrain, youre bound to encounter a recovery situation at some point. It could be either your vehicle or someone elses. And a winch may be the proper tool at that time. This is a good time to review recovery, and winching in particular.
Keep in mind that these tips and the information provided on the bandana are not a substitute for proper training, sound judgment and quality equipment.
Every winching operation should start with a plan in your mind as to how youll rig it up. Winching is a risky procedure; proceed very slowly and methodically. Youre dealing with material and parts that are subject to a tremendous amount of force. A mistake can be fatal, as I pointed out in Dont Lose Your Head While Recovering a Vehicle. Take your time.
Winching begins with a walkthrough. You want to inspect all parts and lines while the system is under light tension. If everything looks good, you can power up and proceed with the recovery.
The vehicle doing the recovery is kept in neutral with the emergency brake on. Having the transmission in neutral protects the parking pawl. Chock the front wheels if you can. (Some people even anchor this vehicle to a tree or other vehicle.) You do not want that vehicle to move. Start the winch slowly so you take up some of the slack.
Lines that are slack while on ground take on a new dimension when under tension. You need to check them before proceeding with the recovery. The lines may be binding or twisting. They could be rubbing against an edge on the bumper or other body part. In some cases the lines end up right over a taillight. Under load those lines will smash the cover and bulb.
Check all connections. Start at one end of the line and work your way through. Are any connections about to be pulled through the pulley? Adjust as needed.
Keep the engine running, or its battery will be drained dry. Even though the emergency brake is on, someone should be in the recovery vehicle applying pressure to the brakes. Now review the winch cable as it is leaving the winch. Does it leave at greater than a 15 degree angle? If so, it will start to pile up on one side of the drum, causing the cable to snag and possibly break that side of the winch. If you see the cable starting to pile up, stop winching. Disconnect the cable, pull it out manually, and wind it up neatly. Always start with your cable properly wound on the drum. Then, consider moving the recovery vehicle or pulley to decrease the angle of pull.
When you winch at greater than a 15 degree angle, theres a greater chance of the cable rubbing or getting caught on the bumper of the recovery vehicle. There may be times when you have no choice but to winch at a severe angle. Just watch the cable closely.
As youre paying out the cable, remember the Rule of 5: Keep at least five turns of cable on the drum at all times (eight turns for synthetic cable, because its slippery). If you dont keep a minimum amount, the tremendous force of recovery will pull the rest of the cable right off the drum.
If you have a large blanket, toss it over the pulley. (See image. ) Called a parachute by 4-wheelers, this blanket will absorb some of the energy should the cable snap.
Keep an eye on the parachute during winching. It has a tendency to ride up the cable. You dont need that jamming into the pulley or winch. Stop the winching if necessary to move the blanket.
Position spotters to watch the lines and pulley. (They should off to the sides of the vehicles. No one should be in the path of the lines.) Winch slowly, and pay particular attention to portions of cables nearest the vehicles. Youre watching for any binding, rubbing and twisting. Make sure, also, that the vehicle being recovered is behaving properly. You may need to stop the winching and adjust the whole arrangement.
Winch kit
All successful winching starts with a good winch kit. That kit should include a pair of sturdy, loose fitting leather gloves, a tree strap 15 to 16 feet long, a heavy blanket, four to six D-rings, and a piece of 70 grade 3/8 chain (10 feet is long enough). Lets look at each component.
Sturdy leather gloves are mandatory. Steel winch line develops small broken wires that will tear into your hands. Loose fitting gloves allow you to pull your hand out if the gloves become caught in the winch or line. A tree strap that is at least 15 feet long will be long enough to go around larger trees. This is done to protect the tree. A chain or cable will cut into the bark, mortally wounding the tree. Also, cable thats wrapped around a tree and hooked back on itself develops a kink, which weakens the cable. The blanket is used as a parachute and placed over the winch line during winching to dampen recoil should the winch line break.
The chain, by the way, needs to be sturdy. Chain strength is given in grades; the higher the number, the stronger the chain. The Working Load limit (WLL) of the chain needs to be in the same range as the rest of your gear. Using higher grade chain (like grade 70) allows appropriate strength in a smaller link size which is easier to store and manage. Chain found at hardware stores is typically around a 43 grade. You will need quite a large link size at that grade. Go with 70 grade (or higher if you can afford it). Higher grade chains have each link welded for extra strength. Finally, having four to six D-rings puts more options at your disposal, especially for complicated winching.
What is working load limit?
I want to stress one thing: Never use equipment whose rating either working load limit (WLL) or breaking limit you dont know. If that information is not on the item, do not use the part. You could put yourself and everyone else in danger.
Working load limit, previously called safe working limit, is just what it means: the maximum stress that the item is designed to handle while in use. For safety reasons, the WLL of winching components is about one-fifth of the items breaking strength. Lets look at some examples. The WLL for grade 70 3/8 chain is 6,600 lbs. D-rings should have a minimum of 3/4 pin. That size has a WLL of 9,500 lbs. You can find the WLL for other sizes of parts on my winching bandana.
After purchasing the parts, if the WLL is only indicated on the package it comes in, make sure you transfer the WLL onto the part permanently. A permanent marker (magic marker or Sharpie) works great on tree straps, whose packaging you pitch after opening. For pulleys and D-rings, carve the information with an engraving pen into the metal. Original sticky labels and markings tend to wear off over time.
Also, never use a recovery strap for winching. Recovery straps are designed to stretch. That stretching builds energy, which is used to snatch a stuck vehicle free. A jerking action while winching is dangerous because of all the metal parts used. A recovery strap adds additional recoil to the winch rigging which is not desirable. If that strap were to break, youd have a bunch of steel missiles flying around. (For more information on risks of using a recovery strap, see Dont Lose Your Head While Recovering a Vehicle. ) For winching, we want a nice, steady pull.
Winching starts with a vehicle recovery plan
A winching operation is serious business and should be treated as such. Take your time to think it through before proceeding. The following steps are outlined under the Vehicle Recovery Plan section of the bandana.
Make sure everyone in the affected vehicle is safe, especially if the vehicle rolled over. Be prepared to provide first aid, but also make sure the vehicle itself is stable. If not, you may need to attach straps or cables first. Also, look for any hazards that could endanger the recovery crew.
Be careful if the vehicle is perched on its side. You dont want it dropping on top of you while youre attaching the cable.
A vehicle recovery plan is essential.
Gather everyone together. Get their input, and determine the best course of action. Dont let anyone start rigging up until youve decided what to do. If need be, appoint a leader. Have someone (that could be you) take charge of the situation. The winching should be done in an orderly manner.
Inspect the vehicle.
Are there any broken of dangling parts that could affect the recovery? What about leaking liquids? Do something to capture those until you can devote time to the environmental issues and clean up.
Determine your exit path, and get a lay of the land.
See if there are any obstacles youll need to overcome. What is the best direction to go? Its always easier to go downhill, but you may find that pulling a few feet up and over a hill or obstacle makes more sense.
If the vehicle is on a slope, set the emergency brake. You dont want the vehicle rolling downhill once its freed up.
Plan the rigging.
Estimate your stuck load, and calculate whether you have the capability to handle the load. (See the sidebar for more information.) Pulleys add friction, so remember to add 10% to the load for each pulley used.
But pulleys also aid in pulling. A full discussion is beyond the scope of this article. Just remember that when you use one "moving" pulley, the winch sees only one-half of the total load. (Only one-third, if two "moving" pulleys are used.) The total load may be 10,000 lbs. but the winch needs to pull only 5,500 lbs. (10,000 plus 10% for the pulley divided by 2).
Last step
Set up the rigging and double check it. Take up the slack and re-inspect for correct assembly. Proceed with the recovery.
| Quote:
A number of variables go into estimating the stuck load:
Stuck Factors are:
Weight of the vehicle and its contents (aka Gross Vehicle Weight GVW)
Type of material its stuck in and how deep
Slope to be pulled up or down
Ground Conditions Resistance
For only shallowly stuck (i.e. no traction) here are the numbers for various types of ground. Dont try to memorize them all. Assume 70% for mud and 35% for any other type of ground. Those numbers will get you close enough in your calculations in the field.
% OF GVW
Pavement/ Hard Surface 2-4%
Grass 8-14%
Wet sand 15-20%
Gravel 10-20%
Soft, Dry sand 25-35%
Light, shallow mud 30-35%
Heavy, deep mud 40-60%
Deep Clay Mud 50-70%
Depth Resistance
(Overrides ground condition use this instead of the shallowly stuck numbers above.)
Up to axles 100% of GVW
Top of the tires 200% of GVW
Hood / Body 300% of GVW
Slope Resistance
(Gravity has to be taken into account. It adds to the load for uphill pull)
Slope in degrees divided by 60 times the vehicles weight up to a 60-degree slope. For a more severe angle, use 100% of vehicle weight.
Lets say the vehicle is on a 30-degree slope: 30 degrees / 60 = 50% x 5,000 GVW = 2,500 lbs.
Finally Calculation
Add ground conditions resistance (or depth resistance) to slope resistance for load estimate.
|  |


 7th July 2011, 10:21

 (1)
Thanks
(1)
Thanks


