Team-BHP > 4x4 & Off-Roading > 4x4 Vehicles
Register New Topics New Posts Top Thanked Team-BHP FAQ


Reply
  Search this Thread
49,170 views
Old 6th July 2021, 00:24   #46
BHPian
 
Arsi's Avatar
 
Join Date: Sep 2015
Location: Srinagar, J&K
Posts: 133
Thanked: 147 Times
Re: My 2008 Maruti Gypsy Hardtop - A childhood dream come true!

DIY 4: Snorkel

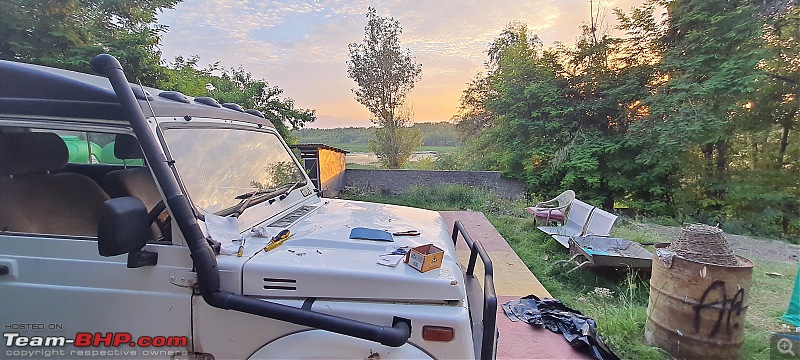
I had always wondered why snorkels cost around 10k. My curiosity led me to research about the matter and I came to the conclusion that this could be a pretty easy DIY and a cheap upgrade. So, I made my mind and went for it.

My goals:
  • Water wading, obviously! But I am not the guy who "unnecessarily" puts his vehicle in water just for the fun of it. However, sometimes, you really have no choice.
  • Better and cold intake for the engine

Items required:
  1. A 2" PVC pipe 10 feet 1 no.
  2. 90 degree PVC bends 2 nos.
  3. Wire mesh
  4. Silicone sealant
  5. Silicone sealant gun (not necessary but it makes the things easy and fast)
  6. Spray paint can 1 no.
  7. Metal cutting blade (cutter or drilling machine with 'cutting jugaad')
  8. Some tin clamps made from left over tin sheets
  9. Some screws, board marker, emery paper, inch tape, gloves, nuts and bolts

Method:
  1. Generally, the air filter is not water tight. Make sure that the rubber seal is intact and working. To check, remove the air filter box and pour water in it and check for leaks.
  2. Now getting to the main process. Remove the rubber hose which is connected after the air filter box. This part will be later used for connecting the PVC pipes at any desirable angle.
  3. Mark the area which is to be cut. This should be straight in line with the air pipe inside the bonnet.
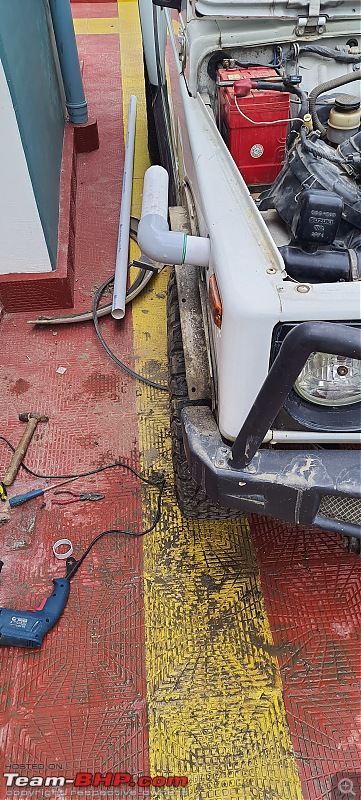
  4. Now, cut the market portion of the fender. If this is close to the wheel arch, you may remove it to prevent damage. Make sure to sand the cut hole so that it doesn't damage the PVC pipe. The hole should be a tight fit so that it provides structural support to the snorkel setup.
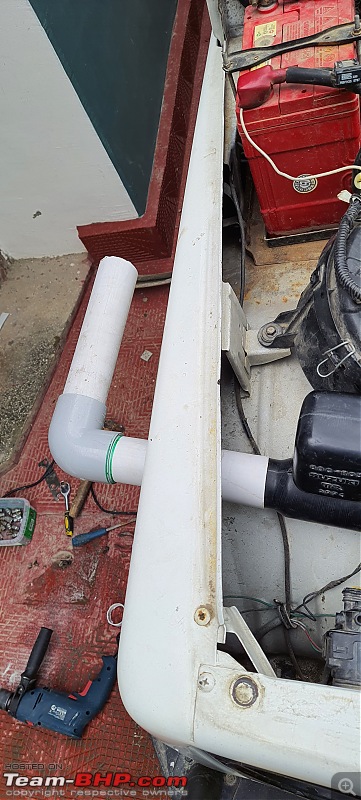
  5. Cut the PVC pipe from the expanded end and fix it in the pipe coming from the air filter box through the cut hole.
  6. Install a 90 degree bend and connect it to another piece of the PVC pipe.
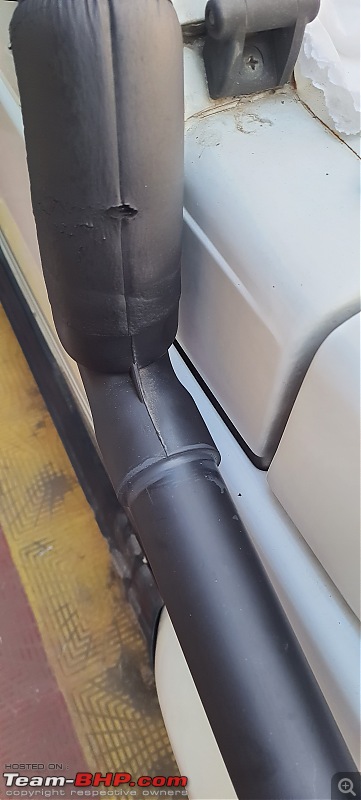
  7. Now insert the part removed in step one to mount the snorkel end at any desirable angle aligned with the windshield.
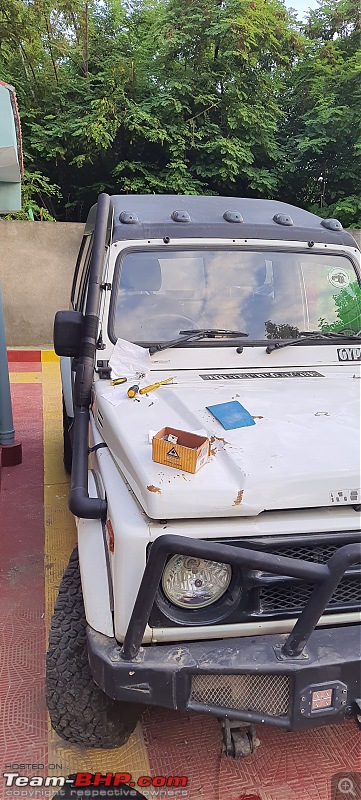
  8. Similarly, complete the setup as shown in the image.
  9. At the end, install 90 degree bend. You may keep it front facing or rear facing. I preferred rear to avoid the entry of rainwater.
  10. Install wire mesh at the end. Now the rough setup is complete.
  11. You may remove all, paint them and clamp them to the body using the tin scrap pieces.
  12. During the final installation, use silicone sealant at every joint to make sure that the fittings are water tight.

To be explored
I have kept the pipe diameter to be 2". I am not sure how much this will affect the engine performance by reducing the air intake. I also made a few test runs with the snorkel on and off but didn't feel any difference. Any suggestions? In any case, 3" setup is also easy and similar.

The total cost of the setup = <Rs. 1000

Here are the pics:

My 2008 Maruti Gypsy Hardtop - A childhood dream come true!-20210705_125715.jpg
List of things

My 2008 Maruti Gypsy Hardtop - A childhood dream come true!-20210705_141723.jpg
Marking the circle to be cut

My 2008 Maruti Gypsy Hardtop - A childhood dream come true!-20210705_152645.jpg
First attachment

My 2008 Maruti Gypsy Hardtop - A childhood dream come true!-20210705_152651.jpg
TV of the first attachment

My 2008 Maruti Gypsy Hardtop - A childhood dream come true!-20210705_193225.jpg
The flexible rubber hose taken out from the bonnet

My 2008 Maruti Gypsy Hardtop - A childhood dream come true!-20210705_193221.jpg
Sealing the joints

My 2008 Maruti Gypsy Hardtop - A childhood dream come true!-20210705_191847.jpg
Final front view

My 2008 Maruti Gypsy Hardtop - A childhood dream come true!-20210705_193110.jpg
Final side view

My 2008 Maruti Gypsy Hardtop - A childhood dream come true!-20210705_193042.jpg
Wire mesh at the end

Last edited by Arsi : 6th July 2021 at 00:27.
Arsi is offline   (3) Thanks
Old 6th August 2021, 01:00   #47
BHPian
 
Arsi's Avatar
 
Join Date: Sep 2015
Location: Srinagar, J&K
Posts: 133
Thanked: 147 Times
Re: My 2008 Maruti Gypsy Hardtop - A childhood dream come true!

Finally, my list of basic mods has been completed for now.
He is what I have upgraded to.

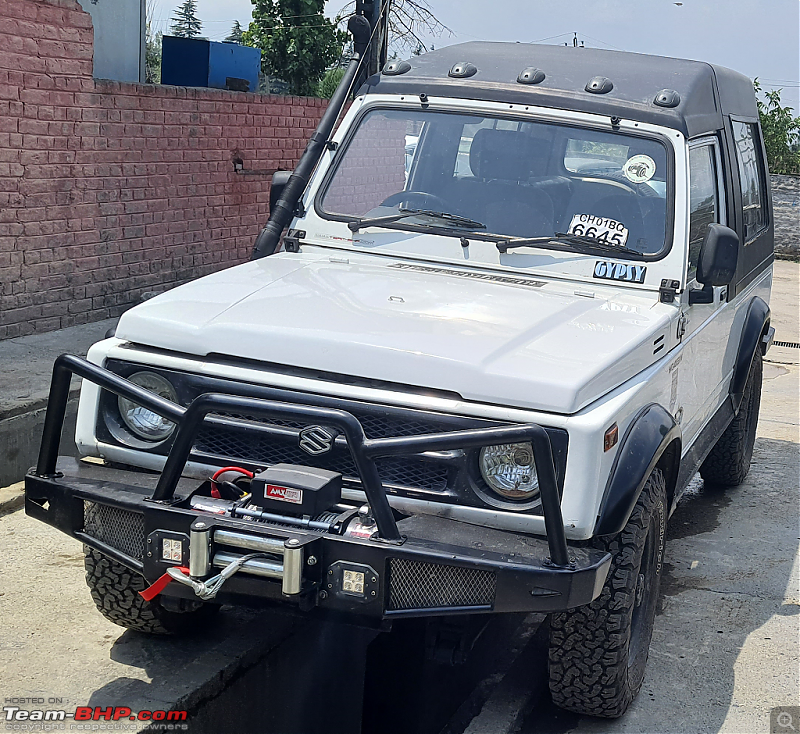
MOD: 9500lbs AMX Winch Waterproof (Steel Rope)

I had seriously planned for a bush winch. I did some research into it but the amount of expertise and precision in fabricating one was beyond my time limit. Besides, it does have some limitations as compared to a normal winch. The last OTR, however, made me realize the urgency of getting a winch. So, I went straight away for AMX 9500lbs without wasting too much time.

AMX is an Indian brand and gives 2 years warranty. Plus, the parts are easily available. I estimated that 9500 lbs would be enough for personal use and even to pull out stuck SUVs during my rescue sessions in winters. I went for waterproof model. Basically, all the AMX winches are water resistant and can be immersed in water without damage. The only difference lies in usage; waterproof models can be used while immersed and the other ones can't. This would made a big difference in life or death situations. Moreover, my choice of steel rope was because it is sturdier than synthetic and does not take damage when tied around trees, etc. Total cost = 31,500 INR

The installation was a 2-day job, the first day in fabricating the metal base and altering the front bumper and the second day in installation. Without many details, here are the pics:

4mm Plate welded to the chassis on which the winch and bumper will go.
My 2008 Maruti Gypsy Hardtop - A childhood dream come true!-fixing-plate.jpg

Installation of the front bumper.
My 2008 Maruti Gypsy Hardtop - A childhood dream come true!-bumper-install.jpg

After installation
My 2008 Maruti Gypsy Hardtop - A childhood dream come true!-after-winch.png

My 2008 Maruti Gypsy Hardtop - A childhood dream come true!-after-winch-2.jpg


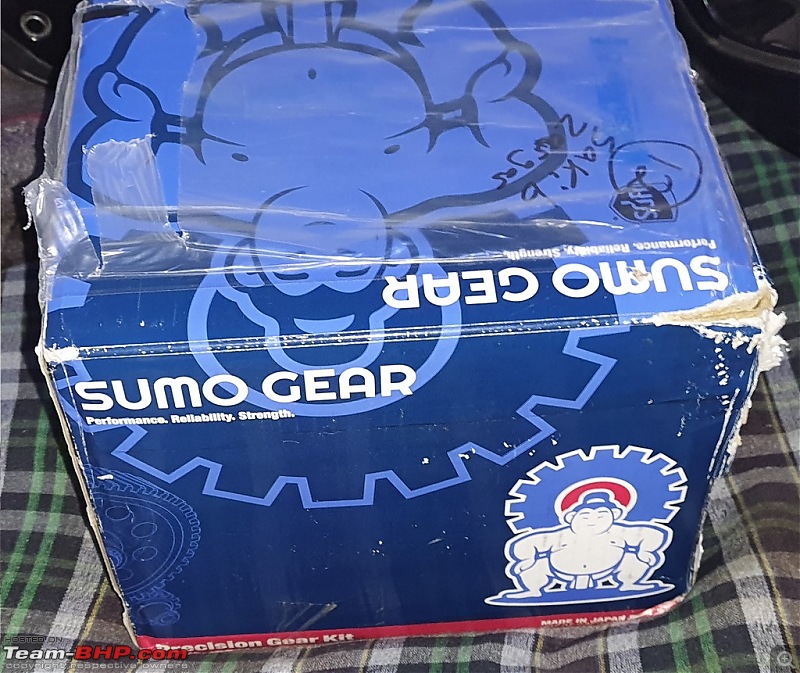
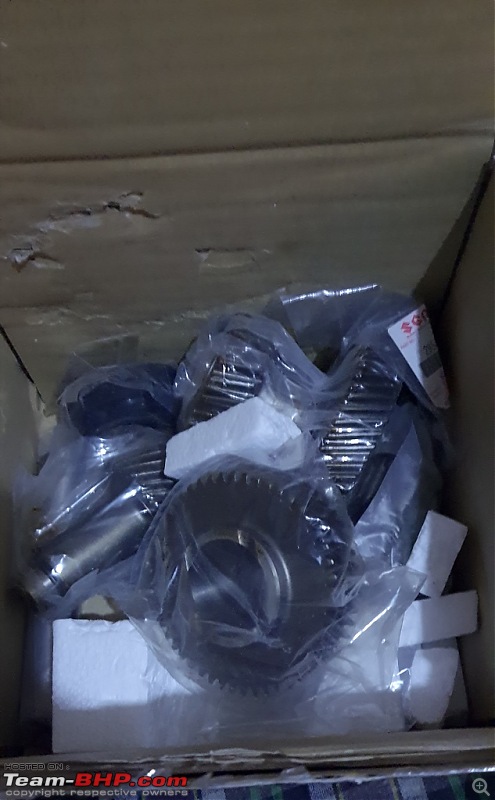
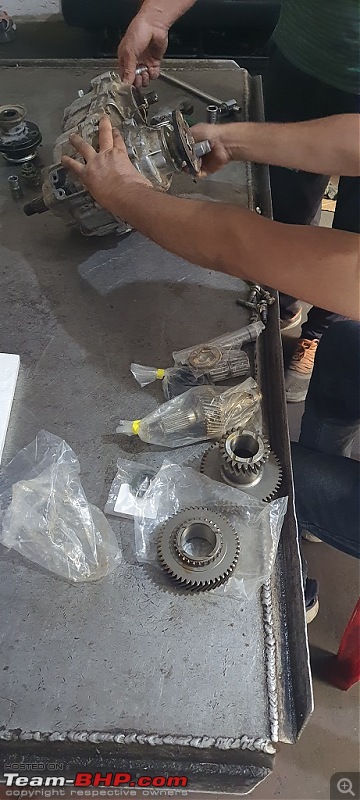
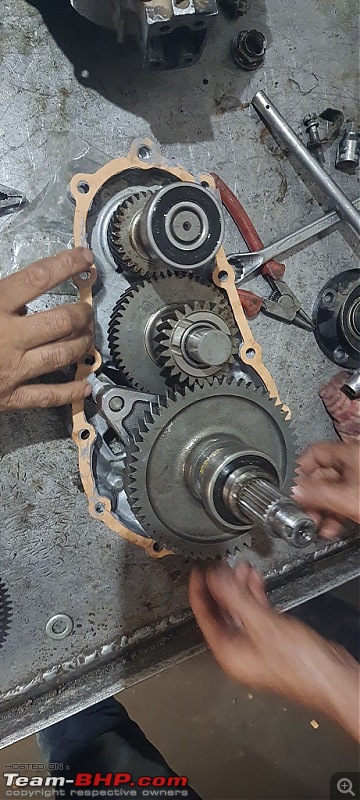
MOD: 4.16:1 Trail tough Crawler gear set

Sourced from the US at 35k. Brought by a friend. Simple plug and play. But just remember to get it installed at MASS. The difference in 2H/4H is visible but not remarkable. However, in 4L, Gypsy just isn't Gypsy anymore . Tremendous torque. Put it in 4L 1st and you will control it inch by inch. I just drove it 10-20m in 4L. However, a proper review of this is scheduled in this Sunday's OTR. The only thing I am concerned about is whether the TC mounts will hold the torque or not. If not, then I would have no other option but to go for PU mounts.

The package
My 2008 Maruti Gypsy Hardtop - A childhood dream come true!-sumo-gear-box.jpg

My 2008 Maruti Gypsy Hardtop - A childhood dream come true!-sumo-gearbox-2.jpg

Opening the gearbox
My 2008 Maruti Gypsy Hardtop - A childhood dream come true!-opening-gearbox.jpg

Installation
My 2008 Maruti Gypsy Hardtop - A childhood dream come true!-installation.jpg

My 2008 Maruti Gypsy Hardtop - A childhood dream come true!-instaltn-2.jpg

Comparison of the gears
My 2008 Maruti Gypsy Hardtop - A childhood dream come true!-comparison-gears.jpg

Subject to moola, my next plans include:
  1. SPOA
  2. Long travel shocks
  3. FFE
Arsi is offline   (4) Thanks
Old 6th August 2021, 08:45   #48
BHPian
 
Vikram Arya's Avatar
 
Join Date: Jan 2016
Location: Calgary/Shimla
Posts: 421
Thanked: 2,113 Times
Re: My 2008 Maruti Gypsy Hardtop - A childhood dream come true!

It's an awesome crawler gear set you have got there.

More than the bushes I would worry about the transfer case mounting brackets.

The mounting brackets are okay for the stock transfer case but with such a low "4L", the brackets would be the first to go (hopefully after quite some time) as the current brackets would find it difficult to deal with the increased torque in 4L.

I would suggest either find a way to strengthen the existing mounting brackets or get a more robust set from a manufacturer based overseas.

All the best!

My 2008 Maruti Gypsy Hardtop - A childhood dream come true!-inkedtransfer-case_li.jpg

* Image courtesy - Boodmo website
Vikram Arya is offline   (2) Thanks
Old 6th August 2021, 12:07   #49
BHPian
 
Arsi's Avatar
 
Join Date: Sep 2015
Location: Srinagar, J&K
Posts: 133
Thanked: 147 Times
Re: My 2008 Maruti Gypsy Hardtop - A childhood dream come true!

Quote:
Originally Posted by Vikram Arya View Post
More than the bushes I would worry about the transfer case mounting brackets.

I would suggest either find a way to strengthen the existing mounting brackets or get a more robust set from a manufacturer based overseas.
Thanks sir for the info. I would keep an eye on it. Can it be strengthened by welding extra brackets, etc.? I am planning to weld extra brackets and mounts so as to distribute the torque across all.
Arsi is offline   (1) Thanks
Old 6th August 2021, 14:25   #50
BHPian
 
Vikram Arya's Avatar
 
Join Date: Jan 2016
Location: Calgary/Shimla
Posts: 421
Thanked: 2,113 Times
Re: My 2008 Maruti Gypsy Hardtop - A childhood dream come true!

Quote:
Originally Posted by Arsi View Post
Thanks sir for the info. I would keep an eye on it. Can it be strengthened by welding extra brackets, etc.? I am planning to weld extra brackets and mounts so as to distribute the torque across all.
That should do the trick.

In case you have someone coming in from US in next few months then you can have a look at these heavy duty transfer case mounts that "LROR" has developed for the Samurai. You may want to talk to them before you place your order though to ensure that they do the job which I think these would.

https://lowrangeoffroad.com/samurai-...ase-mount.html

All the best!
Vikram Arya is offline   (2) Thanks
Old 9th August 2021, 00:27   #51
BHPian
 
Arsi's Avatar
 
Join Date: Sep 2015
Location: Srinagar, J&K
Posts: 133
Thanked: 147 Times
Re: My 2008 Maruti Gypsy Hardtop - A childhood dream come true!

Hey guys, a few updates on mods. I had gone on an OTR today to one of the picturesque meadows. The trail was an intermediately difficult and mostly rocky, which is what I was looking for.

Dual handbrake setup review

The most important thing: It works.
My left rear wheel got stuck in a mud pit once and it lost traction completely. I was in 2H. Engaged the left handbrake and the car budged forward. However, if there is a slope, the working becomes difficult since the load is concentrated on the single wheel with traction. Another thing is that this setup could work better had there been discs at the rear or if it were coupled to a hydraulic setup. In this crude way, one has to forcefully pull the lever to the max. How much will it hold on remains to be seen. Overall, a successful project. I got what I had expected.

Crawler gear review

In simple-short words, Gypsy has turned into a TORQUE MONSTER
Here is a point by point review.
  1. Absolute torque. Staggering. I was left speechless. It would be no exaggeration to say that this should be the Gypsy owner's first mod. This overshadows Gypsy's major shortcomings.
  2. Even the High modes (due to 12% reduction) provide better torque and you hardly feel the need to shift to 4L when on plains
  3. Earlier I had to use so much of ABC to control the car as desired. Now, I just have to put it in 4L 1st and I get inch by inch control
  4. Earlier due to comparatively high speed in 4L, the car would often 'bang' against the obstacles. Now, even if the Gypsy would hit a rock or something, it wouldn't cause much damage because it hits at a very very slow speed
  5. Earlier, momentum was the key on a rocky slope. I hated that. Everything in the Gypsy was thrown here and there. It was also back-breaking. Now, smooth as silk. Due to the reduction in speed, it has become "apparently' comfortable on trails. Everything was at its place today. No "banging". No back-breaking.
  6. TC mounts are sure-shot gonners. Blew mine twice. Thank Almighty, I had a pair with me. However, I still tied a rope to hold the TC (in the traditional way). Looking for PU bushes now.
  7. 4L 1st should be used only when required. It exerts tremendous torque and thus resultant forces on parts which may be unnecessary. Most of the terrains can be done in 4L 2nd or 3rd.

Overall, the satisfaction is beyond expectations here. Crawlers are a must for Gypsy.
Arsi is offline   (4) Thanks
Old 9th August 2021, 11:47   #52
BHPian
 
Arsi's Avatar
 
Join Date: Sep 2015
Location: Srinagar, J&K
Posts: 133
Thanked: 147 Times
Re: My 2008 Maruti Gypsy Hardtop - A childhood dream come true!

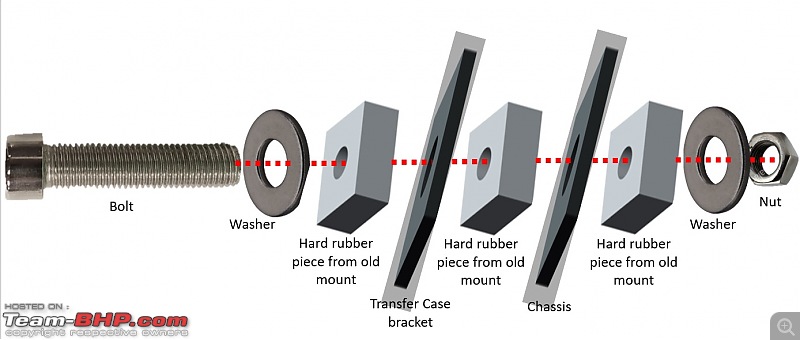
While I was thinking of buying the PU bushes for TC mounts, I came up with a simple design which could be easily done here in a few bucks. The sequence of the design goes like this

Long bolt > Metal Washer > Hard rubber piece from old mount > TC bracket > Hard rubber from old mount > Chassis > Hard rubber piece from old mount > Washer > Nut

This would provide cushion for vibrations from the both sides, up and down. Moreover, a through-bolt design would be sturdy enough to hold the torque. The design seems fine to me but still, I would like to know if I am missing a point or so from you guys.

Check out the design here:

My 2008 Maruti Gypsy Hardtop - A childhood dream come true!-tc-mount-design.jpg

Last edited by Arsi : 9th August 2021 at 12:04. Reason: Design iteration
Arsi is offline  
Old 9th August 2021, 22:06   #53
BHPian
 
Arsi's Avatar
 
Join Date: Sep 2015
Location: Srinagar, J&K
Posts: 133
Thanked: 147 Times
Re: My 2008 Maruti Gypsy Hardtop - A childhood dream come true!

Mod: DIY TC mount (Through-bolt design)

Pertinent to the previous post, I thought of giving the design a try.

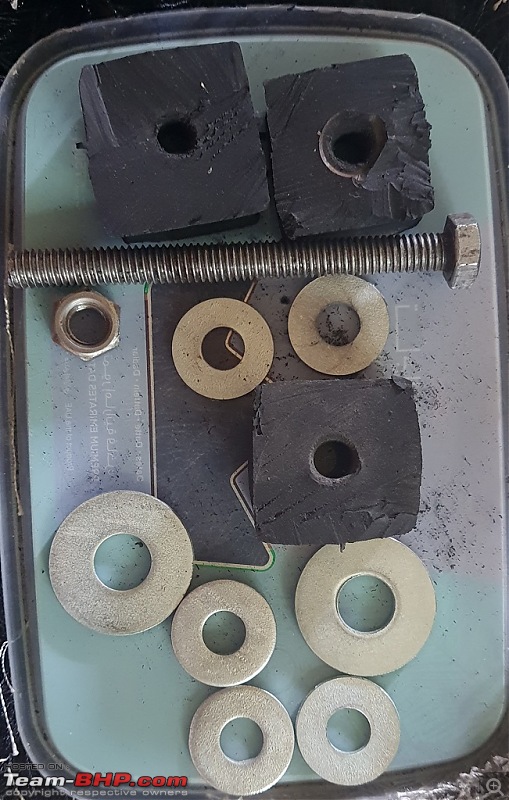
Required:
  1. 3 old blown TC mounts. Or even new ones if you are ready to spend some moola
  2. Some washers.
  3. A long bolt and nut of appropriate length. Long enough to fit all the elements. But not that long so that it doesn't fit in the tight space.

It is known that the strength of rubber in compression is much more than in tension (stretching/elongation). Thus, this design doesn't have any rubber mount in tension. The only thing in tension would be the bolt (Mild steel) which is much stronger than rubber.

Even if this is successful and doesn't fail, I will still have to keenly observe what fails next.

After the installation, I used a jack to check the flex and make sure that the rubber mounts are doing their job. However, I noticed that the TC is now more flexible to move due to 3 rubbers in the setup. Whether that is good or bad remains to be seen.

Required items
My 2008 Maruti Gypsy Hardtop - A childhood dream come true!-20210809_174052.jpg

Notice the rubber mount in the middle which would provide cushioning between the TC and the chassis
My 2008 Maruti Gypsy Hardtop - A childhood dream come true!-20210809_193857.jpg

The rubber mount at the top
My 2008 Maruti Gypsy Hardtop - A childhood dream come true!-20210809_193832.jpg

Bottom view
My 2008 Maruti Gypsy Hardtop - A childhood dream come true!-20210809_193845.jpg

Last edited by Arsi : 9th August 2021 at 22:08. Reason: Addition of information
Arsi is offline   (2) Thanks
Old 15th August 2021, 00:02   #54
BHPian
 
Arsi's Avatar
 
Join Date: Sep 2015
Location: Srinagar, J&K
Posts: 133
Thanked: 147 Times
Re: My 2008 Maruti Gypsy Hardtop - A childhood dream come true!

Today's Solo OTR and the learnings

I usually prefer going out alone. On one side, it is quite an exciting feeling to know that you are all alone in the wilderness. But on the other, you know that if something wrong happens, it might be a life or death situation.

Today was one such trip. I had decided to take my Gypsy to a 4200m frozen lake (I usually use Google Earth to research about the trail as much as possible). It was a 10 km offroad trail to the base meadow with a rocky plus muddy trail and a river crossing. After the sure 10kms, I was skeptic about the path through some steep meadows and hills. So, I had thought to decide on spot whether to proceed in Gypsy or trek the rest of the distance. However, destiny had something else written for me. I did reach the base meadow but with a profusely-leaking petrol tank!

Here is a point wise review of the mods I have done in the past:
  1. The recent one: DIY TC mount did well. I had to use 4L a number of times on steep slopes with loose-sharp rocks and mud but it did the job quite well. Full points. For those going for costly PU mounts, try this cheap and readily available mod.
  2. The Crawlers: I don't know if this is a problem with my set or in general but I have faced this issue more than a couple of times till now. Today, the place where it happened was even more critical and dangerous. The issue is that sometimes the 4x4 doesn't get engaged. Whether I am in 4H or 4L, only the rear wheels work and the front two are disengaged. When this happens, the little gear shifter becomes very slack at N. This usually happens when I either shift suddenly or harshly or while moving (slowly). Today, this thing happened when I was in the middle of the river crossing and the Gypsy got stuck . With gushing water around, I had no other option but to get out and use the winch.
  3. The dual Handbrake jugaad: I came to know that jugaad is always a jugaad. Not reliable and may cause other problems as well. And this was the reason for my petrol tank leak today. My mechanic had welded an angle iron piece on the back side of rear diff to hold the cable. Today, during the water crossing, the diff moved up and hit the tank. Then, it was a really really a herculean task to get the tank down, arrest some of the leak and bring the Gypsy back to town. Now, my mechanic says that the tank needs to be replaced. I thought gas welding would do the job. As of now, the Gypsy is resting at home for long! And yes, the next mods would also include some underbody strengthening for sure.
  4. The snorkel: Did well. At least the Gypsy didn't die midwater.
Arsi is offline   (4) Thanks
Old 20th August 2021, 17:56   #55
BANNED
 
Join Date: Sep 2010
Location: Bangalore
Posts: 1,259
Thanked: 954 Times
Re: My 2008 Maruti Gypsy Hardtop - A childhood dream come true!

Quote:
Originally Posted by Arsi View Post
Today's Solo OTR and the learnings

I usually prefer going out alone. On one side, it is quite an exciting feeling to know that you are all alone in the wilderness. But on the other, you know that if something wrong happens, it might be a life or death situation.

Today was one such trip. I had decided to take my Gypsy to a 4200m frozen lake (I usually use Google Earth to research about the trail as much as possible). It was a 10 km offroad trail to the base meadow with a rocky plus muddy trail and a river crossing. After the sure 10kms, I was skeptic about the path through some steep meadows and hills. So, I had thought to decide on spot whether to proceed in Gypsy or trek the rest of the distance. However, destiny had something else written for me. I did reach the base meadow but with a profusely-leaking petrol tank!
Sorry to hear of the challenges you faced! It would be great once you unwind and cool your heels to post the story of how the Gypsy was recovered all the way back to town (with pics)!. It will help somebody someday who is stuck with some ideas and learnings that can be borrowed.

Even if it is as simple as paid somebody with a tractor to pull me out .... the backstory around how long it took to arrange a rescue in a remote place will carry some learnings.
Ragul is offline   (1) Thanks
Old 26th August 2021, 18:27   #56
BHPian
 
Arsi's Avatar
 
Join Date: Sep 2015
Location: Srinagar, J&K
Posts: 133
Thanked: 147 Times
Re: My 2008 Maruti Gypsy Hardtop - A childhood dream come true!

Sure. Here we go:

The story behind:

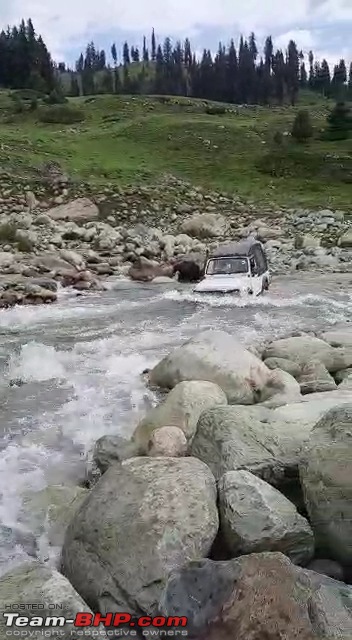
I am a person who likes to go offroading sensibly. I don't like jumping my Gypsy, driving through gushing waters or pushing it beyond the limits unnecessarily. My mantra is, "Take care of the car during easy times and the car will take care of you during the tough time". However, things are inevitable sometimes. I had planned my trip carefully using G Earth. I was trying to reach a 4200m frozen lake via some mountains and meadows. There was a trail that I could chalk out behind the computer screen. And it included a bridge which seemed to be made out of wooden logs. Although, when we reached the spot, the bridge was nowhere to be seen. So, I had to attempt a gushing water-crossing (and that too when there was no rescue vehicle around!). To be very honest, I had only one thing in mind: To get to the other side ASAP. In the excitement, I hasted and misjudged the depth. The water reached upto the bonnet. And this wasn't the worst thing! There were big boulders underneath. I shifted to 4L 2nd and made my way through, neglecting what happened under the floor. The Gypsy came out fine or, may be, it seemed so. It was after 5-6kms further that I came to know about the leak.

The reason:

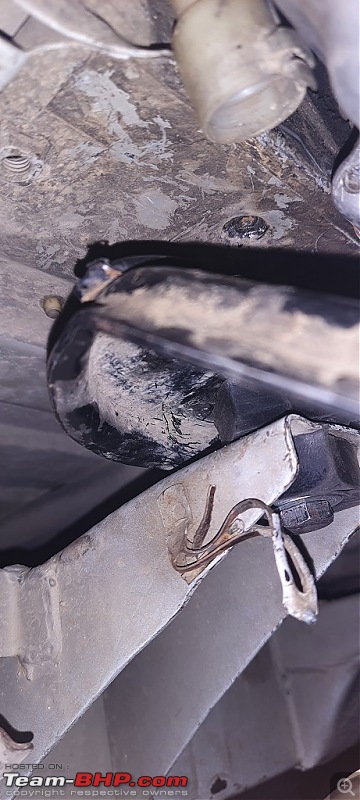
From carefully observing the impact, I could clearly conclude that the jugaad handbrake clamp (you can check that in the previous posts) on the rear differential had hit the tank underneath while traversing up over the boulders. This had caused the bend and the subsequent crack.

Before going ahead about what I did, I would like to share some tips in case someone faces a petrol leak (I have spent 4 years working as a safety officer in a petroleum company).
  1. The most important thing should not be the loss but SAFETY. Petrol is extremely flammable. It flashes at -43 Celsius. So, at room temperature, it has already formed explosive mixture of vapours with air. Make sure you get all the sources of ignition out of the zone. This includes all those things having a battery (mobiles, smart watches, torches, etc.). Swtich off the car or remove the terminals.
  2. Petrol is thinner than water. So, the chances of arresting the leak completely are equally thinner. A regular cloth will do nothing to stop it.
  3. Petrol vapours cause unconsciousness. Never get yourself in a closed space full of vapours, you may not come out.
  4. Try to limit the spillage to a confined area. The more the area the spillage covers, the more the chances of ignition.
  5. Petrol is cold and may cause skin burns. Avoid long contact with skin.
  6. Don't work on metals in the zone. It may lead to sparking and fire.

What I did:

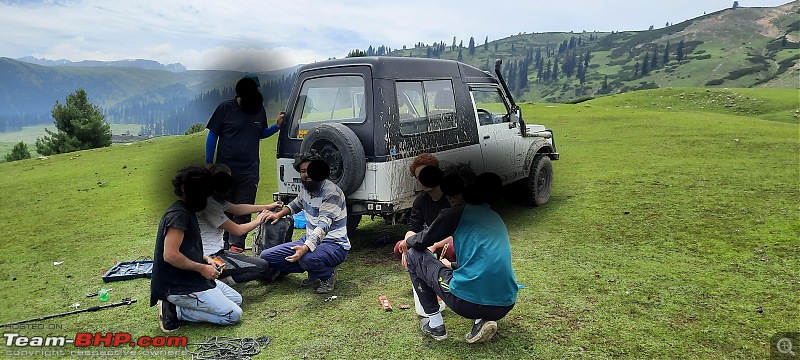
The first thing in my mind was Safety. After making sure every point of safety was addressed, I brainstormed for options. I always carry my Bosch toolbox wherever I go. So, I decided to take out the tank, tilt it to stop the leak momentarily and then work on it without having to rush things. Until, all the bolts, hoses, etc. were taken out, we collected the petrol in a utensil. Finally, when it was out, I sandwiched a polythene piece between the crack and hit one side with a non metallic hammer until the polythene was pressed between the metal. The leak was somewhat arrested. Then, I tried melting the plastic and closing the small gaps but in vain. The plastic simply didn't stick to the metal. Finally, I put some more polythene over the crack and put a medical tape over it. It took another half an hour to fix the tank. After everything was up, I saw the petrol still coming out so by drop. And I realized that, now, it was a race against time!

Better to say: I came offroading, I went back rallying. On the way back the water-crossing did the damage again. So, the leak was at its full yet again. I somehow managed another 10 kms offroad until I reached the fuel station wherein I fuelled again to reach the city. I was burning petrol. I was spilling petrol as well.

And finally, I reached home with an empty tank.

The remedy:

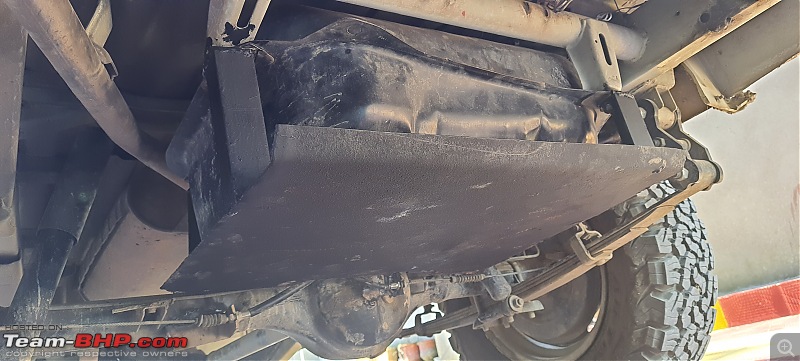
There were two options: replacement or repair. Everyone suggested the former, I went for the latter. A simple welding job and the tank was okay. I didn't stop there. Removed the overhang jugaad part and got a custom tank guard fabricated out of 4mm thick MS sheet from a local vendor.

The problems haven't stopped still. Now, may be due to welding, my differential is leaking and I can't make out from where. I will try to plug it using silicone.

The learning
  1. Never attempt anything without proper inspection especially water crossings
  2. Carry all the tools with you. Carry MSeal or araldite or fevitite.
  3. Carry extra fuel in a cane
  4. Inspect your vehicle underneath whenever you come out of an obstacle
  5. Jugaad mods should be done infront of you. The mechanics usually don't have the aptitude to analyze things.


I'll post the pics soon.
Arsi is offline   (4) Thanks
Old 26th August 2021, 18:48   #57
Senior - BHPian
 
Bibendum90949's Avatar
 
Join Date: Mar 2020
Location: Blr/Kochi/Wynd
Posts: 1,420
Thanked: 6,900 Times
Re: My 2008 Maruti Gypsy Hardtop - A childhood dream come true!

Quote:
Originally Posted by Arsi View Post
On the way back the water-crossing did the damage again. So, the leak was at its full yet again. I somehow managed another 10 kms offroad until I reached the fuel station wherein I fuelled again to reach the city. I was burning petrol. I was spilling petrol as well.

And finally, I reached home with an empty tank.
Wasn't refuelling the car with a leaking tank very risky too even if it was a drop by drop leak? A spark could happen while the car is on the move besides the danger of an external fire source.
Bibendum90949 is offline  
Old 26th August 2021, 19:39   #58
BHPian
 
Arsi's Avatar
 
Join Date: Sep 2015
Location: Srinagar, J&K
Posts: 133
Thanked: 147 Times
Re: My 2008 Maruti Gypsy Hardtop - A childhood dream come true!

Quote:
Originally Posted by Bibendum90949 View Post
Wasn't refuelling the car with a leaking tank very risky too even if it was a drop by drop leak? A spark could happen while the car is on the move besides the danger of an external fire source.
No. It wasn't. Petrol pumps, especially near the dispensers, are already free of ignition sources. Still, I made sure that no source was near the car. I refuelled only when there was no one else in the entire station. The real danger came while I was driving through the city. I was really frightened at a number of tight places.
Arsi is offline  
Old 27th August 2021, 19:44   #59
Senior - BHPian
 
DirtyDan's Avatar
 
Join Date: Jul 2007
Location: Dharamsala, H.P
Posts: 2,075
Thanked: 1,563 Times
Re: My 2008 Maruti Gypsy Hardtop - A childhood dream come true!

Quote:
Originally Posted by Arsi View Post
... Petrol pumps, especially near the dispensers, are already free of ignition sources. Still, I made sure that no source was near the car...
I have opted off some petrol vehicles in the past just so that I can purchase a diesel. Diesel fuel is hard to ignite and therefore a bit safer than gasoline. This is something to consider especially if you are doing a lot of off-roading or bad-roading where damage to your fuel tank or fuel lines can occur.

You can throw a lighted match into a cup of diesel fuel and it will go out. You do the same to a cup of gasoline, it may ignite. And, gasoline fumes are particularly dangerous.

If I bought a petrol 4X4 vehicle I would consider skid plates for sure.

Last edited by DirtyDan : 27th August 2021 at 20:01.
DirtyDan is offline  
Old 27th August 2021, 21:34   #60
BHPian
 
Arsi's Avatar
 
Join Date: Sep 2015
Location: Srinagar, J&K
Posts: 133
Thanked: 147 Times
Re: My 2008 Maruti Gypsy Hardtop - A childhood dream come true!

The water crossing

My 2008 Maruti Gypsy Hardtop - A childhood dream come true!-videocapture_20210826183010.jpg

In the meadow

My 2008 Maruti Gypsy Hardtop - A childhood dream come true!-20210827_103852.jpg

Tank guard

My 2008 Maruti Gypsy Hardtop - A childhood dream come true!-20210821_170031.jpg
Arsi is offline   (2) Thanks
Reply

Most Viewed


Copyright ©2000 - 2024, Team-BHP.com
Proudly powered by E2E Networks