Team-BHP > Motorbikes > Bicycles
Register New Topics New Posts Top Thanked Team-BHP FAQ


Reply
  Search this Thread
9,058 views
Old 20th April 2020, 17:51   #1
Tgo
Senior - BHPian
 
Tgo's Avatar
 
Join Date: Apr 2011
Location: Calgary|Jaipur
Posts: 1,290
Thanked: 3,789 Times
DIY: Bicycle service at home using basic tools

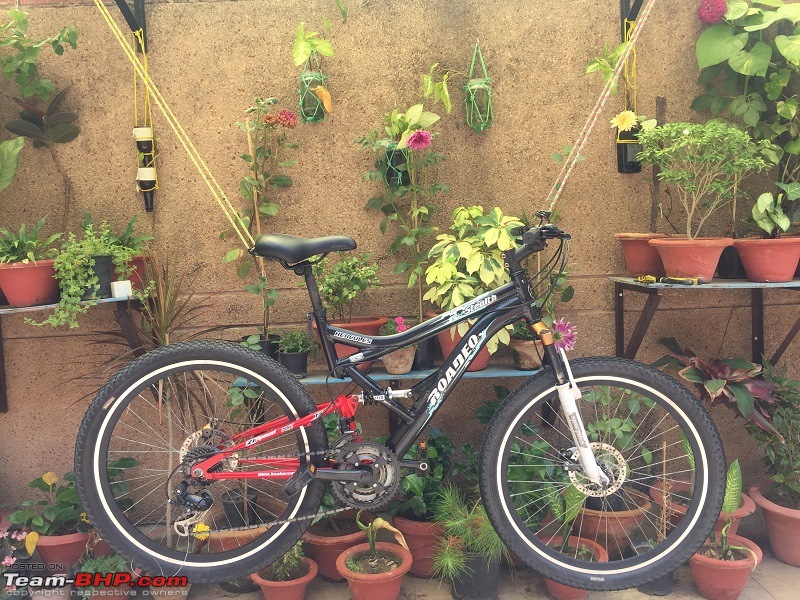
So, over the last three days I have been working on the bicycle. It is a Hercules Roadeo MTB. This is not my bicycle but is in my custody for the last three years now. It belongs to my wife's cousin who is in college these days and doesn't have the use of this un-cool contraption for the time being.


So fort he past two years I had stripped it down to the bare minimum = Rear brake and derailleur only (7 speeds). I needed to get it back in shape since the stuff lying around would get misplaced as we could be shifting soon after the lock-down opens. Along with this I though it would be a nice time to give it a little service too. So the first thing I did was to remove all the components that were already on the bike.
DIY: Bicycle service at home using basic tools-bef-img_6657.jpg
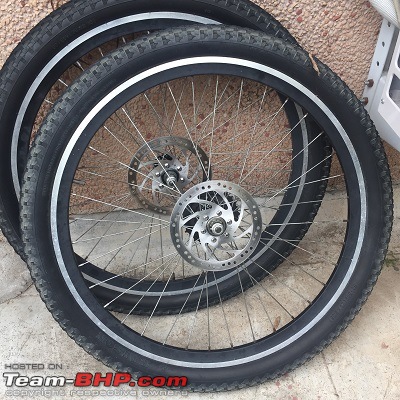
With the wheels off I could see the sprockets and hubs better and could decide the plan of action. The needed a good cleaning and the grease from the hubs had vanished. The front and the rear tyre had worn out differently so I thought I should swap them (Front<->Back).

DIY: Bicycle service at home using basic tools-bef-img_6659.jpg
The brake caliper looked fine. The pads could do with a bit of re-surfacing. The lever was moving smoothly so though of letting it at that. I had previously opened up and serviced the calipers separately on this thread.

DIY: Bicycle service at home using basic tools-bef-img_6660.jpg
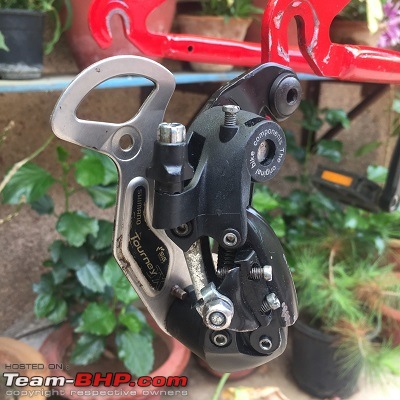
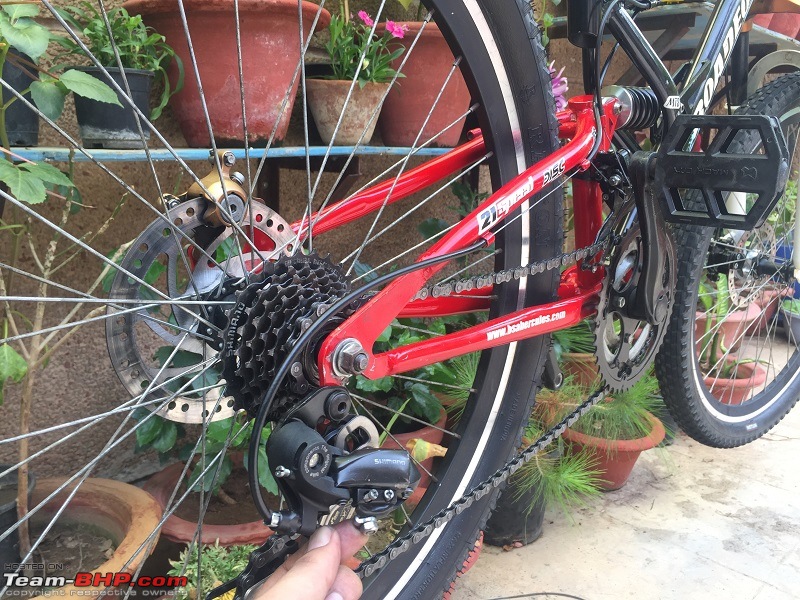
The rear derailleur had some caked up dust and needed a minor clean-up. The mechanism is riveted in place so a thorough clean-up was impossible.

DIY: Bicycle service at home using basic tools-bef-img_6661.jpg
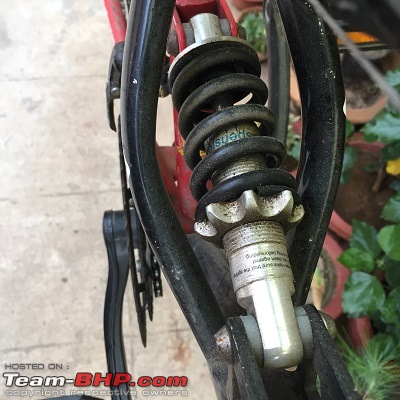
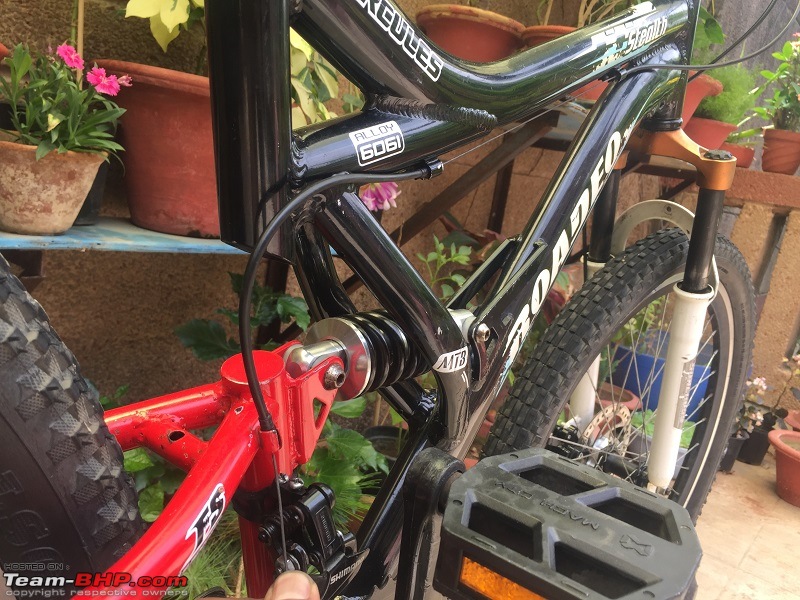
The rear suspension has started squeaking. I had never dismantled it so went thought of taking it up this time along with a nice clean-up.

DIY: Bicycle service at home using basic tools-bef-img_6662.jpg
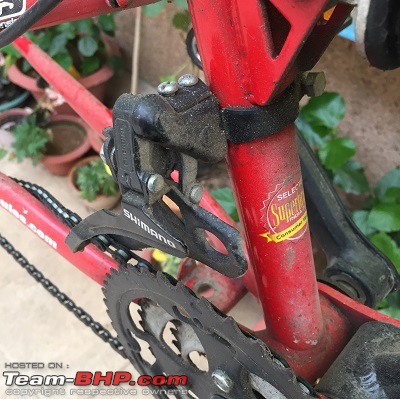
The front derailleur had been lying idle an had caught up a lot of dirt. It needed to be cleaned as it was not going to be put back in service.

DIY: Bicycle service at home using basic tools-bef-img_6663.jpg
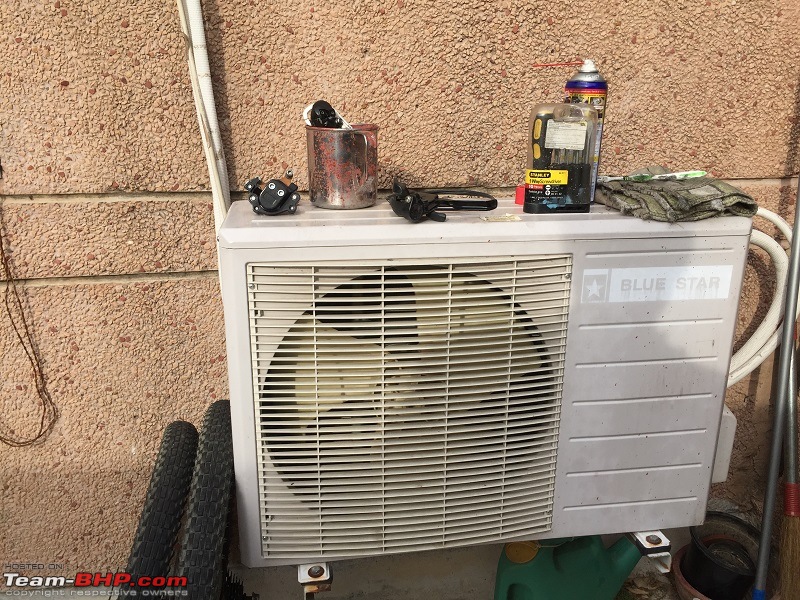
Making up for the lack of a work-bench.

DIY: Bicycle service at home using basic tools-inst-img_6656.jpg
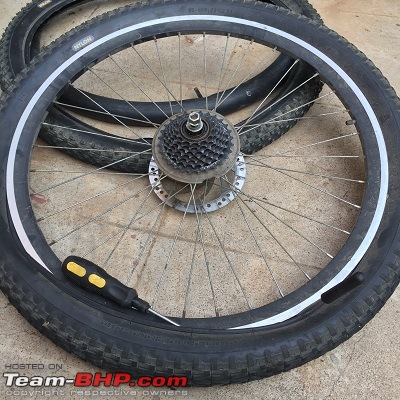
So On the first day, I began with just swapping the tyres. I was a bit apprehensive about the leverage on offer with the small-length prying tools I had at hand. But I was able to proceed without a hiccup.
....jobs of day-2 and day-3 coming-up.
Tgo is online now   (16) Thanks
Old 20th April 2020, 18:43   #2
Tgo
Senior - BHPian
 
Tgo's Avatar
 
Join Date: Apr 2011
Location: Calgary|Jaipur
Posts: 1,290
Thanked: 3,789 Times
Re: My Bicycle Hobby: MTB Minor Service

Day-2 brought about the task of servicing the wheel hubs. I had tackled this once before. One has to be careful while doing this since the hubs have ball bearings in them which get dismantled along with the axle. Here we go..
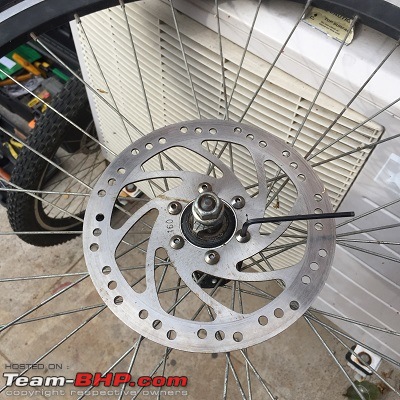
DIY: Bicycle service at home using basic tools-hub-img_6664.jpg
Firstly, I got rid of the discs from the hubs. This made the portion of the hub in between the spokes easier to access for cleaning with the help of a brush. Cleaning and de-greasing of the discs was also made easier.

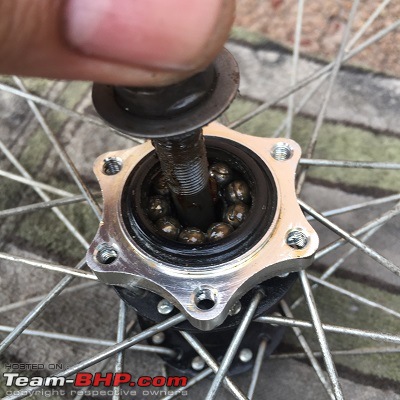
DIY: Bicycle service at home using basic tools-hub-img_6665.jpg
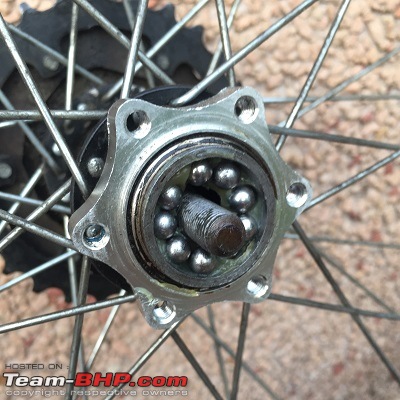
See how the balls are visible and the bearing is devoid of any grease. The balls were making a sound too as there was no grease to dampen their crashing into each other.

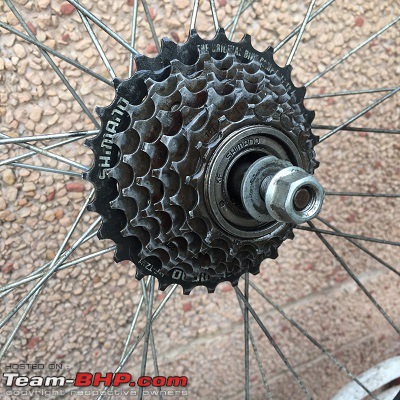
DIY: Bicycle service at home using basic tools-hub-img_6666.jpg
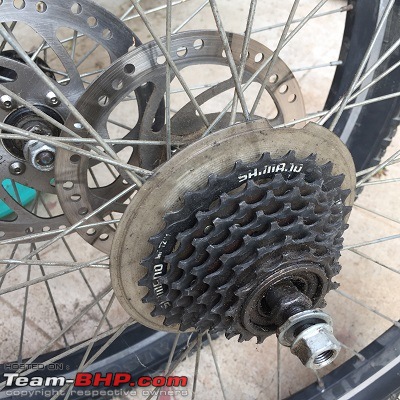
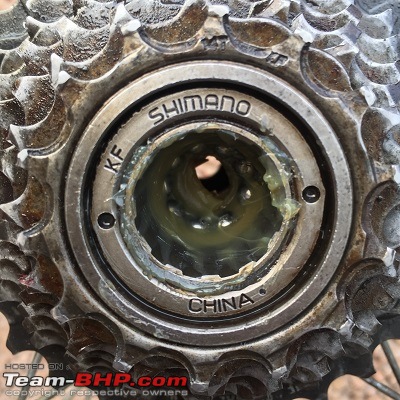
The sprocket needed a thorough cleaning. It was easier to hold a brush in place and rotate the ratcheting hub to get it sufficiently clean.

DIY: Bicycle service at home using basic tools-hub-img_6667.jpg
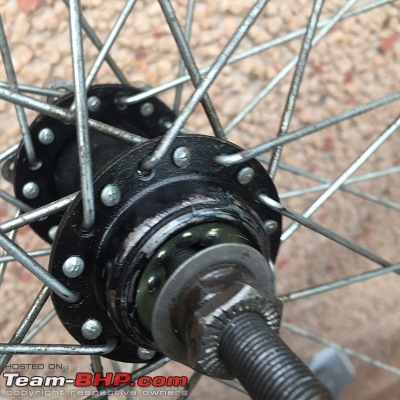
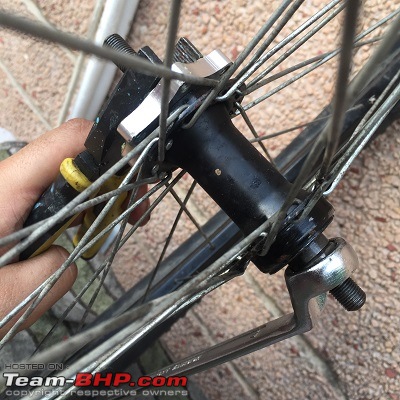
Undid the locking nut and the bearing inner race-cum-tapered tensioning nut. Rested the wheel on one side so the the lower bearing doesn't self dismantle. I am Pulling the axle up and undoing the nut seen in this picture to prevent that from happening. Once this nut was undone, I cupped my hand over this side and flipped the wheel upside down while carefully keeping pressure on the lower bearing. Result - Collecting the balls in the cupped hand. And removing the axle from the other (now upper) end after flipping the wheel.

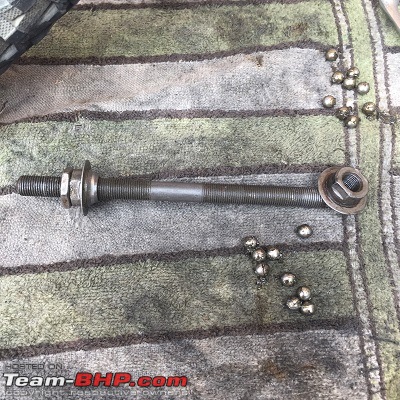
DIY: Bicycle service at home using basic tools-hub-img_6668.jpg
It is imperative to count the balls that came out from each end of the hub and keep track of them while cleaning. I lost one last time and it is difficult for me to order it since I do not have any knowledge of the part (dimensions, material or where to order it from). Same goes for the caps on the tapered nuts. The caps help keep the grease in and the dirt out. My rear axle misses out on these caps. It is better if you undo only one of the tapered bearing nuts from the axle. This will self center the wheel on the axle, just as it was before undoing. Saves you one step while putting the wheel back on.

DIY: Bicycle service at home using basic tools-hub-img_6669.jpg
Cleaned bearing outer race of the front wheel hub. It is pitted. A nicely greased one would not have pitted.

DIY: Bicycle service at home using basic tools-hub-img_6670.jpg
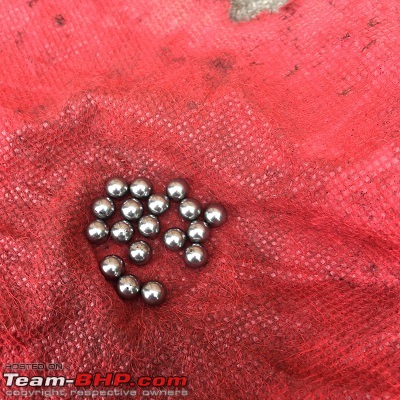
Clean balls for re-assembly.

DIY: Bicycle service at home using basic tools-hub-img_6671.jpg
The rear hub is a little more recessed due tot he sprocket cassette, but is not any more difficult to access.

DIY: Bicycle service at home using basic tools-hub-img_6672.jpg
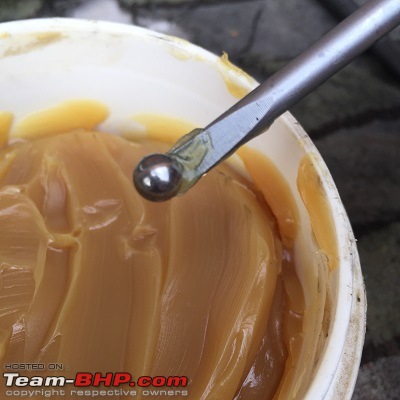
Smear a layer of grease in the outer race for the balls to stick to. Start sliding the balls in until they stick to the grease.

DIY: Bicycle service at home using basic tools-hub-img_6673.jpg
Tip: The magnetic end of a screw driver helps in picking up the balls. A little smear of grease on the screw driver makes it fool proof.

DIY: Bicycle service at home using basic tools-hub-img_6675.jpg
With all the balls in place, smear some more grease while spacing them out somewhat evenly and securing them further to the outer race. Pre-set the tapered bearing nut + Spacer + lock nut on the rear axle and insert it from this end to touch the balls. Flip the wheel....

DIY: Bicycle service at home using basic tools-hub-img_6676.jpg
...and continue the same thing on the other end of the hub. When done, screw in the tapered bearing nut from this end by hand and test the freeness of the wheel spinning around the axle. Screw in the lock nut and hand tighten it.

DIY: Bicycle service at home using basic tools-hub-img_6677.jpg
Do the same for the front hubs. Notice how the nut has a flange which covers the balls and protects them from the dirt that can get in. My rear axle doesn't have these discs on the nuts. Have taken a measurement to make them out of Teflon.

DIY: Bicycle service at home using basic tools-hub-img_6679.jpg
Don't try to tighten the tapered nuts with the help of spanners. You'll make the balls squeeze against the races so hard that they will deform them permanently. I backed off immediately when I realized this foolishness. Hand tight is best. Anything tighter is unnecessary.

With both the wheels ready. I went on to clean the chain and the derralieur and the rear suspension, so that they are ready for installation on the coming day. I also fetched the stored front brake calipers, cables and hand levers and kept them ready for installation.

....jobs of day-3 coming-up.
Tgo is online now   (12) Thanks
Old 20th April 2020, 20:11   #3
Tgo
Senior - BHPian
 
Tgo's Avatar
 
Join Date: Apr 2011
Location: Calgary|Jaipur
Posts: 1,290
Thanked: 3,789 Times
Re: My Bicycle Hobby: MTB Minor Service

On day-3 I had to finish up all the jobs. An overcast day came to the rescue. I could devote the whole day to the task at hand including the post lunch session.
DIY: Bicycle service at home using basic tools-brk-img_6684.jpg
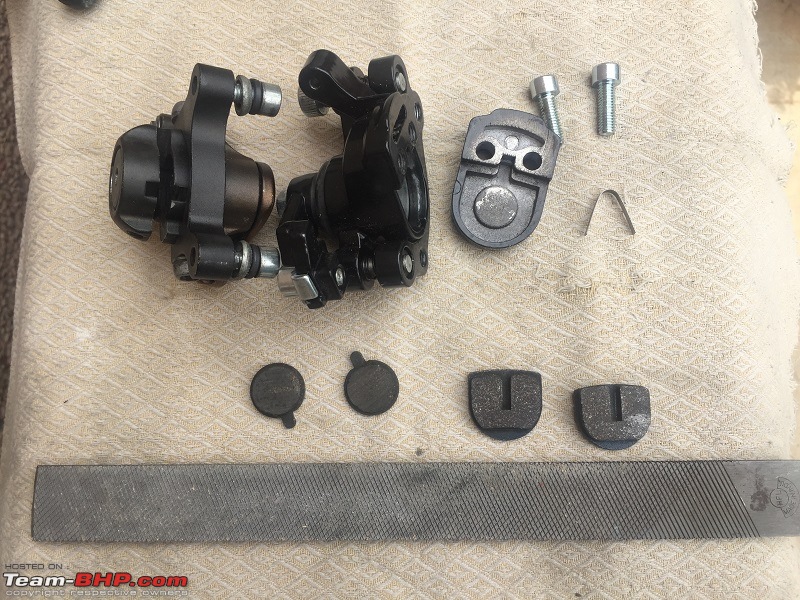
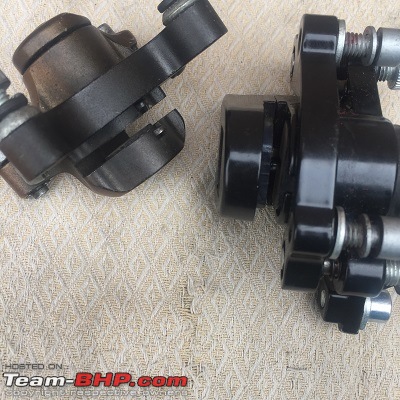
The brake pads needed a bit of a re-surfacing. The rear one has a different design from the front hence you can see that the pads were taken out differently. Front one is a fully floating design where the rear is a rigid caliper. A detailed post here talks about how I discovered their internal mechanisms some time ago. A Skimming on the trusty old file did the job.

DIY: Bicycle service at home using basic tools-brk-img_6685.jpg
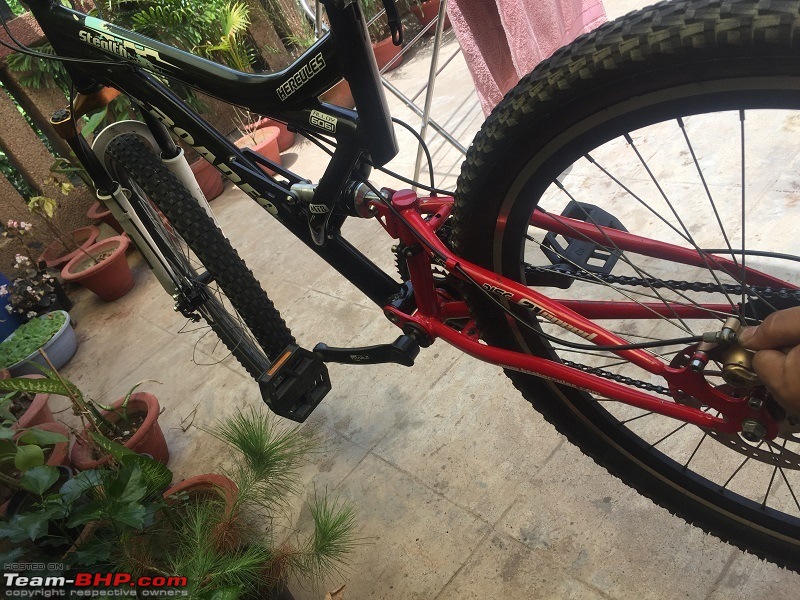
The pads went back in and the calipers went where the belonged on the frame.

DIY: Bicycle service at home using basic tools-brk-img_6686.jpg
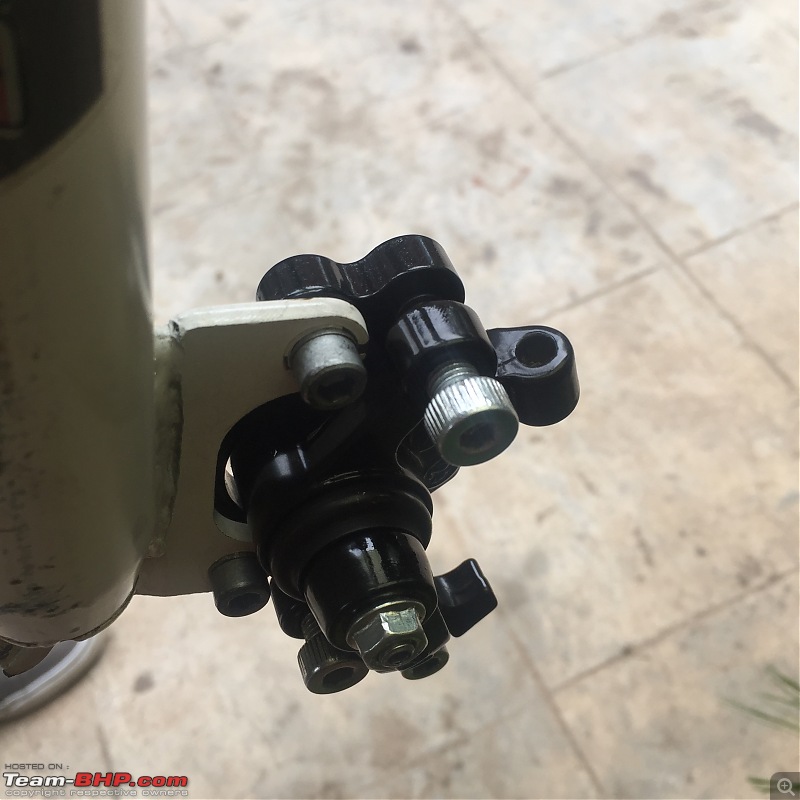
Rear caliper mounted.

DIY: Bicycle service at home using basic tools-brk-img_6687.jpg
Front caliper mounted.

DIY: Bicycle service at home using basic tools-der-img_6690.jpg
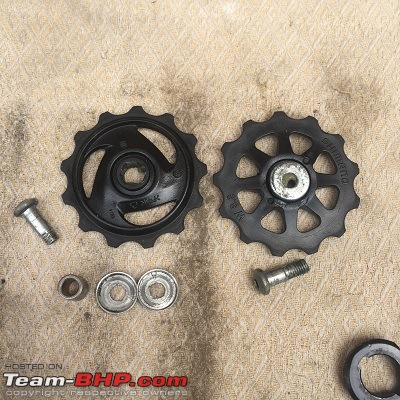
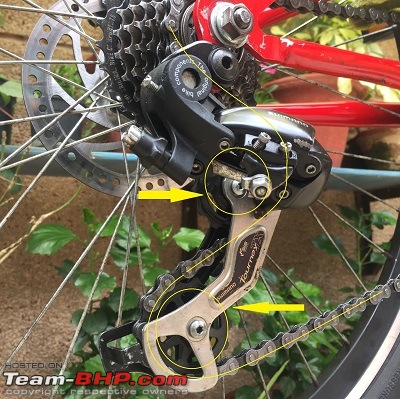
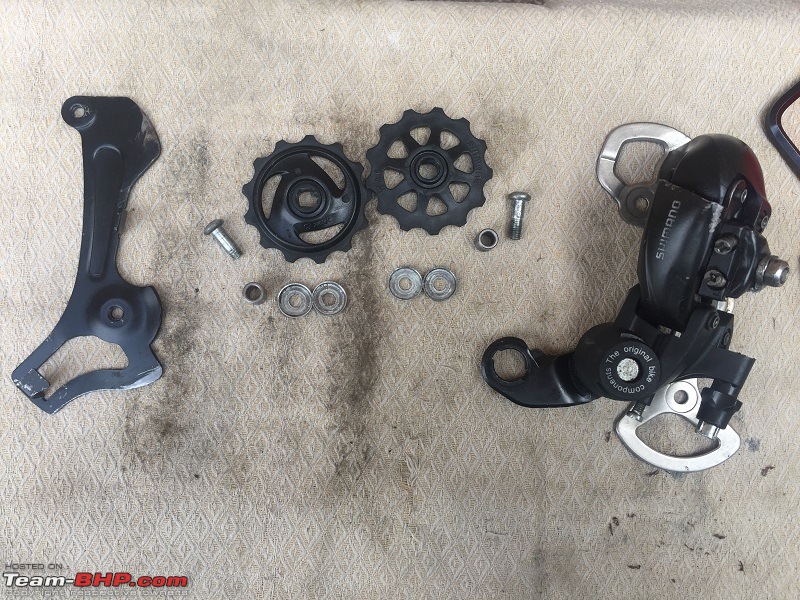
The rear derralieur has two polymer sprockets which ride on hardened steel bush bearings. The interaction of the two seufaces (polymer and metal) is a self lubricating one. I decided to apply slight grease to keep the bushes and the caps protected from water.

DIY: Bicycle service at home using basic tools-der-img_6691.jpg
This is how the two caps come in from either ends of the sprocket to clamp the bush firmly, leaving the sprockets free to rotate. The plain shanked screws act as the axle on which the sprockets rotate. They are of different lengths, remember to note which belongs where.

DIY: Bicycle service at home using basic tools-sus-img_6680.jpg
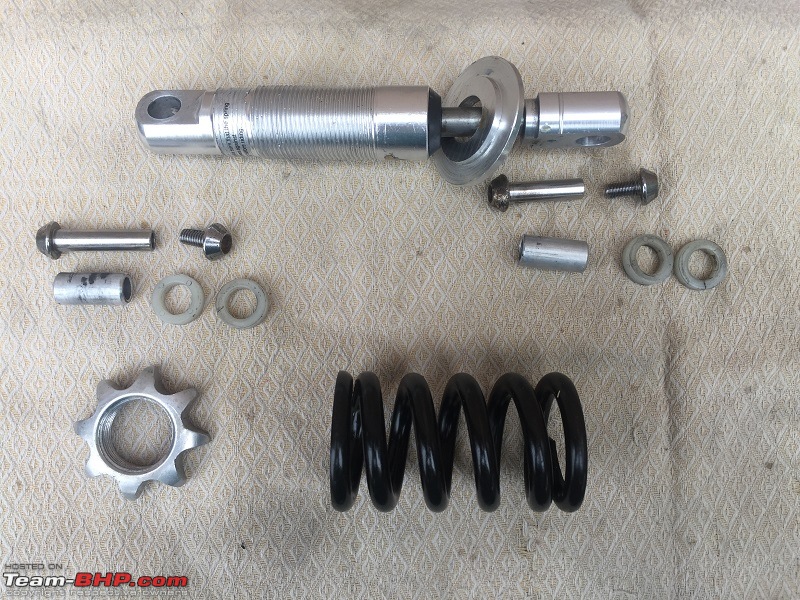
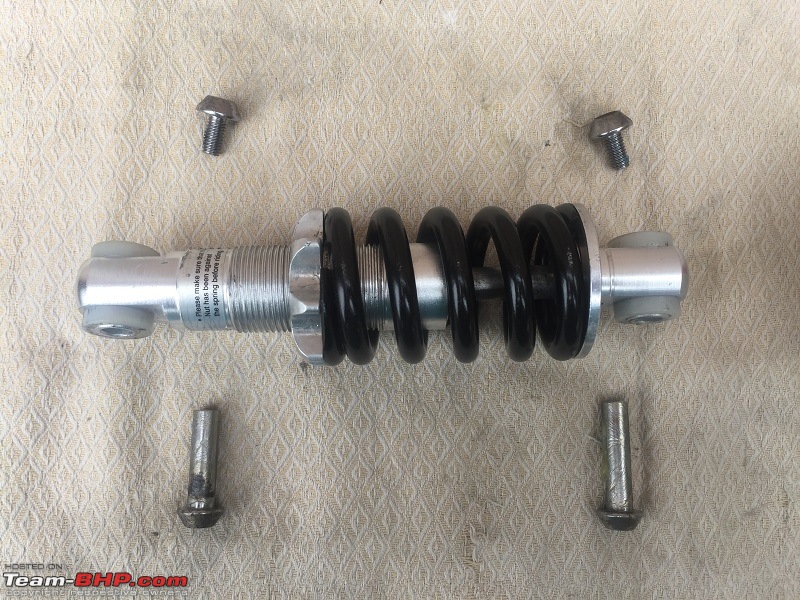
The rear suspension is just a simple spring. There is no dampening effect. The shock-absorber like part part is made of aluminium and is just a piston which is there to guide the two moving parts and has no further function. I didn't have the tool to open it. The bushes that go into the eyelets are made from aluminium too.

DIY: Bicycle service at home using basic tools-sus-img_6681.jpg
Here it it partially assembled. The spring tension I arrived at was by judging how tight the preset adjustment screw was originally. Gave it a 1 and a 1/2 turn more than that for a little more firmness that I wanted.

DIY: Bicycle service at home using basic tools-sus-img_6683.jpg
The assembly goes back on the bike. The plastic bushes were a little worn out but they work more like spacers so wasn't much bothered about them for now. Will make some Teflon ones if required.
...day-3 continued.
Tgo is online now   (12) Thanks
Old 20th April 2020, 21:05   #4
Tgo
Senior - BHPian
 
Tgo's Avatar
 
Join Date: Apr 2011
Location: Calgary|Jaipur
Posts: 1,290
Thanked: 3,789 Times
Re: My Bicycle Hobby: MTB Minor Service

...the next session involved installation of the wheels, hand controls and the cables.
DIY: Bicycle service at home using basic tools-inst-img_6692.jpg
First up was the rear derralieur. Due to a riveted master link in the chain I could not take it off from the bicycle as it was looped through the front derralieur which itself was riveted. You can see the sprockets missing.

DIY: Bicycle service at home using basic tools-inst-img_6694.jpg
Next up was installing the de-greased brake discs onto the hubs.

DIY: Bicycle service at home using basic tools-inst-img_6695.jpg
Wheels ready for installation.

DIY: Bicycle service at home using basic tools-inst-img_6696.jpg
Trial fit (notice chain is not looped over the sprocket) for the rear wheel as I lost the position required for hub centering. Too many threads jutting out on the right.

DIY: Bicycle service at home using basic tools-inst-img_6698.jpg
The left had too little. Took the wheel off and made necessary adjustments.

DIY: Bicycle service at home using basic tools-inst-img_6699.jpg
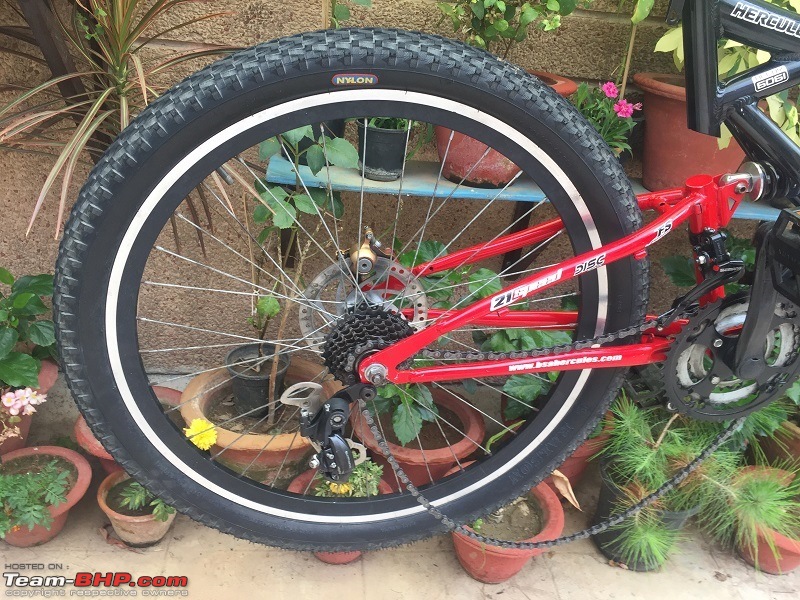
Installed the rear wheel while looping the chain over the front and rear sprockets. Choose any one sprocket at this stage.

DIY: Bicycle service at home using basic tools-inst-img_6702.jpg
Installed the upper derralieur sprocket loosely along with the backing plate. Looped the chain around proceeded to the lower sprocket.

DIY: Bicycle service at home using basic tools-inst-img_6703.jpg
This one had to be brought in from the front whereas the upper one was brought in from the rear. This was a tricky step. I had to twist the spring loaded part (silver one) bring it in front of the backing plate. Slide in the sprocket, insert the screw and hand tighten everything. Took me 10 minutes but I could manage it on my own. Tightened the sprocket pins snugly.

DIY: Bicycle service at home using basic tools-inst-img_6705.jpg
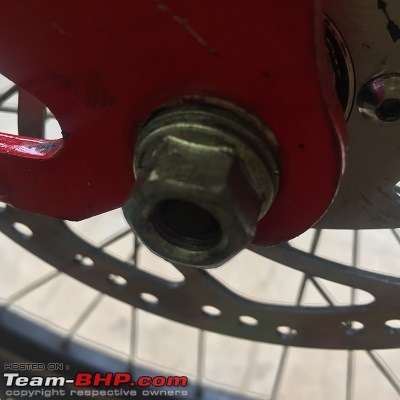
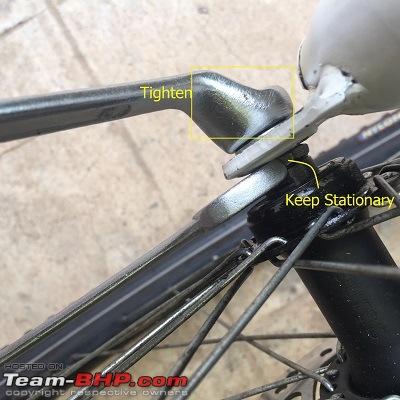
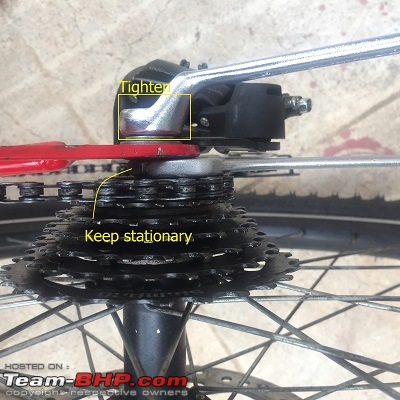
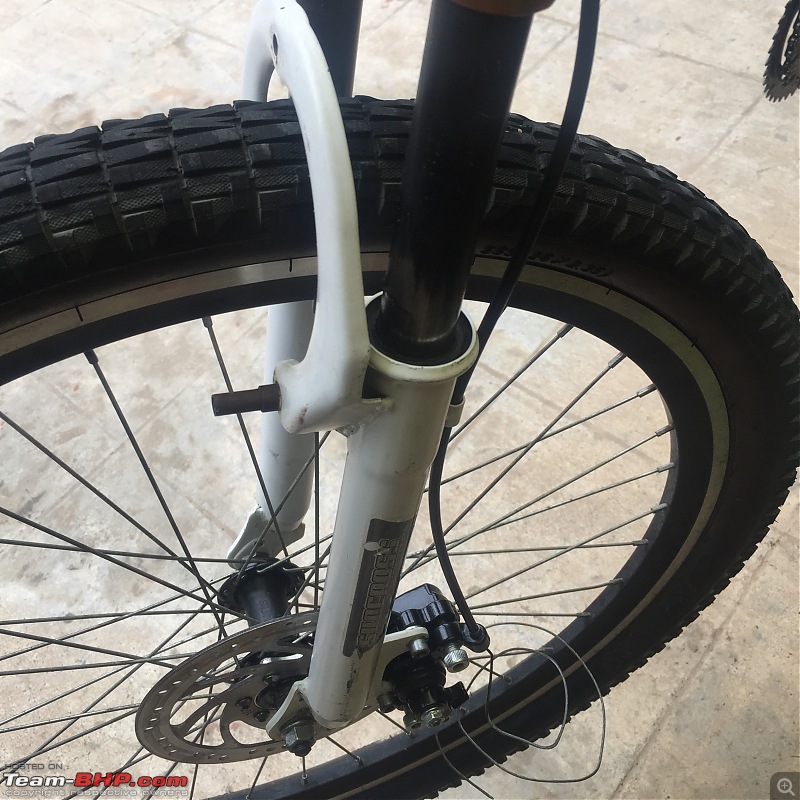
Next up was the front wheel install. The front of the bike need to be resting on ground for the axles to seat properly in the frame. Now comes the tightening part. So from my previous post you would have noticed there is a lock nut backing up the tapered hub-bearing inner race-cum pre-tensioning nut. But its use comes here. Up till now, it was just hand tightened. When securing the wheel to the frame, The lock nut is kept stationary and the axle nut outside the frame is tightened to clamp down on the frame tabs which accommodate the axles.

DIY: Bicycle service at home using basic tools-inst-img_6708.jpg
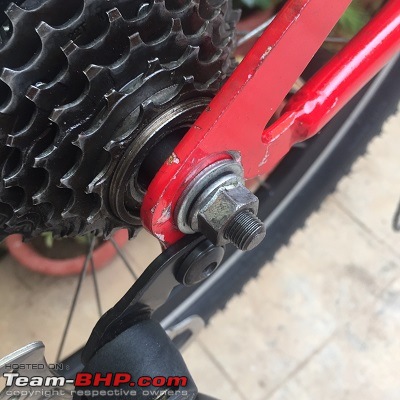
Same goes for the rear axle. The bike need to be resting on ground again for the axles to seat properly in the frame.

DIY: Bicycle service at home using basic tools-inst-img_6713.jpg
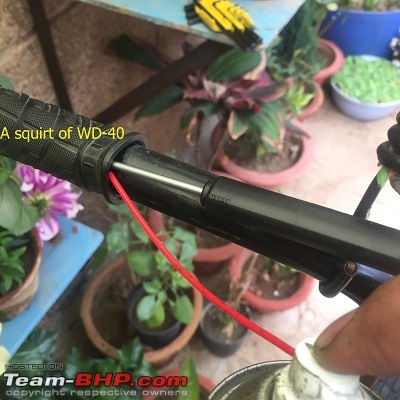
I had to remove the left handlebar grip for sliding in the control levers for the front brake and derralieur. A squirt of WD-40 helped break the friction and it slid off with little effort after that. I washed it with soap before putting it back on.

DIY: Bicycle service at home using basic tools-inst-img_6714.jpg
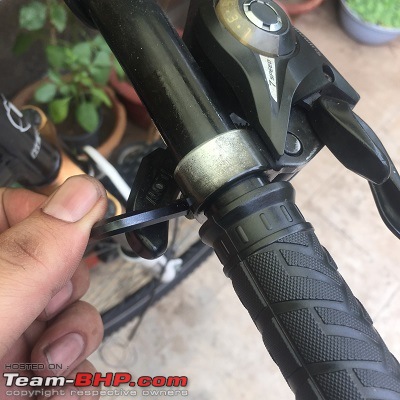
Snugly tightened the hand controls left and right.
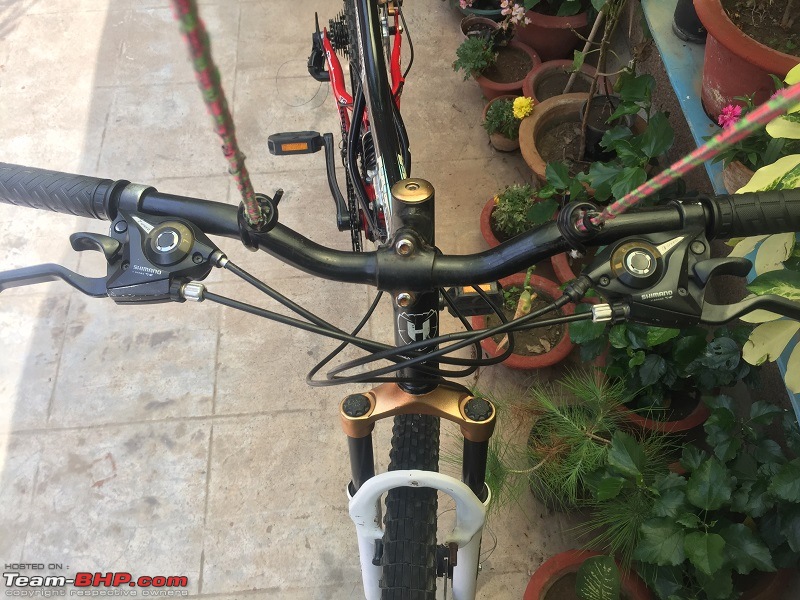
Everything except for the cables was on the bike now. I took my own sweet time to lay the cables. It was pretty straightforward and once correctly done looked like this.
DIY: Bicycle service at home using basic tools-cab-img_6715.jpg
Cable for the front brake.

DIY: Bicycle service at home using basic tools-cab-img_6716.jpg
front derralieur

DIY: Bicycle service at home using basic tools-cab-img_6717.jpg
rear derralieur

DIY: Bicycle service at home using basic tools-cab-img_6718.jpg
rear brake

DIY: Bicycle service at home using basic tools-cab-img_6721.jpg
Remember to neatly criss-cross the cables up-front.

DIY: Bicycle service at home using basic tools-cab-img_6719.jpg
And final assembly done with just the adjustments left to do.

... day-3 continued.
Tgo is online now   (14) Thanks
Old 20th April 2020, 21:52   #5
Tgo
Senior - BHPian
 
Tgo's Avatar
 
Join Date: Apr 2011
Location: Calgary|Jaipur
Posts: 1,290
Thanked: 3,789 Times
Re: My Bicycle Hobby: MTB Minor Service - adjustment of controls

Now comes the tedious part. Adjustments to the controls of the bike require a thorough understanding of the components and how they function. Lets start with the disc brakes and then move on to the tricky derralieurs.
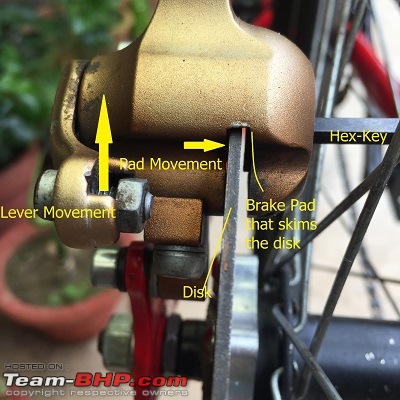
DIY: Bicycle service at home using basic tools-adj-img_6722.jpg
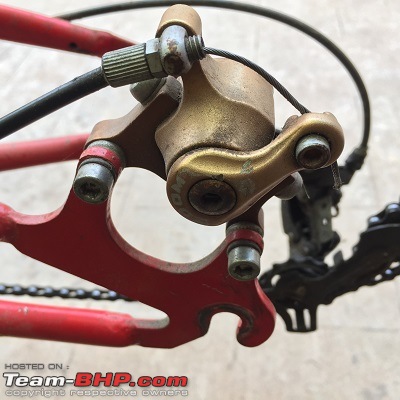
The rear caliper requires the cable to be clamped into the lever for operating it, but before that, the fixed pad needs to be drawn towards the disk. A hex key is required to rotate the pad backing plate which moves the pad closer to the disk. There is a similar arrangement for the moving pad too.
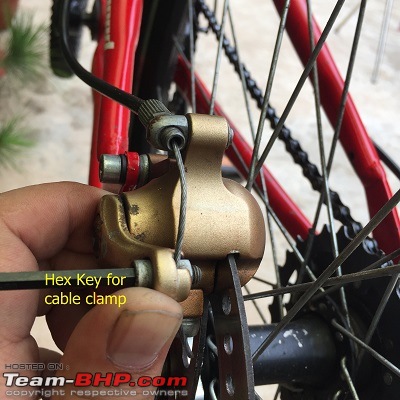
DIY: Bicycle service at home using basic tools-adj-img_6723.jpg
Thread the cable through the caliper lever clamp, move the lever up to make the pads calm the disc, retreat a little bit and tighten the clamping nut to secure the cable in the calmp. Test the rear brake and make adjustments if needed. That's the rear done.
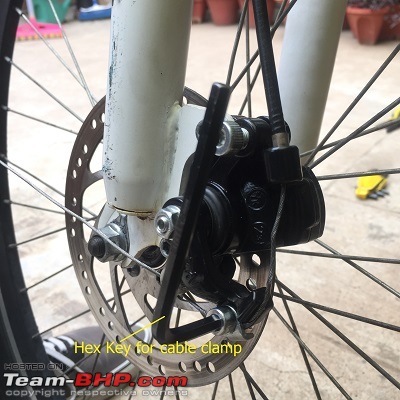
DIY: Bicycle service at home using basic tools-adj-img_6724.jpg
Same goes for the front.

DIY: Bicycle service at home using basic tools-adj-img_6725.jpg
Move the lever up to make the pads calmp the disc, retreat a little bit and tighten the clamping nut to secure the cable in the clamp. Check that the floating action of the caliper is happening freely. If not, Slacken the cable a bit more.
Before understanding the derralieur adjustments one needs to get acquainted to the gearing convention on my bike. Greater Number = greater speed.

H / HIGH = gear which provides you more speed (smaller diameter on rear sprocket or bigger diameter on the front)

L / LOW = gear which provides you lower speed (bigger diameter on rear sprocket or smaller diameter on front sprocket)
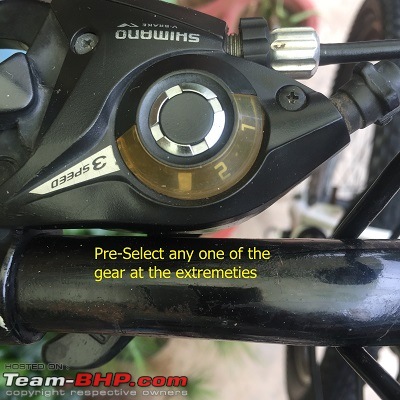
DIY: Bicycle service at home using basic tools-adj-img_6726.jpg
Select one gear for the front derralieur from the hand controls.
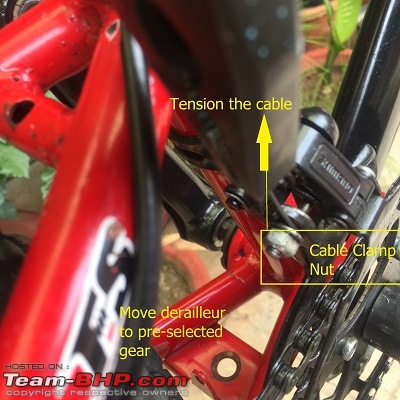
DIY: Bicycle service at home using basic tools-adj-img_6728.jpg
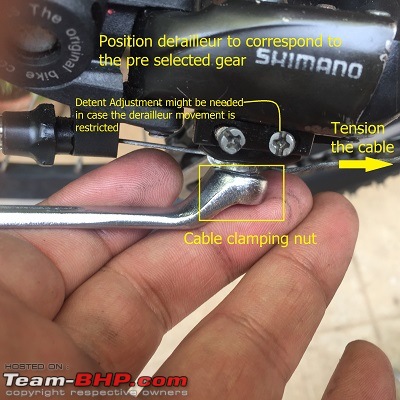
Thread the cable through the clamp. Move the derralieur to the position corresponding to the selected gear. Tension the cable so that the position of the derralieur is maintained and then tighten down the cable clamp. In theory, no further adjustments are required. however...
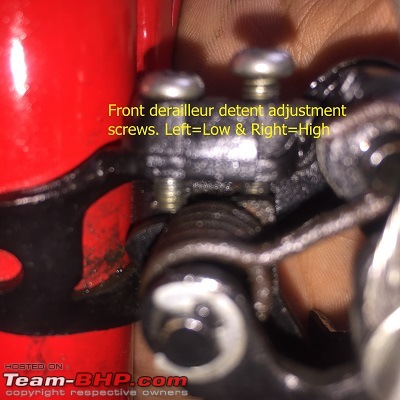
DIY: Bicycle service at home using basic tools-adj-img_6730.jpg
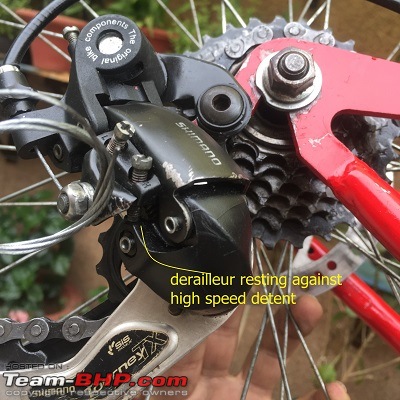
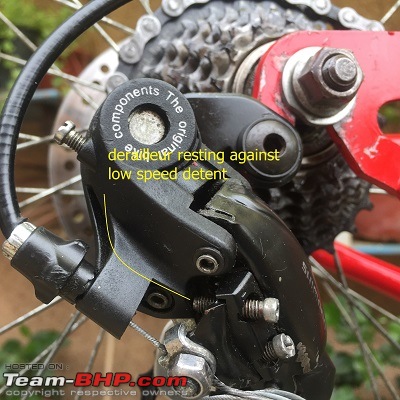
... one needs to be aware of the functions of these two screws. They look like detent screws. They restrict the movement of the derallaieur at its extremities thus determining its maximum allowable range of travel. The detent screws might be holding your derralieur back, thus not allowing the sprockets at that end to engage. On the other hand they might not be restricting it and an unchecked over-travel would slip the chain off the last gear (at the affected end of travel). A clearer picture is coming up for the rear.
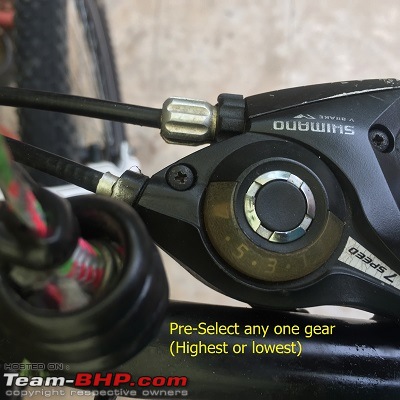
DIY: Bicycle service at home using basic tools-adj-img_6733.jpg
Same goes for the rear. Select a gear..
DIY: Bicycle service at home using basic tools-adj-img_6734.jpg
Move the derralieur to the corresponding position and clamp down the cable.
DIY: Bicycle service at home using basic tools-adj-img_6735.jpg
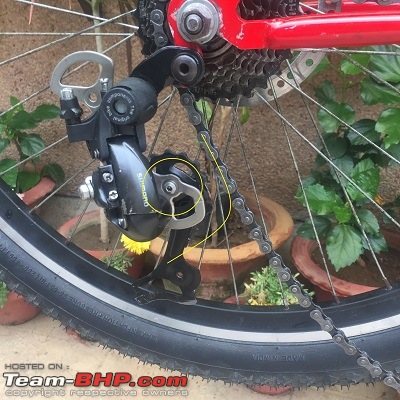
High end detent screw doing its job (the chain is in the highest gear)
DIY: Bicycle service at home using basic tools-adj-img_6736.jpg
Low end detent screw at work (the chain is in the lowest gear)
DIY: Bicycle service at home using basic tools-adj-img_6738.jpg
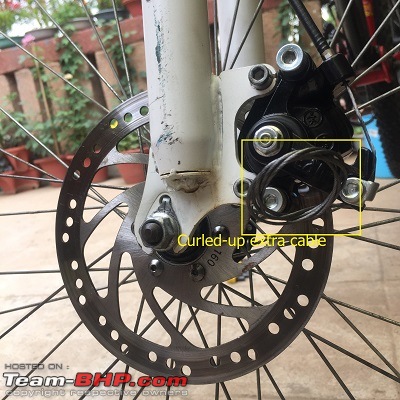
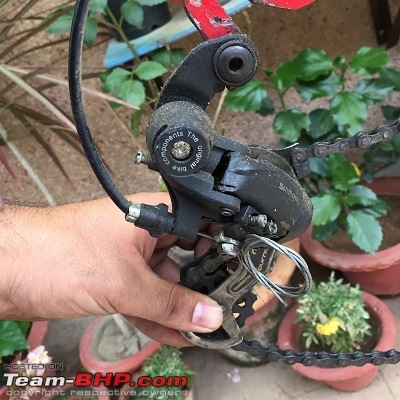
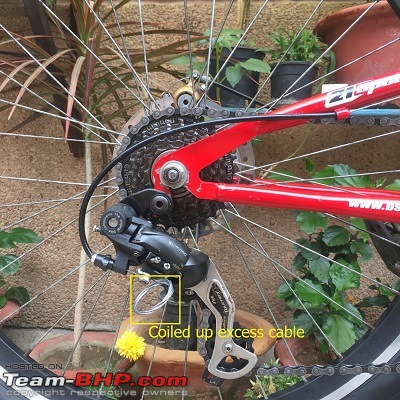
Tidy up the excess cable like this if you cannot cut it off and solder the end.
And we are done. All the controls have adjustment screws on both end of the cables. These require a thorough re-visit (such as above) only once in 5-6 moths with my kind of usage of the bike (40-60 km per month).

Hope I was able to capture everything clearly. The tools required to work on bikes are very basic(Allen keys, screw drivers, pliers, simple spanners and an oiling can). Most of the parts are serviceable, and the confidence one builds up in the process of doing a DIY service on the bicycle can be carried over to take up bigger tasks like working on motorcycles and cars.

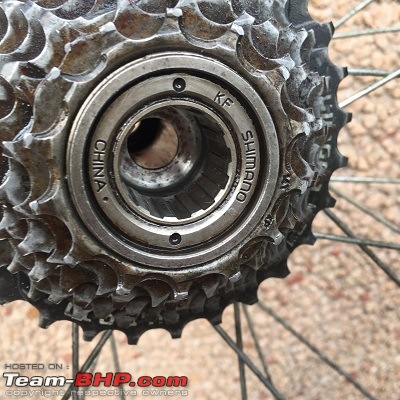
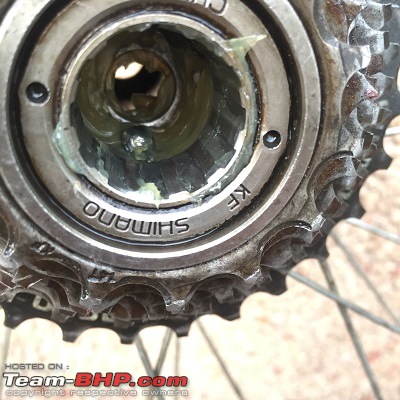
I still havent ventured to dismantle the crank assembly (pedal crank) and the head stock and front forks. Also I do not have the tools for opening the sprocket cassette. Over here I doubt one can find bike parts like in the Netherlands where there are dedicated shops which cater to smaller components. I have only seen plug and play accessory shops which deal with seats, lights, bottle holders etc. Would love to gather some leads regarding this.
Tgo is online now   (27) Thanks
Old 21st April 2020, 07:58   #6
GTO
Team-BHP Support
 
GTO's Avatar
 
Join Date: Feb 2004
Location: Bombay
Posts: 70,538
Thanked: 300,855 Times
Re: DIY: Bicycle service at home using basic tools

Many thanks for sharing, Tgo! Moving your posts to a new thread & adding to our homepage .
GTO is offline  
Old 21st April 2020, 12:10   #7
Distinguished - BHPian
 
Join Date: Oct 2012
Location: Delhi
Posts: 8,111
Thanked: 50,954 Times
Re: DIY: Bicycle service at home using basic tools

Excellent job, well done, thanks for sharing!

On some of the images it looks as if you might be missing one of the ball bearings? With the little balls in their correct place (great job with the grease) there is virtually no room left in between, if there is, one is missing.

Tightening these tapered nuts, as to your point, takes finesse, not strength. When everything is really squeaky clean and properly greased hand tight minus a fraction should suffice. Hand-tighten them and then just back it off a smidgen. You should not feel any play!

Missing these dirt caps on the axle is a real problem. All your careful cleaning and greasing will go to waste very quickly I am afraid.

Take care, look forward to seeing some more

Jeroen
Jeroen is offline   (5) Thanks
Old 21st April 2020, 13:48   #8
Tgo
Senior - BHPian
 
Tgo's Avatar
 
Join Date: Apr 2011
Location: Calgary|Jaipur
Posts: 1,290
Thanked: 3,789 Times
Re: DIY: Bicycle service at home using basic tools

Quote:
Originally Posted by Jeroen View Post
Excellent job, well done, thanks for sharing!

On some of the images it looks as if you might be missing one of the ball bearings?

You should not feel any play!
Thanks for the valuable tips.

Finally after a few iterations, I did go by feel and checking for play in the axles.

The hubs on my bike had 9 balls per bearing; 36 in all, but I only have 35 since I lost 1 the first time I opened the hubs.

Will try to source the caps from somewhere.
Tgo is online now   (1) Thanks
Old 21st April 2020, 16:50   #9
BHPian
 
Aafaq's Avatar
 
Join Date: May 2019
Location: Srinagar, J&K
Posts: 86
Thanked: 209 Times
Re: DIY: Bicycle service at home using basic tools

Excellent DIY

This thread is going to be really helpful, thank you for sharing!
Though my bicycle is comparatively a new one and needs just the basic cleaning as of now but I am sure there must be others like me who would use this as a guide.

DIY: Bicycle service at home using basic tools-img_20200213_204135.jpg

Last edited by aah78 : 27th April 2020 at 21:18. Reason: Picture inserted in-line.
Aafaq is offline   (2) Thanks
Old 21st April 2020, 16:58   #10
Senior - BHPian
 
VijayAnand1's Avatar
 
Join Date: Oct 2013
Location: Stickn' Around
Posts: 1,066
Thanked: 2,825 Times
Re: DIY: Bicycle service at home using basic tools

Beautifully done! A couple of weeks earlier, happen to open my hydraulic calipers, bleed the fluid, and give the pads some TLC. The hub grease seal is very important. The balls will rust and the lubrication material will ooze out eventually or worse attract gunk and make a mess out of the bearings, a real threat.

Good job!

Cheers!
VJ
VijayAnand1 is offline  
Old 21st April 2020, 17:05   #11
Distinguished - BHPian
 
Join Date: Oct 2012
Location: Delhi
Posts: 8,111
Thanked: 50,954 Times
Re: DIY: Bicycle service at home using basic tools

Quote:
Originally Posted by Tgo View Post
The hubs on my bike had 9 balls per bearing; 36 in all, but I only have 35 since I lost 1 the first time I opened the hubs.

Will try to source the caps from somewhere.
Without the correct number of balls the bearing will wear out very quickly, worse because of the missing caps.

Just measure the diameter of the balls with preferably a micrometer. If bicycleshops can’t help, try machinist shops or somebody who deals with bearings. Once you get the size correct, just about any ball bearing ball will do.

Good luck.

Jeroen
Jeroen is offline   (1) Thanks
Old 21st April 2020, 18:17   #12
BHPian
 
bikertillidie's Avatar
 
Join Date: Jan 2011
Location: Calcutta/Pune
Posts: 476
Thanked: 1,026 Times
Re: DIY: Bicycle service at home using basic tools

Nice read.
I have been servicing my cycle since school days.

Since yours is a Hercules cycle, spares should be readily available.

A new generic rear hub assembly minus the sprocket/ratchets should be an inexpensive buy.

Just remove the dust caps off them and fit them on to yours, rather than going through the trouble of fabricating ones out of Teflon.

BTW, the ratchet assembly also needs lubrication.

Last edited by bikertillidie : 21st April 2020 at 18:25. Reason: Additional information a
bikertillidie is offline   (1) Thanks
Old 14th June 2020, 18:48   #13
Tgo
Senior - BHPian
 
Tgo's Avatar
 
Join Date: Apr 2011
Location: Calgary|Jaipur
Posts: 1,290
Thanked: 3,789 Times
Re: DIY: Bicycle service at home using basic tools

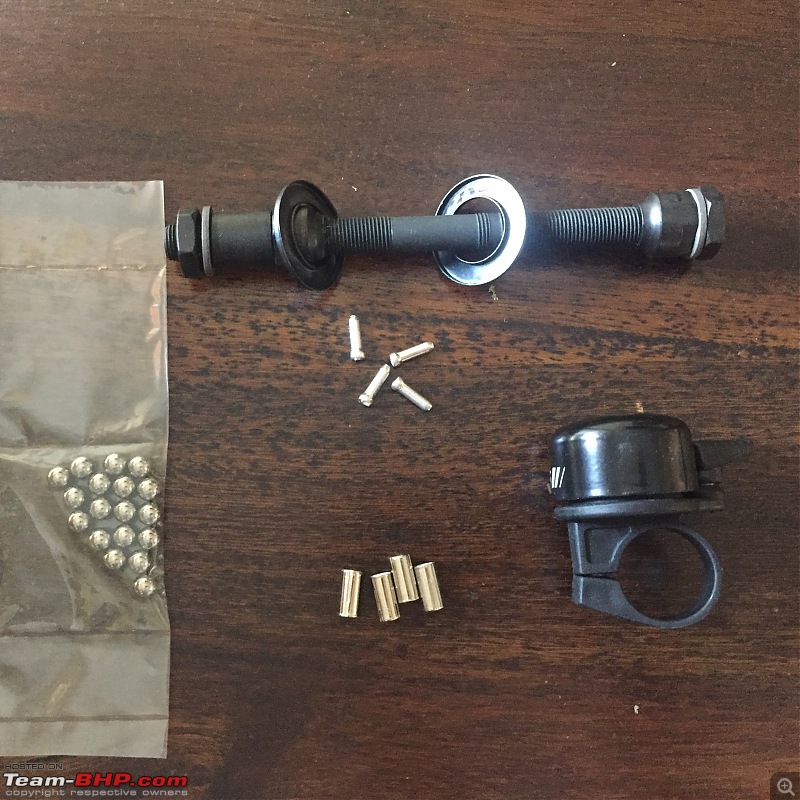
Today was the day, to work some more on the bicycle. I had been receiving the parts in the mail over the last few weeks. I could find everything on the website bumsonthesaddle. Best part of this website was that that small items like cable end caps were available as a single item too.
DIY: Bicycle service at home using basic tools-img_6888.jpg
This was the set-up that needed to go on the bike. I could have got the parts cheaper at any bicycle repair shop but would have lost out on the joy of some hands on work this Sunday.
DIY: Bicycle service at home using basic tools-34102db6ba044aeaaabc6fea69543e74collage.jpg
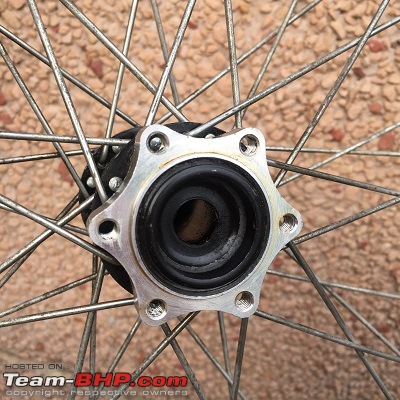
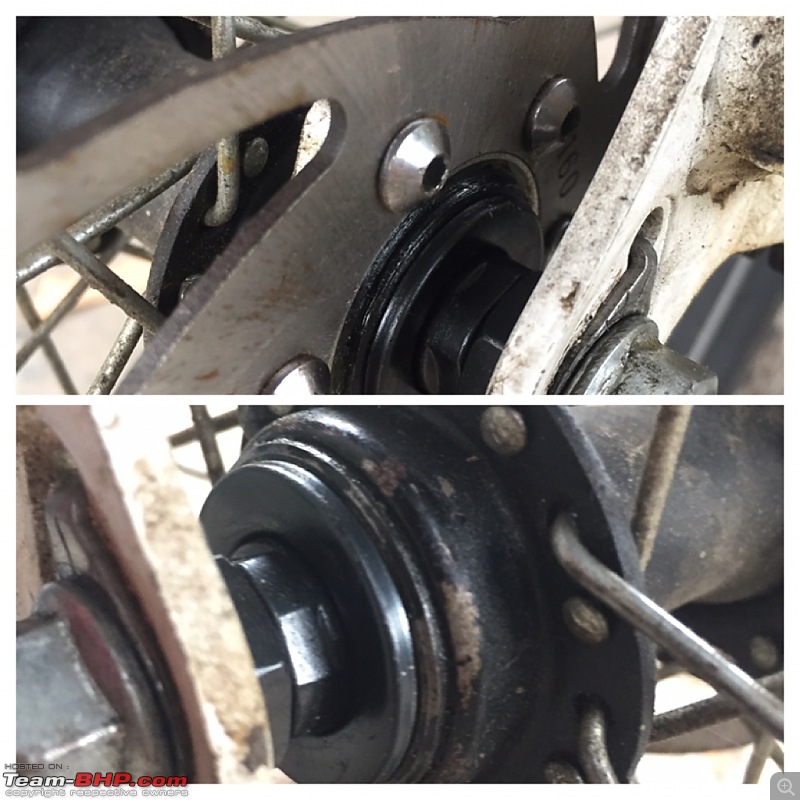
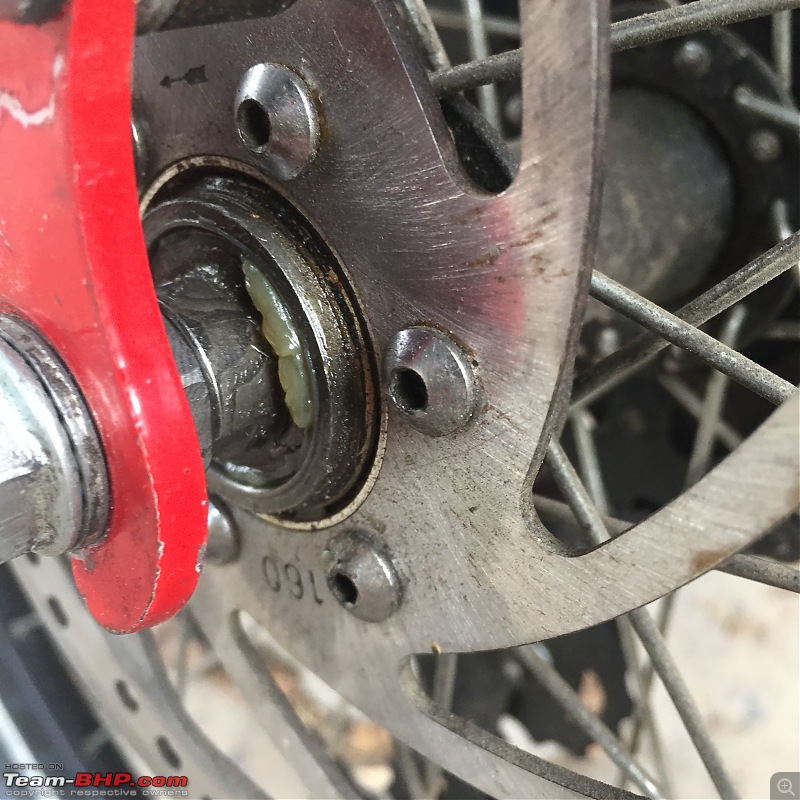
The ordered axle was supposed to be the one for an MTB but ended up short. It was a hollow one so I thought I could go for a front hub Skewer for easy removal of the wheel later. However the bearing caps were larger in diameter and were not compatible in the rear hub. I had to use these ones with the old axle in the front as the threads on the main hub nuts were not matching with the threads on the new axle.
DIY: Bicycle service at home using basic tools-img_6900.jpg
The front races with the old bearing caps doing duty on the front were shifted to the rear. This side was easy and a direct fit, the other side required the diameter fo the bearing cap to be reduced with a file till it fit inside the cassette while being attached to the race. I used all new bearing balls for the rear. Cherry picked the good ones from the old lot for the front. All hubs have the correct number of balls now.
DIY: Bicycle service at home using basic tools-img_6895.jpg
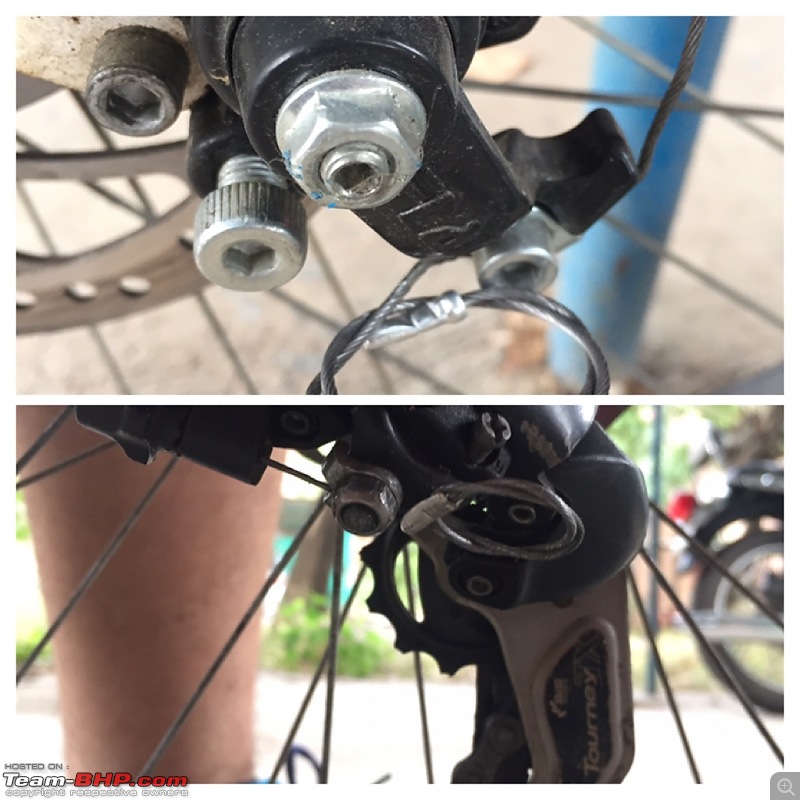
I crimped on the cable inner wire ends before realising that the end caps for the cable outer wire need to be installed first. Wasted two crimps because of this.
DIY: Bicycle service at home using basic tools-f14e12f48adc4ee3ba3804919947a84bcollage.jpg
The cable inner wire end caps were installed next. I reduced the length of the excess to make it a little tidy.
DIY: Bicycle service at home using basic tools-img_6896.jpg
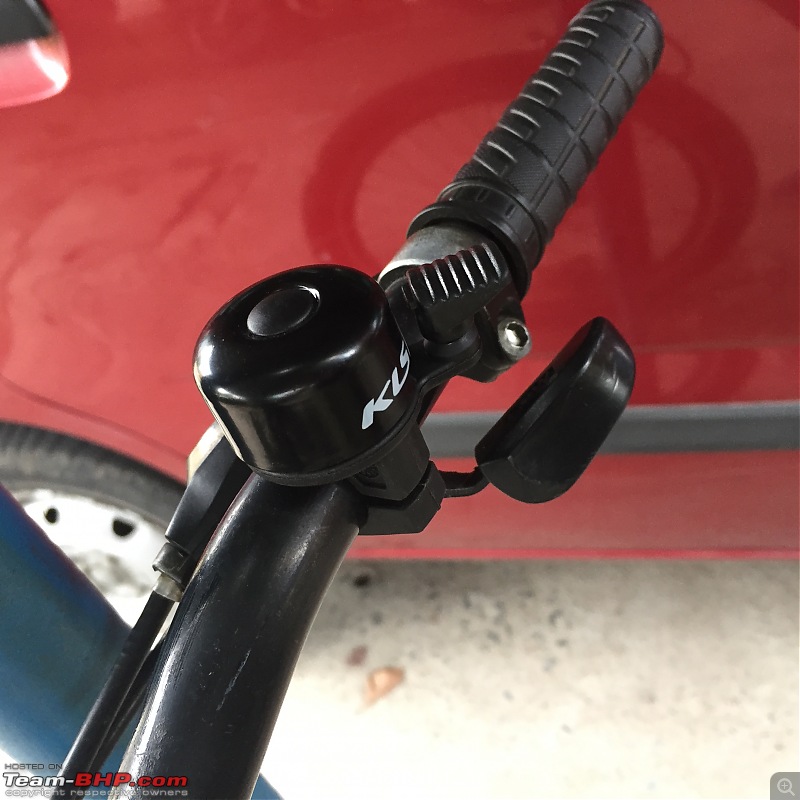
The bell went on and was a pretty straightforward job. It's impinger can be rotated to any orientation which was a neat little design touch.
DIY: Bicycle service at home using basic tools-img_6897.jpg
Wrapped the lock in heat shrink tape that I had lying around.

Lastly, the pedals needed a tightening at the hub and the braked were adjusted. The bike feels nice and nimble now. I won't have to worry about the hub bearings now in the upcoming monsoon.
Tgo is online now   (2) Thanks
Old 17th June 2020, 13:37   #14
BHPian
 
bikertillidie's Avatar
 
Join Date: Jan 2011
Location: Calcutta/Pune
Posts: 476
Thanked: 1,026 Times
Re: DIY: Bicycle service at home using basic tools

Nice progress.

Please try to avoid mix and match of balls within the races.

Use all new ones please.
bikertillidie is offline   (1) Thanks
Old 17th June 2020, 20:55   #15
Distinguished - BHPian
 
Join Date: Oct 2012
Location: Delhi
Posts: 8,111
Thanked: 50,954 Times
Re: DIY: Bicycle service at home using basic tools

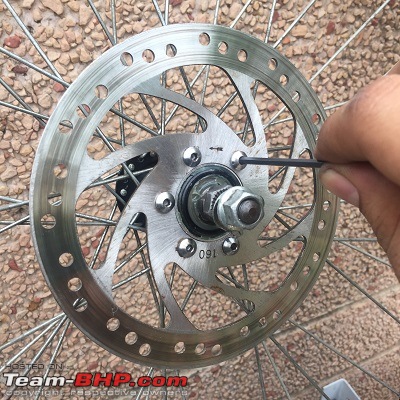
Good job again, well done. I am looking at the image of the axle with some grease. Difficult to tell, but is there some sort of dust cap to protect the bearing? If left open to the elements, your grease will be gone soon, and next the bearing balls too.

Take care

Jeroen
Jeroen is offline  
Reply

Most Viewed


Copyright ©2000 - 2024, Team-BHP.com
Proudly powered by E2E Networks