| |||||||

| Search Forums |
| Advanced Search |
| Go to Page... |
 |
| Search this Thread |  7,475 views |
 20th January 2022, 13:54
| #1 |
| BHPian Join Date: Feb 2015 Location: Borders
Posts: 66
Thanked: 1,084 Times
| Restoring a Road Bike in Canada PRELUDE Work got me to Canada, an assignment to teach YOs, also an opportunity to catch up with an old bud who had gotten into civilian life well over three decades in Canadian olives, he stayed a block away from my accommodation so we decided to meet regularly over World Of Warcraft  Being a sapper (with lots of free time now), he was putting his experience & knowledge into restoring old vehicles, had proper set up etc. was pretty good at it too as I could see from photos of transition, over first greeting he got discussing restoring a beat up road cycle, idea got me cracking but I wasnt a sapper and I had no clues what it entailed, however always up for learning so weathered along. Being a sapper (with lots of free time now), he was putting his experience & knowledge into restoring old vehicles, had proper set up etc. was pretty good at it too as I could see from photos of transition, over first greeting he got discussing restoring a beat up road cycle, idea got me cracking but I wasnt a sapper and I had no clues what it entailed, however always up for learning so weathered along.The below is explained as process with some elements of what we experienced, might not hold water in all cases, especially in India where majority of stuff can be done using help from local cycle shop fella. In Canada thats a pretty expensive option and moreover we both had entire weekends off with nothing in hand to keep ourselves busy otherwise. General anatomy of a road cycle  RESTORATION PROCESS The Bike & disassembly We started with buying (for $30) a racing bike from the 1980s, and after about 3 weeks of work, it was finally go for the first full ride. In this process my role varied from helper to painter to mechanic to test rider to vendor negotiation (Canadians bargain just like us North Indians!) On the bike we got, the rear brakes didn't function. The gears were in good working order, although extremely dirty. All moving parts were very grimy and had not been regularly lubricated. There were many rust spots visible on the surface, and the bicycle had been subjected to multiple coats of paint. There was also paint all over the cables (which were rusty) The bike as we purchased     Things needed for our project: Pliers, side cutters Hammer, spanner and wrench set Allen key set Screwdrivers of various sizes White spirit (for degreasing parts) Metal tin, toothbrush and paintbrush Aluminum oxide paper Spray paint & Anti-rust primer Masking tape for covering areas of the frame prior to spraying Grease Crank-pulling tool & Chain-link tool Wet wipes Wheels x 2 (700C size) Gear & Break cables Handlebar tape Decals Brake pads Tyres, Rim tape, Inner tubes Removing most things are pretty straightforward, usually a matter of undoing various bolts and screws. I'd recommend also taking plenty of photos of everything as you go, this record will help you if you get stuck. If you want to remove the crank arms from the bottom bracket (the axle that your pedals rotate around), then you'll probably need a 'crank-puller' tool. Like many things on bicycles, this is an example of something that varies hugely from decade to decade and manufacturer to manufacturer, but the crank-puller is a pretty common type. Apply force with a large spanner and you'll be able to pull the crank arm off the axle, 'stem' (the piece that connects the front forks to the handlebars) was firmly jammed into the front forks. Luckily this was removed without means more extreme than a quick tap with a hammer to break the corrosion bonds between the stem and the inside of the forks.      Painting Process Now that wed removed all the parts from the frame and forks, it was time to prepare the bike for primer and paint. The first step (and by far the longest!) is to remove the old paint. The primer needs to be applied to bare metal for good adhesion and a smooth finish, so have to do this step well. For me this is where I briefly felt like an archaeologist as I found myself removing layer after layer of paint. In removing the paint you have two allies - abrasives and chemical paint stripper. Be careful with using the coarse Al Ox paper (sand paper), it's apparently easy to find yourself removing metal as well as paint, and causing damage to your frame. Go slow if in doubt! If you're repairing an old bicycle, you'll probably find quite a lot of rust. Don't panic, a lot of rust will be relatively superficial. If ignored, rust will only get worse, so let's remove what we can, and chemically treat what we can't. For the areas of rust which are hard to reach, in recesses, scratches, or just seem too deep to sand away, we used a Rust Converter (something like Dr Fixit), with the paintbrush we applied it very liberally over anywhere where there was a trace of rust on frame. The primer we chose was an anti-rust primer. The purpose of this is to continue to protect the frame from rust even if the paint above is badly scratched or chipped. You'll need a warm, dry, windless day to do this on. Suspend your frame and forks using wires, Mask off the bits that you don't want to get primer on. From this point on only handle the frame whilst wearing disposable gloves, as you don't want to get any oil from your hands onto the metalwork. Daub some paper towel in white spirits and rub down the entire frame, making sure you cover every area. This is very important as what you're doing is removing any dust and grease left over from the paint removal stage, leaving a good surface for painting. As with any painting job, surface preparation is everything! Now leave it for half an hour for the white spirits to totally evaporate from the frame. Find your primer can and give it a good 2+ minutes of shaking (this helps) in order to properly mix the paint. Move the frame and forks to the shed or garage, as you'll need to leave them alone for several days now. After a few days the primer will be ready to paint over, but there's still a little more preparation work before we can get to the fun part. Take some very fine wet & dry paper and moisten. Very lightly rub this over the main frame sections. You've got to press very lightly or you'll sand straight through the primer. The aim of this step is to provide a roughened surface, which will help the paint to adhere well. It also is useful for smoothing the primer surface, taking away any drips or imperfections, which will help you to achieve a nice finish. You won't be able to do this for the complex and tight bits on the frame, but don't worry about that. Use some damp paper towel to rub down the frame, to remove the dust from step 1. This is really important if you want a nice smooth paint coat. Leave the pieces for a while now, just to let the frame and forks totally dry. In the meantime find your paint cans (we used four), and when you're ready to paint give the first can a strong shaking for 2+ minutes. Gently spray the paint all over the frame now. Don't apply too thickly, it's really easy to overdo it and then you'll get thick areas and running drips! Your chosen color will not appear to be opaque yet, so don't try to spray too thickly! After you've done the first coat, leave it for 15 or so minutes to dry. Now go back and apply a second coat, then wait, then a third, then wait, then a fourth, but now you've got to be patient in order to wait for it to fully dry and harden! Transfer your frame and forks into a space like a shed or garage and leave them hanging up, undisturbed. The recommendation is to wait two weeks for the paint to be hard enough to begin re-attaching components to the frame, any sooner and you'll probably damage it quite a lot. To cut short this cycle bud contacted another of his bud who let us dry it in an oven. In the meantime we sorted out the other parts of the bike, and got them ready for assembly. A big bucket of warm water for washing parts in is useful Please note: Using spray paints you'll be able to achieve a very satisfying finish with care, although do recognize that it will never be as good as a factory-applied paint job.         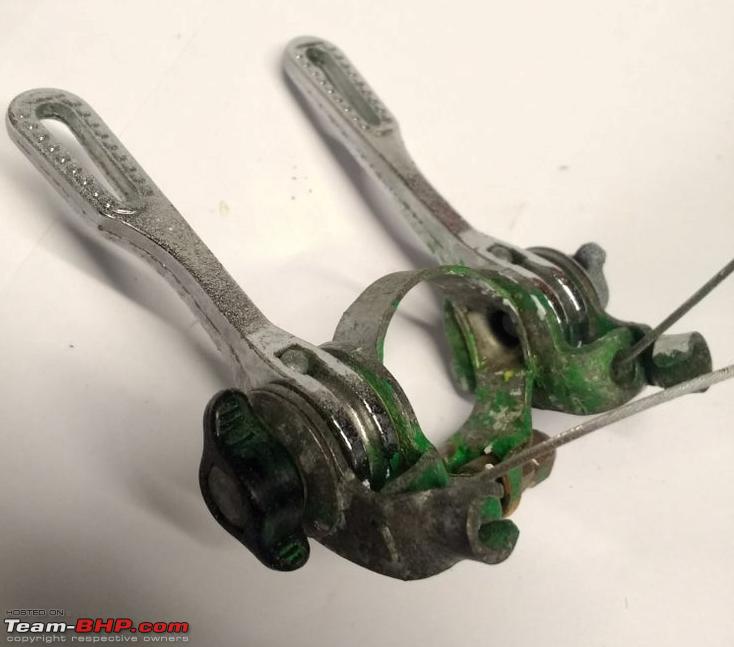 Replacing Wheels The other big loose-end was the wheels. These we found to unfortunately be in a poorer state than had realized. If you held them up to your ear and rotated them, you'd hear a whoosh/rustle/tinkle sound as little flakes of rust tumbled down around the inside! Clearly new wheels were in order, so bought new wheels from local cycle shop. We had the cycle shop fella to align them properly post fitment.  Replacing the Bottom Bracket and Cranks When we removed the bottom bracket previously we just left it covered in the old grease, now we had to install it, so the time had come to clean it and regrease. Using the little bread tin, pour out some white spirits (turpentine), and grab the old toothbrush. Scrub the bearings, bearing cups and axle in the spirits. You should find that the old grease just floats off with ease, leaving nice bare components. Now thoroughly re-lubricate the assembly with grease, in particular the bearings, which you want to 'pack' with grease. Don't be afraid to apply too much, it's easy to wipe away the excess and it won't cause any harm. Now screw the components back into place. As they were now nice and clean and lubricated. Next are the crank arms. Lubricate the axle so they'll slip on nicely, and push into place. Then tighten up the central nut to force the crank arm onto the shaft of the axle. Repeat for both sides of the bike and make sure they rotate smoothly.      The Chain Goes Back On If your sprocket(s) and derailleur (both front and rear) are installed, it's time to put the chain on. We bought a new chain. The chain will come lubricated, so can be hard to handle, making this step much easier if there's a second person to help you. Fit the chain round the sprocket, freewheel and derailleurs. Bring the ends together, and assess the length. It's likely that you'll need to shorten it by a few links. To separate the links you'll need a chain tool (available online or from any bicycle shop). This tool consists of a handle that you turn to push a pin against the side of the chain pin, exerting enough pressure on it to push it aside, allowing the link to be removed. Now this is the theory, in reality its a struggle, so we got the local cycle guy to help and it went smooth. He also got it well aligned. Brakes and Cables Unless old bike has been well taken care of, one will need to replace the brake pads. Make sure to get ones that are a similar size and design, so they'll be compatible, as there's a lot of variation available. Moving onto brake cabling. This isnt challenging. The process is pretty self-explanatory, some specific things to consider are allowing enough spare length of cable to still have slack when the handlebars are fully turned to one side. Make sure loops arent too large. You will probably have to adjust the position of where the cable is clamped onto the brake callipers a few times, to get the brakes actuating at a good point on the brake levers travel. Another thing to think about is the colour of the cable tubing. If you've managed the brake cabling, you should find the gear cabling a breeze. For old road bikes, with the shifters on the 'down-tube' (as opposed to shifters on the handlebars), the gear cable installation is a piece of cake. This is an advantage of the old-style 'index-less' shifting which just relies on friction holding the gear levers in a specific position. You should expect to have to calibrate the derailleurs to an extent, to make sure you can easily change up and down within the full range of gears available. Take your bicycle out for a few quick test rides and you'll soon work out what needs to be tweaked.    Taping Handlebar and Finishing Handlebar tape can be bought in all sorts of different colors and patterns the tape we bought is foamy, rather than simple tape, for comfort, and has an adhesive strip on the back. Applying the bar tape needs to be done in a specific way, so I'd recommend watching a few of the good videos of the subject on YouTube before you try it Apply the tape from the end of the handlebars, heading inwards. For the lower bit of the drop handlebars, applying the tape clockwise for the right-hand side, and anti-clockwise for the left-hand. Leave some overlapping the end of the bar, as you'll use this to tuck into the tube end as you push in the stops that presumably came with your handlebar tape. Wind around the handle now, and when you reach the brake lever assembly, do a loop around the brake handle housing, so that the direction of the rotation of the tape around the handlebars is now reversed. For the top horizontal section you'll want to twist it towards the rider over the top of the handlebars. Reach where you want to stop, then trim it to a straight edge, and finish with the 'finishing tape' that will have come with your handlebar tape. Lastly, use a hammer to gently tap in the end stops on each bar, this will hold the tape in place, as it traps the ends. The last opportunity to personalize your bicycle is the stickers/decals. This gives the desired glamor quotient.  FINAL PRODUCT   Finally after a 3 week haul our cycle was ready and road worthy, there were two learnings Restoring an old bicycle can be very enjoyable and satisfying, you're putting pretty old bicycles back on the road to be enjoyed once again. World of Warcraft is better option to above!  Hope was a good read. |

|  (35)
Thanks (35)
Thanks
 |
| The following 35 BHPians Thank tatafanatic for this useful post: | 2himanshu, Ankkit, AROO7, carthick1000, catchjyoti, chinmaypillay, dailydriver, deepfusion, Dr.AD, dragntailonfire, ebonho, Fuldagap, gauravanekar, GTO, Indraneel Bhat, jomson13, ninjatalli, papr23, promit, RaghavEvoX, shancz, Shubhendra, SinghShu, Slick, SohailPistawala, spd_tkt, SS-Traveller, Tgo, thallipolivandi, the.dogfather, vb-saan, Viju, Vinod_nair, vinya_jag, ysjoy |
| |
|
20th January 2022, 16:28
| #2 |
| Senior - BHPian Join Date: Feb 2010 Location: Pune
Posts: 6,396
Thanked: 10,012 Times
| re: Restoring a Road Bike in Canada A beautiful vintage steel frame nicely restored. With period-perfect original parts. Any idea how much the bike weighs in its restored glory? Cheers, Doc |
|
| (1)
Thanks
|
| The following BHPian Thanks ebonho for this useful post: | gauravanekar |
|
24th January 2022, 16:32
| #3 |
| BHPian Join Date: Aug 2010 Location: Pune
Posts: 122
Thanked: 327 Times
| Re: Restoring a Road Bike in Canada @Tatafanatic An awesome thread and an even better effort on the restoration!!! Congratulations and happy riding...... |
|
| (1)
Thanks
|
| The following BHPian Thanks Indraneel Bhat for this useful post: | tatafanatic |
|
24th January 2022, 17:29
| #4 |
| BHPian Join Date: Feb 2015 Location: Borders
Posts: 66
Thanked: 1,084 Times
| Re: Restoring a Road Bike in Canada @ Doc Weight would be 25Lbs |
|
| (1)
Thanks
|
| The following BHPian Thanks tatafanatic for this useful post: | ebonho |
|