Team-BHP > In-Car Entertainment
Register New Topics New Posts Top Thanked Team-BHP FAQ


Reply
  Search this Thread
57,979 views
Old 16th May 2011, 16:42   #1
BHPian
 
yashshroff's Avatar
 
Join Date: Mar 2011
Location: Delhi
Posts: 63
Thanked: 6 Times
DIY PICS : ANHC Fiberglass Subwoofer Box

so finally started making the subwoofer box...
the feeling is quiet good..
attaching a few pictures

DIY PICS : ANHC Fiberglass Subwoofer Box-img2011051600078.jpg
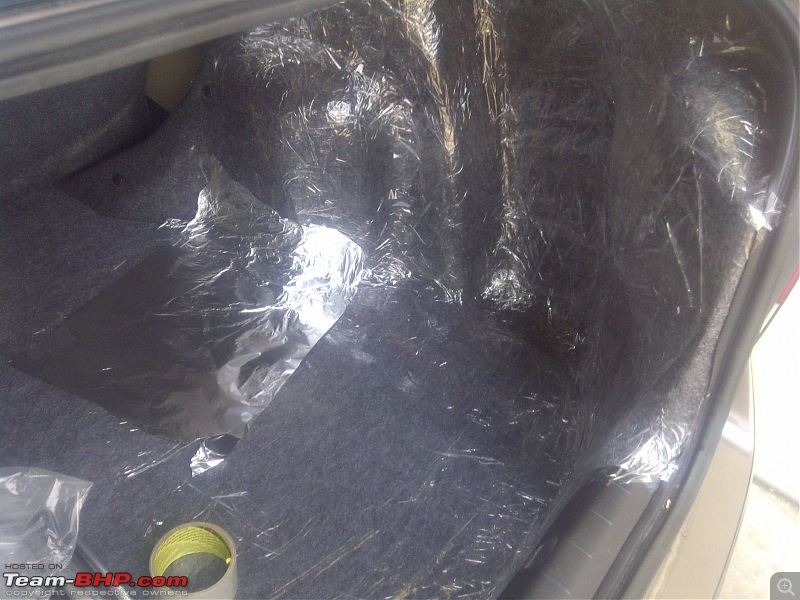
Two layers of 3" transparent cello tape, criss crossed for protection.

DIY PICS : ANHC Fiberglass Subwoofer Box-img2011051600079.jpg
DIY PICS : ANHC Fiberglass Subwoofer Box-img2011051600081.jpg
DIY PICS : ANHC Fiberglass Subwoofer Box-img2011051600082.jpg
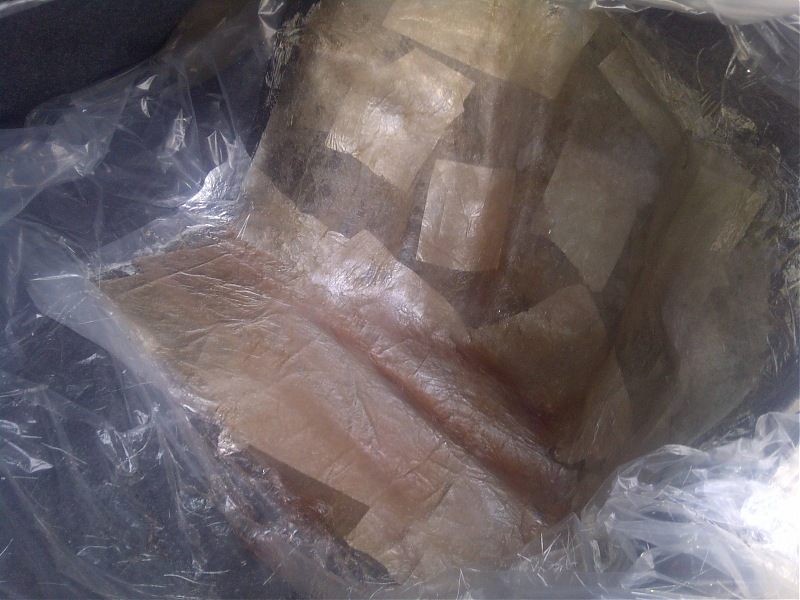
Sticking foil pieces in between for easy release. Finally with a brush applied a layer of waxpol (polish wax) for easy release.

DIY PICS : ANHC Fiberglass Subwoofer Box-img2011051600083.jpg
DIY PICS : ANHC Fiberglass Subwoofer Box-img2011051600084.jpg
Making sure resin spills cause no harm to the car, believe me you do tend to spill it around no matter how careful you are.

DIY PICS : ANHC Fiberglass Subwoofer Box-img2011051600085.jpg
All the stuff

DIY PICS : ANHC Fiberglass Subwoofer Box-img2011051600086.jpg
DIY PICS : ANHC Fiberglass Subwoofer Box-img2011051600087.jpg
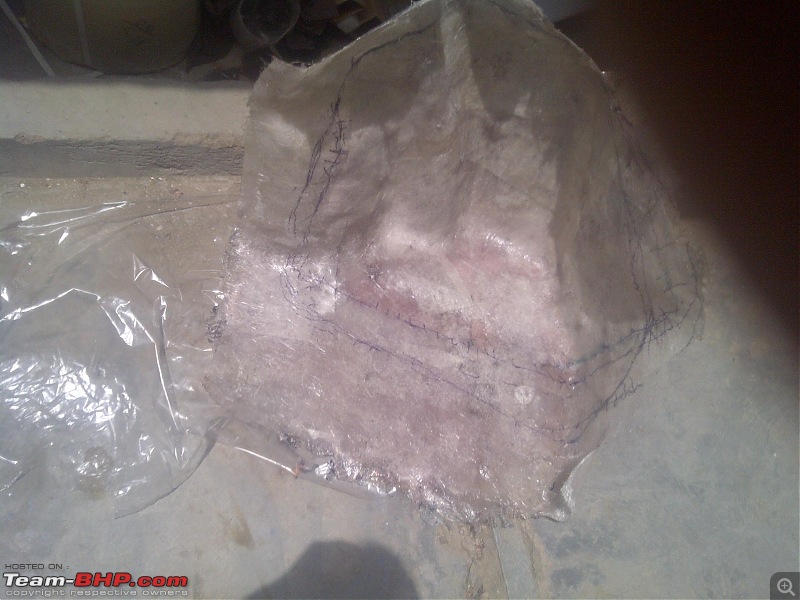
One layer of resin and mat applied all over

The fumes are very strong, wore a 3m n95 mask easily available and industrial rubber gloves.

Left it yo dry, lets see how much time then will apply one more layer of matting before releasing mould. Its a pain working the insides and corners, back gives up

more pics soon
yashshroff is offline   (2) Thanks
Old 17th May 2011, 18:50   #2
BHPian
 
yashshroff's Avatar
 
Join Date: Mar 2011
Location: Delhi
Posts: 63
Thanked: 6 Times
Re: DIY PICS : ANHC Fiberglass Subwoofer Box

DIY PICS : ANHC Fiberglass Subwoofer Box-img2011051600088.jpg
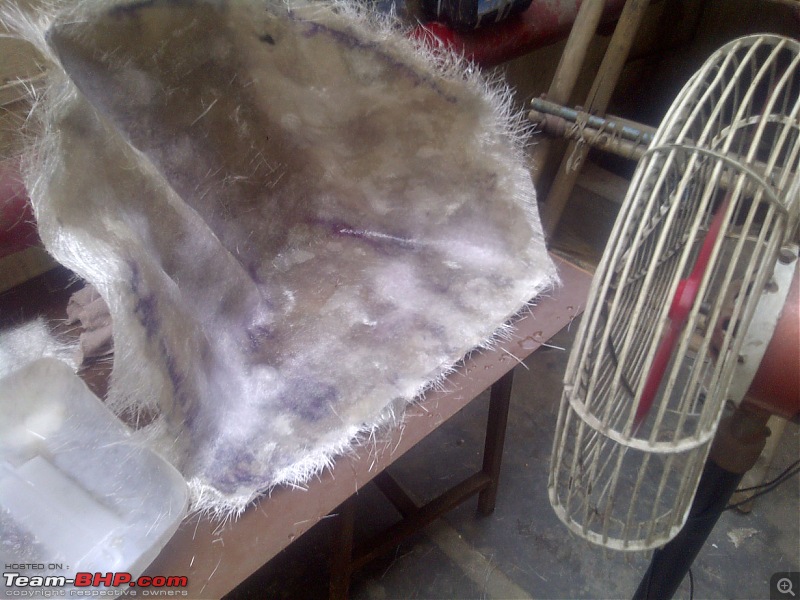
Making sure the mould is dried properly before taking it out, dont want it to crack in the process..

DIY PICS : ANHC Fiberglass Subwoofer Box-img2011051700091.jpg
The mould left over night to dry and next day also in the sun, taking it out was not that easy. Used a screw driver to loosen it from sides and it left the tape/foil backing, but for centre screw driver doesnt help, so pull the box and the carpet comes out then pull the cello tape layer from the carpet first, then the entire mould is out with the cello tape stuck to it, then just pull d cello tape layer which is easy.

DIY PICS : ANHC Fiberglass Subwoofer Box-img2011051700092.jpg
Keeping the specs of the woofer in mind, and making it a flush finish box so two rings are attached together with a layer of resin plus fg mat in between for good bond, and 6 screws are also used to hold the rings together..

DIY PICS : ANHC Fiberglass Subwoofer Box-img2011051700093.jpg
DIY PICS : ANHC Fiberglass Subwoofer Box-img2011051700094.jpg
Three dowels are used to fix the rings to the base of the mould. On the rings a small pilot hole was made for the screws and then the for top a bigger bit was used for flush finish so that when woofer is placed it is flush on the lower mdf ring.
Then silicon was placed in the gap between the dowel and mdf, also where dowels are meeting the fg mould, small screw holes drilled and a approximate placing was done.
Now the dowels will be removed from the mould(still attached to the rings), and 6 layers of mat will be put on the base mould...more pics soon
yashshroff is offline   (1) Thanks
Old 17th May 2011, 19:02   #3
Team-BHP Support
 
Jaggu's Avatar
 
Join Date: May 2004
Location: Bangalore
Posts: 20,215
Thanked: 15,907 Times
Re: DIY PICS : ANHC Fiberglass Subwoofer Box

Wow this is very interesting DIY! Do let us know what is the proportion of the mix, materials, quantity of the same etc also. Once again superb thread!
Jaggu is offline  
Old 17th May 2011, 22:30   #4
BHPian
 
yashshroff's Avatar
 
Join Date: Mar 2011
Location: Delhi
Posts: 63
Thanked: 6 Times
Re: DIY PICS : ANHC Fiberglass Subwoofer Box

Quote:
Originally Posted by Jaggu View Post
Wow this is very interesting DIY! Do let us know what is the proportion of the mix, materials, quantity of the same etc also. Once again superb thread!
thanks..
FG resin (got the cobalt mixed from the shopkeeper only, i think thats 4-5%, not sure but when i use it i mix catalyst @ 2% of FG resin)

Filled several 200ml cups with FG resin and kept putting 4ml catalyst just before using it, it lasts for 3-4minutes before it starts getting gooey and then solid

But sometimes to make it a quick dry coat added 3-4% catalyst and it hardens quickly

Got 12.5kg of resin and 7kg of fg Mat(450gsm), i think i can make another box (for the second sub ) in that much, not sure lets see..

Last edited by yashshroff : 17th May 2011 at 22:31. Reason: typo
yashshroff is offline   (1) Thanks
Old 17th May 2011, 23:01   #5
Senior - BHPian
 
DerAlte's Avatar
 
Join Date: Mar 2007
Location: Bangalore
Posts: 8,069
Thanked: 2,919 Times
Re: DIY PICS : ANHC Fiberglass Subwoofer Box

Super! Fantastic work, @yashshroff.
* Wouldn't using different amounts of catalyst increase the possibility of voids appearing later?
* What is the thickness you are targetting? Maybe you can think of using good 6mm ply sandwiched between 2 FG layers - will give much better strength / rigidity to the large areas (search for Navin's recommendations on this)
* Carpet finish or gloss?
* Which sub?
DerAlte is offline  
Old 17th May 2011, 23:23   #6
BHPian
 
yashshroff's Avatar
 
Join Date: Mar 2011
Location: Delhi
Posts: 63
Thanked: 6 Times
Re: DIY PICS : ANHC Fiberglass Subwoofer Box

Quote:
Originally Posted by DerAlte View Post
Super! Fantastic work, @yashshroff.
* Wouldn't using different amounts of catalyst increase the possibility of voids appearing later?
* What is the thickness you are targetting? Maybe you can think of using good 6mm ply sandwiched between 2 FG layers - will give much better strength / rigidity to the large areas (search for Navin's recommendations on this)
* Carpet finish or gloss?
* Which sub?
thanks for the info...
the layer with more catalyst was used as the last one so mould could be taken out, i am not sure of the voids, so wont use higher mixes now..

i was targeting approx 1.5cm thick, i dont know how to do the sandwich thingy, i did find a post with some mention of sandwiching marine ply but could not get a response.

If i have to sandwich, will it only be the base ? cause there are not many big areas ?

Sub mostly idv3 12, and going by manufacturers sealed box volume of .8 to 1.5 cu. ft, going for a box with approximately 1 cu. ft. excluding the woofer volume. Hope it works well
yashshroff is offline  
Old 19th May 2011, 01:08   #7
BHPian
 
yashshroff's Avatar
 
Join Date: Mar 2011
Location: Delhi
Posts: 63
Thanked: 6 Times
Re: DIY PICS : ANHC Fiberglass Subwoofer Box

so the box was trimmed from sides for perfect box shape which will be put into the car..
After this the dowel's were removed but the most important part was to mark where the dowel drill holes were, so on the underbelly i put patches of tape and put a marker dot on the three drill holes so they could be drilled again.
the tool Using this really helped, it helped me to grind the air pockets and the sides
DIY PICS : ANHC Fiberglass Subwoofer Box-img2011051800100.jpg

Now 2 layers of fg mat applied and left to dry. a easy method was to make the resin mix in the shallow plastic tray and then dip the mat pieces n stick it all over, then apply a layer of resin all over and repeat the same process.
DIY PICS : ANHC Fiberglass Subwoofer Box-img2011051800097.jpg

2 more layers added - total 7layers done. Will see in the morning if more are required by pressing at different points to see any signs of flexing. a few white spots can be seen, but the mould is solid at those points too. Will try to avoid them in future. Also the mould is kept at 90 degrees as against to what it will be placed as in the car, (like the part you see on the bottom will come at the back of the woofer magnet) this is because all the excess resin flows and makes the back hard.
DIY PICS : ANHC Fiberglass Subwoofer Box-img2011051800099.jpg

should be properly roasted by tomorrow.
more pics soon
yashshroff is offline   (1) Thanks
Old 19th May 2011, 11:52   #8
BHPian
 
R. Kotwal's Avatar
 
Join Date: Mar 2009
Location: Jammu
Posts: 48
Thanked: 45 Times
Re: DIY PICS : ANHC Fiberglass Subwoofer Box

thanks for the info...
the layer with more catalyst was used as the last one so mould could be taken out, i am not sure of the voids, so wont use higher mixes now..

i was targeting approx 1.5cm thick, i dont know how to do the sandwich thingy, i did find a post (Fiberglass Vs Mdf Enclosure) with some mention of sandwiching marine ply but could not get a response.

Quote:
If i have to sandwich, will it only be the base ? cause there are not many big areas ?

Sub mostly idv3 12, and going by manufacturers sealed box volume of .8 to 1.5 cu. ft, going for a box with approximately 1 cu. ft. excluding the woofer volume. Hope it works well
Hello Yashroff,

I would strongly advise you not to sandwhich any material ( like plywood and hardboard) that facilitates creation of asymmetrical air pockets between layers of fiberglass it is would compromise its integrity.

However, if there should exist a requirement of making it sturdier around the curves or other facets that cant be adequtely covered by strips of fiberglass chopped mat , you could think of mixing fiberglass microspheres ( very small fiberglass bits) and resin and apply it like a paste.

You could also strengthen it by applying 3 layers of fiberglass cloth alternatively between subsequent layers of the chopped mat.

A foam sandwhich , would be slightly more complicated since it would be hard to source expanding urethane foam in India.

Hope that helps
R. Kotwal is offline   (1) Thanks
Old 19th May 2011, 12:30   #9
BHPian
 
yashshroff's Avatar
 
Join Date: Mar 2011
Location: Delhi
Posts: 63
Thanked: 6 Times
Re: DIY PICS : ANHC Fiberglass Subwoofer Box

Quote:
Originally Posted by R. Kotwal View Post
thanks for the info...
the layer with more catalyst was used as the last one so mould could be taken out, i am not sure of the voids, so wont use higher mixes now..

i was targeting approx 1.5cm thick, i dont know how to do the sandwich thingy, i did find a post (Fiberglass Vs Mdf Enclosure) with some mention of sandwiching marine ply but could not get a response.


Hello Yashroff,

I would strongly advise you not to sandwhich any material ( like plywood and hardboard) that facilitates creation of asymmetrical air pockets between layers of fiberglass it is would compromise its integrity.

However, if there should exist a requirement of making it sturdier around the curves or other facets that cant be adequtely covered by strips of fiberglass chopped mat , you could think of mixing fiberglass microspheres ( very small fiberglass bits) and resin and apply it like a paste.

You could also strengthen it by applying 3 layers of fiberglass cloth alternatively between subsequent layers of the chopped mat.

A foam sandwhich , would be slightly more complicated since it would be hard to source expanding urethane foam in India.

Hope that helps
yes, i decided to go against the ply sandwich, and if i need to strengthen it i'll probably make strips out f the mat and then apply it like a rope.
yashshroff is offline  
Old 19th May 2011, 13:16   #10
BHPian
 
diesel_maniac's Avatar
 
Join Date: Jun 2007
Location: Delhi
Posts: 170
Thanked: 3 Times
Re: DIY PICS : ANHC Fiberglass Subwoofer Box

Superb Effort Yashshroff, I have been contemplating of doing something similar in my Swift VDI and now the Verna. This thread will be a great guide for Novices and budding DIY enthusiasts to take something similar in future.
diesel_maniac is offline  
Old 19th May 2011, 13:23   #11
BHPian
 
yashshroff's Avatar
 
Join Date: Mar 2011
Location: Delhi
Posts: 63
Thanked: 6 Times
Re: DIY PICS : ANHC Fiberglass Subwoofer Box

Quote:
Originally Posted by diesel_maniac View Post
Superb Effort Yashshroff, I have been contemplating of doing something similar in my Swift VDI and now the Verna. This thread will be a great guide for Novices and budding DIY enthusiasts to take something similar in future.
Go ahead, do it, its great fun and for any DIY enthusiast it's gonna be awesome. But it is very tiring and the heat kills it even more
This is my first diy effort, hope it works out well !!
yashshroff is offline   (1) Thanks
Old 19th May 2011, 13:38   #12
Team-BHP Support
 
navin's Avatar
 
Join Date: Mar 2004
Location: Mumbai
Posts: 25,198
Thanked: 9,300 Times
Re: DIY PICS : ANHC Fiberglass Subwoofer Box

Quote:
Originally Posted by DerAlte View Post
* What is the thickness you are targetting? Maybe you can think of using good 6mm ply sandwiched between 2 FG layers - will give much better strength / rigidity to the large areas (search for Navin's recommendations on this)
Quote:
Originally Posted by yashshroff View Post
thanks for the info...
the layer with more catalyst was used as the last one so mould could be taken out, i am not sure of the voids, so wont use higher mixes now..

i was targeting approx 1.5cm thick, i dont know how to do the sandwich thingy, i did find a post with some mention of sandwiching marine ply but could not get a response.

If i have to sandwich, will it only be the base ? cause there are not many big areas ?

Sub mostly idv3 12, and going by manufacturers sealed box volume of .8 to 1.5 cu. ft, going for a box with approximately 1 cu. ft. excluding the woofer volume. Hope it works well
Quote:
Originally Posted by R. Kotwal View Post
thanks
I would strongly advise you not to sandwhich any material ( like plywood and hardboard) that facilitates creation of asymmetrical air pockets between layers of fiberglass it is would compromise its integrity.

However, if there should exist a requirement of making it sturdier around the curves or other facets that cant be adequtely covered by strips of fiberglass chopped mat , you could think of mixing fiberglass microspheres ( very small fiberglass bits) and resin and apply it like a paste.

You could also strengthen it by applying 3 layers of fiberglass cloth alternatively between subsequent layers of the chopped mat.

A foam sandwhich , would be slightly more complicated since it would be hard to source expanding urethane foam in India.
A speaker box needs be be stiff and damped (aka non-resonant). Fiberglass (FRP / FG) gives stiffness but is resonant. Wood is well damped but is not as stiff (per mm thickness) as FG/FRP. I have successfully made speaker boxes from layers of FG/FRP and marine ply (6mm) and bent them in 2 planes (simple curved boxes).

A plain FRP box can be bent along all 3 planes (any shape you want). The boxes I have made are 3 layers of marine ply with 2 layers of FRP the total thickness coming to about 21mm (22-23 mm with veneer and polyurathene polish) but the resultant box is stiffer than 30mm marine ply and almost as well damped.

Your method of using chopped fiberglass mat is excellent to increase the strenght of the box (and I have used this too especially around the speaker mounting andbox corners (areas of high stress) but chopped fiberglass mat does nothing to damp the resonance of the box.

Fiberglass cloth is actually not as strong as the rovings Yash has used. However it is easier to spread. A combination of mat + chopped strands should give the best combination of ease and build and strength.

My initial opinion (in the early 80s) was that a box needs to stiff, damped and light. Stiff to prevent flex, damped so that it does not resonate like a tin drum, and light so it stores as little energy as possible. This followed from the research done sby B&W (801 series), Celestion (SL 600/6000 series), etc. I tried to make light boxes but they all were terrible then one day I was told (by someone who I hold is high esteem) that current research (current as in 1995) has shown that a speaker box needs to have "some" weight and to aim for ultra-light boxes is fool hardy and would not lead to a sound box.

I am quite happy with my marine ply - FRP solution and the boxes have remained stable for the past 15-16 years. If I need to add weight to move the resonace of the box outside the badnwidth I add some lead sheet (1.5mm lead sheet is easily available in Mumbai). My last speaker box (10" wide, 48" tall, 16" deep) was about 45-50 kgs per box. The ply is stressed by bending it so it becomes stiffer and also ensures that the panels are not parallel (reducing standing waves).


Yash,

Sorry for not replying to your earlier posts on the thread linked. I usually try to respond to most posts involving complex speaker boxes. I did most of my box building from the late 70s (all MDF) through the 80s (where I worked with MDF, Plys, Hardwoods and Concrete) till about 1995 (my last speaker boxes used the above mentioned FRP-Ply combination as my earlier concrete speaker boxes prived diffcult to shift).

The last concrete boxes I made were 2 10 cu. ft. boxes using 5 sides of 40mm concrete and a MDF/Marine play baffle (with a sand filling). Each box housed a 18" JBL 2245 and was based on the JBL B460 bass bin. Each of these boxes weighed in at 150kgs+ and I needed a air cushion mobility system (I used the following see link : Appliance, Furniture, Safe & ATM Movers, Moving Equipment & Systems – Air Sled) to move the box around. The sand was not so much used to damp the resonances but used to absrob the energy as was done by the Kinetic Tennis racquet made by a company called Kennex in 1980s (now called Pro-Kennex). A modern version of this racket is here:

BTW I still have the airseld and my dream is to build a huge AV rack (from solid Mahagony, Marine Ply, Brass, and Granite) integrate the air sled into the chassis of rack (but that is another mad story).
navin is offline   (2) Thanks
Old 19th May 2011, 13:43   #13
Senior - BHPian
 
mercedised's Avatar
 
Join Date: Nov 2009
Location: Indore
Posts: 1,204
Thanked: 353 Times
Re: DIY PICS : ANHC Fiberglass Subwoofer Box

Going through the posts in various threads, I have still failed to understand what is the basic Idea behind using a fiber glass material? does it reduce the BASS thump that is received while the music is set to loud?
mercedised is online now  
Old 19th May 2011, 13:47   #14
Team-BHP Support
 
navin's Avatar
 
Join Date: Mar 2004
Location: Mumbai
Posts: 25,198
Thanked: 9,300 Times
Re: DIY PICS : ANHC Fiberglass Subwoofer Box

Fiberglass is stiff. Stiffer than MDF or Ply per mm of thickness. It hence allows you to make boxes that are stiff as well as relatively light (compred to concrete for example).

Fiberglass (since it is a cloth before the resin is added) also can be bent/moulded into just about any shape your heat desires.

It does nothing to reduce the bass thump on the contrary since fiberglass is so stiff it is also resonant (not as resonant as steel or aluminum though) and hence needs to be damped.

to quote my earlier post
"A plain FRP box can be bent along all 3 planes (any shape you want). The boxes I have made are 3 layers of marine ply with 2 layers of FRP the total thickness coming to about 21mm (22-23 mm with veneer and polyurathene polish) but the resultant box is stiffer than 30mm marine ply and almost as well damped."


Hope this helps.

Last edited by navin : 19th May 2011 at 13:49.
navin is offline   (1) Thanks
Old 19th May 2011, 14:06   #15
BHPian
 
yashshroff's Avatar
 
Join Date: Mar 2011
Location: Delhi
Posts: 63
Thanked: 6 Times
Re: DIY PICS : ANHC Fiberglass Subwoofer Box

Quote:
Originally Posted by navin View Post
A speaker box needs be be stiff and damped (aka non-resonant). Fiberglass (FRP / FG) gives stiffness but is resonant. Wood is well damped but is not as stiff (per mm thickness) as FG/FRP. I have successfully made speaker boxes from layers of FG/FRP and marine ply (6mm) and bent them in 2 planes (simple curved boxes).

A plain FRP box can be bent along all 3 planes (any shape you want). The boxes I have made are 3 layers of marine ply with 2 layers of FRP the total thickness coming to about 21mm (22-23 mm with veneer and polyurathene polish) but the resultant box is stiffer than 30mm marine ply and almost as well damped.

Your method of using chopped fiberglass mat is excellent to increase the strenght of the box (and I have used this too especially around the speaker mounting andbox corners (areas of high stress) but chopped fiberglass mat does nothing to damp the resonance of the box.

Fiberglass cloth is actually not as strong as the rovings Yash has used. However it is easier to spread. A combination of mat + chopped strands should give the best combination of ease and build and strength.

My initial opinion (in the early 80s) was that a box needs to stiff, damped and light. Stiff to prevent flex, damped so that it does not resonate like a tin drum, and light so it stores as little energy as possible. This followed from the research done sby B&W (801 series), Celestion (SL 600/6000 series), etc. I tried to make light boxes but they all were terrible then one day I was told (by someone who I hold is high esteem) that current research (current as in 1995) has shown that a speaker box needs to have "some" weight and to aim for ultra-light boxes is fool hardy and would not lead to a sound box.

I am quite happy with my marine ply - FRP solution and the boxes have remained stable for the past 15-16 years. If I need to add weight to move the resonace of the box outside the badnwidth I add some lead sheet (1.5mm lead sheet is easily available in Mumbai). My last speaker box (10" wide, 48" tall, 16" deep) was about 45-50 kgs per box. The ply is stressed by bending it so it becomes stiffer and also ensures that the panels are not parallel (reducing standing waves).


Yash,

Sorry for not replying to your earlier posts on the thread linked. I usually try to respond to most posts involving complex speaker boxes. I did most of my box building from the late 70s (all MDF) through the 80s (where I worked with MDF, Plys, Hardwoods and Concrete) till about 1995 (my last speaker boxes used the above mentioned FRP-Ply combination as my earlier concrete speaker boxes prived diffcult to shift).

The last concrete boxes I made were 2 10 cu. ft. boxes using 5 sides of 40mm concrete and a MDF/Marine play baffle (with a sand filling). Each box housed a 18" JBL 2245 and was based on the JBL B460 bass bin. Each of these boxes weighed in at 150kgs+ and I needed a air cushion mobility system (I used the following see link : Appliance, Furniture, Safe & ATM Movers, Moving Equipment & Systems – Air Sled) to move the box around. The sand was not so much used to damp the resonances but used to absrob the energy as was done by the Kinetic Tennis racquet made by a company called Kennex in 1980s (now called Pro-Kennex). A modern version of this racket is here: YouTube - ‪Kinetic SQ By Kennex‬‏

BTW I still have the airseld and my dream is to build a huge AV rack (from solid Mahagony, Marine Ply, Brass, and Granite) integrate the air sled into the chassis of rack (but that is another mad story).
wow..thats a lot of info. and for a newbie like me it goes over my head.
I think for this box i have done close to 8 layers now and wont be using ply on it, will see for the second box in future.
Also is 8 layers enough for the strength ? or should i add more layers ?

Also would adding a layer of dynamat inside the box (the back area of the driver) help in reducing resonance ?
yashshroff is offline  
Reply

Most Viewed


Copyright ©2000 - 2024, Team-BHP.com
Proudly powered by E2E Networks