Team-BHP
(
https://www.team-bhp.com/forum/)
OEM to Aftermarket Stereo: RETAINING ALL FACTORY FEATURES - DO-IT-YOURSELF (DIY)
Introduction
My Verna has just completed 4 years (with around 1.52L kms on the ODO), she’s old but she is still in an excellent condition and munches miles effortlessly. With no imminent plans of a replacement around the corner, techwise, it was starting to feel old.
Since I plan to keep her for another couple of years, I realised newer cars bring newer tech, it just isn’t possible to keep buying cars every year for the new tech they offer. I have been giving my baby little upgrades every year.
This year's upgrade I thought to myself, let's keep it up with the times, hence the decision to get an audio headunit upgrade. My main requirements (going with the recent trend of car audio) :-
- 7 inch screen (there is no place for a bigger screen)
- Responsive touchscreen and good display visible in sunlight.
- USB Music
- Apple Carplay (nobody at home uses Android phones, so I’m ok if that’s missing)
- Reverse Feed (my car comes with a factory backup camera, so I need the HU to display the video)
- Steering controls integration
- Superb sound quality for calls and music over bluetooth.
- Retain factory USB Port (never used AUX, so I’m ok if that’s missing)
- Clean and neat interface.
RESEARCH & PARTS PROCURING
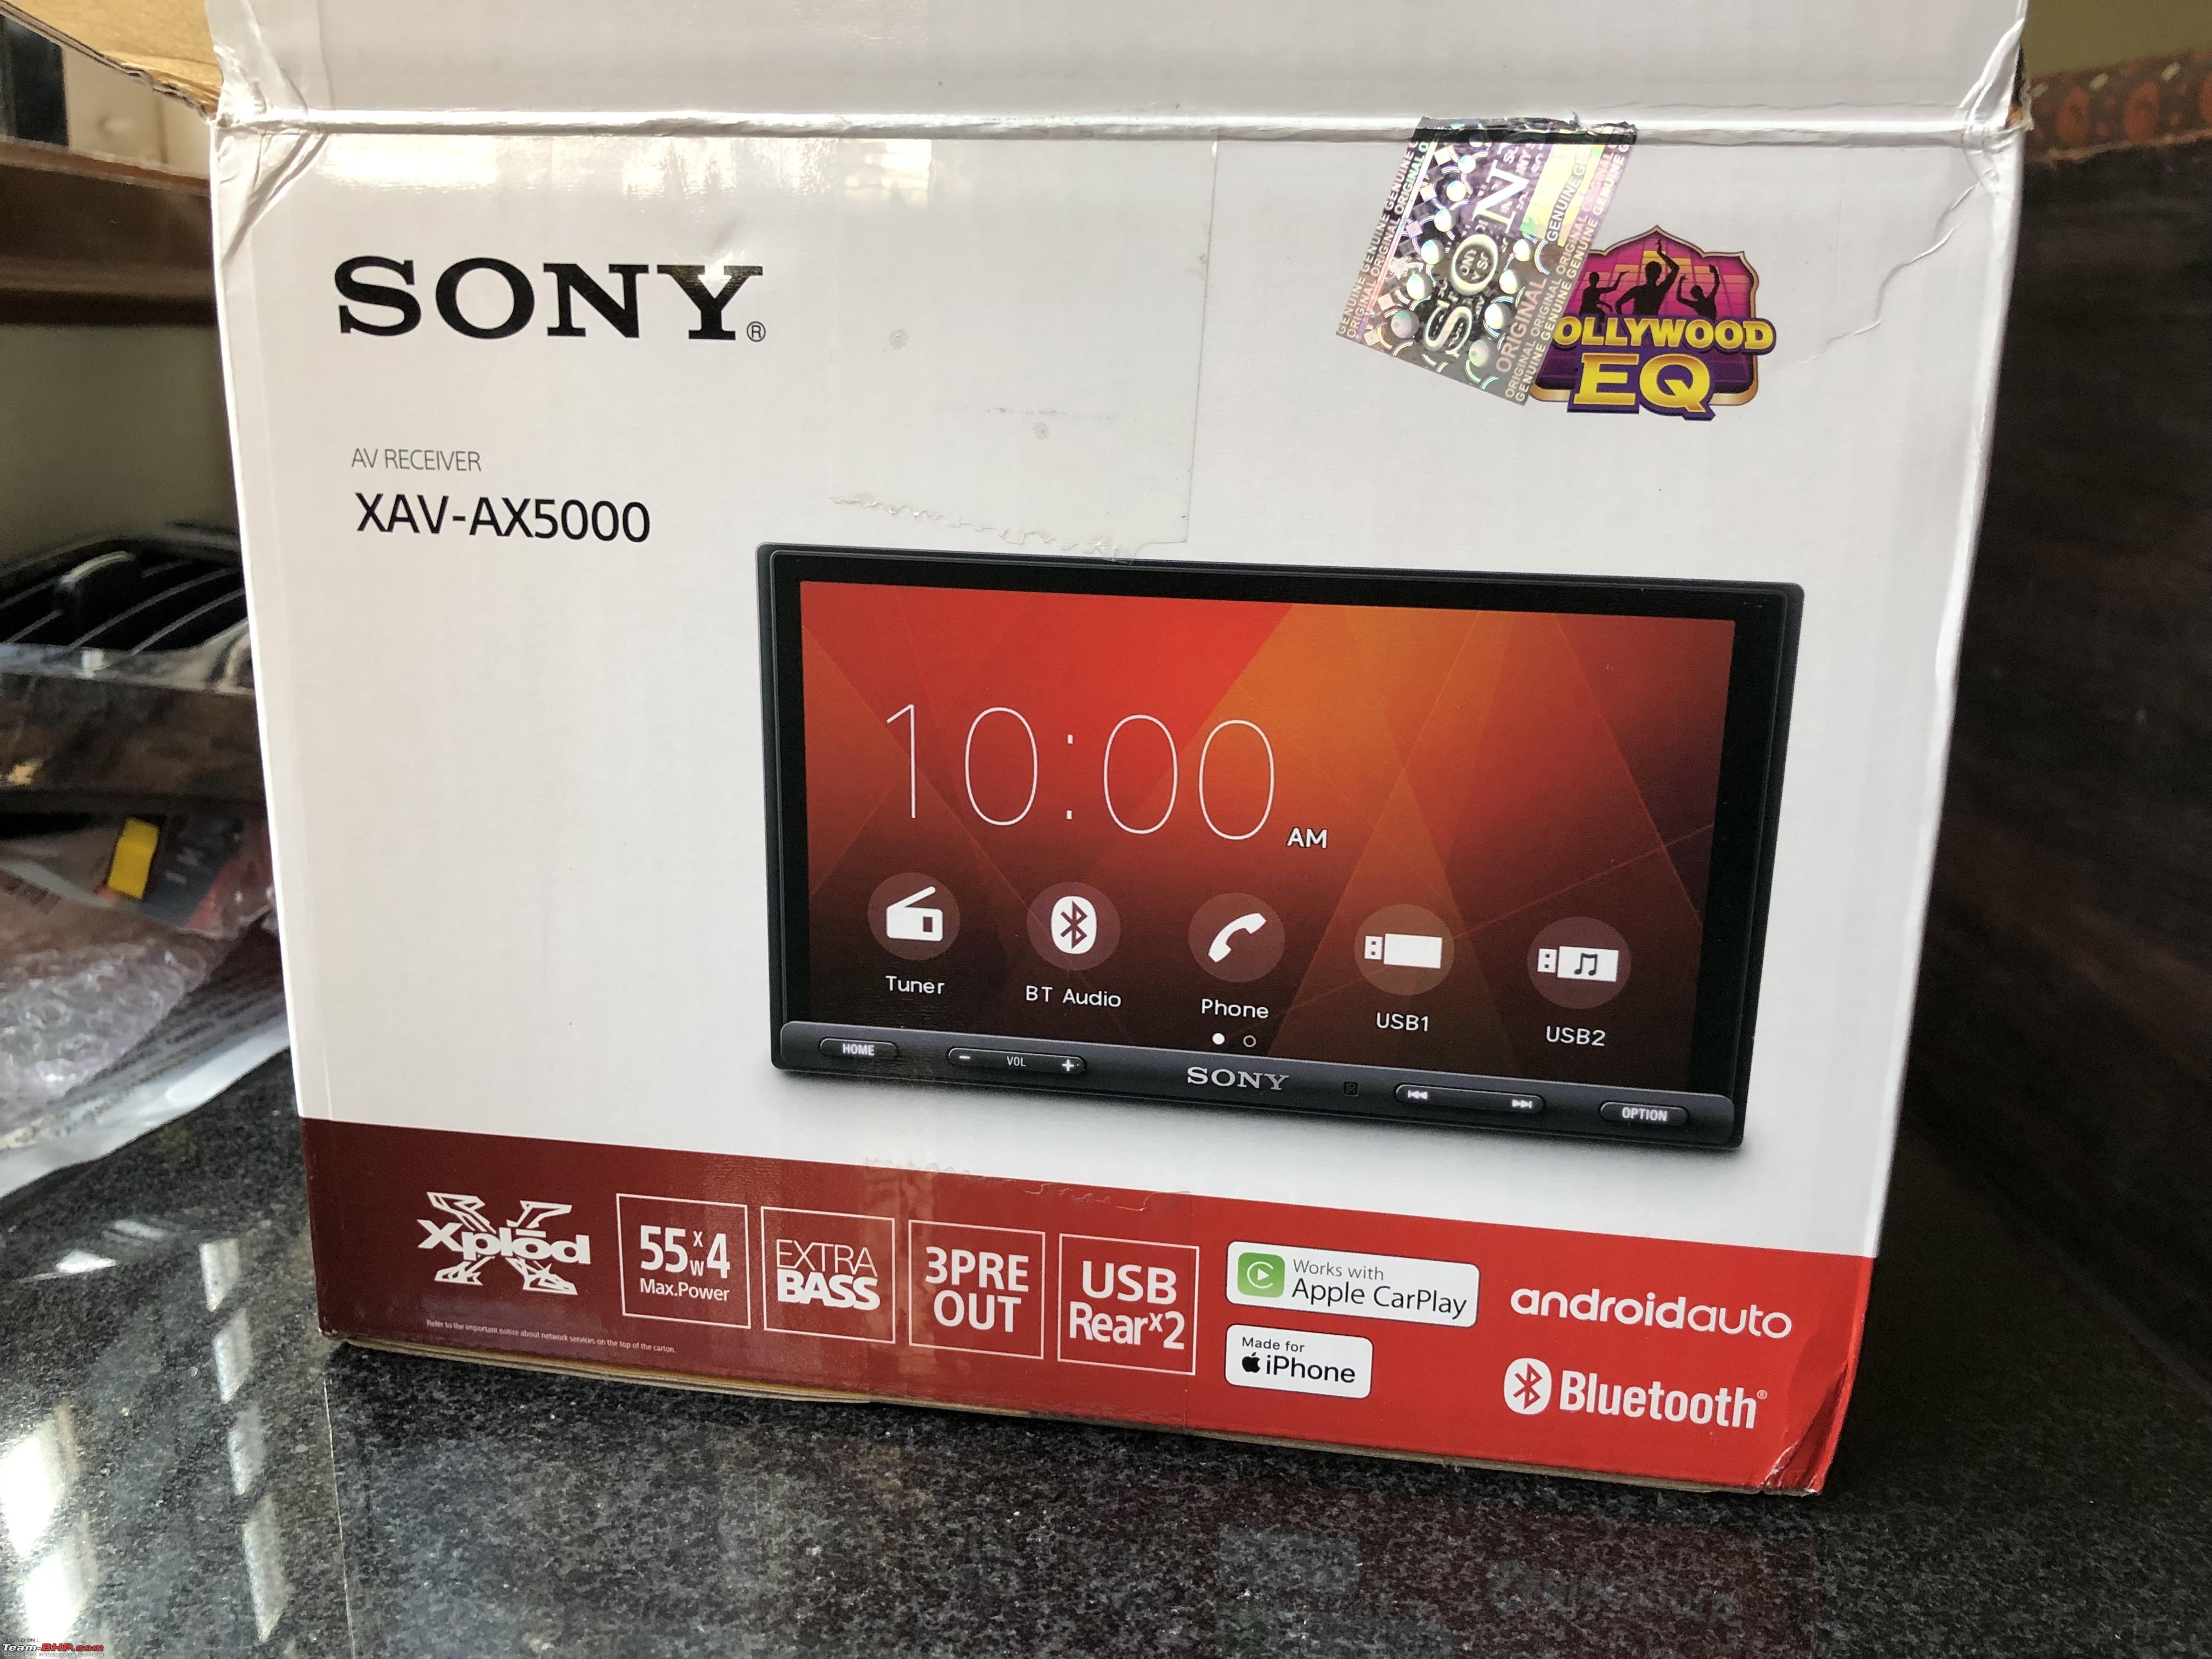
After a lot of research, I figured out that the Sony XAV-AX5000 fits my requirements the most. But putting in an aftermarket HU into cars these days isn't as simple as it used to be. You need dash fascia kits specific to your car, wire harnesses (so you don’t splice factory wires), special adapters to make steering wheel controls and your OEM Bluetooth mic to work and reverse camera integration.
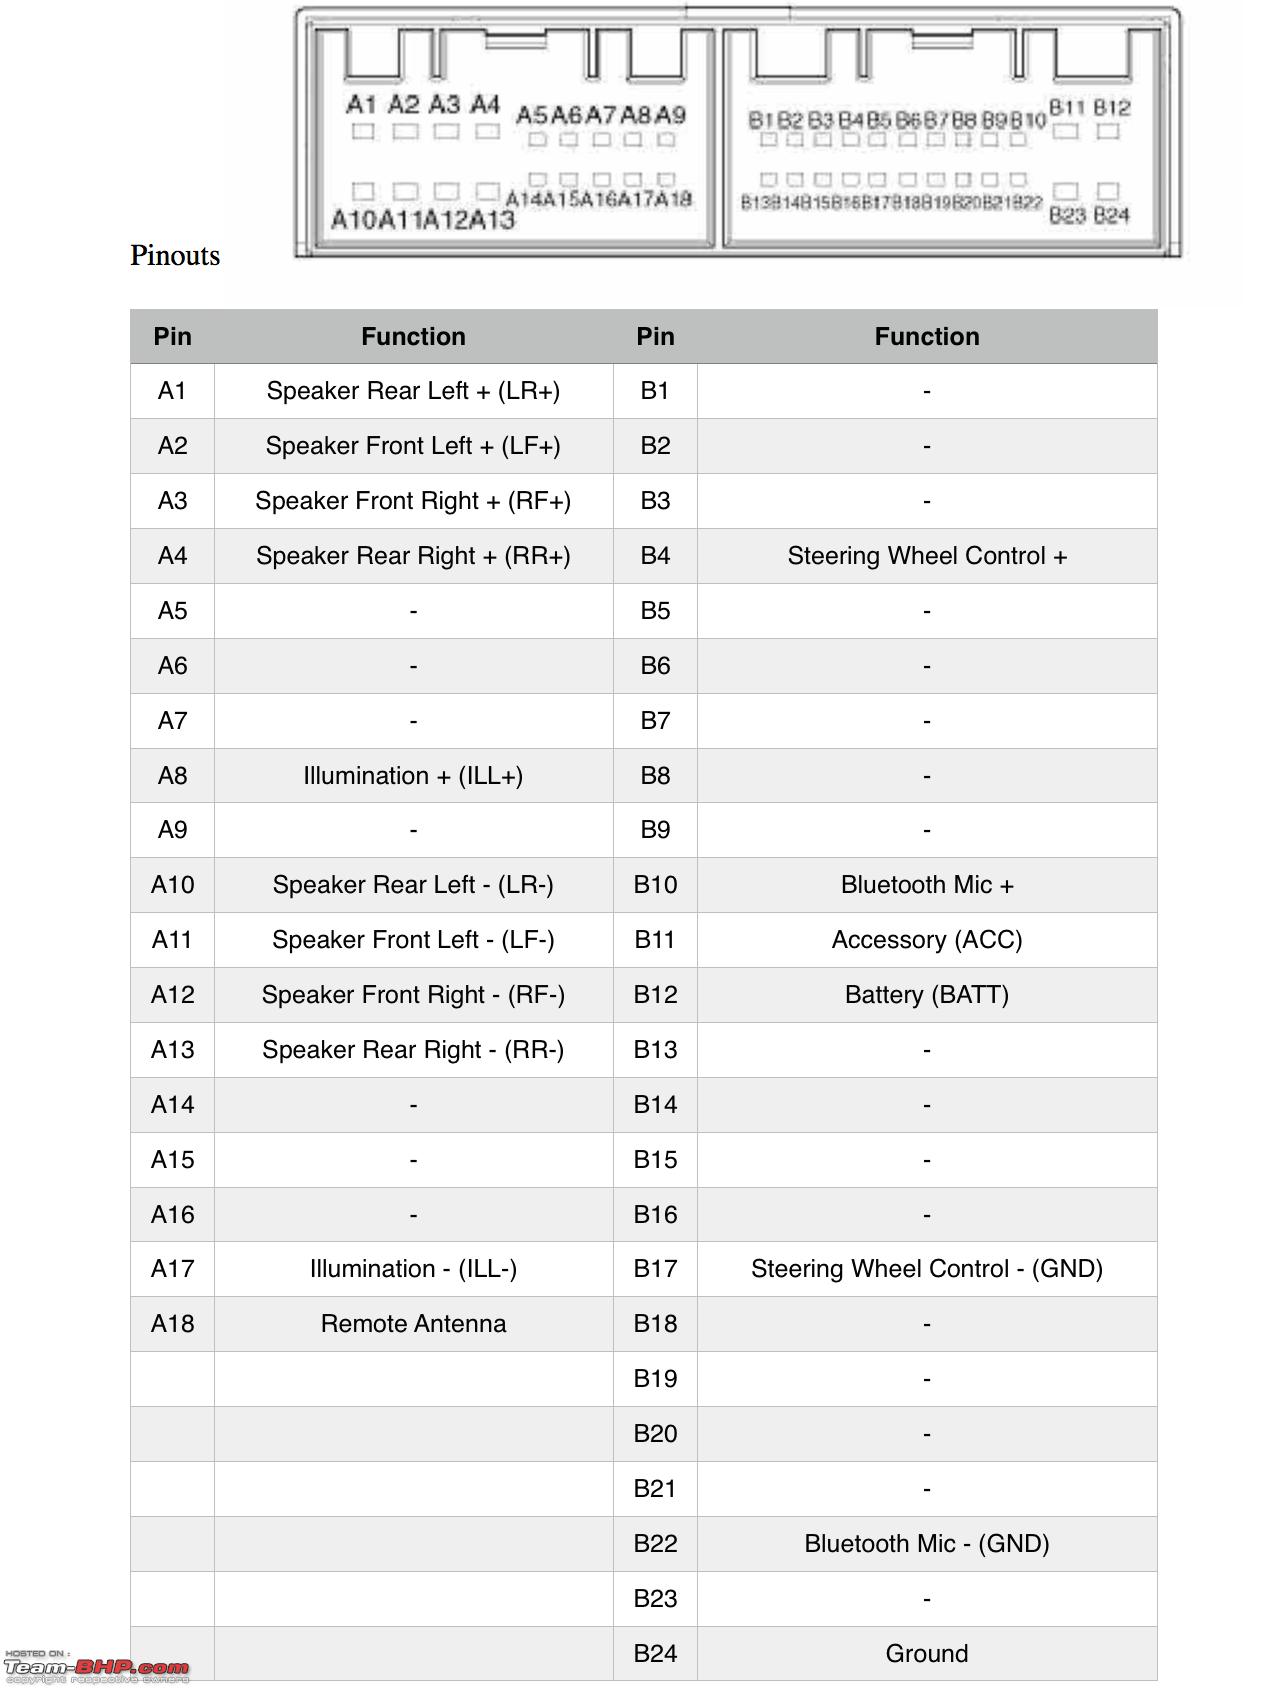
Now the fact is most of the cars use their own proprietory connectors for the various aspects of car audio. Finding the wiring diagrams and the appropriate wire harness adapters required a lot of research. But being a global car, availability of these were fantastic. I bought everything off AliExpress and the wiring diagrams from HyundaiForums.com.
PARTS NEEDED
-
Audio HeadUnit (Sony XAV-AX5000) 
-
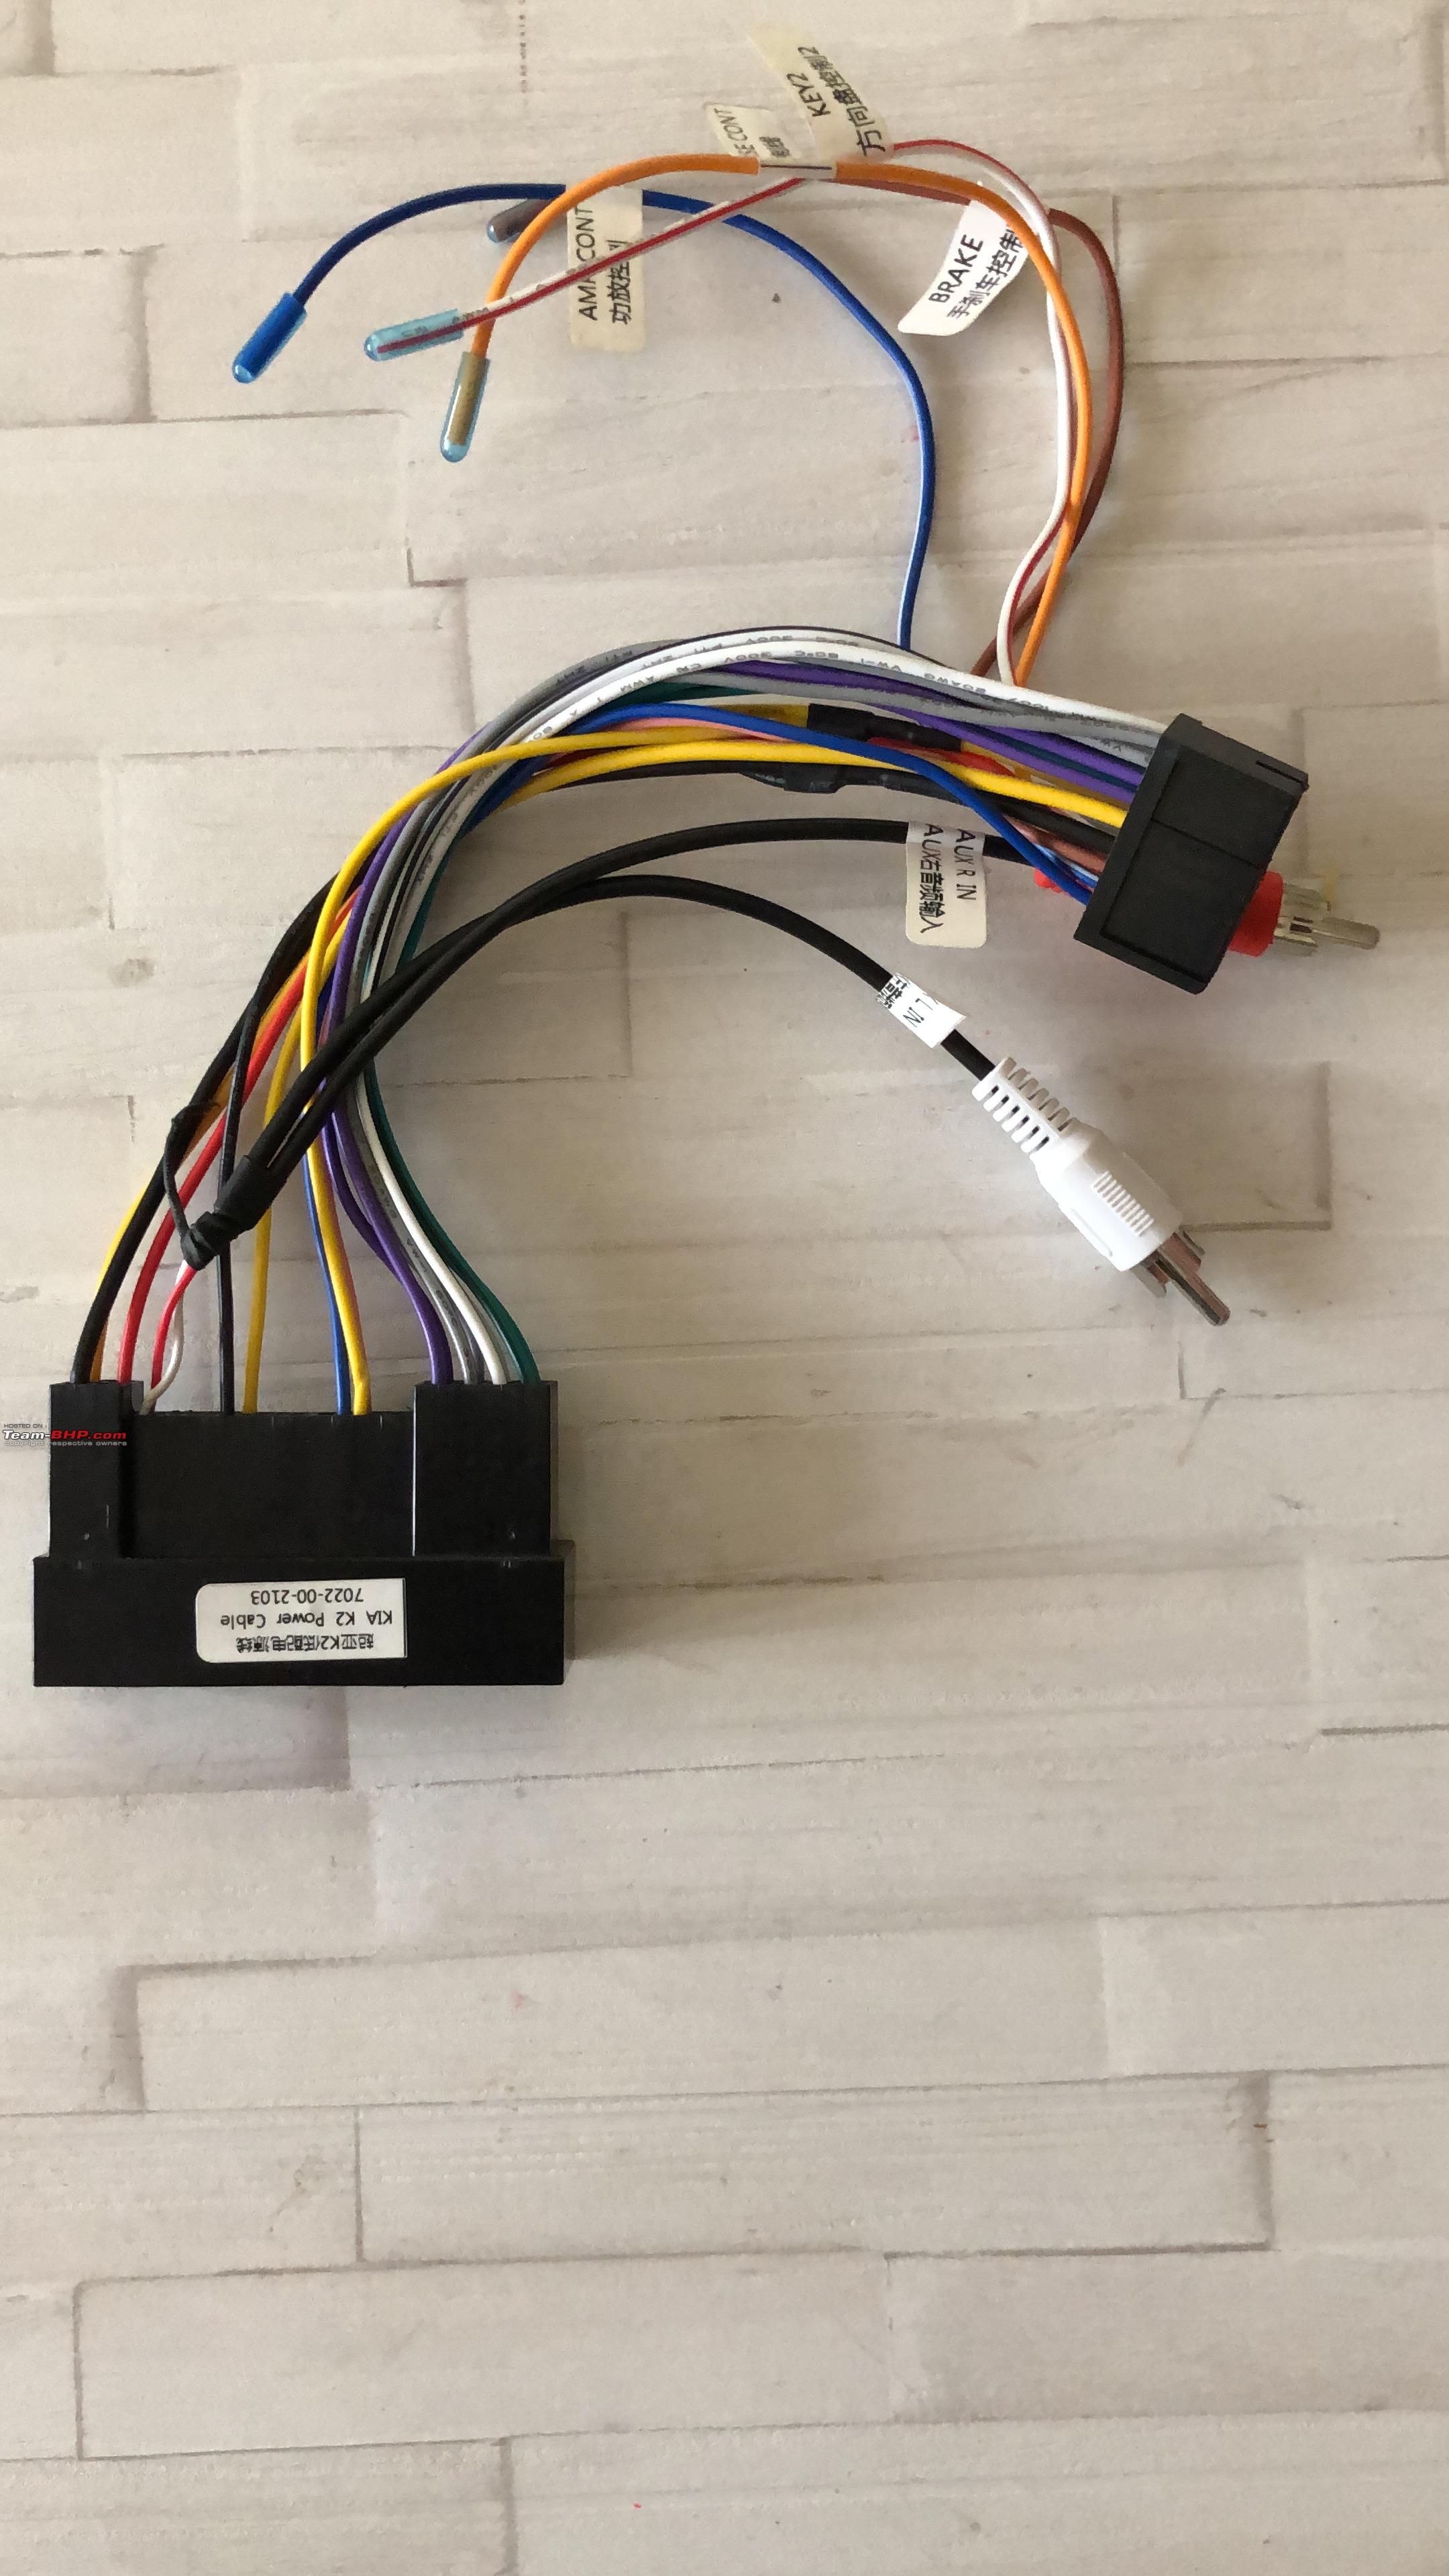
Hyundai Audio Wire Harness (18p + 24p). This will work for most modern Hyundai/Kia cars (2011 & up)

-
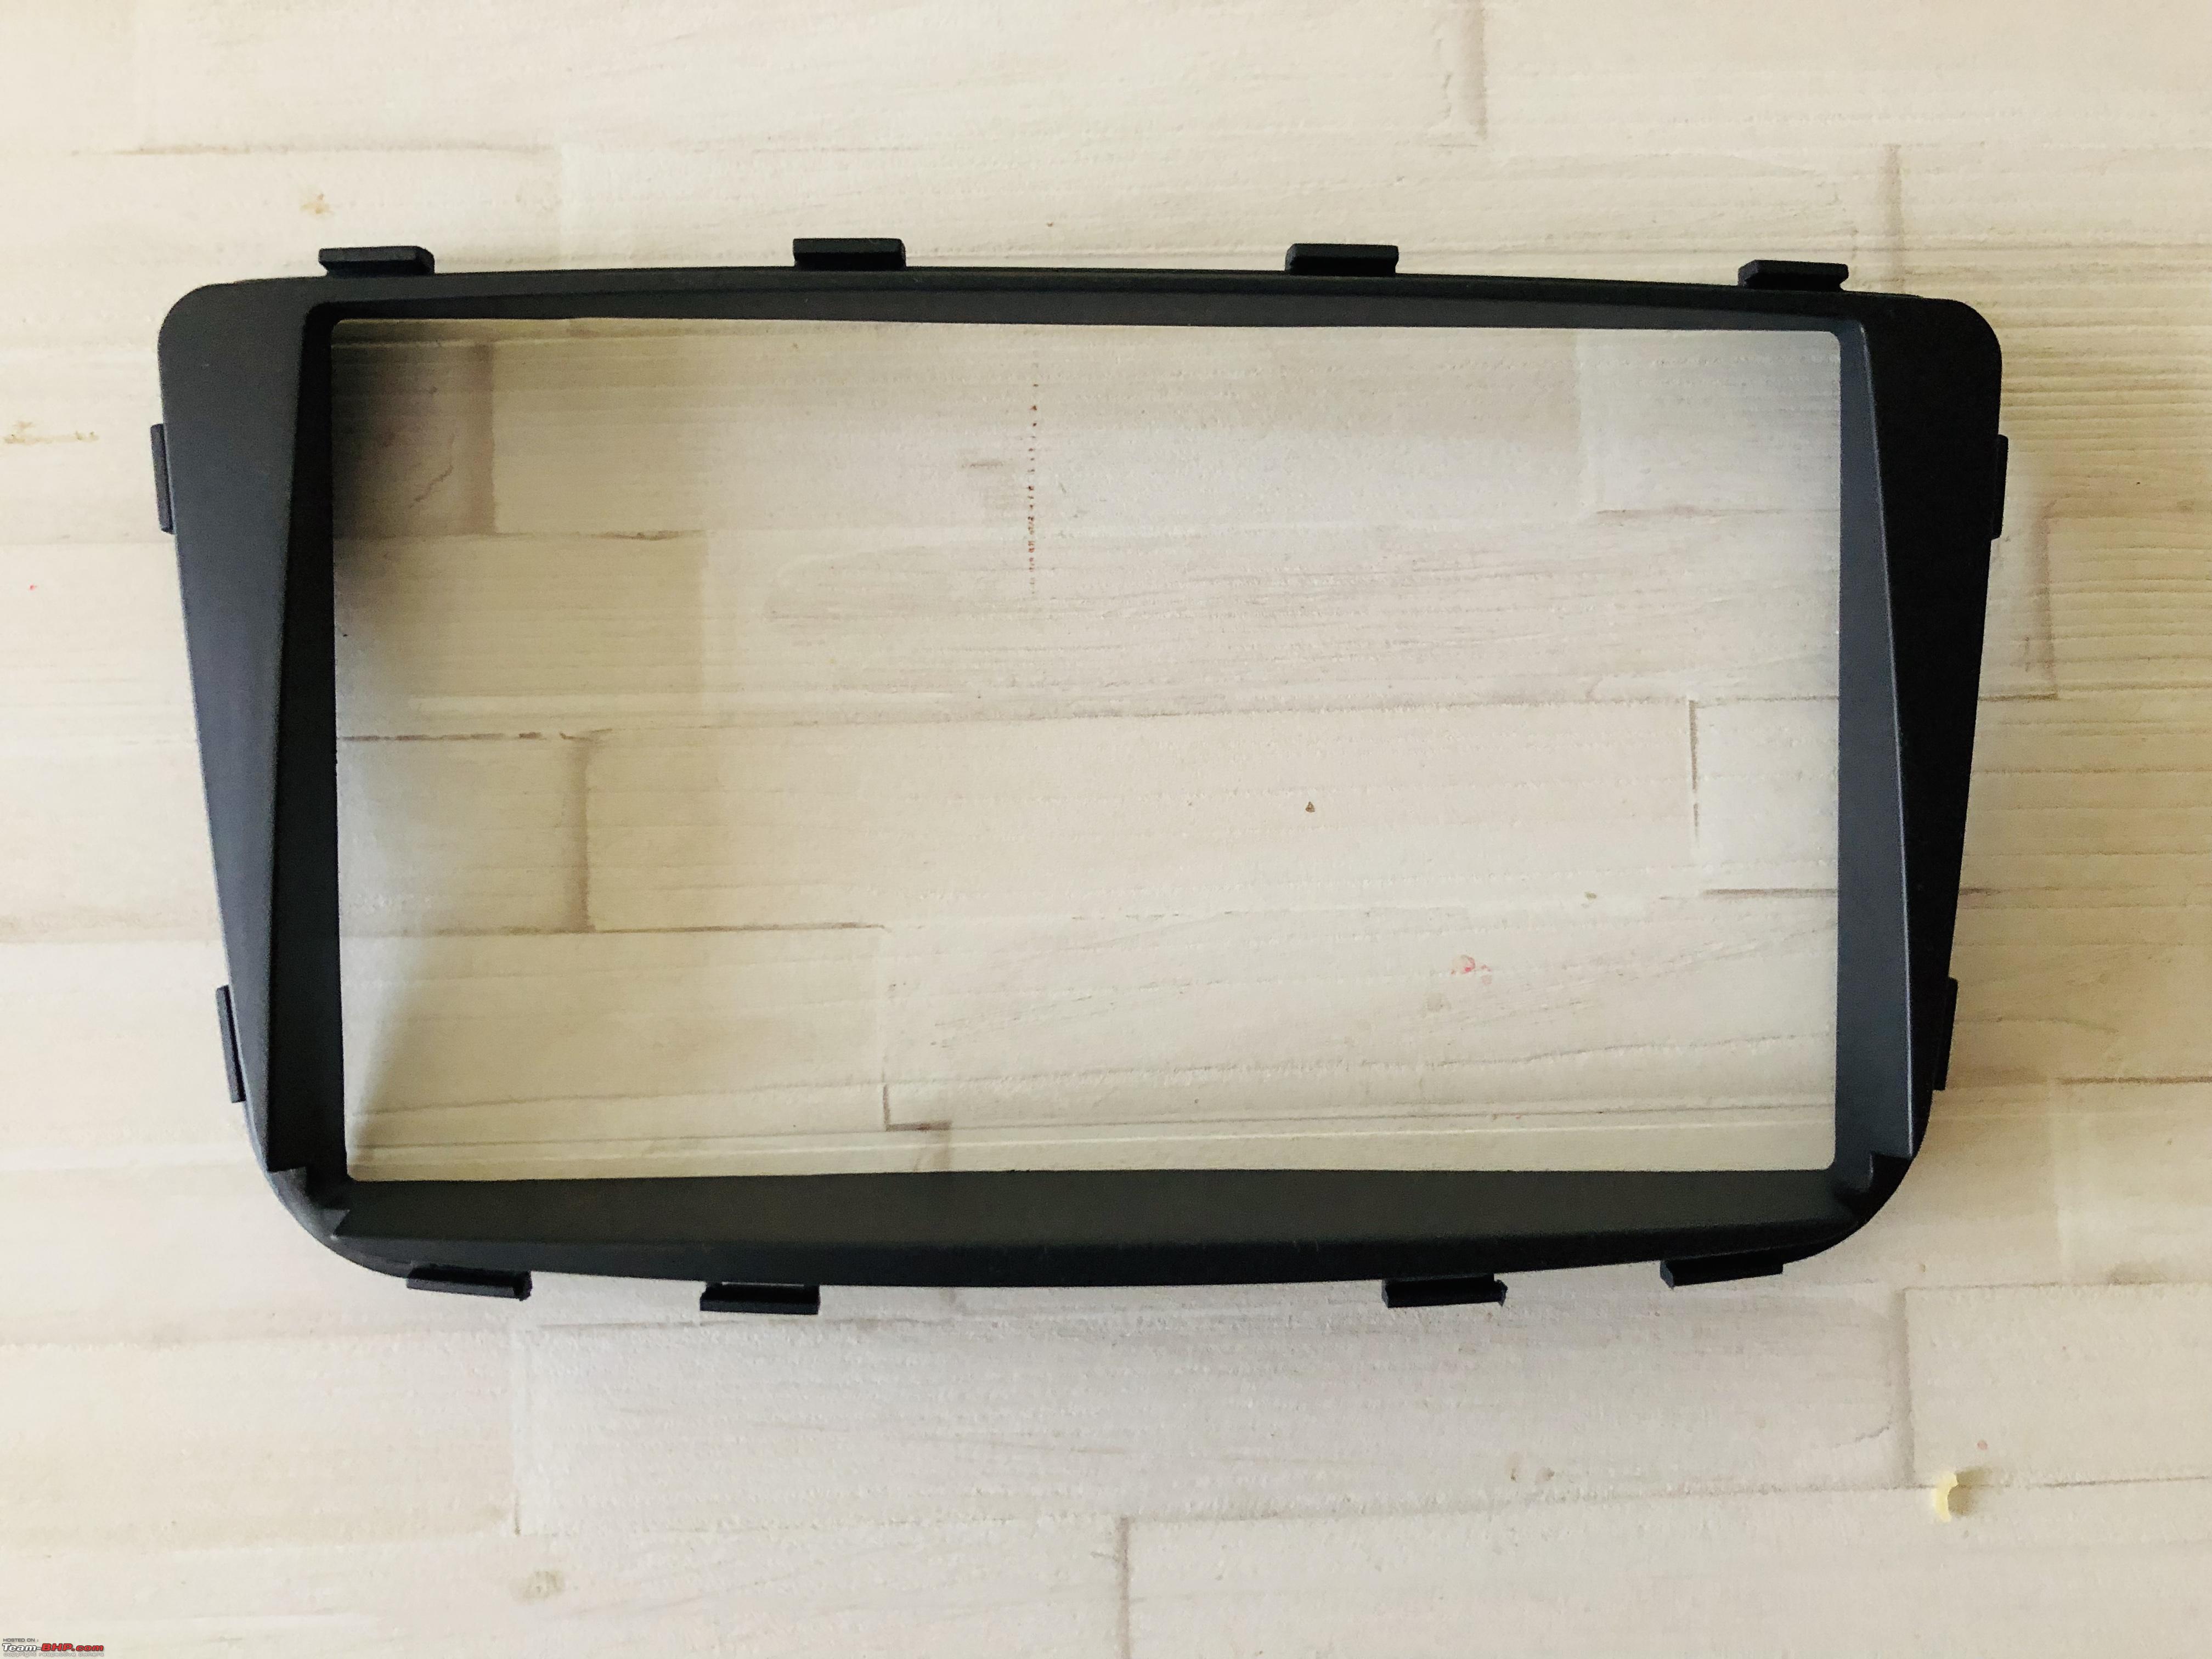
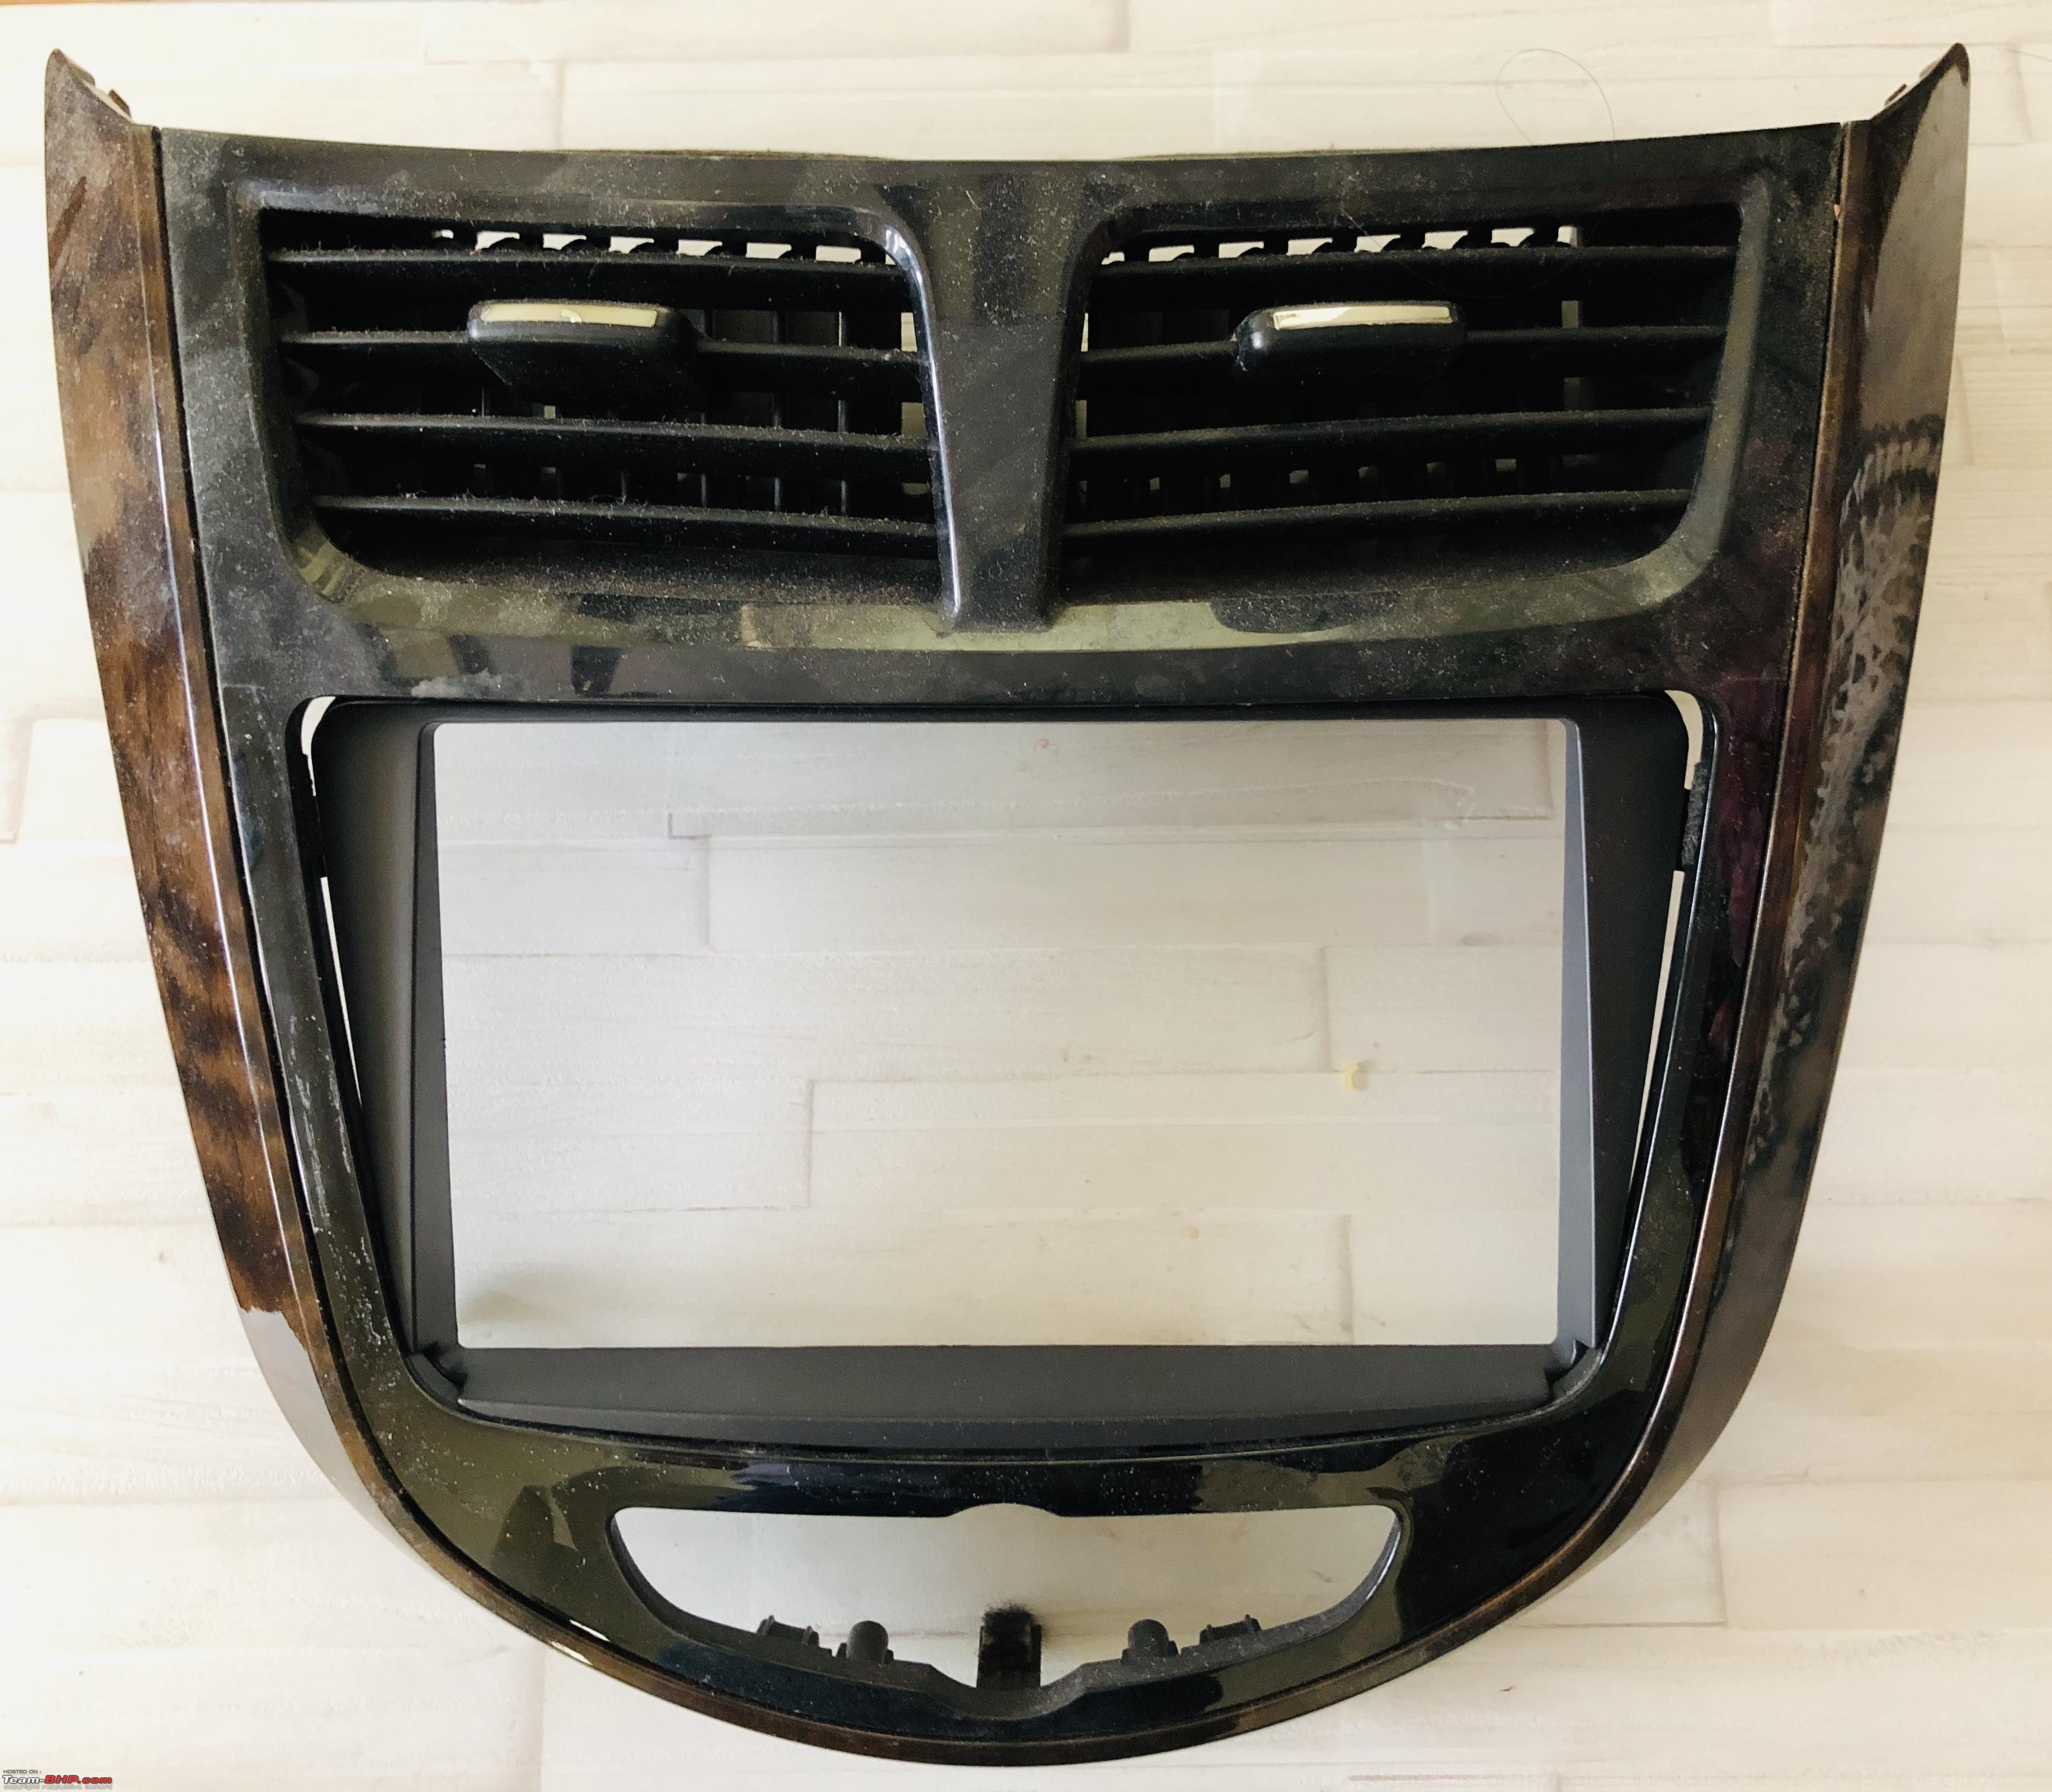
Dash Kit/Fascia Plate You get full dash kits online even in India, but they are all imported and since India is the only country where the Verna’s dash has that wood finish, I wasn’t ready to lose that. So I searched some more on Aliexpress and bumped into the following item. Fits like a glove while retaining the wood finish look of the OEM.


-
Video Cable (RCA) to connect the backup camera to the Sony HU. The default Hyundai Camera harness that you can see on aliexpress will not work. The Verna has the Camera integrated into the Electrochromic IRVM and a completely different wiring setup. (more on that later).

-
Hyundai AUX/USB Retention harness. This did not work. Had to find an other way. (Mentioned below). The connection kept dropping and Android Auto/Apple CarPlay does not work with this harness.
-
ABRO Gloss Black Spray Paint. Now this fascia plate came in a matt-black finish whereas the Verna’s OEM Fascia had a gloss black finish. So I got a can of ABRO Gloss Black Paint and spray-painted it to match the OEM Finish.

-
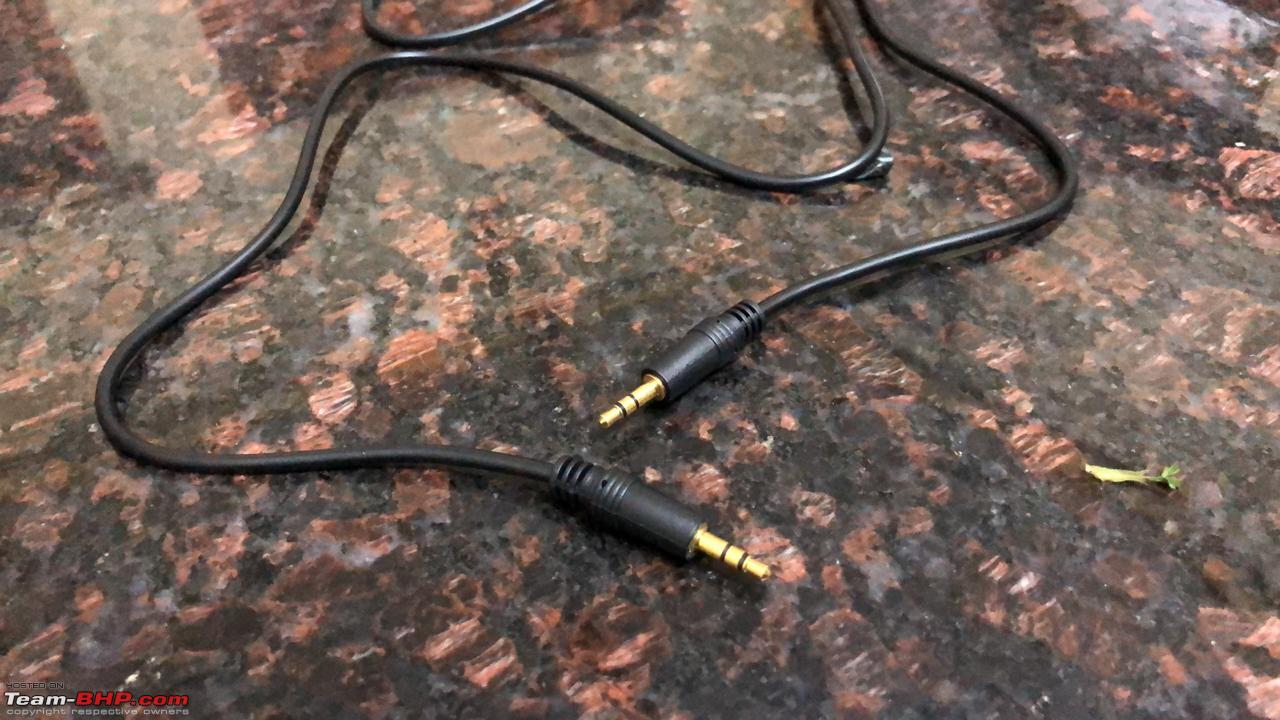
Old AUX/Microphone Cables. (to Retain the Bluetooth mic)
 WIRING
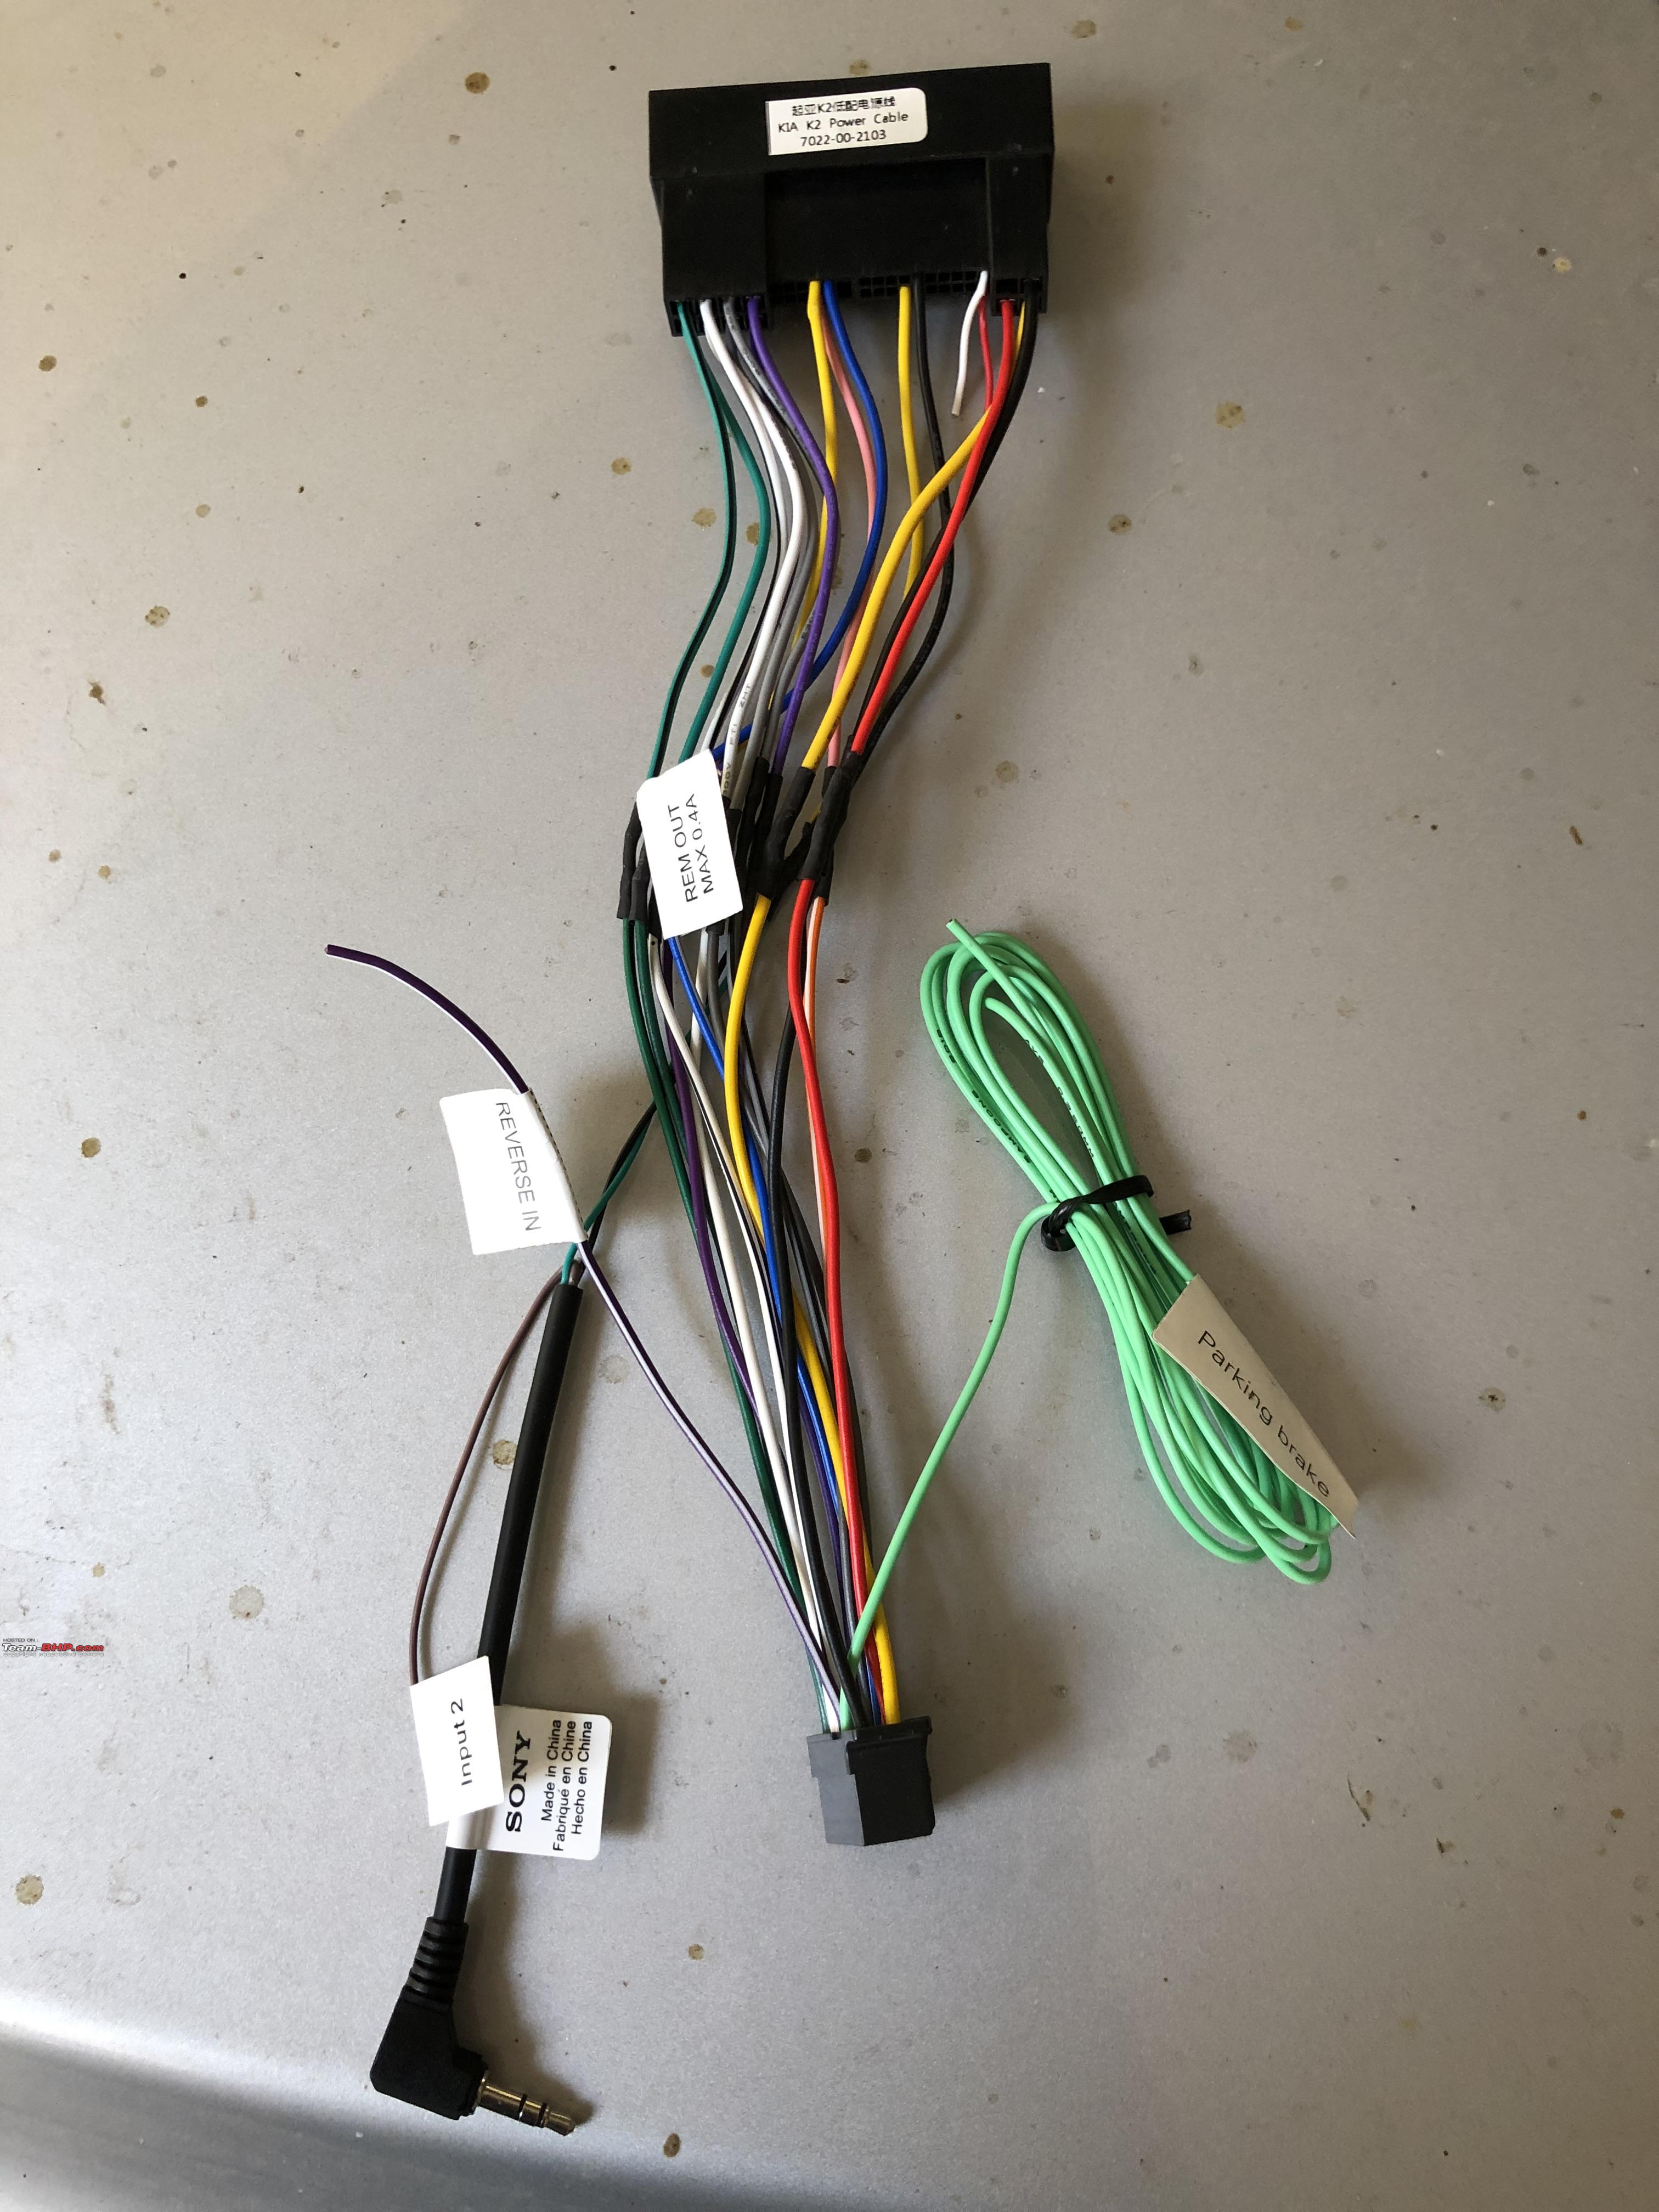
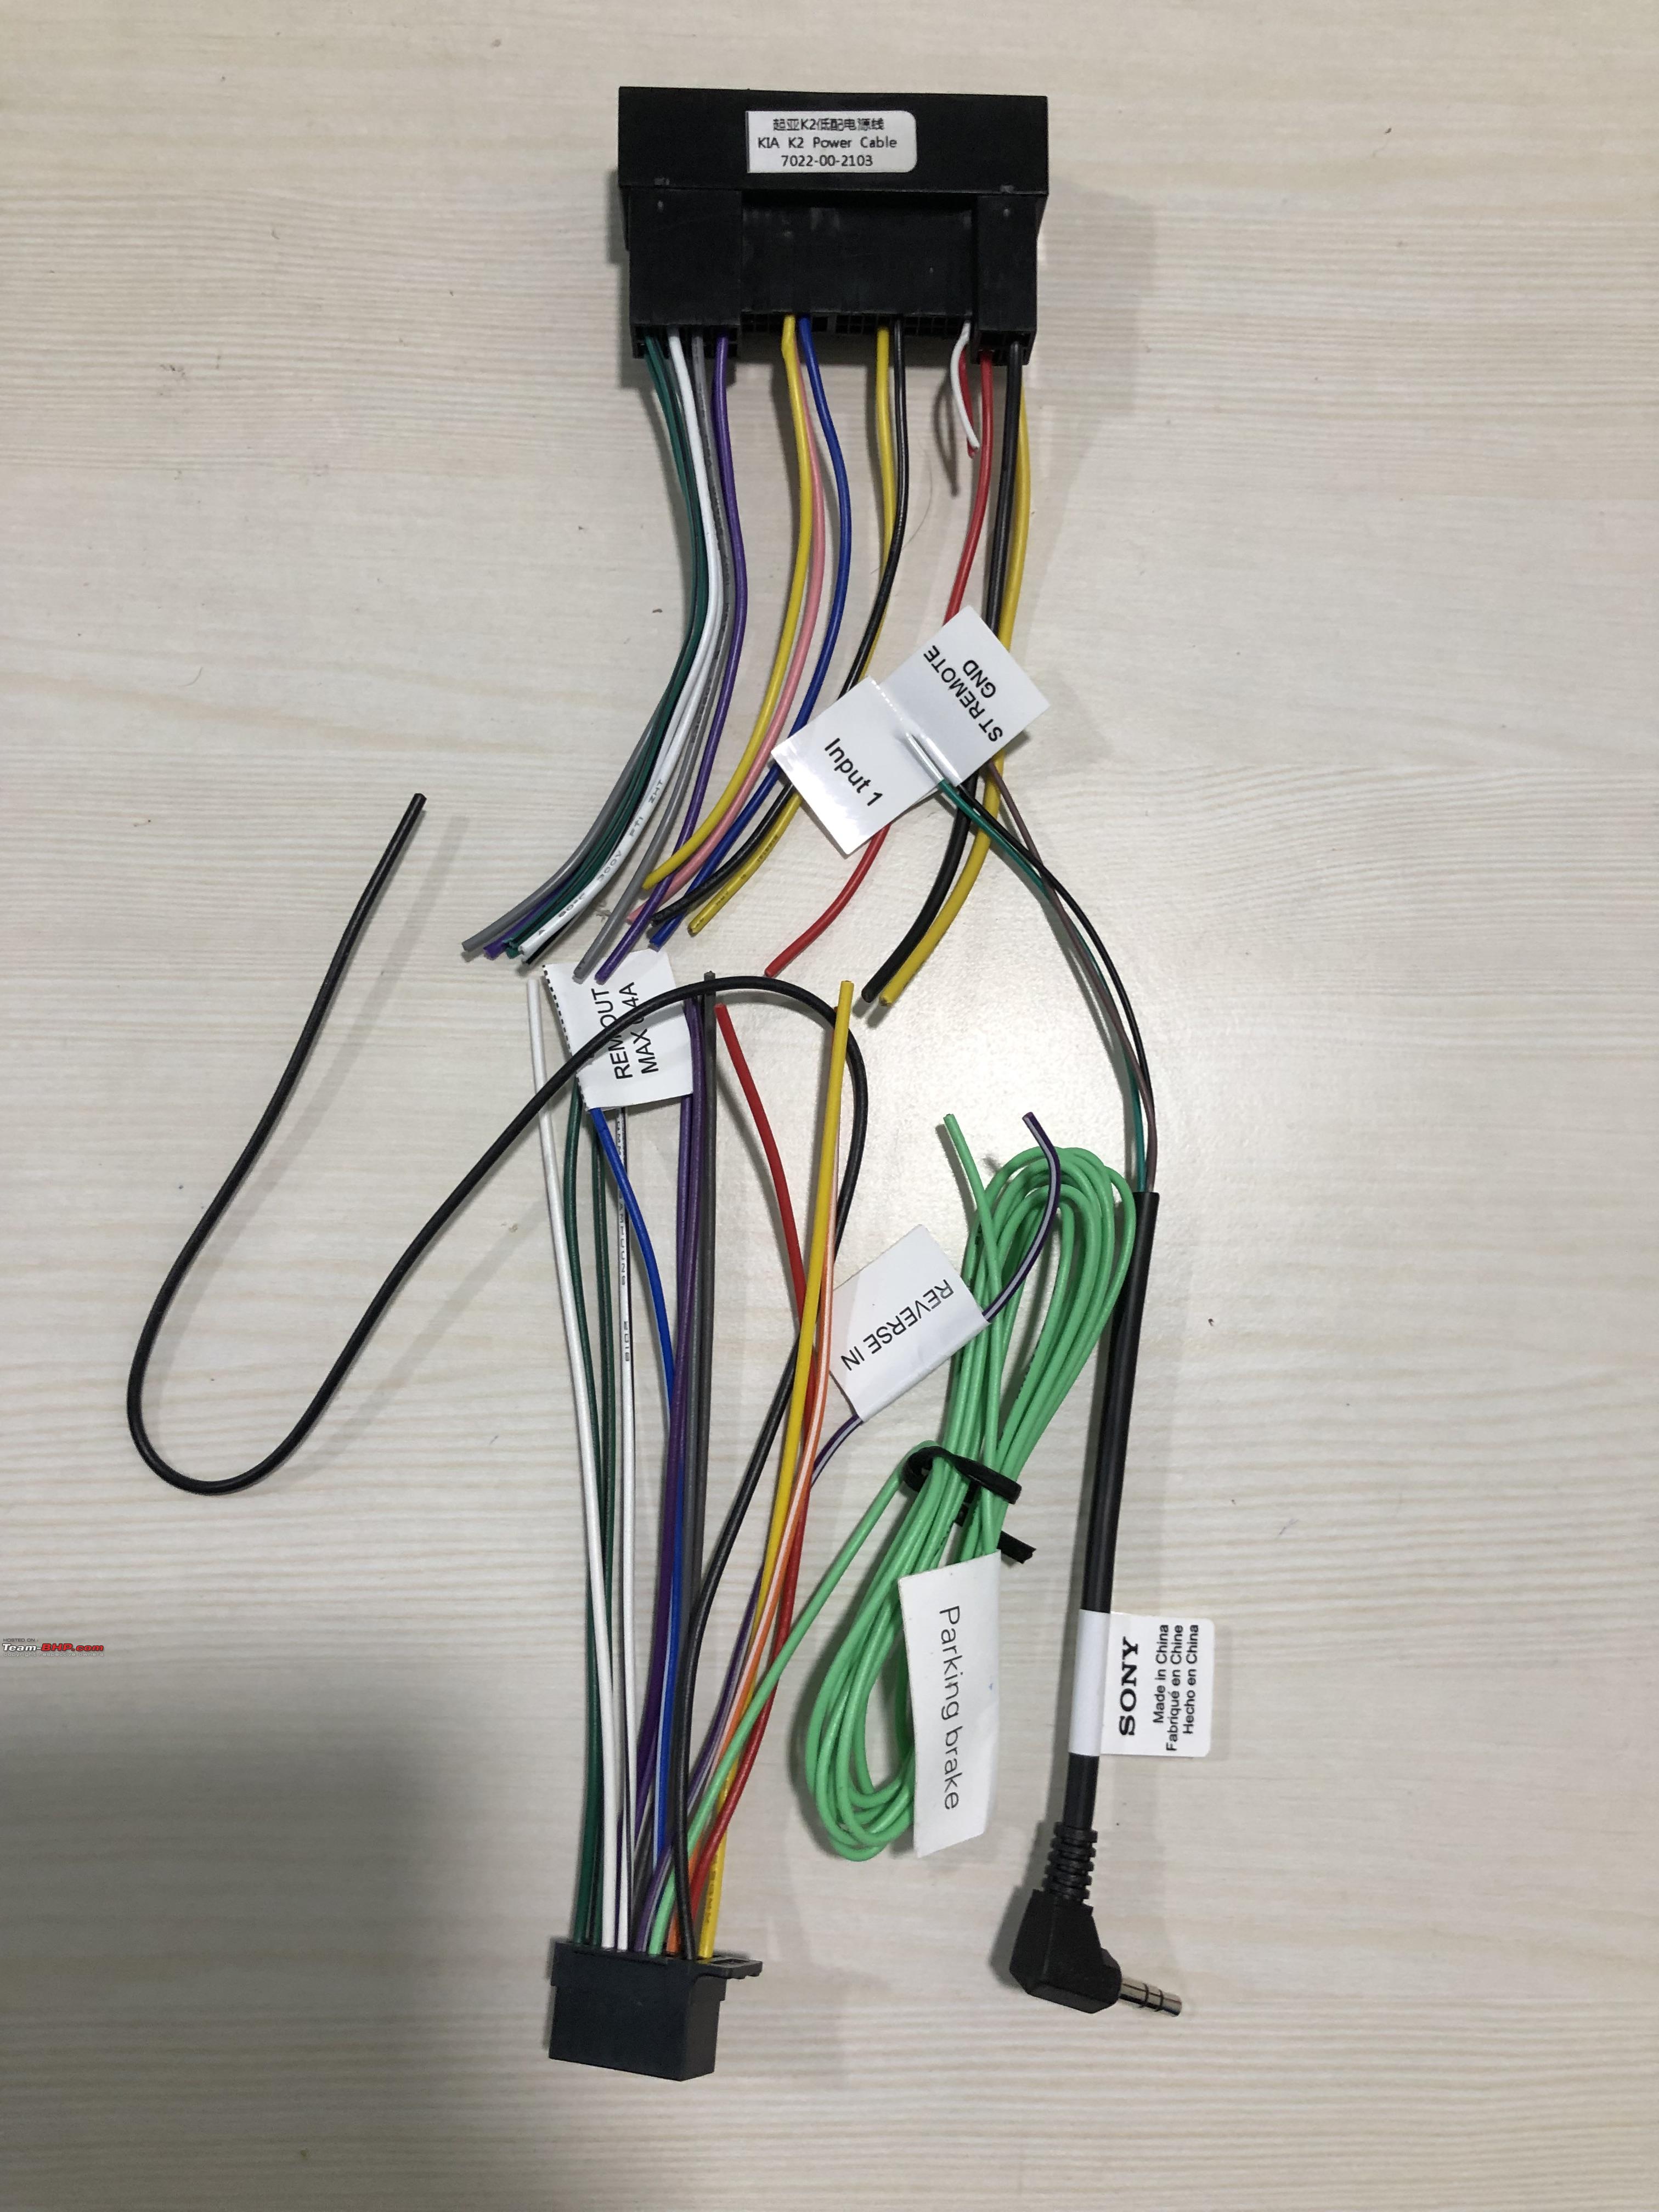
First and foremost, after studying the hyundai wiring diagrams, this all that we need. Eliminate all the wires thats not needed. The rest of it is simply matching the colours. The wiring harness (sourced from AliExpress) has a couple of RCA outputs and unnecessary wires. Following the wiring diagrams, we need to eliminate the unnecessary wires. Since this headunit does not have an AUX-IN, the RCA inputs are not necessary. Also, since this car does not have a built-in amplifier, we don't need the "Remote-In" wires as well. All that we need is the following:
 MAKING THE CUSTOM WIRE HARNESS
Now unlike most car accessories shop guys in India, I was not willing to splice factory wires for anything. So I thought I’d make a custom wire harness that fits into the factory harness on one-end and the Aftermarket headunit on the other end. This way, its completely reversible, I can go back to the stock unit incase I need to for whatever reason. Since the aliexpress harness had colour coded wires, all we need to do is solder them onto the sony's proprietory wiring harness which is as easy as colour matching.
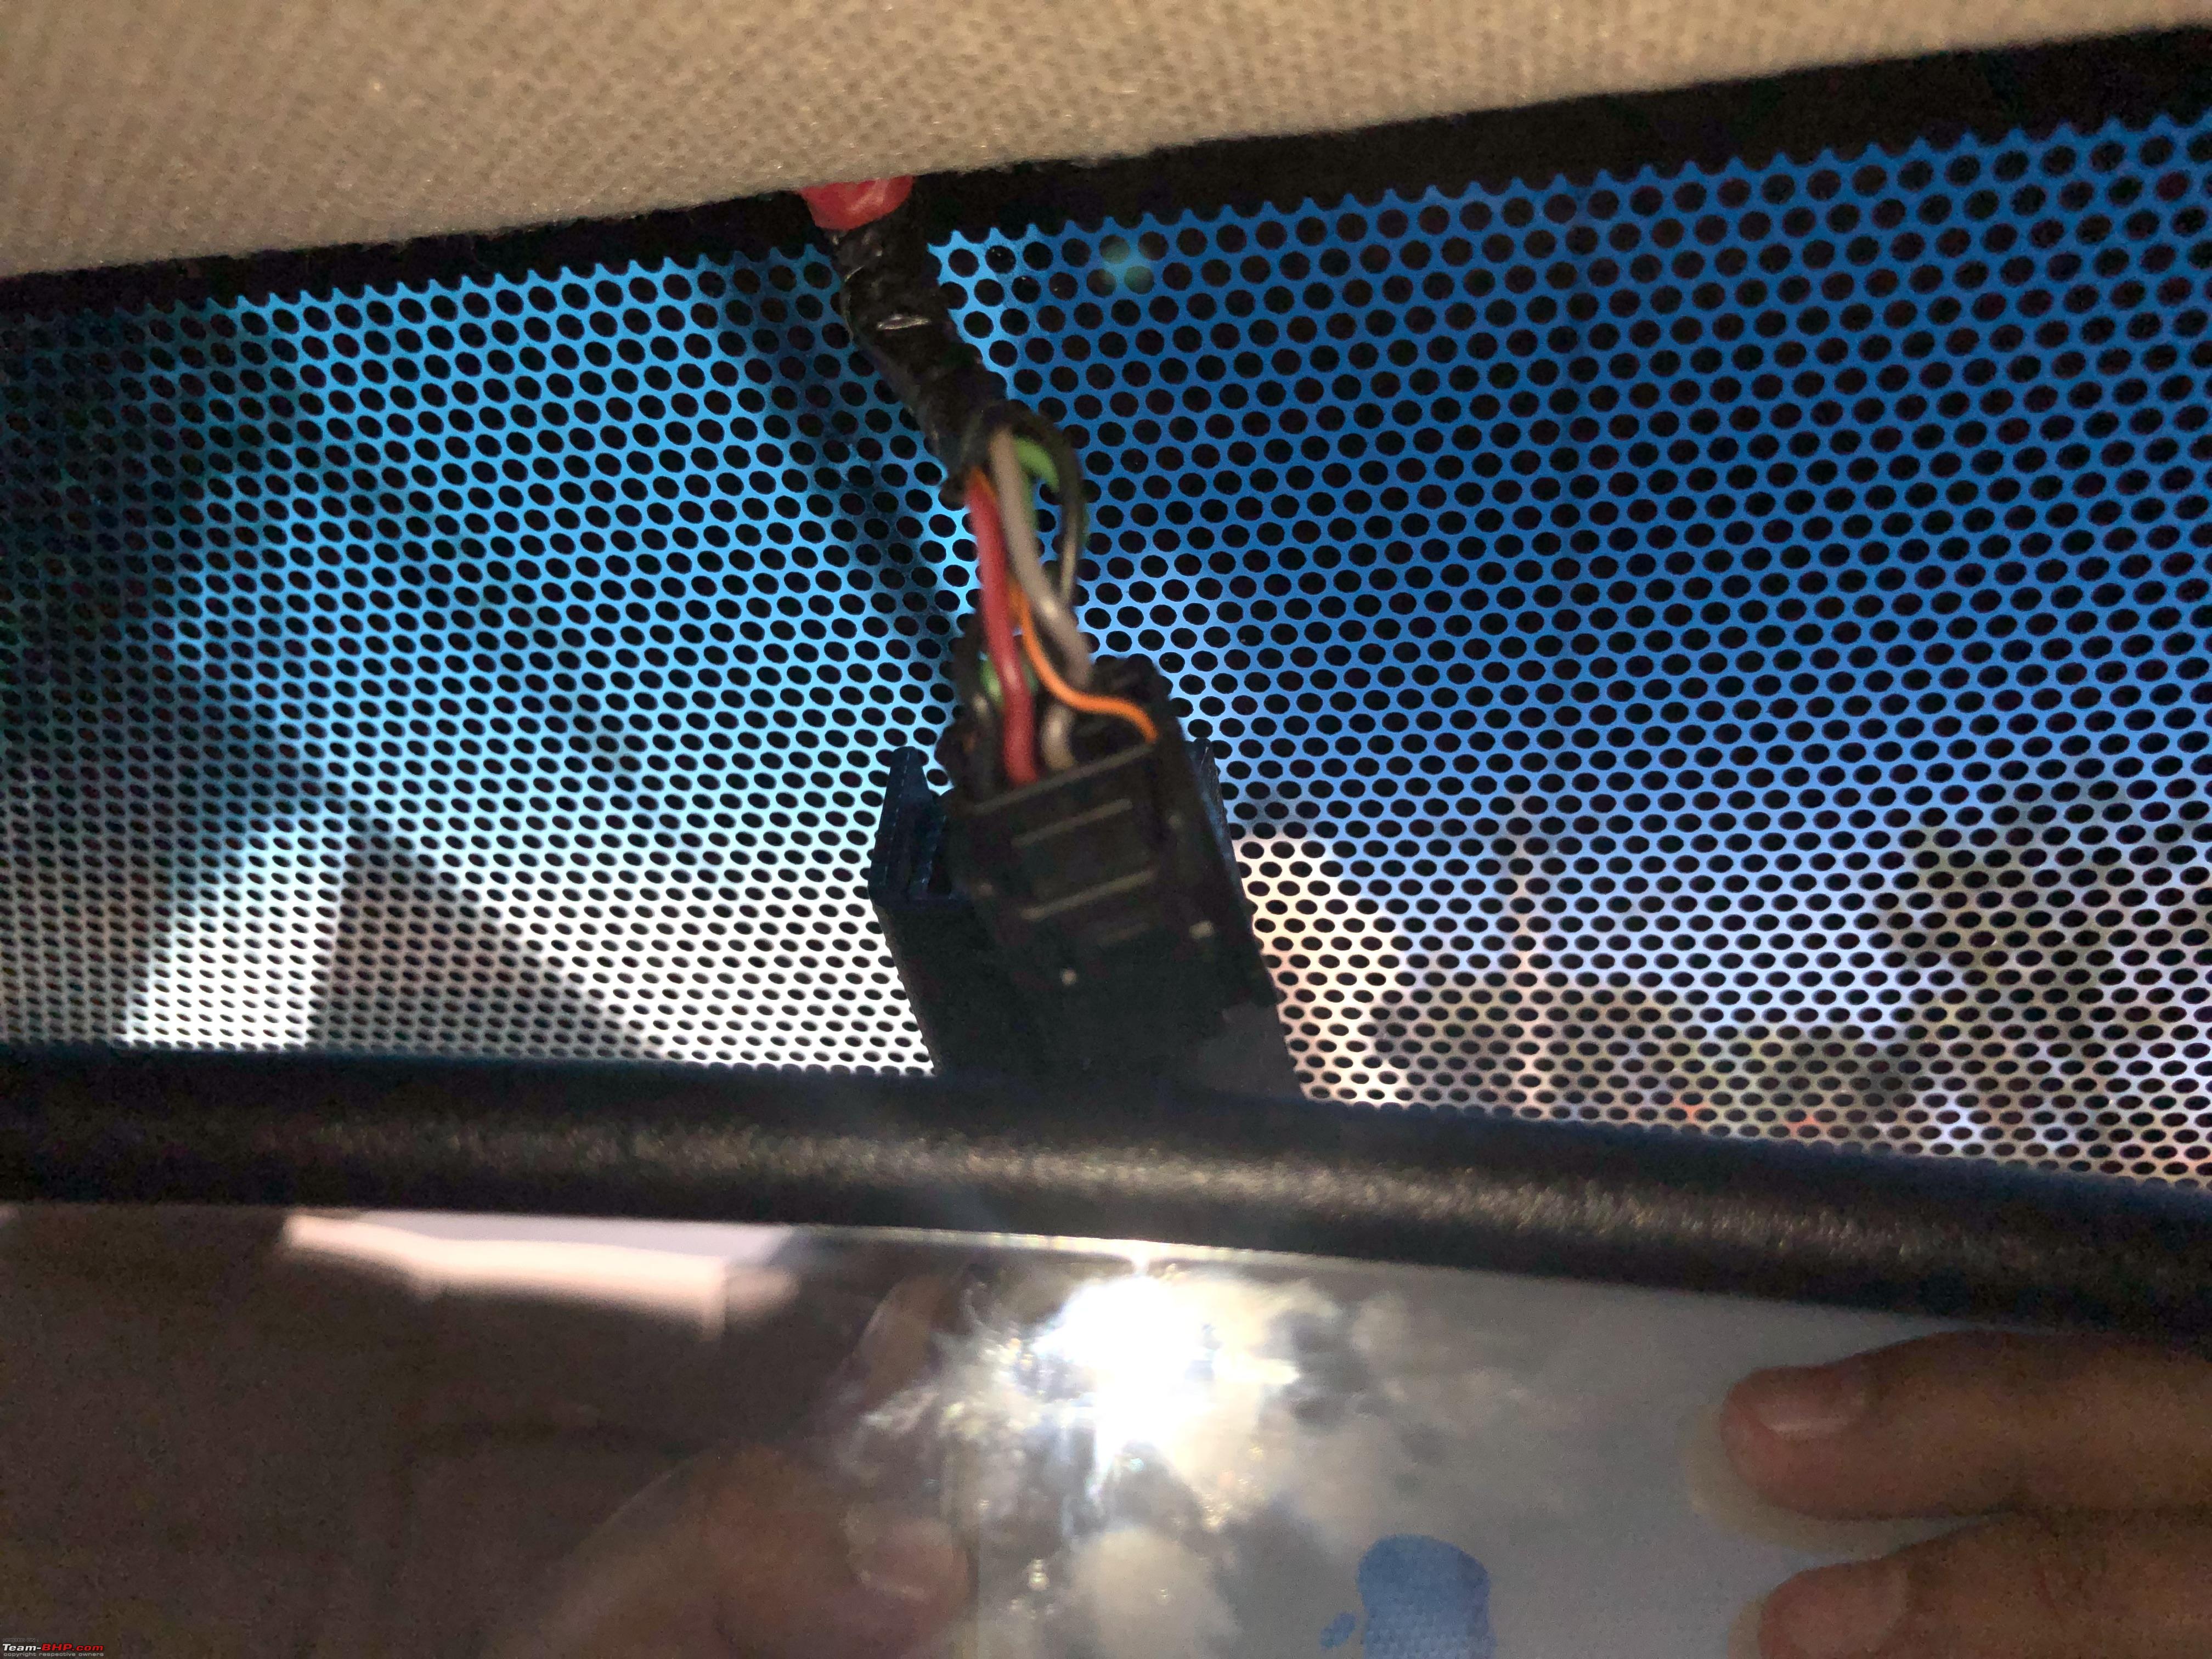
 BlueTooth Mic
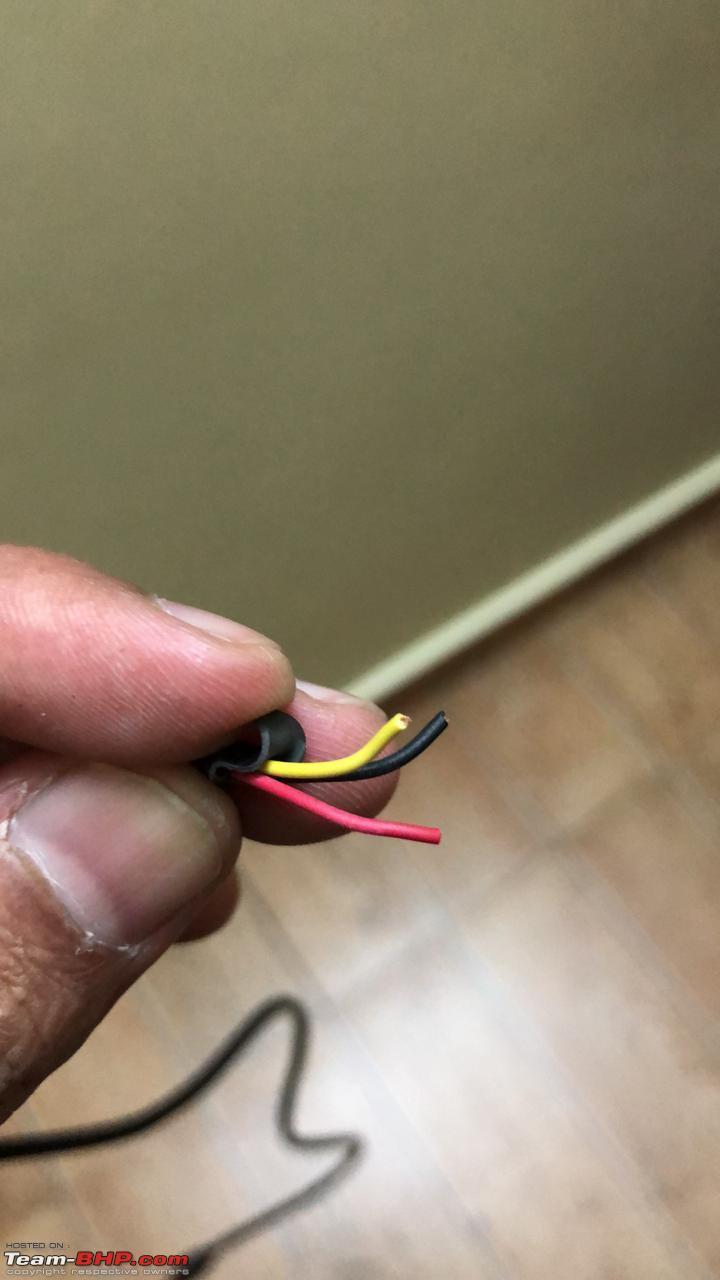
The sony headunit came with a bluetooth mic in the box. This mic needs to be fitted near the A-pillar on the driver’s side. This kinda ruined the OEM look that I was aiming for. Now the only way to get the factory bluetooth mic working with this aftermarket heading was to figure out which pins control this function in the factory harness. The wiring diagrams mentioned the pins needed and all I did was to hack up an old microphone/aux cable, use a multimeter to figure out which is GND and which is +ve and voila we have the wiring for the bluetooth mic ready and integrated into the harness.
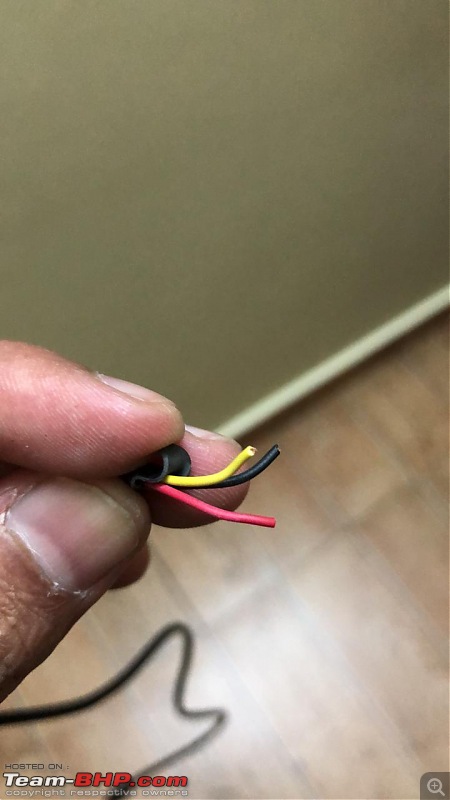
Using a multimeter, I could figure out that the Black wire is the ground and the Red & Yellow wires are positive wires.
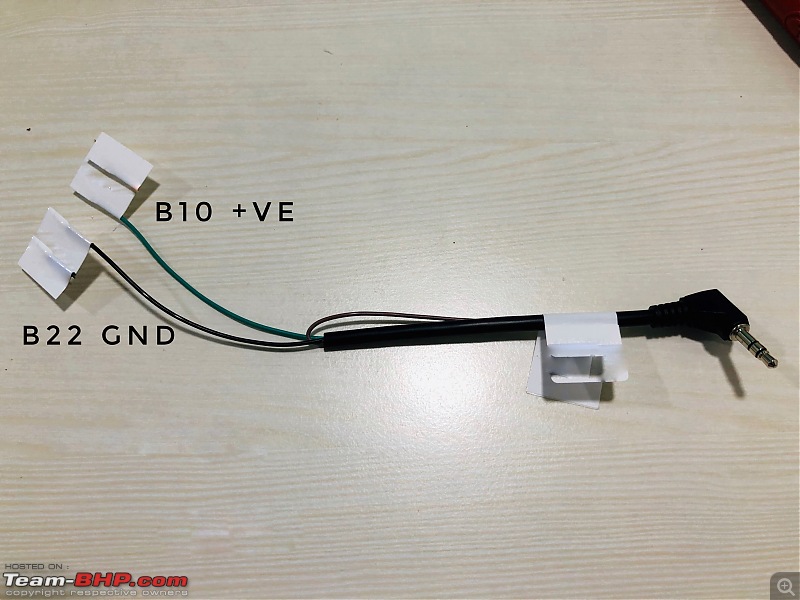
Final wire with the pins they are supposed to go into
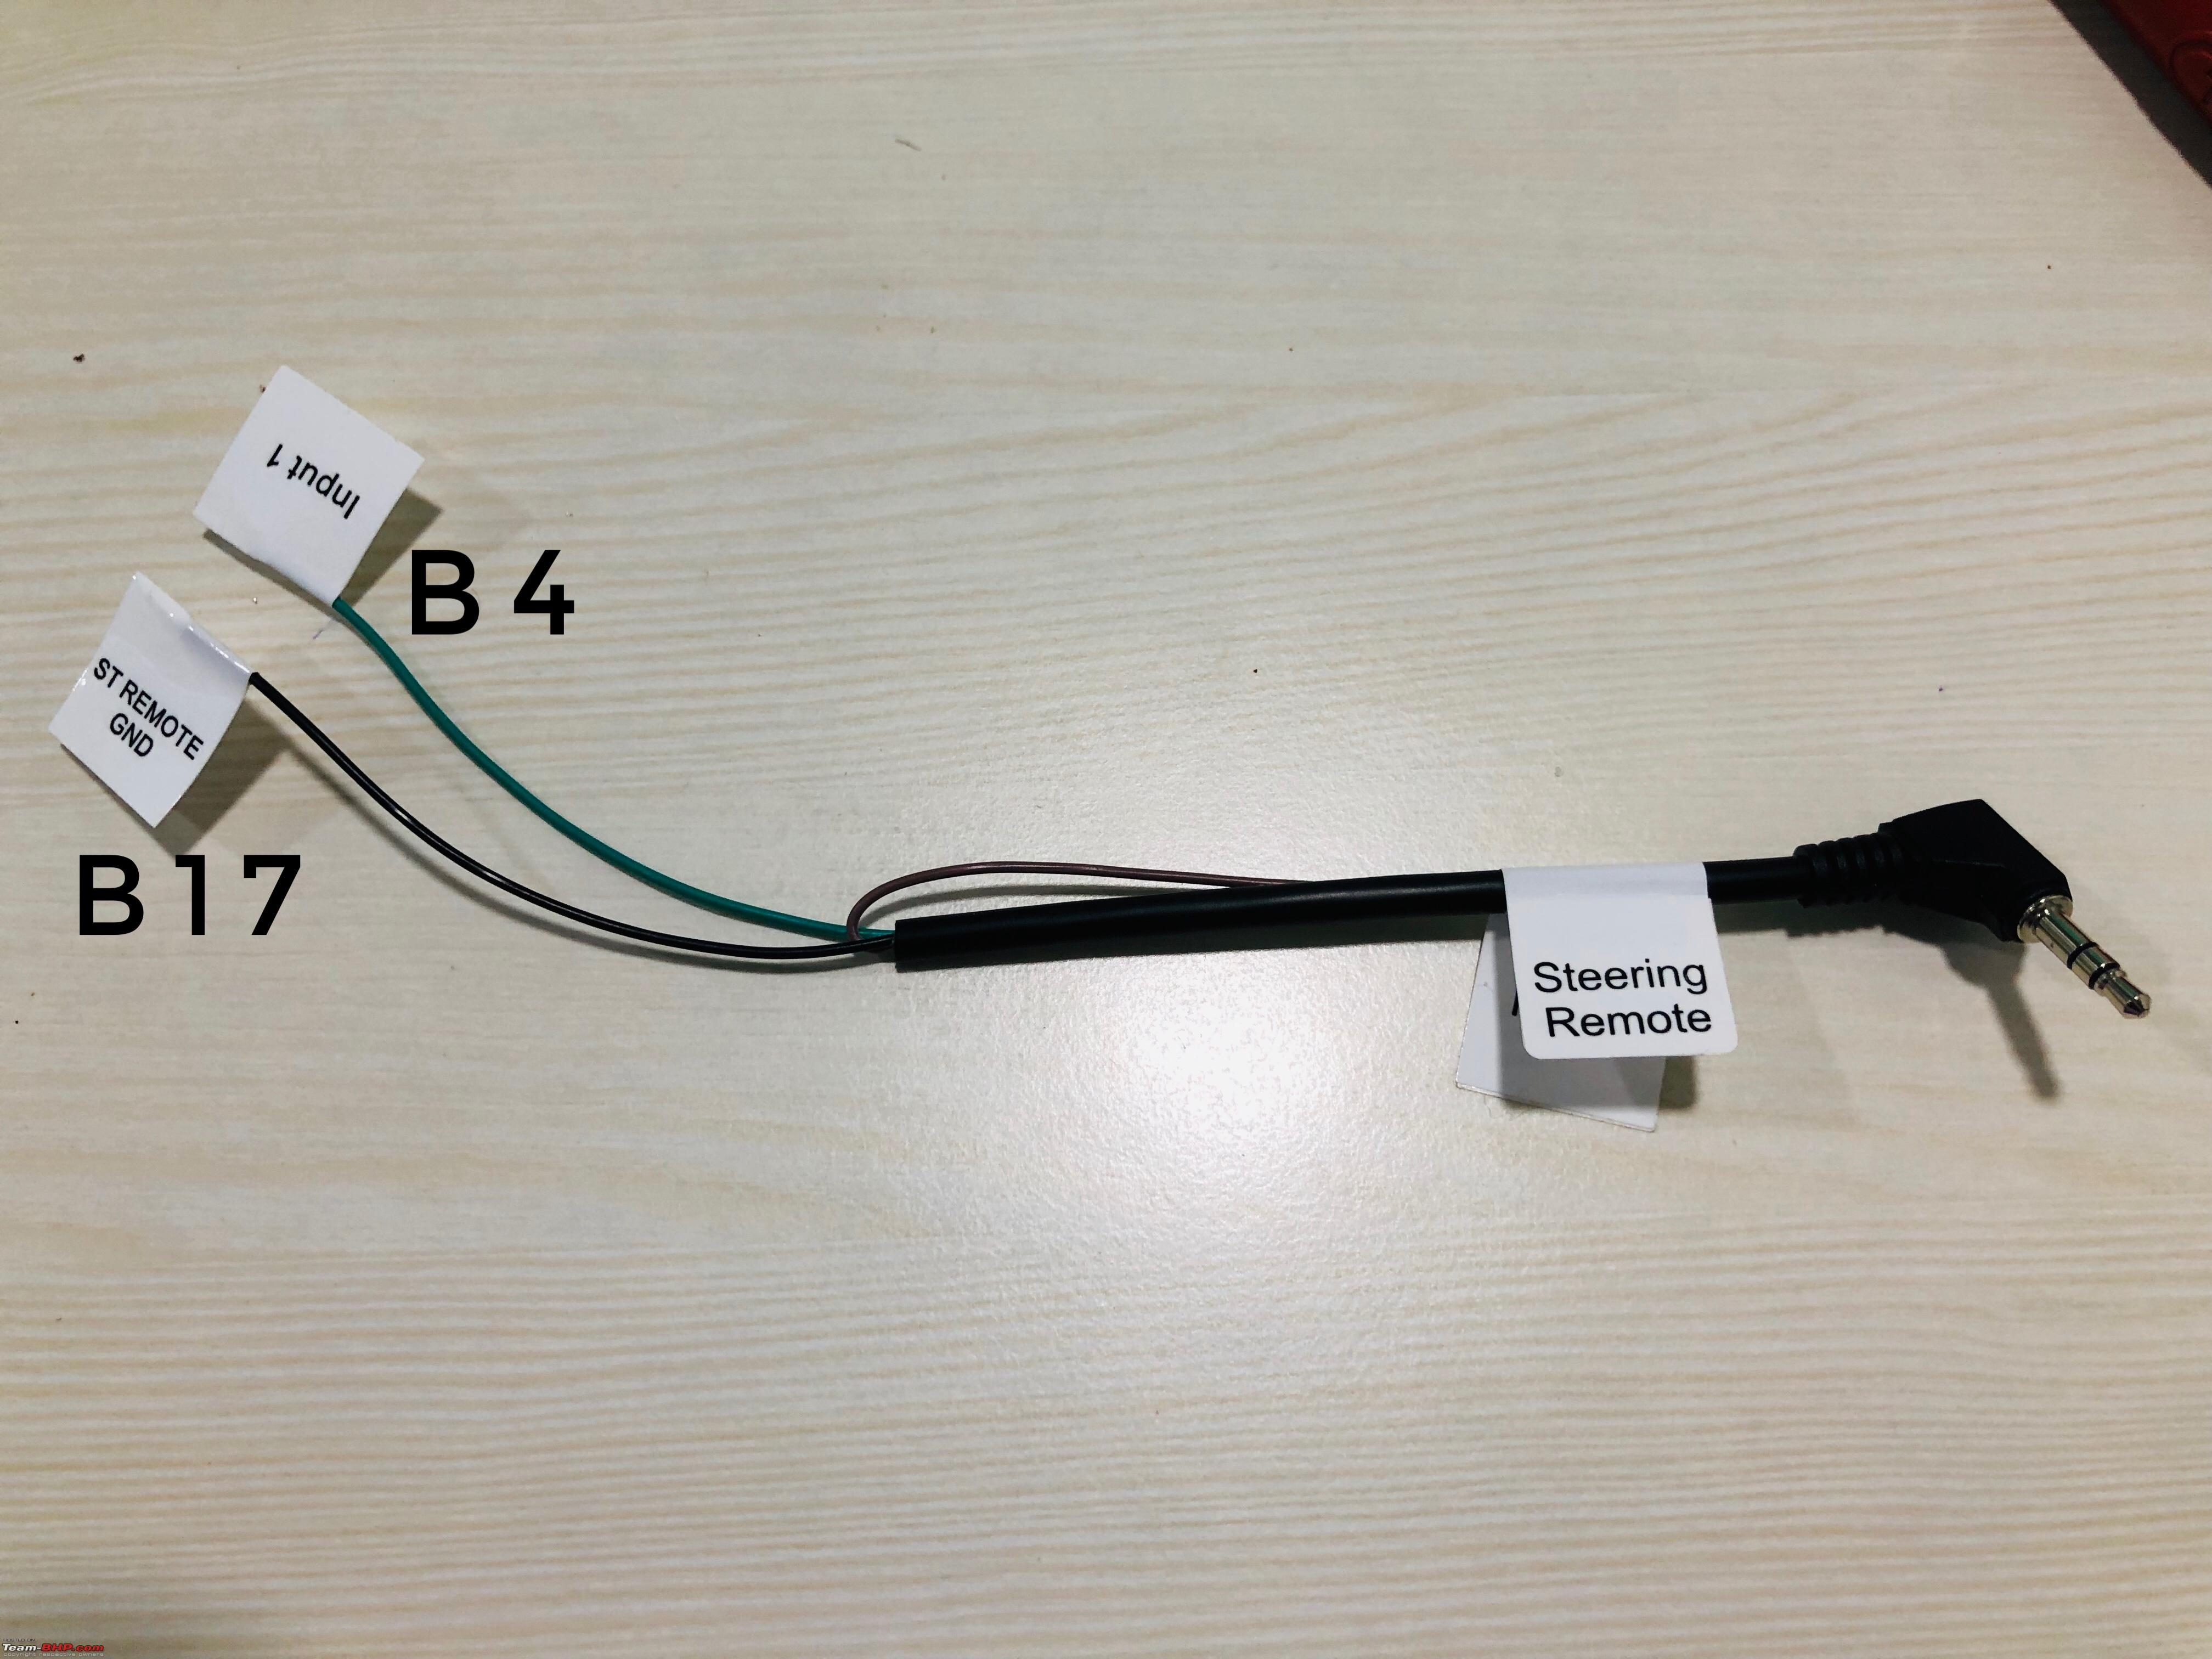
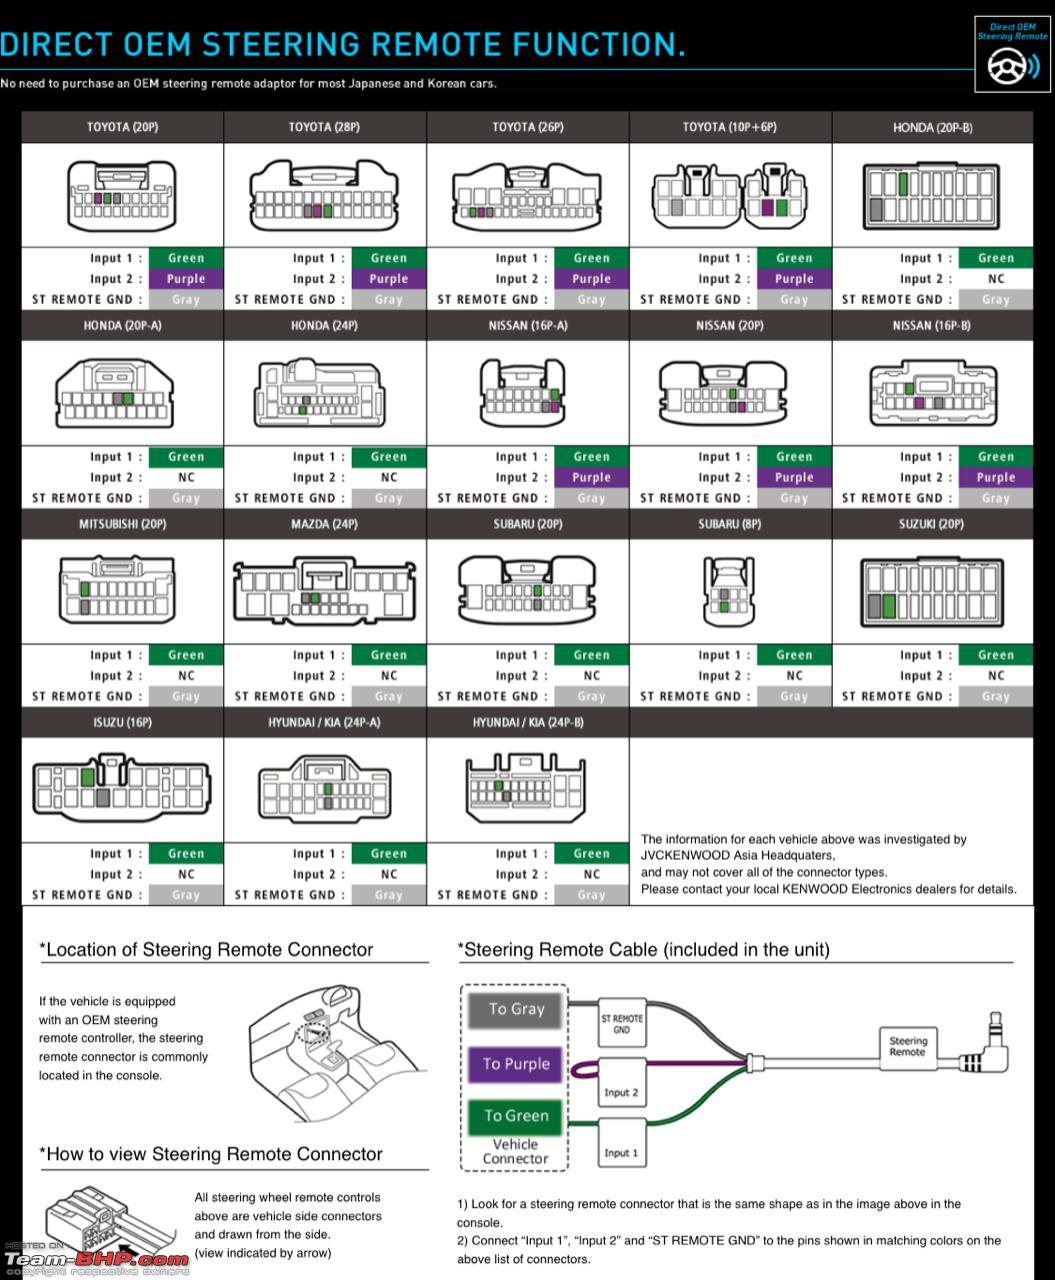
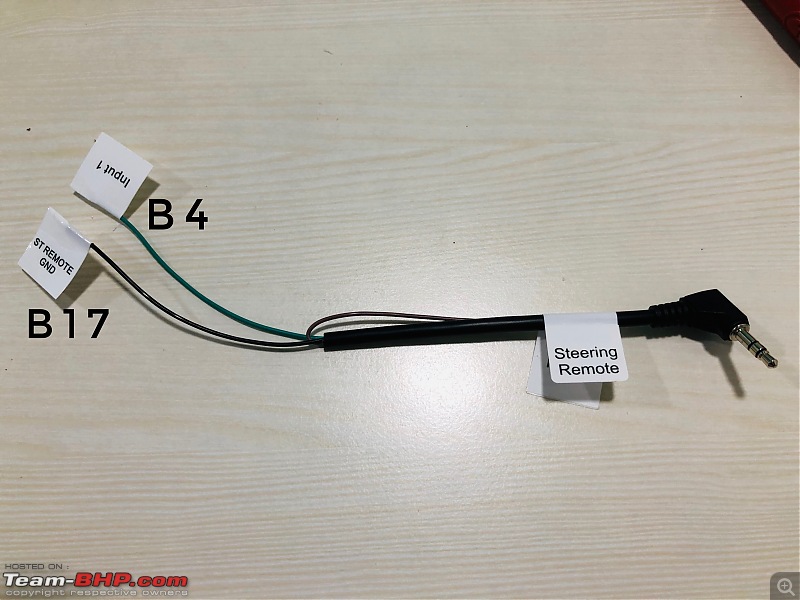
Steering Wheel Controls
What good is music system if it cannot help you retain steering wheel controls. The Sony Headunit came with its own steering wheel controls adapter and the website mentioned how to wire up the whole thing. Also a point to note is that Japanese and Korean cars do not need any other adapters to get the steering wheel controls to work. Once connected and powered on, the unit lets you assign functions to the buttons. Impressive.
Sony's Steering Wheel Controls (SWC) Adapter supplied in the box.
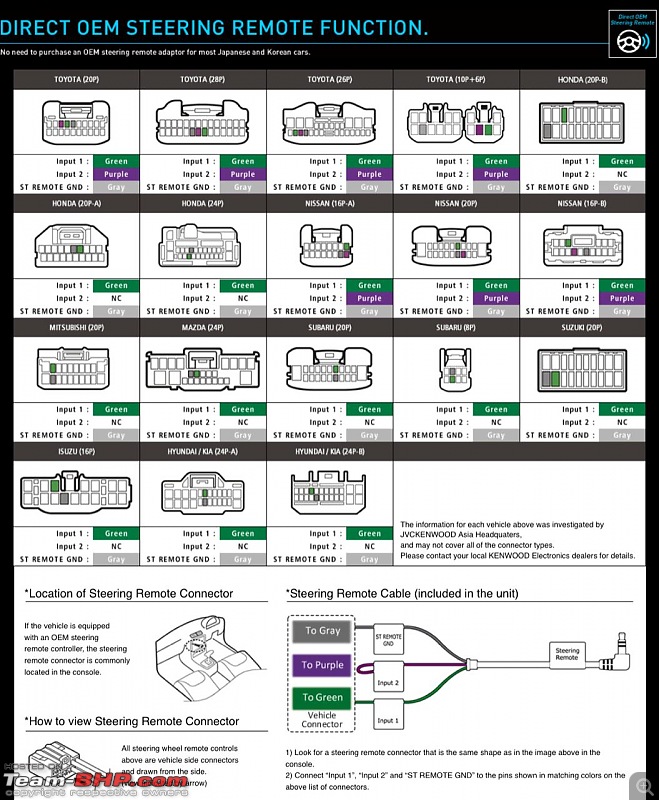
Picture showing how to wire up the SWC in different cars.
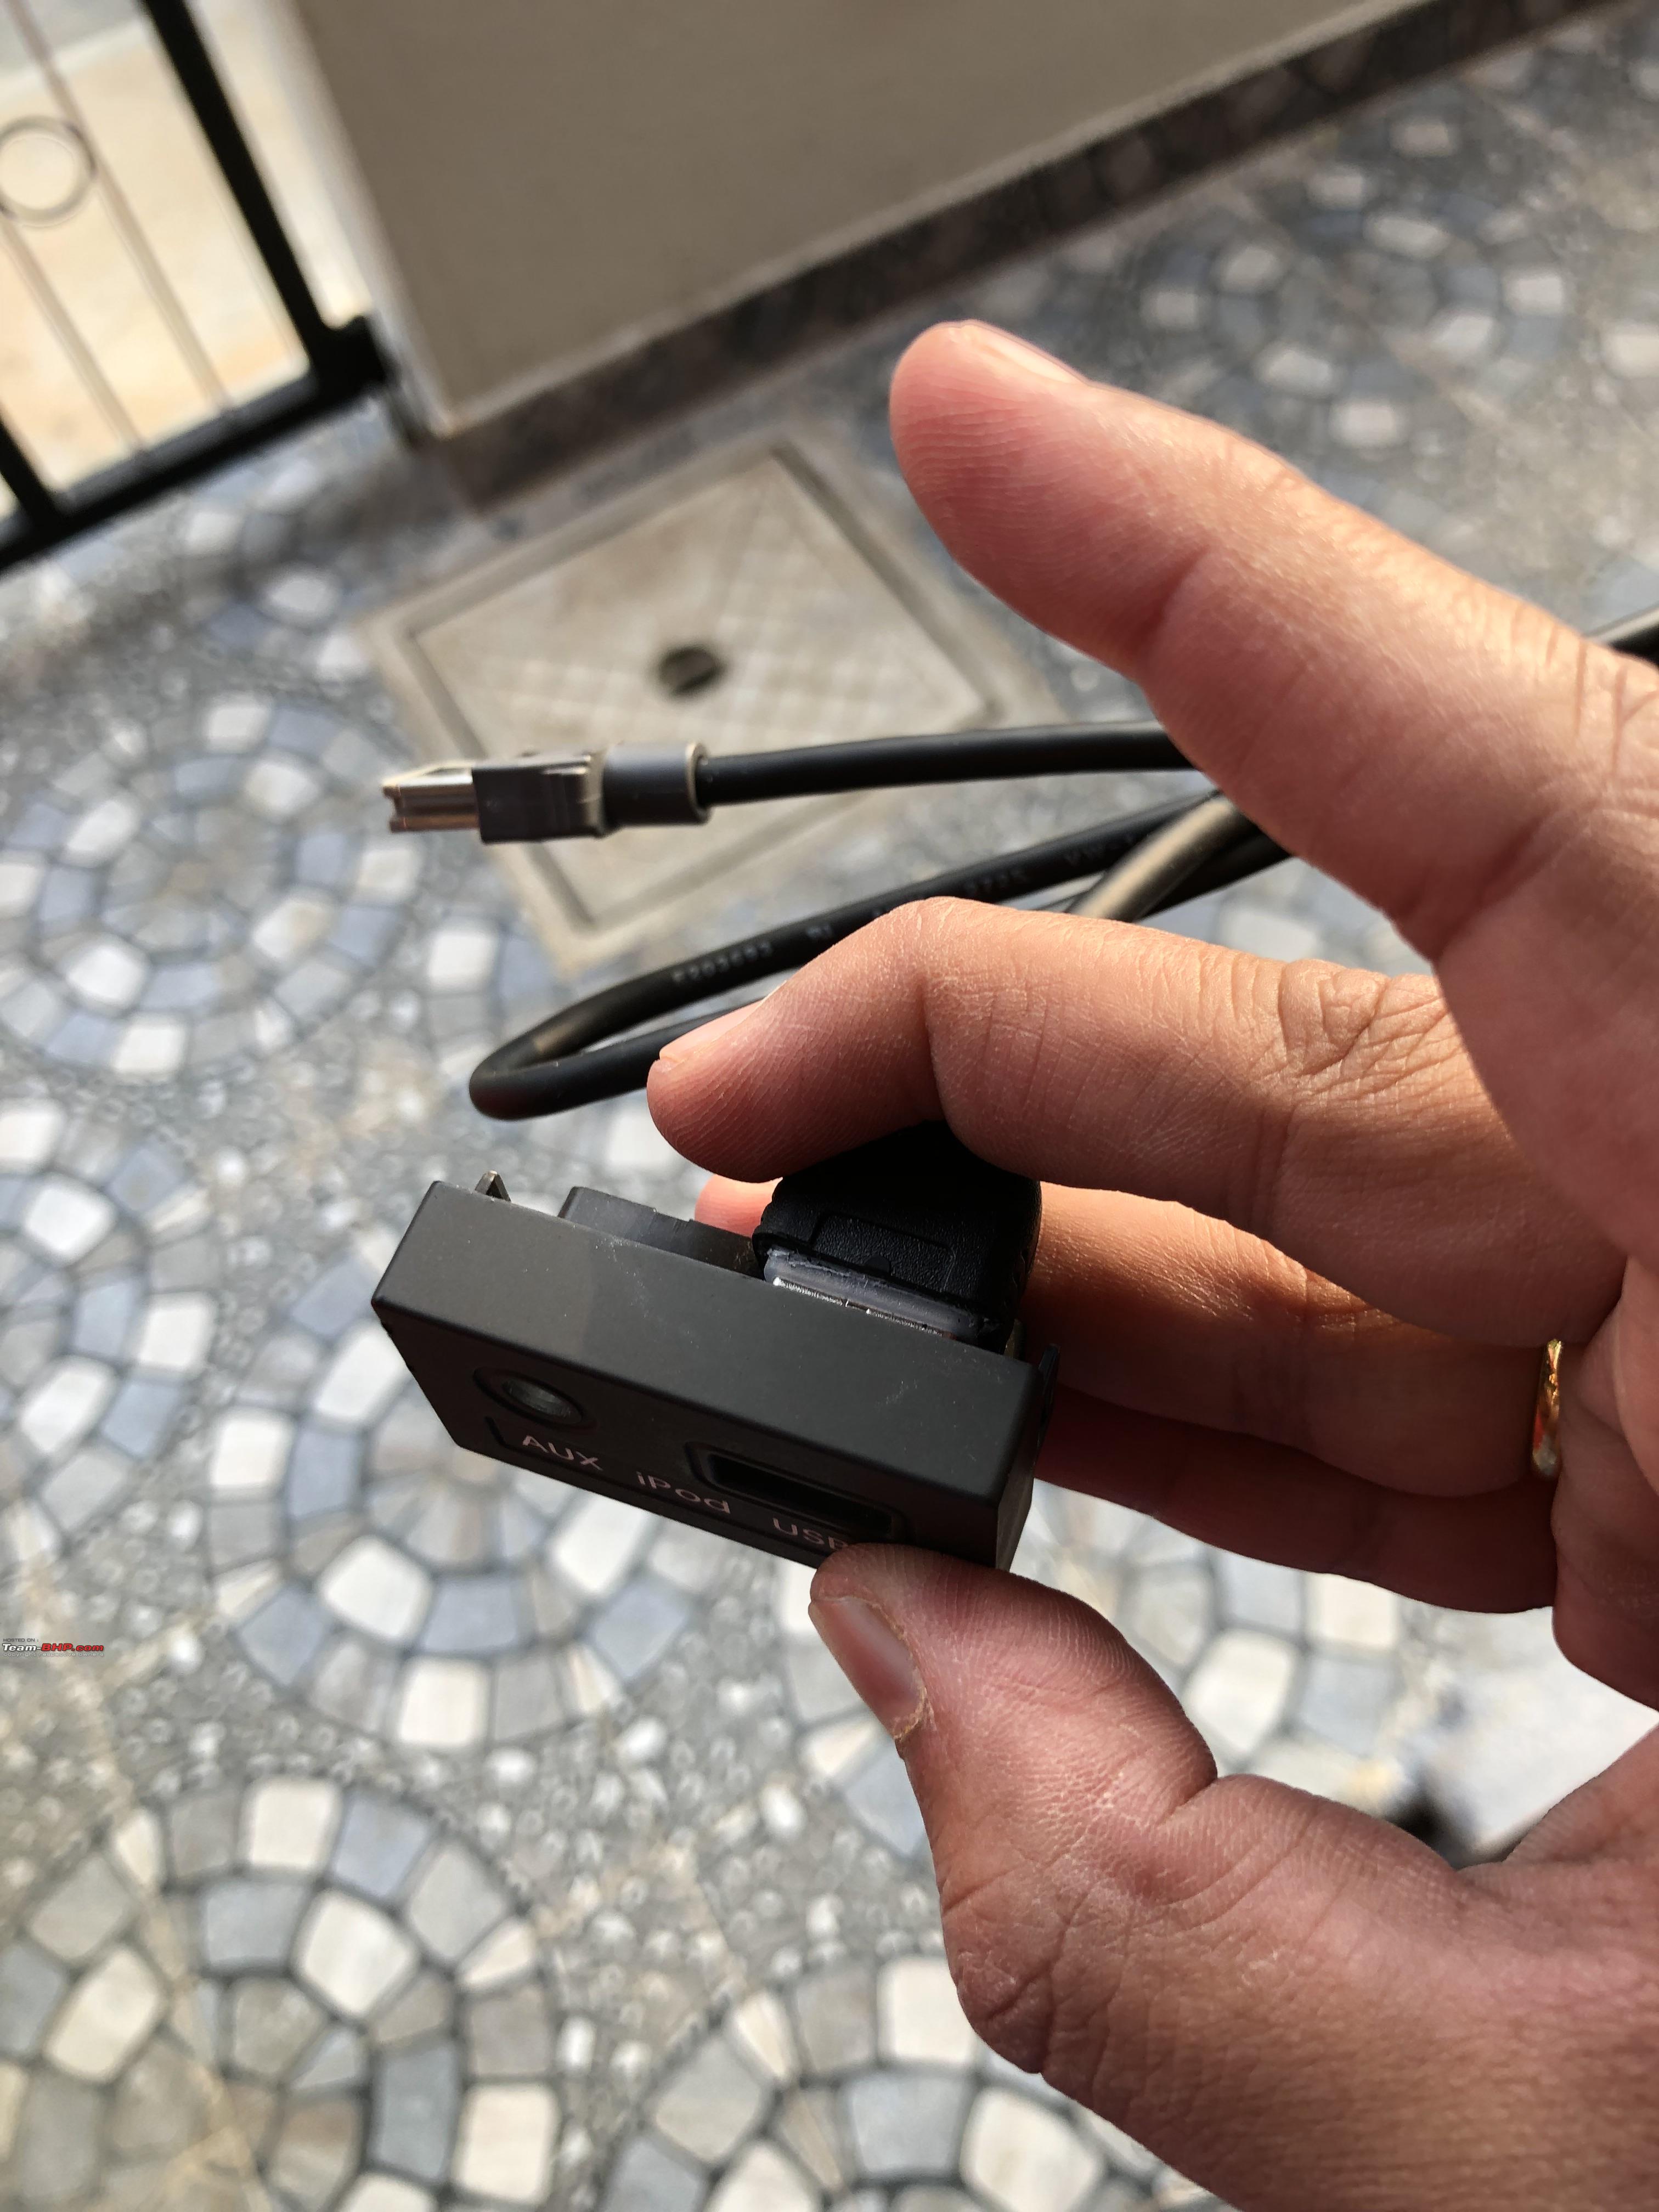
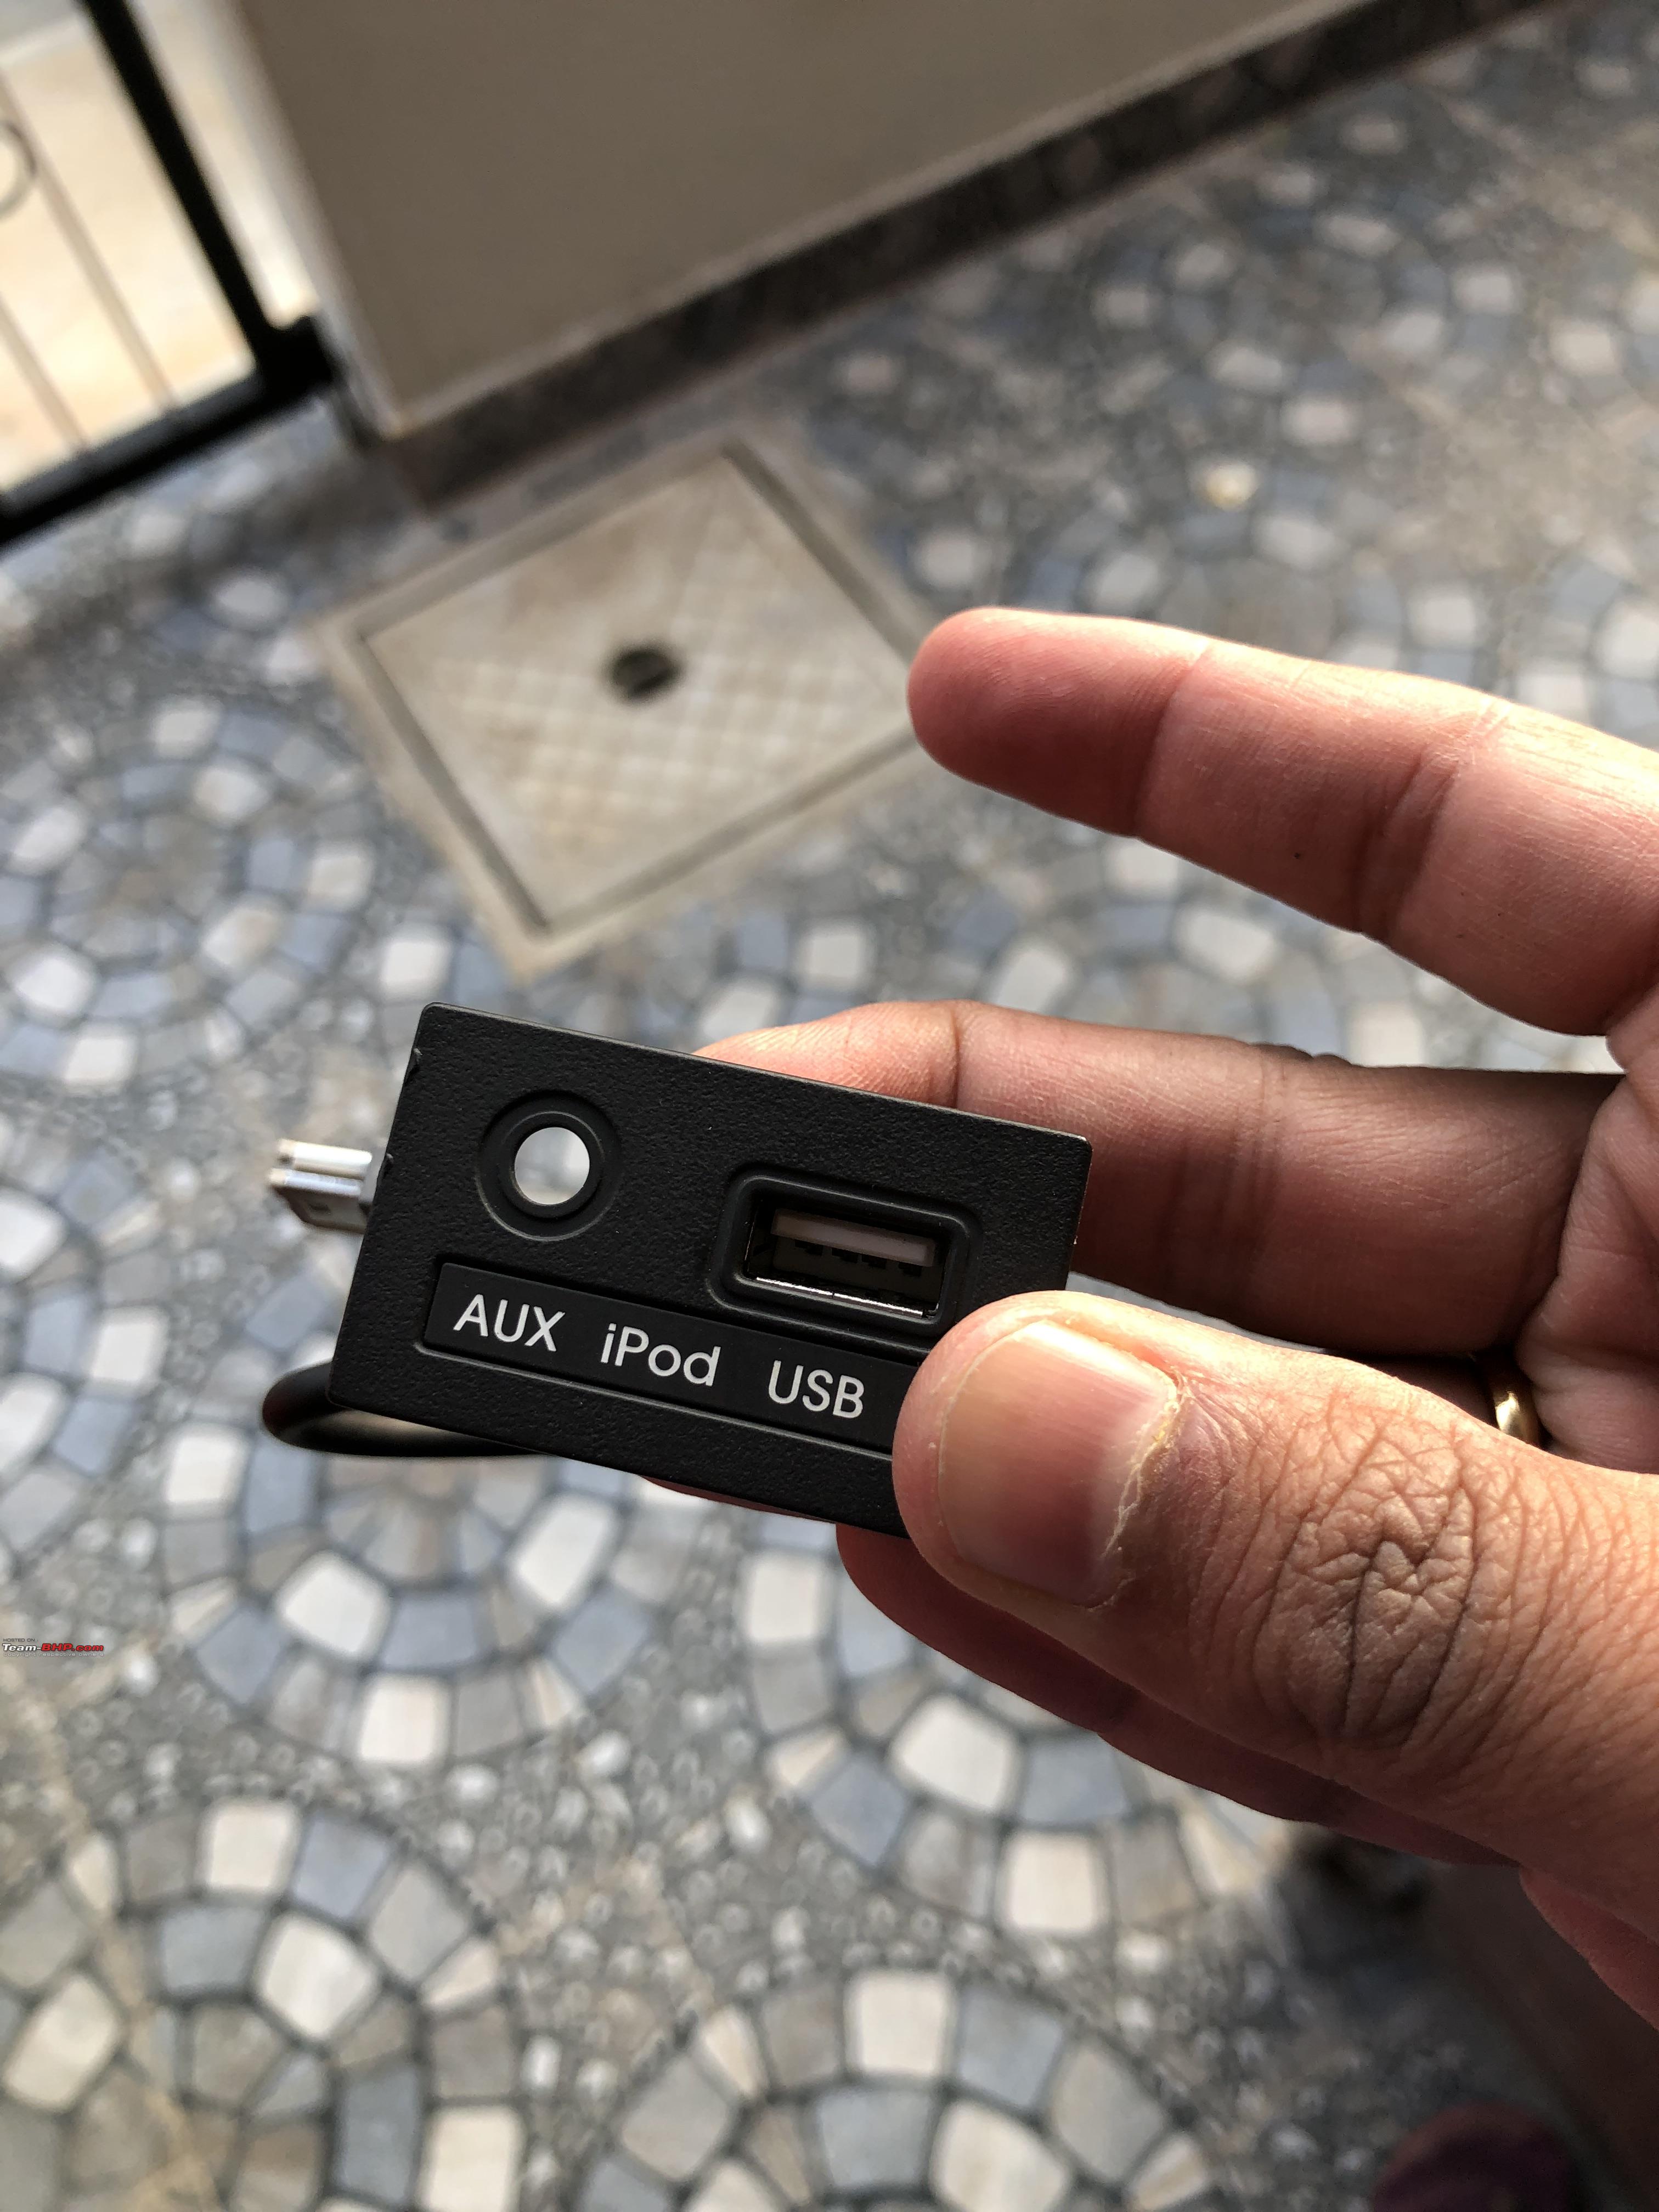
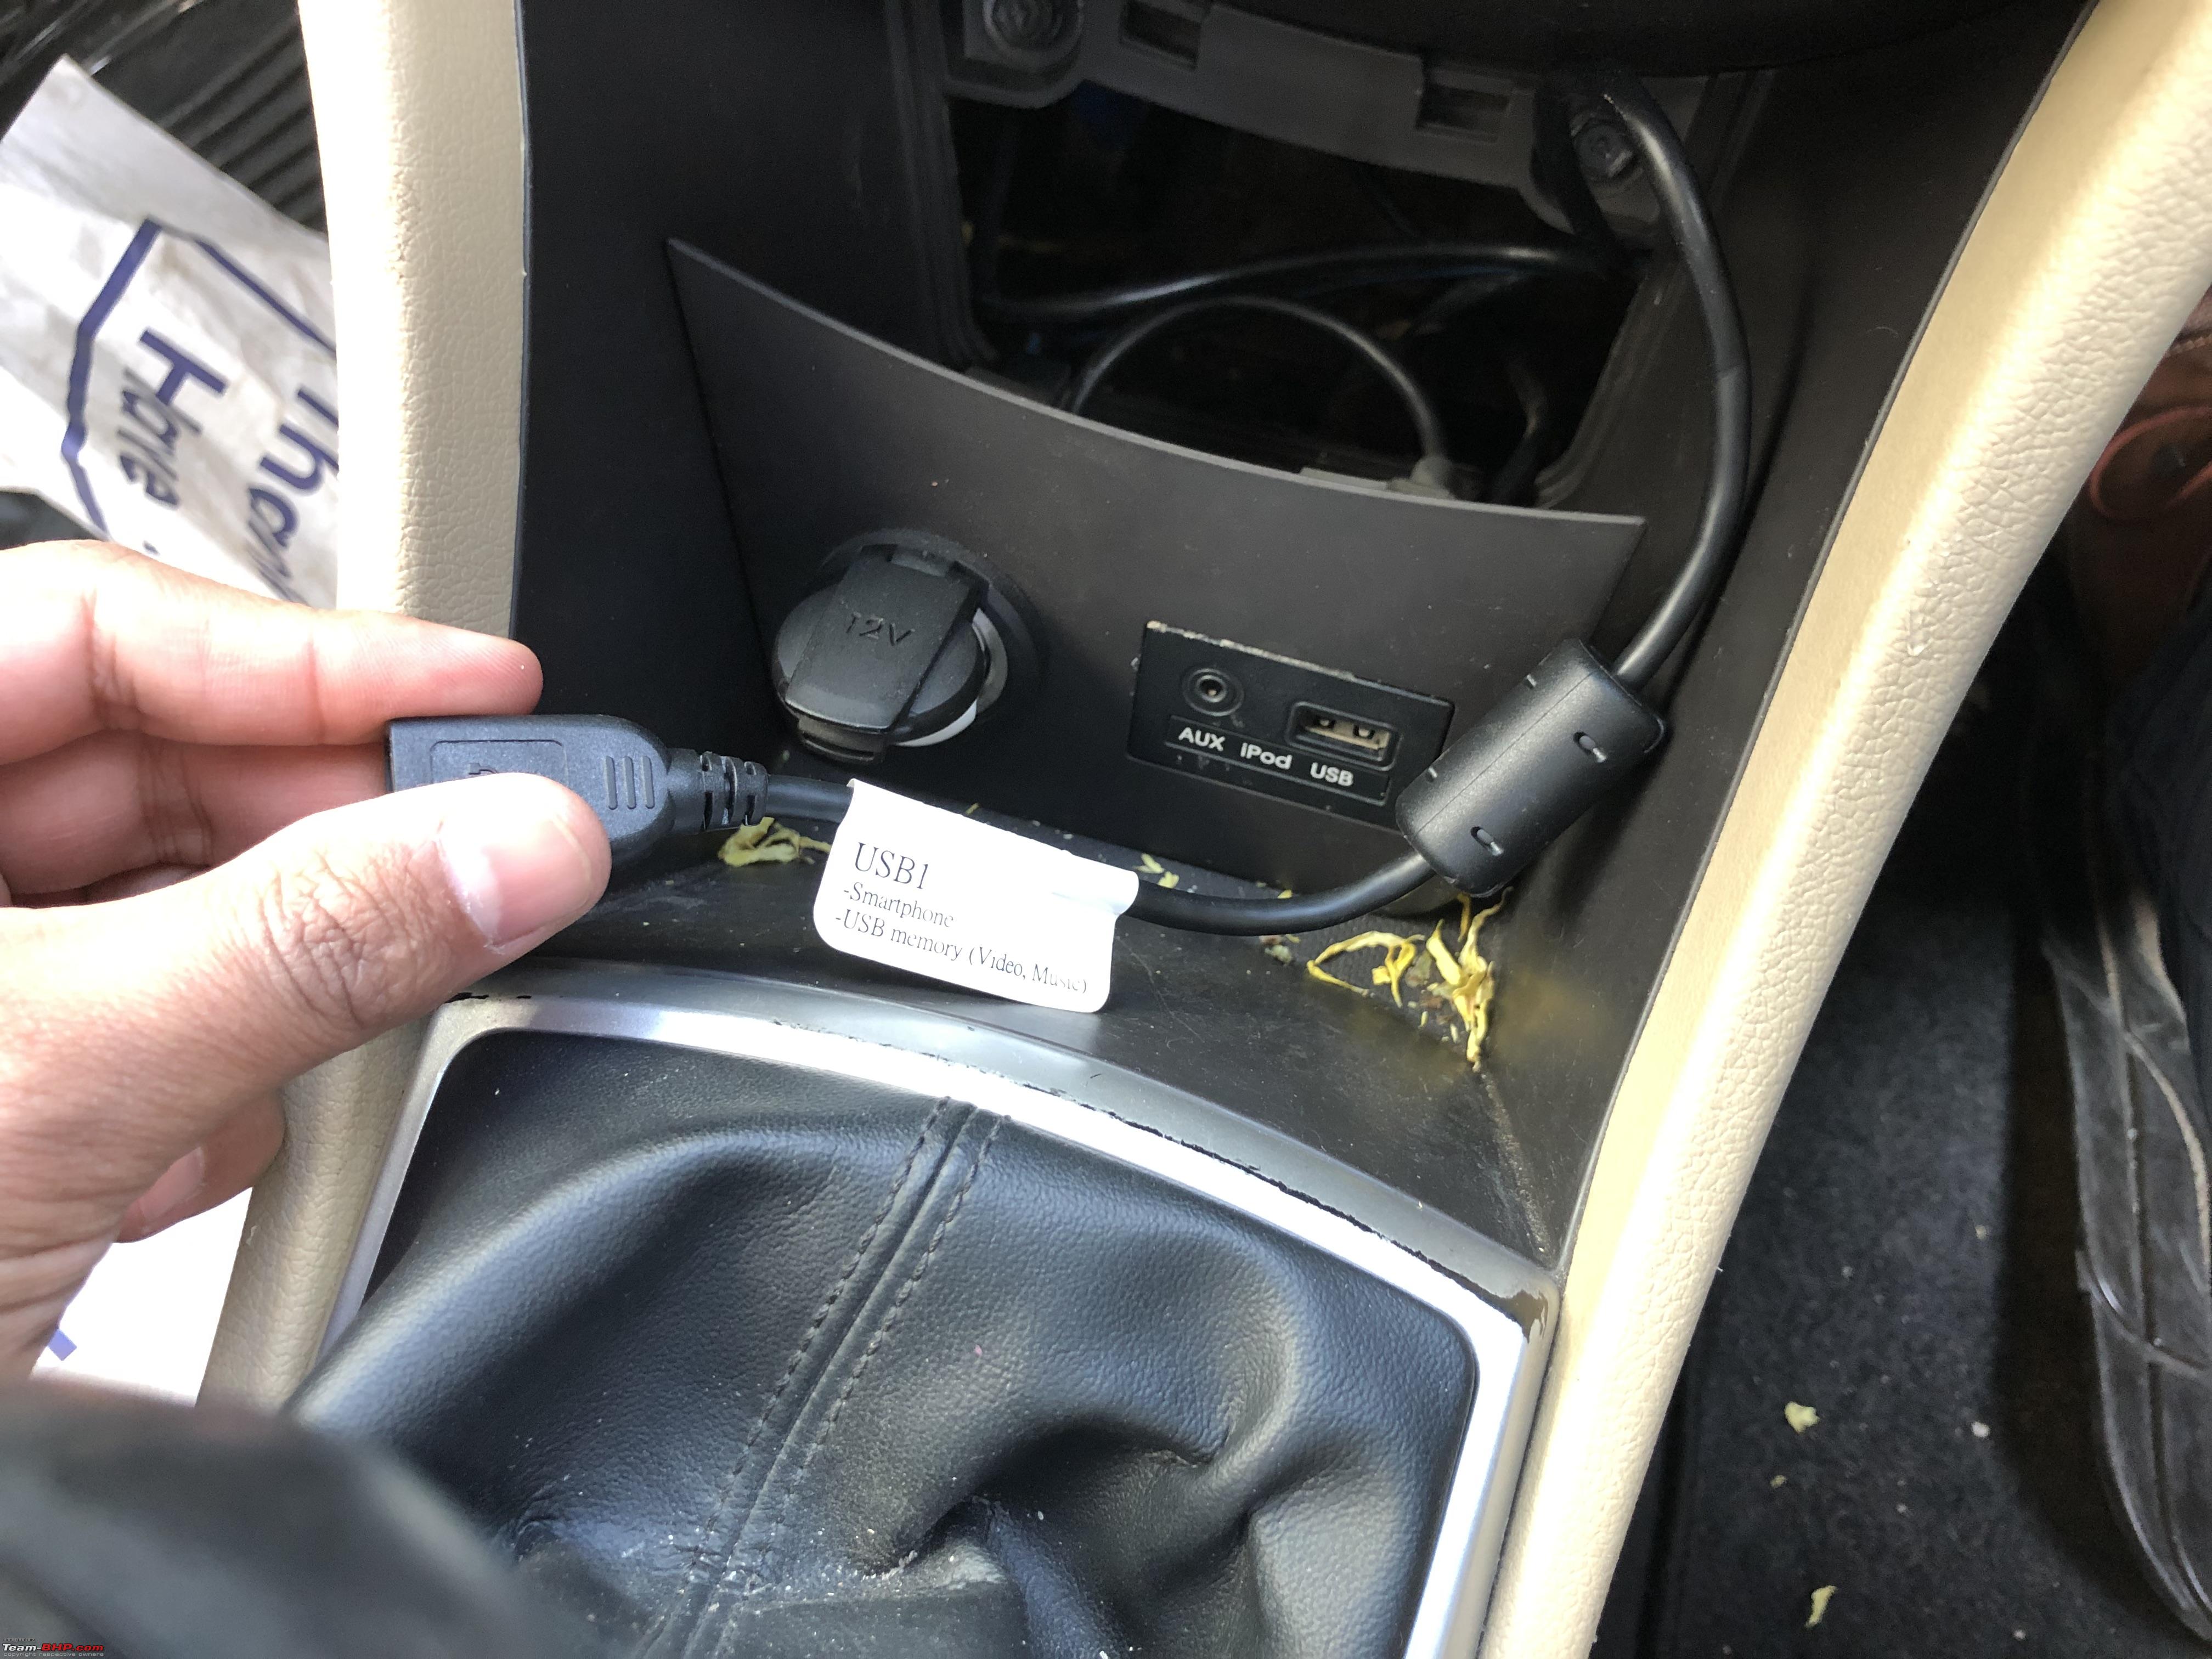
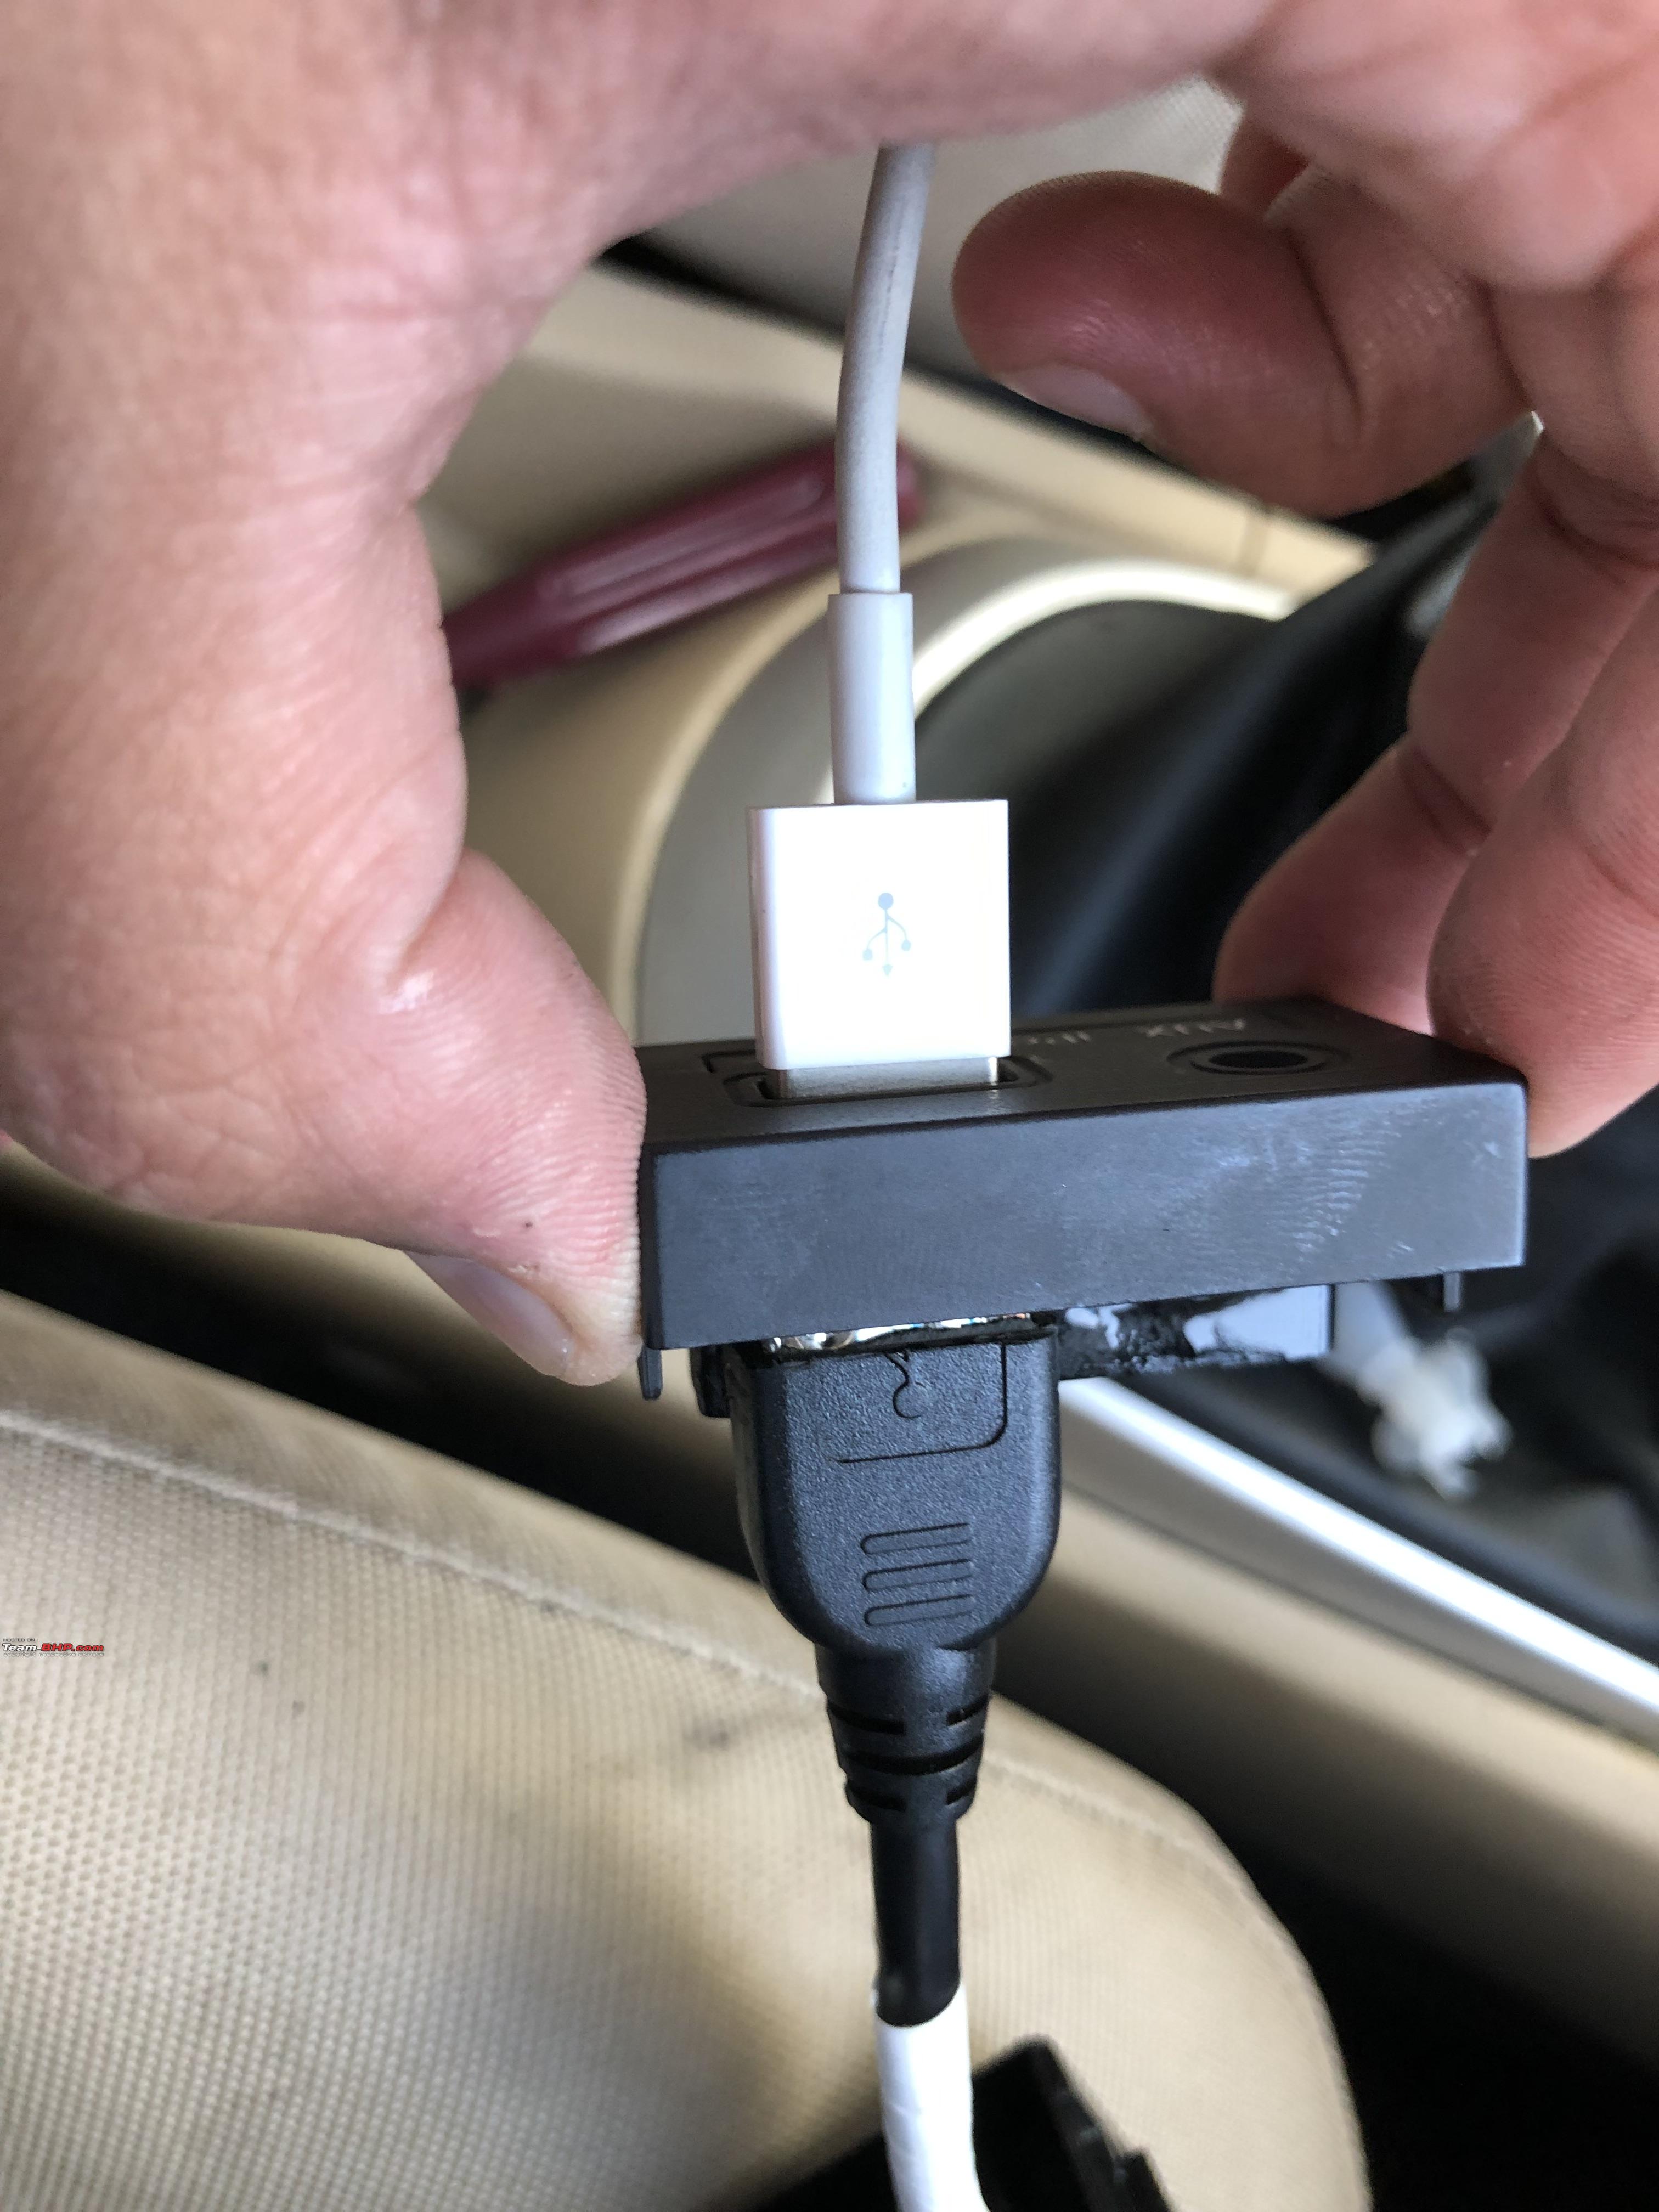
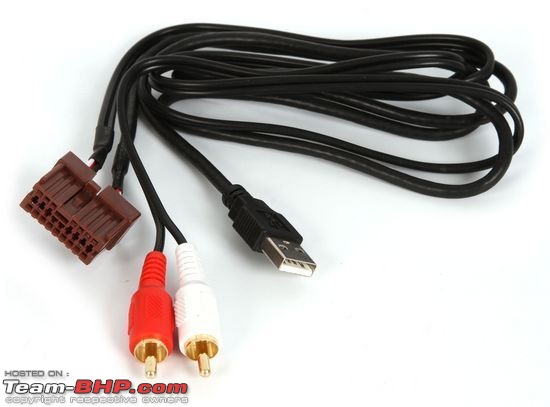
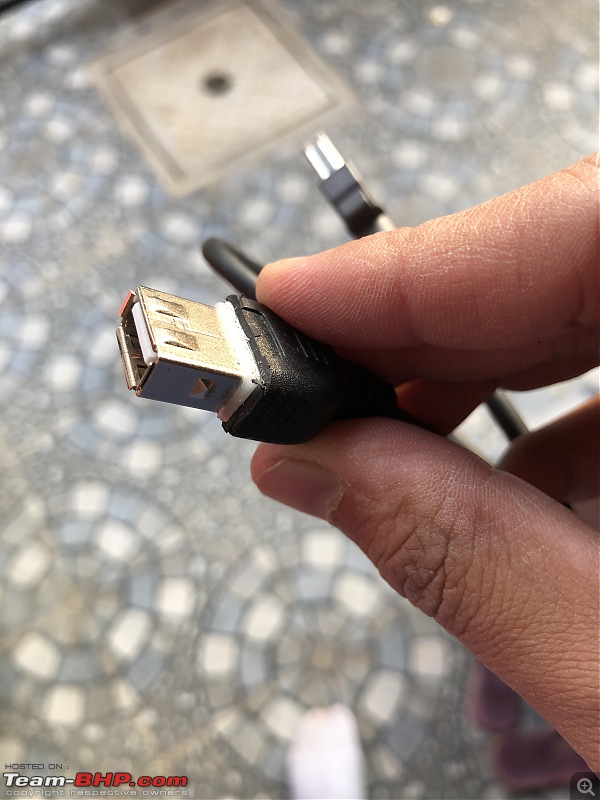
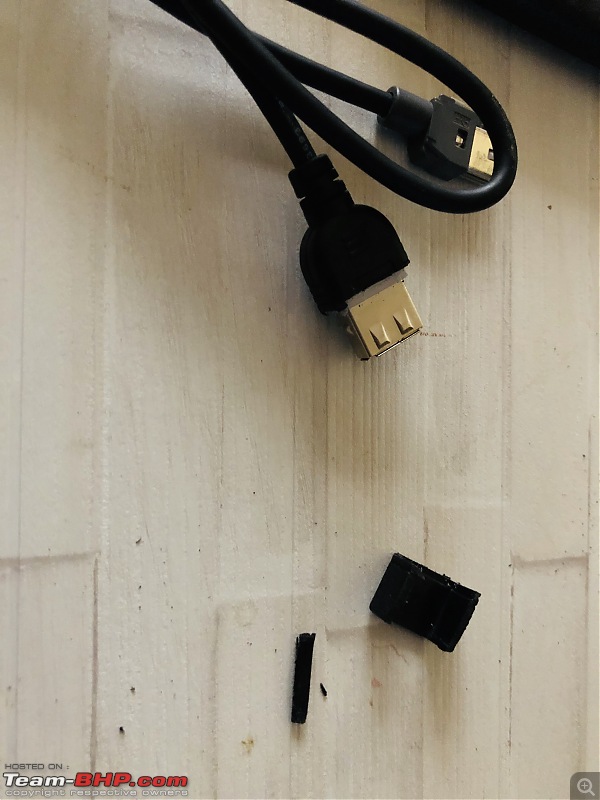
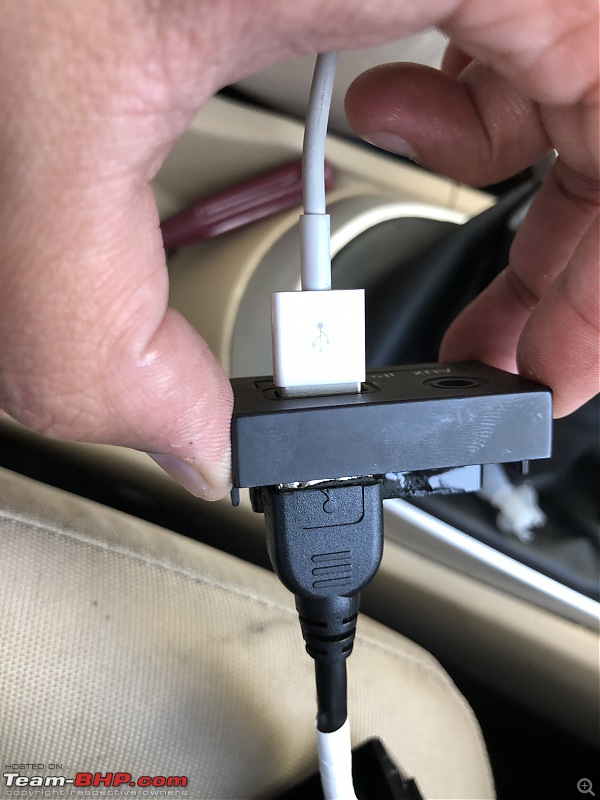
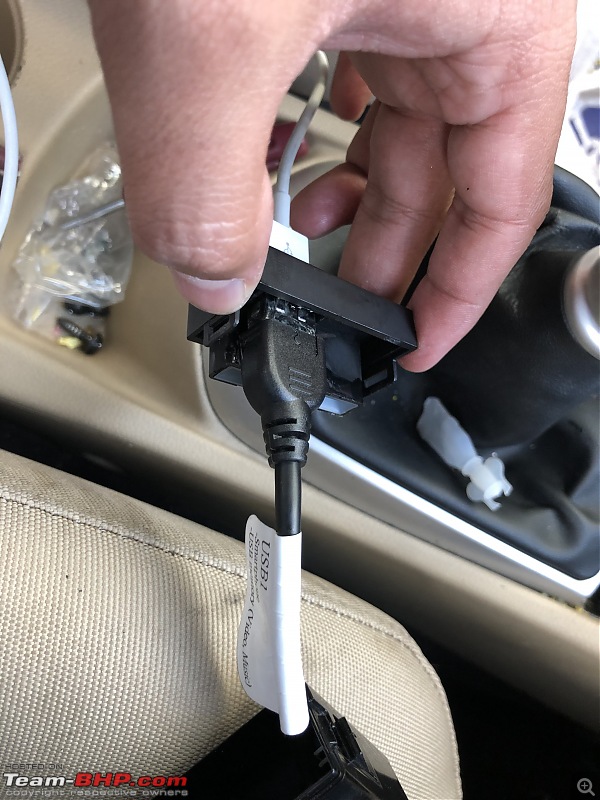
Factory USB/AUX.
The Sony Headunit doesn’t take an AUX-in. Also I haven’t used the AUX port in ages. The Hyundai USB/AUX port uses a proprietary connector which makes connecting to an aftermarket headunit a pain. But, again there are harnesses made exclusively to retain the Factory port when using an aftermarket stereo. This is made by Metra and is available on Amazon India.
Now, before you think this is easy, you need to know that this harness did have a lot of issues. There were frequent disconnections, failed to detect my ipod, USB drives were unable to play songs, phones don't charge and the biggest issue, Apple CarPlay and Android Auto donot work. Now, either the port doesn't provide enough power or there is a resistor built-in to it to prevent it from connecting anything more than a pendrive. Nonetheless, I had to come up with an alternative.
I follow these guys and bumped into their video explaining how to retain factory USB/AUX port on a Hyundai/Kia and it worked.
https://www.youtube.com/watch?v=XCFmT1frn7M
Here's how I got to retain the factory USB/AUX Port


 Factory BackUp Camera
Integrating the factory backup Camera is a bit of a pain because
- Unlike the newer Hyundai's, the backup camera is integrated into the IRVM
- There is no harness available online for Hyundai/Kia backup cameras integrated into the IRVM
- Aftermarket headunits use a Video Cable (RCA input) and OEM Camera's use a proprietory connection.
First we need the wiring diagram of the Electrochromic Rear View Mirror.

3 points to note
- Pin 4 (Video GND)
- Pin 5 (VideoOut Signal)
- Pin 9 (Backup Lamp Signal)
We need to cut out the female end of the RCA Video Cable. Inside are two cables a positive cable and a sheath that acts as the Ground.
Positive cable of RCA = Pin 5
GND cable of RCA = Pin 4
Reverse Cable (for Sony Stereo) = Pin 9
This will tell the headunit to switch over to the reverse camera feed. These wires will go via the glovebox into the A pillar and spliced into the factory harness using T-taps.
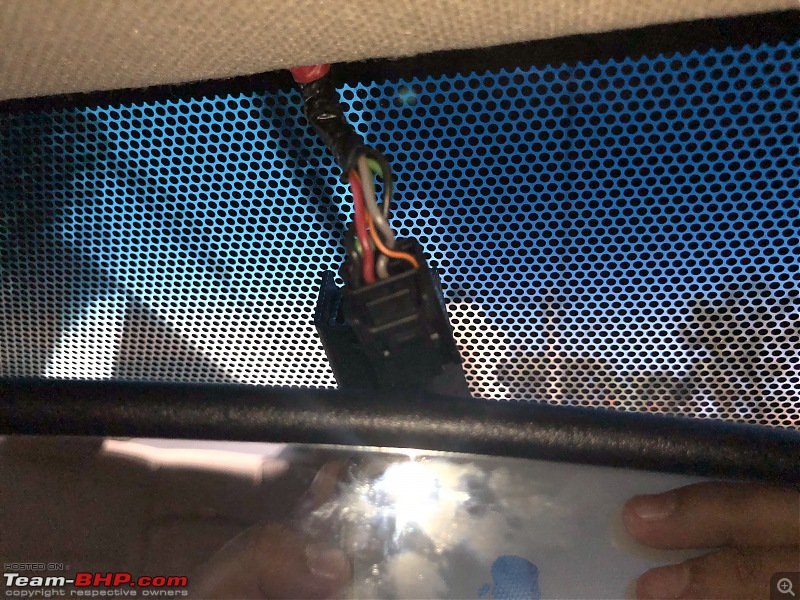
The wires in the IRVM
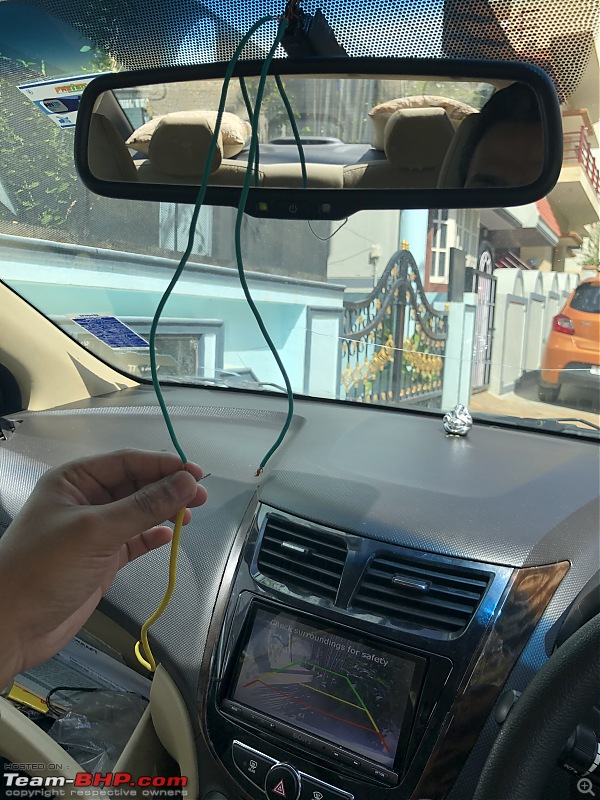
Testing the backup camera.
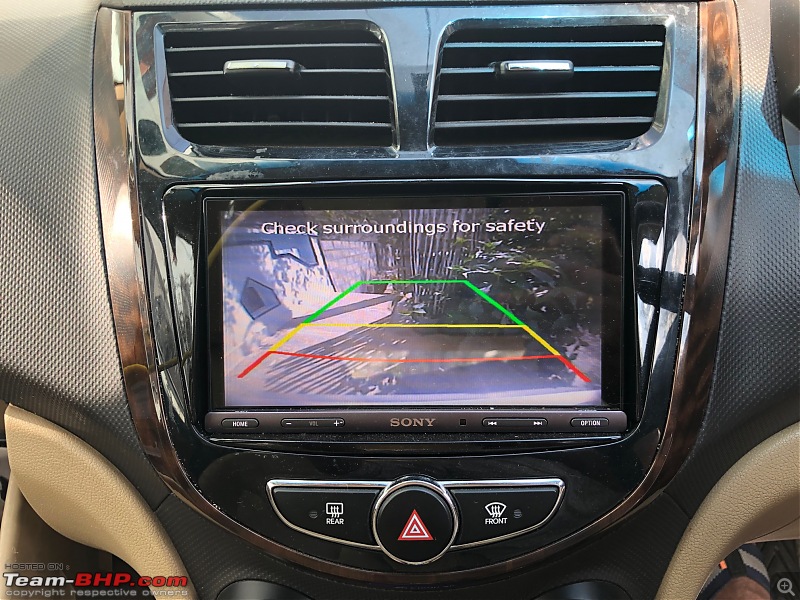
Success.
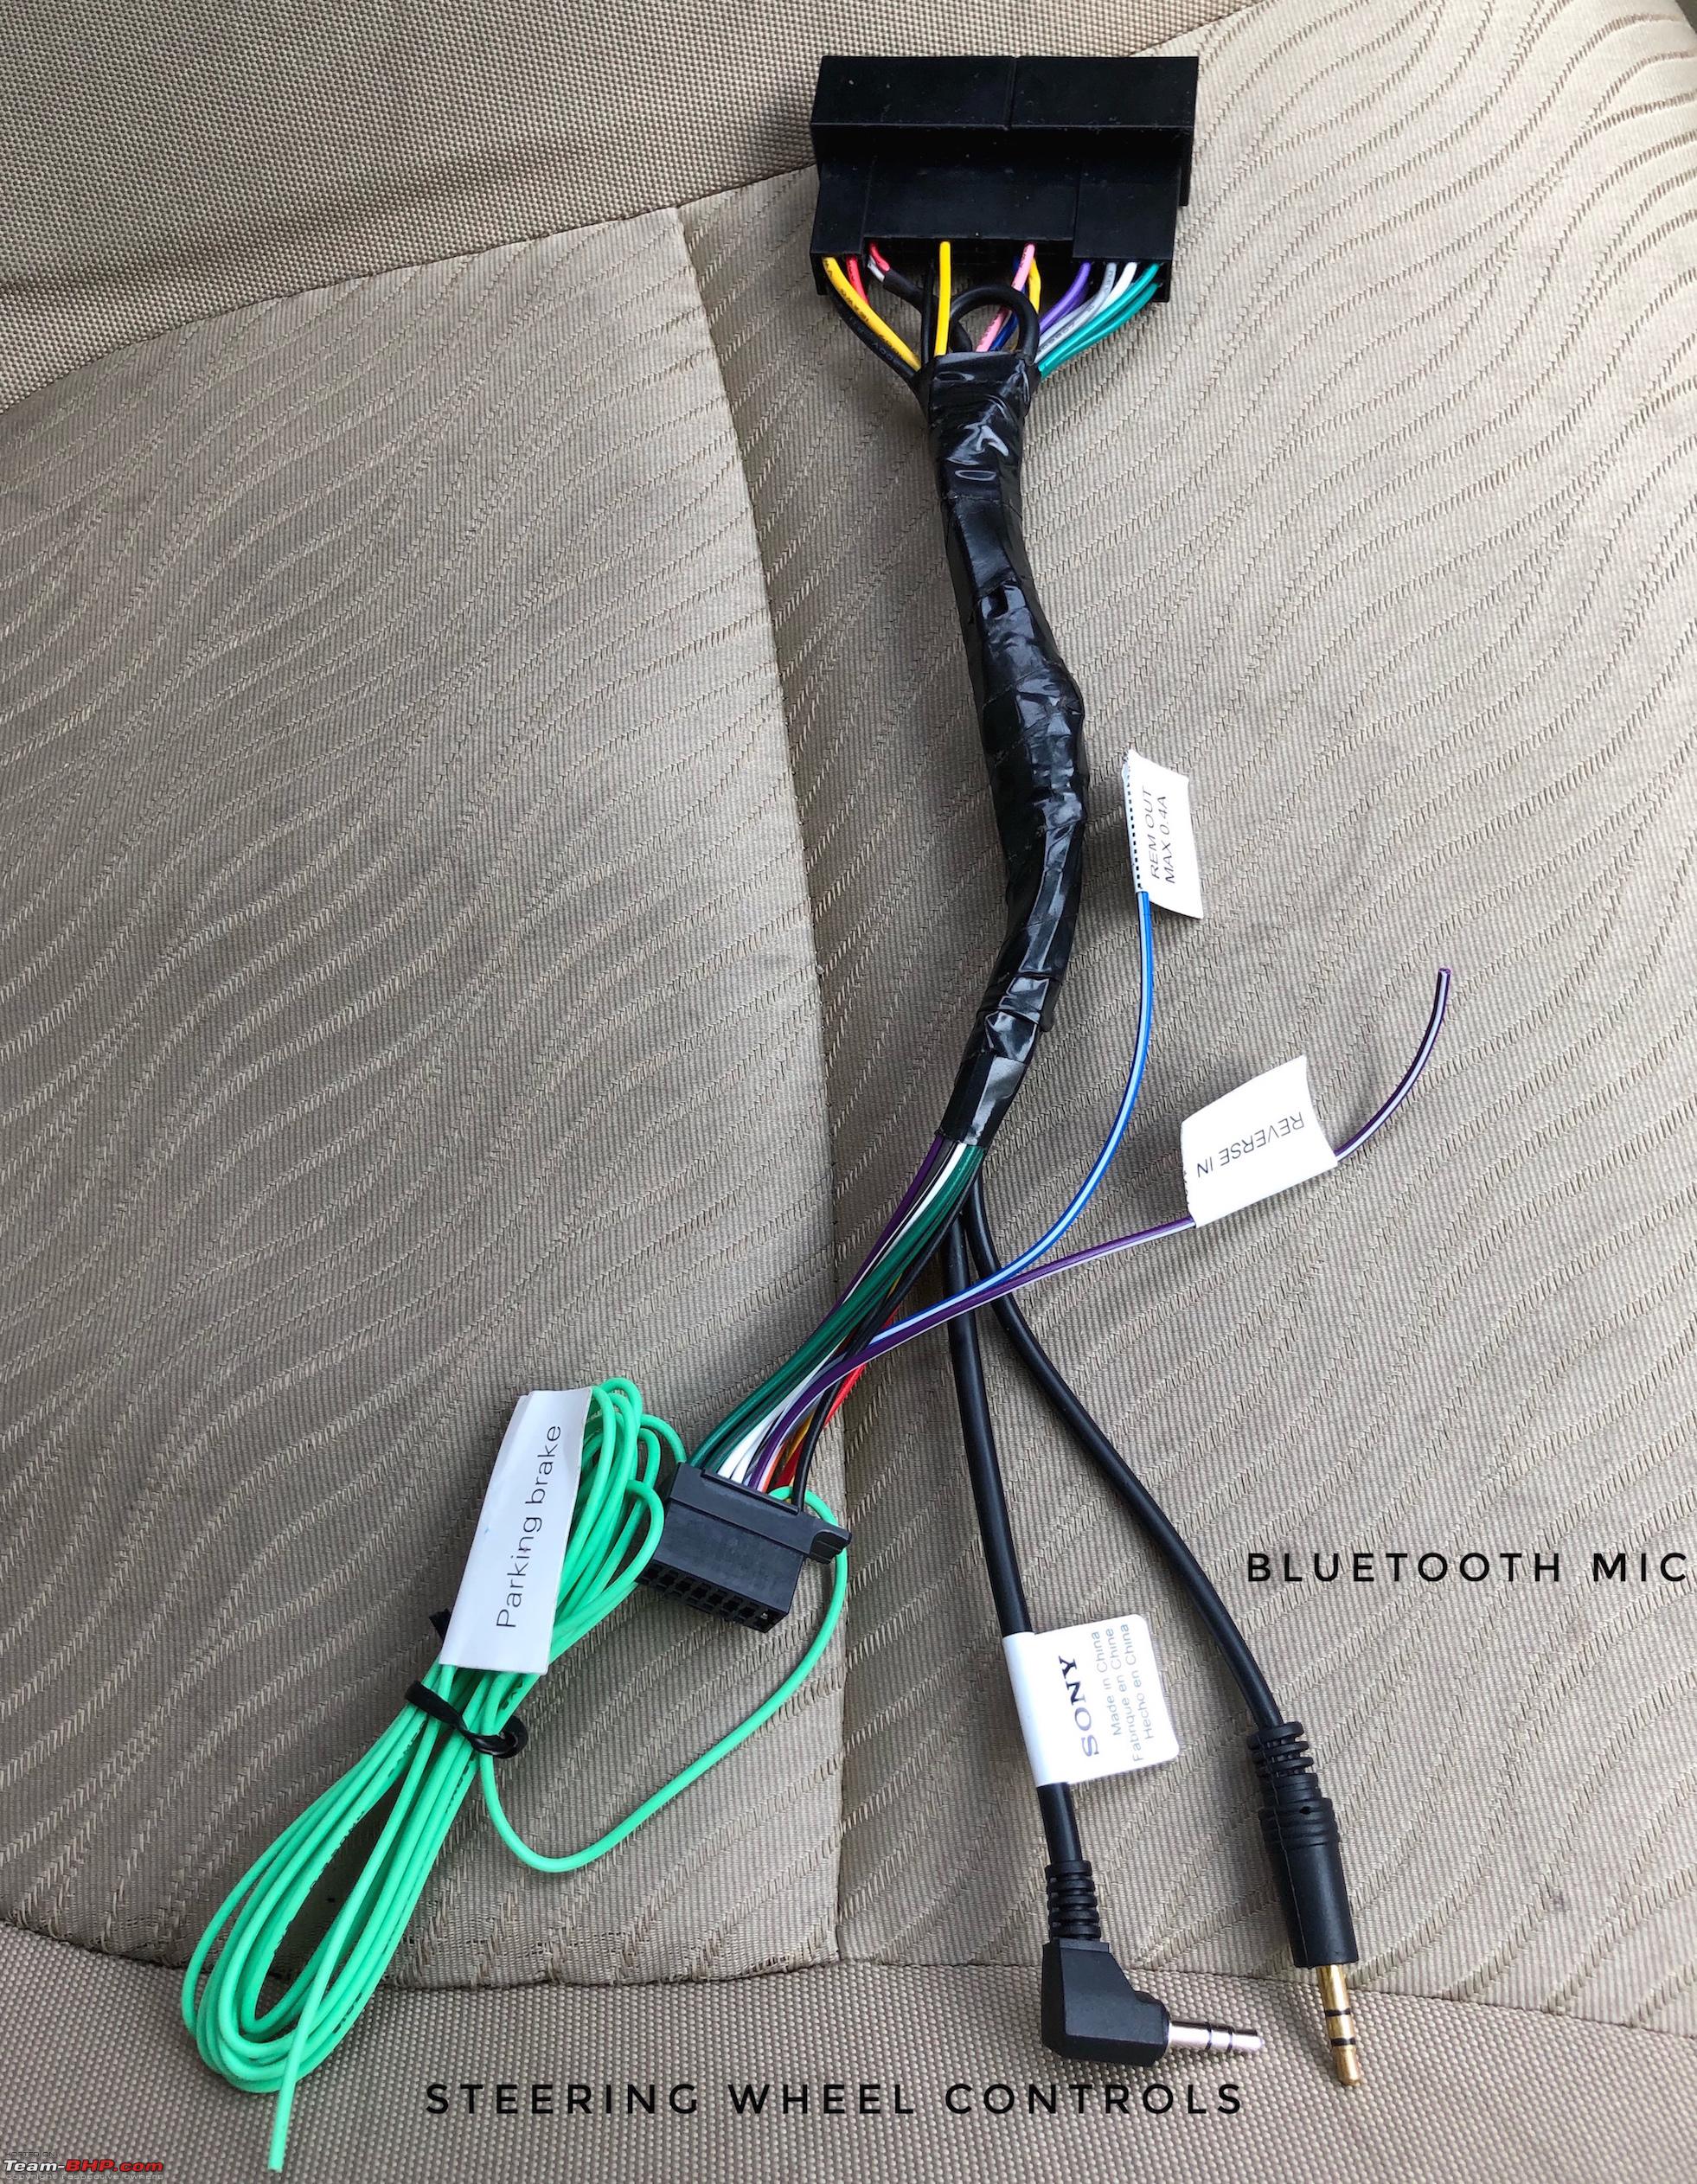
Cleaning Up and Finishing the Wire Harness
I like a clean setup with no cluttered wires and a mess at the back of the HU. Soldered all the connections and wrapped it up in electrical tape.

Colours matched, soldered and wrapped in heat-shrink tubing.

Made to look like a factory harness.
TESTING BEFORE FINAL FITMENT
Before you close everything up, plug in the custom made harness and start her up. Test for :-
- Startup
- Sound
- Steering Wheel Controls
- Bluetooth mic
- Reverse Camera
- Illumination
- USB Port

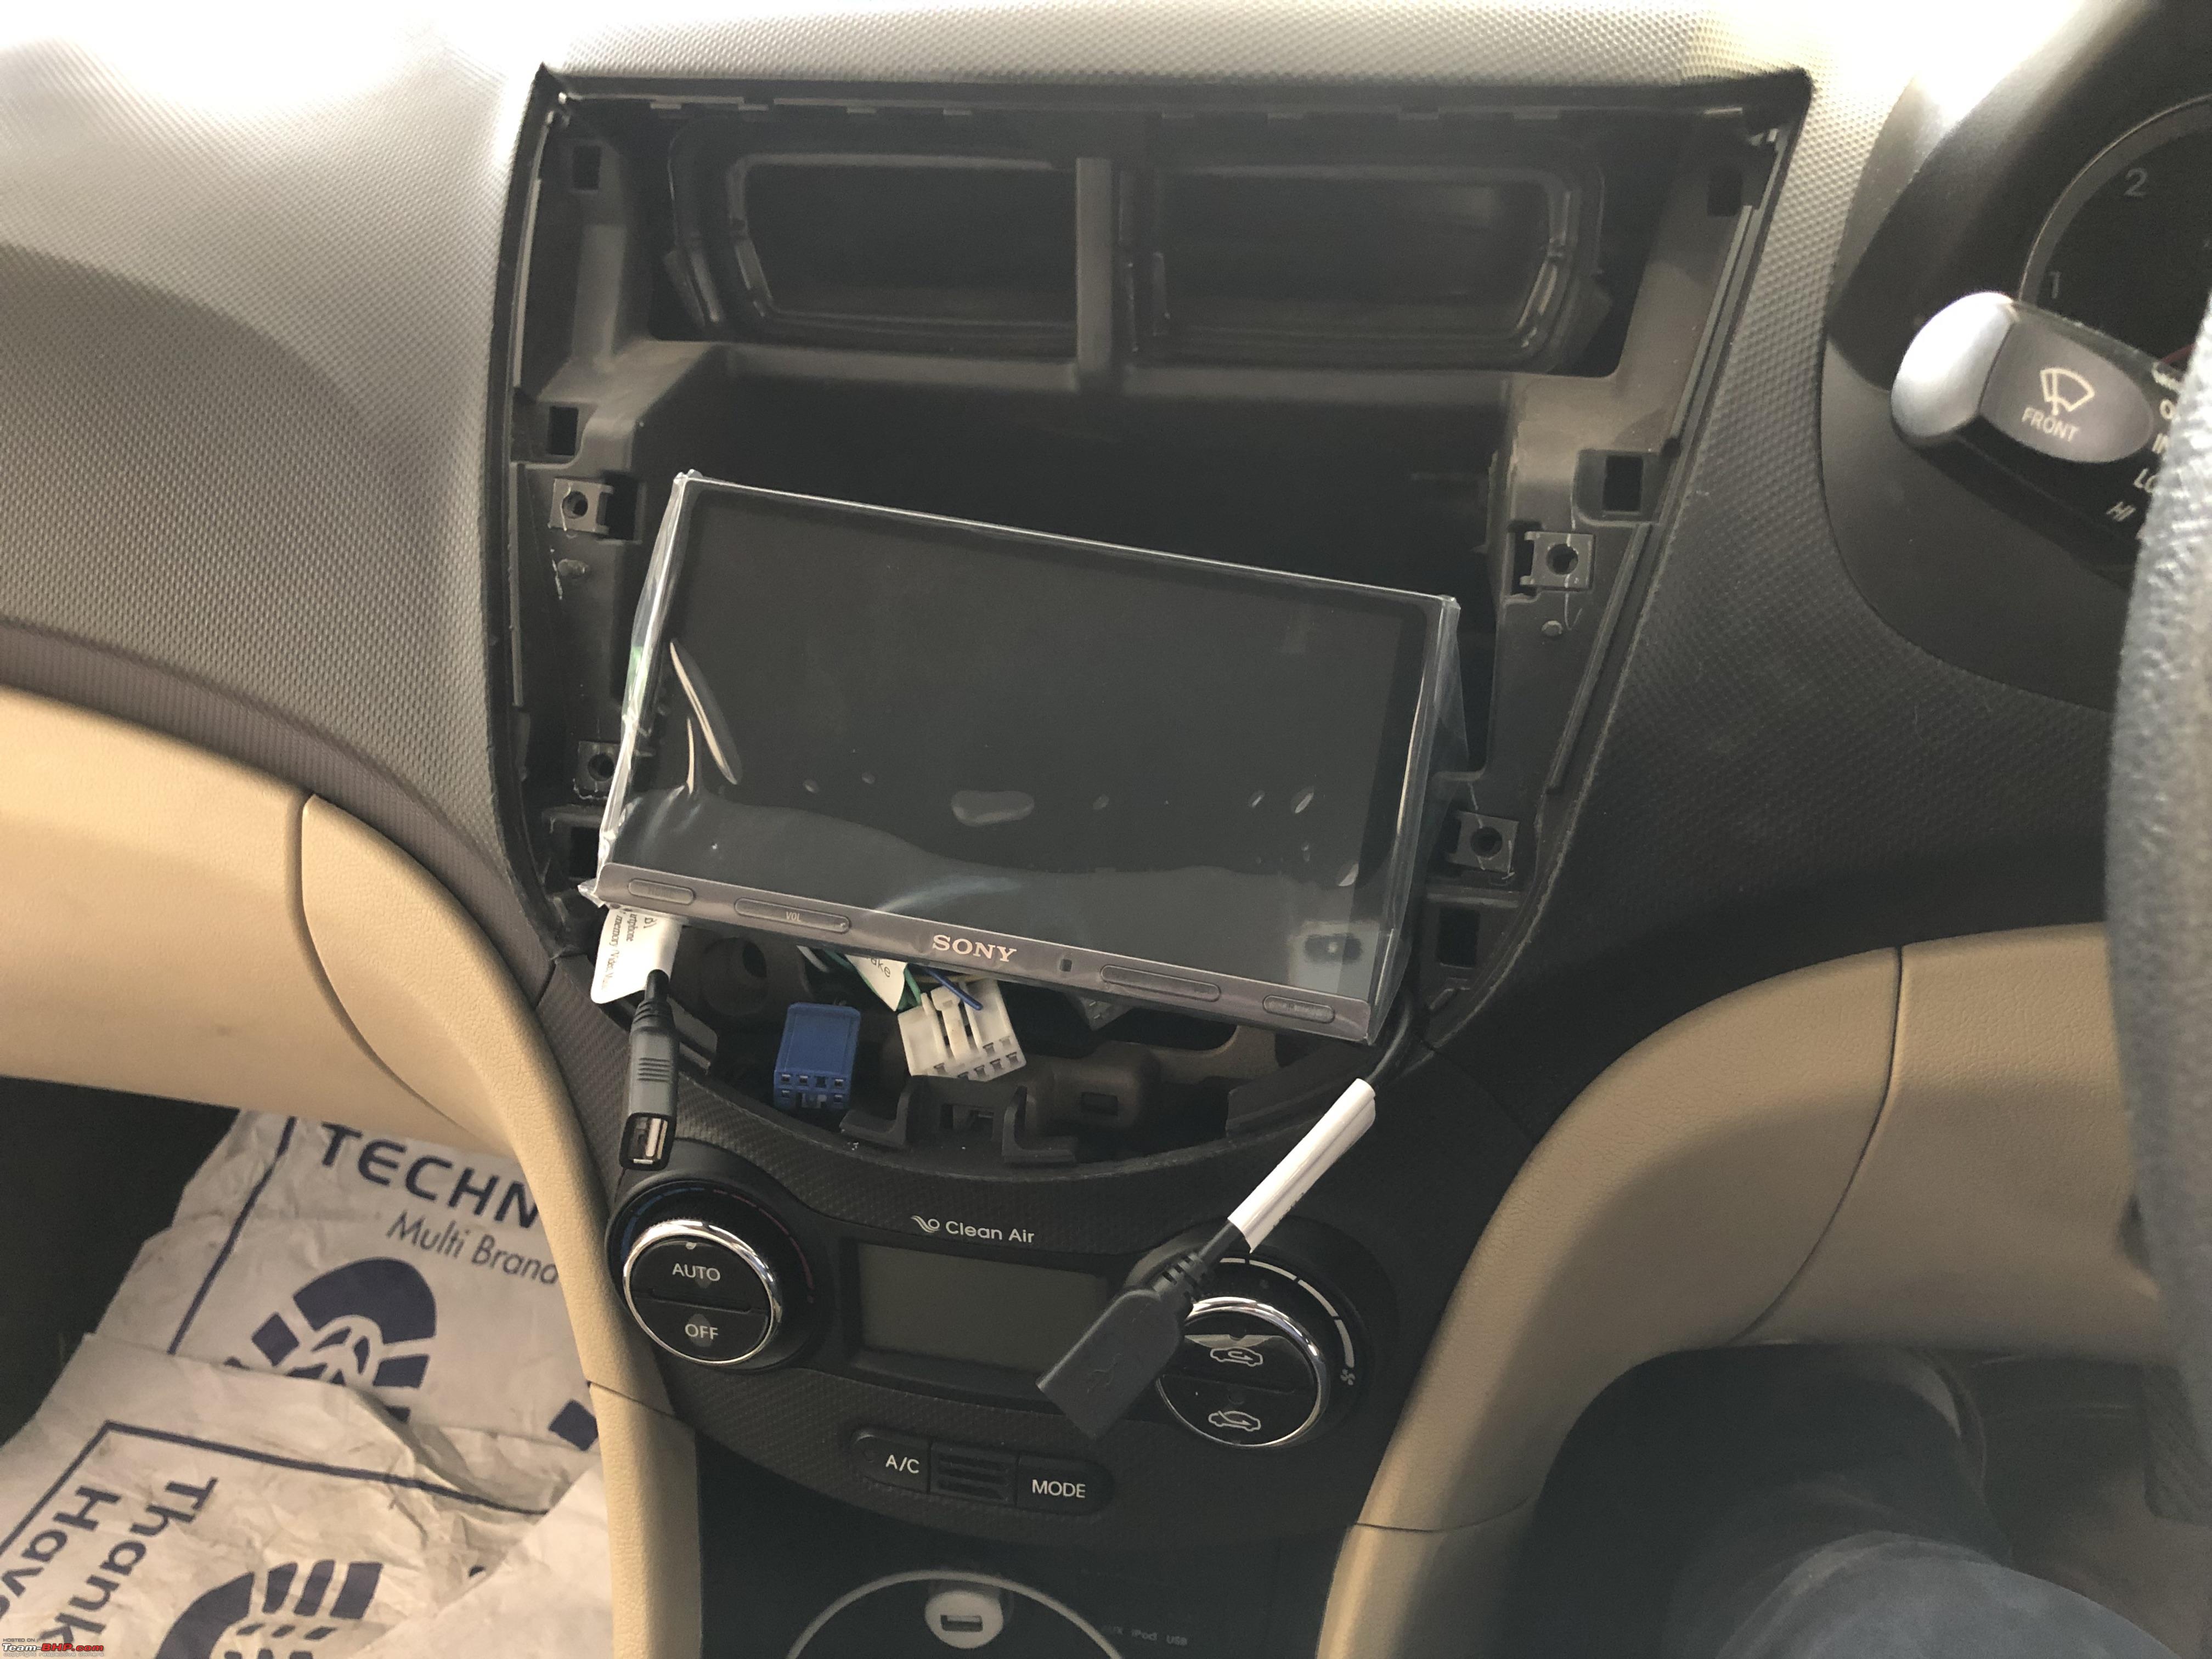
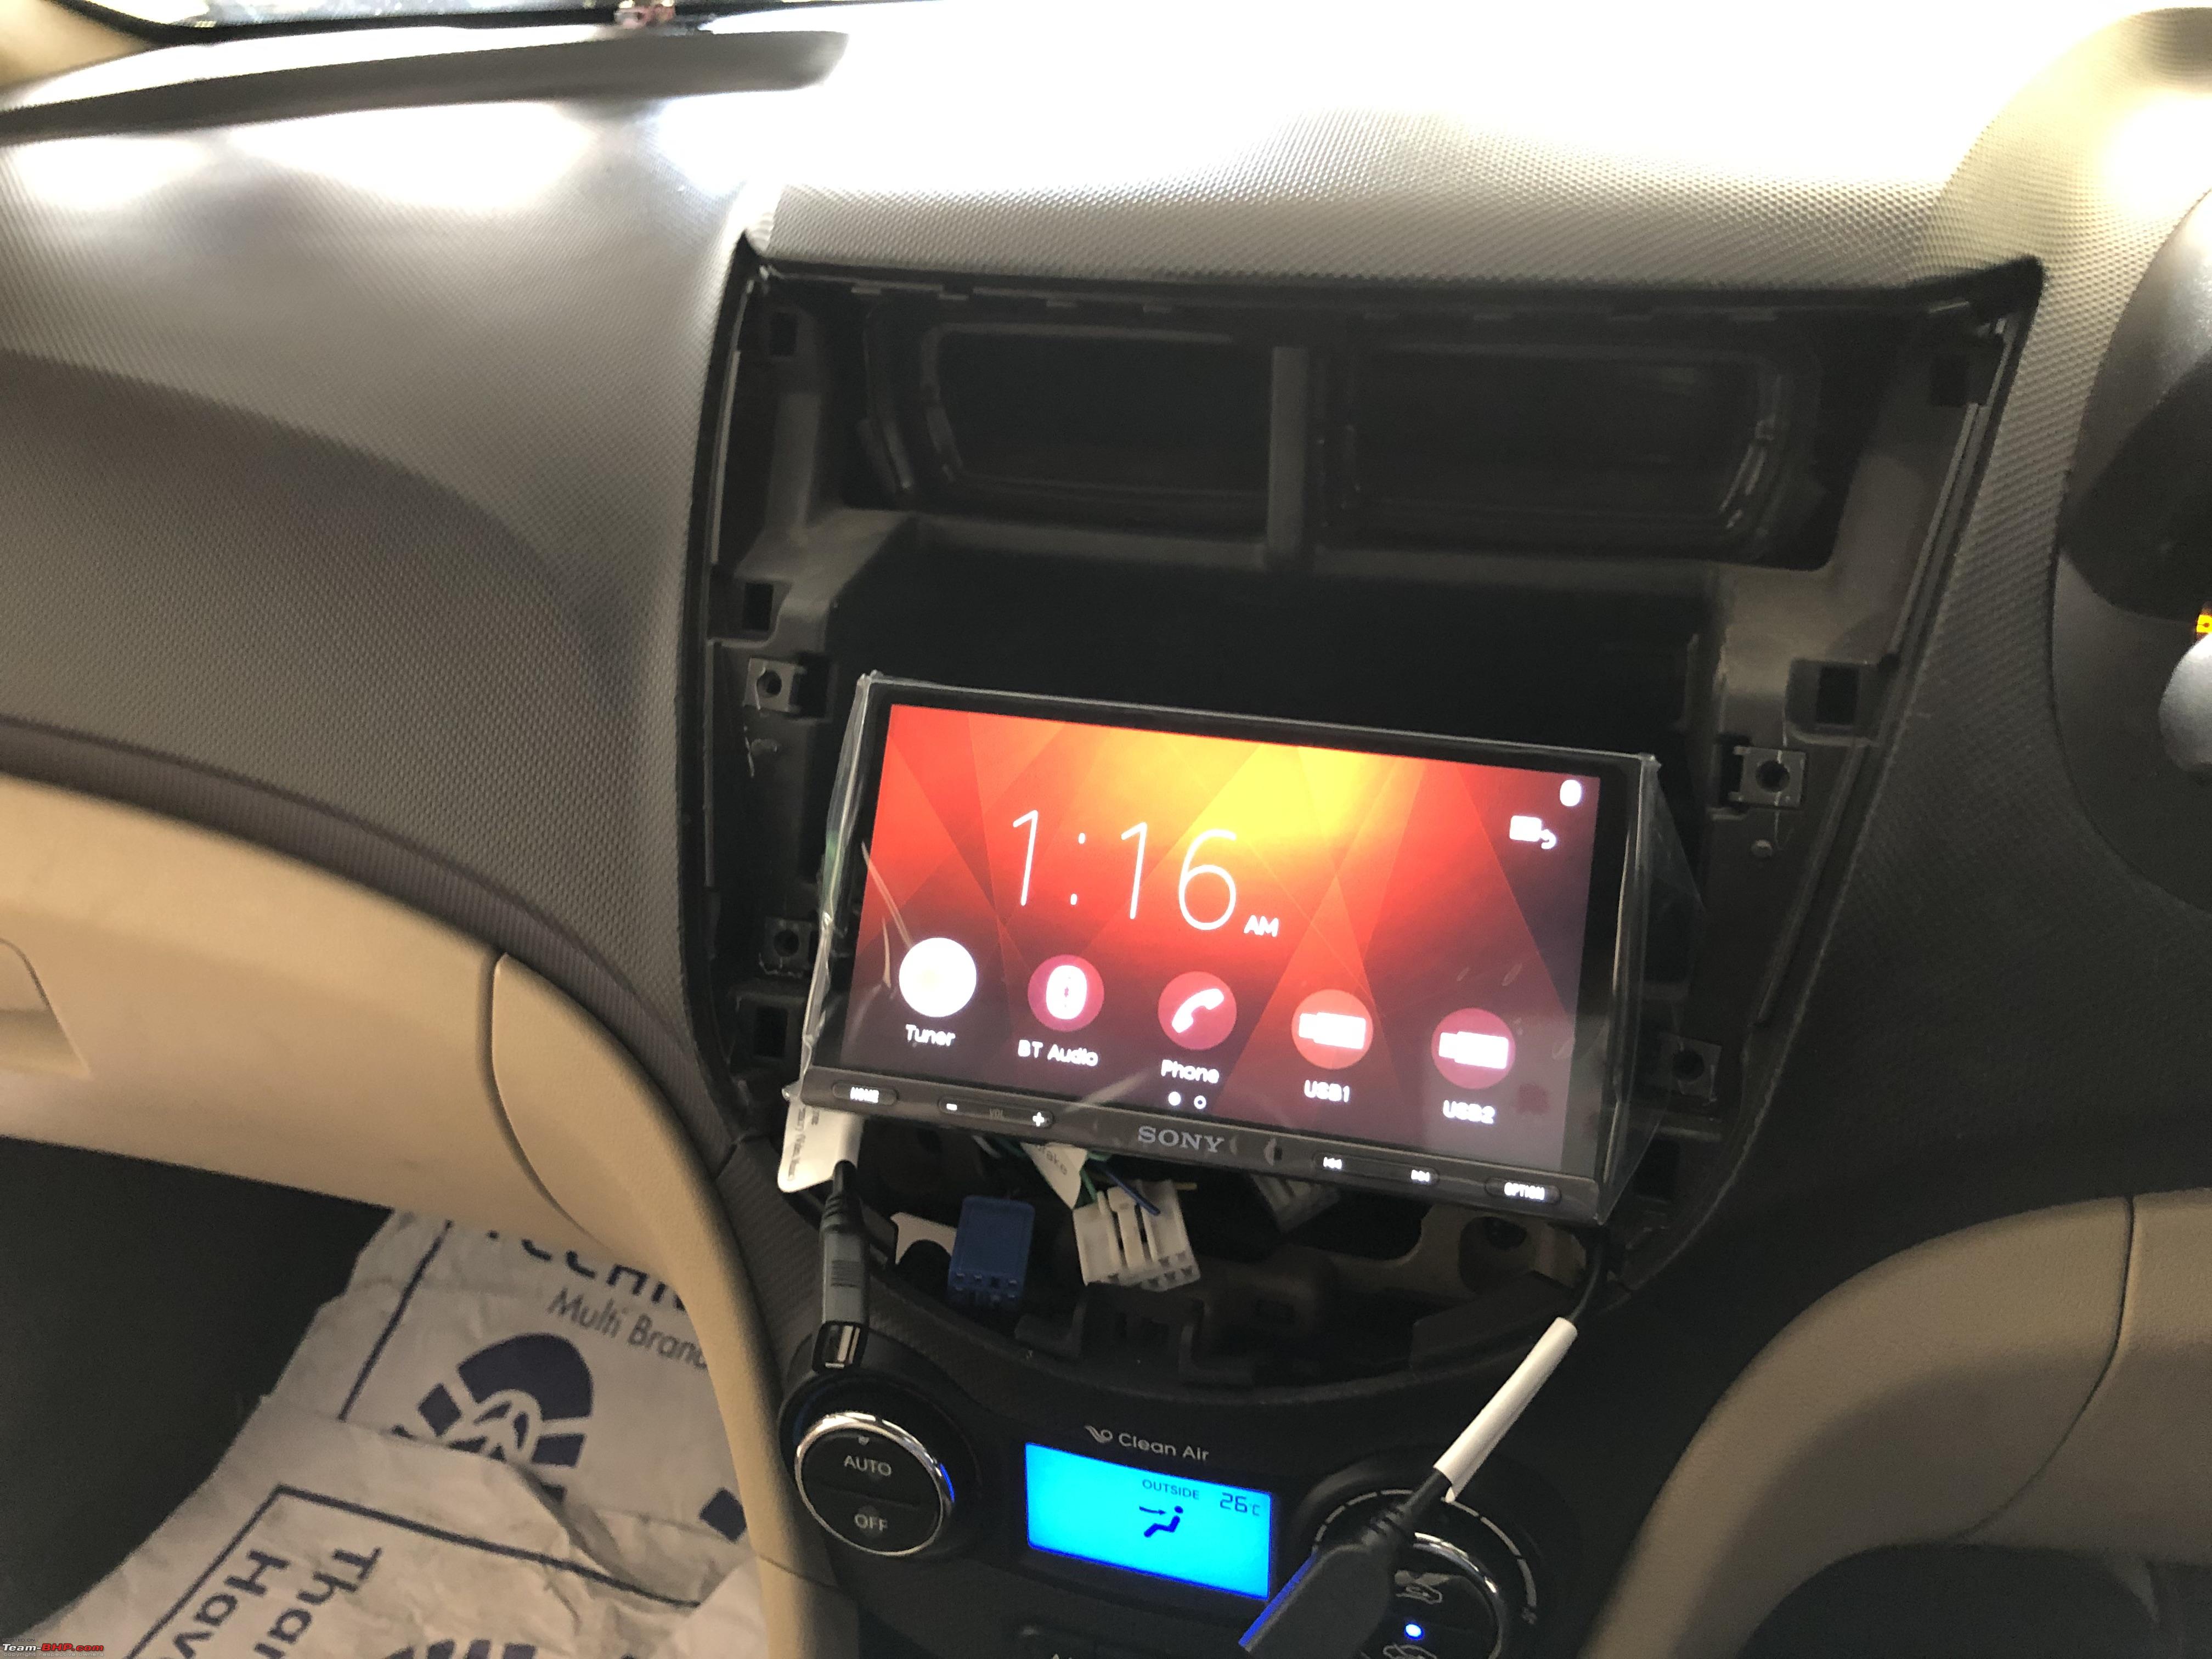
Connected and ready for test-fire

First Boot, check all of the above.

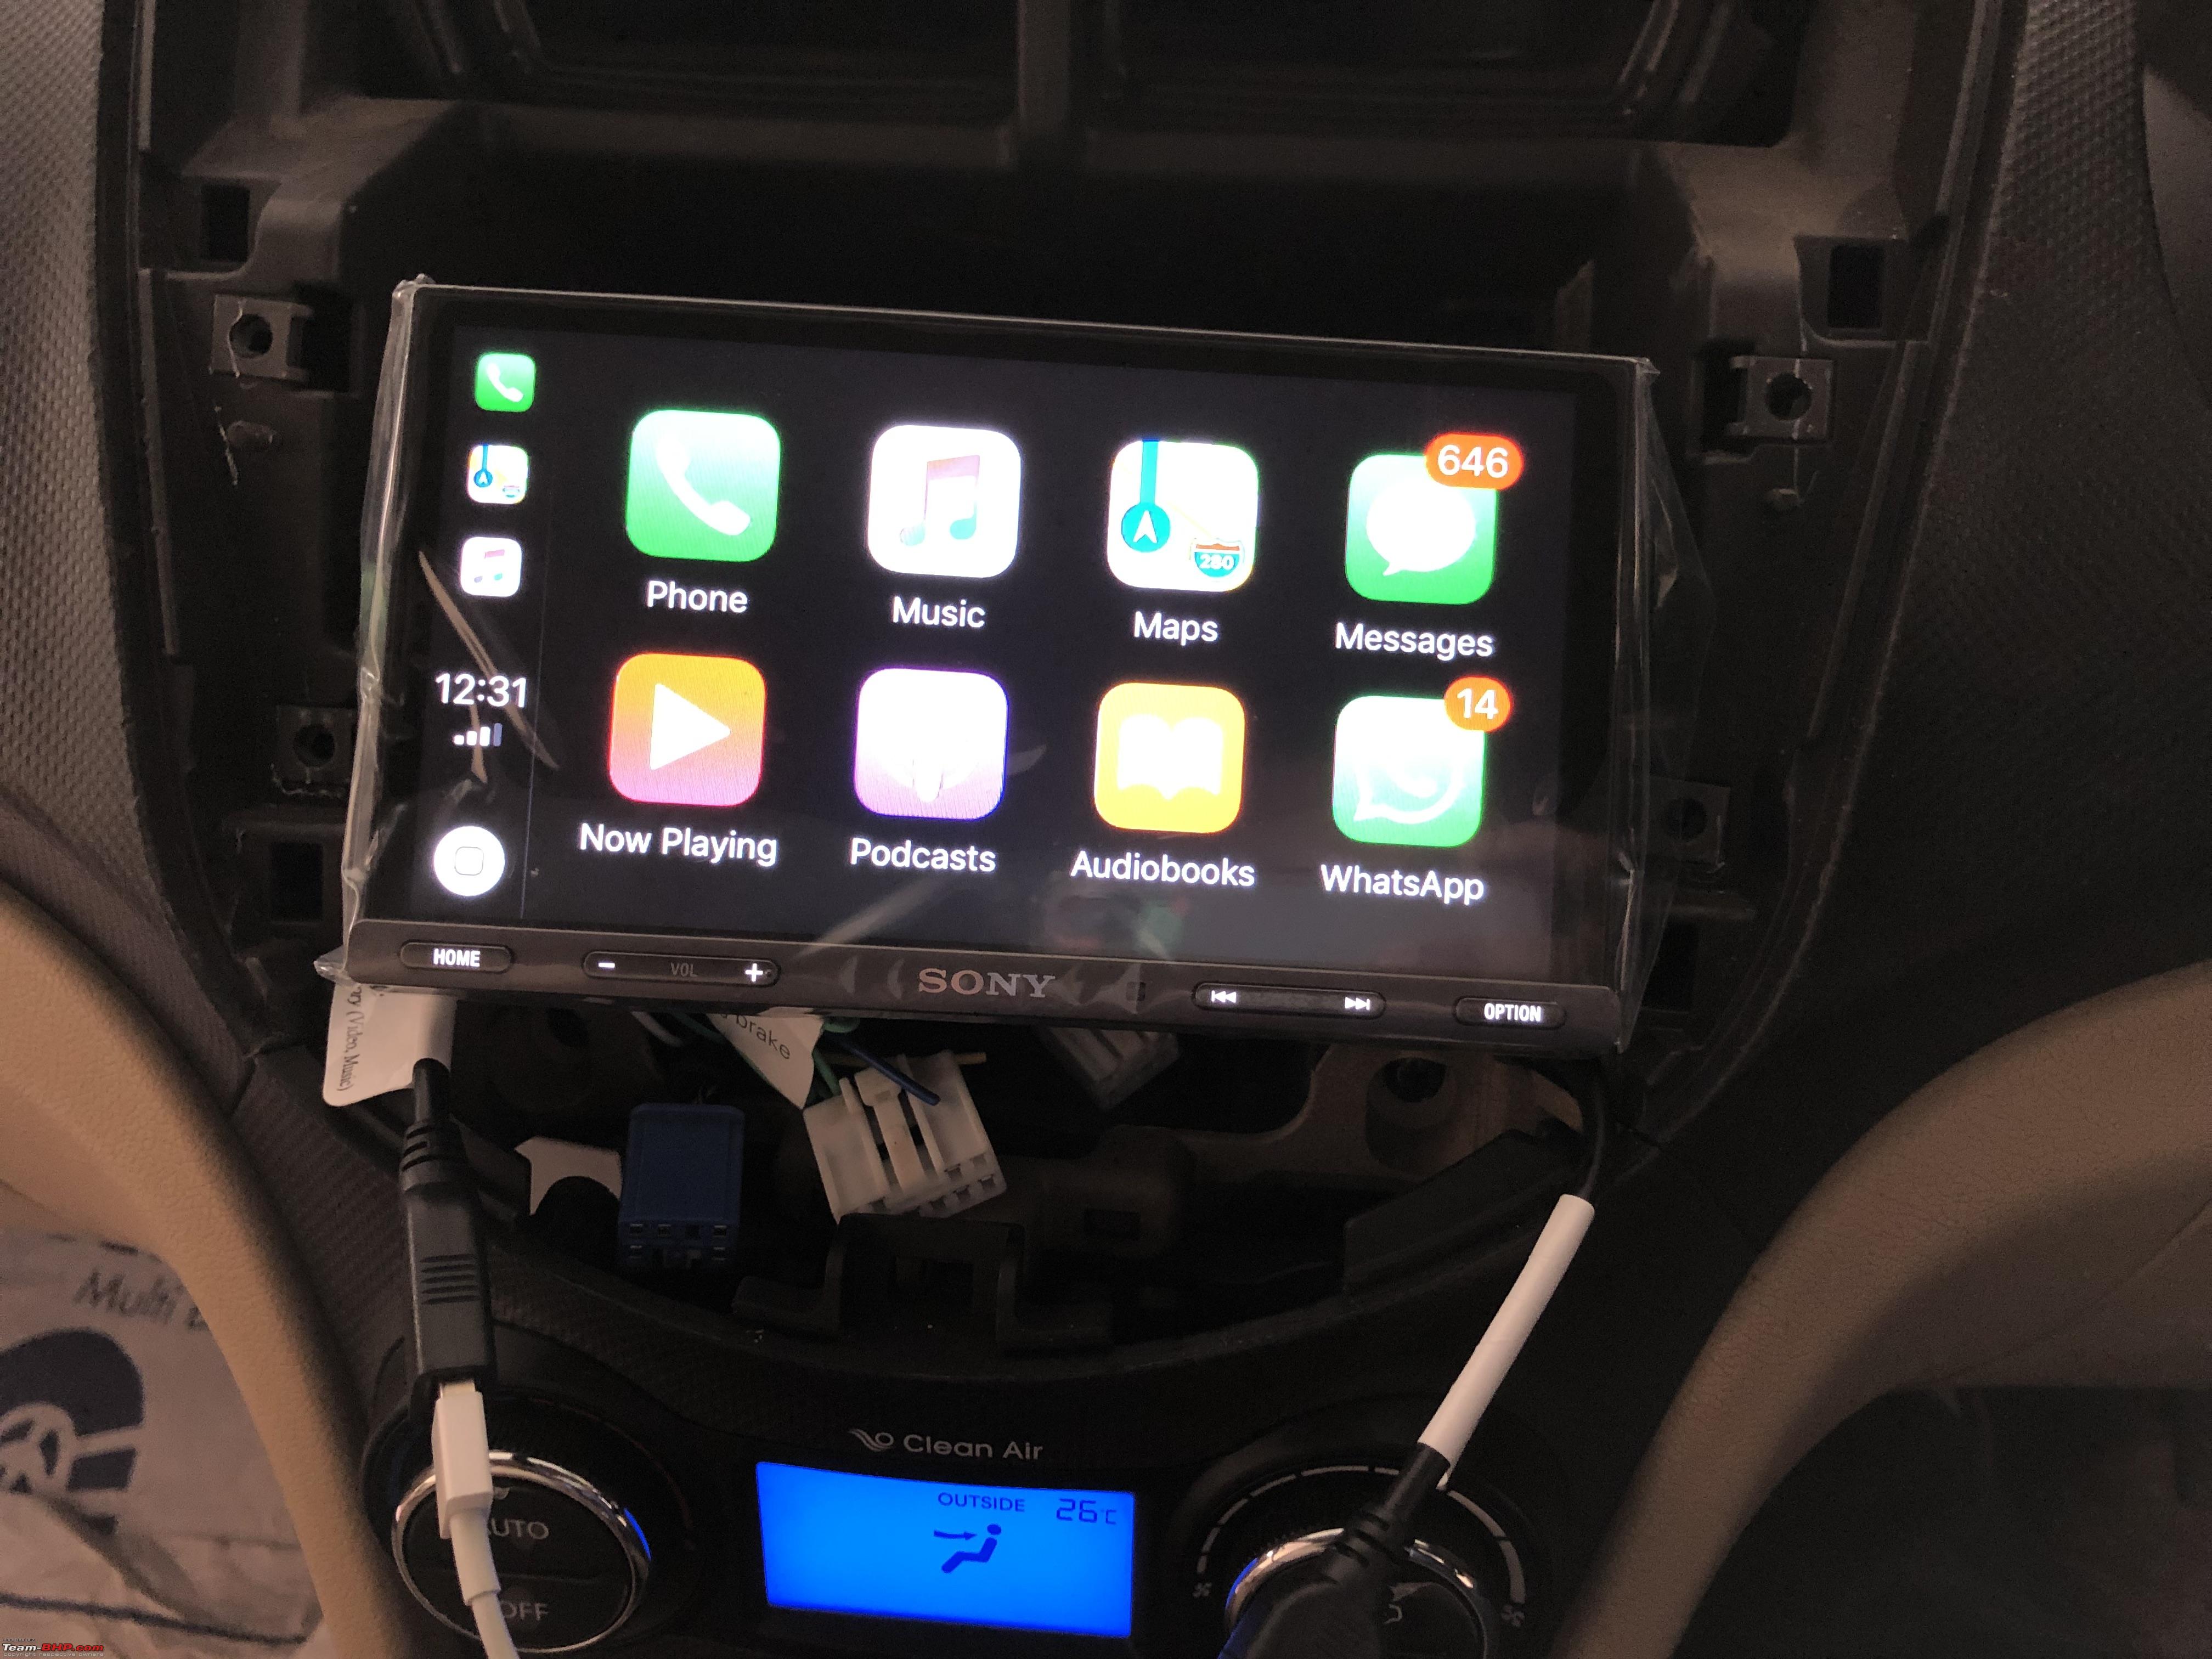
Apple CarPlay

Fitting it all in, Sony even provide a rubber gasket for a flush fit.
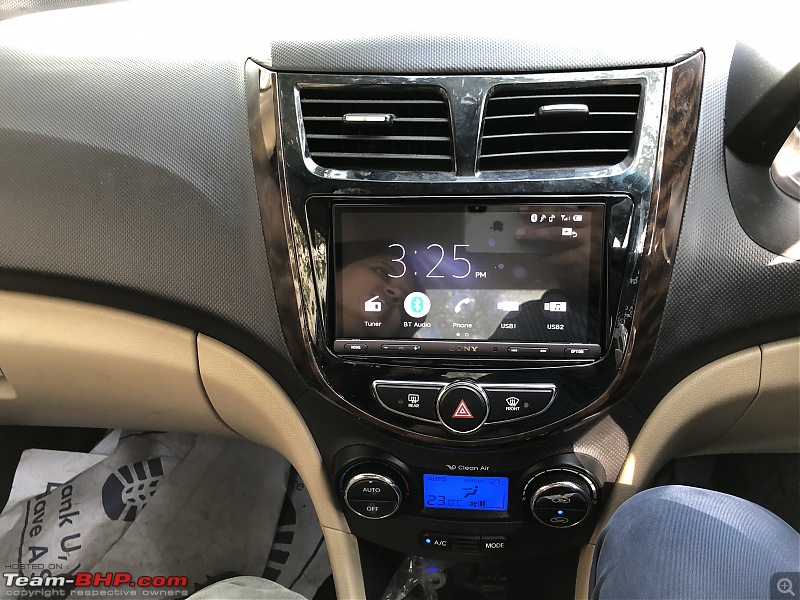
Home screen after final fitment

As good as OEM. Flush fit into the dash.

Driver's eye view
Some close up pictures 

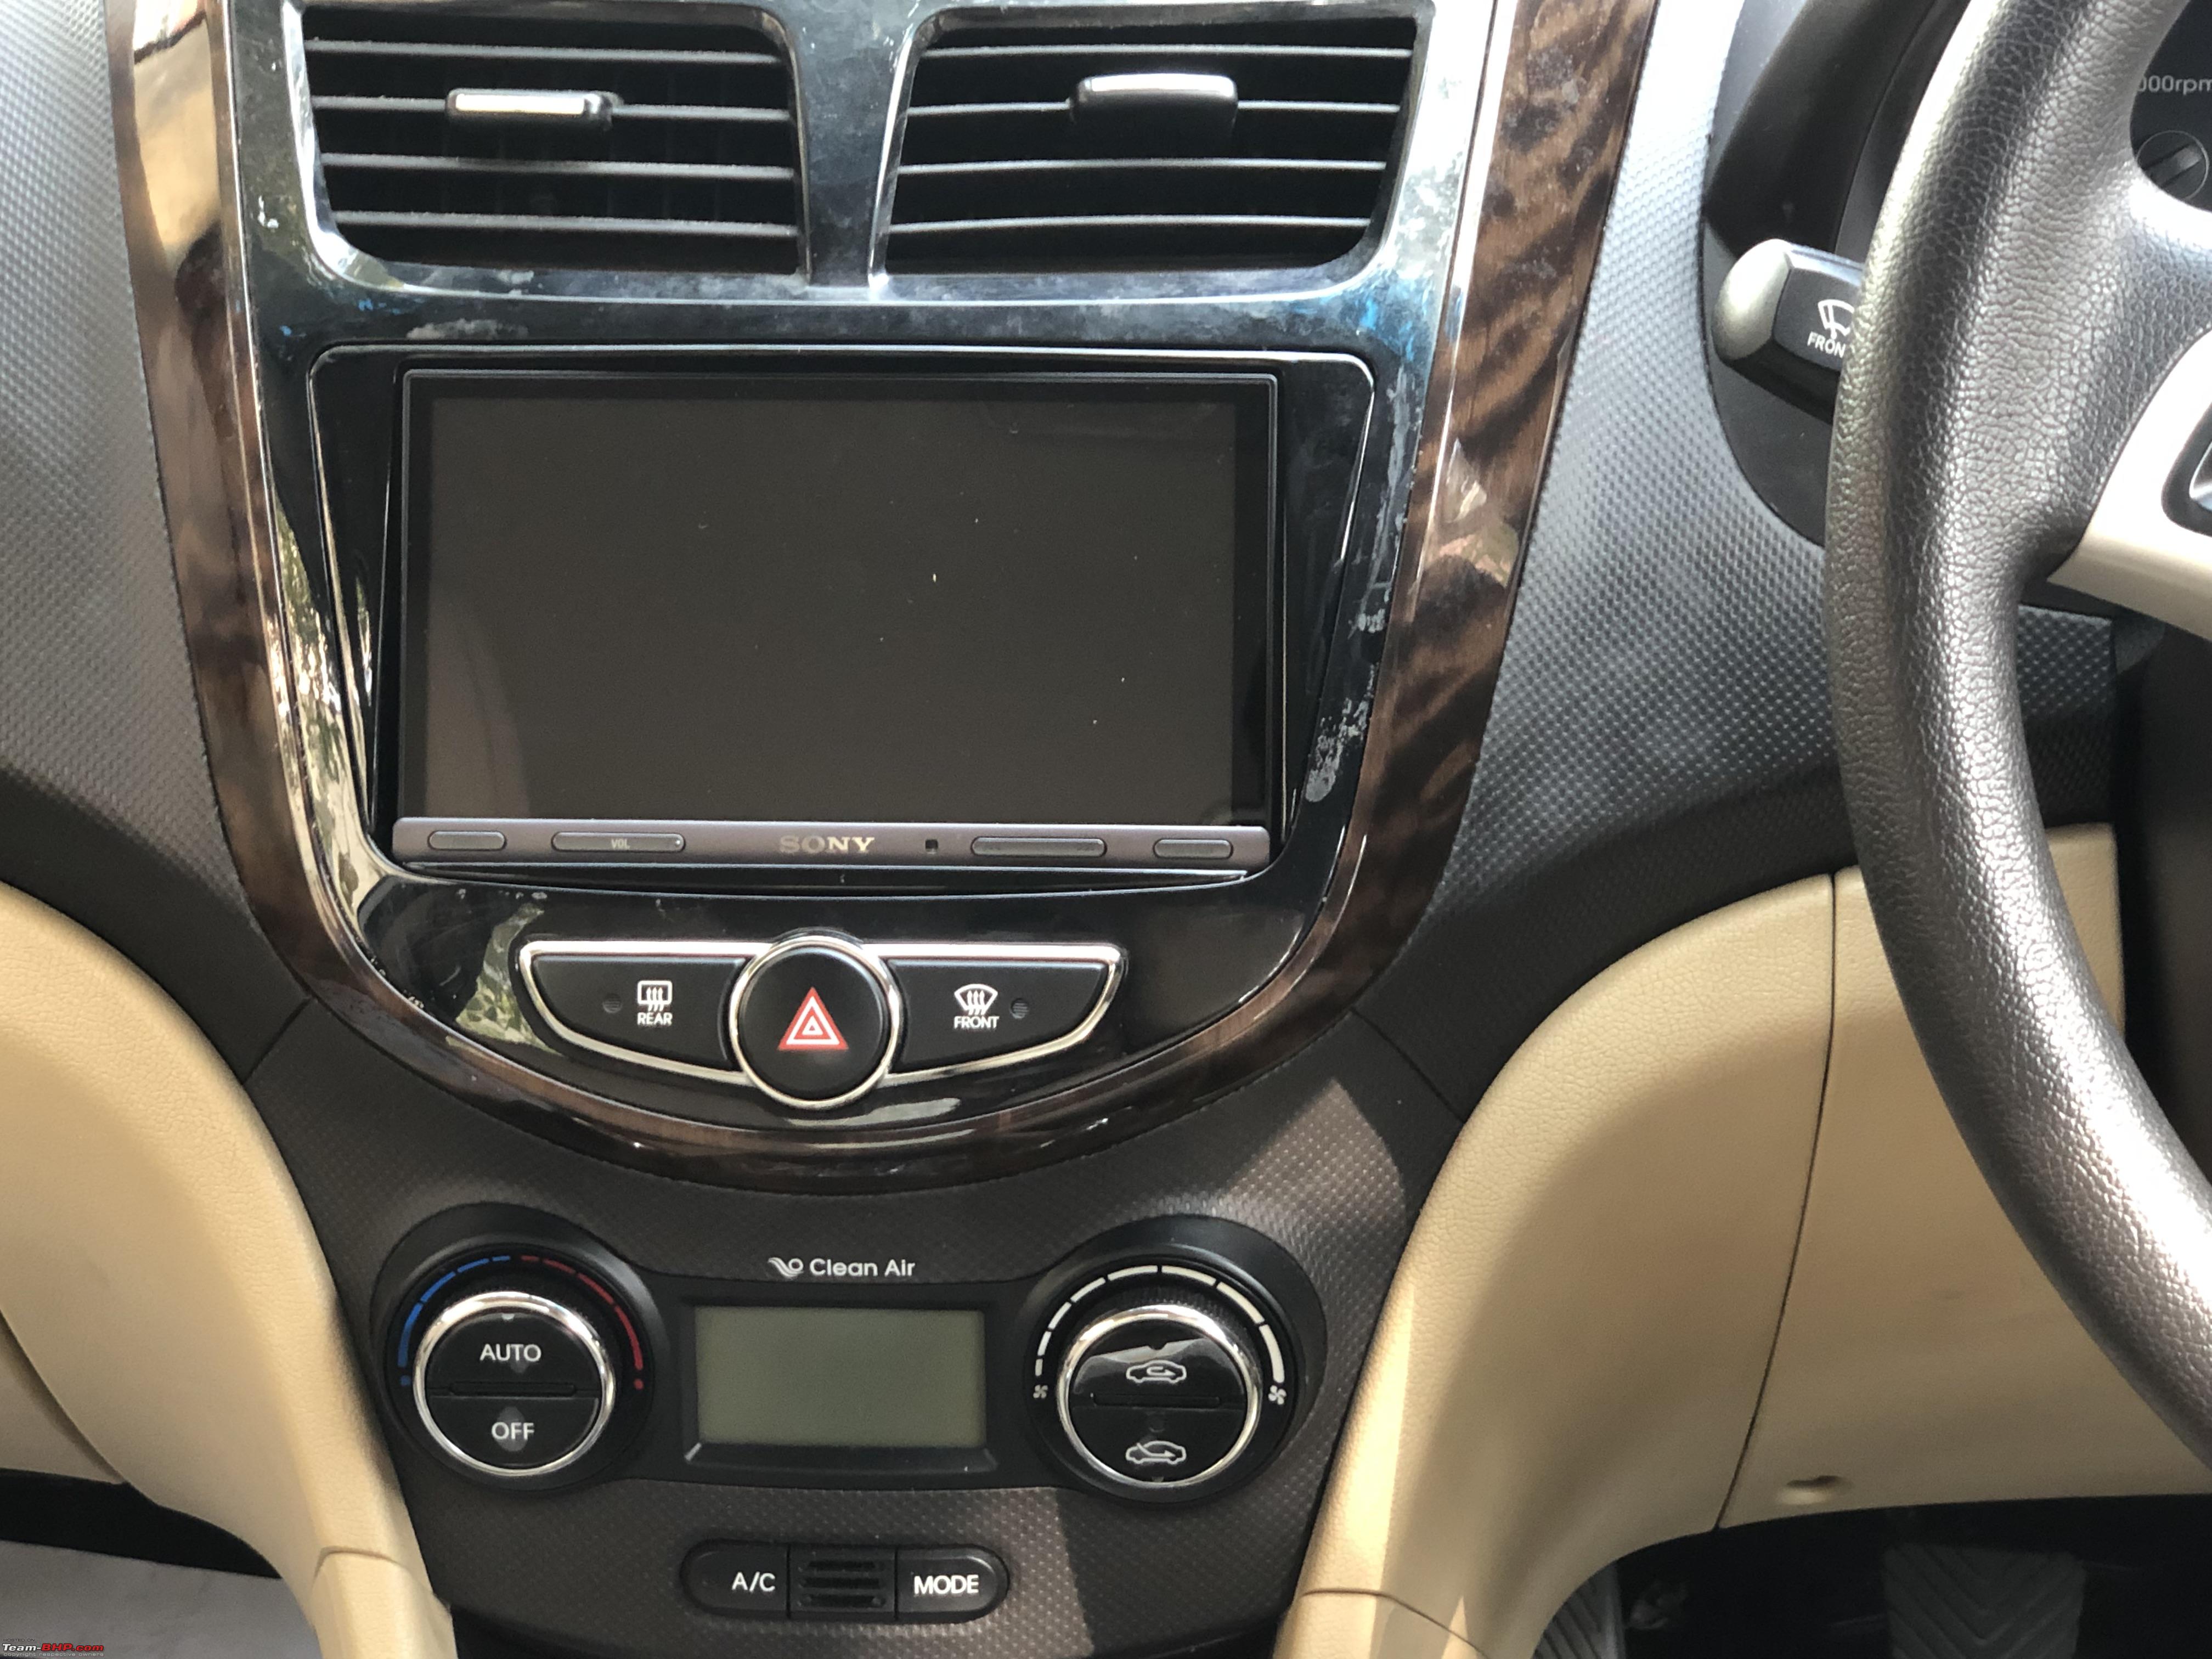
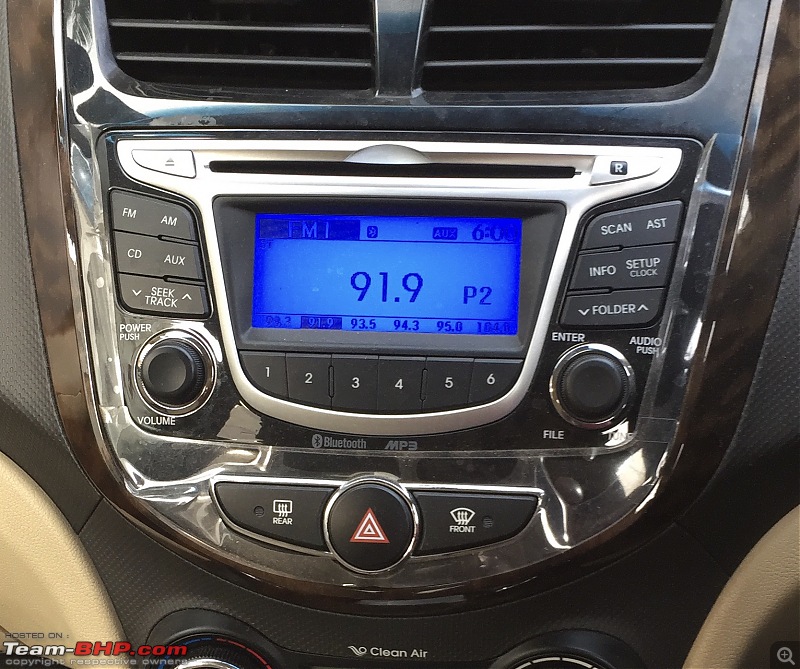
 So we went from: January 2015
From a basic non-touchscreen, non-nav radio with USB/AUX, FM and monochromic display
TO
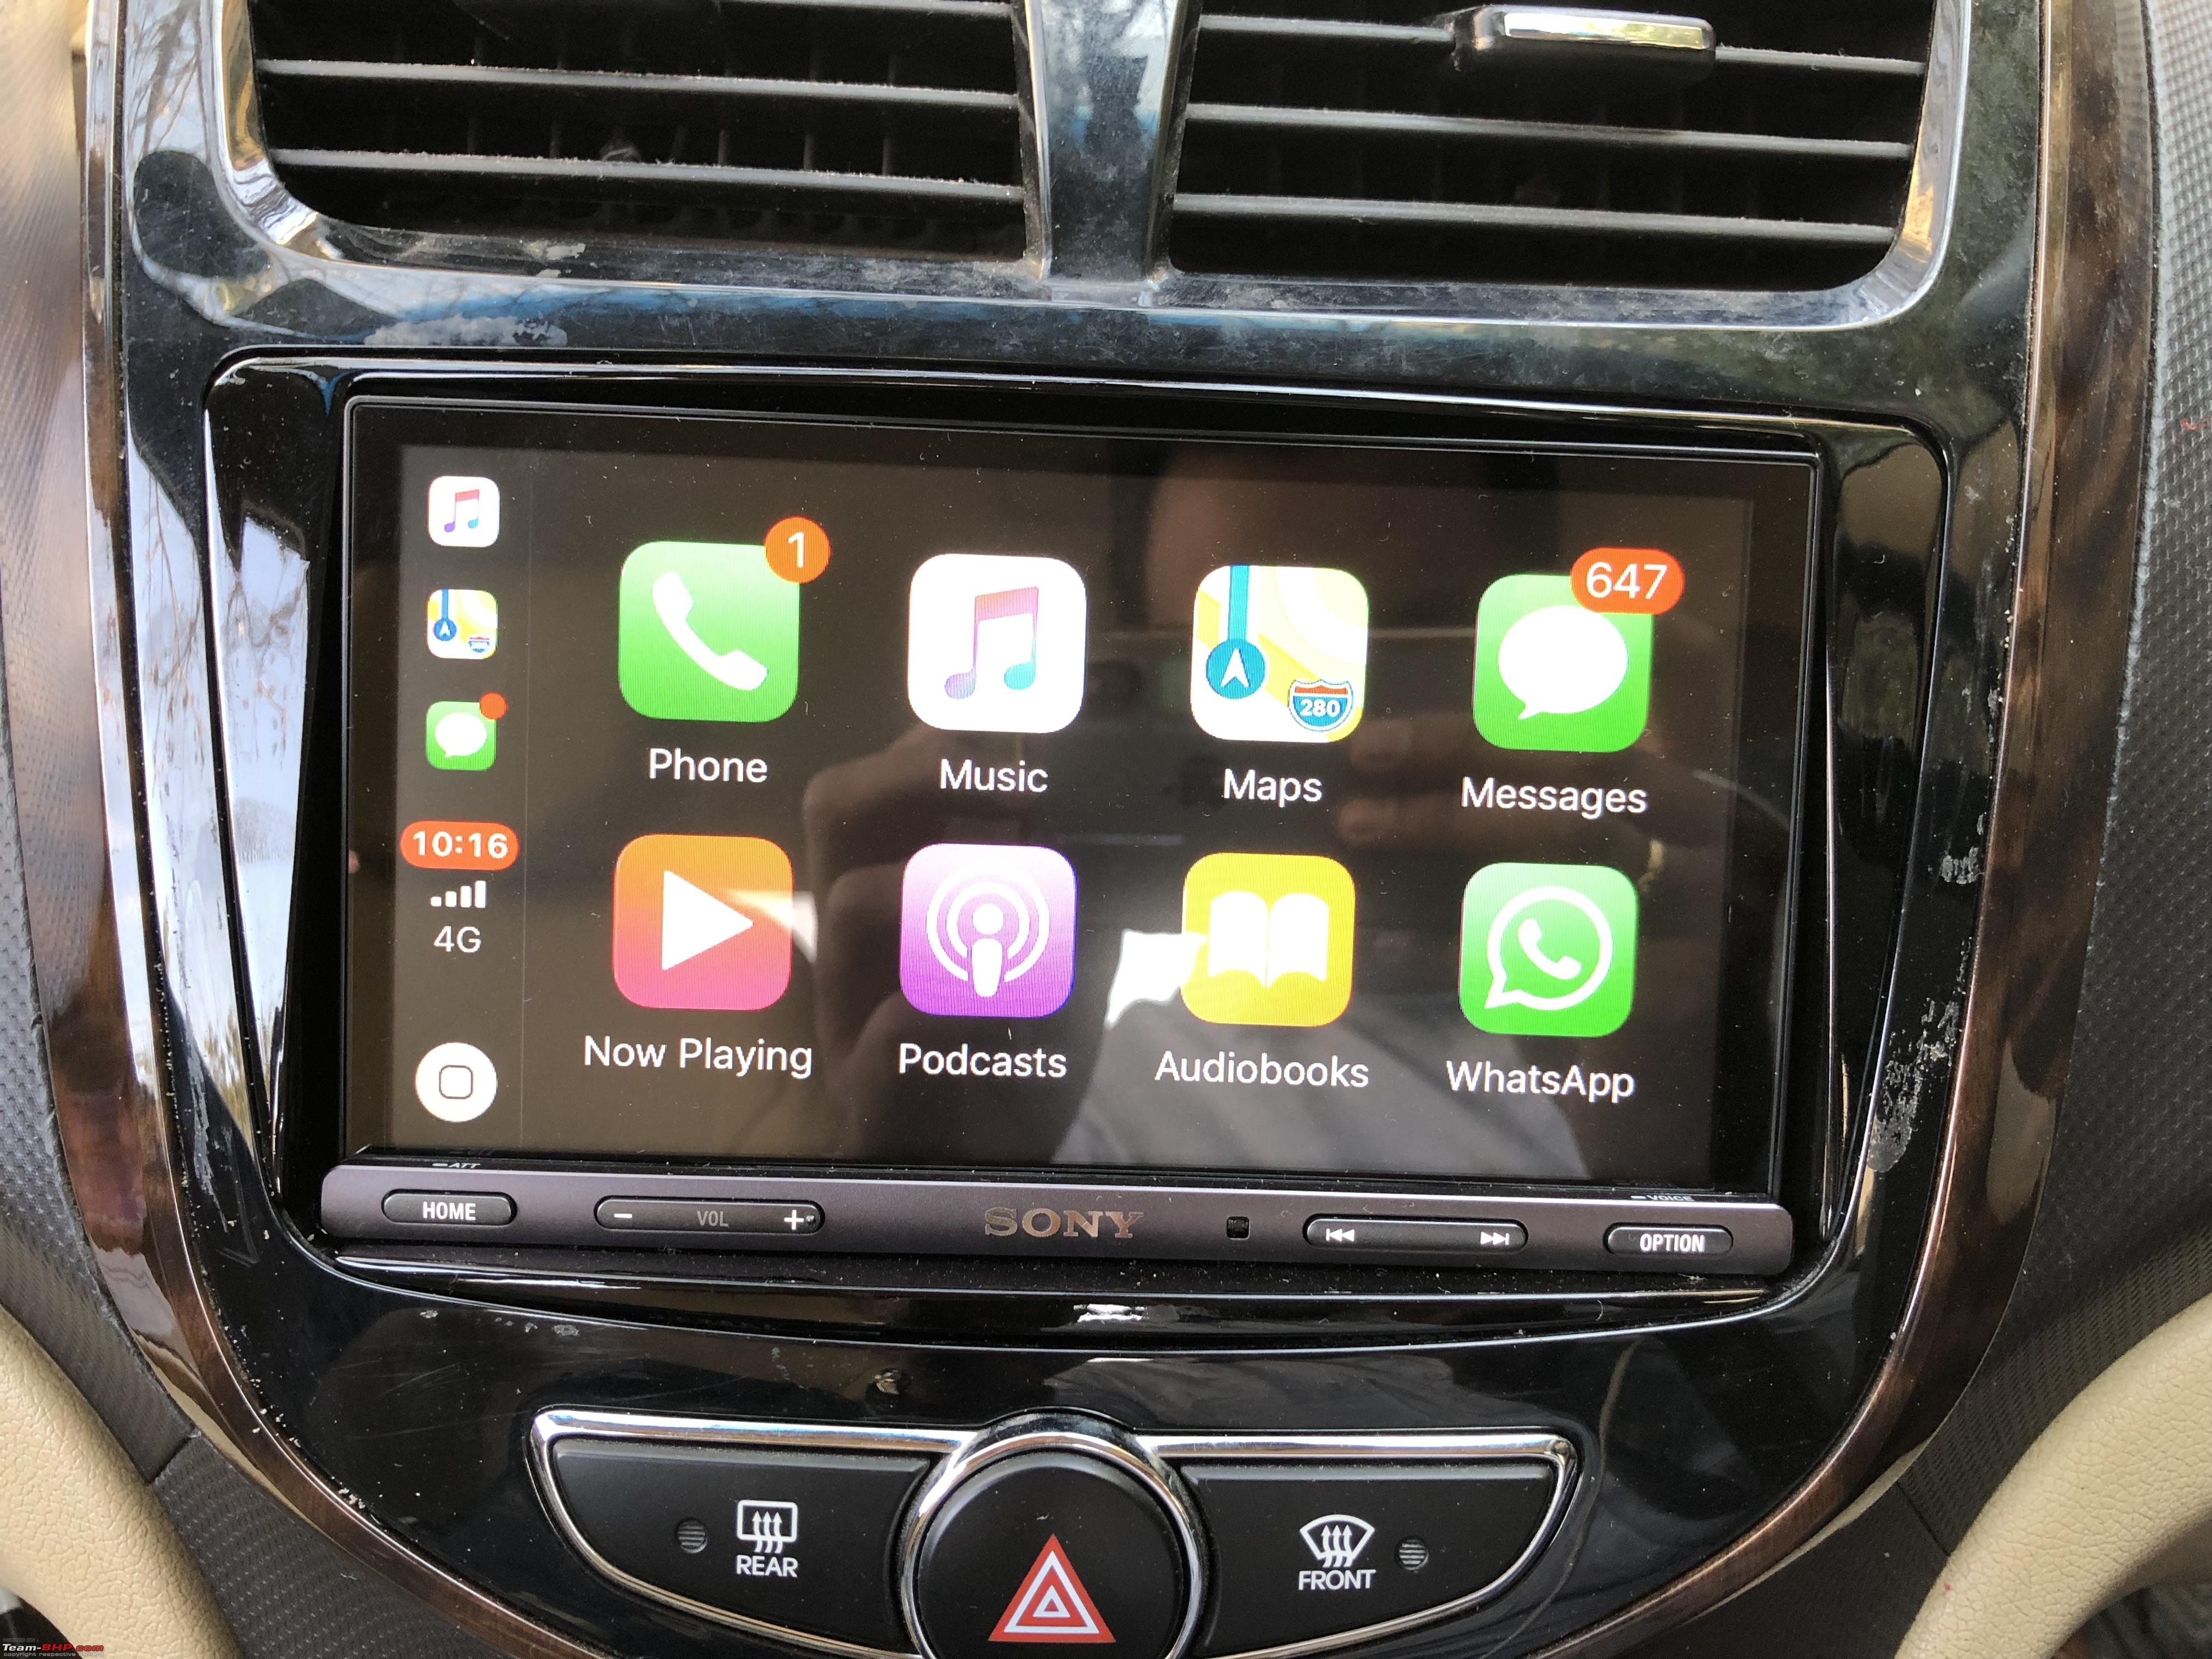
January 2019
A fantastic 7-inch capacitive touch screen with Apple CarPlay/Android Auto, USB/FM and integrated backup camera.

This should keep me happy for years to come and not make me think my car is old. lol:
SONY XAV-AX 5000
Now that the entire installation is complete, I thought I'll put up a small review of the headunit itself.
The Sony XAV-AX5000 is on sale in India at a price of between Rs. 20.5 to 25 thousand rupees depending on where you pick it up (online or Sony Store). It comes with a 2 year warranty.
Inside the box you have:- Headunit itself
- Sony ISO 16-pin stereo harness
- Steering Wheel Controls (SWC) Adapter
- Rubber Gasket
- Installation Manual & User Manuals
- Remote Control

The Sony XAV-AX 5000 is part of Sony's new lineup of Car Audio/Video systems that feature advanced phone connectivity options like Android Auto & Apple CarPlay as is currently the trend among car manufacturers and consumers. The Sony XAV-AX 5000 stands at the elite end of the lineup.
Features- 7" (6.95") bezel-less capacitive touchscreen (no multi-touch)
- Quick access key terminal for easier operation when on the move
- single din chassis for an easier install
- dual USB Ports
- 3 pre-outs to connect your desired amplifiers/sub-woofers
- Rear Camera Ready
- Bluetooth Wireless Technology
- Dynamic Stage Organiser
- FLAC Compatible
- 4 x 55W Dynamic Reality Amp
- Apple CarPlay and Android Auto
What you'll like
- Fantastic capacitive screen. Doesn't cause too much glare in the sun either
- Minimalistic interface that makes it very easy to use.
- Brilliant Audio quality. Both with music as well as calls
- Connects to bluetooth within seconds of turning on the car
- Reverse Camera. You can even view the reverse feed when driving
- Dual USB Ports. 1 for USB devices and 1 for PhoneLink
- Boots up faster than stock system (and no annoying warning messages).
What you won't
- No AUX-IN. Some people will miss this, but I don't use AUX, so I'm ok there.
- Needs better speakers to really take advantage of the sound produced
- 10-band Equaliser doesn't do much.
Now for some pictures:
(Terribly sorry about the quality, I clicked these on an old Nexus 5 since my main phone was out of charge.) Boot Up 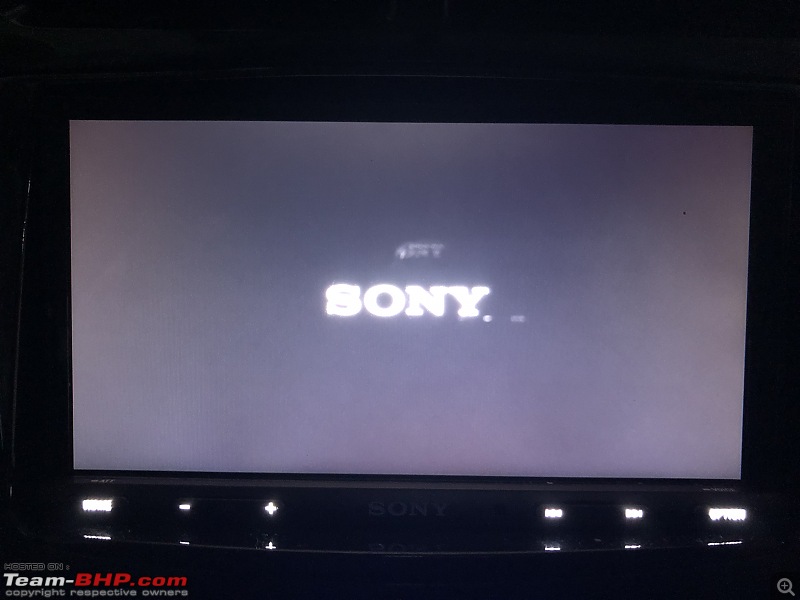 Startup Screen
The annoying startup screen on AVN systems. You don't have to press anything though. It goes away on its own in about 10 secs. Music continues to play in the background at this point
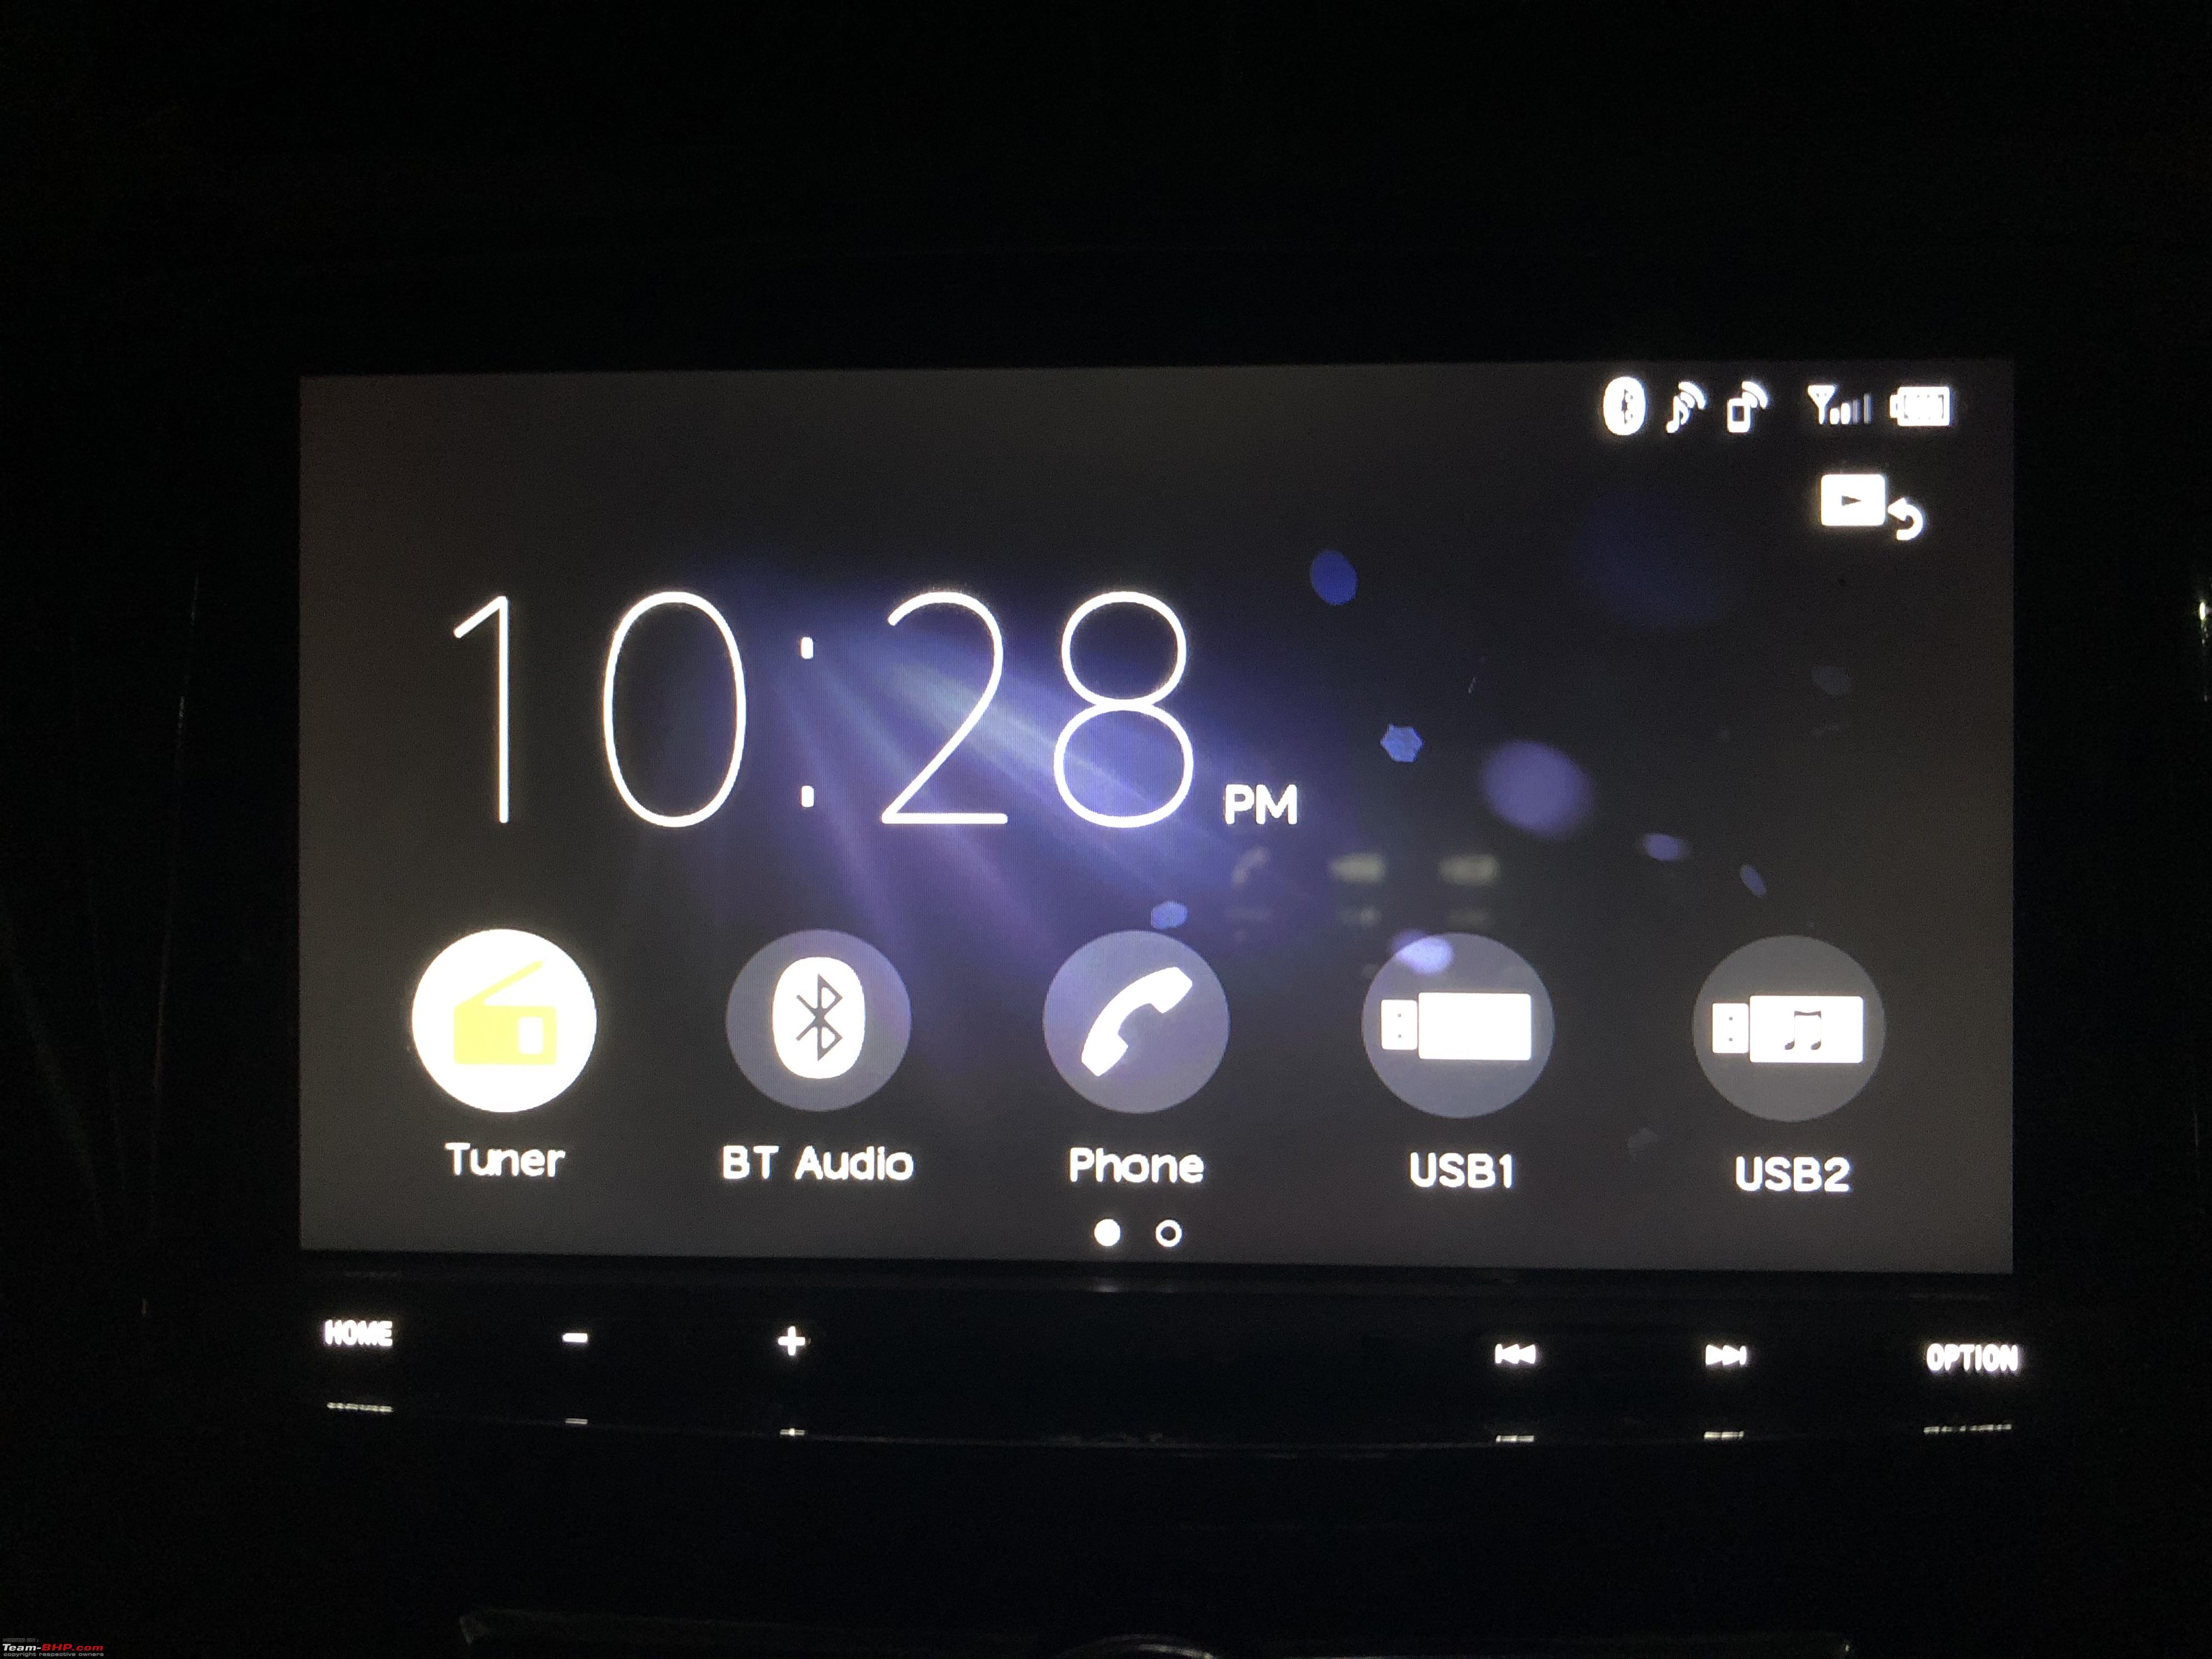
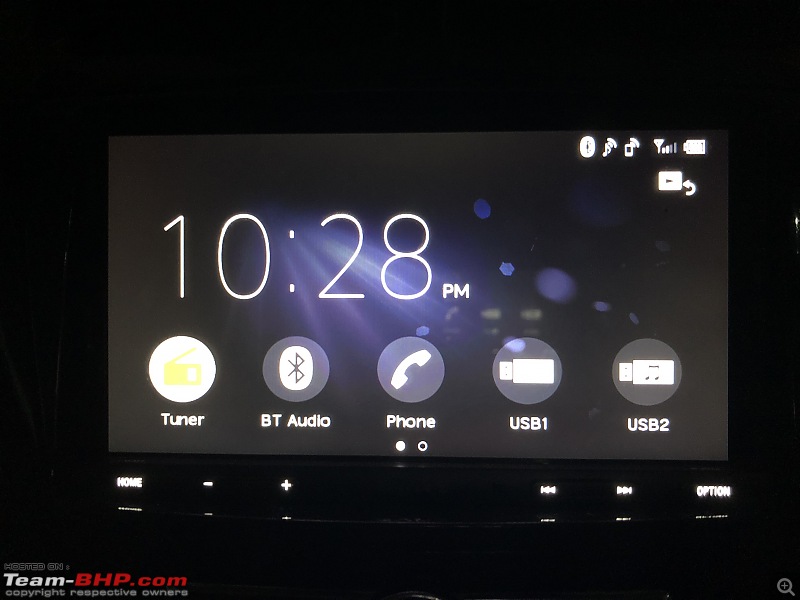
 Home Screen
Clean, minimalistic interface makes it a breeze to use. Very smooth and responsive operation.
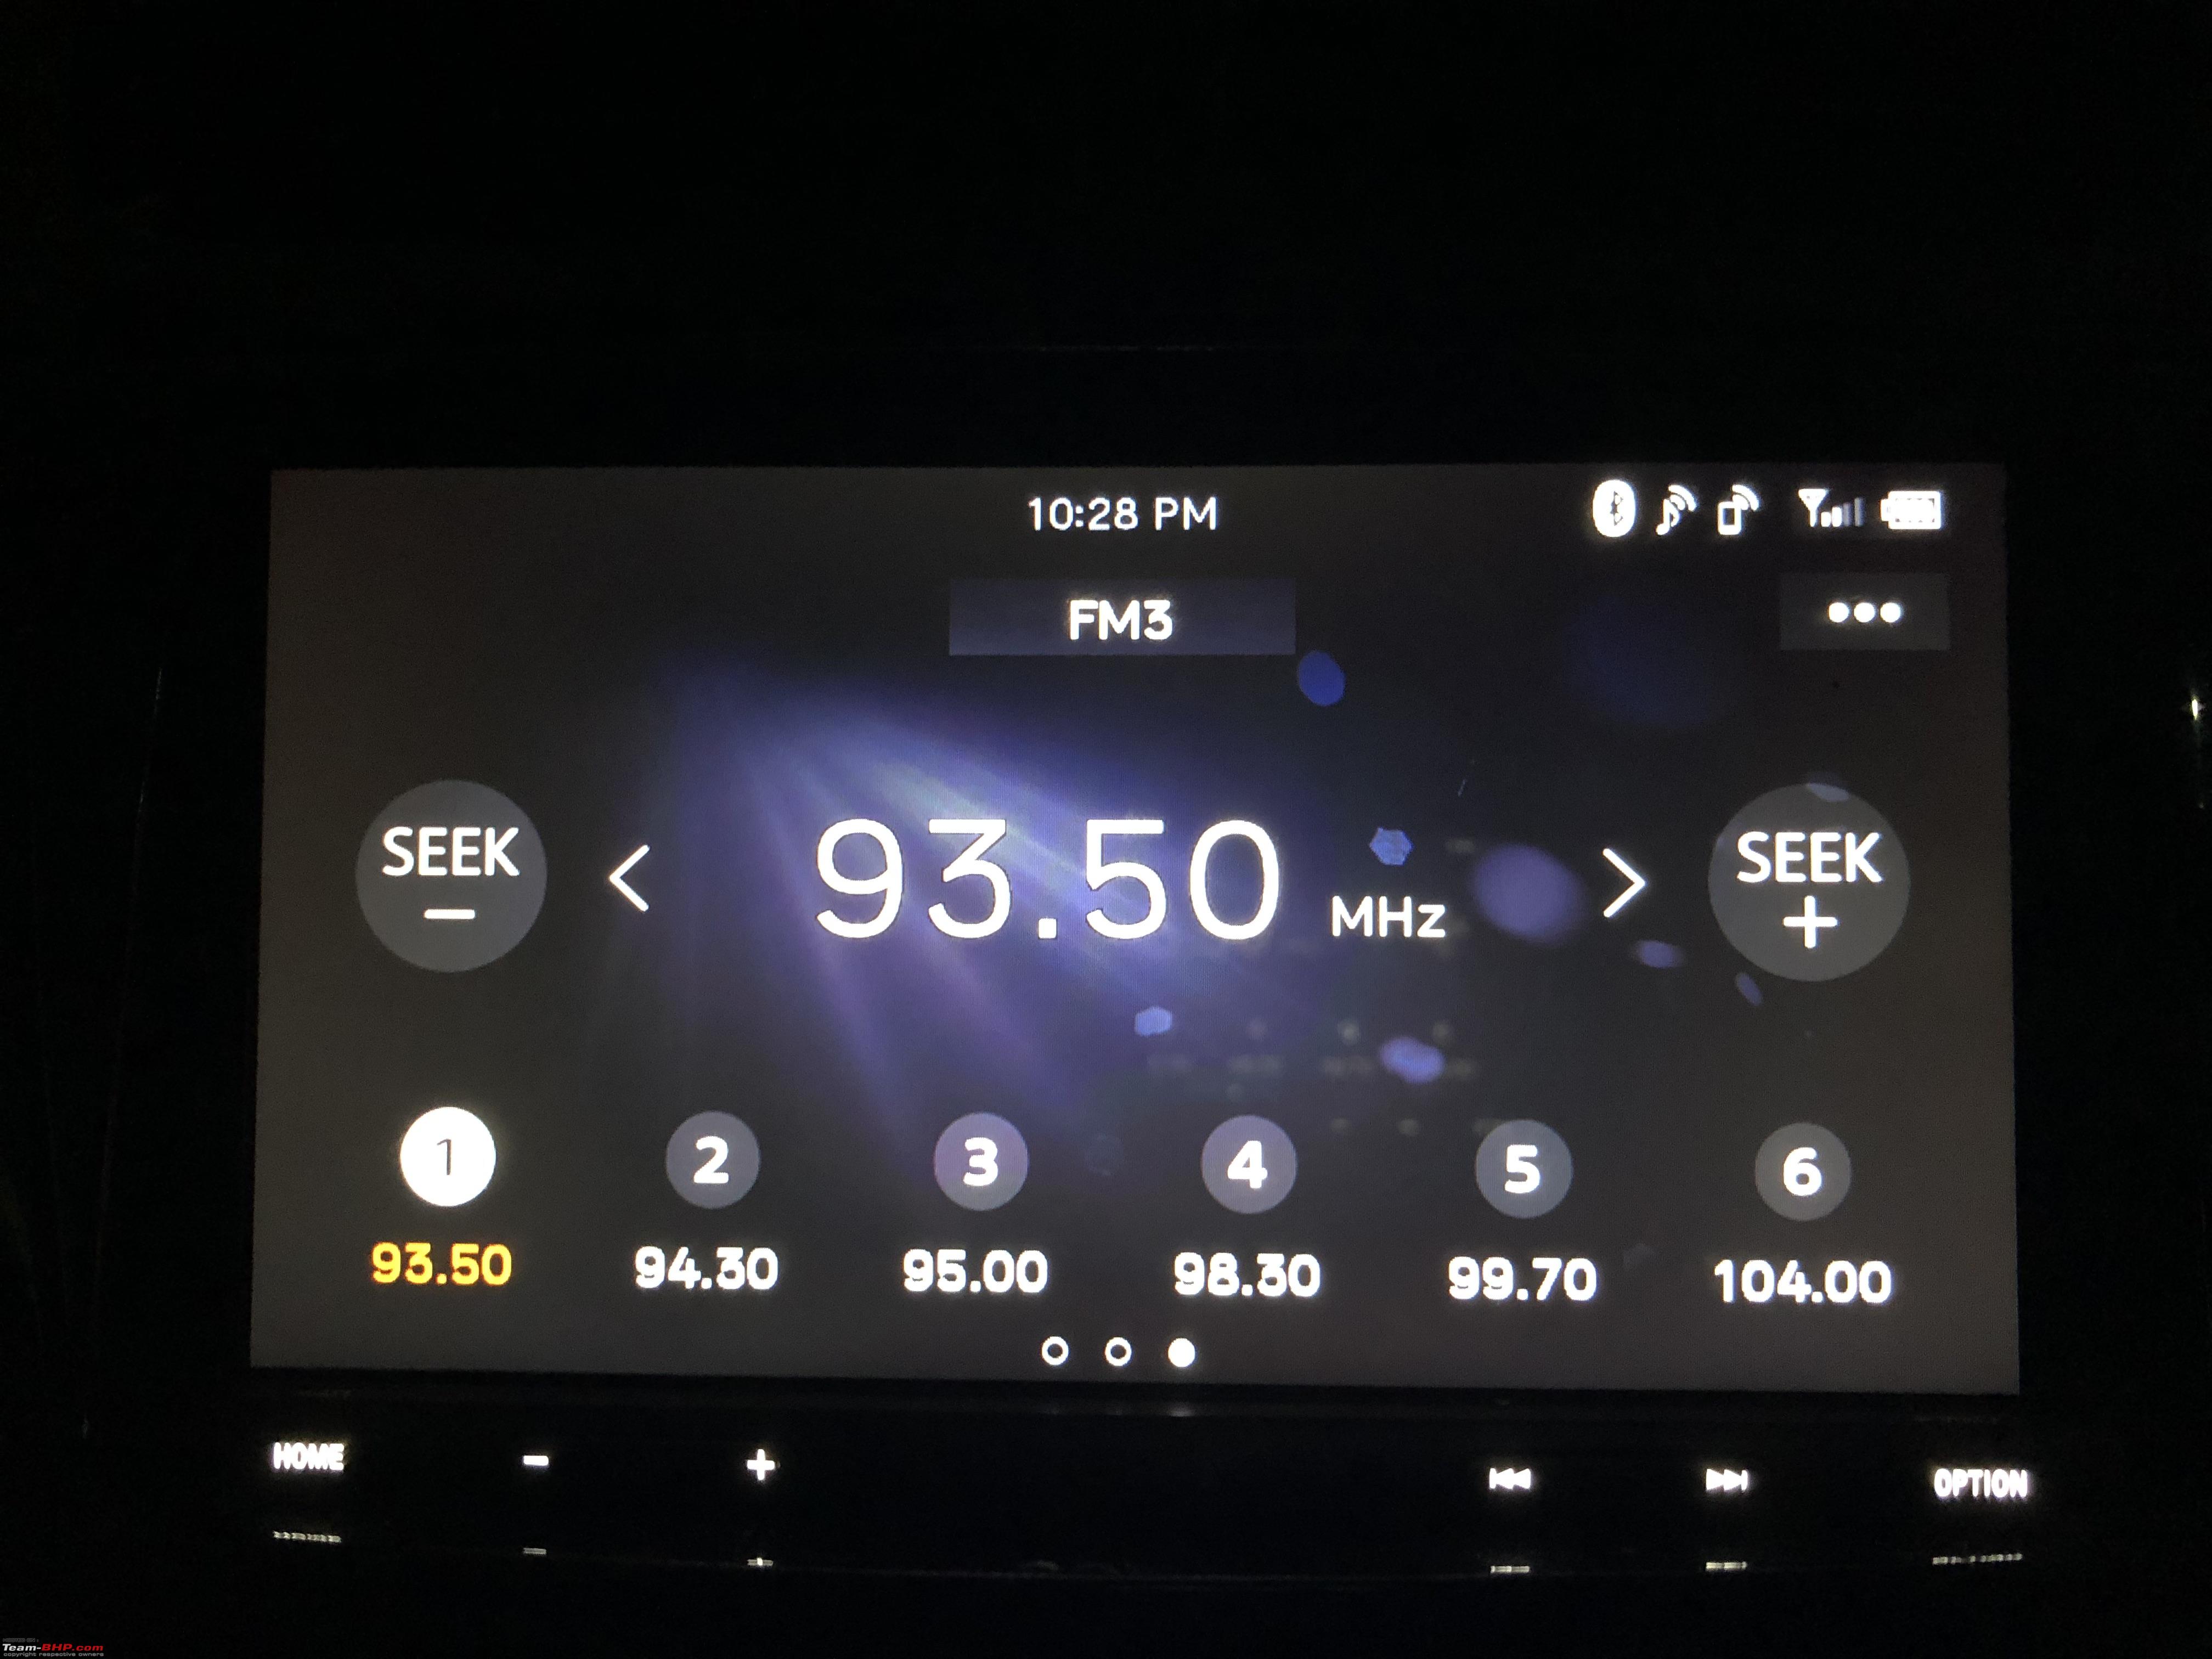
 Tuner
Tuner  BT Audio
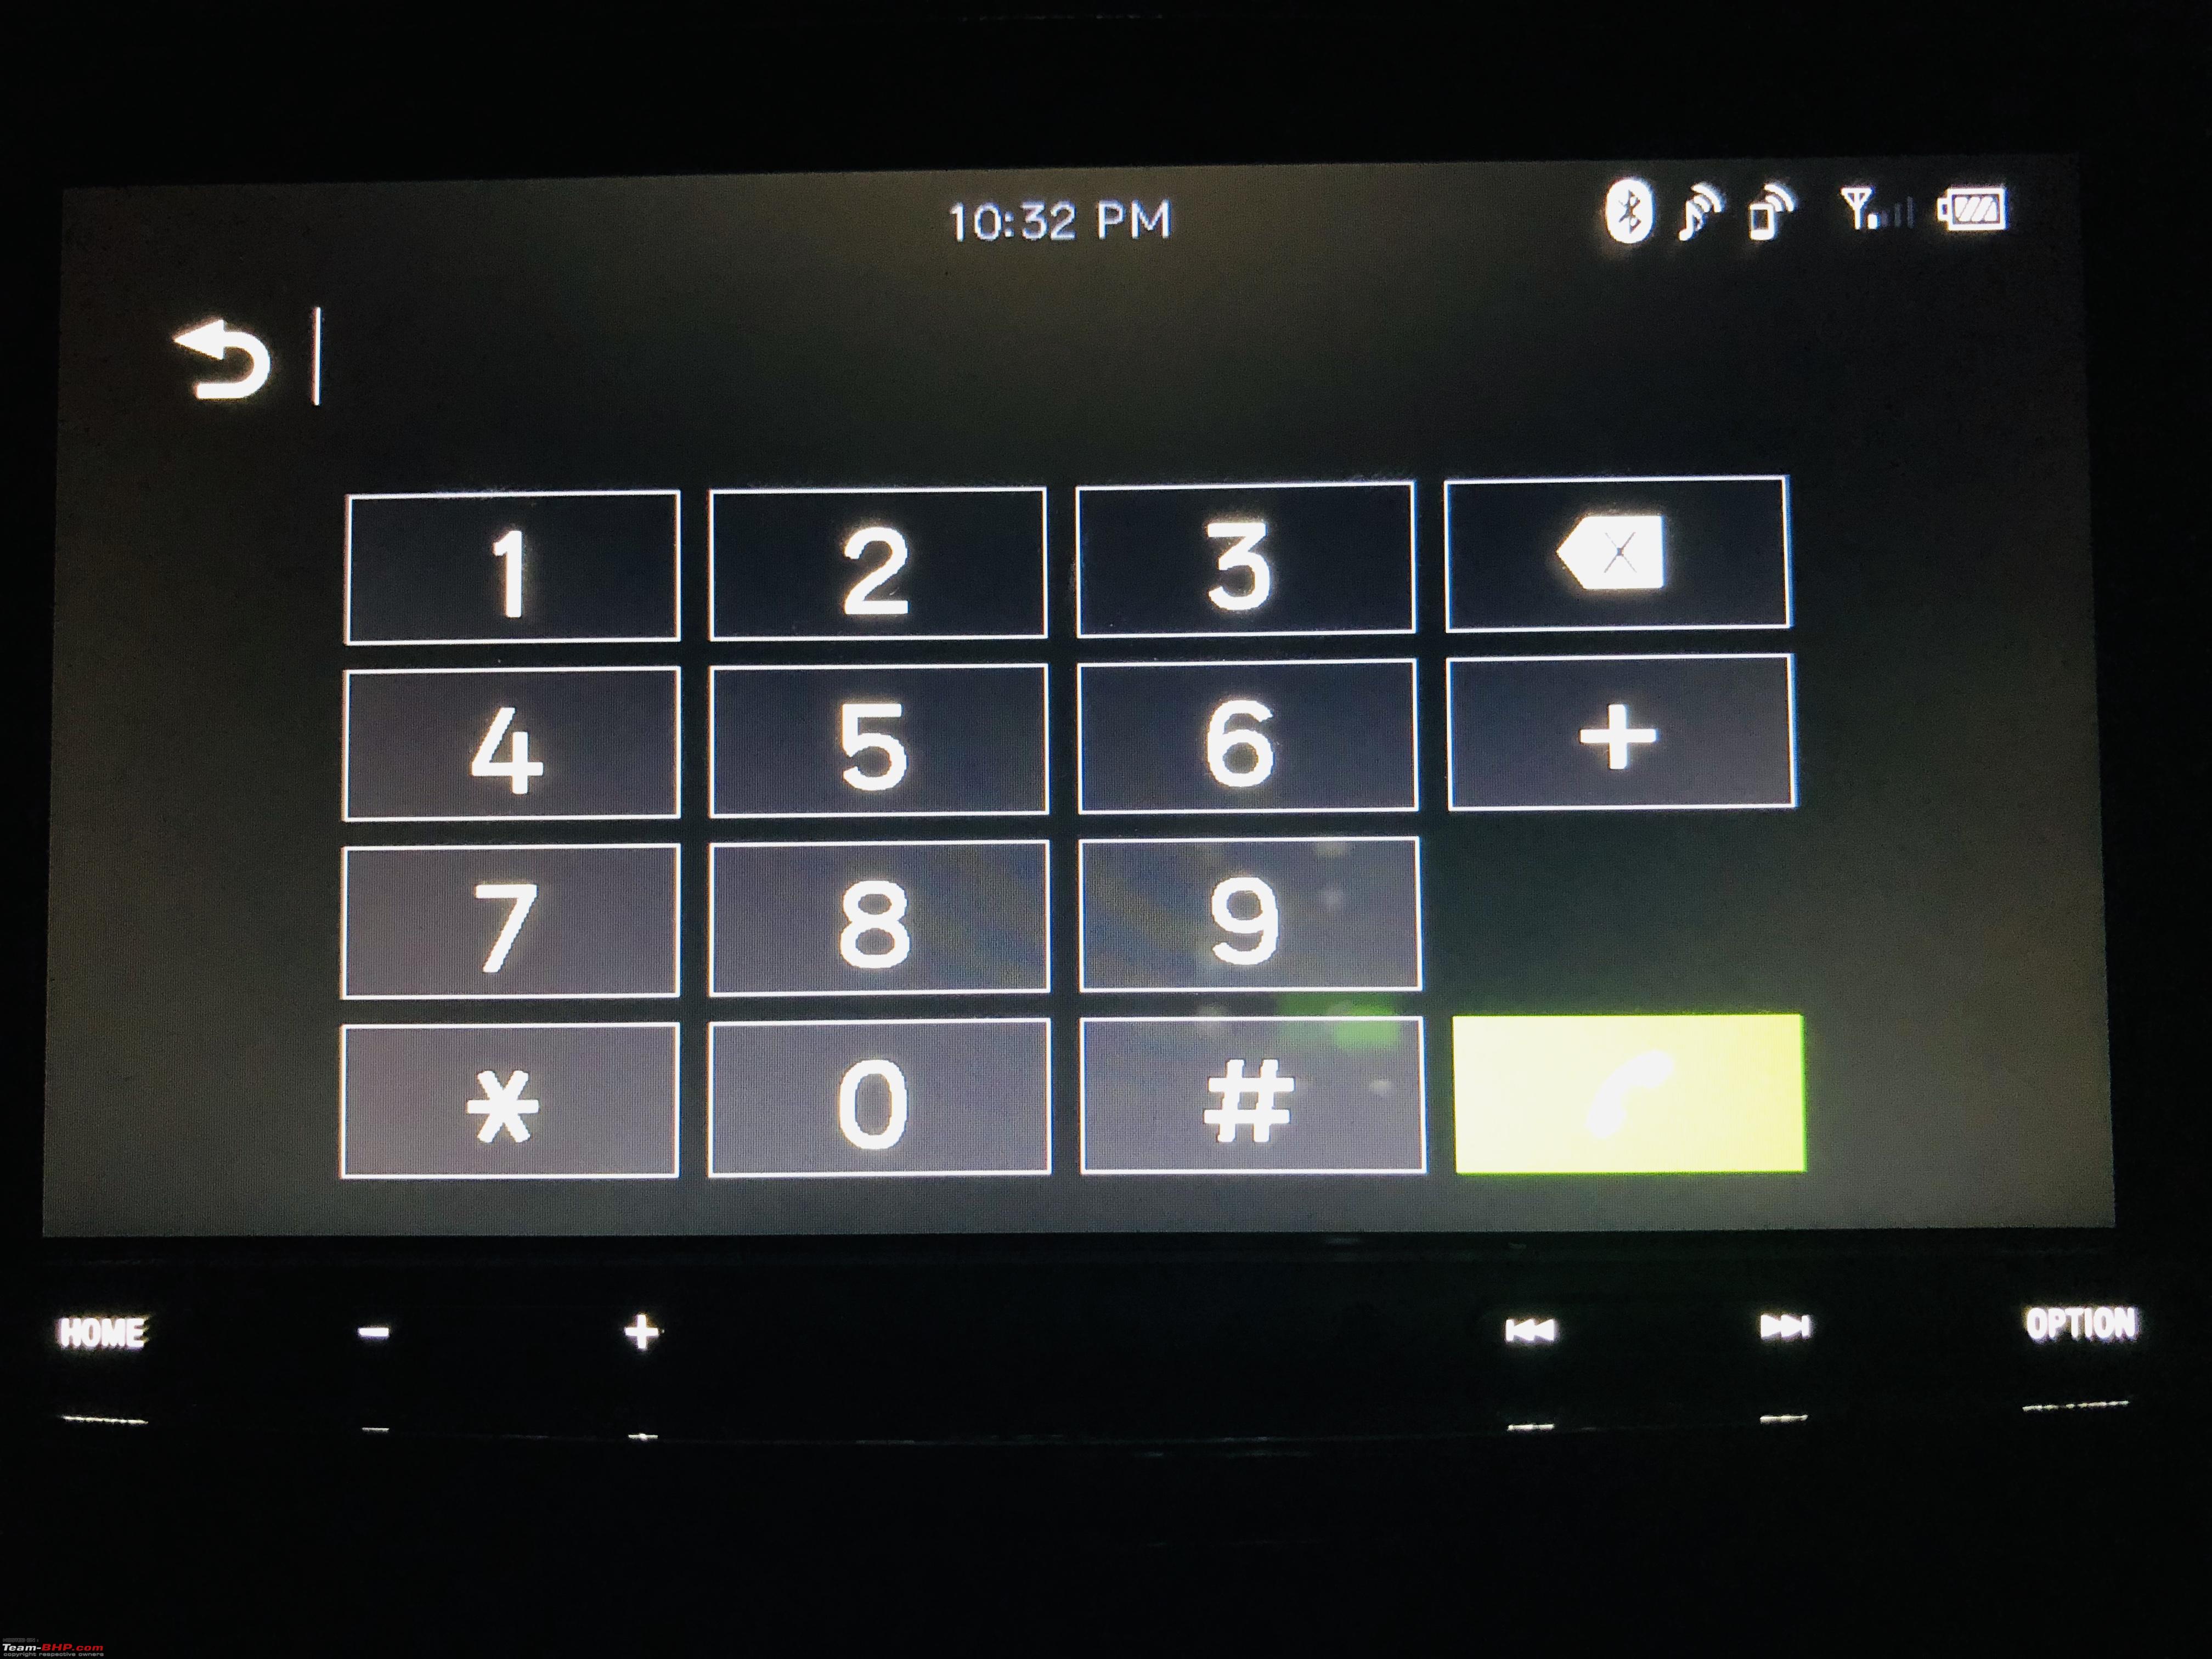
  Phone Menu
Opening the phone menu shows the phonebook, call list and the dialer. Unfortunately I donot have pictures of the same.
 Rear Camera
You can view the rear camera feed even while driving. But in the case of factory Hyundai Backup camera, it is powered only when the car is put into reverse, hence no signal when driving/parked.
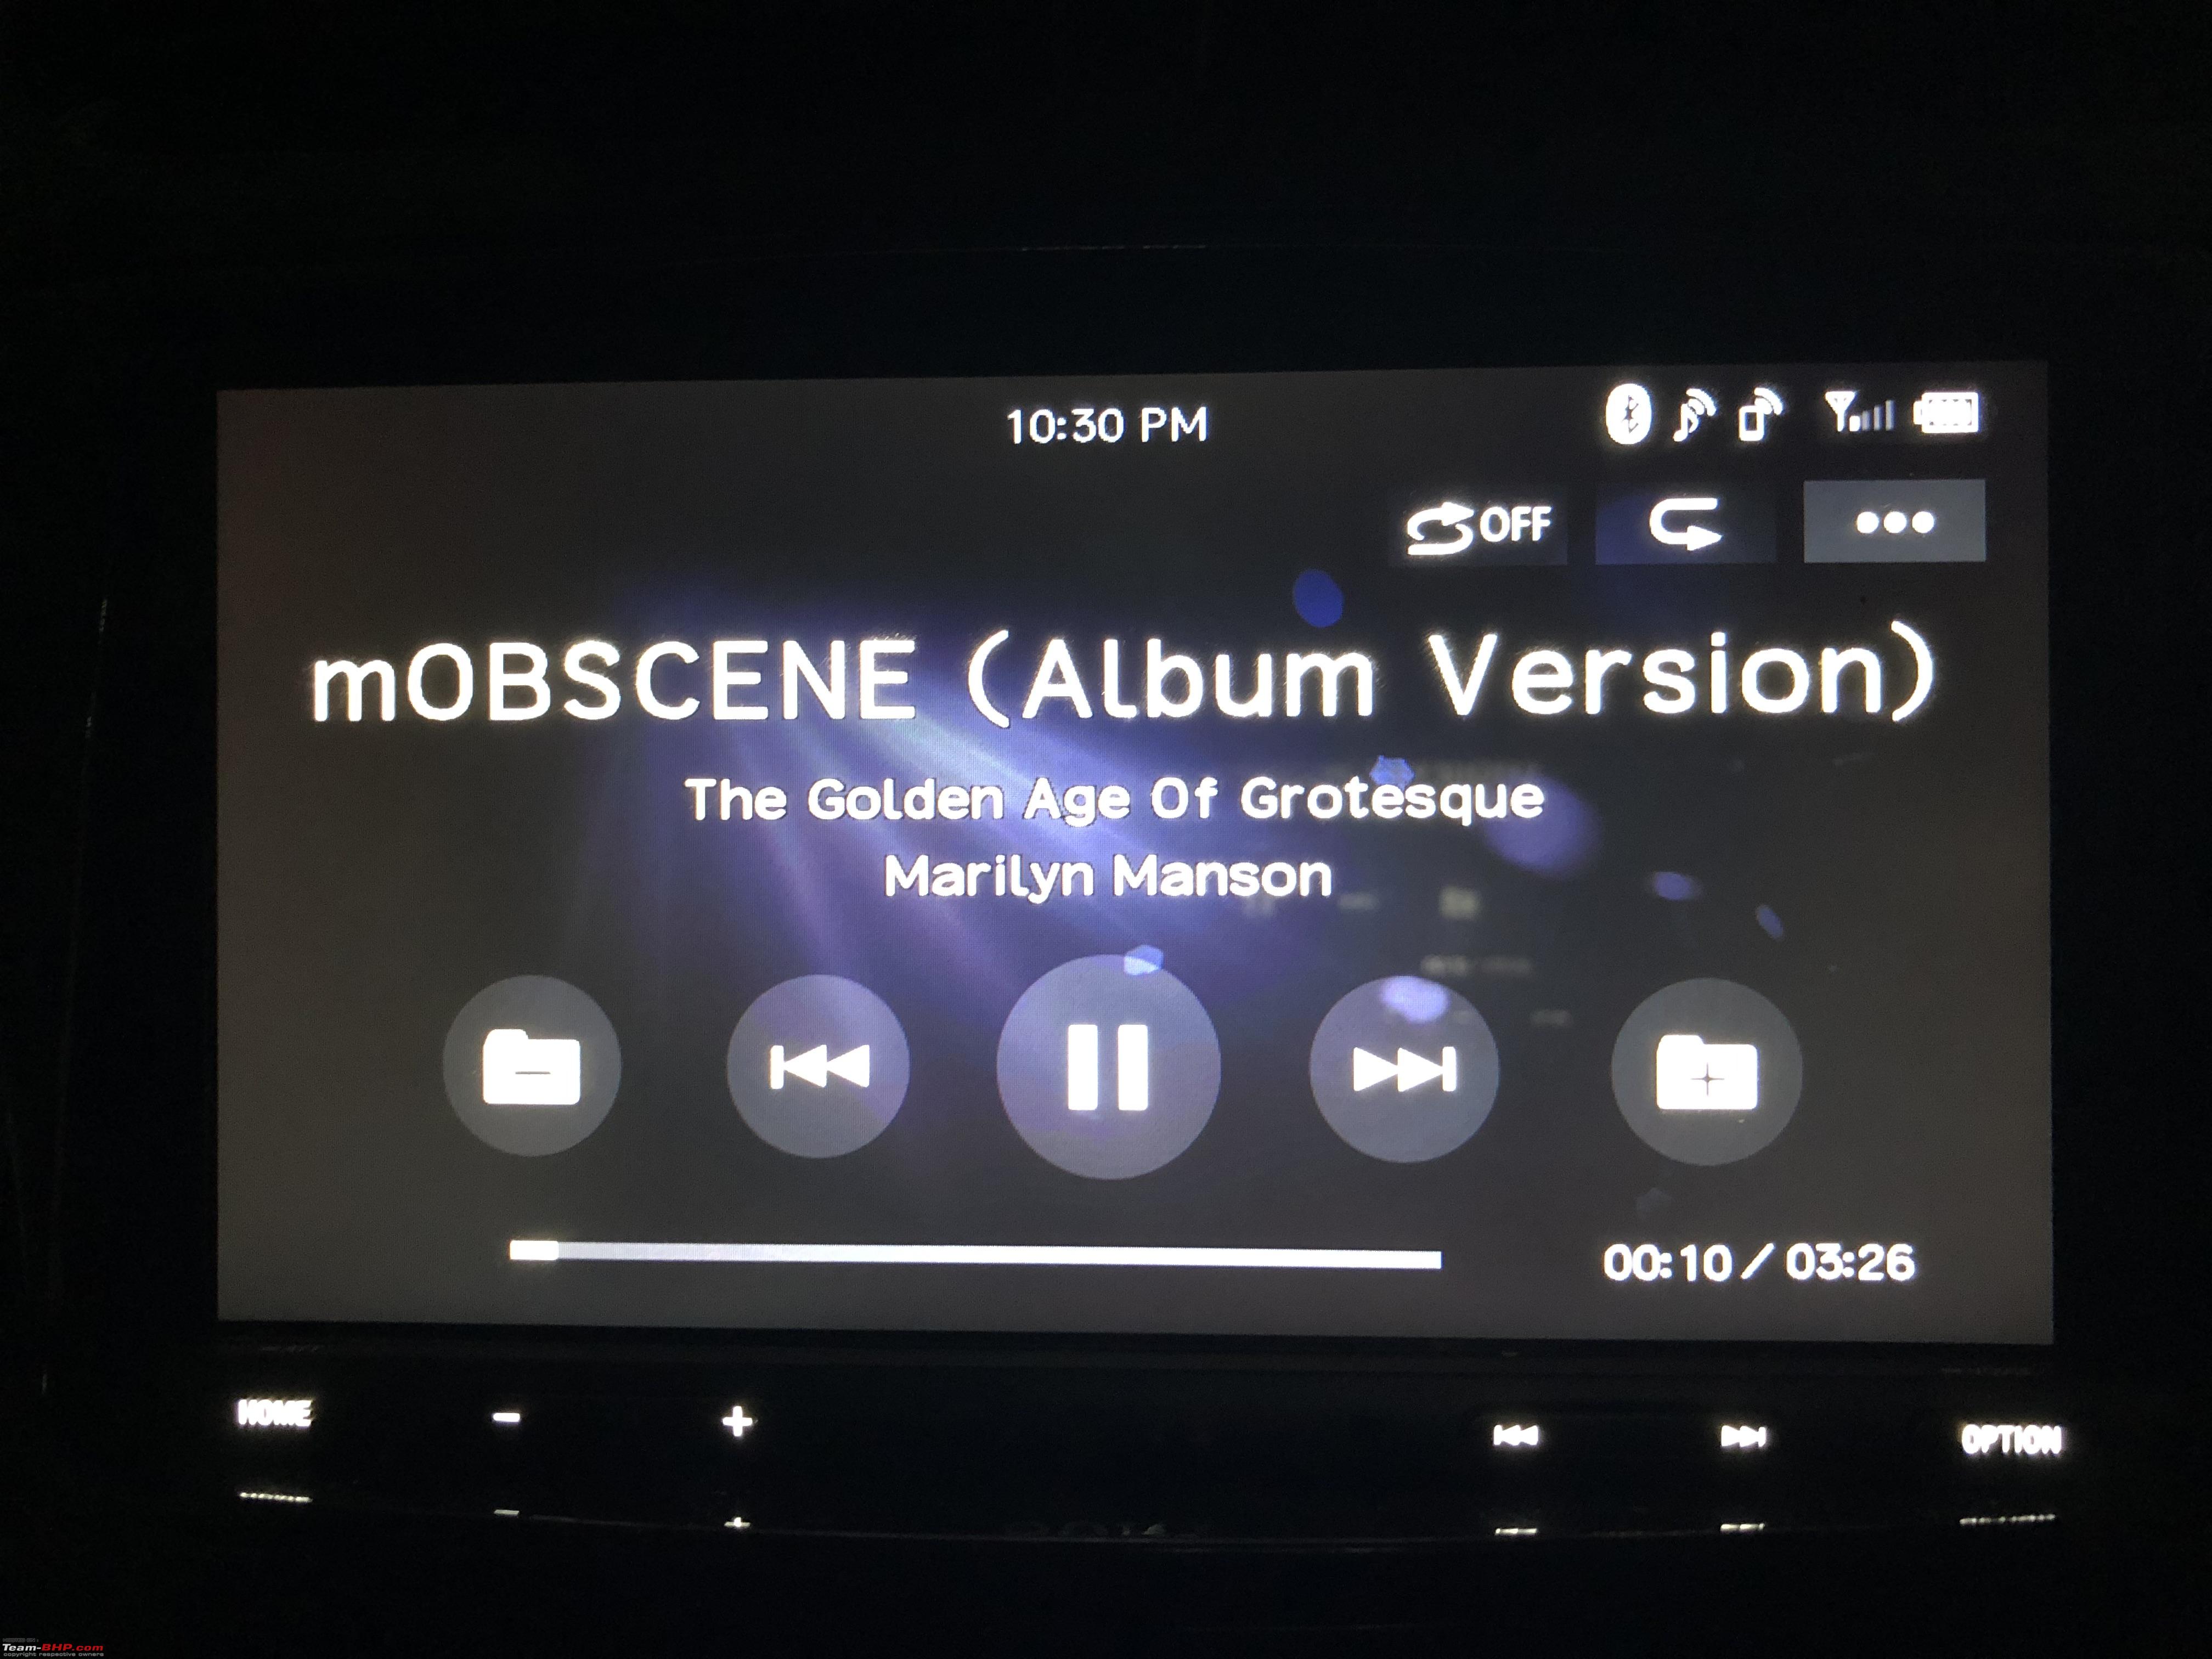
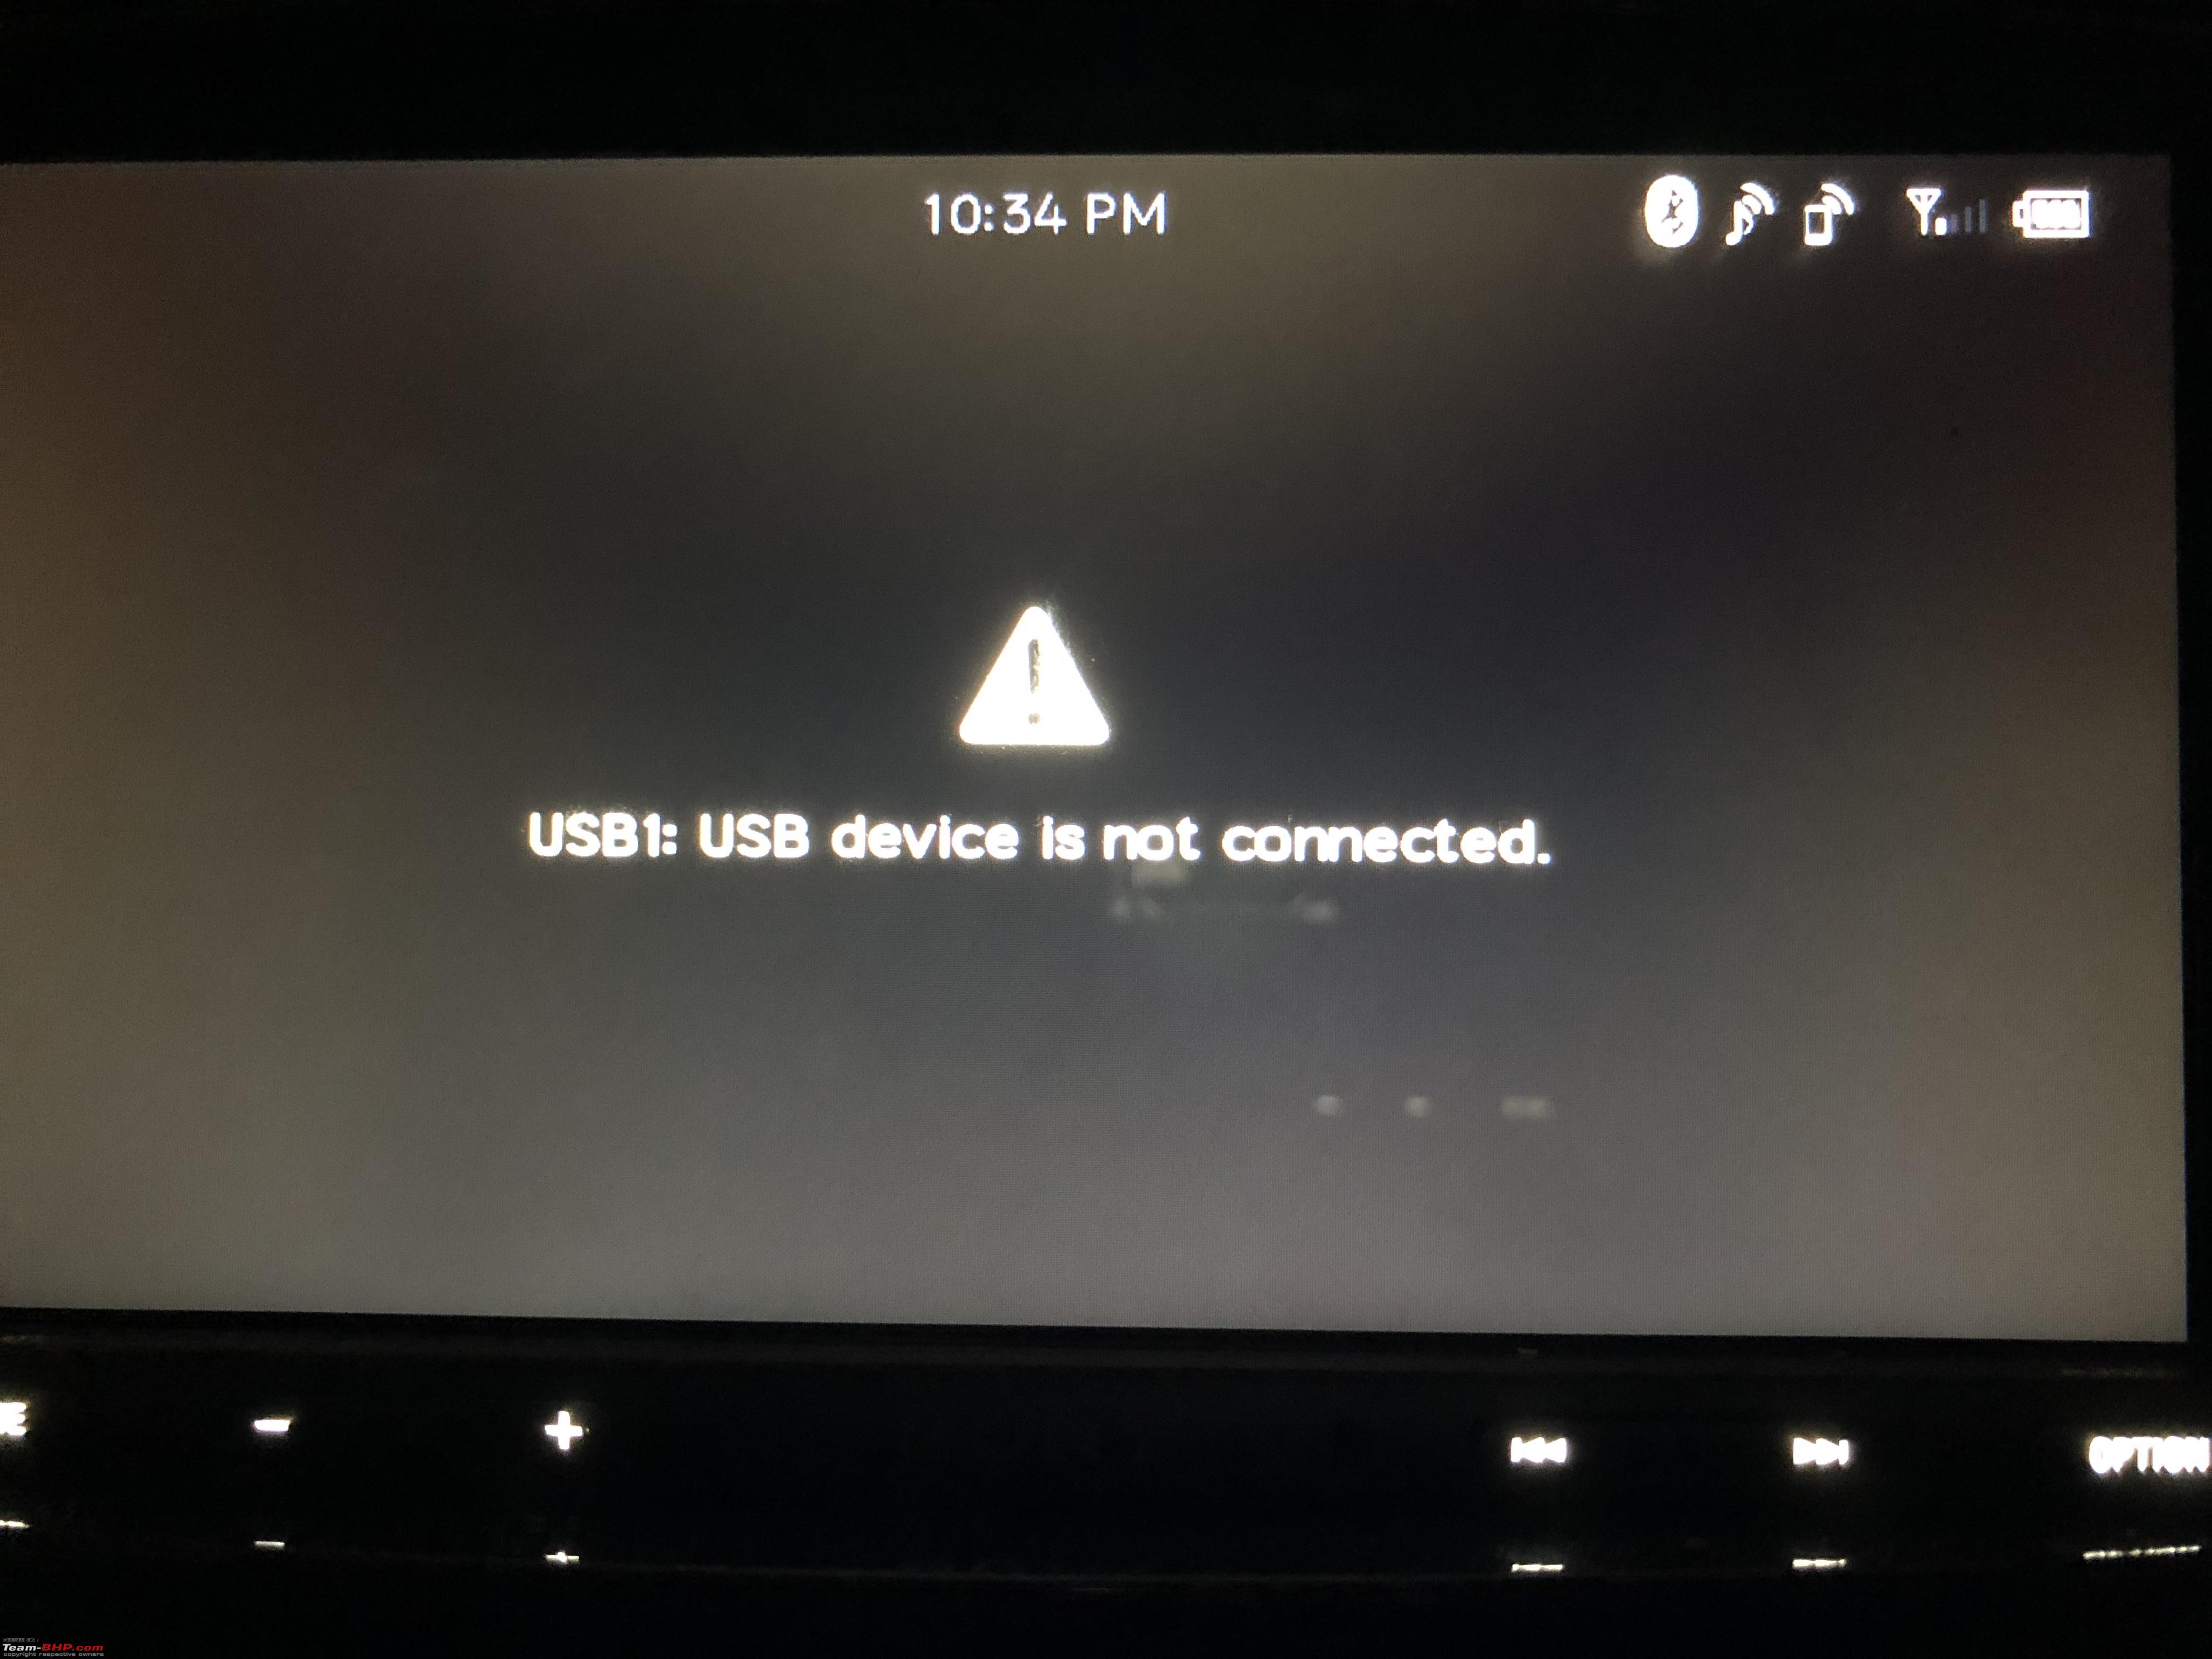
 USB
USB
The USB Port 1 is used for Android Auto/Apple CarPlay and the USB Port 2 is used for thumb drives. It can play music/video via various formats.
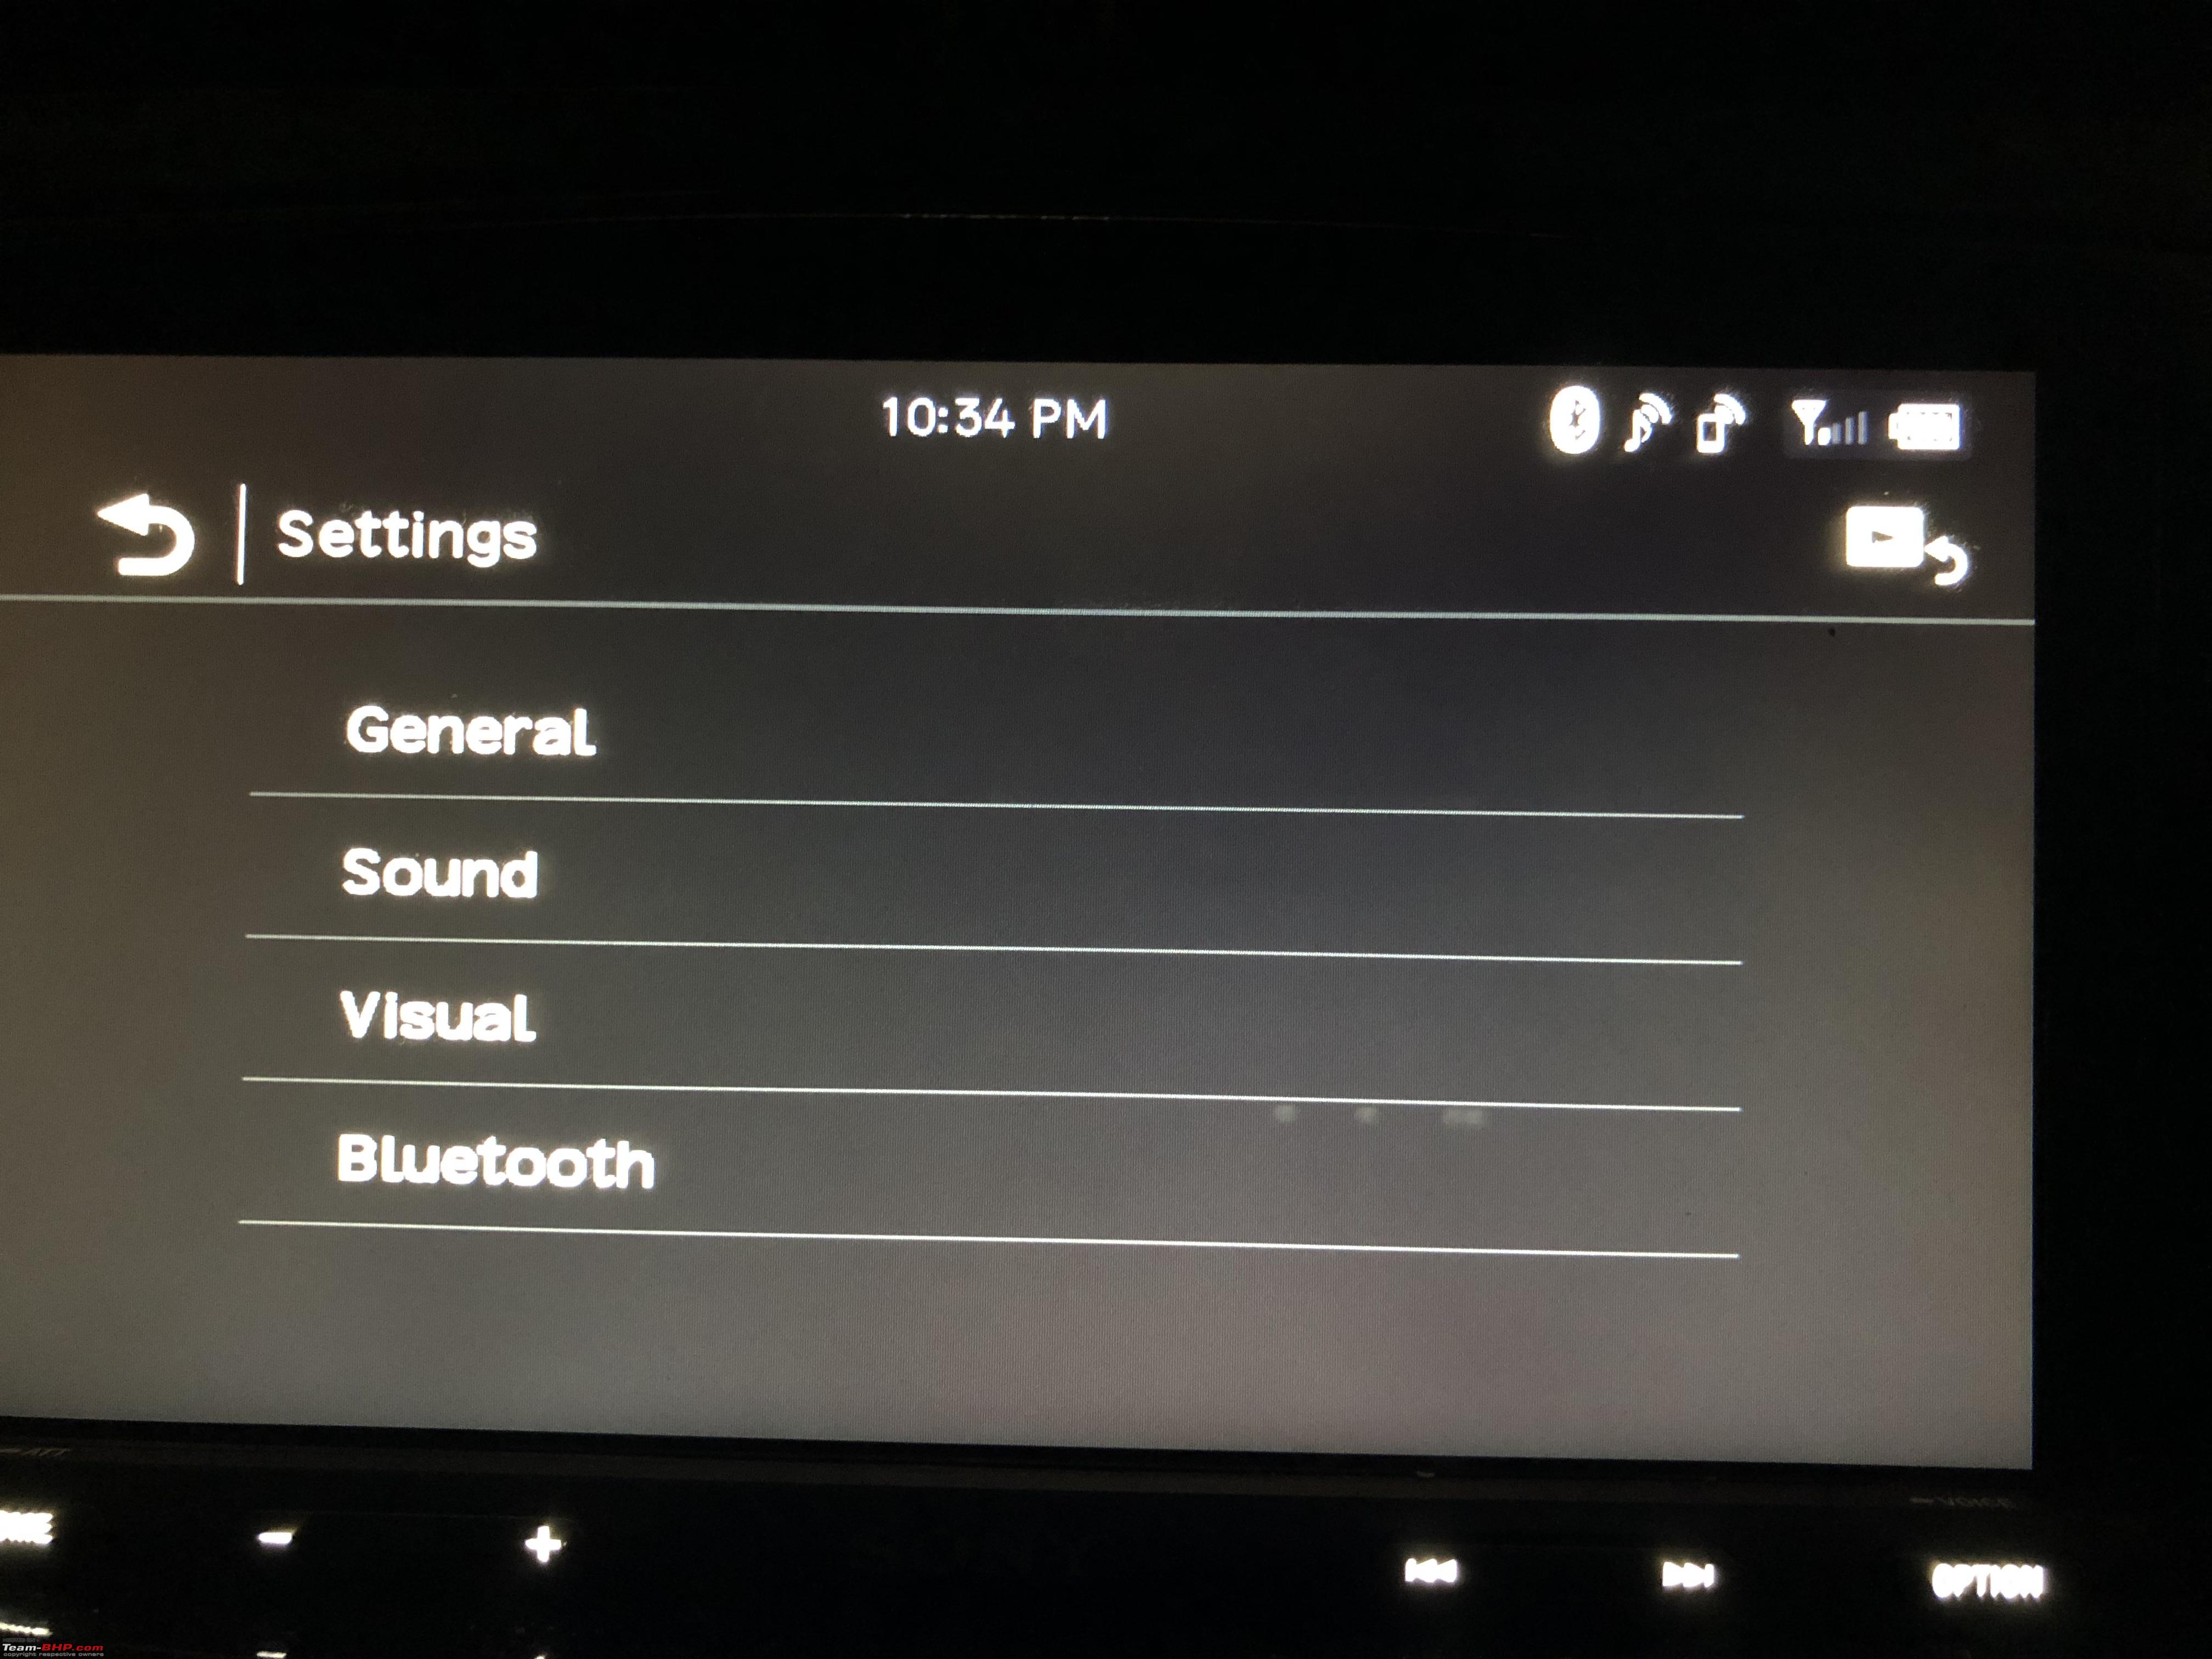
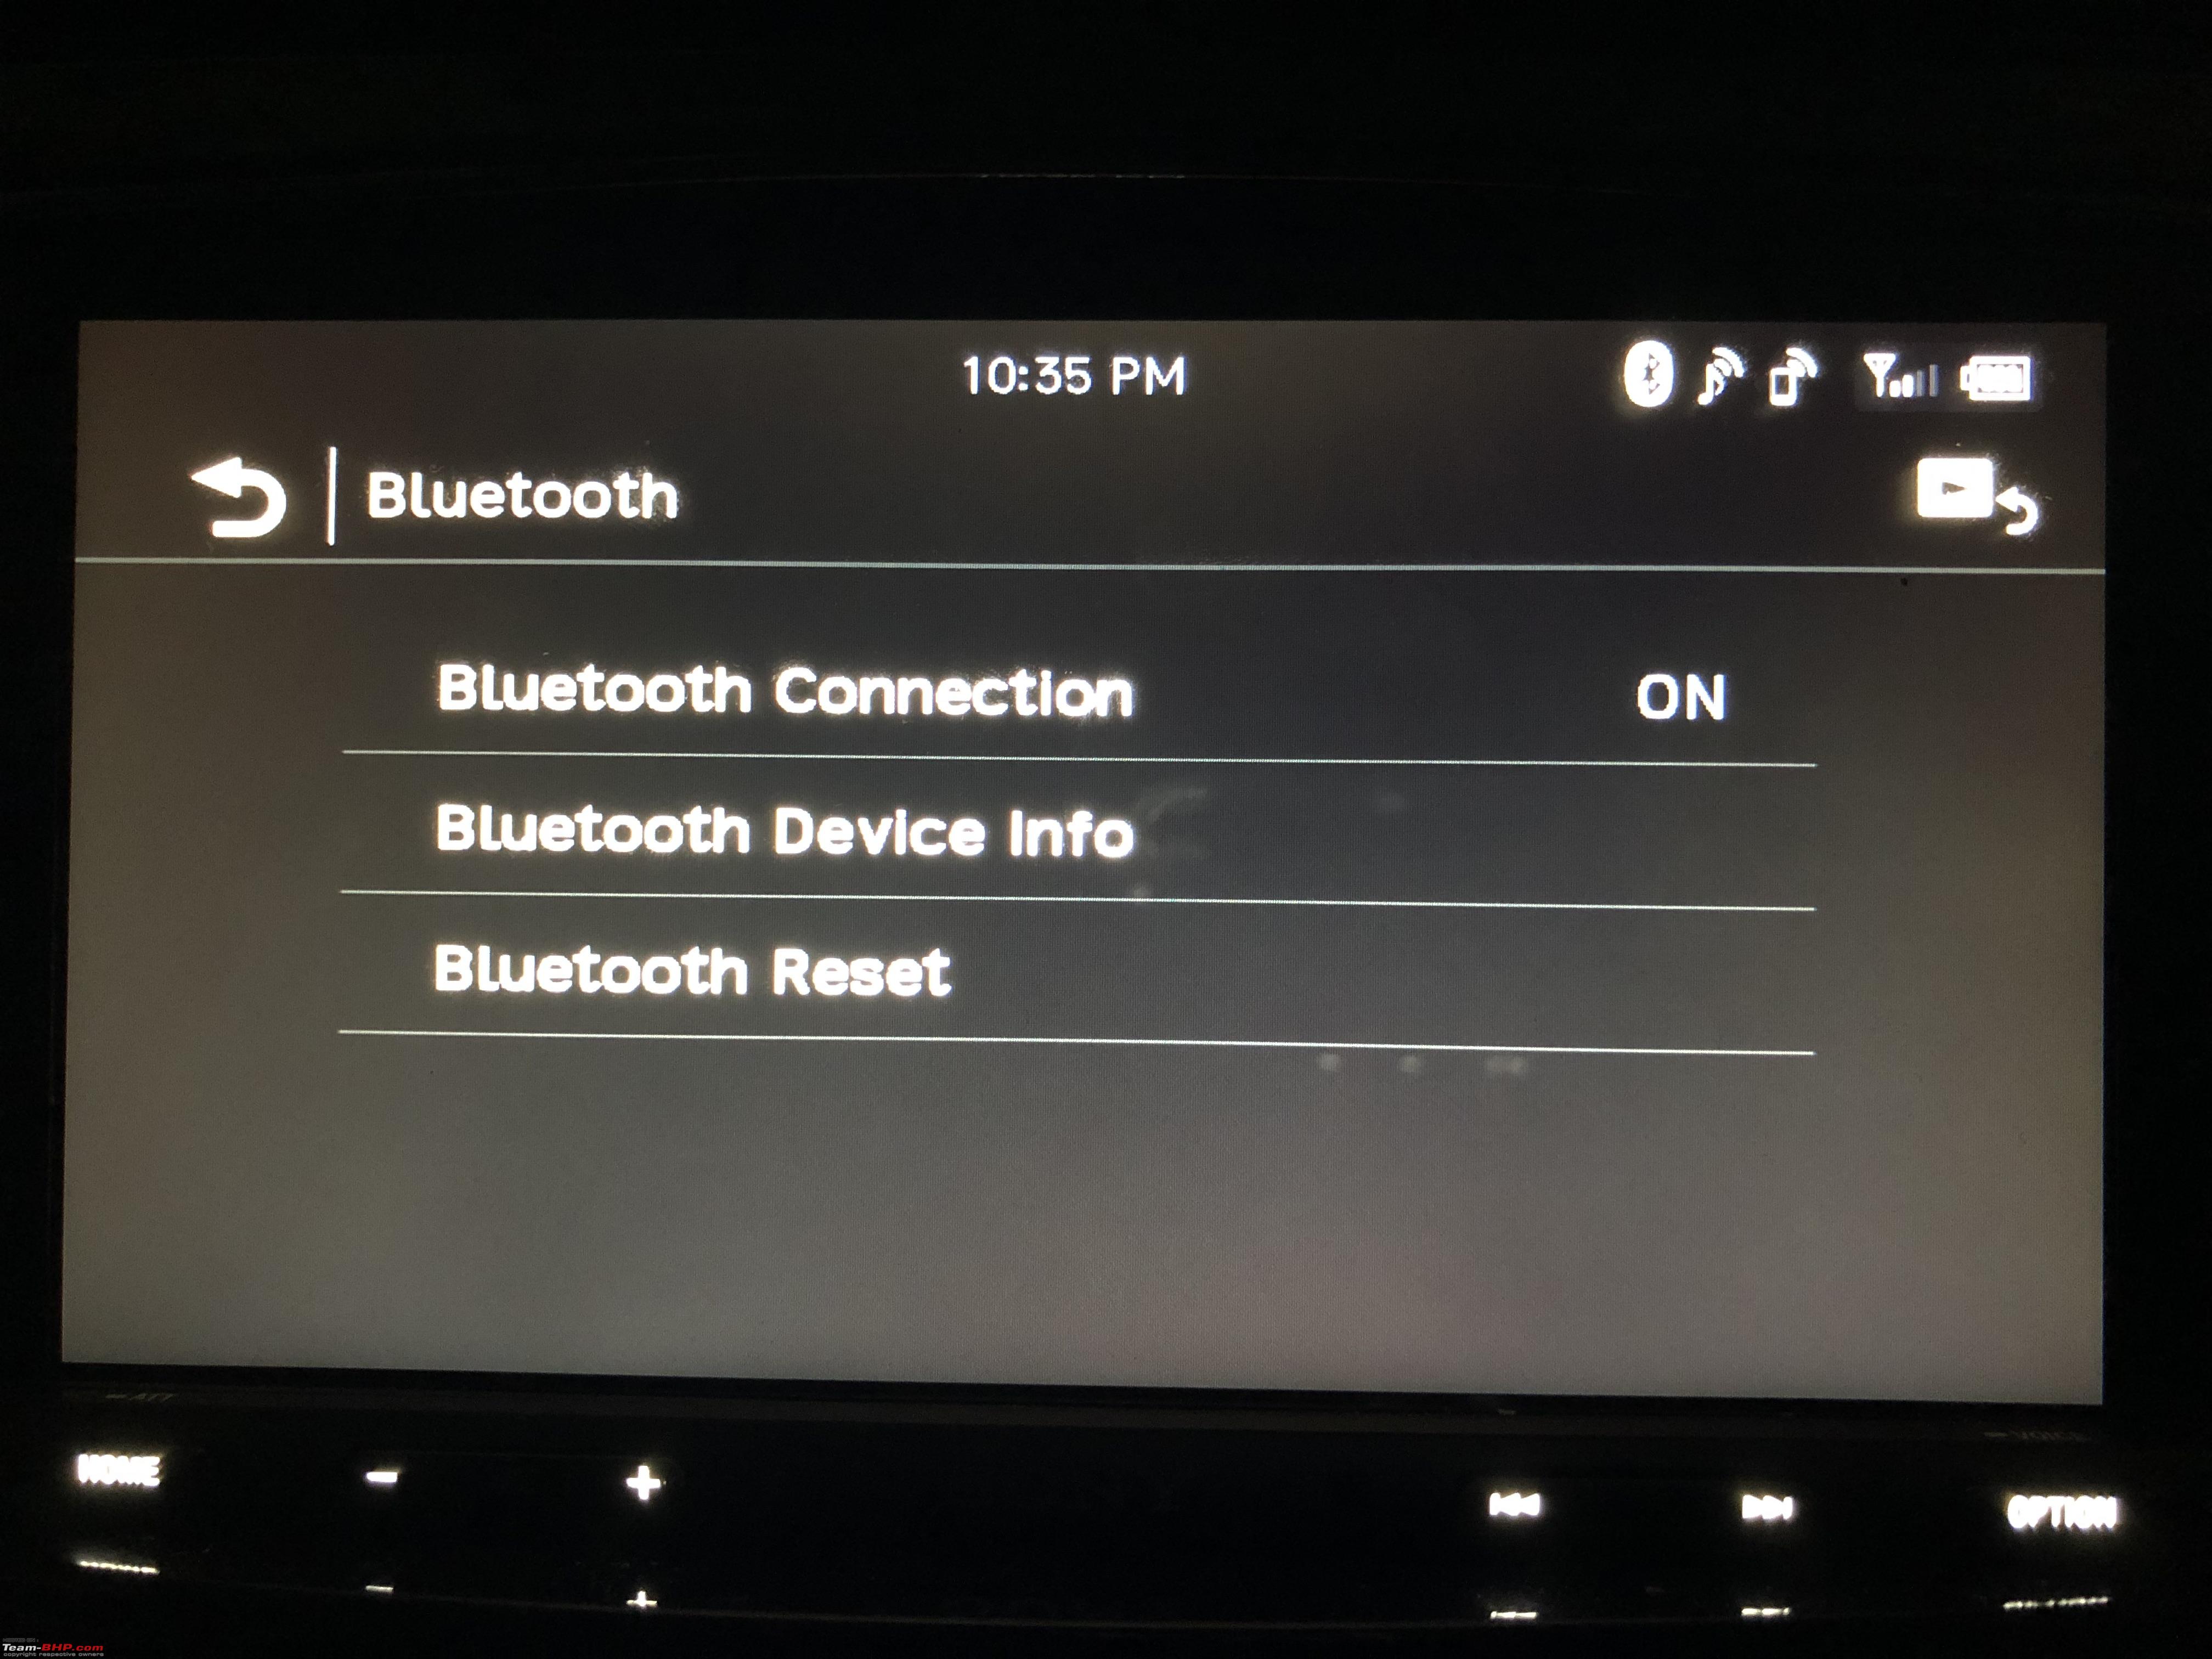
 Settings Menu
Various settings on offer. You can customize quite a bit.


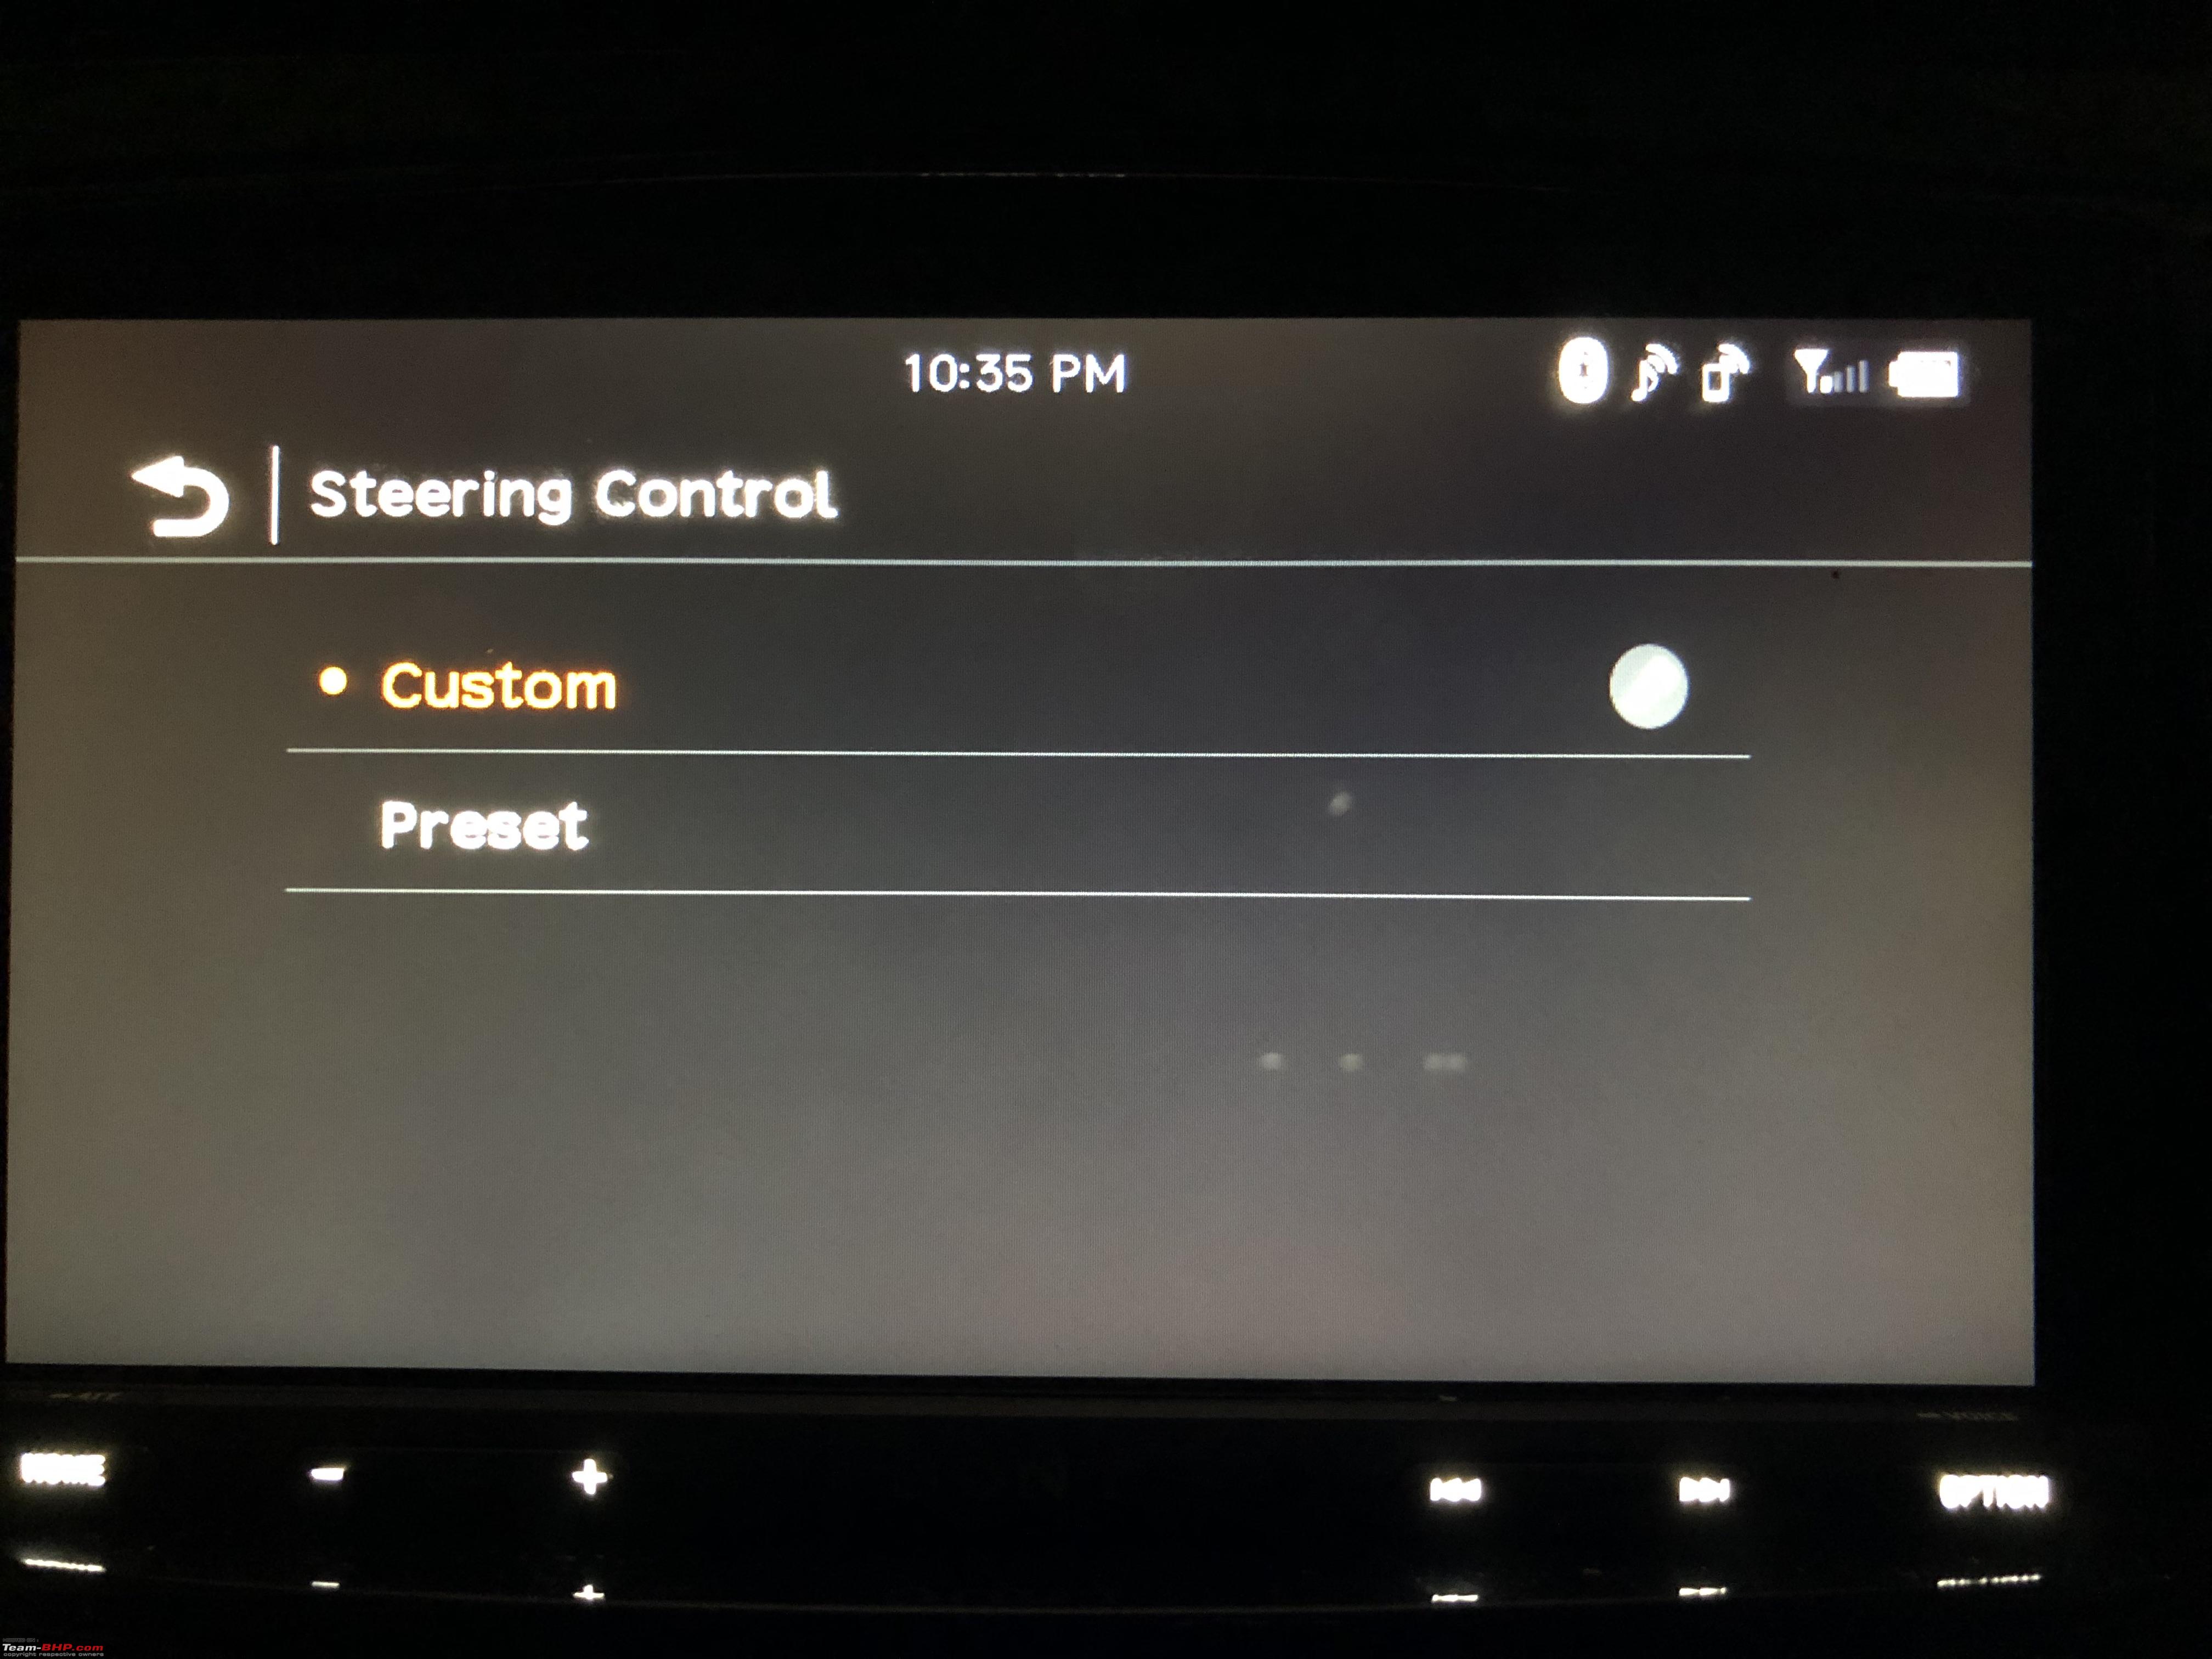
 Steering Wheel Controls
With any Japanese/Korean cars, you don't need any other adapter to make the steering wheel controls work. It is plug and play. You might need to configure individual buttons and this headunit allows that.


Other Points
- This unit does not have inbuilt Navigation. It uses your phone to display navigation on the screen.
- Sony's ExtraBass feature makes it presence in this unit, although you might enjoy it with a subwoofer and better speakers.
- The Unit features Radio Preset (18FM / 12AM) and RDS
- Bluetooth Profile has HFP1.6, A2DP 1.3, AVRCP 1.3 and PBAP 1.1 (Phonebook access)
- It uses the SBC/AAC Codecs for BlueTooth Audio along with MetaData indication.
- The Panel is non-detachable.
- The LCD is a TFT-ActiveMatrix with an 800x480 resolution, a contrast ratio of 600 and a brightness of 500cd/m2.
So, this completes my DIY along with a small review of the headunit itself. Please feel free to fire away whatever questions you may have about this install.
Disclaimer: Do-It-Yourself (DIY) projects and all DIY projects are purely at your own risk. I am NOT responsible in any way whatsoever if you try this and end up setting your car on fire. :uncontrol
Let me be the first one to congratulate you for this wonderful DIY. Very detailed explanation and beautifully presented.
Nice attention to detail on matching the central fascia plate.
By the way, how much time did you take to complete this DIY?
Really an awesome job!! In fact I've been researching to install the same in my Honda City 2018 model (purchased last July). The default infotainment system is pathetic to say the least and I've been looking at alternatives since I intend to keep the car for at least 7-8 years. I'm not sure if I can pull off the installation all my myself (and hats off to you for that), need to check who can get this done for me. I stay at Hyderabad. Can you please let me know if the existing warranty of the car will be annulled if we install an after market one?
Just clap:
Chronic static inertial me would've just stuck a cellphone on a windshield holder & connected through Bluetooth.
Hi
Nice description. I have changed the Head unit of my Verna, however I am not able to connect the OEM USB port. How did you remove the OEM usb port in verna?
Quote:
Originally Posted by drhoneycake
(Post 4545418)
So, this completes my DIY along with a small review of the headunit itself. Please feel free to fire away whatever questions you may have about this install.
|
Good upgrade and fantastic DIY.
Its not plug and play exactly and you have put in quite a bit of effort to integrate the new HU with the existing hardware. The final outcome definitely shows off your planning and patience. Good job !!
I am sure this is going to help a lot of people planning on the upgrade from OE to an aftermarket, especially those owning the Japanese and Korean brands.
Q : Any reason why you shifted the reversing camera from IRVM to the new HU?
Quote:
Originally Posted by Bhatia.D17
(Post 4545976)
Let me be the first one to congratulate you for this wonderful DIY. Very detailed explanation and beautifully presented.
Nice attention to detail on matching the central fascia plate.
By the way, how much time did you take to complete this DIY?
|
Thank you sir, procuring parts via Aliexpress took time, once I had everything in place, a good 3-4 hours on a lazy Sunday was enough.
Quote:
Originally Posted by ramvarvish
(Post 4546198)
Really an awesome job!! In fact I've been researching to install the same in my Honda City 2018 model (purchased last July). The default infotainment system is pathetic to say the least and I've been looking at alternatives since I intend to keep the car for at least 7-8 years. I'm not sure if I can pull off the installation all my myself (and hats off to you for that), need to check who can get this done for me. I stay at Hyderabad. Can you please let me know if the existing warranty of the car will be annulled if we install an after market one?
|
Thank you sir. Unless you splice factory wires, your warranty should NOT be affected, but I'm not sure on that. Regarding the installation on your Honda City, its best if you can source the audio wiring diagrams and start from there.
Quote:
Originally Posted by superbad
(Post 4546387)
Just clap:
Chronic static inertial me would've just stuck a cellphone on a windshield holder & connected through Bluetooth.
|
lol:
Quote:
Originally Posted by lnreddy
(Post 4546422)
Hi
Nice description. I have changed the Head unit of my Verna, however I am not able to connect the OEM USB port. How did you remove the OEM usb port in verna?
|
Please read above, I have described it in detail. Also have added a YouTube video that shows how to integrate your OEM USB port to your aftermarket unit.
Quote:
Originally Posted by Myth_sx
(Post 4546553)
Good upgrade and fantastic DIY.
Its not plug and play exactly and you have put in quite a bit of effort to integrate the new HU with the existing hardware. The final outcome definitely shows off your planning and patience. Good job !!
I am sure this is going to help a lot of people planning on the upgrade from OE to an aftermarket, especially those owning the Japanese and Korean brands.
Q : Any reason why you shifted the reversing camera from IRVM to the new HU?
|
My aim was to help people who wanted to swap to an aftermarket unit from OEM.
Regards to the reverse camera, the display comes on both at the moment, because I haven't cut the factory wires at all (dont intend to either), I have just tapped the Camera (+ve & -ve) on the main harness and used T-taps to get a feed into the aftermarket unit.
To be honest, the OEM Camera's video quality isn't so great to display it on a big screen such as this. The quality is good only when displayed on a small screen such as the IRVM.
Quote:
Originally Posted by drhoneycake
(Post 4546685)
My aim was to help people who wanted to swap to an aftermarket unit from OEM.
|
So what prompted you to go aftermarket way, after spending much time, energy and money in sourcing the OEM touchscreen unit from Korea. Btw, have you already sold the touchscreen OEM unit from before.
Quote:
Originally Posted by autotranny
(Post 4547846)
So what prompted you to go aftermarket way, after spending much time, energy and money in sourcing the OEM touchscreen unit from Korea. Btw, have you already sold the touchscreen OEM unit from before.
|
OEM touchscreen sold to my friend. He pestered me for weeks to sell it to him after he picked up a preowned Fluidic Verna. Sold it for a great price.:D Had no option but to go aftermarket. stupid:
Sir,
Great thread of DIY. Very well explained in detail.
I also want to do the similar exercise of moving from old hard buttons to a touch screen on my Grand I10. But Iam under extended warranty till next march.
So I may have to hold it inorder to have the extended warranty intact.
Can you please elaborate on how to check the exact fit? Iam asking because returning on Aliexpress is again a costly affair.
Good choice of HU.
When I was out scouting for replacement HU's for my OEM unit on my KIA Sorento, I couldn't think of a more aesthetic looking unit than this amongst all the choices that run CarPlay/Android Auto.
I do have an issue with the unit though - Locks up and reboots occasionally.
Your post details how you retained the stock USB port. Now that is an issue I still have. My install in US was rushed up and the installer couldn't figure out how to retain the steering wheel controls. When he finally fixed it, he gave up on the USB ports. I now have 2 ports that are dumb and a dangling cable to use. I hope I can find a way to re-do it.
Quote:
Originally Posted by coolmind
(Post 4548953)
Sir,
Great thread of DIY. Very well explained in detail.
I also want to do the similar exercise of moving from old hard buttons to a touch screen on my Grand I10. But Iam under extended warranty till next march.
So I may have to hold it inorder to have the extended warranty intact.
Can you please elaborate on how to check the exact fit? Iam asking because returning on Aliexpress is again a costly affair.
|
As far as I know, modern cars will easily take a 7 (6.95) system without any issues. Youll just need to find the fascia plate and the wiring diagram and youre good to go. If you make a custom harness (and not splice factory wires), I dont think warranty will be void.
Quote:
Originally Posted by 14000rpm
(Post 4550089)
Good choice of HU.
When I was out scouting for replacement HU's for my OEM unit on my KIA Sorento, I couldn't think of a more aesthetic looking unit than this amongst all the choices that run CarPlay/Android Auto.
I do have an issue with the unit though - Locks up and reboots occasionally.
Your post details how you retained the stock USB port. Now that is an issue I still have. My install in US was rushed up and the installer couldn't figure out how to retain the steering wheel controls. When he finally fixed it, he gave up on the USB ports. I now have 2 ports that are dumb and a dangling cable to use. I hope I can find a way to re-do it.
|
For the lockups, try to update the firmware on the system.
Regarding retaining the factory USB port, I just followed the video that I mentioned above. It will be the same procedure for all Hyundai/Kia cars.
For steering wheel controls you need that SWC wire supplied in the box. Youll need to connect it to the factory pins that correspond to the steering wheel controls which you need to find through your cars wiring diagram.
I cannot stress enough the importance of the wiring diagram. It makes things easier. :)
| All times are GMT +5.5. The time now is 15:16. | |