So I got this Idea of going DIY on fiberglassing as I was wanting to do this for a very long time, so this time I had to upgrade my front Component speakers to a setup which can keep up with the Atlas Series compos I have at the rear, hence the decision came to fit 2 sets of entry level component Speakers by eFx.
I had a visual in my mind of what it needed to look like, and wanted to give the mould the look I visualized and since I was spending most of the time installing some Audio or the other it gave me some time to work on my own setup.
Heck! I had nothing to lose if it failed except for some raw materials and some hours of labour. It came out pretty decent and the setup sounds a lot stronger and clearer than earlier, and everything except for the Final paintjob, I did myself, so it does feel nice.
for all guys who want to go DIY and have always wanted to do some fiberglassing themselves, here are few inputs based on how I did it.
This stuff takes time for beginners but is worth the fun of building something yourself.
Precautions:-
Wear clothes which you are not very fond of, or don't mind if it gets some marks. During applying Resin and rubbing paste off the mould always wear protective gloves as this keep you clean and saves a LOT OF ITCHING!! Trust me!
Step 1)
Determine where the driver needs to be placed and have a visual in your mind of what it should look like.
Step 2)
Decide what materials to use to build the structure which is most commonly MDF, and sometimes cart board for the base only for Speaker mounts. cut the base shape the way it needs to go into the vehicle and then place it and see if the shape gels in with the shape in this case a door pad. Speaker mounts can be cut and placed along with the base to see if it looks the way it needs become the final output. Also see what vital controls on the pad it will interfere with, preferably it should not interfere with anything which is a vital working part.

Step 3)
After taking all measurements, build the skeletal structure of what the speaker mount needs to look like, the things vital to be taken care of are whether the angle of the driver is optimum, and does not come in the way of some moving or working part.
The materials that are needed for this along with the skeletal structure components are Paste, Resin and Hardener. Mix the paste powder with a good amount of Resin so as to make a thick paste, then just before applying pour few drops of hardener into the paste and then immediately apply it to the portions of wood that need to be attached.
NOTE: As soon as the hardener is poured the paste mix will turn slightly browner in color and will start drying up real fast, so if you don't hurry, the paste will dry wherever it is being mixed.
Choose the angle at which the ring needs to face out of the base and cut wooden pieces with the required measurements which will act as a stand and structure between the base and the ring in this case.
NOTE: Smoothening out the outer edges of the ring will ensure a better and smooth shape. You can use a wood file to do this in a uniform manner, can be a flat or a half round file depending on application.


Place the driver into the structure while choosing the final angle of the ring before the hardening paste is being applied so that you ensure the driver does not touch any part of the structure inside other than the mounting ring.

Step 4)
After the structure is ready, now it's time to wrap the skeletal structure with cloth material to get the exact shape desired in the final output. There should be no folds at all and always use some stretchy material which will expand but will sit tight on the structure while applying fiberglass.
I used a Dupatta cloth in this case as it is see through and stretches well, this gives you an internal view of the mould as you wrap it around. Nails can be hammered to hold the cloth on the backside of the base and another thing which is very handy to make up for loose ends and mistakes is Super Glue, it is messy but sticks and dries real quick, and always wear your gloves while doing this. It is good to use super glue especially on the surface, as nails can tear the think dupatta cloth and the shape also does not come out as desired all the time.


Step 5)
Now that the mould with the cloth cover is ready and tight, it's time to apply the fiberglass on it. Cut pieces of the desired shapes and sizes which need to be placed on the mould. It's always good to keep few small extra pieces handy for patchwork as when the Resin mixed with hardener is drying fast you wont have time to lose cutting extra pieces.
After the fiberglass is placed on the mould, mix about 300 to 500 ML at a time of Resin and then pour 1 or 2 teaspoons measurement of hardener in it. Use a Common paint brush to apply the resin and hardener mix on the fiberglass. Pour enough amount of resin so that when it settles in you can see through the white fiberglass which will become translucent. On the edges use a dabbing motion to apply the resin, as this ensures the fiberglass does not get pulled out of place and this helps in removing air bubbles too. After applying enough resin to see through the fiberglass throughout let it dry for a day.

Below is a snap of the first portions of paste being applied on to the mould after the fiberglass has dried for a day.

Below is a snap after one layer of paste has been applied on top of the Mould.

Now, the paste is a mix of the same powder, resin and hardener which we used to join the skeletal structure. Apply uniformly all across without making a thick layer all around. After the paste dries, we can use emery paper to rub off to get a smooth surface.
NOTE: Always wear gloves which rubbing paste off the mould with emery paper as this power will make your skin itch like crazy when it comes in direct contact.
Step 6)
After the paste step is complete, and we have a more or less smooth surface with slight roughness here and there make the necessary speaker and wire holes which will be needed, this has to be done now, as after the final paste and paintjob it's risky to use a drill machine to make holes as it can chip off the paint resulting in a lot of time wastage.
Step 7)
This is the last step when the mould needs to be given the last coat of paste and putty. The putty has to be applied in a very uniform manner, and this will determine how the paint finish will look on the mould. This step is very very vital for the good looks of the mould and this can make or break the finish of the end product.
It's preferable that this is done by a professional painter which was the case for me too, as by now we have put in a lot of effort already, and inexperienced hands will result to a not so good output after so much hard labour.
Below are snaps of the final thing, after the mould was painted.


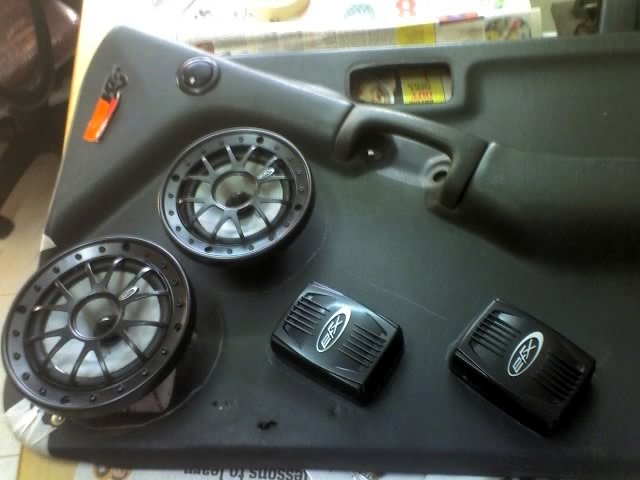
Pics of the Speakers after the final install.


 10th December 2007, 00:21

 (1)
Thanks
(1)
Thanks


