Team-BHP > Technical Stuff > DIY - Do it yourself
Register New Topics New Posts Top Thanked Team-BHP FAQ


Reply
  Search this Thread
12,612 views
Old 30th October 2011, 01:18   #1
BHPian
 
arjyamaj's Avatar
 
Join Date: Apr 2008
Location: NCT
Posts: 105
Thanked: 310 Times
DIY: Blackend A and B Pillars on an Alto (Pictorial)

This weekend, I decided to do something purely for aesthetic value on the car. After having gawped in amazement at the simplicity of black B (and sometimes A ala the swift) pillars that lend so much to the 'cockpit effect'. Why cant I have that? Sure I can, and now, so can you!

With a bit of adhesive backed vinyl sheets and a couple of hours on a weekend that would have otherwise been spent lazing on the couch.

The material of choice

DIY: Blackend A and B Pillars on an Alto (Pictorial)-016.jpg

This is what the stuff looks like. Its black on one side and black (but most importantly, sticky) on the other. And its available at most hardware or paint stores (they use it for panelling apparently). I picked this roll (48 cm x 2 m) for about Rs 400 at a Homestop.

Cutting it to size

DIY: Blackend A and B Pillars on an Alto (Pictorial)-017.jpg

You wont need the entire roll. Just strips wide and long enough to cover the pillars. Like so.

DIY: Blackend A and B Pillars on an Alto (Pictorial)-018.jpg

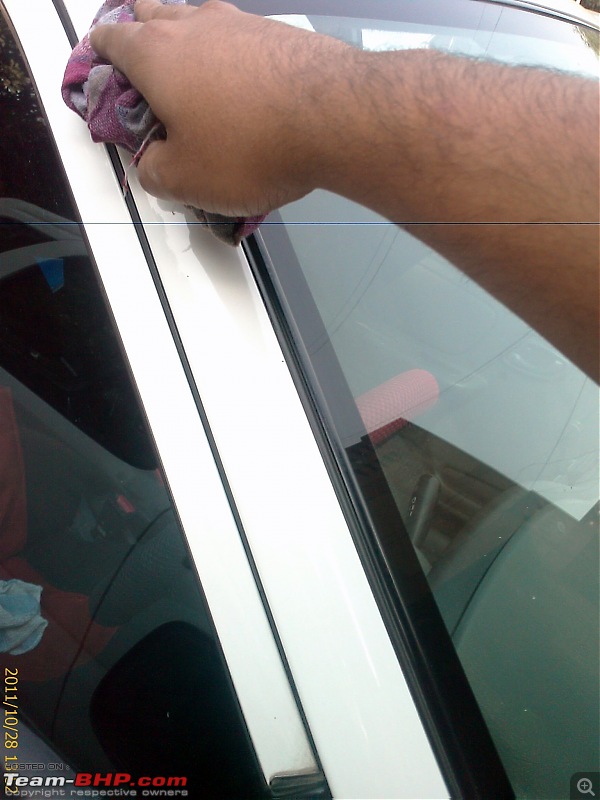
Preparation is the key, even if you have keyless entry

DIY: Blackend A and B Pillars on an Alto (Pictorial)-019.jpg

Before applying it, of course, you'll need to ensure that the surface is clean and all that. I used a generic glass and household cleaner and then wiped on a wet cloth. This is to ensure that the surface is wet when you apply the vinyl- helps ease out the bubbles.

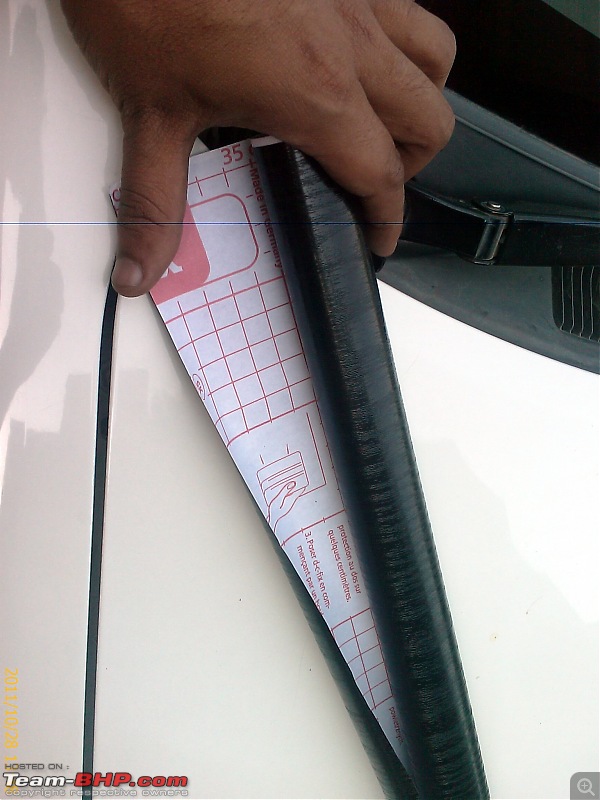
Sticky stuff- yay!

DIY: Blackend A and B Pillars on an Alto (Pictorial)-020.jpg

Then you begin peeling off the backing paper. Careful- you may not want to try this on a windy day.

First attempt

DIY: Blackend A and B Pillars on an Alto (Pictorial)-021.jpg

I started with the RHS A pillar. Notice that its a little wider than necessary. Will cut out the bits and pieces in the next step which is right

here

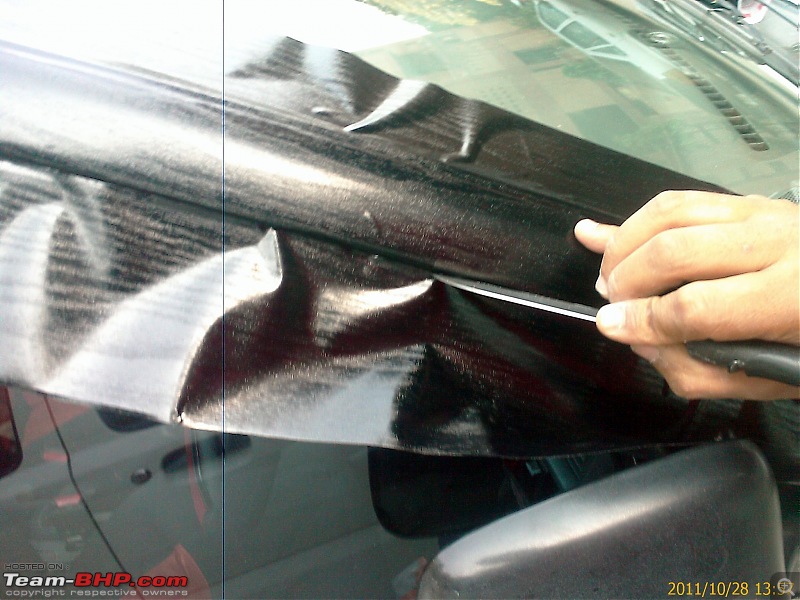
DIY: Blackend A and B Pillars on an Alto (Pictorial)-022.jpg

For lack of a blade, I used a kitchen knife. Fortunately, the missus doesnt know (yet).

Similar steps for the RHS B pillar

DIY: Blackend A and B Pillars on an Alto (Pictorial)-023.jpg

And the LHS A and B pillars- so on and so forth.

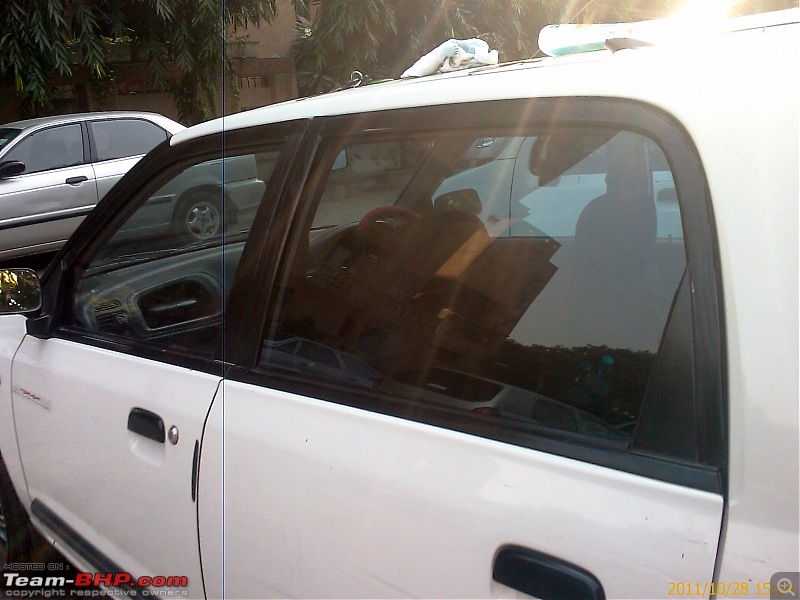
Here's the finished product

LHS

DIY: Blackend A and B Pillars on an Alto (Pictorial)-024.jpg

and RHS

DIY: Blackend A and B Pillars on an Alto (Pictorial)-025.jpg

Two questions that arise (and this is why I love tbhp):

1. Is this worth it? I mean, its good fun and cheap and all but should I stick with this or revert to the good old standard pillars?

2. If this is worth it, should I still consider getting my bumpers painted white?

Brickbats and bouquets welcome

P.S. Mods- couldnt find a similar thread, hence posting a new one.
arjyamaj is offline   (5) Thanks
Old 30th October 2011, 01:55   #2
BHPian
 
Join Date: Jan 2008
Location: Bangalore
Posts: 342
Thanked: 915 Times
Re: DIY: Blackend A and B Pillars on an Alto (Pictorial)

thats a cool mod! for rs.400 it is definitely looks neat. ofcourse neat job by you! can you post proper side shots.

Quote:
Is this worth it?
black pillars!? that you have to say.. you like it right?

Last edited by somspaple : 30th October 2011 at 01:57.
somspaple is offline  
Old 30th October 2011, 01:57   #3
BHPian
 
samarth.bhatia's Avatar
 
Join Date: May 2010
Location: Sydney
Posts: 450
Thanked: 450 Times
Re: DIY: Blackend A and B Pillars on an Alto (Pictorial)

Hi,

I, for one, really like the effect.
I had got it done on my M800 on the door and B-Pillar.
I really liked the effect there as well.

One suggestion, there seems too much of the stuff when it's there on the A-Pillar as well. So maybe you can remove the part on the A-Pillar and see the effect.

Also, please put up pictures of the full side profile to give a better idea.

P.S. IMO the black ORVMs add to the look when you blacken the top frame on doors and the B-Pillars. Maybe some slightly dark tints would help as well, along with Visors (dark shade). I had the same on the M800 and it worked well for me there.

Cheers and drive safe.
Sam
samarth.bhatia is offline  
Old 30th October 2011, 02:16   #4
BHPian
 
arjyamaj's Avatar
 
Join Date: Apr 2008
Location: NCT
Posts: 105
Thanked: 310 Times
Re: DIY: Blackend A and B Pillars on an Alto (Pictorial)

Quote:
Originally Posted by somspaple View Post
can you post proper side shots.

Quote:
Originally Posted by samarth.bhatia View Post
Hi,

Also, please put up pictures of the full side profile to give a better idea.
Will do guys. As soon as the sun comes up tomorrow.
arjyamaj is offline  
Old 31st October 2011, 01:25   #5
BHPian
 
swarnava.m's Avatar
 
Join Date: Oct 2011
Location: Mumbai/Margao
Posts: 635
Thanked: 281 Times
Re: DIY: Blackend A and B Pillars on an Alto (Pictorial)

Seems like a real good deal for 400 bucks. It really boosts the visual appeal. Do post some side profile pictures.

However, my concern here is about its longevity. Is this thing gonna last for sure?? What happens when you wash the car?? Won't water seep under the vinyl (if that's what it is) and weaken the adhesive? Won't they come off in due time?

Do let us know how it goes over a longer period of time. Maybe I will consider it for my car too.
swarnava.m is offline  
Old 31st October 2011, 05:44   #6
Senior - BHPian
 
mayankjha1806's Avatar
 
Join Date: Jan 2011
Location: Bangalore
Posts: 2,160
Thanked: 978 Times
Re: DIY: Blackend A and B Pillars on an Alto (Pictorial)

Not sure, i for one did not like the looks (as it might be something to do with my preference to color of car looking stock and as such i am bad with color combinations), but hey looks are subjective. So if you like them then let them stay otherwise its not too difficult to peel this thing off.
mayankjha1806 is offline  
Old 31st October 2011, 06:18   #7
Senior - BHPian
 
Join Date: Sep 2005
Location: Adelaide
Posts: 1,159
Thanked: 318 Times
Re: DIY: Blackend A and B Pillars on an Alto (Pictorial)

The MOD is good but i was wondering why did you use the Sticker that has the woody texture?
desideep is offline  
Old 31st October 2011, 09:44   #8
Distinguished - BHPian
 
ashis89's Avatar
 
Join Date: Aug 2011
Location: Bengaluru
Posts: 3,460
Thanked: 10,897 Times
Re: DIY: Blackend A and B Pillars on an Alto (Pictorial)

Quote:
Originally Posted by desideep View Post
The MOD is good but i was wondering why did you use the Sticker that has the woody texture?
. A plain texture material should have looked better.
I would also suggest to go in white painted bumpers(with the grill and lower air dams remaining black). Try changing the ORVMs to the larger ones available on the K10.

PS: You did a very neat job.
ashis89 is offline  
Old 31st October 2011, 10:18   #9
Senior - BHPian
 
fine69's Avatar
 
Join Date: Dec 2008
Location: New Delhi
Posts: 1,591
Thanked: 1,467 Times
Re: DIY: Blackend A and B Pillars on an Alto (Pictorial)

Great effort but sorry to say that I personally didn't like the finishing and the material used.

DIY: Blackend A and B Pillars on an Alto (Pictorial)-025.jpg

Now for the markings on the pic
1. Was the length/width of the black sheet an issue or did you deliberately not paste it on the whole A pillar?
2. Is this the beading or do we see car paint here?
3. & 4. Paint can be seen here and the finishing is not up to the mark.

Also towards the bottom of the A-pillar the black sheet gives a wooden trim kind of a look where as towards the top it looks like the material that is used in cars like Swift etc. Not sure if its the angle or the light effect or the material itself.

However, if you are in Delhi then for 400 bucks this is what could've got instead

DIY: Blackend A and B Pillars on an Alto (Pictorial)-dsc09568.jpg

DIY: Blackend A and B Pillars on an Alto (Pictorial)-dsc09566.jpg
fine69 is offline  
Old 1st November 2011, 13:49   #10
BHPian
 
arjyamaj's Avatar
 
Join Date: Apr 2008
Location: NCT
Posts: 105
Thanked: 310 Times
Re: DIY: Blackend A and B Pillars on an Alto (Pictorial)

As promised, here are the full side profile pics

RHS

DIY: Blackend A and B Pillars on an Alto (Pictorial)-001.jpg

LHS

DIY: Blackend A and B Pillars on an Alto (Pictorial)-002.jpg

Quote:
Originally Posted by swarnava.m View Post

However, my concern here is about its longevity. Is this thing gonna last for sure?? What happens when you wash the car?? Won't water seep under the vinyl (if that's what it is) and weaken the adhesive? Won't they come off in due time?

Do let us know how it goes over a longer period of time. Maybe I will consider it for my car too.
I haven't had any issues yet. But yeah that is a concern. The salesperson-type fellow who showed me the roll said that it had a 'setting time' of 5 hours. Not so sure as to whether he meant that after 5 hours, the adhesive would not come off. Evidently that's not the case- see my reply to mayankjha1806 below.

Quote:
Originally Posted by mayankjha1806 View Post
Not sure, i for one did not like the looks (as it might be something to do with my preference to color of car looking stock and as such i am bad with color combinations), but hey looks are subjective. So if you like them then let them stay otherwise its not too difficult to peel this thing off.
This thing is ridiculously easy to peel off. Am expecting the kids in my colony to have a field day you can already see in the LHS picture that someone's already tried.

Quote:
Originally Posted by desideep View Post
The MOD is good but i was wondering why did you use the Sticker that has the woody texture?
Thanks desideep. The shop didnt have a plain one. I figured I might as well use this for an initial demo of how it would actually look on the car.

Quote:
Originally Posted by ashis89 View Post
. A plain texture material should have looked better.
I would also suggest to go in white painted bumpers(with the grill and lower air dams remaining black). Try changing the ORVMs to the larger ones available on the K10.

PS: You did a very neat job.
Thanks ashish89. I have another DIY lined for the bumpers being painted white (standard canned spray paint). However, I am a little hesitant in taking the bumpers off myself- will probably use masking tape or some such. Havent figured that out yet. Totally agree on the OVRMs.

As for the grills and airdam, I recall seeing badboyscad's work on his alto in http://www.team-bhp.com/forum/modifi...ns-alto-6.html , which I would like to replicate, but I dont think I have that kind of manual dexterity.

Quote:
Originally Posted by fine69 View Post
Great effort but sorry to say that I personally didn't like the finishing and the material used.
Thanks fine69, always nice to have constructive criticism.

Agreed on the finishing. My first effort at masking the pillars. See my reply to desideep.

Quote:
Originally Posted by fine69 View Post

1. Was the length/width of the black sheet an issue or did you deliberately not paste it on the whole A pillar?
Well, to tell you the truth, I started on the RHS A-pillar first, and much later I realised that I had cut the strip too short.

Quote:
Originally Posted by fine69 View Post

2. Is this the beading or do we see car paint here?
Thats the beading. In order to get a sung fit, I tucked the edges of the sheet under the beading where possible.

Quote:
Originally Posted by fine69 View Post
3. & 4. Paint can be seen here and the finishing is not up to the mark.
point taken sir!

Quote:
Originally Posted by fine69 View Post
Also towards the bottom of the A-pillar the black sheet gives a wooden trim kind of a look where as towards the top it looks like the material that is used in cars like Swift etc. Not sure if its the angle or the light effect or the material itself.

However, if you are in Delhi then for 400 bucks this is what could've got instead
Its the material- you get to realise the texture only up close.

And since I happen to live in Delhi and happen to have another 400 bucks lying around, do let me know where. That Swift is a top notch job!

Last edited by arjyamaj : 1st November 2011 at 13:53. Reason: inserting URL
arjyamaj is offline  
Old 1st November 2011, 14:19   #11
Senior - BHPian
 
fine69's Avatar
 
Join Date: Dec 2008
Location: New Delhi
Posts: 1,591
Thanked: 1,467 Times
Re: DIY: Blackend A and B Pillars on an Alto (Pictorial)

Quote:
Originally Posted by arjyamaj View Post
And since I happen to live in Delhi and happen to have another 400 bucks lying around, do let me know where. That Swift is a top notch job!
I initially got the A/B pillar tapes from here but as you'd read my account I wasn't happy with the work. Later I got it done from my Friendly Neighbourhood Garage and this time it was indeed top notch.

If you are in South Delhi you have the option to go to Lajpat Nagar auto market and get a similar work done, shops are aplenty. I got it done in Kotla market the 2nd time however the guy who used to keep all such stuff doesn't operate there anymore.

Basically there are two types of tapes (three considering the wood finish one that you introduced all of us to )
1. A little shiny black tape that comes in Vxi/Vdi & Zxi/Zdi swift models
2. Matte black tape (I got this one for my swift)

Though initially I got the matte black tape only because they didn't have the shiny one in stock however the 2nd time even when the shiny one was available I still got the matte black tape because I liked it better.

If I may suggest, try getting only the B pillars blackened first and see if you like that better. IMO just the B pillars should be blackened for Alto, you know how it is in sedans.
fine69 is offline  
Old 1st November 2011, 15:37   #12
Distinguished - BHPian
 
dhanushs's Avatar
 
Join Date: Oct 2009
Location: Chennai
Posts: 4,281
Thanked: 10,175 Times
Re: DIY: Blackend A and B Pillars on an Alto (Pictorial)

The texture of the sticker is not to my taste. I'd prefer a matt black sticker.

Also, you could have spent a bit more time for a much better finish. Overall, sorry to say this, it doesn't appeal to me.
dhanushs is offline  
Old 1st November 2011, 16:15   #13
Distinguished - BHPian
 
kiku007's Avatar
 
Join Date: Apr 2005
Location: AU
Posts: 2,322
Thanked: 7,189 Times
Re: DIY: Blackend A and B Pillars on an Alto (Pictorial)

Nice effort but you could get a much neater job for the same amount (lesser?) at a sticker shop.

I got my Ikon's B pillar blackened in 2005 for Rs.100/-
kiku007 is offline  
Old 3rd November 2011, 11:13   #14
Team-BHP Support
 
benbsb29's Avatar
 
Join Date: Nov 2006
Location: Brisbane
Posts: 9,968
Thanked: 13,209 Times
Re: DIY: Blackend A and B Pillars on an Alto (Pictorial)

Here is a B Pillar treatment which i had done on my Ikon. This was using vinyl with matt finish.

http://www.team-bhp.com/forum/long-t...ml#post1657818
benbsb29 is online now  
Reply

Most Viewed


Copyright ©2000 - 2024, Team-BHP.com
Proudly powered by E2E Networks