Team-BHP
(
https://www.team-bhp.com/forum/)
The AC filter cleaning task was bugging me from past several weeks. Decided to finish it off today!
I must thank 'geminithomas' who gave me the idea that the filter might be located under the plastic shroud - around the gear lever. And yes it was there itself, behind the plastic shroud on the passenger side footwell.
Forgive me for the quality of pics. I didn't had a good camera and used my mobile phone to take pictures. Also, pardon me for any mistakes, as this is my 1st thread here on Team-Bhp!
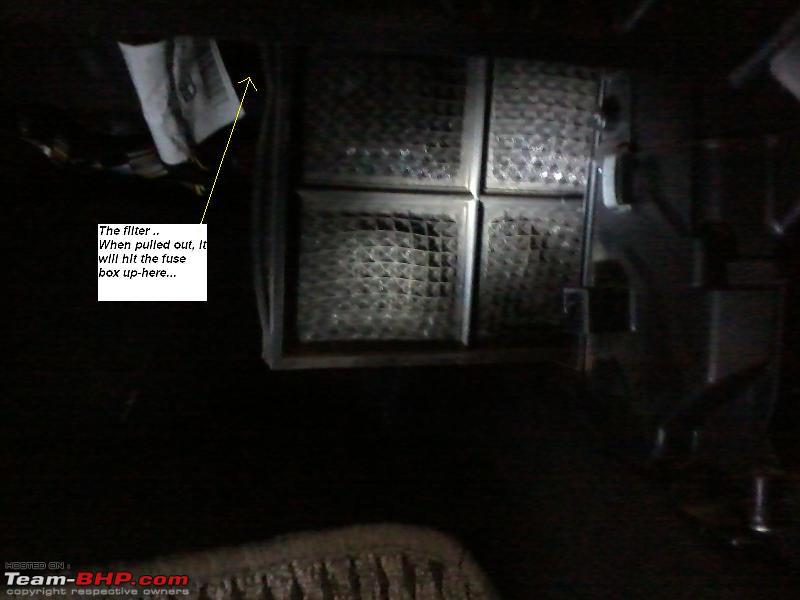
First & foremost let me disclose that this DIY was not as easy as i estimated. I guess this Ford has one of the most complex procedure for removal of cabin AC filter due to its unusual placement and presence of fuse box just 3-4 inches away from it, which obstructs the path while taking the filter out. Hence, The fuse box was required to be removed and let it hang to clear the way for the filter to slide out!
Removal of the plastic shroud around the gear lever and the Fuse Box and again fitting them back is a real pain. Removal of the filter cover and filter element is a pretty easy job.

STEP 1:
Removal of the plastic cover around the gear lever
The entire console is a single piece of molded plastic.
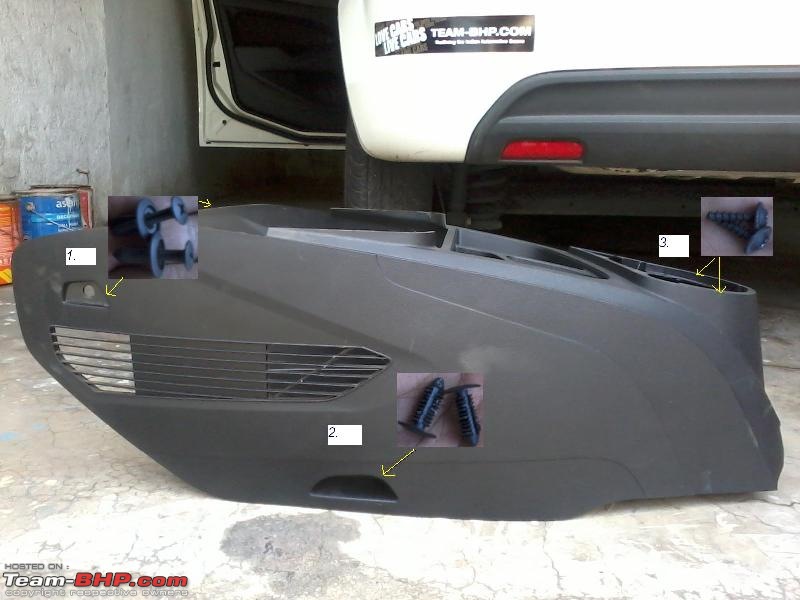
1. Unscrew the screws marked at position
1 on both right & left sides using a phillips screw driver.
2. Pierce out the plastic clips marked at position
2 on both right & left sides.
3. Pierce out the silver plastic surround around the gear lever using a flat head screw driver. Pull the rubber cover up. Locate the plug & wire powering the cigarette lighter socket and pull out the female socket to release the cover.
4. Unscrew the screw marked at position
3, which is on the either side of the gear lever, using a TORX type screw driver head. I bought the tool kit having 32 pieces of funny looking screw driver heads just for this purpose. Same type of head can be used to open the air filter box as well.


5. Keep all the screws and clips at a safe place. Hold the plastic shroud from either sides and pull towards yourself. Now pull it Upwards at the same time adjust the gear lever and parking brake lever to let the console pop out.
Carefully remove the console and keep it aside.
 Removing the glove box
1. Open & Empty the glove box.
2. Pull the rubber stoppers inwards and push the glove box downwards to release and hang.

3. Pull two locks on either sides which holds the glove box from beneath.

4. Take out the glove box and keep it apart. Now there would be enough space to open the fuse box.
 Removing the fuse box unit
1. You only need to remove the unit from its place to let it make way for the filter to come out. Use 10 mm wrench or a bit to unscrew the two bolts on either ends.
2. Now, push the fuse box upwards and then towards yourself to remove it from the housing clips.

 Removing the Filter cover and taking the filter out
1.Unscrew 4 screws placed vertically over each other on the either side of the filter cover.


2. Pull out the filter carefully
 Cleaning the filter
I cleaned the filter with a soapy solution and a toothbrush as it had sticky/greasy dust on it. I could see a good amount of black grime coming out of the filter during cleaning.

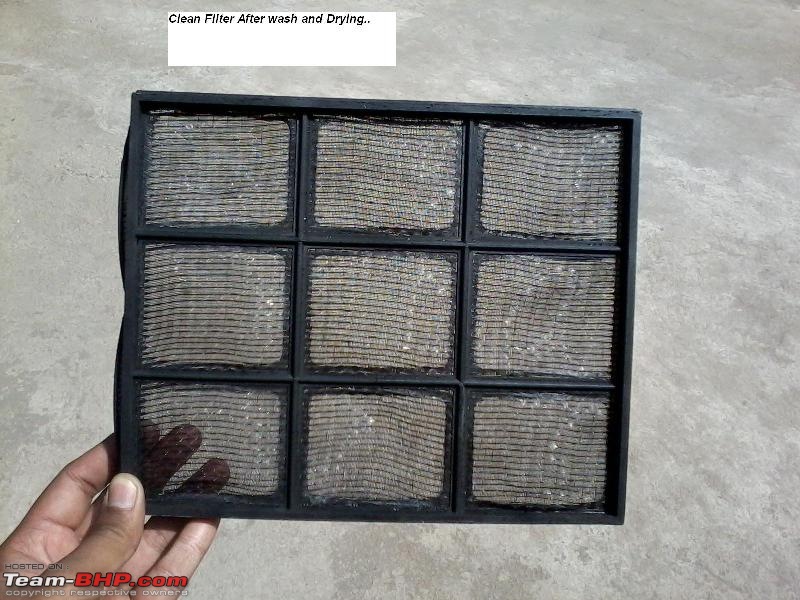
After cleaning,let the filter dry.
Reverse the steps to re-install everything back to its place.
Note: The plastic edges inside the dashboard are pretty sharp and may cut your hands if you are not careful enough. Also, tighten the nuts and screws very carefully as they may slip and get lost. I spent a tiring one hour to search a lost black color screw over the black interiors.
Haven't tested the AC performance, post this cleaning exercise. Will let you all know after some use.
Thread moved from the Assembly Line to the Technical Stuff. Thanks for sharing!
Quiet detailed documented work that you carried out there, hopefully the effects will be worth it. Its quiet a few things that needs to be opened, i would have been slightly apprehensive or maybe to the extent of being scared in opening all these to get to the filter.
Great guide, I think it should be similar for quite a few other makes too
Awesome mate!
Had I tried it myself, I would have given up as soon as I saw the fuse-box. I would not have dared even touching the fuse-box in a car. Even though you have warned that it might not be as easy as it looks like, it has given me quite a confidence.
Quite a handy thread if I ever wanted to do time-pass during a weekend :)
Thanks BHO.
That was surely a painstaking task. Moreover snapping it for all of us out here.
So any noticeable changes ? anyway if not, DIY itself gives a great sense of achievement :D
oh! god! WhY did you remove the whole plastic shroud of the gear
lever. You jUST had to remove the side panel is what i know. Atleast on my car this i not a single piece of plastic. let me check anyways.
Quote:
Originally Posted by gemithomas
(Post 2701978)
oh! god! WhY did you remove the whole plastic shroud of the gear
lever. You jUST had to remove the side panel is what i know. Atleast on my car this i not a single piece of plastic. let me check anyways.
|
Gemi, as i mentioned in the post, the shroud is a single piece of molded plastic. Even i thought that the side panel must come out, but it is not designed that way. Thanks to its single piece design and weird placement of the fuse box, which makes a simple job this difficult. The pictures might present a view that the procedures are very difficult, but once you start doing, it doesn't feel as such. Please check in your car about the shroud else, i'll be in guilt of opening up things uselessly :confused:
Ironically i didn't got a chance to test the AC post this DIY.
Update: Drove the car for around 80kms in extremely sunny and hot day. What I could notice was:
1. The cooling is slightly better (I roughly estimated it tobe 5-8% better)
2. The Freshness of the Air was as good as new. Earlier the air from the blowers didn't felt so fresh and whenever the AC was switched off, the air turned out to be pungent/foul in smell. No such issues now.
So, all in all i feel that this exercise helped in slightly better cooling & majorly in improving the quality/smell of air inside.
Quote:
Originally Posted by gemithomas
(Post 2701978)
oh! god! WhY did you remove the whole plastic shroud of the gear
lever. You jUST had to remove the side panel is what i know. Atleast on my car this i not a single piece of plastic. let me check anyways.
|
Fusion and fiestas have that shroud in 3 pieces.
around the gear lever, and 2 in the footwells
But the figo has a single piece shroud. There were no joints etc. Just one piece. The Shroud was fixed with 4 screws and 2 clips.
Quote:
Originally Posted by Blow Horn Ok
(Post 2700329)
The AC filter cleaning task was bugging me from past several weeks. Decided to finish it off today!
|
:thumbs up for the DIY.
Quote:
Originally Posted by bottle
(Post 2701835)
Great guide, I think it should be similar for quite a few other makes too
|
You are right, it quite similar. Here is how to do it, on a Chevrolet Spark.
http://www.team-bhp.com/forum/techni...ial-guide.html
This is crazy, this part should have easy access. What was ford thinking.
But excellent DIY with great details.
Quote:
Originally Posted by Jaggu
(Post 2704401)
What was ford thinking.
|
Please, don't be that harsh on Ford. As a consumer, we are demanding better products at a cheaper rate. So engineers are asked to come up with innovative solution to make the product cheaper, and while doing that they have sacrifice on something, like the accessibility in here. At least they would have never thought a car owner would clean the cabin air filter, I think they forgot about petrol heads like us :D.
The assumption I made here is that, it would be cheaper for the manufacturer to make shroud as a single piece than in parts.
Quote:
Originally Posted by ecenandu
(Post 2704441)
Please, don't be that harsh on Ford. As a consumer, we are demanding bett=======================
The assumption I made here is that, it would be cheaper for the manufacturer to make shroud as a single piece than in parts.
|
Better would have been a small access area for the filter, which can be covered with a snap on cap which will make it easily serviceable. In Indian climatic condition and usage, this filter will be chocked in 20k kms. This will put load on the AC system and eventually lead to other costly replacements. So i feel this is a design goof up.
Imagine getting 1.5 to 2k bill for AC filter cleaning? Wont be a cheap product to maintain then. And i really dont think Ford is that cheap, it might be relatively cheap thanks to other manufacturer's who sell at crazy premium.
The whole concept of cheap hatches has changed in last few years, there is nothing cheap about them anymore :)
| All times are GMT +5.5. The time now is 10:19. | |