Team-BHP > Technical Stuff > DIY - Do it yourself
Register New Topics New Posts Top Thanked Team-BHP FAQ


Reply
  Search this Thread
53,027 views
Old 4th December 2013, 14:39   #61
Senior - BHPian
 
Join Date: Jul 2009
Location: Calcutta
Posts: 4,668
Thanked: 6,217 Times
Re: DIY ECU : Megasquirting the Premier 118NE

Quote:
Originally Posted by ilangop View Post
install it in front of the crank pulley.
That will likely lead to problems taking off/ installing the fanbelt. Also throwing a belt is likely to take out the sensor.

What phasing are you maintaining between the crank Woodruff key/ TDC/ missing tooth? And how.

Regards
Sutripta
Sutripta is offline  
Old 5th December 2013, 19:13   #62
BHPian
 
ilangop's Avatar
 
Join Date: Jul 2008
Location: Chennai
Posts: 992
Thanked: 903 Times
Re: DIY ECU : Megasquirting the Premier 118NE

Quote:
Originally Posted by Sutripta View Post
That will likely lead to problems taking off/ installing the fanbelt. Also throwing a belt is likely to take out the sensor.

What phasing are you maintaining between the crank Woodruff key/ TDC/ missing tooth? And how.
Yes, I too foresee the same problem. I plan to weld the pulley & the wheel.
ilangop is offline  
Old 6th December 2013, 21:17   #63
BHPian
 
Join Date: Aug 2006
Location: chennai
Posts: 309
Thanked: 111 Times
Re: DIY ECU : Megasquirting the Premier 118NE

Thanks Ilangop for sharing the details. How abt base map. I believe MS2 base map can be derived by volumetric efficiency of the engine.
vijaycool is offline  
Old 18th April 2014, 00:01   #64
BHPian
 
revvedup's Avatar
 
Join Date: Sep 2006
Location: Delhi
Posts: 269
Thanked: 24 Times
Re: DIY ECU : Megasquirting the Premier 118NE

Just went through the thread in go, the amount of thought and attention you have put into this is astonishing.

I am completely with you on doing the ignition first and then getting the injection done later. Do keep at it !
revvedup is offline  
Old 28th July 2014, 13:17   #65
BHPian
 
ilangop's Avatar
 
Join Date: Jul 2008
Location: Chennai
Posts: 992
Thanked: 903 Times
Crank Wheel Installed

After a long pause, finally found time to get the 36-1 crankwheel installed in the car. The space behind the pulley was extremely cramped. With the crank wheel there is only just enough space for wheel to clear away from the engine block. The mechanic had to remove the radiator and the fan for removing the old pulley. Got to figure out how to fit the crank position sensor. Please see attached picture.
Attached Thumbnails
DIY ECU : Megasquirting the Premier 118NE-crankwheel_1.jpg  


Last edited by ilangop : 28th July 2014 at 13:23.
ilangop is offline   (3) Thanks
Old 10th November 2014, 08:01   #66
BHPian
 
shramik's Avatar
 
Join Date: Jan 2010
Location: Bangalore
Posts: 104
Thanked: 162 Times
Re: Crank Wheel Installed

Dear Ilango,

I had no idea of the extent you have ventured into this amazing project until I saw the entire thread !! Congratulations on this path breaking venture ! I understand little of the electronics, but from what I read, you are almost "there" !!
Good luck !!!


Quote:
Originally Posted by ilangop View Post
After a long pause, finally found time to get the 36-1 crankwheel installed in the car. The space behind the pulley was extremely cramped. With the crank wheel there is only just enough space for wheel to clear away from the engine block. The mechanic had to remove the radiator and the fan for removing the old pulley. Got to figure out how to fit the crank position sensor. Please see attached picture.
shramik is offline   (1) Thanks
Old 4th March 2015, 21:55   #67
Senior - BHPian
 
manishalive's Avatar
 
Join Date: Apr 2009
Location: Bangalore
Posts: 2,514
Thanked: 1,079 Times
Re: DIY ECU : Megasquirting the Premier 118NE

Bro,

Never knew of this thread. Stumbled upon this on a forum search on hall effect sensor (you know for what reason ).

And by the way I see that you are in need of some components which I have plenty of them with me.

1.) Timing advance device for CNG / LPG to take care of the fuel characteristics.

2.) The plastic T pipe to branch into the water pipes.

What more is I have other sundry items for the LPG kits, including mixer bodies, solenoids and other hardware. Let me know what you need
manishalive is offline   (1) Thanks
Old 5th March 2015, 09:06   #68
BHPian
 
ilangop's Avatar
 
Join Date: Jul 2008
Location: Chennai
Posts: 992
Thanked: 903 Times
Re: DIY ECU : Megasquirting the Premier 118NE

Quote:
Originally Posted by manishalive View Post
And by the way I see that you are in need of some components which I have plenty of them with me.

1.) Timing advance device for CNG / LPG to take care of the fuel characteristics.

2.) The plastic T pipe to branch into the water pipes.

What more is I have other sundry items for the LPG kits, including mixer bodies, solenoids and other hardware. Let me know what you need
Thanks a lot for your kind gesture. For now I would need the T-pipe to branch water hoses, but looking for something in metal so that I could weld bunges for water temperature sensor. Could you please post a picture of the plastic T anyways. Also please PM me your mobile no, so that I can bug you sometime.
ilangop is offline  
Old 5th March 2015, 11:27   #69
Senior - BHPian
 
manishalive's Avatar
 
Join Date: Apr 2009
Location: Bangalore
Posts: 2,514
Thanked: 1,079 Times
Re: DIY ECU : Megasquirting the Premier 118NE

Quote:
Originally Posted by ilangop View Post
Thanks a lot for your kind gesture. For now I would need the T-pipe to branch water hoses, but looking for something in metal so that I could weld bunges for water temperature sensor. Could you please post a picture of the plastic T anyways. Also please PM me your mobile no, so that I can bug you sometime.
Metal one is not available. I will get the pictures (these are in my home town). These are 2 inch plastic pipes with a quarter inch branched connection for water to kit. You would be able to get metal ones from scrap yard. I think Maruti esteem uses the same size.

PMed you my number.
manishalive is offline   (1) Thanks
Old 3rd June 2015, 10:32   #70
BHPian
 
ilangop's Avatar
 
Join Date: Jul 2008
Location: Chennai
Posts: 992
Thanked: 903 Times
Electric Fan for Radiator & Crank Position Sensor

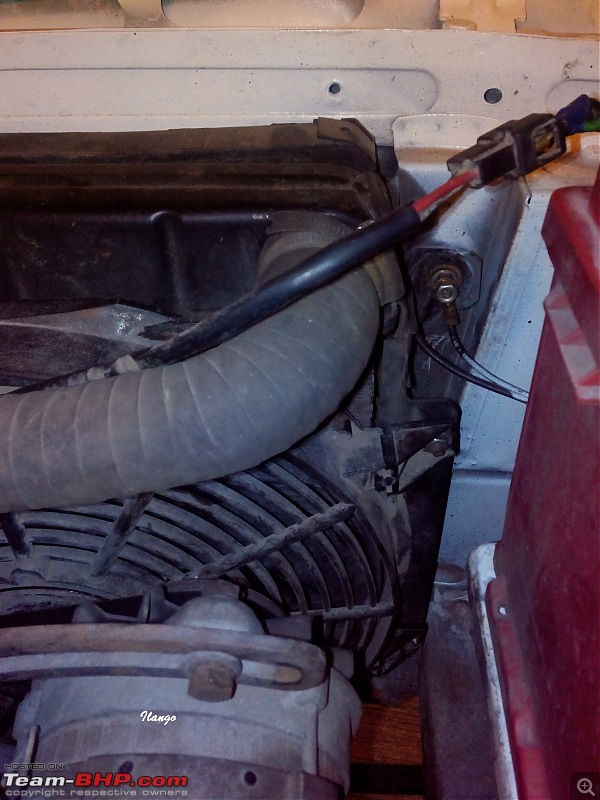
Though it appeared like there was lot of space available under-hood, it was really a hectic task to squeeze an electric fan for the radiator & the crank position sensor.

The Radiator Fan.
With the help of a friendly scrapyard guy I sourced a Fiat Palio fan first. But the shroud was too large to get accommodated in the available space. Though the scrapyard guys don't have a buy-back or a return policy, he was enthusiastic in helping me because of his young age. His dad would have not entertained this. The very next day I had returned the Palio fan and looked for a slimmer fan. Condenser fans were the only option left with. But they all were push type fans placed in the front side of the radiator. So, again I had given him a disclaimer that this will be exchanged if it doesn't do my job. Went home with a Ford Fiesta condenser fan.

At the first trial I was able to slide the fan smoothly (rather with meager difficulty) in the space available. As we all know, any retro fitment doesn't go without compromising on something. Had to get rid of a few fins from the fan shroud to give way to the water pump pulley. Also pulled out the fan from the motor, flipped it and fitted back on to the motor shaft to get the direction right. Got a steel bracket made out of 2 wheeler luggage box clamps. Fitted them all and wired it through a relay & a piano switch. In the meanwhile while the radiator was out, a bung for the M800 thermoswitch was welded and closed with a dummy cork for now.
For now the fan operates through a relay and a switch controlled by the driver (me ).
DIY ECU : Megasquirting the Premier 118NE-img20150526wa0007.jpgDIY ECU : Megasquirting the Premier 118NE-img_20150526_081351.jpg
DIY ECU : Megasquirting the Premier 118NE-img_20150526_191603.jpgDIY ECU : Megasquirting the Premier 118NE-img_20150602_194816.jpg
DIY ECU : Megasquirting the Premier 118NE-img_20150602_194749.jpg

Crank Position Sensor:
After lots of brainstorming I was somehow able to squeeze the crank position sensor of Hyundai accent in the location shown here. Did a paper mockup first and then got it laser cut on a 1.6mm MS plate. Got to wire it with the ECU and understand if it picks up signal.

DIY ECU : Megasquirting the Premier 118NE-img_20150524_184030.jpgDIY ECU : Megasquirting the Premier 118NE-img20150527wa0061.jpg
DIY ECU : Megasquirting the Premier 118NE-img_20150602_194844.jpgDIY ECU : Megasquirting the Premier 118NE-img_20150602_194924.jpg

After confirming that the clearance between sensor & toner ring was between 1 & 2 mm, shut the bonnet and went for a spin. It was 00:30 and the temperature was less. The fan cooling was sufficient. The next day took out the car into the city at 13:00 when it was 38 deg outside. With 2 people onboard the temperature needle was still under half mark. This made be happy. Haven't tested it with AC, might have to fill in the remaining space behind the radiator with another small fan which kicks in with AC on, though not sure.
-Ilango
ilangop is offline   (4) Thanks
Old 3rd June 2015, 10:38   #71
BHPian
 
shramik's Avatar
 
Join Date: Jan 2010
Location: Bangalore
Posts: 104
Thanked: 162 Times
Re: Electric Fan for Radiator & Crank Position Sensor

Good going, Ilango !! Keep it up !!!!

Last edited by Aditya : 15th April 2016 at 07:06. Reason: Quoted text not necessary
shramik is offline   (1) Thanks
Old 21st September 2015, 10:14   #72
BHPian
 
ilangop's Avatar
 
Join Date: Jul 2008
Location: Chennai
Posts: 992
Thanked: 903 Times
Hooking up the ECU with the Crank Position Sensor

After spending 5 days in preparing a small wiring harness to connect the ECU with the relay / breakout box, took the setup to the car and wired the crank position sensor. With a few adjustments on the settings, I was able to see the current engine rpm on the scanning tool. That was a big relief, and patted myself for crossing 1 milestone. But still many more to go.
Attached Thumbnails
DIY ECU : Megasquirting the Premier 118NE-img_20150920_184359.jpg  

DIY ECU : Megasquirting the Premier 118NE-img_20150920_184318.jpg  

ilangop is offline   (4) Thanks
Old 6th March 2016, 17:06   #73
BHPian
 
Join Date: Jun 2015
Location: Warwick
Posts: 40
Thanked: 36 Times
Re: DIY ECU : Megasquirting the Premier 118NE

Hey Illango,

Came across your thread just now. Respect

Any updates after the ECU trial?
Eager to Know.
Now that you will have EFI, is the next step a Turbo..?

Thanks

Kannan
autodoctor is offline   (1) Thanks
Old 6th March 2016, 18:43   #74
BHPian
 
shramik's Avatar
 
Join Date: Jan 2010
Location: Bangalore
Posts: 104
Thanked: 162 Times
Re: DIY ECU : Megasquirting the Premier 118NE

Quote:
Originally Posted by autodoctor View Post
Hey Illango,

Came across your thread just now. Respect

Any updates after the ECU trial?
Eager to Know.
Now that you will have EFI, is the next step a Turbo..?

Thanks

Kannan
Long time no updates, Ilango !
I hope the project is going well.
Do update me on whatsapp.
Shramik
+919845013893
shramik is offline   (1) Thanks
Old 7th March 2016, 09:22   #75
BHPian
 
ilangop's Avatar
 
Join Date: Jul 2008
Location: Chennai
Posts: 992
Thanked: 903 Times
Re: DIY ECU : Megasquirting the Premier 118NE

Quote:
Originally Posted by shramik View Post
Long time no updates, Ilango !
I hope the project is going well.
Do update me on whatsapp.
Hello Sir, Had to do some soldering for the ignition coil driver chips. And the car was being used extensively during the winters. So couldn't do much work in the car.

Quote:
Originally Posted by autodoctor View Post
Came across your thread just now. Respect
Any updates after the ECU trial?
Eager to Know.
Now that you will have EFI, is the next step a Turbo..?
Dear Kannan,
Thank you. Turbo, no way.
ilangop is offline   (1) Thanks
Reply

Most Viewed


Copyright ©2000 - 2024, Team-BHP.com
Proudly powered by E2E Networks