Team-BHP > Technical Stuff > DIY - Do it yourself


Reply
  Search this Thread
89,620 views
Old 17th November 2013, 15:35   #46
BHPian
 
Join Date: Mar 2004
Location: Pune
Posts: 156
Thanked: 169 Times
Re: DIY: Tacho Install in Maruti WagonR

Quote:
Originally Posted by vishwaschettri View Post
Great I dint knew this. Any more info on this would be appreciated.

Cheers
Vishwas
Below is a pic I could find online. Looks neat.

DIY: Tacho Install in Maruti WagonR-santroxolimitededition.jpg
vaasu is offline  
Old 8th December 2019, 11:18   #47
BHPian
 
Tom Sooraj's Avatar
 
Join Date: Jul 2019
Location: Nagercoil TN74
Posts: 126
Thanked: 440 Times
Re: DIY: Tacho Install in Maruti WagonR

Quote:
Originally Posted by vishwaschettri View Post
The Epilogue : The tacho increases the fun and cool quotient of a otherwise boring car exponentially.
A very great DIY. I wish to add tacho to our Waggy, but I'm not that good in handling with electricals.
Quote:
Live 12V supply was tapped from the acc. socket since my friend wanted it to light up the moment he turns the key. Moreover it was easier this way without splicing / cutting of any wires.
Attachment 1162637
I wonder what that part is (The one behind the 12V socket).
Quote:
No panels on the dashboard needs to be opened (though we had removed the entire dash in our quest)
How to remove the entire dash? I found many clips, but didn't know which are to be removed.

And since I don't have drilling tools, etc., is it possible to get the tacho installed at MASS?

Thanks,
Sooraj.
Tom Sooraj is offline  
Old 8th December 2019, 22:16   #48
BHPian
 
Tom Sooraj's Avatar
 
Join Date: Jul 2019
Location: Nagercoil TN74
Posts: 126
Thanked: 440 Times
Re: DIY: Tacho Install in Maruti WagonR

Sorry for my back to back posts. Mods, please merge if necessary.

Found an OEM tachometer for the A-star in this link. The image shows that the wire coming out of the tacho is connected to a connector as a whole. Are the individual wires (red, black, blue and yellow) present inside the black surrounding material? Planning to order one. Hoping to get some help.

Thanks,
Sooraj.
Attached Thumbnails
DIY: Tacho Install in Maruti WagonR-screenshot_20191208220323.png  


Last edited by Tom Sooraj : 8th December 2019 at 22:18.
Tom Sooraj is offline  
Old 8th December 2019, 23:10   #49
BANNED
 
Join Date: Oct 2011
Location: Hyderabad
Posts: 12,350
Thanked: 21,411 Times
Re: DIY: Tacho Install in Maruti WagonR

Quote:
Originally Posted by Tom Sooraj View Post
The image shows that the wire coming out of the tacho is connected to a connector as a whole. Are the individual wires (red, black, blue and yellow) present inside the black surrounding material? Planning to order one.
Yes. The four wires are present inside the sheath connected to that white connector. Quoting from my DIY Install thread:

Quote:
The Tachometer comes with 4 wires (Red, Black, Blue and Yellow), the Red is +ve; Black is –ve; Blue is tachometer backlight and Yellow is the RPM/Tacho signal wire.

For the Red wire, I have used a fuse tap cable and connected to a fuse in the fuse box that works only when the ignition is ON. Same as what I have done with the Blue wire that is the backlight one that requires a 12V supply so connected it to the fuse box via another fuse tap cable.

The black wire is crimped using a ring terminal connector to be used as Earthing on any bolt.

The Yellow wire is connected to via a T-tap connector to the brown wire that was separated from the coupler.
You can refer to the thread here for other details.

Last edited by a4anurag : 8th December 2019 at 23:12.
a4anurag is offline   (1) Thanks
Old 8th December 2019, 23:56   #50
BHPian
 
Tom Sooraj's Avatar
 
Join Date: Jul 2019
Location: Nagercoil TN74
Posts: 126
Thanked: 440 Times
Re: DIY: Tacho Install in Maruti WagonR

Quote:
Originally Posted by a4anurag View Post
You can refer to the thread here for other details.
Thank you so much for your prompt reply. I read your thread, and finally got some idea on how to remove the dashboard.

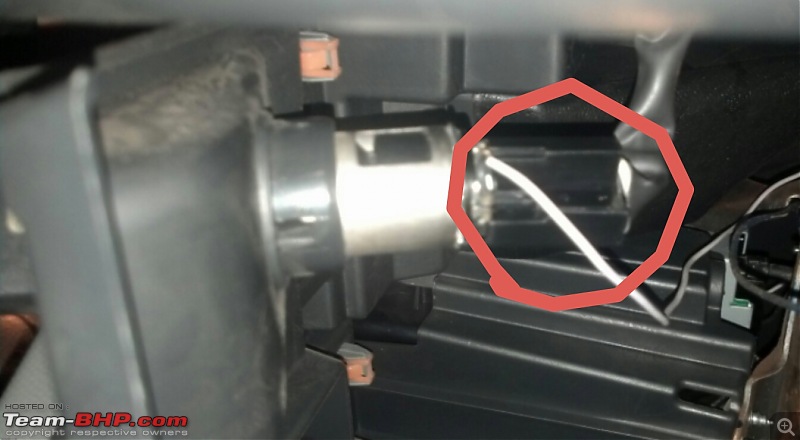
Do you know what that part is?
The one I've marked in red. Image is taken from vishwaschettri's post.
DIY: Tacho Install in Maruti WagonR-photo-marker_dec082019_235409.jpg

Thanks,
Sooraj.

Last edited by Tom Sooraj : 9th December 2019 at 00:00.
Tom Sooraj is offline   (1) Thanks
Old 9th December 2019, 00:12   #51
BANNED
 
Join Date: Oct 2011
Location: Hyderabad
Posts: 12,350
Thanked: 21,411 Times
Re: DIY: Tacho Install in Maruti WagonR

Quote:
Originally Posted by Tom Sooraj View Post
Do you know what that part is?
Looks like a connector ('L' shaped) to connect the positive and negative terminals of the 12V socket which helps in easy removal of the socket if required.
a4anurag is offline   (1) Thanks
Old 9th December 2019, 11:07   #52
BHPian
 
Tom Sooraj's Avatar
 
Join Date: Jul 2019
Location: Nagercoil TN74
Posts: 126
Thanked: 440 Times
Re: DIY: Tacho Install in Maruti WagonR

Thanks for the steps on how to remove the dashboard. Just tried whether I could remove it or not. I failed twice, but succeeded at the third attempt.

DIY: Tacho Install in Maruti WagonR-20191209_102918.jpg

Found the coupler joining the PS module.

DIY: Tacho Install in Maruti WagonR-20191209_103002.jpg

Is it required to remove the indicator-wiper housing (behind the steering wheel)?

Quote:
Originally Posted by a4anurag View Post
Looks like a connector ('L' shaped)
May I know where can I get that?

Thanks,
Sooraj.
Tom Sooraj is offline  
Old 9th December 2019, 11:30   #53
BANNED
 
Join Date: Oct 2011
Location: Hyderabad
Posts: 12,350
Thanked: 21,411 Times
Re: DIY: Tacho Install in Maruti WagonR

Quote:
Originally Posted by Tom Sooraj View Post
Is it required to remove the indicator-wiper housing (behind the steering wheel)?
Not required.

Quote:
Originally Posted by Tom Sooraj View Post
May I know where can I get that?
Salvage yard or any popular MASS in your city (where you have good contacts) can help you get that part.

AFAIK it is a part of the dashboard wiring harness so getting it separately is difficult. I'll check online and shall share the link if I find one.
a4anurag is offline   (1) Thanks
Old 10th December 2019, 10:45   #54
BHPian
 
Tom Sooraj's Avatar
 
Join Date: Jul 2019
Location: Nagercoil TN74
Posts: 126
Thanked: 440 Times
Re: DIY: Tacho Install in Maruti WagonR

Quote:
Originally Posted by a4anurag View Post
it is a part of the dashboard wiring harness
The part, which I've been asking for, is present behind the 12v socket. Sorry for my ignorance.

DIY: Tacho Install in Maruti WagonR-20191210_101446.jpg

DIY: Tacho Install in Maruti WagonR-20191210_101143.jpg

And a few more queries:
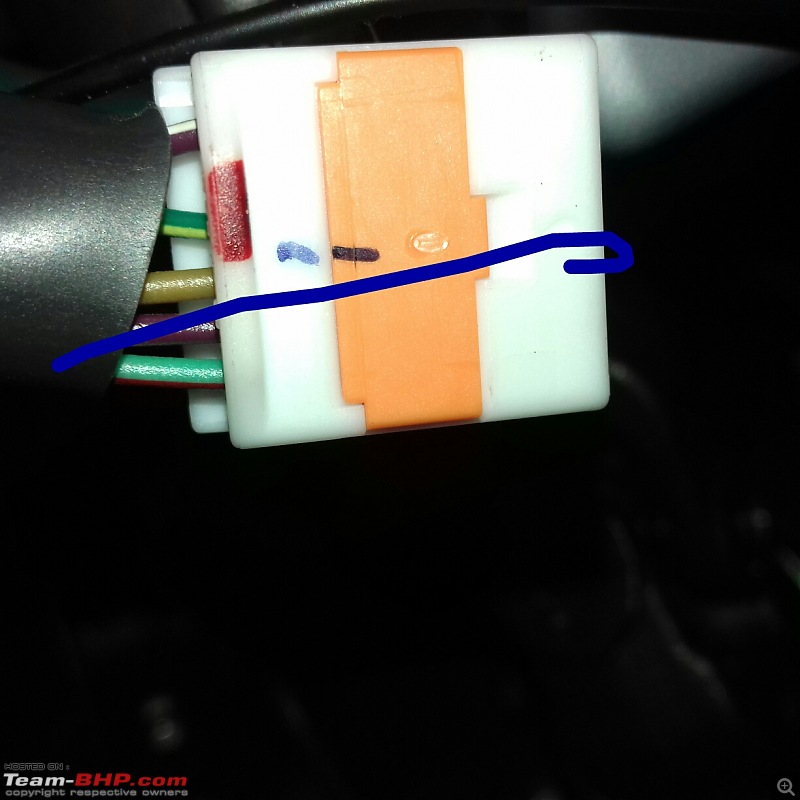
1. Is the 3rd wire the brown one?

2. Should the parallel feed wire be inserted via the other end of the brown wire?

DIY: Tacho Install in Maruti WagonR-photo-marker_dec102019_103544.jpg

3. How to connect the wire to the 12v socket?

4. Should heat shrink tube be used compulsorily or just insulation tape is enough?

Thanks,
Sooraj.

Last edited by Tom Sooraj : 10th December 2019 at 10:47. Reason: Adding quote
Tom Sooraj is offline  
Old 10th December 2019, 13:14   #55
BANNED
 
Join Date: Oct 2011
Location: Hyderabad
Posts: 12,350
Thanked: 21,411 Times
Re: DIY: Tacho Install in Maruti WagonR

Quote:
Originally Posted by Tom Sooraj View Post
The part, which I've been asking for, is present behind the 12v socket.
Yes. I'm saying that wiring with that connector (in black) is included in the dashboard wiring harness. I don't think that connector (in black) will be available separately for purchase.

Quote:
Originally Posted by Tom Sooraj View Post
1. Is the 3rd wire the brown one?
Yes.

Quote:
Originally Posted by Tom Sooraj View Post
2. Should the parallel feed wire be inserted via the other end of the brown wire?
You can use a quick splice connector. IIRC that's what I used too.

Quote:
Originally Posted by Tom Sooraj View Post
3. How to connect the wire to the 12v socket?
Use a fuse tap cable from the fuse box. Easier and safer too.

Quote:
Originally Posted by Tom Sooraj View Post
4. Should heat shrink tube be used compulsorily or just insulation tape is enough?
Heat shrink tubing will be better if used and will look neater. In case you don't have that with you, use the insulation tape.
a4anurag is offline   (2) Thanks
Old 10th December 2019, 18:29   #56
BHPian
 
Tom Sooraj's Avatar
 
Join Date: Jul 2019
Location: Nagercoil TN74
Posts: 126
Thanked: 440 Times
Re: DIY: Tacho Install in Maruti WagonR

Quote:
Originally Posted by a4anurag View Post
You can use a quick splice connector. IIRC that's what I used too.
You've used a T-tap connector. Does attaching the wire to the male connector require a crimping tool?

Quote:
Use a fuse tap cable from the fuse box. Easier and safer too.
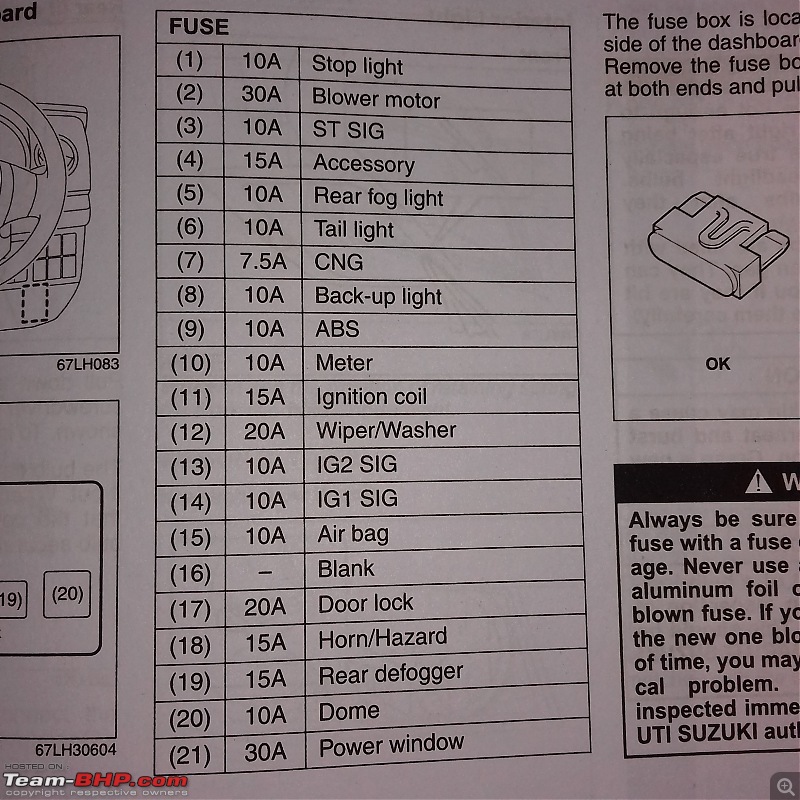
The fuse box in our Waggy is like this:

DIY: Tacho Install in Maruti WagonR-20191210_180746.jpg

DIY: Tacho Install in Maruti WagonR-20191210_181508.jpg

Quote:
Heat shrink tubing will be better if used and will look neater. In case you don't have that with you, use the insulation tape.
The heat shrinking tube requires crimping tool, right?

And a big thanks to you for clarifying my doubts with patience.

Thanks,
Sooraj.
Tom Sooraj is offline  
Old 10th December 2019, 18:51   #57
BANNED
 
Join Date: Oct 2011
Location: Hyderabad
Posts: 12,350
Thanked: 21,411 Times
Re: DIY: Tacho Install in Maruti WagonR

Quote:
Originally Posted by Tom Sooraj View Post
You've used a T-tap connector. Does attaching the wire to the male connector require a crimping tool?
Thank you for refreshing my memory. Yes, I had used a T-tap connector.

You'll need the crimping tool to crimp the wire to the connector.

Quote:
Originally Posted by Tom Sooraj View Post
The fuse box in our Waggy is like this
Use the No.16 labelled as 'Blank' or No.4 labelled as 'Accessory'.

Quote:
Originally Posted by Tom Sooraj View Post
The heat shrinking tube requires crimping tool, right?
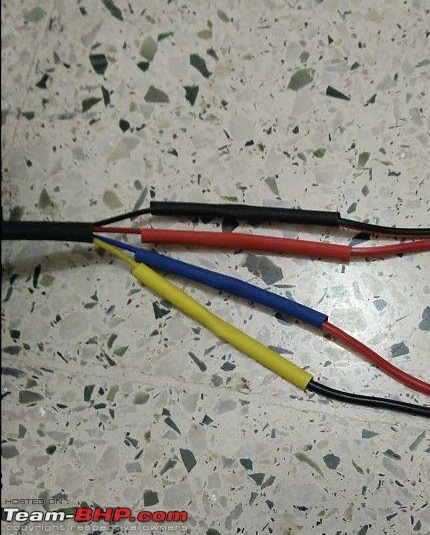
DIY: Tacho Install in Maruti WagonR-3.-extended-wires-heatshrinked__01.jpg

Before you crimp or solder or join two wires, slide in a heat shrink tube first, then join the wires and then slide the heat shrink tube over that 'exposed joint' and heat that tube using a hot air gun (if available) else use a lighter.

The tube will shrink and take that shape protecting the wire and connection.
a4anurag is offline   (2) Thanks
Old 10th December 2019, 22:07   #58
BHPian
 
Tom Sooraj's Avatar
 
Join Date: Jul 2019
Location: Nagercoil TN74
Posts: 126
Thanked: 440 Times
Re: DIY: Tacho Install in Maruti WagonR

Quote:
Originally Posted by a4anurag View Post
Use the No.16 labelled as 'Blank' or No.4 labelled as 'Accessory'.
A fuse tap cable (with two 15A fuses) is to be inserted in the fuse box, right?

Quote:
Before you crimp or solder or join two wires, slide in a heat shrink tube first, then join the wires and then slide the heat shrink tube over that 'exposed joint' and heat that tube using a hot air gun (if available) else use a lighter.

The tube will shrink and take that shape protecting the wire and connection.
I'm sorry but your answer is a bit confusing for me. I saw a youtube video in which the person connected individual wires at each end of the heat shrink tube, crimped them and then heated the tube using a lighter. Is this procedure okay?

Thanks,
Sooraj.
Tom Sooraj is offline  
Old 10th December 2019, 22:20   #59
BANNED
 
Join Date: Oct 2011
Location: Hyderabad
Posts: 12,350
Thanked: 21,411 Times
Re: DIY: Tacho Install in Maruti WagonR

Quote:
Originally Posted by Tom Sooraj View Post
A fuse tap cable (with two 15A fuses) is to be inserted in the fuse box, right?
15A and a 10A should be sufficient.

Quote:
Originally Posted by Tom Sooraj View Post
I'm sorry but your answer is a bit confusing for me.
Sorry to complicate it. See this video attached. Hope it helps.

a4anurag is offline   (1) Thanks
Old 10th December 2019, 23:14   #60
BHPian
 
Tom Sooraj's Avatar
 
Join Date: Jul 2019
Location: Nagercoil TN74
Posts: 126
Thanked: 440 Times
Re: DIY: Tacho Install in Maruti WagonR

Quote:
Originally Posted by Tom Sooraj View Post
I saw a Youtube video
Here is the link of the video.


Quote:
Originally Posted by a4anurag View Post
Sorry to complicate it.
It was not your fault. I just got hold of the word 'crimping' and expected it to be a part of your answer. Now, I understood your point.

And finally, placed an order for the A-star tachometer.

Thanks,
Sooraj.
Tom Sooraj is offline  
Reply

Most Viewed
Thread Tools Search this Thread
Search this Thread:

Advanced Search

Copyright ©2000 - 2024, Team-BHP.com
Proudly powered by E2E Networks