Team-BHP > Technical Stuff > DIY - Do it yourself
Register New Topics New Posts Top Thanked Team-BHP FAQ


Reply
  Search this Thread
95,077 views
Old 30th April 2015, 11:17   #46
Distinguished - BHPian
 
paragsachania's Avatar
 
Join Date: Nov 2007
Location: Belur/Bangalore
Posts: 7,148
Thanked: 27,140 Times
Re: DIY: Additional 12V accessory socket for the Ertiga. EDIT, added one more!

Quote:
Originally Posted by Sankar View Post
Parag, nice DIY project! I too wanted to have more than one power outlet in my Swift but I procrastinated and didn't start on this. The only place where i would have deviated from your plan is in the choice of power socket. I would have preferred to use the OEM power socket (the one that already comes in the car) to retain that OEM look inside the cabin.

The part no of the OEM 12V socket is 39420M75J00 and that of the OEM socket lid/flap is 39441M75J01-5PK. These are available on order through the MGP dealer.
So, I managed to tweak this a bit to give it an almost OE look and indeed the results were clean.

Thanks Sankar for your suggestion. I had a look at only the dust cap for the socket at MPG and bought it and didn't pick the socket.

Here's how I managed the changes:

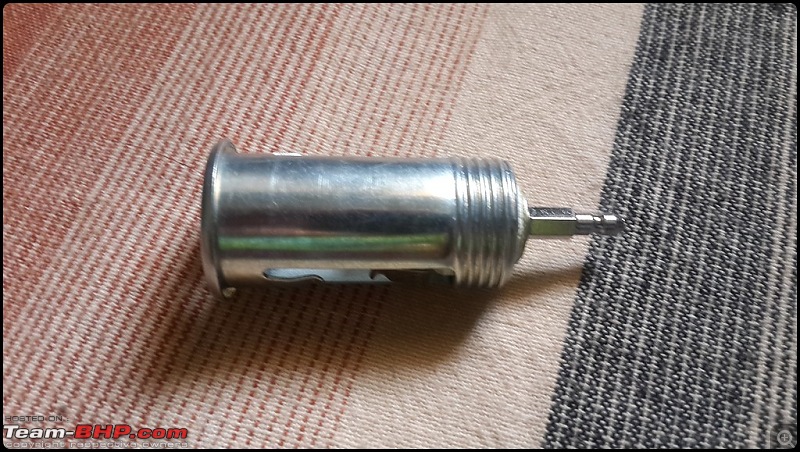
The Dust cap that I bought from MGP:


DIY: Additional 12V accessory socket for the Ertiga. EDIT, added one more!-20150430_104622bordermaker.jpg

Had to cut the Xenos socket's outer cover by half to accommodate it into the new Dust cap.

DIY: Additional 12V accessory socket for the Ertiga. EDIT, added one more!-20150430_104532bordermaker.jpg

The Inner part of the aftermarket socket:

DIY: Additional 12V accessory socket for the Ertiga. EDIT, added one more!-20150430_104607bordermaker.jpg


Next 2 snaps capture the socket going into the MGP dust cap:

DIY: Additional 12V accessory socket for the Ertiga. EDIT, added one more!-20150430_104638bordermaker.jpg

DIY: Additional 12V accessory socket for the Ertiga. EDIT, added one more!-20150430_104647bordermaker.jpg

The outer cover now attached over the inner socket through the thread

DIY: Additional 12V accessory socket for the Ertiga. EDIT, added one more!-20150430_104712bordermaker.jpg

Socket in place

DIY: Additional 12V accessory socket for the Ertiga. EDIT, added one more!-20150430_105305_richtonehdrbordermaker.jpg
paragsachania is offline   (8) Thanks
Old 6th December 2015, 19:24   #47
BHPian
 
Join Date: Oct 2015
Location: Mumbai
Posts: 28
Thanked: 38 Times

Hi Parag,

Hats off to you, this is one heck of DIY.
One question though, are you done with installing the same in funkykar's Linea?
As I own a Fiat GP 90HP and once I asked for installing the additional 12V socket to service guy who handles the electrical work in my car. But he denied stating that this car doesn't has the required earthing.
This question may pose silly but I am not too well versed with this technical stuff hence some inputs from your end will be really helpful.
J_Man is offline   (1) Thanks
Old 6th December 2015, 20:48   #48
Distinguished - BHPian
 
paragsachania's Avatar
 
Join Date: Nov 2007
Location: Belur/Bangalore
Posts: 7,148
Thanked: 27,140 Times

Quote:
Originally Posted by J_Man View Post
But he denied stating that this car doesn't has the required earthing.
1. For sourcing 12V power you have more than one empty fuse slot in the fusebox below the steering
2. For ground, you have the whole car where you can hook up the other wire to complete the circuit.

In the Linea, I connected the Ground wire with a ring terminal to one of the bolts holding the Armrest. The Punto won't have an armrest (but you can fit one from the Linea anyway) and what you can do is remove the center console and hook up the ring terminal from Ground wire to one of the bolts below that's well connected to the body of the car.

It is now more than a year and that 12v socket on Linea works flawlessly.

Wondering why your electrician said that as its simple old school Technique anyway.

Let me know in case you need more help on this.
paragsachania is offline   (1) Thanks
Old 9th December 2015, 13:50   #49
BHPian
 
Join Date: Oct 2015
Location: Mumbai
Posts: 28
Thanked: 38 Times
Re: DIY: Additional 12V accessory socket for the Ertiga. EDIT, added one more!

Thanks for your reply. I will definitely try this DIY and would surely bring you in Loop in case the help is required.
J_Man is offline   (1) Thanks
Old 6th January 2016, 23:02   #50
Senior - BHPian
 
samaspire's Avatar
 
Join Date: Sep 2015
Location: Manipal / Udupi
Posts: 1,629
Thanked: 4,859 Times
Re: DIY: Additional 12V accessory socket for the Ertiga. EDIT, added one more!

I'm wondering why you are adding only accessory sockets and not USB sockets. Wouldn't that be more convenient to charge phones and tabs? And with less bulky wires.

Any drawbacks of USB sockets?
samaspire is offline  
Old 8th January 2016, 17:59   #51
Distinguished - BHPian
 
paragsachania's Avatar
 
Join Date: Nov 2007
Location: Belur/Bangalore
Posts: 7,148
Thanked: 27,140 Times
Re: DIY: Additional 12V accessory socket for the Ertiga. EDIT, added one more!

Quote:
Originally Posted by samaspire View Post
I'm wondering why you are adding only accessory sockets and not USB sockets. Wouldn't that be more convenient to charge phones and tabs? And with less bulky wires.

Any drawbacks of USB sockets?
Well, a simple Accessory socket has answered me address lot of devices I use. Also, I don't know how wires will be less bulky?

1. The front right socket is almost and always connected to the Dashcam who's wire runs in a concealed manner without any exposure

2. The left hand side socket has a dual USB socket charger. While one of the USB sockets is to charge my Phone, the other one is used for charging my MapMyIndia PND to make logs

3. The rear socket is used primarily for charging a Tab or phones depending on who's using what. Also, this socket too uses a USB port charger

So essentially, barring the Dashcam socket, rest of the sockets are USB "enabled".
paragsachania is offline   (1) Thanks
Old 8th January 2016, 21:52   #52
Senior - BHPian
 
samaspire's Avatar
 
Join Date: Sep 2015
Location: Manipal / Udupi
Posts: 1,629
Thanked: 4,859 Times
Re: DIY: Additional 12V accessory socket for the Ertiga. EDIT, added one more!

Quote:
Originally Posted by paragsachania View Post

2. The left hand side socket has a dual USB socket charger.

3. Also, this socket too uses a USB port charger

So essentially, barring the Dashcam socket, rest of the sockets are USB "enabled".
My query was that since the accessory port is used with a usb charger port, why not install a usb port directly.

DIY: Additional 12V accessory socket for the Ertiga. EDIT, added one more!-images.jpg
I was thinking of installing something like this - any technical problems associated with it?
samaspire is offline   (1) Thanks
Old 9th January 2016, 00:28   #53
Distinguished - BHPian
 
condor's Avatar
 
Join Date: Jun 2006
Location: Speed-brkr City
Posts: 15,864
Thanked: 16,008 Times
Re: DIY: Additional 12V accessory socket for the Ertiga. EDIT, added one more!

Quote:
Originally Posted by samaspire View Post
My query was that since the accessory port is used with a usb charger port, why not install a usb port directly.

Attachment 1458289
I have picked up one of these, but yet to try it out.
condor is offline  
Old 9th January 2016, 12:05   #54
Distinguished - BHPian
 
paragsachania's Avatar
 
Join Date: Nov 2007
Location: Belur/Bangalore
Posts: 7,148
Thanked: 27,140 Times
Re: DIY: Additional 12V accessory socket for the Ertiga. EDIT, added one more!

Quote:
Originally Posted by samaspire View Post
My query was that since the accessory port is used with a usb charger port, why not install a usb port directly.
Right samaspire but then my intention was to have accessory socket as I had 2 typical car chargers (non USB) and the Dashcam. Had never thought of hardwiring the Dashcam anyway.

Secondly, I would limit myself to use just the USB charging only which would render the car charger plugs totally useless. With this set-up, at least I am assured that I can use both.

Quote:
Attachment 1458289
I was thinking of installing something like this - any technical problems associated with it?
Saw so many of these on dx.com when I looked for 12v socket. Was tempted to try one but the typical wait for the arrival of the part after ordering while desi sites promised delivery in a day or two .
paragsachania is offline   (1) Thanks
Old 21st February 2016, 21:10   #55
BHPian
 
sudeepg's Avatar
 
Join Date: Feb 2006
Location: Bangalore
Posts: 811
Thanked: 2,447 Times
Re: DIY: Additional 12V accessory socket for the Ertiga. EDIT, added one more!

Quote:
Originally Posted by paragsachania View Post
Had never thought of hardwiring the Dashcam anyway.
Hey Parag,

I have just installed the DashCam in my S-Cross but could not complete hard wiring due to the ports not being compatible. I have zeroed in on the exact part I need. I have a couple of quick questions for you.
  1. The black cover on your fuse box appears to be exactly the same in my S-cross. How do we remove that?
  2. Secondly, after installing the fuse tap, does the cover sit well? Is there space for the fuse tap wire to come out? Do you have any snaps of it?
sudeepg is offline  
Old 21st February 2016, 21:14   #56
Distinguished - BHPian
 
paragsachania's Avatar
 
Join Date: Nov 2007
Location: Belur/Bangalore
Posts: 7,148
Thanked: 27,140 Times
Re: DIY: Additional 12V accessory socket for the Ertiga. EDIT, added one more!

Quote:
Originally Posted by sudeepg View Post
Hey Parag,

I have just installed the DashCam in my S-Cross but could not complete hard wiring due to the ports not being compatible. I have zeroed in on the exact part I need. I have a couple of quick questions for you.
  1. The black cover on your fuse box appears to be exactly the same in my S-cross. How do we remove that?
  2. Secondly, after installing the fuse tap, does the cover sit well? Is there space for the fuse tap wire to come out? Do you have any snaps of it?
1. The Fuse box Cover would just come off by merely lifting it from its place with a light pressure.
2. No, the cover won't fit back after you install Fuse Taps here. Unlike other cars which have a huge cover for Fuses and Relays together, this one is just a Fuse Box cover fitting tightly atop all the fuses there.

However, I always keep the fuse cover behind the Sun Visor inside the plastic. So it is always secure and handy when I need to troubleshoot anything. Also, by not putting the cover back, you are not really posing any threat anyway as no one would want to spray pressurised water under the driver side footwell.
paragsachania is offline   (1) Thanks
Old 21st February 2016, 22:08   #57
BHPian
 
sudeepg's Avatar
 
Join Date: Feb 2006
Location: Bangalore
Posts: 811
Thanked: 2,447 Times
Re: DIY: Additional 12V accessory socket for the Ertiga. EDIT, added one more!

Quote:
Originally Posted by paragsachania View Post
1. The Fuse box Cover would just come off by merely lifting it from its place with a light pressure.
2. No, the cover won't fit back after you install Fuse Taps here. Unlike other cars which have a huge cover for Fuses and Relays together, this one is just a Fuse Box cover fitting tightly atop all the fuses there.

However, I always keep the fuse cover behind the Sun Visor inside the plastic. So it is always secure and handy when I need to troubleshoot anything. Also, by not putting the cover back, you are not really posing any threat anyway as no one would want to spray pressurised water under the driver side footwell.
Thank you for your quick response. The internal fuses are located behind the dashboard to the left of the glove box. I regularly pressure wash my car and I am wondering if that would be an issue. The wheel well is well cladded and I doubt if water will even creep into the passenger compartment. It would be an issue when driving in the rains. I think the insides are well sealed, but you raised an important point for me to look at.
sudeepg is offline  
Old 22nd February 2016, 07:34   #58
Distinguished - BHPian
 
paragsachania's Avatar
 
Join Date: Nov 2007
Location: Belur/Bangalore
Posts: 7,148
Thanked: 27,140 Times
Re: DIY: Additional 12V accessory socket for the Ertiga. EDIT, added one more!

Quote:
Originally Posted by sudeepg View Post
The internal fuses are located behind the dashboard to the left of the glove box.
To the left of the Glovebox would be right above the co-passenger's footwell?

Quote:
I regularly pressure wash my car and I am wondering if that would be an issue.
It all depends on the wash-job Sudeep. I rarely see anyone spraying water anywhere beyond the Door sils. There is absolutely lesser chance of water to really creep in there. If so, there are other components here as well and the floor carpet area which can retain moisture is equally bad in this area.
paragsachania is offline   (1) Thanks
Old 22nd February 2016, 10:14   #59
BHPian
 
Join Date: Mar 2014
Location: Bombay
Posts: 67
Thanked: 188 Times
Re: DIY: Additional 12V accessory socket for the Ertiga. EDIT, added one more!

Quote:
Originally Posted by paragsachania View Post
Not just the Ertiga but in general, given the fact that we have just too many devices to charge while we are traveling, it makes sense to have an additional 12V accessories socket
Thank you for a very useful DIY guide. I ve been thinking of installing one in my car as well, especially for the rear seat passengers but stumped as to a good location. Id really liked the one in the indica vista near the rear head rest, but not sure if I can pull it off on the vento.

Last edited by famousshoes : 22nd February 2016 at 10:16.
famousshoes is offline  
Old 22nd February 2016, 10:21   #60
Distinguished - BHPian
 
paragsachania's Avatar
 
Join Date: Nov 2007
Location: Belur/Bangalore
Posts: 7,148
Thanked: 27,140 Times
Re: DIY: Additional 12V accessory socket for the Ertiga. EDIT, added one more!

Quote:
Originally Posted by famousshoes View Post
Id really liked the one in the indica vista near the rear head rest, but not sure if I can pull it off on the vento.
If there is a hollow space behind those trims covering the inside of the car, you can easily place one anywhere as you wish.

The challenges would be to pull longer wires for which you may have to take off a lot of stuff and fix it back.

Last edited by ampere : 22nd February 2016 at 11:16. Reason: Typo Fixed
paragsachania is offline   (1) Thanks
Reply

Most Viewed


Copyright ©2000 - 2024, Team-BHP.com
Proudly powered by E2E Networks