Team-BHP > Technical Stuff > DIY - Do it yourself


Reply
  Search this Thread
94,965 views
Old 23rd March 2015, 20:47   #31
Senior - BHPian
 
Join Date: May 2005
Location: Location
Posts: 5,766
Thanked: 9,053 Times
re: DIY: Additional 12V accessory socket for the Ertiga. EDIT, added one more!

Quote:
Originally Posted by paragsachania View Post
This is exactly where the new socket will go:

Attachment 1352794

The Challenge:
The exposed hole was bigger in diameter and couldn't accommodate the socket. This meant I had to add a packing to ensure the diameter is reduced.
[center]

Thought of using the most commonly used item as this one!

Attachment 1352797

So, finally I had to make use of the drill even when I never wanted to this time:

Attachment 1352795

Attachment 1352796
Parag, nice DIY project! I too wanted to have more than one power outlet in my Swift but I procrastinated and didn't start on this. The only place where i would have deviated from your plan is in the choice of power socket. I would have preferred to use the OEM power socket (the one that already comes in the car) to retain that OEM look inside the cabin.

The part no of the OEM 12V socket is 39420M75J00 and that of the OEM socket lid/flap is 39441M75J01-5PK. These are available on order through the MGP dealer.
Sankar is offline   (1) Thanks
Old 23rd March 2015, 23:00   #32
BHPian
 
latentpotential's Avatar
 
Join Date: Oct 2012
Location: Pune (1-4 DND)
Posts: 509
Thanked: 419 Times
re: DIY: Additional 12V accessory socket for the Ertiga. EDIT, added one more!

Interesting choice of location for the #3 socket parag, however, the poorer Z*i cousins of yours have a USB and Aux-in port at that very same location. What other place could suffice for this #3 socket instead? I was thinking of - behind the flat plastic panel under the steering wheel?
latentpotential is offline   (1) Thanks
Old 23rd March 2015, 23:30   #33
Distinguished - BHPian
 
paragsachania's Avatar
 
Join Date: Nov 2007
Location: Belur/Bangalore
Posts: 7,148
Thanked: 27,139 Times

Quote:
Originally Posted by Sankar View Post
Parag, nice DIY project! I too wanted to have more than one power outlet in my Swift but I procrastinated and didn't start on this. The only place where i would have deviated from your plan is in the choice of power socket. I would have preferred to use the OEM power socket (the one that already comes in the car) to retain that OEM look inside the cabin.

The part no of the OEM 12V socket is 39420M75J00 and that of the OEM socket lid/flap is 39441M75J01-5PK. These are available on order through the MGP dealer.
Thanks Sankar for the Part No. To be honest, I too think alike when it comes to retaining originality to the maximum for any modifications.

The choice for aftermarket socket was quick and decisive due to easy availability and delivery at door step as I browsed one day. Plus, the product was from Xenos who are a better lot than most of the other players.

Hence, this socket didn't matter much when I installed the first one for second row. But now after fitting this I hear what you say. Having paid mere 190 bucks fron Xenos site this time who took 21 days for delivery, I am better off visiting an MGP dealer and buying the OE Part soon. Thanks again!

Quote:
Originally Posted by latentpotential View Post
Interesting choice of location for the #3 socket parag, however, the poorer Z*i cousins of yours have a USB and Aux-in port at that very same location. What other place could suffice for this #3 socket instead? I was thinking of - behind the flat plastic panel under the steering wheel?
Yes, I am aware of the location of Aux and USB Ports in the Z Variants. Else, I may have been the first person to wonder why there was a round hole and that cap in V variants .

For location in Z Variants for another socket, under the steering wheel IMHO is a bad idea. Wires from the charging devixes can lie low and may often come in your way when your fret do the job and can distract/irritate you.

Best is another round hole in the same location that I have installed but in the center. While the left one will be OE Socket and right side will be your Aux and USB.
paragsachania is offline  
Old 24th March 2015, 14:02   #34
BHPian
 
latentpotential's Avatar
 
Join Date: Oct 2012
Location: Pune (1-4 DND)
Posts: 509
Thanked: 419 Times
re: DIY: Additional 12V accessory socket for the Ertiga. EDIT, added one more!

Thanks, but I will pose the question in a different way:

For the dashcam, I want the power supply point to be hidden (avoid deliberate or accidental disconnection). What location would you recommend in such a case?
latentpotential is offline  
Old 24th March 2015, 14:48   #35
Senior - BHPian
 
Join Date: May 2005
Location: Location
Posts: 5,766
Thanked: 9,053 Times
re: DIY: Additional 12V accessory socket for the Ertiga. EDIT, added one more!

Quote:
Originally Posted by latentpotential View Post
Thanks, but I will pose the question in a different way:

For the dashcam, I want the power supply point to be hidden (avoid deliberate or accidental disconnection). What location would you recommend in such a case?
Keep the power outlet in or behind near the glovebox. Take care to cover the back of the power outlet and the pins.

Dashcam power cable can go behind the glovebox and then up the A-pillar behind the A-pillar panel and then under the edge of rooflining just behind the windshield and to the camera.
Sankar is offline  
Old 24th March 2015, 15:02   #36
BHPian
 
latentpotential's Avatar
 
Join Date: Oct 2012
Location: Pune (1-4 DND)
Posts: 509
Thanked: 419 Times
re: DIY: Additional 12V accessory socket for the Ertiga. EDIT, added one more!

Quote:
Originally Posted by Sankar View Post
Keep the power outlet in or behind near the glovebox. Take care to cover the back of the power outlet and the pins.

Dashcam power cable can go behind the glovebox and then up the A-pillar behind the A-pillar panel and then under the edge of rooflining just behind the windshield and to the camera.
But I think there is the AC unit and filter there, as well as possibly some wiring related to the airbag unit? I will give it a shot this weekend, I have recently got the fuse tap as well, so a DIY coming up.
latentpotential is offline  
Old 24th March 2015, 15:47   #37
Distinguished - BHPian
 
paragsachania's Avatar
 
Join Date: Nov 2007
Location: Belur/Bangalore
Posts: 7,148
Thanked: 27,139 Times

I have routed the cable from behind the roof ceiling, followed by the passenger side A Pillar, behind the Glove box and finally into the socket.

Have secured the cable with Nylon ties every possible place.

I was earlier planning to have a 12V socket tied behind the Dash and powering the dashcam all the times (which is still doable if I want to).

As of now, the empty Slot (No 23) of the Fusebox is supplying power even without the Key in Ignition or Acc Positon and I may opt for some other slot later.

Will try to post pics of the way I have routed wires later so that the Dash area doesn't resemble a "Laboratory".

Clean wiring is the ultimate goal when you have multiple devices.
paragsachania is offline  
Old 24th March 2015, 15:57   #38
Senior - BHPian
 
Join Date: May 2005
Location: Location
Posts: 5,766
Thanked: 9,053 Times
re: DIY: Additional 12V accessory socket for the Ertiga. EDIT, added one more!

Quote:
Originally Posted by latentpotential View Post
But I think there is the AC unit and filter there, as well as possibly some wiring related to the airbag unit? I will give it a shot this weekend, I have recently got the fuse tap as well, so a DIY coming up.
The blower unit is behind the glovebox but it will not interfere with the power outlet if positioned well. I took the easy route with the power socket for dashcam and mobile charger with the following unit:

www.amazon.com/gp/product/B0009JB7GI/

The above unit was stuck on top of the glove box exterior. One wire from the OEM charger goes to this unit (you can do it discreetly if you so desire just takes bit more effort like Parag put in) and then the dashcam power adapter is plugged into this out of sight and its wire goes up like i mentioned earlier. Mobile phone can be charged out of sight in the glove box. It will not interfere with airbag wiring, all of this is away from airbag wires.
Sankar is offline   (1) Thanks
Old 24th March 2015, 16:10   #39
Distinguished - BHPian
 
paragsachania's Avatar
 
Join Date: Nov 2007
Location: Belur/Bangalore
Posts: 7,148
Thanked: 27,139 Times

Quote:
Originally Posted by Sankar View Post
I have used similar product but in different cars we drove and have liked this simple extender too but one my friend picked from dx.com worked well and started acting cranky with 2 of the 4 outlets going dead due to bad quality wires I guess (and the usage plus pulling or mishandling of these sockets).

This was unlike what you posted but was one plug extending to 4 sockets with independent wires for each for flexibility.

Finally I succumbed to the fuse tap idea with independent linen for every socket.

We ended up using the same sockets that has gone dead for a DIY in the Linea few months before .

After all, socket is the most simplest element to troubleshoot here.

Last edited by paragsachania : 24th March 2015 at 16:12.
paragsachania is offline  
Old 24th March 2015, 16:16   #40
Senior - BHPian
 
Join Date: May 2005
Location: Location
Posts: 5,766
Thanked: 9,053 Times
Re: DIY: Additional 12V accessory socket for the Ertiga. EDIT, added one more!

Quote:
Originally Posted by paragsachania View Post
I have used similar product but in different cars we drove and have liked this simple extender too but one my friend picked from dx.com worked well and started acting cranky with 2 of the 4 outlets going dead due to bad quality wires I guess (and the usage plus pulling or mishandling of these sockets)
The one i listed have received mostly positive reviews from the users and thats how i finalised on this one. The construction is also good and the lead wire is pretty thick. Looks like a well constructed unit, no wonder its got good reviews.

Of the 4 sockets, 1 socket can take the cigarette lighter and the other 3 are 12V outlets only.
Sankar is offline   (2) Thanks
Old 24th March 2015, 16:46   #41
BANNED
 
Join Date: Dec 2007
Location: Gurugram
Posts: 7,969
Thanked: 4,787 Times
Re: DIY: Additional 12V accessory socket for the Ertiga. EDIT, added one more!

@paragsachania; You should have got a 3M tapped connector (called double bladed connector) and avoided wire cutting & splicing. These come with most HID kits and the installers do not use them, so are a good source.
sgiitk is offline  
Old 24th March 2015, 16:56   #42
Distinguished - BHPian
 
paragsachania's Avatar
 
Join Date: Nov 2007
Location: Belur/Bangalore
Posts: 7,148
Thanked: 27,139 Times

Quote:
Originally Posted by sgiitk View Post
@paragsachania; You should have got a 3M tapped connector (called double bladed connector) and avoided wire cutting & splicing. These come with most HID kits and the installers do not use them, so are a good source.
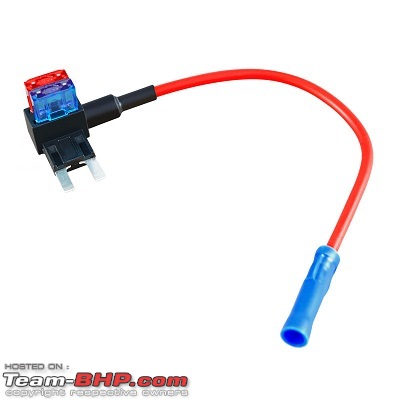
This is what I ordered last week and was delivered yesterday. Will use this for my next DIY in planning.

DIY: Additional 12V accessory socket for the Ertiga. EDIT, added one more!-1427196099864.jpg

Regarding cutting or slicing, as you can see from the very first post, I have not cut any OE wires.

Secondly, the fuse Tap as well as 12V socket that I bought has 2 loose ends for 12v and Ground and need to be skinned and connected to wires to lengthen them.

Skinning, twisting, soldering and finally sealing it with heatshrink tubing was the best option here than waste 4 connectors for both ends.

Unless I was skinning or cutting the OE Wires, I felt this method was always safe.

If you refer to my 2 DIN installation DIY also, I have not cut or sliced a single wire and used Heatshrink tubing.

I now have 10 3M connectors for my upcoming DIY in few weeks where I may have to tap power from OE wiring.

Edit- I see that Gannu has already responded on same lines.

Last edited by paragsachania : 24th March 2015 at 16:59.
paragsachania is offline   (1) Thanks
Old 24th March 2015, 16:57   #43
Team-BHP Support
 
Gannu_1's Avatar
 
Join Date: Apr 2013
Location: Madras
Posts: 7,173
Thanked: 20,211 Times
Re: DIY: Additional 12V accessory socket for the Ertiga. EDIT, added one more!

Quote:
Originally Posted by sgiitk View Post
@paragsachania; You should have got a 3M tapped connector (called double bladed connector) and avoided wire cutting & splicing.
No stock cables are spliced or cut. This is a fuse tap cable:

DIY: Additional 12V accessory socket for the Ertiga. EDIT, added one more!-ampiretapforminiatofusesxsa200_b_0.jpg

Used for the +12V source. Simply insert this into an empty fuse slot and tap a +12V line from the slot. Zero splicing and cutting.

Whatever bare wire ends you see there in the images are for the +12V socket; which has to be either soldered (and heatshrink tubing applied) or an insulated butt connector like this could be used:

Name:  1.PNG
Views: 2264
Size:  79.7 KB

EDIT: Paragbhai beat me to it.

Last edited by Gannu_1 : 24th March 2015 at 16:58.
Gannu_1 is offline   (2) Thanks
Old 3rd April 2015, 21:33   #44
Senior - BHPian
 
mukeshgoel's Avatar
 
Join Date: Sep 2008
Location: Gurgaon
Posts: 1,234
Thanked: 2,138 Times
Re: DIY: Additional 12V accessory socket for the Ertiga. EDIT, added one more!

Quote:
Originally Posted by paragsachania View Post
I added the 3rd socket.
Awesome DIY.

Can I add a second socket in a Swift VDi at front with parallel connection from the first socket if I make sure that not no heavy power eating devices are connected simultaneously ?

It will be a maximum of two mobile phones and a dashcam at any given time (with dual USB car chargers).
mukeshgoel is offline  
Old 4th April 2015, 08:18   #45
Distinguished - BHPian
 
paragsachania's Avatar
 
Join Date: Nov 2007
Location: Belur/Bangalore
Posts: 7,148
Thanked: 27,139 Times

Quote:
Originally Posted by mukeshgoel View Post
Awesome DIY.

Can I add a second socket in a Swift VDi at front with parallel connection from the first socket if I make sure that not no heavy power eating devices are connected simultaneously ?

It will be a maximum of two mobile phones and a dashcam at any given time (with dual USB car chargers).
Easily possible but then if thd fuse blows for wherever reason (load, faulty charger etc) you will have no socket to charge. Secondly, this will need using same 2 wires behind OE Socket for powering the additional socket and might involve slimming these wires if you don't have a proper wire tap connector too!!

You may also upgrade the fuse for the Accessory socket to 30Amps just in case.

However, if you are using only for charging mobile phones and Dashcam you may not even want to change the Original fuse.
paragsachania is offline   (1) Thanks
Reply

Most Viewed
Thread Tools Search this Thread
Search this Thread:

Advanced Search

Copyright ©2000 - 2024, Team-BHP.com
Proudly powered by E2E Networks