Team-BHP > Technical Stuff > DIY - Do it yourself
Register New Topics New Posts Top Thanked Team-BHP FAQ


Reply
  Search this Thread
95,202 views
Old 10th January 2017, 14:49   #76
BHPian
 
Join Date: Aug 2014
Location: KA, TS
Posts: 620
Thanked: 880 Times
Re: DIY: Additional 12V accessory socket for the Ertiga. EDIT, added one more!

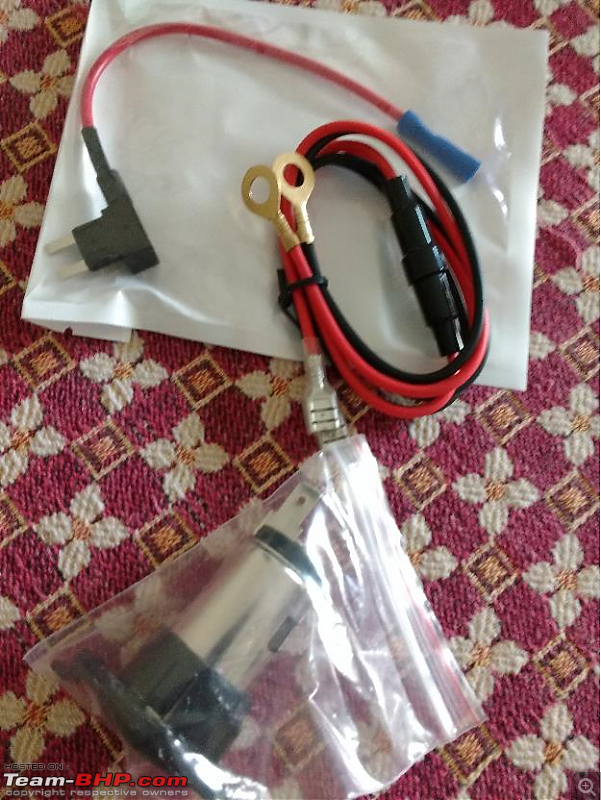
I placed the order on 12/31 and I received it today. For something that is coming from HK, it was pretty fast

Quote:
Originally Posted by paragsachania View Post
You don't have to but fuses. The Fuse Tap itself will come with 2 fuses. One for the load and another for the internal circuit.
Unfortunately, the Fuse Tap didn't come with the fuses.

I'll probably get them from a local car accessories dealer.

DIY: Additional 12V accessory socket for the Ertiga. EDIT, added one more!-package.png

This weekend is going to be a busy one!
shifu is offline   (2) Thanks
Old 10th January 2017, 20:23   #77
BHPian
 
Join Date: Aug 2014
Location: KA, TS
Posts: 620
Thanked: 880 Times
Re: DIY: Additional 12V accessory socket for the Ertiga. EDIT, added one more!

First thing I checked after coming home is to make sure the fuse tap fits in the fuse box, and it really does. Thanks Parag for making me buy the 'mini' fuse.

I have few more questions, marked in bold -

I have arranged all the components in the way they should be connected. Below is the image with the complete 'circuit'. Please let me know if there is anything wrong in my understanding.

DIY: Additional 12V accessory socket for the Ertiga. EDIT, added one more!-circuitdesign.png

I just have a question on the way in which the wires should be connected to the socket. Is it important where the red and black wires are connected to the socket? Would it matter if I swapped the red and black wires on the socket?

Name:  FuseTap.png
Views: 2205
Size:  308.7 KB

As I mentioned in my previous post, the seller didn't provide spare fuses. I went to my car and I could see couple of spare fuses. Now the fuse tap can accommodate 2 fuses. Is it necessary to use a fuse for both the locations? I know you mentioned before that one is for the load and another is for the internal circuit. As you can see from the previous image, the wire has an inline fuse. So I am now trying to understand which of the 2 locations do I use?

Name:  FuseLocation.png
Views: 3027
Size:  19.3 KB

My Nano (CX) doesn't have a radio (F8), nor does it have a power socket (F9). So I guess I don't really need to search for the right fuse, I'll just use F9.

Now the fuse box has a fuse in F8. It looks like a 5A (not clear on the fuse). Since I don't have a radio, can I use the fuse that is present in F8. That way I won't really need to use any of the spare fuses.

Thanks for patiently answering all my noob questions!
shifu is offline   (1) Thanks
Old 10th January 2017, 22:49   #78
BANNED
 
Join Date: Oct 2011
Location: Hyderabad
Posts: 12,350
Thanked: 21,411 Times
Re: DIY: Additional 12V accessory socket for the Ertiga. EDIT, added one more!

If I can answer,

Quote:
Originally Posted by shifu View Post
Is it important where the red and black wires are connected to the socket? Would it matter if I swapped the red and black wires on the socket?
As one of the tab is +ve and the other is -ve, I am not sure if it can be swapped. Aren't there any marking on the socket for connections?

Quote:
Originally Posted by shifu View Post
which of the 2 locations do I use?
Put the fuse in the farthest holder, that way the whole circuit will be protected. I know there is an inline fuse but no harm in having extra protection. Peace of mind.

Quote:
Originally Posted by shifu View Post
can I use the fuse that is present in F8
Since your Nano doesn't have the accessory socket, you can put the fuse tap cable in the accessory fuse point.

Use the F9 one.
a4anurag is offline   (2) Thanks
Old 11th January 2017, 12:57   #79
BHPian
 
Join Date: Aug 2014
Location: KA, TS
Posts: 620
Thanked: 880 Times
Re: DIY: Additional 12V accessory socket for the Ertiga. EDIT, added one more!

Quote:
Originally Posted by a4anurag View Post
If I can answer,
Thanks Anurag!

Quote:
Originally Posted by a4anurag View Post
As one of the tab is +ve and the other is -ve, I am not sure if it can be swapped. Aren't there any marking on the socket for connections?
Unfortunately, it doesn't have any markings. I see that one of the tab is vertical (away from the center of the socket) and the other is horizontal (at the center of the socket). Looking at the structure I am assuming the vertical one is ground. Can I 'try-out' with one combination? I'll only put the USB car charger, not an appliance to it. If the light comes up on the car charger then it works, else I'll swap. Having a multi-meter would have helped, but unfortunately I don't have one.

Quote:
Originally Posted by a4anurag View Post
Put the fuse in the farthest holder, that way the whole circuit will be protected. I know there is an inline fuse but no harm in having extra protection. Peace of mind.
Got it. Thanks!

Quote:
Originally Posted by a4anurag View Post
Since your Nano doesn't have the accessory socket, you can put the fuse tap cable in the accessory fuse point.

Use the F9 one.
Yes, I'll put the fuse tap in F9. That I understood. I was asking if I can use the fuse of F8 and put that in the fuse tap.

Once again, thanks for all the help...
shifu is offline   (1) Thanks
Old 11th January 2017, 13:12   #80
BANNED
 
Join Date: Oct 2011
Location: Hyderabad
Posts: 12,350
Thanked: 21,411 Times

Quote:
Originally Posted by shifu View Post
Can I 'try-out' with one combination?

I was asking if I can use the fuse of F8 and put that in the fuse tap
You can try it.

If the radio fuse is lying idle then you can put that fuse in the fuse tap cable and plug it in F9. Shouldn't be an issue but check if the F8 circuit is idle or powering something else other than the radio.
a4anurag is offline   (2) Thanks
Old 11th January 2017, 21:52   #81
Distinguished - BHPian
 
paragsachania's Avatar
 
Join Date: Nov 2007
Location: Belur/Bangalore
Posts: 7,148
Thanked: 27,140 Times
Re: DIY: Additional 12V accessory socket for the Ertiga. EDIT, added one more!

Quote:
Originally Posted by shifu View Post
Is it important where the red and black wires are connected to the socket?
Indeed it will be important as its DC powered socket.

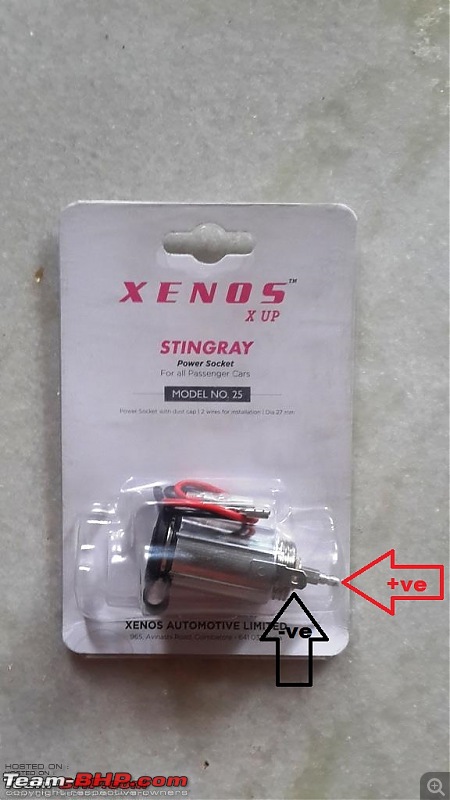
Ideally, the center pin on the socket is always positive while the one on the outer cylinder is negative:

DIY: Additional 12V accessory socket for the Ertiga. EDIT, added one more!-socket.jpg

Quote:
Would it matter if I swapped the red and black wires on the socket?
It would of course. In terms of color it wont matter but you need to ensure that any wire that is originating from the +ve terminal of the socket (above) should end at the Fuse Tap on the other side.

Quote:
Is it necessary to use a fuse for both the locations? I know you mentioned before that one is for the load and another is for the internal circuit. As you can see from the previous image, the wire has an inline fuse. So I am now trying to understand which of the 2 locations do I use?
Use the one that is towards the Fuse Tap pin. Since the In-line fuse will take care of your load, you will have to use a fuse for the OE circuitry as well.
Quote:
My Nano (CX) doesn't have a radio (F8), nor does it have a power socket (F9). So I guess I don't really need to search for the right fuse, I'll just use F9.
Yes, you can use either of these if there is no Radio or Power socket that comes as OE with Nano.

Quote:
Now the fuse box has a fuse in F8. It looks like a 5A (not clear on the fuse).
If there is a Fuse already in F8, I suspect that there is something else that is part of this. More often than not, a fuse marked Radio at times will also be powering something else.

In case of the SX4, using Belkin Adapter wrongly, the 12V socket went Kaput that also ended up rendering the outside mirrors non adjustable (electric). I do remember SX4 had a set-up of this sort (Fuse marked as Accessory and Accessory 2) and one of them had gone dead due to which both the 12V socket and mirror controls were not working.

Quote:
Since I don't have a radio, can I use the fuse that is present in F8. That way I won't really need to use any of the spare fuses.
It's a trial and error that would give you the answers. Pull that fuse from Radio and before you plug that Fuse Tap, you can check the functionality of the basic accessories - All lights, Cabin Lights, Power windows, Door Lock (Central lock) etc and see if they are working as expected. If yes, just plug the fuse tap here.
paragsachania is offline   (4) Thanks
Old 14th January 2017, 20:33   #82
BHPian
 
Join Date: Aug 2014
Location: KA, TS
Posts: 620
Thanked: 880 Times
Re: DIY: Additional 12V accessory socket for the Ertiga. EDIT, added one more!

Quote:
Originally Posted by paragsachania View Post
Pull that fuse from Radio and before you plug that Fuse Tap, you can check the functionality of the basic accessories - All lights, Cabin Lights, Power windows, Door Lock (Central lock) etc and see if they are working as expected. If yes, just plug the fuse tap here.
I did and everything seemed to be working fine. Nano is such a simple car, I just had to check one light. It doesn't have any central lock, power windows, etc.

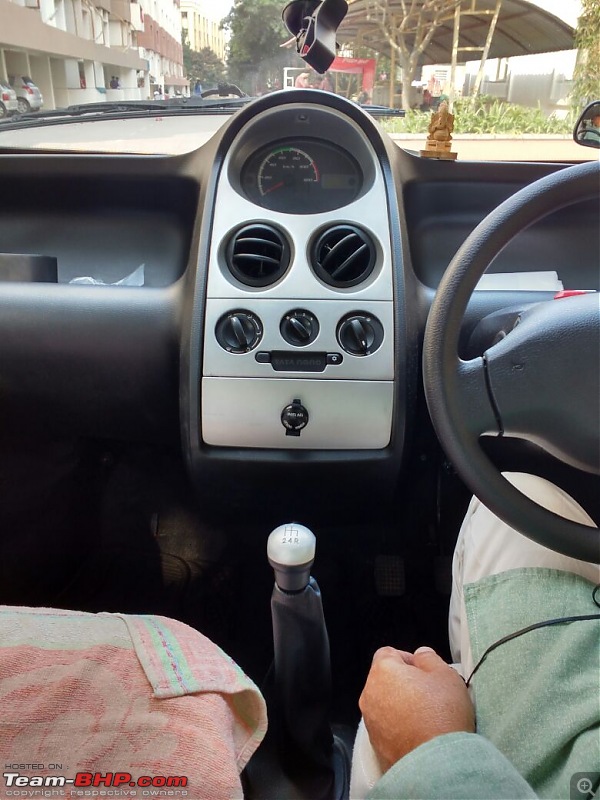
Thanks to you Parag, and Anurag, I have done the 'project'. My Nano now has a power socket! This is primarily my father's car, and the first thing he did after it was fixed was to connect a bluetooth speaker and play his favorite ghazal through it. The satisfaction was priceless, and as they say for everything else there is Mastercard!

To get the hole done in the dashboard, I chose the cover that covers the socket for HU. I thought that a wood carving guy would have the drill bit to make the hole in that cover. There are plenty of stores in Hafeezpet, but everybody kept saying that the plastic would break if they tried to drill. Finally found one Pasha bhai who was brave enough to give it a shot. He first did a 25mm hole. It was small by a few mm. He then filed the hole slowly so that it got big enough to fit the socket.

I have just attached one pic, because there is nothing much to explain beyond what's on this thread.

DIY: Additional 12V accessory socket for the Ertiga. EDIT, added one more!-img20170114wa0020.jpg

Oh, and the little one wanted to help me out. This is him trying to tighten the nut where the ground was connected. On the days he drives me absolute nuts, this pic will remind me how blessed I am.
DIY: Additional 12V accessory socket for the Ertiga. EDIT, added one more!-img20170114wa0015.jpg

Last edited by shifu : 14th January 2017 at 20:35.
shifu is offline   (7) Thanks
Old 14th February 2017, 08:29   #83
Senior - BHPian
 
ecosport rules's Avatar
 
Join Date: Jun 2013
Location: Hyderabad
Posts: 1,174
Thanked: 2,044 Times
Re: DIY: Additional 12V accessory socket for the Ertiga. EDIT, added one more!

Quote:
Originally Posted by shifu View Post
I did and everything seemed to be working fine. Nano is such a simple car, I just had to check one light. It doesn't have any central lock, power windows, etc.

Thanks to you Parag, and Anurag, I have done the 'project'. My Nano now has a power socket! This is primarily my father's car, and the first thing he did after it was fixed was to connect a bluetooth speaker and play his favorite ghazal through it. The satisfaction was priceless, and as they say for everything else there is Mastercard!

I have just attached one pic, because there is nothing much to explain beyond what's on this thread.
Neat work Shifu,never knew that Nano does not come with a 12 volt socket.

What was the rating of the fuse you used for the fuse tap?

If the original circuit is unused in the fuse box, one needs to insert fuse only in the farthest slot of the fuse tap to power the new circuit.Both work independently
ecosport rules is offline   (1) Thanks
Old 14th February 2017, 10:15   #84
BHPian
 
Join Date: Aug 2014
Location: KA, TS
Posts: 620
Thanked: 880 Times
Re: DIY: Additional 12V accessory socket for the Ertiga. EDIT, added one more!

Quote:
Originally Posted by ecosport rules View Post
Neat work Shifu,never knew that Nano does not come with a 12 volt socket.
Thanks! The variant that I have doesn't have the socket. The next variant has it though.

Quote:
Originally Posted by ecosport rules View Post
What was the rating of the fuse you used for the fuse tap?
5A
shifu is offline   (1) Thanks
Old 12th November 2017, 16:32   #85
BHPian
 
ramki067's Avatar
 
Join Date: Sep 2006
Location: BANGALORE
Posts: 610
Thanked: 35 Times

Quote:
Originally Posted by paragsachania View Post
Cellphone, Tab, Dash Cam, Navigation Device, Bottle Warmer, Belkin - Give me that socket, I want to get charged!.

Ultimately, its the survival of the weakest in this case and whichever device is dying gets the power. However, there have been times when all of them are losing charge on a super long journey.
Hey Parag,
I'm planning to add an extra cigar socket for back benchers in my WagonR Lxi model. I'm confused on which fuse to select from fuse box. Below is the fuse box diagram. Although i already have one cigar lighter socket in the dashboard.

Also would like to know from where can we procure the rubber sleeves and plastic zipper ties which you have used. Although you have specified that fuse tap cable can be bought from dx.com

Many thanks,
Ramki
Attached Thumbnails
DIY: Additional 12V accessory socket for the Ertiga. EDIT, added one more!-1510484454728.jpg  


Last edited by ramki067 : 12th November 2017 at 16:39.
ramki067 is online now  
Old 18th June 2019, 12:03   #86
Senior - BHPian
 
Join Date: Jun 2014
Location: Bangalore
Posts: 1,526
Thanked: 1,366 Times
Maruti Brezza - fixing additional cigarette lighter points

Have any one here managed to get additional cigratte lighter sockets fixed to Vitara Brezza VDI model? The car comes with one cigarette lighter socket, but looks like I would have many more electronic devices to be plugged in (mobile + dash cam is the bare minimum).

I want to know if some one was able to fix additional sockets and where did they manage to find the space? How was the electrical wiring done? I had contacted local mechanic, who said that Brezza's "gauntlet" (!?)* is at unfriendly location and it is right behind the A/C machinery. Which ensures that no cables, or additional wires can be routed via this gauntlet from the bonnet to the car interior.

* I meant the hole, covered by a rubber washer; connecting the bonnet to the car interior. In my previous vehicles I had used this to draw additional lines from the battery and route by VHF antenna cable.
sachinpk is offline  
Old 18th June 2019, 12:16   #87
BHPian
 
Who_are_you's Avatar
 
Join Date: Apr 2018
Location: Pune
Posts: 172
Thanked: 421 Times
Re: Maruti Brezza - fixing additional cigarette lighter points

I would suggest using a multiple USB output charger.

Last edited by Who_are_you : 18th June 2019 at 12:18. Reason: Formatting
Who_are_you is offline   (1) Thanks
Old 18th June 2019, 12:18   #88
Senior - BHPian
 
vikram_d's Avatar
 
Join Date: Jul 2006
Location: Bangalore
Posts: 2,427
Thanked: 1,185 Times
Re: Maruti Brezza - fixing additional cigarette lighter points

Dash cam can be connected through internal wiring to the ignition switch so that dash cam will be on as long as the ignition is on.
vikram_d is offline  
Old 18th June 2019, 14:16   #89
Senior - BHPian
 
Join Date: Jun 2014
Location: Bangalore
Posts: 1,526
Thanked: 1,366 Times
Re: Maruti Brezza - fixing additional cigarette lighter points

Quote:
Originally Posted by Who_are_you
I would suggest using a multiple USB output charger.
I do have one such thing (two USB ports), and that is used to run the mobile charger and the dash cam. But I may have a device which requires a cigarette lighter socket all by itself. Due to its power consumption, it cannot be clubbed with other devices.

Quote:
Originally Posted by vikram_d
Dash cam can be connected through internal wiring to the ignition switch so that dash cam will be on as long as the ignition is on.
Okay. Thanks . Was not keen on doing the wiring for the dash cam.
sachinpk is offline  
Old 18th June 2019, 14:33   #90
Distinguished - BHPian
 
paragsachania's Avatar
 
Join Date: Nov 2007
Location: Belur/Bangalore
Posts: 7,148
Thanked: 27,140 Times
Re: Maruti Brezza - fixing additional cigarette lighter points

This may help with some ideas to start with.

I have installed 2 more. Back then, Ertiga used to get just one socket.

In my case one socket is wired directly to ignition via Fuse Tap and hence its always ON. I use this socket to charge my devices at times after locking my car during my usual journeys. All the other times it's the dashcam that is connected to this socket.
paragsachania is offline   (1) Thanks
Reply

Most Viewed


Copyright ©2000 - 2024, Team-BHP.com
Proudly powered by E2E Networks