Team-BHP > Technical Stuff > DIY - Do it yourself
Register New Topics New Posts Top Thanked Team-BHP FAQ


Reply
  Search this Thread
204,023 views
Old 21st July 2014, 23:17   #1
Team-BHP Support
 
Gannu_1's Avatar
 
Join Date: Apr 2013
Location: Madras
Posts: 7,174
Thanked: 20,219 Times
VW Polo DIY: Removing / upgrading the instrument cluster

I had swapped the stock instrument cluster on my GT to the highline spec cluster (from the Polo GTI) few days back. The process was simpler than I had thought but the only gripe was getting the old keys programmed/coded with the cluster (immobilizer PIN) which can be done only by the dealership/service center or a qualified VW aftermarket technician with the right equipment. This DIY will thus focus only on removing and installing the cluster.

From whatever info I could gather from the internet, there are several types of instrument clusters for the VAG group cars with different combinations of the speedo/tacho gauges and MFDs. But essentially, there are 3 types for the Polo vaguely classified as follows:
  • Lowline:

    VW Polo DIY: Removing / upgrading the instrument cluster-lowline-cluster.jpg

    The MFD is a basic red backlit display and displays functions such as current fuel consumption, average fuel consumption, distance-to-empty, driving time, distance travelled, average speed, preset speed warning, outside temperature, time and service reminders (days left, distance left). This cluster is installed on all the Indian models sold between 2010 and 2014 irrespective of the variant.

  • Midline:

    VW Polo DIY: Removing / upgrading the instrument cluster-midline-cluster.jpg

    The new midline cluster makes its way into the 2014 Polo facelift sold in India. The MFD is slightly larger with a soothing white backlighting, offers larger numerals and in addition to all the functions displayed by the lowline MFD, it also displays the current coolant temperature. The cluster also throws a warning symbol if the boot lid is open - hat tip to member surajp for pointing this out!

    Here is a short video that shows the MFD quickly cycling through all the available functions:


    Some of the Polo variants sold abroad receive the midline cluster with a larger MFD:

    VW Polo DIY: Removing / upgrading the instrument cluster-midline_2.jpg

  • Highline:

    VW Polo DIY: Removing / upgrading the instrument cluster-img_8871.jpg

    The highline GTI cluster features a white backlit MFD (similar to the Jetta) and displays all the information that the lowline MFD does and some more such as door ajar warning (for all the doors including the boot lid), Bluetooth phone information, HU info (track/radio station) etc. The cluster has analog coolant temperature and fuel quantity dials in a concentric design. The speedometer goes all the way till 280 kmph (remember this originally belongs to the GTI with a 1.4 TSI engine that puts out 180 hp! 
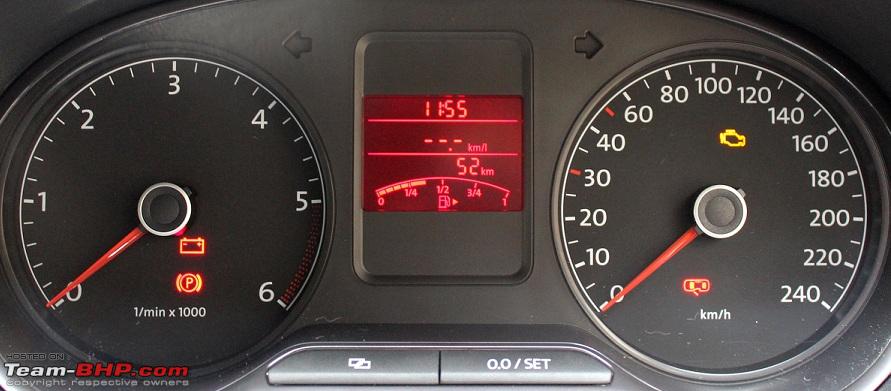
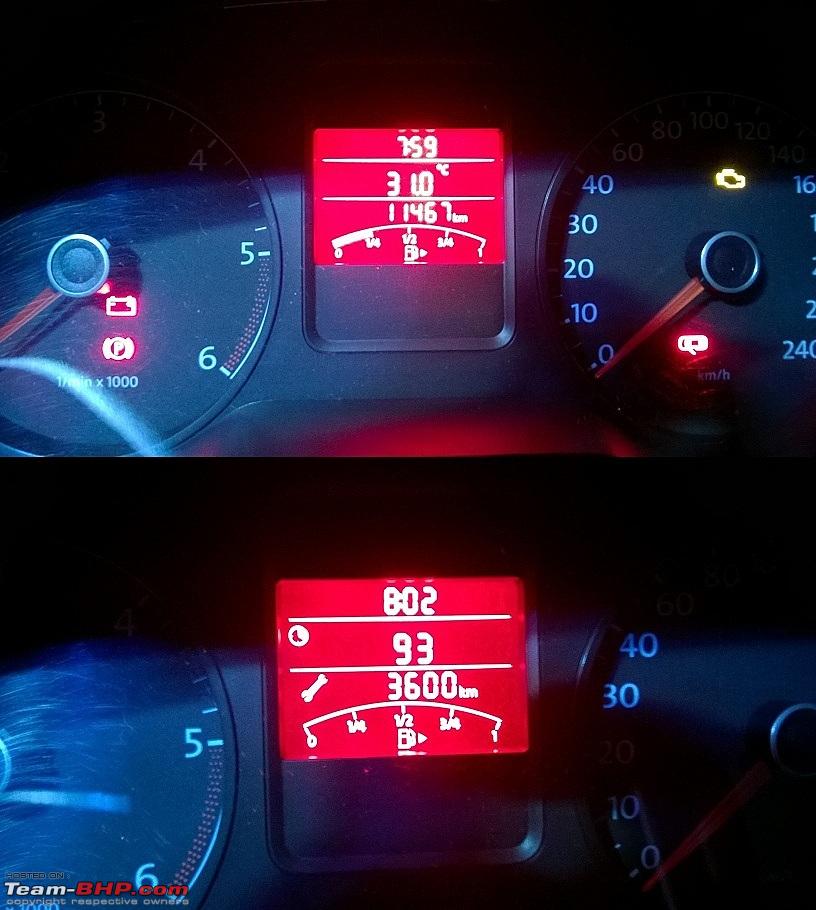
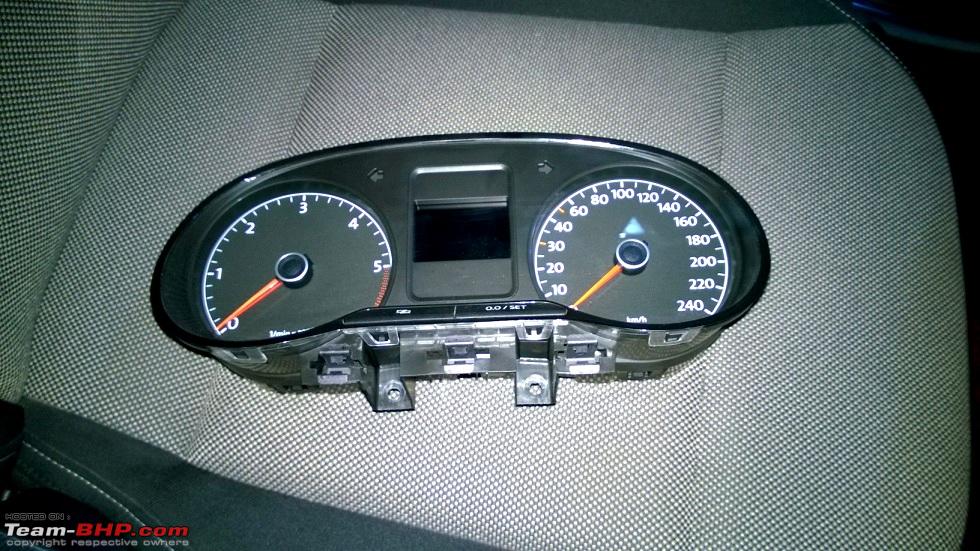
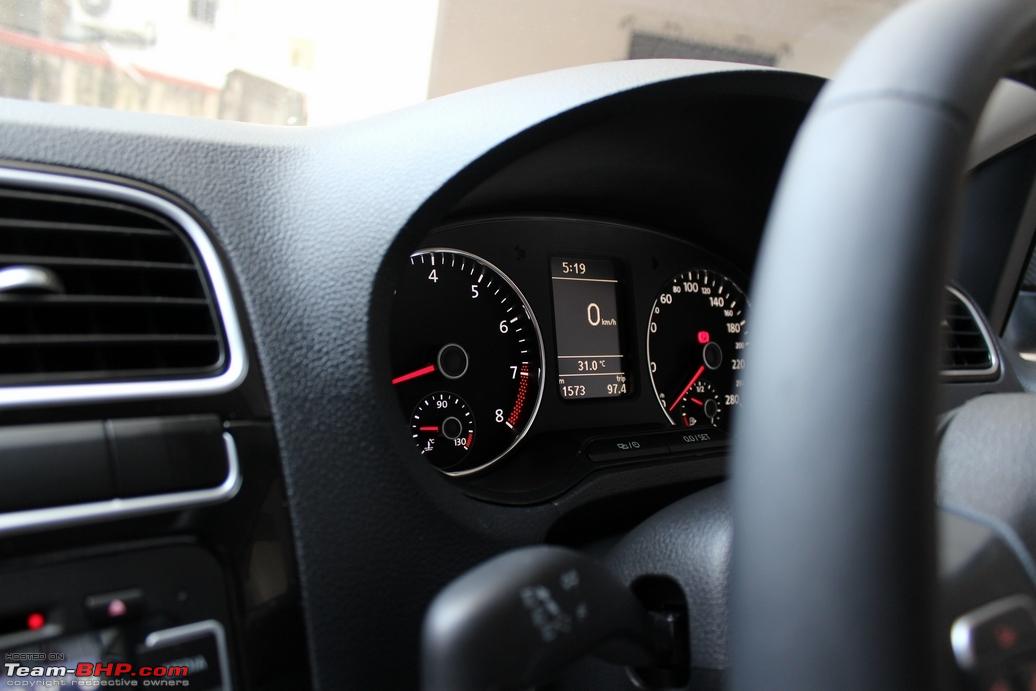
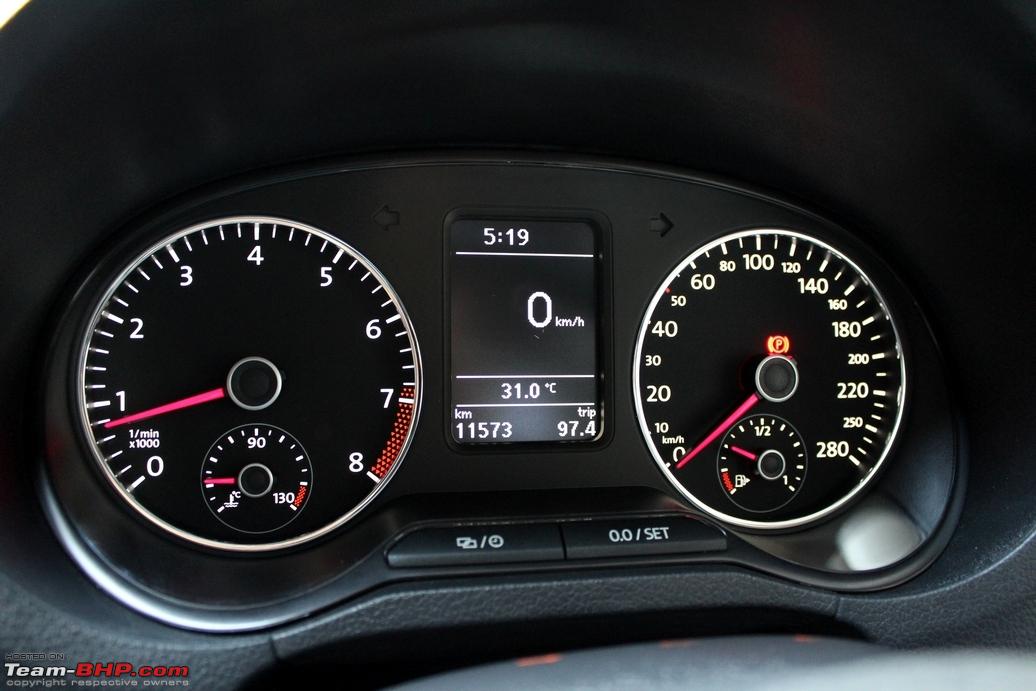
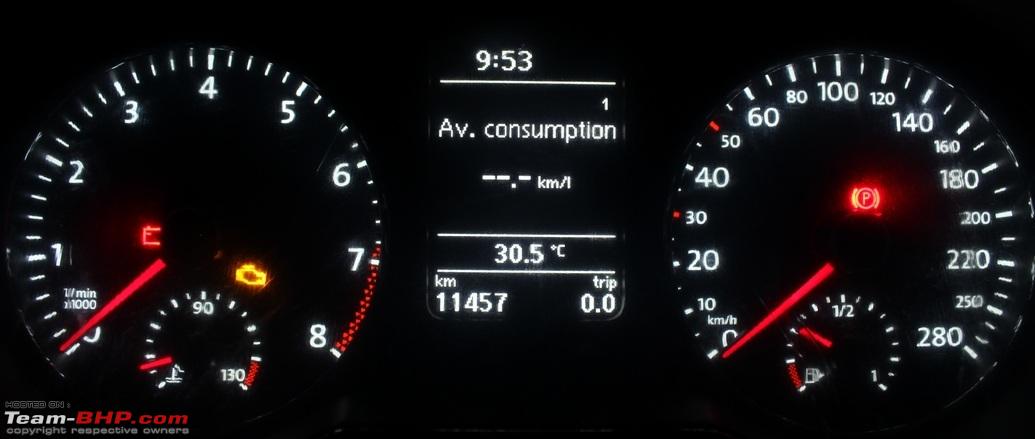
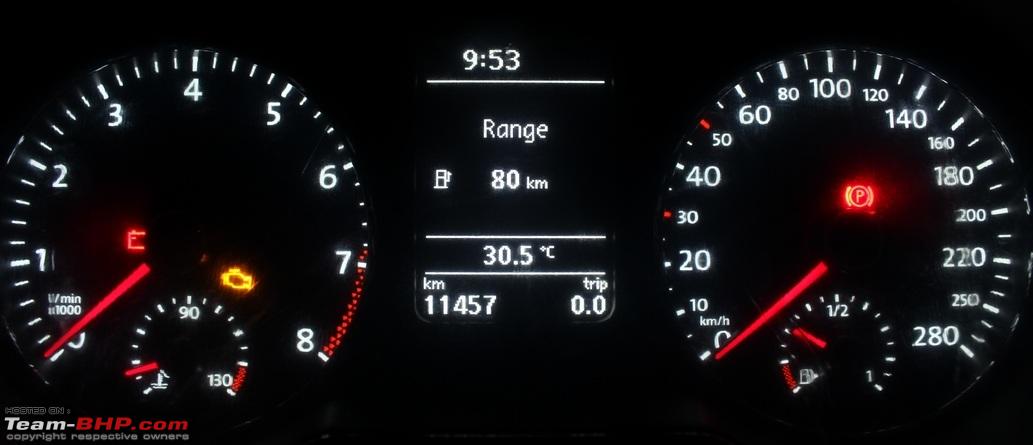
) which is not very relevant here other than showing it off to your non-auto friends. The cluster also features an ambient light sensor that turns on the gauge lights. Here is a short clip that demonstrates it:


    Installation of this cluster on the Polo 2010-14 models have a few caveats however. These variants of Polo sold in India do not have a coolant level sensor and the associated loom attached to the coolant expansion tank:

    Name:  GT coolant sensor.png
Views: 134477
Size:  628.3 KB
    Notice the highlighted part - there is a slot provided for the sensor but it is missing.

    As a result, this will throw the low coolant level warning light in the cluster unless you disable it. The good thing is, the 2014 facelift Polo comes with this coolant sensor attached to the coolant expansion tank:

    VW Polo DIY: Removing / upgrading the instrument cluster-coolant-sensor-cable.png

    Drawbacks of installing the GTI cluster on a Polo TDI:

    Decided to put these under a different heading since this is very important.

    The Polo GTI uses a petrol TSI engine and thus, there are two drawbacks of using this cluster on a Polo with a diesel TDI engine:

    • The tacho range is higher. For petrol engines, it is set from 0 to 8k RPM redlining from 6k RPM:

      VW Polo DIY: Removing / upgrading the instrument cluster-tacho_p.jpg

      Whereas for diesel engines it is set from 0 to 6k RPM redlining from 5k RPM:

      VW Polo DIY: Removing / upgrading the instrument cluster-tacho_d.jpg

      As a result, care has to be taken here not to rev the engine beyond the limits. The calibration is perfect regardless and displays the correct engine RPM as confirmed by the OBD II smartphone application.

    • The glow plug warning light 
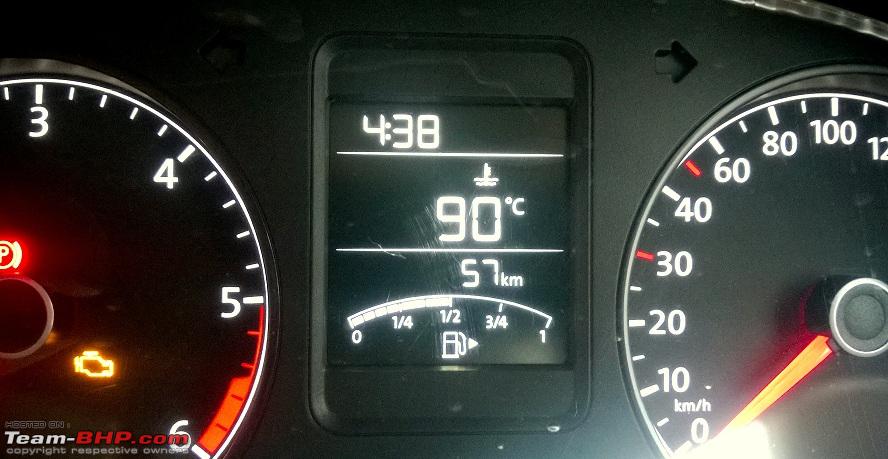
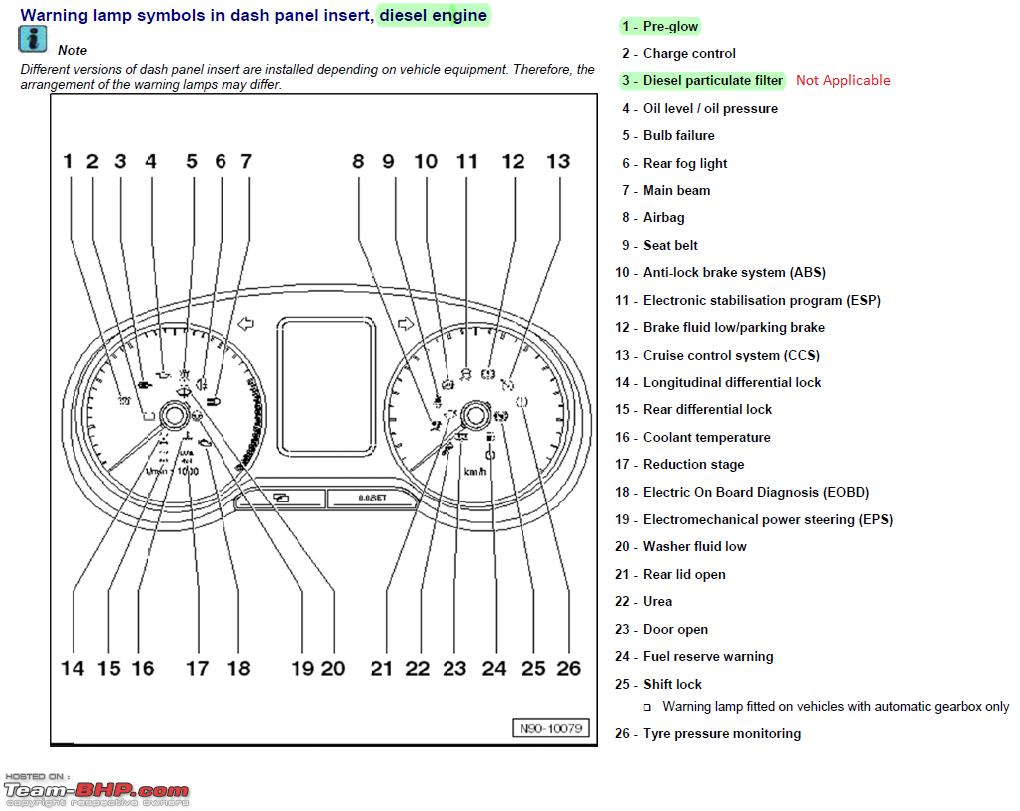
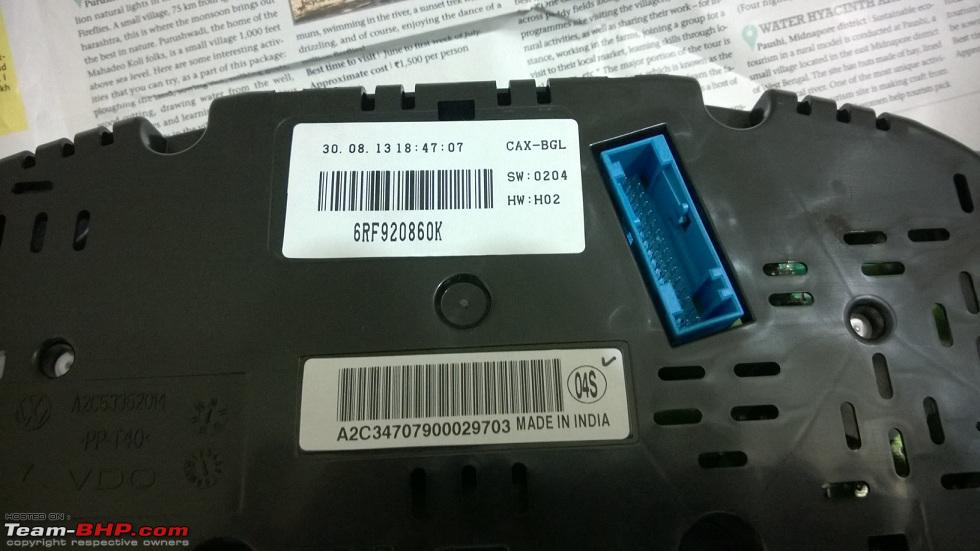
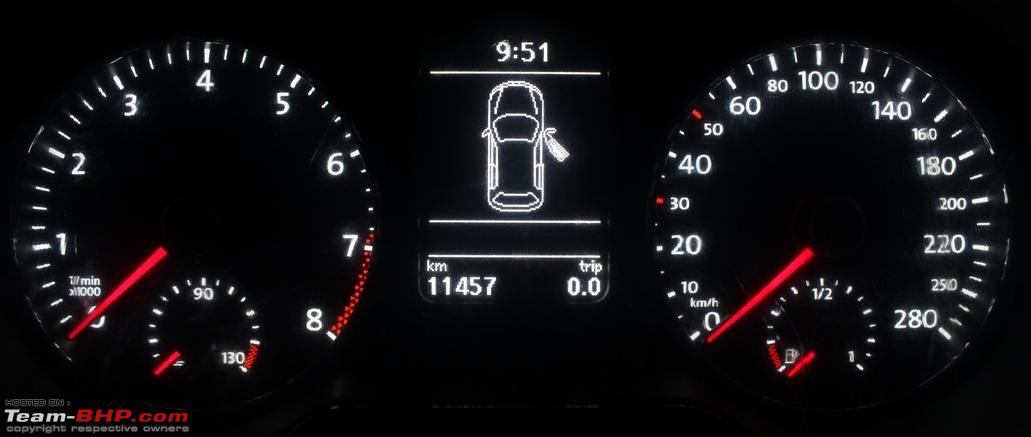
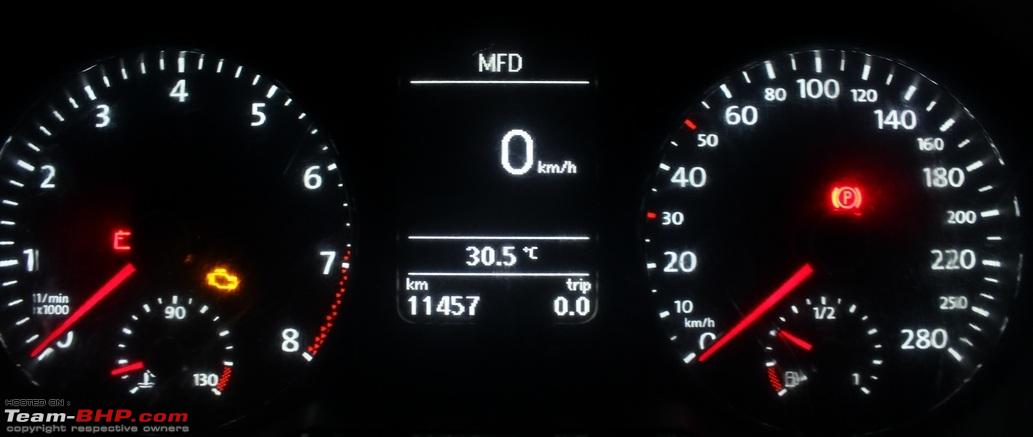
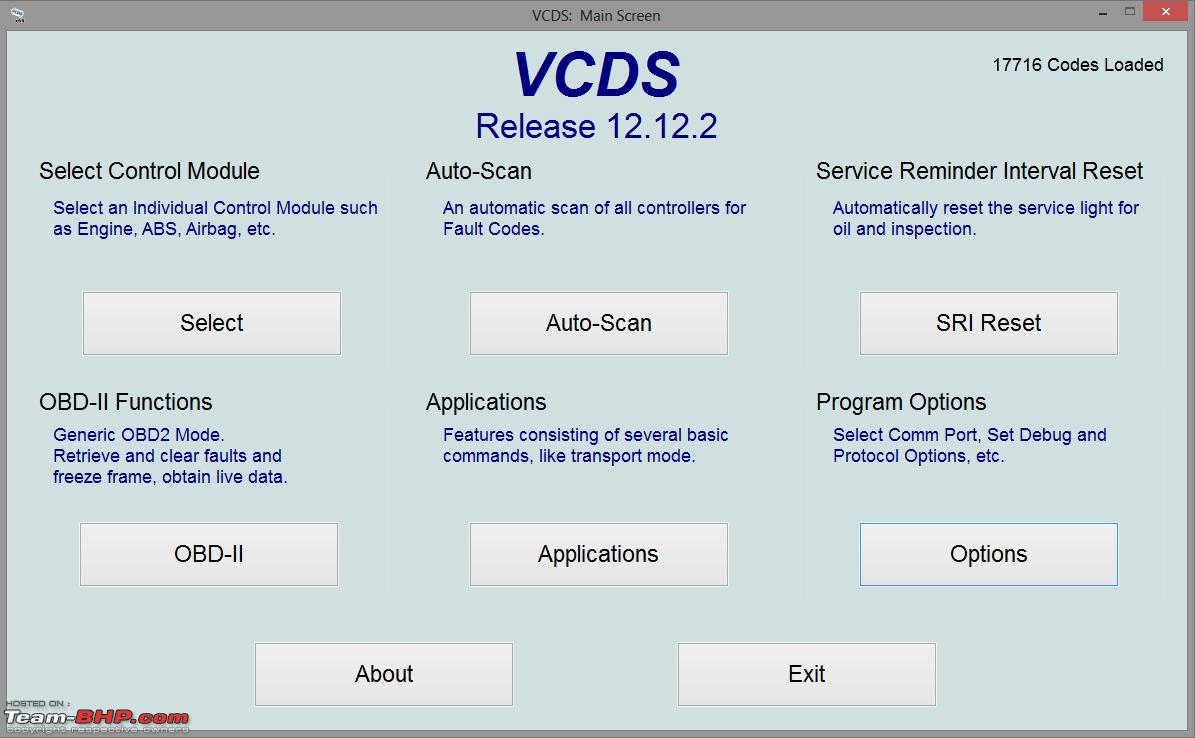
on the cluster is missing. But in the event of an error or a warning, the OBD port is able to transmit the relevant diagnostic trouble code to the application.

      Here is a comparison from VW Workshop Manuals indicating the warning symbols used for both the clusters with the differences highlighted:

      VW Polo DIY: Removing / upgrading the instrument cluster-warning-symbols_p.png

      VW Polo DIY: Removing / upgrading the instrument cluster-warning-symbols_d.png

Last edited by Gannu_1 : 27th May 2015 at 14:59. Reason: coolant sensor > coolant level sensor
Gannu_1 is offline   (18) Thanks
Old 
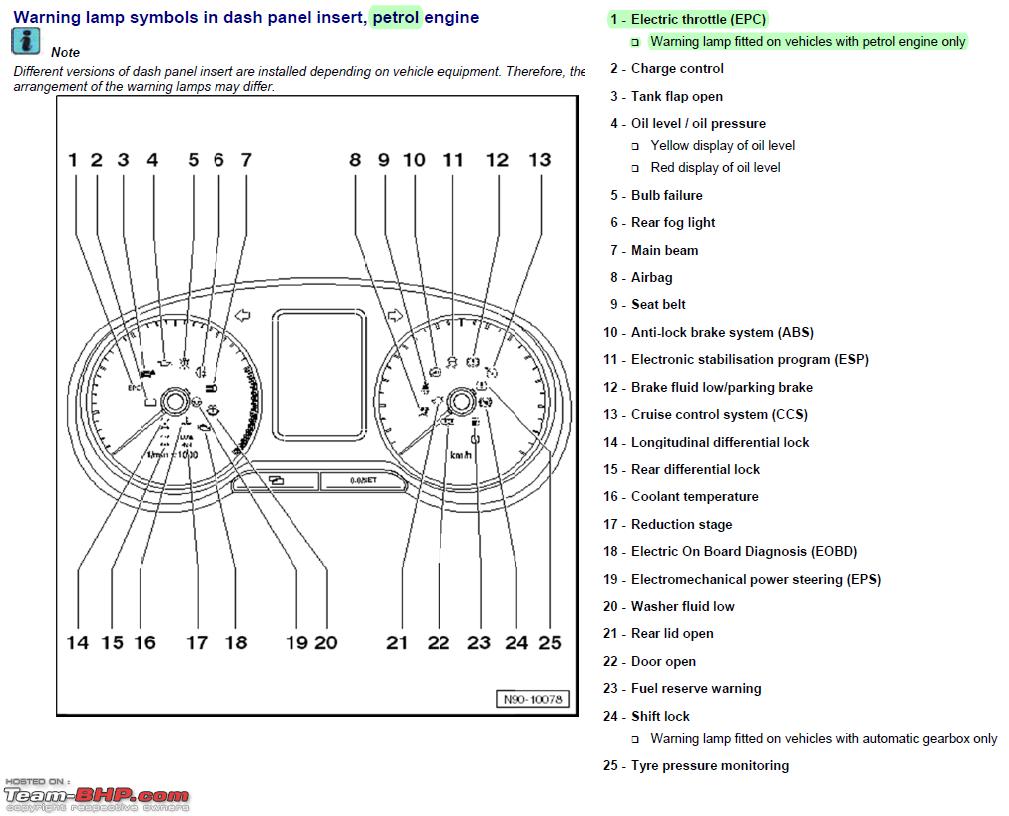
22nd July 2014, 12:16   #2
Team-BHP Support
 
Gannu_1's Avatar
 
Join Date: Apr 2013
Location: Madras
Posts: 7,174
Thanked: 20,219 Times
re: DIY: VW Polo - Removing / upgrading the instrument cluster

  • Tools Required:

    A screw driver with T20 Torx bit and a flat-head bit.

  • Procedure:

    This is best done at a place with adequate ambient lighting. I did it at 8 PM in the evening and had a torch held by my mouth!

    1. If you are replacing the cluster, note down the odometer reading and the service reminder reading on a piece of paper. Or click snaps of the readings:

    VW Polo DIY: Removing / upgrading the instrument cluster-odo_service-reminders.jpg

    This reading has to be coded into the new cluster via VCDS.

    2. Release the steering column lock by pulling it down. Hold the steering wheel, pull down the steering column and pull it out completely to make some working space.

    3. Notice that the steering column is covered with 2 plastic trims on the top and bottom:

    VW Polo DIY: Removing / upgrading the instrument cluster-steering-column-trim.jpg

    The lower trim is screwed to the column using a screw but the upper one is simply pried fit to the lower one. The stalks on either side come out of these trims through a small square slot sufficient enough for 2 fingers to be put inside.

    Insert 2 fingers into the slot and pull the upper trim towards up:

    VW Polo DIY: Removing / upgrading the instrument cluster-lift-trim.jpg
    Image clicked after new cluster was installed.

    4. The upper trim has come off but is joined to the trim below the cluster using a rubber flap. Put the hands below this trim and pull it towards you:

    VW Polo DIY: Removing / upgrading the instrument cluster-pull-trim.jpg
    Image clicked after new cluster was installed.

    The whole part comes off in one piece. Keep it aside for now.

    5. Taking off this trim exposes 2 Torx screws that secure the cluster to the column:

    VW Polo DIY: Removing / upgrading the instrument cluster-2-screws.png

    Use the screw driver with the T20 Torx bit to unscrew them. Take care not to drop the screws on the trim below the steering column! This space is nearly inaccessible.

    6. Once the screws are out, the cluster is free to move out. Gently pull it out towards your direction and turn it towards the co-driver side. Notice the blue X-pin connector with a pink lock tab:

    VW Polo DIY: Removing / upgrading the instrument cluster-connector-new-cluster.jpg
    Image clicked after new cluster was installed.

    Do NOT pull the connector as you would pull out a computer motherboard’s 24-pin connector! This will break the connector permanently.

    Press the tab:

    VW Polo DIY: Removing / upgrading the instrument cluster-lock-release.png

    So the pink lock tab comes off:

    VW Polo DIY: Removing / upgrading the instrument cluster-pull-tab.png

    Now rotate the tab towards the top of the connector and the connector would come off the slot by itself.

    7. The cluster is out:

    VW Polo DIY: Removing / upgrading the instrument cluster-cluster-out.jpg

    VW Polo DIY: Removing / upgrading the instrument cluster-vacant-cluster-slot.jpg

    VW Polo DIY: Removing / upgrading the instrument cluster-cluster-rear.jpg

    8. You now have to take this cluster to the service center or a qualified aftermarket VAG technician along with one of the car keys (electronic keyfob or the spare key) to get the new cluster programmed. Some VW service centers are willing to help swap clusters but most do not.

    9. If you have the new cluster (with the key coded and the odo programmed) with you, an additional cable has to be inserted into a vacant slot of the connector on the wiring loom in order to disable the coolant warning sensor light which will otherwise be lit up (due to the absence of the coolant expansion tank sensor as I had mentioned in the first post). Credits to Sugesh for mentioning this.

    To take out the white connector from the blue sleeve, use the flat-head tip screwdriver to pull the tab up:

    VW Polo DIY: Removing / upgrading the instrument cluster-connector-lock.jpg

    And pull the white connector out from the sleeve. The 32-pin female connector on the cluster’s wiring loom is numbered 1 and 16 on one side of the connector and 17 and 32 on the other side. You will have to shine a torch and look carefully for the numbering on the connector.

    Insert the cable with the pin on vacant slot no. 18:

    VW Polo DIY: Removing / upgrading the instrument cluster-connector.png

    Replace the blue sleeve back and use a couple of cable ties to connect this cable with the wiring loom.

    10. Connect this cable to the GND. There is already a cable which has been screwed to the steering column:

    VW Polo DIY: Removing / upgrading the instrument cluster-gnd-screw.png

    Unscrew it using the T20 Torx bit, wrap around the cable and screw it:

    VW Polo DIY: Removing / upgrading the instrument cluster-gnd-cable.jpg

    That’s all. This disables the coolant warning light which would otherwise be lit up permanently. Fret not, the coolant temperature is displayed correctly on the analog gauge.

  • But won’t I need the multi-function steering wheel (MFSW) to get the menu commands working?

    Name:  MFSW.png
Views: 92901
Size:  652.4 KB

    Nope! The right stalk with wiper controls is sufficient to access the menu functions:

    VW Polo DIY: Removing / upgrading the instrument cluster-wiper-stalk.png

    Notice the two TRIP buttons? Long press one of them for a few seconds to bring up the MFD Main Menu:

    VW Polo DIY: Removing / upgrading the instrument cluster-main-menu.jpg

    Use them to navigate through each of the functions and press OK to set the desired option:

    VW Polo DIY: Removing / upgrading the instrument cluster-menu.jpg

    Of course, if you have the moolah, please get the MFSW by all means. Looks much better than the stock steering wheel.

Last edited by Gannu_1 : 22nd July 2014 at 20:00.
Gannu_1 is offline   (20) Thanks
Old 22nd July 2014, 17:04   #3
Team-BHP Support
 
Gannu_1's Avatar
 
Join Date: Apr 2013
Location: Madras
Posts: 7,174
Thanked: 20,219 Times
re: DIY: VW Polo - Removing / upgrading the instrument cluster

  • Purchase Experience:

    This is a rather long one so please bear with me! TL;DR - as a whole, a positive experience.

    I sourced the cluster from Vagtune, Cochin (link) for $583.16 (Rs. 41210) + Rs. 1890 (customs duties) + Rs. 826 (DTDC shipping charges). Sugesh Chandran, the owner was extremely helpful during the entire process and answered all my queries patiently. Since I was located at Surat and Sugesh at Cochin, I knew that I had to take the car to his shop to get it swapped. But Sugesh suggested a workaround - the cluster can be removed by the owner himself (or a garage technician at home) and can be shipped to him along with one of the keys so he can extract the PIN from the key and program the new cluster accordingly. I was a bit reluctant initially since shipping the cluster is a huge risk (damage/loss during transit) and if the programmed cluster wouldn’t work as desired (throwing up random errors), I would not be satisfied after having spent so much. However, Sugesh convinced me that this has been done before several times and the owners were satisfied.

    He went on record suggesting that since I have a diesel car, the GTI cluster (meant for the TSI engine) would not come with the glow plug warning symbol and thus, will not flash this light during startup/ignition or in the event of a failure. It was a risk I was willing to take but in the event of a problem, the diagnostic trouble code (DTC) transmitted by the OBD II port to the smartphone application can be used to find this error. I went ahead, ordered the cluster and since the cluster was a part of a huge consignment originating from Hong Kong, I had no choice but to wait until it reached Sugesh at Cochin. I could also use my car until then. Few days later, Sugesh informed me that the shipment has landed and I could send my cluster anytime now. He had given me some pointers on how to get the cluster dismantled and even uploaded a video on YouTube upon request.


    Watched the video, headed to the parking lot, noted down the odo/service reminder readings and the cluster was removed in a jiffy! It was easier than we had thought. Packed the cluster in ample bubble wrap and taped it using masking tape so it was easy for Sugesh to remove the wrap and reuse it while sending the clusters back.

    VW Polo DIY: Removing / upgrading the instrument cluster-cluster-wrap.jpg

    VW Polo DIY: Removing / upgrading the instrument cluster-box.jpg

    Packed the spare key in an envelope and kept it alongside the cluster inside a box which was a snug fit. Loaded the box with Styrofoam peanuts (thanks to the tail lights shipment!), sealed the box with cellophane tape all around, stuck the packing labels and the address, kept the declaration letter inside a reusable polythene envelope and stuck it to the box. We headed to our friendly DTDC branch. The DTDC branch charged Rs. 826 for sending the box using DTDC Blue.

    The wait began! And it was going to be a rather painful one knowing I cannot use the car without the cluster. I dropped a message to our car-pooling group on WhatsApp:

    VW Polo DIY: Removing / upgrading the instrument cluster-msg.jpg

    DTDC delivered the consignment 3 days later (probable delay by a day due to monsoons) and Sugesh dropped me a message that he has received it and is working on it. The customs duty amount was credited to his account the same day and I sent him a mail intimating him of the credit. Few hours later, a lady calls me and promptly reconfirms my address. The consignment was shipped the same day via DTDC, true to his word. Thanks to the weekend, the consignment got delayed and 4 days later, it was finally delivered.

    The packaging was neat. The two clusters were packed in ample bubble wrap and placed inside two separate OEM boxes. These boxes were then placed inside a bigger box with some additional bubble wrap and Styrofoam peanuts, with the packaging labels were stuck on top of it.

    VW Polo DIY: Removing / upgrading the instrument cluster-carton.jpg

    VW Polo DIY: Removing / upgrading the instrument cluster-boxes.jpg

    Here’s a 2 minute unboxing video we had captured:


  • Results:

    Here are some snaps we had clicked:

    VW Polo DIY: Removing / upgrading the instrument cluster-img_8872.jpg

    VW Polo DIY: Removing / upgrading the instrument cluster-img_8877.jpg

    VW Polo DIY: Removing / upgrading the instrument cluster-img_8871.jpg

    VW Polo DIY: Removing / upgrading the instrument cluster-img_8883.jpg

    VW Polo DIY: Removing / upgrading the instrument cluster-door-ajar.jpg

    VW Polo DIY: Removing / upgrading the instrument cluster-main-menu.jpg

    VW Polo DIY: Removing / upgrading the instrument cluster-menu.jpg

    VW Polo DIY: Removing / upgrading the instrument cluster-mfd-data.jpg

    VW Polo DIY: Removing / upgrading the instrument cluster-speed.jpg

    VW Polo DIY: Removing / upgrading the instrument cluster-average-speed.jpg

    VW Polo DIY: Removing / upgrading the instrument cluster-av-mlg.jpg

    VW Polo DIY: Removing / upgrading the instrument cluster-range.jpg

    The cluster is also capable of displaying HU information such as radio channels, track currently being played etc. and phone contacts, call information, range, battery life of the device connected etc via Bluetooth. However these features need to be activated via VCDS. Once I get them up and running (hopefully in a few days' time), I shall post it here.

  • DIY Experience:

    Pretty good I'd say. It always feels good to dismantle things and assembling it yourself, getting stuck at some point, scratching the head over it, referring to the owner's manual, online VW workshop manuals or YouTube videos (just like how you'd refer to a game's walkthrough if you would get stuck somewhere). Of course, one can always get it done by a qualified aftermarket garage, be a bystander and pay them a fee. As far as possible, I'd love to get things done by myself. It's super fun and can teach us a thing or two.

  • Warranty Issues:

    For the petrol variants, this is an acceptable swap. In any case, no stock cables or connectors were cut/spliced. An additional cable was inserted into the connector which can always be removed if the need arises. The cluster is swapped retaining the stock one so this mod is perfectly reversible if the need arises (the odo reading on the stock cluster has to be corrected however). It is only when the cluster is used in the diesel engine variants, the lack of the glow plug warning can be bothersome. This light flashes for a second when the key is turned before cranking the engine but the light can flash for a longer period during cold weathers (indicating that the glow plug is heating). So please keep this in mind before attempting the swap.

Big shout-out to my roomie Moorthy for helping me with clicking the snaps, tools and shining the torch. And the community for all the support. This also brings up my 1000th post on the forum!

Last edited by Gannu_1 : 28th July 2014 at 09:12.
Gannu_1 is offline   (40) Thanks
Old 28th July 2014, 11:44   #4
Team-BHP Support
 
Rehaan's Avatar
 
Join Date: Feb 2004
Location: Bombay
Posts: 24,039
Thanked: 34,069 Times
re: DIY: VW Polo - Removing / upgrading the instrument cluster

Thread moved from the Assembly Line to the Initial Ownership Section. Thanks for sharing!
Rehaan is offline   (1) Thanks
Old 28th July 2014, 12:01   #5
BHPian
 
ajaypjayaraj's Avatar
 
Join Date: Jun 2014
Location: KL 11
Posts: 930
Thanked: 1,162 Times
re: DIY: VW Polo - Removing / upgrading the instrument cluster

Another addition to DIY list from Gannu. Good to see people who loves to, and has the patience to do such DIYs and mods. Great work, keep it up!
ajaypjayaraj is offline   (1) Thanks
Old 28th July 2014, 12:24   #6
BHPian
 
TheLizardKing's Avatar
 
Join Date: Jul 2013
Location: Mumbai
Posts: 428
Thanked: 1,321 Times
re: DIY: VW Polo - Removing / upgrading the instrument cluster

Quote:
Originally Posted by Gannu_1 View Post
Big shout-out to my roomie Moorthy for helping me with clicking the snaps, tools and shining the torch. And the community for all the support. This also brings up my 1000th post on the forum!
Congrats. I see a "Distinguished BHPian" in the making.

Quote:
Originally Posted by ajaypjayaraj View Post
Another addition to DIY list from Gannu. Good to see people who loves to, and has the patience to do such DIYs and mods. Great work, keep it up!
Not just love and patience, you also need a lot of $$$. I'd love for Gannu_1 to make a list of all this DIYs so far and put the cost incurred against each of them. The total will be a BIG number.
TheLizardKing is offline   (1) Thanks
Old 28th July 2014, 12:31   #7
BHPian
 
ajaypjayaraj's Avatar
 
Join Date: Jun 2014
Location: KL 11
Posts: 930
Thanked: 1,162 Times

Tell me about it! We prefer to not think much about those big numbers. Mostly, the family does the thinking and sometimes even talking part for you
ajaypjayaraj is offline   (1) Thanks
Old 28th July 2014, 13:32   #8
BHPian
 
Join Date: Nov 2013
Location: Bengaluru
Posts: 103
Thanked: 44 Times
re: DIY: VW Polo - Removing / upgrading the instrument cluster

Nice one Gannu. As requested, it would be nice to have a list of all the mods and the damages to each of them. I bet you could get a decent car for that total
Kanasu is offline   (1) Thanks
Old 30th July 2014, 06:52   #9
BHPian
 
batterylow's Avatar
 
Join Date: May 2014
Location: TN38/KL11/KL58
Posts: 643
Thanked: 954 Times
Re: DIY: VW Polo - Removing / upgrading the instrument cluster

Good Work Gannu_1, this is turning out to be like building a jeep from scratch.

Reminds me of, "Jeeps are not bought, they are built"!

Cheers

Ok, the numbers as calculated from the posts in the forum,(I know I am jobless)

$583.16 (Rs. 41210) + Rs. 1890 (customs duties) + Rs. 826 (DTDC shipping charges) - VW Polo - Removing / upgrading the instrument cluster
12.4k - VW Polo DIY: OEM front armrest
12,905 - VW Polo DIY: Euro-spec Tail lamps
5181.06 - DIY - Installing the OEM Sharkfin Antenna on a VW Polo
(800-900) - VW Polo DIY - Adding a lamp to the glovebox
??? - VW Polo: Rear neck-restraint replacement

total- Approx 75k

Did I miss anything?

Last edited by batterylow : 30th July 2014 at 07:13. Reason: Additional data
batterylow is offline   (1) Thanks
Old 30th July 2014, 08:56   #10
Senior - BHPian
 
extreme_torque's Avatar
 
Join Date: Feb 2005
Location: Melbourne
Posts: 4,376
Thanked: 5,105 Times
Re: DIY: VW Polo - Removing / upgrading the instrument cluster

I am wondering why would the MFD control not working via the steering wheel mounted buttons?
extreme_torque is offline  
Old 30th July 2014, 09:56   #11
Team-BHP Support
 
Gannu_1's Avatar
 
Join Date: Apr 2013
Location: Madras
Posts: 7,174
Thanked: 20,219 Times
Re: DIY: VW Polo - Removing / upgrading the instrument cluster

Thanks guys. I am sure the service center guys here will have something to say when I drop the car during September first week for the first service.

I sincerely hope they don’t mess up since we have a long trip coming up after that.

Quote:
Originally Posted by extreme_torque View Post
I am wondering why would the MFD control not working via the steering wheel mounted buttons?
You mean the steering controls on the left spoke? Those are meant for the audio controls not the MFD. The ones on the right spoke available on the Jetta/Laura/Octavia/Passat are used for the MFD functions.

Quote:
Originally Posted by batterylow View Post
Did I miss anything?
A lot of things actually! My ownership thread should give you an idea.

Quote:
Originally Posted by batterylow View Post
??? - VW Polo: Rear neck-restraint replacement
Haven’t done anything on this front so far. Since the 2014 facelift features the inverted restraints, we are yet to hear from the VW service center if they can source the rear seat restraints separately. If they deny (which they will in all probability), I’ll have the stock restraints modified.
Gannu_1 is offline  
Old 30th July 2014, 10:12   #12
BHPian
 
satya180's Avatar
 
Join Date: Dec 2005
Location: Pune
Posts: 204
Thanked: 427 Times
Re: DIY: VW Polo - Removing / upgrading the instrument cluster

Thank you for being such an inspiration Gannu. I love reading through your DIYs. I am very tempted to go for this mod on my 2013 Vento 1.6TDI HL, however:
1) Can the coolant temperature sensor from the new 2014 Polo be fitted on a 2013 Vento 1.6TDI?
2) I've read a little, but how difficult is it to score a diesel (highline) speedometer, with the 5k redline? Any pointers?

Thanks.
satya180 is offline   (1) Thanks
Old 30th July 2014, 11:28   #13
BHPian
 
ajaypjayaraj's Avatar
 
Join Date: Jun 2014
Location: KL 11
Posts: 930
Thanked: 1,162 Times

Quote:
Originally Posted by Gannu_1 View Post
Thanks guys. I am sure the service center guys here will have something to say when I drop the car during September first week for the first service.
I sincerely hope they don’t mess up since we have a long trip coming up after that.
If you have not changed any control modules in your car, the service centre guys can't mess up much. But if you have, and if they carry out the guided access function, then your add ons will be messed up as this will reset everything to car's original coding. You have to re-code everything back after the service in that case. Other than this I don't think they can mess up as far as coding is concerned.
But yeah, one screw up is that certain control module codings are irreversible. You can code it back and will show the same in VCDS but it doesn't actually take effect in the module. There are a few such codes which needs to be not tampered with.

Last edited by ajaypjayaraj : 30th July 2014 at 11:31.
ajaypjayaraj is offline   (1) Thanks
Old 30th July 2014, 12:16   #14
Team-BHP Support
 
Gannu_1's Avatar
 
Join Date: Apr 2013
Location: Madras
Posts: 7,174
Thanked: 20,219 Times
Re: DIY: VW Polo - Removing / upgrading the instrument cluster

Quote:
Originally Posted by satya180 View Post
1) Can the coolant temperature sensor from the new 2014 Polo be fitted on a 2013 Vento 1.6TDI?
2) I've read a little, but how difficult is it to score a diesel (highline) speedometer, with the 5k redline? Any pointers?
1. I haven’t inquired about this. It could be possible if you can source the sensor and the wiring loom. I am not sure if the service center will help in installing these though.

You really do not need it however. The analog gauge shows the reading correctly. When the car is started after a long break (say, in the morning), the needle gradually moves up as the coolant gets heated up and it stays at 90 ‘C (12 ‘o clock) which is the correct reading during normal engine running.

2. I tried my luck but no go. Tried several websites - carsystems.pl, eBay Germany, a site from Czech but no one stocked the diesel cluster. The petrol clusters were readily available OTOH.

Quote:
Originally Posted by ajaypjayaraj View Post
If you have not changed any control modules in your car, the service centre guys can't mess up much.
I don’t have a VCDS cable (not yet) so haven’t attempted any changes w.r.t. that. The service interval reminder (km/days) was not changed by Sugesh. Hopefully, the VCDS cable (which is in transit) works so I can do that myself. Any idea if this is easy Ajay?
Gannu_1 is offline  
Old 30th July 2014, 12:25   #15
BHPian
 
ajaypjayaraj's Avatar
 
Join Date: Jun 2014
Location: KL 11
Posts: 930
Thanked: 1,162 Times
Re: DIY: VW Polo - Removing / upgrading the instrument cluster

Quote:
Originally Posted by Gannu_1 View Post
I don’t have a VCDS cable (not yet) so haven’t attempted any changes w.r.t. that. The service interval reminder (km/days) was not changed by Sugesh. Hopefully, the VCDS cable (which is in transit) works so I can do that myself. Any idea if this is easy Ajay?
Yep. It is pretty basic. There is a SRI reset button on the VCDS main screen. Attaching a screen shot.
VW Polo DIY: Removing / upgrading the instrument cluster-vcds1.jpg
But in Yeti, I can do it through the MFD itself without having to use the VCDS.
ajaypjayaraj is offline  
Reply

Most Viewed


Copyright ©2000 - 2024, Team-BHP.com
Proudly powered by E2E Networks