Team-BHP > Technical Stuff > DIY - Do it yourself
Register New Topics New Posts Top Thanked Team-BHP FAQ


Reply
  Search this Thread
163,582 views
Old 10th November 2015, 13:44   #1
Team-BHP Support
 
Gannu_1's Avatar
 
Join Date: Apr 2013
Location: Madras
Posts: 7,174
Thanked: 20,220 Times
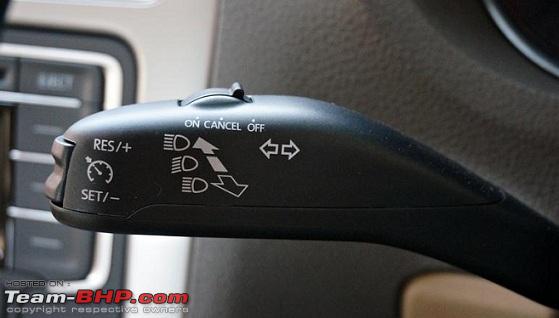
VW Polo DIY: Cruise Control!

We had installed the cruise control system on my 2013 Polo GT TDI last weekend and it was certainly the most amazing DIY experience we’ve ever had! Almost an year's research and work went into this installation and it paid off.

VW Polo DIY: Cruise Control!-img_1475.jpg

VW Polo DIY: Cruise Control!-img_1474.jpg

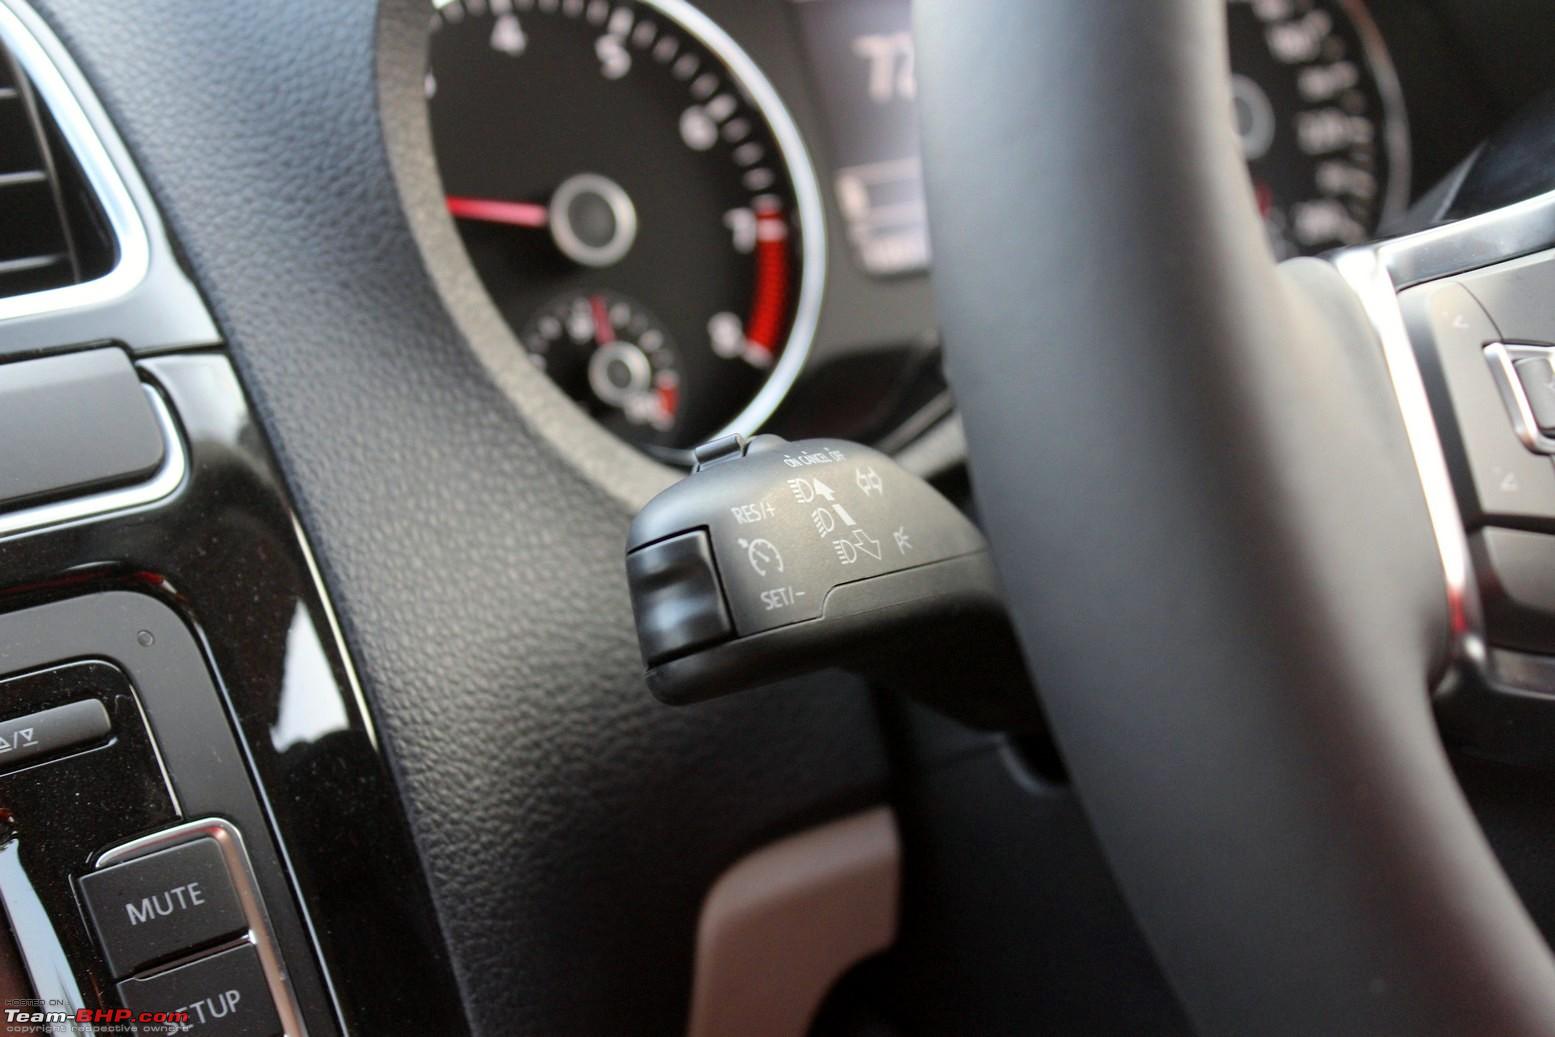
The best part was the learning experience - since we were completely new to this DIY, we were essentially starting from ground zero, collected all the data required for the installation, did a couple of mistakes (as usual!) and sorted them out as we progressed. I have documented the entire procedure below. If you are looking to install cruise control system in your Polo/Vento (engines/transmissions do not matter), look no further - this thread will cover ‘em all!

How it all started:

Before I share the information regarding the required parts, tools and the procedure involved, I thought I should share how the whole cruise control idea was conceived and materialized.

In Q4 2014, the Skoda Rapid 1.5L DSG was launched and I had noticed that Skoda had provided cruise control in the car. The Rapid is essentially the Vento and the Vento is based on the Polo 6R. Which meant that whatever features were available on the Rapid or Vento could be had on the Polo as well with some parts change. In the overseas, cruise control is available as a standard fitment or a dealership upgrade - not here in India though. The new Highline models of the Polo and Vento launched this year have the cruise control feature.

In the meantime, in December last year, I had to relocate to a place located approx. 55 km from my workplace which meant a 110 km daily commute to and fro. Initially I was a part of a carpool but opted out after a few months due to the timing clashes with the other colleagues and had to take my car 6 days a week. The 55 km route involves a 30 km drive over empty 4-laned stretches and I used to cruise at 85-90 kmph. Fast forward 7 months, there were no changes here. I was still cruising at the same speed and the traffic was minimal - a few trucks at best. I was also doing my research on what is the overall work involved if I had to install the cruise control system in my car. Turns out, it was fairly simple save for a couple of upgrades and access issues and it wasn’t an expensive add-on. All the information required to help me with the retrofit was scattered in the internet - I just had to search. Ultimately, I decided to get it done.

BHPian charansuki (Gurucharan) had acquired a brand new Rapid 1.5L DSG and I had asked him for the part number of the BCM installed on his Rapid 1.5L DSG (link):

VW Polo DIY: Cruise Control!-rapid-charan.png

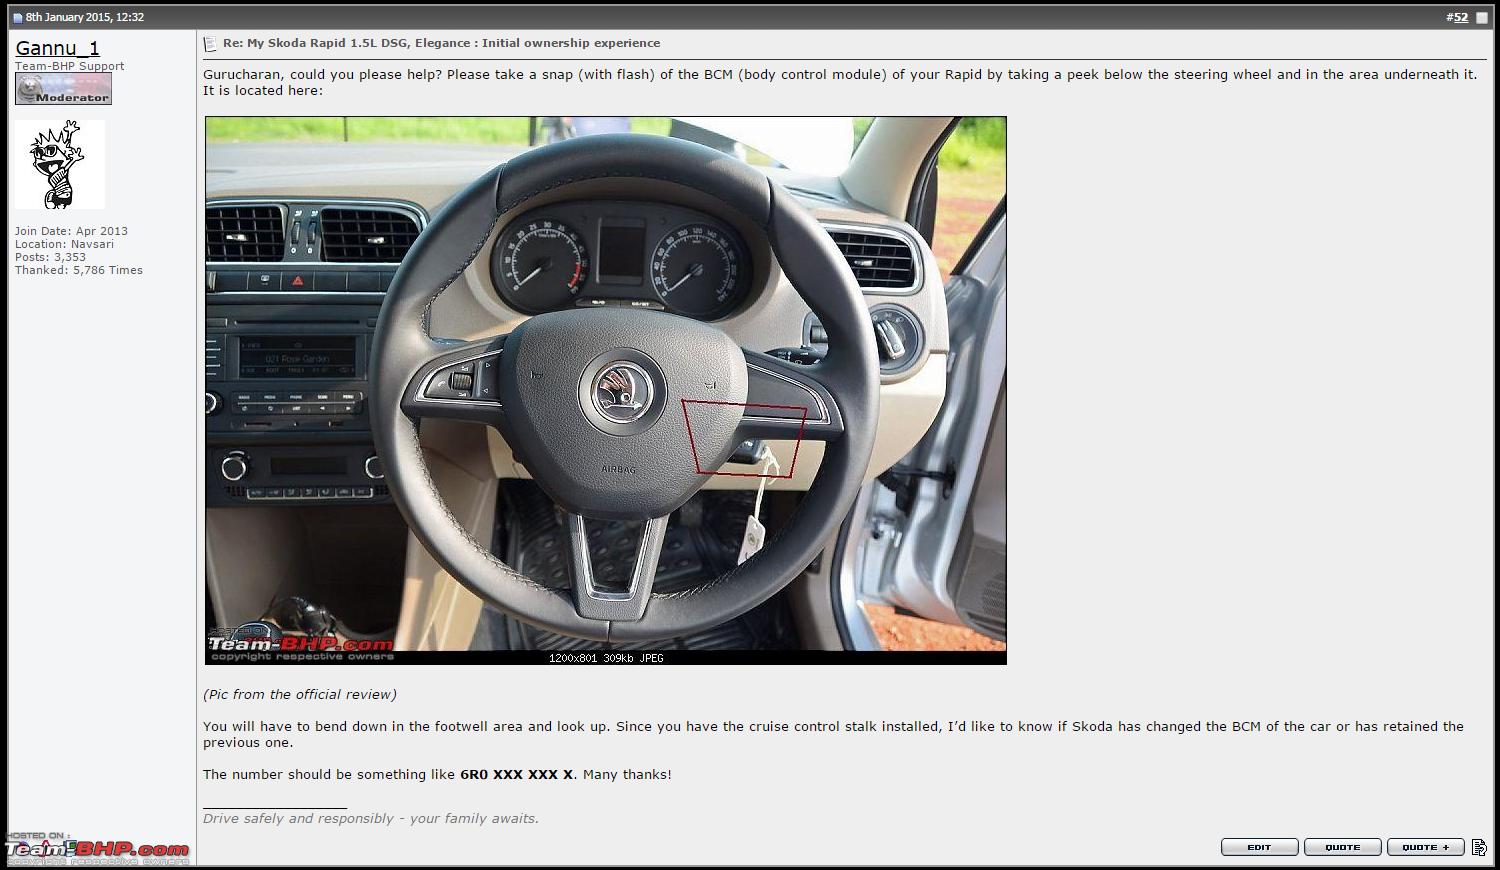
This was a weird request because the BCM wasn’t readily accessible and with some difficulty, Charan helped me out. My response followed (link):

VW Polo DIY: Cruise Control!-rapid-charan_2.png

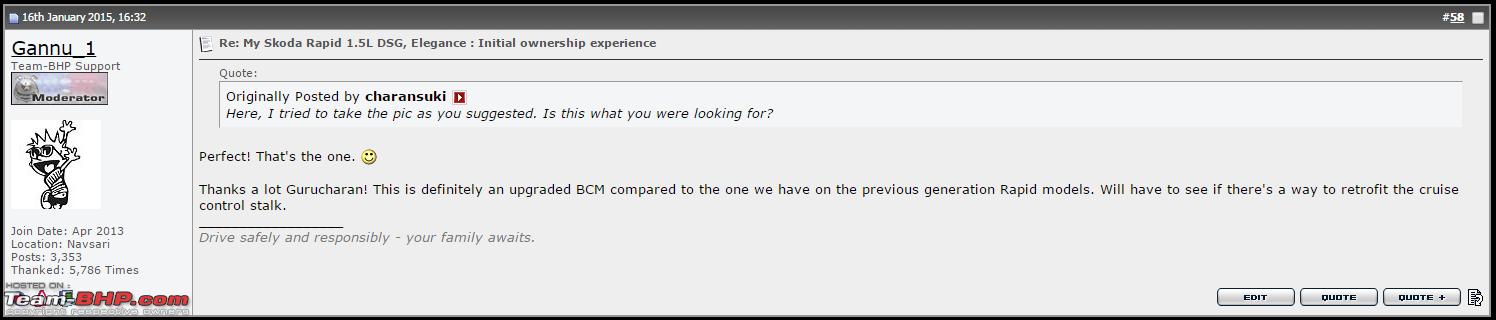
I figured out that the BCM unit had to be upgraded because the stock BCM in my car did not support the cruise control function. And thus the search for a highline BCM began and during a casual search online, I stumbled upon a Russian dealer registered on eBay Germany selling a brand new highline BCM unit. Bit the deal without a second thought and bought it. I upgraded the unit on the same weekend it had arrived. The report is here - VW Polo DIY: Upgrading the BCM (Body Control Module)) .

Next, was sourcing the new stalks unit (VW calls it steering column combination switch) and the wiring harness. The cruise control buttons are provided on the left stalk and a new set of stalks were required along with the wiring harness. The first site was Aliexpress (obviously; cheaper and the buyer feedback would tell you if the stuff is genuine or otherwise) and there are a few links retailing the cruise control kits (links). At the same time, a DIY enthusiast and a Polo 6R TSI owner from Spain, Fernando with whom I am constantly in touch with, had put a cruise control kit for sale! Talk about the timing - I sent him a mail and he confirmed it. Paid the amount via PayPal and bought it. India Post held on to the shipment for some time - they weren’t sure what this weird thing was! After a bunch of mails and follow-up calls, I got the shipment released. I didn't have to pay any duties luckily!

So I had everything at my disposal for the cruise control upgrade. It was just a matter of time.

Last edited by Gannu_1 : 15th November 2015 at 13:05.
Gannu_1 is offline   (33) Thanks
Old 10th November 2015, 15:16   #2
Team-BHP Support
 
Gannu_1's Avatar
 
Join Date: Apr 2013
Location: Madras
Posts: 7,174
Thanked: 20,220 Times
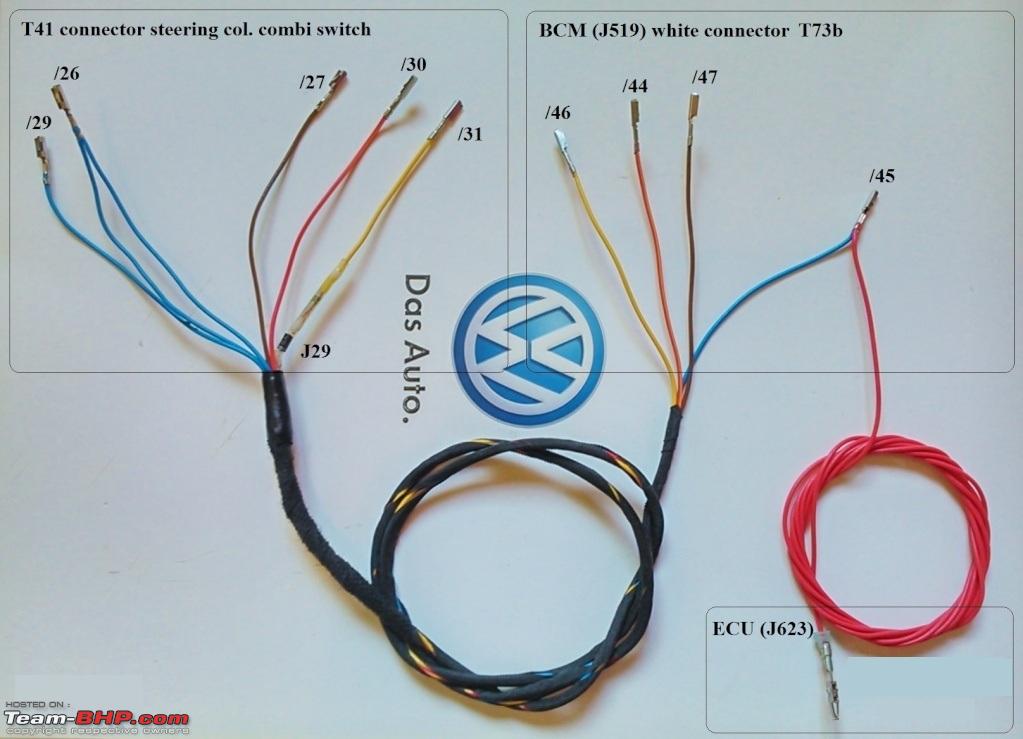
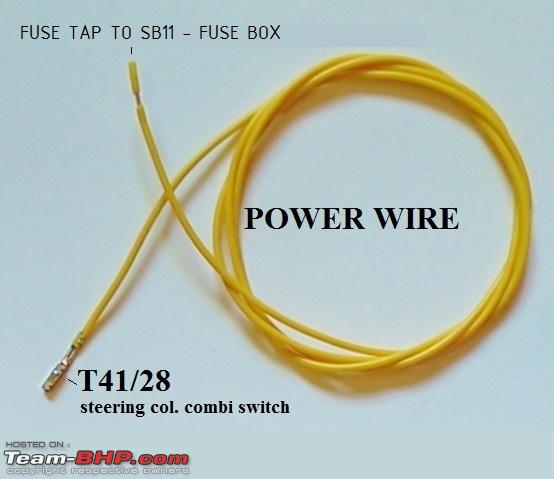
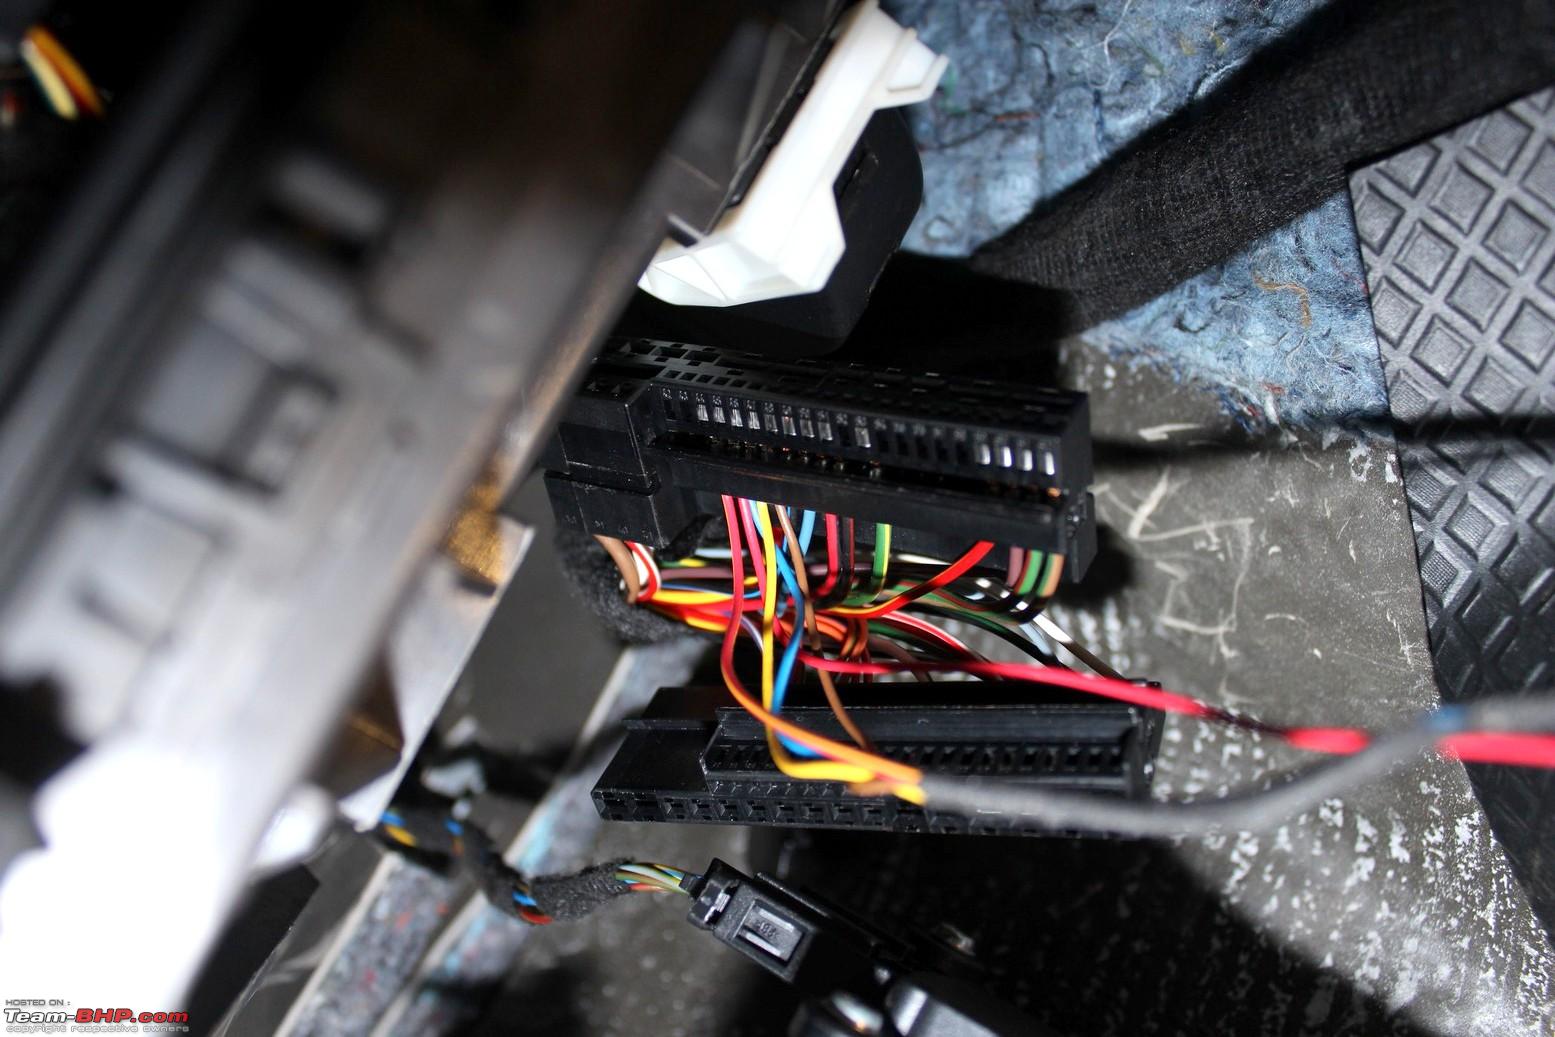
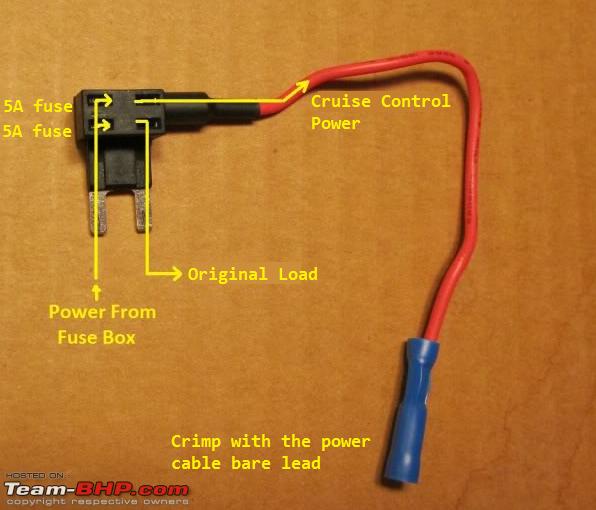
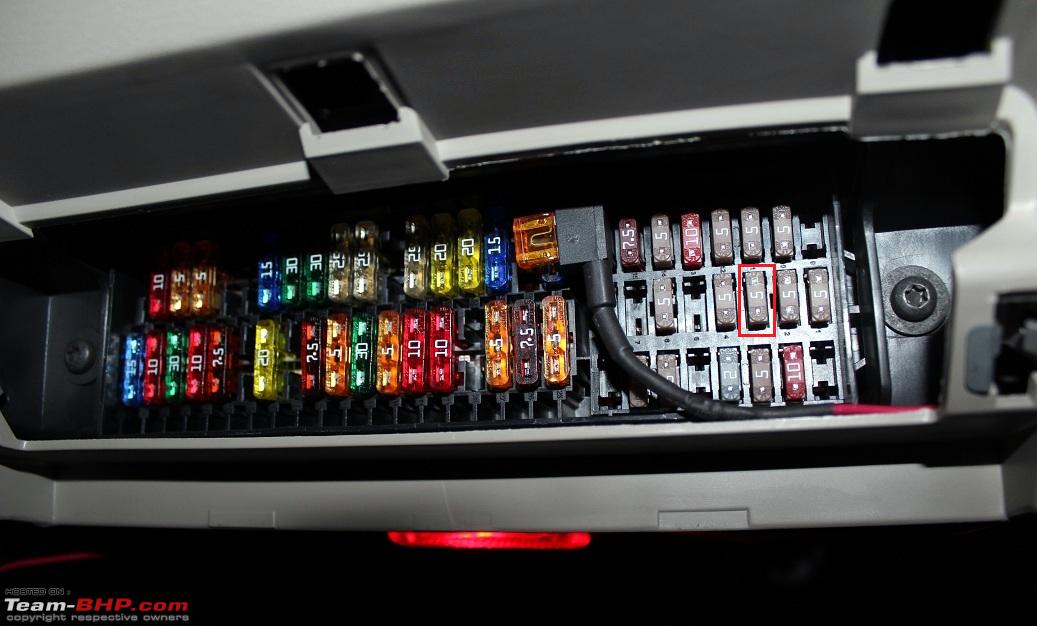
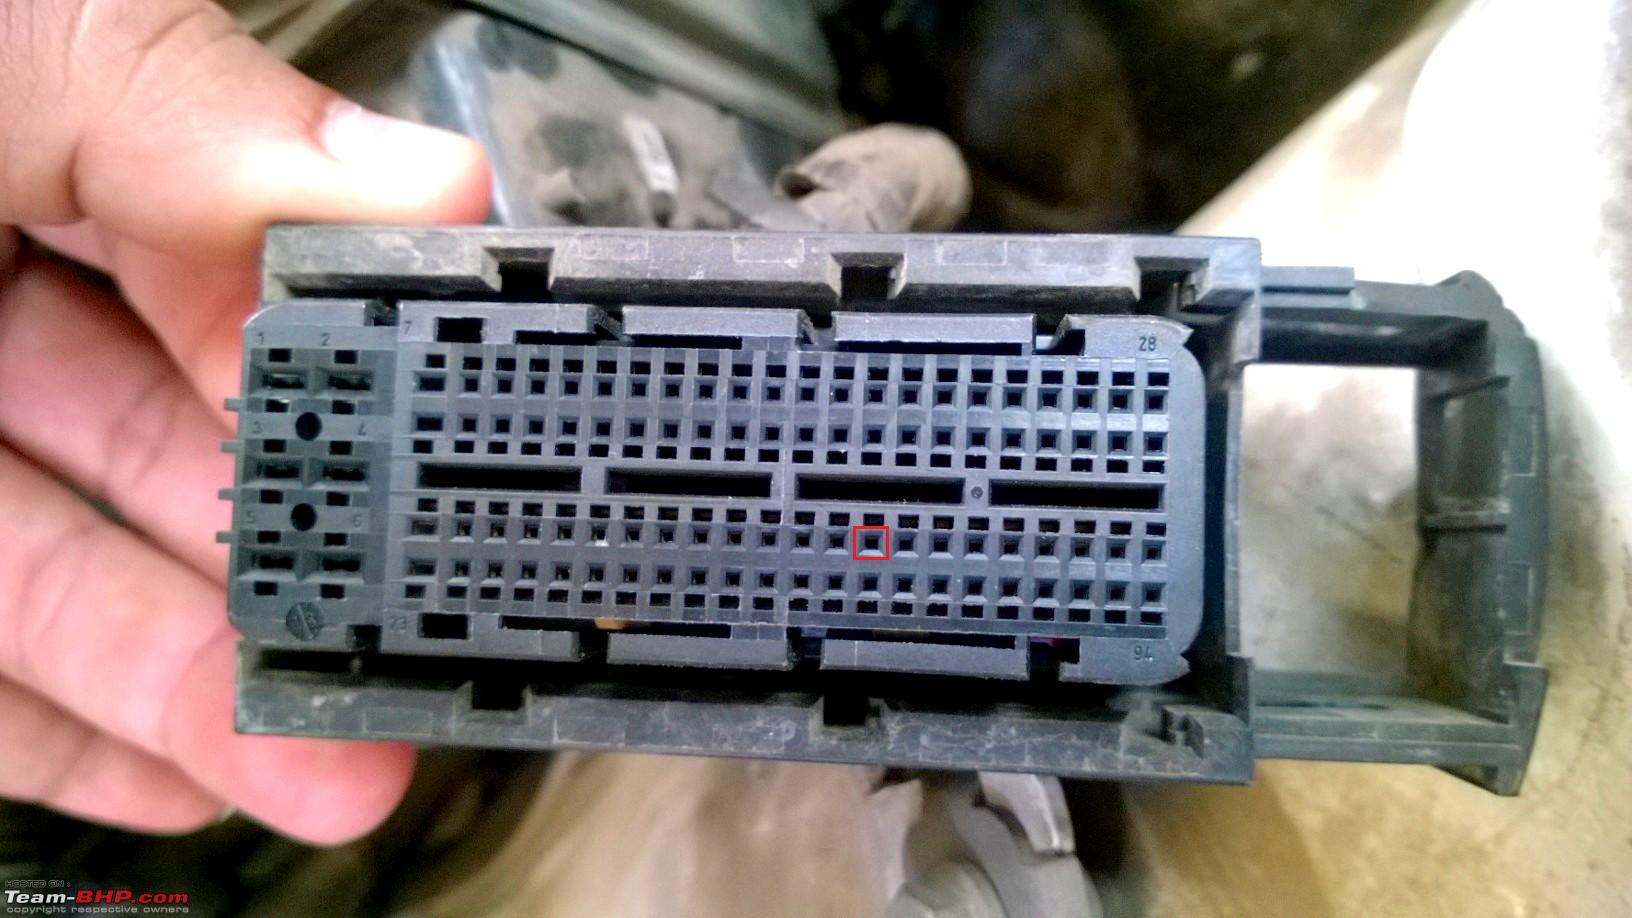
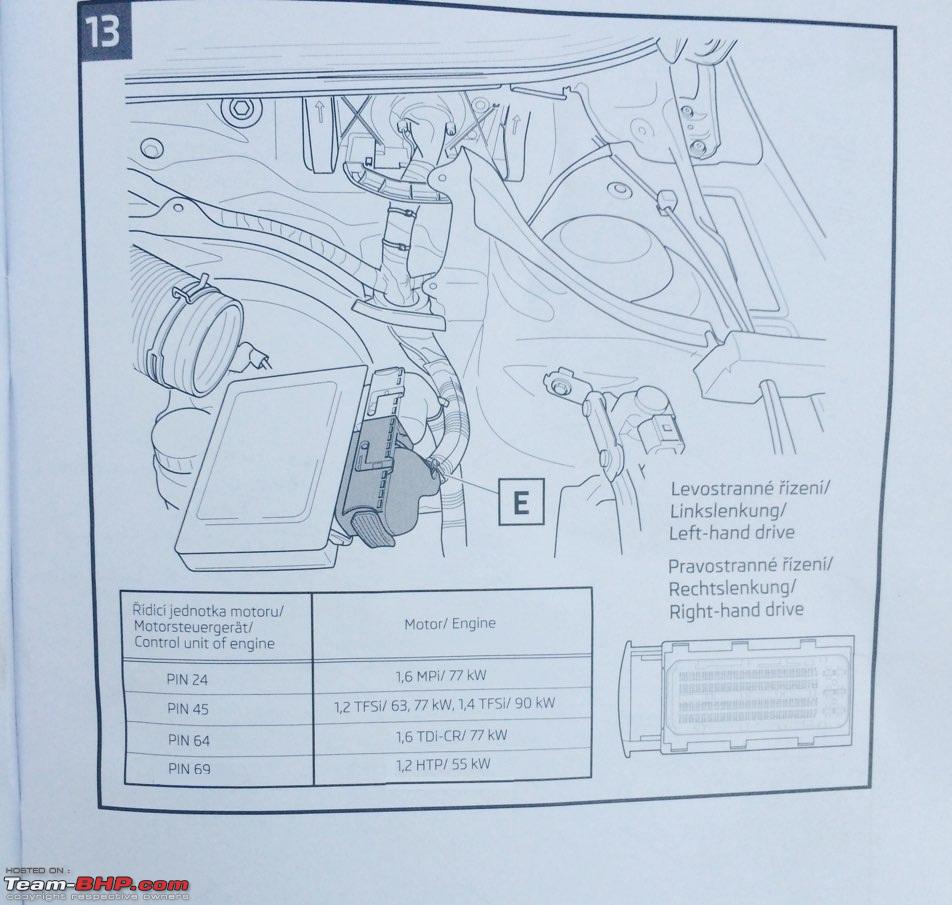
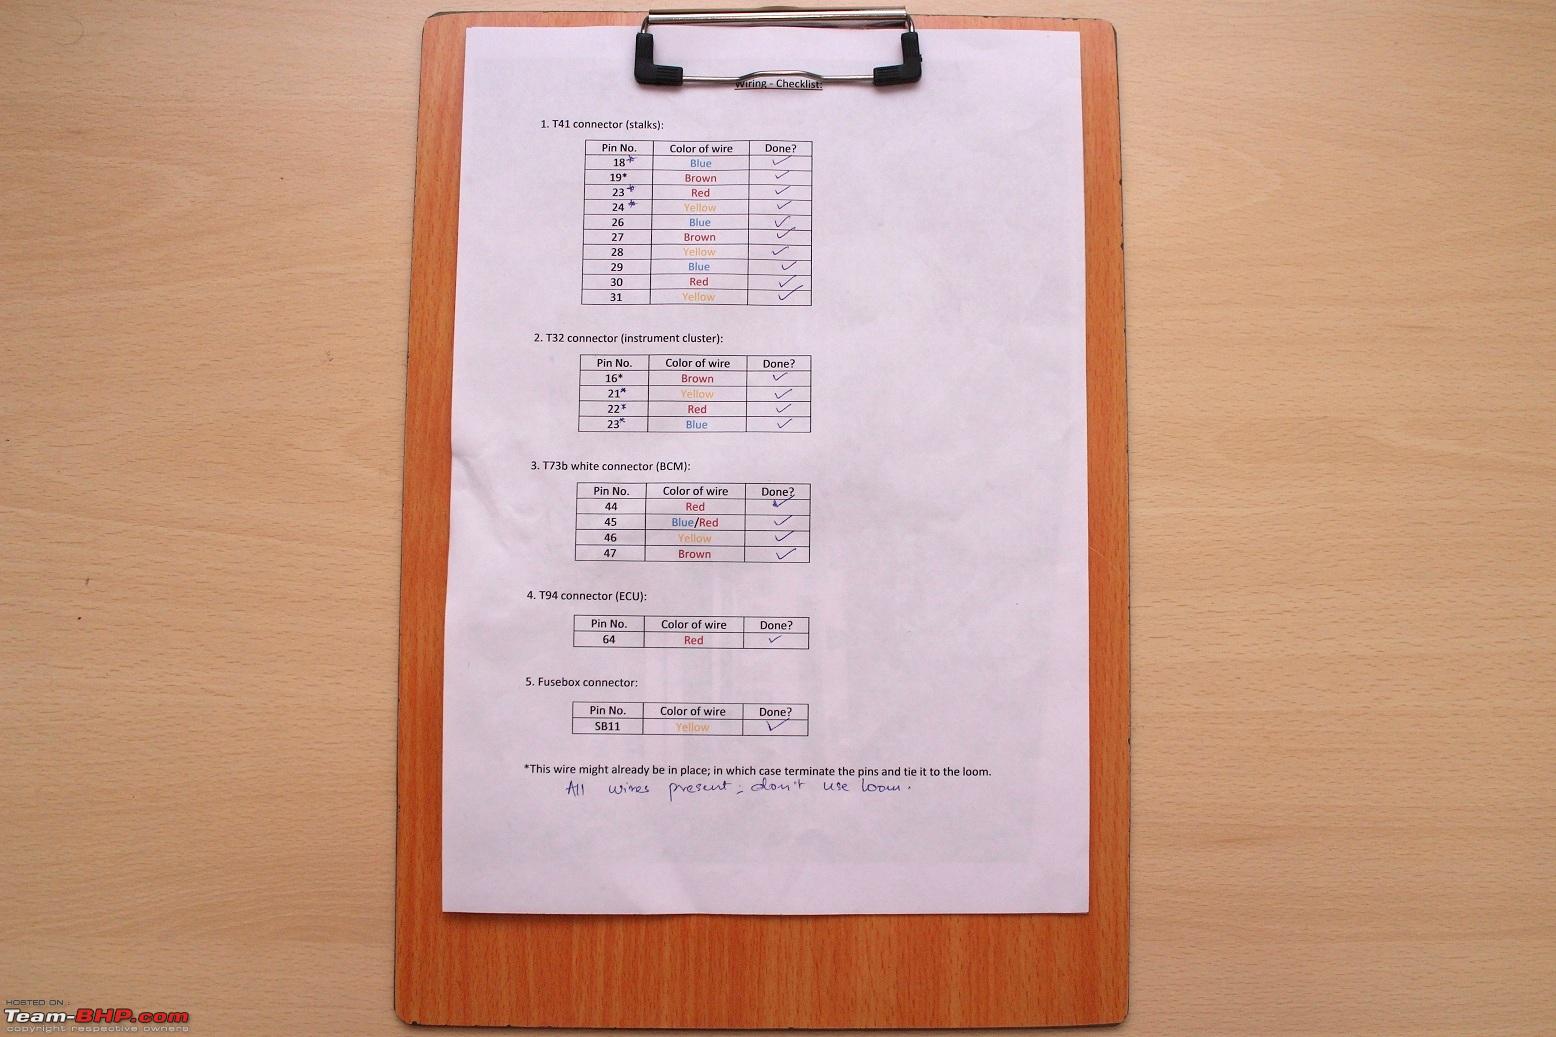
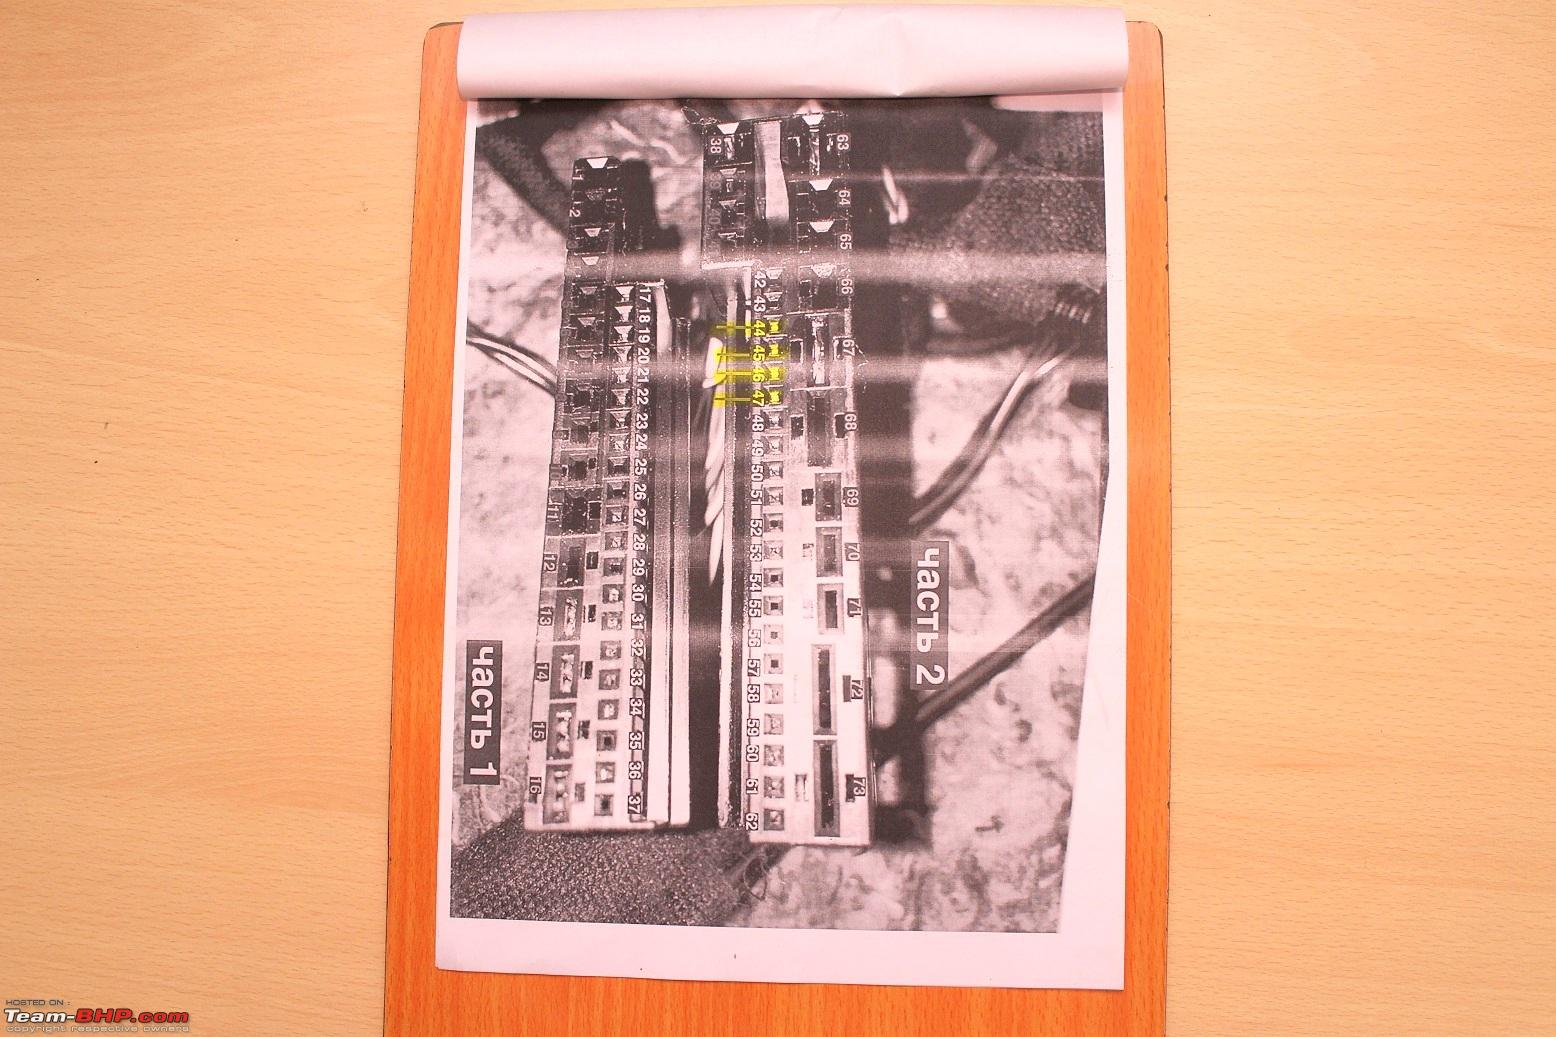
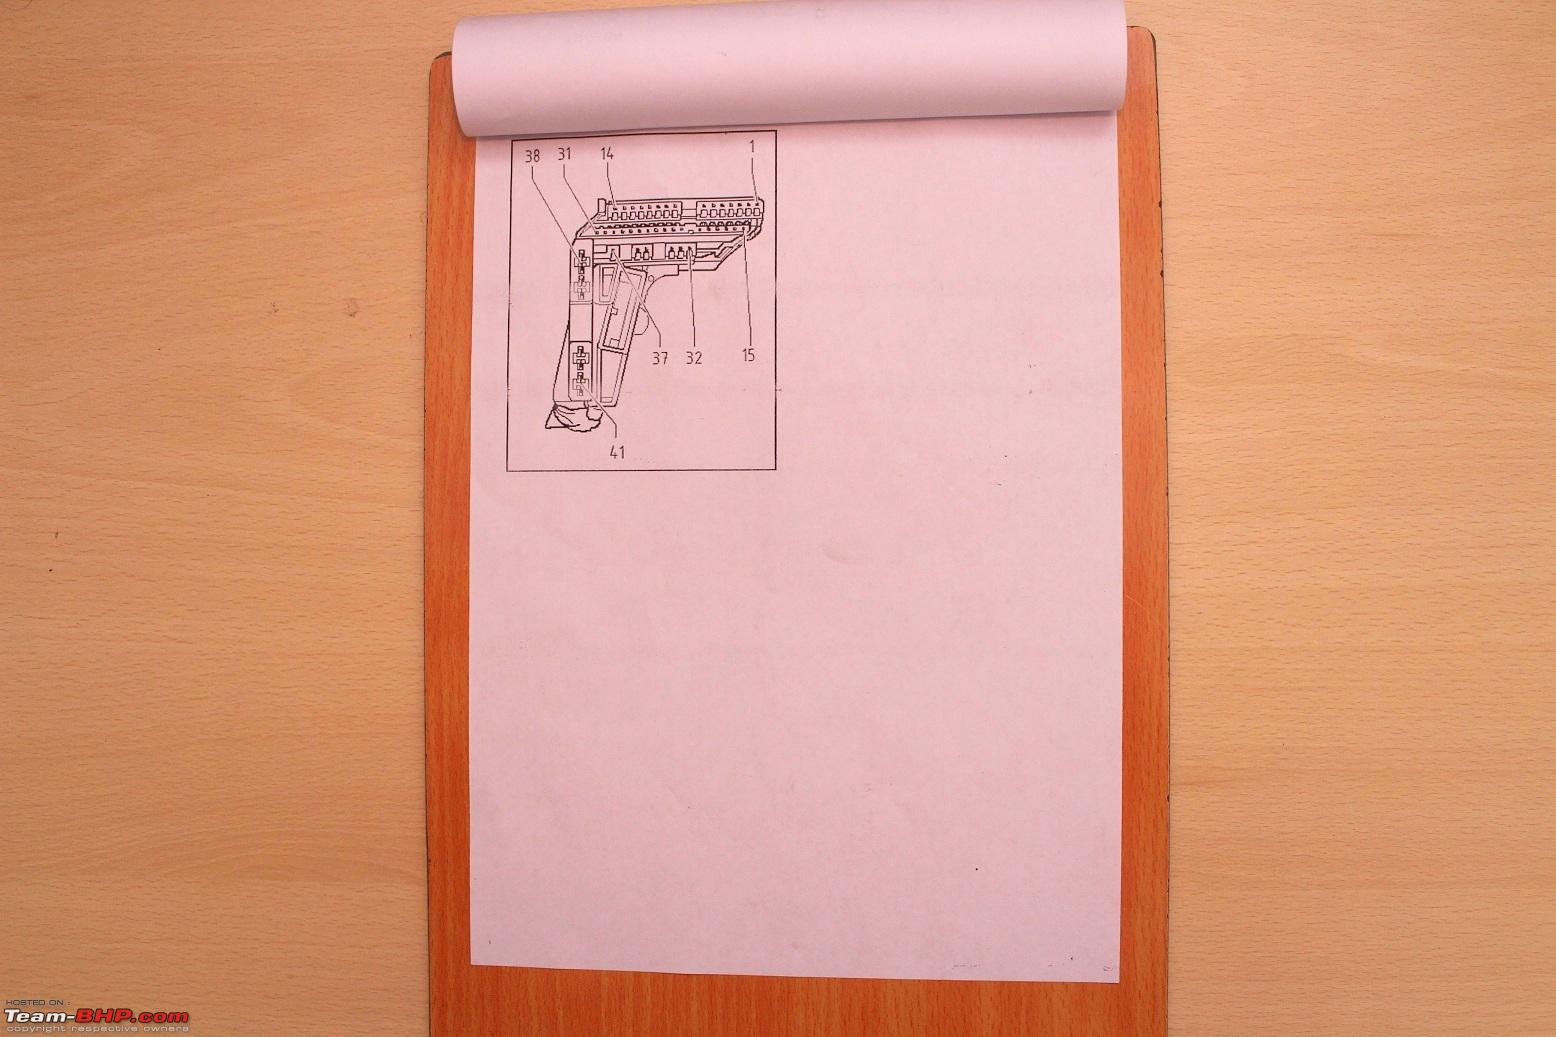
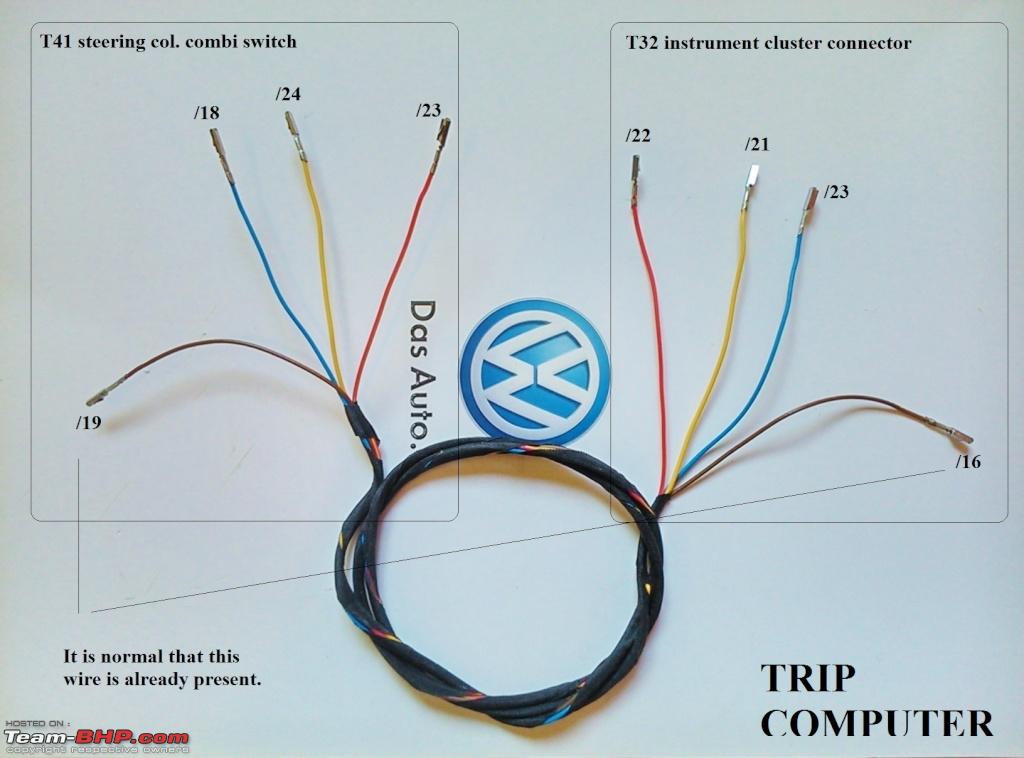
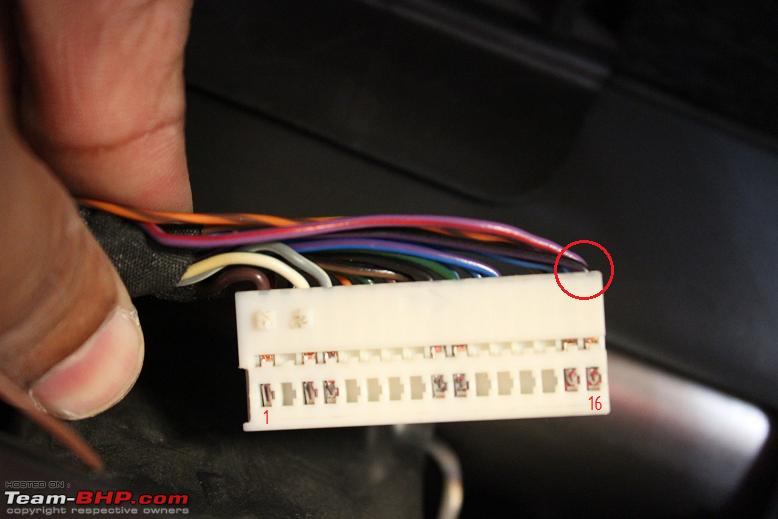
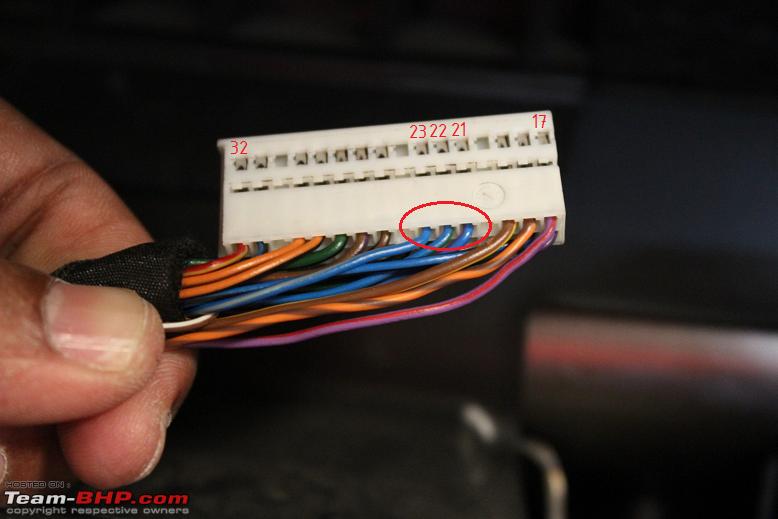
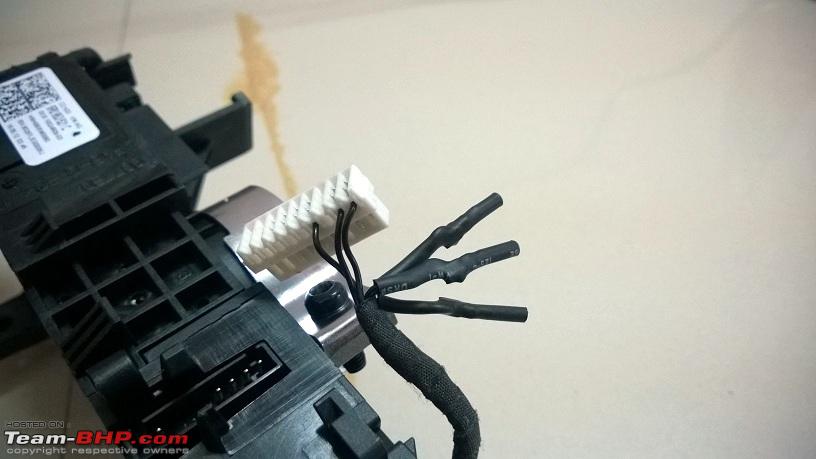
re: VW Polo DIY: Cruise Control!

Wiring Diagrams:

From ELSAWIN, this is the current flow diagram applicable:

VW Polo DIY: Cruise Control!-cfd.png

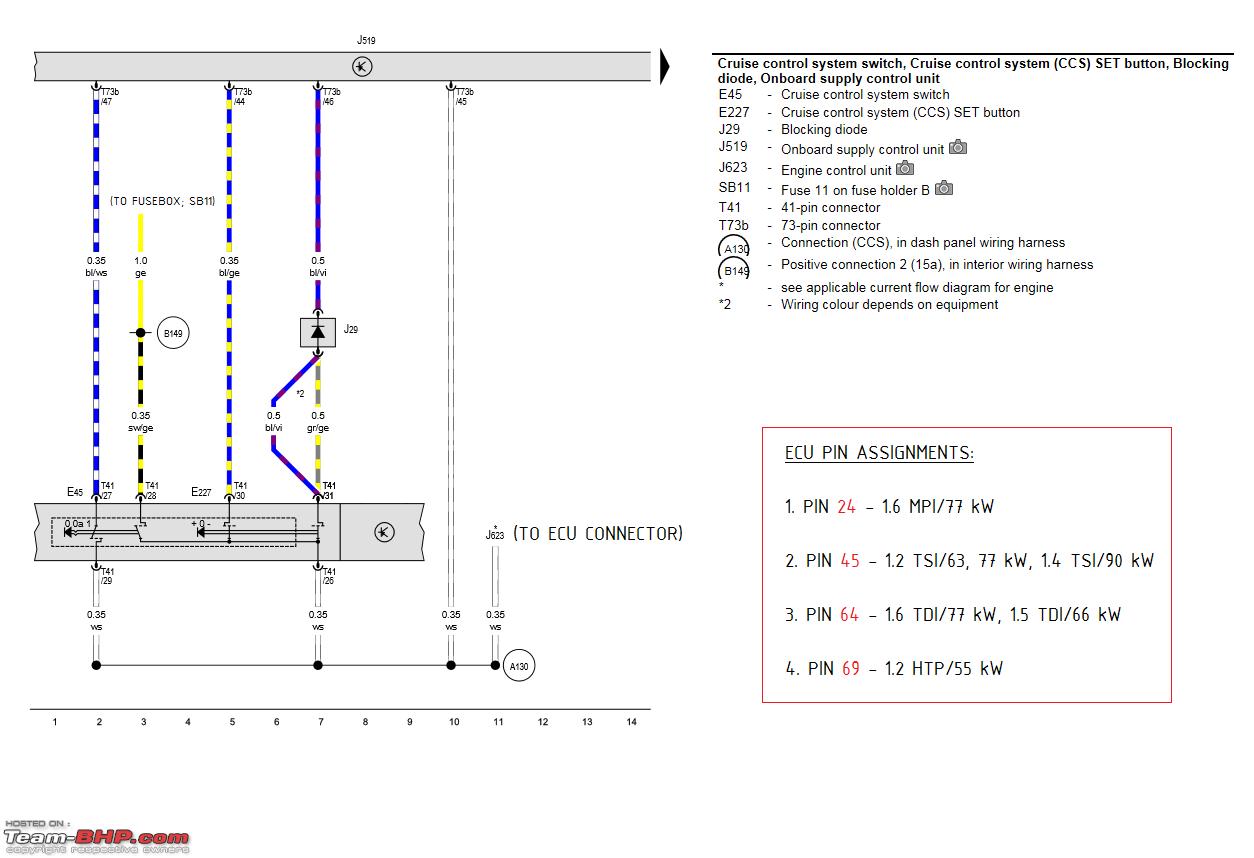
I've prepared a simplified wiring diagram in MS Paint:

VW Polo DIY: Cruise Control!-simplified-wiring-diagram.png

I guess the above diagram makes it a lot more simpler? It is pretty simple - the wiring harness has 6 cables that goes into the stalks connector, 1 power cable to the fuse box, 4 cables to the BCM and 1 to the ECU.

The cruise control system takes power from the SB11 fuse in the fuse box. Refer this sheet for the Polo's fuse box layout. Under sl. no. 11 it mentions, Fuse 11 on fuse holder B -SB11-Cruise control system switch -E45-.

Parts Required:
  1. A new set of stalks with the cruise control buttons on the left stalk:

    There are different types of stalks with different part numbers and configurations available online. While the cruise control buttons are integrated within the left stalk as shown below:

    VW Polo DIY: Cruise Control!-cc-stalk.jpg

    The right stalk varies. Please choose the right stalk as per the existing configuration in your car.

    • 2010-14 models (including pre-facelift):

      These cars were equipped with the previous generation steering wheels which did not have the MFD/phone controls on the right spoke of the steering (reference image). The right stalk has the TRIP and OK/RESET buttons.

      • Polo models:

        On the Polo, the first generation top-end Highline variants did not feature the rear windshield wiper/washer whereas the later generations did. The stalks are different for these cars. Here's one from the 2013 model that features rear wash/wipe:


      • Vento models:

        The Vento models do not have the rear windshield wiper/washer. This is the stalk:

        VW Polo DIY: Cruise Control!-vwvento07.jpg

    • 2014 and onward models:

      These cars shipped with the new generation steering wheels which had the MFD/phone controls on the right spoke of the steering wheel (reference image). Thus, the right stalk do not have the TRIP and OK/RESET buttons anymore:

      • Polo models:

        VW Polo DIY: Cruise Control!-polo-fl.jpg

      • Vento models:


  2. Wiring assembly:

    The wiring assembly consists of the following cables:

    1. A set of cables routed from the steering column combination switch's T41 right-angled connector to the BCM's T73b white connector:

      VW Polo DIY: Cruise Control!-.jpg

      In this harness, the cable from pin 31 (T41) to pin 46 (T73b) has a P-N blocking diode (IN 4001) as per VW's current flow diagram. The diode is provided to block the current in the reverse direction. The Aliexpress cables may not have this diode - please check prior to installation! These diodes are available at your neighbour electronic component shops and retail for Rs. 1 a piece.

    2. One cable from the BCM's T73b white connector to the ECU's T94 connector - indicated above. Different engines have different ECU pin connections - refer to the current flow diagram indicated above.

    3. One cable from the T41 right-angled connector to the fusebox:

      VW Polo DIY: Cruise Control!-c.jpg

    In any case, all the wires in the harness assembly terminate with the end terminals with part number N 907 647 01 in case you are looking to buy the terminals individually (these are available in Aliexpress) and crimping them.

    VW Polo DIY: Cruise Control!-img_1564.jpg

    These terminals are used in the instrument cluster connector, BCM connector, T41 stalks unit connector and the ECU connector (for TDI engines; TSI engines may need a different pin - owners willing to upgrade must confirm this by taking out the ECU connector).

  3. Mini fuse tap cable with 5 A fuse - 1 no. To tap the cruise control power input cable from the fuse box's SB11 slot. This will prevent cutting/splicing the cable or even using a Scotchlok connector to the stock cable.


    These are available in Aliexpress for as low as 2 USD for one piece. Best to buy a bunch of these as they come in handy in the future in case you are looking to tap extra sources of power (dashcam, additional lights etc). Please note that you need one 5 A fuse with the fuse tap cable!

  4. Flexible pipe/conduit - 10 mm diameter, 2 meters. To protect the ECU cable in the engine bay and below the dashboard. Available at most electrical shops that retails household fixtures. Cost me Rs. 5/meter.

    VW Polo DIY: Cruise Control!-img_1546.jpg

  5. Butt crimp connectors - 2 nos. To join the ECU cable after pulling it out through the firewall and to join the power cable with the fuse tap cable. These butt crimps are an easier alternative to soldered joints, works equally well, looks neat and comes with a heatshrink tubing outside:

    VW Polo DIY: Cruise Control!-butt_connector2.jpg

Tools Required:
  1. M12 XZN triple square spline bit socket - to unscrew the gr. 8.8 screw from the steering wheel. This socket is available at most automotive tools/hardware stores. The socket cost me Rs. 250.

    VW Polo DIY: Cruise Control!-img_1508.jpg

  2. Ratcheting socket wrench with the extension bar - to remove the steering wheel.

    VW Polo DIY: Cruise Control!-img_1516.jpg

  3. Screw driver with Torx bit set and flat-blade bit - to undo the Torx screws on the trims, stalks unit and air filter housing.

  4. VCDS cable and a laptop with functional VCDS software - to diagnose/eliminate any errors.

  5. Ring spanner (10-11) - for unscrewing/fastening the nut on the battery.

  6. Crimping tool - to crimp the butt joints.

  7. Cellophane/masking tape, 1” wide - to lock the center position of the airbag slip ring in place.

  8. Tesa cloth harness tape - to wind the harness together.

  9. Utility knife - to cut the protruding bit on the slip ring unit. This has been explained in detail later in the procedure.

  10. A pair of tweezers with fine pointed ends - to open the housings of the ECU connector and BCM connector.

  11. Flexible metal cable - to pull the ECU wire from the cabin to the engine bay through the hole in the firewall.

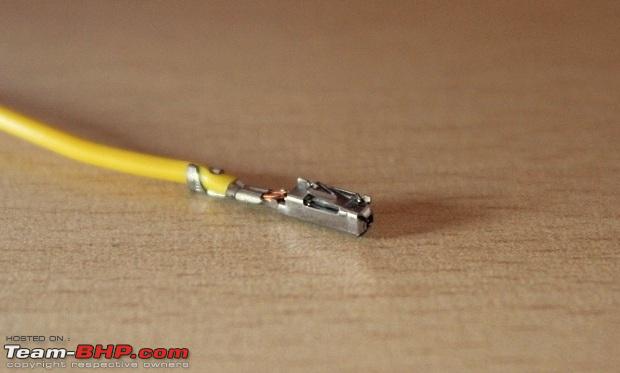
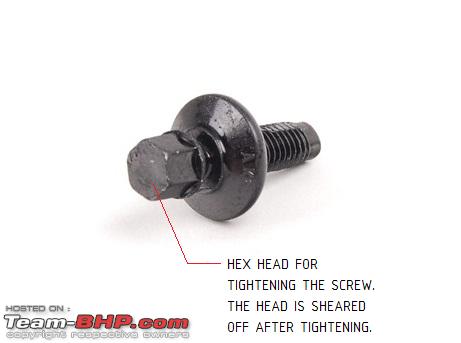
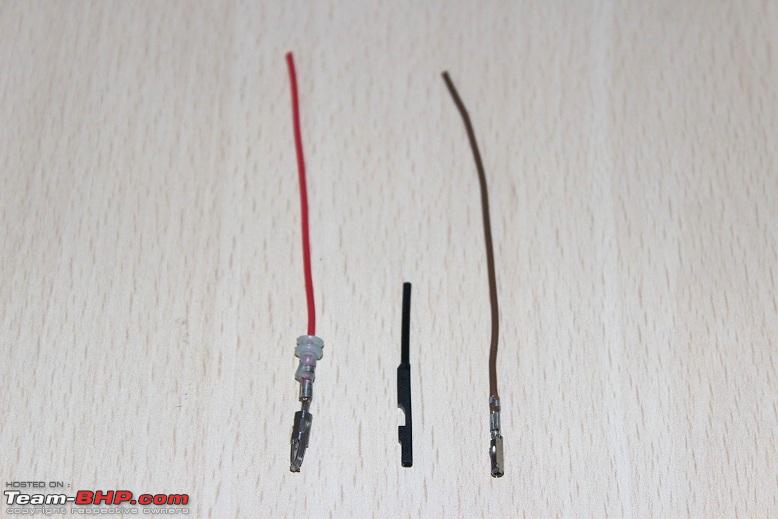
Last edited by Gannu_1 : 17th November 2015 at 19:19. Reason: Forgot to insert terminal pin snap. Uploaded!
Gannu_1 is offline   (25) Thanks
Old 12th November 2015, 21:47   #3
Team-BHP Support
 
Gannu_1's Avatar
 
Join Date: Apr 2013
Location: Madras
Posts: 7,174
Thanked: 20,220 Times
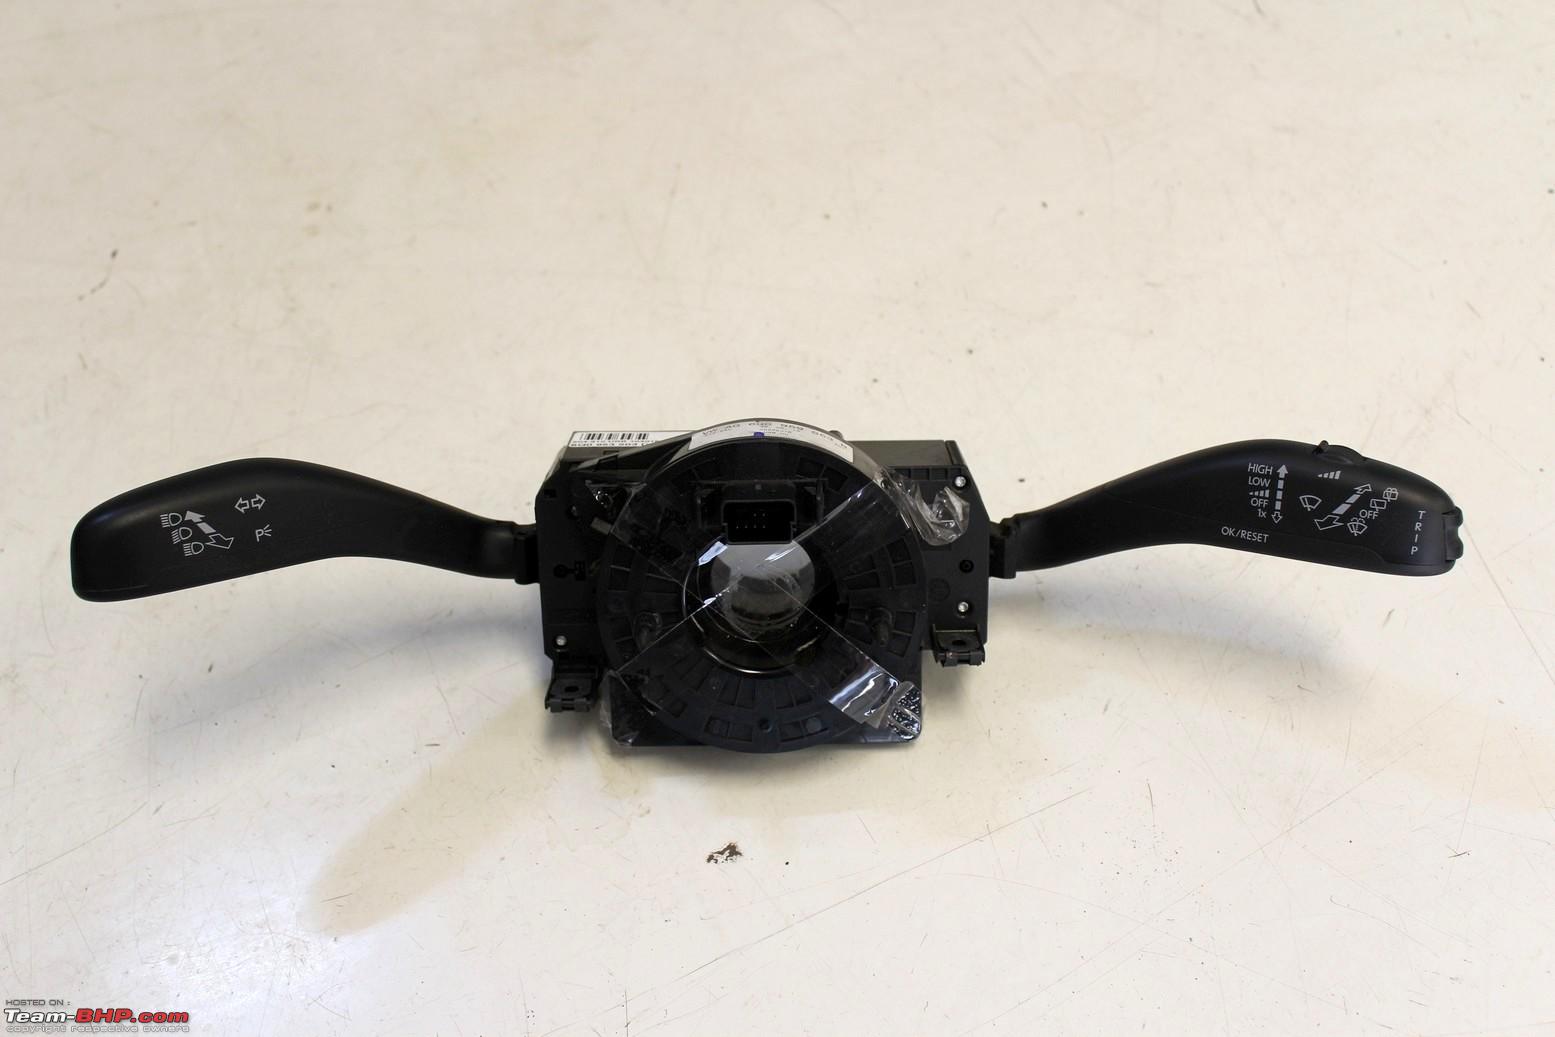
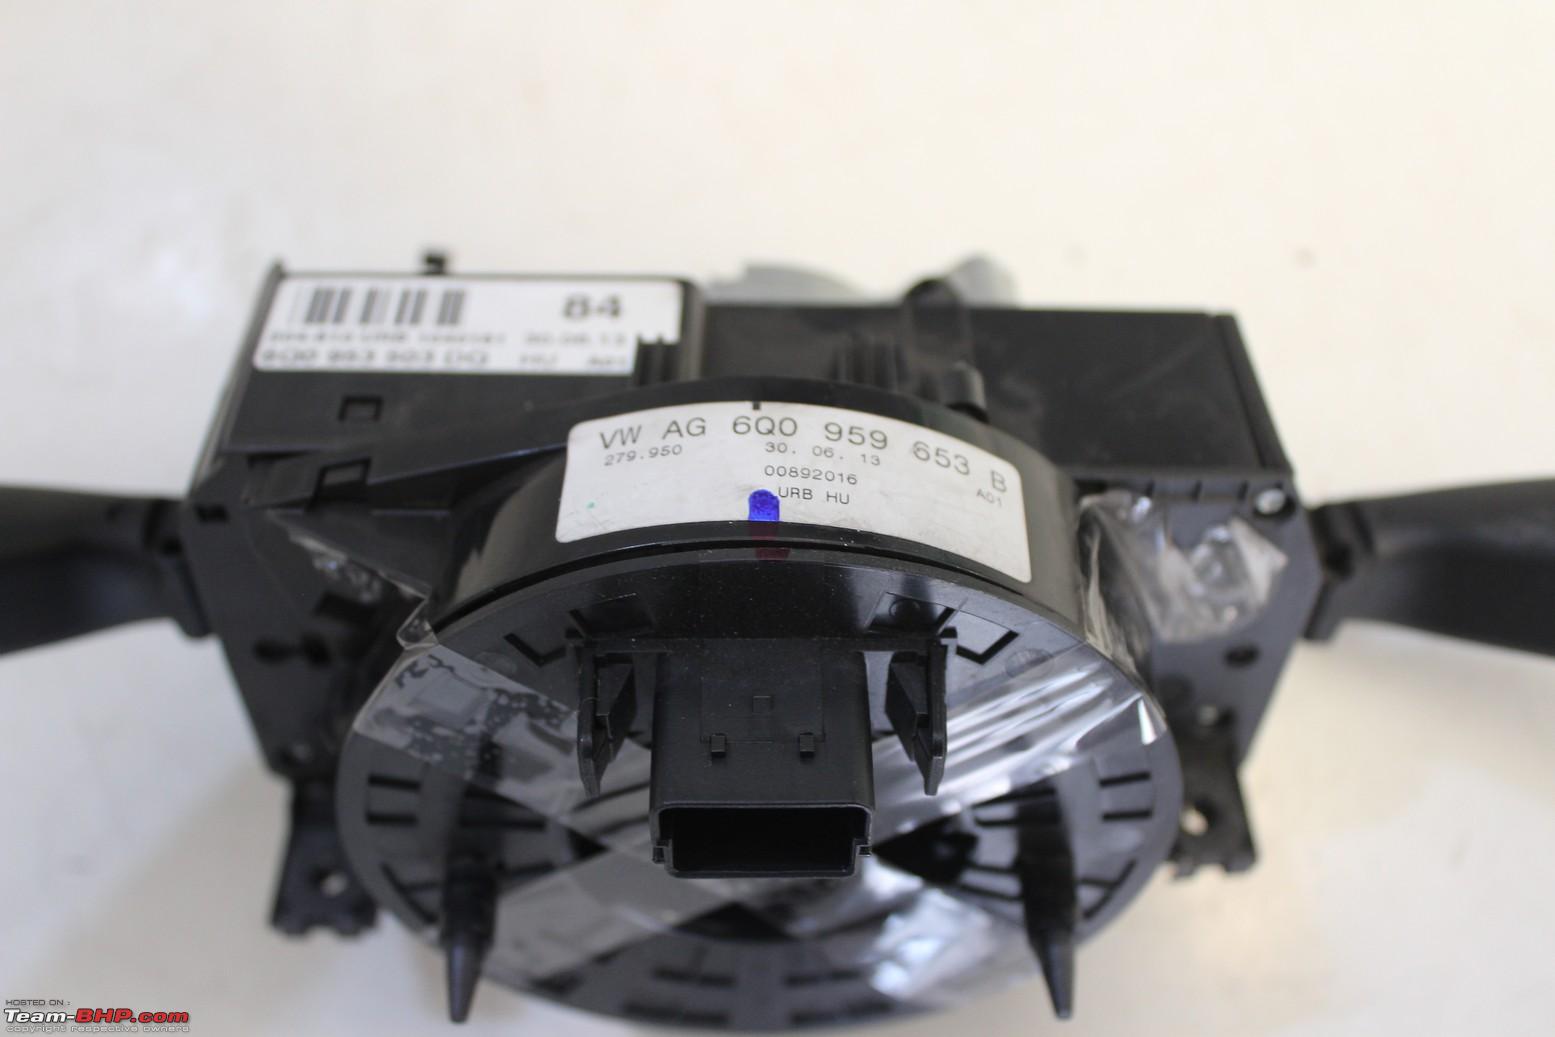
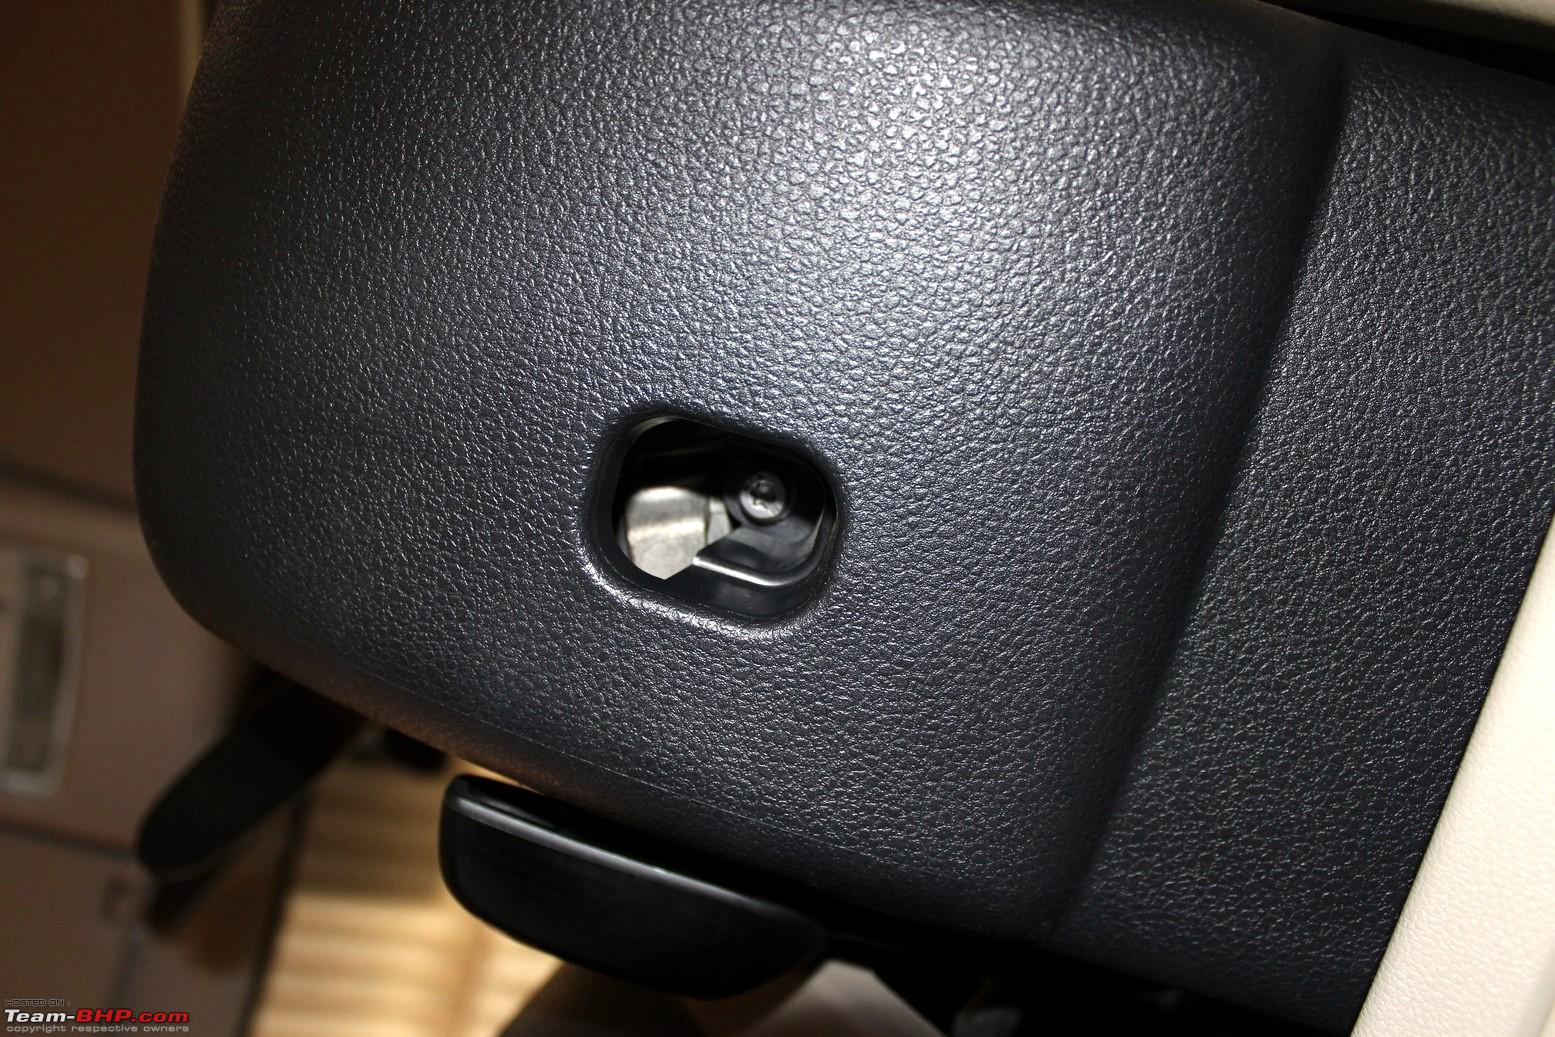
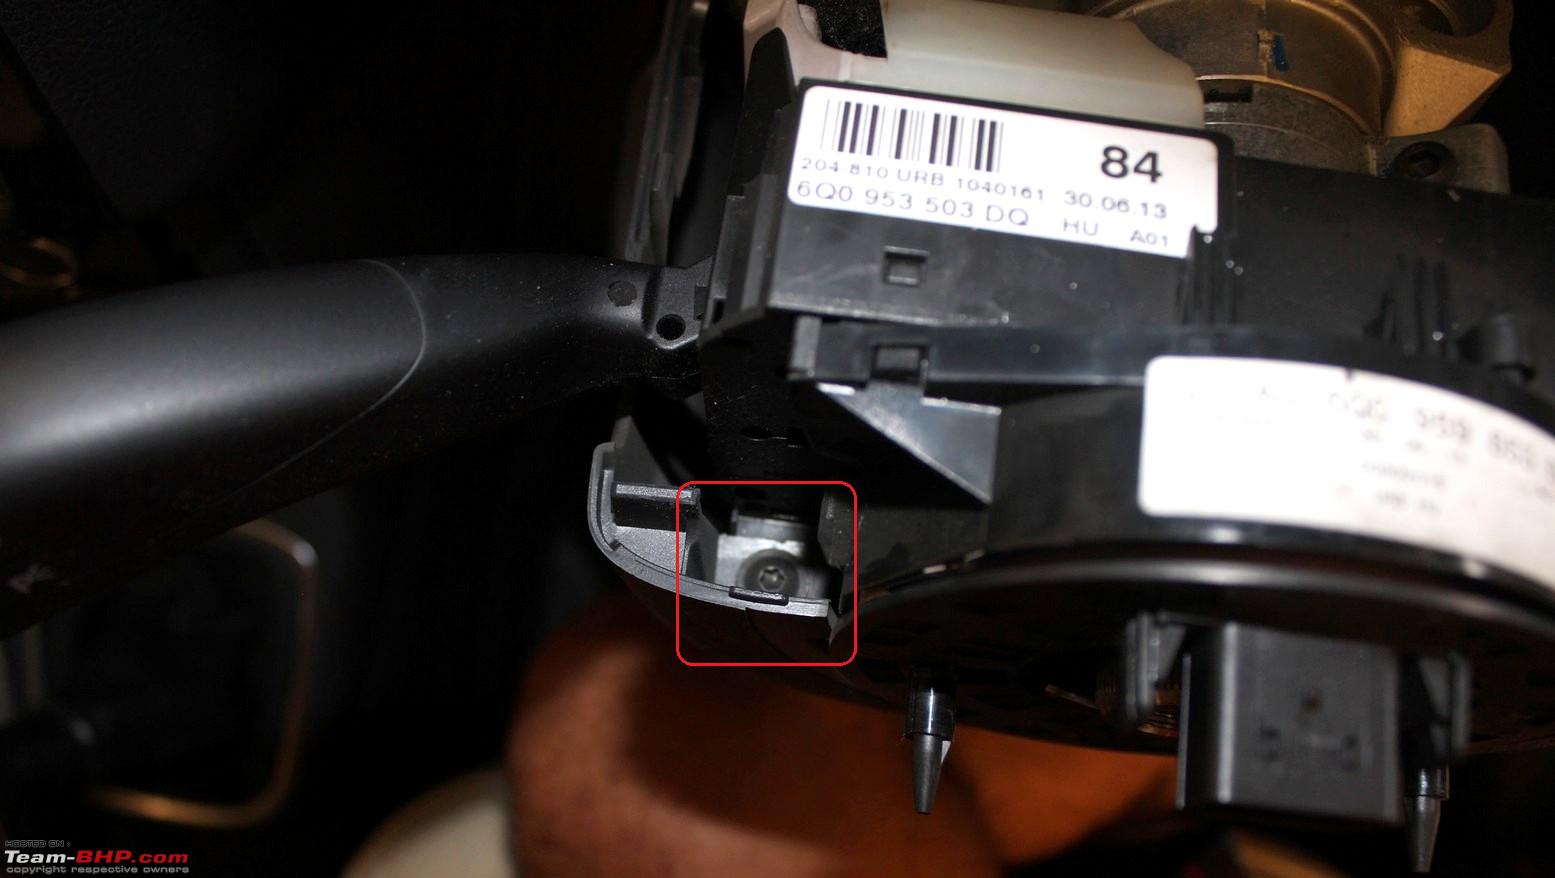
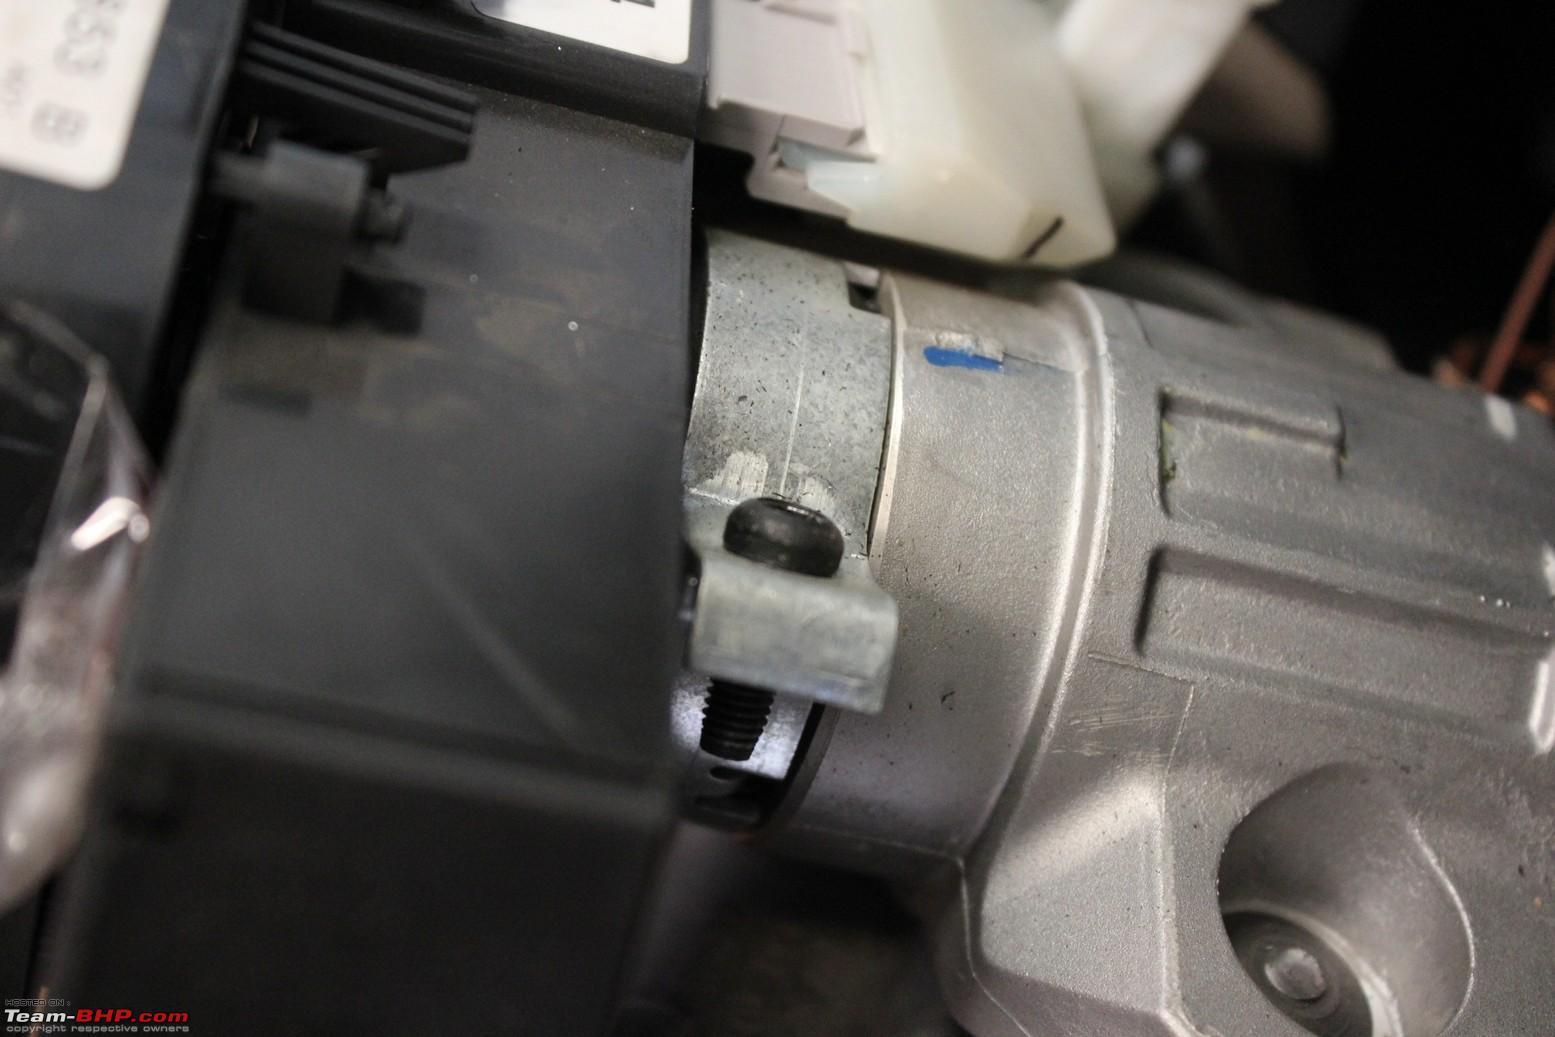
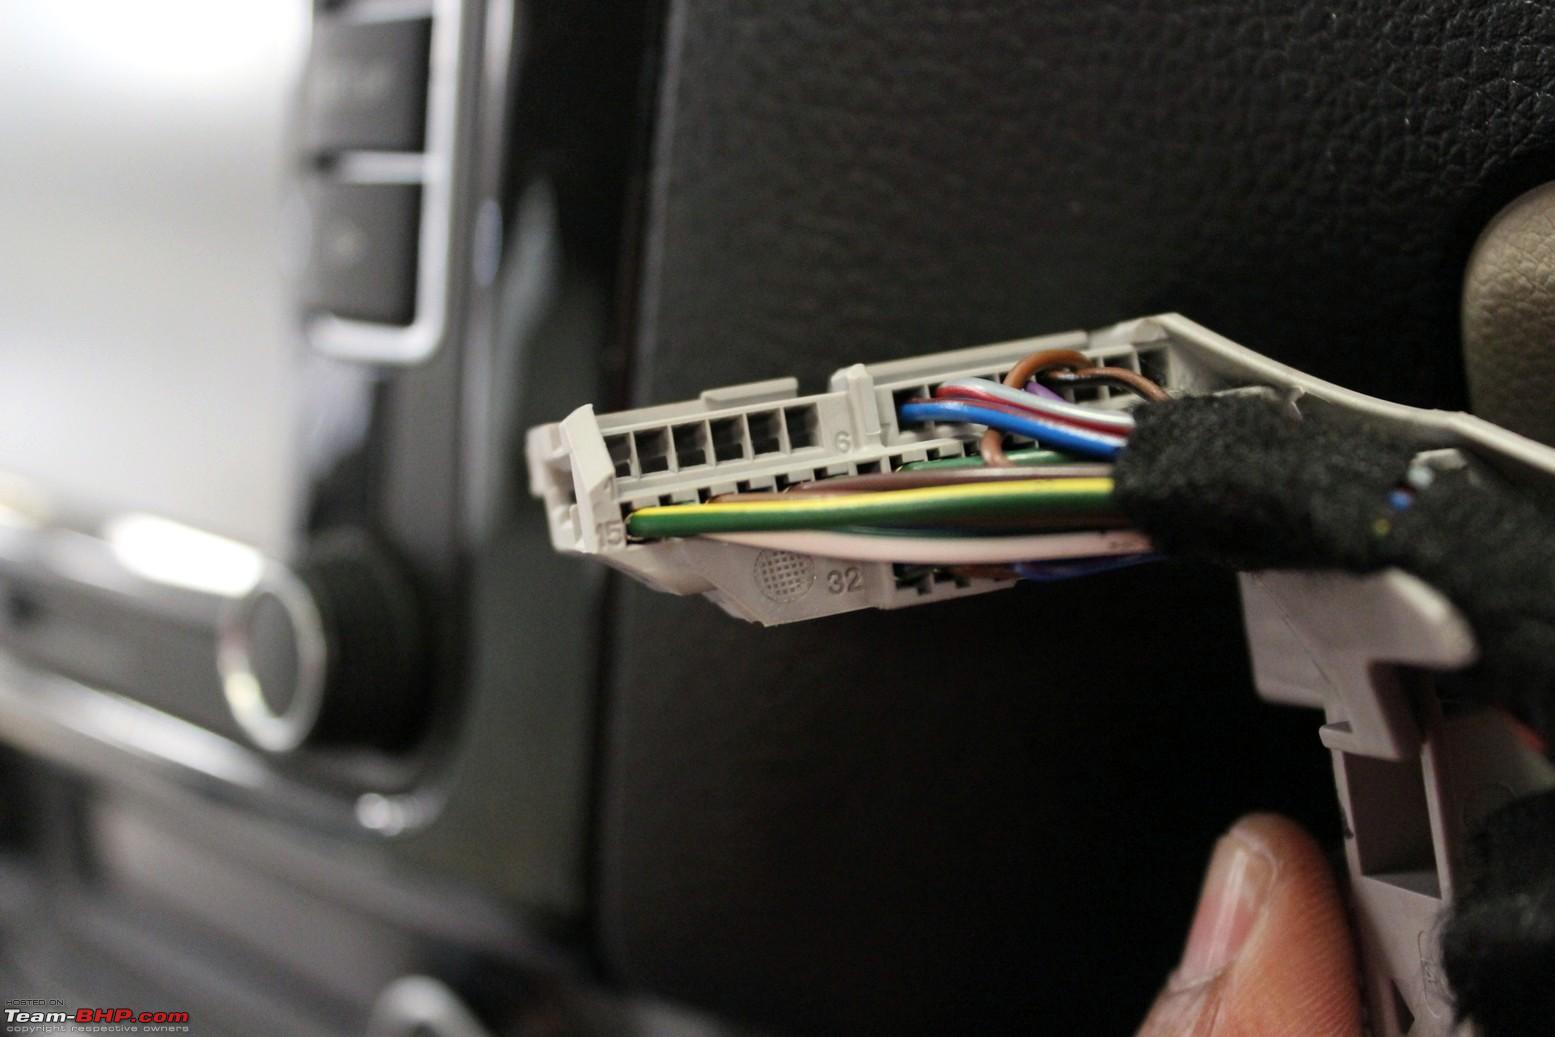
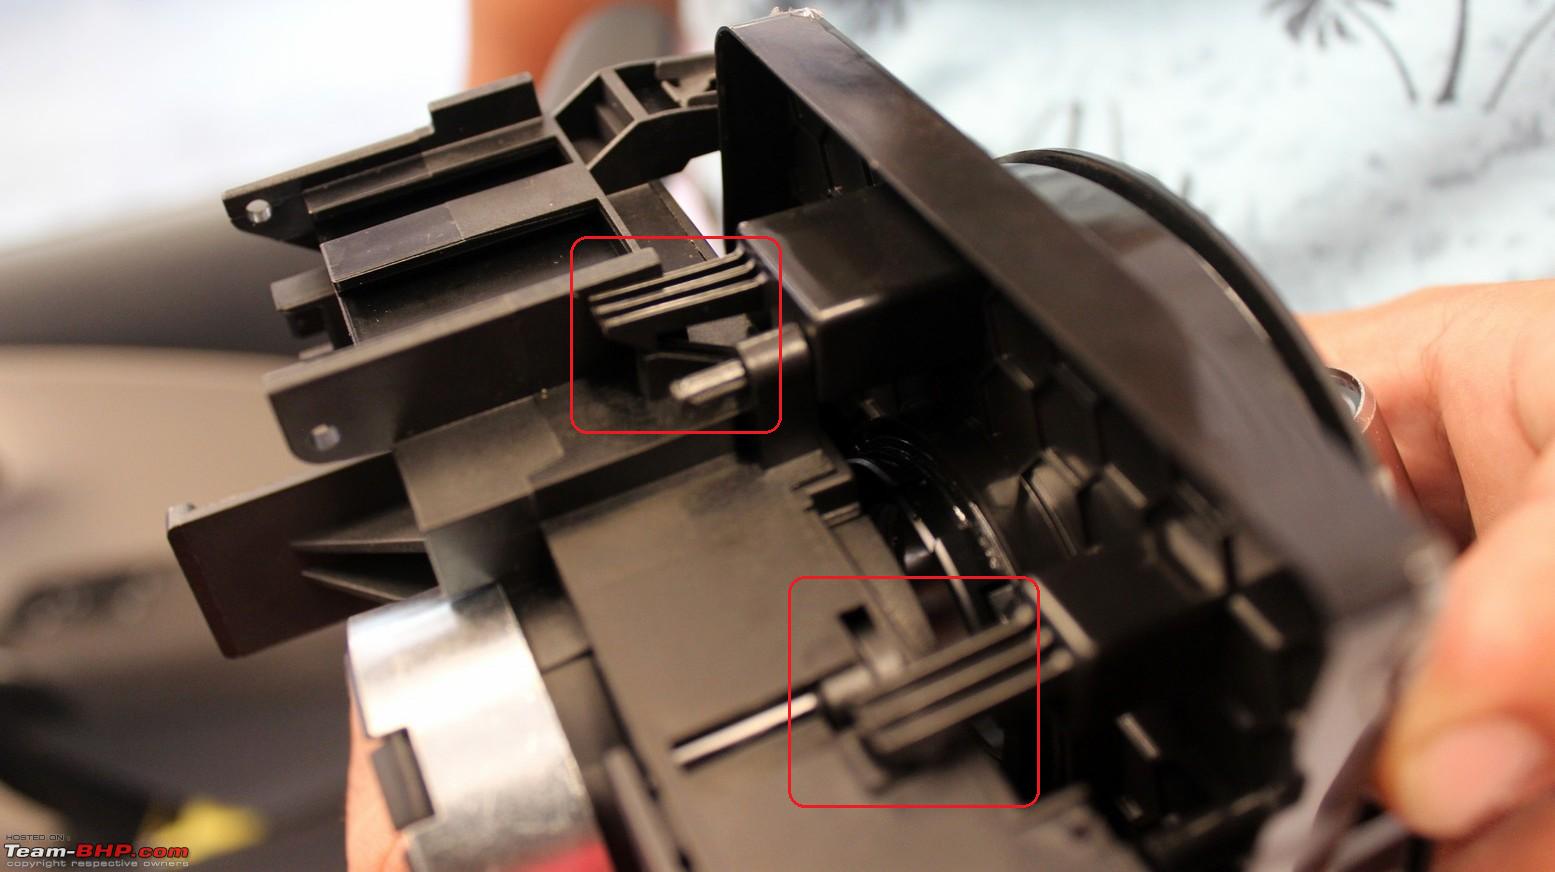
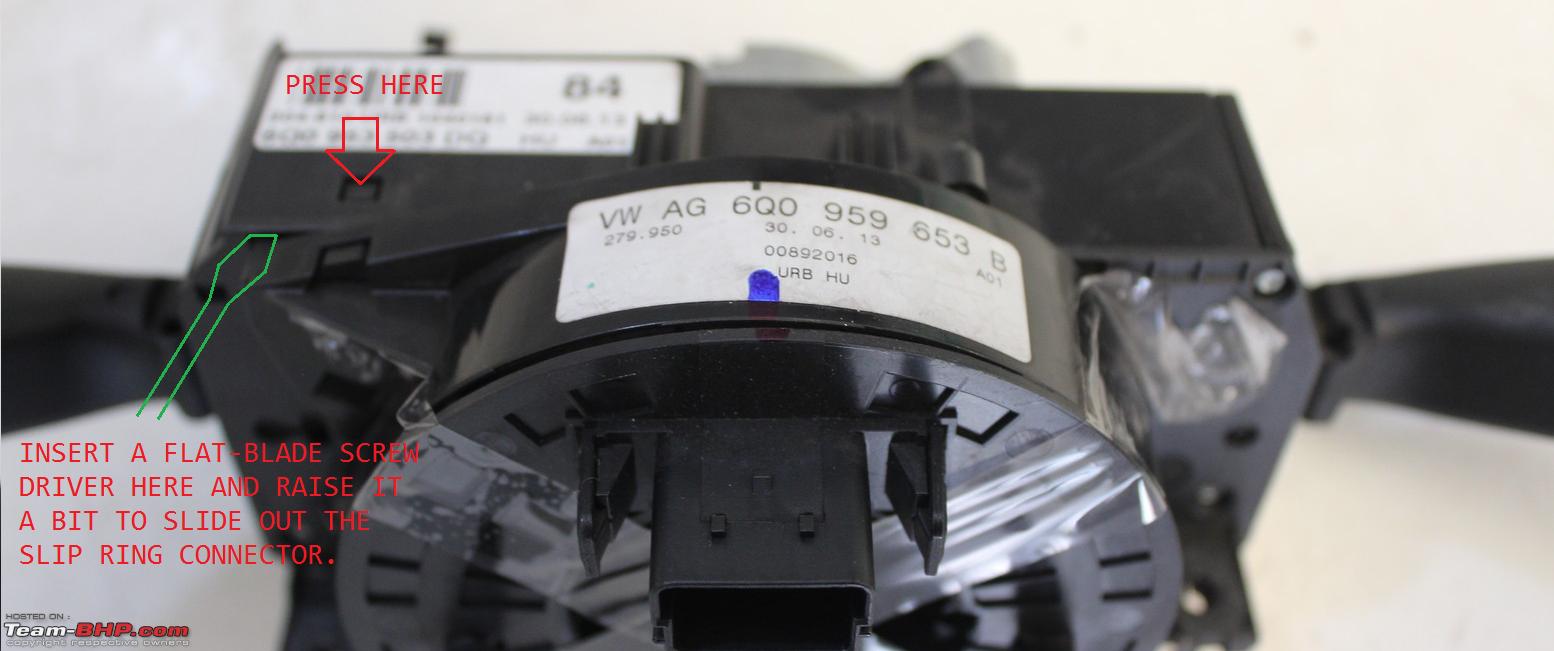
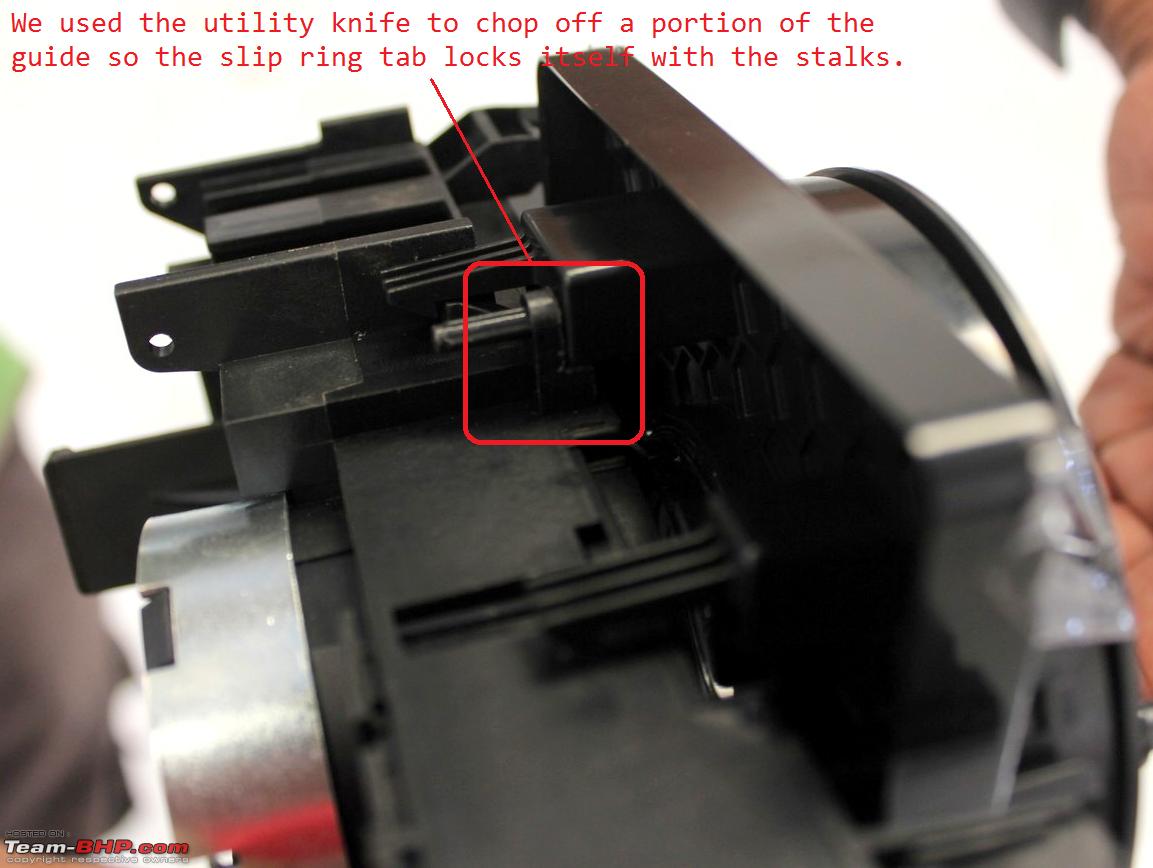
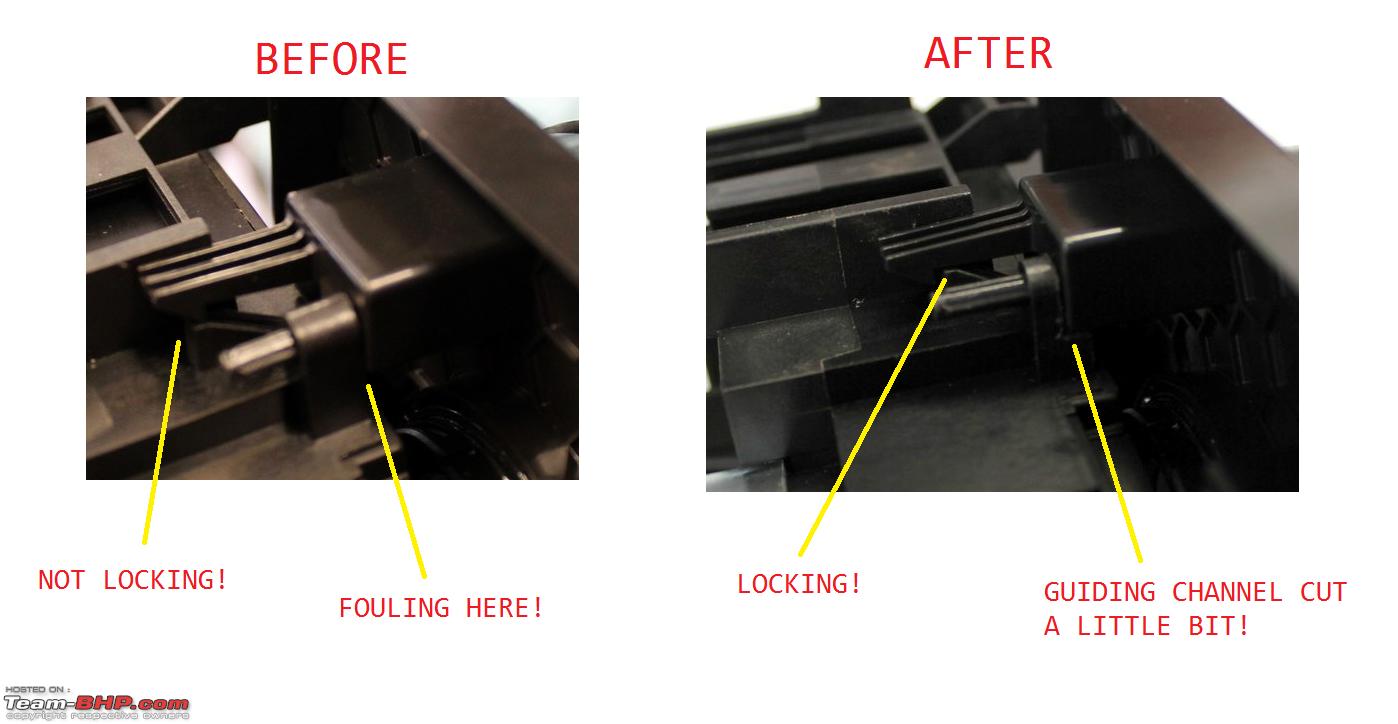
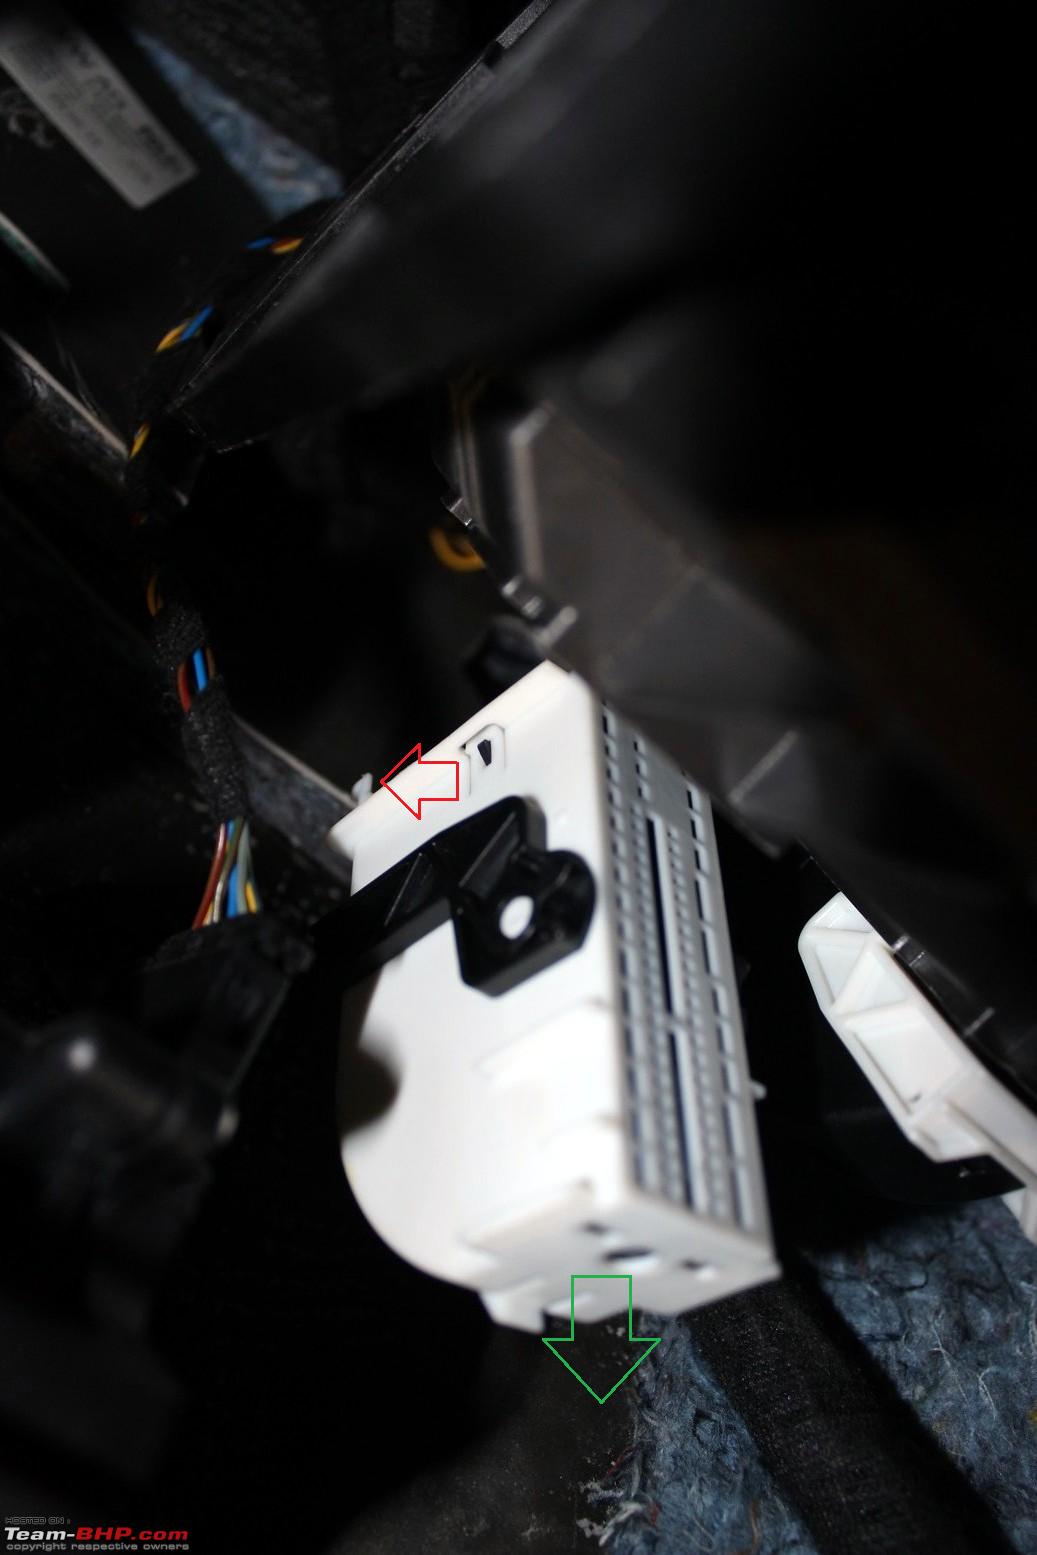
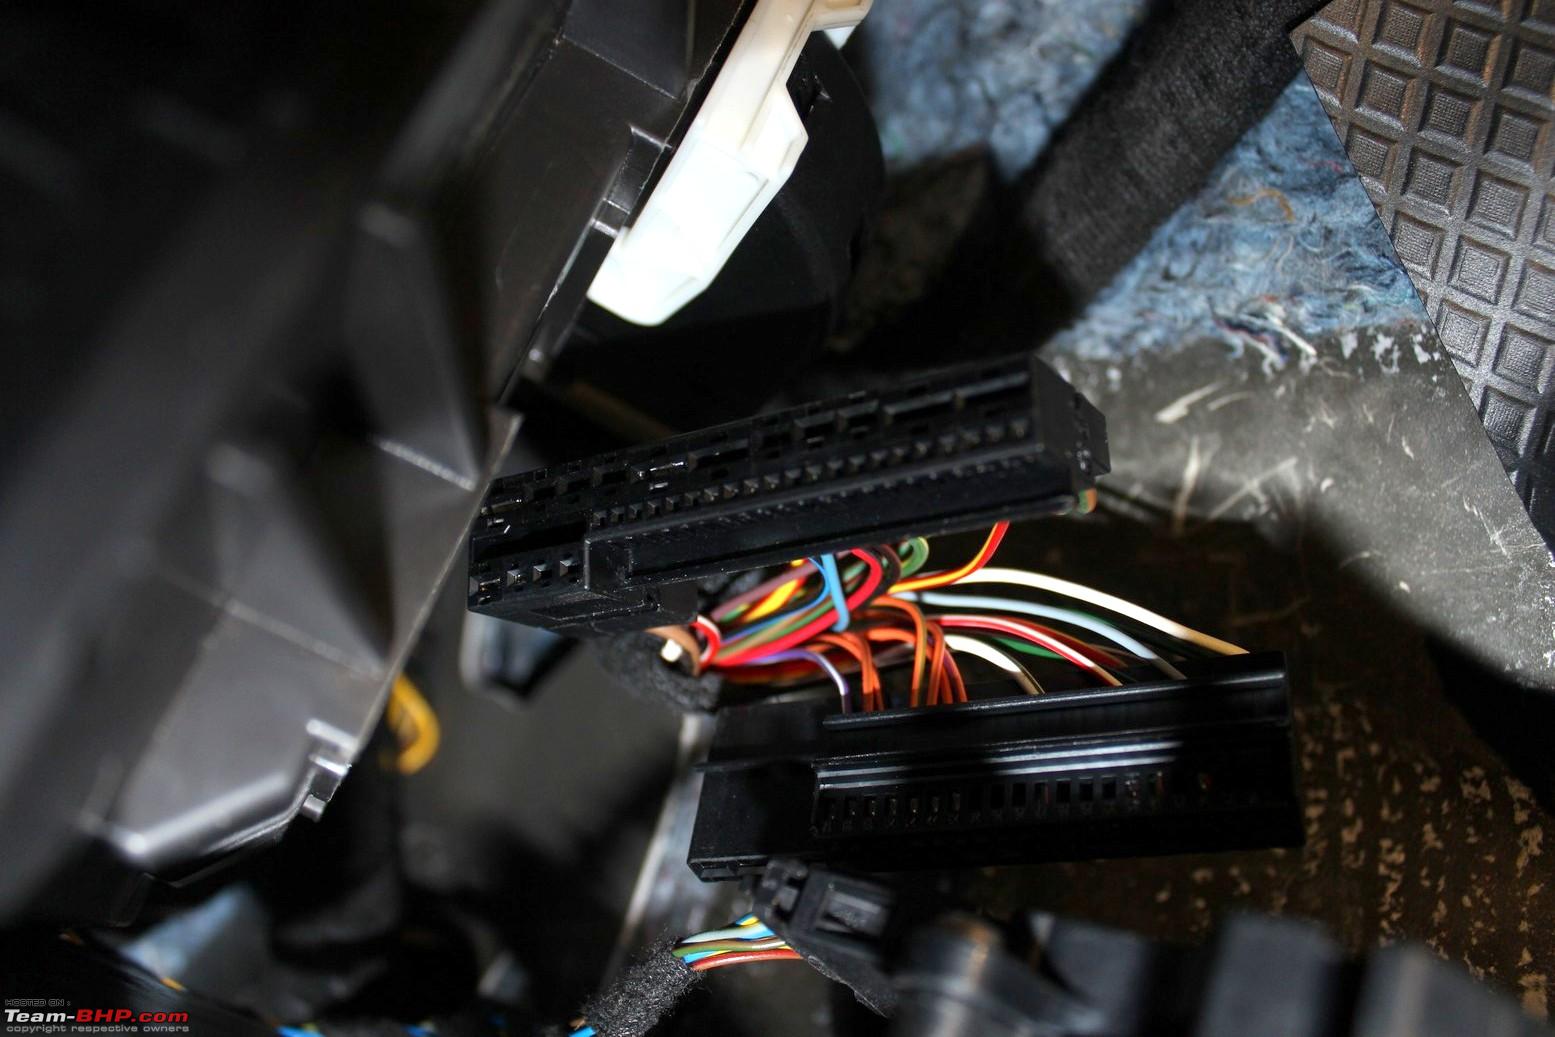
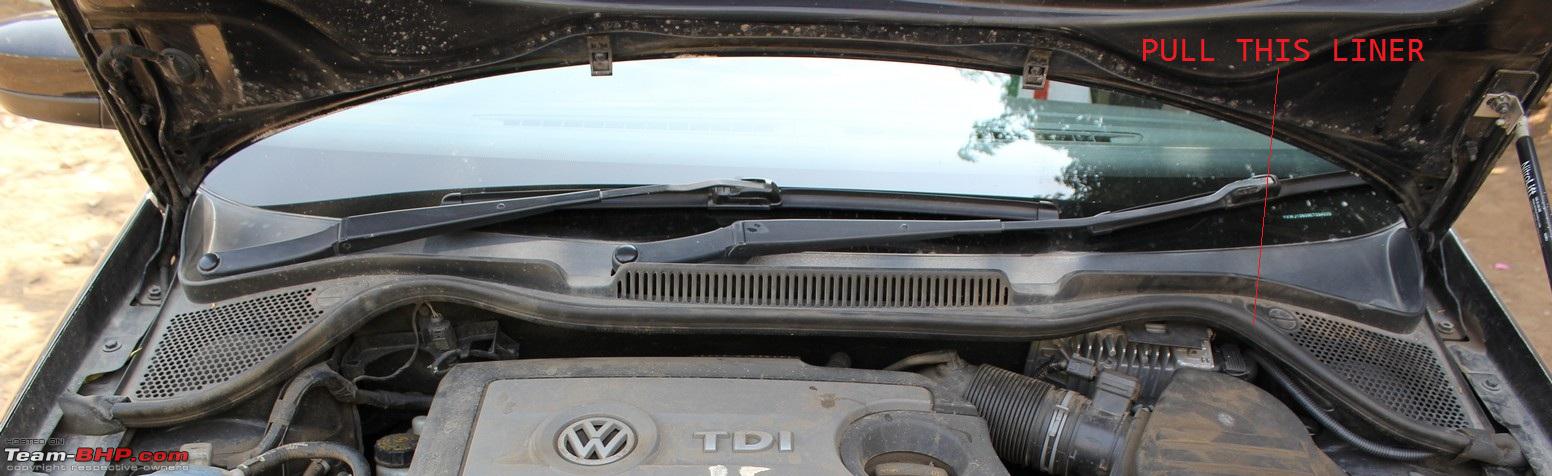
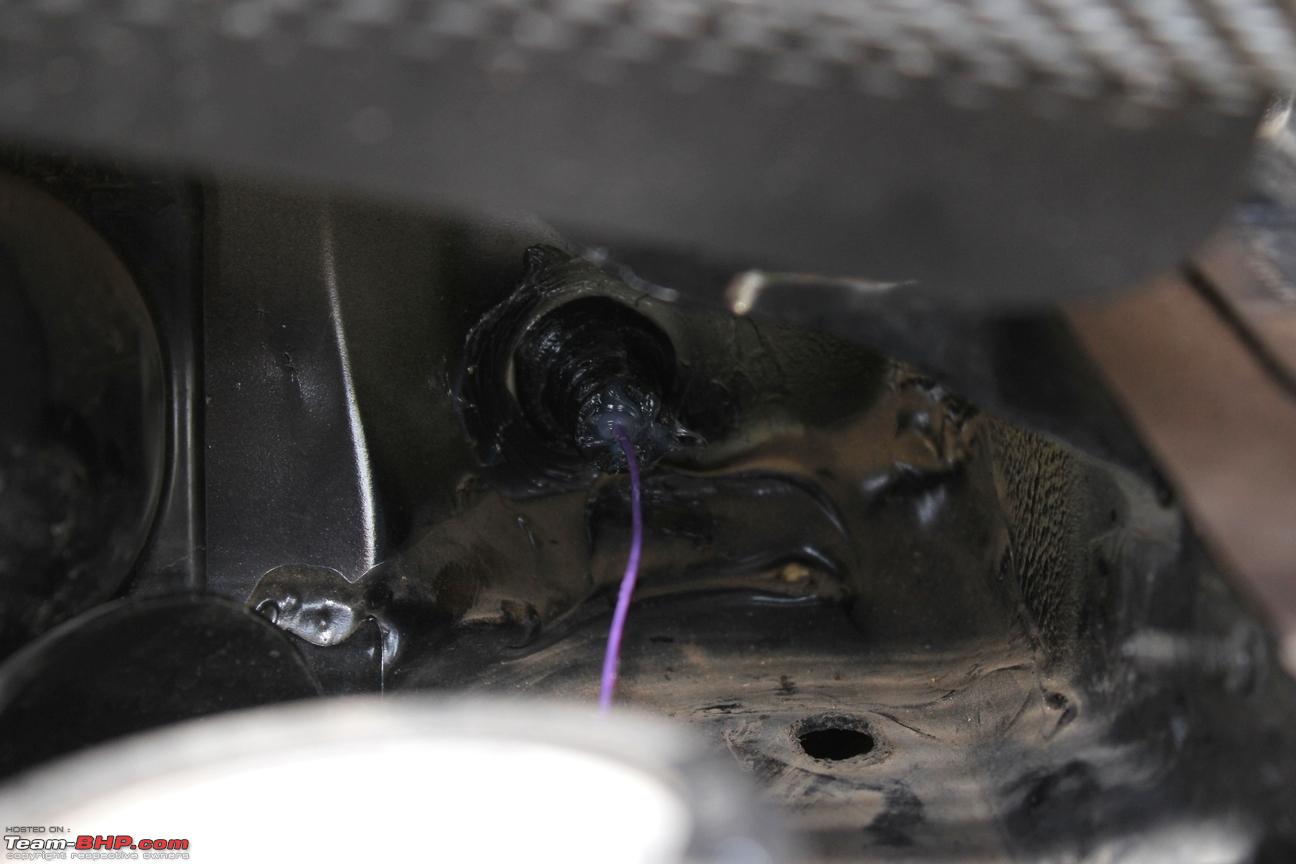
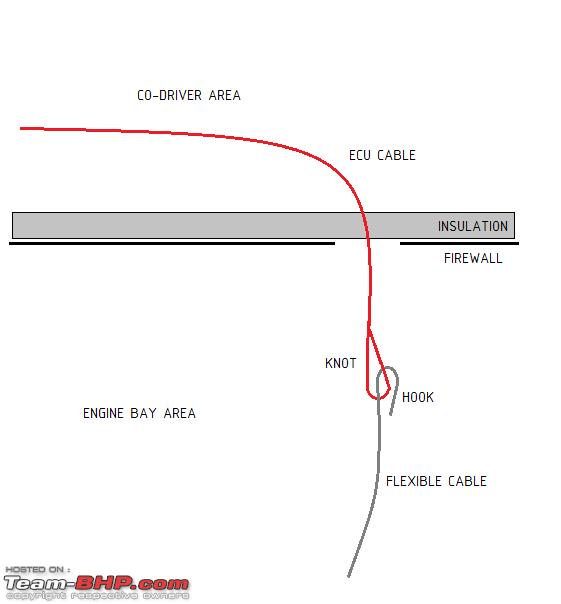
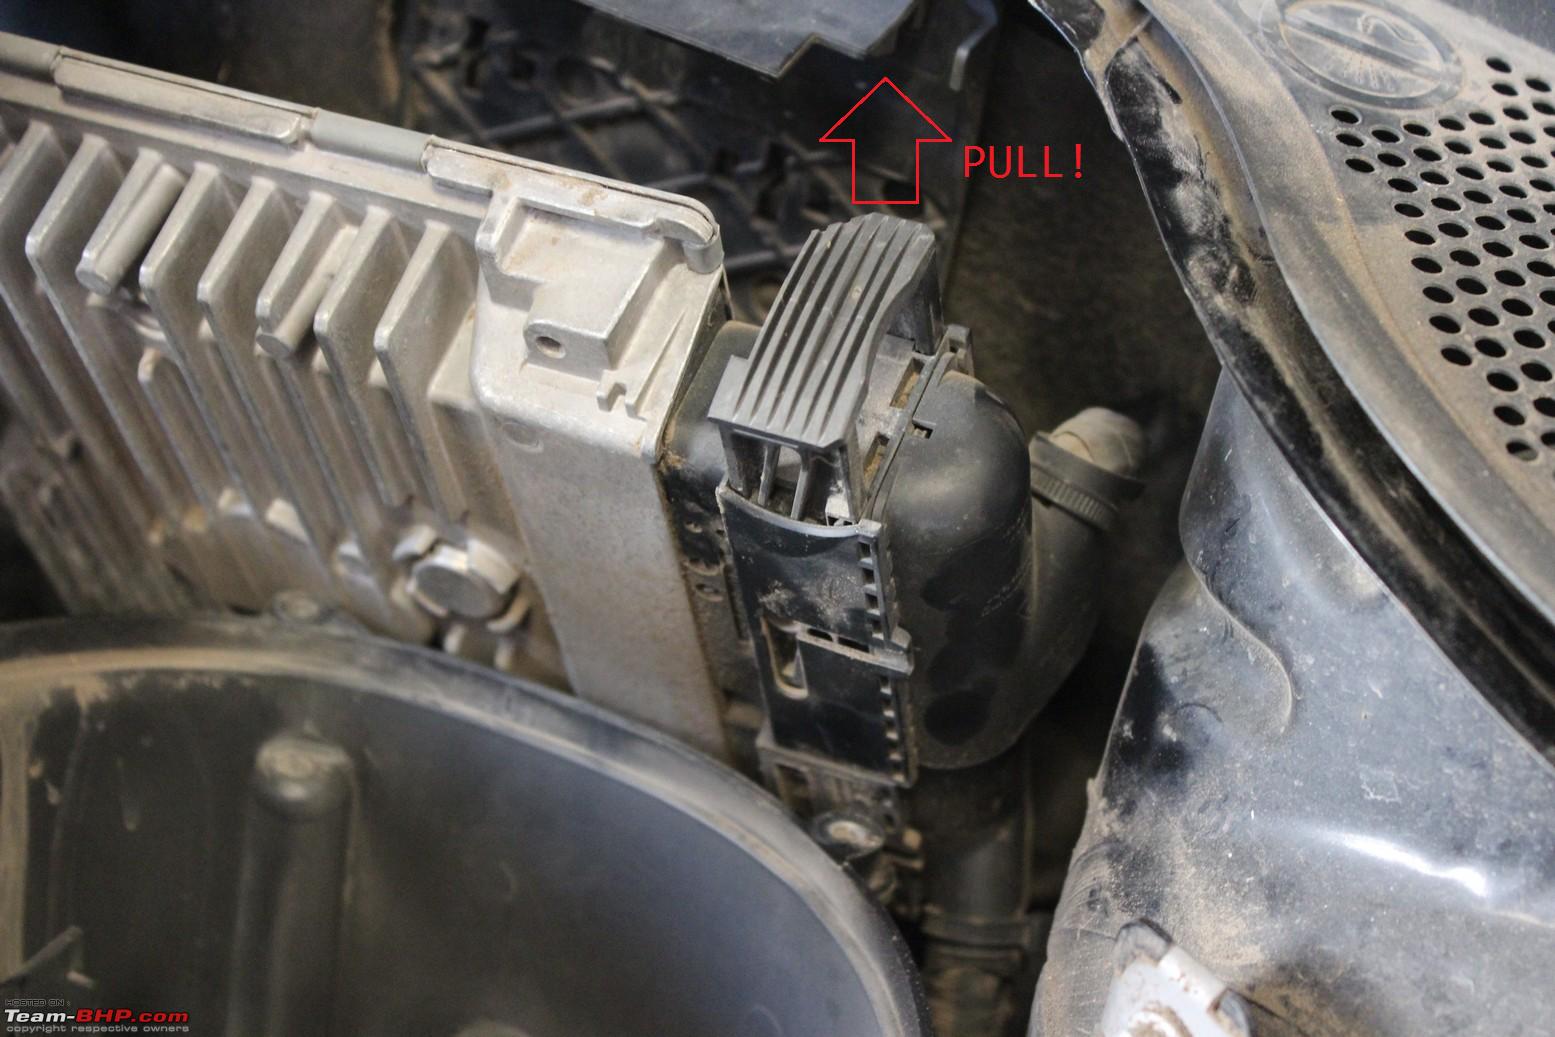
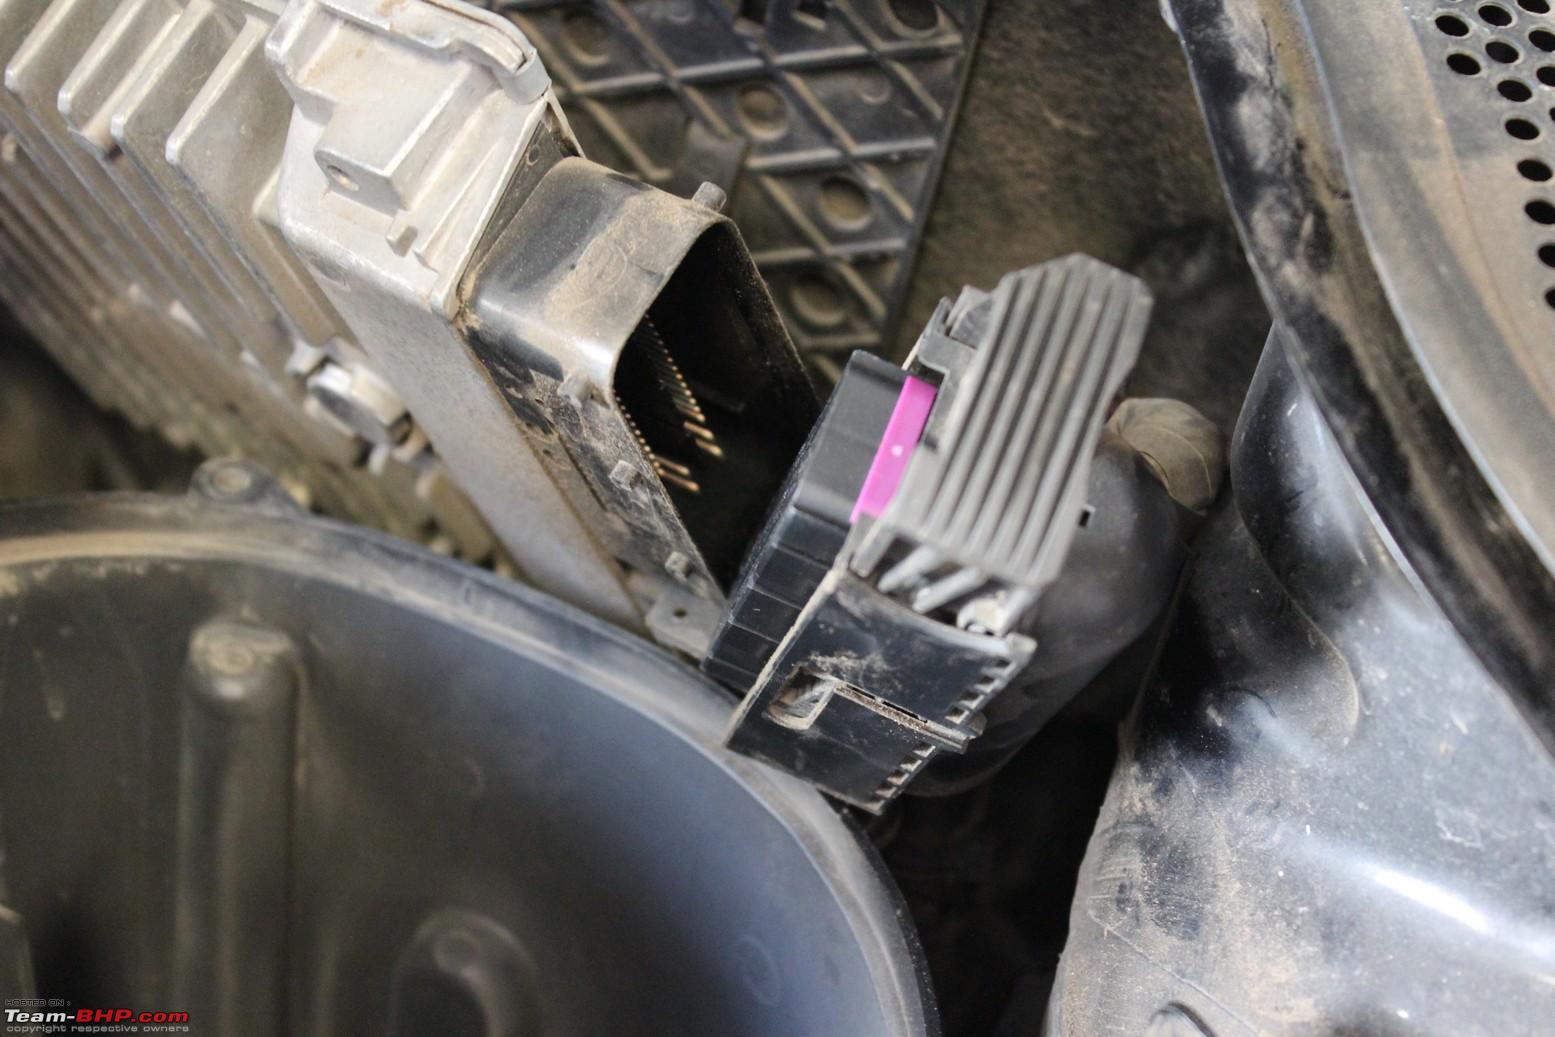
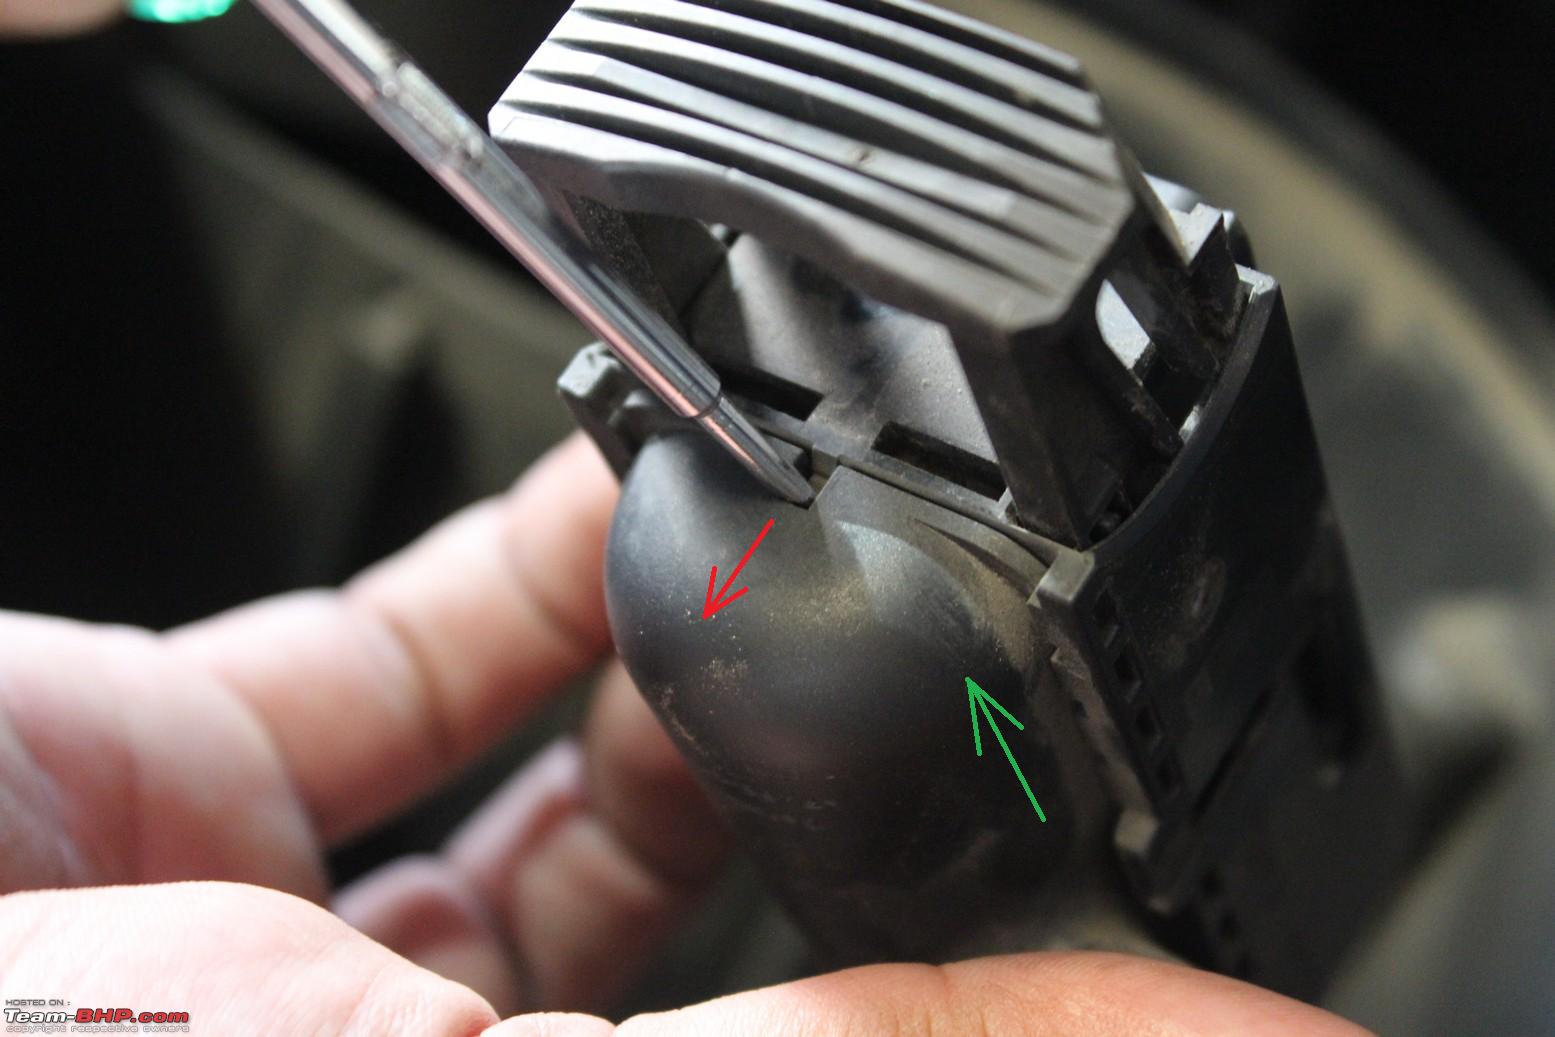
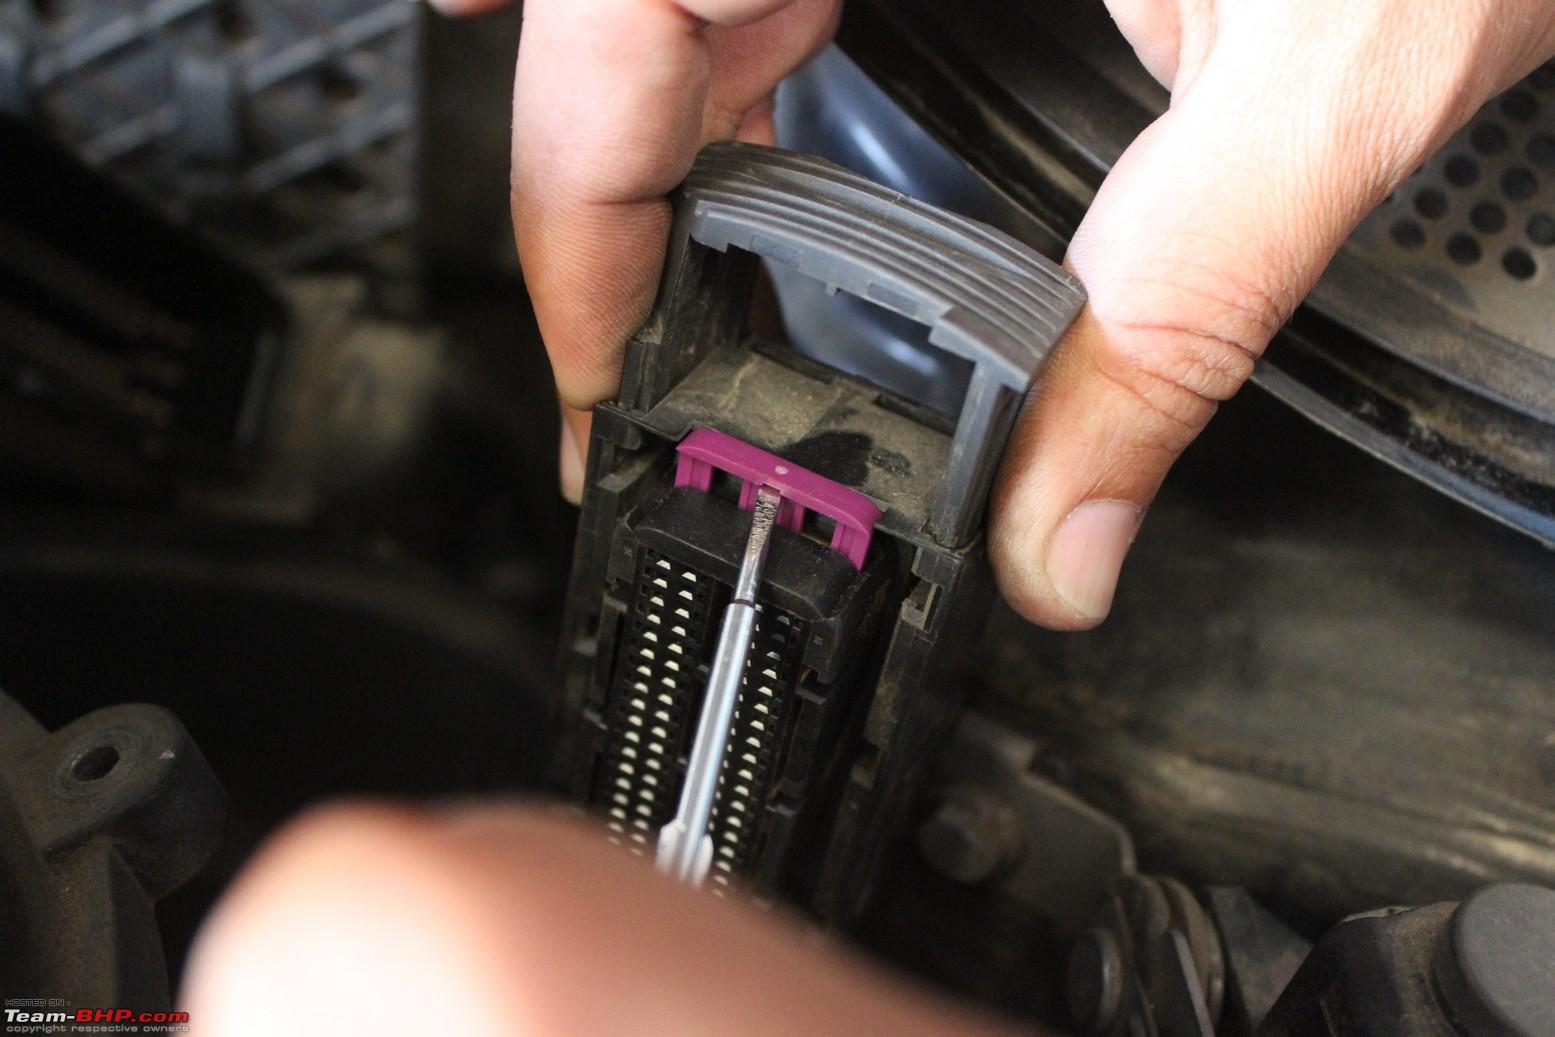
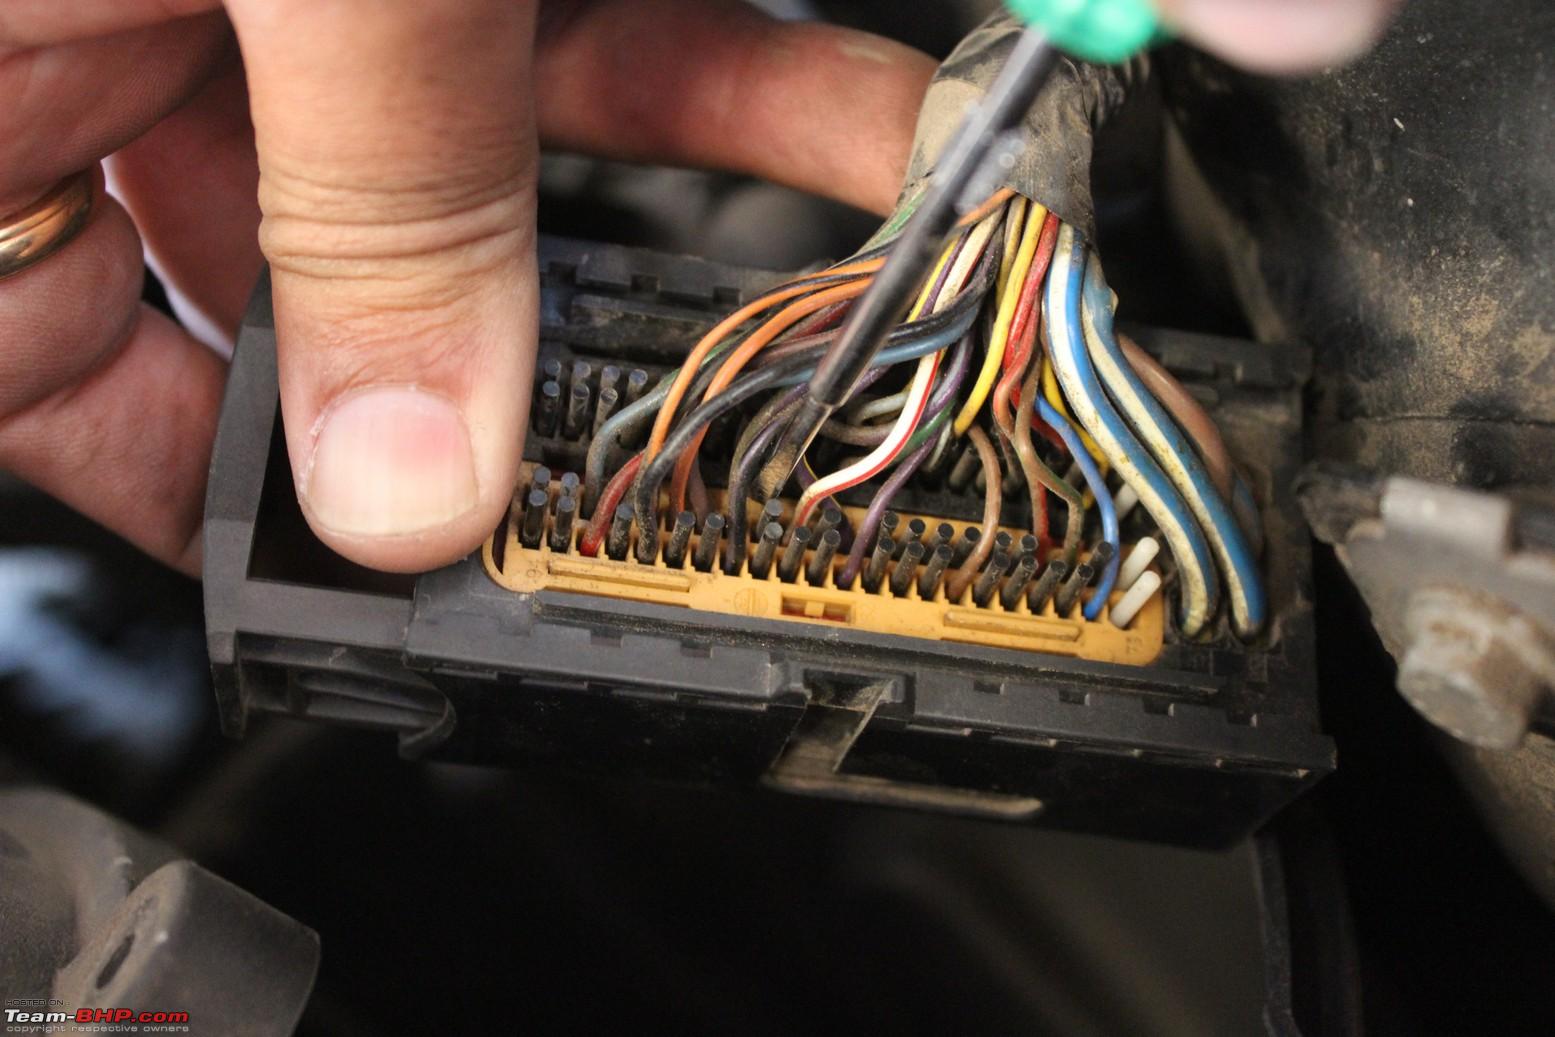
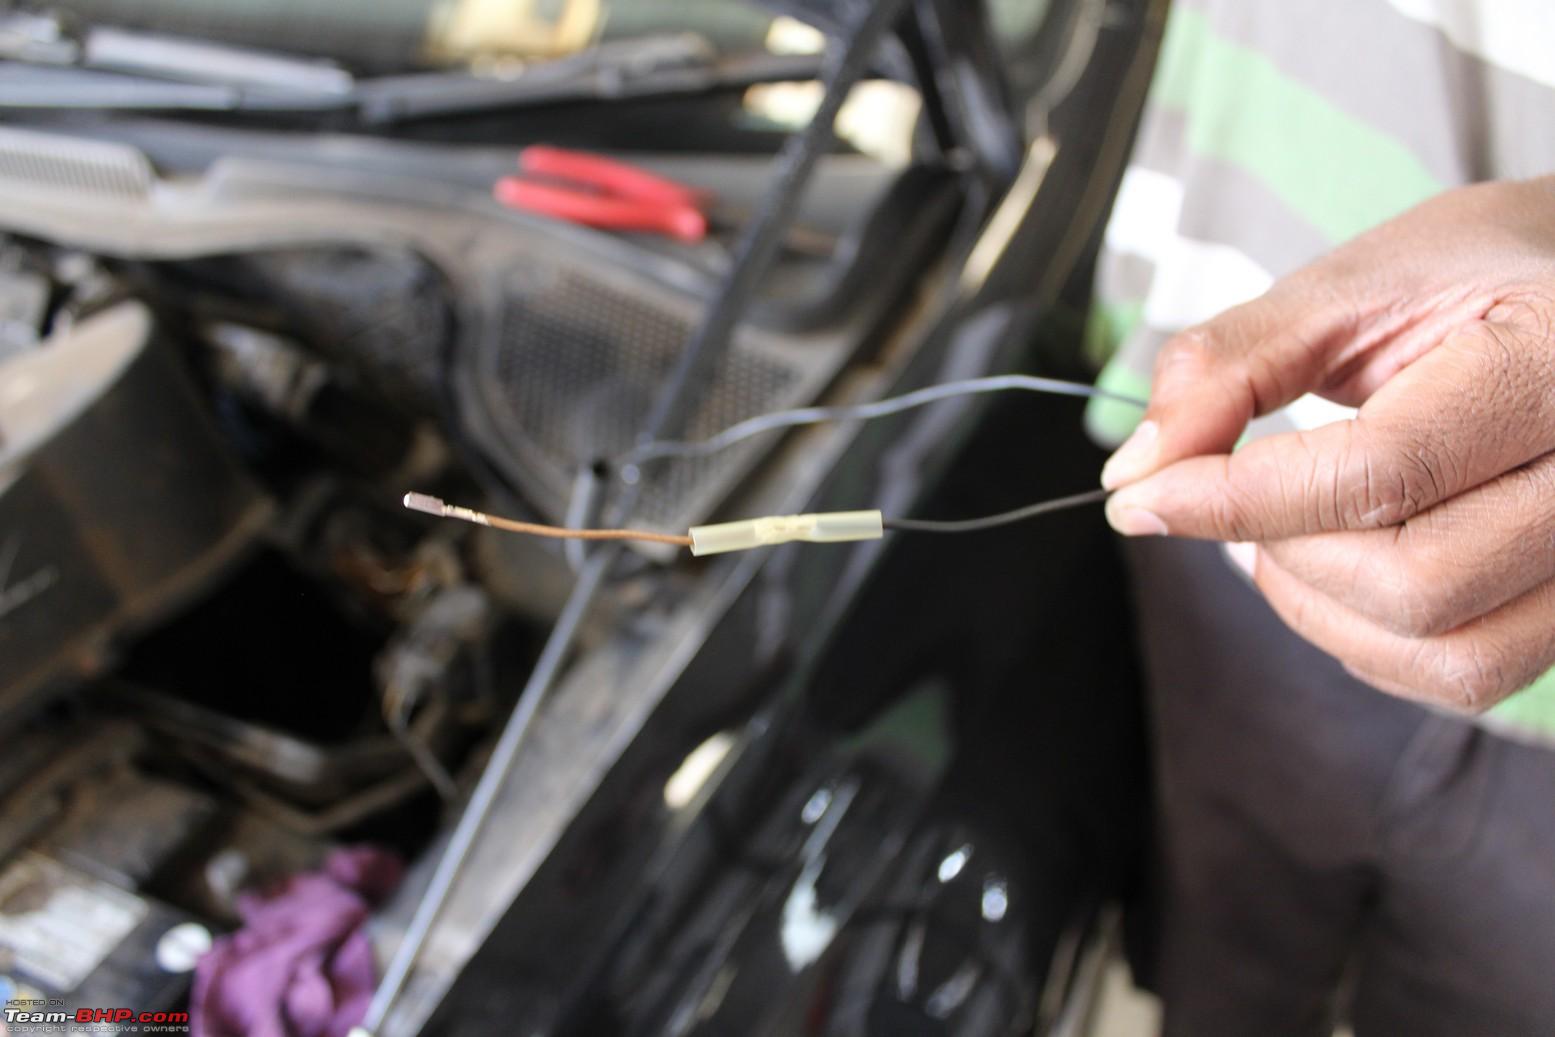
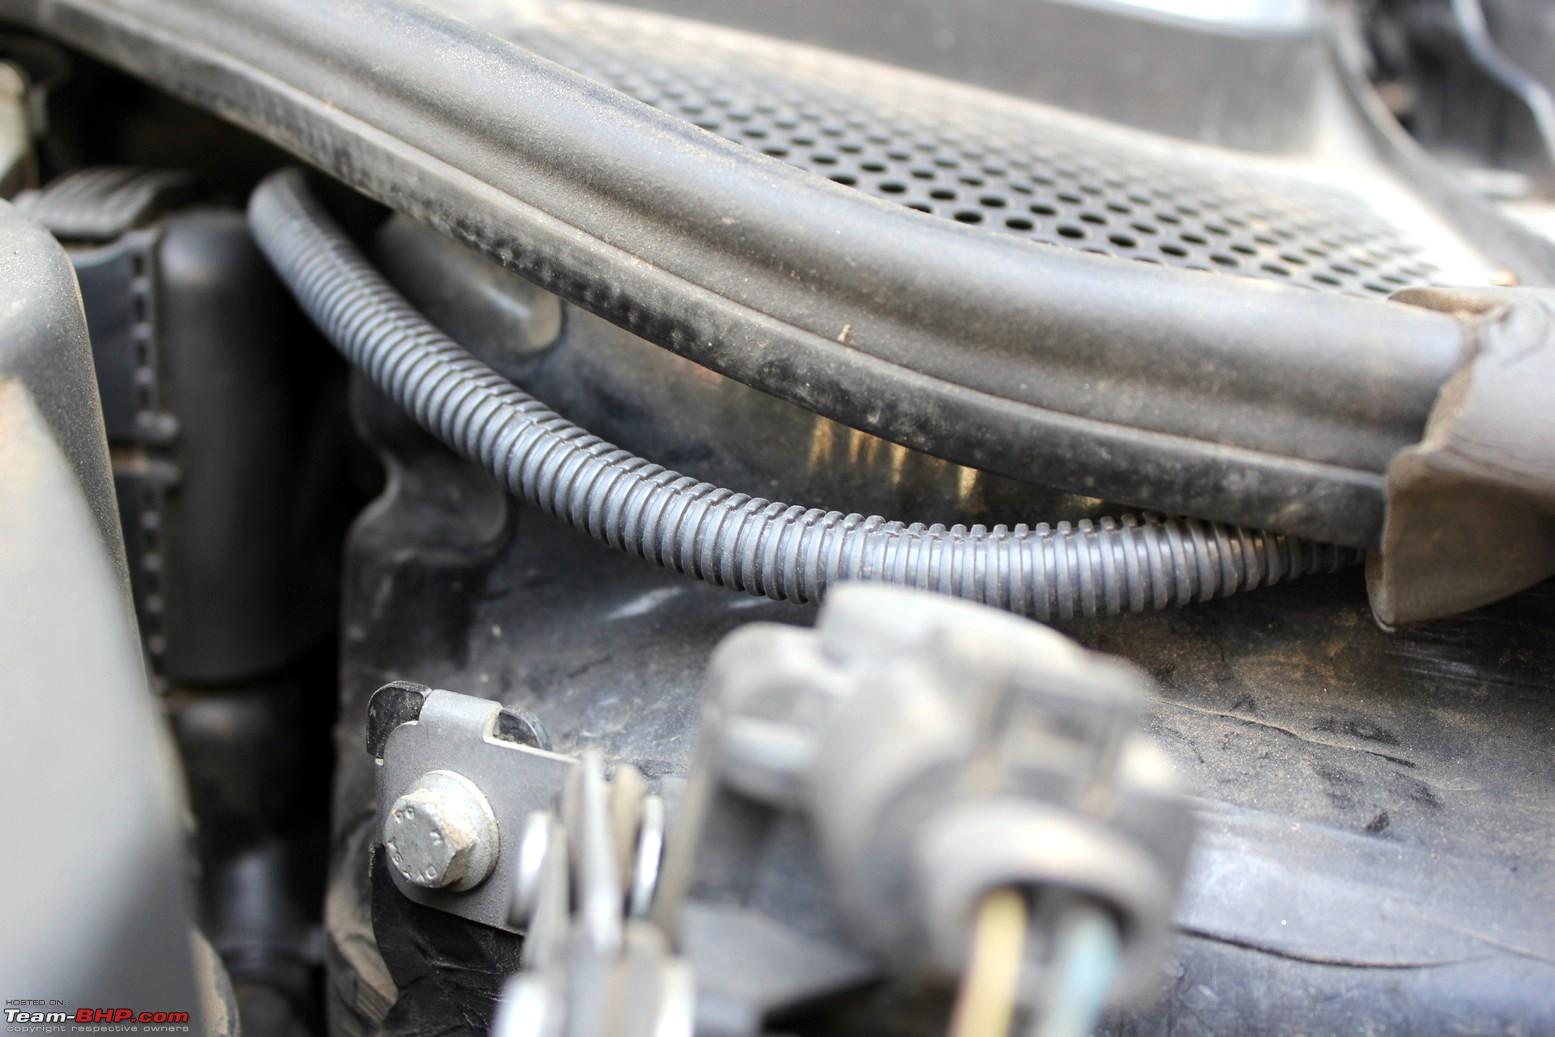
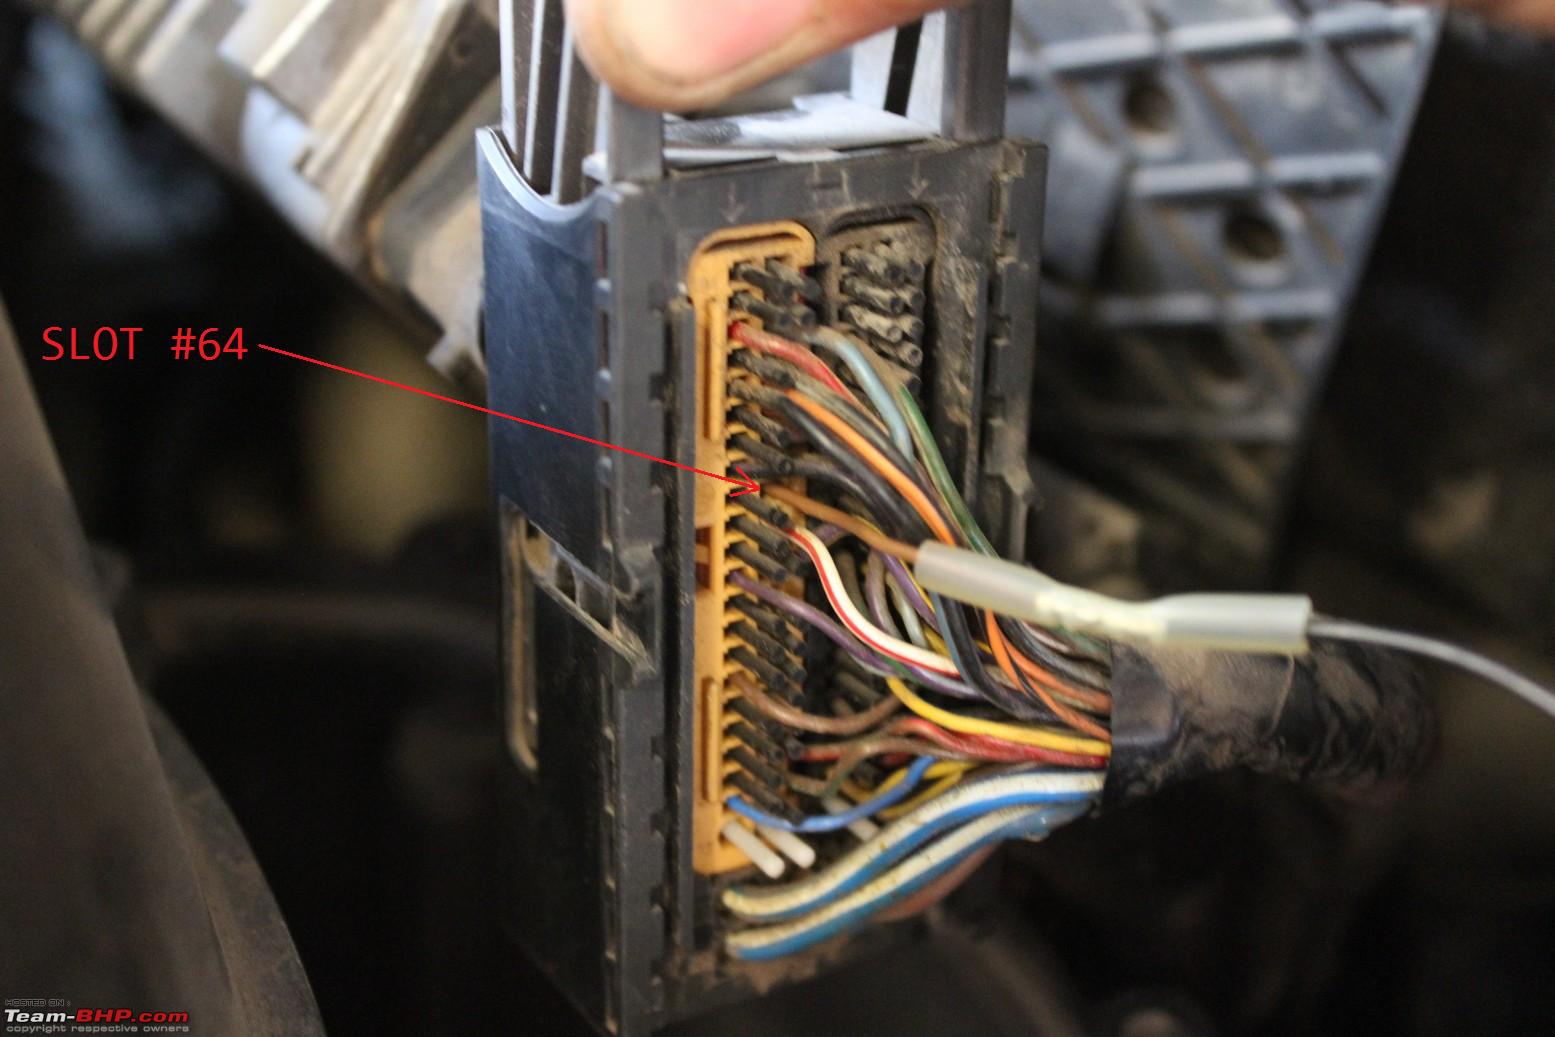
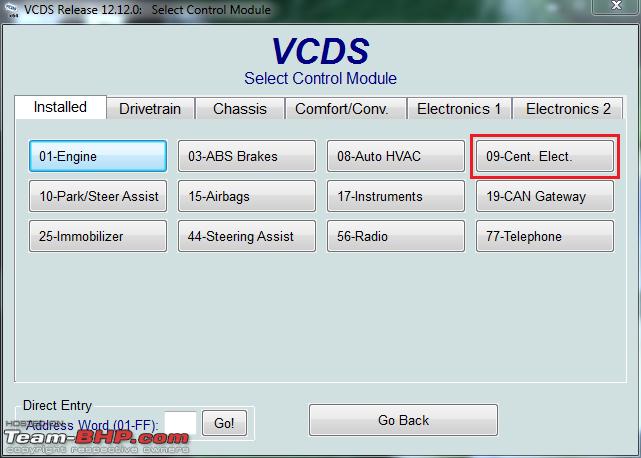
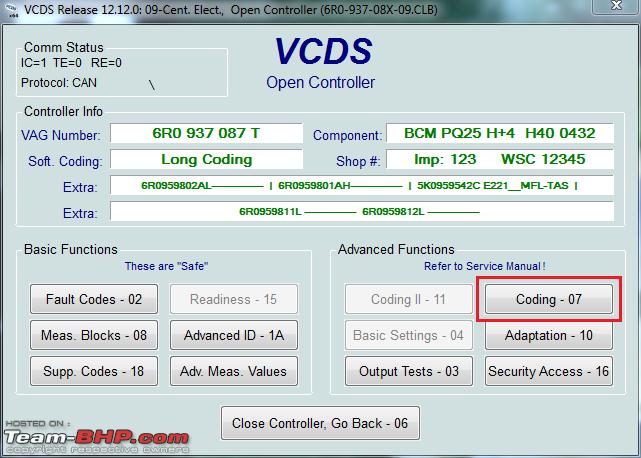
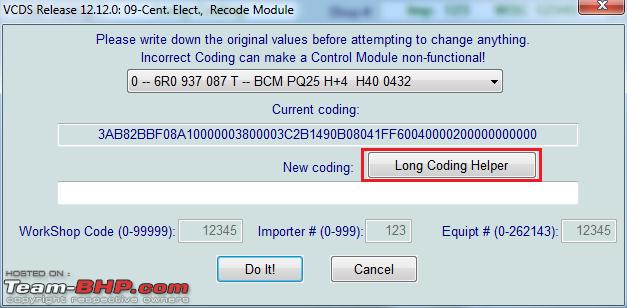
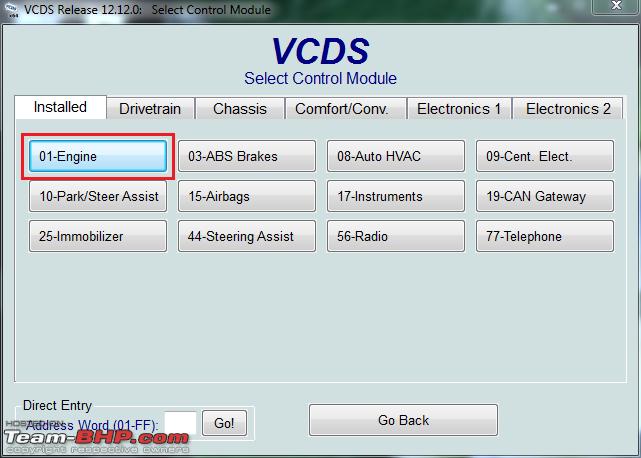
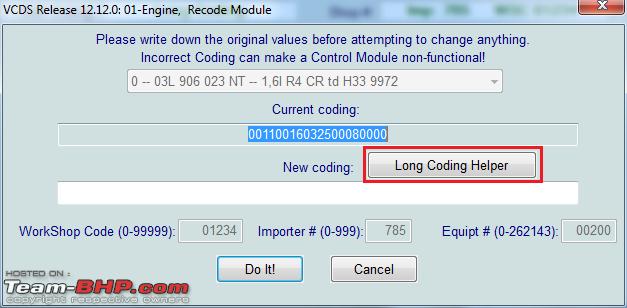
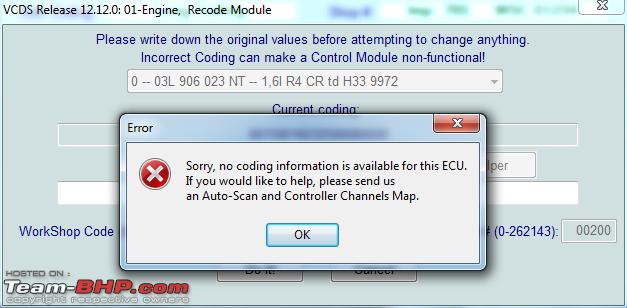
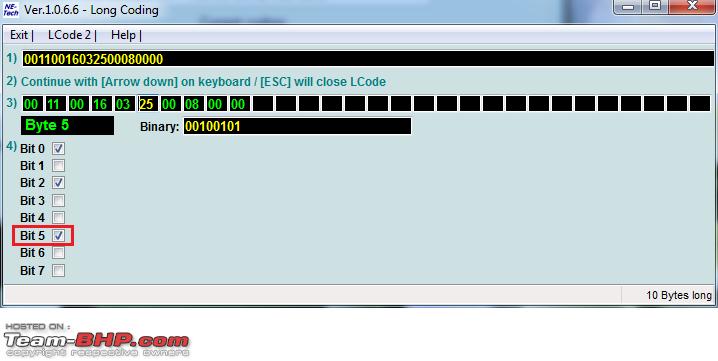
re: VW Polo DIY: Cruise Control!

Procedure:
  1. Disconnect the battery’s GND terminal using the 10-11 ring spanner and insulate it to avoid the terminal coming in contact with the body during the process.

    VW Polo DIY: Cruise Control!-img_1383.jpg

  2. Remove the upper trim from the steering column. Refer steps 3 & 4 from the instrument cluster upgrade DIY thread - Link.

  3. Move the driver seat to the AFT as much as possible to make space. Release the steering column lock lever, pull the steering wheel out and below as much as possible and lock the column. Once the steering wheel is removed from the column, this step isn't possible so ensure that this is done before attempting to remove the wheel.

  4. Remove the steering wheel. Refer steps 4-8 from the steering wheel upgrade thread - Link.

    VW Polo DIY: Cruise Control!-img_1391.jpg

  5. Lock the rotating front face of the slip ring using masking tape/cellophane tape as shown below:

    VW Polo DIY: Cruise Control!-img_1410.jpg

    VW Polo DIY: Cruise Control!-img_1412.jpg

    This is to ensure that the slip ring is at its default centered location and it does not rotate while attending to the other steps. If it rotates by mistake and the steering wheel is replaced back into the column, it will damage the slip ring!

  6. Remove the bottom trim from the steering column. The bottom trim is screwed to the column by an M5 Torx screw:

    VW Polo DIY: Cruise Control!-img_1396.jpg

    While removing the trim, note that the keyhole's rubber grommet is also a part of the trim. Slide the grommet out of the keyhole while removing the trim. Preserve the screw in the ashtray or some place safe.

  7. Unscrew the 2 Torx screws on the top face of the stalks unit:

    VW Polo DIY: Cruise Control!-img_1397.png

    VW Polo DIY: Cruise Control!-img_1398.png

  8. The stalks unit have a right-angled T41 connector (41 because it has 41 terminals in the connector) plugged to it on the rear. Pull the white tab on the T41 connector and the connector would detach itself from the stalks unit:

    VW Polo DIY: Cruise Control!-img_1404.png

  9. There's an additional Torx screw at the rear which holds the unit to the steering column on a ring collar. Unscrew it a bit so the stalks unit can be slid out from the steering column:

    VW Polo DIY: Cruise Control!-img_1407.jpg

    There's no need to remove this screw completely.

  10. This is the T41 connector:

    VW Polo DIY: Cruise Control!-img_1414.jpg

  11. Now that the connector is out, we need to insert the pins from the wiring harness into the corresponding vacant slots (26 to 31) of the connector as indicated in the wiring diagram.

    To insert the pins, we need to take out the protection cover from the T41 connector. To remove it, first cut the cable tie that is holding the harness assembly with the connector.

    Next, there are 2 locks indicated by the red arrows:

    VW Polo DIY: Cruise Control!-img_1416.png

    Insert a flat-blade screw driver at the point of contact and release the tabs. Once they are released, the cover can be slid out of the connector in the direction of the green arrow indicated above.

    VW Polo DIY: Cruise Control!-img_1417.jpg

    The pin numbers are also indicated on the connector. Insert the pins into the vacant slots 26, 27, 28, 29, 30 and 31 as per the color coding. The pins can be inserted into the empty slots only in a particular orientation and locks itself with a reassuring 'click'.

    VW Polo DIY: Cruise Control!-img_1422.png

  12. Once the pins are inserted, route the wires along with the existing harness, slide back the protection cover locking it with the connector and attach a zip tie with the harness and the connector. Use the Tesa cloth tape to wind the new harness with the stock one and lead it to the footwell region. The T41 connector wiring part is complete.

  13. We need to remove the stock slip ring from the stalks unit and attach it to the new unit which has the left stalk with cruise controls. Removing the slip ring is easy - it is held by 2 plastic tabs on the top and 2 at the bottom:

    VW Polo DIY: Cruise Control!-slip-ring-tabs.png

    While the connector on the top, has a tab locking it with the stalks:

    VW Polo DIY: Cruise Control!-sr-tabs.png

    Insert a flat-blade screw driver as shown to raise the area a bit, push the tab from the top and release the slip ring from the stalks unit.

  14. Replace the slip ring with the new stalks unit. In my case, this wasn't that simple as the stock slip ring - a flimsy unit which seemed like it will break anytime, was having a square'ish plastic block at the rear which was interfering with the guiding channel and were not locking with the tabs on the stalks unit as indicated below:

    VW Polo DIY: Cruise Control!-slip-ring-fouling.png

    We used the utility knife to cut down a portion of this guiding channel so the square block can move further ahead and the tabs can now lock. It worked beautifully:

    VW Polo DIY: Cruise Control!-slip-ring-cut.png

    This comparison pic will make this part clear:

    VW Polo DIY: Cruise Control!-sr-comp.png

  15. Once the slip ring is inserted into the new stalks unit, replace it in the steering column and tighten the Torx screw in the collar ring at the rear. Attach the T41 connector and press down the locking tab which will guide the connector and lock it in place.

  16. Replace the bottom steering column trim back while sliding the rubber grommet for the keyhole. Fasten the 2 Torx screws on the either side of the stalks to the bottom trim and the M5 Torx screw from below.

    Click image for larger version

Name:	IMG_1391.JPG
Views:	705
Size:	271.1 KB
ID:	1438852

  17. Replace the steering wheel back and while doing so ensure that the notches on the wheel and the shaft are aligned:


    Fasten the XZN screw using the M12 socket bit. Do not over-torque the screw while doing so.

    VW Polo DIY: Cruise Control!-img_1386.jpg
    (Older steering wheel shown for reference. )

    Plug the connectors for the media/phone controls and the airbag unit. Replace the airbag unit into the steering wheel.

  18. The wiring loom now has 4 wires to be inserted in the BCM's T73B connector, one wire to the fuse box and one wire to be inserted in the ECU's connector. The BCM is located behind the dashboard above the driver side footwell.

    Disconnect the white connector with the black locking tab (which is T73B, the black one adjacent to it which is nearly inaccessible, is coded T73A). Refer steps 5 & 6 from the BCM upgrade DIY thread - Link.

    VW Polo DIY: Cruise Control!-img_1426.jpg

    To remove the white plastic housing from the connector, insert a tweezers' pointed end in the gap around the white latch and gently push it to the outside (in the direction of the red arrow) so the tab releases the connectors inside. There are 2 such latches on either side so this might be a bit tricky! Pull the white housing below while doing so (in the direction of the green arrow):

    VW Polo DIY: Cruise Control!-img_1427.png

  19. There are 2 connectors in a single housing which hold onto each other. Simply slide them in the direction of the arrows as indicated below to separate them:

    VW Polo DIY: Cruise Control!-img_1429.png

    Connectors separated:

    VW Polo DIY: Cruise Control!-img_1431.jpg

    Look at the wiring diagram and based on the color coding of the wires, insert the corresponding terminals in the empty slots 44, 45, 46 and 47. The connectors have the pin numbers in place so its easy to recognise them:

    VW Polo DIY: Cruise Control!-bcm-pins-44-47.png

    A snap with the wires in place:

    VW Polo DIY: Cruise Control!-img_1433.jpg

    Slide the connectors back into one piece, insert them into the housing (hear that distinctive click sound) and plug the connector back into the BCM. That completes the BCM wiring part.

  20. Next up - the power wire tap from the fuse box. There are 2 ways to go about with this power wire. Tap into the wire of fuse no. 11 from the rear of the fuse box (nearly impossible due to the amount of wires; we tried this and gave up!) or use a fuse tap cable and plug this cable into the fuse slot no. 11 which is the designated slot for the cruise control system and an easy job at hand as well.

    This is how the fuse tap cable works:

    Name:  fuse tap working.PNG
Views: 61190
Size:  370.1 KB

    The yellow cable must be routed to the fuse box front through one of the gaps at the edges. Locate the 5 A fuse at no. 11 (highlighted below in red) and pull it out:

    VW Polo DIY: Cruise Control!-fuse-11-location.png
    (I've already used a fuse tap cable for the glovebox light some time back and that's the one you see above.)

    Insert the fuse tap cable into this slot, insert both the 5 A fuses into the slots, crimp the end with the power cable, use the heat gun to shrink the tubing. I didn't have a spare fuse tap cable so ended up using the glovebox light's one.

    We're done! Close the fuse box cover.

Last edited by Gannu_1 : 16th November 2015 at 09:39.
Gannu_1 is offline   (30) Thanks
Old 13th November 2015, 19:02   #4
Team-BHP Support
 
Gannu_1's Avatar
 
Join Date: Apr 2013
Location: Madras
Posts: 7,174
Thanked: 20,220 Times
re: VW Polo DIY: Cruise Control!

  • The last piece of wiring that remains to be connected is the cable to the ECU's connector. The pin number and the type of terminal varies from engine to engine as I have indicated in the current flow diagram. Here goes the pin numbers:

    • Pin 24 - 1.6 MPI/77 kW

    • Pin 45 - 1.2 TSI/63, 77 kW, 1.4 TSI/90 kW

    • Pin 64 - 1.6 TDI/77 kW, 1.5 TDI/66 kW

    • Pin 69 - 1.2 HTP/55 kW

    For the 1.6 and 1.5 TDI engines, the terminal is the same as that of the one that goes into the instrument cluster, the T41 connector and the BCM - N 907 647 01. Since I have not worked with the TSI engine, I am not sure what is the terminal that goes here - apologies for that! But if someone can help me with a clear snap of the ECU connector on the 1.2 TSI engines, I shall suggest what is the corresponding pin.

    Route the cable from the driver side footwell to the co-driver side footwell behind the central tunnel of the dashboard. There's a small gap through which the cable can be routed:

    VW Polo DIY: Cruise Control!-img_2762.jpg
    (Driver side footwell on top; co-driver side footwell at the bottom)

    I need to insert the cable through a flexible conduit and have it tied somewhere instead of leaving it dangling like that. Will be doing it sometime.

  • Pop up the hood and remove the seal for the water cowl (the trim that collects the water from the windshield):

    VW Polo DIY: Cruise Control!-img_2765.png

    On the RHS, pull the cowl up a little bit and notice that in the corner of the firewall, there's a rubber grommet - it is essentially hiding the hole through which the Bowden cable for opening the hood, for the LHD cars are routed. Since the same body is used for the RHD cars, they cover this hole with a rubber grommet:

    VW Polo DIY: Cruise Control!-img_9864.jpg
    (You can see a cable already there because I've routed the windshield washer reservoir sensor's cable through this hole before.)

    Using a flexible metal cable, make a hook at the end and using the ECU cable end, make a knot.

    Poke a tiny hole on the insulation, push the hook through the hole and pull this hook from the co-driver side footwell (there is no need to remove the glovebox). Insert the knot into the hook and pull the metal cable from the engine bay side.

    Name:  HOOK KNOT ARRANGEMENT.png
Views: 52076
Size:  14.3 KB

    VW Polo DIY: Cruise Control!-img_1458.jpg

    Now we have the ECU cable routed to the engine bay, time to open the ECU connector.

  • Before opening the ECU connector, it would be a good idea to open the air filter housing (especially for the TDI engines since the working space is limited). Disconnect the MAF sensor connector:

    VW Polo DIY: Cruise Control!-img_1442.jpg

    Pull the 3 vacuum hoses from the clips:

    VW Polo DIY: Cruise Control!-img_1439.jpg

    The air filter housing is screwed to the bottom using 6 Torx screws. Unscrew them (and keep the screws safe), open the housing, twist the air filter to remove it. Now may be a good time to clean the air filter as well. Use a blower to clean the air filter and the innards of the housing.

    Removing the air filter housing has cleared up a lot of space. The ECU in the Indian Polo and Vento variants are simply held on to a plastic bracket. In the overseas, owners have reported a special metallic security bracket with anti-theft round head screws which requires a slot to be cut on the screw head to remove them. Luckily, it turned out to be easy for us.

    The security bracket in question:

    VW Polo DIY: Cruise Control!-partsbase-figure.png
    (Image source: Elsawin)

    And the anti-theft round head screw:

    Name:  SHEAR BOLT.png
Views: 51684
Size:  50.7 KB
    (Image source: ECS Tuning)


    It is referred to as shear bolt by VW. The bolt has a hex head which is used for screwing in and then the head is sheared off. To remove such a screw, a slot has to be cut using a rotary tool on the head and a flat-blade screw driver must be used to unscrew it.

    Simply unclip the ECU off the bracket holding it, pull the top latch of the connector to release the connector from the ECU:

    VW Polo DIY: Cruise Control!-img_1444.png

    There is no need to physically unplug the connector - pulling the top latch unplugs the connector from the ECU.

    VW Polo DIY: Cruise Control!-img_1445.jpg

  • The connector has a sliding housing which encloses all the cables and protects the connector from water ingress. The housing also has a cable tie, tied with the harness:

    VW Polo DIY: Cruise Control!-img_1455.jpg

    Cut the cable tie carefully and using a small flat-blade screwdriver or a pair of tweezers, push the tab at the center (in the direction of the red arrow) and pull up the housing (in the direction of the green arrow):

    VW Polo DIY: Cruise Control!-ecu-connector-housing.png

    Before inserting the pin, it might be a good idea to look at the connector and understand the pin layout (the pins are numbered albeit at the corners):

    VW Polo DIY: Cruise Control!-ecu-terminals.png

  • There is an additional purple colored lock hidden inside the connector. Pull it up using a flat blade screw driver and remove it from the connector completely:

    VW Polo DIY: Cruise Control!-img_1450.jpg

    On the side where the wires go into the connector, all the empty slots are covered with plastic dummy terminals (possibly to prevent water/dust ingress). Identify the empty slot #64 (for TDI engines only!) and pull out the plastic terminal using a pair of tweezers.

    VW Polo DIY: Cruise Control!-img_1449.jpg

    The plastic pin and the actual terminal which would occupy the slot:


    Preserve the plastic dummy pin just in case.

  • Using the second butt crimp, crimp the bare end of the cable with the terminal:

    VW Polo DIY: Cruise Control!-img_1453.jpg
    (Apologies for the terribly out-of-focus pic!)

    Insert the cable through a piece of flexible conduit to cover it (from external harm, just in case):

    VW Polo DIY: Cruise Control!-img_2767.jpg

  • Insert the terminal into the slot (you will hear the click once it locks in place):

    VW Polo DIY: Cruise Control!-img_1454.png

    Replace the purple lock into the connector, replace the housing and use a cable tie to lock the housing with the harness. Plug the connector to the ECU and push down the tab to lock it with the ECU.

    And with that, the wiring part is complete!

  • Replace the air filter housing and fasten the 6 Torx screws and reconnect the MAF sensor's connector. Replace the seal for the water cowl. Finally, reconnect the battery's GND terminal.

  • Next up, VCDS programming. Connect the VCDS cable with the OBD port and start the application.

    Head to 09-Central Electronics:

    Name:  1b.png
Views: 50538
Size:  58.2 KB

    Coding - 07:

    Name:  new bcm.PNG
Views: 51265
Size:  69.2 KB

    Long Coding Helper:

    Name:  2.PNG
Views: 50554
Size:  42.9 KB

    Head to Byte 17, enable Bit 7 which reads Cruise Control System (CCS) installed:

    Name:  1212.PNG
Views: 50762
Size:  42.5 KB

    Exit out of Central Electronics. Head to 01-Engine:

    Name:  1a.png
Views: 50504
Size:  58.2 KB

    It's alright if it says Unable to find a .ROD file for: EV_ECMXXXXXXXXXXXX. Go to Coding-07:

    Name:  3.PNG
Views: 50434
Size:  64.8 KB

    Copy the current coding to a Notepad file as a backup. Go to Long Coding Helper:

    Name:  4.PNG
Views: 50670
Size:  41.5 KB

    When you click on Long Coding Helper, it will show this error if VCDS labels do not have the relevant file for your engine. Don't fret, click on OK and proceed:

    Name:  5.PNG
Views: 50622
Size:  65.9 KB

    All the bits would be displayed as blank without any descriptions. Go to Byte 5 and enable Bit 5:

    Name:  6.PNG
Views: 50473
Size:  40.1 KB

    Exit out.

  • That's it! Time to test the cruise control system. Flick the button on the left stalk to ON:

    VW Polo DIY: Cruise Control!-cc.jpg

    Head out to an empty stretch of road, accelerate to above 20 km/h, press the SET/- button. You will get the cruise control indicator in the cluster:

    VW Polo DIY: Cruise Control!-img_1473.jpg

    That completes it.

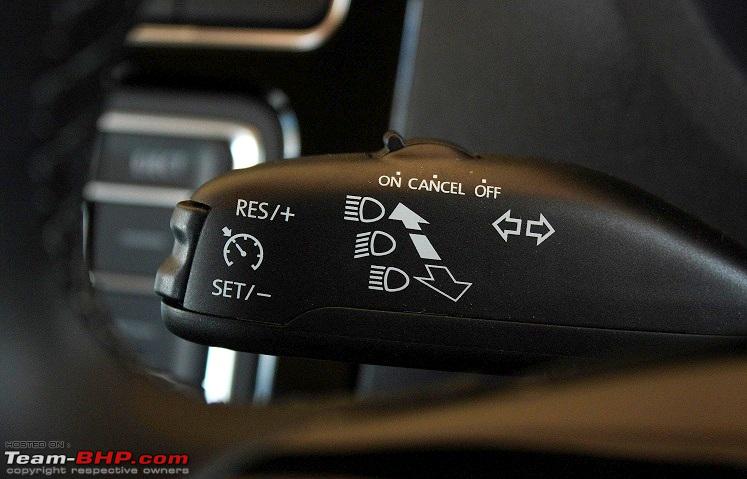
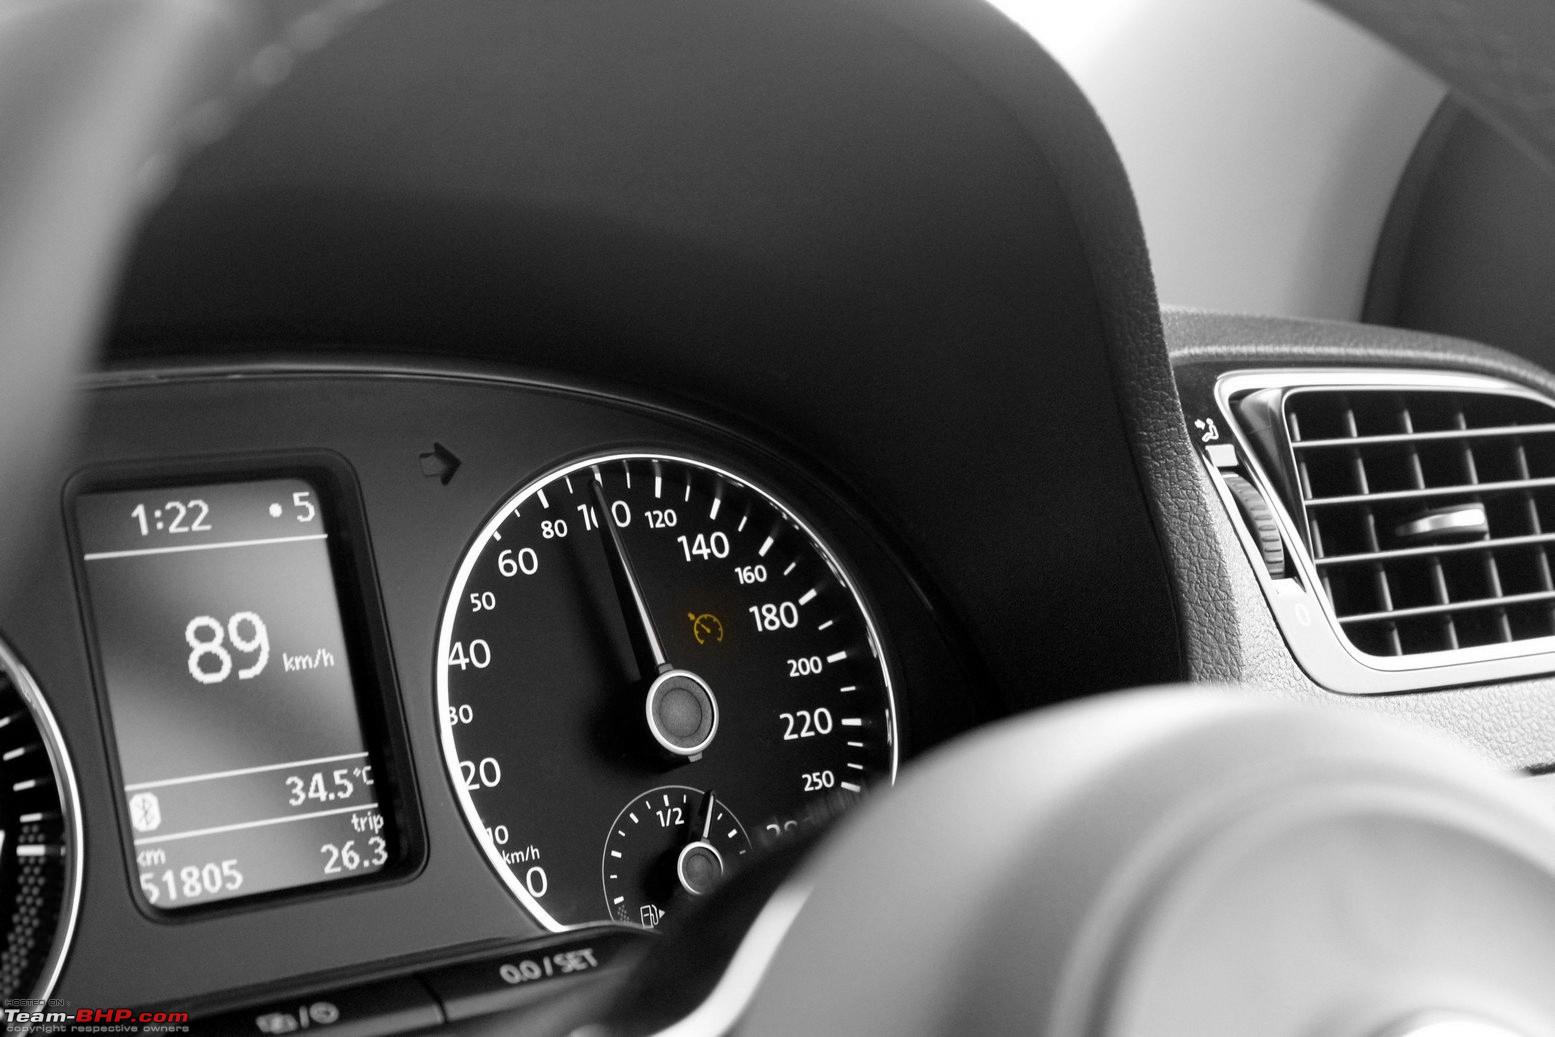
Results:

Here's a short clip indicating cruise control in action:


When the speed is above 20 km/h, cruise control can be activated by pressing the SET/- button. It can be activated in any gear. But when you intend to upshift as you speed up and depress the clutch pedal, CC deactivates itself. You will have to set it again. Pressing the brake pedal also deactivates cruise control. Once you have set the desired cruising speed, the set speed can be increased by pressing the RES/+ or decreased by pressing the SET/- button. Its a nice party trick to use the stalk to increase and decrease the speed using the left stalk while resting the right foot on the floor.

Last edited by Gannu_1 : 17th November 2015 at 10:02.
Gannu_1 is offline   (46) Thanks
Old 15th November 2015, 13:25   #5
Team-BHP Support
 
Gannu_1's Avatar
 
Join Date: Apr 2013
Location: Madras
Posts: 7,174
Thanked: 20,220 Times
re: VW Polo DIY: Cruise Control!

The DIY Experience:
  • In one word, brilliant! This has to be the most satisfying experience I've had so far. That moment when we took the car out on the road for a drive, activated cruise control and the tiny green symbol lit up on the cluster - that feeling was one of a kind, can't put it in words here! While the Morimoto projectors took almost 2-3 weeks for execution, it was mostly hard labour. This one OTOH, required a lot of research before we undertook this. Right from the BCM upgrade, the new set of stalks and harness, removing the steering wheel, accessing the ECU connector etc.

  • I had been browsing the Russian websites - drive2.ru and polosedan.ru for quite a while now and can tell you those guys are absolutely crazy with the modifications. The good thing for them is their geographical location allows them to order parts from the EU and China and the shipping time is a lot lesser. And they have documented everything on their blogs including the part numbers. Google Translate does a good job of translating the content. The cruise control installation had been done by quite a few owners there and they had shared their experiences on the website.

  • And luck was on my side, twice - during the search for a BCM online when I came across a superior model on the eBay Germany website and when Fernando, my good friend from Spain and a Polo enthusiast who was retailing a cruise control kit complete with the stalks, harness and some goodies like cloth tape, connectors, heatshrinks thrown in. I had in fact sourced the CC kit from him during August whereas the BCM arrived much later. Talk about assembling the ammo before the gun arrives! I knew the CC installation was inevitable and it was only a matter of time.

  • Removing the steering airbag unit was a bit hard - we had to spend almost 10 minutes getting the first clip out. The spring loaded clip was very strong and it wouldn't budge easily. We used 2 short flat-blade screwdrivers, one to pull down the clip and the other to push it down the metal protrusion. It worked. The second clip was easy.

  • My partner Moorthy has an advantage - he is ridiculously slim, can flex his body better than mine and his hands can access most places where mine would get stuck. For instance, when we wanted to access the BCM area (we had an experience before while swapping the BCM 2 weeks back), I knew that accessing the BCM connectors and removing the outer housing is going to be a pain. It was indeed one. I was unable to open the housing with the tweezers whereas Moorthy did it quickly!

  • The part where we had the heart in the mouth moment was while opening the ECU connector. FWIK, the ECU costs more than a lakh and we didn't want to brick it. Carefully, we detached the connector from the ECU, followed by the housing and then comes the part where we figure out that the pin attached to the harness sent by my friend from Spain doesn't fit this ECU. What a bummer! Was all the time spent on this day going to be a waste we asked ourselves. Upon comparing the plastic dummy pin with the BCM pin, we figured out that the dimensions were exactly the same. Could this pin be it? Yep it was. Carefully inserted the pin into the required slot and 'click' - we heard that reassuring sound of the pin getting locked in the slot.

  • Everything was completed, we reconnected the GND terminal and it was time to test the cruise control system. Turned on the ignition, started the car, flicked the left stalk's CC button to ON. I see no green symbol on the cluster. Yikes! The conversation at that point went something like this:

    Me: Moorthy WTH man?

    Moorthy: Not sure. How's it supposed to let you know that the CC is working?

    Me: A green symbol should come up in the cluster inside the speedo dial.

    Moorthy: Hmmmm. All connections were given as per your wiring diagram right? I don't think we messed up anywhere. Do you think that ECU pin is the culprit? Is that the right pin? And you were absolutely sure that the harness from the cluster to the T41 connector were in place from the factory?

    Me: Yeah man, those wires were there. I checked the color coding. And I am quite sure that is the ECU pin. It locked itself firmly and you heard that clicking sound too. Damn it man, this cannot be! *feeling terribly upset*

    Moorthy: Chal, let's go for a drive and see. Who knows, the CC system is meant to activate beyond a certain speed and won't show up on the cluster until then?

    We leave the apartment complex and go for a short drive. The 6-laned NH8 is close to my apartment and we hit the service lane shortly when I click on the SET/- button and VOILA! The tiny green CC symbol comes up on the speedo dial. I start shouting and howling like crazy in excitment! Moorthy tries controlling and relaxing me! We went for a 10 km drive and returned back shortly. Damn, this was quite an experience I must say!

  • Like I said before, I was heavily into browsing the drive2.ru forums and came across some snaps for the new Rapid's cruise control retrofit (sold by Skoda as an official accessory). These helped me greatly especially the ECU connector pin assignments:

    VW Polo DIY: Cruise Control!-77928as960.jpg

    VW Polo DIY: Cruise Control!-af7928as960.jpg

    VW Polo DIY: Cruise Control!-946516as960.jpg

  • We also took printouts of a checklist for the pin connections, the T41 connector layout and the BCM connector layout. Helped us immensely especially the checklist:

    VW Polo DIY: Cruise Control!-img_1567.jpg

    VW Polo DIY: Cruise Control!-img_1570.jpg

    VW Polo DIY: Cruise Control!-img_1571.jpg

    Here is the PDF copy of the checklist if anyone's interested - Wiring Checklist.pdf

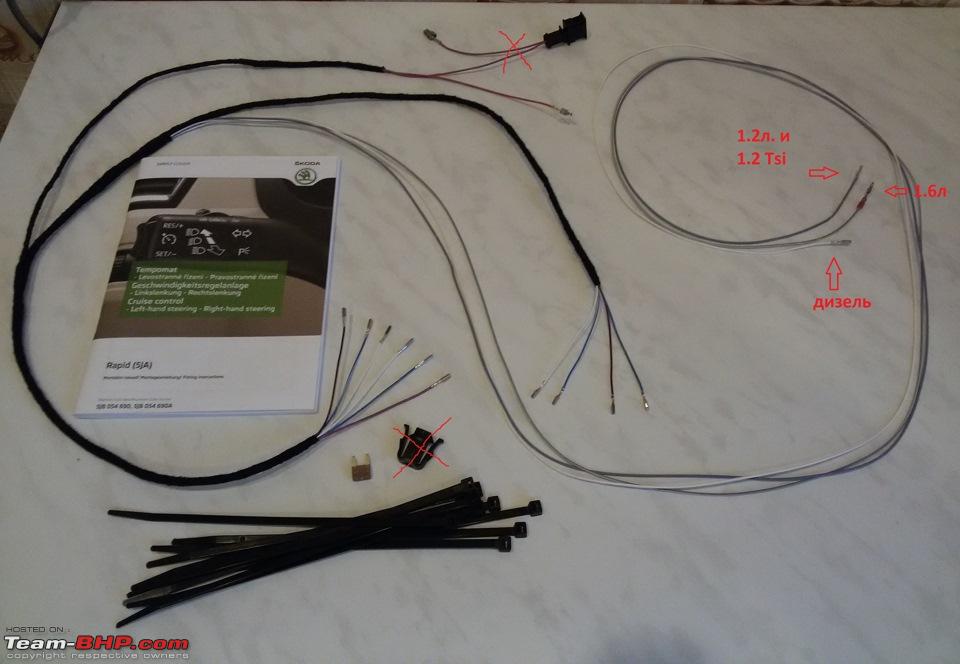
The Shopping Experience:

Like I had mentioned before, I sourced the cruise control kit from a friend based in Spain, Fernando. He's pretty active in the UK Polos forum and has done several retrofits to his 90hp TSI. I keep pestering him from time to time requesting current flow diagrams of various systems, doubts etc. He had put up his kit for sale for 90 Euros (approx. Rs. 6500) and I bagged it instantly! Of course, Aliexpress has these kits for sale but between this one and the Ali kit, it was a no-brainer. I sent him the money through PayPal and he dispatched the goods instantly. He had packed it neatly with ample bubble wrap and air pillow cushions inside. But the good folks at India Post wasn't willing to release the goods until they figured out what was inside. So I called them up and explained to them that the parcel has these switches for activating wipers and the wiring. Buggers didn't accept it so I had a friend call them up and explain it to them in Gujarati. They asked me to send a mail with some details. And they finally released it without charging me any duties.

I received the package in approx. 20 days from the day of dispatch. The contents were neatly packed and I was surprised to see he had packed some goodies like butt crimp terminals, cable ties, heat shrink tubing and an entire roll of Tesa cloth tape! I really didn't need any of those since I had them in stock but that was a really nice gesture from his side.

VW Polo DIY: Cruise Control!-1.jpg

VW Polo DIY: Cruise Control!-4.jpg

VW Polo DIY: Cruise Control!-5.jpg

VW Polo DIY: Cruise Control!-6.jpg

VW Polo DIY: Cruise Control!-img_1283.jpg

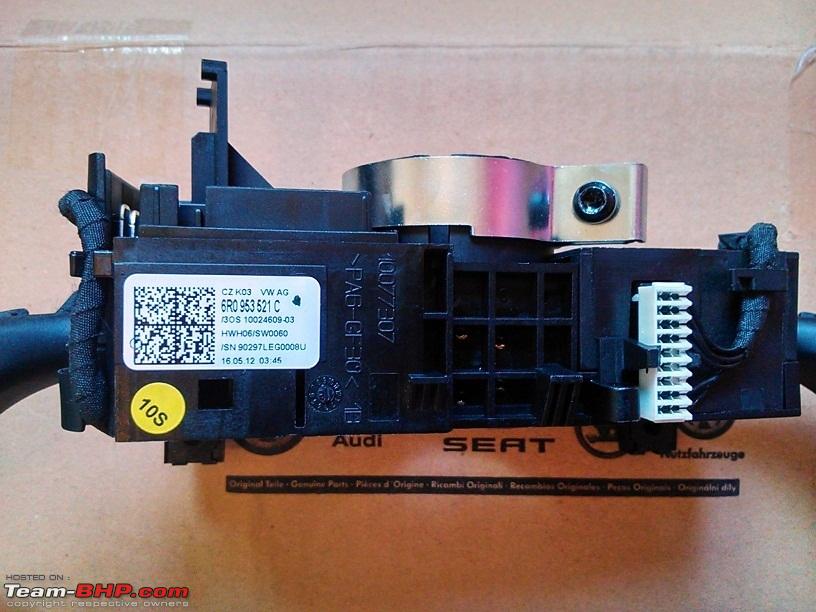
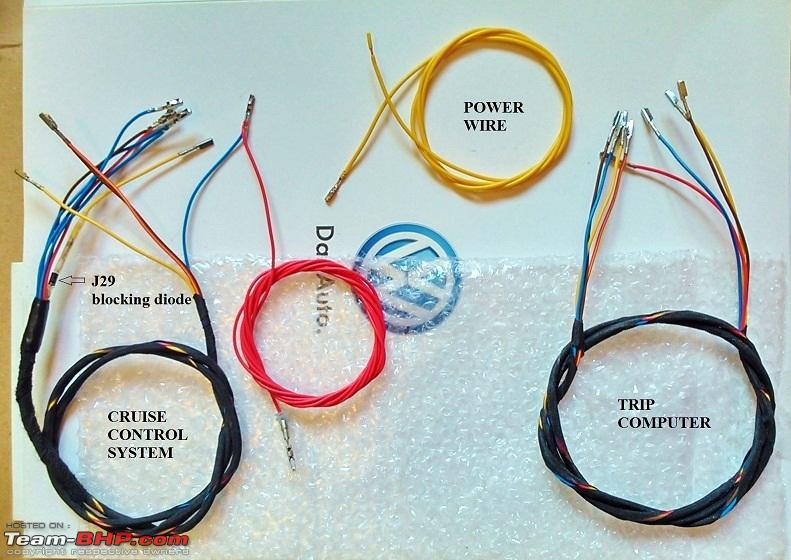
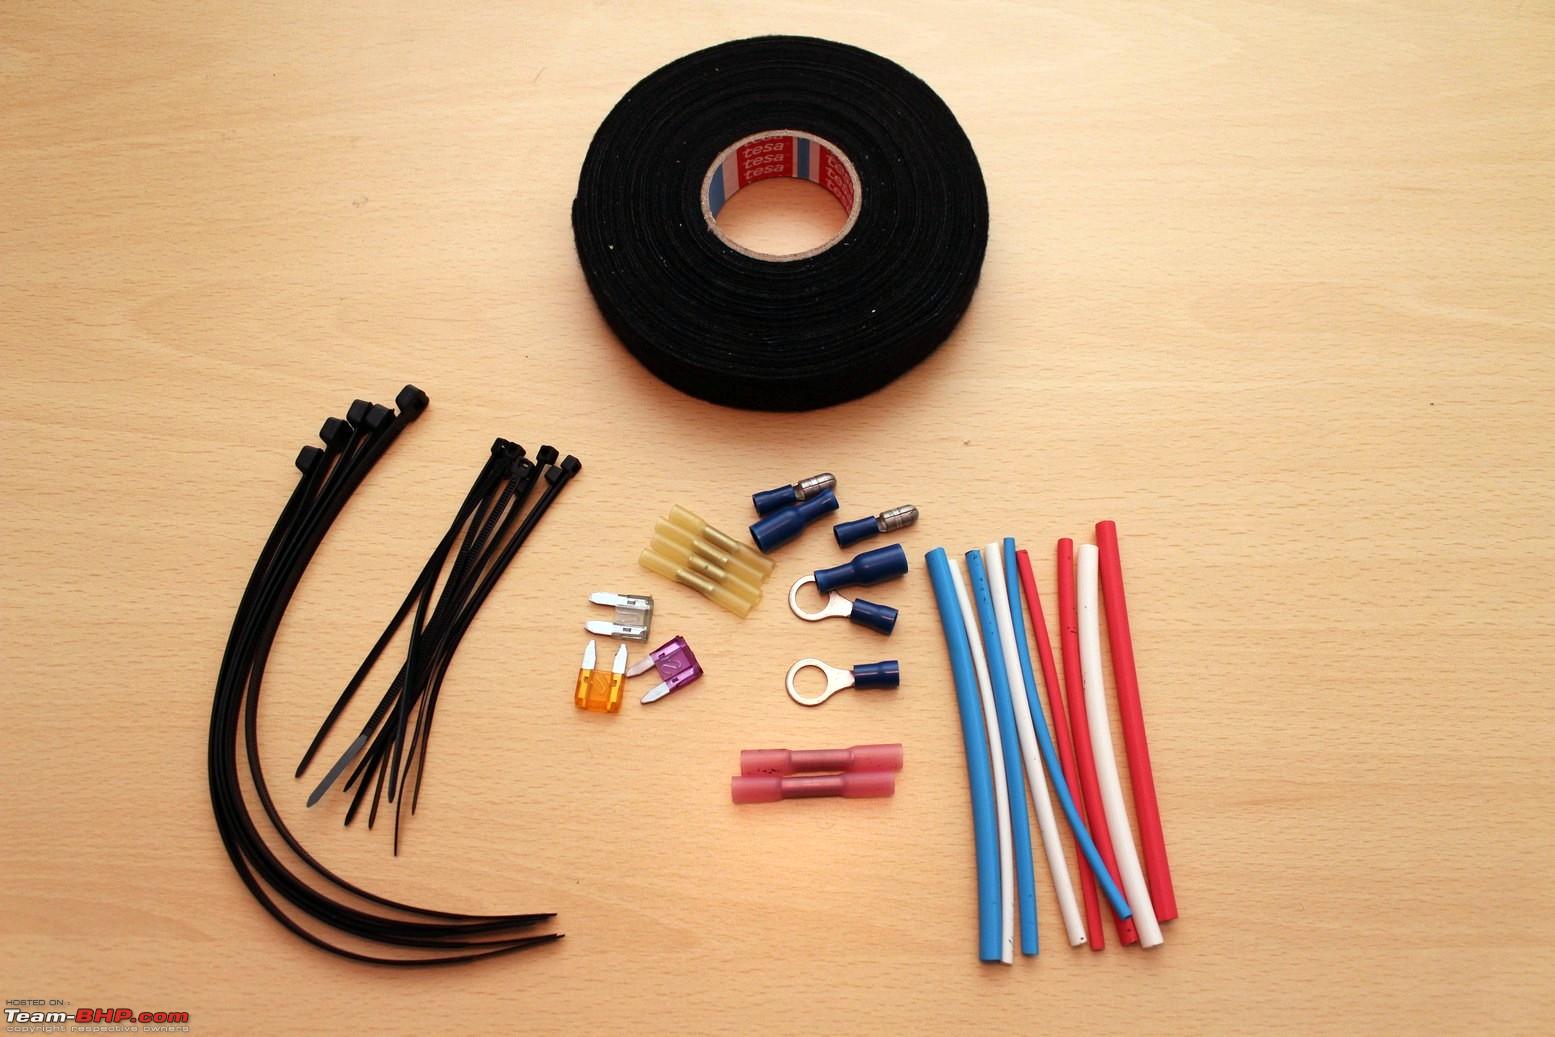
The setbacks and the learning:

Any DIY has had its share of setbacks and progresses with a lot of learning. This wasn't any different. Let me list them down:
  1. My package had a wiring harness having 4 wires to be connected to the instrument cluster connector and the T41 connector. In the picture above, it is marked as TRIP COMPUTER. It was supposed to be connected as shown below:

    VW Polo DIY: Cruise Control!-b.jpg

    When we opened up the instrument cluster connector to connect these wires, we found out that they were already in place from the factory!

    Here're the snaps of the cluster's connector indicating the pins:

    Name:  INST CLU 1.png
Views: 49243
Size:  622.1 KB

    Name:  INST CLU 2.png
Views: 48977
Size:  623.2 KB

    And that of the T41 connector:

    Name:  IMG_1422.png
Views: 49504
Size:  673.9 KB

    So we didn't need that harness at all.

  2. And here's a little experiment I did on the stalks to prevent the redundancy of the buttons on the right stalk. Let me explain - for the pre-facelift cars which are equipped with the older model steering wheels - we used to have the media/phone controls only on the left spoke of the steering and we had to use the buttons on the right stalk for navigating through the MFD.

    This was the steering:

    VW Polo DIY: Cruise Control!-img_2808.jpg

    And this was the stalk we had in our cars:


    And some folks have upgraded the steering wheel to the GTI models which have the MFD navigation buttons on the right spoke as well. Which is this one:

    VW Polo DIY: Cruise Control!-golfsw.jpg

    Well now, the problem is the same set of buttons are available on the steering wheel's right spoke as well as the right stalk - redundancy. So when you start the car and use the steering wheel's buttons to navigate the MFD, if you accidentally use the right stalk's buttons, the steering wheel's buttons would stop responding unless you turn off the ignition and turn it back on. This problem would have happened in my case as well since I was upgrading my steering wheel to a Mk7 model which has a similar layout of buttons on the right spoke.

    Well, one day I figured out that the 3 buttons on the right stalk could be disabled since the connector to the right stalk's buttons were exposed on top of the stalks unit:

    Name:  Connector top.png
Views: 48798
Size:  618.8 KB

    So I took out the DMM (digital multimeter) and set it to the Continuity check mode (the DMM beeps when the circuit is complete). There are 6 cables inside the connector. And with the 2 leads of the DMM, there should be 15 combinations without repetitions, to check the continuity when the 3 buttons are pressed on the stalk.

    So the activity looked something like this:

    Name:  IMG_2808.png
Views: 48247
Size:  156.5 KB
    (Fluke DMM shown for reference!)

    Each time I had the 2 leads on the connector, I would press one of the 3 buttons to hear the beep. And finally, I got the 3 combinations when the DMM would beep when the individual buttons were pressed. Turns out, there was one common lead and 3 other leads for the 3 buttons. Easy as pie! Removed those 3 pins from the connector:

    VW Polo DIY: Cruise Control!-wp_20151101_17_34_59_pro.jpg

    And insulated them using heatshrink tubing as shown:

    VW Polo DIY: Cruise Control!-wp_20151101_17_39_25_pro.jpg

    And used a small cable tie to tie them together. So now, those 3 buttons on the right stalk would not be redundant any more. Unfortunately, not all the stalk sets have this connector exposed. Some are hidden inside the central unit.

  3. The last one was a bit painful and time consuming! While we were done with the connections on the T41 connector and were reassembling the stalk and the steering wheel back, we had replaced the steering column's bottom trim before placing the stalks unit. The screw holes aligned perfectly but there was a huge gap in the keyhole and the hole through which the stalks come out.

    I have made a rough sketch indicating it:

    Name:  BOTTOM TRIP WRONG.png
Views: 47528
Size:  10.6 KB

    Name:  BOTTOM TRIP CORRECT.png
Views: 47166
Size:  10.7 KB

    The bottom trim's screw holes should be above the stalk unit's holes. We did it the incorrect way the first time as shown above. And screwed back the steering wheel! We had to remove the steering wheel once again, remove the stalks unit and then reassemble them in order, screw the steering wheel back. So keep this in mind.

  4. When I received the package, I had noticed that this was the pin which was supposed to go into the ECU connector:

    VW Polo DIY: Cruise Control!-img_1254.jpg

    But at the time of installation, when we opened up the ECU connector, turns out the pin was a bit larger in size and it wouldn't go inside the empty slot at all. Yikes! And then, when we compared the dummy plastic pin with that of pin that is inserted into the BCM connector, it looked exactly similar. We had a few spare terminals so decided to use one of them and bingo! That was indeed the pin.

    VW Polo DIY: Cruise Control!-img_14921.jpg
    From L to R: The incorrect pin from the harness, the dummy plastic pin and the correct pin.

    My friend Fernando says, this could have varied because of some localisation aspect. Internationally, the broader pin appears to be used for the TDI engines.

  5. The last one - connecting the power cable to the fuse box. We have to connect the power cable of the cruise control system to fuse box's no. 11 slot. Now no. 11 already has a 5A mini fuse and is also being served to other consumers. One way is to tap the stock cable using a Scotchlok connector or removing the insulation, soldering the wire and insulating the joint. We removed the fuse box and figured out that this place was nearly inaccessible! The bunch of cables were so much and there was no way we could have managed to tap into this cable. We even tried extracting the pin from the fuse side using the tweezers so we could pull it out and do the work but nope, it wasn't possible. And finally, decided to go with the fuse tap cable. Works equally well and we don't have to splice into any stock cables.

That would be all. I owe my thanks to Fernando for all the help he has lent me so far - the cruise control kit, the current flow diagrams, clearing my doubts and responding to my mails. Thanks to Moorthy for helping me with the installation during the weekend and to my wife for the support (she knew about cruise control ever since I explained to her about the whole thing during a trip and how convenient it would be and she kept asking me from time to time if I completed the retrofit).

Let me know if you have any queries. Will be happy to answer them.

Last edited by Gannu_1 : 17th November 2015 at 09:51.
Gannu_1 is offline   (59) Thanks
Old 17th November 2015, 09:49   #6
GTO
Team-BHP Support
 
GTO's Avatar
 
Join Date: Feb 2004
Location: Bombay
Posts: 70,512
Thanked: 300,697 Times
Re: VW Polo DIY: Cruise Control!

Thread moved from the Assembly Line to the Modifications Section. Thanks for sharing!
GTO is offline  
Old 17th November 2015, 10:13   #7
BHPian
 
PatchyBoy's Avatar
 
Join Date: Nov 2007
Location: Goa
Posts: 917
Thanked: 2,022 Times
Re: VW Polo DIY: Cruise Control!

Excellent DIY and equally brilliant documentation. Took me back to my days of retrofitting cruise control on my Linea T-Jet. Enjoy the relaxed drive. I am sure you will see improved fuel efficiency as well. I have seen as high as 21 kmpl in the T-Jet with cruise control set at 90 kmph.
PatchyBoy is offline   (3) Thanks
Old 17th November 2015, 10:59   #8
BHPian
 
Join Date: Sep 2015
Location: Mumbai
Posts: 54
Thanked: 98 Times
Re: VW Polo DIY: Cruise Control!

Gannu, I read through this once and I am sure I would need to read it 10 times over before I can attempt to do this retrofit! Many thanks for one of the most detailed and complex DIY guide that I have ever come across! Wanted to know how much time did this activity take? Am coming to Navsari this weekend and would love to meet up with you.
Jamsukh is offline   (3) Thanks
Old 17th November 2015, 11:09   #9
Distinguished - BHPian
 
paragsachania's Avatar
 
Join Date: Nov 2007
Location: Belur/Bangalore
Posts: 7,148
Thanked: 27,140 Times
Re: VW Polo DIY: Cruise Control!

A laborious DIY and convenience guaranteed for life! That sums up this one Gannu .

Needless to say its very well captured & documented to aide anyone who would want to attempt this.

Where will you use CC in Indian Roads?

Well, there are so many stretches on our Indian roads today where one can easily set the CC between 80-90 kmph and drive all day without even hitting the brake pedal. This is the era of ATs/AMTs and CCs!!

Way to go.
paragsachania is offline   (1) Thanks
Old 17th November 2015, 12:16   #10
BHPian
 
Join Date: Oct 2015
Location: Trivandrum
Posts: 61
Thanked: 32 Times
Re: VW Polo DIY: Cruise Control!

What a DIY. Really takes a lot of experience and effort, cruise control is something I would really want in my car but its going to be a long time before I can event attempt something like this. Kudos and thumps up to your wife for her support too.

Last edited by nitheeshsreeram : 17th November 2015 at 12:27. Reason: Typo
nitheeshsreeram is offline   (1) Thanks
Old 17th November 2015, 12:27   #11
BHPian
 
Join Date: Mar 2011
Location: Chennai
Posts: 92
Thanked: 78 Times
Re: VW Polo DIY: Cruise Control!

Dear Gannu_1,

Man, though i don't own a Polo or anything from VW, even i had heart in the mouth moment just reading your post. You guys have taken DIY to a different level.

But if it were me, I'd still give it a thought or two even before attempting this, as this DIY touches super critical parts like airbags and ECU. I am seriously feeble minded when it comes to doing stuff on these lines.

But still, you guys deserve a pat on the back! for all that hard work!!

Trumpet!
trumpet is offline   (1) Thanks
Old 17th November 2015, 12:54   #12
Senior - BHPian
 
SnS_12's Avatar
 
Join Date: Jun 2014
Location: Bombay
Posts: 1,268
Thanked: 8,701 Times
Re: VW Polo DIY: Cruise Control!

Man, I have followed most of your DIY's and I just can't even imagine the amount of research and dedication that would be required to even do one of them. Brilliant stuff.

On a different note, since you have changed a lot of stuff from the current steering wheel, headlight etc, and since most of them are expensive have you got these parts endorsed to be covered in your current insurance?
SnS_12 is offline   (1) Thanks
Old 17th November 2015, 13:18   #13
BHPian
 
avdhesh15's Avatar
 
Join Date: Jan 2014
Location: Mumbai
Posts: 873
Thanked: 1,204 Times
Re: VW Polo DIY: Cruise Control!

Dude - this is insane stuff man! I was amazed at the entire post and how well it was executed. Great going and look forward to reading more of your DIYs in the future!
avdhesh15 is offline   (1) Thanks
Old 17th November 2015, 13:42   #14
Distinguished - BHPian
 
PrasannaDhana's Avatar
 
Join Date: Jun 2015
Location: TRICHY - TN
Posts: 2,923
Thanked: 18,375 Times
Re: VW Polo DIY: Cruise Control!

Excellent!!

One day when you list your car for sale, the potential buyer is going to have a hard time believing the extra add-ons you have put in your polo.
PrasannaDhana is offline   (1) Thanks
Old 17th November 2015, 13:48   #15
BHPian
 
Join Date: Oct 2015
Location: Chennai
Posts: 63
Thanked: 50 Times
Re: VW Polo DIY: Cruise Control!

Wow! What a well laid out instructional manual! Mind boggling and scary too. You went ahead and fiddled not just with hardware but changed bytes in ECU too. It proves the amount of confidence and research that went into this project, hats off.
rselva is offline   (1) Thanks
Reply

Most Viewed


Copyright ©2000 - 2024, Team-BHP.com
Proudly powered by E2E Networks