| |||||||

| Search Forums |
| Advanced Search |
| Go to Page... |
 |
| Search this Thread |  959,981 views |
 11th July 2022, 11:18
| #931 | |
| Distinguished - BHPian  | Re: My Car Hobby: A lot of fiddling, and some driving too! Jaguar XJR, Mercedes W123 & Alfa Romeo Sp Quote:
Jeroen | |

|  (1)
Thanks (1)
Thanks
 |

| The following BHPian Thanks Jeroen for this useful post: | Thad E Ginathom |
| |
|
12th July 2022, 00:48
| #932 |
| Distinguished - BHPian | Re: My Car Hobby: A lot of fiddling, and some driving too! Jaguar XJR, Mercedes W123 & Alfa Romeo Sp Yesterday evening I was driving home in the Jeep. I had just entered the motorway when I noticed the volt meter had dropped to zero and a red light check gauges had come on! Problems with the instruments and lights on the instrument display is a well known problem on these old Jeeps. I have had multiple failures. But I thought I had fixed it earlier when I cleaned the two connectors on the back of the instrument display. Since I had no problems. Also, when there are problems, lights and gauges usually dont indicate anymore. The light check gauges and the non-working volt meter was something I had not seen before. I did not think too much of it. Car still drove fine. But after 20 minutes or so, I got tired of looking at this problem. So I pulled over at a petrol station to see what was wrong. Unfortunately, this is the one car that does not have any tools in it (yet!). First thing I did was to check the owners manual. sure enough this exact problem was mentioned. So it was likely to be more than just a loose display connector. I tried to restart the engine, but it was immediately apparent the battery was almost dead!! Managed to borrow some jumper cables from somebody and he helped me with his car. But for some reason it would not work. Also, the jumper cables got very warm very quickly. I double checked I had them connected correctly, which they were. So in the end I called my insurance road side emergency number. A mechanic arrived within 35 minutes. He checked the battery with a multimeter, about 11,5V. So too low. He had one of these huge booster packs with him. Engine fired up immediately. Checked with the multimeter and it looked like the battery was charging too. Volts were back on and the check gauges light was off. So I just drove home. This morning the Jeep still managed to start and I drove over to our local Euromaster, one of these quick fitters (tires, exhausts, batteries). I told them what had happened and could they please do a proper battery test for capacity. Sure, they were just going to drive it into their workshop, but it would not start. Battery dead again. So they brought the battery tester outside and hooked it up to the Jeeps battery. Within 10 seconds it had diagnosed a broken battery cell. Which we thought explained all the problems. Unfortunately, they did not stock this type of battery, but a car parts store a few kilometres down the road did. The plus and minus are swapped compared to regular batteries. And the cables in the Jeep are to short to fit, so you have to have one of these batteries with swapped poles. Old and new battery  I checked the battery tray, typically you will lots of rust here. Not so much, well its plastic, there might be rust beneath it.  But I did notice that the old battery had pinched some of the wires! Not broken yet, but I will keep an eye on it.  New battery installed, engine fired up right away, all looks good.   So I load up the Jeep with some of the old parts and used liquids to be disposed of and to return the old battery. You pay a Euro 10 deposit on your new battery, which will be returned when you hand in your old battery.  Dumped all the old stuff at the Council tip and returned the old battery. I was driving home happy! I was just on the phone to spanner mate Peter to tell him what happened when I noticed the volt meter had dropped again to zero and the blasted Check Gauges light had come on again!!  I quickly drove home and checked the battery with my multimeter. Just 12,5V, so no charging happening!! So I checked the manuals, I also called my Jeep specialist Martin. The alternator on this Jeep has an external voltage regulator which is part of the PCM. Cant replace the voltage regulator by itself. But with no charging at all, the most likely problem was the alternator and in particular the brushes. So I decided to take the alternator off and take it from there. Shuffled my cars around and the Jeep back into its usual spattering position.  Removing alternators can be a bit of a pain on some cars. It wasnt to difficult on the Jeep. Still, it took me the better part of two hours. But then again, I am very slow these days. Here you see the top bolt just right of the battery tray.  Here the alternator from below the engine.  Once I had removed all the wiring and the various bolts (Had to take the battery out to get access to the bolts), it took me about 10-15 minutes to pry it out from underneath the engine and all the various hoses, tubings, brackets and so on.    In a nearby little town, Leerdam, I knew a company that overhauls starters and alternators. So I took my alternator over to them. The guy opened it up right away and there was definitely a problem with the bushes. Almost none left and therefor not sufficient pressure on them anymore. 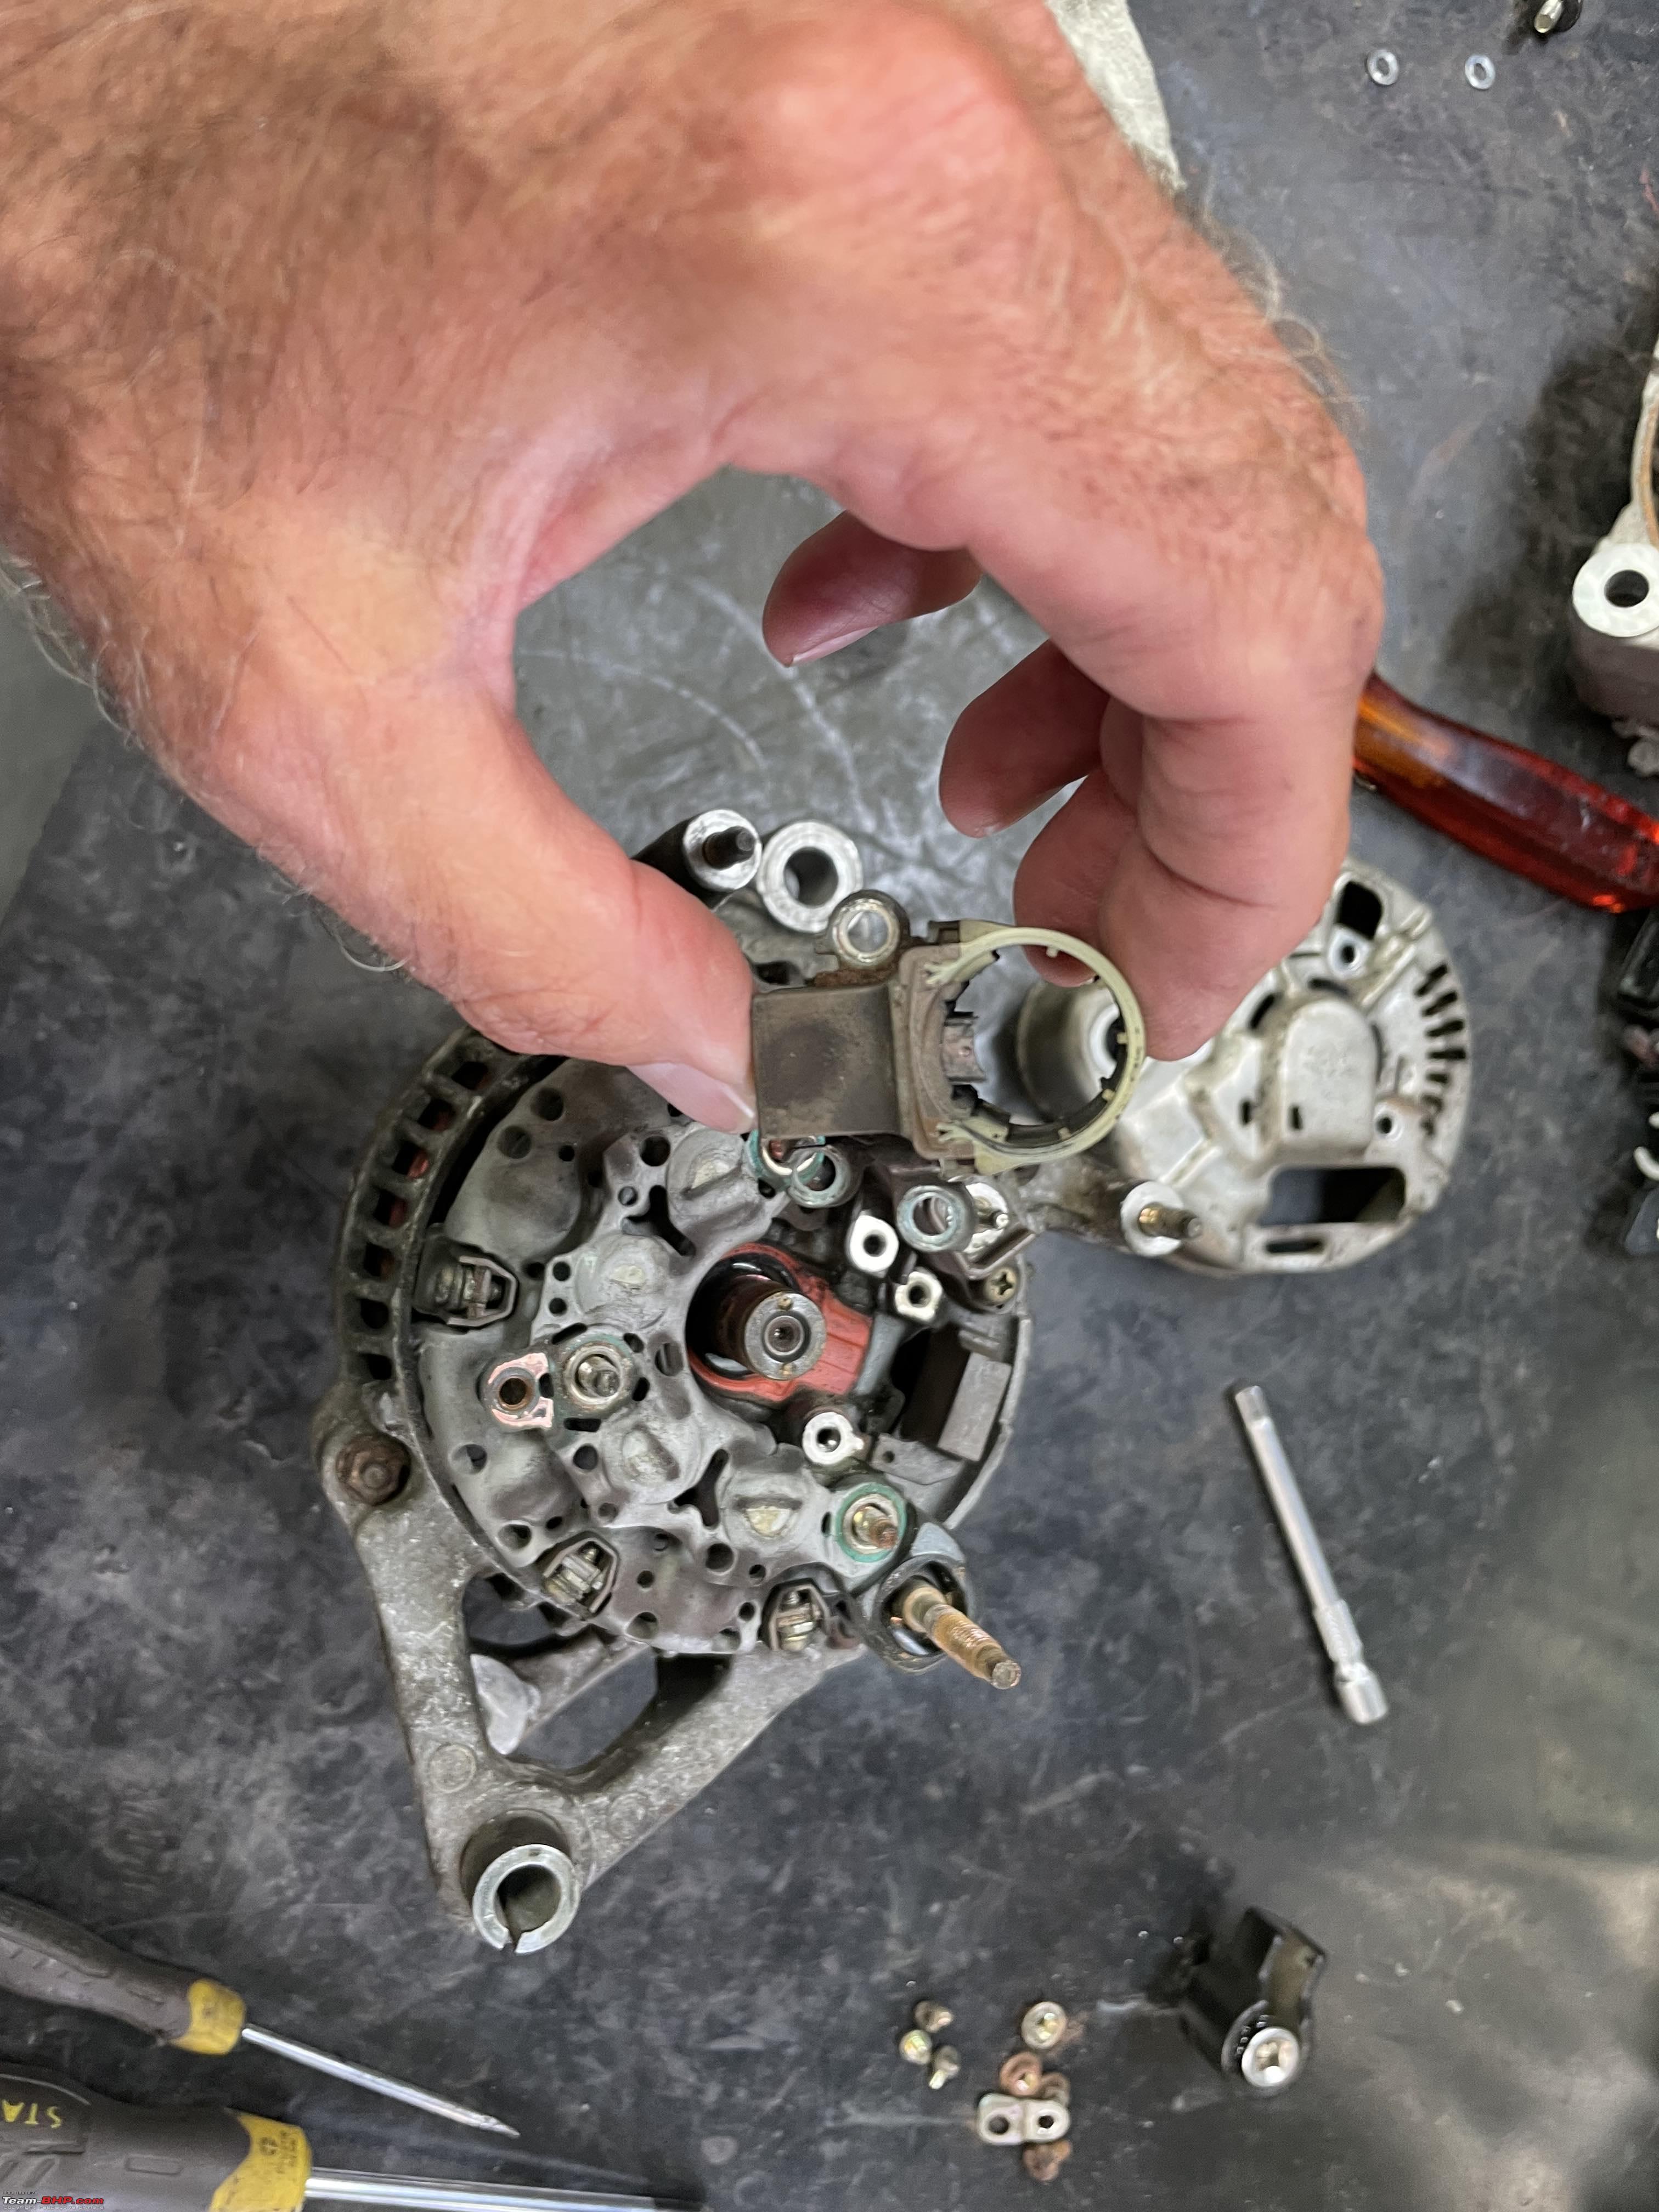 He could overhaul it for me, but he double checked for the price of a new one. And it was about the same price as the overhaul might have cost. So we ordered the new one, which should arrive tomorrow hopefully!! I spend the afternoon cleaning up bolts and the wires. I also took of the ground connection and cleaned them. Its these two studs behind the loose wiring in from of them  Poor grounds can cause all sorts of problems, so better safe than sorry. Once everything was clean I applied di-electric grease liberally.  The di-electric grease works better than just vaseline I find. Especially in this spot as it is likely to get a bit wet. We will see. Hopefully the new alternator will arrive tomorrow!! Jeroen |
|
| (28)
Thanks
|
| The following 28 BHPians Thank Jeroen for this useful post: | anoopelias, Bibendum90949, Capricorn, Captain Slow, carthick1000, CLIX, dailydriver, dkaile, Dr.AD, Excommunicado, gauravanekar, gunin, IcarusMan, InControl, Ithaca, keroo1099, Newtown, Nick_Wanderlust, NiInJa, Prowler, roby_dk, sagarpadaki, SnS_12, Thad E Ginathom, Theyota, TorqMaster, vaasu, VivekCherian |
|
12th July 2022, 17:11
| #933 |
| Distinguished - BHPian Join Date: Jun 2007 Location: Chennai
Posts: 11,005
Thanked: 26,443 Times
| Re: My Car Hobby: A lot of fiddling, and some driving too! Jaguar XJR, Mercedes W123 & Alfa Romeo Sp Nice to see some model-engine parts in the background. My alternator story was with a 13-yr-old Honda Civic ('74: original model). A friend helped me remove it from the car. We ran all the tests in the Haynes manual, and it failed every one. We refitted it and it worked fine! I'm sure you have lots of alternator stories, and, quite likely, even some pre-alternator generator tales! |
|
| (5)
Thanks
|
| The following 5 BHPians Thank Thad E Ginathom for this useful post: | Dr.AD, gauravanekar, InControl, Jeroen, Prowler |
|
12th July 2022, 19:29
| #934 | |
| Distinguished - BHPian | Re: My Car Hobby: A lot of fiddling, and some driving too! Jaguar XJR, Mercedes W123 & Alfa Romeo Sp Quote:
Got a call this morning at 08.30 my new alternator had arrived. So I went to pick it up. Also I ordered a new set of brushes for the old alternator. Very cheap, just a few euros, and I will keep it as spare unit. You never know what parts availability will be a few years from now. Old and new and identical in every way!! Very important or it just wont fit. You should also double check the rating of the alternator before installing it.   Putting the new alternator back into its narrow and confined space went smoothly. Always double checking what bolts to torque to what spec!  I am still very happy with the two new torque wrenches I bought some time ago. Excellent piece of kit and very easy to use and to set the correct value.  Before putting it back in, I had to make sure all the loose wires from the battery and the alternator itself were out the way. I just use simple pieces of metal wire.  Here you see it mounted and wires attached from underneath.  A bit more close up, you can also see the ground points I had cleaned earlier.  Getting the belt back in place, not too difficult, but double check the belt routing. If you get it wrong, worse case your water pump might be driven in the wrong direction.  I had also found a piece on the belt tension in my Haynes manual:  Put the fan back in and took the car and started her up: Everything looked and sounded fine. So a quick test drive. I drove for about twenty minutes and all looks good. However, when I stopped I noticed the belt making a bit of a screeching sound. So I redid the tensioning and experimented a bit till the noise was gone.  Finally, put away all my tools and mopped the garage floor and moved the Mercedes and the Jaguar back in their respective spots.  I am glad the new alternator solved the charging problem. I was dreading it to be the voltage regulator in the PCM. Fingers crossed, so far, so good! I have just ordered some power steering fluids for the Jeep. That is the only fluid I had not changed yet. Should arrive in the next couple of days. Jeroen Last edited by Jeroen : 12th July 2022 at 19:30. | |
|
| (24)
Thanks
|
| The following 24 BHPians Thank Jeroen for this useful post: | abhijit 2284, ajayc123, amvj, anoopelias, asbshyam, Capricorn, carthick1000, CLIX, dailydriver, dkaile, Dr.AD, IcarusMan, InControl, Ithaca, Nick_Wanderlust, Prowler, Siva Prakash, SS80, Thad E Ginathom, the.dogfather, Theyota, toothless, vaasu, vishy76 |
|
13th July 2022, 12:19
| #935 | |
| BHPian Join Date: Jul 2008 Location: Madras
Posts: 774
Thanked: 1,326 Times
| Re: My Car Hobby: A lot of fiddling, and some driving too! Jaguar XJR, Mercedes W123 & Alfa Romeo Sp Quote:
One thing (there are many things I learn from your thoroughly detailed writeups) I notice is you have access to the workshop manuals and a complete set of professional grade tools - mandatory for such jobs. Problem here is we can't get workshop manuals for Indian brand cars (eg. Tata) but you can get such manuals for all other brands. {/rant} | |
|
| (5)
Thanks
|
| The following 5 BHPians Thank Prowler for this useful post: | Capricorn, Dr.AD, gauravanekar, Jeroen, Thad E Ginathom |
|
14th July 2022, 11:45
| #936 | |||
| Distinguished - BHPian | Re: My Car Hobby: A lot of fiddling, and some driving too! Jaguar XJR, Mercedes W123 & Alfa Romeo Sp Quote:
Corrosion and water between contacts is effectively a capacity and or high resistance. Your digital meter will read it wrong or not at all, whereas you are more likely to get a reading on an analogue meter. The cheaper the better!! Quote:
I do like my tools and I have collected quite a few of them over the years. I would happily invest in a tool I might be using once for a particular job. Apart from the fact that I really enjoy fiddling with my cars in this fashion, it also saves me a lot of money. Labour rates here in the Netherlands are high. On most jobs on a car the labour tends to be a lot more than the parts. Quote:
see https://www.emanualonline.com It is more difficult to find workshop manuals for modern cars these days. Some manufacturers have it integrated whole or partly in their diagnostic systems. Why is it so difficult to get workshop manuals for Indian brand cars? Too small a market, not enough interest for DIY spannering? My Power steering fluid arrived yesterday as well as the spare set of brushes for my old alternator. I will probably get to work with both in the next few days. Jeroen | |||
|
| (8)
Thanks
|
| The following 8 BHPians Thank Jeroen for this useful post: | abhijit 2284, bikertillidie, Dr.AD, gauravanekar, Prowler, Thad E Ginathom, Theyota, vishy76 |
|
15th July 2022, 10:08
| #937 | |
| BHPian Join Date: Apr 2009 Location: HBX, N. Kar
Posts: 190
Thanked: 917 Times
| Re: My Car Hobby: A lot of fiddling, and some driving too! Jaguar XJR, Mercedes W123 & Alfa Romeo Sp Quote:
I like your garage floor. It seems to have held up well. Is it epoxy? I dream of having a nice garage of my own one day. But having to move from country to country every 3 years or so, it seems like a distant dream for now. | |
|
| (2)
Thanks
|
| The following 2 BHPians Thank Theyota for this useful post: | Jeroen, Thad E Ginathom |
|
15th July 2022, 10:26
| #938 | ||
| BHPian Join Date: Jul 2008 Location: Madras
Posts: 774
Thanked: 1,326 Times
| Re: My Car Hobby: A lot of fiddling, and some driving too! Jaguar XJR, Mercedes W123 & Alfa Romeo Sp Quote:
Quote:
fell off due to shearing off of one of its mounting bush, the Service Center chaps asked me to change the entire front bumper assembly (at a cost of Rs.14000/-). I took the bumper to a metal fabricator and asked him to make a metal bracket with a design I made myself. It cost me about Rs.500/- and the Bumper served its job until I sold the car 3 years later. | ||
|
| (2)
Thanks
|
| The following 2 BHPians Thank Prowler for this useful post: | Jeroen, Thad E Ginathom |
|
16th July 2022, 11:36
| #939 |
| Distinguished - BHPian | Re: My Car Hobby: A lot of fiddling, and some driving too! Jaguar XJR, Mercedes W123 & Alfa Romeo Sp As some of you might recall, my friend Berndt and I bought one of these classic car engine measuring / testing kits a few years back at a classic car part show. I have spend quite some time on trying to get it back to working order. As parts are not available any more I bought another one. The idea being to make one working out of two broken ones. The second unit I bought looked identical to the first one. They were respectively model 1631 and 1630. Turns out the model 1631 is a digital version of the 1630 as far the electronics is concerned. So I could not use a single part other than the cables. I did get hold of a third one, a true, analoge, model 1630. I took it apart so I could swap parts. But it meant the model 1631 had to go. No use for it. So I had an advertisement in a classic car magazine and yesterday a guy came round to pick it up.  I picked up my spare brushes for the alternator.   In Dutch this is called a “borstel-brug”. Which would translate a “brush-bridge”. It is a complete assembly, with the two brushes, spring loaded into one fitting. Very easy to replace! As it will also fit my new alternator, I decided not to fit it to the old alternator. The old alternator was a Denso. Spanner mate Peter used to work at Denso and he confirmed they were OEM supplier to Chrysler/Jeep in the USA around that time. So it was most likely the original alternator. Lasted more than 300K kilometers. So I think it is unlikely I will have to replace it again, but you never know. Just labelled everything and put it into my spare part cabinet.  Got the Jeep ready for the Power Steering fluid flush. Pretty straight forward. I always raise the front wheels. This ensures that when you bleed the system, the fluid does not get frothed up by the pump. You need to pay particular attention to this at low ambient temperatures. Once it happens it might take days for the air to disappear from the oil!  There is no mention of flushing of this system in any of my manuals. Usually the easiest way is to disconnect the pressure side hose of the pump and run the engine for a short while till no more fluid spills out. But the hose connectors are badly corroded and inaccessible without removing a bunch of stuff. So I decided to just extract the old fluid from the reservoir, put new fluid in, run the system, extract again etc until I had clear fluid left in the reservoir. I used my vacuum brake bleeder to extract the fluid from the reservoir.  Power Steering fluid is essentially an ATF these days. Nasty stuff, make sure not to spill and if you do, rinse with a lot of water and degreaser or soap.   I repeated the extract/refill cycle four times. Each time I started the engine and moved the wheel 20 times lock to lock left right. By the fourth time I had very clear fluid left. So that is as good as it gets. On the Jeep you need to check two levels. Once with the fluid cold (C on the dipstick) and once with the fluid at normal working temperature (H on the dipstick). All looked well!!  All fluids on the Jeeps have now been refreshed! On to the next job. Jeroen Last edited by Jeroen : 16th July 2022 at 11:37. |
|
| (5)
Thanks
|
| The following 5 BHPians Thank Jeroen for this useful post: | carthick1000, IcarusMan, Prowler, Thad E Ginathom, vaasu |
|
16th July 2022, 13:42
| #940 | |
| Distinguished - BHPian | Re: My Car Hobby: A lot of fiddling, and some driving too! Jaguar XJR, Mercedes W123 & Alfa Romeo Sp Quote:
See https://www.team-bhp.com/forum/diy-d...my-garage.html (At long last: My own man cave...My Garage!) Jeroen | |
|
| (1)
Thanks
|
| The following BHPian Thanks Jeroen for this useful post: | Thad E Ginathom |
|
21st July 2022, 20:42
| #941 |
| Distinguished - BHPian | Re: My Car Hobby: A lot of fiddling, and some driving too! Jaguar XJR, Mercedes W123 & Alfa Romeo Sp We are having a bit of a heat wave here in the Netherlands and most of Western Europe. Earlier this week temperatures were up to about 40oC, which for the Netherlands is very very hot!! On such hot days there is not much you can do, other than taking it easy. But today we have about 19oC and some rain. So a good day to fiddle with my cars. I started with the Spider. I am still mopping up more oil on the floor and on the Spider due to my earlier little mishap. I also checked the little oil separator in the crankcase ventilation system. It drains any oil back into the sump, but I have had the drain blocked before. So I disconnected the hose from the oil separator.  Try to blow it through, but it was completely blocked. So I took off the other end of this hose. It connects via a T-piece to the dip stick connector on the engine sump. I put a plastic bag around the end of the house and taped it with gorilla tape.  Last time I did not put a plastic bag on the hose, when I blew it through I ended with a lot of oil and crap all around the engine bay. I have had enough of oil-mishaps as it is. Caught quite a bit!!  My Jeep is still suffering from what I thought was squealing belt. So I had another good look at it. Made sure all the pulley and idler are properly aligned. Cleaned all the pulleys and idler pulleys too. A simple trick to test the belt is to spray water between the belt and the pulley and see if the squealing stops. It did not. So I took the belt off again. It looks like the noise is coming from the AC compressor clutch. Which means it is either the clutch or the clutch bearing. My money is on the clutch bearing. I had the same problem in 2011 on our Jeep in the USA. (https://www.jeepforum.com/threads/ac...lutch.1240081/) I also inspected the belt very carefully. I thought it looked fine, but a new belt isn’t very expense and I thought I would just swap belts as well. So I got myself a new belt from Edwin of Jeepparts.  However, the new and the old belt were very different length. The new one was about 12 cm shorter in overall length. No way it was going to fit!!  Called Edwin again and he double checked. He thought the wrong belt might have been put into this package, so I drove over to him again, and exchanged it. We checked and it was the wrong belt in this particular package. Would not be the first time I am having trouble with finding the correct length belt. A few years ago I spend an extraordinary amount of time and effort in finding the correct belt for my Jaguar. All the official documentation was simply incorrect!!  This time the belt fitted perfectly, but I am still getting the noise and it becomes worse when I engage the AC compressor/clutch. I have already been phoning around. In the USA they used to have special clutch overhaul kits. New bearing, new clutch, new shims, new coil. But nobody stocks those anymore. So I am just going to try and figure out what type and size the bearing is and replace it. According to my Jeep, it is a job which requires several special tools. But I recall I did this in an afternoon in Kansas City with no special tools at all. Not sure how, but I think I should be able to figure it out again. Jeroen Last edited by Jeroen : 21st July 2022 at 20:44. |
|
| (5)
Thanks
|
| The following 5 BHPians Thank Jeroen for this useful post: | ashis89, Bibendum90949, IcarusMan, Thad E Ginathom, vaasu |
| |
|
26th July 2022, 22:47
| #942 |
| Distinguished - BHPian | Re: My Car Hobby: A lot of fiddling, and some driving too! Jaguar XJR, Mercedes W123 & Alfa Romeo Sp Time to get cracking on this AC compressor bearing. I always prefer to have my replacement parts at the ready when I start a job. So I had been trying to figure out what bearing I needed. Tried various forums, but got different answers. As I mentioned, I had done this job in 2010 on our US Jeep. So I checked my mails and sure enough I found the original instructions from the guy that sold me the overhaul kit. I contacted his e-mail address but no reply. Also, no mention of the bearing size. So nothing else to take the clutch apart and see what is what. The original Jeep Instruction calls for many special tools. I have none of those, so it will take some improvising. Towards the end I will also try and explain how these electromagnetic clutches work. First thing is to take of the support beam and the two cooling fans.   Next, the central nut holding the clutch plate drive in place has to come off.  However, when you turn the nut you turn the compressor shaft too, so you need to find a way to fix it. I propped one of my wrenches between the fan blade hub and a rivet on the clutch plate drive. Worked fine. This (self locking) nut is tightened to only 17Nm  I could not get the clutch plate drive to come off. Tried prying with a few screw drivers and various tools. You really need a special puller. But I just put three little bolts into the holes in the centre. These are actually to hold the bolts of the puller. But if you just keep on turning the three bolts very carefully you will effectively push the whole clutch plate drive off.  Inside also three washers. Well, actually they are shims, three different thicknesses. These allow you to set the air gap between the clutch plate drive and the pulley. See further below.  With the compressor mounted pretty close to the radiator there was no way I could get my pullers in there to pull the main pulley off. So I undid the compressor, four large bolts. Two electrical connectors. The actual AC plumbing are special rubber hoses, so that makes it possible to move the AC compressor about a bit. Piece of wood underneath it, so it doesnt damage or short circuits anything.   The pulley itself is locked in place with a circlip. You can see the inner bearing ring and the dust protection of the bearing.  I have a box full of circlip pliers, of course!!  Got my puller attached to the pulley. You need to be careful, everything needs to line up nicely, or it might get stuck!!  The pulley came off very nice and easy!!  Here you see it from the inside and you clearly see the bearing. Also a circlip to keep it in place.  Took the circlip out and found a socket that sort of fitted and rammed out the old bearing.  Everything removed    The old bearing still had its number written on it. 35BD5520DUK. Which means the outer diameter is 55mm, inside diameter 35 and thickness 20mm. The various letters indicate the dust protection. These bearings get a high axial loading, so you cant just any old bearing. I first tried my usual bearing supplier. But he did have it. SKF does not have any 55mm outside diameter bearing. Bit of googling and I found an automotive supplier who had the correct bearing. It was also advertised as a Sanden compressor clutch bearing. So I ordered that one. Spend a bit more time cleaning all the parts, waiting for my bearing to arrive the next day.  I had also noticed that one of the bottom isolated of my new radiator was damaged. I had not installed in correctly. It was a bit torn.  For some reason these small rubber isolators are hugely expensive. So I just super glued this one back together. Put it into a glass with boiling water to make it soft and pliable and re-installed it. Just a bit on how these clutches operate. This is a so called electromagnetic clutch. The clutch connects/disconnect the AC compressor from the drive belt. Many modern cars have variable displacement compressor with no separate clutch. Although the last couple of years those type of compressor are often equipped with a electromagnetic clutch too. Some of these variable displacement compressors get problems with continuous operations without compressing gas. The gas also carries the lubrication oil, so lubrication becomes a problem. Here you see me holding the pulley in front of the AC compressor. At the front of the AC compressor a large field coil is mounted, the black ring you see.  Here I have slid the pulley into its normal position, it sits over the coil. The bearing is still missing here. So you can see there is no connection between the AC compressor shaft and the pulley!! It can just rotate (with its bearing in place) independently from the AC compressor shaft  Here you see me holding the clutch plate drive in front of the AC compressor with pulley.  It connects to the AC compressor drive shaft by means of a tight fit collar and a spline. So this plate is mounted and fixed directly onto the AC compressor shaft but rotates freely in relation to the pulley. Here you see the same clutch drive plate, but from a slightly different angle. You will notice that it actually consist of a few different parts. The middle part is attached to the AC compressor shaft, but the outer part is connected to the middle parts by strong metal springs.  When the field coil is energised it becomes magnetic and it pulls the clutch plate against the springs into the pulley. Clutch plate on pulley is just metal to metal contact. As long as the field coil is energised the clutch plate is pulled tight onto the pulley. As the pulley is driven by the belt it will also start turning the AC compressor subsequently. The shims I showed earlier determine the air gap between clutch plate and pulley. |
|
| (5)
Thanks
|
| The following 5 BHPians Thank Jeroen for this useful post: | Cyborg, IcarusMan, shancz, vaasu, vb-saan |
|
26th July 2022, 23:02
| #943 |
| Distinguished - BHPian | Re: My Car Hobby: A lot of fiddling, and some driving too! Jaguar XJR, Mercedes W123 & Alfa Romeo Sp The next day, my new bearing arrived around 15.00 hours in the afternoon. So plenty of time to install it. The bearing fits in tight in both the pulley as well as on the shaft. You dont want to hammer to hard onto the compressor shaft as you might damage the internal bearings and or seals of the compressor. So I always use heat and cold to make the fitting as easy as can be. So the pulley goes into the over on 65oC and the bearing goes into the freezer, inside a plastic bag, about -18oC. Leave them for some 30-40 minutes. I use my infra red thermometer to take temperature readings.  Also, you need to have some tools and bits ready to drive the bearing into place. It is always going to take a bit of hammering. You need to find something that closely matches the diameter of the outer- and inner bearing ring. On smaller bearings various sockets might do. This bearing outer diameter was to big though. Luckily I have a huge collection of various tools, so rummaging through everything until I found something suitable.  This extractor bit looked as if it was made for this job!!    Done!  Got the pulley back into position inside the bearing. With the bearing still pretty cold, I put the pulley with the bearing back into the oven. Because now I needed to slip the pulley and bearing onto the outer housing. I cant cool it down, part of the compressor, but I can warm up the complete pulley and bearing of course.   Worked well. Circlip back in place. Did the same trick with the clutch plate driver too.  Put the AC compressor back in its original position, bolted and torqued it down to specification. Similar trick to get the central locking nut back on as undoing it earlier. Used a toolbit to fixate the clutch plate driver.  Belt back on and tightened it. Although not everything in place, I started the engine to see if everything ran smoothly, which it did!!  Last bits to go back on:  All done!!  I cleaned up all my tools, tidied my garage, had a shower and took the Jeep for a test drive. Initially everything looked and sounded great. However, after some 10 minutes of driving the exact same noise was back again. Bugger!! So either I managed to damage the new bearing. I dont think so, I spun the pulley freely and it was absolutely soundless. Or, it might be an internal bearing of the compressor. Or maybe the idler pulley underneath it. Cant get at it with my stethoscope to check. For now, I will leave it and check of a plan B. The Jeep is also going back to Martin, my local Jeep specialist, on Monday. There are two small places that need a bit of welding. I will talk it over with him, see what he says/thinks. Jeroen Last edited by Jeroen : 26th July 2022 at 23:06. |
|
| (5)
Thanks
|
| The following 5 BHPians Thank Jeroen for this useful post: | carthick1000, IcarusMan, keroo1099, Thad E Ginathom, vaasu |
|
29th July 2022, 11:49
| #944 |
| Distinguished - BHPian | Re: My Car Hobby: A lot of fiddling, and some driving too! Jaguar XJR, Mercedes W123 & Alfa Romeo Sp The squeaky belt saga continues! I have been thinking about this problem a lot. As I mentioned I found it difficult to believe that the compressor bearing are the problem. So yesterday afternoon I decided to have another look. Jeep at the ready for trouble shooting:  I checked everything again with the engine shut off. Checked all bolts of all the various bits on the engine for correct tightness, checked the alignment (as far as you can without special tools). Nothing!! So I fired up the engine again and looked and listened at the clutch again. The air gap between the clutch plate and the pulley is too wide. That can cause the clutch to start slipping. Listened to all the bearings with my stethoscope again. Nothing!! But whilst I was looking at the clutch I noticed something important!! The AC compressor cycles on/off during normal operation, by means of the clutch. When it switches on, it also activates the electric fan. I noticed that the squeak starts about 1 second before I see the clutch engaging! I took a little video. Unfortunately you cant hear it on the video. But you can see the clutch initially engaged and after about 10 seconds you can see it disengaging. The clutch plate driver stops rotating. Then some seconds later it engages again. If you watch closely you can also see that the clutch moves about 1-1.5mm when it engages, which is a little on the high side. I checked it a few more times, then I experimented with switching on the rear window heater and lights. When I do that, the squeaky noise can be heard as well. Back to the compressor: When the PCM decides the compressor clutch needs to engage it shows a relay, which powers up the fan and the clutch. The fan comes in about 1 second earlier than the clutch. The fan causes an increase in load on the battery and alternator. Then about 1 second later the clutch engages and the noise becomes even more. My conclusion: The compressor is fine! Which is a BIG relieve. But there is something wrong with the alternator. As I had started and stopped the engine repeatedly during the trouble shooting, I noticed similar behaviour right after starting the engine for the 10th time or so. As soon as the engine starts I can hear the belt squeaking, but it fades away after 10-20 seconds. Due to the many starts, the battery capacity has been somewhat depleted and that means as soon as you start the alternator needs to top up and is loaded up. But very quickly everything is back to normal. I experimented with spraying water on the inside (ribbed) of the belt. An old trick to find whether the belt or a bearing might be the problem. Did not make any difference though. Remember, this alternator is brand new, I mounted it only a few posts ago. I thought about swapping the pulley of the new alternator for the old one. See if that makes a difference. But I am not sure they are identical. I have also experimented with belt tension, but again no difference. Anyway, I am actually pleased it is not the compressor bearing. Because that would have been a very expensive job and complicated. I would have to ask my mate Jack to remove the cooling charge, swap the compressor and get him to re-charge again. A new compressor cost easily Euro 500-600. If I get one shipped from the USA probably half. I thought I had better check with the guy from whom I bought the alternator. So, I drove by his shop, but either he had closed early or maybe he is on holiday. Oh well, today another day for some more fiddling. Jeroen |
|
| (5)
Thanks
|
| The following 5 BHPians Thank Jeroen for this useful post: | IcarusMan, shancz, Thad E Ginathom, vaasu, wbd8779 |
|
29th July 2022, 14:59
| #945 | |
| Distinguished - BHPian Join Date: Jun 2007 Location: Chennai
Posts: 11,005
Thanked: 26,443 Times
| Re: My Car Hobby: A lot of fiddling, and some driving too! Jaguar XJR, Mercedes W123 & Alfa Romeo Sp Quote:
When I was in London, I used to find that bargain prices from abroad were usually not, in the end, bargains at all! | |
|
| (1)
Thanks
|
| The following BHPian Thanks Thad E Ginathom for this useful post: | Prowler |
|