| |||||||

| Search Forums |
| Advanced Search |
| Go to Page... |
 |
| Search this Thread |  954,341 views |
 1st June 2023, 22:42
| #1096 |
| Distinguished - BHPian  | Re: My Car Hobby: A lot of fiddling, and some driving too! Jaguar XJR, Mercedes W123 & Alfa Romeo Sp I called my Jeep parts specialist Edwin and luckily he had a steering box in stock. So I quickly drove over and picked it up, including two new hoses. Also picked up some steering gear fluid, ATF. Edwin also lend me his special pitman arm puller!  All new shiny parts and fresh ATF  First thing I did was to suck out the fluid reservoir of the hydraulic pump. Could only get about 400 ml out, the system holds about 1.2l So the rest is inside the pump, the hoses and the steering box itself. Always be careful these hydraulic oil. They are very corrosive, especially on paint!!  I had hoped to take the pitman arm and nut off, with the steering box still attached to the car. But that was not possible, unless I took off the stabiliser bar too.  Interestingly enough, according to my Jeep Workshop manual, it is a very simple job. It took me all afternoon just to get the steering box out of the Jeep and the pitman arm off!!!  So I disconnected the dragrod. I only installed new ball joints a few weeks ago, so it came apart real easy.  I could not get good access to the three bolts holding the steering box to the chassis. So off comes the wheel and part of inner liner as well.   It took all my might to get these bolts undone. When I say undone, I actually meant I broke two of the three bolts!!  Getting the hoses of the pump and the steering box was the next challenge. I could have just cut them, but I was not a 100% sure the new ones would fit. In the end I did cut one and part of the pump came out as well as the hose nut had seized as well.   Bit of the pump stuck to the hose!! Easy enough to loosen once in the vise!   I had to undo the connection between the steering coupler column too. That went without too much drama. So finally I could get it our of the Jeep and on my workbench for comparison. Look Ma, no steering box!!   But there was another problem. There is an aluminium spacer between the steering box and the chassis. The three steel mounting bolts go through this spacer. So you get a lot of corrosion. That is why the bolts were stuck and subsequently broke!     Eventually I managed to get the spacer off the old steering box. It needs replacing. You cant get the original ones anymore. I can get them second hand on Ebay from the USA. But that will be expensive and will take a long time. I might just make my own new one. Next was to take the pitman nut off. It was a very odd size. Just under 33mm. 32mm is to small, 34mm to large. So I put the whole thing with the nut in the vice and gave it a couple of whacks!  But there was more trouble to come. Getting the pitman arm off, was a real problem too. Even with Edwin special puller this thing would not budge. And believe me, I put a lot of torque on that puller. But according to the manual the pitman arm nut is tightened with 250Nm. Go figure!!  When all else fails, go violent and torch the bugger! My new toch came in very handy. With a final whack of the hammer everything popped apart!  I put the wheel back on, I dont like to leave my cars on Jack stands for too long. Just put the socket on, so I dont forget to torque it properly. I probable take it off again in order to install the new steering box. 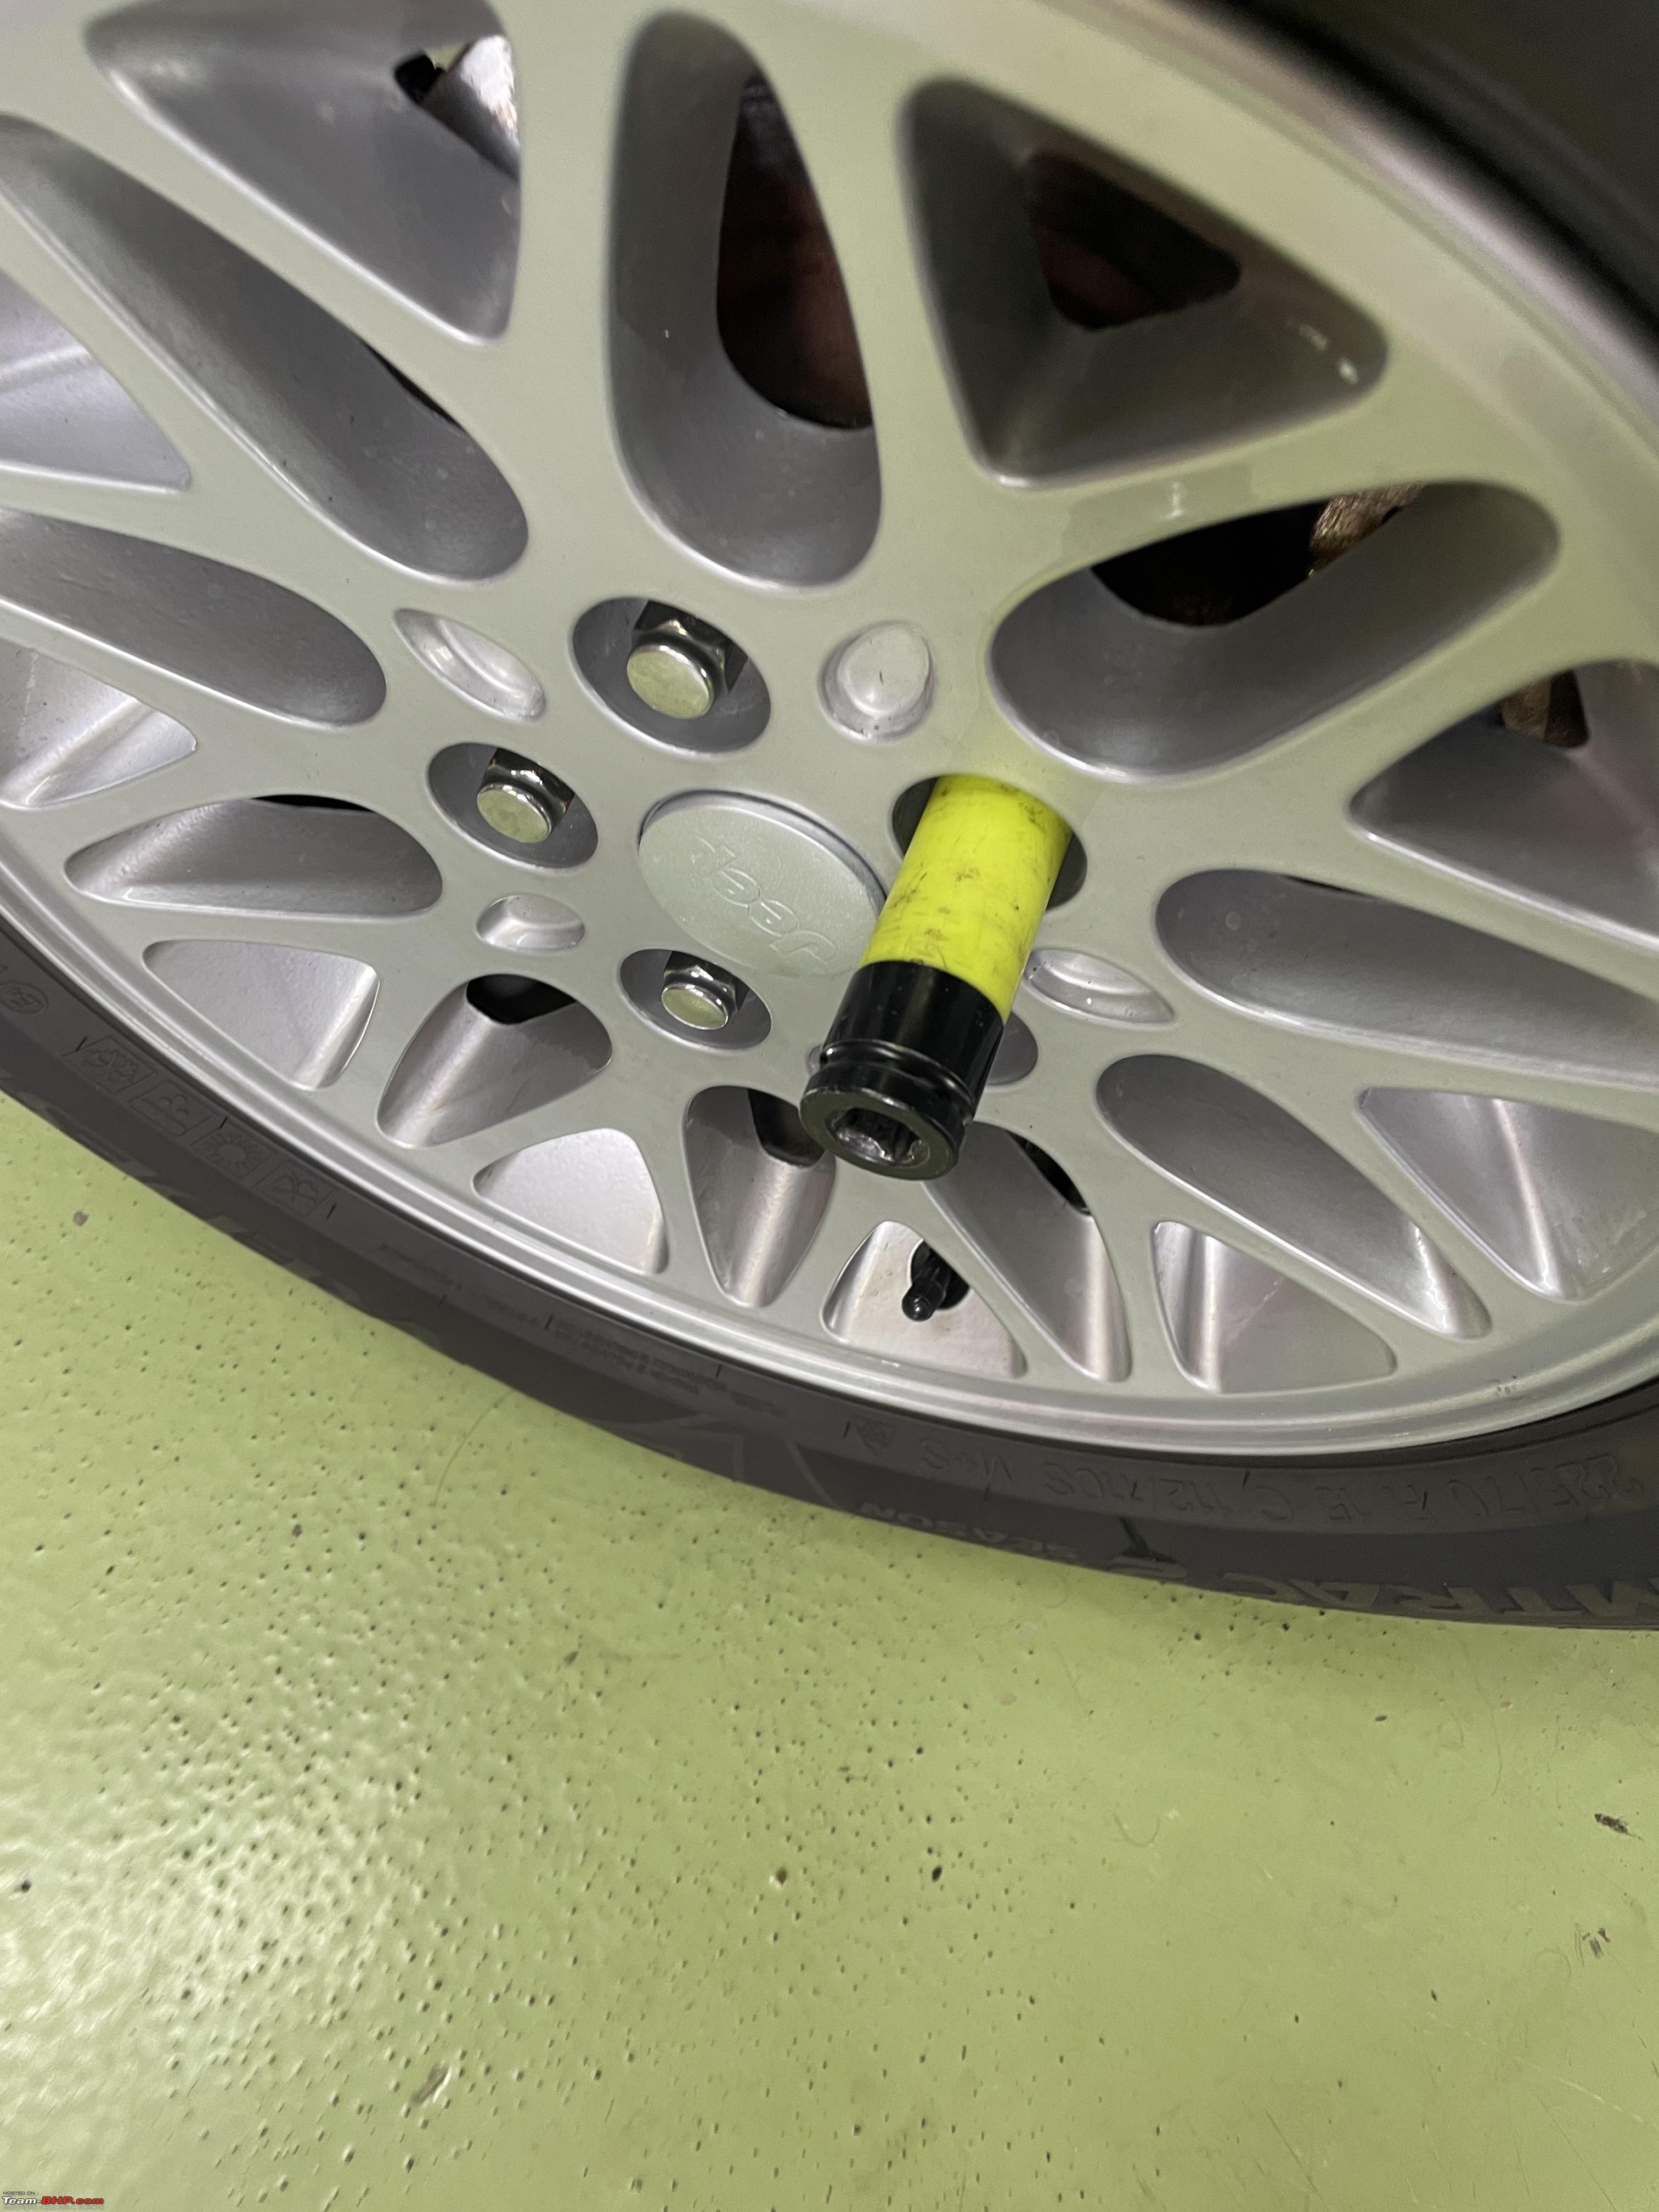 All in all, what in theory is a very simple and straightforward job, turned out to be quite the challenge. I have already located another guy who has three new mounting bolts. He is also searching for the spacer. I will decide tomorrow whether I will make my own or not. Hopefully installing everything will go a bit more smoothly. Lots of other jobs coming up. On Monday Jack and I are replacing the Fiesta AC. Coming Thursday spanner mate Peter is coming and he will bring his two Jaguar carburators and overhaul sets. Should keep us busy for the day. On Friday I might drive the W123 to Bochhorn, Germany for the big parts events. And Berndt just called his parts for his Austin Somerset should be arriving in a week or so as well. Jeroen |

|  (12)
Thanks (12)
Thanks
 |
| The following 12 BHPians Thank Jeroen for this useful post: | Freespirit27, GwD, IcarusMan, Jaggu, Maxton07, mugen_pinaki27, Omkar, s4ch, Thad E Ginathom, vaasu, VivekCherian, WhiteKnight |
| |
|
2nd June 2023, 21:33
| #1097 |
| Distinguished - BHPian | Re: My Car Hobby: A lot of fiddling, and some driving too! Jaguar XJR, Mercedes W123 & Alfa Romeo Sp Last night I spend the whole evening on the Internet trying to find information about this blasted steering box spacer. Long story short, it is a well known problem on many older Jeeps. As it is made of aluminium it corrodes and locks up the bolts. You cant get the original ones anymore They were priced at an astonishing $350! That is almost as much as a completely overhauled box!! But there are plenty of aftermarket upgrades available. However, not in Europe. I did find a shop that would send to the Netherlands. Would take at least 2-3 weeks. So I decided to make my own, having seen dozens of examples on the Internet. How hard could it be? First things first. Early in the morning I drove over to Tiel to pick up my new mounting bolts. I passed an almost Identical Jaguar to mine. It is probably only the second or the third time in all these years I have come across one with identical color!  On the way home, I also picked up a socket size 34mm. Bernd had found one and was going to take it over to me. But this one was very reasonable priced, so I decided to buy it myself. Cant have enough tools!!  You might recall about half a year ago or so, we had a brazing workshop in my garage. Willum, our teacher and inspirator brought several boxes with all kinds of offcuts we could have. Those included some large aluminium plates as well. I found one that was 20mm thick. The spacer needs to be 17,5mm. So that was excellent. Cut of a piece with my electric grinder. The more you manage to cut and grind, the less you need to mill! punched a few holes. Nothing is supercritical in terms of dimensions. Of course the spacer needs to have the correct width and the holes need to be in the correct orientation. But nothing that requires my usual level of precision of 0,001mm!   Drilled the three holes.  I milled of 2,5mm of the surface with my BIG cutter. Worked really well!   Checked with a quick test fit that the holes were positioned correctly. Also, this allowed me to determine where I was going to mill material away.  Here we go, with a regular 16mm cutter, 800RPM, 4mm cuts, easy peasy!!!  Things beginning to take shape. I took another pass across all the surfaces after this one.  The finished product!!   How the old one looked against the chassis:  My improved and much more rigid version!!  Next I put the pitman arm back on the new steering box and torqued it correctly. In all honesty, it needs a bit more, but this will do. My torque wrench can do about 220Nm and this needs 250 Nm. On Monday I will see Jack to fix the AC on our Fiesta. I will ask if I can borrow his ultralarge torque wrench again. The tricky thing is to find a way to hold the steering box in place whilst you tighten the nut!  Getting the steering box back in the Jeep was a bit of a challenge. It is quite heavy and you really need two persons. But I used one of my Jacks to prop it sort of in position and managed to get all the bolts in!  My electric torque wrench and this nifty flexible bit came in very handy!  Attached the steering column coupler. A bit fiddly. Also, you must make sure that the pitman arm, the wheels and the steering wheel all have the correct position.  Reconnecting and torquing up some more stuff.  A lot of the hoses on my Jeep have these special hose clamps. They are called equal pressure clamps or something along those line.  I have a couple of these special pliers that are very handy. They are made specially for these sort of hose clips. They have a ratchet mechanism, so you can clamp a hose clamp open and easily slip it over a hose.   So everything was going very smoothly. Until I tried to attach the new hydraulic hoses to the the new steering box. It would not fit!! How often have I mentioned always check your parts before starting to install them? Probably a zillion times. And I did do a couple of checks and I recall having some worries about the hose connections on the pump, but I never looked at the steering box connection!! On the left, this is what the connection on the old steering box looks like and on the right the new steering box  The problem is that the tube and the connector wont go in deep enough.  A real bummer!! I had hoped to finish this job today. I promised to help my neighbour take some debris to the council tip. We have arranged to borrow a trailer and we would be using the Jeep. We will have to use another car with a hook. And probably might have to take 1 or 2 extra trips. The Jeep can haul a phenomenal amount of weight!! Regular cars less so. I have already spoken to Edwin and send him a bunch of photographs. He had never come across this problem before. So I am waiting for him to call me back and decided what we are going to do. More to come. Jeroen |
|
| (8)
Thanks
|
| The following 8 BHPians Thank Jeroen for this useful post: | Akshay1234, dailydriver, GwD, IcarusMan, Jaggu, Prowler, Thad E Ginathom, vaasu |
|
6th June 2023, 12:14
| #1098 |
| Distinguished - BHPian | Re: My Car Hobby: A lot of fiddling, and some driving too! Jaguar XJR, Mercedes W123 & Alfa Romeo Sp Last Sunday was a gorgeous day. Clear blue sky about 20oC. Perfect weather to go touring in my Alfa Spider. I drove for a couple of hours, towards the coast and reached the Maasvlakte 2 or MV2 as it is known. MV2 is the most recent extension of the Rotterdam deep water harbour. It is build on reclaimed land and it allows Rotterdam to tripple its container handling volume. I went to see Future Land, a very interesting information facility where you can learn about the whole project. My wife hates being out here, because it is all industrial. I love it, in a previous life, many of the (chemical) companies out here were customers of mine. Spider parked at Future Land against the backdrop of one of the electricity plants here.  I had booked a 90 minute harbour tour at the end of the afternoon. Very interesting and enjoyable. Rotterdam is one of the very few ports in Europe that can take the largest container vessels fully loaded. So they will offload containers here in Rotterdam and then continue to say, Antwerp and Hamburg. They will return to Rotterdam and load to maximum capacity before returning to the Far East once again. All of Rotterdam main harbours have a guaranteed depth of at least 20 meters. A few images of the various ships we saw.   This Evergreen vessel is one of the sisterships of the one that got stuck in the Suezcanal. 400 meters long it is!! I took this image with my iPhone on Panorama mode as we cruised along side her!  These container cranes are remotely controlled and work mostly automatic.  A very enjoyable day, I drove about 180km. Yesterday I took my wifes 2015 Ford Fiesta to my local AC specialist and neighbour, Jack. Jack has helped me out with the filling of my Jeeps AC system after I had replaced the evaporator and we replaced the condensor on my wifes Fiesta about 8 months ago. Jack used to run his own Car AC shop. Which he sold, but he kept most of his inventory of tools and equipement to work from home a bit. As I mentioned in an earlier post, we had diagnosed the problem as a leaking AC compressor. So Jack had ordered a new one. When I entered his garage there was another project ongoing. This VW Beetle had developed a peculiar sound. Jack ended up stripping the whole engine and transmission to find the problem,  This is what the compressor looks like:  Getting the old one out of the Fiesta was very straightforward with the Fiesta on the lift.  It is very accessible from underneath.  You do need to loosen up the belt. On this Fiesta the belt is tightened by a tensioner roll. Newer Fiestas have a special stretch belt. According to Jack they can be a pain to remove. I have no experience with those (yet).  The system was already completely empty, so we could just disconnect the hoses and the compressor is held in place with just a couple of bolts. Out it comes. Comparing old and new as usual!  We bolted the new one back in place. 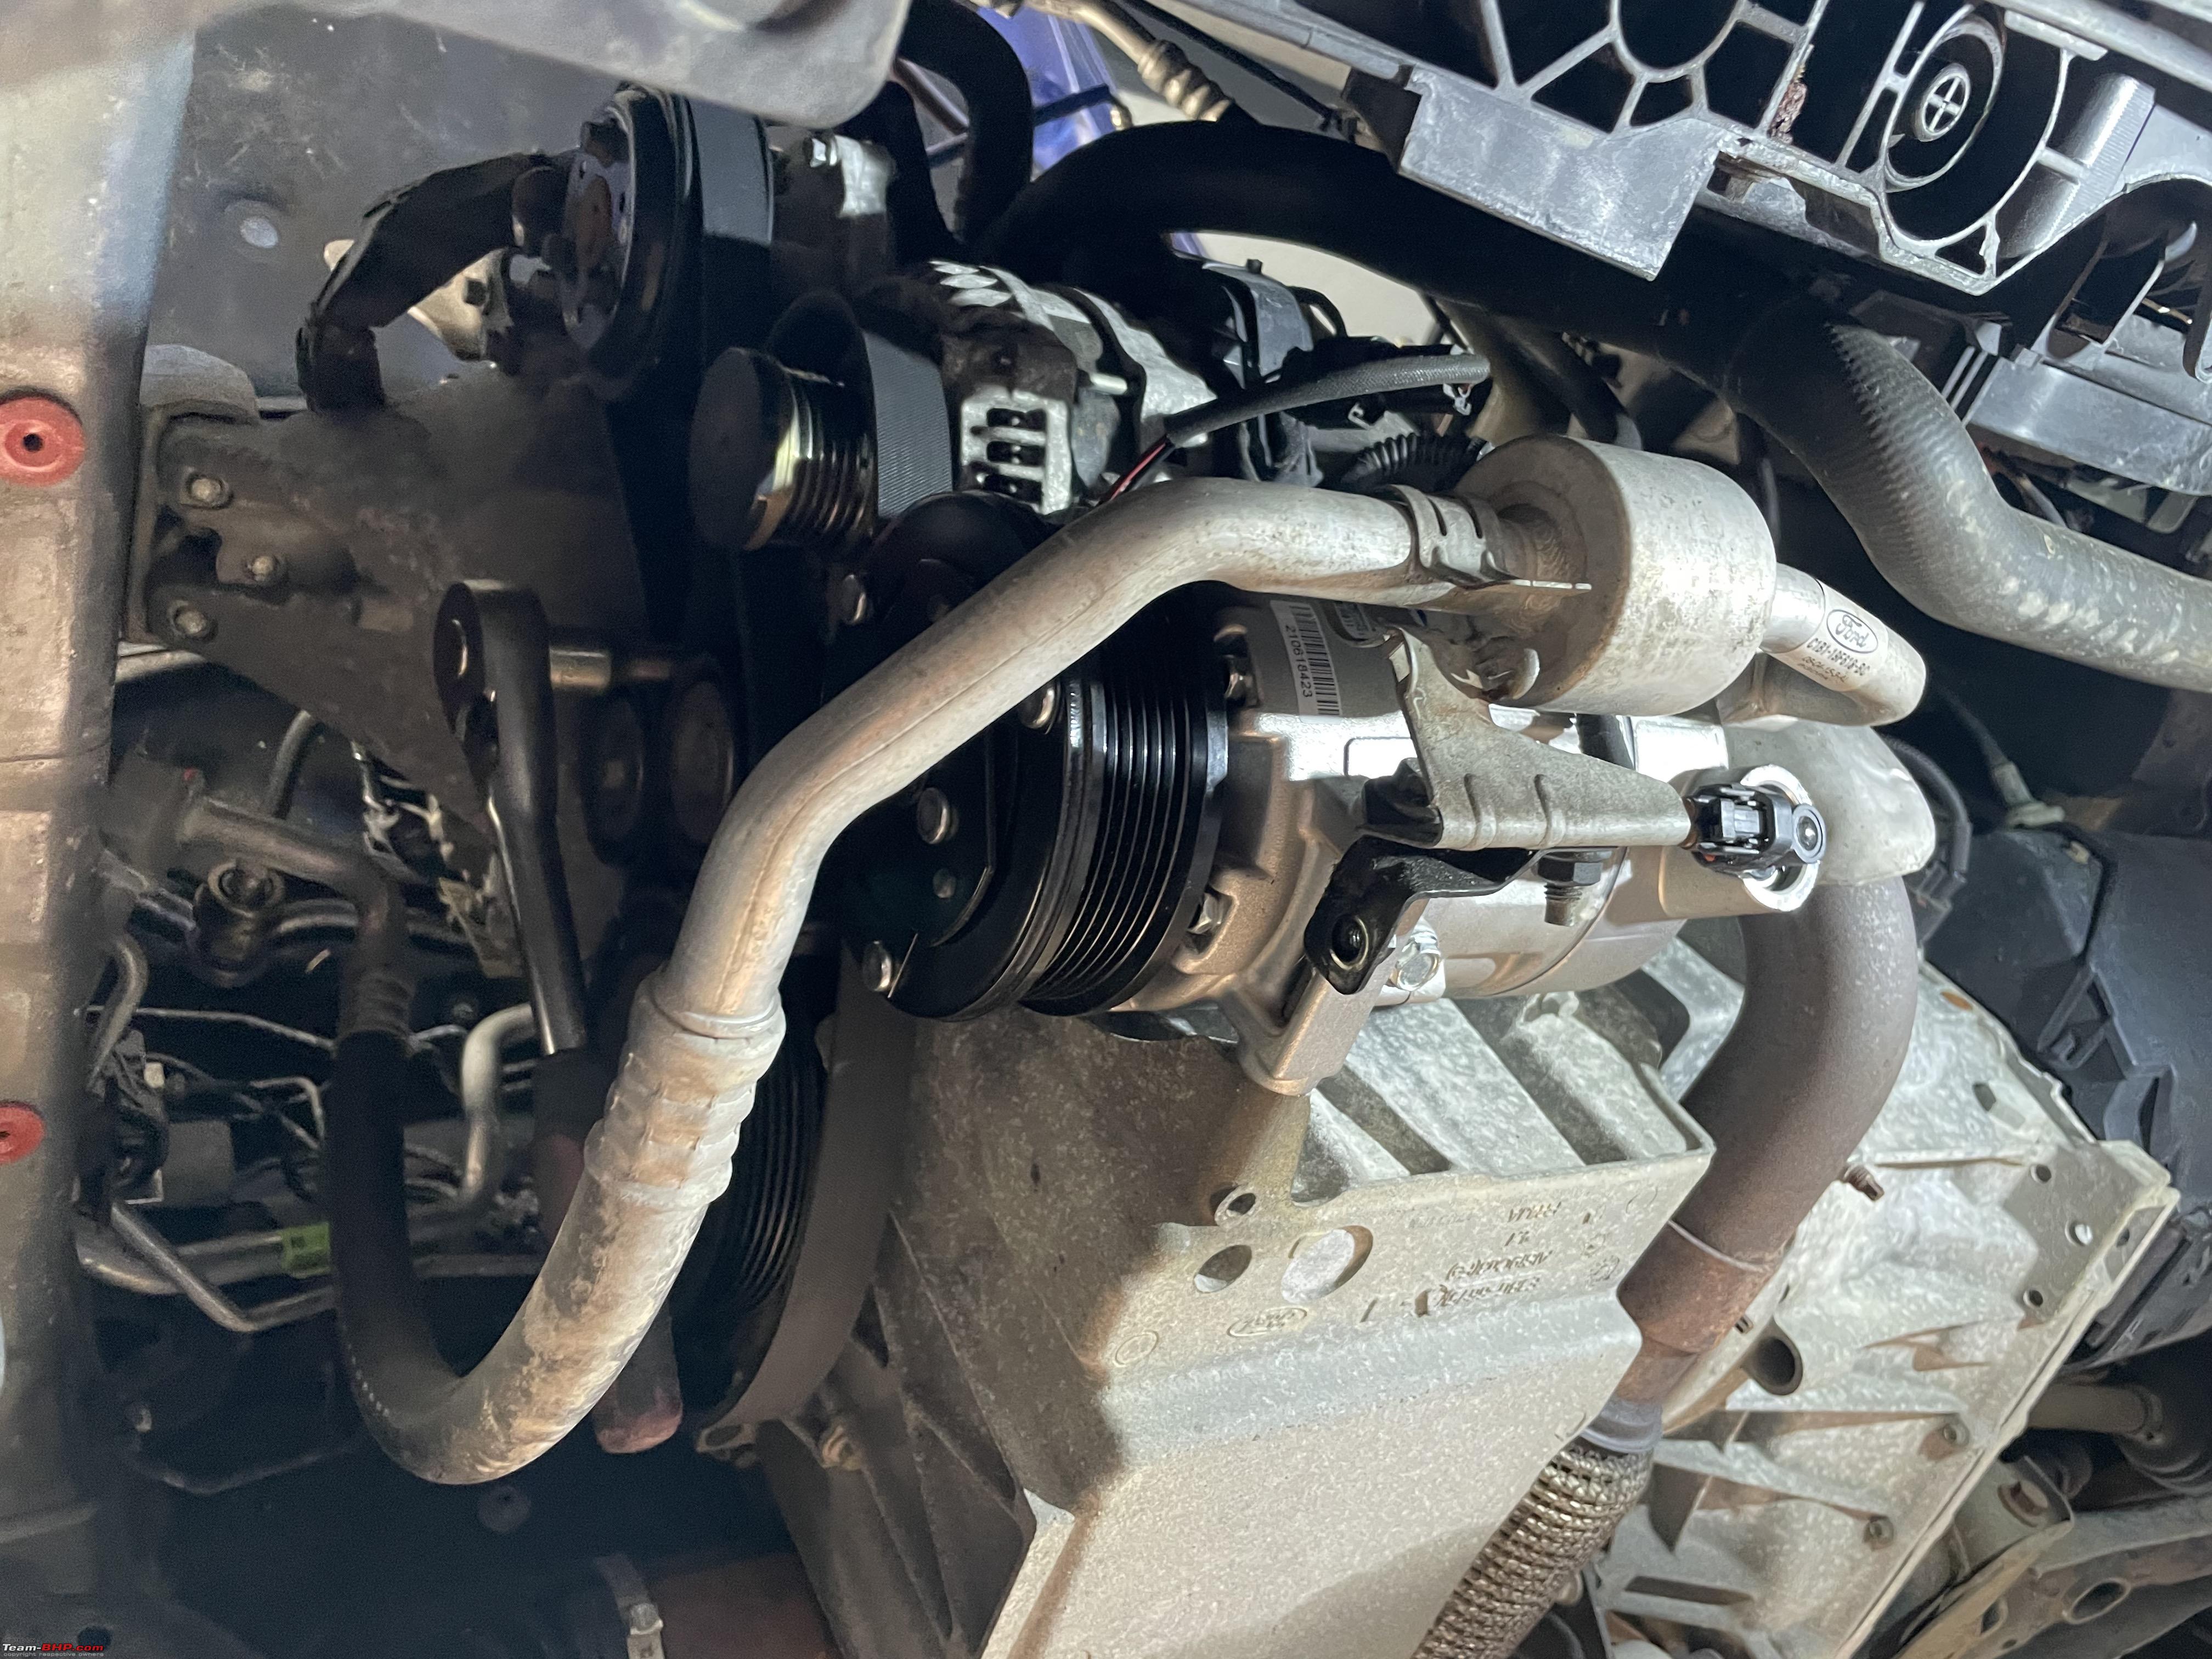 First thing is to pressure test the complete system. A special Nitrogen / Hydrogen gas is used. 95% Nitrogen / 5% Hydrogen. There are several reasons for having a small amount of hydrogen present. Hydrogen molecule are the smallest and will make their way through the tiniest of holes. Nitrogen molecules are larger. But also, Hydrogen has a very distinct smell and it will be easy to trace the leak. Nitrogen is odourless.   With the pressure test concluded successfully, Jack hooked up the vacuum pump to empty out the system. In fact, creating a good vacuum in the complete AC system takes longer than anything else, about 40 minutes! Once, there is sufficient vacuum the system is re-filled with R134A.  The filling goes by weight. Every system has a predetermined amount. Jack told me the Acs on diesel engine powered cars, tend to slightly larger than the petrol variant. Not sure why. Perhaps something to do with the cooling? Some diesel might have intercoolers in front of the condenser? Whilst we were waiting for the vacuum to be drawn, Jack also showed me his very fancy battery tester. The Ford dealer had told me recently the battery needed replacing. But we could not find anything wrong with it.    Checking the temperature of the air inlet in the cabin with a digital thermometer. Ideally, it should be around 6-8oC, but it would not go below 10oC. I need to check if perhaps the heating does not turn off completely. Regardless, this is good enough for summers in the Netherlands!   So my wife is very happy once again with a working AC in her little car. I have taken the old compressor home with me and I am going to strip it. Stay tuned for the dissection of the AC compressor. Spoiler alert: lots of pistons!  As soon as I got home Edwin called about the steering box of my Jeep. He had just received a new one, so I quickly took the box with the incorrect fittings out of my Jeep once more. Took me less than 20 minutes to get it out and the pitman arm removed! Practice makes perfect as they say. But the main difference was of course, nothing had seized yet.  I will be installing the new one later this week. Fingers crossed!! Jeroen |
|
| (7)
Thanks
|
| The following 7 BHPians Thank Jeroen for this useful post: | GwD, IcarusMan, Jaggu, keroo1099, Prowler, Thad E Ginathom, VivekCherian |
|
8th June 2023, 00:18
| #1099 |
| Distinguished - BHPian | Re: My Car Hobby: A lot of fiddling, and some driving too! Jaguar XJR, Mercedes W123 & Alfa Romeo Sp Jeepparts Guru Edwin called me, a new steering box had arrived at his shop. So I drove over immediately. Just to be sure, I brought the hoses and we did a testify. All seemed good! Back in my garage I had a closer look at this steering box. It looked a whole lot nicer than the previous one. It was better spray-fininished. Both in- and output shafts were very clean fitted with proper protectors. And a brand new pitman arm nut!   So I was quite confident this would all fit together fine. Fist thing is to fit the pitman arm back on.  The steering box went back in real easy. Practice makes perfect!! Also, hooking up the hoses went without a glitch! I was very happy with my little stubby wrenches. They look a bit silly until you find yourself having to tighten nuts in a very confined area!  Stubby 18 next (left) to a regular 18mm spanner.  I had also borrowed the BIG MANLY torque wrench from Jack. My largest torque wrench will do 200Nm, but this pitman arm nut needs 250NM.  I found out that when I lifted the Jeep at the front a bit, I could actually get a socket 24mm onto the pitman arm nut easily. The stabiliser bar moves out of the way as the wheels become unloaded!. At 250Nm it is almost impossible to tighten on the workbench. Best with the box fitted to the chassis.  Also, to refill and bleed the hydraulics of the steering system the wheels need to be off the ground. You fill the reservoir with ATF and wait about ten minutes, just wiggle the steering wheel a bit back a forth. Add some more ATF and slowly turn the steering wheel full right / full left lock about 20 times. Add ATF if necessary. Start the engine and repeat. It is important to have the wheels of the ground. The lower the ambient temperature the more relevant this becomes. Because if the hydraulic pump starts to draw air/vacuum it will start to froth up the ATF. This proces is worse if it has to work hard, i.e. when the wheels are fully on the ground. When the ATF is all frothy there is nothing you can do but wait till all the air in the fluid in the reservoir has come out again. I did notice still some play in the steering and it was definitely coming from the box. So I called Edwin and he asked me to come over later that evening. We had a good look at everything, could not find any faults in my installation. So we decided to, very carefully adjust the box. It took almost 1,5 turns of the adjustment screw before the play was gone. I took the Jeep for a quick test drive and the steering still felts very light and no play. So our conclusion is that somehow the guy who overhauled this box, forgot to make the final adjustment. So, for now the steering play is all solved. But two new problems have popped up. I noticed when I started the engine two different things. The starter appeared to binding up for a few seconds (so it did not disengage properly) and also none of the cruise control buttons on the steering wheel or the horn work, also the airbag light is on! I looked it up and this is almost certainly a result of a broken clock spring underneath the steering wheel. I cant recall, but with the steering column detached from the box, the steering wheel can rotate freely. At least, it could if it was not for the clock spring. Most likely my clock spring (which is essential a flat multi stand cable, is broken. The more immediate problem was the starter. A very unpleasant noise when you start the engine. So this morning I took the starter off. It is really simple. Disconnect two electrical connections at the rear of the starter.  Undo two bolts attaching it to the bell house.  Here we are, one by the looks, original Chrysler, starter.  Put it in my vice. My first thought was that it was properly very dirty and the sprocket and or solenoid was not disconnecting properly  The little sprocket wheel turned and moved axially easily, the little shaft looks fine! So lets have a look at the solenoid and the little lever system. Only two screws hold the solenoid in place, both very very stuck. Out comes this handy little tool, my impact screw driver. Couple of whack with the hammer and both came out easily.  Again, everything looked fine and moved smoothly.   So I called my alternator/starter specialist friend Ton. Ton has helped me out before on the Jeep and Mercedes alternator. He told me to bring it over. He had opened up the starter fully and measured the relevant resistances too.  You can see inside it is very dirty and the solenoid had a way to high resistance. So Ton was pretty sure this was the problem. I could have overhauled this one, but a complete new one is actually cheaper than overhauling the old one! So I bought a new starter from Ton. Old and new for my usual comparison.  It was quite easy to re-install the new starter. The electrical contacts were very very dirty. Took a while to clean them, primarily these are on a short wire/lead and it was difficult to get my brushes and sandpaper on them! All done and some di-electric grease on the connections too!  So I anticipated a very smooth start. Unfortunately, with the brand new starter fitted I got the exact same horrible screeching sound, as if the sprocket remains stuck for a few seconds. No idea what is happening. Could this new starter be faulty? Tomorrow spanner mate Peter is coming for a full day of spannering. So we will investigate some more. I want to listen with my stethoscope on the starter whilst engaging the ignition. See if this noise is coming from the starter or somewhere else. Our (Spider) friends for several decades, Alex and Bianca arrived for dinner and a small workshop job. Bianca has a beautiful Alfa Romeo Spider Coda Tronca (Creme coloured). You can spot it in the various posts about our joint trips into France. As I mentioned earlier, part of her bumper had become loose. The bumper anchor plate / bolt had torn out of the plastic boss on the back of the bumper.  So we glued in back in place with my special two component JB weld.  Afterwards, I though of a much better way to fix this. I should have taken a piece of Delrin and milled it into the correct shape so it would fit into the plastic protrusion. We could have bolted it onto it. We will see how long this will last. If it comes loose again, I know how to do a permanent fix. Also did a lot of work on the 1952 Austin Somerset of my friend Berndt. More about that later. Jeroen Last edited by Jeroen : 8th June 2023 at 00:20. |
|
| (25)
Thanks
|
| The following 25 BHPians Thank Jeroen for this useful post: | Akshay1234, dailydriver, Diezeeel, digitalnirvana, GTO, GwD, IcarusMan, InControl, Jaggu, keroo1099, Leoshashi, mugen_pinaki27, NomadSK, noob_petrolmonk, Omkar, Prowler, Sen, Spaced Out, sridhar-v, Sumer, Thad E Ginathom, vb-saan, vigsom, VivekCherian, Zinda |
|
9th June 2023, 14:12
| #1100 |
| Distinguished - BHPian | Re: My Car Hobby: A lot of fiddling, and some driving too! Jaguar XJR, Mercedes W123 & Alfa Romeo Sp The jeep starter making the same horrible noise after having it replaced, was really bugging me. So I dug into the manuals. When everything else fails, consult the manual!! Turns out I should have done this before. This is a classic case where experience isn’t necessarily the best way forward. Always check the documentation first. Over the years I have encountered multiple similar problems with the starting noises and when they sounded like this, it was always down to the starter, one way or the other. But check out what the Jeep workshop manual says:  If the starter motor does not disengage (and thus the horrible screeching sound) you really ought to check three things firs before you suspect, let alone take out, the starter!! It is one of the reasons I nearly always consult manuals, rather than relying on experience only. This time it caught me out though! Because I thought it was so obvious. Never ever let experience get in the way of proper diagnosis technique!! So I did. I had looked at the manual prior to taking the starter off and back on. But I thought it was so simple, could not go wrong. Two bolts hold it to the bell house and two nuts hold the electrical wires. The starter fits in a machined hole, can only go in in one particular orientation. What could possibly go wrong. Well, it turns out you need to tighten the two bolts in a particular sequence and they also require different torque setting!  So I loosed up the two nuts and retightened them, this time in the correct sequence and the correct torque for the lower (47Nm) and upper (41Nm) bolt. All done!  Next I checked out the starter relais. Which is situated in the fusebox on top of the PCM.  Luckily the starter relais is identical to the electrical fan relais. So I just swapped them.  I started the engine. And the noise was gone!!! I did check the relais a bit more and swapped them back again. No difference. So maybe the contacts were a bit corroded and pulling and plugging them back in solves that. No matter what I am going to get me a spare relais, just in case. So the problem looks solved. But I know for a fact that the other third reason, a wonky ignition switch/ key lock , might also be a problem. Or at least a problem waiting to develop. My ignition switch/key lock is a bit wonky. I will need to remove the steering wheel to get at the clock spring. That is a good time to also have a good look at the ignition switch / key lock. At least spray it full with contact cleaner. So for now the Jeep is in running order. Albeit without horn, cruise control and airbag light on. Next week I am going to open up the steering wheel. I have already phoned around and I can get a new clock spring from the USA. I have also fiddled a tiny bit with the steering box adjustment. The play is really gone, but I want to make dead sure it is not too tight. So I will experiment a bit more, giving the adjustment screw 1/8 of a turn and taking a test drive till I think it is perfect. For good measure here is an overview of what the Jeep Hydraulic Steering box looks like inside.  Jeroen Last edited by Jeroen : 9th June 2023 at 14:14. |
|
| (17)
Thanks
|
| The following 17 BHPians Thank Jeroen for this useful post: | Akshay1234, carthick1000, digitalnirvana, GwD, IcarusMan, InControl, Jaggu, keroo1099, Leoshashi, mugen_pinaki27, Prowler, Redline6800, Thad E Ginathom, vaasu, vigsom, VivekCherian, Zinda |
|
9th June 2023, 15:16
| #1101 |
| Distinguished - BHPian | Re: My Car Hobby: A lot of fiddling, and some driving too! Jaguar XJR, Mercedes W123 & Alfa Romeo Sp As I mentioned before, we needed to do some more work on the two Austin Somersets of my friend Bernd. Last time, see a few posts back, we managed to solve the engine problems (noises). But we noticed some leaks on the fuel pumps and one brake was leaking too. So Berndt had ordered all new parts. And they arrived a few days ago, so I went over for a day fiddling with Berndt.  Berndt has two of these delightful little cars. They were only produced from 1952 to 1954 and the black one is a very special one as it was made for the UK defence department. https://en.wikipedia.org/wiki/Austin_A40_Somerset In order to work on the black one, Berndt wanted to fix the grey one on his lift first. Once fixed we could drive it out of his garage and move the black one onto the lift.  Berndt has been organising a yearly tour in this part of the Netherlands for almost 25 years. Every year, third Saturday of June, it is on. His daughter Anita will be driving the Black Austin, affectionally known as Ollie! So we have to get these cars sorted in the next two weeks! With the grey one already on the lift, I could easily remove the fuel pump. It is, in typical British fashion, located on the left side of the engine, underneath the exhaust! Just had to undo two nuts and the fuel in and outlets and it came out easily. Here we have it:  Just undo the top nut and remove the lid and you have access to the little valves.  We also pried off the membrane. It is sort of twist locked/hooked into the pump lever inside the pump housing.   Here you also see the pump drive handle. Once the pump is fitted to the engine this handle/lever sits against a cam. The cam pushes the lever in and out of the pump house. The handle moves the membrane which then sucks and pushes out the petrol to the carburator.  We cleaned and checked all the parts. In fact I could not find anything wrong with the membrane or the valves. Even so, as we had two complete pump overhaul sets we decided to replace everything. Popped out the little valves with a small screw driver.  You might have noticed that Berndts garage is little less tidy than mine. His is chockfull of all kinds of stuff. These valves are kept in place by four tiny indents in the pump housing. So we had to whack the new ones back in, using various sockets and so on. Attachment 2461710    We got them messed up first try. The valves are identical. But one is used as a suction valve and the other one is a check valve. Which means you need to mount them into the correct hole in in the pump house and in the correction orientation. (flipping them changes it from suction to check valve and vice versa) When I took the membrane off, it took me all but 2-3 seconds to twist and pull it out. It took us about half an hour to figure out how to put it back on!!   With the pump al back together again, all new parts, seals fitted we put it back onto the little black Austin. Here another interesting detail of the fuel pressure connection, it has a little mesh filter around it.   We lowered the lift to hook up the battery.  Berndt had the battery on a trickle charge, but it had died anyway. We measured 0 (zero) volts. Not a problem, because Berndt has got cars all over his yard, so we took the battery from one of his Rover 200 Cabrio.  Connected the battery up and put some extra fresh petrol in the tank  With Bernd starting the engine I was watching the fuel filter if any fuel was coming.  We started for a long time, but we were not getting any fuel. Now, this car has been sitting on this lift for a very long time, so we were expecting it to take a while to draw fuel. But it was taking too long. We tried a few things, but in the end decided to take the pump off again and check everything. I discovered that the new check valve was somehow not working or block. Cleaned it out and blew compressed air and all was fine. Re-installed, started and sure enough within 15 seconds we had fuel going to the carburator!! So far so good, but it would not actually start. So we checked a lot of things. Made sure the sparks plugs were sparking. Which they were not. Sorted the breaker contacts in the distributor.  Bernd had pulled of the spark leads and I wanted to label them, but he was confident he knew which one was going to which cilinder. Well, turns out, he got them messed up and we had to figure out the firing sequence. Which took a lot of time. By then I had to return home. Berndt was going to do some more work. We will continue our work, next week on both Austins! Jeroen |
|
| (15)
Thanks
|
| The following 15 BHPians Thank Jeroen for this useful post: | dailydriver, digitalnirvana, GwD, IcarusMan, InControl, Jaggu, keroo1099, maddyg, mugen_pinaki27, PearlJam, Prowler, sudeepg, vaasu, vigsom, VivekCherian |
|
9th June 2023, 16:09
| #1102 |
| Distinguished - BHPian | Re: My Car Hobby: A lot of fiddling, and some driving too! Jaguar XJR, Mercedes W123 & Alfa Romeo Sp Spanner mate Peter came over earlier this week, so we could overhaul the two carburettors of his Jaguar XJ S1. See earlier posts on what we have been doing on the Jag till now to try and get it running again. Working on carburettors, means making sure you have sufficient clean working space on the workbench. I also had set up my ultrasonic cleaner and parts washer.  Peter had detached the two carburettors from the Jag earlier and brought also two complete overhaul sets.  Although they look identical, there are some differences and Peter was given two different overhaul sets. We decided to take apart and overhaul them one by one, just so we would not get any parts mixed up. Splitting the two carburettors was easy.  The overhaul sets come with decent instructions:  It also lists which parts are included in the overhaul set. We carefully laid out one set, belonging to the front carburettor. Jaguar actually calls that the right carburettor. Because if you stand on the right side of the engine bay and look at the two carburettors, the front one is at the right.  Even though we left one of the two carburettors completely intact, we took a lof of detailled photographs to help us put everything back together again. Some details on bits and pieces that ultimately all came apart.     Peter removing the float chamber. With hind sight that is something we should have done later as you will see.  The main body completely stripped next to a still be worked on second carburettor. (known as the left or rear one!).   In the centre you can see the so called Jet. Peter also brought a Haynes Carburettor Manual. According to them, this Jet can’t be removed. But our overhaul kit had a new one, so we just punched it out. Haynes guys are wimps!! Peter being very gentle with the hammer!  Here you see the main membrane, amongst others. This one was still fine, but we will replace it anyway. But we know for sure the other one is torn. A common problem with these Stromberg carburettors. (As I have found out on my W123 as well)  If you have followed this thread all of this will look pretty familiar. These carburettors are very similar to the one fitted to my Mercedes W123 I overhauled not too long ago. The Mercedes one is slightly newer and more advanced. As we progressed more and more tools come out!  Here you see why we should have more careful with removing that float chamber. This is the inside of the float chamber. And you see those little clips, one is broken!! These clips hold the actual float in place. And because they protrude and we were handling the body endlessly to whack parts out, clean and scrape off old gaskets, we managed to brake this delicate little part.   So Peter tried to phone around see if we could source this part. Absolutely not, so we had to fix it. Out comes the JB weld once again!! I carefully positioned the broken tiny piece with a tiny magnet and applied JB weld to the bottom!  Fingers crossed on this one! If push comes to shove, I can always make a new one, drill out the old one and so on. But if this hold, we will leave it for now. The float operates a tiny valve inside the float chamber that regulates the petrol flow into the float chamber.  It looks us a long time to clean everything properly and figure out how everything went back together, which gasket goes where and so on. Just as an example, here you see Peter putting the new throttle spindle in. It runs through two bushes inside the body and has a seal on each side. The kit came with new spindle seals as well. We knew that the spindle had several (vacuum) leaks and was drawing false air. But getting the spindle and the throttle plate back in the correct position, took us at least half an hour. And we managed to get it wrong several times over. We also discovered, we used the wrong throttle spindle. Because there is a difference between the right/left one!! Go figure! 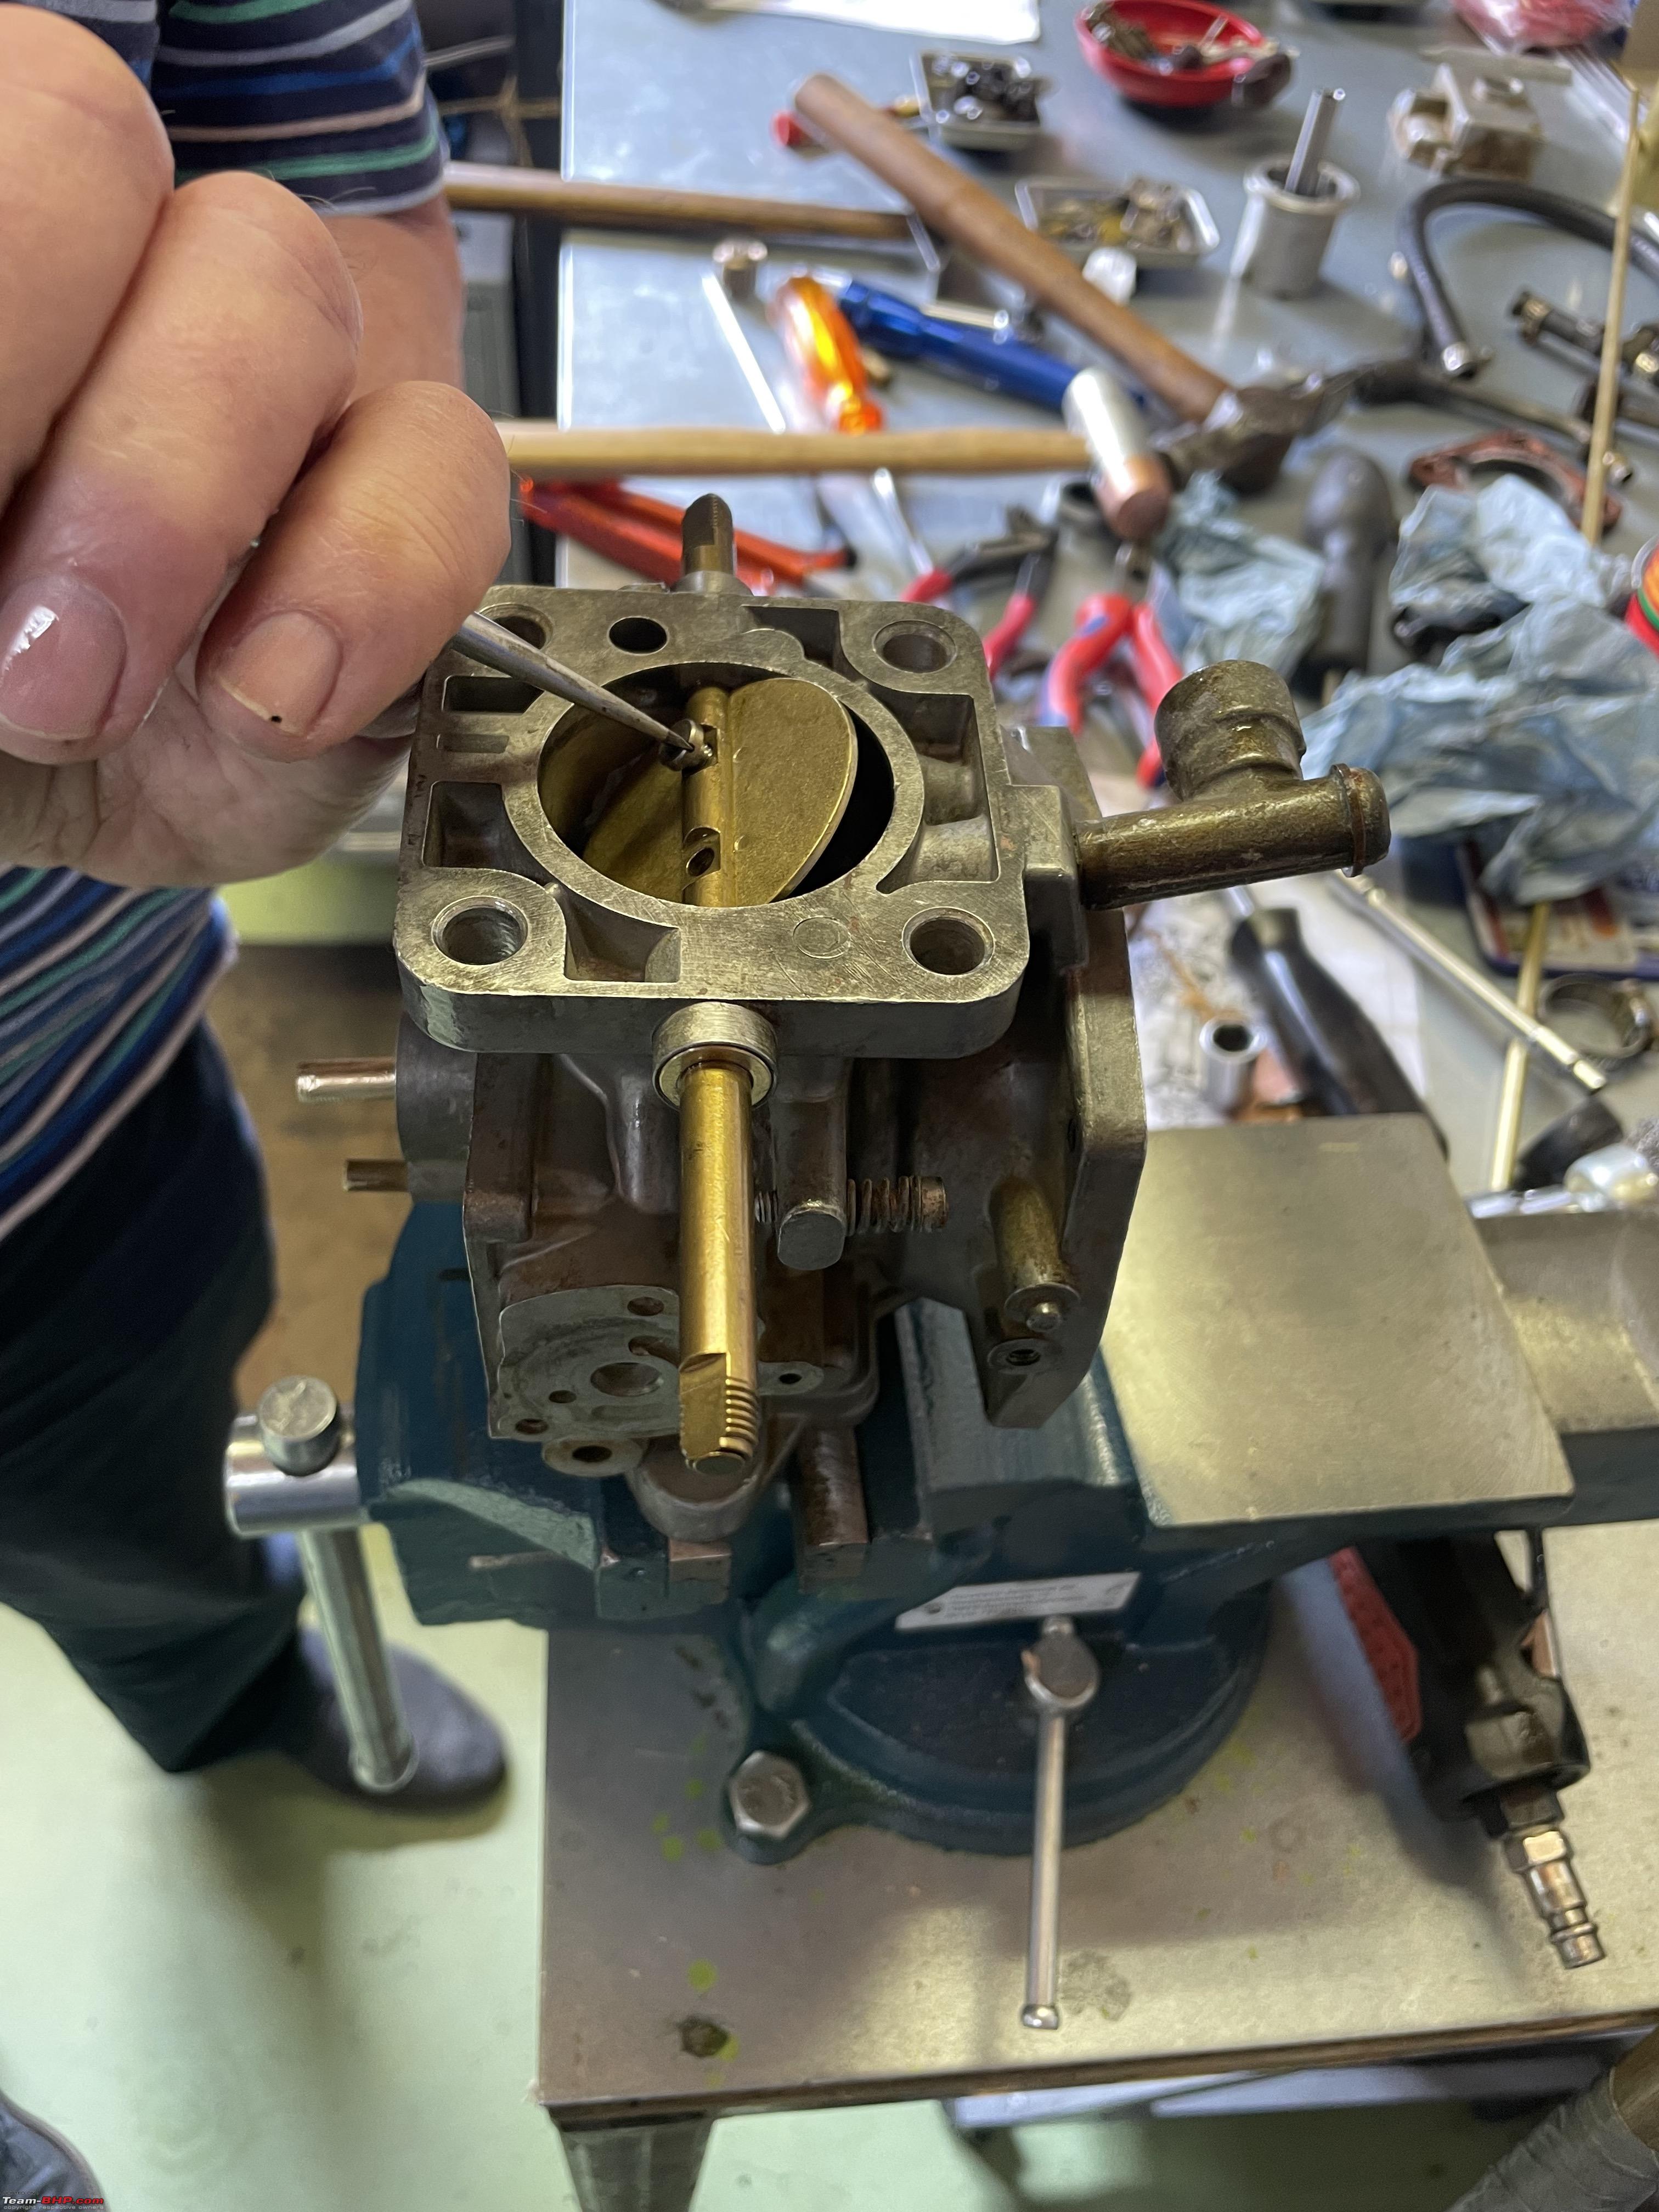 We got quite far in putting back this carburettor. But the JB weld has to cure for 24 hours and then another carburettor to go. So we cleaned up the shop and put everything in a box, ready for the next time. (In about a week and a half)  Here another part of the Jaguar XJ S1 engine. It is known as a Gulp valve hose assembly. It is part of the emission system on the US Jaguars. As you can see it is in a sorry state. Fair assumption is we are getting a lot of false air drawn in here!  I could fix this by gluing and making a little tube/ring to go inside. But Peter had managed to find the only and last one available on earth on Ebay in the USA. Problem was the seller did not want to ship internationally. I have come across this many times. It is no use asking them if they can make an exception. The average American does not know, nor care, there is a whole wide world outside the USA. Also, they simply lack the intellectual capabilities to figure out how to send something across Europe. Which by the way, is identical to shipping inside the USA apart from having to fill out a very simple custom declaration form. They just can’t be bothered. So I ordered it using my Ebay account and had it shipped to my brother in law who lives in Texas. He will forward it to us, he knows how to ship international, he is a Bajan, and not an American!! Peter had also brought a part of his Lancia Derda. The inlet air pipe including the mass air flow meter.  We took the MAF sensor out of the housing and sprayed it very liberally with special MAF sensor cleaning fluid. Before:  After:  It is difficult to see, but the wire (which is the main part of sensor) cleaned up really well. No matter what the Internet tells you, never ever use anything other than special MAF cleaner on these sensors. i have seen people use contact cleaner, brake cleaner, carb cleaner. At best it won’t do much, at worse it will damage the sensor. And they are very very expensive!!  Peter also had a little problem with his Jaguar X350. The bonnet would not catch properly on the right side. So we investigated. As on any modern car you start by removing a lot of plastic bits, before you can actually see the parts involved.  We found the catch was actually just sticking. So gave it a good squirt of WD40, a couple of gentle whacks with a hammer and punch on the part that had seized and Bob was once again our uncle.  More to come soon. Jeroen Last edited by Jeroen : 9th June 2023 at 16:24. |
|
| (27)
Thanks
|
| The following 27 BHPians Thank Jeroen for this useful post: | Akshay1234, AKTransAM, anandmv, Ashtoncastelino, digitalnirvana, GwD, IcarusMan, InControl, keroo1099, MotoBlip, mugen_pinaki27, Nature&Me, NomadSK, OffRoadFun, Omkar, PearlJam, PreludeSH, Prowler, Redline6800, s4ch, sai_ace, Spaced Out, sudeepg, Swarup5, Thad E Ginathom, vaasu, VivekCherian |
|
15th June 2023, 13:02
| #1103 |
| Distinguished - BHPian | Re: My Car Hobby: A lot of fiddling, and some driving too! Jaguar XJR, Mercedes W123 & Alfa Romeo Sp How dedicated are classic car enthusiast, when it comes to fiddling with their cars I hear you ask? Well, let me tell you. I just spend a full day working with my good friend Bernd on his 1953 Austin Somerset. That in itself is not unusual. But three days earlier, Berndt had taken a very bad fall. He had done his back in, hurt his leg, his head and was black and blue all over. Also, a couple of days ago, I managed to get my leg (shin) infected. It went to being a bit of a nuisance, to excruciating in a matter of less than an hour and my wife had to rush me off the emergency ward at our local hospital. So neither Berndt, nor me, was in any fit state to spend a whole day fiddling. But Berndt is enrolled in a classic car event this weekend, so we needed to get his Austin sorted! We thought ourselves immensely tough and butch. Both our wifes had other thoughts though! Anyway here goes; As I mentioned earlier Berndt has two of these lovely Austin Somerset. You saw us working on the grey one earlier. That one had to be fixed so it could be moved of the lift to make room for Berndt true pride and joy, Ollie, the 1953 Austin Somerset. We knew we had to fix at least two leaking brakes and the fuel pump was leaking too. Walking into Berndt garage, with Ollie up on the lift. Believe it or not, Berndts garage is the exact same amount of square meters as mine, 70m2.  I brought both my vacuum and pressure bleeder. But we could not adjust the compressor pressure, nor did I have the correct adaptor to fit the pressure bleeder to the brake reservoir. The pressure bleeder can handle only 1,4 bar. So we ended up using my trusted vacuum bleeder which can handle the normal shop compressor pressure.  With the car on the lift working on things like brakes is so much easier!!  Although vacuum bleeding is in theory better than pressure bleeding, my experience is that often on the rear brakes it wont work properly. At least not if the brake lines have been emptied. Berndt had already done some work on the brakes about a week earlier. So we also had to use the trusted method of pumping the brake pedal and me operating the bleed valve from underneath. Which meant Berndt, with his wonky back and hurting everywhere, at 76 years of age, climbing into the Austin.  The Austin has four traditional drum brakes. We put an axle stand underneath the differential and lowered the lift, so the wheels come free. So much easier than fiddling about with jacks, multiple stands and finding yourself on a cold concrete floor for hours!  Similar at the front, with the stand underneath the central chassis strut.  We did manage to get the system bled. Just to make sure we removed the wheels and the brake drum for a final inspection and to also adjust the brake shoes once again.  Whereas just about all drums I have worked on so far tend to have two little bolts securing the drum to the axle, the Austin only has one, and it will also fit into one hole on the drum properly!  Here you can just about see the shoe adjustment mechanism. It is operated from outside the brake drum. We just cleaned everything up. Adjusting these drum brakes is very simple. You rotate the wheel and start winding in the adjuster until the wheel locks up firmly, then you back off with the adjuster a bit till it just starts to free up. You can allow for a tiny bit of friction noises. That will wear off soon enough.  With all four brakes sorted we took the fuel pump out and replaced the main membrane. See my earlier post about completely overhauling the fuel pump of the other Austin. This one was working fine, just a tiny leak from underneath the membrane. Which is a good indication that the membrane is likely torn. Which it was. So we replaced it, but this time left the valves in, as the pump was working fine otherwise.  Ollie fired up right away and then stalled. We were expecting this to happen. On carburator engine, the float chamber is usually full of petrol. So when you remove the fuel pump, the pump when re-installing will be empty and the fuel lines too, but it will still start on the petrol left behind in the carburettor. It took about 10-12 seconds of continuous starting to get the pump to get going and provide petrol to the carburator once again. As you will notice Berndts yard is organised according to the same approach as his garage.  We moved the Rover 200 and went out for a test drive! We are currently enjoying a very warm period here in the Netherlands. Up to 30oC! So we opened up the AC mechanism!  A combined age of 210 years!! (Berndt 76, Jeroen 64, Ollie 70).  Ollie drove well, but stopping was a bit problematic. Even after repeated braking, the brakes were still not working well. So back onto the lift.  We found the cup of the right front brake was leaking and the left brake was not put together properly. Somehow the adjust mechanism got buggered.   With both these two minor problems solved, which meant a lot of sandpapering of the right front brake shoes (because they had become permeated with brake fluid) we took Ollie for a second test drive. Braking action had improved considerable. Berndt very happy again. All ready for this coming Saturday drive.  As you might recall Berndt is an avid model car collector, who owns and runs the largest model car collection in the Netherlands, more than 7000 pieces. Whenever I visit him, he will show me the latest additions. We have just had the 100th edition of LeMans and he managed to secure a whole series of LeMans winners, starting with the very first one!   Nice pair of Alfa Winners!  This one is relevant to Dutch LeMans fans. One of its driver was Jan Lammers. Next to Max, probably the most successful Dutch driver. Although Jan was more into rallying and races such as LeMans then F1.  Mrs D thought it was ridiculous for us to have been on our feet all day, crawling and climbing all over old cars. Even so, the next day, she concluded I must be well enough to do some house hold chores. Our extractor fan needs taking apart every 2-3 years. It gets very oily and greasy and start to smell. Probably a bit of a fire hazard too. So I took it down and took it apart in my garage to clean. As I have done this a couple of times before I know exactly how to get it out of the kitchen by myself.  All apart to be cleaned.  Mrs. D happy once again! Tomorrow I am visiting our friend Bianca. I had repaired her bumper earlier, but it doesnt fit properly so I need to fix that. Saturday spanner mate Peter will be here all day and we will overhaul the second of this Jaguar XJ S1 Carburettor. Jeroen Last edited by Jeroen : 15th June 2023 at 13:18. |
|
| (8)
Thanks
|
| The following 8 BHPians Thank Jeroen for this useful post: | anandhsub, GwD, IcarusMan, Jaggu, Prowler, srini1785, sweetvar26, vaasu |
|
19th June 2023, 13:31
| #1104 |
| Distinguished - BHPian | Re: My Car Hobby: A lot of fiddling, and some driving too! Jaguar XJR, Mercedes W123 & Alfa Romeo Sp I drove over to visit our friend Bianca, and to fix her bumper. Sorry, forgot to take any images. But I am happy to report the initial JB Weld repair is still holding. But the bumper did not line up properly on the chassis. Just a case of a bit of bending and whacking the bumper support bar. All done. Still, with hindsight, I wished I had done the repair differently. At least I know what to do when the bumper comes apart again. Fingers crossed though. Saturday spanner mate Peter came round in his Spider. It is gorgeous weather here, so nice to drive the Spider. It also had a small problem we fixed, see later.  First things first, overhauling the second carburettor of the Jaguar XJ S1! Peter had done some more research and come up with four slightly different drawings. It is truly remarkable how many different variants there are, on one and the same model carburator. Even with four different drawings, the one we had in front of us, was still a bit different! Go figure!   With our experience of overhauling the first carburator things went pretty smoothly.  This time we decided to leave the float chamber on, till the very last minute when we needed to replace the jet. Less chance of damaging/breaking the little clips that hold the float in place.   Last thing to take out (prior to removing the float chamber) was the spindle. Last time we managed to put it back together four times incorrectly! So this time we took a dozen photographs, to make sure we captured each and every detail.  Although this valve looks pretty simple, it can mounted in different positions. The only proper way is as it looks here in this photograph! So we made note!!  Next we took of the float chamber and started hammering out the jet. Would not go as easily as last time. So I quickly made a special little tool on the lathe. Worked really well!  Very simple, It had to fit snuggly over the jet, but also just fit inside the hole the jet is pressed in. Turning a small piece of round brass stock on my little lathe, to within a few tenths of a millimeter is easy of course. Took less than five minutes. Now we have an official "Jet punch out.  We ran into a problem with the new spindle. It was not the same dimension as the old one! It is longer!  We decided we have three options. Check with the supplier and see if they have the correct one in stock. I could probably fix the old one, or shorten and re-thread the new incorrect one and make it fit. Plenty of options. Peter will call the supplier first thing Monday and we will take it from there. We spend a lot of time cleaning everything and then it was easy to put everything together, apart from the spindle and valve. If anything, these two carburettors are going to be the nicest and cleanest looking parts on the Jaguar!!   Once we have the new spindle, or fix the old one or the incorrect one, we are going to re-install these carburettors on the Jaguar and see if all our work has made any difference! Next we had a quick look at Peters Spider.  I had noticed that his rear left light was a lot dimmer than the right one. So we opened up the left rear light unit, polished the reflector and cleaned all electrical contacts. Looking good again. If anything the left one is slightly brighter now!  This morning I took my Jaguar for its annual APK (Dutch MOT). Passed with flying colours, as usual! These APKs are pretty thorough. Takes about 45 minutes.    Inside the showroom of this garage I noticed this old Toyota Corolla. It belongs to the owner. He sold it many years to a farmer and managed to buy it back some years ago, It looks completely original! A good example of a very nice, relatively cheap, classic car. This one is not for sale, but if it would it would probably cost about Euro 4-5000. To put that is some perspective, I bought my wife a regular E-bike last year for Euro 2500!.  Jeroen Last edited by Jeroen : 19th June 2023 at 13:39. |
|
| (11)
Thanks
|
| The following 11 BHPians Thank Jeroen for this useful post: | DrANTO, GwD, IcarusMan, jayakumarkp, keroo1099, Kurrant, Prowler, s4ch, Thad E Ginathom, vaasu, VivekCherian |
|
25th June 2023, 12:53
| #1105 |
| Distinguished - BHPian | Re: My Car Hobby: A lot of fiddling, and some driving too! Jaguar XJR, Mercedes W123 & Alfa Romeo Sp Yesterday we had the touring tour of my good friend Berndt, who also owns the National car model museum. Berndt has been organising this tour for the last 25 years. Due to Covid it did not take place a couple of years. This would be the 23rd edition. I always help out here and there. As mentioned in earlier posts with getting his cars ready. This year I also helped Berndt with the final route check. We drove the route in his Rover 200 Cabrio. Berndt provides easy to read written instructions. We just needed to check every single one. It is always a good idea to have somebody who is not familiar with the route, read out the route and see what happens. Any mistakes, any misinterpretations and so on.  I noticed only a few very small errors, misspellings and so on. So we printed out 100 route-books, stabled them, sorted them, put them in paper bags, with various vouchers for coffee along the way. Afterwards we also took Berndt’s Austin for one more testdrive. Berndt had noticed it sort of hesitated sometimes. We cleaned all the electrical contacts, spark plugs, rotor etc. Made a considerable improvement. So yesterday I left home at about 09.45 and drove along the river Linge to Asperen. The village where Berndt lives, but from where we also start our tour. More than 80 classic cars were assembled. Just about anything you can image!   My Mercedes all ready for the tour and ready to provide enroute assistance.  The gorgeous Alfa Romeo Bertone of my friends Niek and Rene who live in the same village as us.    As you can see, just about any car, type, model that you can think of is participating.  We started at 11.30 and we had a break down, literarily only 500 meters up the road. So I pulled up in the W123. A lovely classic Opel Cadet. A cooling water hose had separated. It would have been possible to fix that, but the engine refused to start. The owner really did not want to take any risk. He was going to call his sons to come and get him. But he lived only a few villages away so I offered to tow him back home, which we did. I found out that he and his wife are one of two couple of have participated in every one of Berndt’s tours! They were worried this one would not count. In fact, he did manage to fix his car and joined us again towards the end of the tour.   I had taken my TomTom when Berndt and I were verifying the route. TomTom has a record function, which is ideal. So whereas everybody else needed a navigator or read the route description themselves, I could just follow my TomTom.  We had another problem with a Fiat 130 that would not start after lunch. That one we managed to get fixed again with help from various people.  Berndt had also planned for a visit to the newest car museum in the Netherlands in a lovely little village called Buren. It opened only a few months ago, mainly French cars. Some 120-130 cars. Really nice! I will go another time to have a proper look around.  All in all, a very pleasant day, with gorgeous weather! Today I am off to the British Auto Jumble in Waalwijk. About half an hour drive from here. Looking forward to it. Jeroen |
|
| (8)
Thanks
|
| The following 8 BHPians Thank Jeroen for this useful post: | Akshay1234, Chetan_Rao, GwD, IcarusMan, Kurrant, Prowler, Thad E Ginathom, VivekCherian |
|
30th June 2023, 01:22
| #1106 |
| Distinguished - BHPian | Re: My Car Hobby: A lot of fiddling, and some driving too! Jaguar XJR, Mercedes W123 & Alfa Romeo Sp Several small fiddly jobs this week on three different cars. I started with a two different jobs on the Jeep. I am still not happy about the start up noises of the engine. As I have mentioned before, all the specialist tell me it is piston slap. But I am not convinced. We did the compression test and inspection of the cilinder liners earlier and could not see or find anything out of the ordinary. There are a couple of other possibilities too. One of them being one or more loose bolts on the flex-plate. A flexplate (or flex plate) is a metal disk that connects the output from an engine to the input of a torque converter in a car equipped with an automatic transmission. I have come across a number of people who report very similar noise, with the engine cold and idling as mine and claimed all they had to do was tighten the flex-late bolts. It is an easy job, because I can just slide underneath the engine/transmission. You take off an inspection cover and you can see the flex-plate and the bolts. Here we are looking upwards. You see the cover of the transmission, the flex-plate (notice the teeth for the starter!) and you can see one bolt. There are five in total.  So its a question of tightening one bolt, get from underneath the car, dive underneath the car at the front and use a wrench on the front pulley to turn the engine. Get out from underneath the front of the car, get back underneath near the transmission, tighten the next bolt and repeat till you have done them all. (Un)fortunately (!?) all my flex plate bolts were tight already. So it could be something with the valve tappets, the bearings or the pistons. I have to choose which route to take. Either remove the valve cover and check for valve play. Or take the sump off and check the bearings and peek inside the liners . I will probably end up doing both at some time. While I was retightening the bolts of the inspection cover, the flexible coupling of the socket I was using on my brand new impact wrench exploded!!  This is a special impact coupling. So it is meant to be used with an impact wrench or hammer. I found the little bar is screwed in and had just come undone. So put it all back together again, with some locktite. For good measure I checked and locktited all the other couplings I have too. And there was another one, almost undone. This thing could have ended up in my eye!  I also re-adjusted the steering box one more time. I found a way to use the workshop manual procedure. Sorry, no photographs. But it basically means I took off the steering rod of the pitman arm. Next used my torque wrench to measure the amount of torque in different positions. and with the adjustment bolt fully turned out. According to the manual you need to average out a number of different measurements. Next you start tightening the adjustment nut and redo the torque measures in a different orientation. You should be between 0,5-1Nm higher than the calculate value.  Again, endless back and forth from working underneath the car and standing over the engine bay adjusting this bolt and nut of the steering box. But the steering has definitely improved. Less play, very light! Next a small job on the W123. When I was showing off my W123 during the last tour I had noticed a bit of an oil leak on the engine valve cover.  Never had any oil leaks on the W123. So I took the air inlet filter off.  As far as I can tell, it was this connection that was leaking. This is part of the sump breather return. This hose is forty years and has become very stiff and does not fit snugly enough anymore. So I put a new hose clamp on it.  Pretty sure that was the cause of the oil leak. Cleaned up the engine bay a bit and all looks well again!!  Last job was to prepare the spindles for the carburettors of Peters Jaguar. As I mentioned before we were given an incorrect one. Peter had been discussing it at length with the supplier. But they did not have the correct length. Here you see the old one, already polished and the new one, as you can see too big!  So I used my lathe and my special die-tool and my mini mill to modify the new spindle.  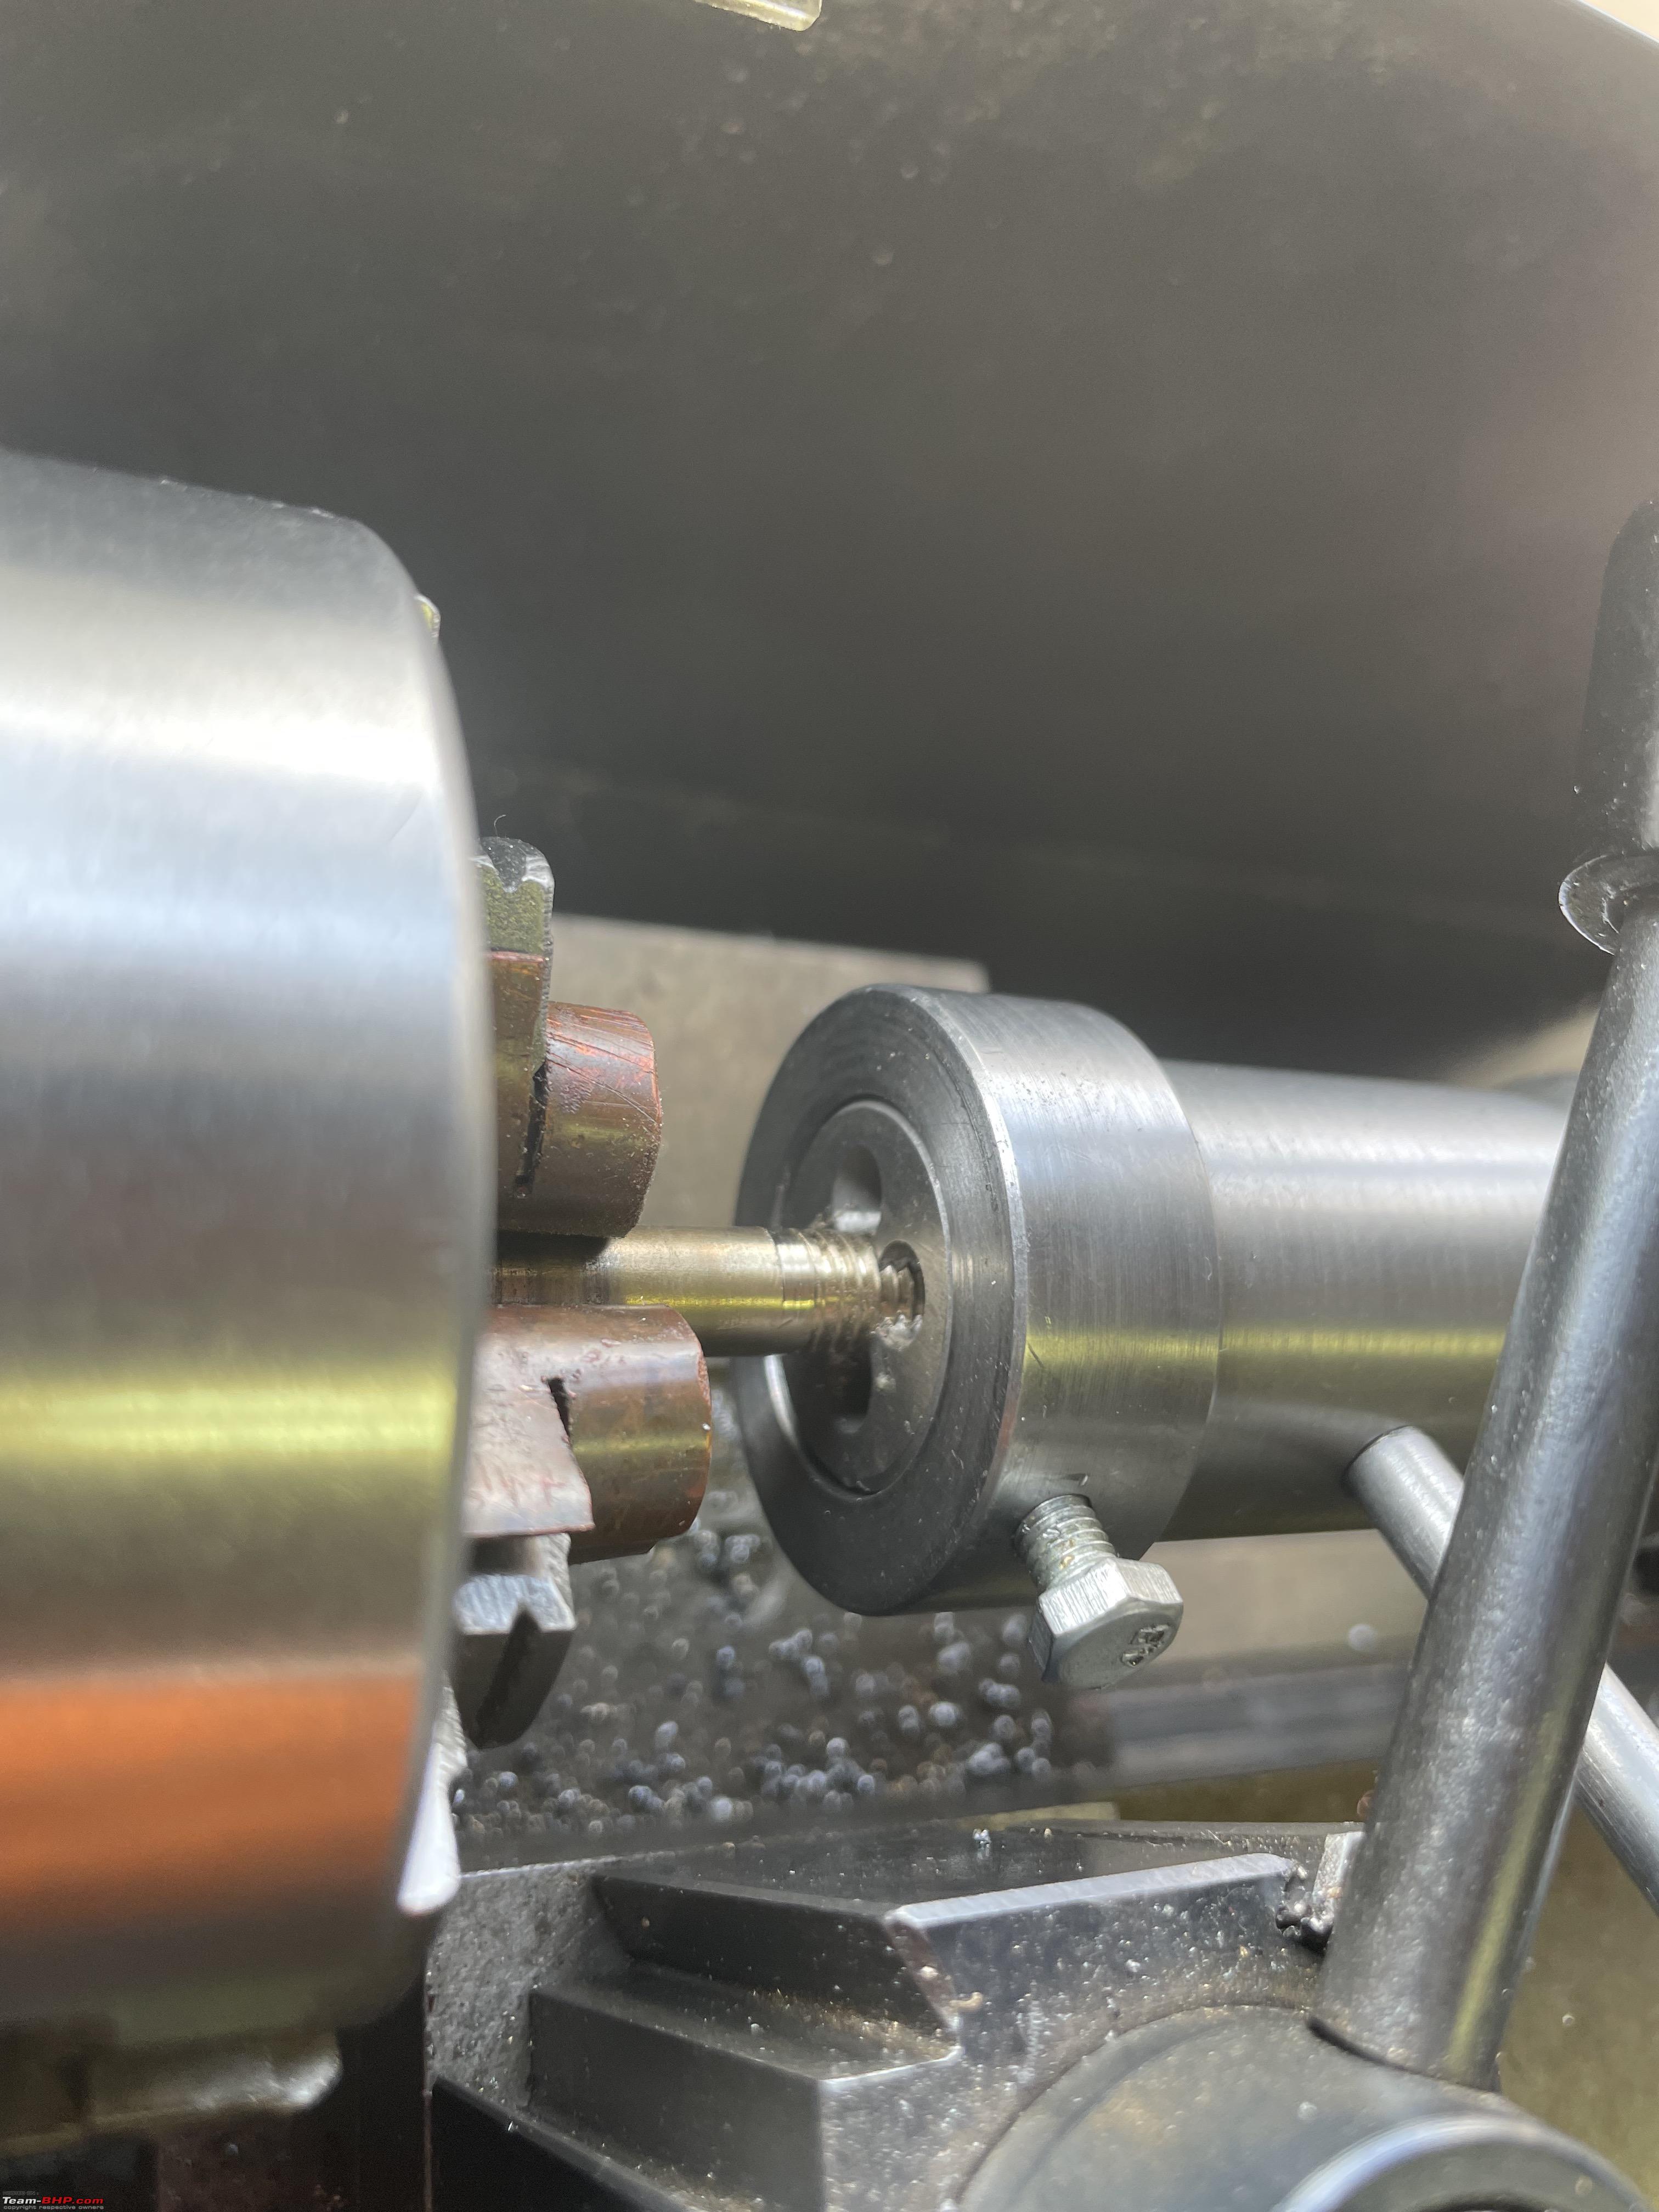  In the end I decided to also modify the old spindle from the other carburator. So now we have three new spindles. Peter had to cancel this week, so I will be visiting him this coming Thursday. Fingers crossed! Would be great if the Jaguar starts up, after we put the carburators back on! Jeroen |
|
| (9)
Thanks
|
| The following 9 BHPians Thank Jeroen for this useful post: | Akshay1234, dailydriver, GwD, IcarusMan, keroo1099, Prowler, Thad E Ginathom, vb-saan, VivekCherian |
| |
|
30th June 2023, 12:24
| #1107 | |
| BHPian | Re: My Car Hobby: A lot of fiddling, and some driving too! Jaguar XJR, Mercedes W123 & Alfa Romeo Sp Quote:
| |
|
| ()
Thanks
|

|
1st July 2023, 17:53
| #1108 | ||
| Distinguished - BHPian | Re: My Car Hobby: A lot of fiddling, and some driving too! Jaguar XJR, Mercedes W123 & Alfa Romeo Sp Quote:
I have taken another image of air filter. Here you see it with the camera positioned on the right side of the engine bay looking towards the engine and the air filter. Air can be drawn through the front of the car/engine, which is considered cold air. Inside that snorkel is a valve controlled by a thermo element. At low ambient temperature it close the valve and air (warm air) is drawn across the exhaust manifold.  Here you see the thermo element inside the air inlet. I have replaced these several times over the years. There are several posts on this thread with some more detail I believe.  Quote:
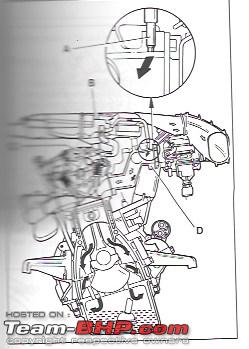 All engines have a ventilation system, in order to ensure no pressure, or potentially explosive mixture can be build up in the crankcase. Piston rings do never seal completely, fumes get into the crankcase. Mixed with hot oil and fuel fumes, the resulting excess pressure can damage the crankshaft seals. In extreme circumstance you might even have a potentially combustible mixture in the crankcase which can cause an explosion. Very rare on normal car engines. But for instance on large Marine diesel there are special measuring instrument that monitor the crankcase environment. And crankcase explosion do happen on these very large diesels! Look at the diagram. The hot fumes flow through the oil trap c in the tappet cover via the pipe to the water trap B in the air filter. (This was were my leak was). The oil is filtered out of the oil trap C and flows back into the cylinder head. Here the inside of the air filter and the oil trap taken apart. (see earlier posts for more details)  From the water trap B the fumes are sucked through a bypass bore A in the manifold D and go back into the combustion chambers, together with the air/fuel mixture coming out of the carburator. This is the rubber hose you saw. Here another better image.  Hope this help. Feel free to ask any additional questions, happy to help out. Jeroen | ||
|
| (4)
Thanks
|
| The following 4 BHPians Thank Jeroen for this useful post: | GwD, Prowler, Thad E Ginathom, VivekCherian |
|
4th July 2023, 16:35
| #1109 | |
| BHPian | Re: My Car Hobby: A lot of fiddling, and some driving too! Jaguar XJR, Mercedes W123 & Alfa Romeo Sp Quote:
| |
|
| ()
Thanks
|
|
4th July 2023, 16:40
| #1110 | |
| Distinguished - BHPian | Re: My Car Hobby: A lot of fiddling, and some driving too! Jaguar XJR, Mercedes W123 & Alfa Romeo Sp Quote:
Jeroen | |
|
| ()
Thanks
|
|