| |||||||

| Search Forums |
| Advanced Search |
| Go to Page... |
 |
| Search this Thread |  49,251 views |
 11th March 2017, 21:13
| #1 |
| BHPian Join Date: Feb 2006 Location: Bangalore
Posts: 812
Thanked: 2,453 Times
| S-Cross DIY: TPMS & 12V socket installation Update on additions to the car. I had been itching to do some DIY on my car. A while ago, I had bought a Novatek dashcam from AliExpress. It has been about a year and the device has been working well so far. I am quite happy with the dashcam as it serves the purpose although the fit and finish are far from desirable. When I started installing the dashcam, I realized that the power interface for the camera was using Mini USB and the hardwire kit I had bought had the micro USB interface. As a consequence, I was using the 12 Volt socket to power the dashcam (details are in this thread in earlier posts). This was obviously taking up one of the power sources and anytime someone had to charge their cellphone, I'd have to disconnect the dashcam. I had also been contemplating installing a tyre pressure monitoring system (TPMS) considering that I drive out frequently and a method to check tire pressure was something I could use to ensure optimal pressure before and while on a long trip. Given this, this was the DIY project I wanted to take up. DIY Level: Absolute Rookie Acknowledgements BHPians arunphilip & paragsachania - Their DIY posts on hardwiring dashcam & adding a 12v socket gave me the real motivation to start off on the project. Their narration is were so clear that anyone should be able figure out the basics of car electrical system and have fun with their own DIYs. Arun was also very helpful with advice and review of the work in progress TPMS considerations. I wanted a TPMS system that gave an OEM look. I am a sucker for anything that looks OEM or elegant. Sadly in my search I found no real good TPMS which gives OEM like look and function for Suzuki cars, the ones available were only for Toyota, Honda, Nissan and others. To the right side of the steering, next to parking sensor switch was an empty slot and I wanted to use that. I found none suitable on Amazon.in. Worse, the available ones were severely overpriced. Searching AliExpress showed a lot more options (and cheaper). After much considerations, I zeroed in on CAREUD U912 TPMS. I opted for a variant with internal sensors. For the length, width and height specifications of the target location, it should be a near perfect fit. All other models were either solar powered, big in size or not to my taste and liking. I wanted the TPMS system to be small and placed in one corner, and not look like an after market fitment. I have ordered the device, CAREUD U912 TPMS from AliExpress and its been about two weeks. It monitors temperature of the tyre pressure in addition to pressure. In the meantime, I decided to add an additional 12v Socket to power TPMS as well as the dashcam while the shipment arrived. The 12v socket idea is due to the fact that if I decide to do away with the dashcam in future, I could use it to power something else without much rework. CAREUD U912 TPMS 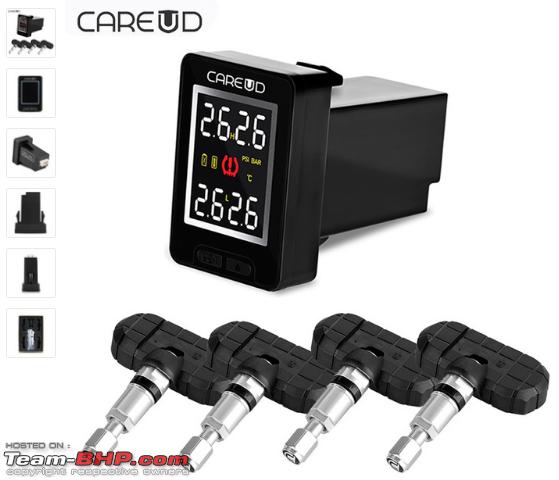 To begin with, I made up a diagram on how I wanted to wire the setup. I also spent some time dismantling the glove box and examining how the wiring will be placed, where I will ground the devices etc. After much deliberation, I decided to place the 12 V socket right next to the entertainment system, behind the dash. This is the model of 12v Socket I ordered from Amazon.in. I liked this because it came with connectors and the necessary wires with an inline fuse. http://www.amazon.in/Generic-Waterproof-Motorcycle-Cigarette-Lighter/dp/B01AG94GUE?_encoding=UTF8&psc=1&redirect=true&ref_ =oh_aui_detailpage_o00_s00 And here's the wiring diagram 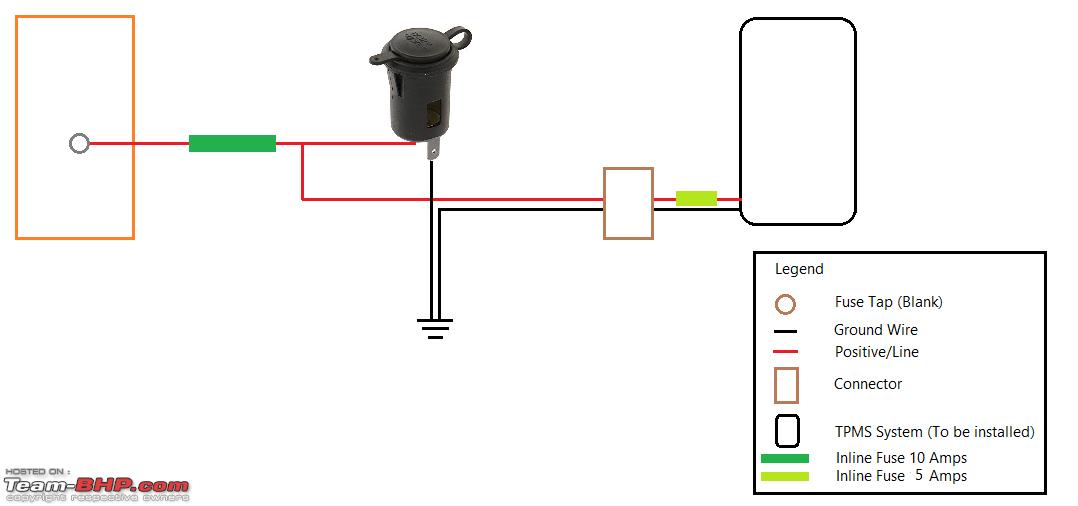 Summary of my Approach a. Made a mental map of how to go about wiring. b. Read the car manual to clearly understand the location of internal fuses, and how to dismantle things like glove box and covers. c. Researched on equipment I needed. d. Checked to ensure I have the tools needed. e. Watched several YouTube videos of DIY projects similar to what I was about to undertake. f. Considered backup plans if I end up with surprises. For e.g. Fuses that were not connected to the battery, alternate location for 12V socket etc. g. Sourced all the tools and equipment I needed. Wiring Plan: My wiring plan was to use a 12 V socket and then tap an additional powerline right after the inline fuse of the socket to power the TPMS system. Both devices together only needed less than 5 Amps and the fuse protects at 10 Amps. I will also add a 5 amp inline fuse for the TPMS when it arrives. The fuse box in S-Cross is not in an easily accessible position. It's right behind the glove compartment to the left on the passenger side. The only way to work easily with it is by removing the glove box and the soft insulation under the foot well. With the socket being in the center of dashboard and the TPMS on the other end of the dash, I had to account for enough wire length to ensure I could connect the systems. I used a measuring tape to account for the length of wires required. Fuses location in S-Cross 1.3 MJD 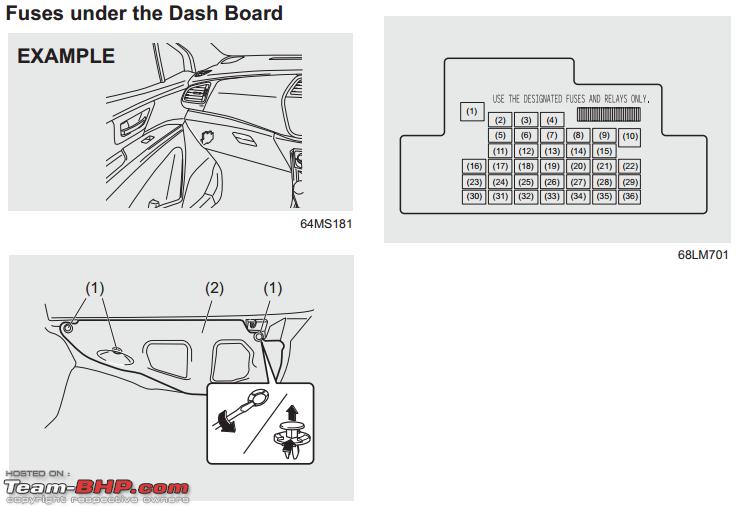 Fuses - Internal  Micro Blade Fuses in S-Cross  Fuse Tap- I had initially chosen to use the Accessory Socket 3 as the location to tap the power from, but in my tests I realized that this socket is not connected to the battery. This was a bit of surprise to me. Thus, the default choice then was to use the blank socket. Tests using multimeter showed that the socket is powered only when ignition switch is on. This was good enough since I wanted these devices to be powered on only when the car was running. I always prefer to use a minimum number of devices when the engine is not running. This practice, I believe, has greatly helped conserve battery with all my previous cars. I never had a battery change before 5 years of ownership. Now having figured out how to get the power, the next was to consider how to get the ground wire done. Looking behind the dash, I located a place where I could add a nut and bolt to hold the ground connectors together at the same spot. I was lucky to find a nut and bolt in my toolbox that matched exactly with the hole on the internal hardware. Placing the 12V Socket - Since there was no real holder, my plan was to use zip ties to hold the 12v socket to the internal hardware and then plug in the adapter for the dashcam. There's plenty of space behind the dash, so routing the wire was easy. Equipment & Tools 12 Volt socket sourced from Amazon.in. TPMS from AliExpress. The socket came with proper connectors and also insulators. Cost was reasonable too and quality is very good.  16 AWG Wires, Connectors sourced from S. P. Road, Bangalore  Fuse Tap - Sourced from AliExpress 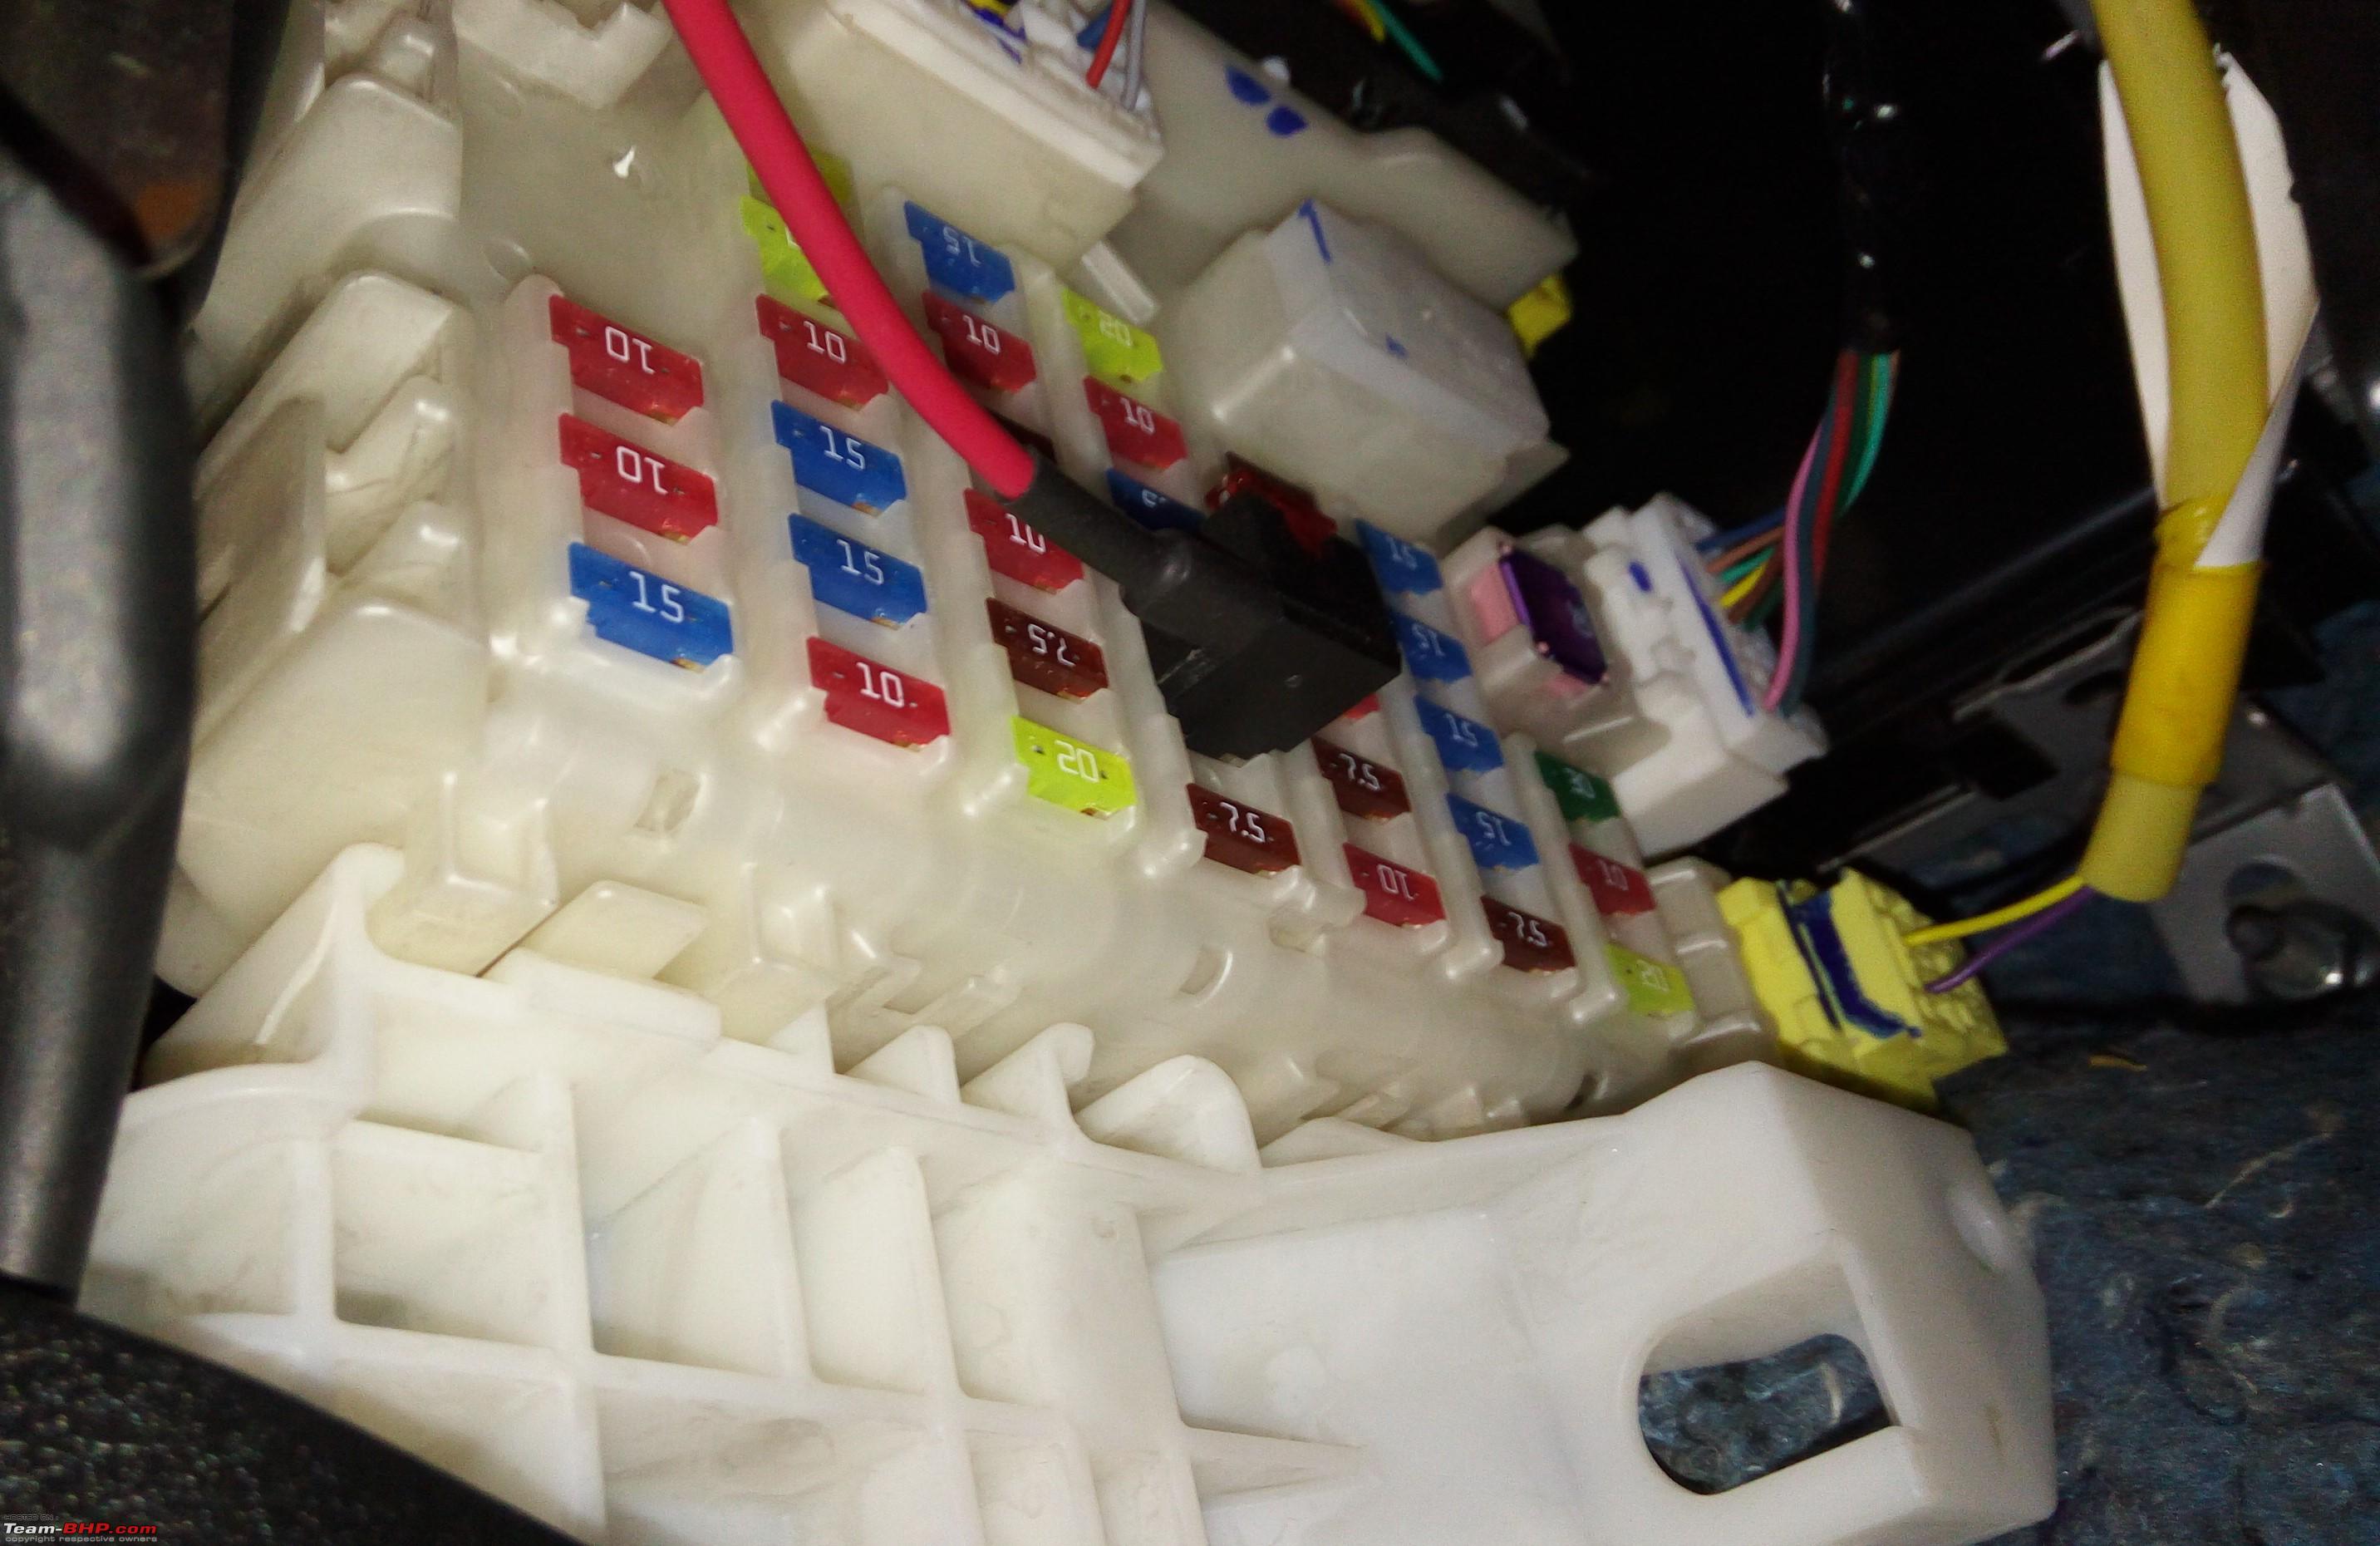 Fuse Puller - You will find it in the car's main fuse box (inside engine compartment) 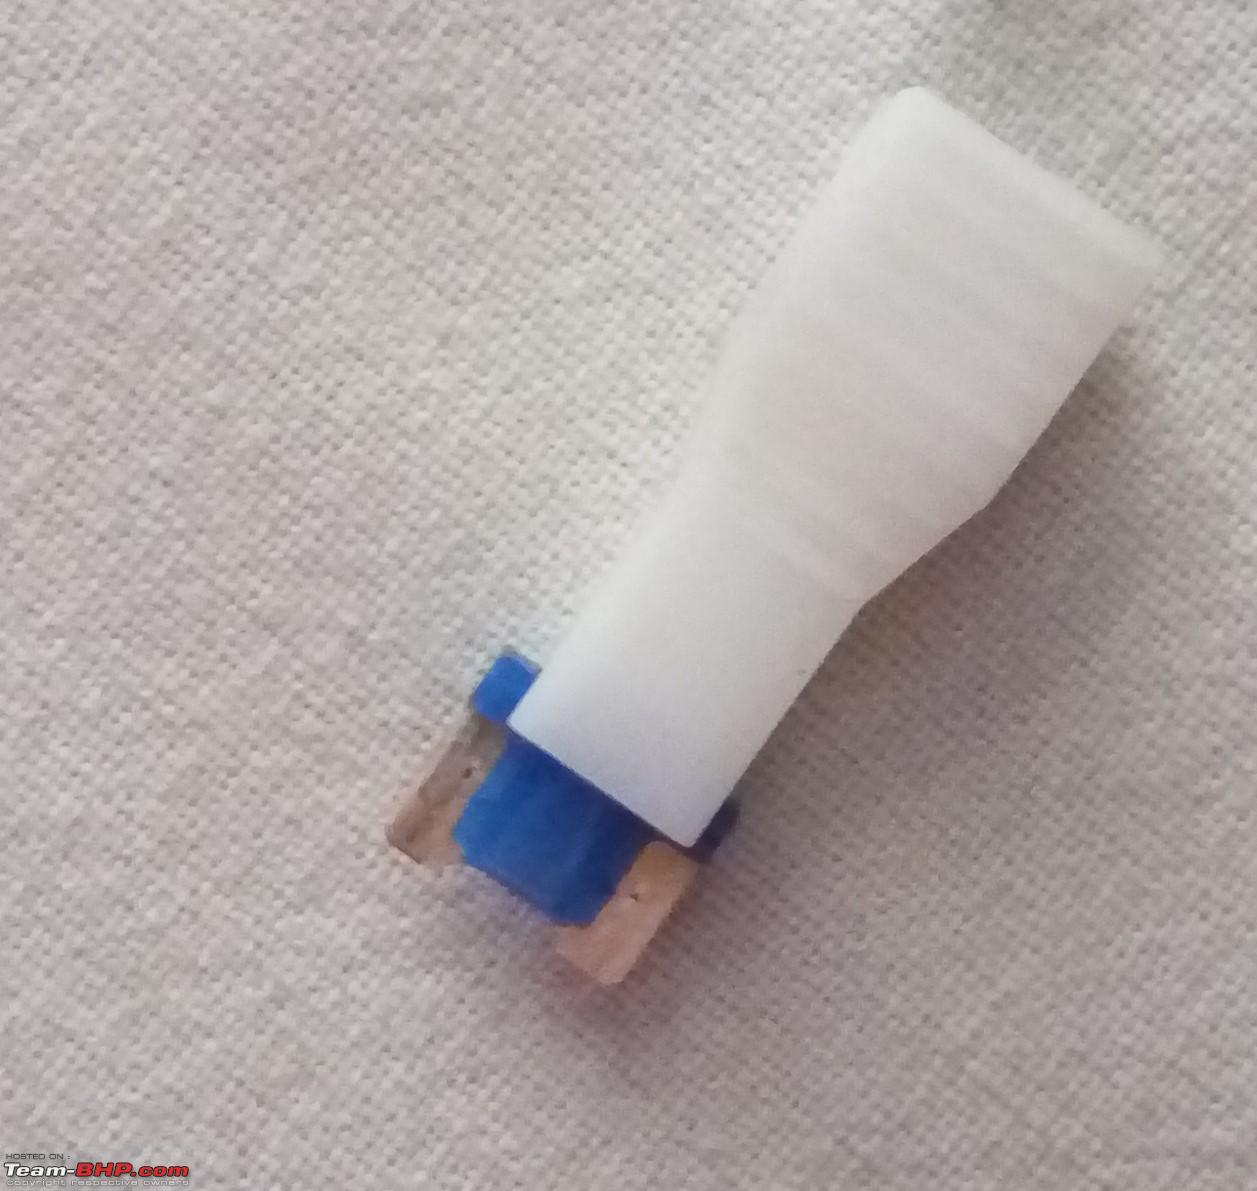 LED Connector  Male female connection 
Wiring the hardware Solder Joints - I believe I did it pretty well for a first timer 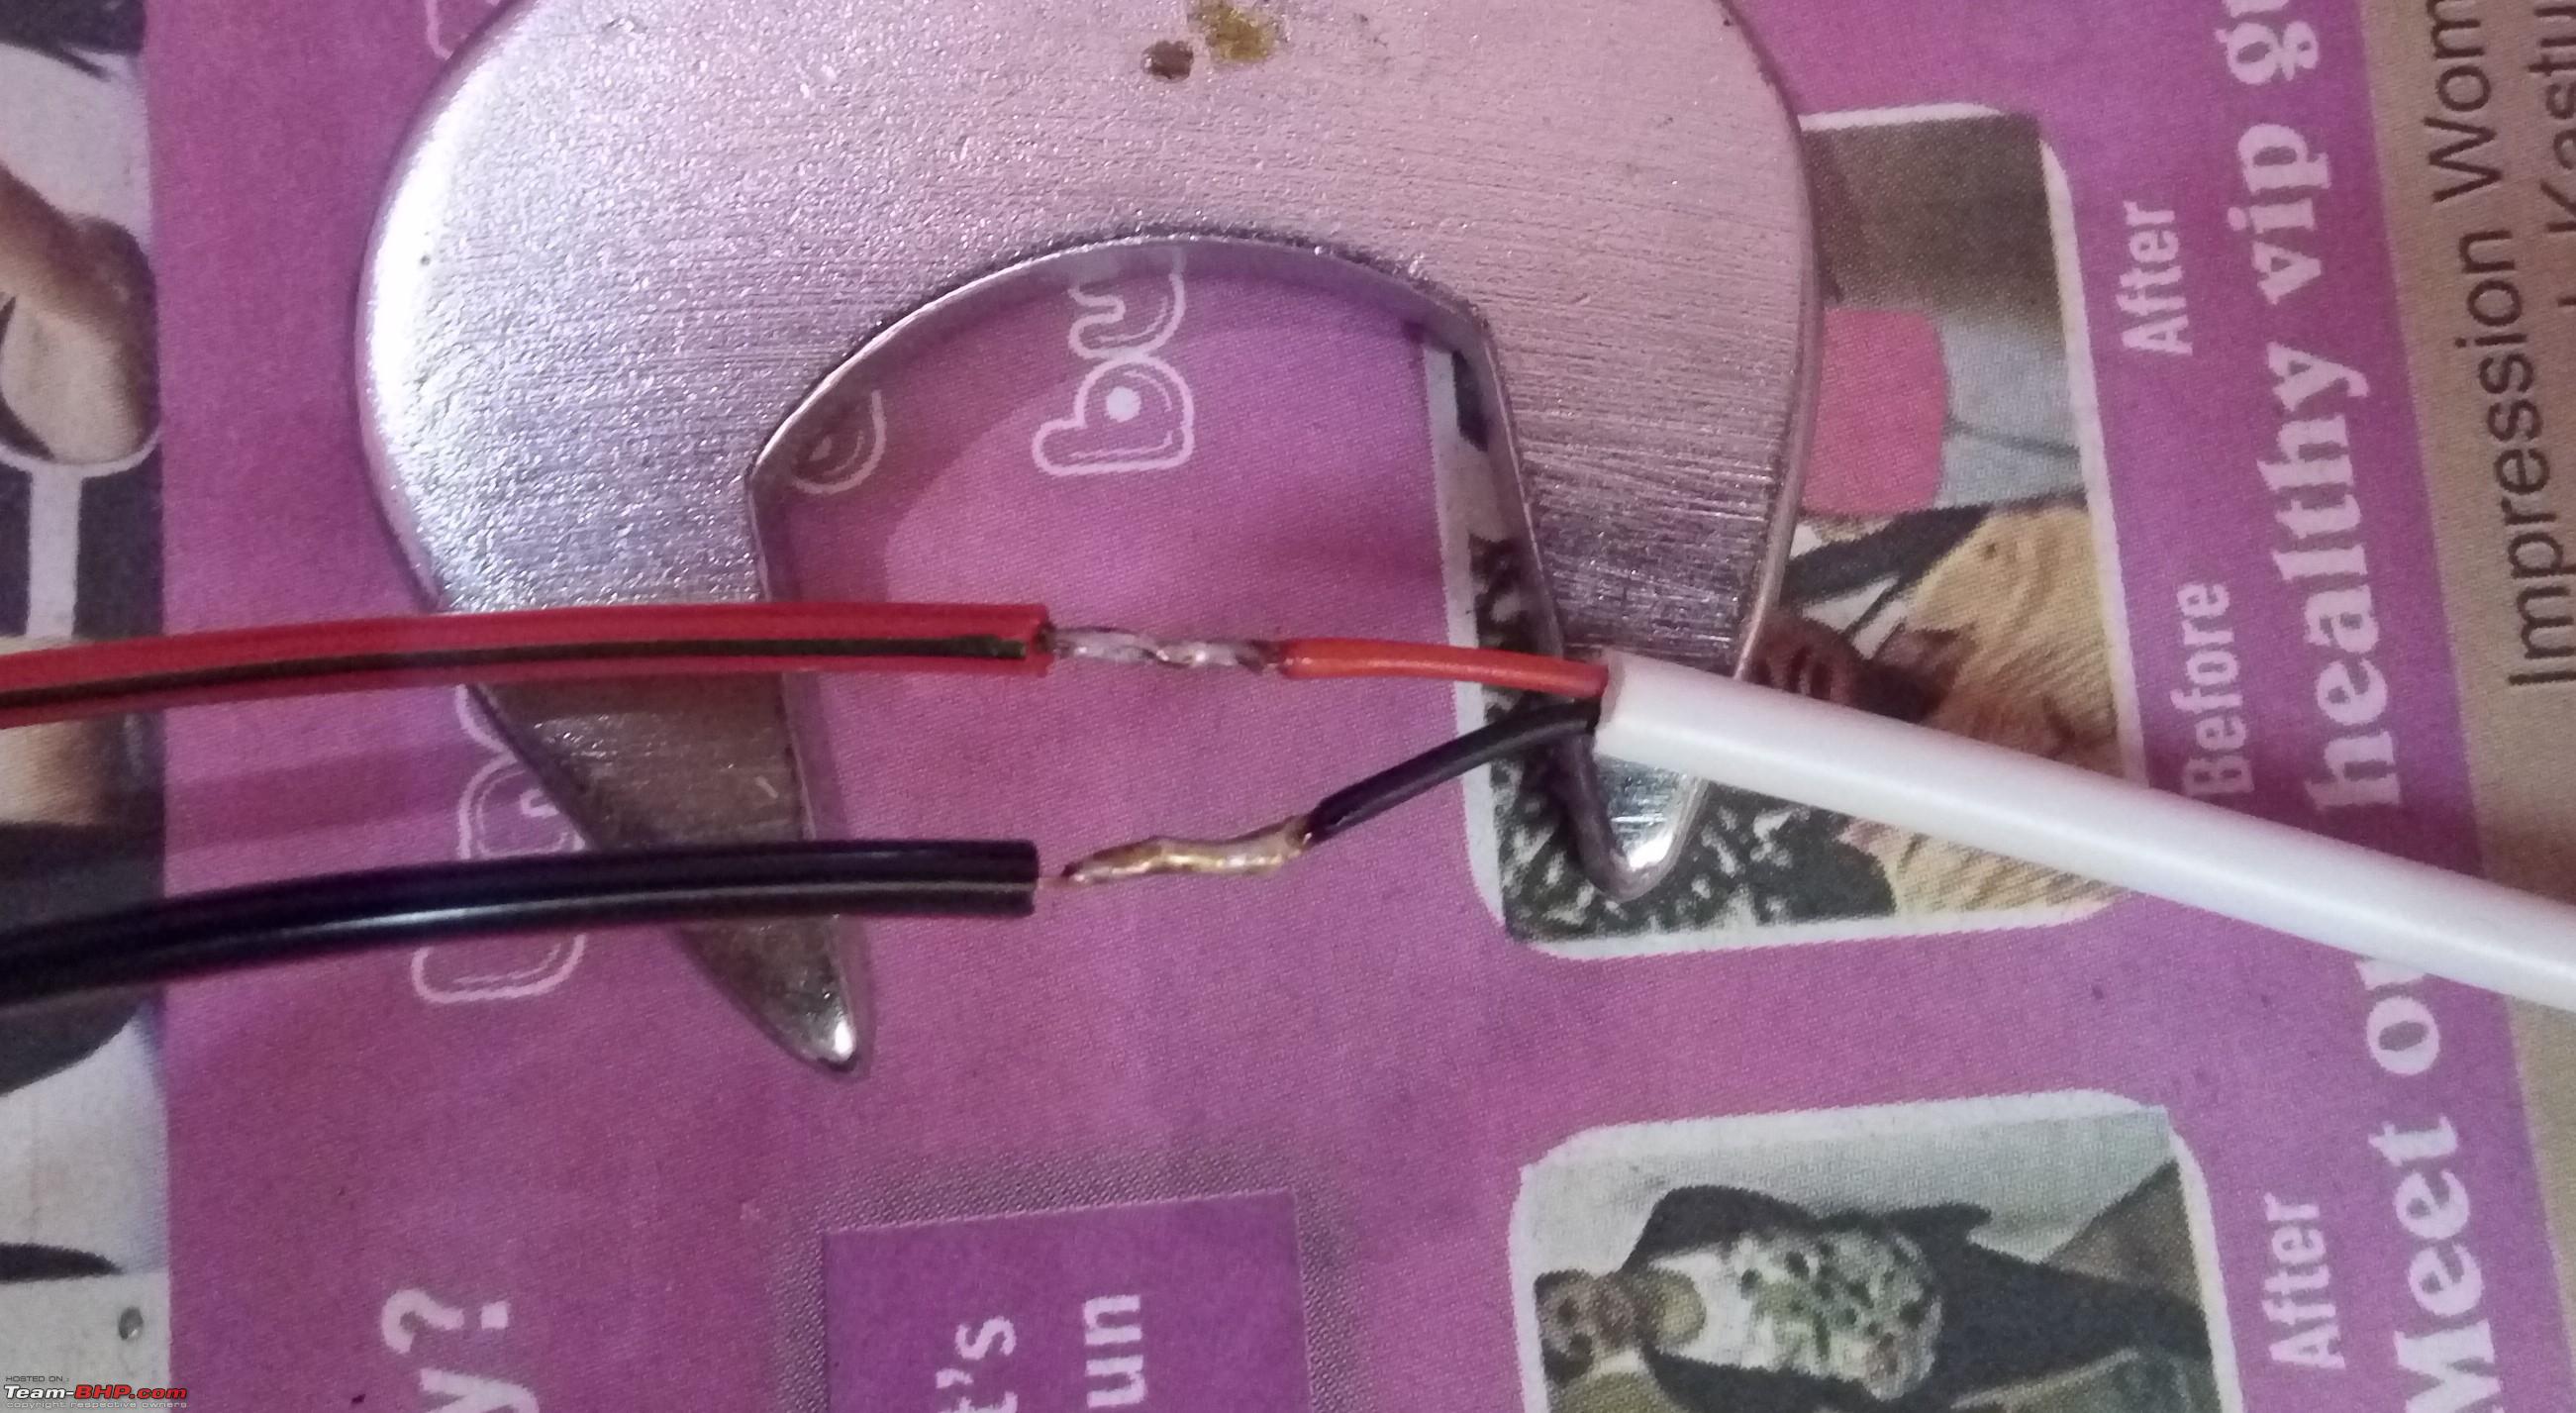 Final Output. If you follow the wire from fuse tap, you will see that right after the inline fuse for the socket, there is an additional branch off to the LED connector. It's soldered properly and every solder joint is insulated with heat shrink tubing and insulation tape. 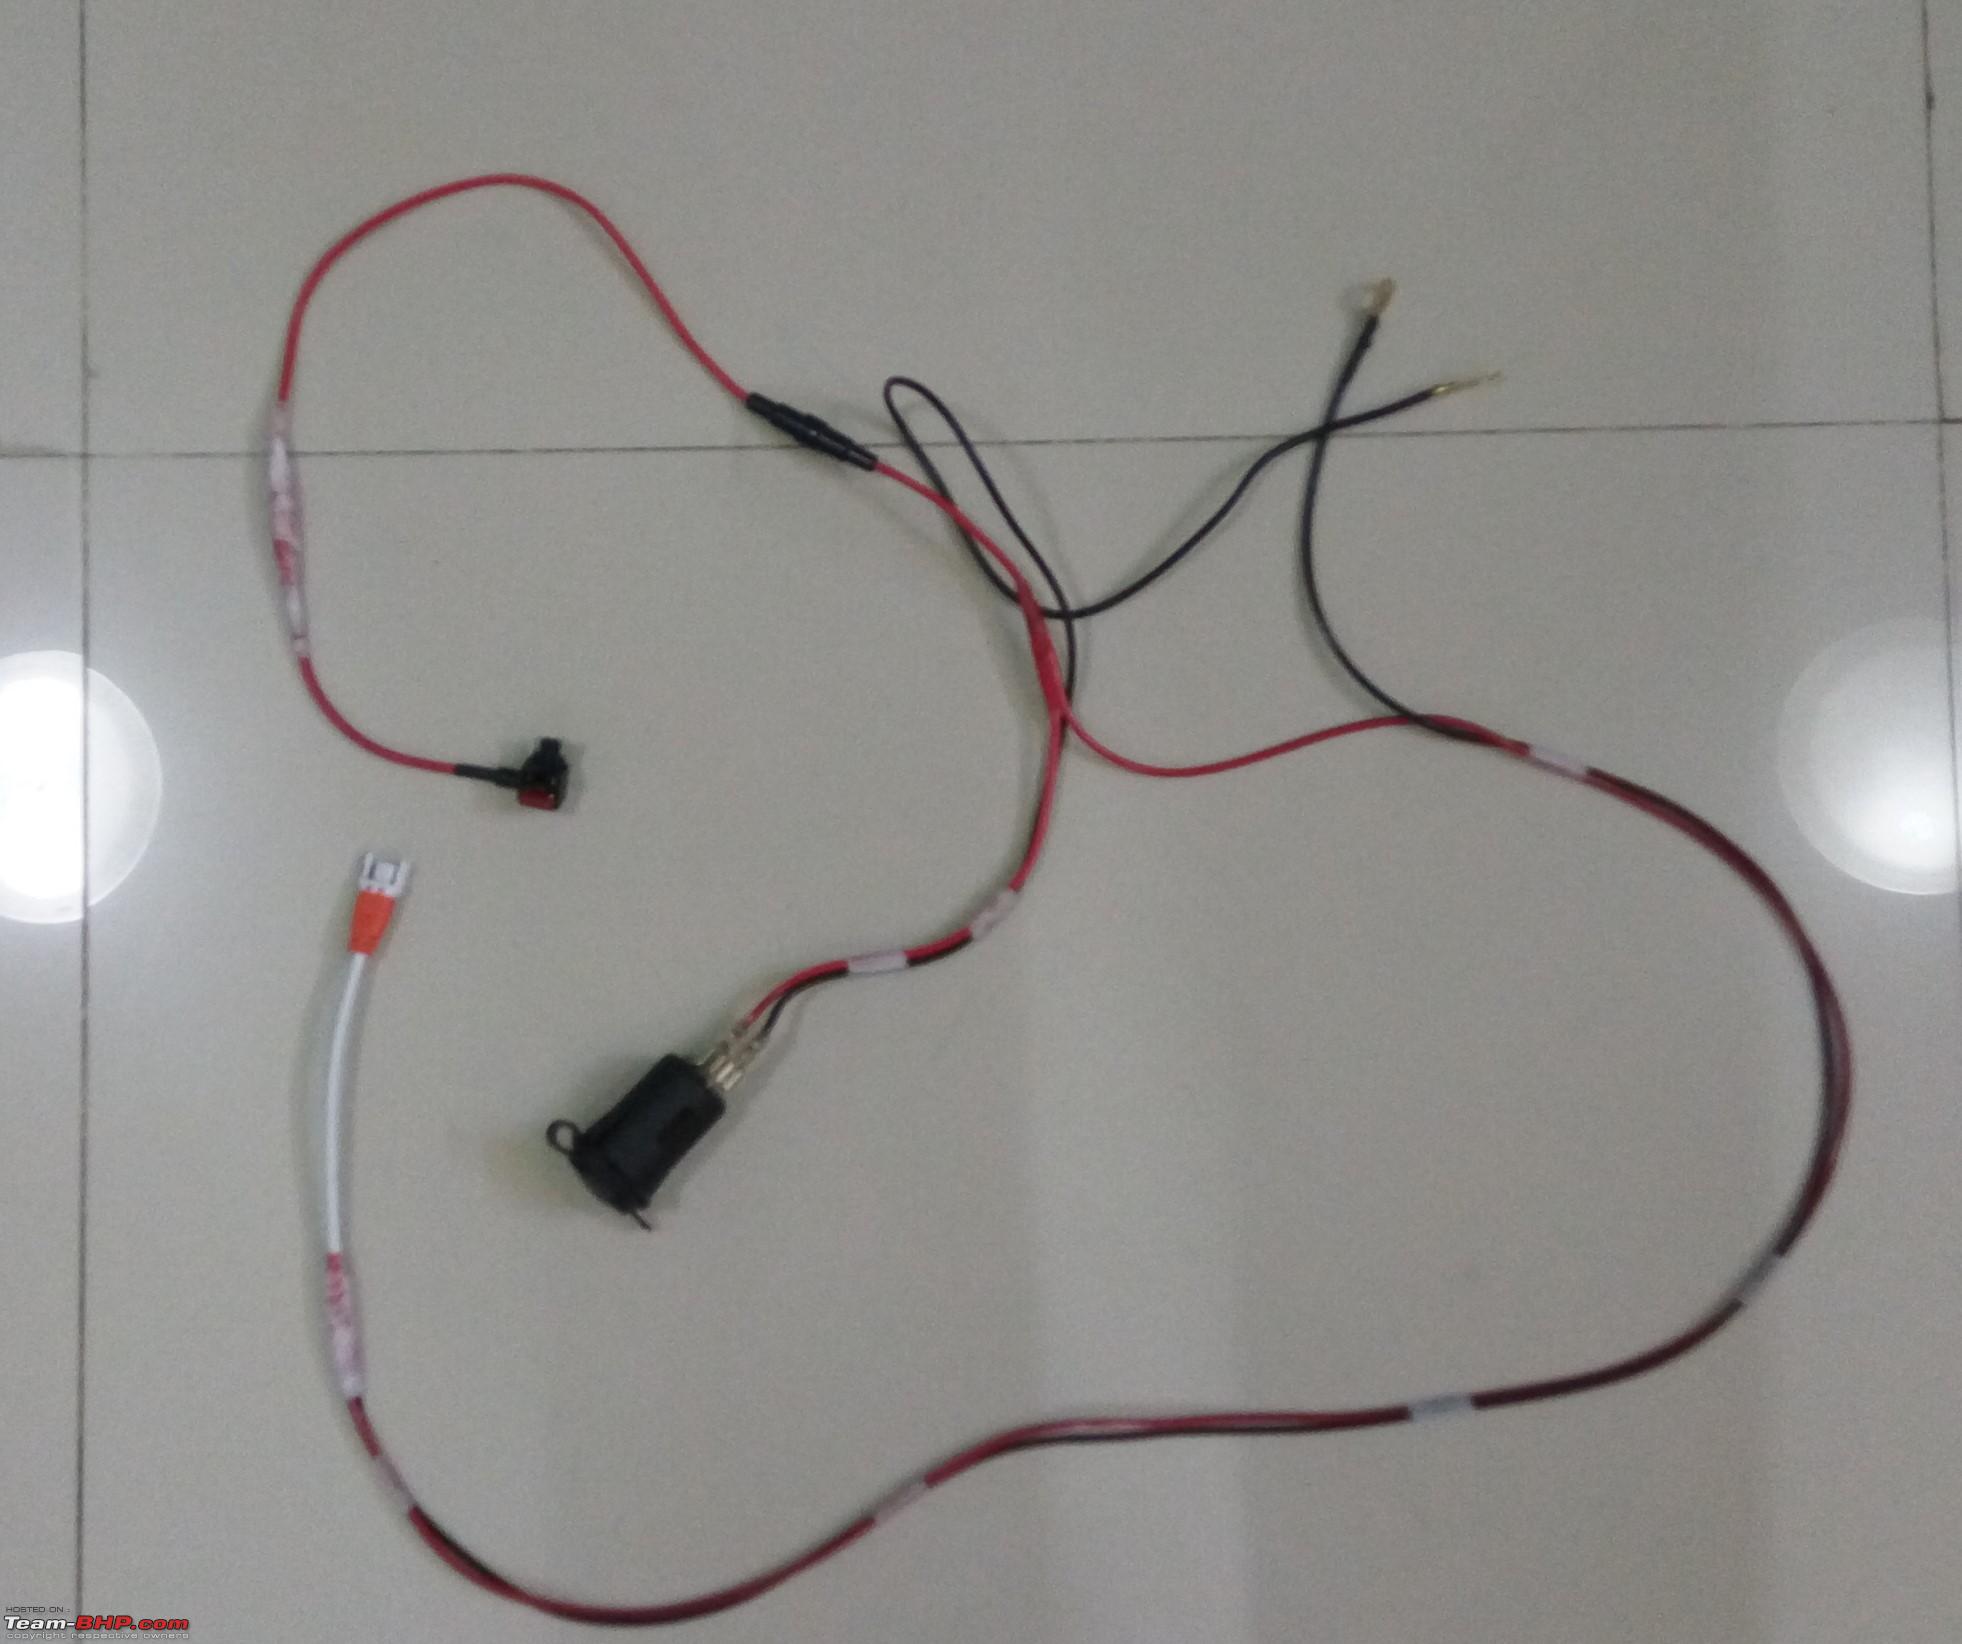 Installation Procedure This should be a no brainer, but before you start, ensure that the accessories or ignition is not on. This is very important or you could cause a spark or short circuit. Step 1: Remove the glovebox. Clear instructions are given in the manual on how to remove the glove box. Armed with this information, I removed the glove box, foot well cover and the fuse cover. Step 2: Position the 12V Socket and ensure that the wires have enough length to connect the devices. If you planned this well and did your homework, then you should be good. The picture below shows a hardware just behind my dashboard center console  Step 3: Fix the 12V Socket using zip ties. I had to chain Zip ties together to ensure a strong fix against the internal hardware. 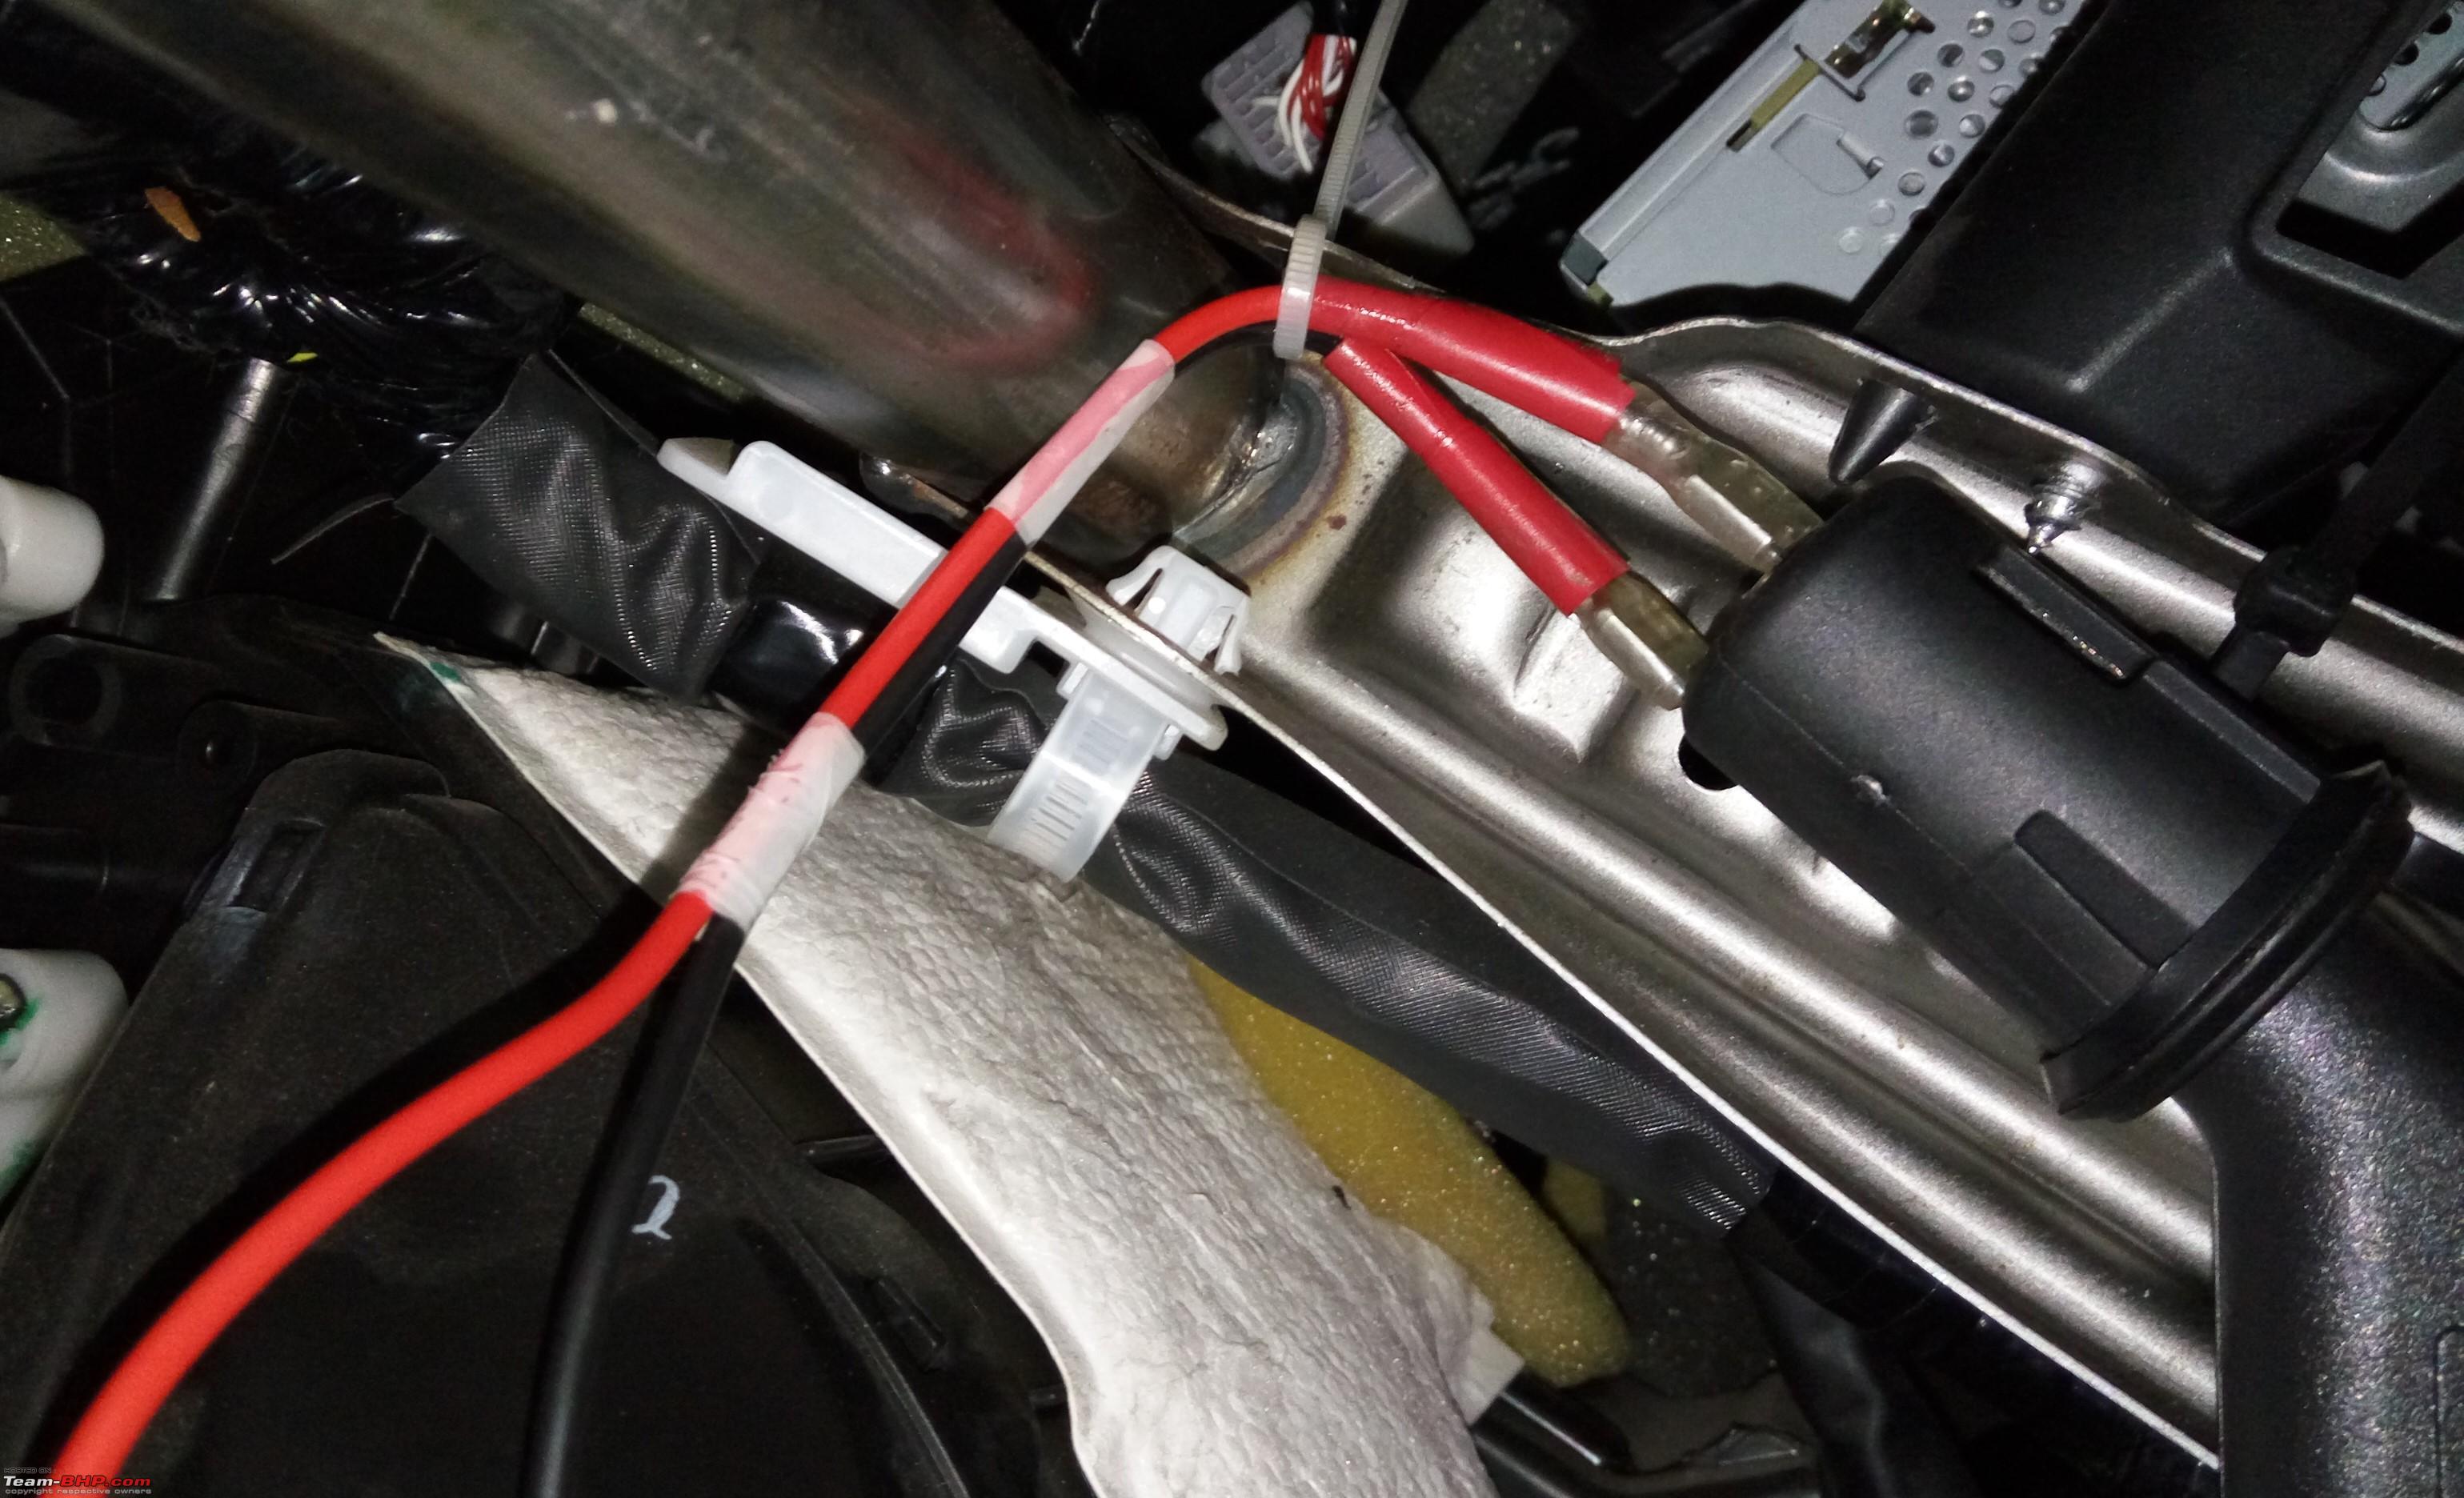  Routed the wires over and below the cabin air filter housing and secured with zip ties. The positive wires go to the fuse tap and the connector portion opposite direction to the other side of the dashboard     LED connector coming out of the other side of the dashboard. This is currently not in use and will be connected when TPMS arrives. For now its just tied up well and insulated.  Step 4. Connect the fuse tap to the blank fuse socket or the one you designated as the power source. Electrical wisdom says always connect positive first, although you could get away without it also. Step 5: Connect the ground wires to a body frame  Smoke Testing We do this in software too! - Basically after you connect up everything, you power on and observe if there are any connection related problems. Once you have wired up everything, turn on the ignition and try to use your nose and ears to check if you hear any burnt smell or sounds which indicate sparking. If everything looks good, plug in your dashcam into the socket and check if it powers up. Also check if turning off the ignition powers down the dashcam. If everything is good so far, ensure your ignition is turned off and continue below: a. Use zip ties to tie up the wires so that they are well secure and not interfering with other equipment and your legs. b. Close up the glove box and the foot well cover. c. Check your little tray to see if you missed adding any screws or anything back. In my case, the fuse cover could not be put back, so I placed it in my manual holder for future reference. Potential Pitalls in this DIY a. If you are rookie at soldering, then chances are you will execute a bad solder. As a consequence, the soldering may not be strong or will increase resistance. Solution: Watch YouTube videos on how to solder properly. b. Ensure you use a proper gauge wires so that you don't risk overheating of wires. A bit higher gauge is better. For such DIYs you can consider any gauge from 16-22 AWG c. Vibrations could cause the adapter to dislodge from the 12V socket after sometime. I need to check this and do something about it if that happens Learnings a. Always wear gloves for added protection & use proper tools. b. Ensure you carry a tray to keep all small things or else you will be spending a lot of time searching for "missing" stuff c. Plan for enough time with the DIY. do not rush and do a perfect job where possible. d. Do your homework well - I bet a lot of us haven't been so enthusiastic about homeworks when you were a child. The learnings are great for satisfaction especially rookies in this field like me. |

|  (22)
Thanks (22)
Thanks
 |
| The following 22 BHPians Thank sudeepg for this useful post: | aeroamit, arunphilip, audioholic, dailydriver, dpat17, Dr.Naren, govigov, graaja, GTO, harsh79, jaunthead, landcruiser123, Mr.Boss, Myth_sx, Omkar, paragsachania, R2D2, ragh_bhushan, rohiT Nonu, runaldahiwade, samaspire, sdp1975 |
| |
|
11th March 2017, 21:26
| #2 |
| BHPian Join Date: Feb 2006 Location: Bangalore
Posts: 812
Thanked: 2,453 Times
| Re: Journey from a Honda City to the Maruti S-Cross 1.3L Upcoming DIY - TPMS Installation TPMS Location is given below. It's about 1 inch by 1.5 inches and the TPMS system is about the same length and width. The difference might be off by a couple of mm's only. If the gap is too much, I'd have to add some packing or some glue or tape to ensure the fit is tight. Given that I only need to solder my connector, this should now be an easy plug and play. The only major work will be to install the internal sensors. My friendly neighborhood tyre shop has agreed to help with the installation & wheel balancing. The govers shop @ Banaswadi that does tyre works is very good. That guy even told me that if the weight of the sensor is off only by a couple of milligrams, all they need to do is deflate the tyre, cut out the existing valve and fix the sensor and valve. Balancing may not be required as long as the tyre position does not change. Thinking about it, I think that could actually be true. TPMS Location  Dummy currently in the position  |
|
| (11)
Thanks
|
| The following 11 BHPians Thank sudeepg for this useful post: | aeroamit, arunphilip, dailydriver, GSMINC, GTO, harsh79, jaunthead, Keynote, landcruiser123, paragsachania, Rehaan |
|
25th March 2017, 16:05
| #3 |
| BHPian Join Date: Feb 2006 Location: Bangalore
Posts: 812
Thanked: 2,453 Times
| DIY: Tyre Pressure Monitor Installation on Suzuki S-Cross 1.3 MJD Alpha NOTE: This is a continuation of the post at http://www.team-bhp.com/forum/test-d...ml#post4161726 Tyre Pressure Monitor Installation (TPMS) on S-Cross 1.3 MJD My car runs fairly well and sees a lot of highways, especially during the holidays. Sometimes, I also end up going through some bad patches of roads. The tyre being the point of contact to the ground for the car, I always try to take the best care for my tyres which include
These checks, I believe, have helped me in not getting stranded and also have a comfortable drive everytime. Correct tyre pressure is one of the things that can give a comfortable fatigue free drive. On the S-Cross, I usually keep it at the manufacturer recommended pressure of 33 PSI during winter season and 32 in summer. So given this, one of the equipment I decided to install is the TPMS. My experience selecting, ordering and installation is described below Choice of TPMS System My first choice of sourcing equipment is locally in Bangalore. My requirement was specific - The device had to be small, gives an OEM look and feel and preferably have pressure and temperature monitoring. Most of the options I had were either brands that were not well known, had very few customer reviews and expensive. I also checked Amazon.in and most of them were in the upwards of 7000 rupees. They'd occupy the cigarette lighter socket and the power interface for the ones I liked were integrated into the monitor, like a T shaped Pad. See this link for e.g. http://www.amazon.in/Blaupunkt-Tire-Pressure-Monitoring-System/dp/B01CGFG03W/ref=sr_1_1?ie=UTF8&qid=1490437193&sr=8-1&keywords=TPMS That wouldn't fit into S-Cross because the socket is placed inside the center storage where there is little room for a device given the interior side panels of the console. There were also a few models which had a cell phone app to monitor the pressure, which I didn't prefer either. Next up, AliExpress - AliExpress has lots of options and if you wait for their sale, you can get some good deals, the only problem being the long wait time for delivery. I had already decided that I wanted a model with internal sensors because the external sensor had to be removed everytime using a supplied spanner if you had to top up nitrogen or air. I felt this was an inconvenience and a lost spanner would make things worse. Aesthetically, it didn't appeal to me either. There were some solar powered models too which had a big monitor unit. I finally zeroed in on CAREUD U912 TPMS with internal sensors. This model is available for Toyota, Honda and a few other cars. The device fits neatly into one of the dummy sockets in the car, but being 23mm x 34mm meant it would not fit into the dummy socket in the S-Cross. I then found that the one for Honda came with a rubber padding and locking that fits more or less perfectly in S-Cross. A few days went by before the order was placed as I was in the middle of other work priorities as well as wiring up the 12v socket for use with my dashcam. When wiring up the 12v socket, I also made it a point to make provision for TPMS connection of the same power supply. This was because once the device was delivered, it was just a matter of wiring up a female socket to the device and it would be plug and play post the sensors were installed. Features of the CAREUD U912 TPMS
Ordering from AliExpress I ordered the device from AliExpress paying $80 with free shipping. But, I made a small mistake. Instead of ordering the one for Honda, I ended up ordering the one for Toyota as I had not booked marked my selection. I didn't realize this until the package was delivered to me 29 days later. Installation One of the first issues I ran into was the fact that the rubber packing that made the device fit flush in the dummy socket next to the start button switch was not included due to the ordering error I made. I had a few choices given the situation. Cut the dummy switch to specification to fit the device OR fabricate a new rubber seal. Cutting the dummy switch to specification turned out to be difficult than I initially thought. A rotary cutter (dremel tool) was required and I could not find someone who could do this precision work. I then attempted it myself with a haxoblade and it didn't go well to say the least. I didn't completely screw up the switch but the work progress was very slow and not to my satisfaction. Switch to plan B - I fabricated the packing for the monitor using a rubber piece that came along with one of my watches. Yeah! Sounds crude but it did the job perfectly. I spent a while cutting the packing to exactly match the button hole and device and used double sided tape to hold it in place. I have seen many people use glue to fill the gap, but this was not something I liked. I have verified that the installation will hold it well and will likely absorb minor vibrations too! The installation was pretty straight forward and the steps involved are as follows:
Costs
Much of the time went in fixing the new wireless sensors in the tyre and also routing the wires. As I figured, the wiring on the driver side of most cars and S-Cross had very less wires running across. This might be to prevent a wire tangle. So it was difficult to find a proper path for the TPMS wires so that it doesn't interfere with the steering assembly or the ABC pedals or while driving in any way. I have explained in the pictures how I finally got it routed. Pictures of the Installation Box  Sensor Features  Contents after opening  Contents of the package  Contents placed out on table. Notice the sensors  Monitor display held in hand for size reference. It's really small!  Sensor held in hand for size reference  Notice how the power wire is directly attached to the 15 Amp fuse. It's crude in my opinion, but since I had already tapped power from the 12V hidden socket installed earlier and wired up a connector, all I had to do was cut the wires on the monitor and solder the female connector to make it plug and play. Also helps with maintenance and installation. The dashcam and TPMS take power from a single 12v socket and is powered on with ignition 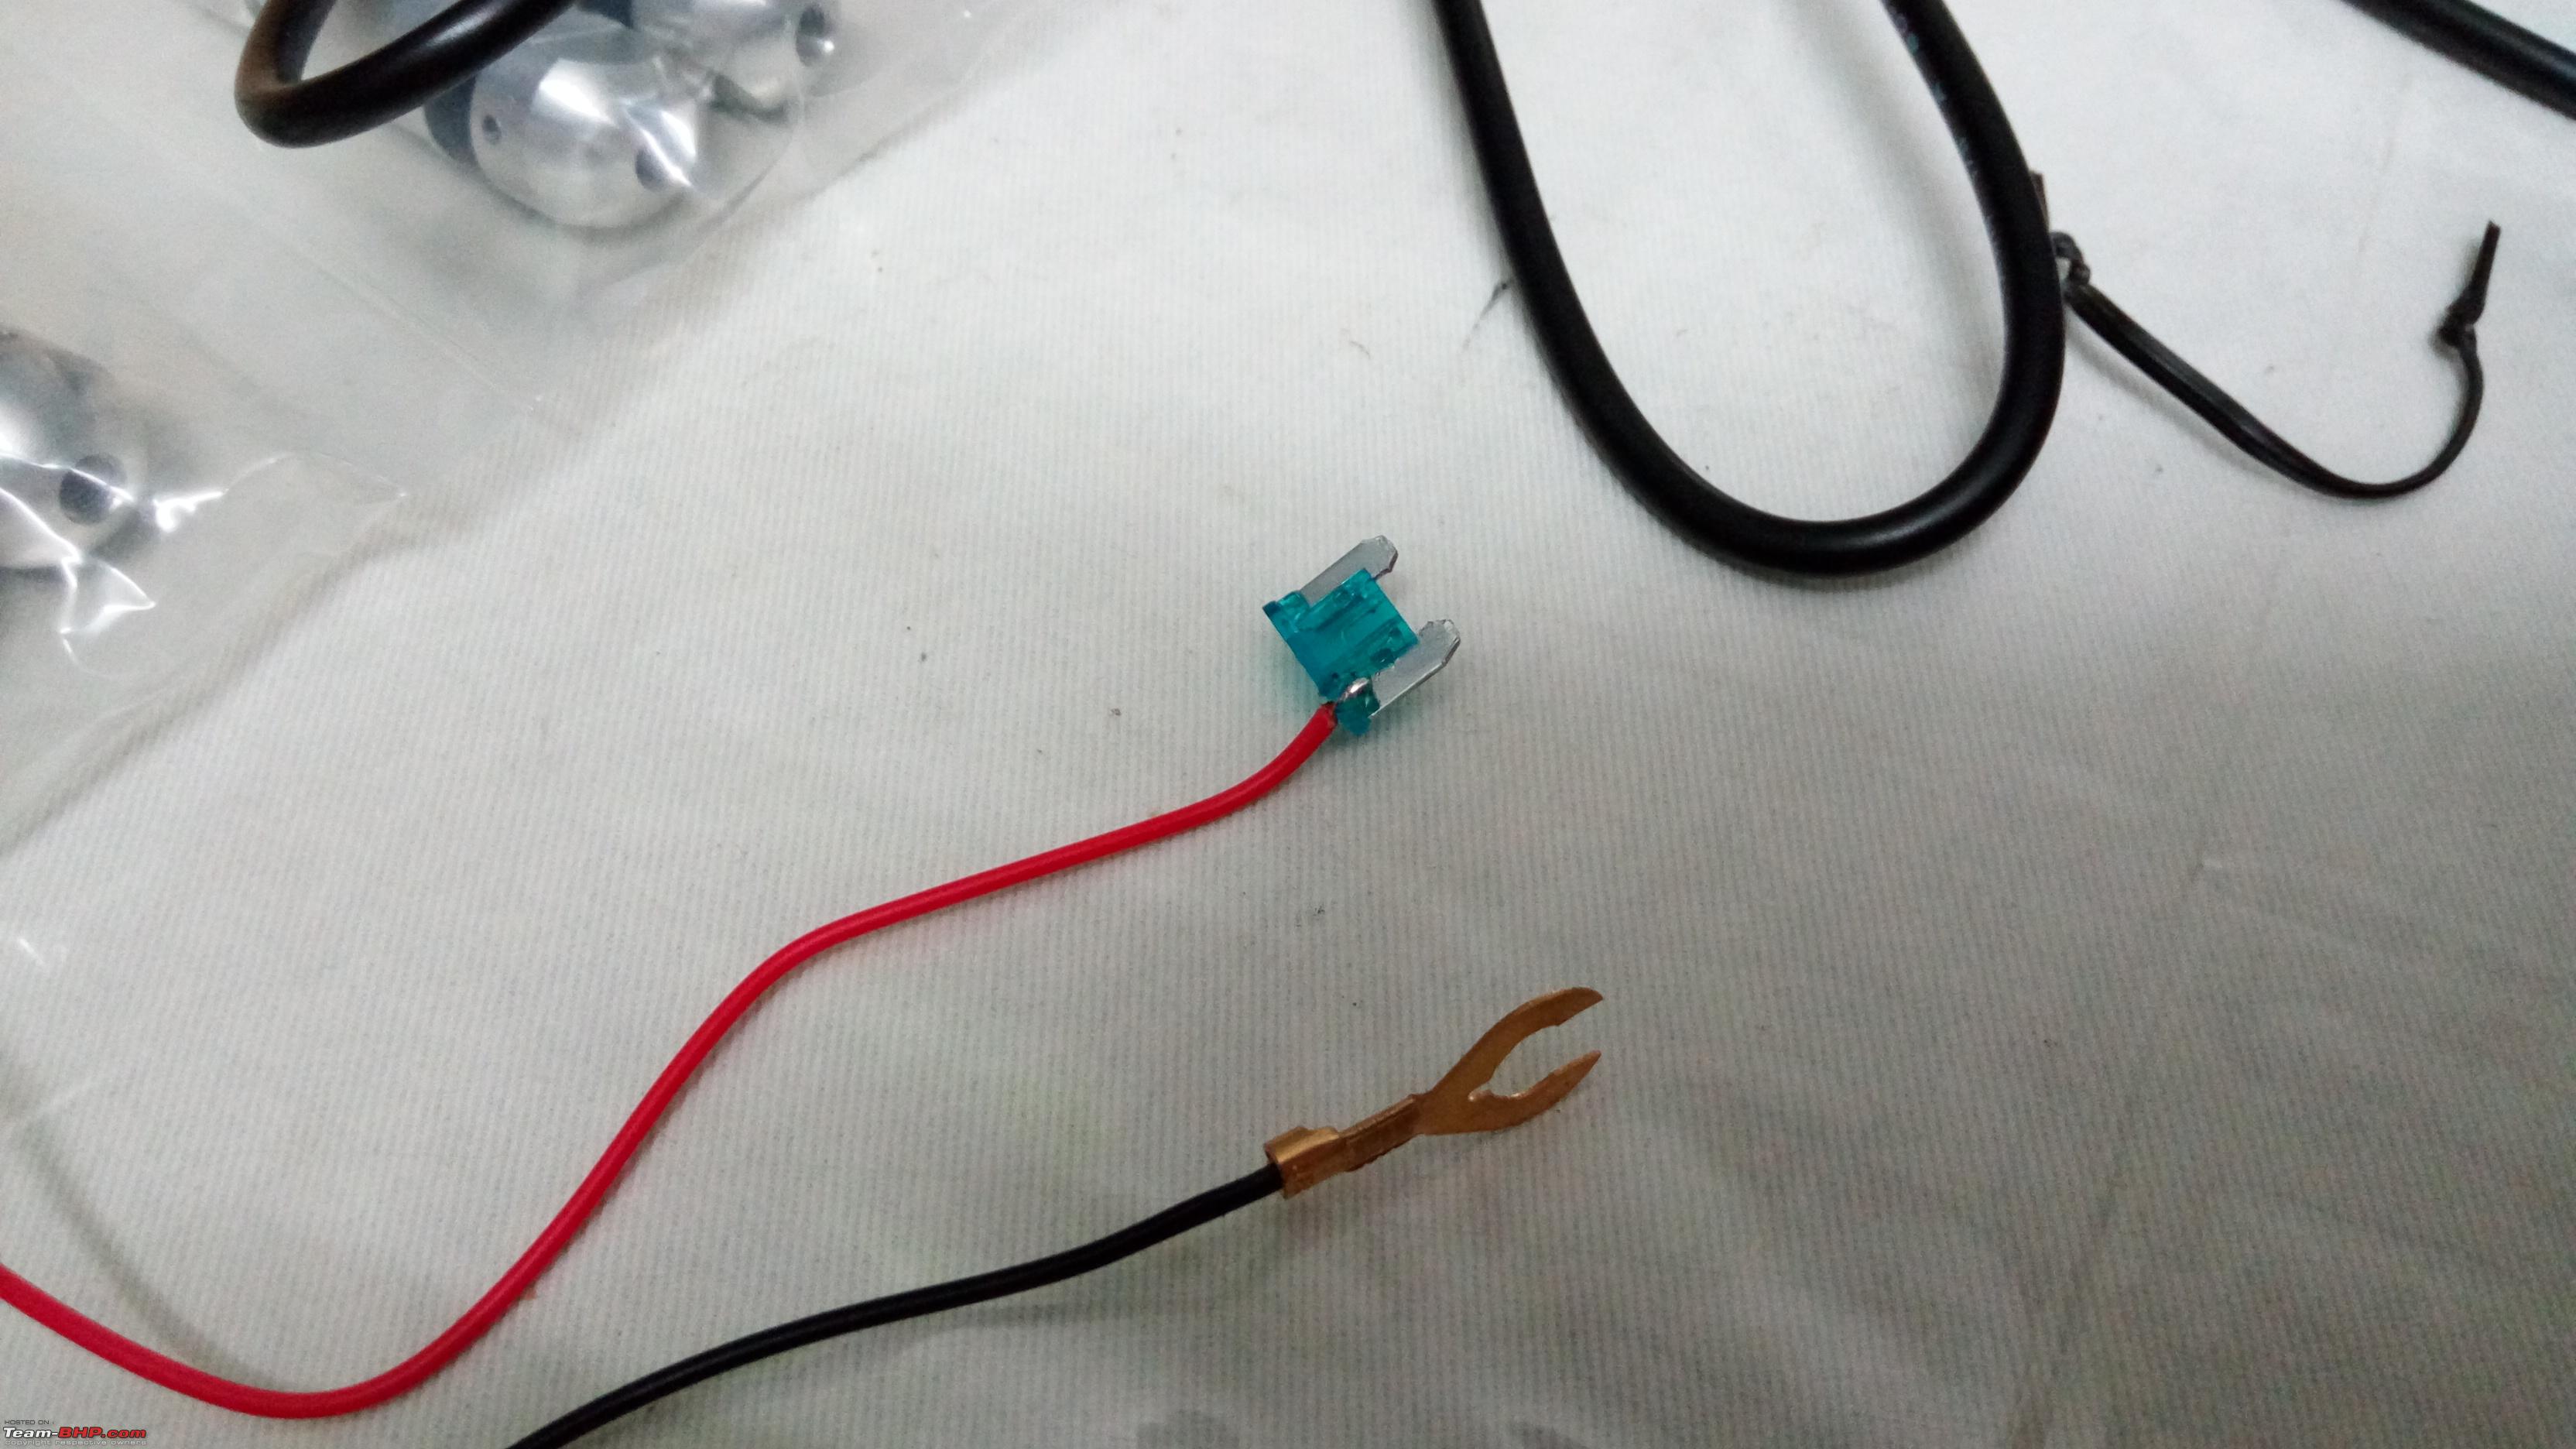 The mike shaped end at the blue wire is the antennae for the display. This receives data from all 4 sensors attached on the wheels  Monitor display against dummy switch for size comparison   Tyre being removed  Existing Rubber valve cut off  New valve cap being installed after attaching pressure sensor  Tighten it up  Sensor installed. It sits at a small gap from the inner rim surface. Notice the next picture   New Valve  The packing I built to host the monitor. This is the one I had to make on my own due to the ordering error I made  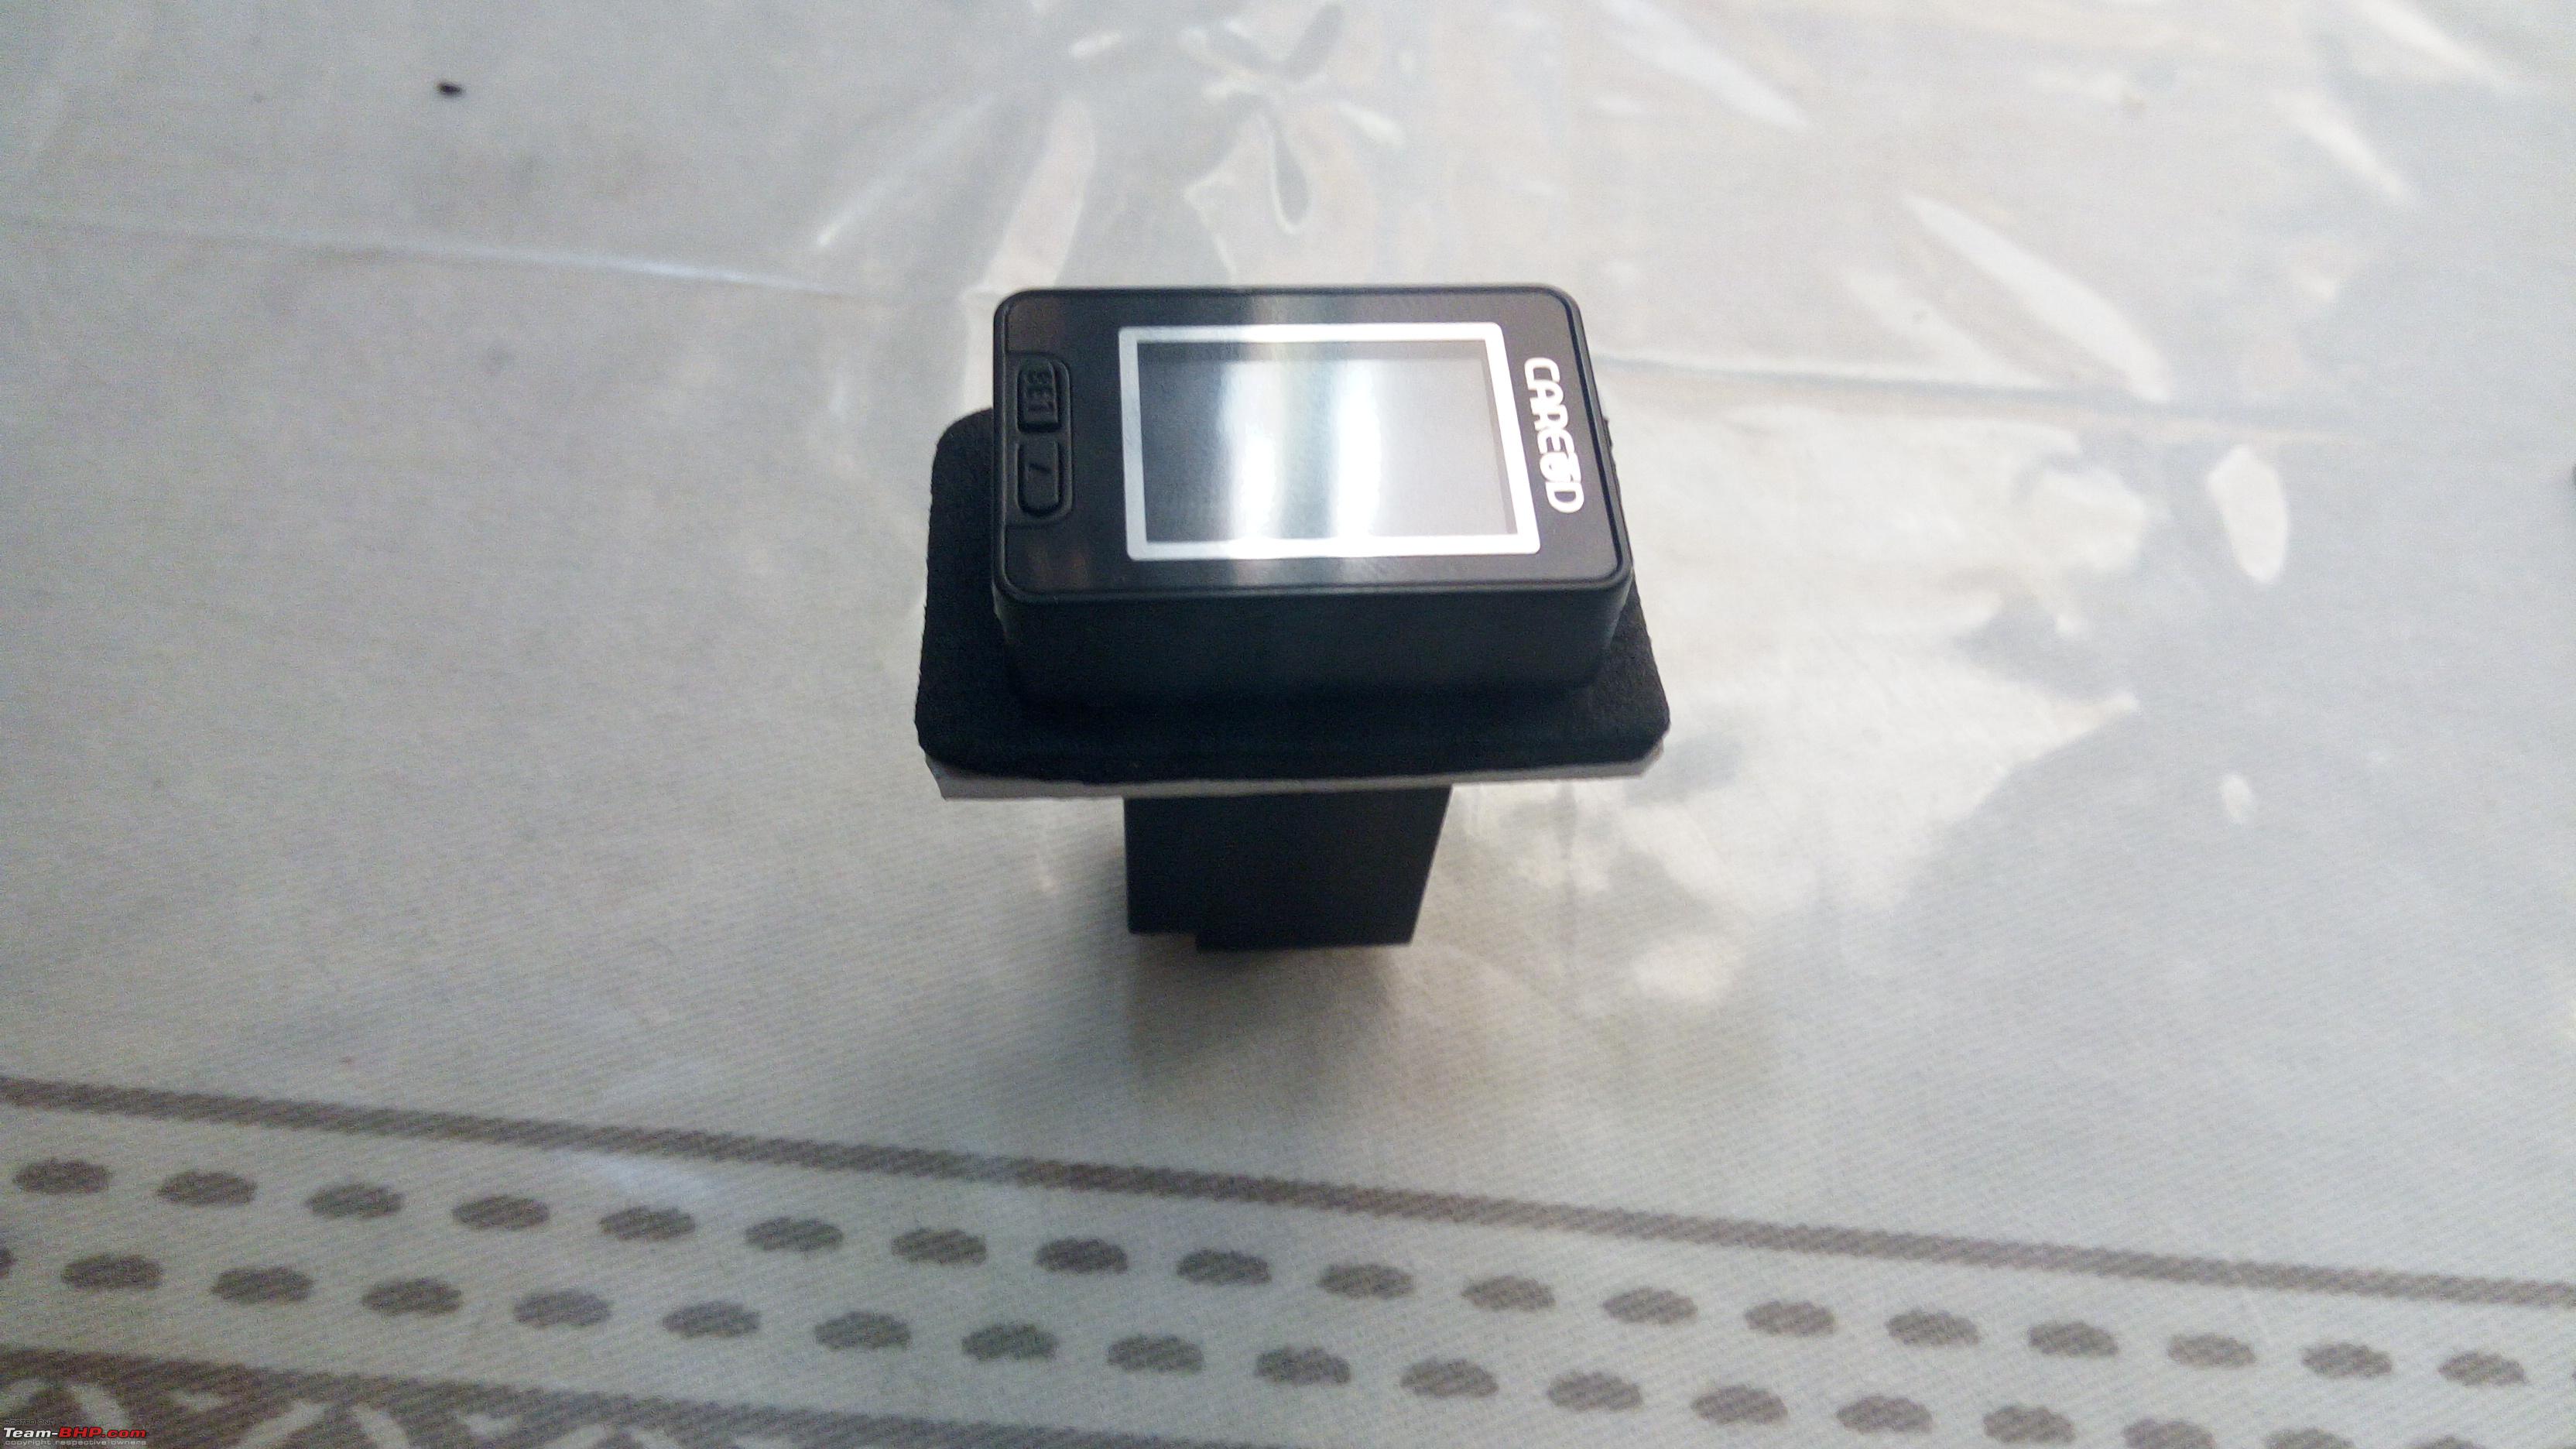 Point of installation  Wire router just above the steering column secured by zip ties  Over and above another wire tubing, secured using zip ties. The wire then falls into the center console area on the driver side. See next pic   Both connectors ready to be plugged in. The male connector is connected to the 12v socket from an earlier DIY which in turn draws power from a blank socket secured with a 15 Amps micro blade fuse. This part was done in an earlier DIY  Plugged in!  Monitor installed  Tyre pressure reading  Post installation observations The tyre pressure seems to be 1 - 2 PSI more than what the tyre shop equipment shows. I do not know which one to trust, but I have accepted the fact that if the reading in TPMS shows 35 PSI, its 33 PSI at the tyre shop. I have set a high of 39 and low of 30. The pressure and temperature reading is provided every 3 seconds. It's been just a few hours since I installed it. I'll update this thread and my ownership thread as I go forward with my ownership of the car. Credits
Hopefully this is good information for BHPIans who are looking to install TPMS on their cars. Thank you for taking the time read my post. As always, feedbacks are most welcome and I can improve my effort and fix any potential problems the members may have observed. Last edited by sudeepg : 25th March 2017 at 16:22. Reason: adding more details |
|
| (56)
Thanks
|
| The following 56 BHPians Thank sudeepg for this useful post: | --gKrish--, aargee, abhishek46, abishek2222, aeroamit, AkMar, amitpunjani, Ananthc, Ananthponraj, ARAY, arunphilip, arvind71181, BoneCollector, concorde24, CrazyToDrive, dailydriver, Dani7766, DeepBlueZen, deetjohn, doc_zeus, dpat17, Dr.Naren, DudeWithaFiat, govigov, GTO, gururajrv, harsh79, i74js, jaunthead, Keynote, landcruiser123, lovetorque, Mr.Boss, Myth_sx, negativeH, Nonstop-driver, Omkar, paragsachania, PatienceWins, PraNeel, rohiT Nonu, saket77, samaspire, Sankar, sdp1975, sidzz, silversteed, sindabad, somspaple, Sree73, supertinu, TorqueTwist, vaasu, VaibhaoT, vikred, Waspune |
|
25th March 2017, 22:19
| #4 |
| BHPian Join Date: Aug 2015 Location: Bangalore
Posts: 243
Thanked: 997 Times
| Re: Journey from a Honda City to the Maruti S-Cross 1.3L Very detailed write-up sudeepg. Kudos to you and Akash on this successful mini project.  |
|
| (1)
Thanks
|
| The following BHPian Thanks Keynote for this useful post: | sudeepg |
|
27th March 2017, 10:02
| #5 |
| Team-BHP Support  | Re: S-Cross DIY: TPMS & 12V socket installation Thanks for sharing, Sudeepg! Moving your very useful posts to a new thread, and adding it to the homepage. |
|
| (3)
Thanks
|
| The following 3 BHPians Thank GTO for this useful post: | Dr.Naren, paragsachania, sudeepg |
|
27th March 2017, 10:28
| #6 |
| BHPian | Re: S-Cross DIY: TPMS & 12V socket installation Good install. I have the same item in my Aliexpress cart since long and was in two minds to buy or not. Aliexpress anniversary sale starts tomorrow and it is getting a massive price drop. |
|
| ()
Thanks
|
|
27th March 2017, 10:47
| #7 | ||
| Senior - BHPian Join Date: May 2005 Location: Location
Posts: 5,766
Thanked: 9,053 Times
| Re: S-Cross DIY: TPMS & 12V socket installation Quote:
Quote:
| ||
|
| (4)
Thanks
|

| The following 4 BHPians Thank Sankar for this useful post: | audioholic, lovetorque, R2D2, sudeepg |
|
27th March 2017, 11:04
| #8 | ||
| BHPian Join Date: Feb 2006 Location: Bangalore
Posts: 812
Thanked: 2,453 Times
| Re: S-Cross DIY: TPMS & 12V socket installation Quote:
1. Strip the edges of the wires for a good length 2. Twist and join the wires 3. Apply the soldering paste 4. Solder the joint. The only care we have to take with this approach is that after solder, there should not be any wires poking out, otherwise it damages the heatshrink tubing. It took me a couple of tries, but eventually got it done. You need proper soldering equipment and crocodile clips to hold the wires in place while soldering a good set of helping hands  Quote:
Honestly, the current 12v socket wire route is not something to my complete liking and I may consider moving it. This is the part that took most of my time in the DIY. Thanks for your feedback. Much appreciated! | ||
|
| (3)
Thanks
|
| The following 3 BHPians Thank sudeepg for this useful post: | jaunthead, paragsachania, Sankar |
|
27th March 2017, 11:28
| #9 | |
| Senior - BHPian Join Date: May 2005 Location: Location
Posts: 5,766
Thanked: 9,053 Times
| Re: S-Cross DIY: TPMS & 12V socket installation Quote:
OT Just a tip: If wires need to be drawn through minor gaps provide an additional sleeve so as to prevent chafing due to vibrations/movement over the years. | |
|
| (3)
Thanks
|
| The following 3 BHPians Thank Sankar for this useful post: | audioholic, jaunthead, sudeepg |
|
27th March 2017, 13:27
| #10 |
| BHPian | Re: S-Cross DIY: TPMS & 12V socket installation Quick question. What was the necessity of adding a 12v socket when you can power the TPMS or Dashcam directly from the fuse by tapping it. I have tapped power windows fuse for my Dashcam and intend to tap same for the TPMS as well. My dashcam works only on crank which is what I wanted. |
|
| ()
Thanks
|
|
27th March 2017, 14:26
| #11 | ||
| Distinguished - BHPian  | Re: S-Cross DIY: TPMS & 12V socket installation Quote:
Quote:
| ||
|
| (2)
Thanks
|
| The following 2 BHPians Thank Mr.Boss for this useful post: | mjumrani, sudeepg |
| |
|
27th March 2017, 16:52
| #12 | ||
| BHPian Join Date: Feb 2006 Location: Bangalore
Posts: 812
Thanked: 2,453 Times
| Re: S-Cross DIY: TPMS & 12V socket installation Quote:
Quote:
The 12v socket idea is due to the fact that if I decide to do away with the dashcam in future, I could use it to power something else without much rework, such as re-purposing the fuse tap. These days a lot of things come with a standard adapter and it would just be a plug and play use. It's just a little more flexible. That's all. | ||
|
| (2)
Thanks
|
| The following 2 BHPians Thank sudeepg for this useful post: | DeepBlueZen, mjumrani |
|
27th March 2017, 17:05
| #13 | |
| Senior - BHPian Join Date: Oct 2010 Location: Bangalore
Posts: 1,813
Thanked: 5,864 Times
| Re: DIY: Tyre Pressure Monitor Installation on Suzuki S-Cross 1.3 MJD Alpha Quote:
A few questions from my side: - Do the foreign objects inside the rim cause any unbanalance/alignment issue? - Is there a chance that in case of a rapid puncture, the Sensor itself could be crushed by coming in contact with the deflated tyre?  - How long do the batteries in the sensor last?  | |
|
| (1)
Thanks
|
| The following BHPian Thanks abhishek46 for this useful post: | sudeepg |
|
27th March 2017, 17:43
| #14 | |
| BHPian Join Date: Feb 2006 Location: Bangalore
Posts: 812
Thanked: 2,453 Times
| Re: DIY: Tyre Pressure Monitor Installation on Suzuki S-Cross 1.3 MJD Alpha Quote:
2. A sudden and rapid puncture is unlikely to damage the sensor. Coming to think of it unless the tyres get into the inner groove of the rim (in which case it's a terrible situation anyways), they should be safe. Tubeless tyres are primarily designed to resist rapid punctures unless a blowout occurs (rare). I also change tyres every 5 years or upwards of 35000 KMS. The sensors is off only by a few mm inside the rim and as long as the tyres expand outwards, it should be safe. Even if one of them fails or gets crushed, I could easily order a replacement for just the one that failed. 3. 4-5 years as per product brochure (including shelf life). | |
|
| (2)
Thanks
|
| The following 2 BHPians Thank sudeepg for this useful post: | abhishek46, Mr.Boss |
|
29th March 2017, 22:02
| #15 |
| BHPian Join Date: Oct 2009 Location: Chennai
Posts: 355
Thanked: 166 Times
| Re: S-Cross DIY: TPMS & 12V socket installation I use an orange TPMS, sourced from Madhus, The TMPS sensor mounted on the wheel at least in orange has to be tightened with a torque wrench,to a specific torque or else you could have a slow leak.please check the manual carefully.Beware you may need a replacement sensor if one goes bad after a while. |
|
| (1)
Thanks
|
| The following BHPian Thanks abishek2222 for this useful post: | sudeepg |
|