Team-BHP > Technical Stuff > DIY - Do it yourself
Register New Topics New Posts Top Thanked Team-BHP FAQ


Reply
  Search this Thread
127,752 views
Old 22nd April 2020, 12:37   #76
Distinguished - BHPian
 
BoneCollector's Avatar
 
Join Date: Apr 2011
Location: BIHAR
Posts: 3,202
Thanked: 10,814 Times
Re: DIY Install: 3" XP Micro Bi-Xenon Foglight Projectors on my Swift

Quote:
Originally Posted by Drbhavesh View Post
Is there any thread/video/theory where I can learn wiring?
You can see wiring diagram here (Operation Khoj: Maruti Vitara Brezza ZDi+) and here (Operation Khoj: Maruti Vitara Brezza ZDi+) . Not sure how much it'll be of help. DBHPian Reinhard has already shared links with you. Feel free to ask if required. Can't send a PM till the time you're a newbie.
BoneCollector is offline   (2) Thanks
Old 22nd April 2020, 15:30   #77
Distinguished - BHPian
 
sagarpadaki's Avatar
 
Join Date: May 2010
Location: Bengaluru
Posts: 4,213
Thanked: 5,881 Times
Re: DIY Install: 3" XP Micro Bi-Xenon Foglight Projectors on my Swift

Quote:
Originally Posted by Drbhavesh View Post
Check this video on YouTube. He has installed HID fog lights, with remote controlled high/low beam function.
What i liked with this approach is how the author has used one factory fog lamp plug to power on the main relay for the HID and another for supply power to the remote control module to power the high/low solenoid. Very neat approach.
sagarpadaki is offline  
Old 22nd April 2020, 15:34   #78
Distinguished - BHPian
 
Reinhard's Avatar
 
Join Date: Nov 2010
Location: Pune
Posts: 4,854
Thanked: 17,732 Times
Re: DIY Install: 3" XP Micro Bi-Xenon Foglight Projectors on my Swift

Quote:
Originally Posted by sagarpadaki View Post
What i liked with this approach is how the author has used one factory fog lamp plug to power on the main relay for the HID and another for supply power to the remote control module to power the high/low solenoid. Very neat approach.
In modern cars, for this to work, we need to include a canbus adapter (fooling device) - basically a correct rating resistor to fool the BCM logic. For BCM controlled fog lights (like in case of my Nexon) - if the high wattage bulb is not connected to the stock plug, it keeps on firing test signal probes causing power flicker on that wire harness & basically renders the connected device (projector HID / BT controller device / HID powering relay harness) useless. If the powering relay harness is plugged into a BCM controlled stock fog lamp connector, it continuously keeps tripping due to the test probe signal from BCM. Tried it already .
Reinhard is offline  
Old 22nd April 2020, 18:31   #79
Distinguished - BHPian
 
sagarpadaki's Avatar
 
Join Date: May 2010
Location: Bengaluru
Posts: 4,213
Thanked: 5,881 Times
Re: DIY Install: 3" XP Micro Bi-Xenon Foglight Projectors on my Swift

Quote:
Originally Posted by Reinhard View Post
In modern cars, for this to work, we need to include a canbus adapter (fooling device) - basically a correct rating resistor to fool the BCM logic. For BCM controlled fog lights (like in case of my Nexon) - if the high wattage bulb is not connected to the stock plug, it keeps on firing test signal probes causing power flicker on that wire harness & basically renders the connected device (projector HID / BT controller device / HID powering relay harness) useless. If the powering relay harness is plugged into a BCM controlled stock fog lamp connector, it continuously keeps tripping due to the test probe signal from BCM. Tried it already .
Got it.

For dumb cars, this method would work. For cars like nexon which use steering input to fire on the corresponding fog lamp, it will not be feasible. In which case the power to the remote control module must be from battery and not from a factory harness.

Any idea if Tiago also has a BCM controlled lighting circuit?
sagarpadaki is offline  
Old 22nd April 2020, 18:40   #80
Distinguished - BHPian
 
Reinhard's Avatar
 
Join Date: Nov 2010
Location: Pune
Posts: 4,854
Thanked: 17,732 Times
Re: DIY Install: 3" XP Micro Bi-Xenon Foglight Projectors on my Swift

Quote:
Originally Posted by sagarpadaki View Post
Any idea if Tiago also has a BCM controlled lighting circuit?
No I'm not sure. Non-JTP Tiago does not have the static cornering lights via fog lights. However - looking at the extremely high part sharing between the Tiago & Nexon - I won't be surprised if the same BCM with cornering feature disabled is installed in the normal Tiago. This would mean even without the cornering - the BCM test probe signals will occur and interfere with the normal operation of the power drawing / remote high beam relay. Will have to be checked on the car though . The actual fog lamp is same H16 based unit in Tiago & Nexon. So to try using the remote controller - an H16 connector would be needed to hook into the stock coupler (to avoid splicing).
Reinhard is offline  
Old 22nd April 2020, 18:46   #81
Distinguished - BHPian
 
sagarpadaki's Avatar
 
Join Date: May 2010
Location: Bengaluru
Posts: 4,213
Thanked: 5,881 Times
Re: DIY Install: 3" XP Micro Bi-Xenon Foglight Projectors on my Swift

Quote:
Originally Posted by Reinhard View Post
No I'm not sure. Non-JTP Tiago does not have the static cornering lights via fog lights. However - looking at the extremely high part sharing between the Tiago & Nexon - I won't be surprised if the same BCM with cornering feature disabled is installed in the normal Tiago. This would mean even without the cornering - the BCM test probe signals will occur and interfere with the normal operation of the power drawing / remote high beam relay. Will have to be checked on the car though . The actual fog lamp is same H16 based unit in Tiago & Nexon. So to try using the remote controller - an H16 connector would be needed to hook into the stock coupler (to avoid splicing).
Yes, I will order an unit from AliExpress and try out!
sagarpadaki is offline  
Old 24th April 2020, 00:48   #82
BHPian
 
Join Date: Apr 2020
Location: Surat/Mumbai
Posts: 31
Thanked: 34 Times
Re: DIY Install: 3" XP Micro Bi-Xenon Foglight Projectors on my Swift

After reading all the posts I found answers of most of my questions.

I checked both a4anurag’s and doc’s wiring diagrams.
My plan is to install 55W HID in my swift Dzire VDI with OE fog lamp switch, same as a4anurag’s. But to execute that plan, I need to find answers to few more questions.

1) Will the stock fog lamp wiring be enough to power the 55W fog lamps or I will need wiring harness? Will it be safe to use stock wiring in long run?

2) I saw pictures of OE fog lamp switch. Could you please add Little more details on that? Which wire to connect where?

3) Use of chocolate box connector is to just connect two wires right? There is no special purpose of it.

4) I find doc’s idea of getting power supply directly from battery easier and more convenient. But I read some discussion about adding a fuse. Would you mind explaining little more on this aspect please?

5) Suppose after this, I upgrade my headlight to either 90/100 or another projector housing, will it create too much load on battery or electrics of the car?
Drbhavesh is offline  
Old 24th April 2020, 08:57   #83
Distinguished - BHPian
 
sagarpadaki's Avatar
 
Join Date: May 2010
Location: Bengaluru
Posts: 4,213
Thanked: 5,881 Times
Re: DIY Install: 3" XP Micro Bi-Xenon Foglight Projectors on my Swift

Quote:
Originally Posted by Drbhavesh View Post
After reading all the posts I found answers of most of my questions.

I checked both a4anurag’s and doc’s wiring diagrams.
My plan is to install 55W HID in my swift Dzire VDI with OE fog lamp switch, same as a4anurag’s. But to execute that plan, I need to find answers to few more questions.

1) Will the stock fog lamp wiring be enough to power the 55W fog lamps or I will need wiring harness? Will it be safe to use stock wiring in long run?

5) Suppose after this, I upgrade my headlight to either 90/100 or another projector housing, will it create too much load on battery or electrics of the car?
Stock harness should suffice with a 35W HID. I would not recommended 55w HID in fogs. Since the stock harness is rated for H8 55w bulb it should be able to handle the spikes by a 35W HID. However if you Insist on a 55W HID then have a wiring harness.

Upgrading your headlamps to 100/90 will not cause an excess load on the system as long as you have a seperate wiring harness for it
sagarpadaki is offline  
Old 24th April 2020, 09:38   #84
Distinguished - BHPian
 
Reinhard's Avatar
 
Join Date: Nov 2010
Location: Pune
Posts: 4,854
Thanked: 17,732 Times
Re: DIY Install: 3" XP Micro Bi-Xenon Foglight Projectors on my Swift

Quote:
Originally Posted by Drbhavesh View Post
1) Will the stock fog lamp wiring be enough to power the 55W fog lamps or I will need wiring harness? Will it be safe to use stock wiring in long run?
Maruti stock fog light wiring will not support 55W HID setup. The start up surge of the ballasts is very high, and its not just about the 55W wattage of the bulb in stable run.
You must use a separate relay harness powering directly from battery. A good quality relay harness includes an inline fuse in the power wire to be connected with battery +ve terminal. This ensures better safety.
Quote:
Originally Posted by Drbhavesh View Post
2) I saw pictures of OE fog lamp switch. Could you please add Little more details on that? Which wire to connect where?
Does your car have existing OEM fog light switch? If not - you need to source it. Please refer to this thread -
Link - Alto K10 HID Fog light install (DIY - Maruti Alto K10 - HID Fog Light Installation)
I have mentioned the OEM switch link in it along with the wiring to be done to make the switch work. Exact pin details of the OEM switch connector in case you need them are available in @audioholic's thread here -
Link - OEM Maruti fog light switch pin and wiring details (Maruti Celerio DIY - Fog lights and DRL installation)

If your car already had fog lights & OEM switch - you don't need to change anything here. Just connect the switch trigger wire of the extra relay harness you use to one of the fog light connectors in the bumper (LHS generally due to the limited length of wire). So that when you press the stock fog light switch, the power going to that connector actually triggers the external relay harness to draw power directly from battery for the new fog lights.
Quote:
Originally Posted by Drbhavesh View Post
3) Use of chocolate box connector is to just connect two wires right? There is no special purpose of it.
That is the only use. But it is the best approach. Certainly far better than taping wires together.
Quote:
Originally Posted by Drbhavesh View Post
4) I find doc’s idea of getting power supply directly from battery easier and more convenient. But I read some discussion about adding a fuse. Would you mind explaining little more on this aspect please?
If you get a good quality relay harness - it already has an inline fuse in the source wire. If you get a relay harness that doesn't have one (I'd say don't get it!) - you can add a 10 Amp fuse (available at auto spares store) and connect it at the start of the wire that you connect to battery +ve. This should be as near as possible to the terminal in the circuit so that in case of any short / failure - the fuse immediately blows and avoids melting / short circuit / fire in the rest of the wiring harness.

In his picture - the white-yellow small square box like thing you see inside the red rectangle that I have drawn - is an inline fuse for sample. The loose end of the wire after it - is to be connected to the +ve terminal of the battery directly. The black box near the bottom edge of the image is the actual external relay. The pin connector you see between the relay & the black ballast on the lower right of the image (just above "2019") is the trigger wiring in an H4 connector. If you can source a relay harness with the connector same as your stock fog light pins - you just have to insert this socket into the LHS stock wiring and you are done.
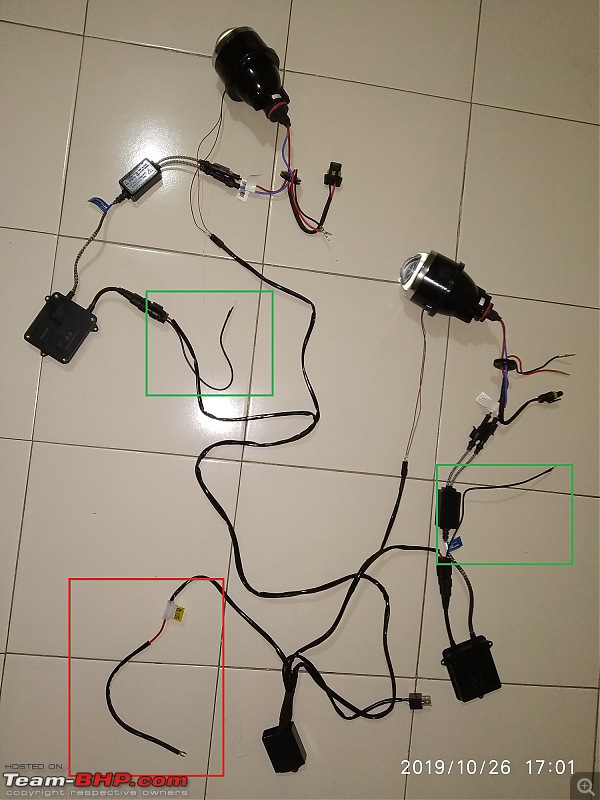
DIY Install: 3" XP Micro Bi-Xenon Foglight Projectors on my Swift-wiredonfloor.jpg

Quote:
Originally Posted by Drbhavesh View Post
5) Suppose after this, I upgrade my headlight to either 90/100 or another projector housing, will it create too much load on battery or electrics of the car?
After you install 55W projector HIDs - you won't need to upgrade to 90/100 halogen bulbs. If you do - yes there will be excess load on the alternator and battery charging. It won't damage anything immediately of course. But its load that you can avoid.

If you install projectors within headlamps via retrofit route - the setup will be 55W again - which is same as stock halogen bulbs, so no extra load on the electricals at all.

Last edited by Reinhard : 24th April 2020 at 09:45.
Reinhard is offline   (1) Thanks
Old 24th April 2020, 20:00   #85
BHPian
 
Join Date: Apr 2020
Location: Surat/Mumbai
Posts: 31
Thanked: 34 Times
Re: DIY Install: 3" XP Micro Bi-Xenon Foglight Projectors on my Swift

Quote:
Originally Posted by Reinhard View Post
In his picture
Thank you very much for detailed and prompt reply.

I studied the picture and read those threads. Here is what I am thinking about doing. Please tell me if these things are correct and possible.

1) In HID kits, two terminals (red and black which were supposed to go in stock fog lamp connectors) and a coupler (which was suppose to go with ballast coupler) will be of no use becuase I will be using an external harness.

2) My harness will also have H4 trigger connector and i want to add independent switch for fog light high beam. I can buy H8 connector and throught it, I can connect low beam and negative wires to the stock fog lamp connector and I can route high beam wire to the switch near the driver (I will add another fog lamp switch). Is this correct?
Drbhavesh is offline  
Old 25th April 2020, 00:18   #86
Distinguished - BHPian
 
Reinhard's Avatar
 
Join Date: Nov 2010
Location: Pune
Posts: 4,854
Thanked: 17,732 Times
Re: DIY Install: 3" XP Micro Bi-Xenon Foglight Projectors on my Swift

Quote:
Originally Posted by Drbhavesh View Post
Thank you very much for detailed and prompt reply.
I studied the picture and read those threads. Here is what I am thinking about doing. Please tell me if these things are correct and possible.

1) In HID kits, two terminals (red and black which were supposed to go in stock fog lamp connectors) and a coupler (which was suppose to go with ballast coupler) will be of no use becuase I will be using an external harness.
That's correct. I have removed that grommet and those 2 wires to reduce weight & dangling items after installation of the projectors was complete.
Quote:
Originally Posted by Drbhavesh View Post
2) My harness will also have H4 trigger connector and i want to add independent switch for fog light high beam. I can buy H8 connector and throught it, I can connect low beam and negative wires to the stock fog lamp connector and I can route high beam wire to the switch near the driver (I will add another fog lamp switch). Is this correct?
See if you can find a harness with the same connector as your stock fog lights - instead of H4. I know that harnesses are available for H11/H16 OEM sockets of fog lights. Is your's H8? If you get only H4, you'll have to remove the connector and splice the wires into the stock wiring of one of the fog lights.

Your logic about the wiring for the additional switch wiring is correct. Please note that you'll need to wire the power, illumination & switch pins on that additional switch you install. You can power that via the headlamp leveler switch of course.
But you are going through a lot of hassle just for high beam. why not simply hook up the solenoid wires into the stock head lamp's high beam wire? That only operates the solenoids and not the HID bulbs anyway. So if the HID projectors are OFF and you turn high beams - it will only click the solenoid shutters & no light will actually come from the projector fog lights anyway. This is far easier to implement. With the projectors and head lamp low beans ON, you'll never need to go on full high beams generally. Lighting is more than enough. So high beams are needed only for warning oncoming errant traffic to get out of the way. For this purpose - a separate switch is pretty useless as the oncoming traffic will be gone by the time you trigger the switch. Also - you may well forget to switch it off many times, leaving the projectors on high beam for that much duration. My 2 cents.
Reinhard is offline   (1) Thanks
Old 28th April 2020, 00:31   #87
BHPian
 
Join Date: Apr 2020
Location: Surat/Mumbai
Posts: 31
Thanked: 34 Times
Re: DIY Install: 3" XP Micro Bi-Xenon Foglight Projectors on my Swift

Quote:
Originally Posted by sudeepg View Post
DIY - Fixing a Messy Wiring For XenonPlanet Micros

XenonPlanet is working to get heat shrink tubing over the connector, but I have no idea how they can do it without removing the wiring first. Removing it will be a very bad idea. On the other hand, Anabond is an industrial sealant that can work in high temperature conditions, resists moisture and also used in electrical wiring. I am going to wait and watch how XP goes about this.
Have you come across any ideas to cover the connectors (like H4/H8/H11 etc.)?
I found few 15mm heat shrink tubes but as those tubes shrink 2:1, I don't think we can put it over big connectors like H4.

While thinking about it, I got few stupid ideas

1) we can put a polythene cover, covering good margin and then wrap around an insulation tap

2) we can put cling/saran wrap around the connectors.

Do think any of the ideas has any chance to be successful and practical??
Drbhavesh is offline  
Old 28th April 2020, 06:45   #88
Distinguished - BHPian
 
BoneCollector's Avatar
 
Join Date: Apr 2011
Location: BIHAR
Posts: 3,202
Thanked: 10,814 Times
Re: DIY Install: 3" XP Micro Bi-Xenon Foglight Projectors on my Swift

Quote:
Originally Posted by Drbhavesh View Post
Have you come across any ideas to cover the connectors (like H4/H8/H11 etc.)?
I've used waterproof self adhesive rubber tape used in submersible pumps to seal all electrical points. You'll get it at an electric shop but may need to hunt it. It's not the regular electric insulation tape and there is no branding as such. This tape bonds to its layers pretty well. To remove it, it has to be cut. And it doesn't peel off by itself. Its a good alternative to heat shrink tubes where the size to cover is big.
BoneCollector is offline   (3) Thanks
Old 28th April 2020, 08:06   #89
BHPian
 
Join Date: Apr 2020
Location: Surat/Mumbai
Posts: 31
Thanked: 34 Times
Re: DIY Install: 3" XP Micro Bi-Xenon Foglight Projectors on my Swift

Quote:
Originally Posted by BoneCollector View Post
I've used waterproof self adhesive rubber tape used in submersible pumps to seal all electrical points. You'll get it at an electric shop but may need to hunt it. It's not the regular electric insulation tape and there is no branding as such. This tape bonds to its layers pretty well. To remove it, it has to be cut. And it doesn't peel off by itself. Its a good alternative to heat shrink tubes where the size to cover is big.
Won't the glue of the tape will cause corrosive effecr in long term?
Do you mind posting a picture of the electric tape and how you wrapped it around connectors? I searched and found this tape.
Attached Thumbnails
DIY Install: 3" XP Micro Bi-Xenon Foglight Projectors on my Swift-images-9-20200428t080356.274.jpeg  

Drbhavesh is offline  
Old 28th April 2020, 17:43   #90
BHPian
 
sudeepg's Avatar
 
Join Date: Feb 2006
Location: Bangalore
Posts: 813
Thanked: 2,454 Times
Re: DIY Install: 3" XP Micro Bi-Xenon Foglight Projectors on my Swift

Quote:
Originally Posted by Drbhavesh View Post
Have you come across any ideas to cover the connectors (like H4/H8/H11 etc.)?
...
Do think any of the ideas has any chance to be successful and practical??
I used Anabond paste where the wire enters the tap and a electrical tape over it. I have been using it since the post went live and it has been about 3 years now. I have driven through heavy rains and washed the engine bay several times. The XPs continue to work without issues.
sudeepg is offline   (2) Thanks
Reply

Most Viewed


Copyright ©2000 - 2024, Team-BHP.com
Proudly powered by E2E Networks