| |||||||

| Search Forums |
| Advanced Search |
| Go to Page... |
 |
| Search this Thread |  67,700 views |
 23rd August 2017, 21:33
| #1 |
| Senior - BHPian | DIY: Supercharged Fiat Palio 1.6 Well, this all started with a purpose. Back in 2014 I had purchased a preowned Fiat Palio 1.6 GTX and restored it. Link to the restoration log – http://www.team-bhp.com/forum/modifi...-1-6l-gtx.html   Till date I have thoroughly enjoyed every single km of the splendid performance by the Gtx. The GTX was a legend and remains a legend in terms of hot performance hatch. The powerful 1.6 twin cam , big bore short stroke engine matched to a wonderful 5 speed gearbox ensures that the GTX flies off the block from the word GO. But then I had purchased this car as a hobby car to cultivate my skills in tuning and I had promised myself the below points which I mentioned in my restoration log Performance: 1. Upgrade the brakes to adventure calipers and discs upfront + rear bigger drums (not sure) 2. Manufacture own slotted brake discs ( We already do for export). This would add good braking. 3. Add turbo to the GTX - add the TJET turbo with electronic waste gate actuator, unichip - piggy bank ECU, extra injector and the needed plumbing. I have already upgraded the braking – both front and rear have been upgraded. Now I had already made a choice that I would plonk in a turbo but then as my knowledge in tuning grew over the past couple of years I thought why not go for a supercharger. Benefits of the supercharger : 1. Instant boost at ones peril without any associated lags 2. Almost linear power delivery 3. Almost flat torque curve 4. No need of complicated exhaust plumbing and oil lines – critical in palio due to no space. But with the benefits does comes some drawbacks as well 1. Supercharger is noisy like hell – the car almost sounds like a f1 car, this is mostly with roots supercharger ( More on this later) 2. Supercharger needs lot of engineering like matching pulleys, its critical calculations, alignment of the drive pulley with the supercharger pulley etc. 3. As the supercharger rpms rise the IAT rises exponentially. You should have the best of the intercoolers 4. Blow off valves ( more on this later) After brainstorming a lot for almost a month and doing some homework as much as possible I decided to take the plunge and go the supercharger route. The main driving factor was “ Doing something different than others “. I knew I would be getting the least help from others as not many have done the supercharger mods. ------------- To be Continued ( excuse me for the lengthy posts ) Last edited by amit_mechengg : 23rd August 2017 at 21:35. |

|  (44)
Thanks (44)
Thanks
 |
| The following 44 BHPians Thank amit_mechengg for this useful post: | .anshuman, abhijeet080808, abhishek46, Akib Khan, ashis89, audioholic, Avikbrio, BlackPearl, blackwasp, carrazy, Dr.Naren, Foxbat, ganeshb, GTO, HappyWheels, howler, iliketurtles, im_srini, jacs, jaunthead, kaustubh_vaze, Klub Class, mh09ad5578, motorpsycho, nkrishnap, procrj, R2D2, rajivc666, rav11stars, Rehaan, rohansachar, Shreyans_Jain, Shubhendra, SnS_12, sridhar-v, starter, Sutripta, theexperthand, TheSkinnyDevil, Varun_HexaGuy, VijayAnand1, Viju, Wildy, YDS |
| |
|
23rd August 2017, 22:11
| #2 |
| BHPian Join Date: Jan 2016 Location: Mumbai.
Posts: 213
Thanked: 388 Times
| re: DIY: Supercharged Fiat Palio 1.6 Hi Amit. I am a big fan of your car and had gone through your restoration log multiple times. The colour scheme looks smashing to say the least. Coming to superchargers, have you completed the project? I don't think any petrolhead would mind the F1 sound.  I am hooked to this thread now. Drive safe. Last edited by Akib Khan : 23rd August 2017 at 22:13. |
|
| (3)
Thanks
|
| The following 3 BHPians Thank Akib Khan for this useful post: | amit_mechengg, Klub Class, mh09ad5578 |
|
24th August 2017, 12:26
| #3 |
| Senior - BHPian | re: DIY: Supercharged Fiat Palio 1.6 The foremost thing I started with was hunt for a good Standalone/ Piggyback ECUs. I am not going to mention any brands here which I rejected as I don’t want any sort of debates. I can just tell people that some piggyback ecus do not drive 4 high capacity injectors, instead you have to add extra injectors in the intake after the throttle. I have done a lot of study on this topic and again without initiating any debates I believe that installing 4 high capacity injectors are always better than adding 1 or 2 extra injectors. The vaporisation of the fuel, its timing and the place where its injected is very important. The oems have the injectors placed at a location which is closest to the intake valve and at an angle which is optimized to fire fuel into the air for best mixture and flow pattern. This is not possible with the add on injectors. My hunt ended after finding one of the best piggyback ecu which I can call a VFM ecu too since it works as a Piggyback as well as something called “ Fuel Implant Mode” (FIP) which can control the fuelling totally like a stand alone ECU. This ECU also has a onboard 4 bar MAP sensor cleanly integrated. Below are the details of the ECU ECU MASTER - Digital ECU Tuner 3 http://www.ecumaster.co.uk/products/digital-ecu-tuner-3  Digital ECU Tuner 3 is the most popular and best type of device "piggy back" on the market. Due to its features and a very attractive pricing, has gained a large group of satisfied customers. Technical details: • four 16x16 side tables (fuel map,two PWM tables, ignition table), • 8 Correctiontables 16x1, • 2 independent switchable map sets , • possibility modification of one analogue signal, • 4 analogueinputs, • inbuilt Data Flash – possibility of logging without connected PC, • battery voltage monitoring , • support of frequency output air flow meter (possibility of signal modification) 17Hz-4kHz, • support VR and Hall effect crank sensors together with ignition modules pulse. Device supportbothsingle ended and differential signals, • supports a lot of crank trigger patterns :60-2, 36-2, 36-1, Multitooth, Ignition Modules and more, • support of waste gate valve, • output for 4 saturated injectors ("full group"), • ON/OFF parametricoutput, • automatic conversion of MAP to MAF with the use of the learning algorithm, • launch control, • road dyno, • possibility individual calibration of each analogue sensors – device displayed values with correct units, free firmware update – new crank trigger patterns and new functionality, • fuel Implant mode –possibility of drive injectors in standalone mode (batch fire), • USB communication no additional interface needed, • 24 months warranty. The above ECU perfectly suffices most of the small turbo and supercharger mods and for a Fiat, this was even better. I don’t see any missing function apart from direct input of a wide band lambda controller in Fuel implant mode. Having procured this my hunt for other parts started. I was searching for a small supercharger that will provide a decent 5-7 psi boost. This was primarily for two reasons 1. I wanted to retain stock internals – my engine is brand new 2. There is no space in Palio engine bay for a large supercharger I started researching a list of supercharged cars right from Americal V8s to small Renaults and Subarus. I came across a car names Cleo which is fitted with an Aisin AMR 500 supercharger. This is a tiny roots supercharger good for small engines ranging from 800 cc to 1800 cc. Below is the almighty  Specs and info received on Superchargers forum Application: to increase performance on motorcycles, snowmobiles, ATVs, VW engines, Mini Coopers, Subarus, Nissans, Toyotas or any engine under 3.0L. 500cc/ revolution (30.5 cu.in.) With straight, 2 lobe rotors. It could be over-driven, and make good boost on a 650cc-1000cc drag bikes or larger if RPM is kept low. Or it could be under-driven for smaller engines. Examples: On a 500cc two stroke, with the blower being driven 1.5:1 with the crank, it would produce approximately 7 psi boost. On a 750cc four stroke, with the blower being driven 1:1 with the crank, it would produce approximately 5 psi boost. On a 750cc four stroke, with the blower being driven 1.5:1 with the crank, it would produce approximately 15 psi boost. On a 1000cc four stroke, with the blower being driven 1.5:1 with the crank, it would produce approximately 9.5 psi boost. On a 1600cc VW engine, with the blower being driven 2.1:1 with the crank, it would produce approximately 5 psi, but the engine RPM must be limited to 8000 rpm. Additional Info: Max blower continous speed is 16,000 RPM Before this, these were only available in Japan! This would be a great blower for any small engine up to 1200cc ( depending on RPM ). Over all length is 6.75", Width is 8", Height from inlet to outlet 5.5" The 4 bolt inlet & outlet flanges makes it easy to fabricate custom mounts for manifolds, and carbs. The drive pulley diameter is aprox. 3" but could be changed out to a cog belt drive quite easily. We have no info on what modifications are needed to mount this unit on your engine. You will need to be capable of doing custom fabrication. Last edited by amit_mechengg : 24th August 2017 at 12:32. |
|
| (28)
Thanks
|
| The following 28 BHPians Thank amit_mechengg for this useful post: | .anshuman, audioholic, Avikbrio, AYP, bhuvan_prasad, blackwasp, carrazy, Divya Sharan, greenhorn, GTO, hemanth.anand, iliketurtles, im_srini, jaunthead, Klub Class, kolimuttai, mh09ad5578, nkrishnap, procrj, R2D2, Rahulkool, Rehaan, rohansachar, SnS_12, starter, Sutripta, theexperthand, Varun_HexaGuy |
|
24th August 2017, 15:20
| #4 |
| Senior - BHPian | re: DIY: Supercharged Fiat Palio 1.6 Mathematics 1. FIRST CALCULATION (Engine Litres/min @ 0 Psi ) 1.6 litres X 7200 = 11, 520 litres / min , but since the engine fills at every second stroke only we need to divide this by 2. 11520/2 = 5,760 litres /min 2. SECOND CALCULATION (boost ratio) Desired boost 7 PSI + Atmospheric pressure 14.7 PSI = 24.7 PSI 21.7 PSI / 14.7 PSI = 1.47 (boost Ratio) 3. THIRD CALCULATION (Actual air requirements @ desired boost) We need to multiply the NA engines air requirement with the boost ratio 5760 X 1.68= 8502 litres/ min Now from the above specs of the supercharger we know that it sweeps 500cc per revolution. So to calculate the max rpms that the supercharger needs to run at we need to divide the air requirement by volume swept by the supercharger. 8500 / 0.5(500cc) = 17000 rpms Now its evident that to achieve 7 psi boost I need to overdrive the supercharger. Further we need to keep a target BHP in mind. I reverse calculated the max bhp I can achieve by adding some more theory and maths to it. With 8500 litres per minute I can achieve around 300 CFM which equals to around 147-150 BHP max. But all of the above is theory Practically things are quite different. But to start with if you dont have theory then I am sure you are going to mess out everything. I really dont know whether the tuners do all these calculations or not, but if they arent doing this and are just going by their own instinct then god help them and their customer. Now why I say practically things are different is because the volumetric efficiency (VE) of the engine, rise in IAT due to compressed air from supercharger, losses in piping and intercooler etc come into the picture. To start with I was happy with 140-150 BHP supercharged engine, some might feel that this is not a big figure. Yes it isnt but remember this is not on a turbocharged engine, this is on a supercharged engine and believe me the dynamics is quite diff. A 140 bhp supercharged engine will feel like a 200 bhp na engine. Below are some calculations i did by physically calculating the various pulley dimensions :  After deciding the target figures and realistic expectations in my mind I started ordering parts that are must to start the project. 1. Wide band lambda sensor with controller and digital AFR gauge. I went for the most reputed AEM ones with bosch LSU 4.9 lambda sensor. Details in the link below http://www.ebay.com/itm/AEM-30-4110-...-/272793618123 Do not even start any modifications until you have the Wideband lambda sensor with AFR gauge. Start work without this means trying to hit the target in the dark. 2. Exhaust Gas temperature gauge You can purchase any good quality gauge, I choose Epman racing, link below http://www.ebay.com/itm/Exhaust-Temp...VXJcNz&vxp=mtr Below are some pics of installation. I had to remove the downpipe. My palio is fitted with the Siena engine and fiat provides a 4x2x1 exhaust right from factory   Last edited by amit_mechengg : 26th August 2017 at 23:33. |
|
| (26)
Thanks
|
| The following 26 BHPians Thank amit_mechengg for this useful post: | .anshuman, ashis89, audioholic, Avikbrio, AYP, blackwasp, carrazy, d3mon, Divya Sharan, Foxbat, GTO, iliketurtles, im_srini, Klub Class, mh09ad5578, motorpsycho, nkrishnap, procrj, R2D2, rav11stars, Rehaan, rohansachar, SnS_12, starter, theexperthand, vaasu |
|
24th August 2017, 19:04
| #5 |
| Senior - BHPian | re: DIY: Supercharged Fiat Palio 1.6 WIRING - feels like breaking through the MATRIX  As soon as my ECU arrived I started the wiring work. I had a spare wireloom for the palio. I bought some good quality automobile grade wires , pins, DSUB crimping tool (must have) , heat shrink tubing etc. This was a very tough job, you need immense patience and good hands to do this work. I have not cut any wires. I have used splitters to tap into key wires like IAT, CLT, TPS etc. The wires from the crank sensors need to be cut, they go into the DET3 and then again to the OEM ecu. I spent back breaking 6 hours to do this messy job. The wiring diagrams were tough to interpret due to mismatch in color codes. But at the end I could do this perfectly. I tagged all the wires so that later on there is no confusion. 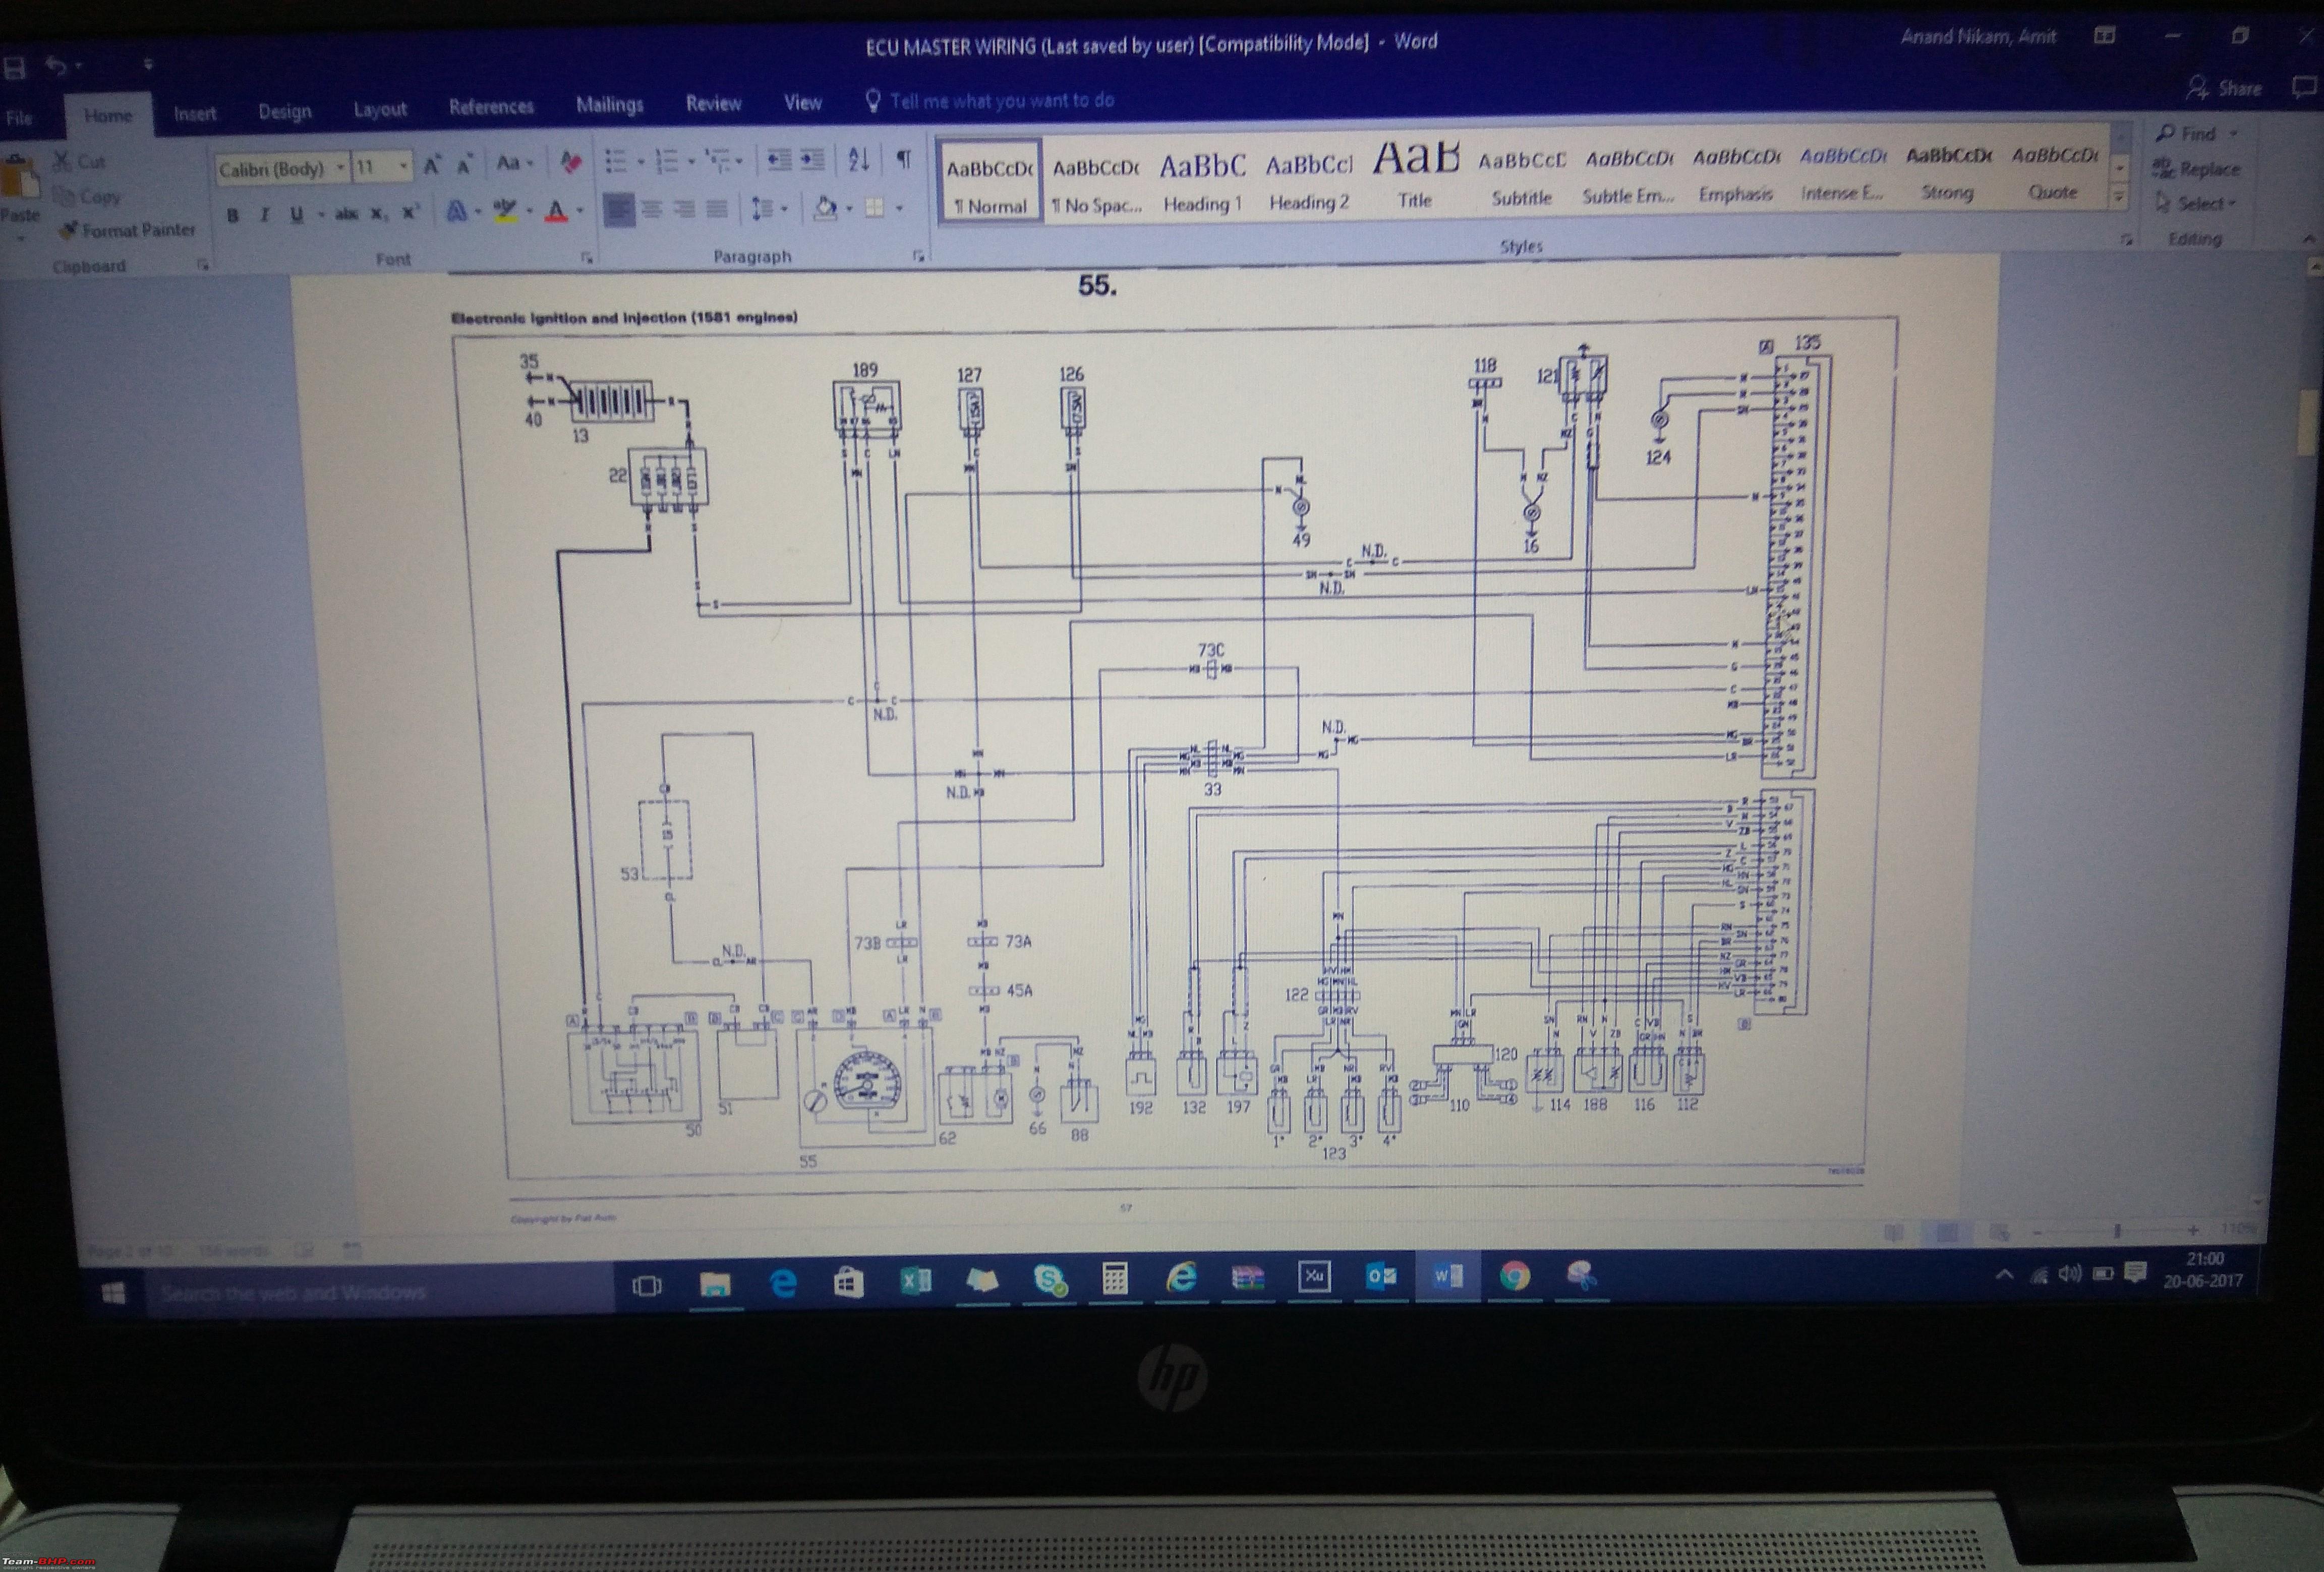   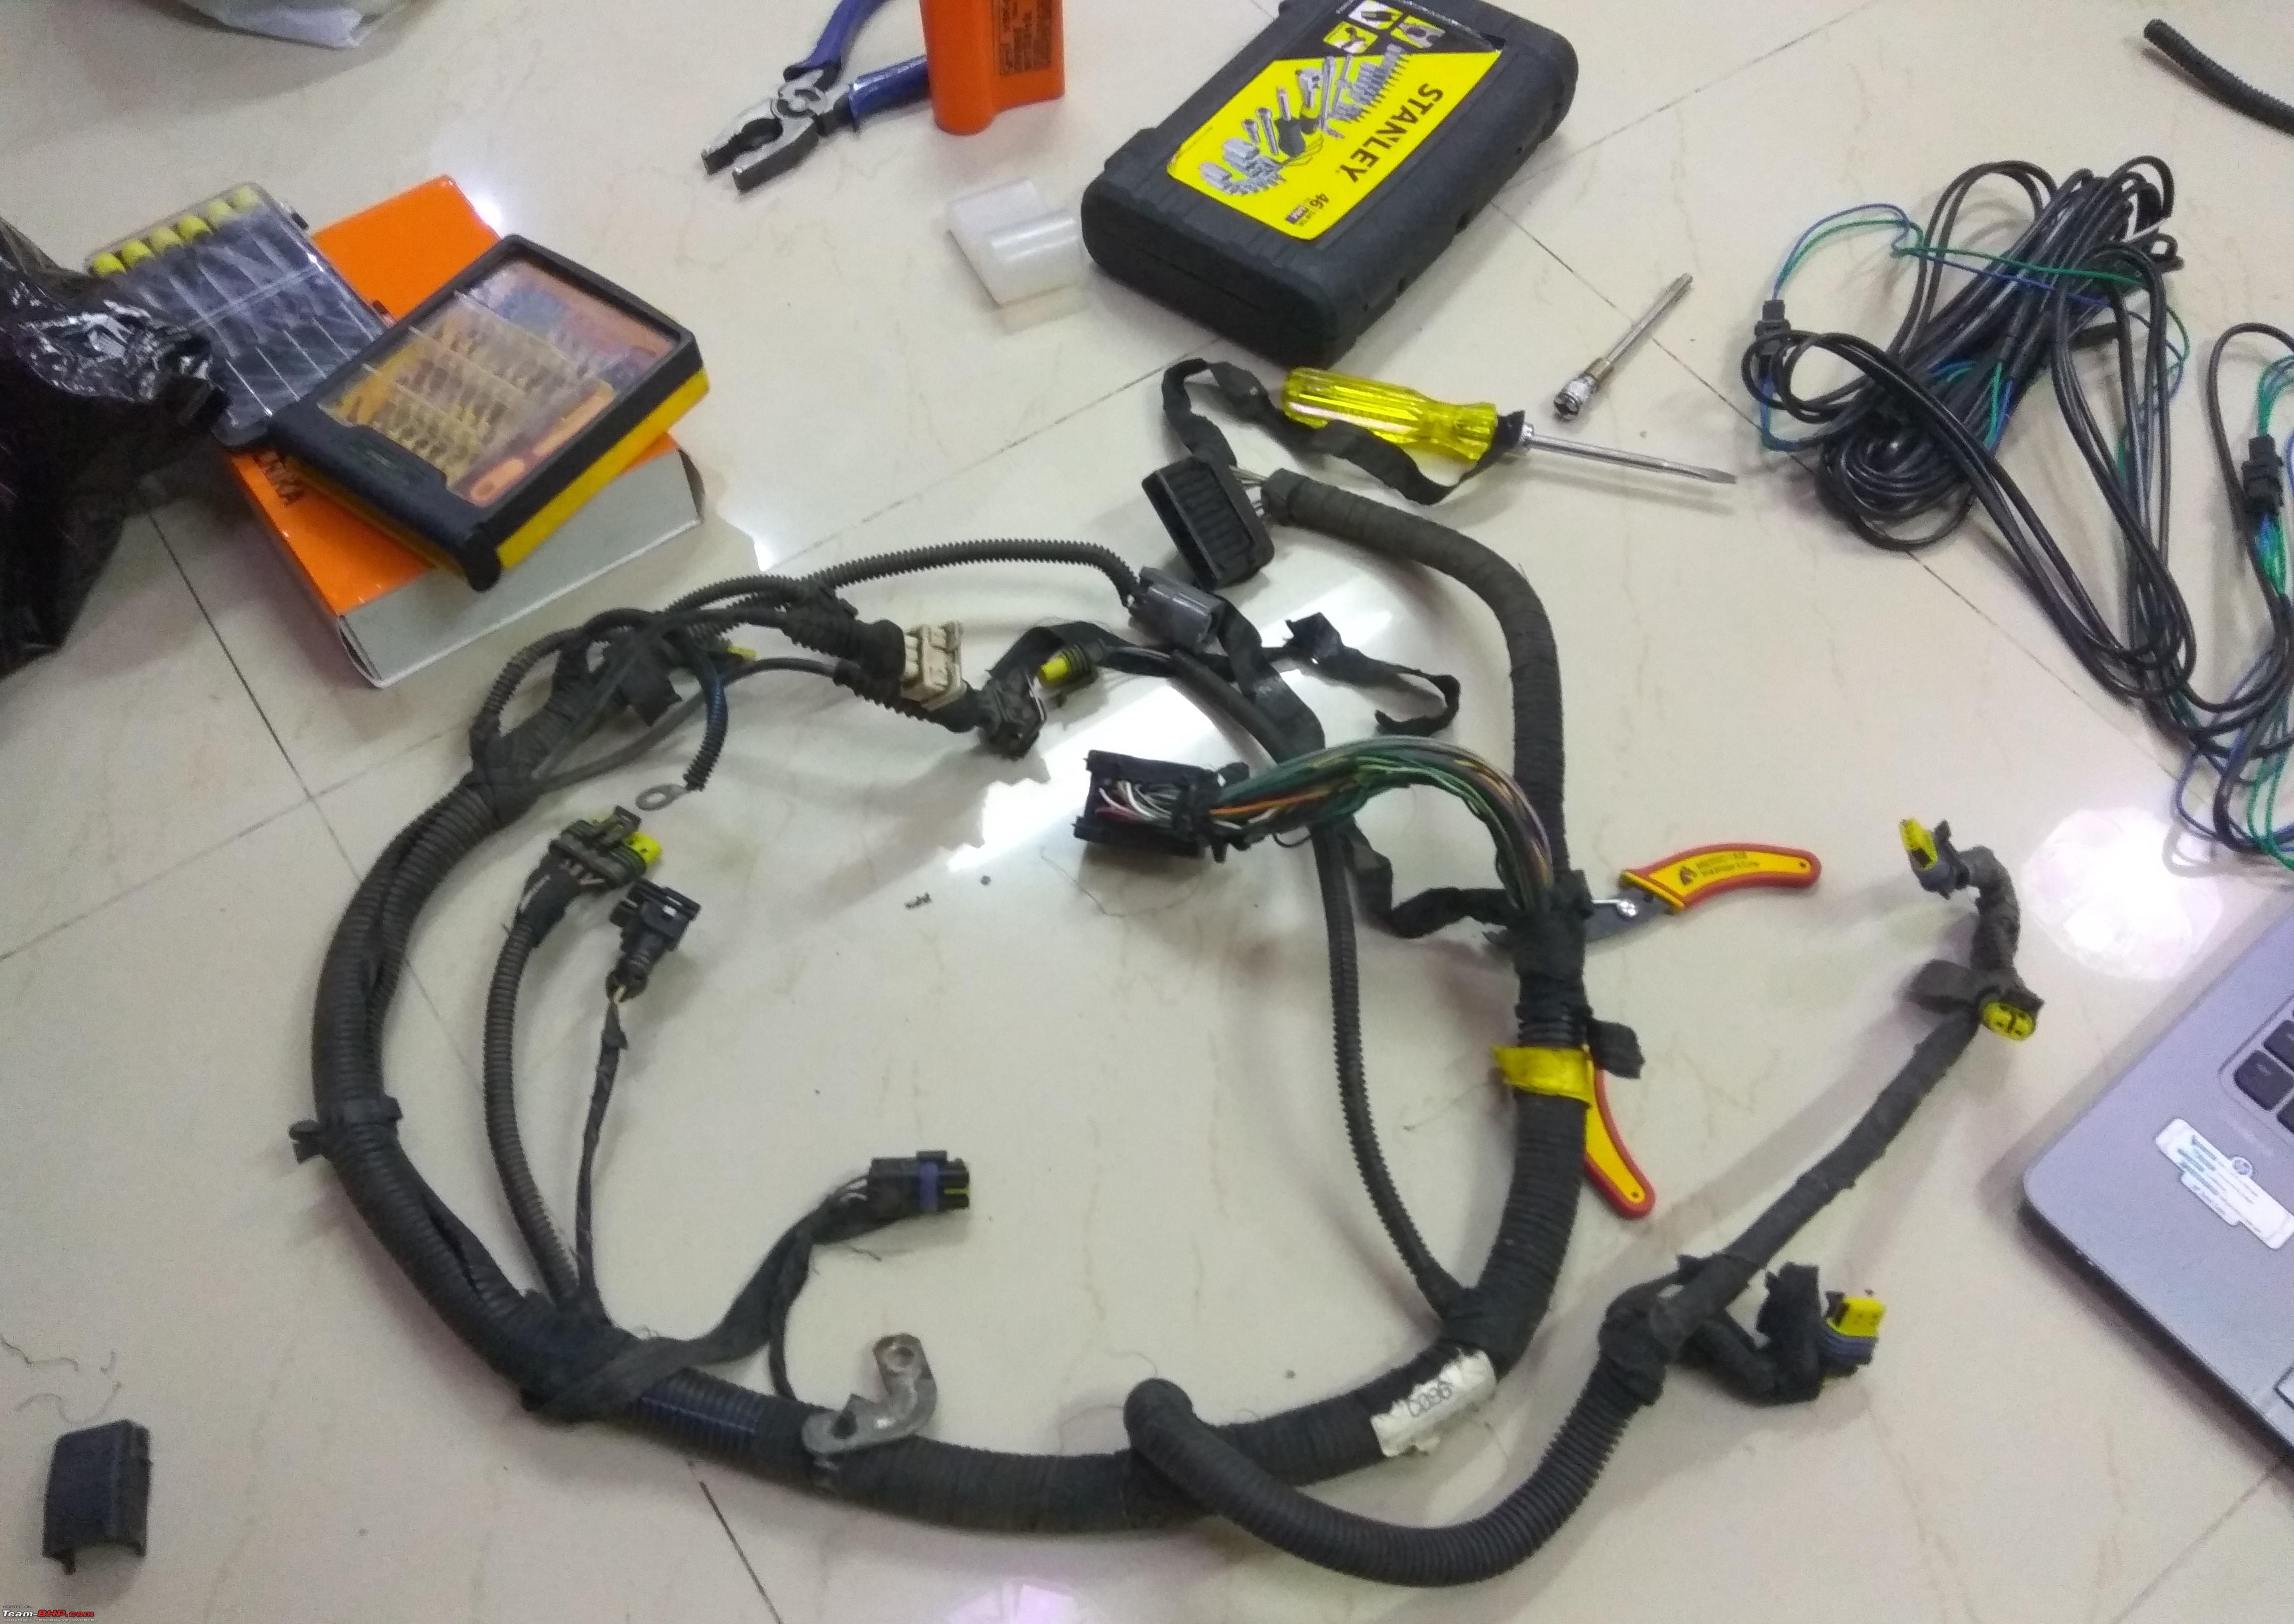 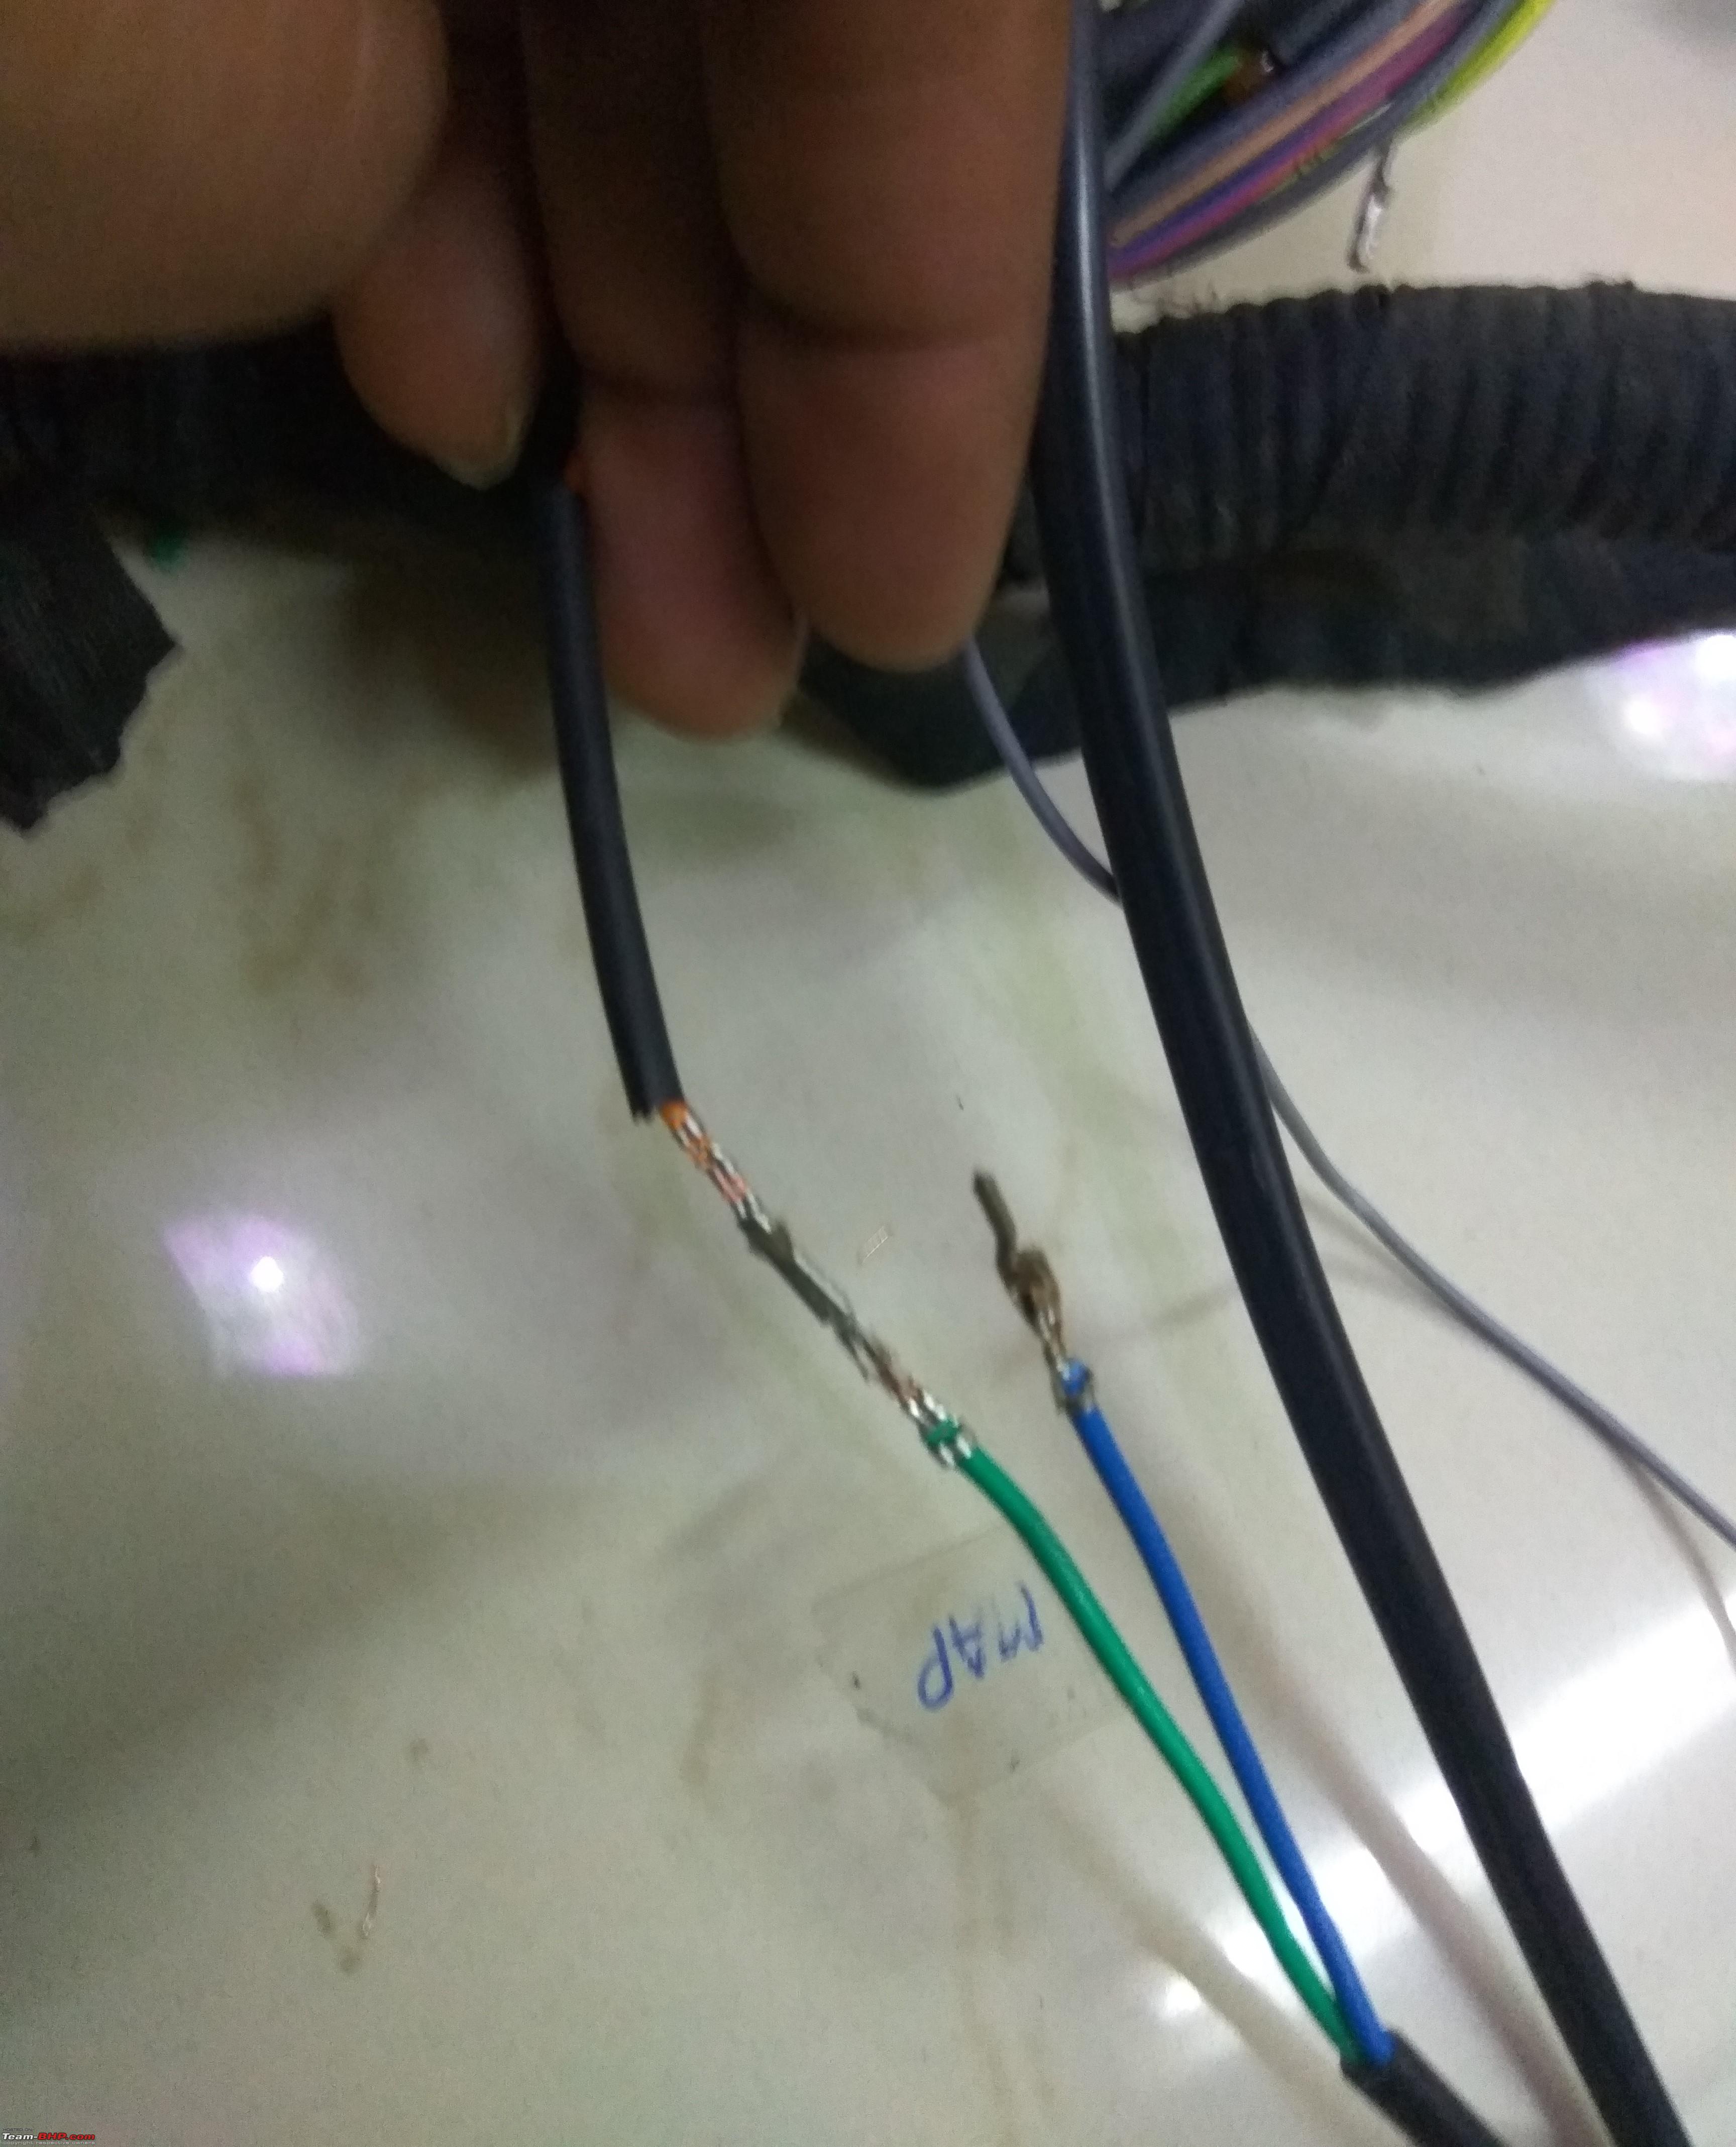   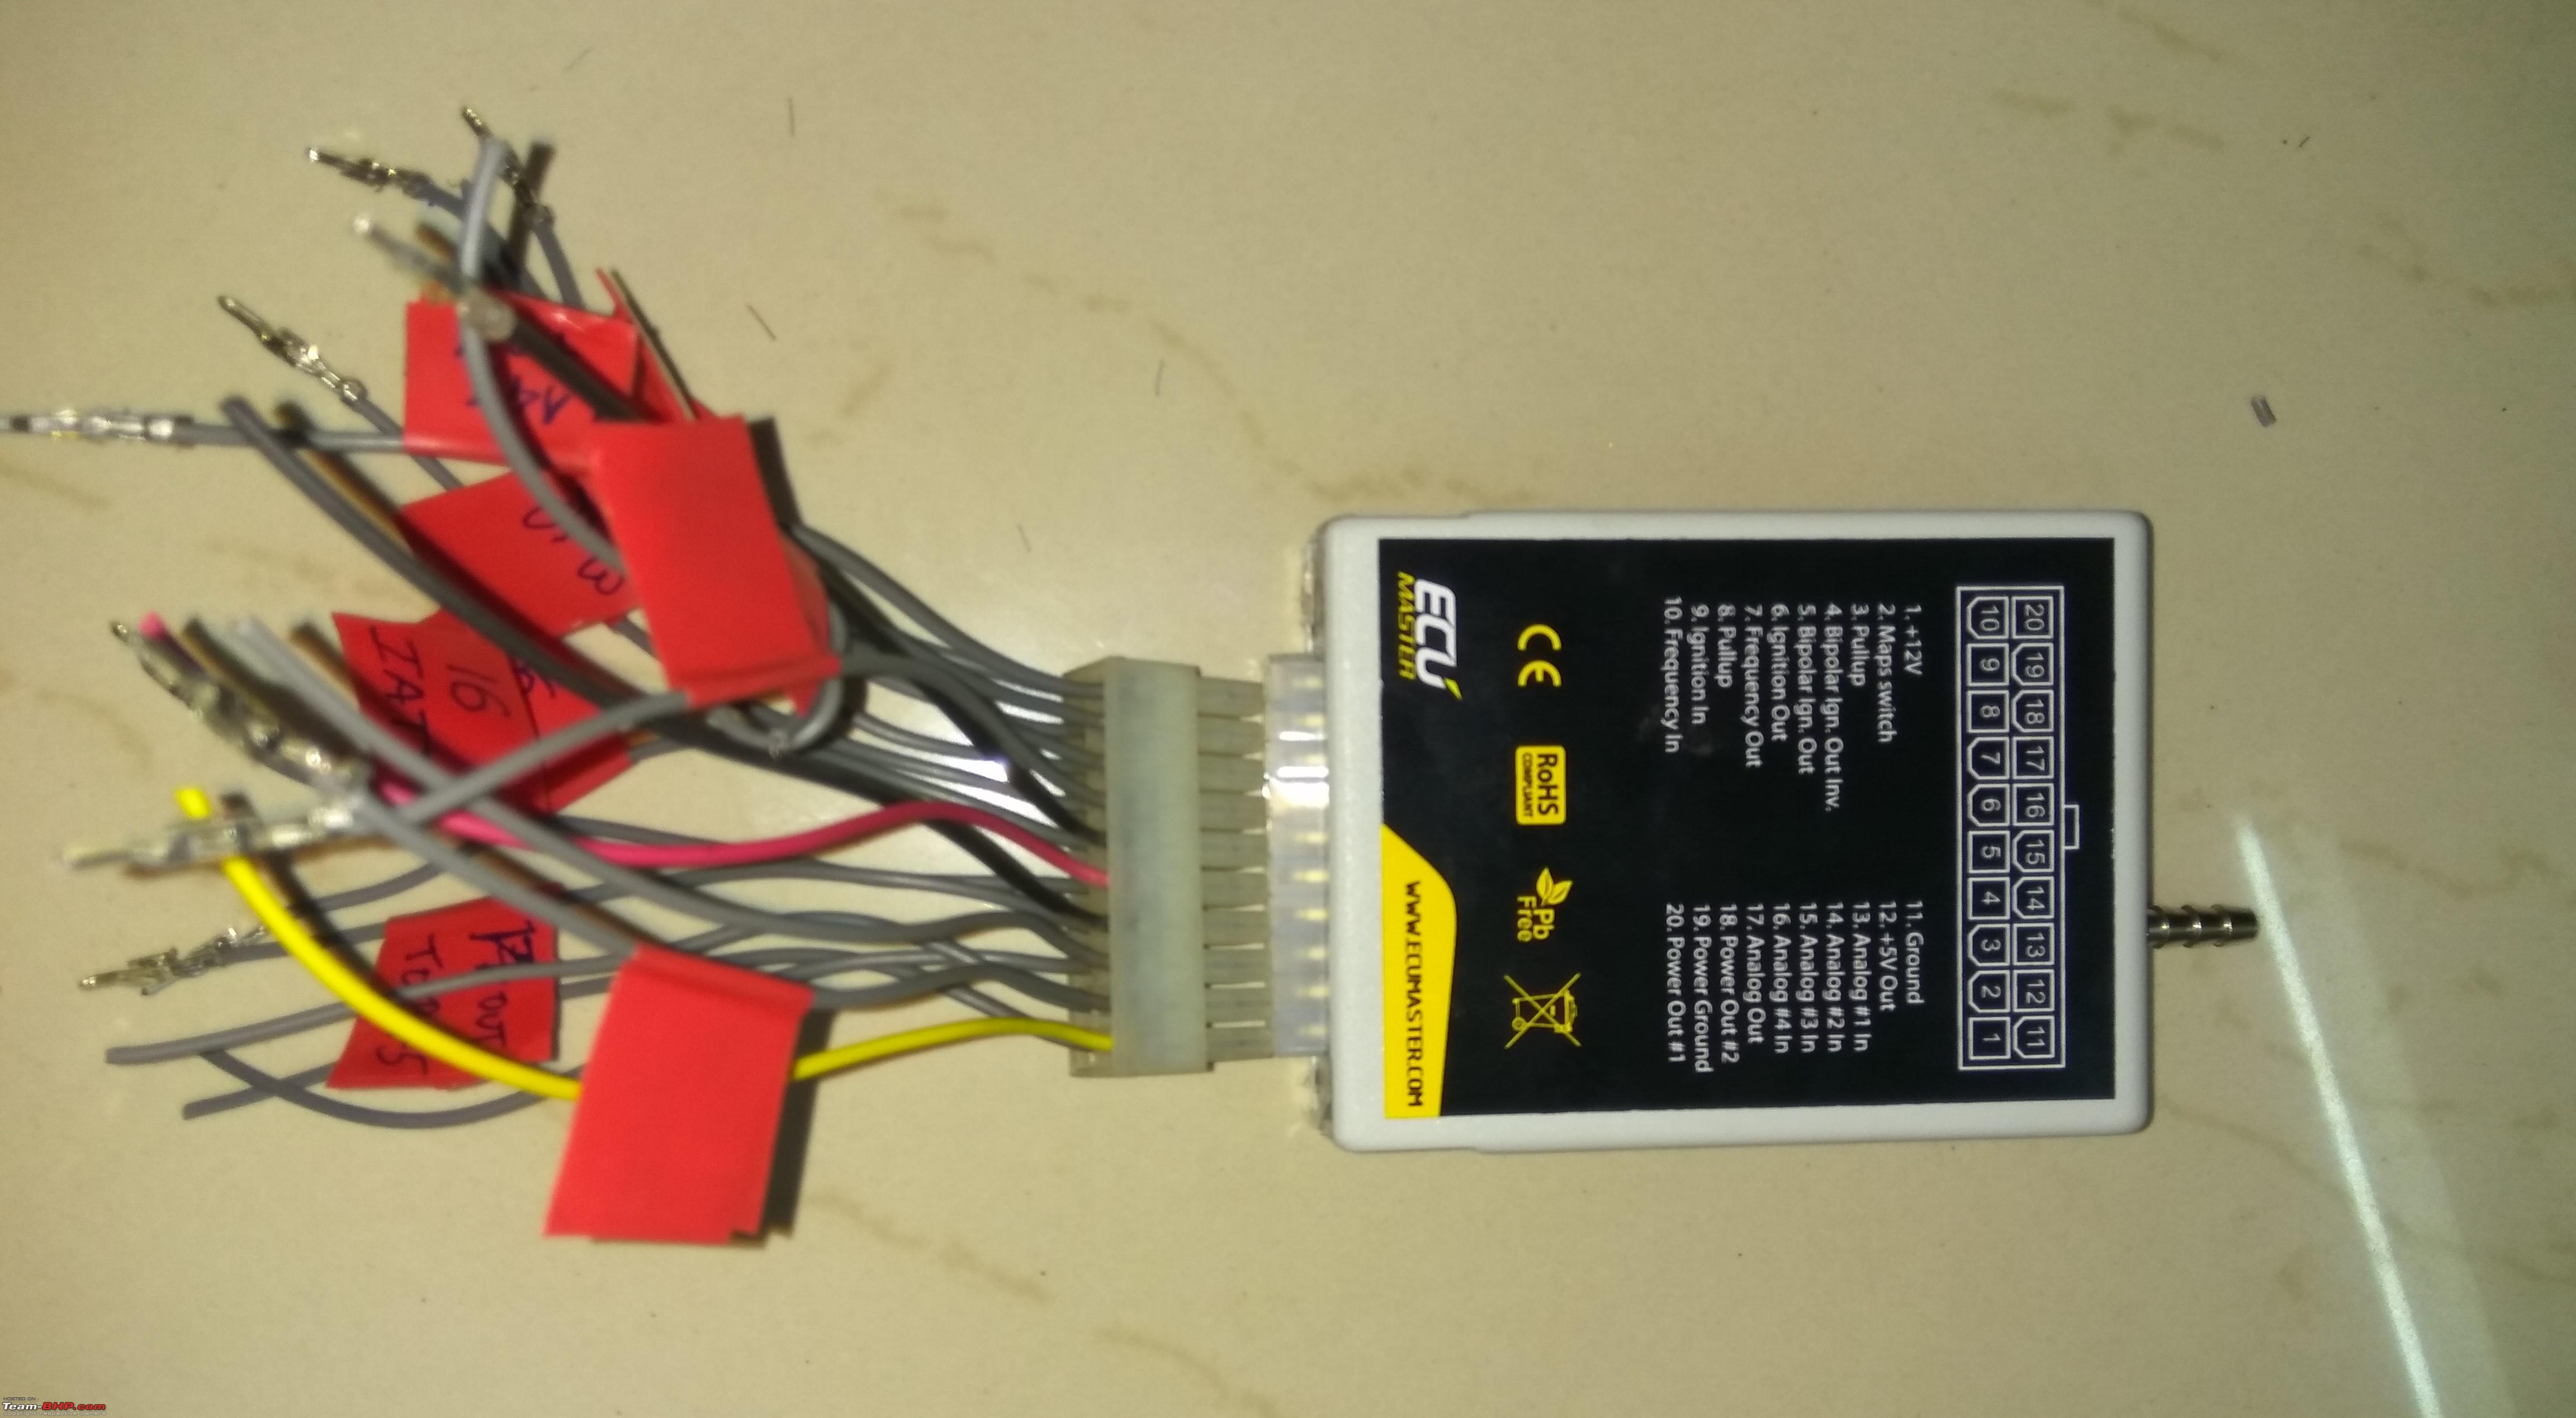 I started the work at 7 PM and completed it in the midnight at about 3 AM. I slept with sore eyes. Early morning was a shock to my family  |
|
| (30)
Thanks
|
| The following 30 BHPians Thank amit_mechengg for this useful post: | --gKrish--, .anshuman, Added_flavor, Akib Khan, akshay380, audioholic, Avikbrio, bhuvan_prasad, blackwasp, carrazy, d3mon, GTO, hemanth.anand, iliketurtles, im_srini, Klub Class, mh09ad5578, nkrishnap, R2D2, Rahulkool, rav11stars, Rehaan, rohansachar, Shubhendra, SnS_12, somspaple, starter, theexperthand, vaasu, Viju |
|
24th August 2017, 21:49
| #6 |
| Senior - BHPian | re: DIY: Supercharged Fiat Palio 1.6 The Supercharger and Fitting As soon as the supercharger arrived I opened it to see how it looks inside. Below is the pic. The two gears run the two lobes. The lobes are Teflon coated. This supercharger can be run in both directions. The gears are lubricated by splash lubrication and I have added 200 ml oil to this chamber.  The next herculean task was finding the right location and fabrication of the mounts that would hold the supercharger. The palio is plagued with a tight engine bay with no place whatsoever. Now the only option remained was to take out the stock air filter box and make a custom mount for supercharger. One has to consider few very important things while designing the mount. 1. The mount has to be on the engine the engine oscillates and vibrates in the bay, if you fix the mount on the body and supercharger cant move with the engine, you are heading towards a flaw which will keep swapping your belts 2. The Supercharger driving pulley and driven pulley should be perfectly inline. There can be some tolerance but not much. Else the belt will jump off from the pulley 3. The mount should have a feature where in you can give some tension to the belt to adjust the slack. I have done a temporary arrangement to mount the supercharger. I have made a fulcrum point on which the supercharger can oscillate and the main mounts are attached to the engine. I have mounted an additional pulley on the power steering pulley by putting a spacer in between. I manufactured the spacer on my own in my machine shop. User light weight aluminium for this purpose. Below are few pics.      Thank god i selected a supercharger which can be rotated both ways. There is no way one can mount a unidirectional supercharger on the palio engine After a lot of adjustments i could start my car for the first time. Please note - this is just the first trial video Last edited by amit_mechengg : 25th August 2017 at 14:13. |
|
| (29)
Thanks
|
| The following 29 BHPians Thank amit_mechengg for this useful post: | .anshuman, Added_flavor, Akib Khan, akshay380, Avikbrio, AYP, blackwasp, carrazy, Divya Sharan, GTO, iliketurtles, im_srini, Klub Class, mh09ad5578, nkrishnap, procrj, Rahulkool, rav11stars, Rehaan, rohansachar, SnS_12, somspaple, starter, Sutripta, theexperthand, toiingg, TSIboy, vaasu, Viju |
|
25th August 2017, 14:56
| #7 |
| Senior - BHPian | re: DIY: Supercharged Fiat Palio 1.6 After fitting the supercharger the next phase that I went into was something quite untraditional. I kept the supercharger project on hold, yes you read it right. I have justification for the same. I did not want to jump onto the supercharger route as soon as it was mounted. I had to get my basics right. I wanted to first run my stock car on the new ECU as perfectly as the OE tune. I wired the new ecu (DET3) with the OE ecu and tried to start the car in the Client mode i.e the normal mode (not fuel implant) , but in no way the car would start. I was highly disappointed and clueless. This was the first roadblock in my project. This took me up to a further level of deep study on how the ignition triggers work. Palio uses a 60-2 teeth crank wheel which triggers the signal to the ecu indicating the TDC of the piston. The sensor type is VR with an adaptive threshold. The crank signal from the sensor goes to DET3 and Bipolar in and out goes to the original ecu from DET3. Based on the signal the ecu retards and advances the timing. I corrected the settings and voila the car started without any issues. Did my first trial run and was very happy that I could run the car perfectly without any mistakes in wiring or configuration. Below is how the interface looks like  I wont explain all these areas marked with numbers here. It wont add any value right now. I played around with different values of fueling and ignition. After playing for 1 week and logging the details i got extremely confident in the things i am doing, the changes i make and its effect. Below is the snapshot of perfect AFRs achieved and i monitored EGT on stock NA car to have a reference of things happening inside the combustion chamber on wide open throttle runs (WOT)   I would recommend all who are doing such DIY tuning projects, not to miss this step. If you are an experienced tuner you can directly jump onto a boosted setup, but if you arent make sure you first do all research and learning on the stock car. On a stock car you cant blow off anything - and i am happy neither did i. TIPS : You can idle at a lean ratio than stoich (14.7) and as you go at high rpms you can got rich upto say 12.5 - stock cars are tuned to run at stoich AFRs as much as possible to adhere to environmental norms The next step I did was rewiring the ECU to run the stock car on stock injectors in “ Fuel implant mode” This mode basically is a semi stand alone mode where you have total control over the fueling. Ignition is taken care by OE ecu to a certain extent and you can add a retard as well as advance thru the maps. The revv limiter also can be taken off and you can set any value as you wish. Fueling is very tricky. The whole fueling is based on the Volumetric Efficiency (VE) table. This table needs to be populated perfectly and carefully by looking at AFR meter. It is extremely difficult to map this on road. Since I did not have a dyno I had to tune this by taking a help of a friend who is also an expert driver. I used to ask him to hold certain rpms – example say 2000 on a flat surface and then see the AFR and populate the respective cell. The scale on the VE table is MAP vs RPMS i.e load at various RPMS. Now the load keeps on changing and the cell pointer keeps on jumping across the tables, and hence its difficult to populate this on road. This task would have been easy and perfect if I had access to a Load bearing dyno. A load bearing dyno basically holds the set rpms. Then you can press the accelerator and give different loads at same rpms. By this method you can populate one row of cells each time at given rpms. Check this video below : After lot of efforts and trials and burning a hell lot of fuel I managed to not only get a OE tune but a better tune and performance at most of the rpms. Courtesy – playing with fuel and mainly ignition maps. Ignition advance is the most powerful method on stock NA cars. Fueling wont help you much as there is no extra air to burn. Lean ratios add to performance but also account to more EGTs. Ignition advance also has certain limits. 1 or 2 degrees max advance provides the best performance atleast on the Palio. Now I was feeling that I have done a PHD in tuning this particular ECU and I decided to resume my supercharger project. Last edited by amit_mechengg : 25th August 2017 at 22:57. |
|
| (28)
Thanks
|
| The following 28 BHPians Thank amit_mechengg for this useful post: | .anshuman, Avikbrio, AYP, bhuvan_prasad, blackwasp, Divya Sharan, govigov, GTO, headers, hemanth.anand, hifisharu, iliketurtles, im_srini, jaunthead, Klub Class, mh09ad5578, nkrishnap, R2D2, Rahulkool, rav11stars, Rehaan, rohansachar, Shubhendra, SnS_12, starter, theexperthand, Viju, YDS |
|
25th August 2017, 23:16
| #8 |
| Senior - BHPian | re: DIY: Supercharged Fiat Palio 1.6 Supercharger project resumes : To extract more from the same stock engine you need more Air and more Fuel. More air = boost and more fuel = upgraded injectors. " Boost is the secret of my energy" - says the engine In no way my stock 180 cc injectors were going to help. The stock ones are Magnetti Marelli/ Weber Pico injectors IWP164/IWP064. For the power I was looking at I needed atleast 260-300 cc injectors. Now this is the point where most of the tuners as well DIY guys get into dilemma. One has to decide whether you keep your stock injectors and add 1 or 2 more injectors or change and upgrade all 4 of them. I do not want to get into any debate with any tuner on this aspect. But believe me the wisest choice is to change all 4. Every cylinder has individual intake line and spraying fuel in equal quantities close to the intake valve is always better. I will never agree that spraying fuel near throttle body also ensures same amount of accurate distribution as in stock car. Some tuners have this limitation due to the ECU they choose. If the Piggyback doesnt support running 4 upgraded injectors then they push to run extra injectors. If anyone knows how the palio injectors are fitted on the intake and how tough it is to remove them due to the tight clearances will understand why we cant think of any other injector sizes than stock. My hunt for IWP series started and there are only few options available in the market. The perfect match were the Ducati Monster IWP043 with 390cc flow rating. They were rated at 14.5 ohms which matched the stock ratings. The Fraud and Cheating : Be very careful when you order parts. I purchased 4 injectors on ebay USA after confirming with the seller twice that these were original ones. The seller had clearly mentioned these were original Weber/Magnetti marelli manufactured in his listings. My friend carried it to India. As soon as I opened the packing I smelled something fishy. No where the finish was good, the plastic quality was pathetic and so was the filter quality. I decided to test them. I plugged all 4 to the injector testing machine. Not even a single ones fired properly at 3.5 bars. I was badly cheated and I felt extremely sad that this thing happened with me. This was a total downer in the whole project. I immediately blasted at the seller and without any questions he offered for refund. His silence proved that he was guilty. I had to ship them back at my own expense and I spent around 6k for shipping. I got the refund without any issues.  Meanwhile I started searching for injectors again. I couldnt dare to buy these ducati injectors due to the above experience. After an extensive search I could find that Renault Megane 2.0 turbo uses the same IWP series injectors. But the flow ratings were totally unknown and manufacturer kept secret. But I was confident these would suffice as these were from a 2 L turbo car. I found a honest Renault distributor in Germany and bought these online from him and got it shipped to a friend in Germany. He carried it to India for me. These injectors are made in Italy. When they arrived I could clearly make out these are original from the finish of the filter and plastic. Still I went ahead and checked them on the machine. I could find approx. flow of these injectors on the testing machine and it was close to 300cc. I was again a happy man   The next step was to run the stock car on these high CC injectors. This learning was important as its very difficult to idle the car with high capacity injectors. After a permutation combination and playing around with VE table and injector dead time I was able to get perfect idles upto 98%. This was fair enough considering that I had deviated from the stock set up. I started the next phase of plumbing. I thought this would be a pretty easy task, but I was totally wrong. I had to run from pillar to post in finding right silicon hoses and various bends etc. I used pure stainless steel for intake plumbing. Hoses are mostly from the TATA stable and they are the best silicon hoses available in the market, they are costly though. These hoses are made of such a high quality heat resistant material that no matter what they are not going to give up even at 150-200 psi boost. Now since I am from the engineering background I was not going to entertain any shoddy quality welds. I went in for Argon gas welding method. Costly but perfect finish and quality. All the supercharger brackets are CNC laser cut with precision profiles. I made few drawings for cnc laser cutting profile with my hand on a plain paper, then i created an autocad drawing.  Below are few pics of plumbing and the supercharger brackets.     Last edited by amit_mechengg : 26th August 2017 at 22:54. |
|
| (25)
Thanks
|
| The following 25 BHPians Thank amit_mechengg for this useful post: | .anshuman, Added_flavor, Avikbrio, bhuvan_prasad, d3mon, Divya Sharan, ganeshb, GTO, hemanth.anand, iliketurtles, im_srini, Klub Class, mh09ad5578, motorpsycho, nkrishnap, Prowler, R2D2, Rahulkool, rav11stars, Rehaan, starter, Sutripta, theexperthand, vaasu, Viju |
|
26th August 2017, 22:47
| #9 |
| Senior - BHPian | re: DIY: Supercharged Fiat Palio 1.6 INTERCOOLER : This was one tough find. The palio has a very limited space behind the bumper. The perfect fit was a Punto/Linea intercooler, but I couldnt choose it due to the inlet and outlet dia of just 35mm. With the power I was targeting and the 2 plumbing throughout I needed a 2 plus size intercooler inlet and outlet. After hunting a lot I found out that the Vento intercooler has 2 I/O. But then the problem was that the inlet and outlet were facing perpendicular to the intercooler, whereas i needed parallel faces. So I bought a used intercooler from a scrap dealer and removed one end carefully and fabricated one new end that was parallel to the body. Again, I used high quality stainless steel and used a lot of sealant across the welds to ensure double proofing. This is just a temporary arrangement till all my trials are over. Later I would go for a brand-new intercooler.     Blow off Valve Wandering into the unknown area I bought a tial 50 mm BOV with a 18 PSI spring rating. When I hooked this up it started causing hell lot of issues. This valve wont open fully on idle. This was causing a lot of load on supercharger and the plumbing. While driving too the BOV behaviour was quite irradiate, it used to open partially and close at vague rpms than desired. After a lot of research I found out that the working of the BOV valve on supercharged engines is quite different that turbocharged engines. This was a hard find.  The supercharger needs extremely light springs, the valve should be totally open at idle speeds. Unlike turbo which does not create any boost at low rpms the supercharger keeps on building boost proportional to the engine rpms. Now at part throttle and idle where your butterfly valve in the throttle body is closed the boost created by the supercharger should be totally vented out to the atmosphere. No was I was going to again buy springs from USA and get them shipped. I directly headed to the spring manufacturers in the nearby MIDC , within couple of hours I got 5 different rated springs manufactured exactly of same dimensions like the BOV. I started my trials with the lightest spring. This was useless and the mid range boost was totally missing as this light spring could not close the BOV in the mid range. As I progressed further I could establish the exact behaviour of the BOV and I finally found the best spring rating (unknown). With this spring the BOV remains open perfectly at IDLE and shuts the BOV perfectly as per the engine load conditions.   Last edited by amit_mechengg : 27th August 2017 at 00:14. |
|
| (25)
Thanks
|
| The following 25 BHPians Thank amit_mechengg for this useful post: | .anshuman, Added_flavor, Avikbrio, bhuvan_prasad, BlackPearl, blackwasp, Divya Sharan, GTO, hemanth.anand, iliketurtles, im_srini, jaunthead, Klub Class, mh09ad5578, motorpsycho, nkrishnap, R2D2, Rahulkool, rav11stars, Rehaan, rohansachar, starter, theexperthand, Viju, wbd8779 |
|
27th August 2017, 00:10
| #10 |
| Senior - BHPian | re: DIY: Supercharged Fiat Palio 1.6 First start on the boost and tuning : After hooking up all the plumbing, laying down the vacuum and boost lines to BOV and MAP sensor etc I did a double check on the plumbing, tightened the hose clips and ensured that the ecu is perfectly online and connected to the laptop and showing the live data perfectly. I also connected the OE ecu through OBD and Fiat ecu scan and cross verified that all the sensors like IAT, Coolant, MAP etc are showing the same readings as the DET3. This is very important as every aftermarket ECU has settings to define and calibrate the various sensors. Any deviation here would lead to disastrous effects. I just prayed to the god and cranked the car. The car purred to stable idles perfectly. At this point I had defined the engine cut off at 4000 rpms for safety purpose and also added a good amount of retard. I took my car for a short spin. The ride was lumpy at certain rpms and smooth at certain. I wasnt too happy. I checked the logs and found out few problems in the tuning. I corrected those and again went for a spin. Still the ride wasnt smooth this was totally due to the BOV valve acting up (wont explain it again as I have narrated the BOV issue in the above section) After correcting the BOV the car started running extremely well. I increased the revv limiter to 6500. Wow what a fun this car was now. The NA car itself was a nirvana and this was totally a divine experience. I was so happy and content.  The next day I went to the expressway to tune it better. After 20-30 kms the tune was way better and the car was running great. It was raining heavily while doing this exercise. So couldnt test any top speeds (Neither am i interested in top speeds). I drove almost 400 kms with the supercharger , experimenting different tunes, data logging and doing a lot of practical learning. The greatest achievement here is that I have not blown off the engine , neither have damaged any part nor there are any issues in the car. I always had a fear in my mind that I would blow off the engine for sure. Now here I realised that the theoretical calculations of boost etc are not matching perfectly with the practical output. The boost readings were off by 1.5 to 2 PSI. This was due to the losses in plumbing and the losses in the intercooler. I was getting around 5.5 PSI boost in the mid range, this used to drop off at 4200 at the point where the VE of the engine is max and then again raise a bit and continue at 3 PSI etc. Burning some midnight oil  Level 2 begins : I started making fresh calculations and decided to increase the size of the driving pulley to match the ratio of 3:1. Now the driving pulley size had to be increased from 130 to 160 MM. My initial pulley was 3pk and now I had a chance to upgrade to 4pk pulley. I purchased a 4pk 160mm pulley and modified it to match the spacer I had manufactured earlier. I did this in my machine shop on the CNC and VMC machine. Now with 3:1 I know that I am going to overdrive the supercharger, but I wanted to experiment and learn more. I am ready to sustain any damages to the supercharger due to overdriving it. I mounted this new pulley and the new 4pk belt. I went for a drive. Oh man, what a transformation it was. There were total wheel spins in 1st and 2nd gear. The power surge was immense. The boost jumped from 5.5 to 7.7 PSI but the best part is that the boost continues at healthy levels even at high rpms. I am thoroughly satisfied with the way the car drives now. I am not a greedy person and I know the limits of the engine as well as the car. 7 PSI boost is more than enough for a engine with 9.5:1 compression ratio. This is a FIAT engine which is very rugged and hence can take 7 PSI even with such a heavy compression. I do not plan to touch any of stock internals. I want to make a special mention of the intercooler here. The vento intercooler is the best intercooler I have come across. The intake temperatures are around 120-150 degrees and the exit temps from the intercooler is just 35 to 40 degrees. Even the stock car IATs are in the range of 40-60. This great performance of the intercooler has saved me from lots of headaches. The supercharger generates very high IATs unlike the turbochargers. Last edited by amit_mechengg : 27th August 2017 at 00:25. |
|
| (26)
Thanks
|
| The following 26 BHPians Thank amit_mechengg for this useful post: | .anshuman, ashis89, audioholic, Avikbrio, AYP, bhuvan_prasad, govigov, GTO, headers, im_srini, Klub Class, mh09ad5578, nkrishnap, R2D2, Rachit.K.Dogra, Rahulkool, rav11stars, Rehaan, rohansachar, Shreyans_Jain, Shubhendra, somspaple, starter, theexperthand, Torino, Viju |
|
27th August 2017, 00:17
| #11 |
| Senior - BHPian | re: DIY: Supercharged Fiat Palio 1.6 Now everything is not as rosy as it seems to be, there are certain issues that need to be tacked. I would also request experts here to help me on these. Issue No 1: The supercharger noise Below is a video to show how my car sounds like – this is a generic video, refer to the 1st car in the video. I want to get rid of this sound ASAP, else someone is going to thrash me on road for sure. People get a shock when I zoom past them. Someone had also written bad words on my rear window due to this At times I also get thoughts of dumping the supercharger and plonking in a turbo. Issue No 2: Spark blow out This is a critical issue, when the boost suddenly comes at the closure of BOV there is a noticeable spark blow out. Initially I thought that it’s a fuelling issue but its not. Even though its just for few milliseconds its very irritating. The stock coils on European cars are really nasty. The same issue persist on skoda TSIs. I decreased the spark plug gap from 0.9 to 0.7 and still this issue persists. I am now planning to install an MSD ignition coil. Please note that palio uses a wasted spark type coil. Issue no 3: Slipping belts (Rare occasions) On rare occasions, especially under heavy acceleration when the engine and supercharger is hot , I can hear squeaks from the belt. Even though minor I know that this will decrease the belt life. I have kept 3 belts in stock , in case of any failures. Issue no 4: Tyres and Vehicle dynamics There is fair amount of wheel spins due to which the launch is imperfect and the 0-100 timings take a massive hit. I plant to upgrade the tyres. Secondly the palio doesn’t have great dynamics like modern siblings (Punto and Linea), also the braking (though upgraded) doesn’t feel secure due to lack of ABS. I plan to install strut braces soon. I can easily manufacture them in my machine shop. I have run just around 600 odd kms on the supercharger. Keeping fingers crossed , I plan to experiment more, drive more and continue logging the car. The major issue why I don’t drive it as a daily car is the supercharger noise. Thank you guys for tolerating my long posts, bad English, typos etc. I want to pay special thanks to Joe – from Blackworks and Rajiv who is a very good friend of mine from the Wolf Tuning. Joe is a gem of a person and very down to earth. He is one tuner who will never hide facts or shy away from sharing his knowledge. He is the expert when it comes to Honda engines and has decades of experience. Rajiv and I are friends from the period our group started remapping MJDs. The only switchable maps provider Wolfmoto has many happy customers. We speak daily over the phone and he has guided me throughout the project with his in-depth theoretical knowledge. Special thanks to GTO and the moderator team here to provide me an opportunity and enthusiasm to write such a lengthy post here. Up Next : I would be plonking in a new intercooler. I would also be adding a mesh grill to the bumper. It has huge cut right now to accommodate the inter-cooler. MSD ignition. Permanent mount for the supercharger. Paint touchups. Better tyres and slotted brake discs. Few more Gauges. |
|
| (57)
Thanks
|
| The following 57 BHPians Thank amit_mechengg for this useful post: | .anshuman, abhishek46, Added_flavor, Akshay1234, aqualeo2040, ashis89, bhuvan_prasad, BlackPearl, blackwasp, catchjyoti, d3mon, Dennis, Divya Sharan, djoel99, Dr.Naren, E = mc², GTO, haria, hemanth.anand, honeybee, i74js, iliketurtles, im_srini, jaunthead, kaustubh_vaze, keroo1099, Klub Class, KMT, Leoshashi, mh09ad5578, motorpsycho, Myth_sx, nkrishnap, PM - B, PraNeel, R2D2, rageshgr, Rahulkool, rakesh_r, rav11stars, Rehaan, rohansachar, Shreyans_Jain, Skyline_GT, somspaple, spd_tkt, starter, theexperthand, TheSkinnyDevil, toiingg, Torino, TSIboy, vaasu, vibhu_f430, vivtho, wbd8779, YDS |
| |
|
28th August 2017, 09:22
| #12 |
| Team-BHP Support  | Re: DIY: Supercharged Fiat Palio 1.6 Thread moved from the Assembly Line to the DIY Section. Thanks for sharing! |
|
| ()
Thanks
|
|
28th August 2017, 09:55
| #13 |
| BHPian Join Date: Jan 2016 Location: Mumbai.
Posts: 213
Thanked: 388 Times
| Re: DIY: Supercharged Fiat Palio 1.6 Hey Amit congratulations on completing your project successfully. Anything related to superchargers gets my attention. Can you please upload videos of your car post installation of supercharger? Drive Safe and keep us updated. |
|
| (1)
Thanks
|
| The following BHPian Thanks Akib Khan for this useful post: | amit_mechengg |
|
28th August 2017, 10:36
| #14 | |
| Distinguished - BHPian  | Re: DIY: Supercharged Fiat Palio 1.6 I am sure that this project would have been very special to you  . You have redefined the term DIY here, haha. Hats off to your passion and dedication. Reliability factory of the build : let the time answer!! . You have redefined the term DIY here, haha. Hats off to your passion and dedication. Reliability factory of the build : let the time answer!! Quote:
 Last edited by Dr.Naren : 28th August 2017 at 10:53. | |
|
| (2)
Thanks
|

| The following 2 BHPians Thank Dr.Naren for this useful post: | amit_mechengg, sai_ace |
|
28th August 2017, 12:35
| #15 |
| BHPian Join Date: Jun 2013 Location: Pune
Posts: 69
Thanked: 78 Times
| Re: DIY: Supercharged Fiat Palio 1.6 Amazing dedication and hard work there! Although I could not understand a single bit of that tech stuff, I was amazed at your deep knowledge. Hats off! After diving your beast last week I was awestruck to say the least. Congrats on the build once again |
|
| (1)
Thanks
|
| The following BHPian Thanks Oranger for this useful post: | mchanna |
|