Team-BHP > Technical Stuff > DIY - Do it yourself
Register New Topics New Posts Top Thanked Team-BHP FAQ


Reply
  Search this Thread
83,968 views
Old 27th July 2020, 14:13   #61
Distinguished - BHPian
 
Join Date: Oct 2012
Location: Delhi
Posts: 8,101
Thanked: 50,872 Times
re: DIY: Metal model engine building UPDATE: build complete (page 16)!

Quote:
Originally Posted by Thad E Ginathom View Post
I gasped at the prospect of taking a hacksaw to that! And again at your beautiful straight, neat cut!
Thanks. It is not that bad. Probably 12-15 minutes. Make sure you start with a good, preferably, new blade on the hack saw. Cutting straight with hack saw is something that I am reasonable well at. Same with working with a file. No expert, but at least confident to a degree of my skills and what I can expect.

Not there yet with my lath and or milling skills.
Jeroen is offline   (1) Thanks
Old 27th July 2020, 14:30   #62
Distinguished - BHPian
 
Thad E Ginathom's Avatar
 
Join Date: Jun 2007
Location: Chennai
Posts: 11,005
Thanked: 26,443 Times
re: DIY: Metal model engine building UPDATE: build complete (page 16)!

I am not confident that I can cut straight with a hacksaw. Practice would help. I'm better at filing skills, but had more practise at that.
Thad E Ginathom is offline  
Old 28th July 2020, 22:34   #63
Distinguished - BHPian
 
Join Date: Oct 2012
Location: Delhi
Posts: 8,101
Thanked: 50,872 Times
re: DIY: Metal model engine building UPDATE: build complete (page 16)!

Some more work done and progress made!

I managed to finish the outer diameter of the cilinder at exactly 50mm. Check across the whole length. Some very small difference, but that is no problem.

DIY: Metal model engine building UPDATE: build complete (page 16)!-p7280001.jpg

I really wanted to cut the cool ribs first, but I don’t have the correct parting blade. Or at least nothing I feel confident about driving it into this lump of metal for some 5mm. I’ll get it later this week.

So I decided to start on the internal bits of the cilinder. I had already done the centre drill bit. So I drilled right through, initially a 5mm, then 9mm and finally my largest drill bit, 12mm. That gave my just sufficient clearance to get my nice new smallest boring bar into this hole

DIY: Metal model engine building UPDATE: build complete (page 16)!-p7280002.jpg

The challenge is the depth of this thing. This cilinder is 61mm. That meant I had to get the boring bar sticking out at 63mm. Just to make sure it went right through and still had a bit of clearance before the compound or other bits smash into the cilinder!

My tool holder was barely able to properly clamp this small boring bar with so much overhang. I was concerned it would vibrate, chatter etc. But as I feed it in, it does move a bit, but entirely consistent. So it actually gives quite a nice cut and finish. Lucky me!

DIY: Metal model engine building UPDATE: build complete (page 16)!-p7280003.jpg

DIY: Metal model engine building UPDATE: build complete (page 16)!-p7280004.jpg

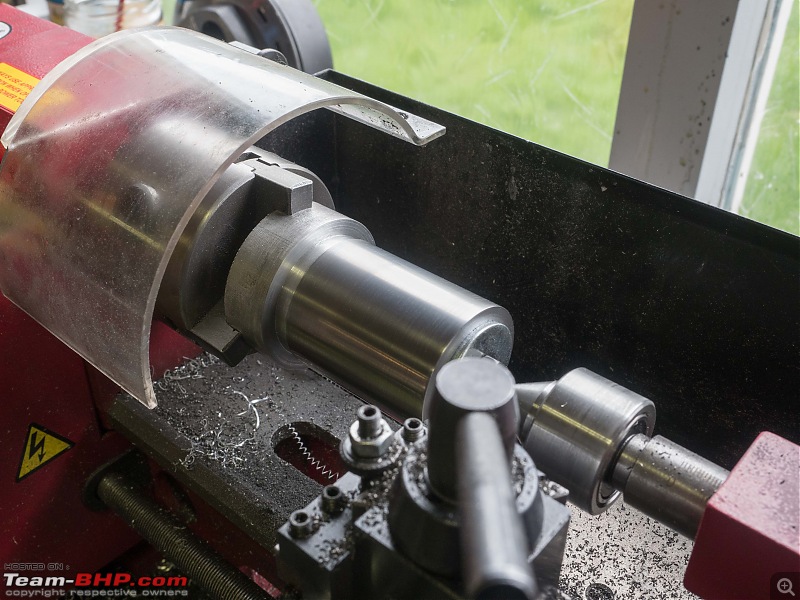
Within half an hour or so I had the cilinder inner diameter already at 20mm. Large enough to get my bigger, more rigid boring bars in. Also, I have a special boring bar toolholder for these larger sizes.

Made a make shift “keep the dust away from my tools/instruments”. Held in place with a clamp. I will put some parkers in it tomorrow.

DIY: Metal model engine building UPDATE: build complete (page 16)!-p7280005.jpg

All in all, a productive few hours behind the lathe. It is slow going with this little lathe. But I have got all the time of the world, so I am not worried.

Jeroen
Jeroen is offline   (3) Thanks
Old 28th July 2020, 22:57   #64
Senior - BHPian
 
Join Date: Jul 2009
Location: Calcutta
Posts: 4,668
Thanked: 6,217 Times
re: DIY: Metal model engine building UPDATE: build complete (page 16)!

Quote:
Originally Posted by Jeroen View Post
I managed to finish the outer diameter of the cilinder at exactly 50mm. Check across the whole length. Some very small difference, but that is no problem.
That should not be the case. You need to investigate why.

Sutripta
Sutripta is offline  
Old 28th July 2020, 23:06   #65
Distinguished - BHPian
 
Join Date: Oct 2012
Location: Delhi
Posts: 8,101
Thanked: 50,872 Times
re: DIY: Metal model engine building UPDATE: build complete (page 16)!

Quote:
Originally Posted by Sutripta View Post
That should not be the case. You need to investigate why.
We are talking a few hundreds of mm. That is good enough for me.
I would not even rule out, me being a little sloppy / too eager with my new digital callipers.

Jeroen
Jeroen is offline   (1) Thanks
Old 29th July 2020, 11:21   #66
Senior - BHPian
 
Join Date: Jul 2009
Location: Calcutta
Posts: 4,668
Thanked: 6,217 Times
re: DIY: Metal model engine building UPDATE: build complete (page 16)!

Check for taper though using the micrometer.
Your new caliper - absolute reading?

Sutripta
Sutripta is offline  
Old 2nd August 2020, 21:06   #67
Distinguished - BHPian
 
Join Date: Oct 2012
Location: Delhi
Posts: 8,101
Thanked: 50,872 Times
re: DIY: Metal model engine building UPDATE: build complete (page 16)!

At long last I managed to spend some time with Debbie to be this weekend. Got quite a bit done.

I managed to drill the hole to 12mm and next use my boring bars in increasing size/rigidity:

DIY: Metal model engine building UPDATE: build complete (page 16)!-p8010002.jpg

Looked pretty good:

DIY: Metal model engine building UPDATE: build complete (page 16)!-p8010001.jpg

The boring, at least in theory, should give me a pretty decent roundness of the hole. For the finish I decided to do a bit of old fashioned honing. I have done honing extensively in my merchant navy years.

Took me a while to get some honing oil. It’s not that you can’t get it. But it is almost exclusively sold in minimum 5L cans! That is more I would use in lifetime, let alone being 61 already. Found this place in a town nearby. Cycled over bought as they made up their own smaller sizes. Also, bought some proper polishing paste I will be needing for the piston / cylinder later on

DIY: Metal model engine building UPDATE: build complete (page 16)!-p8010003.jpg

I had bought a very simple honing device earlier. Just a few euro’s. Essentially three honing stone on spring loaded levers. You attach them to your drill.

Make sure to really soak those honing stones well with the honing oil prior to starting.

DIY: Metal model engine building UPDATE: build complete (page 16)!-p8010004.jpg

DIY: Metal model engine building UPDATE: build complete (page 16)!-p8010005.jpg

DIY: Metal model engine building UPDATE: build complete (page 16)!-p8010006.jpg

Let the drill do the rotating and move in / out yourself. Check youtube how to get the correct 45o Cross finish. Of course, honing is a real surface treatment and it is used primarily to provide a good surface for the lubracition oil in combination with the piston rings. Debbie won’t have piston rings. So it was just to make the inside surface, after the boring, a little smoother. Worked a treat!

DIY: Metal model engine building UPDATE: build complete (page 16)!-p8010010.jpg

DIY: Metal model engine building UPDATE: build complete (page 16)!-p8010011.jpg

DIY: Metal model engine building UPDATE: build complete (page 16)!-p8010013.jpg

As I explained before, I made an error (again) reading the drawing, which meant I got the piece for the cylinder too short. Rather than ordering a new one, I decided to use this and make do. Which did mean making an arbor to make the final cuts along the full length:

So a Quick design: You will notice that my designs these days, leave a lot to be desired. This is the best I can do. It works best if I can visualise stuff next to the drawing.

DIY: Metal model engine building UPDATE: build complete (page 16)!-p8010014.jpg

Took a big chunk of aluminium. Only bit I had of sufficient diameter. Since I will be doing a lot of cutting, on a relative large diameter, including the cutting of the cool ribs I wanted the face of the arbor almost the same diameter and the outer diameter of the cylinder.

DIY: Metal model engine building UPDATE: build complete (page 16)!-p8010015.jpg

But there is a bit of a mystifying problem.

Quote:
Originally Posted by Sutripta View Post
Check for taper though using the micrometer.
Your new caliper - absolute reading?
There is no taper, but on both the cylinder and on the arbor on the left side of the workpiece both show a 5-6mm ridge of approx 0,08mm larger diameter. Peculiar, because given the sizing of these two different pieces and how they are being made, it happens on different parts/orientation of the lathe.

DIY: Metal model engine building UPDATE: build complete (page 16)!-p8020016.jpg

Anyway, finalised the arbor: Made the same stupid mistake with the thread as I did on the arbor for the Wobbler. I wanted M12 thread, I had bought M12 nuts and washers. But somehow my mind tricked me into looking into the thread table with shows M12 needs a 10,3mm drill hole. But here of course I needed just 12mm, not 10.3mm. So after some confusion and cursing, made it M10

DIY: Metal model engine building UPDATE: build complete (page 16)!-p8020030.jpg

The cylinder fits really snugly!

DIY: Metal model engine building UPDATE: build complete (page 16)!-p8020031.jpg

Managed to cut of the remaining bit and a very nice, very shallow final pass:

Put some elbow grease and various grit-sandpaper to good use:

DIY: Metal model engine building UPDATE: build complete (page 16)!-p8020032.jpg

DIY: Metal model engine building UPDATE: build complete (page 16)!-p8020033.jpg

Looks good! The odd little ridge has gone completely. The diameter across the full length is now consistent within 0.02mm.

Next the cool ribs. I had bought a new parting blade to fit into my new quick change post. It’s 2,3mm wide. Whereas according to the drawing the ribs are 2mm apart. But I checked, doubled, checked, triple checked and I think I will be ok with the 2,3mm cuts.

This parting blade is tapered, so I had to cut some shims to get it properly positioned into the quick change post. Cut up a 0,2mm feeler blade.

DIY: Metal model engine building UPDATE: build complete (page 16)!-p8020034.jpg

DIY: Metal model engine building UPDATE: build complete (page 16)!-p8020035.jpg

First 2,5mm cut, needs to go all the way to 6mm depth:

DIY: Metal model engine building UPDATE: build complete (page 16)!-p8020036.jpg

I just noticed some play in the compound. I will have to fix it before continuing!

Jeroen

Last edited by Jeroen : 2nd August 2020 at 21:09.
Jeroen is offline   (1) Thanks
Old 4th August 2020, 00:22   #68
Distinguished - BHPian
 
Join Date: Oct 2012
Location: Delhi
Posts: 8,101
Thanked: 50,872 Times
re: DIY: Metal model engine building UPDATE: build complete (page 16)!

Checked the lathe manual. Pretty straight forward on how to adjust this sort of play.

DIY: Metal model engine building UPDATE: build complete (page 16)!-p8030011.jpg

Some of my smaller tool sizes had to come out:

DIY: Metal model engine building UPDATE: build complete (page 16)!-p8030012.jpg

With no play I gave it another try. I had also checked a few more Youtube video’s on parting. Blondihack does a nice one, so does Tubelcain in a thee part series:


One of the things that struck me is to use relative high RPM on aluminium, compared to steel. Also, on the actual cut as he says: Don’t Baby it in. Go for it. Well, this is cast iron and by increasing the RPM, with the newly created rigidity and by really keeping the blade moving inwards, lots of cutting oil it went well. In fact, it turned out quite nicely I think!

DIY: Metal model engine building UPDATE: build complete (page 16)!-p8030013.jpg

I will turn the cylinder around on the arbor and do three more on the other side.

Jeroen

Last edited by Jeroen : 4th August 2020 at 00:28.
Jeroen is offline   (3) Thanks
Old 4th August 2020, 03:42   #69
Distinguished - BHPian
 
Thad E Ginathom's Avatar
 
Join Date: Jun 2007
Location: Chennai
Posts: 11,005
Thanked: 26,443 Times
re: DIY: Metal model engine building UPDATE: build complete (page 16)!

Nice job, Jeroen. Well done!
Thad E Ginathom is offline  
Old 4th August 2020, 12:41   #70
Senior - BHPian
 
Join Date: Jul 2009
Location: Calcutta
Posts: 4,668
Thanked: 6,217 Times
re: DIY: Metal model engine building UPDATE: build complete (page 16)!

The ridge - something is shifting. You have to approach it like a detective!

The parting tool - you running the lathe in reverse?
Does this model have a rear toolpost? Highly unlikely, but still asking.

Sutripta
Sutripta is offline  
Old 4th August 2020, 12:54   #71
Distinguished - BHPian
 
Join Date: Oct 2012
Location: Delhi
Posts: 8,101
Thanked: 50,872 Times
re: DIY: Metal model engine building UPDATE: build complete (page 16)!

Quote:
Originally Posted by Sutripta View Post
The ridge - something is shifting. You have to approach it like a detective!
Did some further checking, but it remains a bit of a mystery. When turning the arbor I did not encounter this problem at all. I have noticed that sometimes the compound/cross slide moves a bit, turning the spindle. Especially during relative heavy cuts. This lathe does not have a lock up on the compound or the cross slide. They are just supposed to stay in place, but I am suspicious. But I have adjusted both of these for a little play now. So lets see what happens.

Quote:
Originally Posted by Sutripta View Post
The parting tool - you running the lathe in reverse?
No, I have not tried that yet. It is confusing enough as it is!

Quote:
Originally Posted by Sutripta View Post
Does this model have a rear toolpost? Highly unlikely, but still asking.
No, not that I have seen anywhere. I am sure somebody has made their own by now. YouTube is awash with video’s of guys improving their mini lathe.

Jeroen
Jeroen is offline  
Old 4th August 2020, 13:01   #72
Senior - BHPian
 
Join Date: Jul 2009
Location: Calcutta
Posts: 4,668
Thanked: 6,217 Times
re: DIY: Metal model engine building UPDATE: build complete (page 16)!

If the lathe allows it, I personally prefer running the parting tool on the rear toolholder. As in anything which is basically there from the time of the industrial revolution, there are a million opinions on everything, and because of the internet, views are widely disseminated thoroughly confusing everyone!

Sutripta
Sutripta is offline  
Old 4th August 2020, 13:49   #73
Distinguished - BHPian
 
Join Date: Oct 2012
Location: Delhi
Posts: 8,101
Thanked: 50,872 Times
re: DIY: Metal model engine building UPDATE: build complete (page 16)!

Quote:
Originally Posted by Sutripta View Post
If the lathe allows it, I personally prefer running the parting tool on the rear toolholder.a
I haven’t come across one anywhere yet on Youtube I think. What are the advantages, would it be more rigid?

I think I will try the next three cuts with the blade upside down, running in reverse. See if it makes a difference.

As I mentioned before, I also really need to make a modification so I can fixate the carriage for parting operations. Holding it in place with the half nut clamped down still allows it to move several mm. Not exactly rigid either.


Jeroen
Jeroen is offline  
Old 4th August 2020, 15:01   #74
Senior - BHPian
 
Join Date: Jul 2009
Location: Calcutta
Posts: 4,668
Thanked: 6,217 Times
re: DIY: Metal model engine building UPDATE: build complete (page 16)!

With a rear toolpost one can fix the blade upside down while running the lathe in the normal direction.
Normally not a good idea to run a lathe under load in the reverse direction.

Sutripta
Sutripta is offline  
Old 4th August 2020, 16:54   #75
Distinguished - BHPian
 
Thad E Ginathom's Avatar
 
Join Date: Jun 2007
Location: Chennai
Posts: 11,005
Thanked: 26,443 Times
re: DIY: Metal model engine building UPDATE: build complete (page 16)!

Quote:
Originally Posted by Jeroen View Post
I think I will try the next three cuts with the blade upside down, running in reverse.
The chuck does not screw onto the spindle. Right?
Thad E Ginathom is offline  
Reply

Most Viewed


Copyright ©2000 - 2024, Team-BHP.com
Proudly powered by E2E Networks