| |||||||

| Search Forums |
| Advanced Search |
| Go to Page... |
 |
| Search this Thread |  56,359 views |
 28th February 2022, 07:55
| #1 |
| BHPian | DIY: Juicing up the Ford EcoSport S with ICE, Front Park, ST-line cluster, steering wheel and ADAS Hello BHPians. Before I get into the various modifications I did, I would like to introduce myself as this is my first real post on team-bhp. I am from Hyderabad, currently based out of Frankfurt and by qualification a Chemical engineer. I was that geek in school working on science fairs building stuff, sorting out friend's electronics, software installs, helping dad servicing his Vespa, RE Bullet, CBZ, HM Ambassador, Indica V2. Dad was in the car travels business, and I loved accompanying him to the FNGs to see them taken apart. My comic books were Autocar magazines that dad used to get from his office. I was infected with this auto-bug early on and so have been a silent reader on team-bhp forums for years going through various travelogues, reviews, DIYs etc. Fast forward, I bought my first car with my savings, a Ford EcoSport as a gift to my dad on Father’s Day in June 2019 before my planned move to Germany 3 months later. Reason for choosing an EcoSport was that we had a significant exposure to Fiesta and my dad loved driving it more than any other car. EcoSport seemed like the spiritual successor and an upgrade up the Ford ladder. It's not really a surprise that Ford cars are well known for their handling and steering dynamics. Everyone I knew recommended to either get a Brezza or Creta or Nexon, but I had made up my mind to choose Function (driving pleasure) over Form. Delivery day 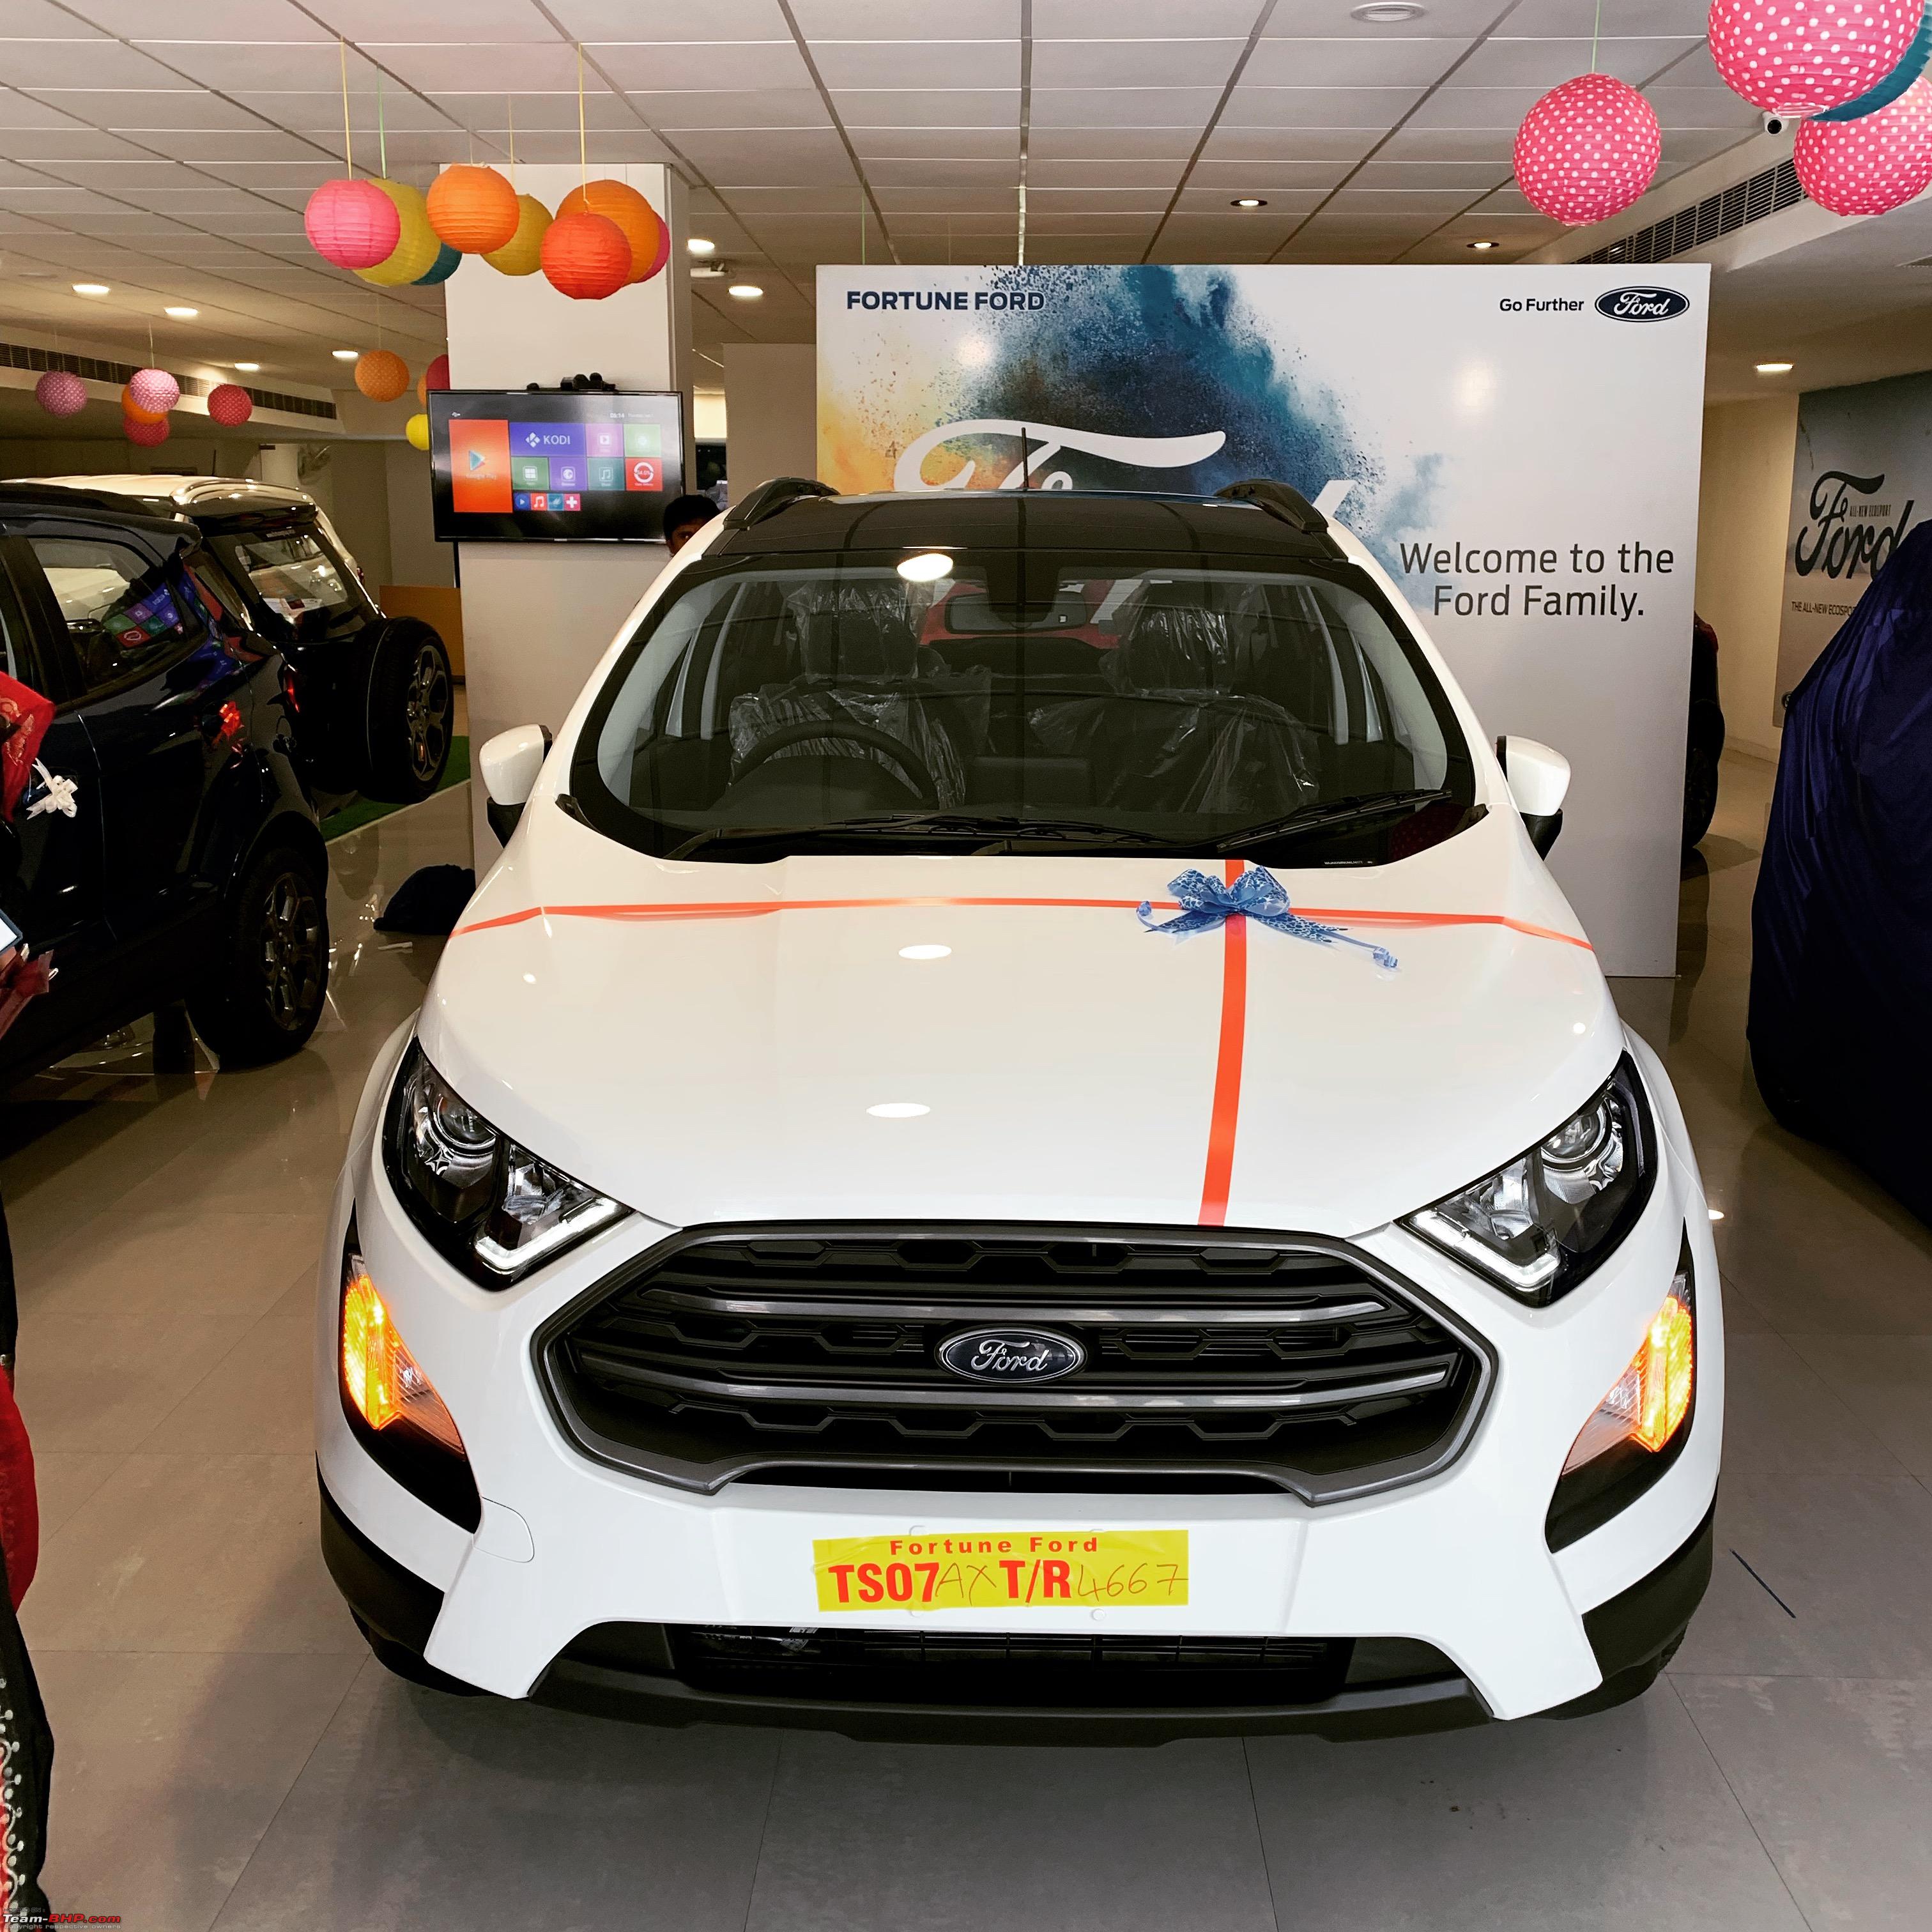 'Ghost' Ready to fly 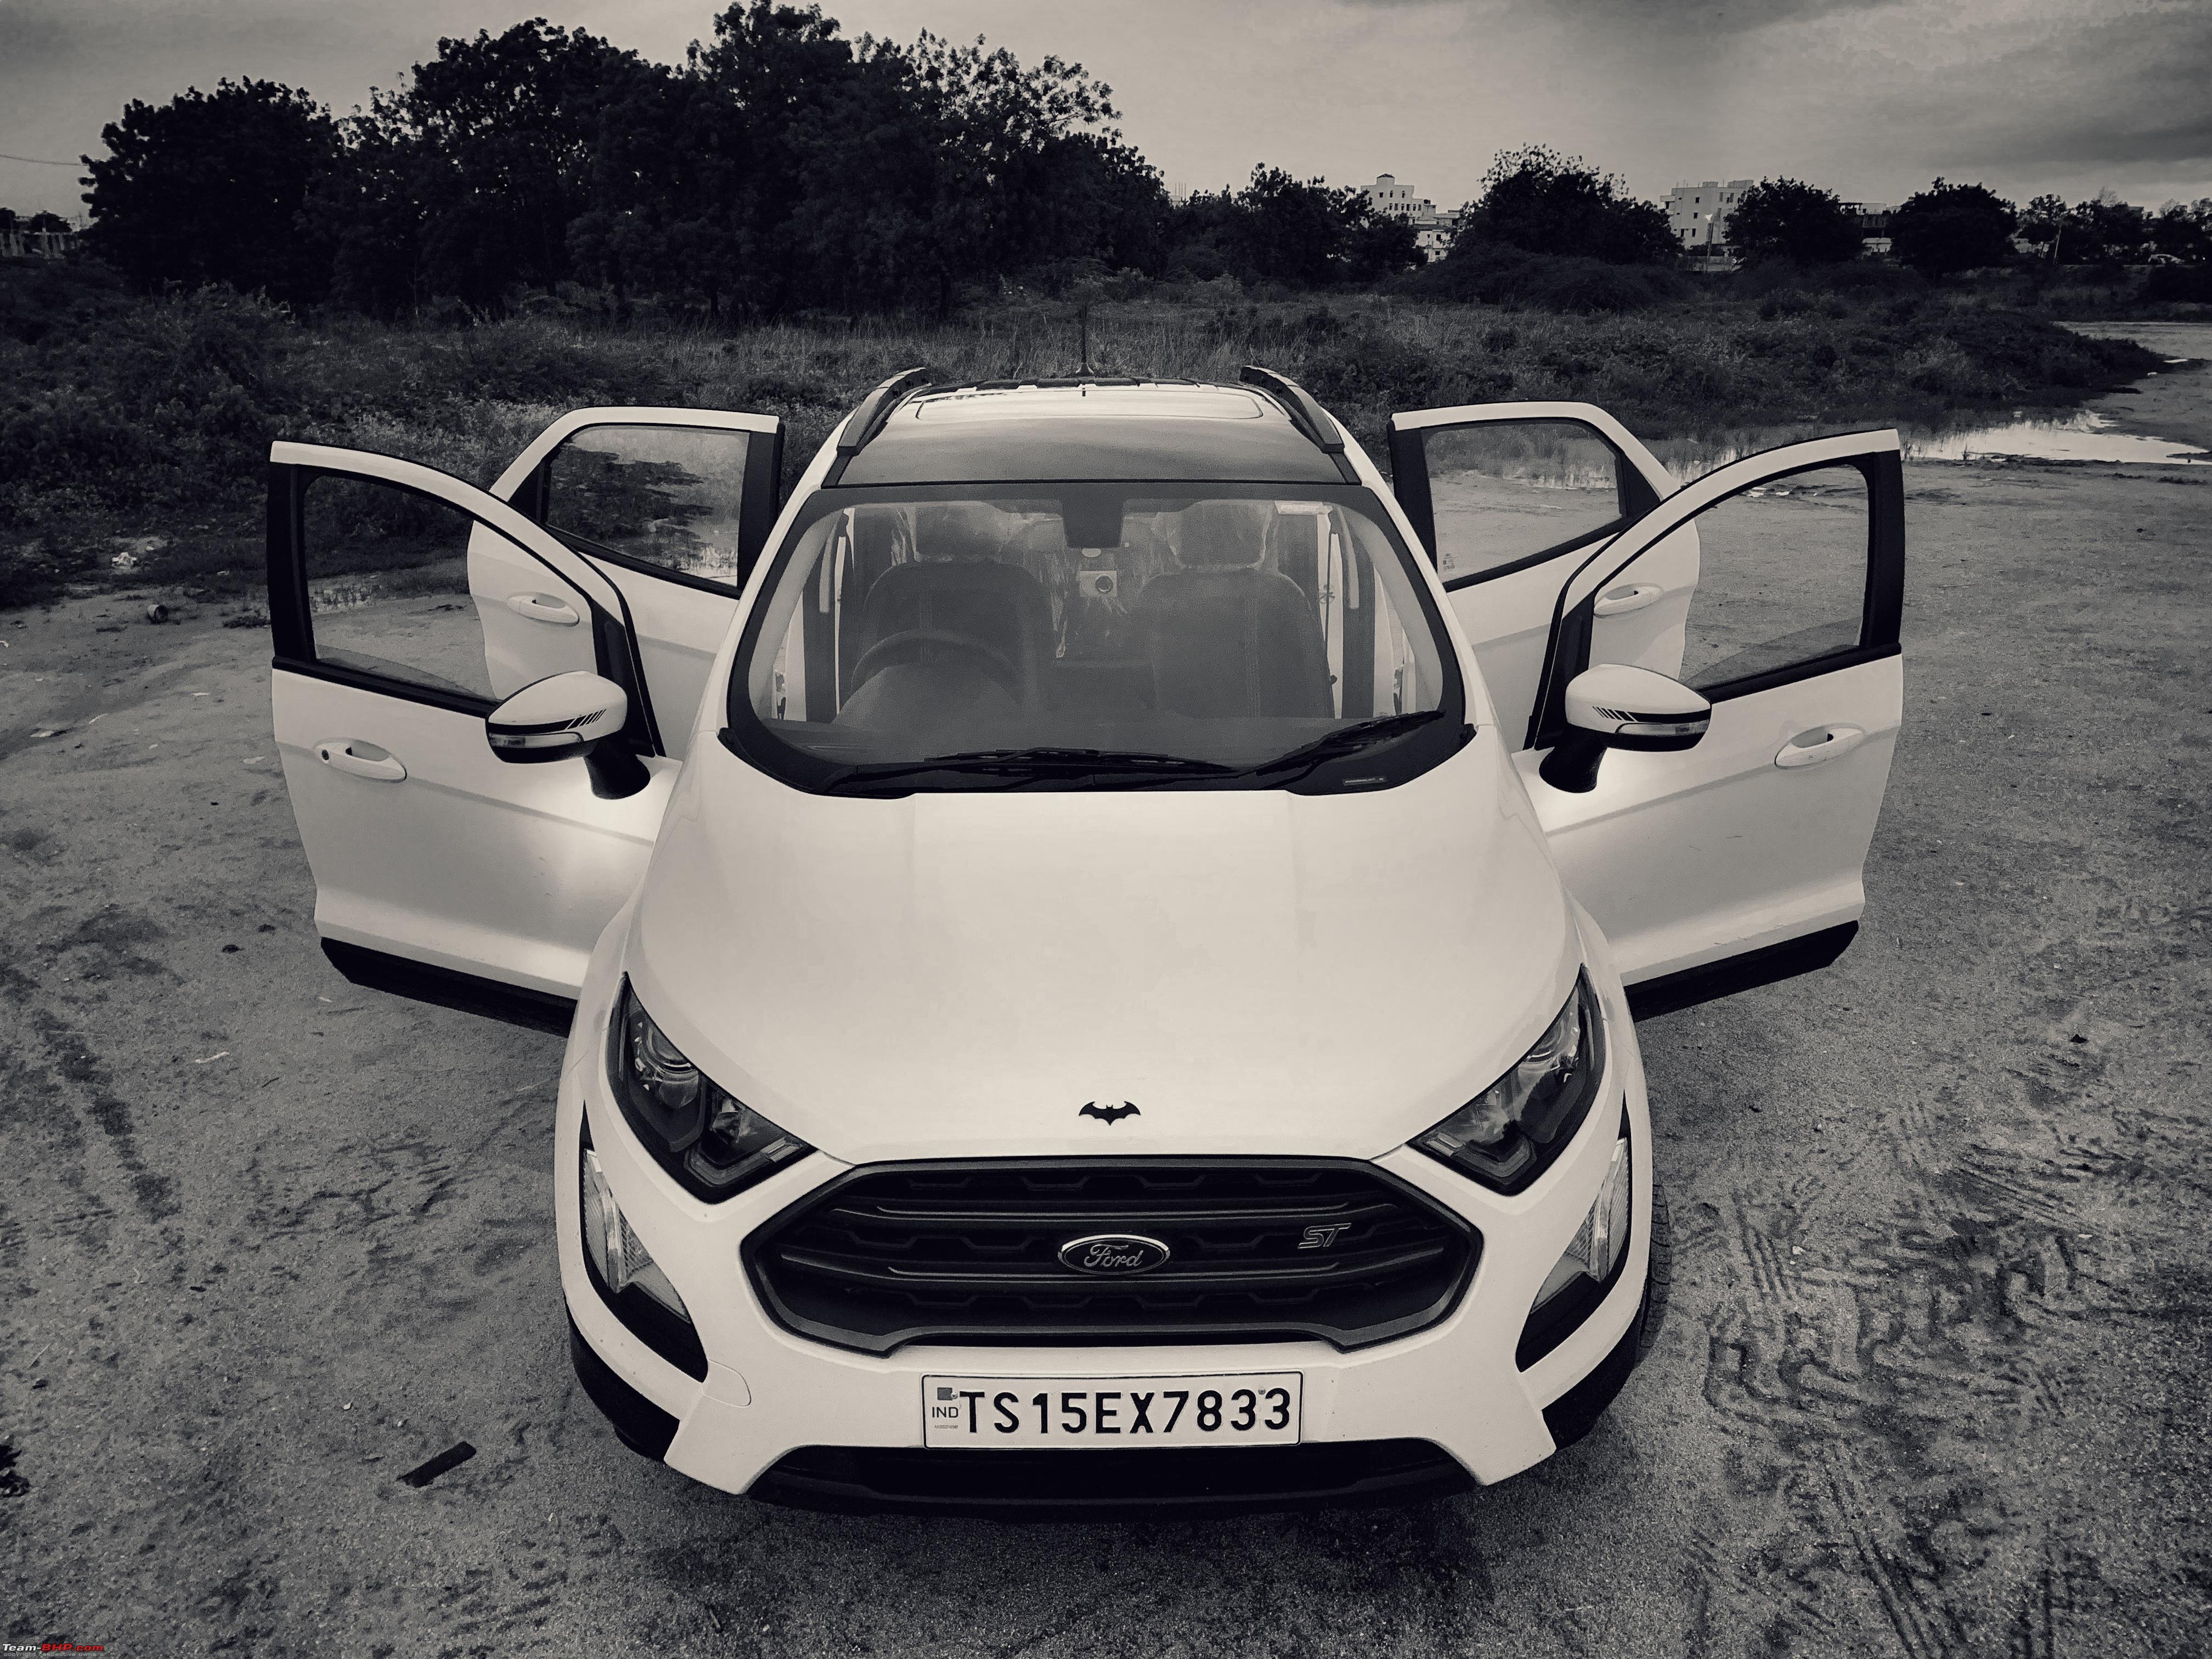 Somehow many had this huge misconception that Ford service costs an arm and a leg while it's the lowest in the segment and in all probability lower than cars from other manufacturers in lower segments. At peace with by brothers 2016 Verna 1.6 SX  I have made many visual and functional mods and accessories for the car over these two years but couldn’t post due to time constraints, lack of pictures while making the mods, being away and some mods were done by my dad. This post has also been 3 - 4 months in the making due to busy schedule. There will be an overload of information. So, brace yourselves! Let me answer the most important question many ask me, Yes, the car is still under warranty technically! (5 year extended warranty) I am going to break my experience into three sections – 1) Tyres, Lights and Accessories 2) In-Car Entertainment (ICE) 3) Car electronics which include ADAS. I tried my best to provide information about cost, sellers, and part numbers wherever I can. These mods were made over a period of 2.5 years and there are time gaps in between different mods. For sake of ease, I sorted the mods based on function, but these are not installed in that specific order. I estimate that I spent around 2L for the ICE and another 2L+ for various accessories, softwares, electronic modules, wiring, tools, shipping etc. I stopped counting after a while for my family's peace of mind  . I understand some may feel few of the mods are pointless or unnecessary even over the top. But, when did “just because” stop being a good enough reason for curiosity and tinkering with something you are passionate about? This journey can be its own reward without offering any real tangible benefits. . I understand some may feel few of the mods are pointless or unnecessary even over the top. But, when did “just because” stop being a good enough reason for curiosity and tinkering with something you are passionate about? This journey can be its own reward without offering any real tangible benefits.Politics aside, I have used Aliexpress extensively due to lack of availability of various accessories locally in India. Unfortunately, shipping to India is a hit or miss currently. Sometimes, I had them shipped to me in Germany and carried/couriered them back to India. I subscribed to Ford Motorcraft sites whenever required and bought manuals from Ebay US to aid my DIY projects.  I have uploaded owner manual, workshop manual, wiring diagrams, firmwares, software etc. on my Gdrive to aid fellow EcoSport enthusiasts at https://drive.google.com/drive/folde...uf?usp=sharing Huge shout out to other Ford enthusiasts on team-bhp like Naveen (@nkdev89) whose informative DIY Retrofit post for IPC, SCCM and Steering wheel made my job easier and saved me precious hours figuring out ways to disassemble the units. 1. Tyres, Lights and Accessories Tyres: We had a pleasant ownership experience in these 2.5 years without any problems except the infamous Bridgestone Ecopia tyre gate. The Ford Authorised Service Station (FASS), Fortune Ford Hyderabad, has also been very professional, supportive, thorough and maintains great engagement with EcoSport owners’ group in Hyderabad – Ecobeasts. 800 km road trip on the day of delivery  Fun to drive on the ghats 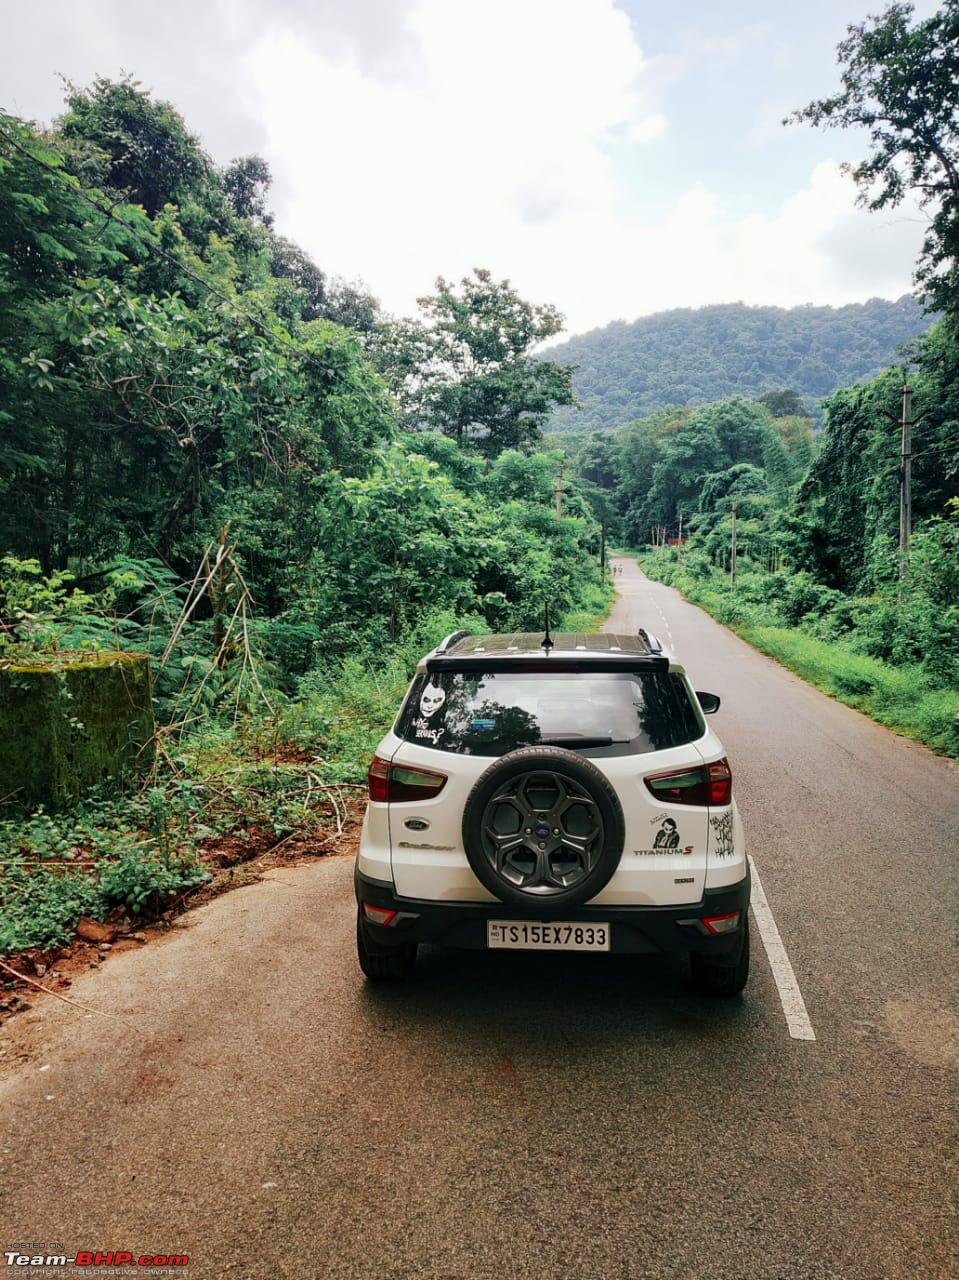 In those first three months in 2019 I was with the car, we covered about 12000 kms driving between Hyderabad-Bangalore and Hyderabad-Kakinada-Visakhapatnam. Meanwhile the gear head in me was thinking of ways to improve the car. Things that immediately came up in my mind are tyres. I had to replace the infamous 17" Bridgestone Ecopia low profile tires twice (front tires both times) due to sidewall damage within two months of buying the car. 3rd Sidewall damage and minor scratches on the Alloy 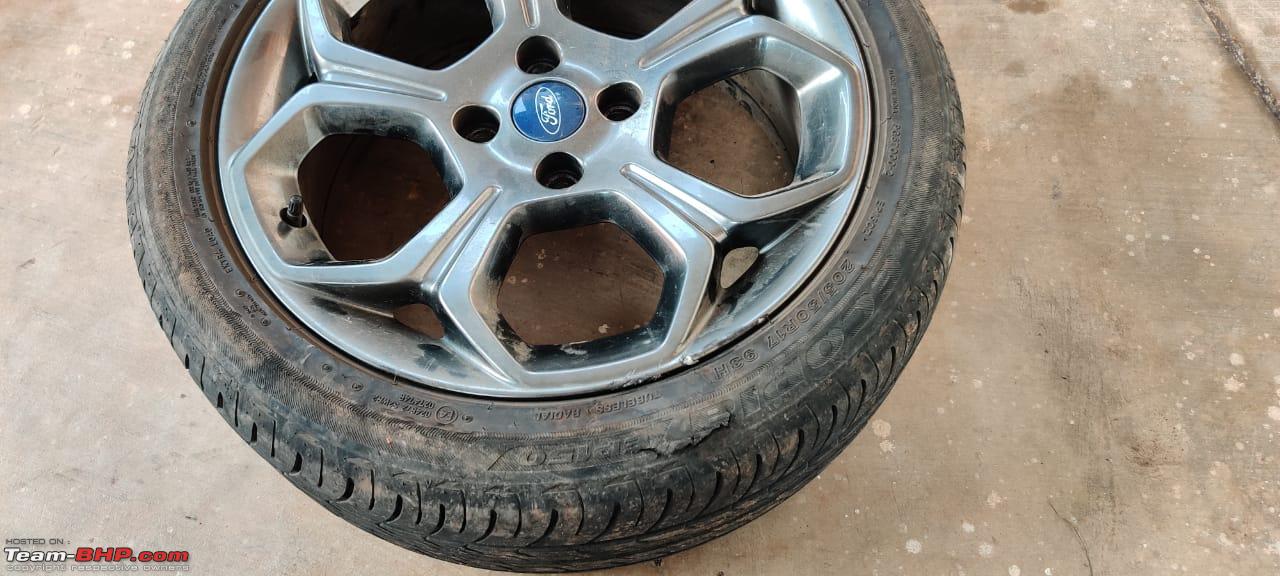 On the third tyre burst I paid the price difference (Rs. 300) and had FASS fix a Michelin Pilot Sport 4 instead of "BS" Ecopia. I bought a second Michelin (Rs.9500 in 2019 from a Michelin dealer) and switched the other front tyre as well. Now both of my front tyres are Michelins (retained stock tyre size of 205 50 R17) and in these two years (14K Kms) we had no punctures or any other damage. They have performed exceptionally well on road and off-road.  In the above picture you can see that I have also applied Rim protector around the edge of the alloy for protection and visual appeal. I believe they will provide protection against minor scratches. Rim protector – 8m roll is enough for all 5 wheels (6 euros) https://www.aliexpress.com/item/33035212771.html It is also available on Amazon India from various sellers now, but they do not have any reviews. Anti-theft lug nuts - M12x1.5 (12 euros) https://www.aliexpress.com/item/10000079546874.html 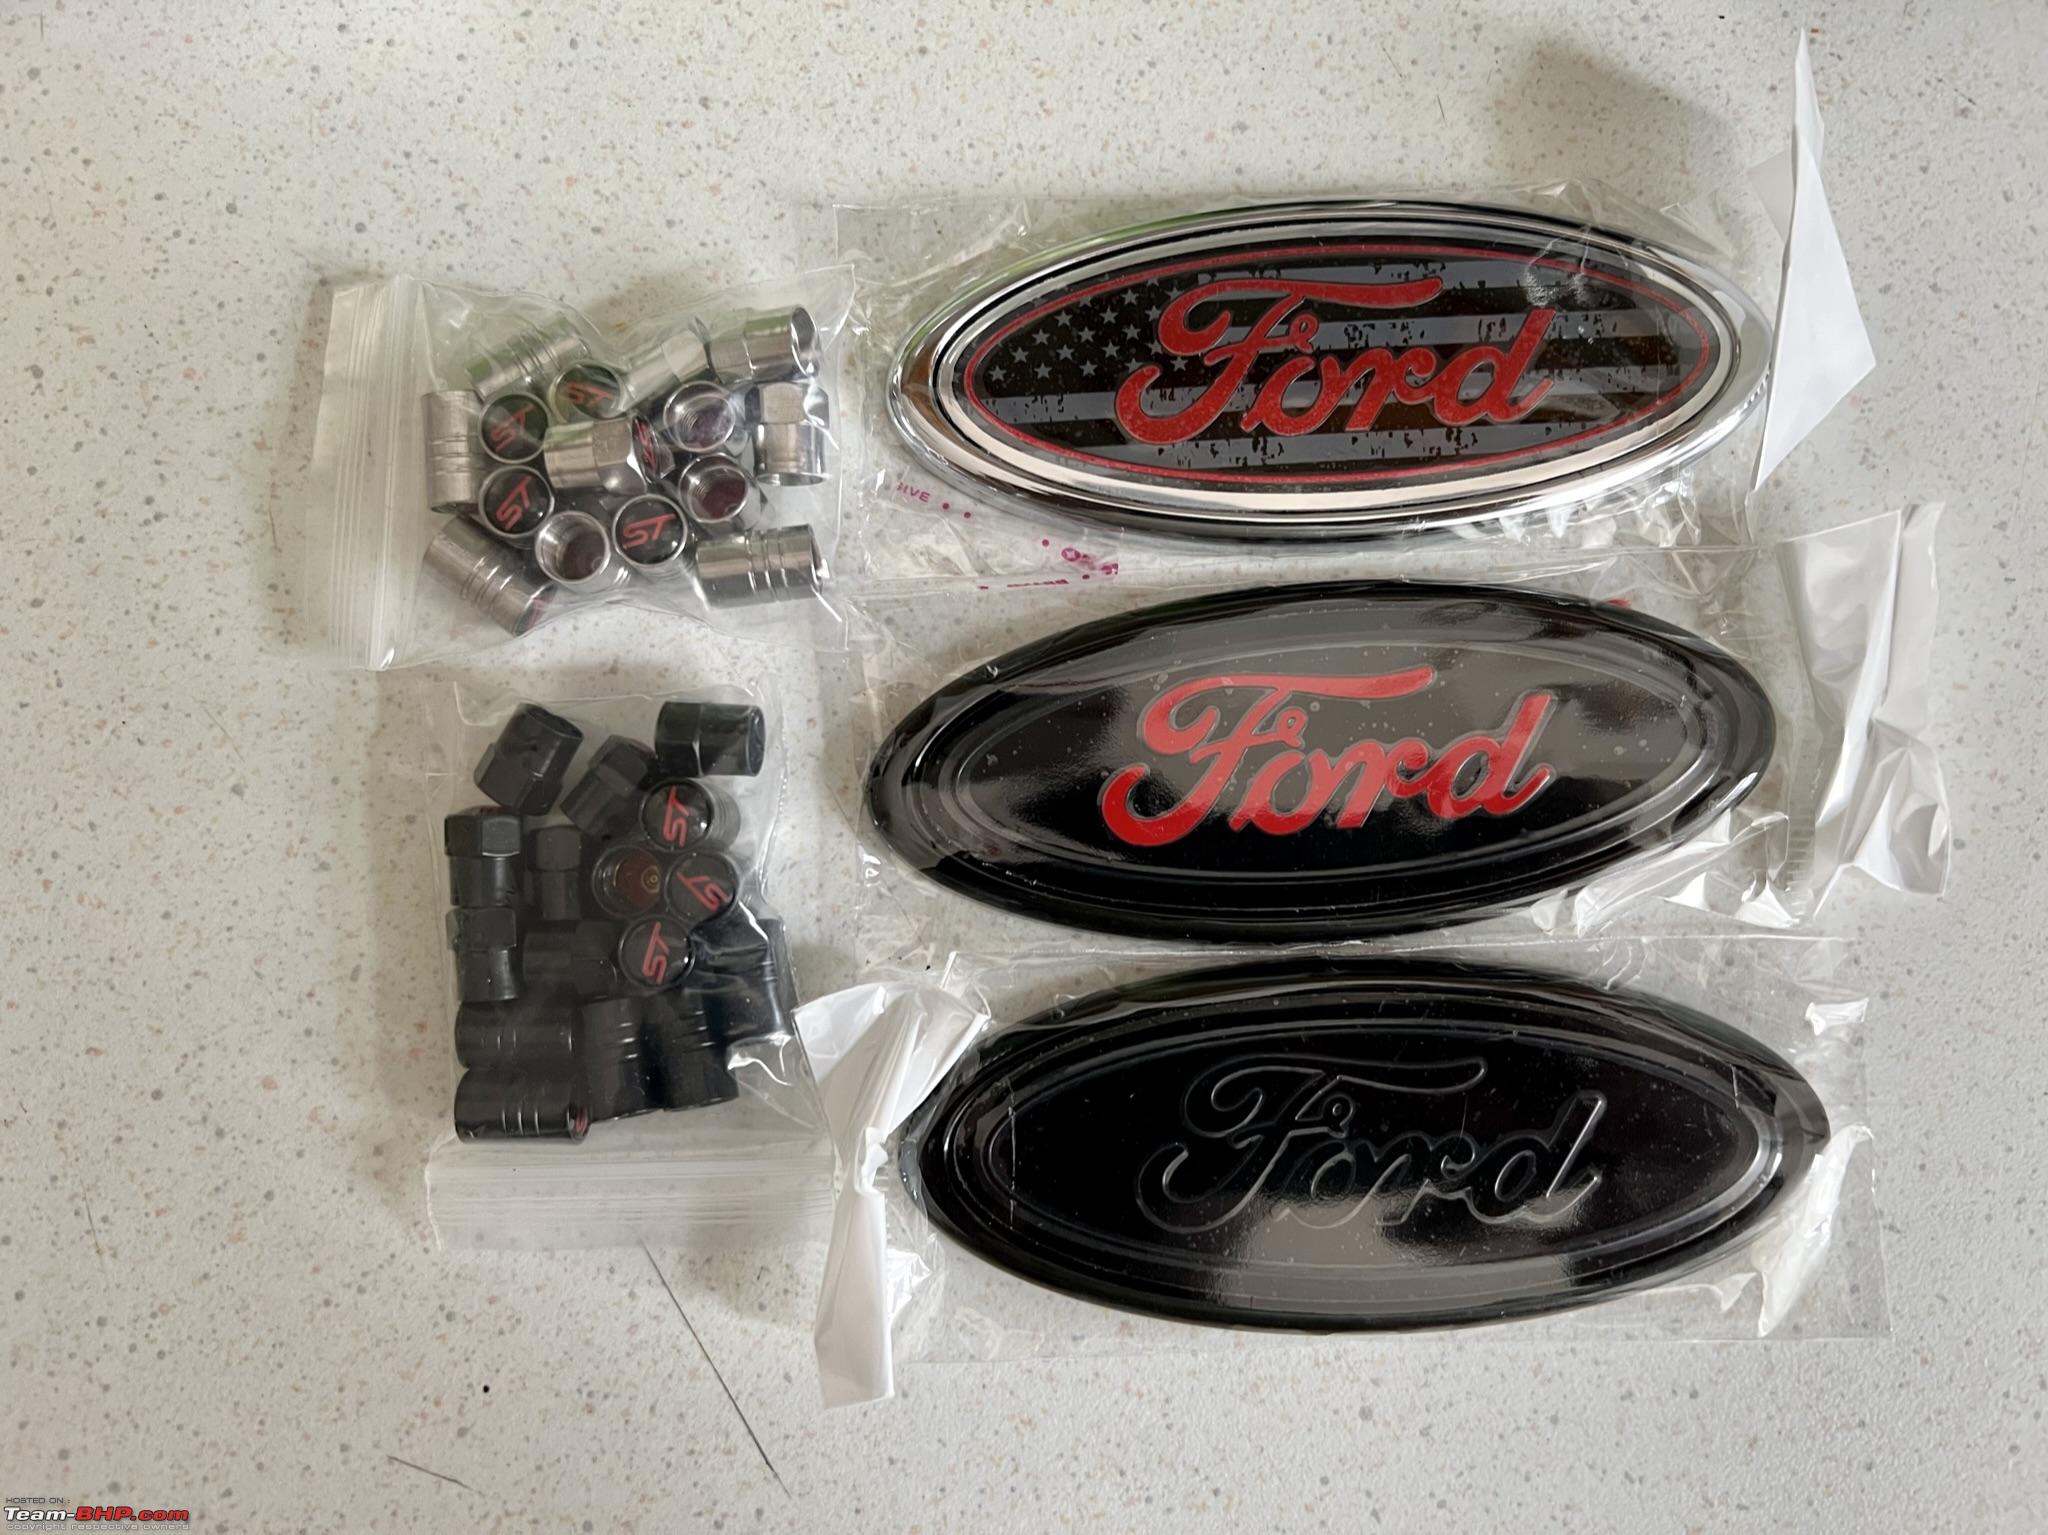 ST hub caps (3 euros) https://www.aliexpress.com/item/1005001906318376.html Tyre valve caps (3 euros) https://www.aliexpress.com/item/1005003690638826.html https://www.aliexpress.com/item/1005001361732025.html Dad painted the Front Disc brake callipers and Rear drums. He used primer from local paint shop and spray paint from Amazon Spray paint (Rs. 400) - https://www.amazon.in/gp/product/B01...0?ie=UTF8&th=1 Jack stands to help with DIYs (Rs. 1700) – https://www.amazon.in/gp/product/B07...?ie=UTF8&psc=1 I hope this gives the car additional 10 bhp   Lights: Low beams in top line S variant were D5S HIDs at 4300K which provide good performance. However, high beam performance from the OSRAM 55w H1 Halogens was poor during highway drives. After reading various LED reviews on team-bhp and going through technical specifications of various products on Amazon, local sellers, Aliexpress, I have decided to order two types of LED bulbs from Aliexpress (COB chip type and Lumilex type). I have tried both and decided to install the Lumilex type LEDs due to better focus in my trials. A note of caution against using aftermarket LEDs in reflectors meant for halogens. There will be glare and it is likely to blind oncoming traffic aside from likely being illegal. Hence, we use high beams judiciously and dip them as soon as we notice anybody on the other side. Also, I prefer 4300K/5000k colour temperature which is easy on the eyes and efficient. Stock 55w H1 type Halogen bulb from Osram 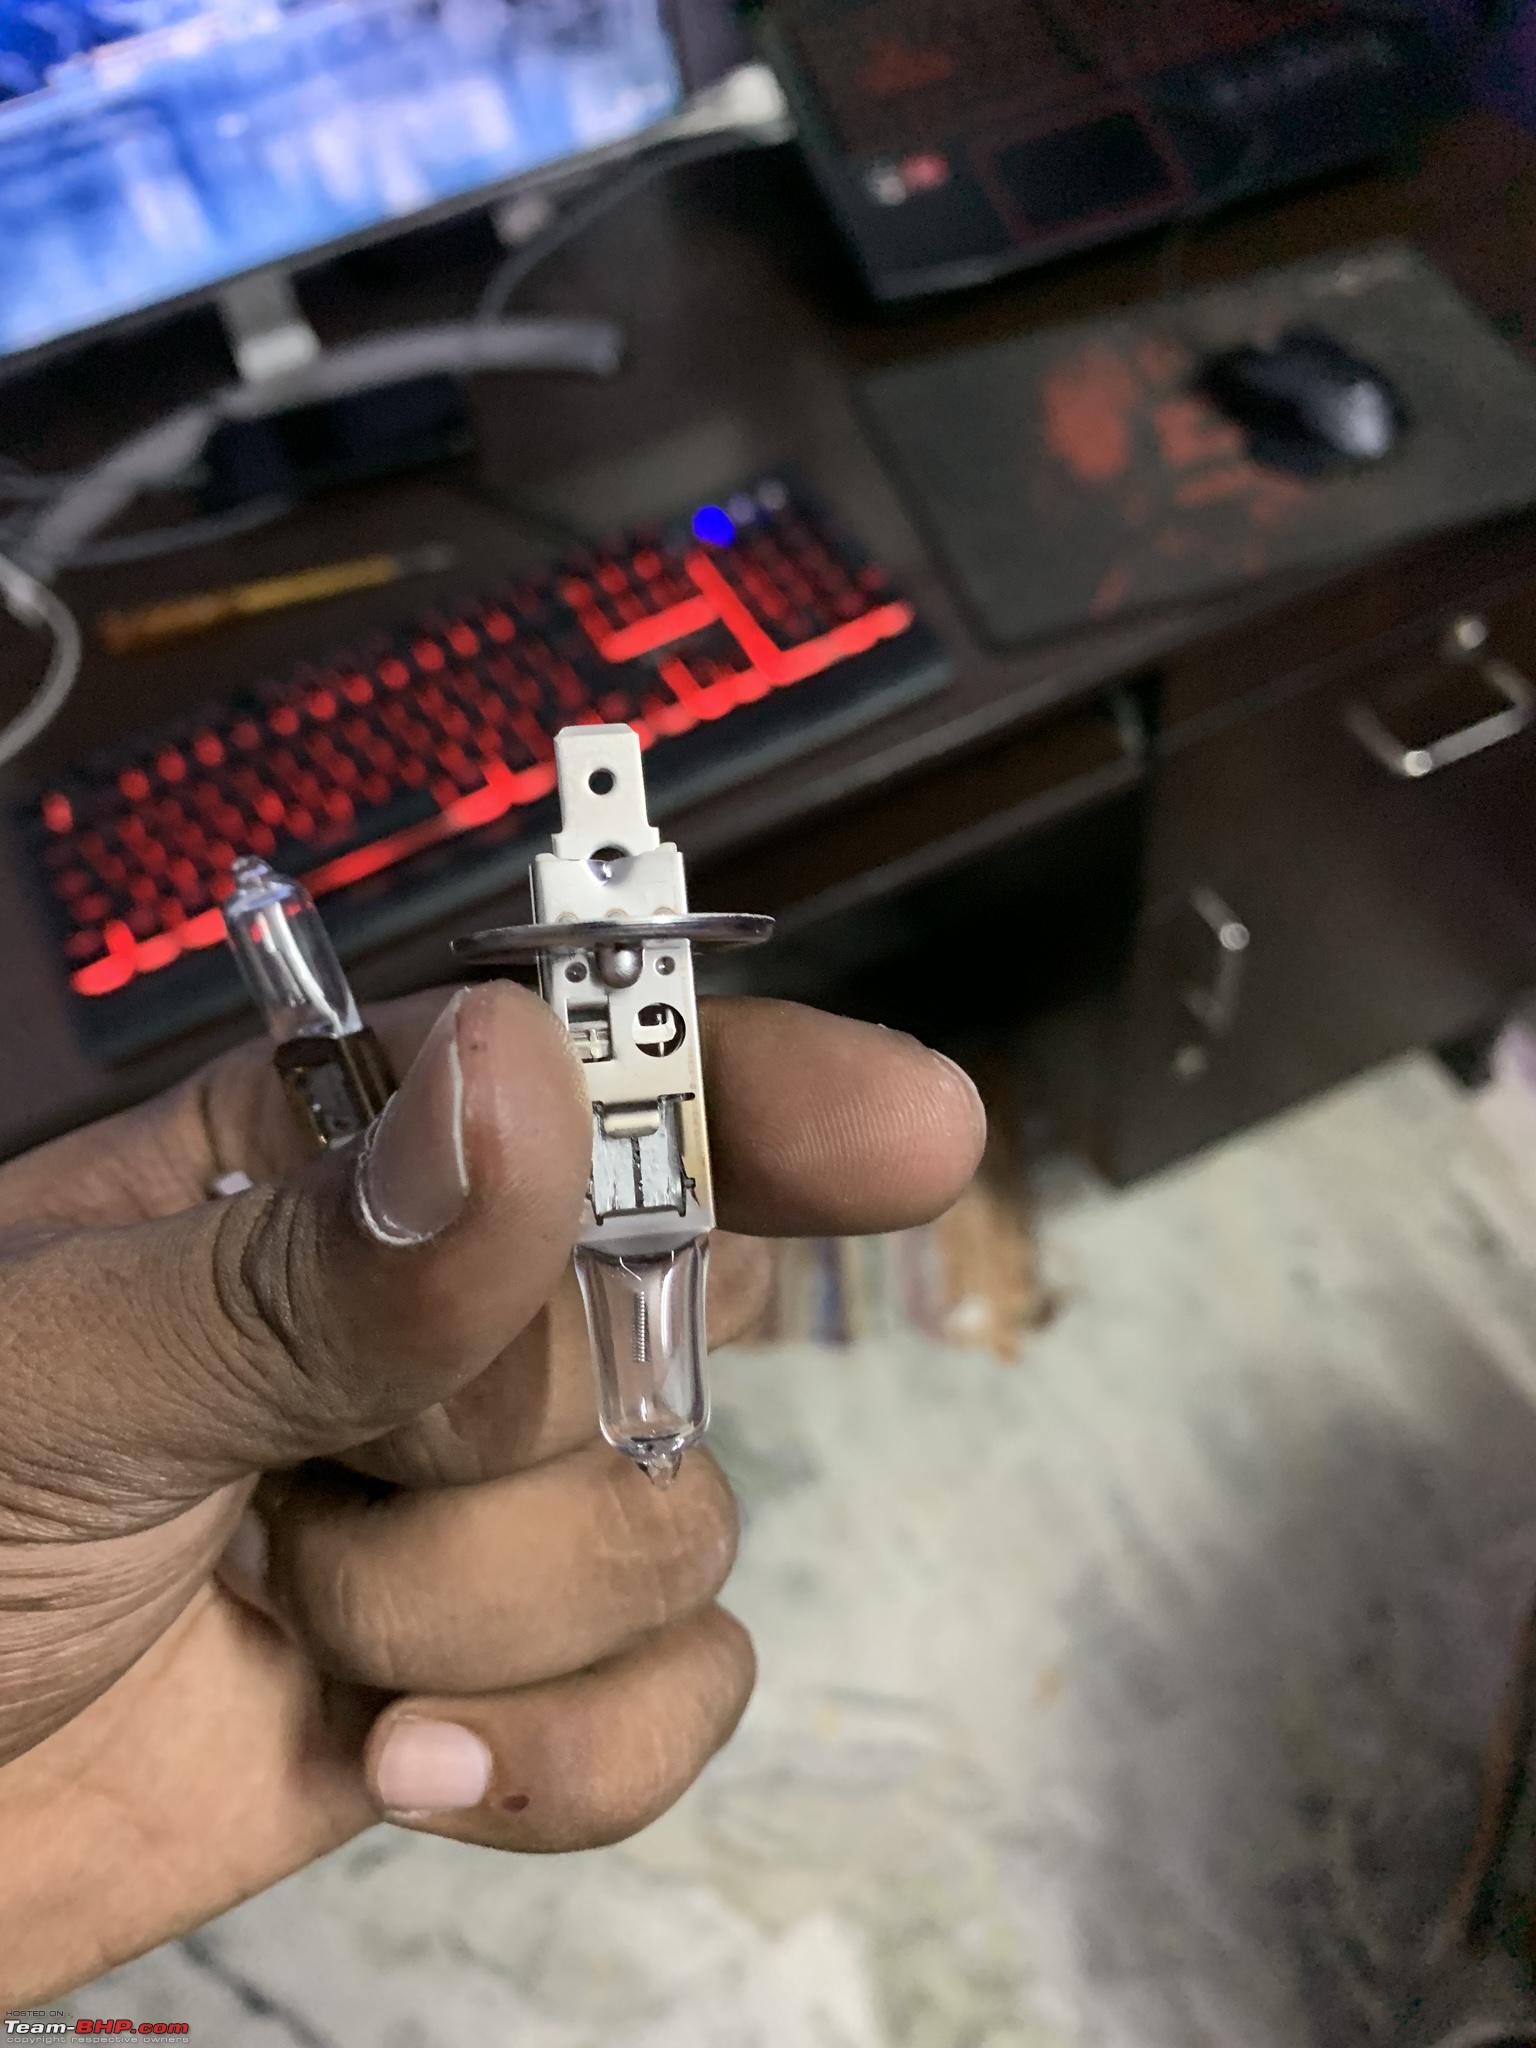 Please note that the headlamp housing in EcoSport does not have enough clearance for the heat sinks of the LEDs. This was explained in numerous posts on the forum.  I cut the back plate/housing of the LED that was touching the headlamp assembly and completed the LED install. High beams - 4300K H1 (25 euros) https://www.aliexpress.com/item/1005003244827068.html Replaced above ones with the ones from Amazon India below (Rs.1500) for the time-being as right-side bulb fused on one side and AliExpress is no longer shipping to India https://www.amazon.in/gp/product/B09...?ie=UTF8&psc=1 Fog lamps- 4300K H8 (10 euros) https://www.aliexpress.com/item/1005001814439819.html LEDs in high beam and fogs lamps. My dog loves car trips. 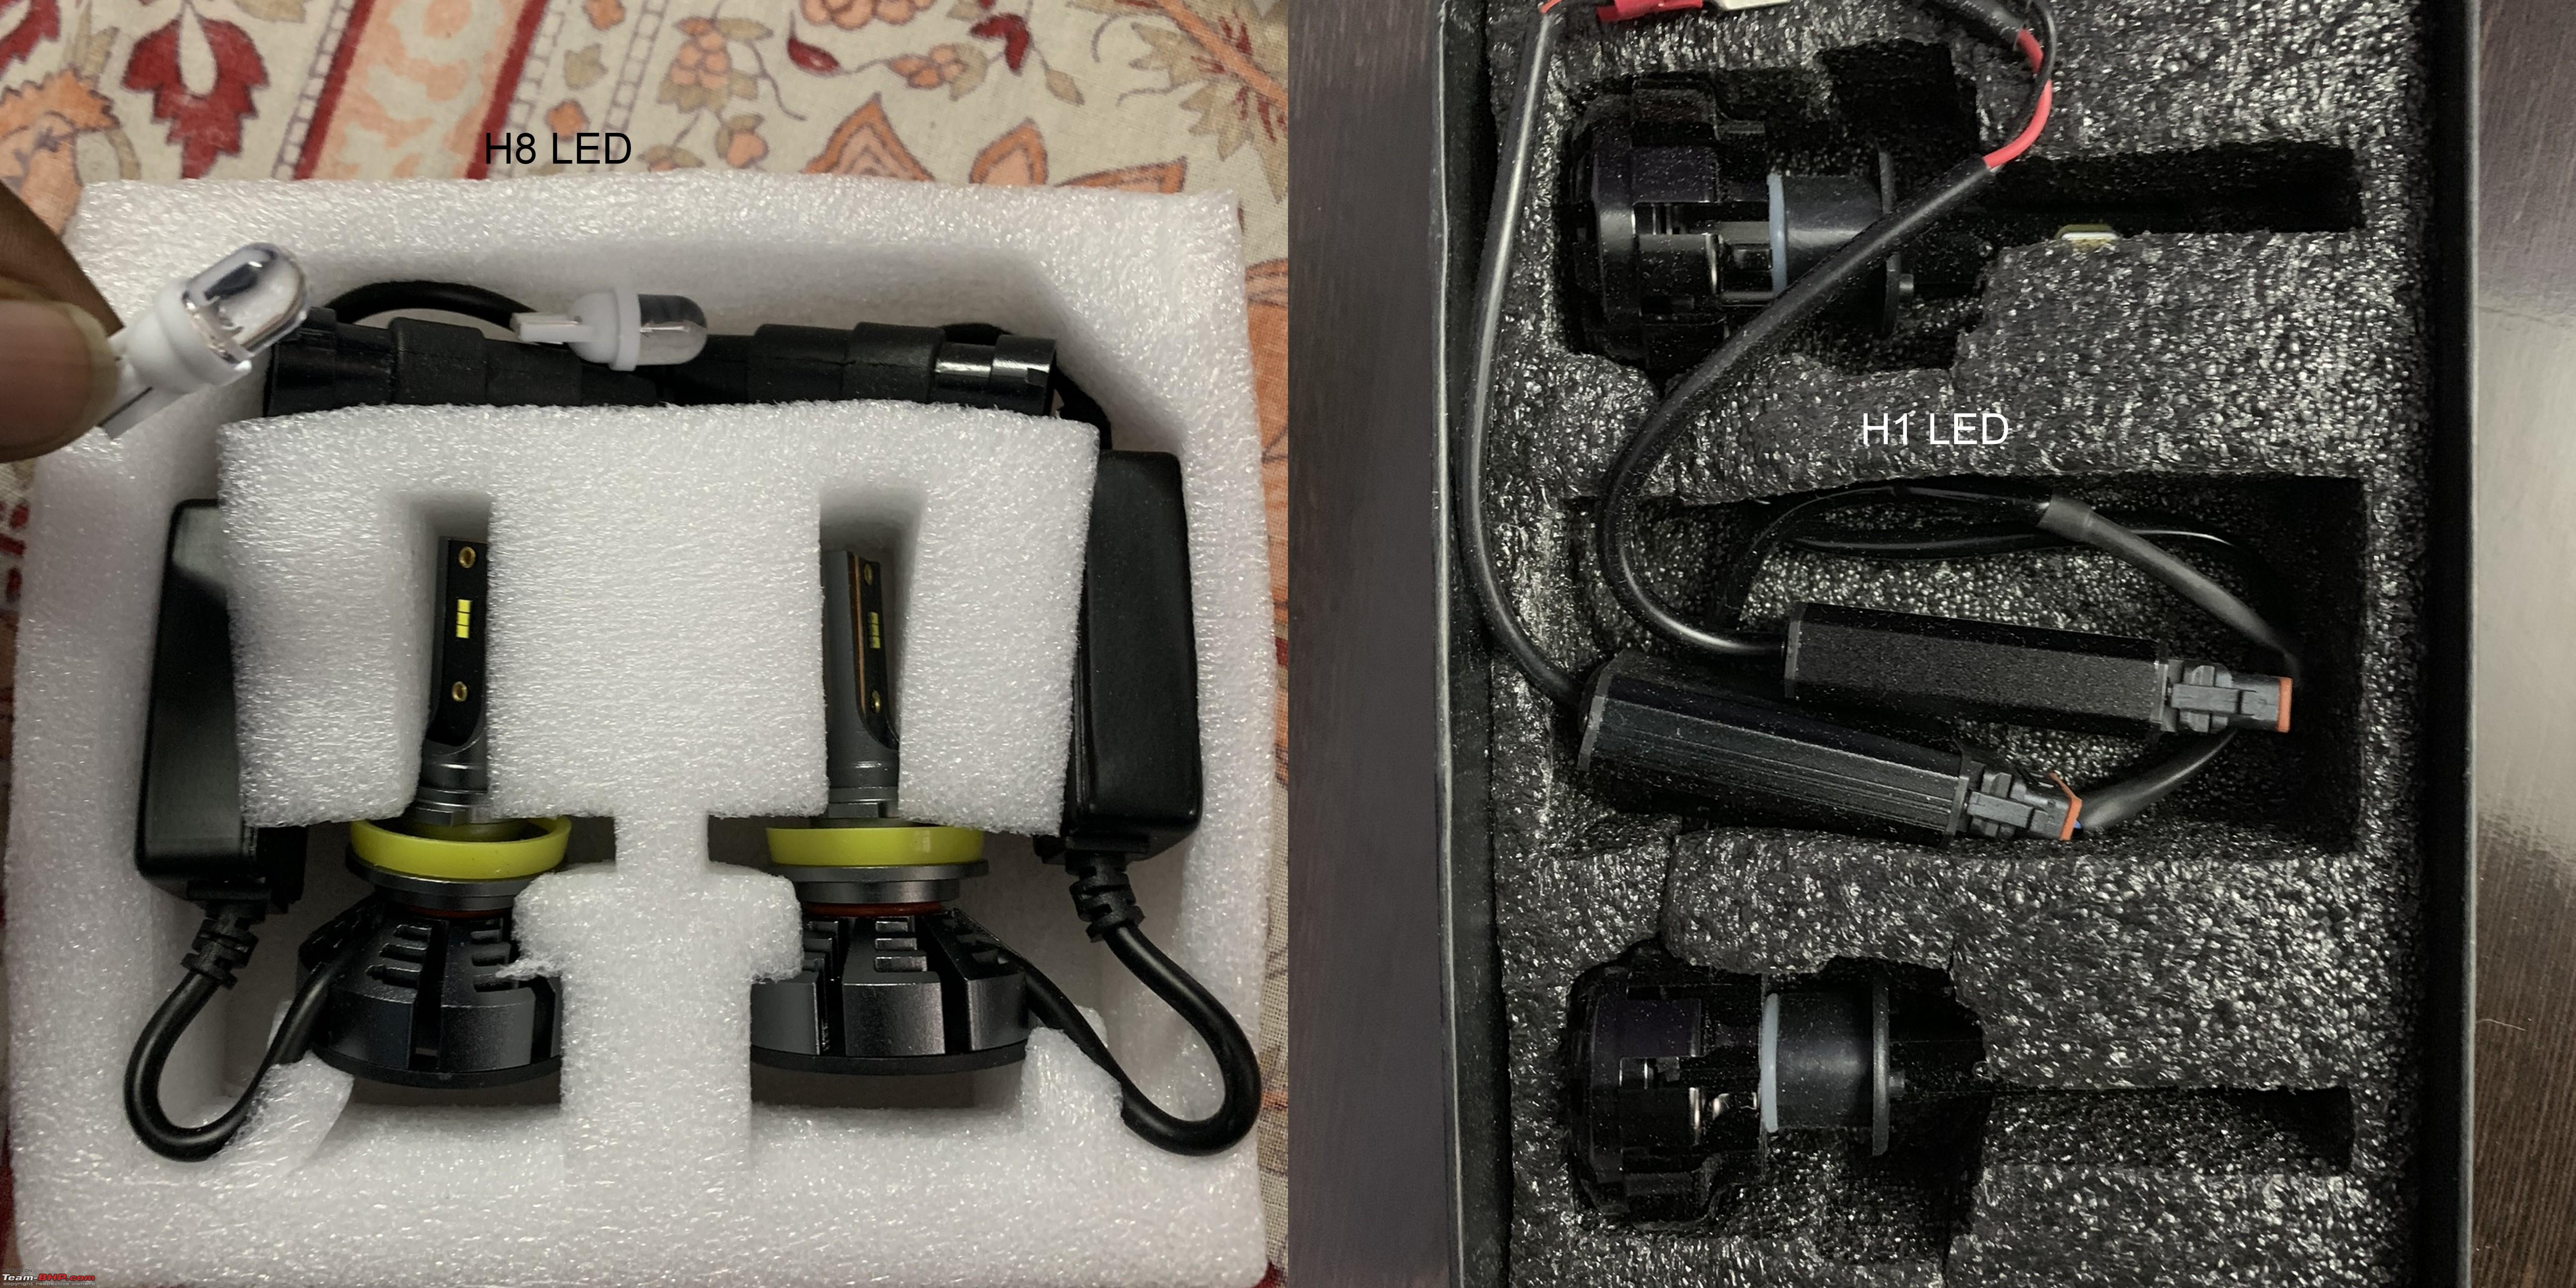 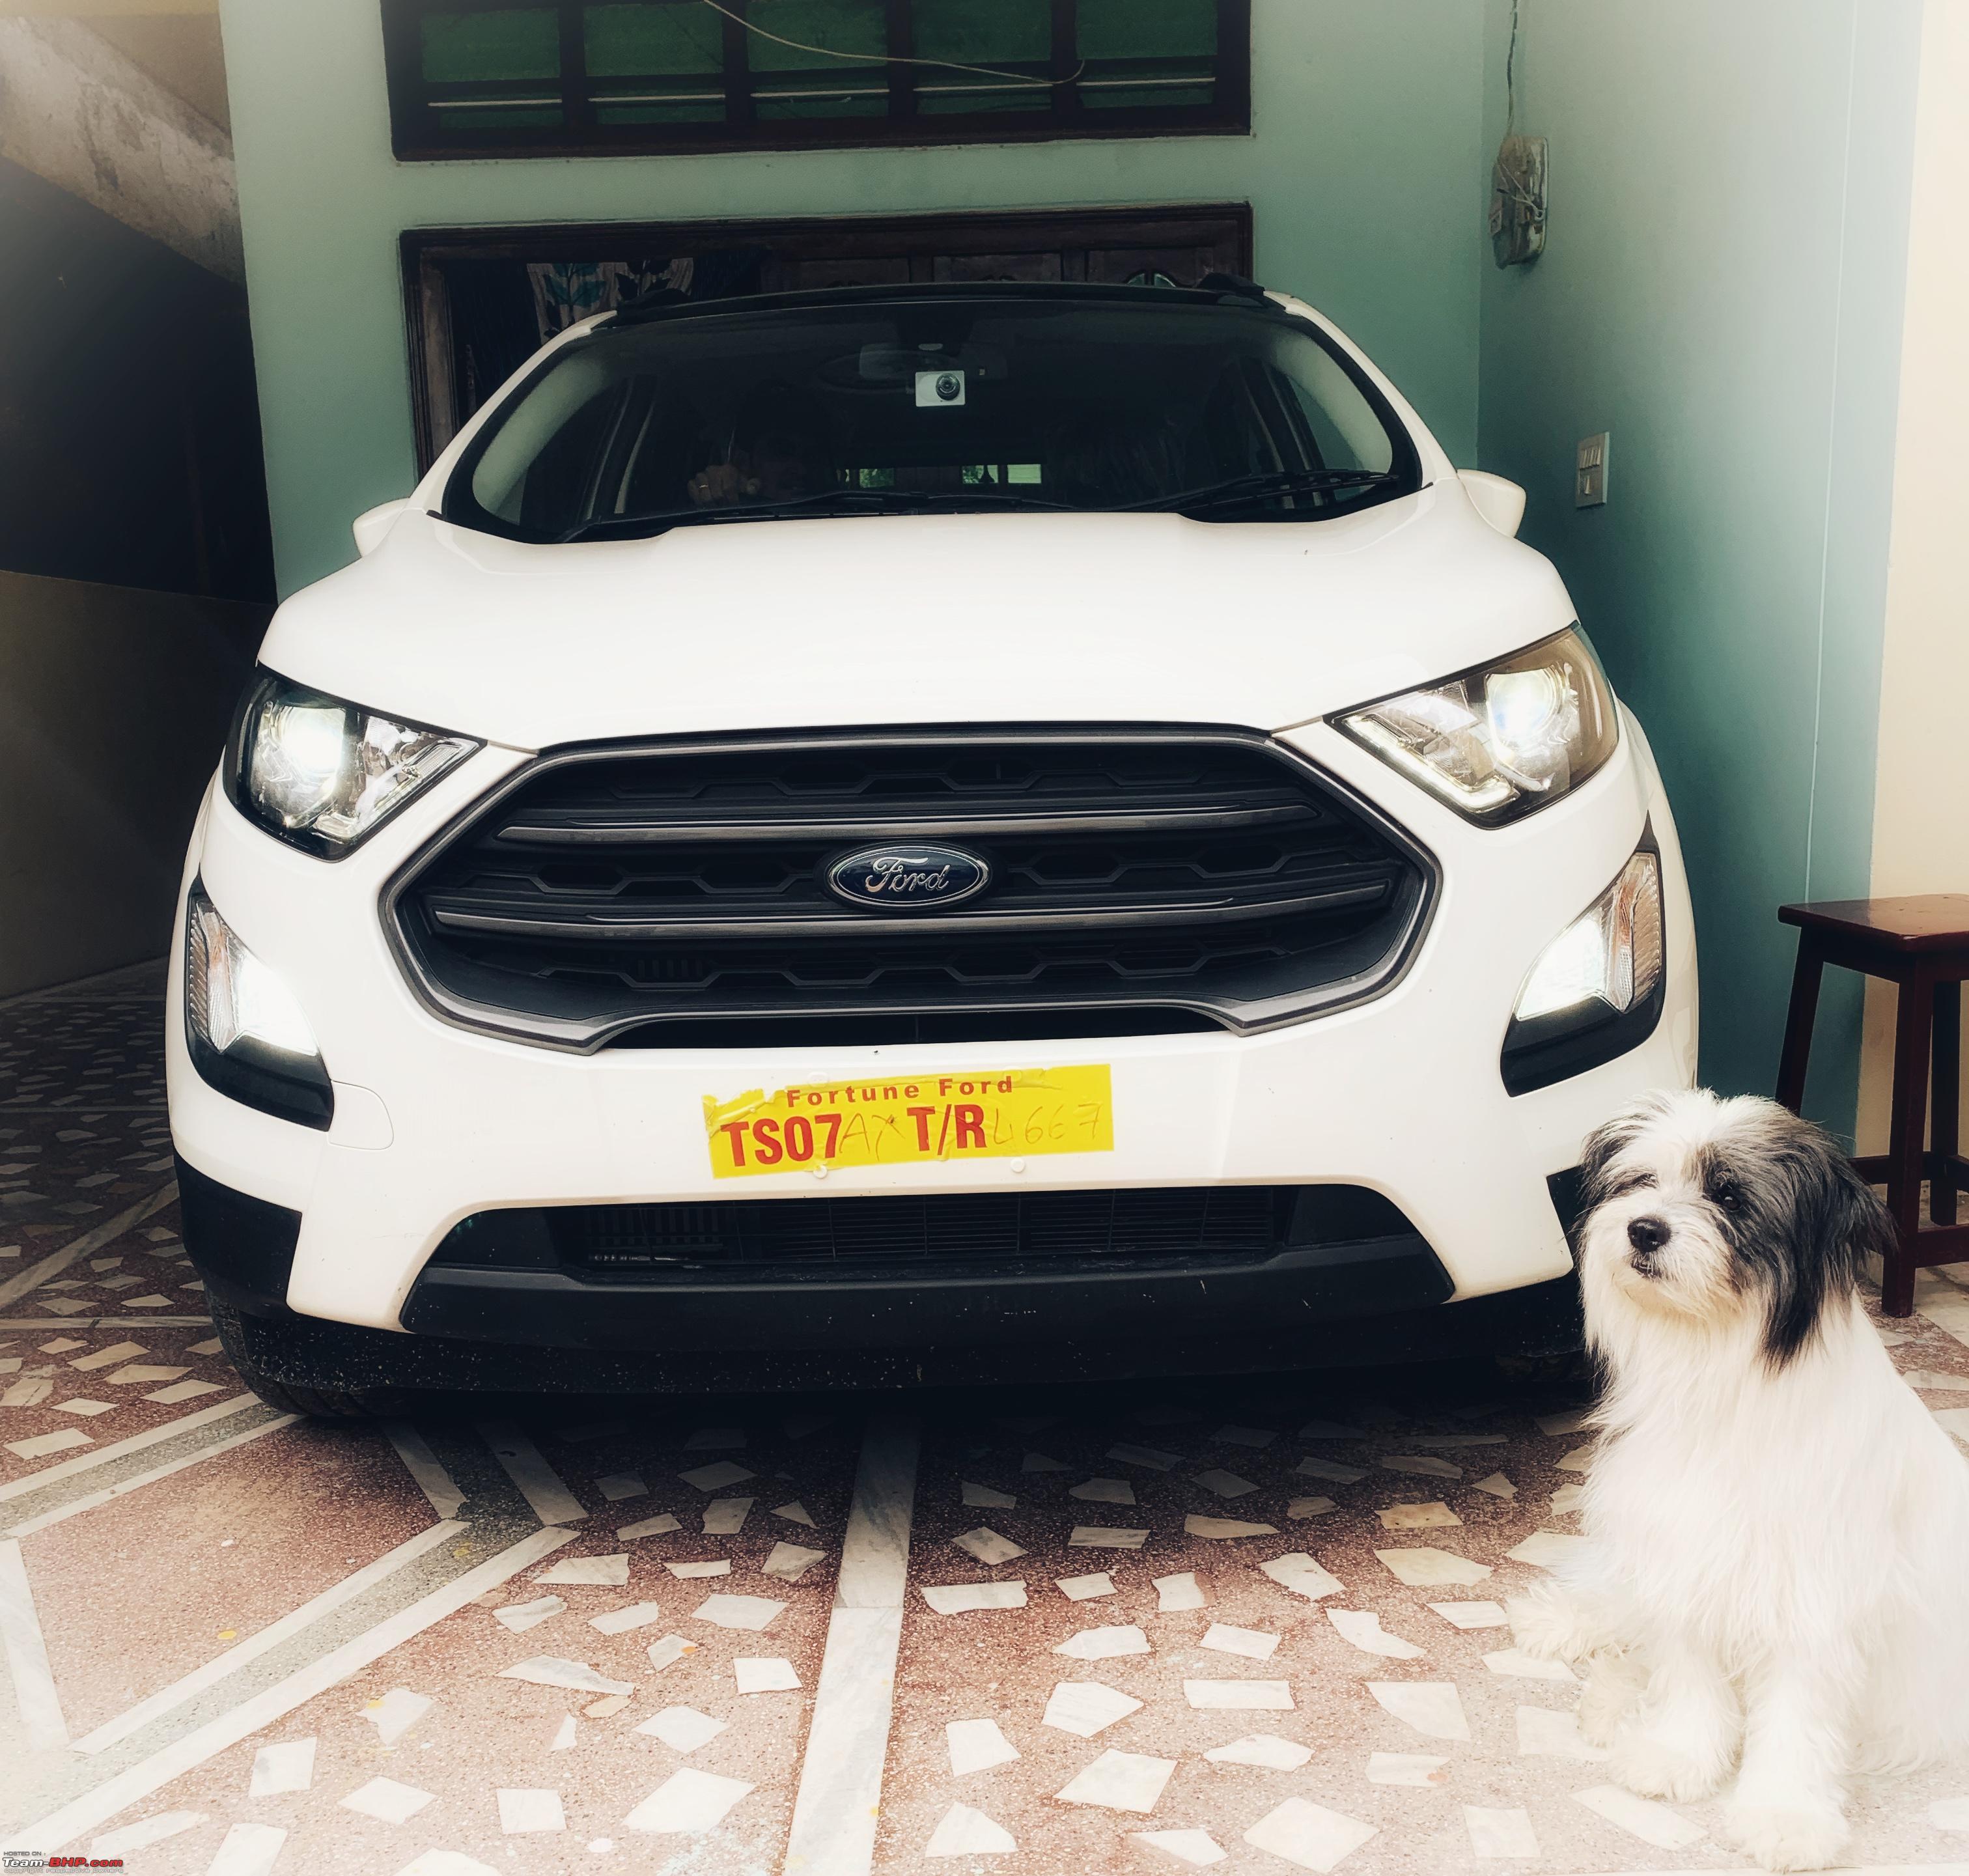 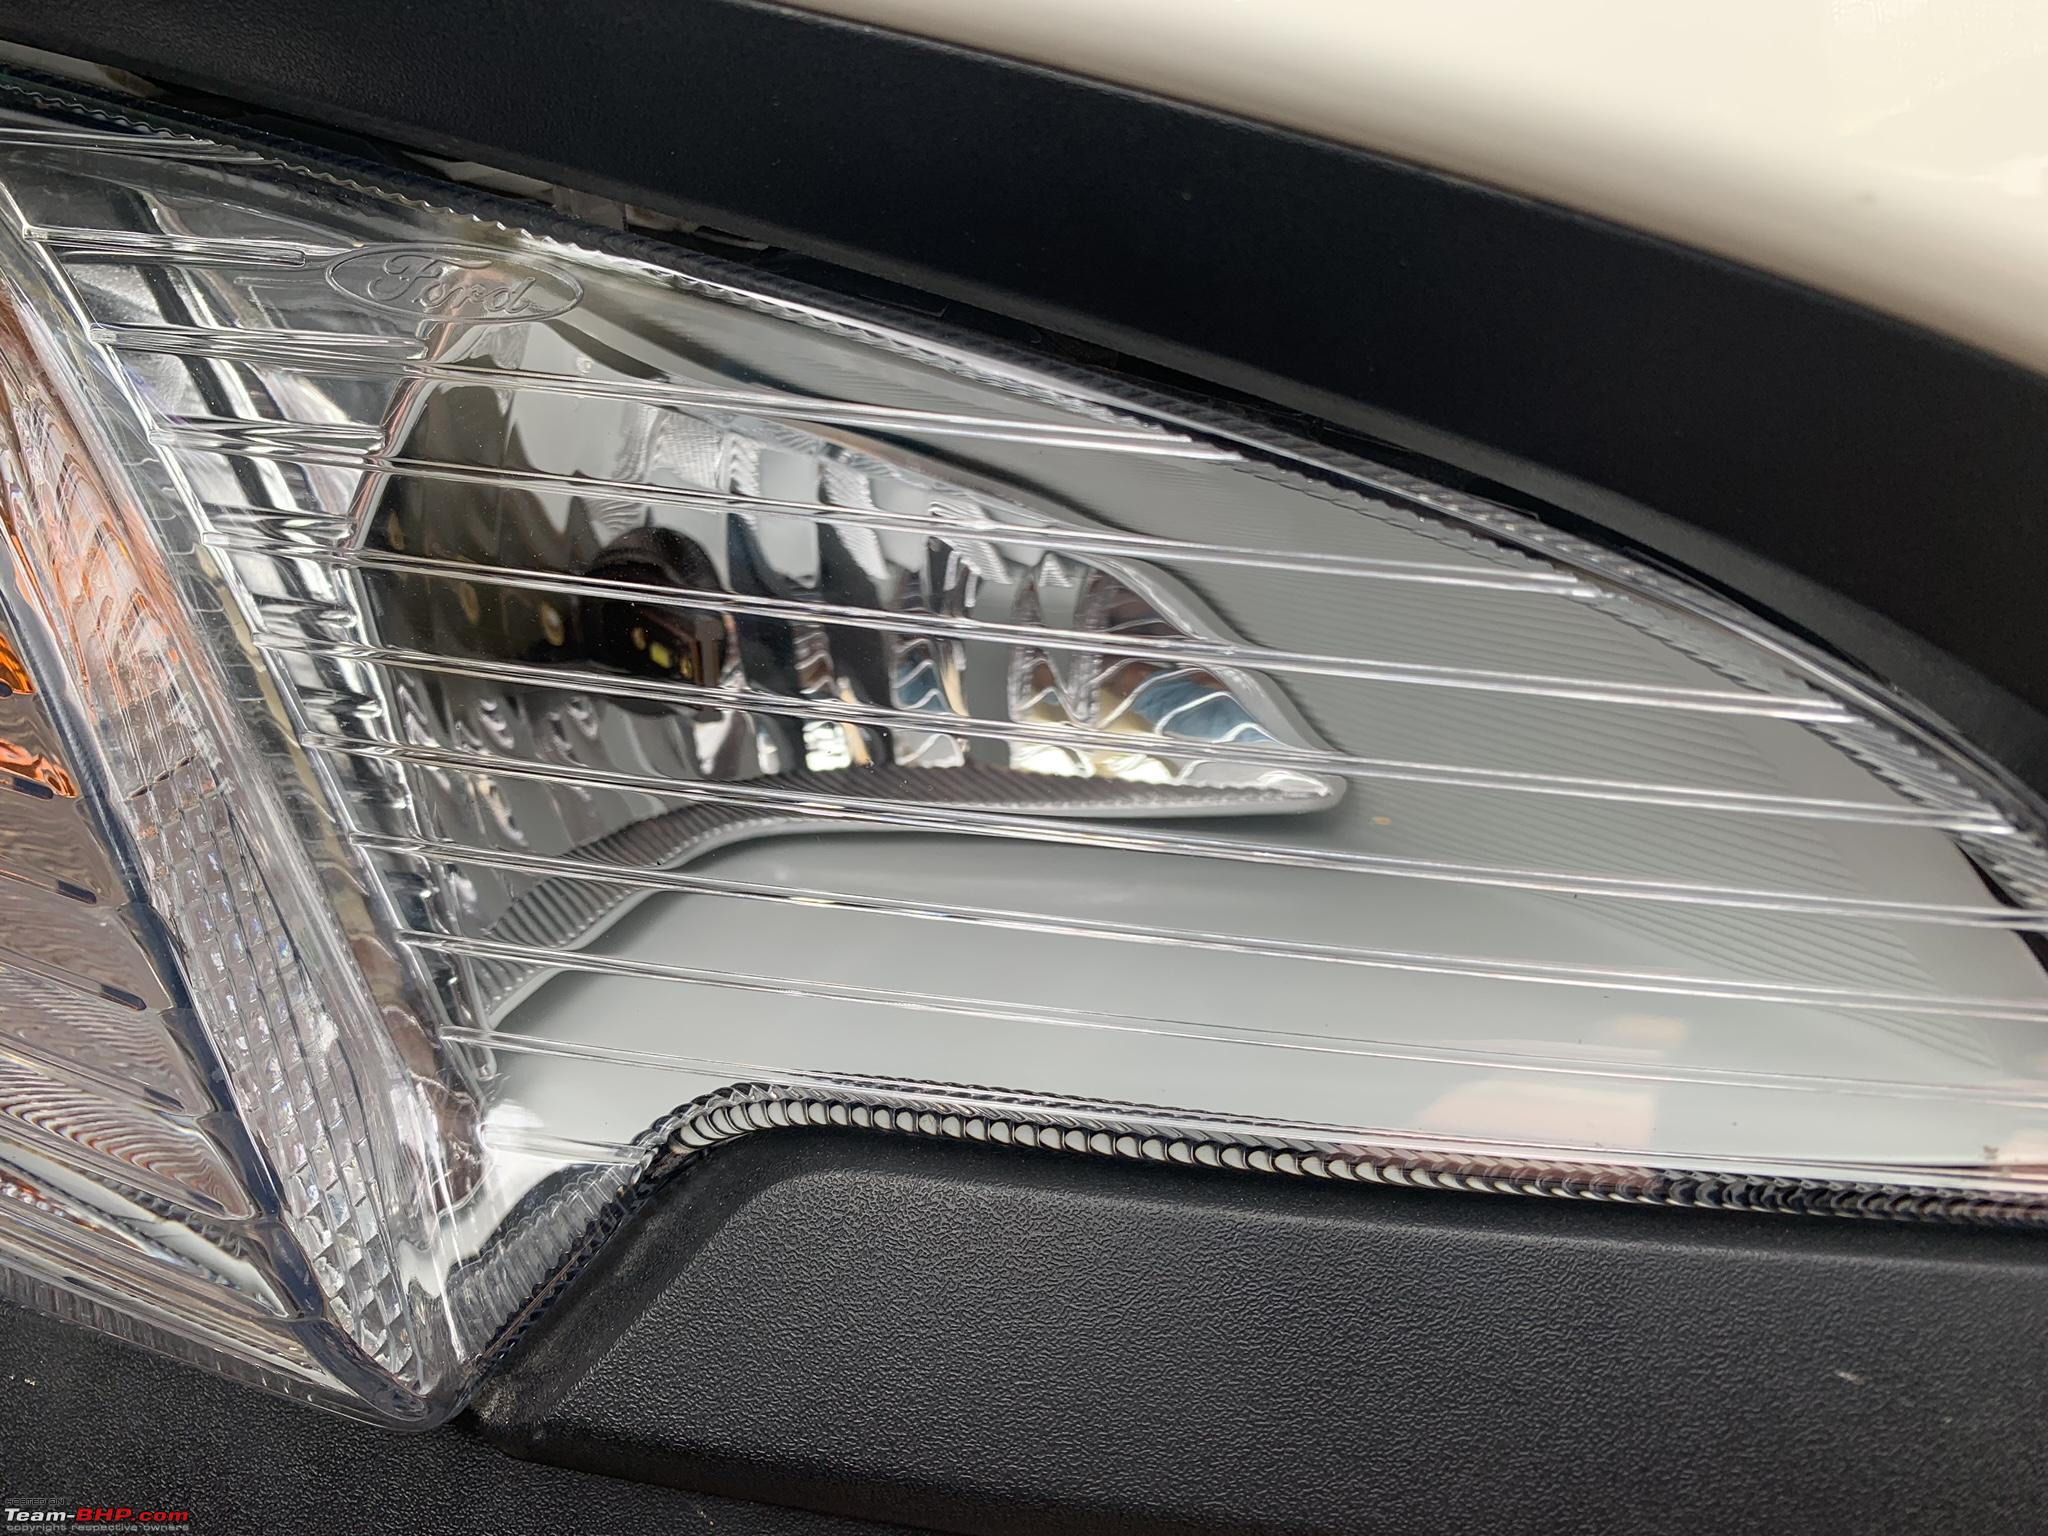 Front Turn signal lamps – T20 7440 W21W (20 euros) Insanely bright https://www.aliexpress.com/item/1005002043729177.html ORVMs – W5W T10 Orange and Interior lights W5W T10 White (8 euros) https://www.aliexpress.com/item/1005002038184923.html  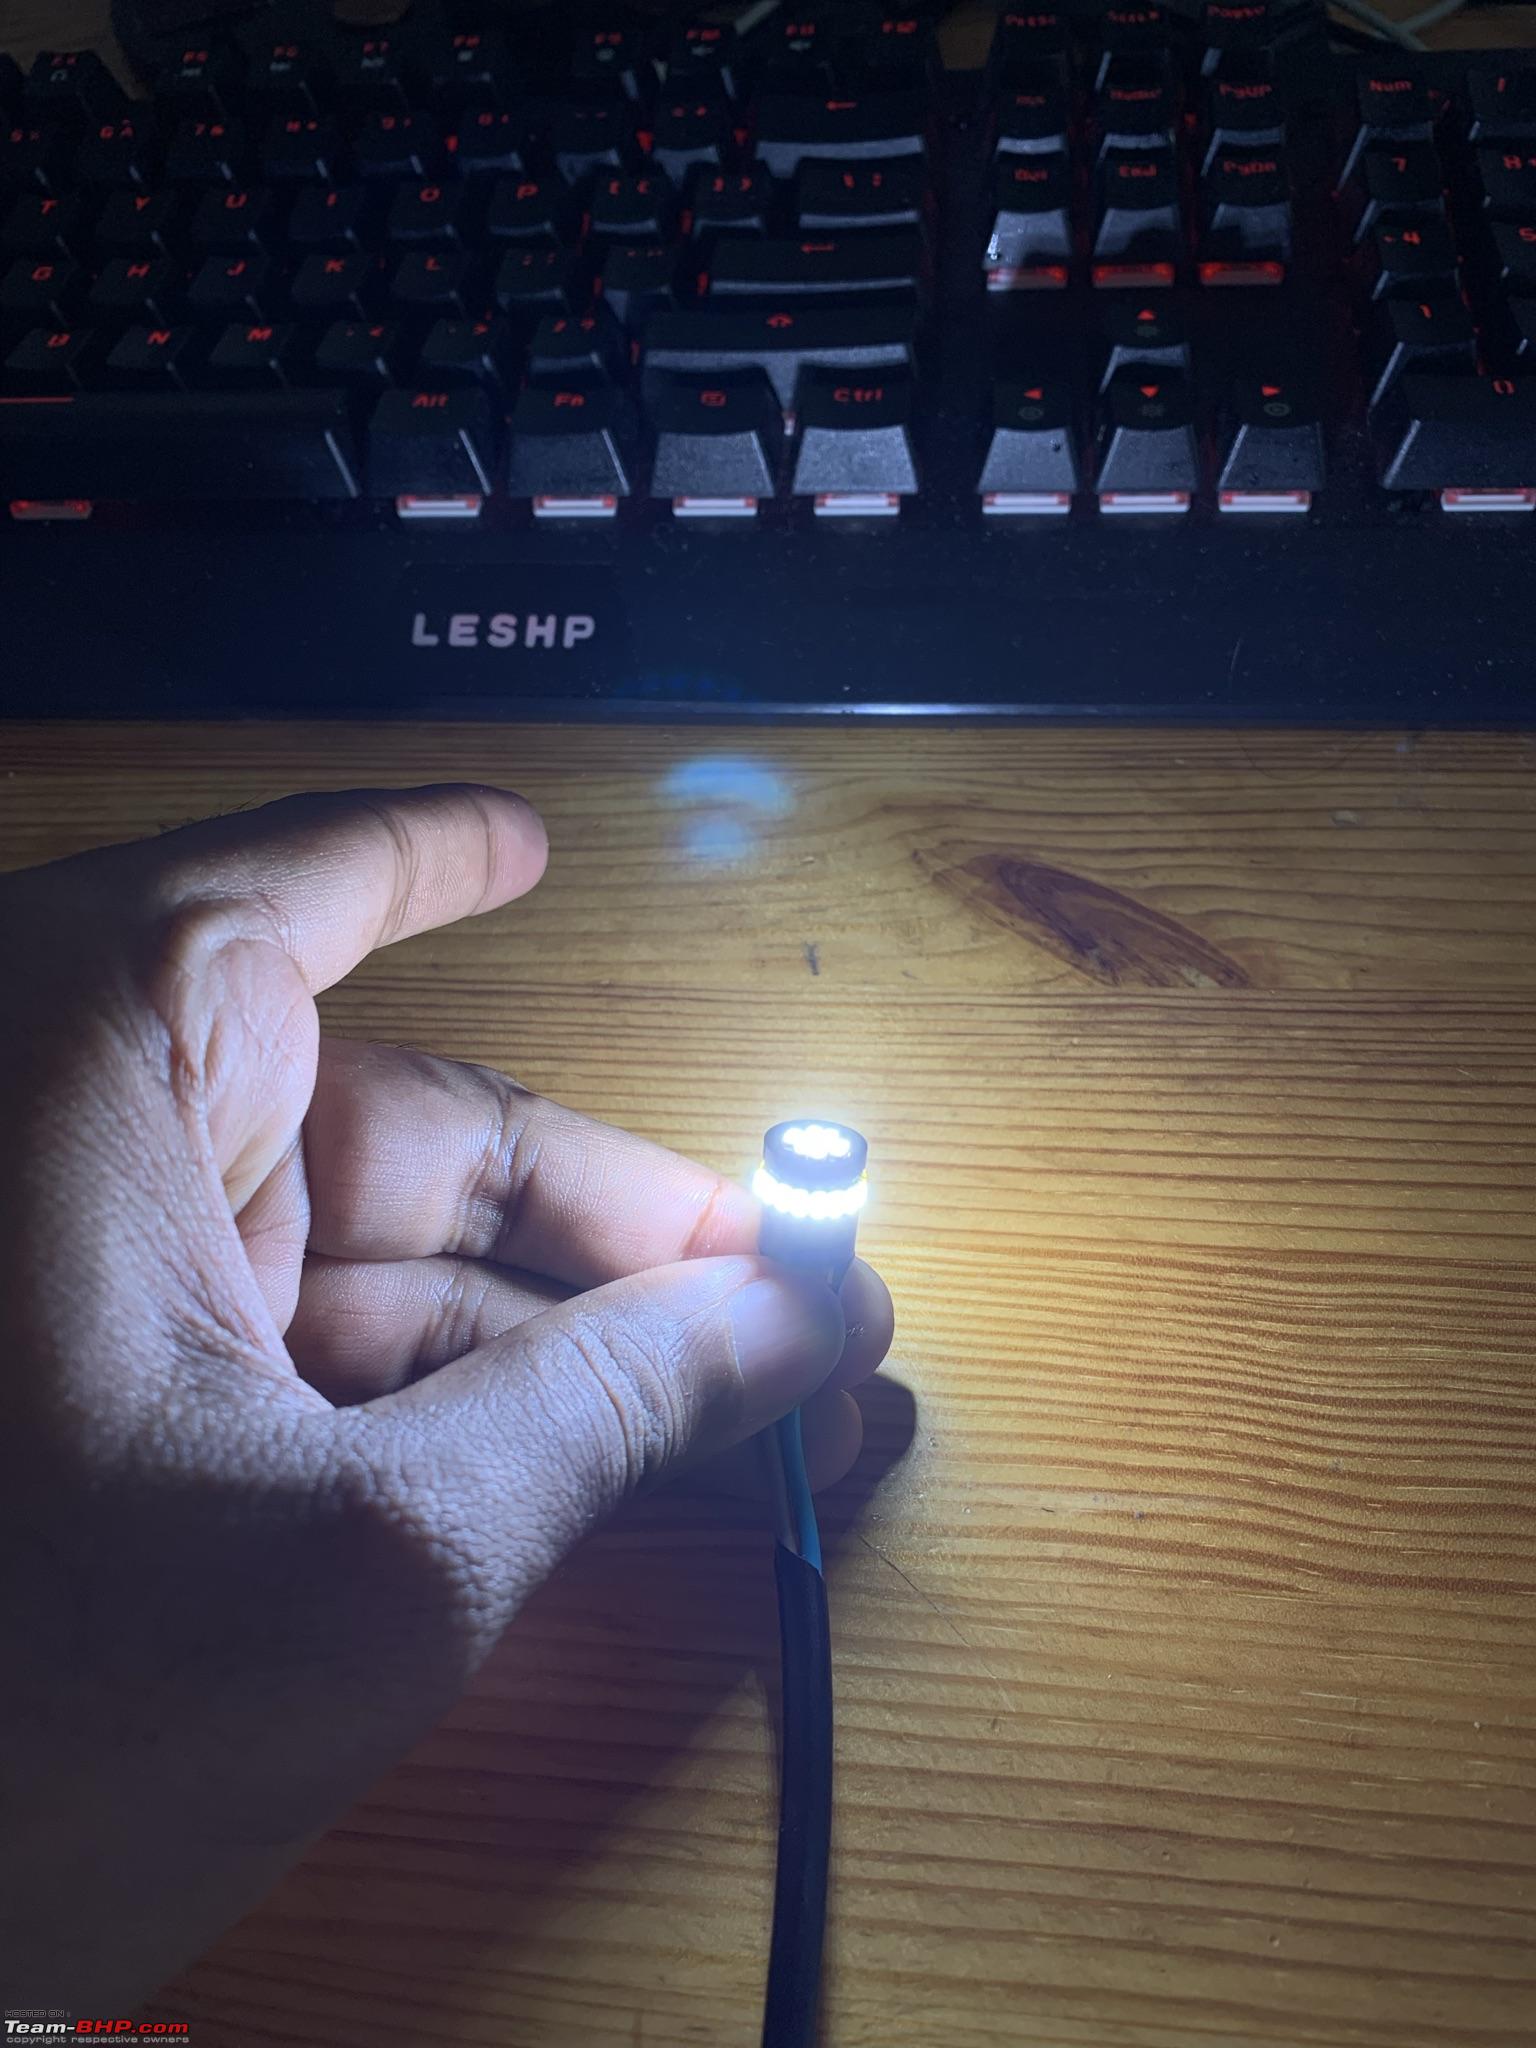 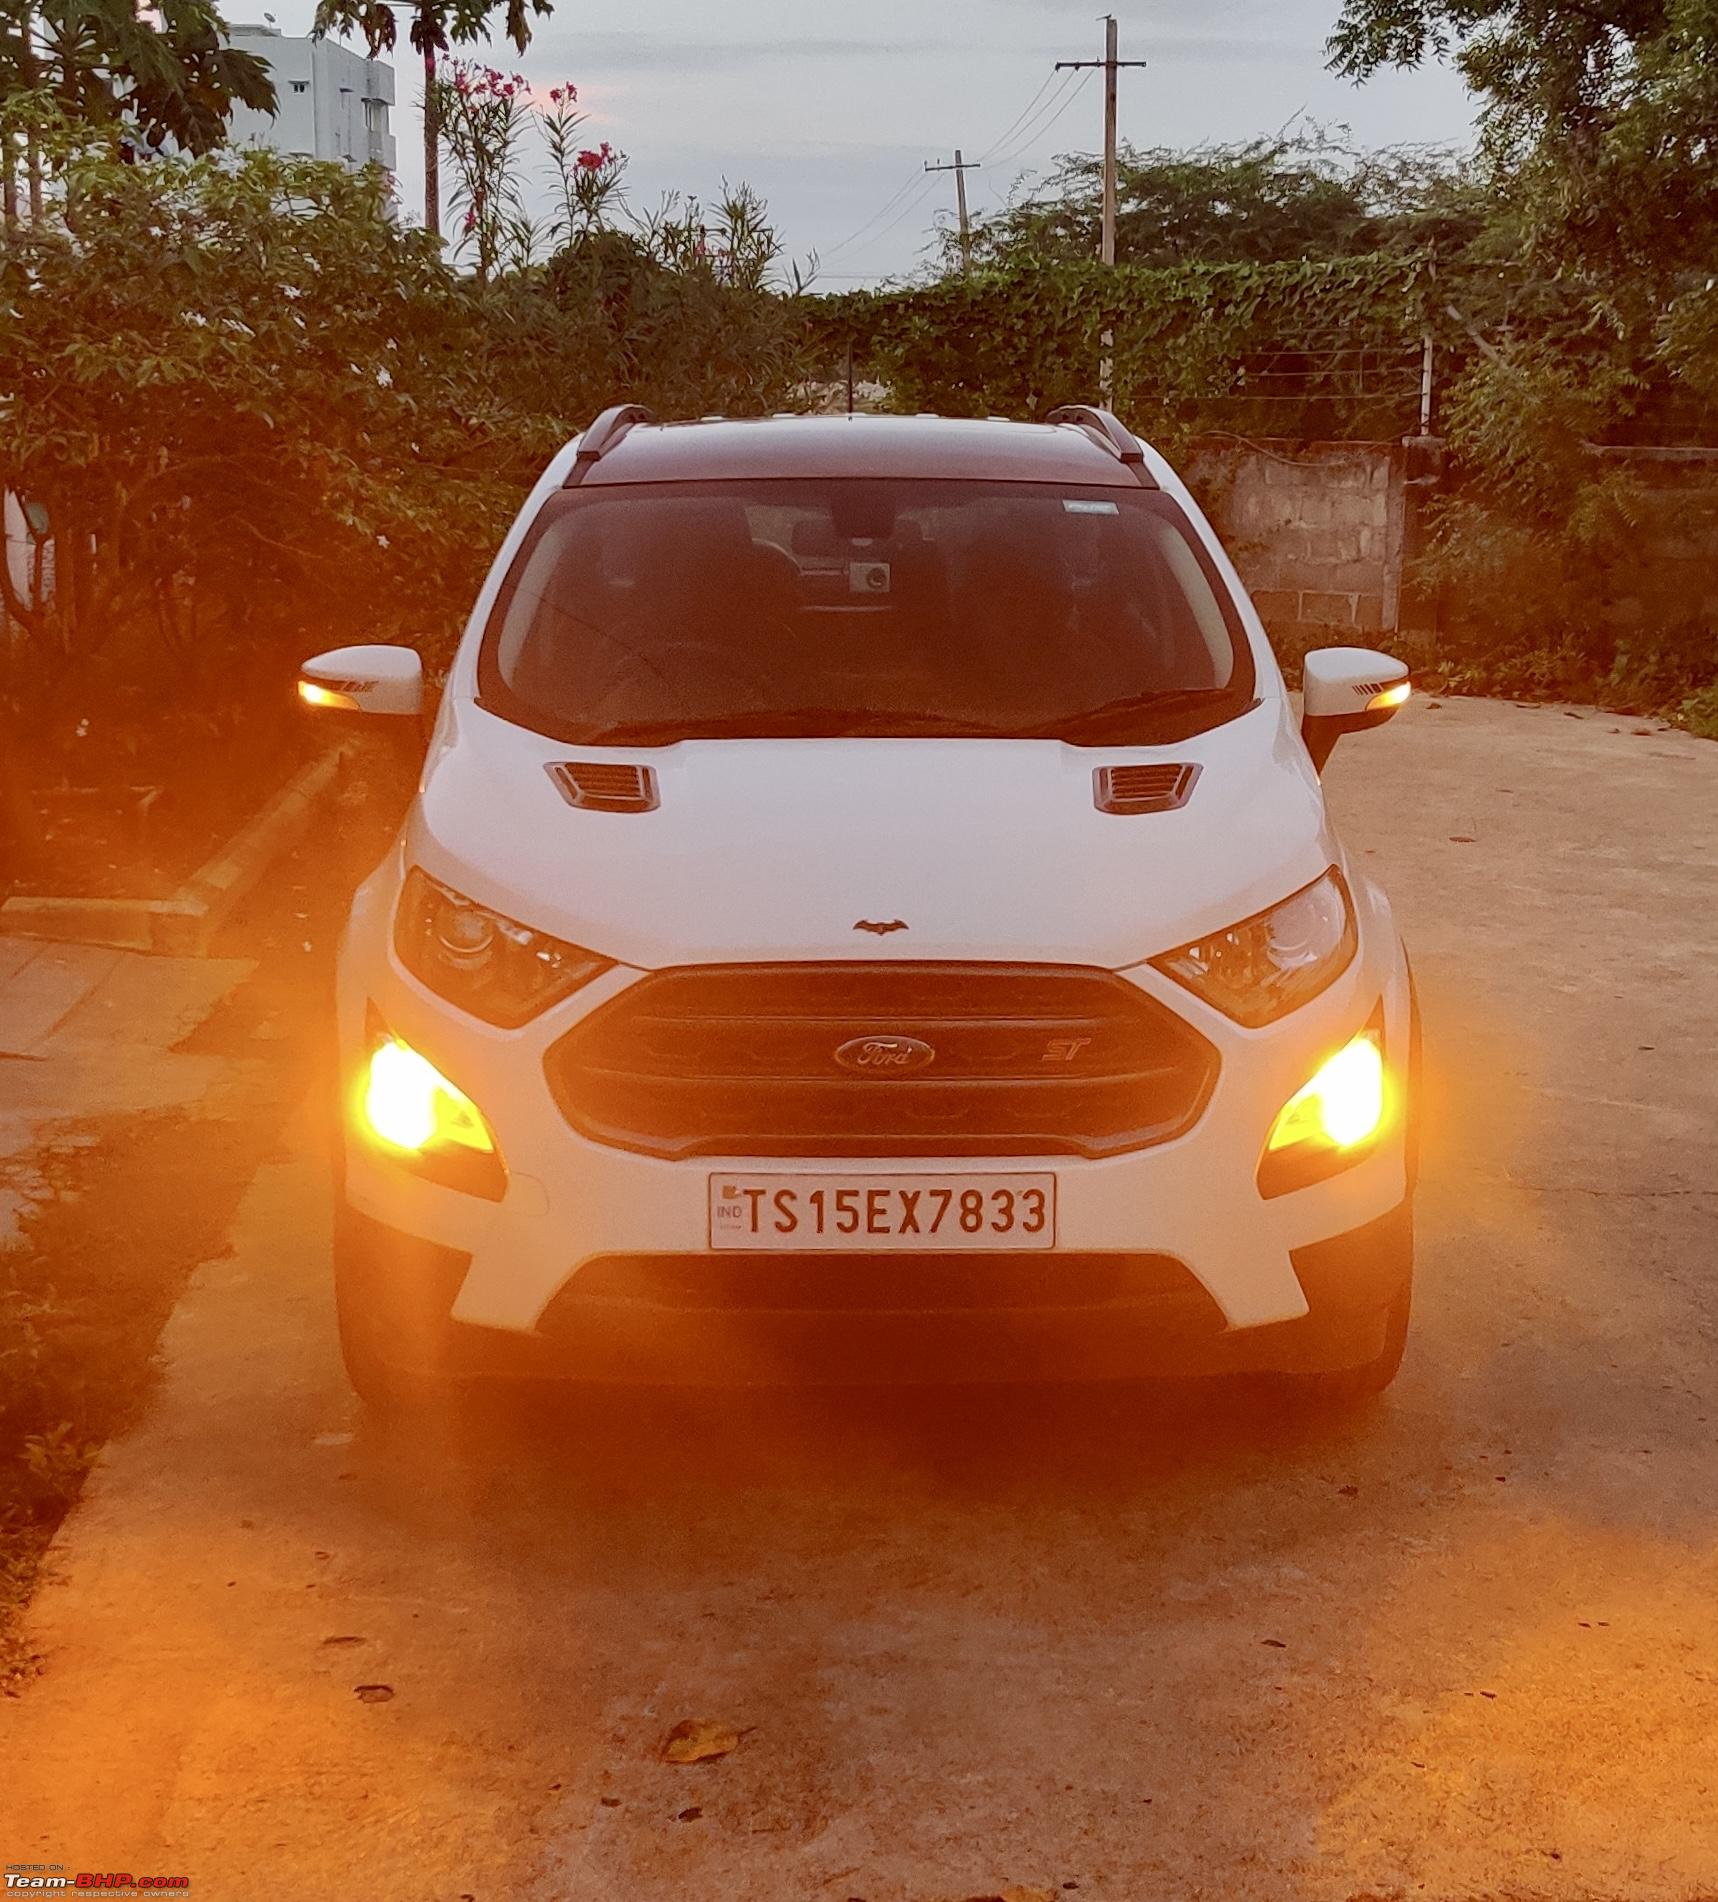 After-market LED tail lamps (Rs.6500) – Bought from Autopreneurz Delhi (+91-8130840420) and LED reflectors (Rs.1700) 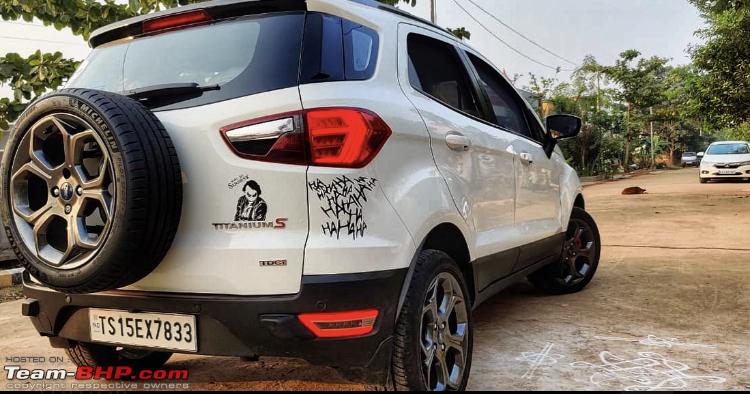  Night drive (Right side high beam LED partially burnt): Turn Indicators: Accessories: 1. I have installed illuminated sill plates that I got from AliExpress ($60). Similar acrylic sill plates were also available locally but were offered only in Blue color while I was looking specifically for Red. We wired the sill plates to the interior roof lamps - https://www.aliexpress.com/item/4000172786217.html 2. Aftermarket Raptor grill (Rs.9500 @ Fast track, Jubilee Hills, Hyderabad) 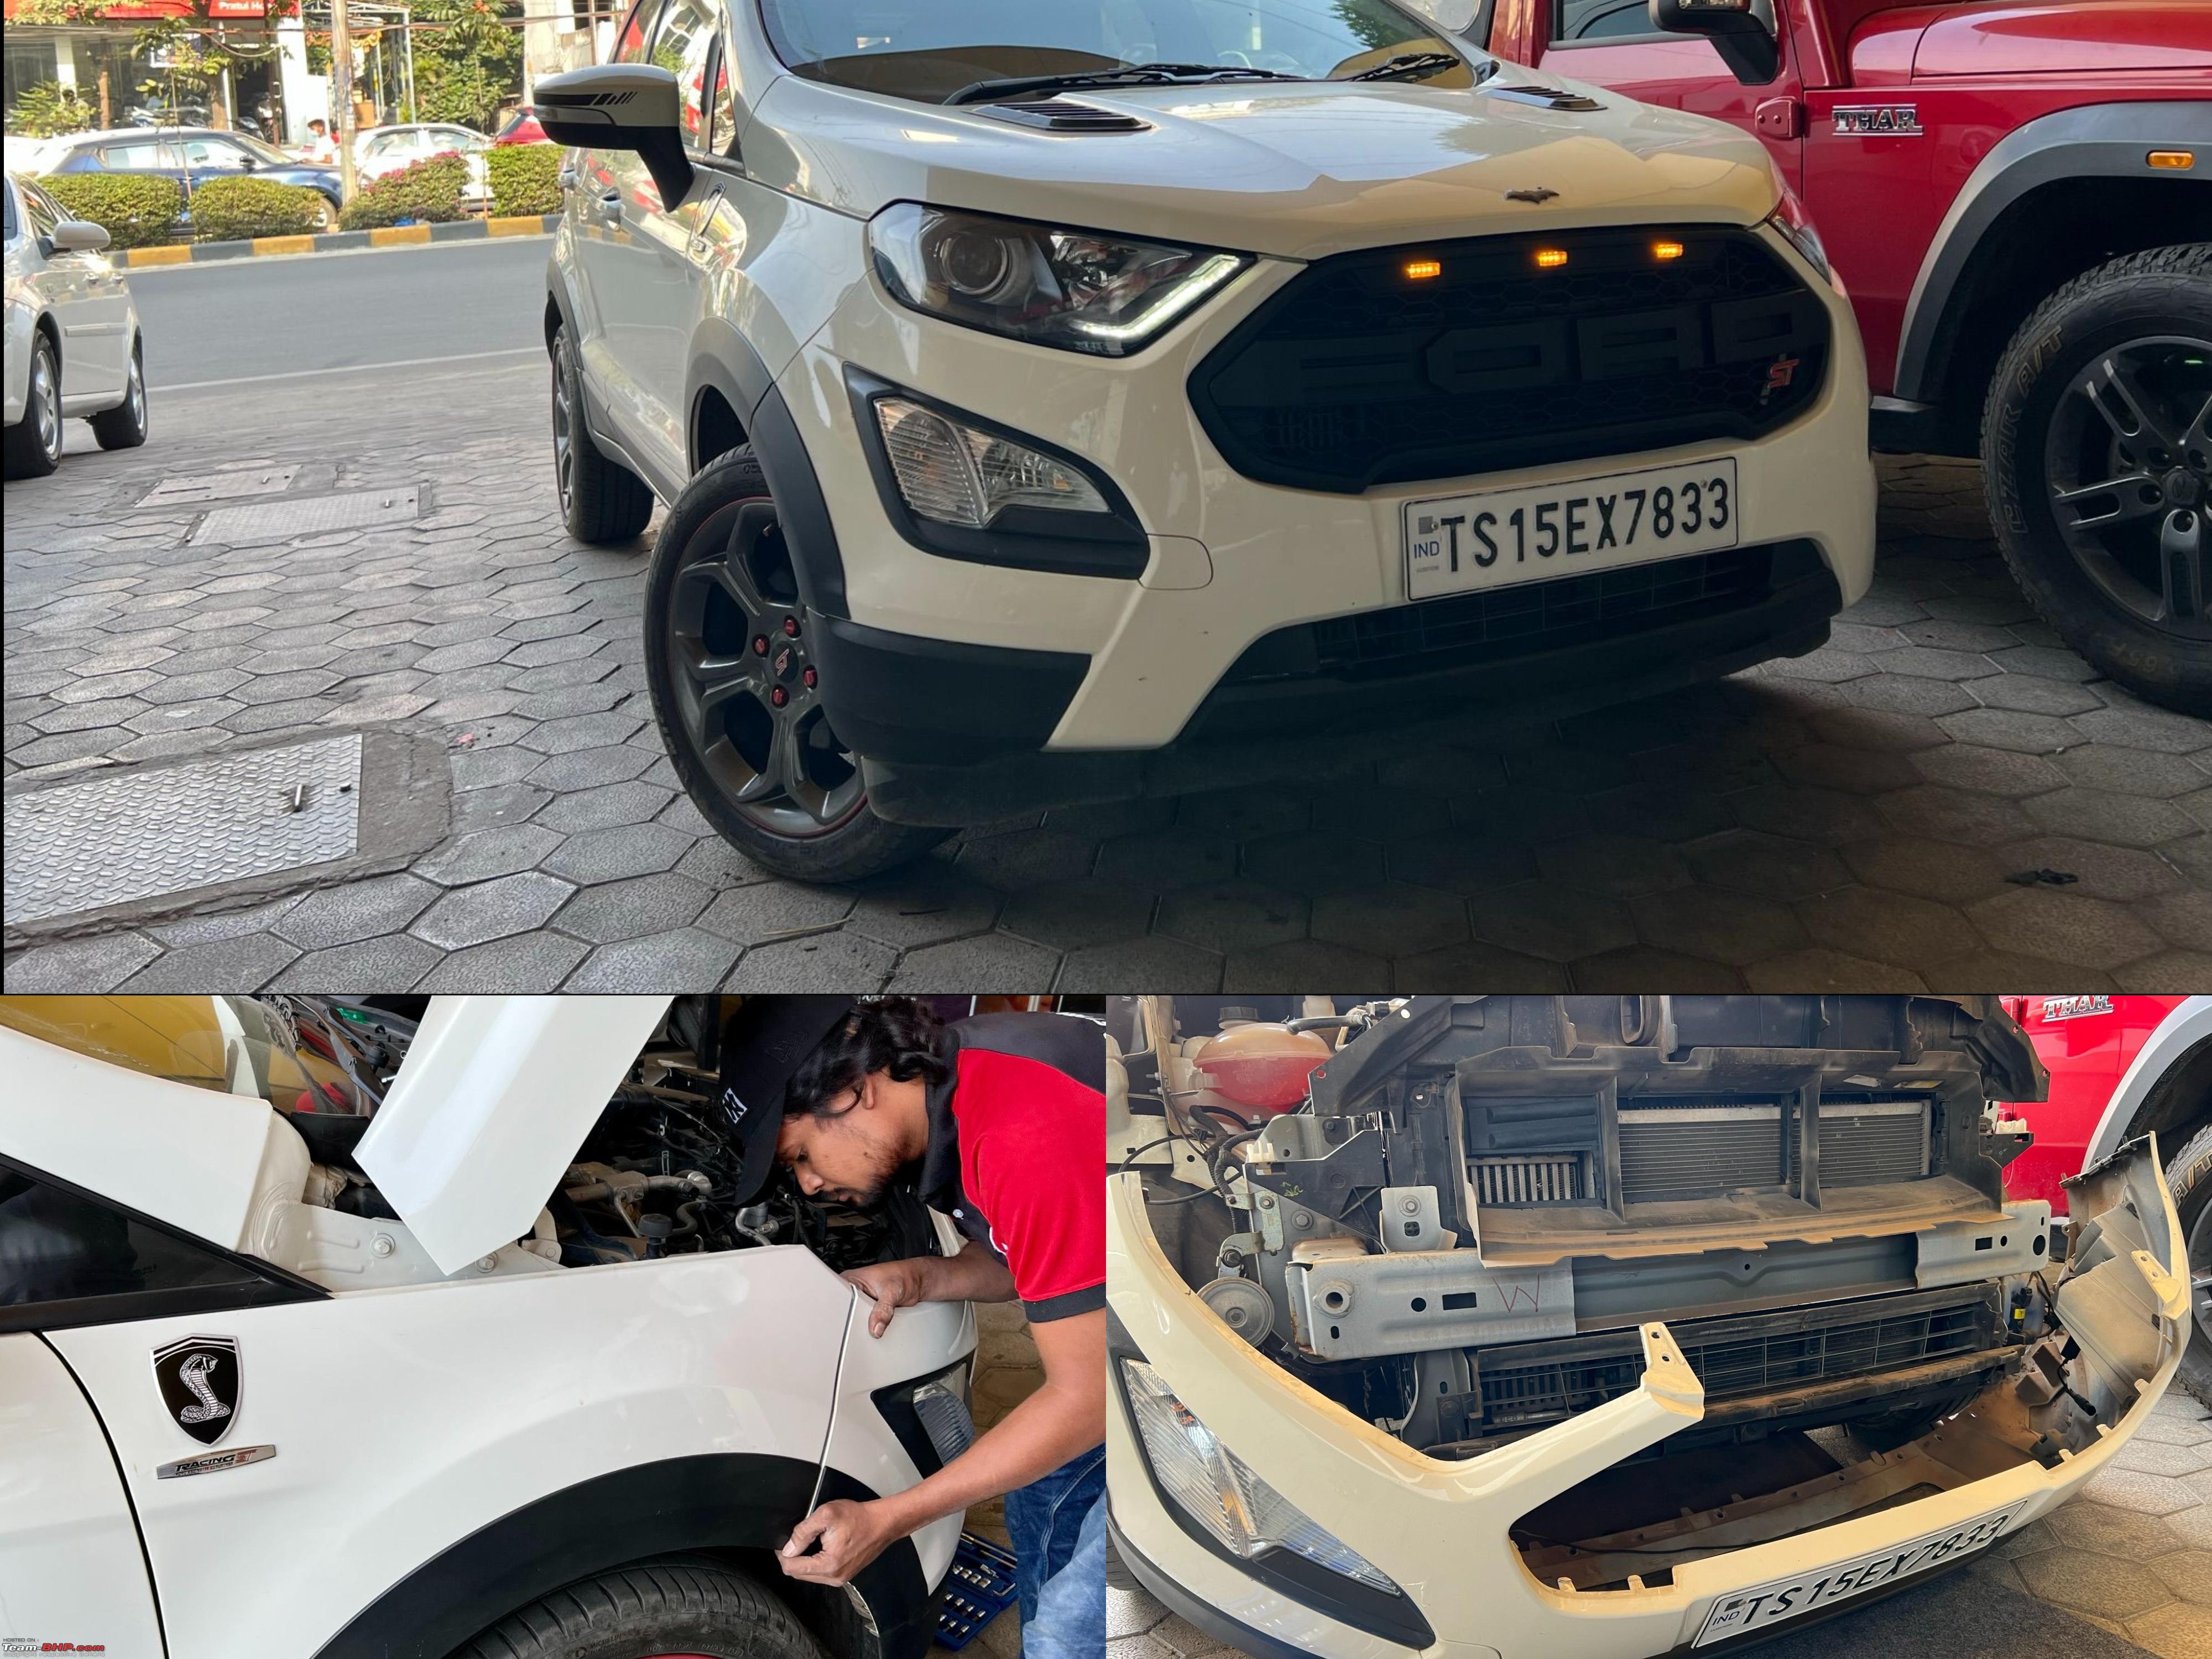  3. ST Badge – https://www.aliexpress.com/item/32847603921.html 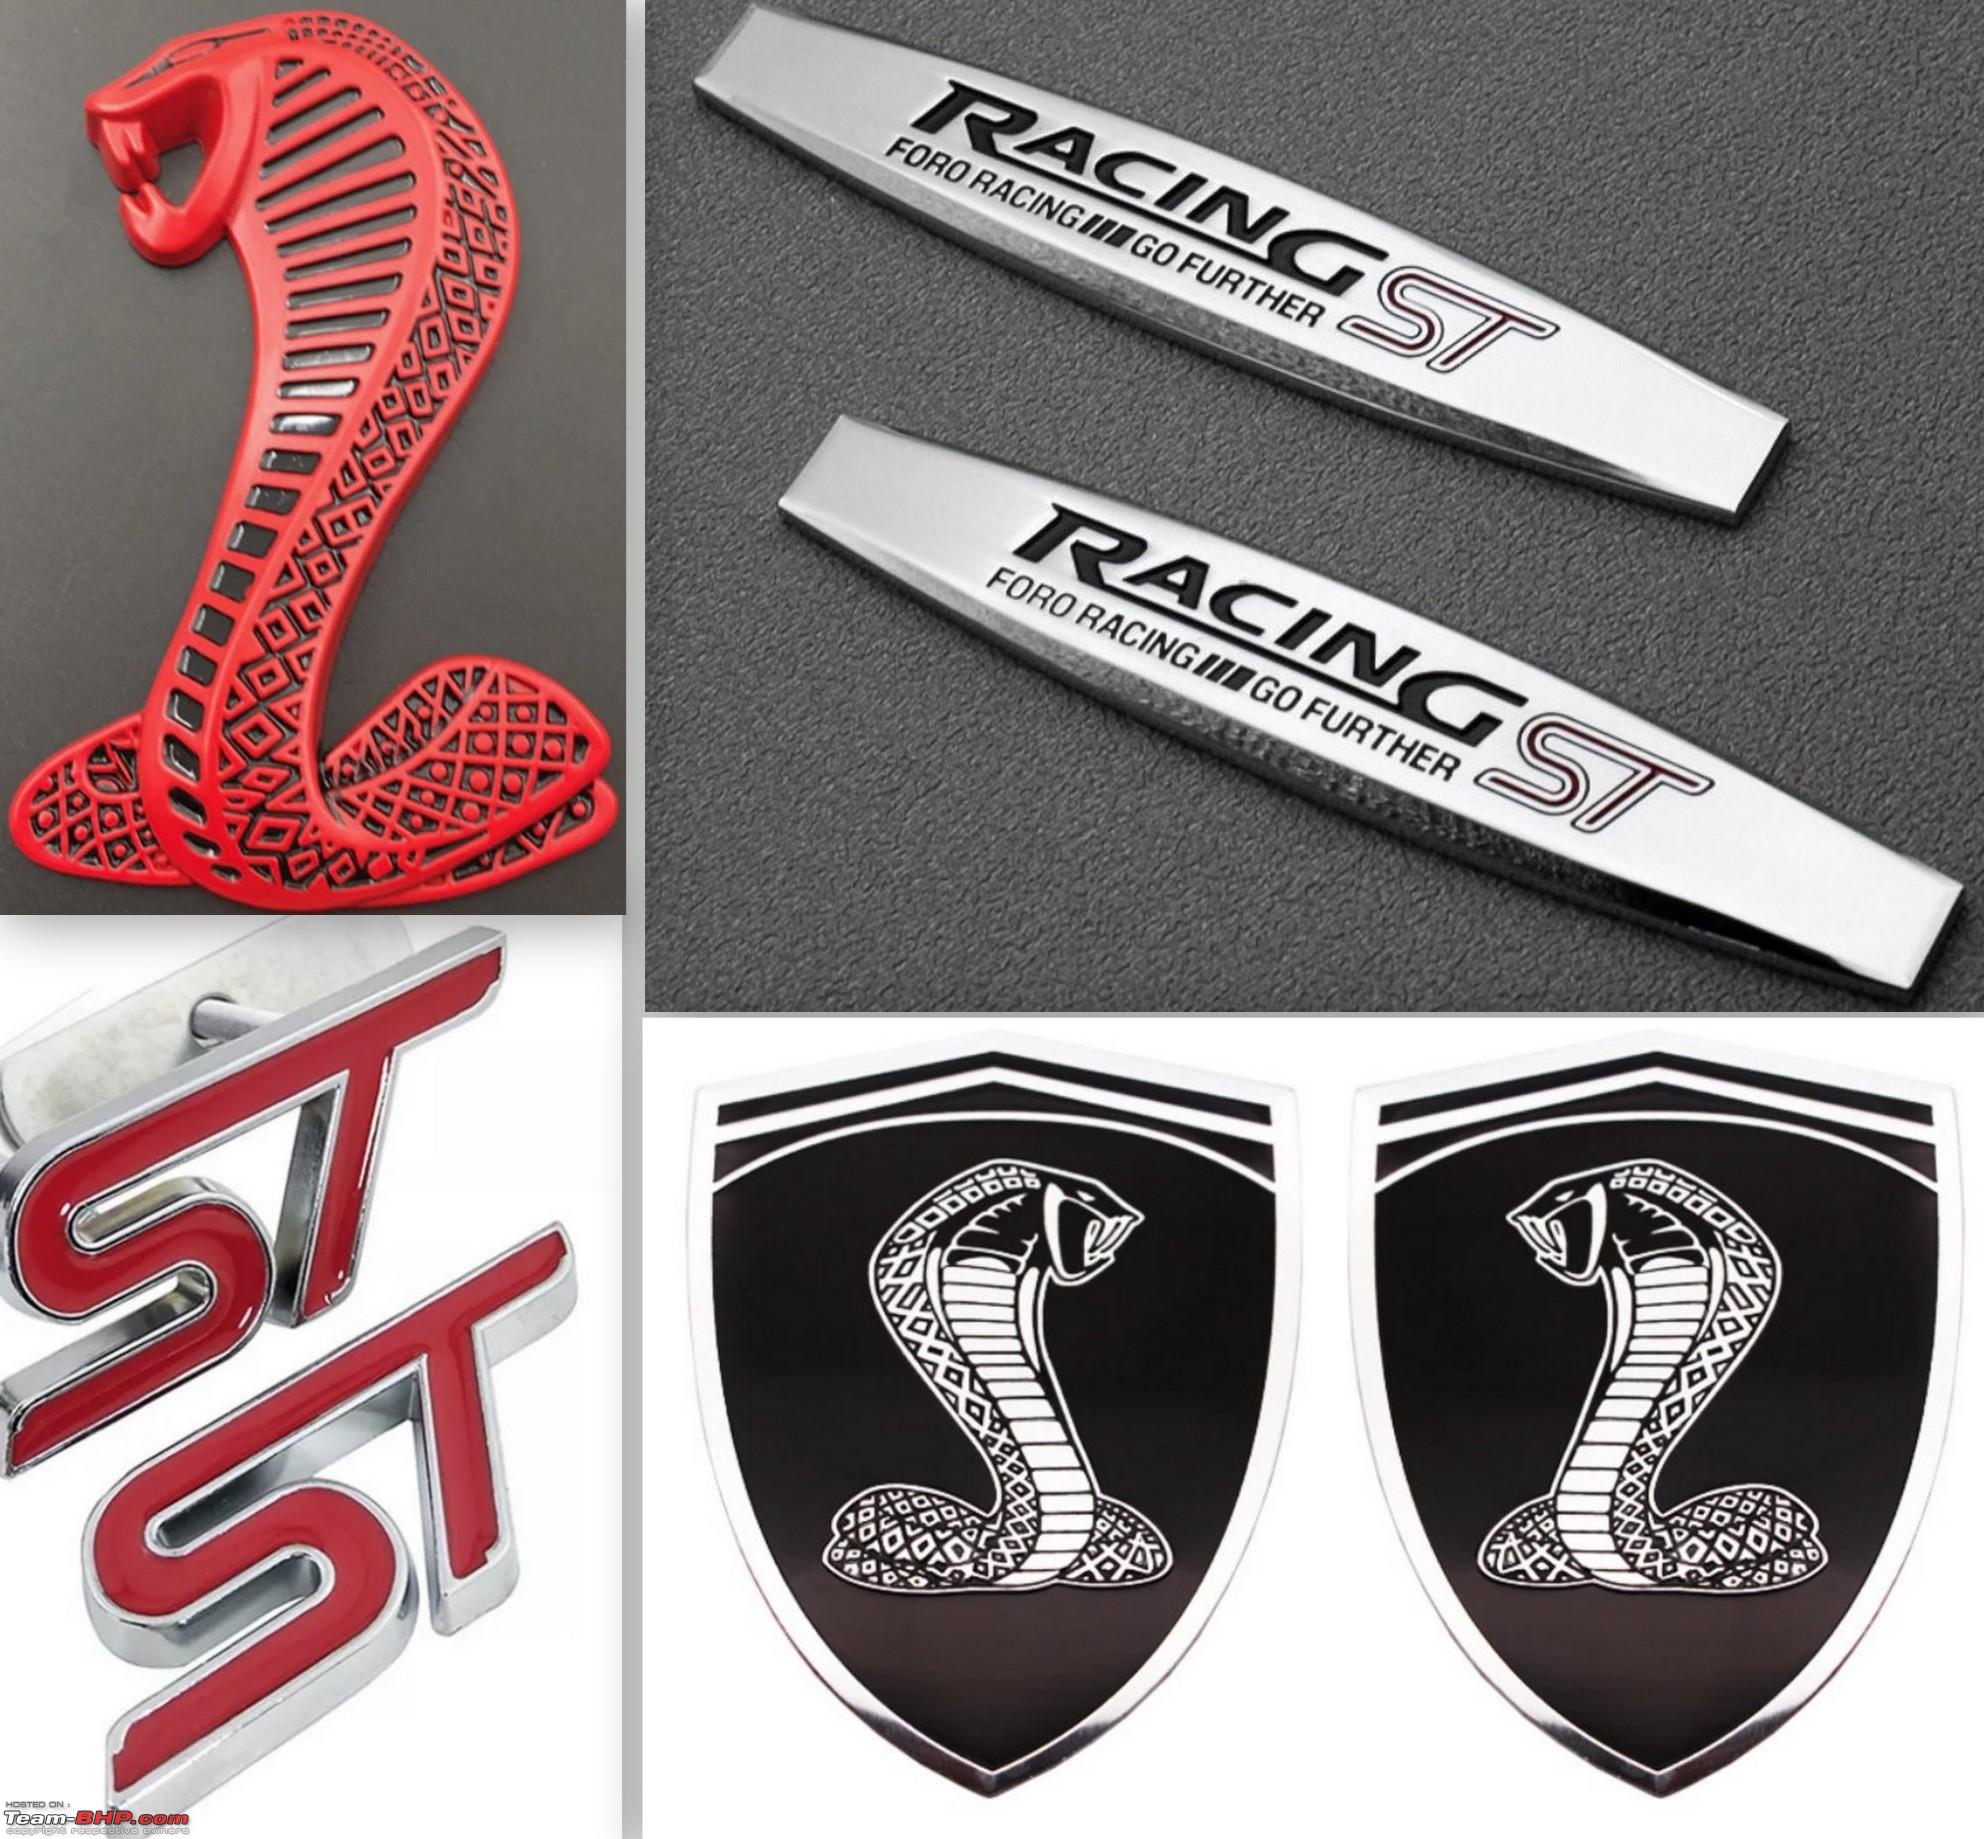 4. Ford Racing Emblem – https://www.aliexpress.com/item/4001233626815.html 5. 3D Shelby Cobra - https://www.aliexpress.com/item/1005003479473993.html 6. Shelby Cobra Emblem - https://www.aliexpress.com/item/33010598938.html 7. Joker Vinyl sticker - https://www.amazon.in/gp/product/B07...?ie=UTF8&psc=1 8. Joker Hahaha decals – https://www.aliexpress.com/item/4001050243826.html 9. Baseus 12V to 220V Inverter 120W (40 dollars) https://www.aliexpress.com/item/1005002907777474.html 10. Fake Intake Hood Scoops (10 dollars) https://www.aliexpress.com/item/1005001976048628.html 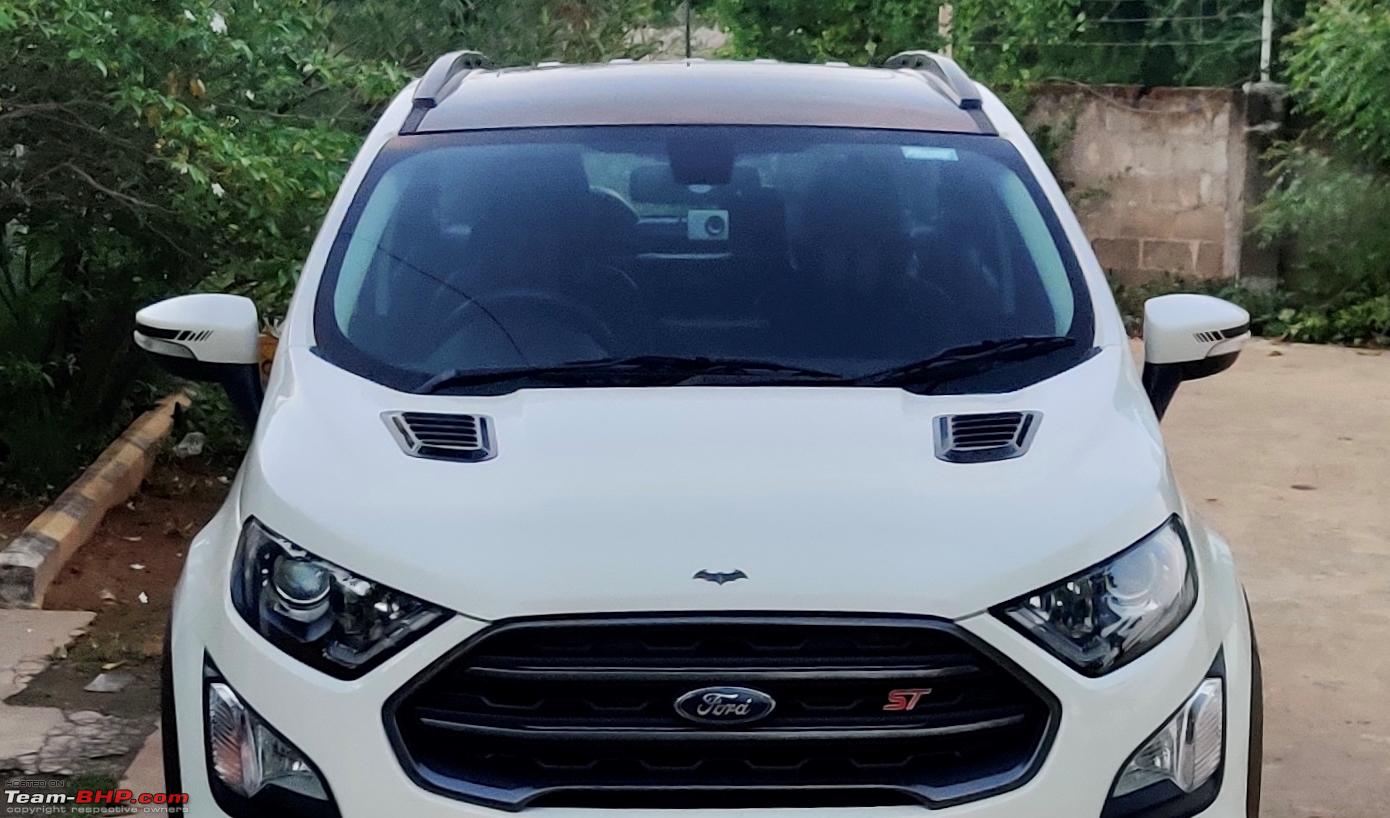 11. Wheel arches (Rs.6000), Cross-bars (Rs.6500) and Illuminated gear knob (Rs.2500) - Ford official accessories from service center 12. Ventilated seat cover for driver seat – Heating, cooling and massage function ($50) https://www.aliexpress.com/item/4000492761232.html 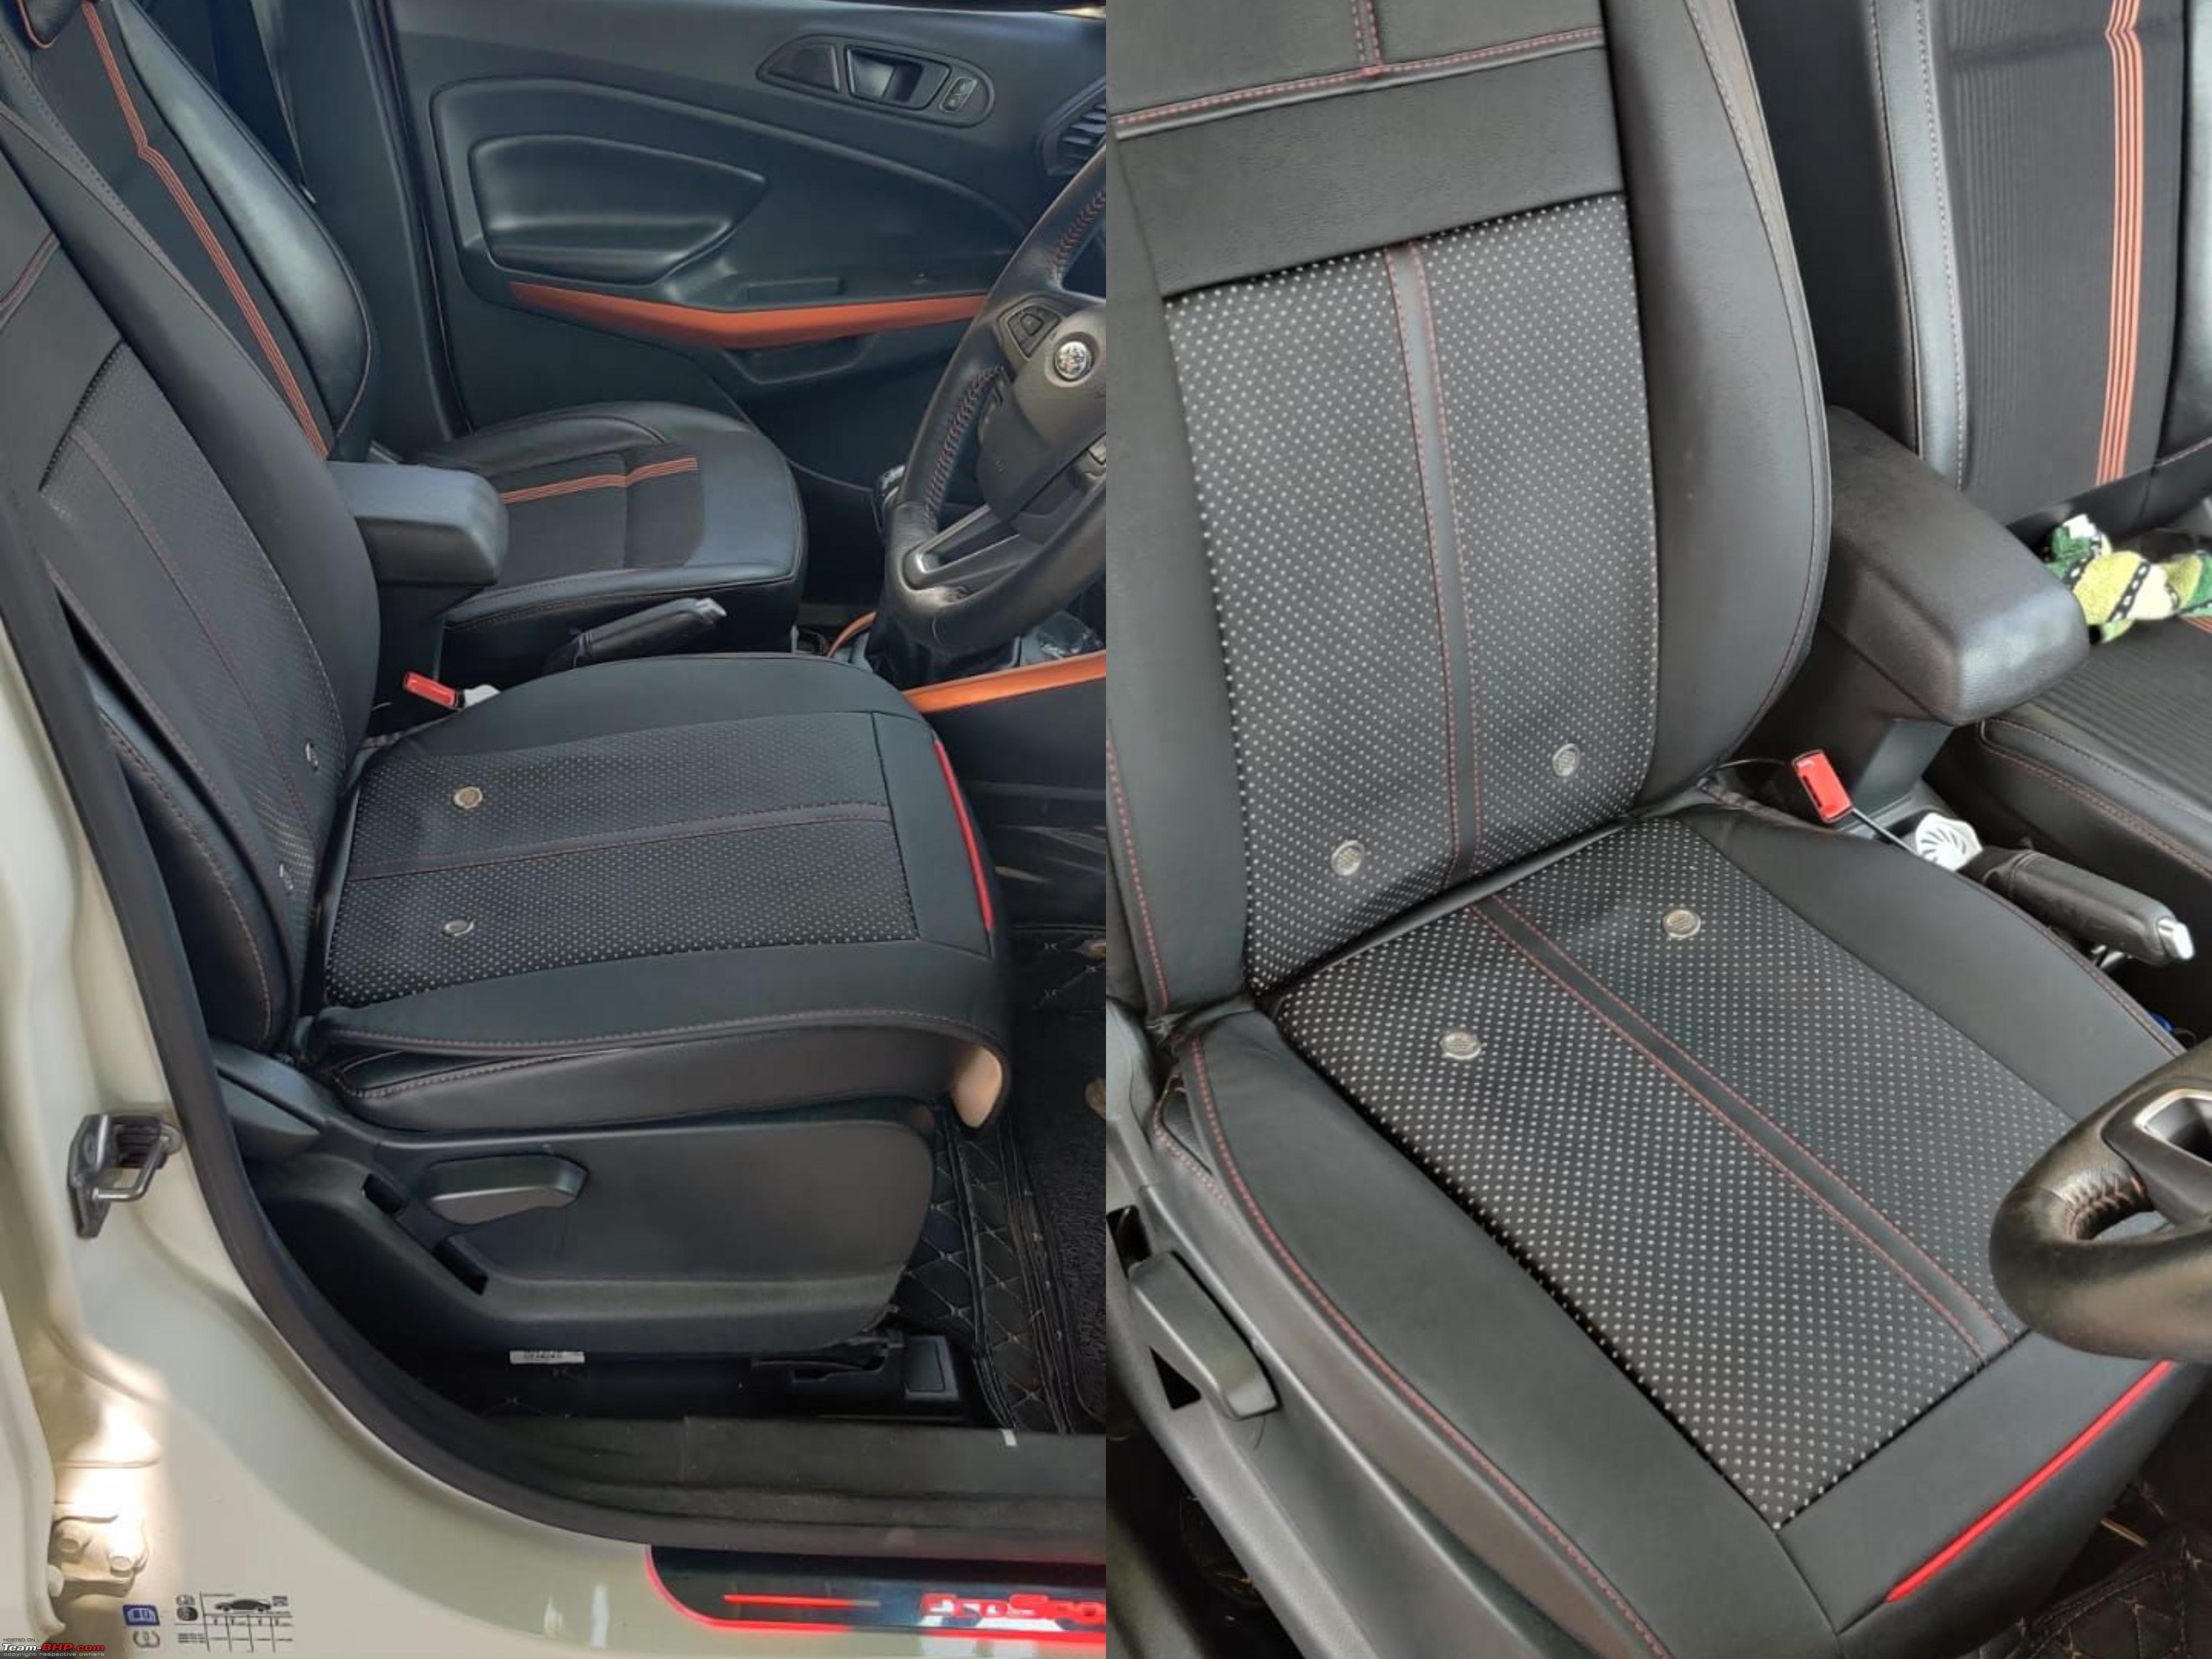 13. Coozo 7D Mats (Rs.3200 including shipping – Mr. Vijay Hasija 8920352454; 9958562510)  14. American Micronic Pressure Washer 1500WDX (Rs.8000) https://www.amazon.in/gp/product/B07...?ie=UTF8&psc=1 15. Dashcam – Yi smart Dash camera bought in May 2019 from AliExpress even before taking delivery of the car. No longer available and superseded by better ones. Infact, now we have lot of choices as dashcams from brands like DDPAI and 70mai are imported by local sellers which was not the case back then. 16. Underbody Neon lights – 40 euros https://www.aliexpress.com/item/3293...21ef1802UYfcUv 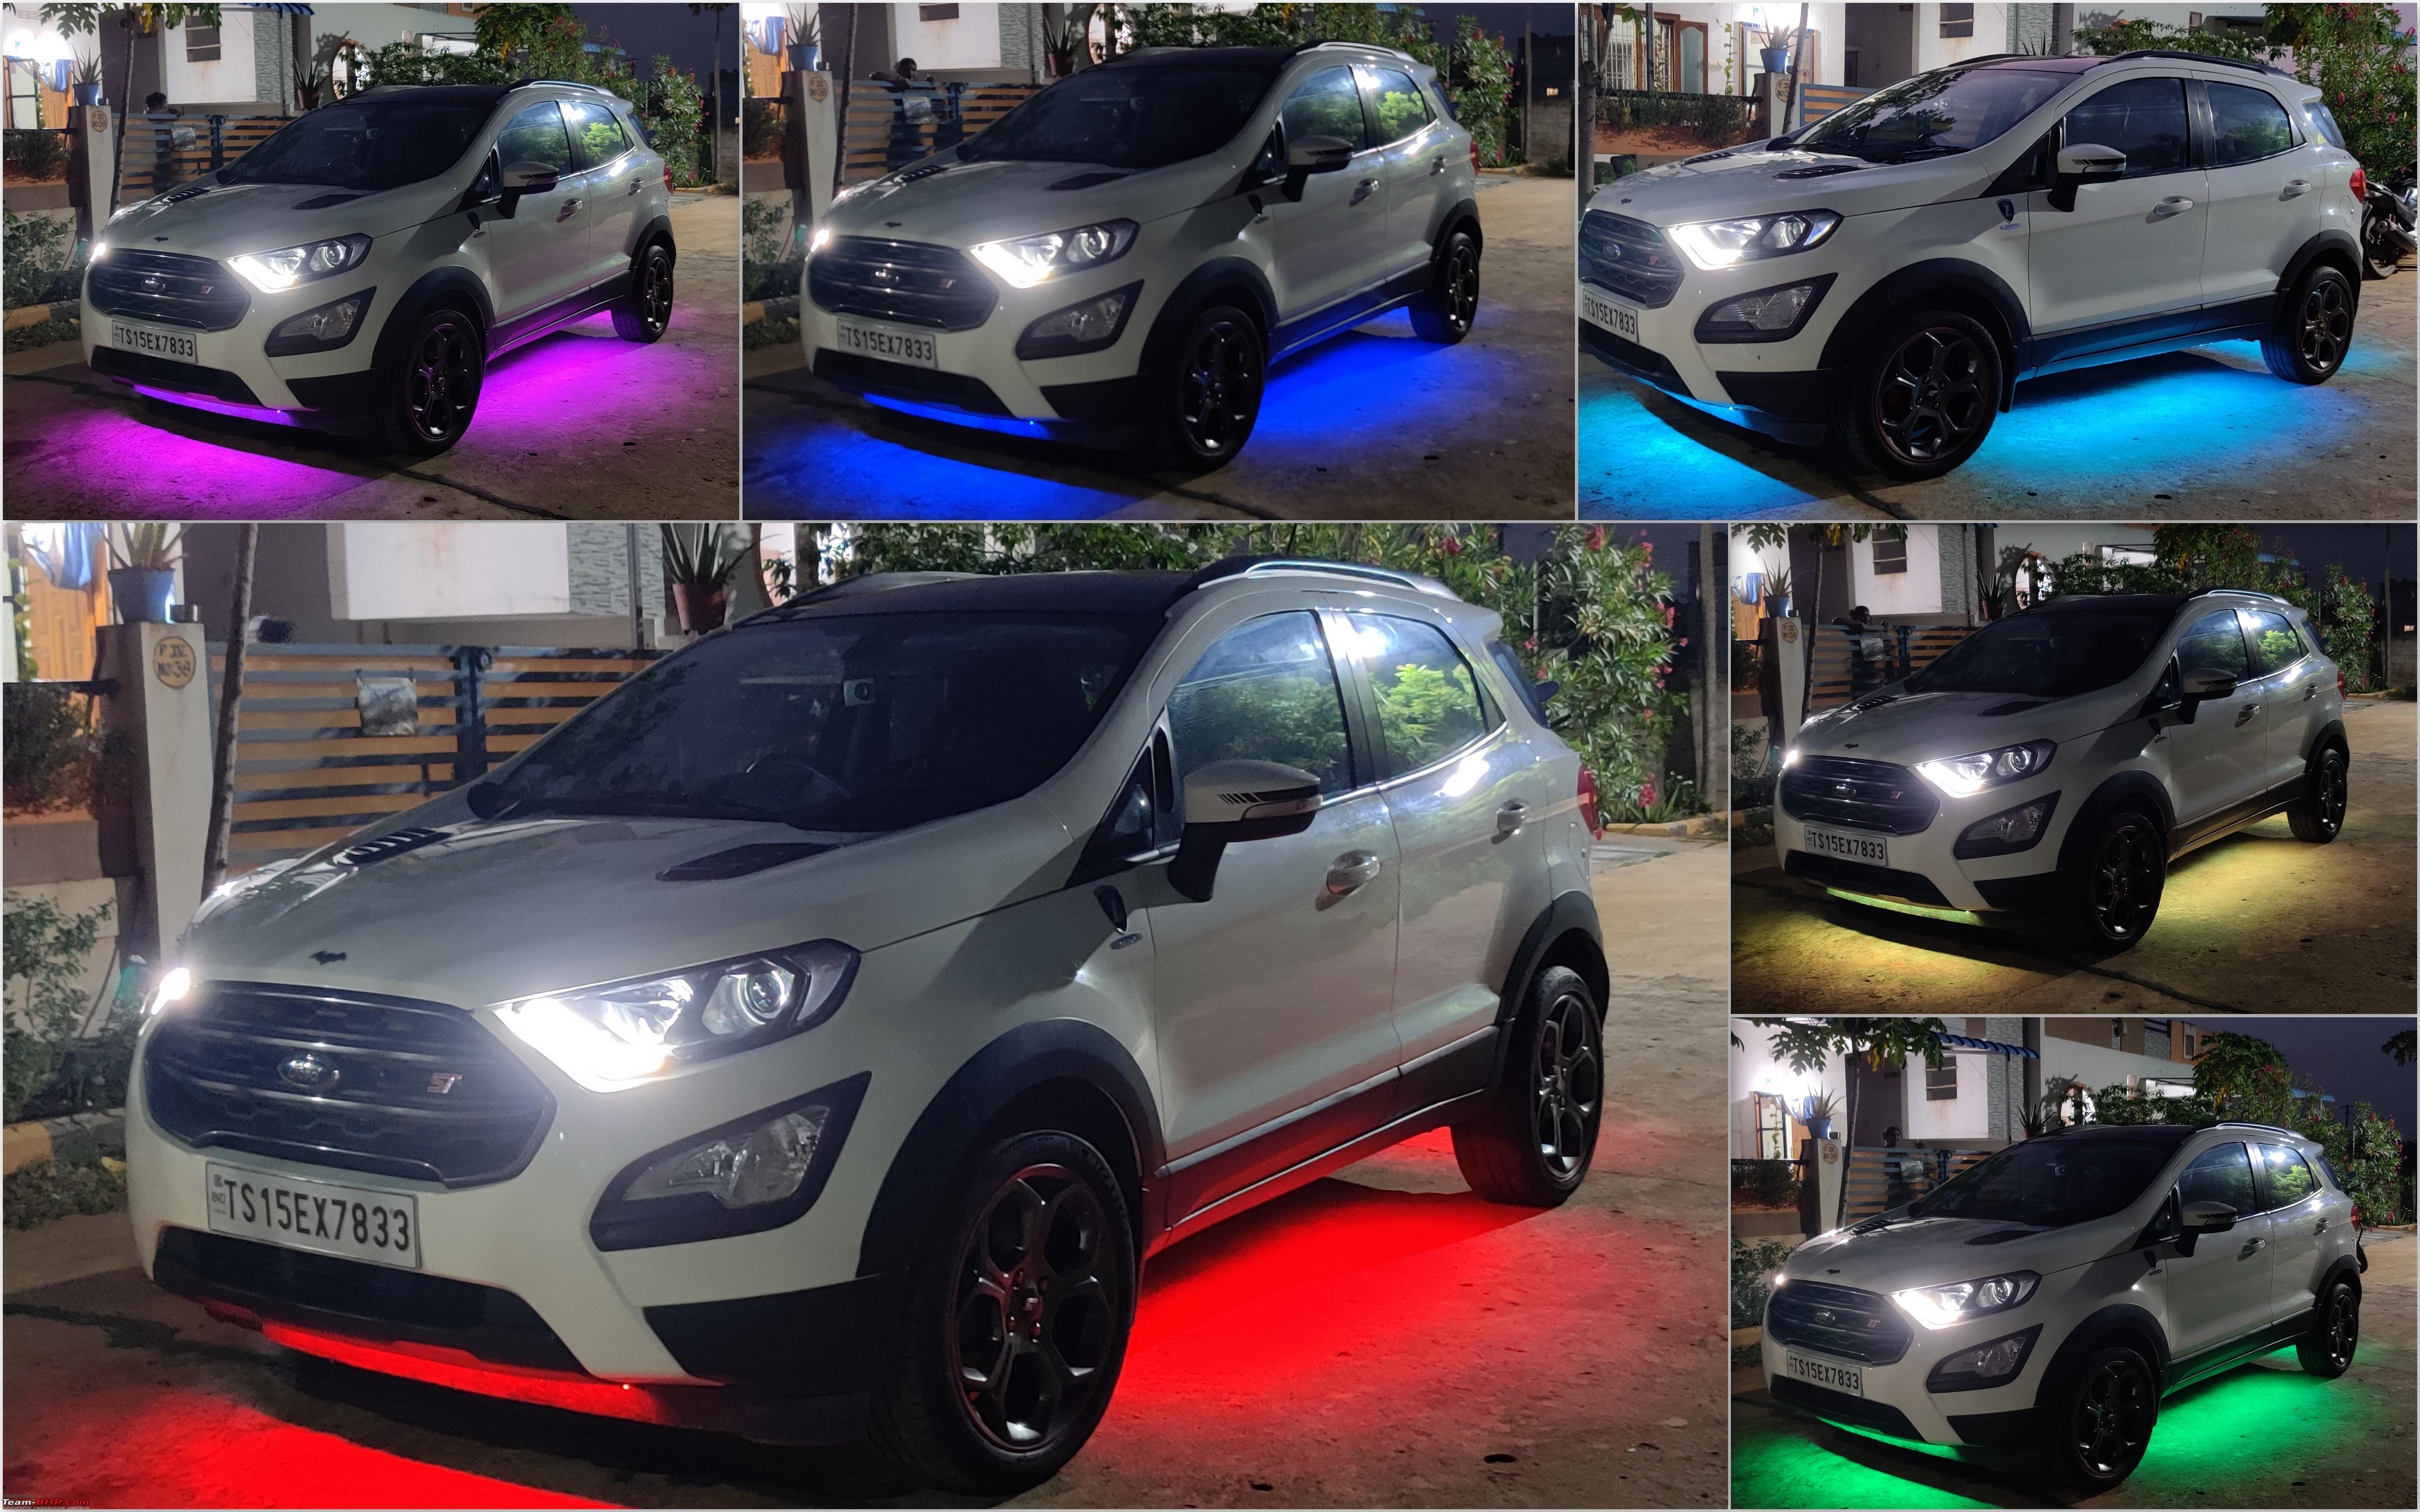 17. Car Battery Charger ($30) https://www.aliexpress.com/item/1005003065657872.html 18. Car trim removal kit ($15) https://www.aliexpress.com/item/1005001375534781.html Additives use(d) in the car: 1. Liqui Moly CeraTec Friction modifier (Rs.2700) – Made the car smoother and silent. https://www.amazon.in/gp/product/B00...?ie=UTF8&psc=1 2. Liqui Moly Diesel Additive – We add it every 4000 Kms (Manufacturer recommended for 2000 Kms) https://www.amazon.in/gp/product/B01...?ie=UTF8&psc=1 3. Liqui Moly Engine Oil treatment – Every oil change https://www.amazon.in/gp/product/B01...?ie=UTF8&psc=1 4. Wavex all-purpose Degreaser for Engine bay and wheels https://www.amazon.in/gp/product/B01...?ie=UTF8&psc=1 5. Wavex Foam wash shampoo https://www.amazon.in/gp/product/B01...?ie=UTF8&psc=1 6. Wavex Leather and Dashboard cleaner https://www.amazon.in/gp/product/B00...?ie=UTF8&psc=1 Last edited by nightraven : 28th February 2022 at 18:36. Reason: HTTPS link for youtube |

|  (45)
Thanks (45)
Thanks
 |
| The following 45 BHPians Thank nightraven for this useful post: | AdityaDeane, adwaith, arjunsatheesh, AROO7, ashpalio, AYP, bamaboy, BRZRKR, CEF_Beasts, chautob0t, cka, CoolFire, digitalnirvana, dimburai, fluidicjoy, Godzilla, GTO, Harjot37, InControl, jithin23, lemedico, neel@makrand, Night_Fury, nitinkbhaskar, Prakritij, raiuday, ramnaresh_2000, Researcher, rkv_2401, ron82x3, ruzbehxyz, saikishor, Samfromindia, Shreyans_Jain, skb1811, speedmunster, sridhar-v, swiftnfurious, tchsvy, The Rationalist, The_Outsider!, Viju, Vinod_nair, Wanderers, ysjoy |
| |
|
28th February 2022, 16:17
| #2 |
| BHPian | re: DIY: Juicing up the Ford EcoSport S with ICE, Front Park, ST-line cluster, steering wheel and ADAS In-Car Entertainment (ICE)  Sound quality is subjective as each of our ears have unique perception, sensitivity, and preference. 7 speaker system in the S variant has decent performance among the competition, however, it was still a budget system. I wish Ford offered 8-speaker B&O system in India. I am an audiophile and very particular about my home audio, earphones, and headphones, so why should car audio be any different? I was not very happy with the channel separation, staging, bass and distortion (@high volumes). So, I decided to follow the holy commandments to upgrade components, damping, amplifier, sub-woofer etc. Having experienced what a DSP does to improve music to your taste on my HT setup, I got to work quickly and installed the following things in that order: 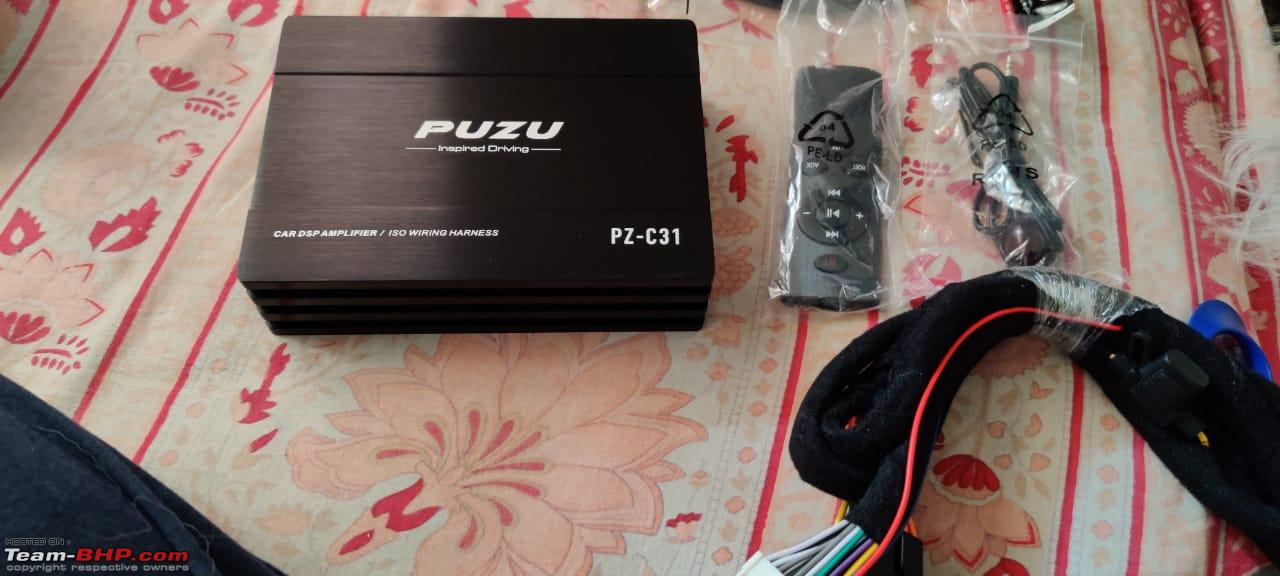 1. Puzu PZ-C31 DSP amplifier from Aliexpress (31-band parametric EQ, 4-IN/6-Out) https://www.aliexpress.com/item/32943217567.html Currently this is retailing at 190 euros. It was 125 euros when I got in 2019. While writing this post, I came across an unbranded 10-channel DSP with built in amplifier on Aliexpress for around 150 dollars with decent reviews. If anyone is interested can give this a try https://www.aliexpress.com/item/1005003298258617.html 2. i-Copper i-D5 Ultimate (Rs.10000) acoustic damping mats inside doors, tailgate, few areas of the floor (Motorogue.in) 3. Focal PS165V1 component speakers in 4 doors powered by the Puzu DSP amplifier (Ebay Germany – 150 euros per pair) I installed the front tweeters on A-pillars as they were bigger than stock tweeters and wouldn’t fit in their position near the door latch. Rear tweeters were flush mounted on the rear door by drilling a hole into the door pad. 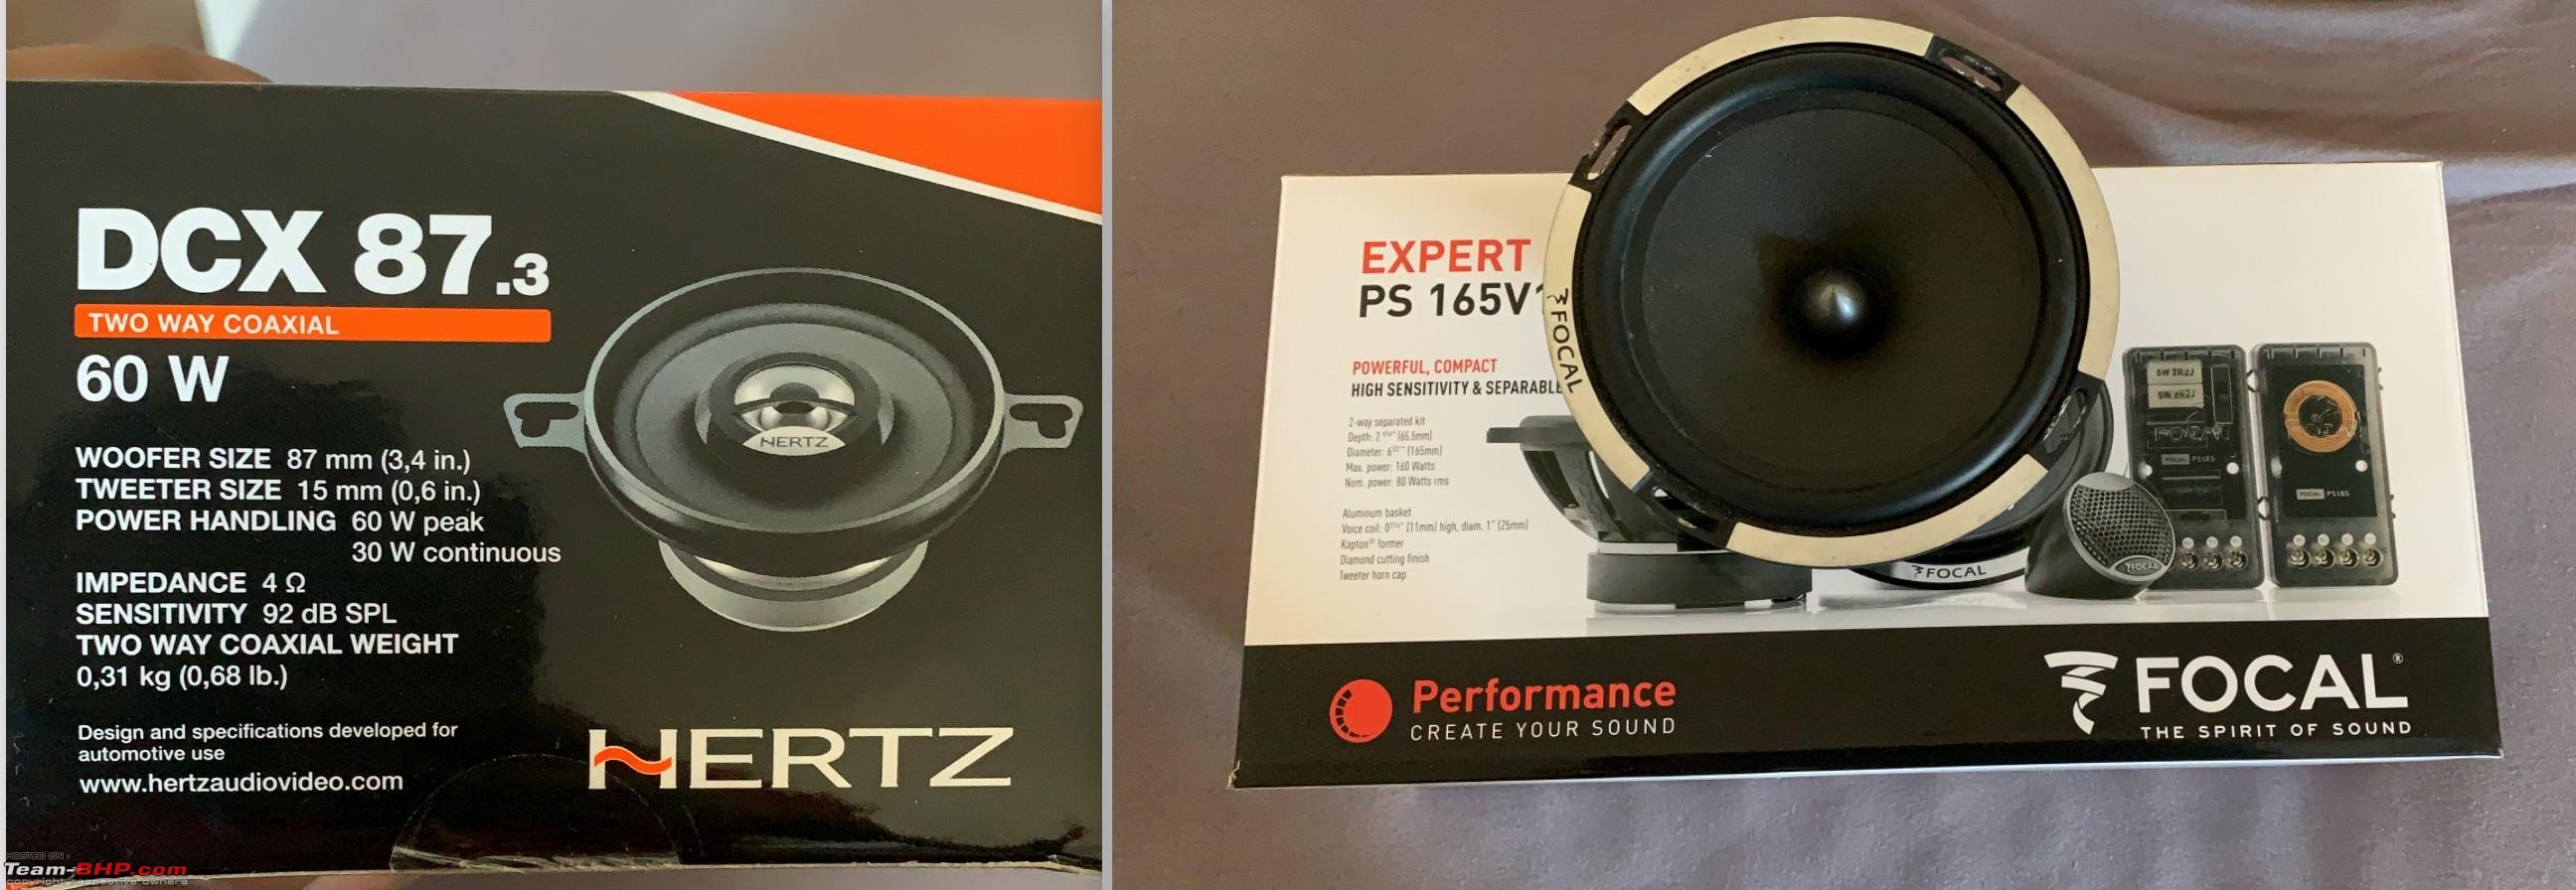 4. Hertz Dieci 87.3 coaxial center speaker running on stock audio player (Ebay Germany - 50 euros per pair) Some say center is not great in car audio, but I like it for better sound staging. Dad performed the install at home with my brother on a car that was barely 6 months old. The bass response and clarity difference was night and day. Center was borderline absent/inaudible as stock system was not pushing enough juice for the Hertz and at high volumes of 16 and up, the Head Unit (HU) was pushing distortion and the audio signal was beginning to clip (confirmed with a handheld Oscilloscope). We did gain matching to ensure that we never cross volume of 16 on the head unit. However, the Focals are rated for 80W RMS while the Puzu DSP has rated output of 48W max and only 20W RMS @ 0.1% Total Harmonic Distortion (THD) going by the manual. So, Puzu will never be able to drive the Focals at rated power and even at half power (40W) the THD is way higher than acceptable. 5. We had an Alpine MRP-F600 4-channel amplifier taken out of our previous car and connected it to the DSP. This was an 8-year-old Class AB amplifier with very good specifications (100W x 4 < 1% THD). It was old but still gold. Focals run clean without distortion and to their full potential now. Hurray!!! 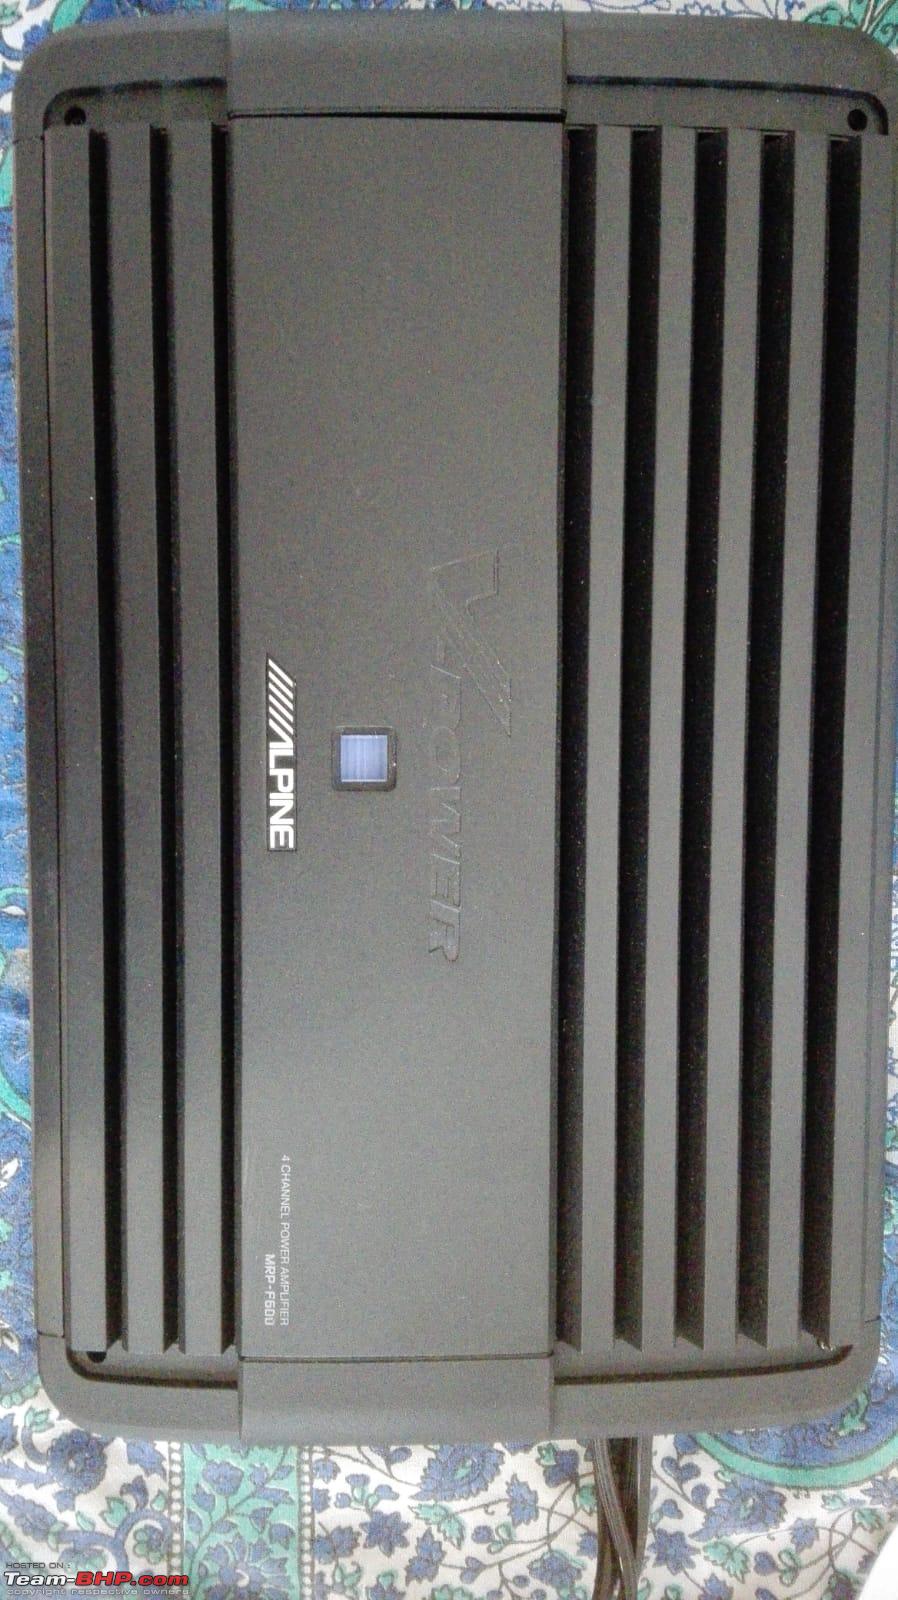 6. We are accustomed to the deep thunderous bass of dual SVS SB-2000 sub-woofers in our Atmos HT setup that perform very well into the infrasonic range. Although bass quality has tremendously improved compared to stock setup, we were missing that kick in the chest that a bad*** subwoofer can bring. And irrespective of our best efforts to damp every panel in the door, there were occasional rattles of the plastic in the door panels. A quick check by cutting off frequencies below 90 Hz (using the DSP) to the door speakers eliminated these rattles. So, I bought a 12" Rockford Fosgate Power series T1D2 subwoofer (800W RMS, was a steal deal for 400 euros @ caraudio24.de) and JBL Club A1KW monoblock (150 euros @ ebay.de). The dual voice coils on the sub-woofer run in parallel. I set a Butterworth Low-pass filter (LPF) at 90 Hz for the subwoofer and a HPF of 90 Hz for the component speakers. DVC Impedance toggle 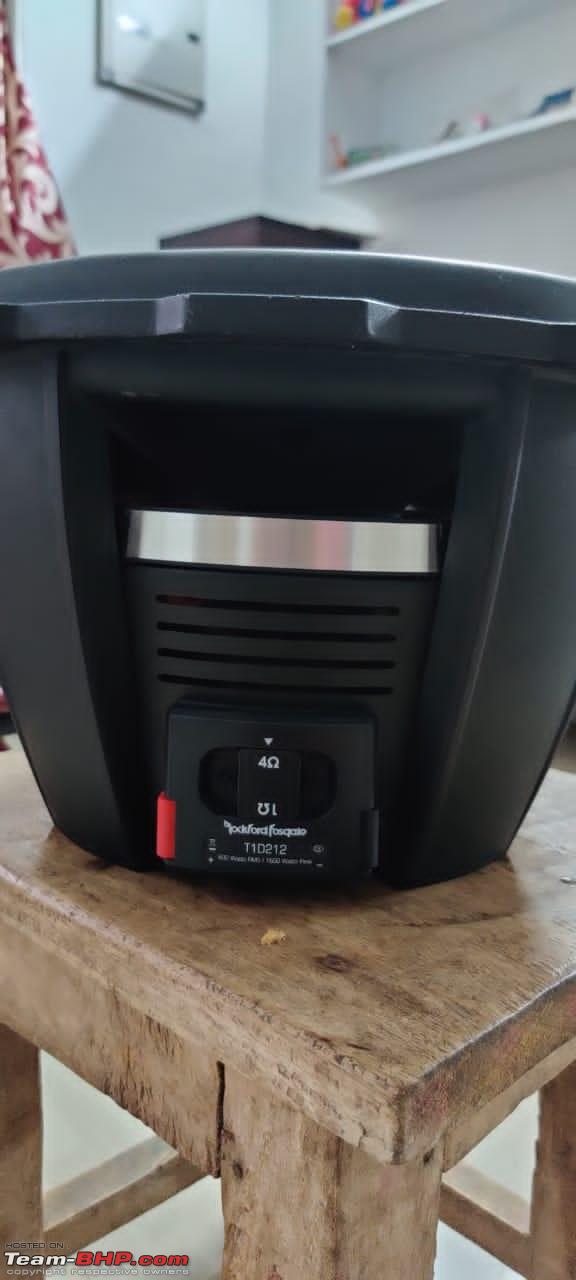 7. The setup ran fine for few days but the JBL monoblock went kaput after 4 months due to component failure. We did not push the subwoofer much which implies that it is likely due to a manufacturing problem. So, I bought an Interfire 4000D Mono (Rs.10500 @ Motorogue.in) which has been driving the subwoofer well. Puzu DSP doesn't offer audio channel mixing/summing. Audio mixing in this context is “ability for the input from any channel (multiple input channels can be mixed as well) to be routed to any output channel”. I had a Dayton DSP-408 (https://diyaudiocart.com/Dayton-Audi...h=dayton%20408) which I got for a home audio build but dropped the project mid-way as I did not need the bookshelf’s anymore. This is a 4-in 8-channel DSP without amplifier function. Dayton is well known in the audio circuit for their DIY products. The few draw backs with the Dayton DSP range from minor to major depending on your luck. It has only 10-band parametric EQ compared to the 31-band on the Puzu DSP which reduces ability to fine tune. It needs a proprietary USB module to enable Bluetooth i.e., stream audio directly to the DSP. Puzu DSP on the other hand offers a built in Bluetooth feature. Many users online reported alternator whine and high noise floor (hiss) with the Dayton DSP due to nature of the power supply design. A DC-DC ground loop isolator fixed the issue in many cases. Apparently, it’s a hit or miss with these units. However, I did not face these issues. Pros: Dayton software Interface more polished, Audio summing, Remote display (accessory which I did not get) I wired the Dayton and drove its output into the Alpine and Interfire amplifiers. Sound seemed little clearer (confirmation bias?). I also mixed in 50% of front speaker signal into the rears as factory processing was not sending a full range signal. I had an extra 3.5-inch Hertz speaker lying around (one was used in center on the dash). It was time to let imagination run wild with possibilities. So, I had a hole drilled in the rear parcel tray and fixed the spare Hertz. To solve the power problem, I wired the Puzu DSP to both front and rear center speakers. My final audio setup is as follows – 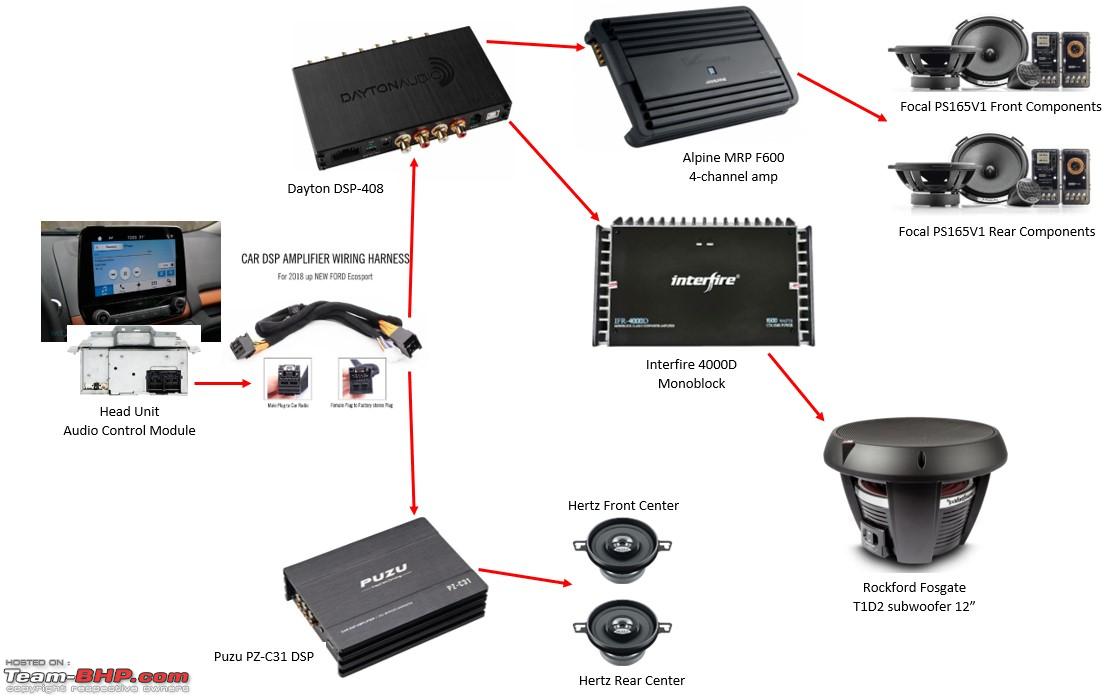 8. I used a T-Harness to connect the DSPs to the head unit which helps us avoid wire cuts to the factory wiring. With the help of T-harness, I am diverting the door and center speaker signals from the head unit to the Puzu and Dayton DSPs and feeding the amplified signals back into the factory wiring. DSPs have a high level/speaker level signal input negating the need to use any Line level converters. The variable line level signal from the Dayton is sent to Alpine and Interfire amplifiers through RCA cables. Amplified high level signal from the Alpine amplifier is sent to the Focal component speakers via crossovers through the factory wiring using the T-harness. Amplified signal for the Puzu DSP is sent to front center through the T-harness and rear center through fresh wiring. T-harness for Ford EcoSport - $25 https://www.aliexpress.com/item/4000145376965.html Similar T-harness is also available locally for about Rs.1600 from Globalbyte (https://globalbyte.co.in/) in India. However, from what I saw, two pins meant for center speaker were positioned incorrectly. These must be re-positioned for center speaker to work correctly. I don’t know if this was a one-off mistake. Global byte harness bought by a friend 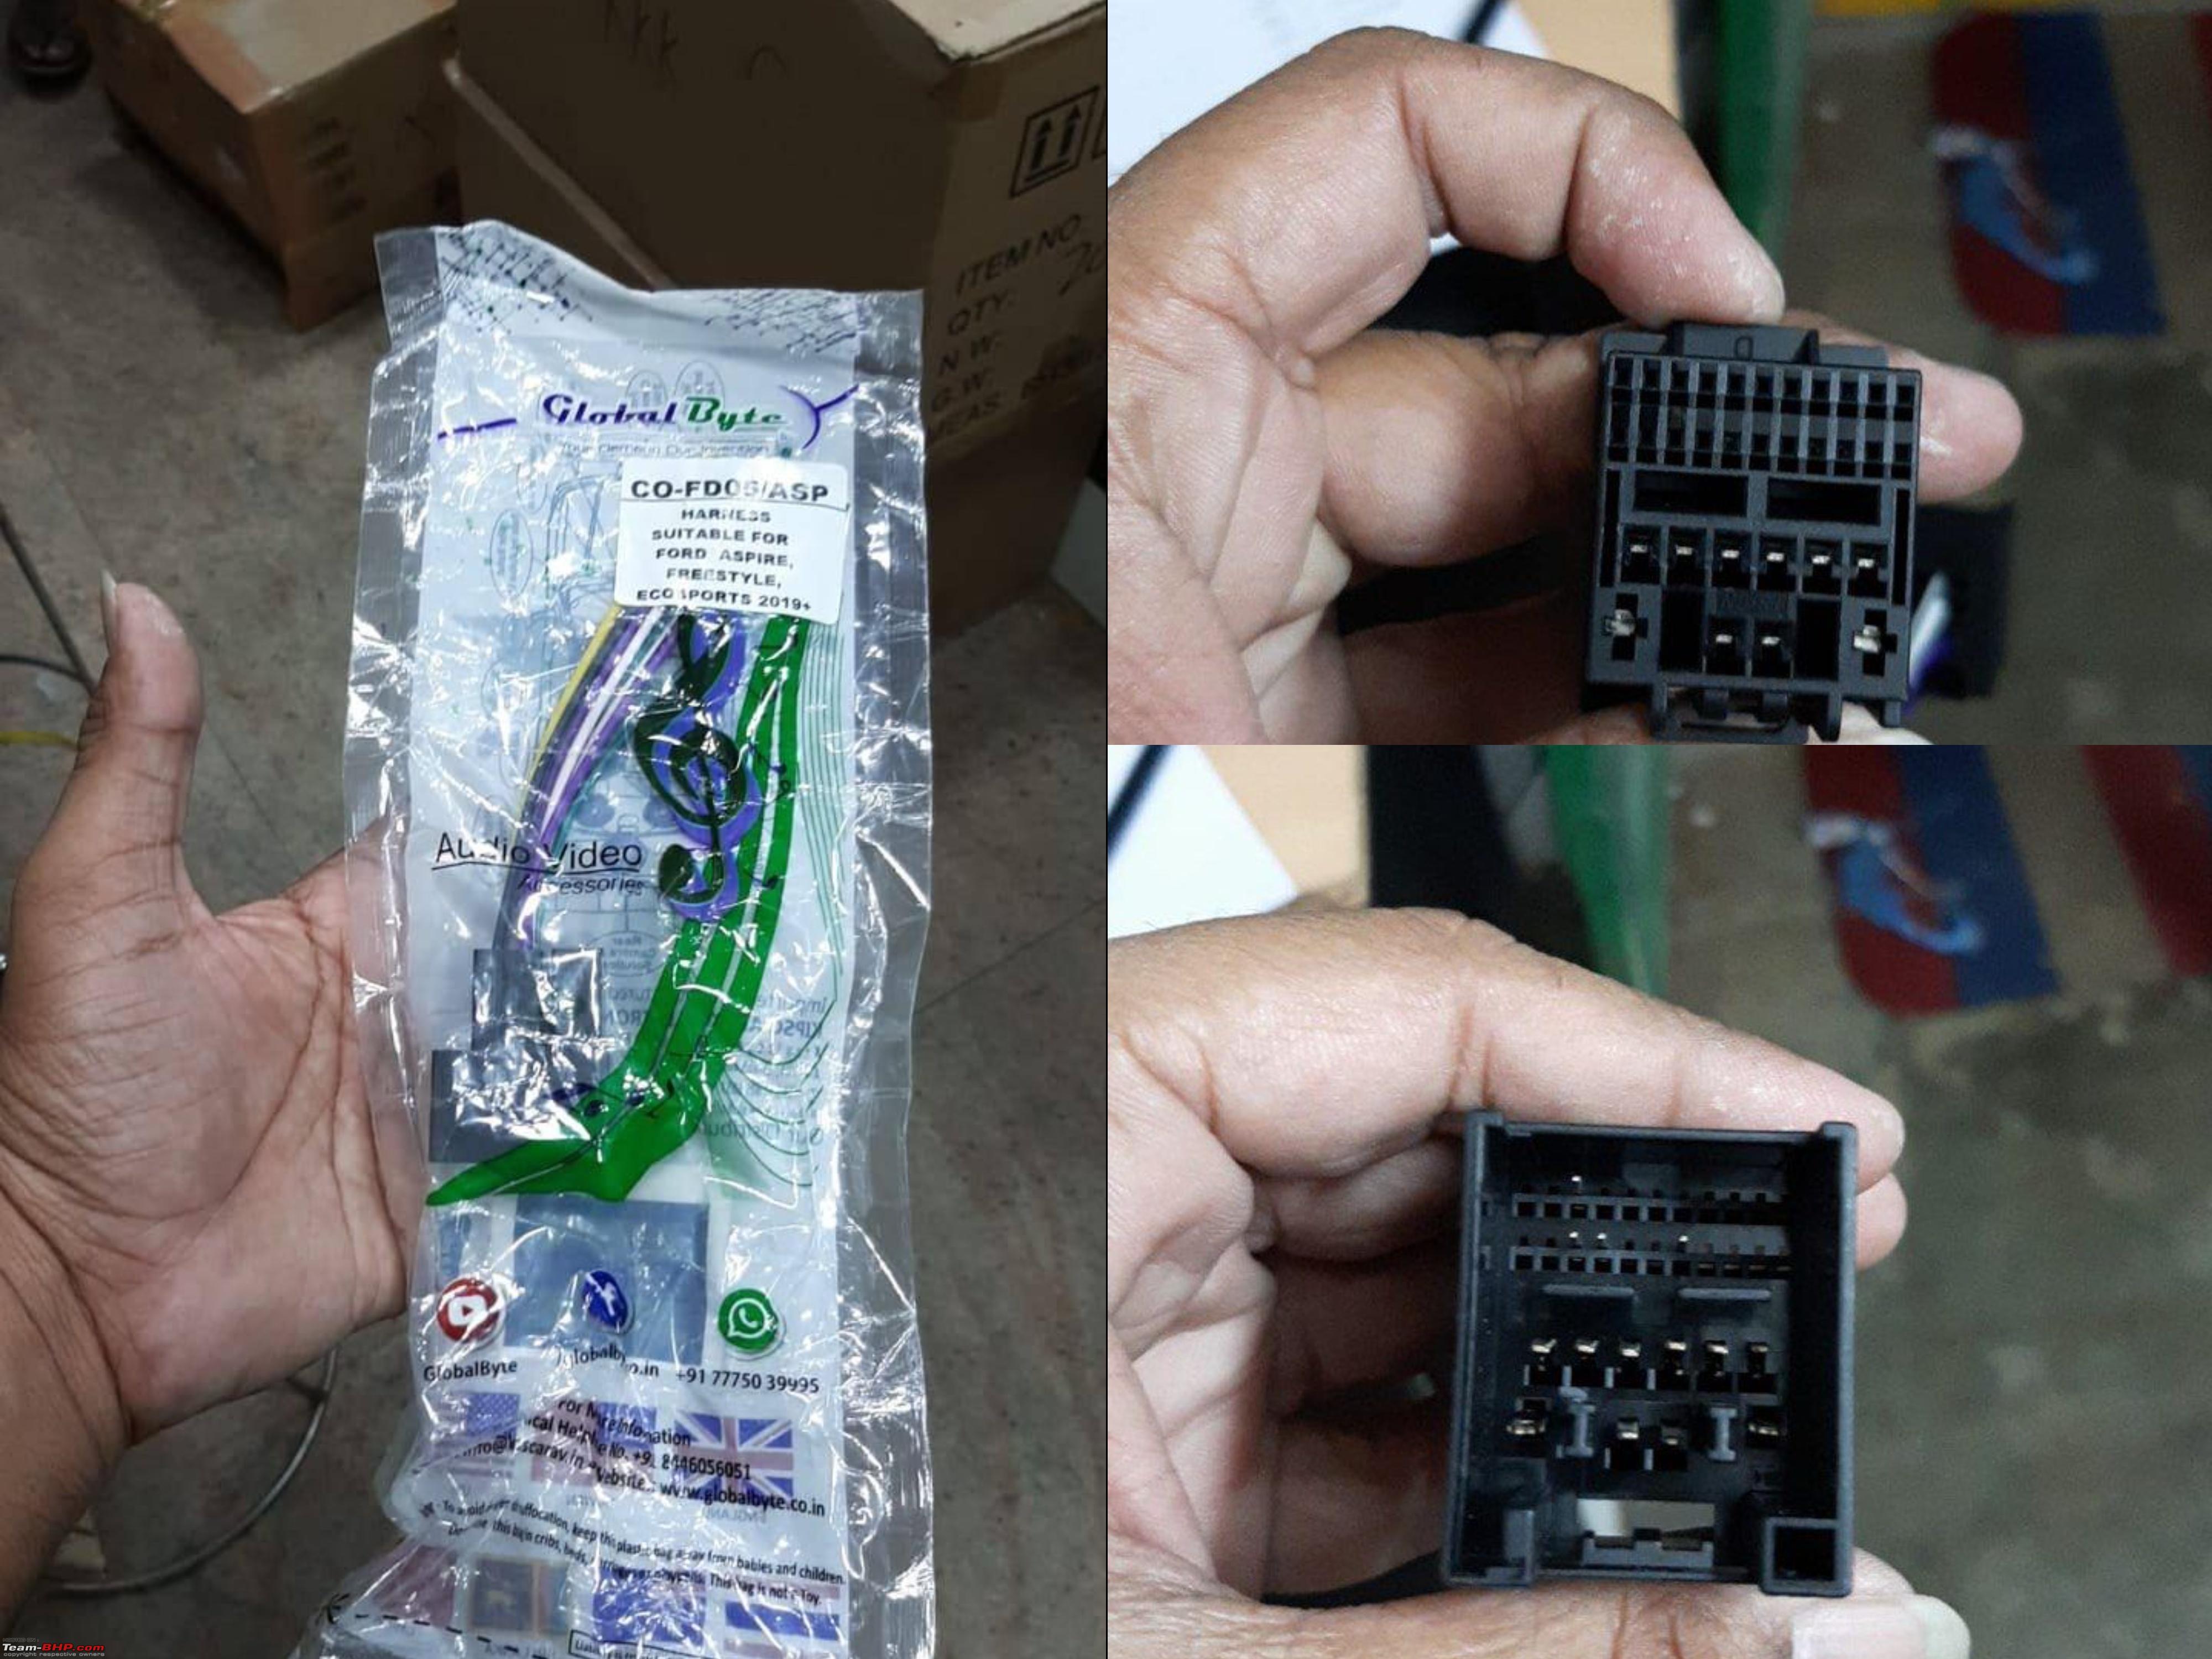 Many of you may be wondering why I haven’t changed my speaker wiring in this build. Wiring new speaker cables into the doors through a rubber grommet is not possible unless you drill through empty pin slots on the plugs, as Ford uses plugs/harnesses for the door wiring. So, I am stuck with factory wiring for the amplified signals to door and center speakers. Ford uses 18 AWG copper wiring for speaker signals which can handle anywhere between 3 and 15 amps, depending on the distance (12.2 ft to 2.4 ft). So, these should handle my power requirements for regular scenarios anyway. Door harness plug on a F-150 for illustration:  Accessories used for the ICE install: 1. Cerwin Vega 4 AWG OFC Copper amplifier installation kit (Motorogue.in – Rs.4500) The positive cable from battery is routed through the blank rubber grommet on the passenger side front door. I did not want to punch a hole in the engine harness grommet on the firewall. 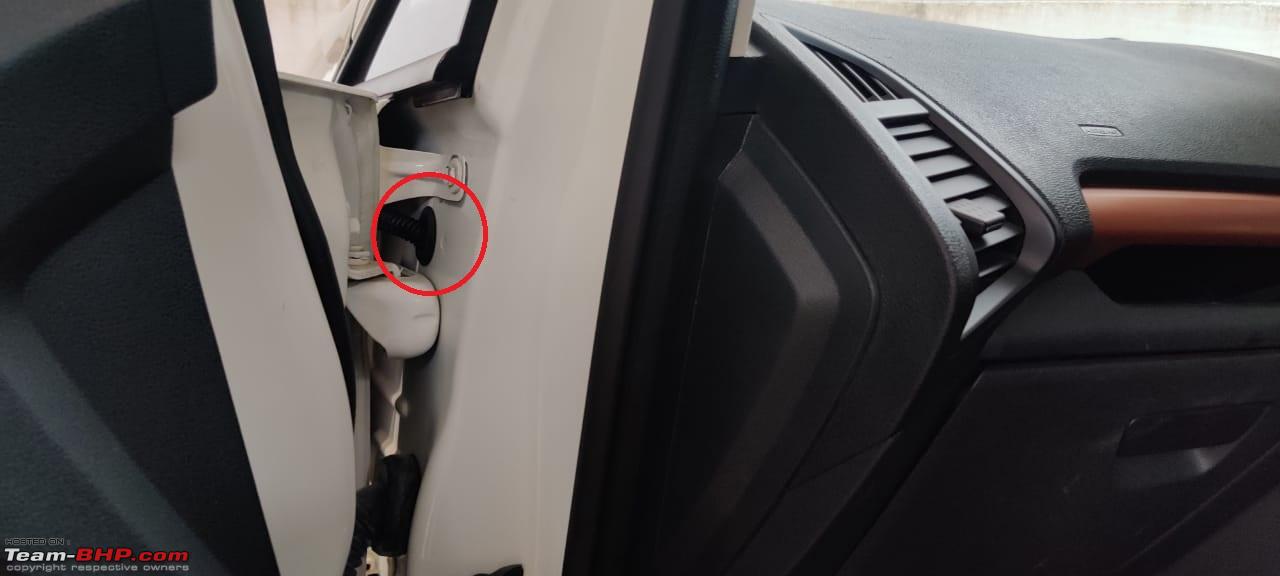 2. Distribution blocks – For +ve with Voltage indicator $15 https://www.aliexpress.com/item/4000369074347.html For Ground $5 https://www.aliexpress.com/item/4000176360335.html 3. Silicone baffles 4 pcs $30 (also available locally on Motorogue.in) https://www.aliexpress.com/item/32960994536.html 4. Woofer insulation foam pads 4 pcs $10 https://www.aliexpress.com/item/1005003732656715.html 5. Scosche/Metra speaker harness bought locally 6. 2 pcs of 5m of 12-core cable bought locally (each cable inside is 18 AWG) 7. I had a local speaker guy build a sealed subwoofer box and Speaker mount rings from MDF. Sub-woofer sits flush with the rear seat slope/angle and as per recommended volume in the manual and sub-box calculations (https://subbox.pro/en/). The sealed sub was filled with polyfill. Sketch i provided to the builder. Not my best drawing  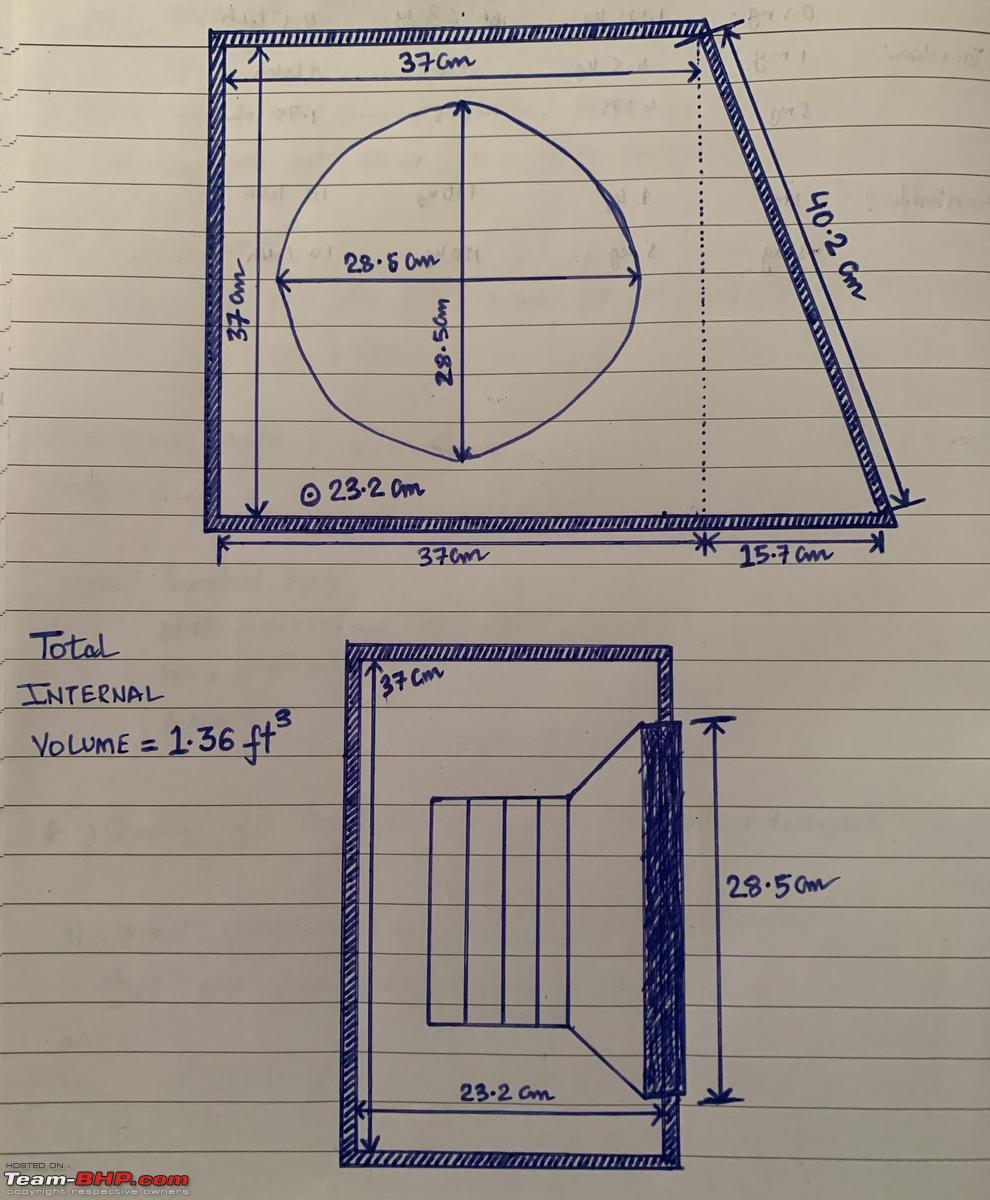 Finished Subwoofer box  8. Big 3 upgrade for car battery system: Alternator to the Battery Positive, Chassis Ground to the Negative Battery Terminal, Ground Wire from the Engine Block to the Chassis. I bought a) 3 meters of zero-gauge (50 mm2) Oxygen Free Copper (OFC) power cable (45 euros @ ebay.de),  b) Battery coupler terminals - https://www.aliexpress.com/item/1005001666859091.html c) Battery clamps - https://www.aliexpress.com/item/1005001953758493.html Installation images: Factory speakers: 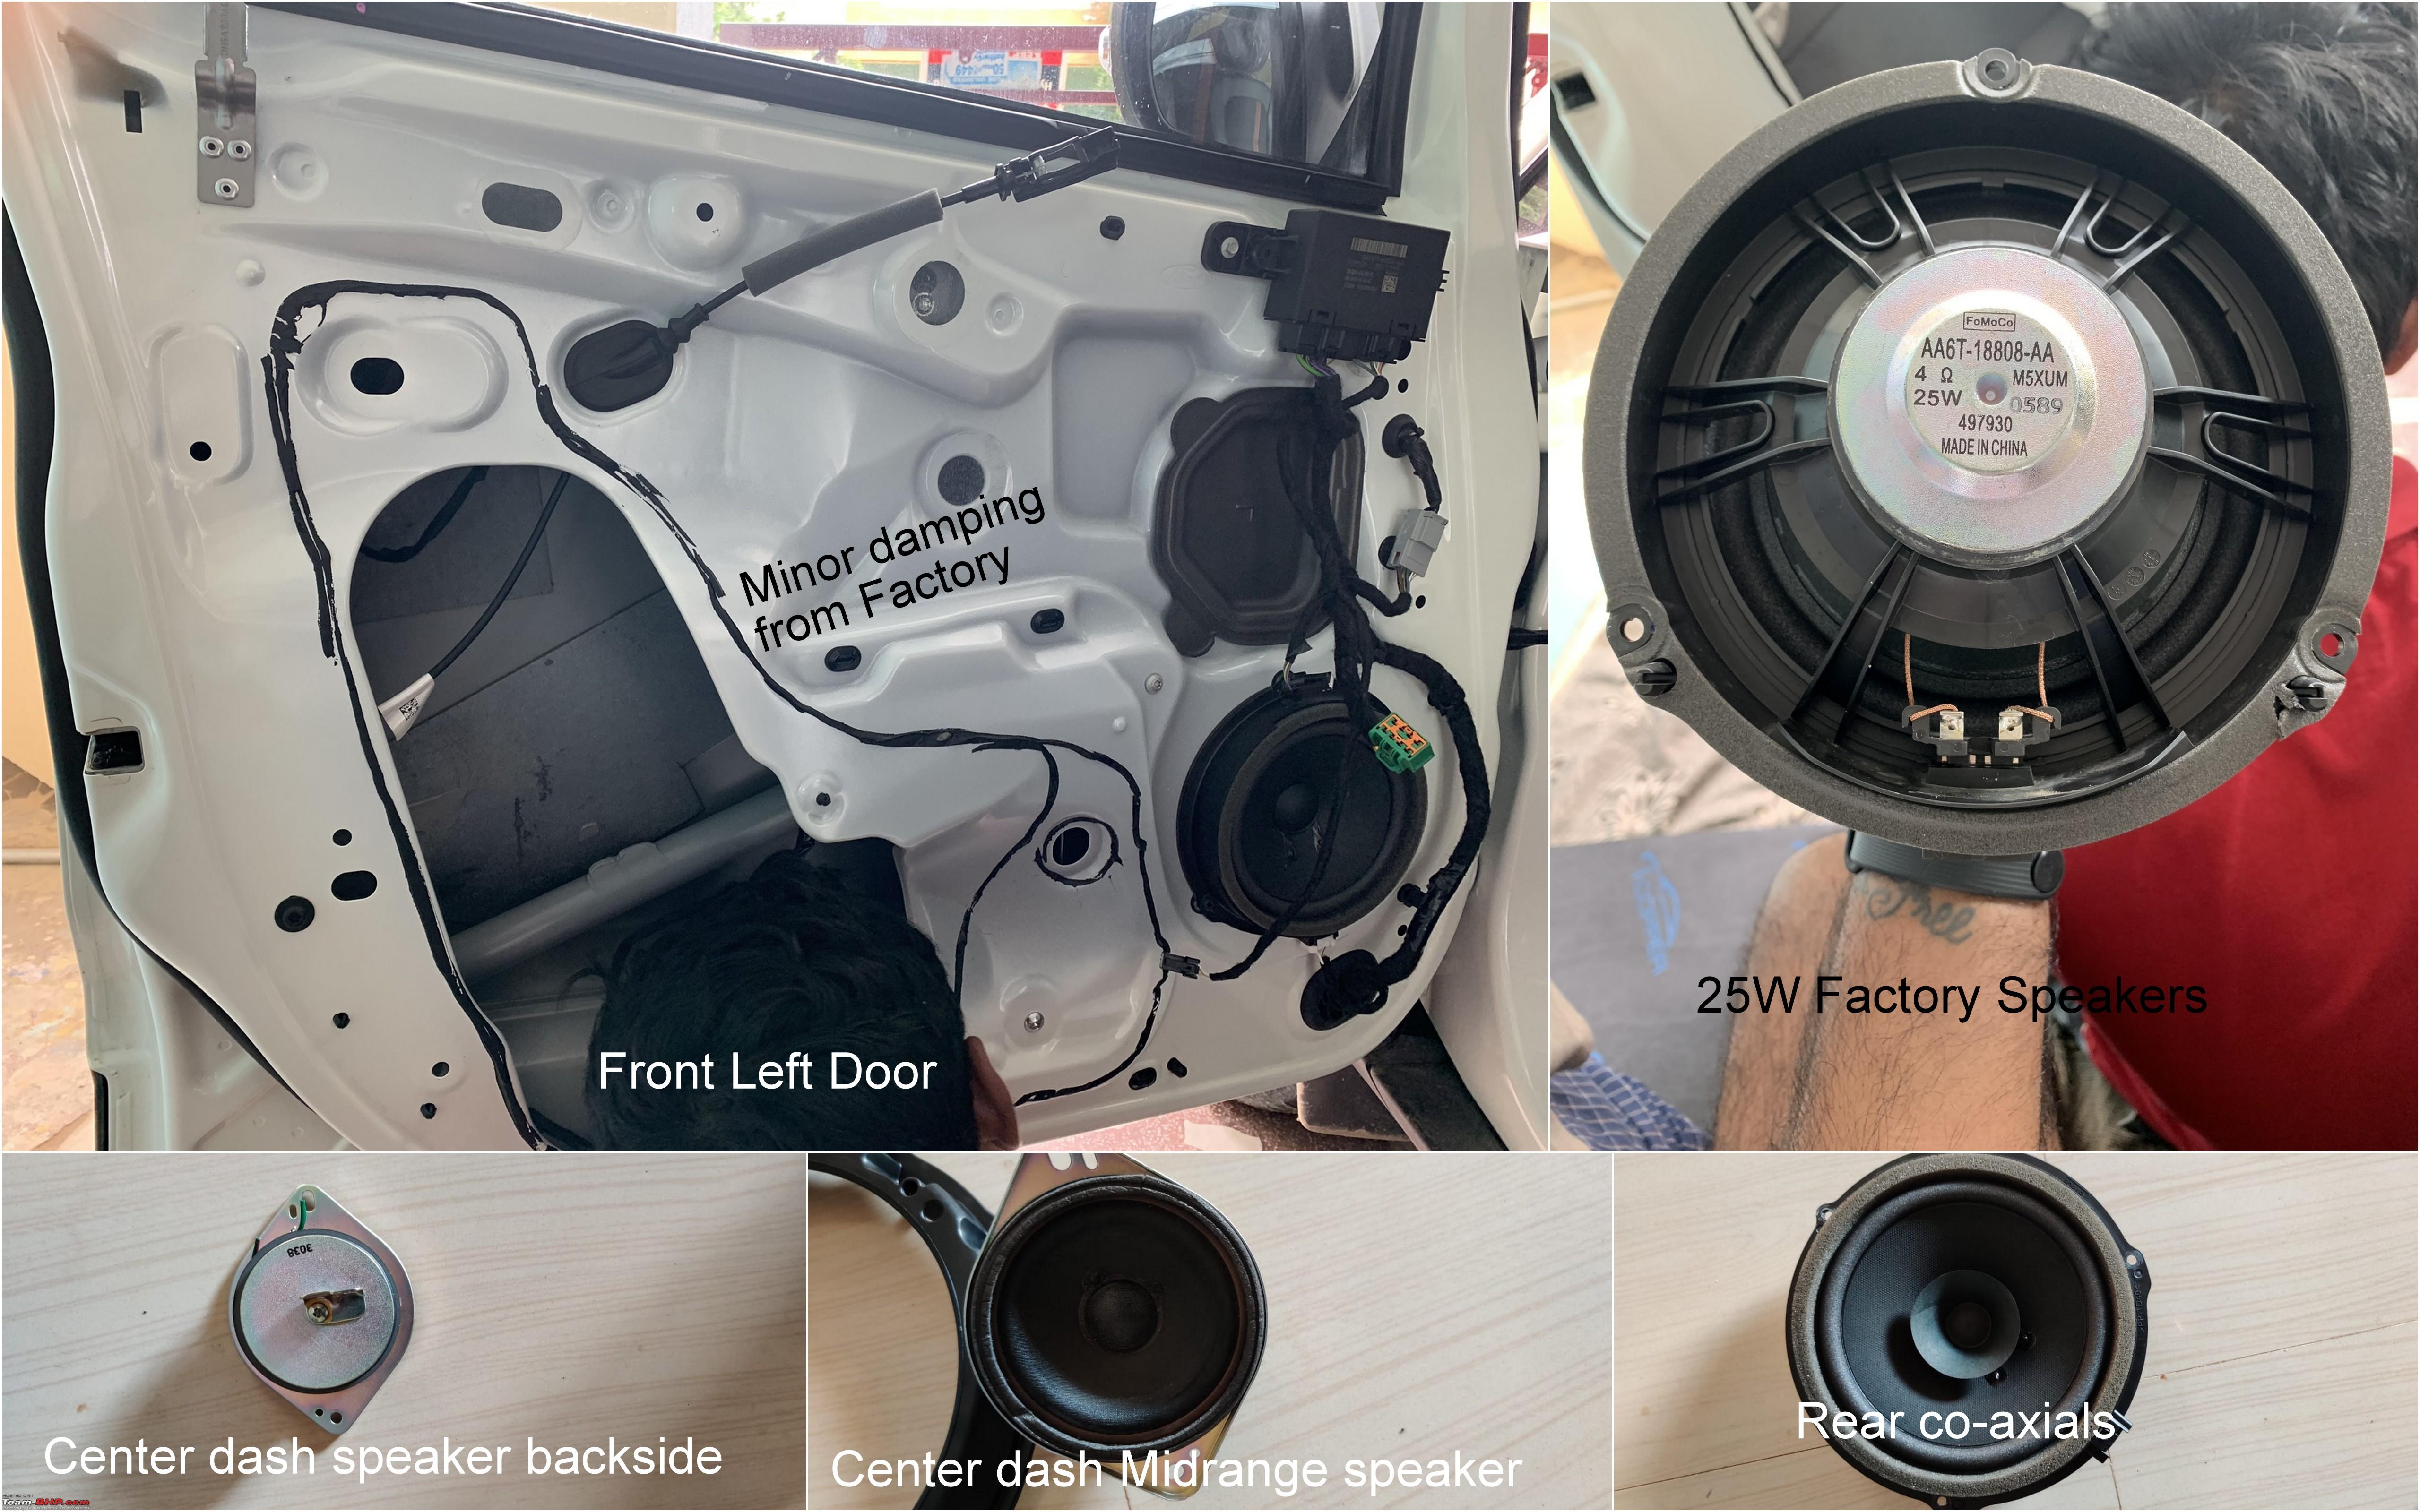 Focals 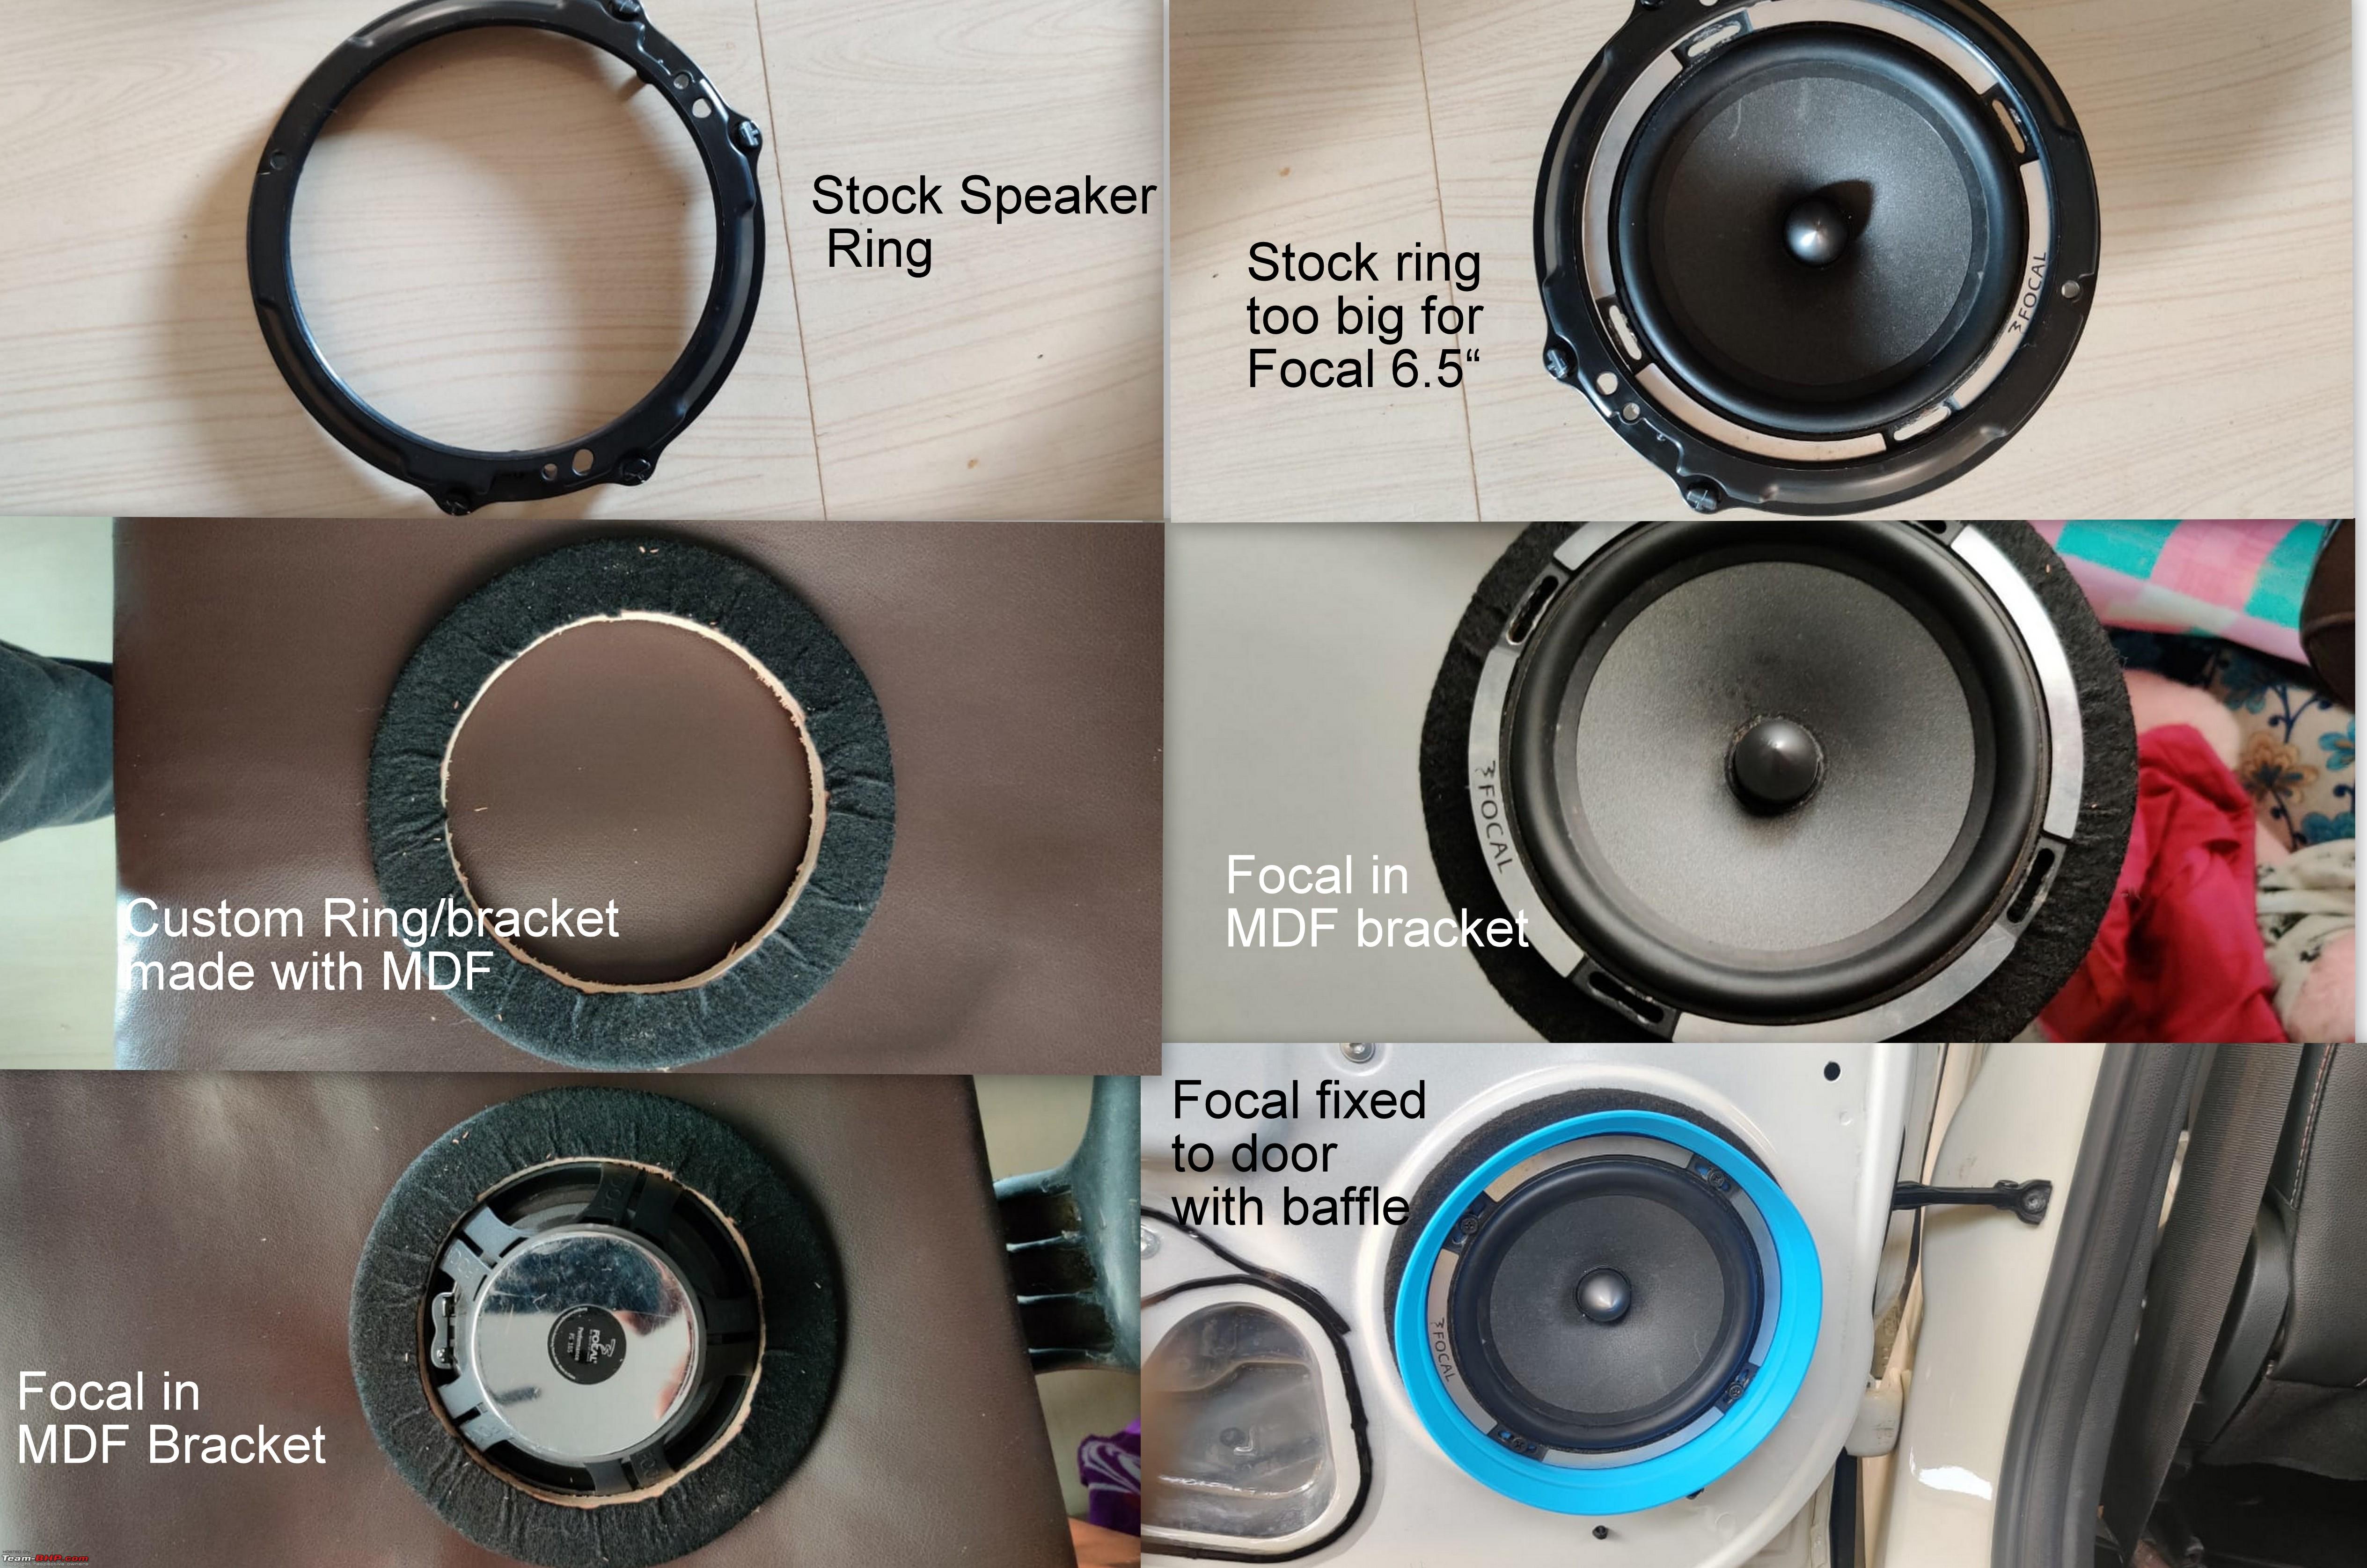 Speaker wiring layout  Power connections layout 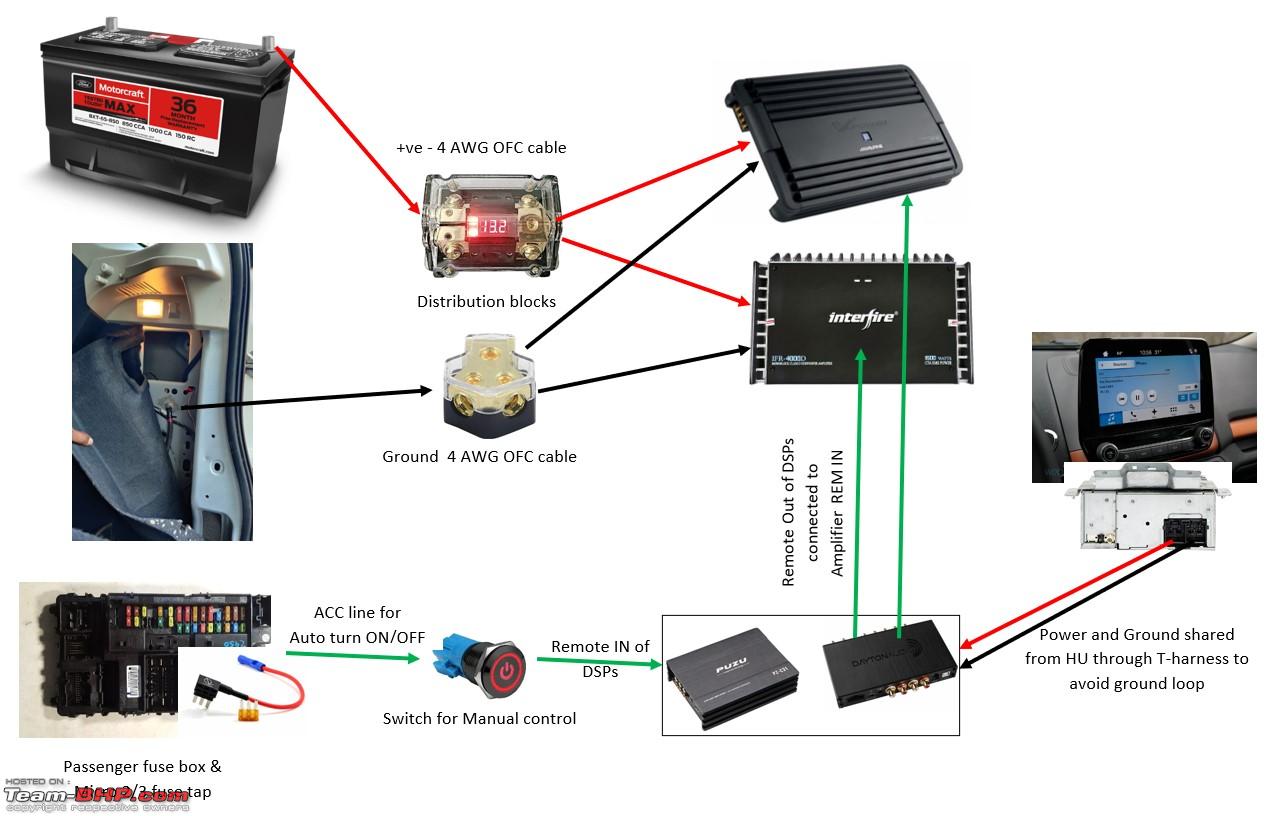 T harness  Notice the Load resistors on the T-harness. Some factory car audio systems have circuitry in their radios that prevent them from producing any output if their original speaker isn’t connected. This is to prevent damage to their filter circuits which occurs when running the system without load. Running so may also cause high frequency noise in some cases. That is why load devices such as resistors are added to fool the system into sensing speakers. Interesting read here - https://www.bestcaraudio.com/why-do-...oad-resistors/ I do not know if the local Globalbyte harness has load resistors, sorry! Positioning the equipment to see best fit (Spot the Focal tweeters flush mounted on rear door pads!) 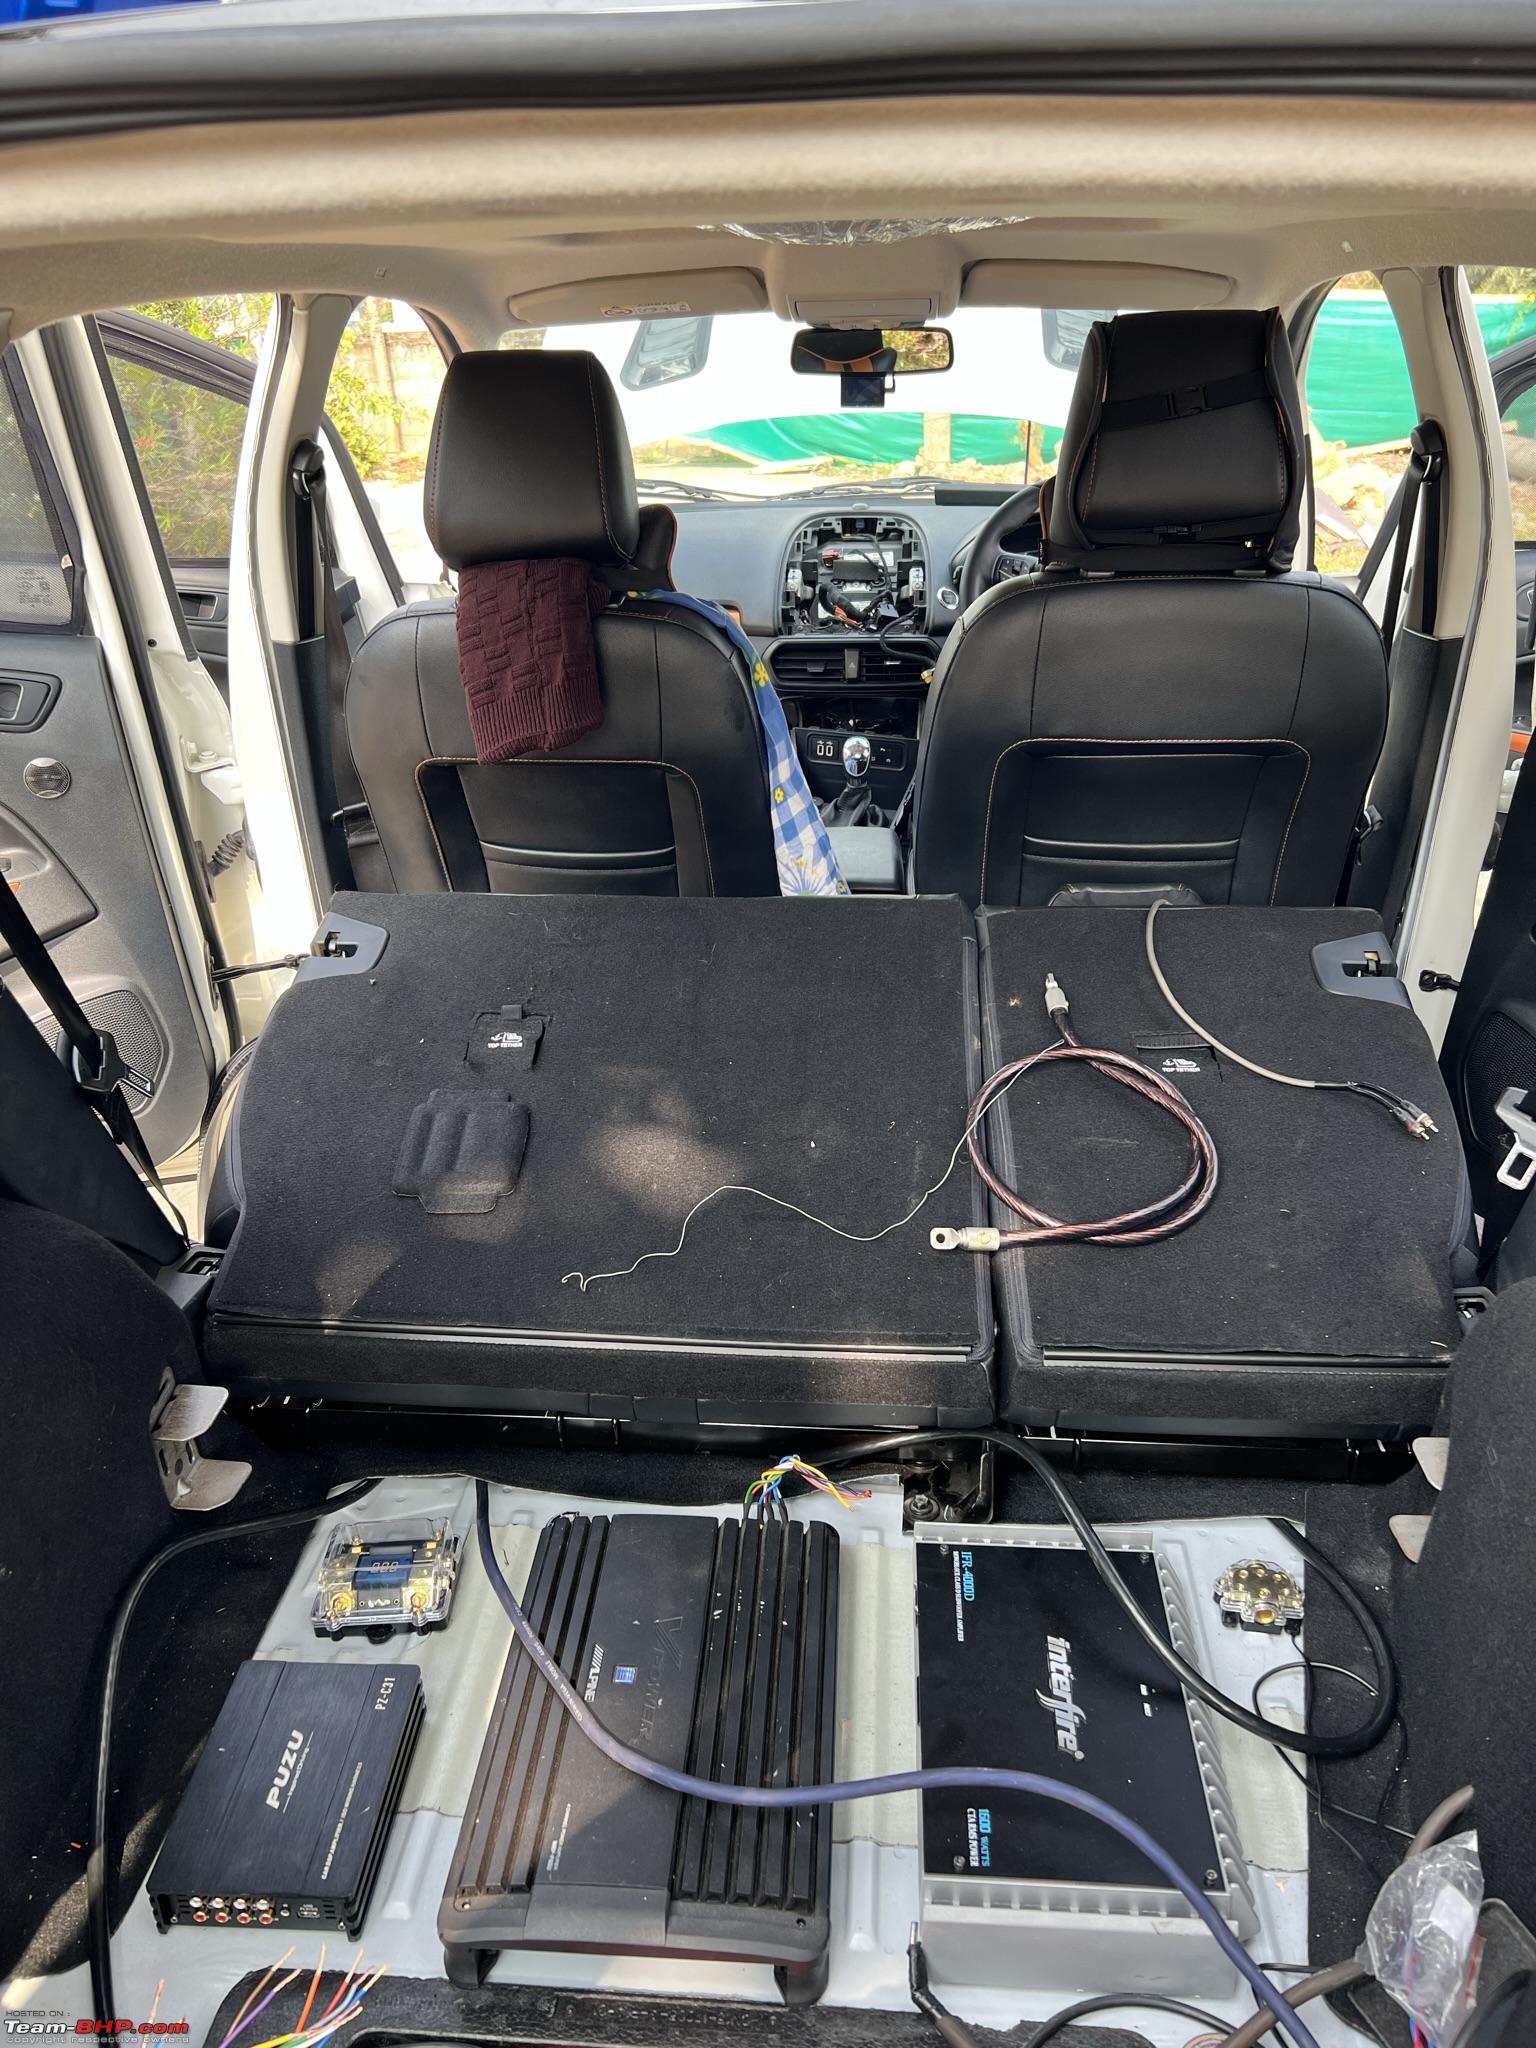 Damping the rear boot  Cross-overs fixed on doors  Equipment fixed on an MDF board cut to required shape 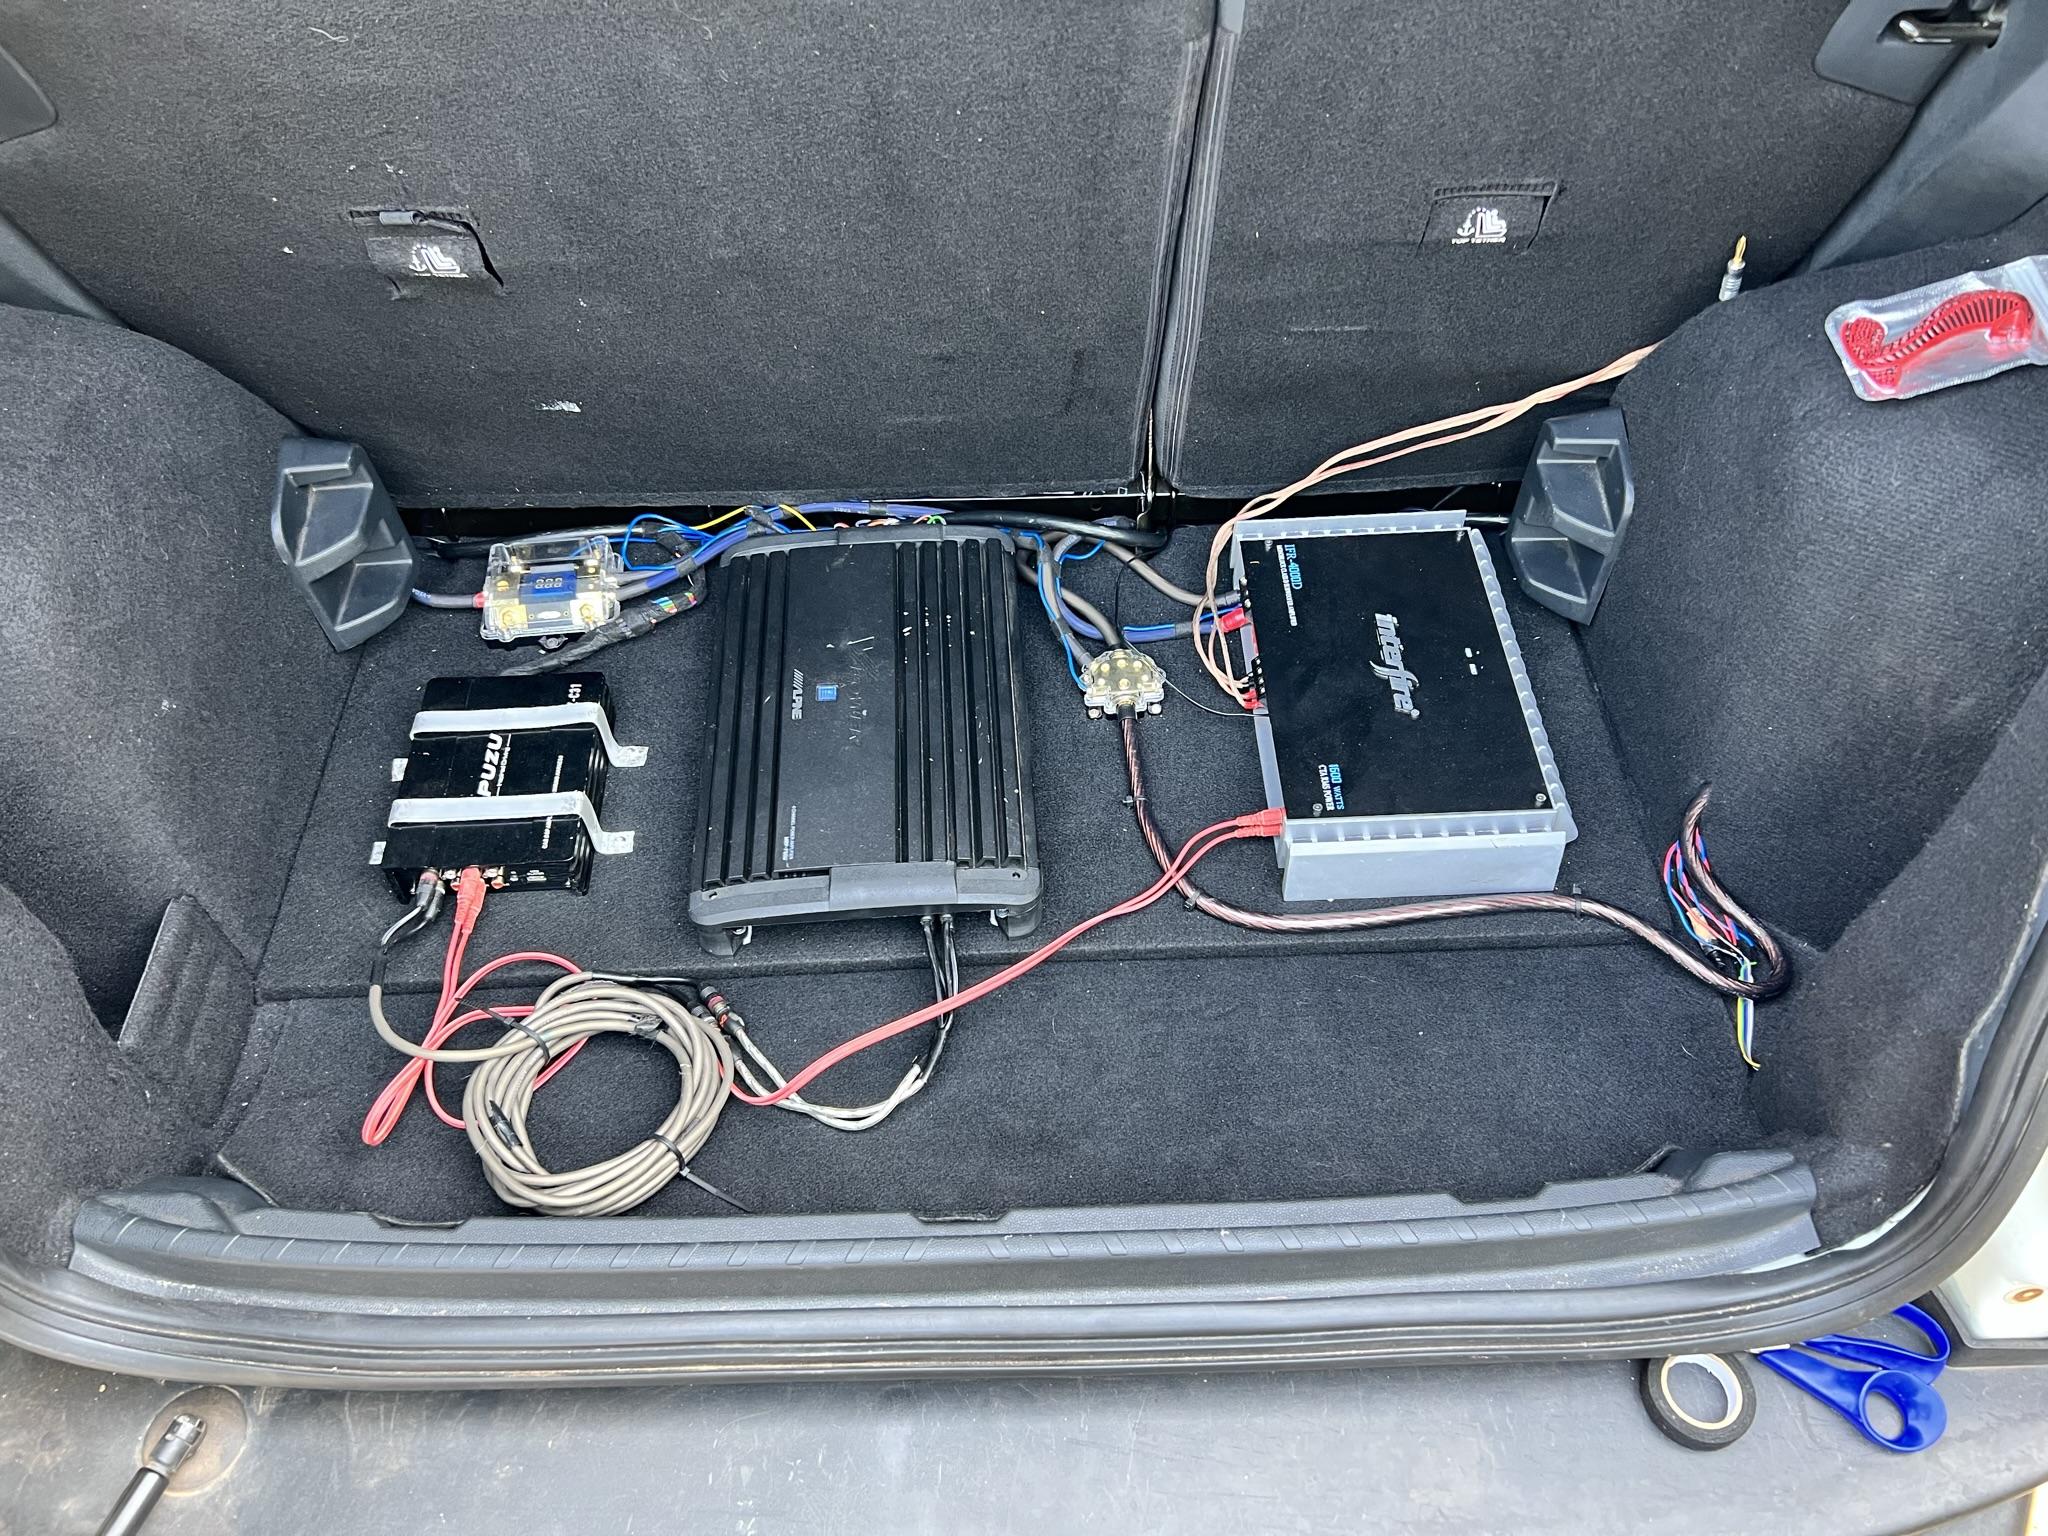 Testing the system S-variant gets a height adjust boot floor which I played to my advantage. I slotted the boot floor at height setting-1. This provided enough space for me to fix the DSPs and Amplifiers to a MDF board under the boot floor. Notice the clean look after slotting the boot floor and fixing the sub-woofer on top. 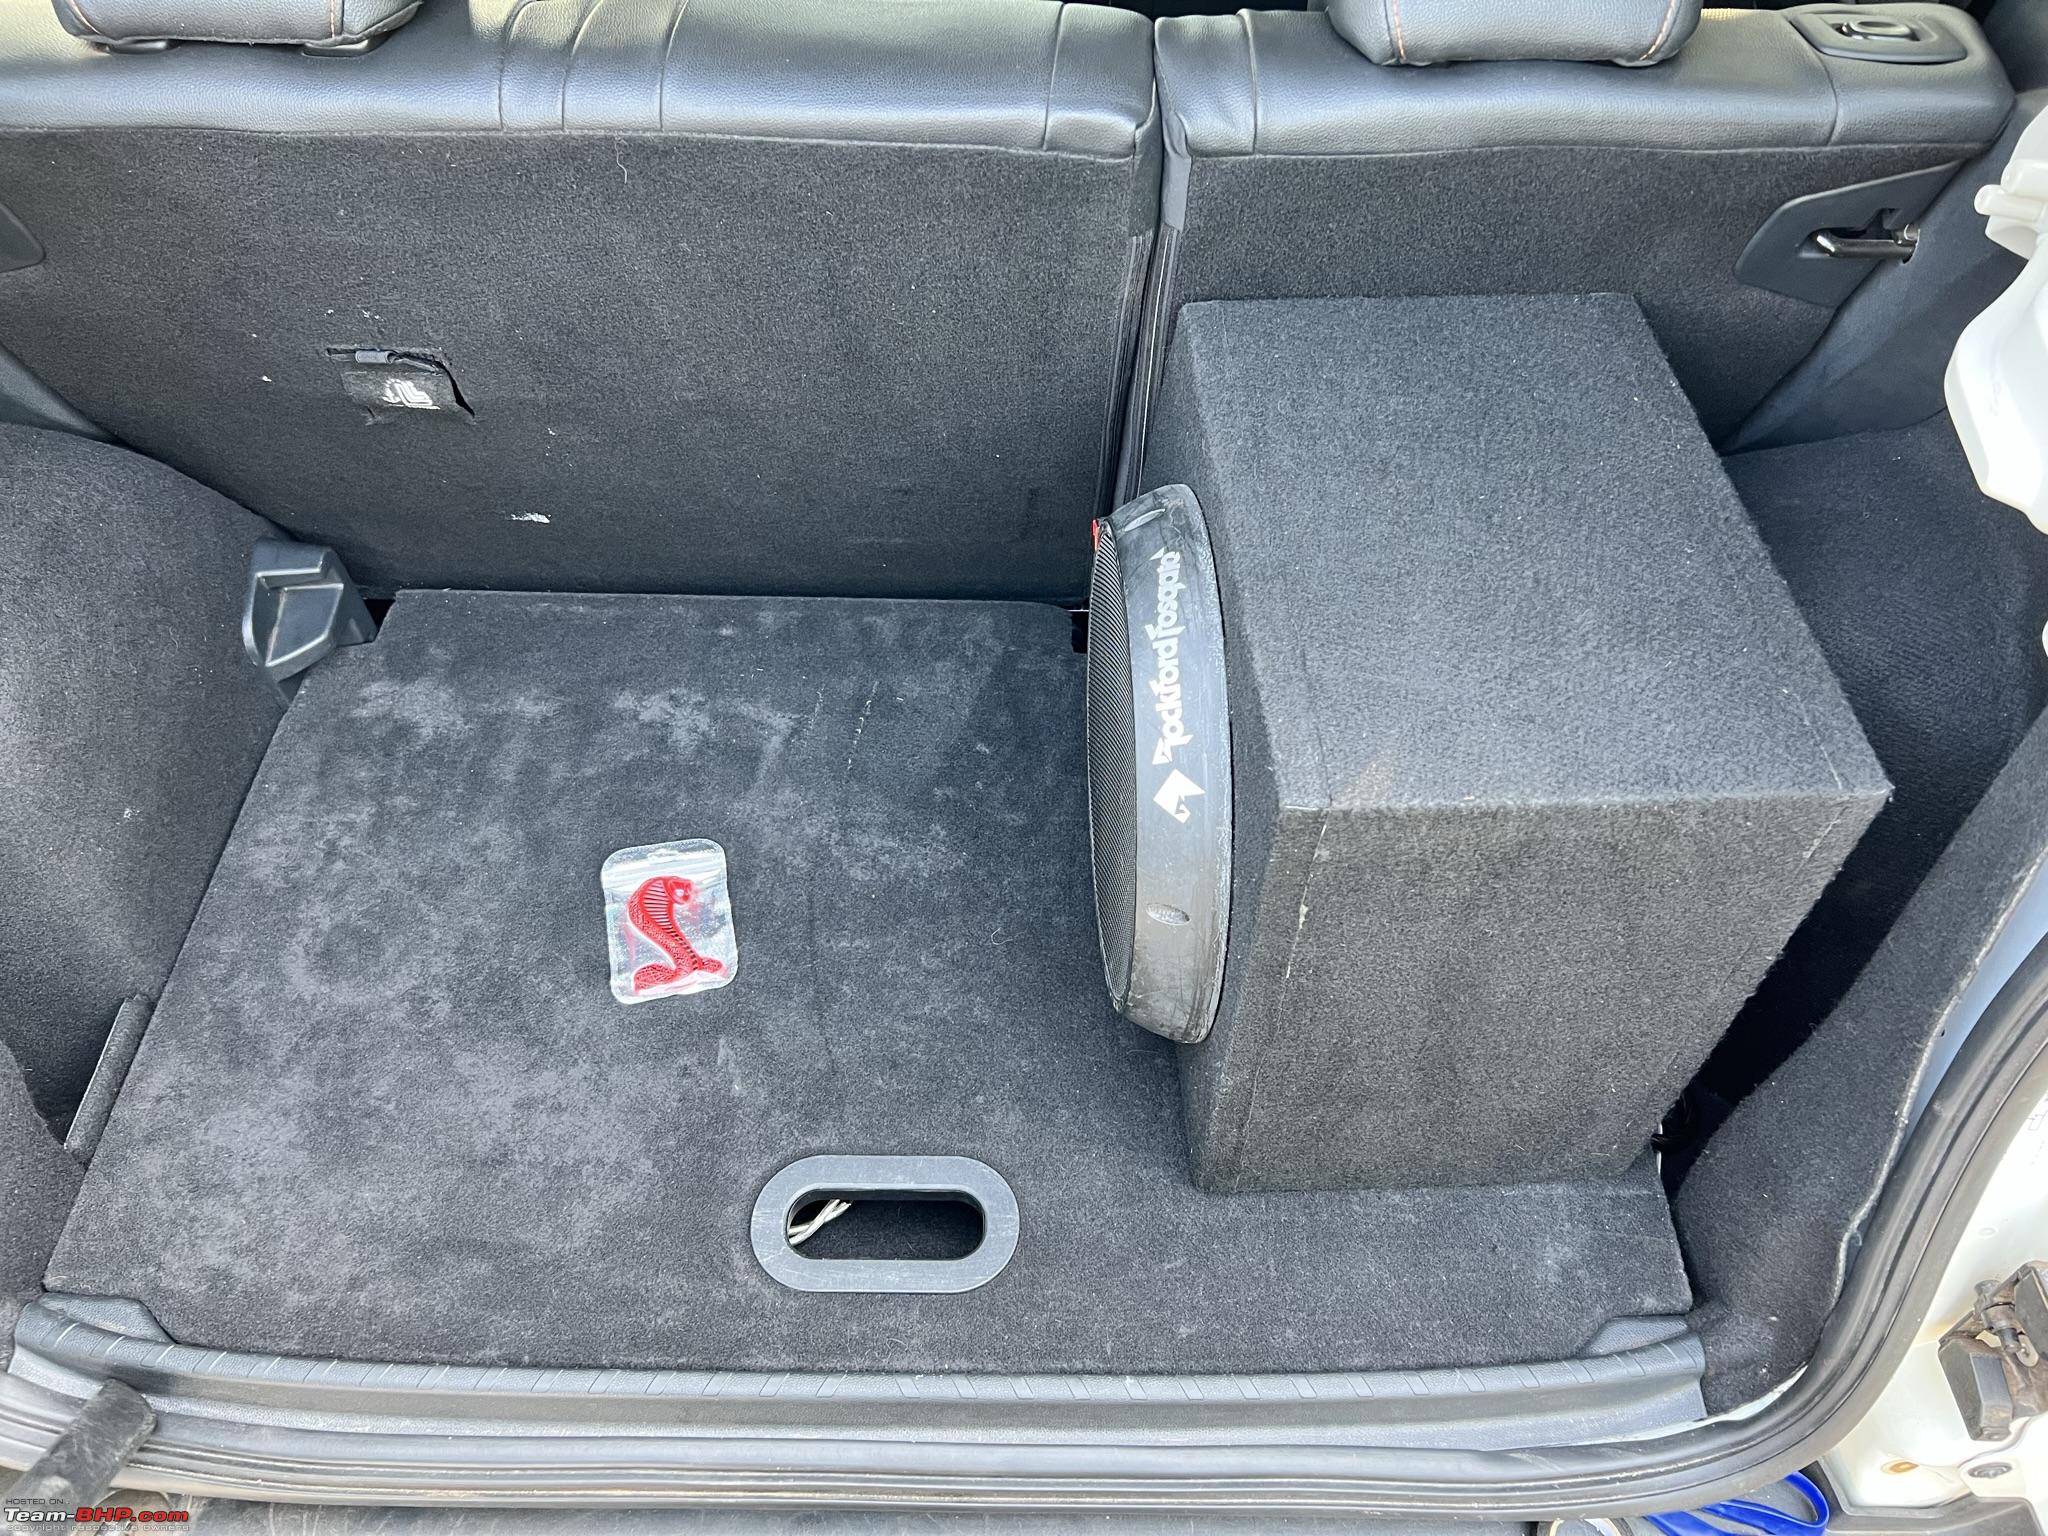 Another audiophile I met on FB EcoSport group from BLR had the following clean install from a professional installer. Hope he doesn’t mind me using this picture. I am sharing this so that anyone trying a clean look can do so.  Last edited by nightraven : 28th February 2022 at 23:04. |
|
| (36)
Thanks
|
| The following 36 BHPians Thank nightraven for this useful post: | adwaith, bamaboy, CEF_Beasts, digitalnirvana, fluidicjoy, GaryTSI, GTO, Harjot37, InControl, jithin23, jothishX, lemedico, Leoshashi, mp417, Nilesh5417, nitinkbhaskar, Potatopoco, Prakritij, PraNeel, raiuday, ramnaresh_2000, Researcher, saikishor, sai_ace, Samfromindia, Shreyans_Jain, skb1811, swiftnfurious, tchsvy, TheLxGuy69, The_Outsider!, VijayAnand1, Viju, Wanderers, ysjoy, Yuvuz |
|
28th February 2022, 16:33
| #3 |
| BHPian | re: DIY: Juicing up the Ford EcoSport S with ICE, Front Park, ST-line cluster, steering wheel and ADAS ICE Software tweaks We time aligned and calibrated the system against pink noise with a Dayton mic I use for my home audio calibration. There are iOS and Android apps as well that one can use to do a basic calibration of your audio system. One such app I recommend for apple users is Mobile tools by AudioControl. We also used calibrated Noise monitoring equipment with Octave functions from work to confirm the readings. Factory head unit ends up becoming the weakest link in an audiophile build for car audio. Since, the car electronics are tightly integrated into the HU, chucking it out was a clear no go. Hence, I was looking for ways to improve the audio quality at the source to maximize sonic performance from upgrades I made downstream. The articles I was reading online casually to achieve this have embarked me on a tangentially different path. Factory audio systems like Sync 3 apply sound processing techniques on the audio being played to match car cabin acoustic profile, variant segmentation, speaker performance characteristics and to protect factory speakers from blowing etc. Ford F150 forum had lot of audiophiles that tweaked their Audio Control Module (ACM) settings using softwares like Forscan or UCDS to disable Factory processing, output flat EQ and enable Line level Variable audio signal output. These settings completely disable any processing applied by the audio player and output pure signal as intended by the composer. This can then be fed into aftermarket DSPs or amplifiers to get a consistent output. I also realized that many of these cars ran Sync 3.4 as opposed to Sync 3.0 provided in Indian variants at the time in 2019. This intrigued me and introduced me to the world of Forscan, UCDS, Cyanlabs, Fmods and informative forums like F150forum.com, ffclub.ru, fordownersclub.com, 2gfusions.net, mustang6g.com which had a lot of Ford related mods. I will explain Forscan and UCDS in detail in next section as they are oriented more towards module programming than dealing specifically with ICE. I bought a clone 15$ ELS27 OBD on AliExpress compatible with Forscan to test the waters. This reader performs all Forscan functions like the original OBD EX. Forscan will identify it as a clone, but it will not hamper any functions. ELS27 - https://www.aliexpress.com/item/32847034453.html Low-cost Forscan scanners come in two models 1) ELM327, which are older variants and support less CAN protocols. They typically have a manual toggle to switch between channels. These are obsolete and not recommended.  2) ELS27 which support 3-4 CAN channels simultaneously and auto-switch. These are clones of readers like OBDlink EX.  By default, Factory Head Unit is configured to send full range signal to front speakers (components) while rear speakers (co-axials) receive only mid-range frequencies. This is probably done to protect factory speakers. However, this seems illogical considering stock speakers are co-axials with tweeter at the center. In case you installed aftermarket components at rear, then you will notice that tweeters are not working well. Notice that Default Speaker-3 and Speaker-4 (LR and RR) output is set to Non-tweeter only  I configured the ACM using Forscan to enable (my post on Forscan forum - https://forscan.org/forum/viewtopic.php?f=16&t=16150) 1. Full-range signal to rear channels by enabling Woofer and Tweeter for speakers-3 and 4. 2. Flat EQ output This setting only deals with EQ adjustments applied by the Head unit by default. This is not related to the Parametric EQ menu that we see on the head unit which we use to adjust the sound profile. The EQ menu will work as usual.  3. Audio output to 8-channel audiophile Not really sure what this is doing. I tried all the options, and this was by far providing the best performance. 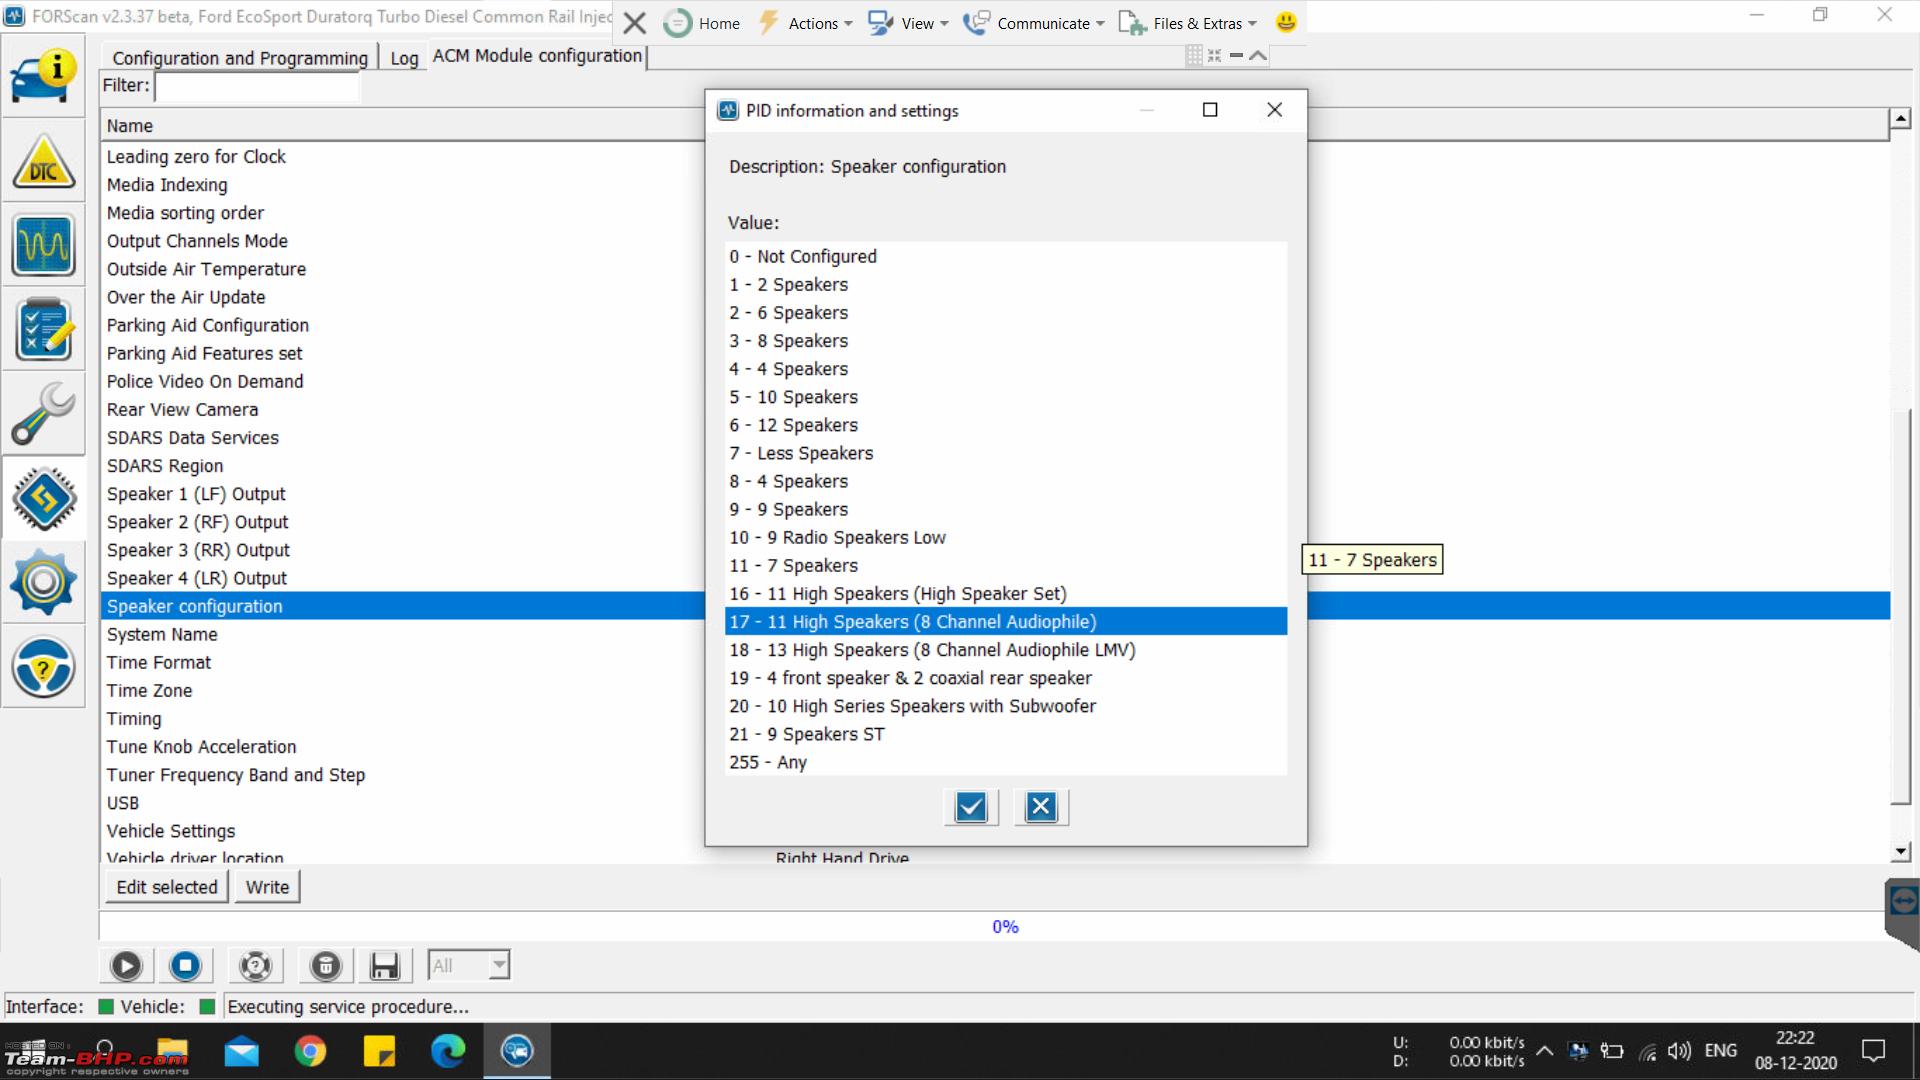 You will have to reset the ACM after making these changes. Flat EQ and Audiophile output setting brought considerable perceptible difference even on a friends stock Sync 3 system and they engage rear speakers better than before. However, as a side effect chime sounds are also louder as they are played through rear speakers in Ford cars. Here is what the DSP control software looks like. Reminded me of Winamp in the 2000s Puzu DSP control 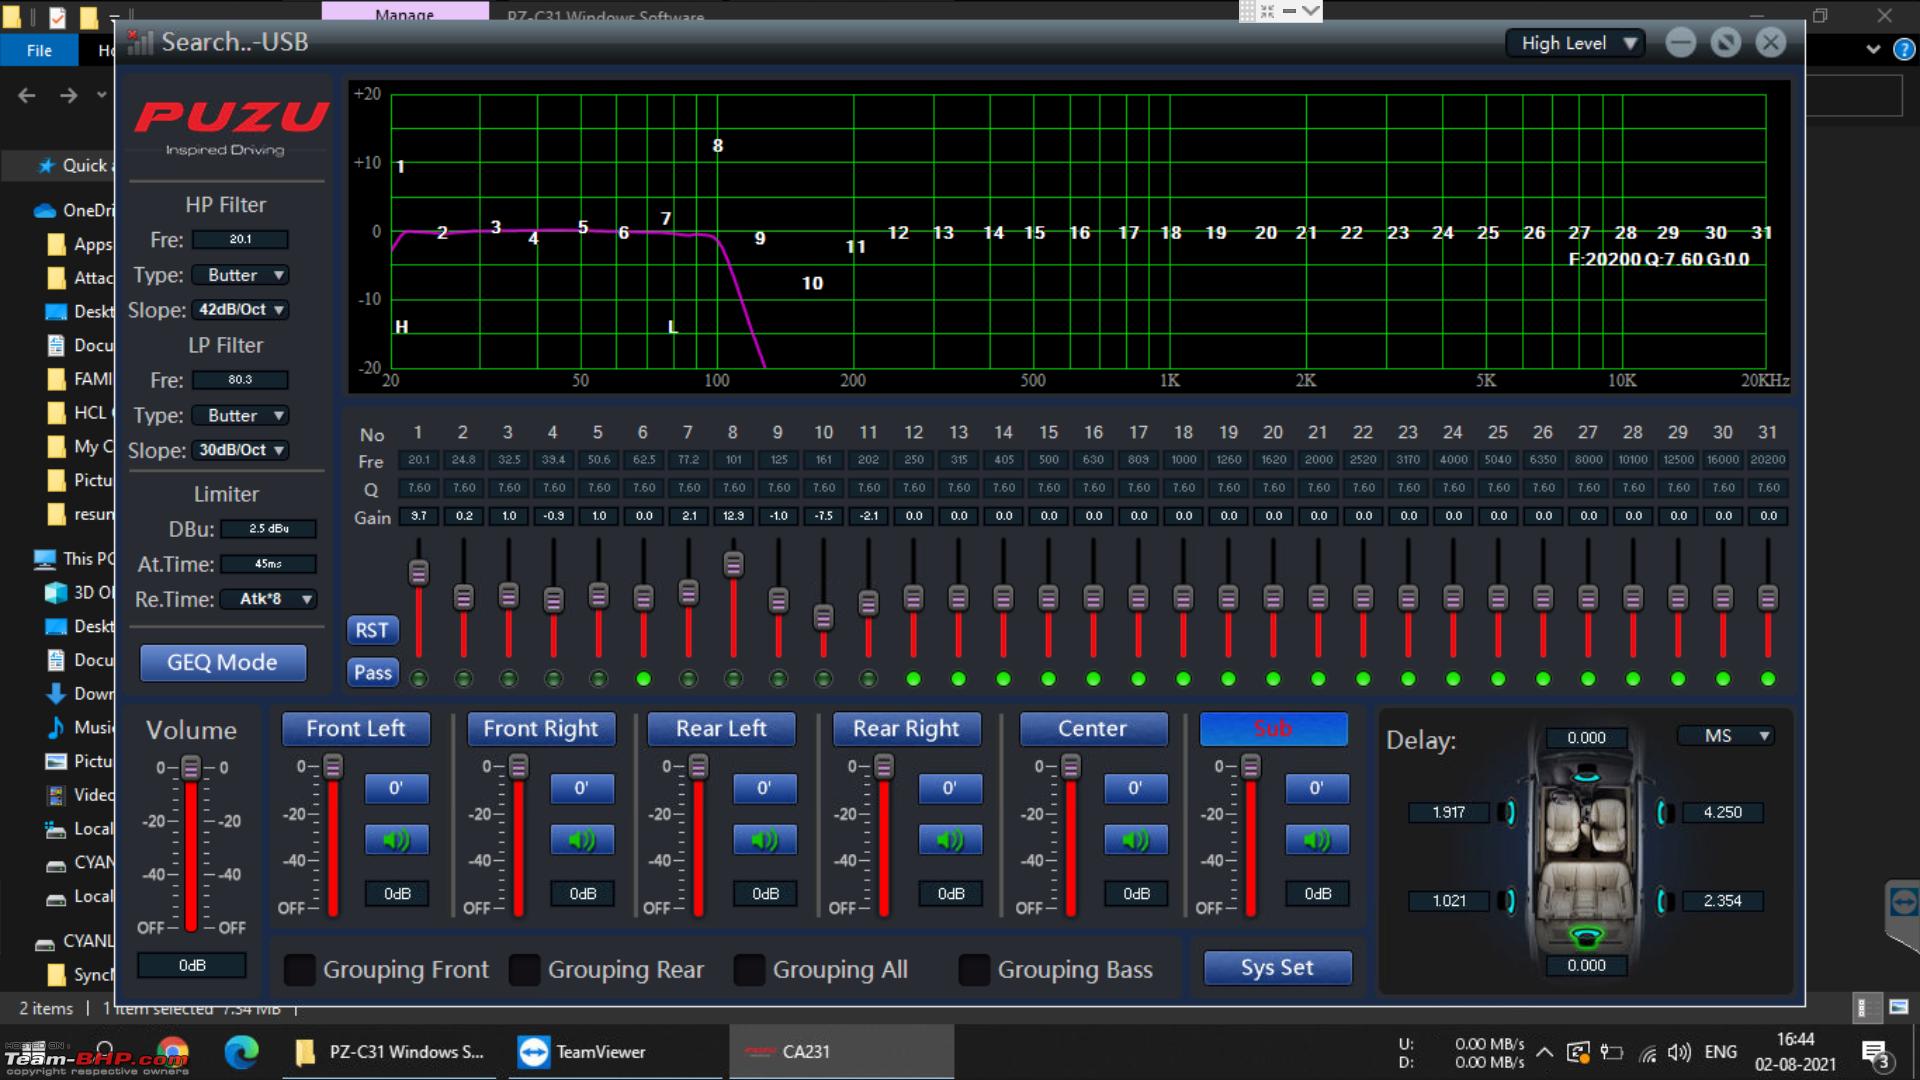 Dayton DSP control  Cyanlabs (https://cyanlabs.net/) to upgrade Sync OS through USB without depending on Ford OTA updates or update files from Ford owner website. I immediately upgraded my Sync 3.0 to 3.4. Note that upgrade from 3.0 to 3.4 is irreversible and in case something is messed up then warranty will not cover it. Chances of bricking the unit permanently is less for Ford India cars. Only factory units that came with 3.4 from factory (2020 and newer) have issues with reformat mode during update. If you are careful and install through auto-install setting it should be okay. Updating to the most recent 3.4 (build 21265) from 3.0 is worth it as bugs related to Android Auto, CarPlay etc. are quashed, and UI is more responsive. I will not cover the how of it as fellow enthusiasts - naveen (@nkdev89) and @jithin23 on the forum have already shared their experience with Sync 3.0 upgrade. Interested can follow the tutorial at https://cyanlabs.net/tutorials/windo...update-to-3-4/ and these topics have also been extensively discussed on EcoSport Owners groups on FB. F-mods (https://www.fmods.net/) Huge shout out to the enthusiast community at F-mods. They have jailbroken the Sync 3 OS (based on QNX) and developed custom scripts to run in the car such as video player, custom backgrounds, themes, CAN based hacks like enabling camera view while driving, display custom information like weather, stocks, car readings etc. on the main screen. CAN hacks require an Arduino board connected to the OBD. Accessory Protocol Interface Module (APIM) which runs the Sync 3 OS is located behind the instrument cluster. Inside the frame it has two boards 1. Power board (VMCU) that deals with power supply and microcontrollers 2. Data board which has the TI OMAP5432 processor, RAM, eMMC flash etc. Indian Sync 3 units do not get factory navigation. They do however have GPS to augment navigation during AA and Carplay use. They are equipped with 1 GB RAM and 8 GB of Memory. Sync 3 Navigation units offered in EU and US are essentially same, but they come with 2 GB RAM to run the Nav app and 32/64 GB Memory to store the maps. APIM unit  PCBs making up the APIM unit 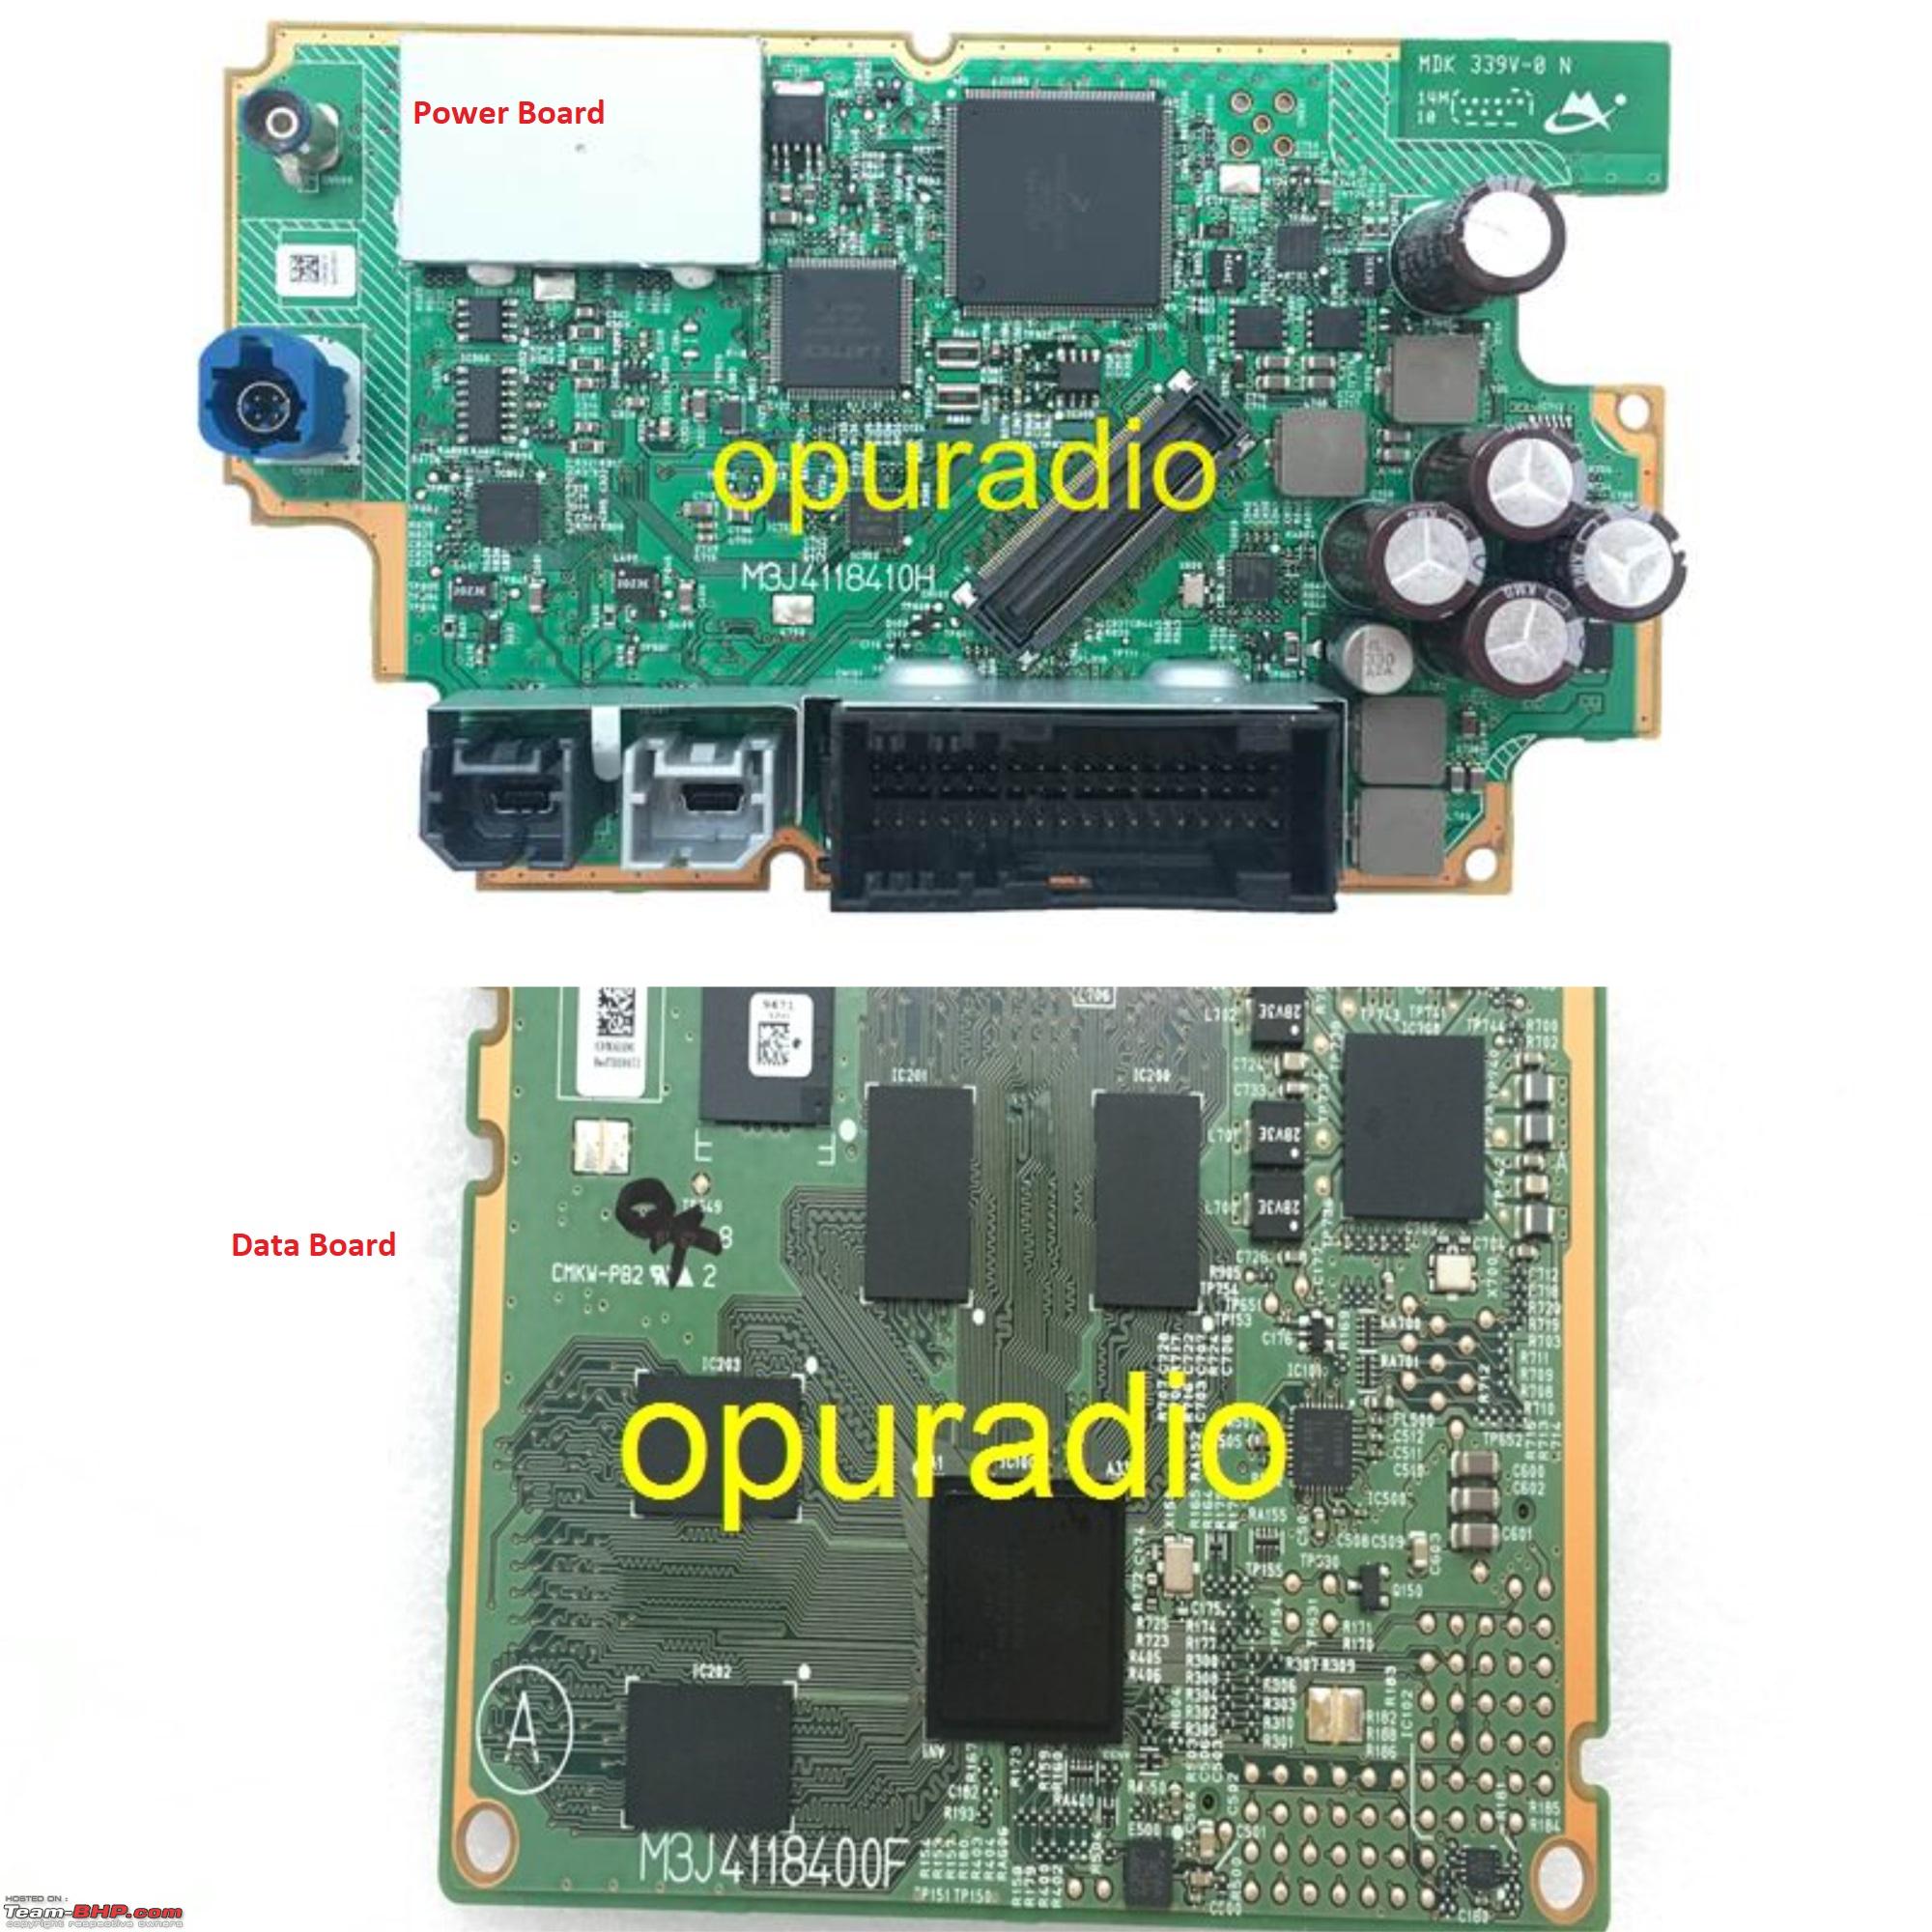 To jail break the unit, F-mods previously relied on disassembling the Data board from the APIM unit and connecting the Data paths from the eMMC to a computer through a MMC reader or J-Tag. I did not want to risk damaging my Factory data board in my first try and worst case be left with an incapacitated ICE. I decided to get a data board from a Sync 3 with Nav so I can have a better specced Sync 3 with factory navigation and jailbreak it while I am at it. I got a 32 GB data board for $45 during the first COVID wave. Apparently, they jacked up the prices to $150 now which is daylight robbery. You can get a complete APIM unit for less than that in US/EU ebay. Data board link - https://www.aliexpress.com/item/1005001813600428.html Sync 3 data board wiring 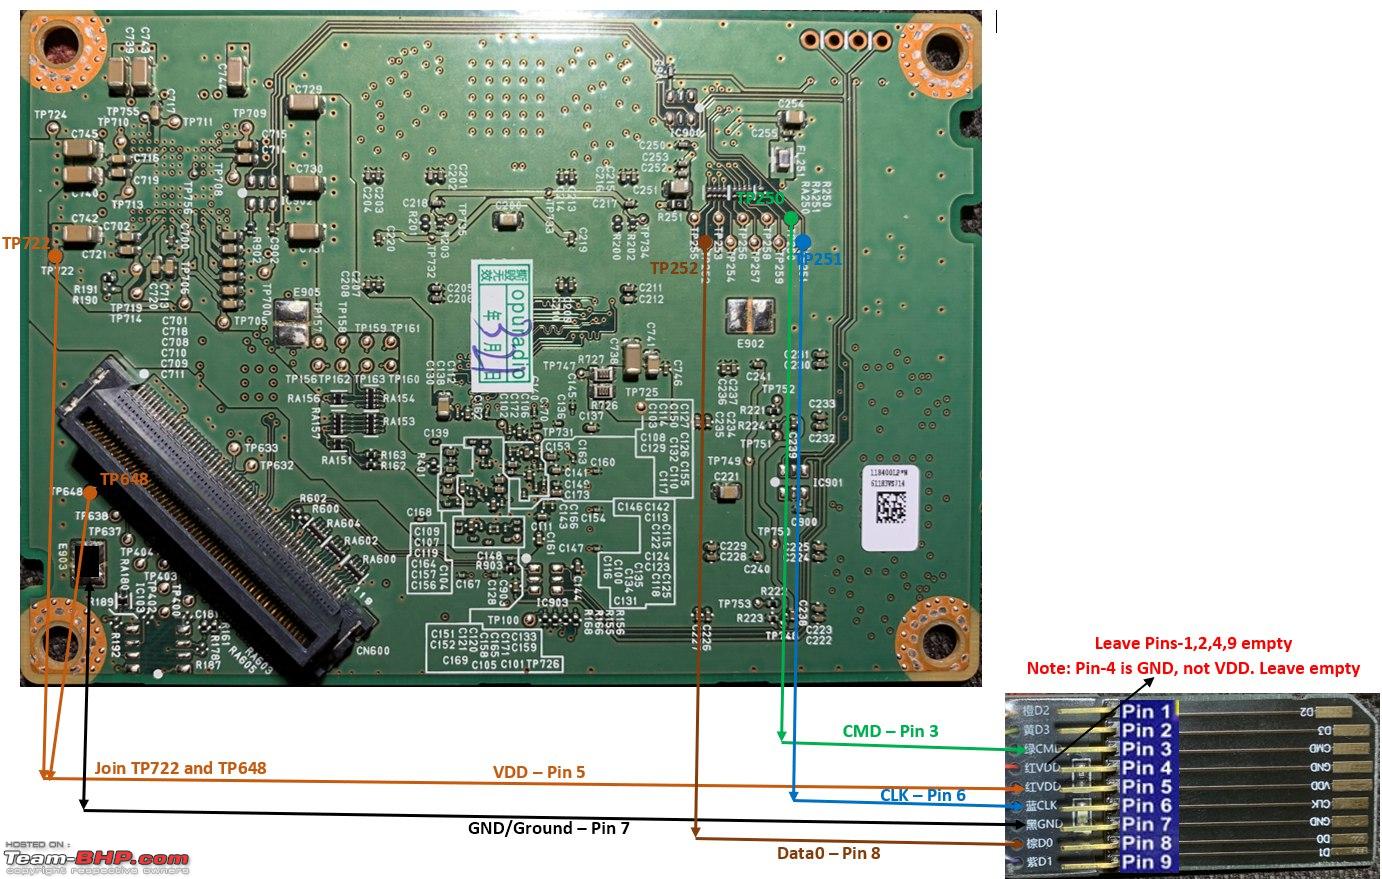 Data board comparison 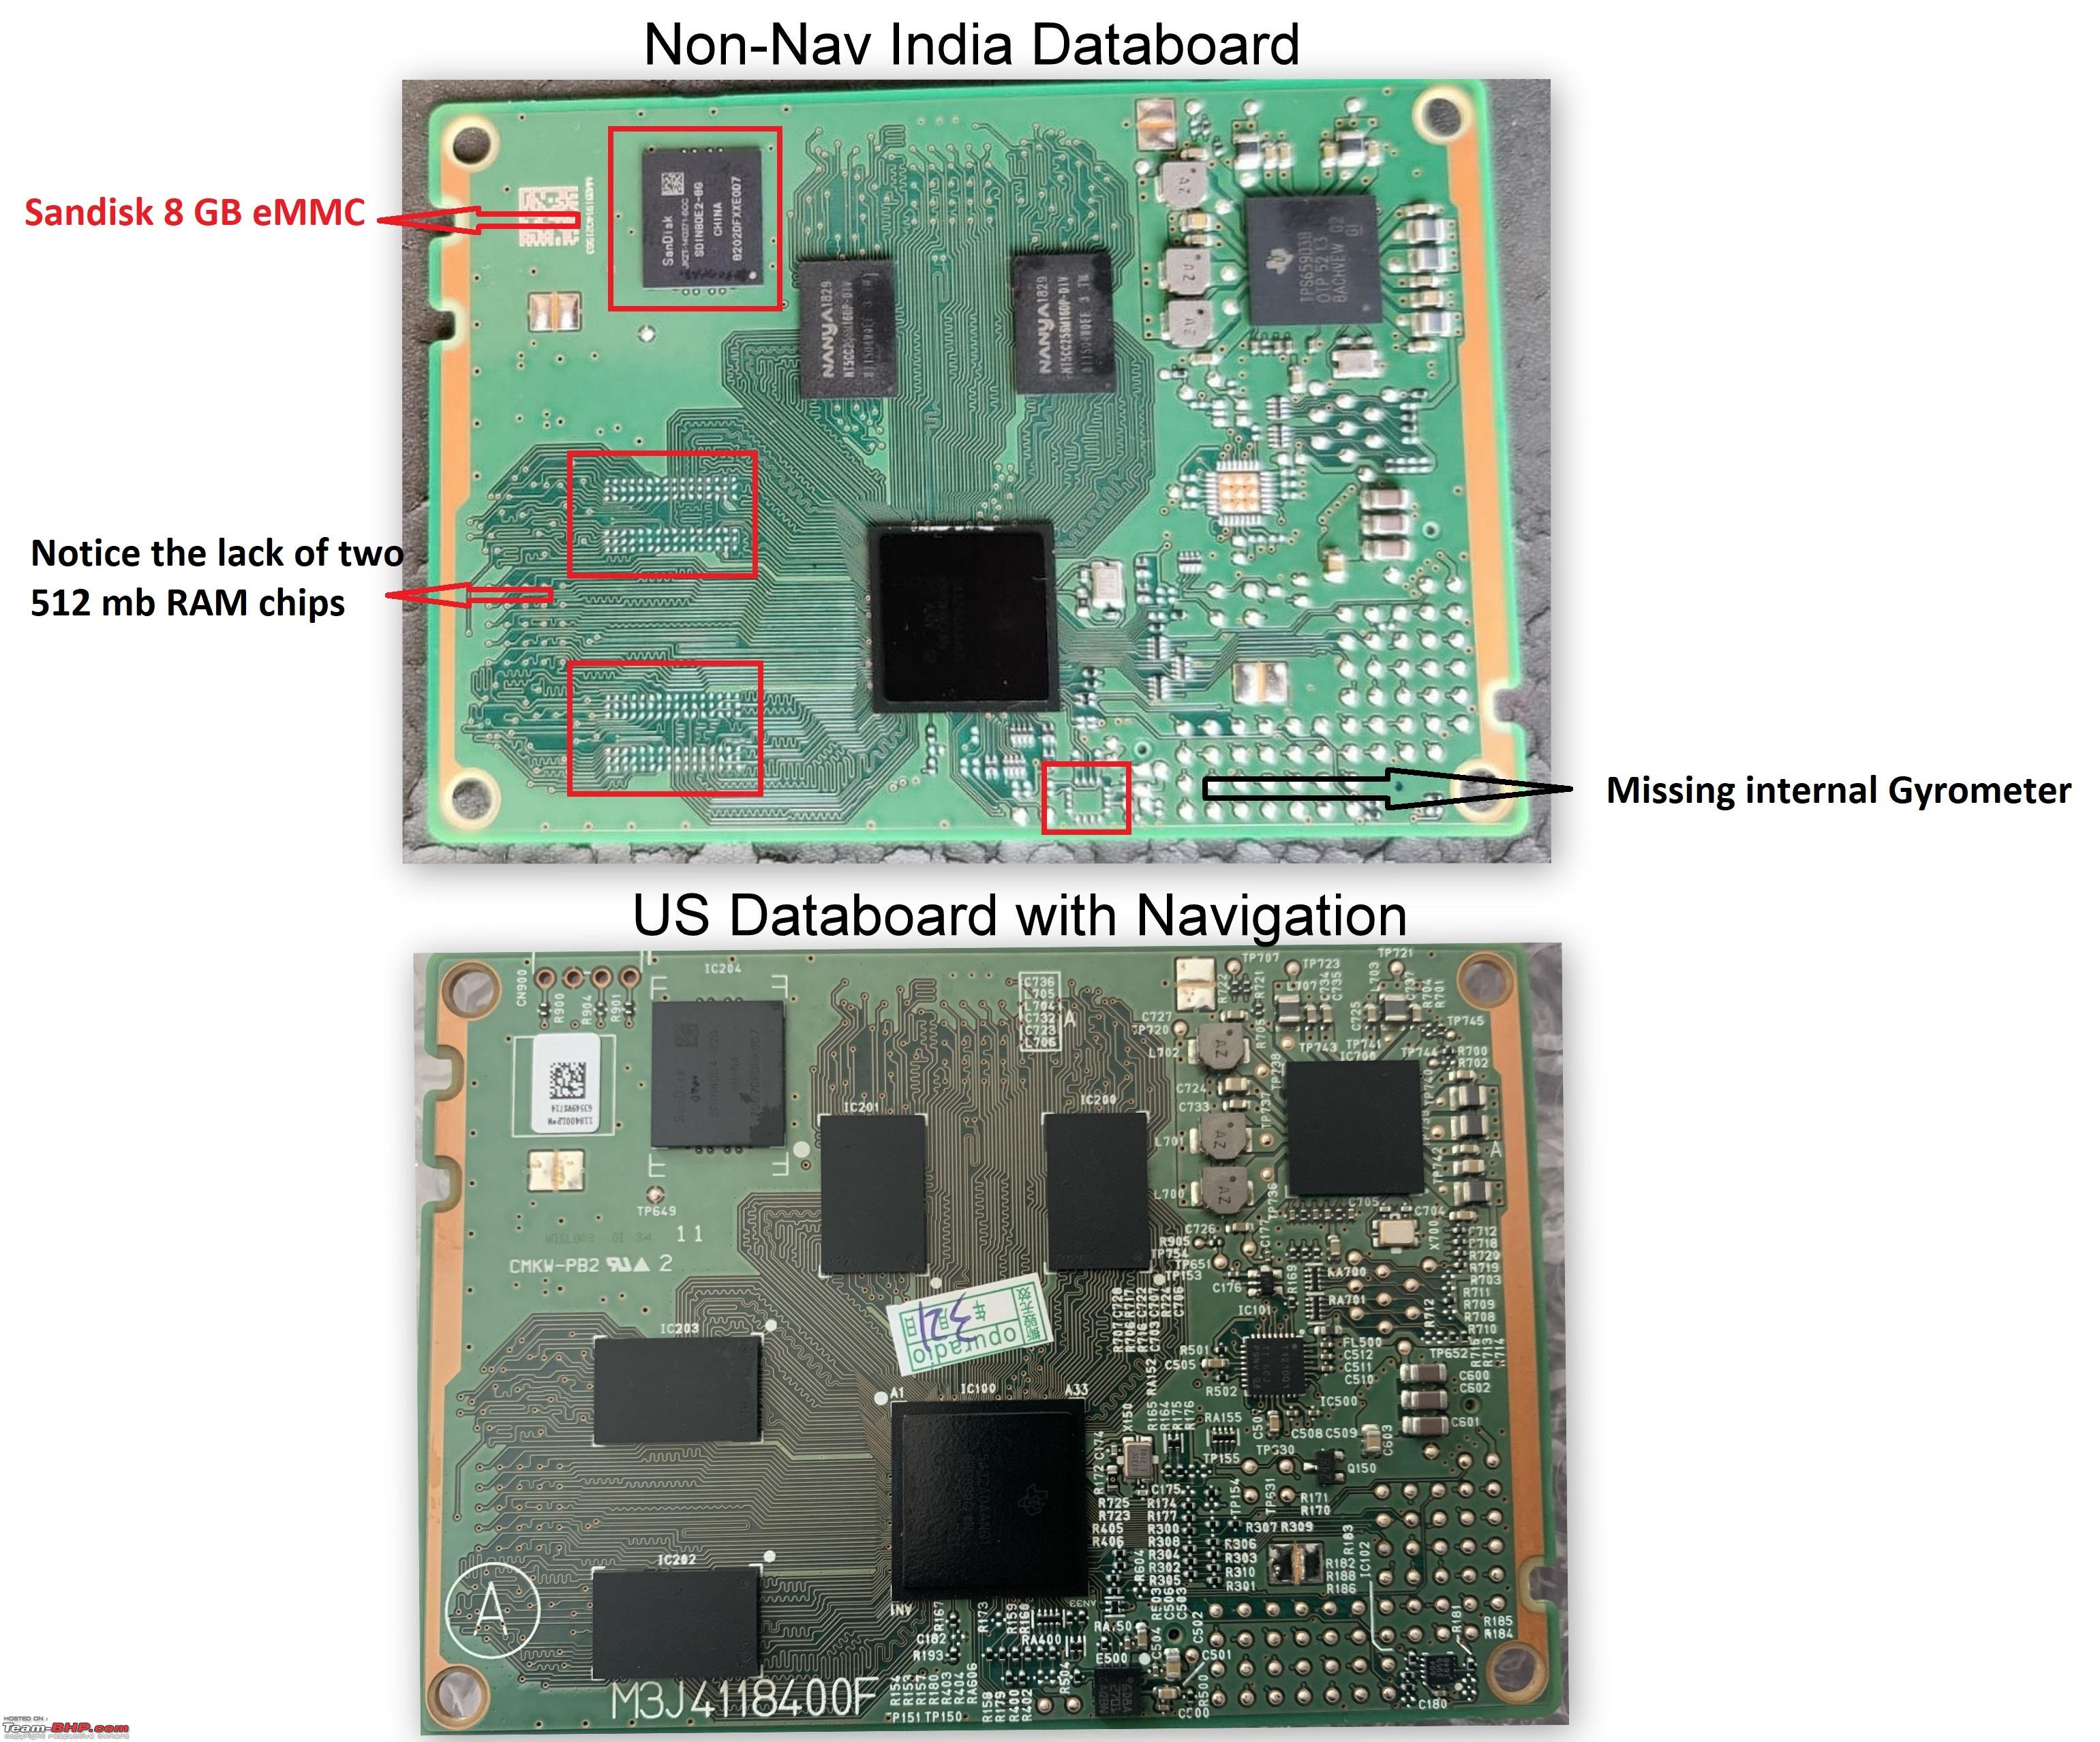 Factory nav is obviously not required when you are using real-time applications like Google maps or Waze. However, during a recent night camping trip to a remote place in Andhra Pradesh we were stranded with no mobile signal. Factory nav came to our rescue and helped us get on the right route. Factory Nav on my Ghost  Wiring the eMMC to the laptop for jailbreak 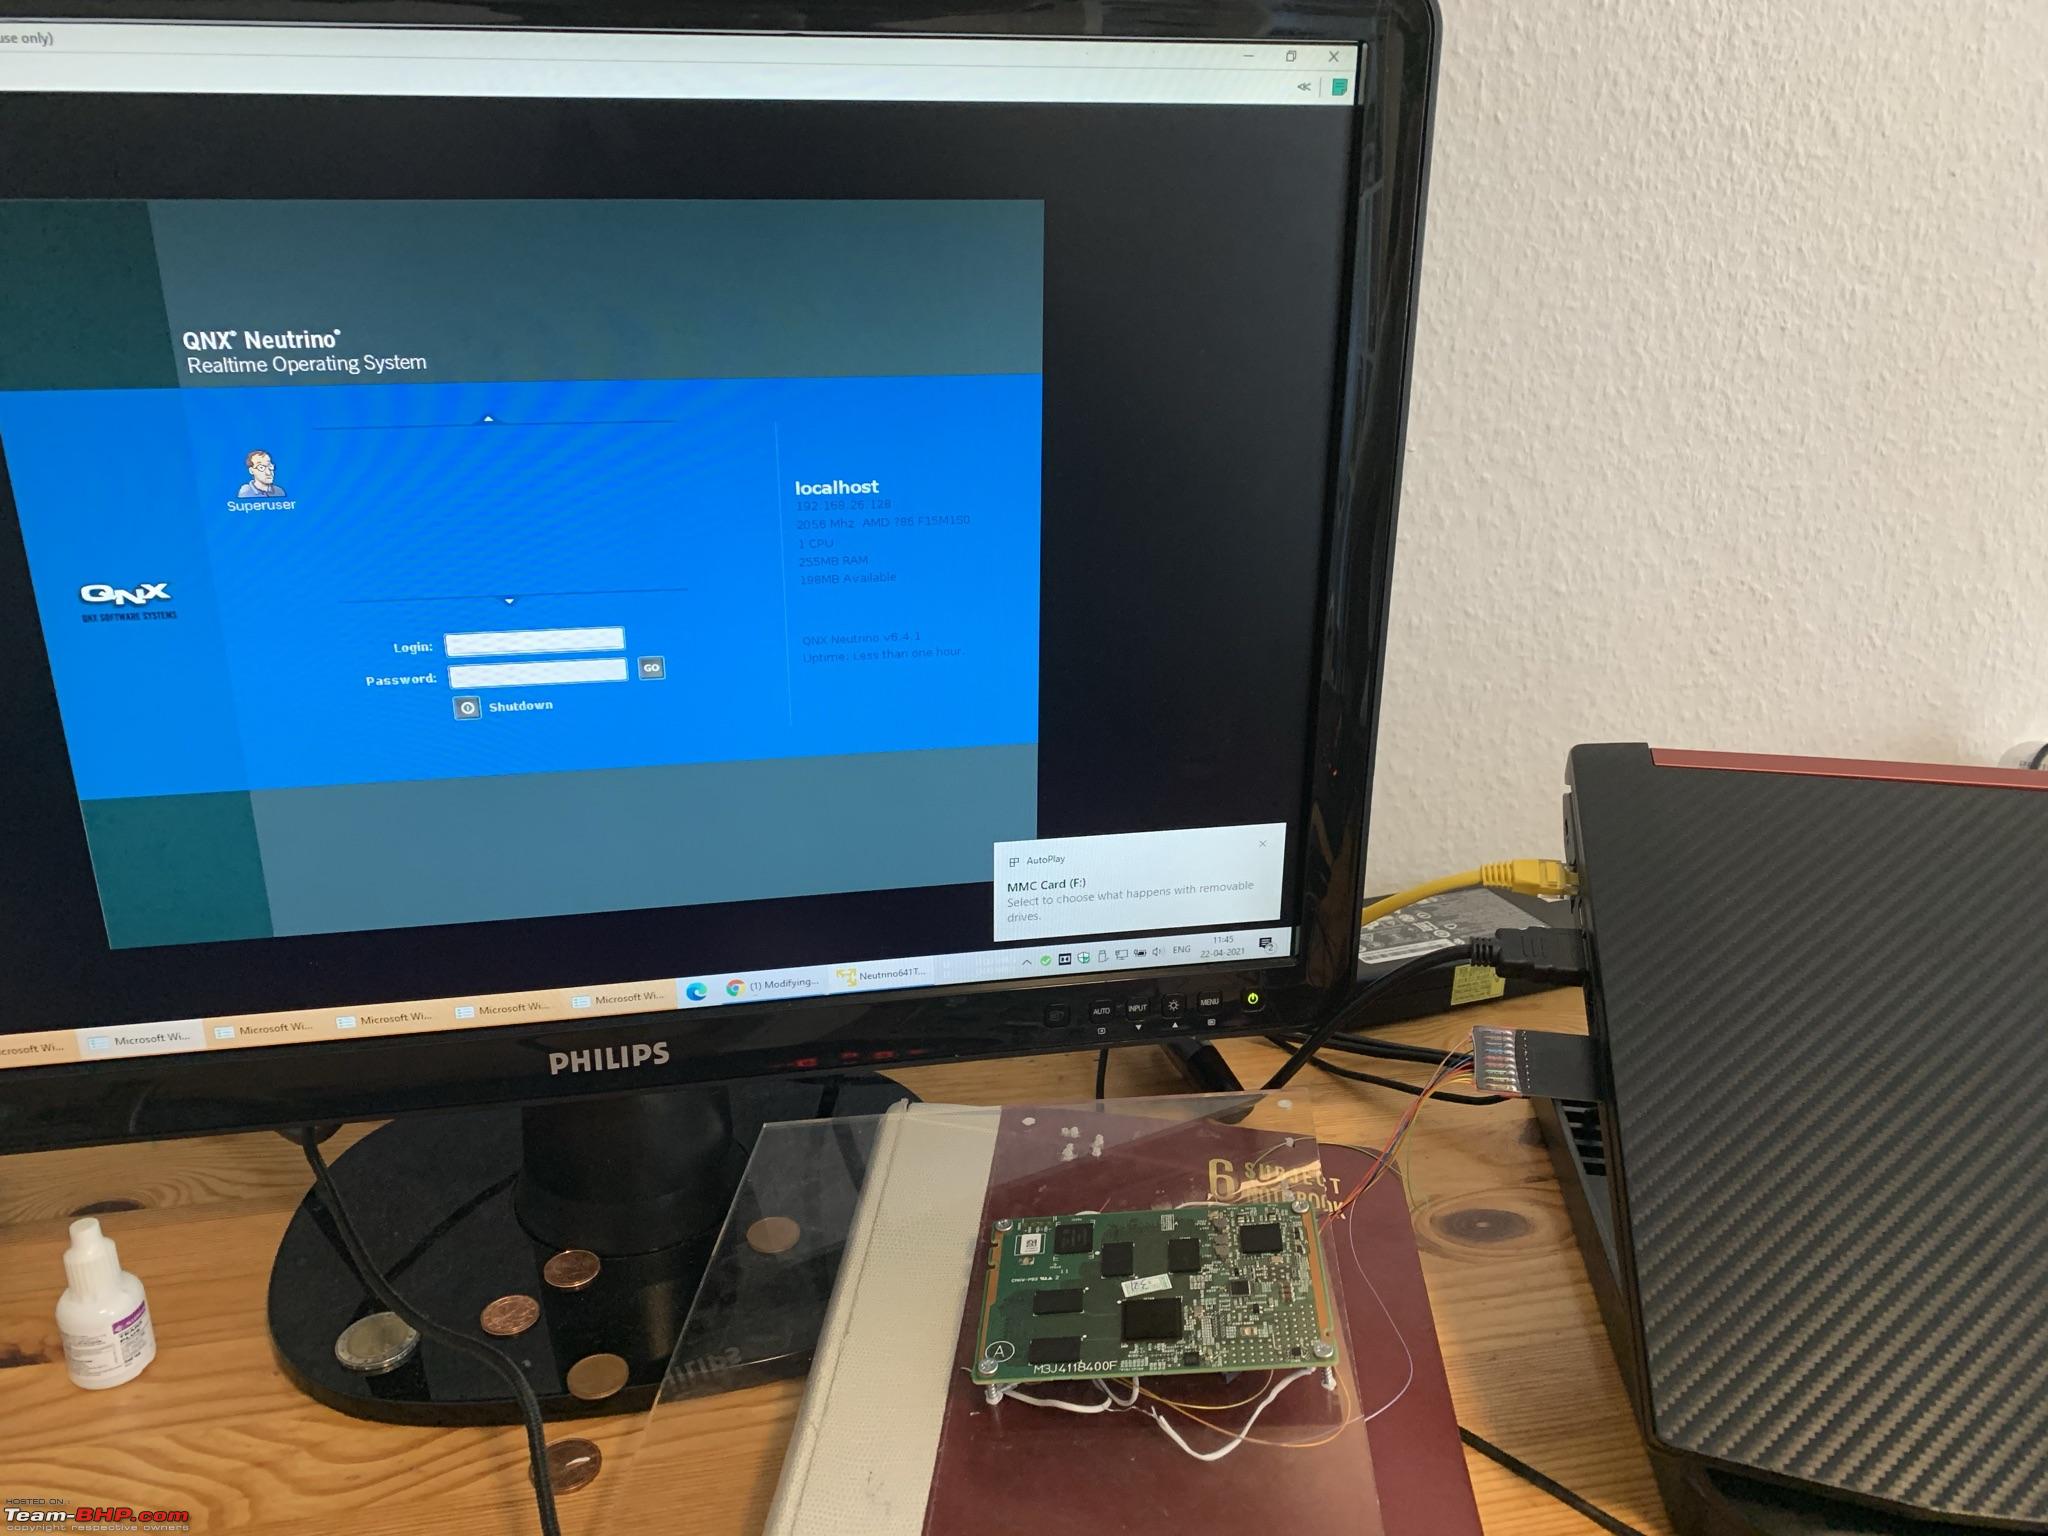 Thankfully this jailbreak method is legacy, as a Ford insider leaked the necessary files to jailbreak via USB on ffclub forum. You can jailbreak the unit through the USB method as described at https://www.fmods.net/community/viewtopic.php?t=190 Those of you without Forscan can jailbreak the unit by manually restarting using the Vol+FWD method. Following video is in German but has subtitles in English. You can install various mods, themes from fmods.net after the jailbreak. Few of them are: Ford Performance bootscreen (this one is not related to F-mods but one can install custom bootscreens)  Video player (I do not support playing videos while the car is travelling) Custom Themes 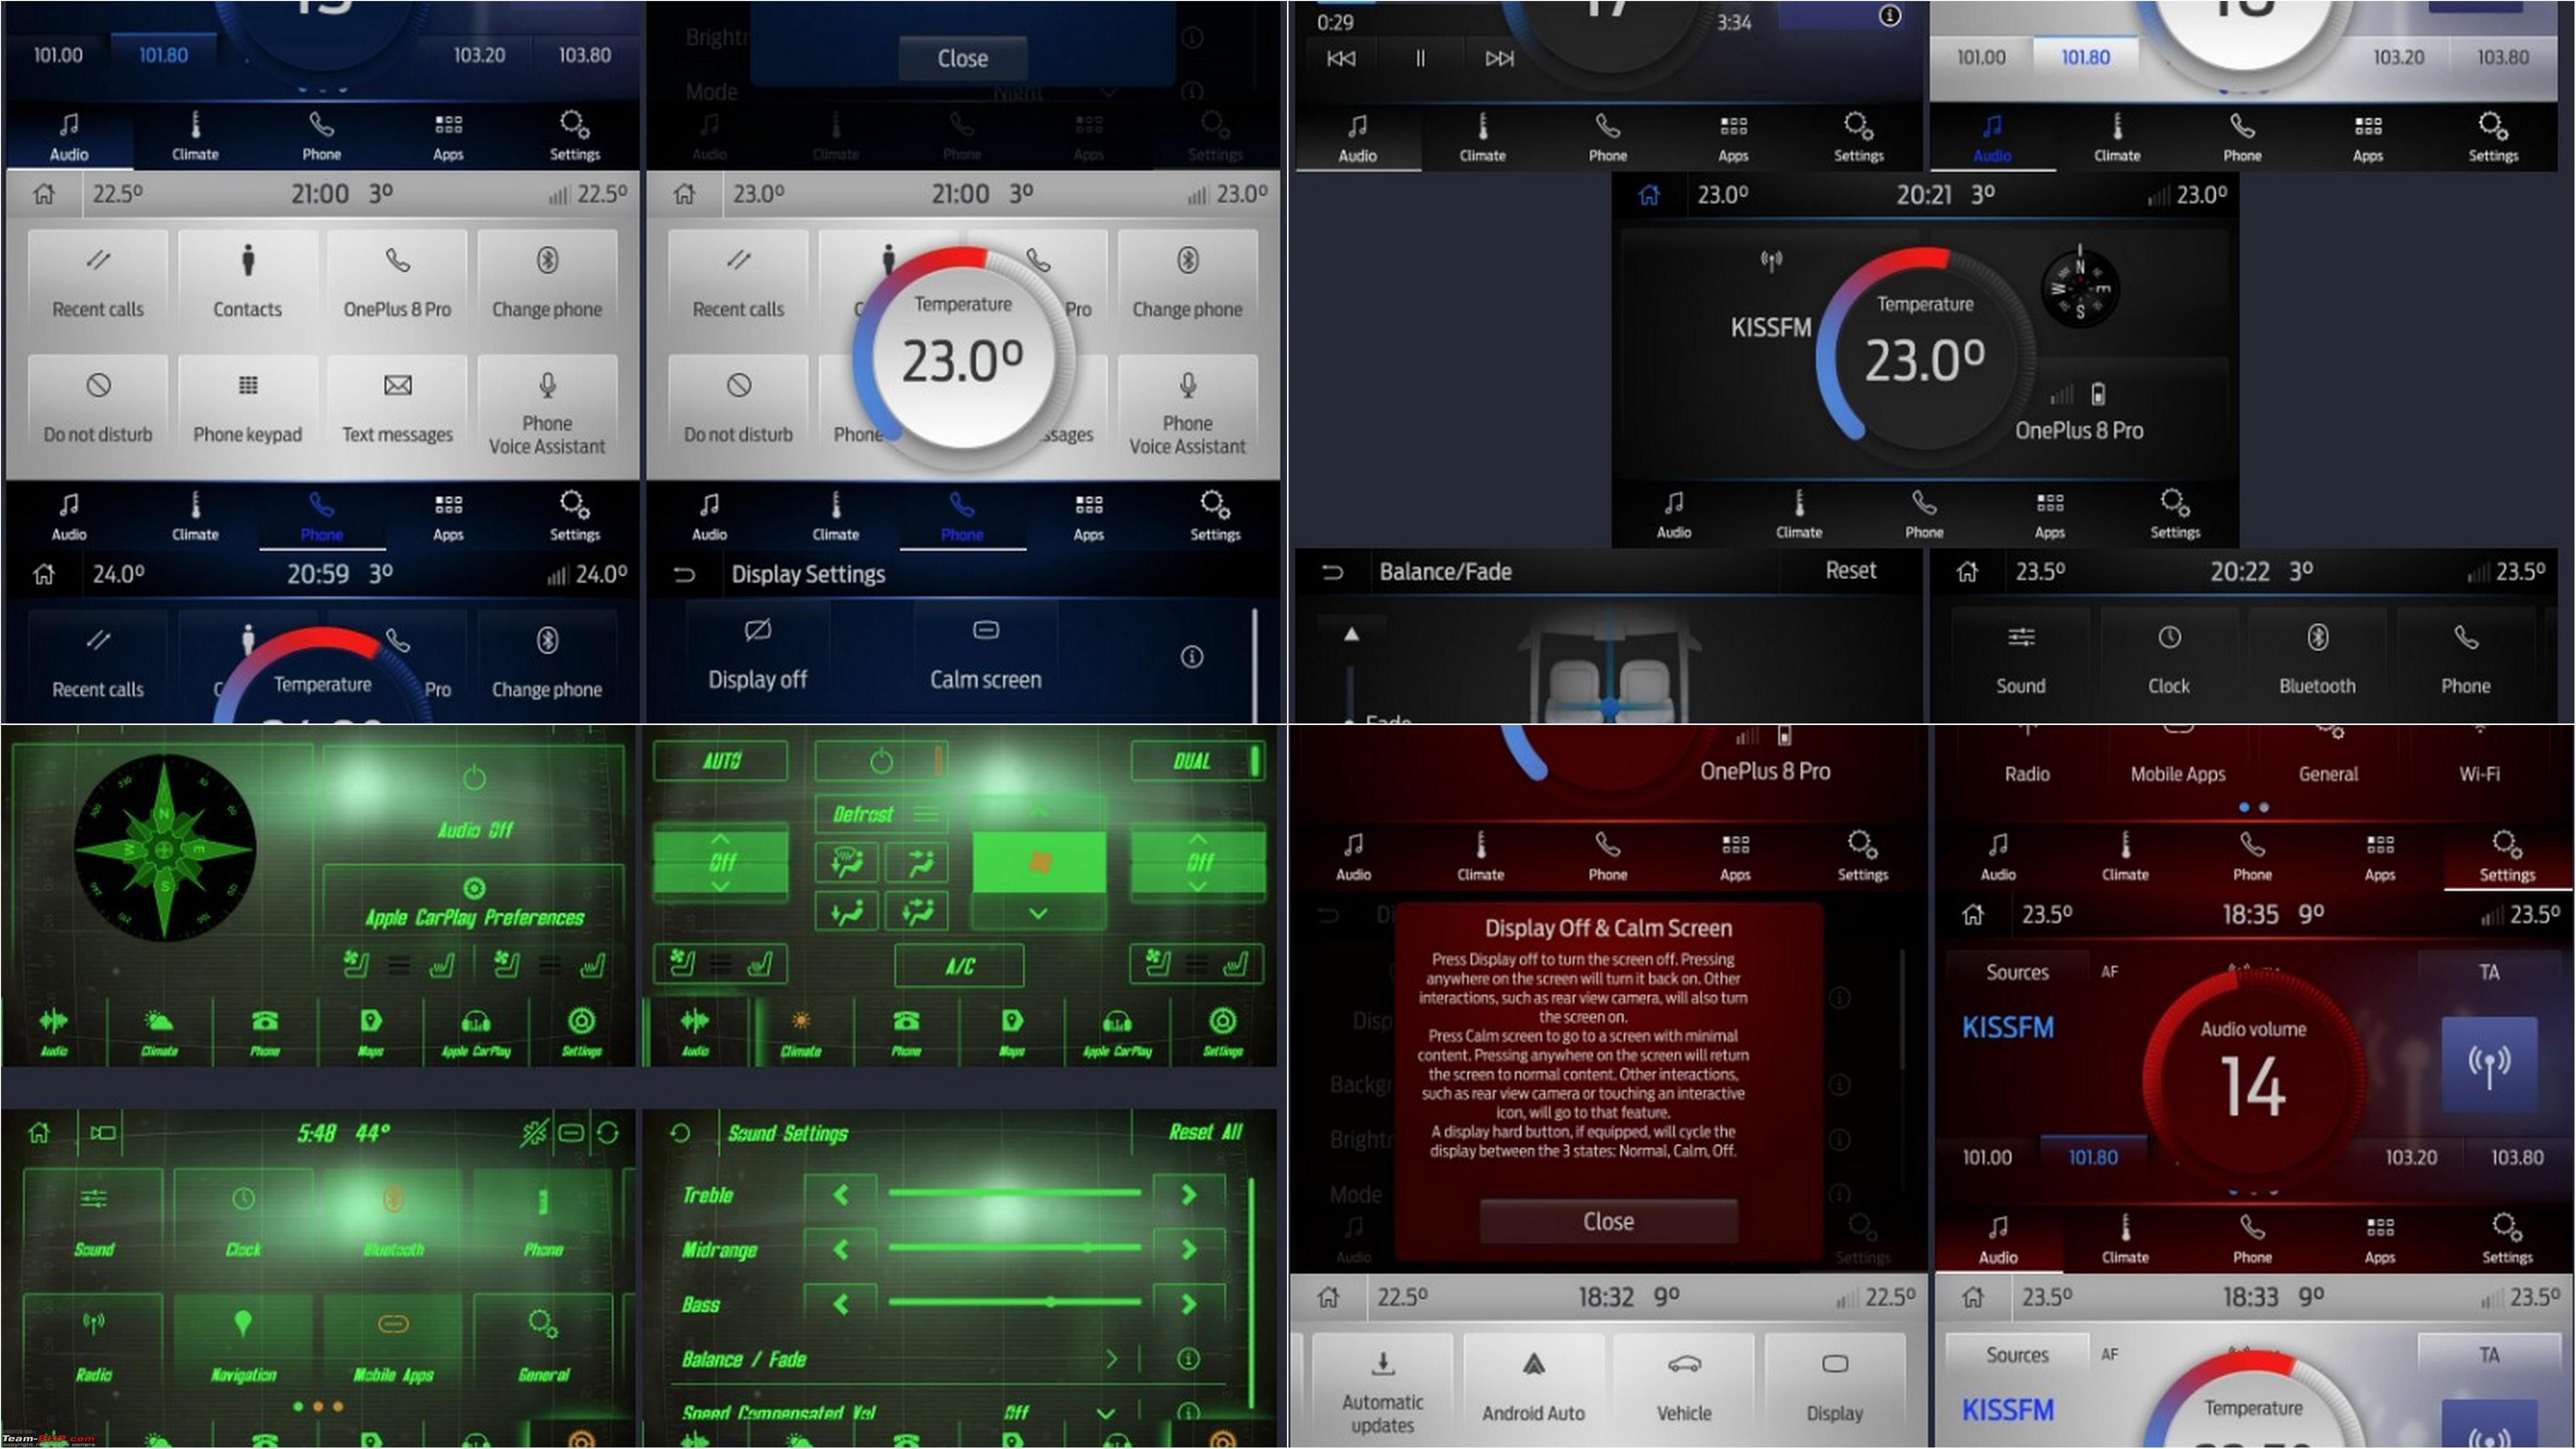 Custom Backgrounds  Weather forecast (in development) 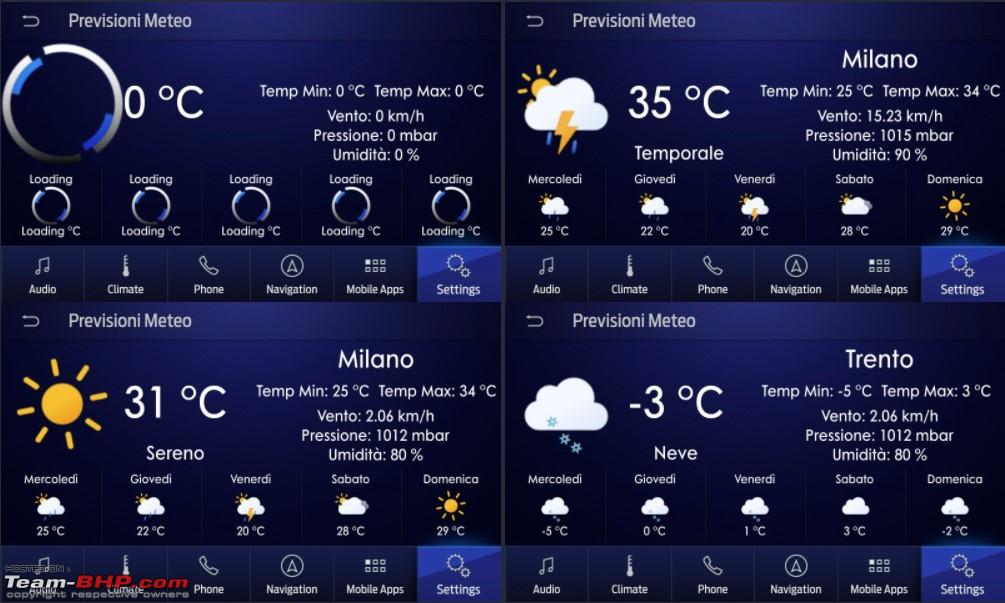 |
|
| (26)
Thanks
|
| The following 26 BHPians Thank nightraven for this useful post: | adwaith, audioholic, AYP, CEF_Beasts, digitalnirvana, fluidicjoy, giri1.8, GTO, Harjot37, InControl, Nilesh5417, Prakritij, PraNeel, raiuday, ramnaresh_2000, Researcher, saikarthik, saikishor, Samfromindia, sarfraz1997, sridhar-v, swiftnfurious, Tanmay007, tchsvy, The_Outsider!, ysjoy |
|
28th February 2022, 17:00
| #4 |
| BHPian | re: DIY: Juicing up the Ford EcoSport S with ICE, Front Park, ST-line cluster, steering wheel and ADAS 3. Car Electronics and features  Due to work I constantly drive around Europe. My company holds a business account with Europcar, and the local dealership has various Ford cars such as Fiesta, Kuga and Mondeo of which the 2020 Kuga is the one I look forward to drive. Its an AWD AT powered by the 2.0 Diesel which puts a smile whenever I drive. I regularly do 200 kmph with ease on the autobahn with the Kuga and AWD helps insanely during European winters.  My 1100 Km first cross-country drive on a Fiesta from Germany to Austria to visit my GF during the first COVID wave as all trains were cancelled.  Driving the Kuga during a snow-storm on a trip to Poland Driving these ford cars and my above research for ICE, made me realize that they share some of the components like steering wheel, instrument cluster (speedometer), HVAC modules, Reverse sensors, Blind spot sensors, Sync 3 units etc. I started exploring and made a list of functional features offered in international variants of EcoSport such as Front Parking sensors, Navigation, Blind Spot Assist System (BLIS), Passenger Collision Assist (PCA), Auto-emergency braking (AEB) which I can transplant into the EcoSport. These changes are relatively straight-forward as long as you have the modules taken out of a donor car and the VIN number of the donor car to copy the Asbuilt codes. You can download asbuilt code of any Ford car by entering its VIN at Ford Motorcraft site (https://www.motorcraftservice.com/asbuilt). Only challenges are making custom wiring/harnesses to connect them across various modules in the car in case your car doesnt have them and calibrating the modules. Some features like Flat bottom steering wheel, Backlit Instrument cluster with red racing needles were offered only on Fiesta or Focus ST performance pack. Some features like Adaptive Cruise Control (ACC), Lane Departure Warning (LDW), Lane Keeping Assist (LKA) and Driver Drowsiness Alert were offered on other models such as Fiesta, Focus, Kuga etc. but not on the EcoSport which shares a lot of components with its mass-market sibling Fiesta. I studied everything I could to find more about these features to make a Frankenstein build on my EcoSport. Configuring and flashing the modules with fords FDRS is not possible in these scenarios. This is where third-party software like Forscan and UCDS help us program the modules. Both of them have very active communities and developers to support in case of need. Forscan (https://forscan.org/), is used to configure various electronic modules on Ford cars. Forscan is free to use and available on Windows (recommended), iOS and Android (lite versions). It is good for starters with an easy-to-use interface such as direct configuration where you can select options from a drop-down list. Earlier people had to rely on coding with Asbuilt codes by comparing numbers between various car models and working out which digit corresponds to the feature they are trying to alter. This was time taking and frustrating. Now Forscan offers a direct configuration menu from which you can select a required setting, forscan will interpret the correct asbuilt code and write it to the module. Asbuilt codes used to compare and edit car features previously:  Direct configuration menus which significantly improved ease of use 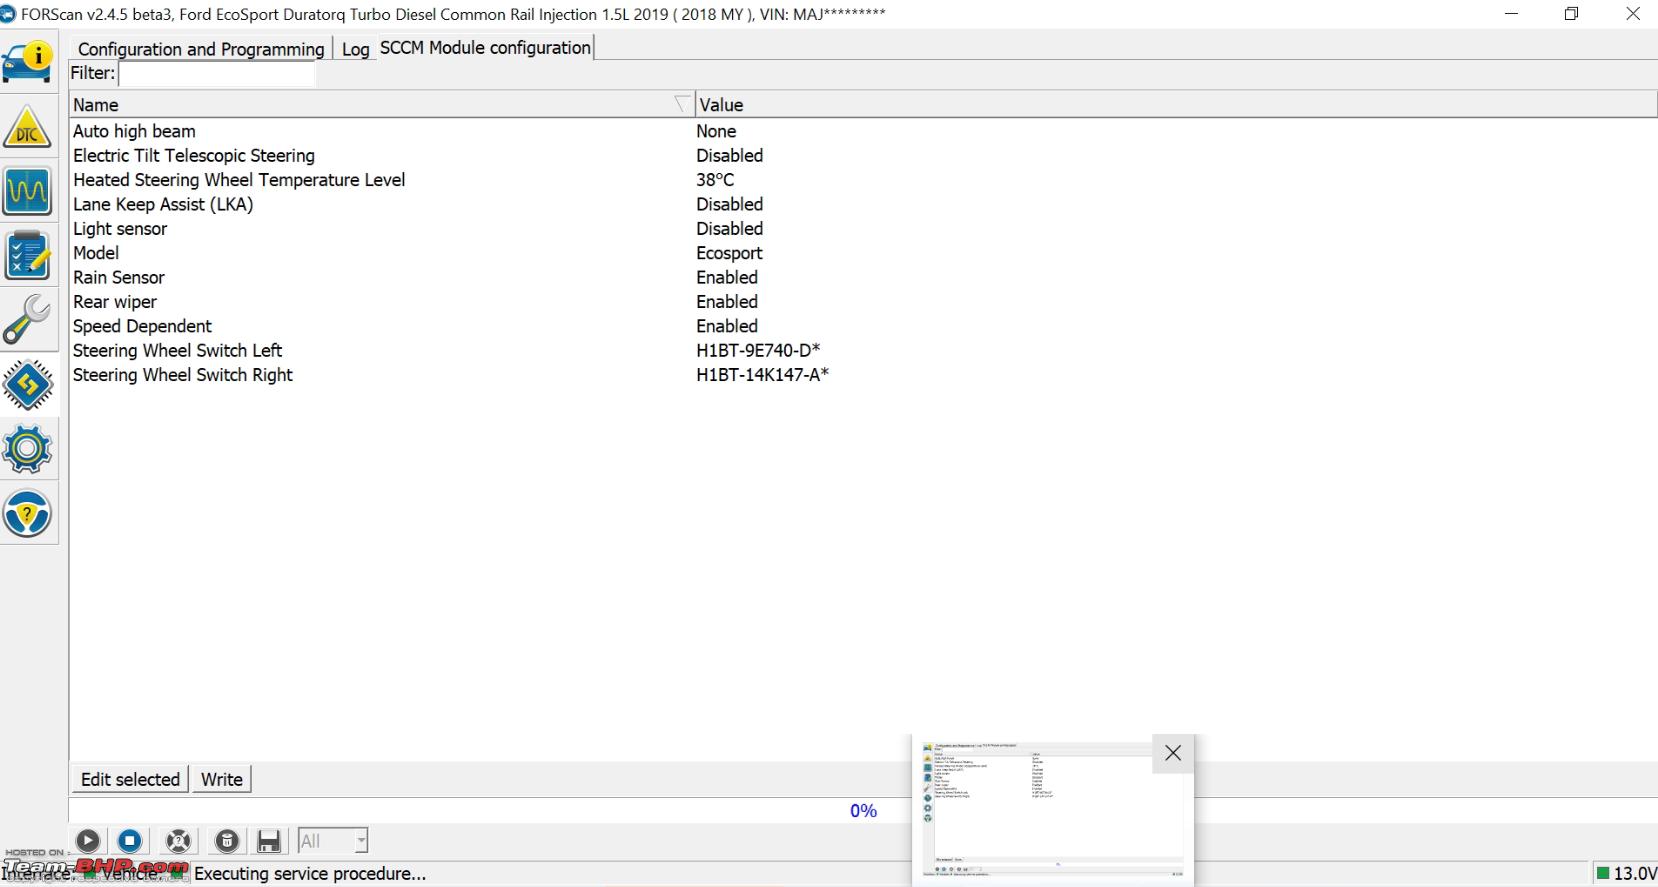 Forscan works with any compatible third-party ELM or ELS reader. Some functions such as programming of modules require an extended license. I bought a lifetime extended license for $50 in 2019. Lifetime license is discontinued now. Currently extended license can be bought only for a fixed period of 1 or 3 years. One can sign-up on the forum and activate a trial extended license valid for 2 months. You can repeat this indefinitely, however to support the developer, I wouldnt recommend this abusive practice. Forscan has also started offering functionality to flash firmware, strategy, ECU configuration on the electronic modules in the car. In layman terms, these are analogous to BIOS and OS for PCs. Car manufacturers sometimes update the modules to fix bugs, improve reliability, performance etc. Few of the updates are mandatory if they affect passenger safety or address a critical flaw and are performed at the dealership using Fords Ford Diagnostic & Repair System (FDRS) and a Bosch VCM Rotunda (programmer costs $2000+). Generally, this doesnt happen often and Ford releases Technical Service Bulletins (TSB) in such cases. However, some dealerships can still ignore updating the modules in few cases due to time and manpower constraints such as availability of only one workstation or software technician etc. It is also possible that some updates do not bring any quantifiable improvements, but in-principle I prefer to stay up-to date. Note that firmware update function on Forscan has been in beta for 3 years due to the risky nature of the operation. Many have bricked their modules due to usage of cheap OBD readers, PC issues, car battery discharge etc. It is recommended to use reliable equipment for flashing firmwares to avoid bricking the modules. Forscan officially recommends OBD reader like OBDLink EX to ensure compatibility and performance. You can buy it for $60 @ https://www.obdlink.com/products/obdlink-ex/. There are other versions like MX SX etc. which work over Bluetooth and WiFi. For latency reasons, I recommend EX which works over USB. OBDLink EX I got for a friend  Few drawbacks of Forscan: 1. Direct configuration menus are not available for some of the modules such as Parking aid module, ABS module, Side Object Detection modules (BLIS sensors). You will have to rely on the older asbuilt code comparison method to configure these modules. 2. Firmware flash reliability has come a long way in 3 years but its not as reliable as UCDS or FDRS. 3. Forscan cannot download firmware files of other models. Example Fiesta and EcoSport share same Parking Aid Module (PAM) and you are trying to install Front parking sensors on EcoSport. If you bought a module from Fiesta and intend to flash EcoSport firmware, then you will not be able to download EcoSport firmware to flash. It will only offer you updates available on Fiesta. However, if you can get the EcoSport files from someone with access to UCDS or FDRS then you can custom flash them using Forscan. 4. Does not have expert features available in UCDS such as Mileage reset, expert menus, flash remaps etc. Helpful tutorials: How to manage module configuration in FORScan - https://forscan.org/forum/viewtopic.php?f=16&t=17208 How to update module firmware with FORScan - https://forscan.org/forum/viewtopic.php?f=13&t=18751 2. UCDS (https://www.ucdsys.ru/) - Developed by Russian Ford enthusiast community and is used to configure various electronic modules on Ford, Lincoln and Mazda cars and vans. They offer same functions as Forscan plus expert functions like downloading firmwares (by piggy backing into Ford servers), reset mileage, flash engine remaps (not available for EcoSport), support for more modules and car models. The software is available only on Windows OS. UCDS software interface 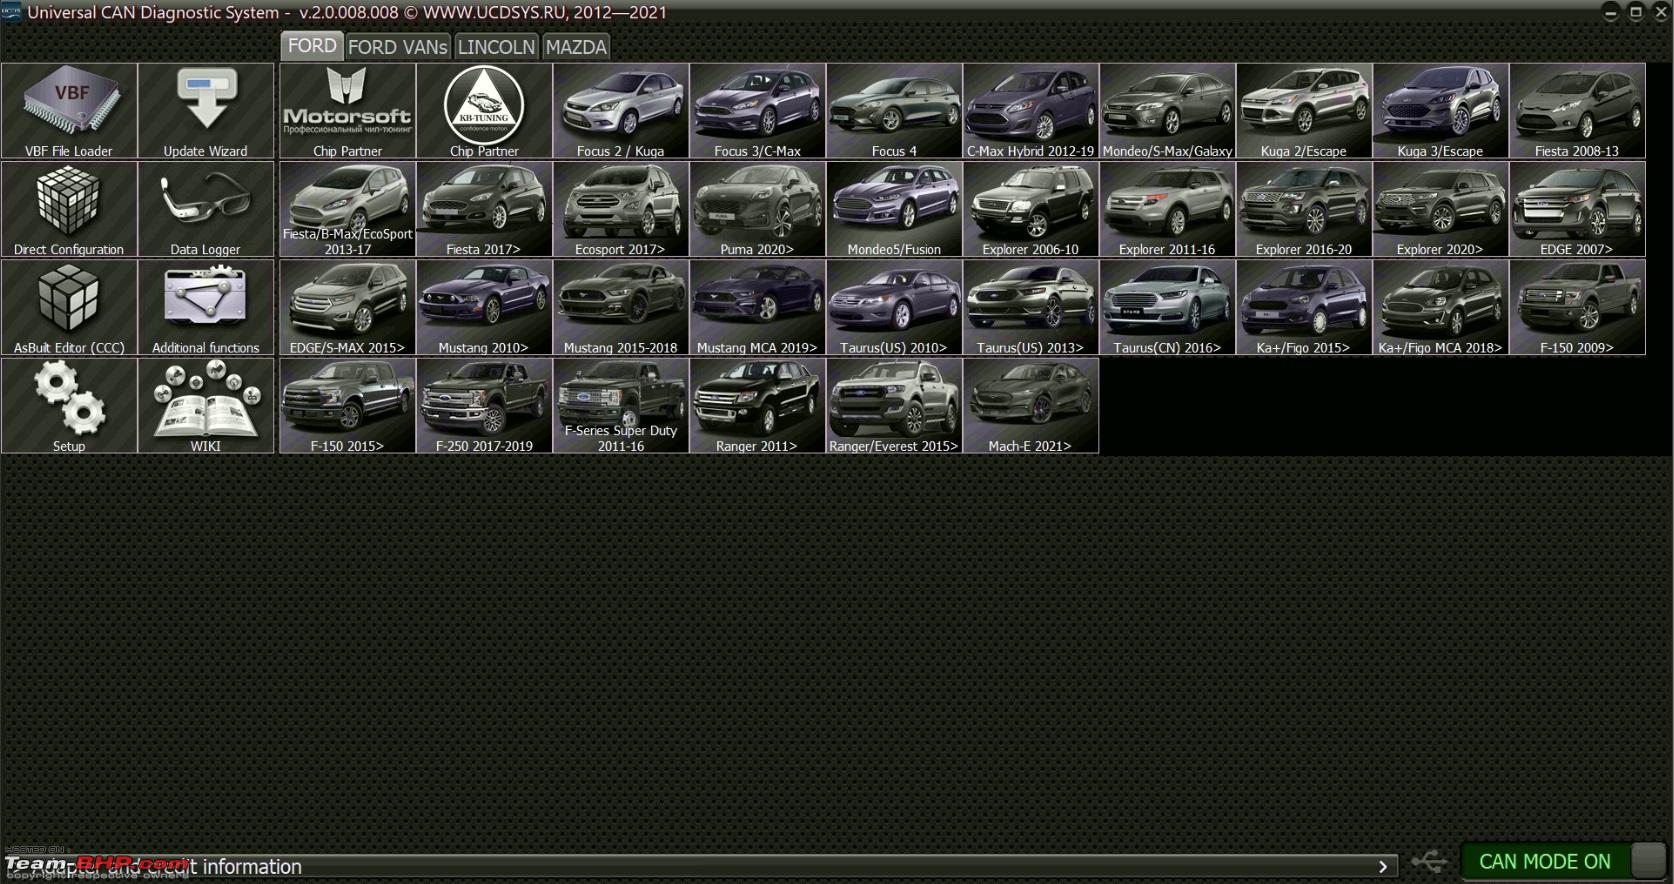 UCDS adapter  UCDS requires a proprietary OBD reader which is shipped from Russia. The adapter with extended license and a level-1 token cost me 210 euros. The adapter conforms to J2534 standards and therefore can be used with Fords FDRS as well. Forscan readers cannot be used with FDRS. You wouldnt find this Direct config menu for some modules in Forscan offered in UCDS 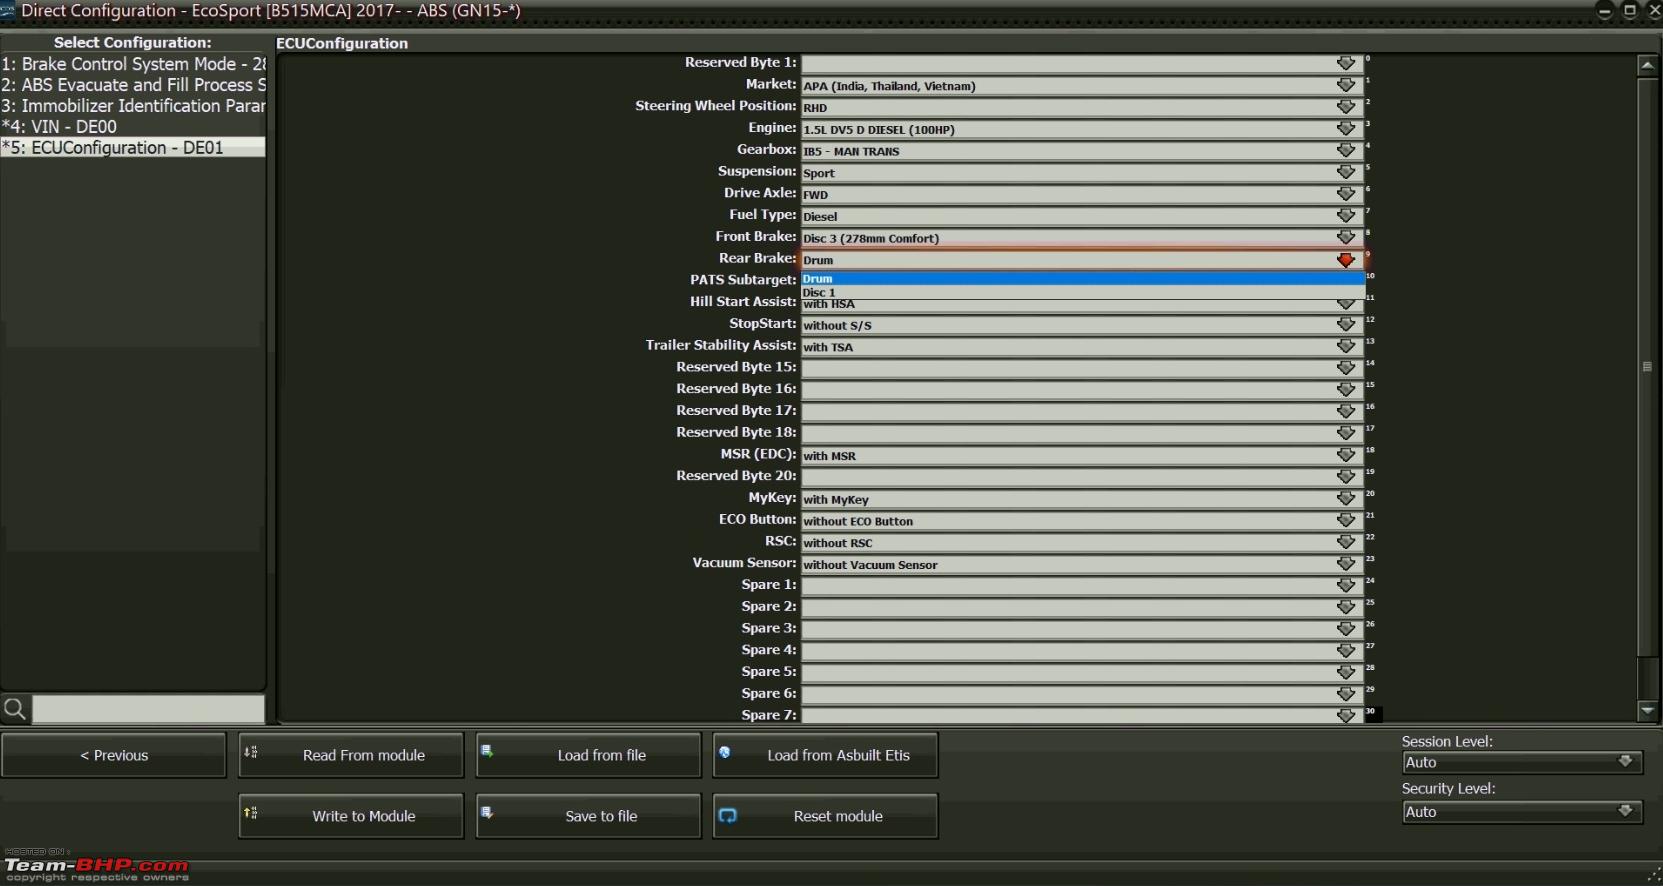 3. FDRS (also called GFDRS) is successor to IDS (used by Ford to service yesteryear models). This requires very minimal install space on your computer compared to IDS which required Gigabytes. This is an online tool, and the system has to be connected to Ford servers through internet for it to perform any updates or calibrations. FDRS is useful to perform service functions such as EGR adaptations, ABS bleeding, Coding of keys, Steering angle sensor alignment etc. to name a few. Some of these service functions can also be performed using Forscan and UCDS but FDRS is most reliable in this regard. FDRS is also used to flash the firmware on new modules bought from service center/factory (this coding process is called as Programmable Module Installation (PMI)). It does this automatically by comparing the factory build data of your car and part number of new module. You can perform the same using Forscan and UCDS by flashing required firmware. We will require subscription to use FDRS which unfortunately is not offered to customers in USA and India. It is offered only in EU due to strong Right to service laws to the best of my knowledge. One can create an account as an Independent Operator on https://www.fordserviceinfo.com/EuropeanSponsor and pay for subscription through a credit card. Subscription/License prices are as follows:  I take the 1-hour license for 15 euros whenever I have a need for it. Although it says 1-hour, it works for 24-hours (verified thrice so far). With a license you also get access to technical documents such as wiring diagrams, workshop manuals (which are shared in the Gdrive link at top) for the license period. Note that FDRS license is different from Motorcraft subscription. Motorcraft subscription provides access to technical documents only and not the software. In case your only requirement is technical documents then create an account on https://www.motorcraftservice.com/. Motorcraft pricing is as follows:  After my insistence for software updates, Mahindra service station that does Ford authorized service in my hometown informed that there were no module updates during my second service. Here is me flashing the non-existent updates on my Door Control Units (DCUs DDM and PDM), ABS module, Power Steering Control Module (PSCM) and Powertrain Control Module (PCM) to the newest firmware using UCDS adapter on FDRS after second service. This is why I do not trust service centers blindly. Car felt more smoother, silent, and responsive after the PCM update. 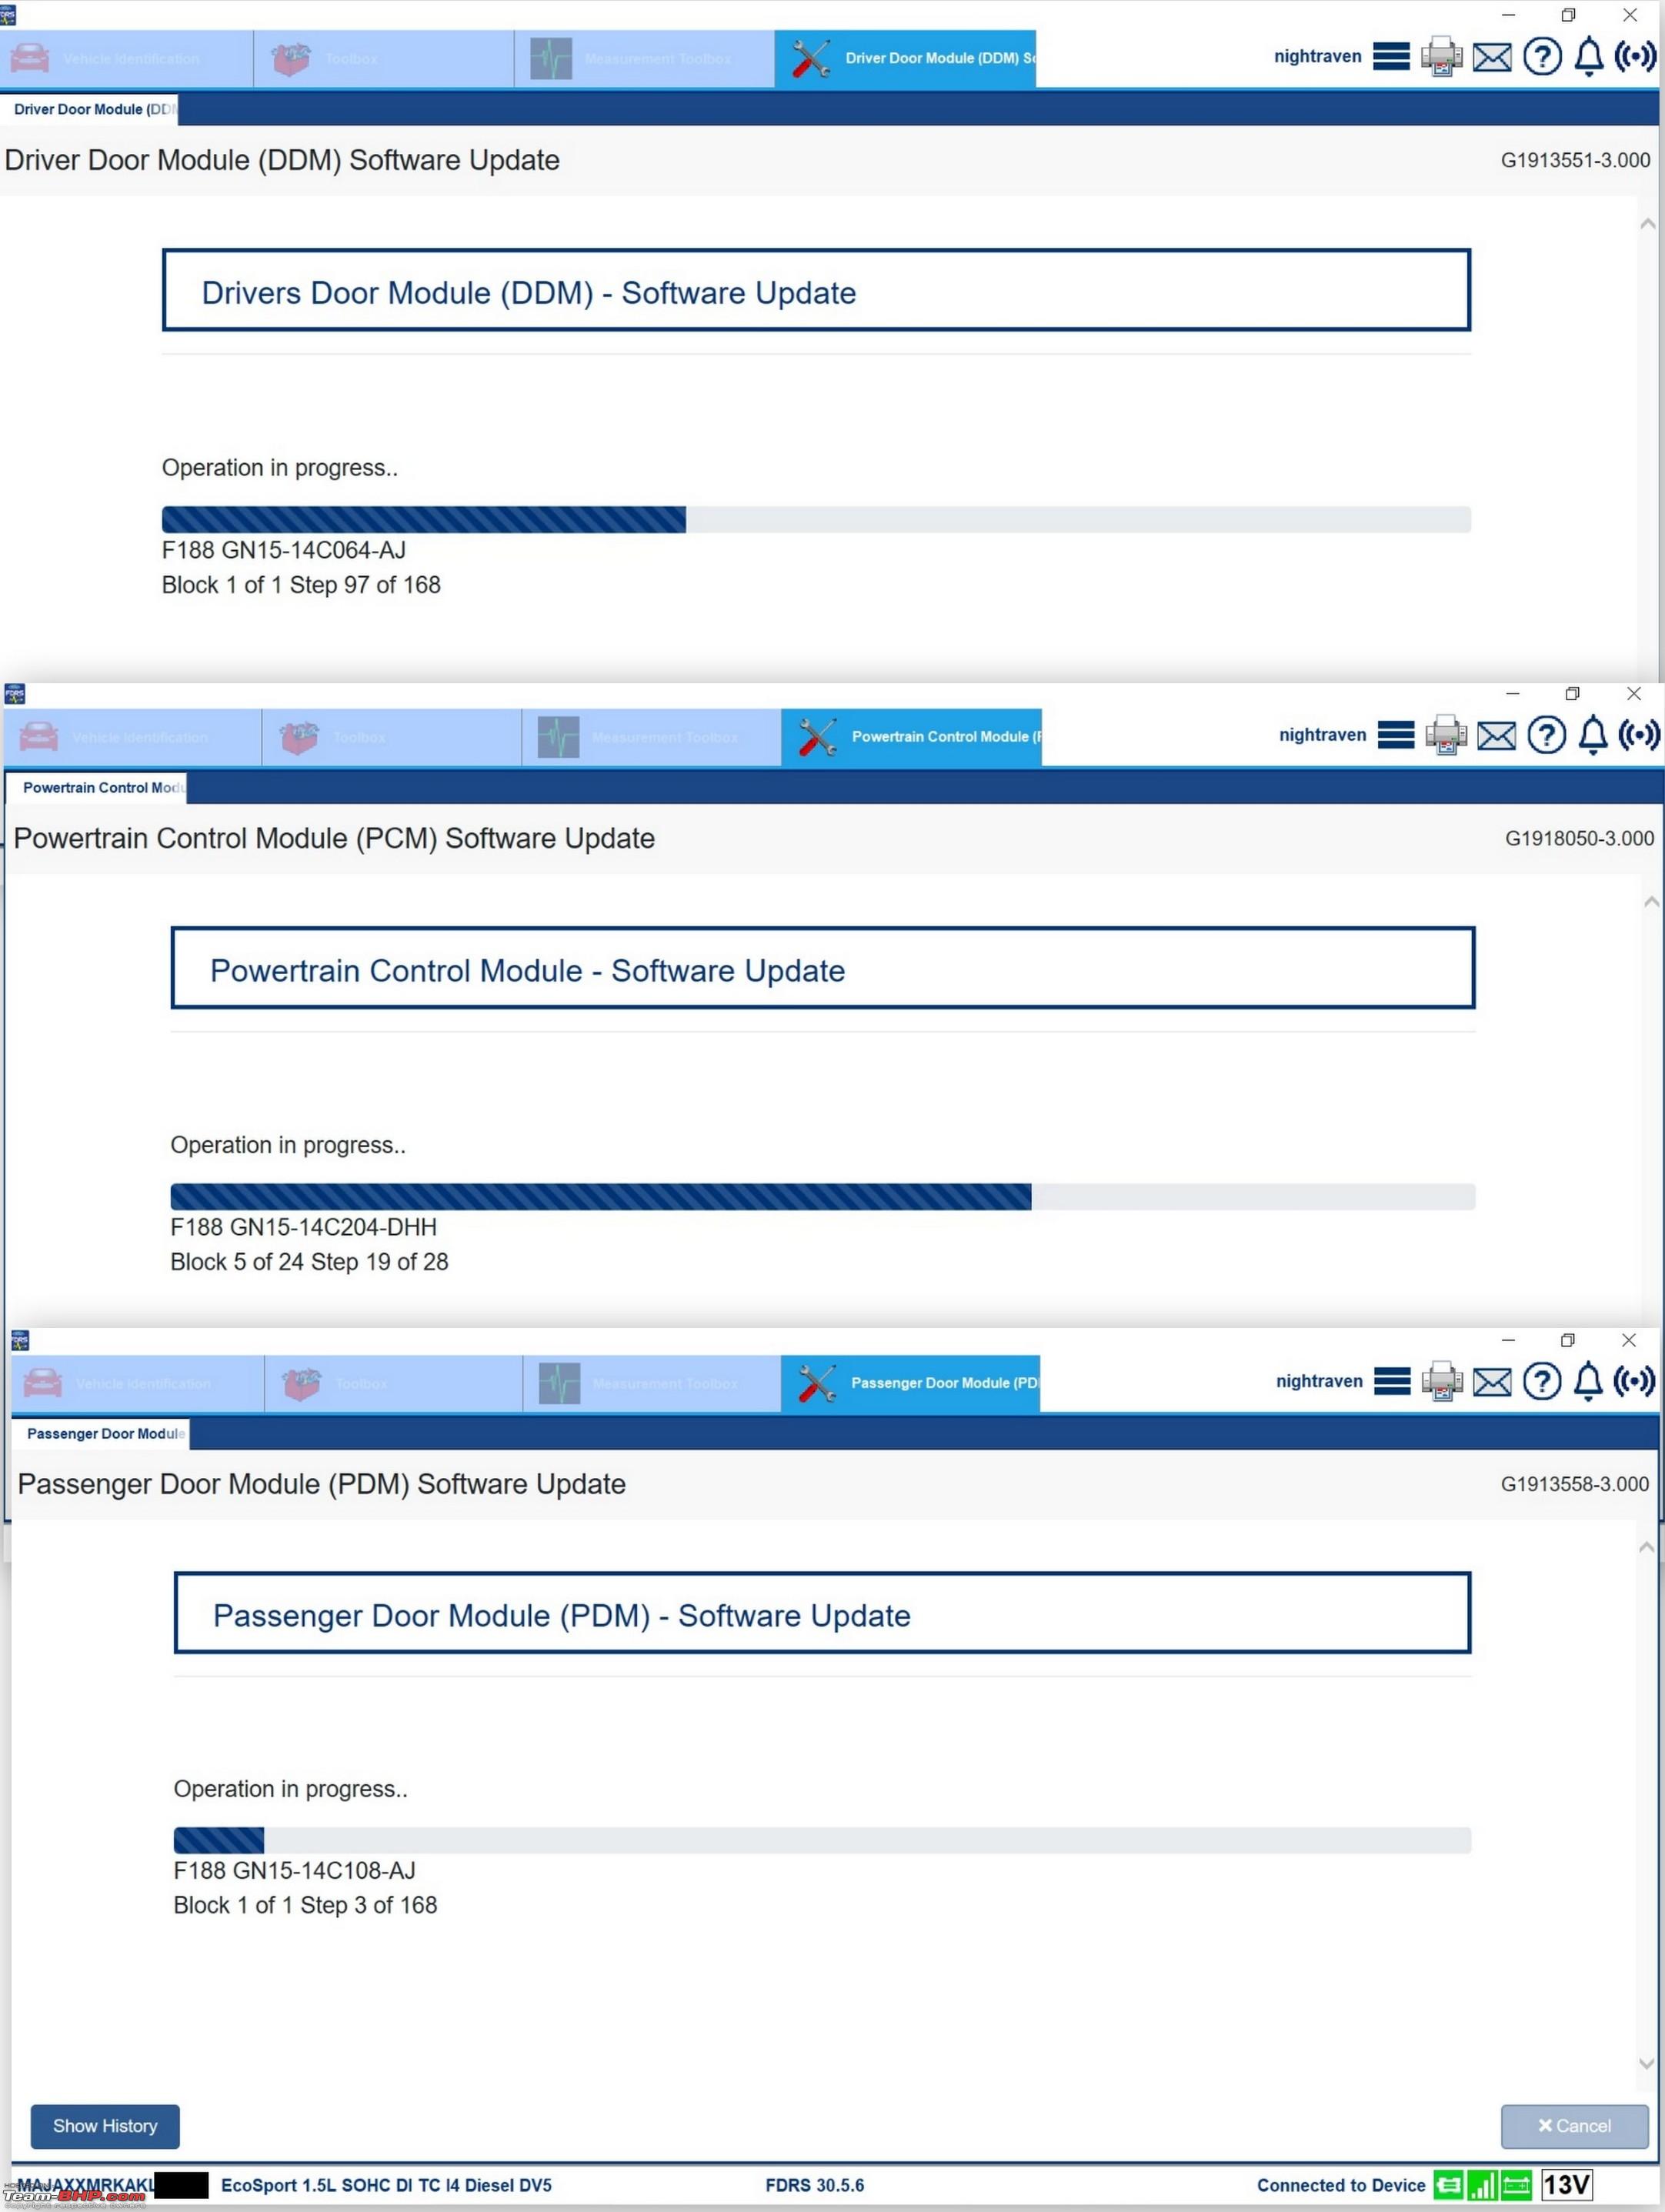 Fiesta 1.5 ST Instrument Cluster retrofit 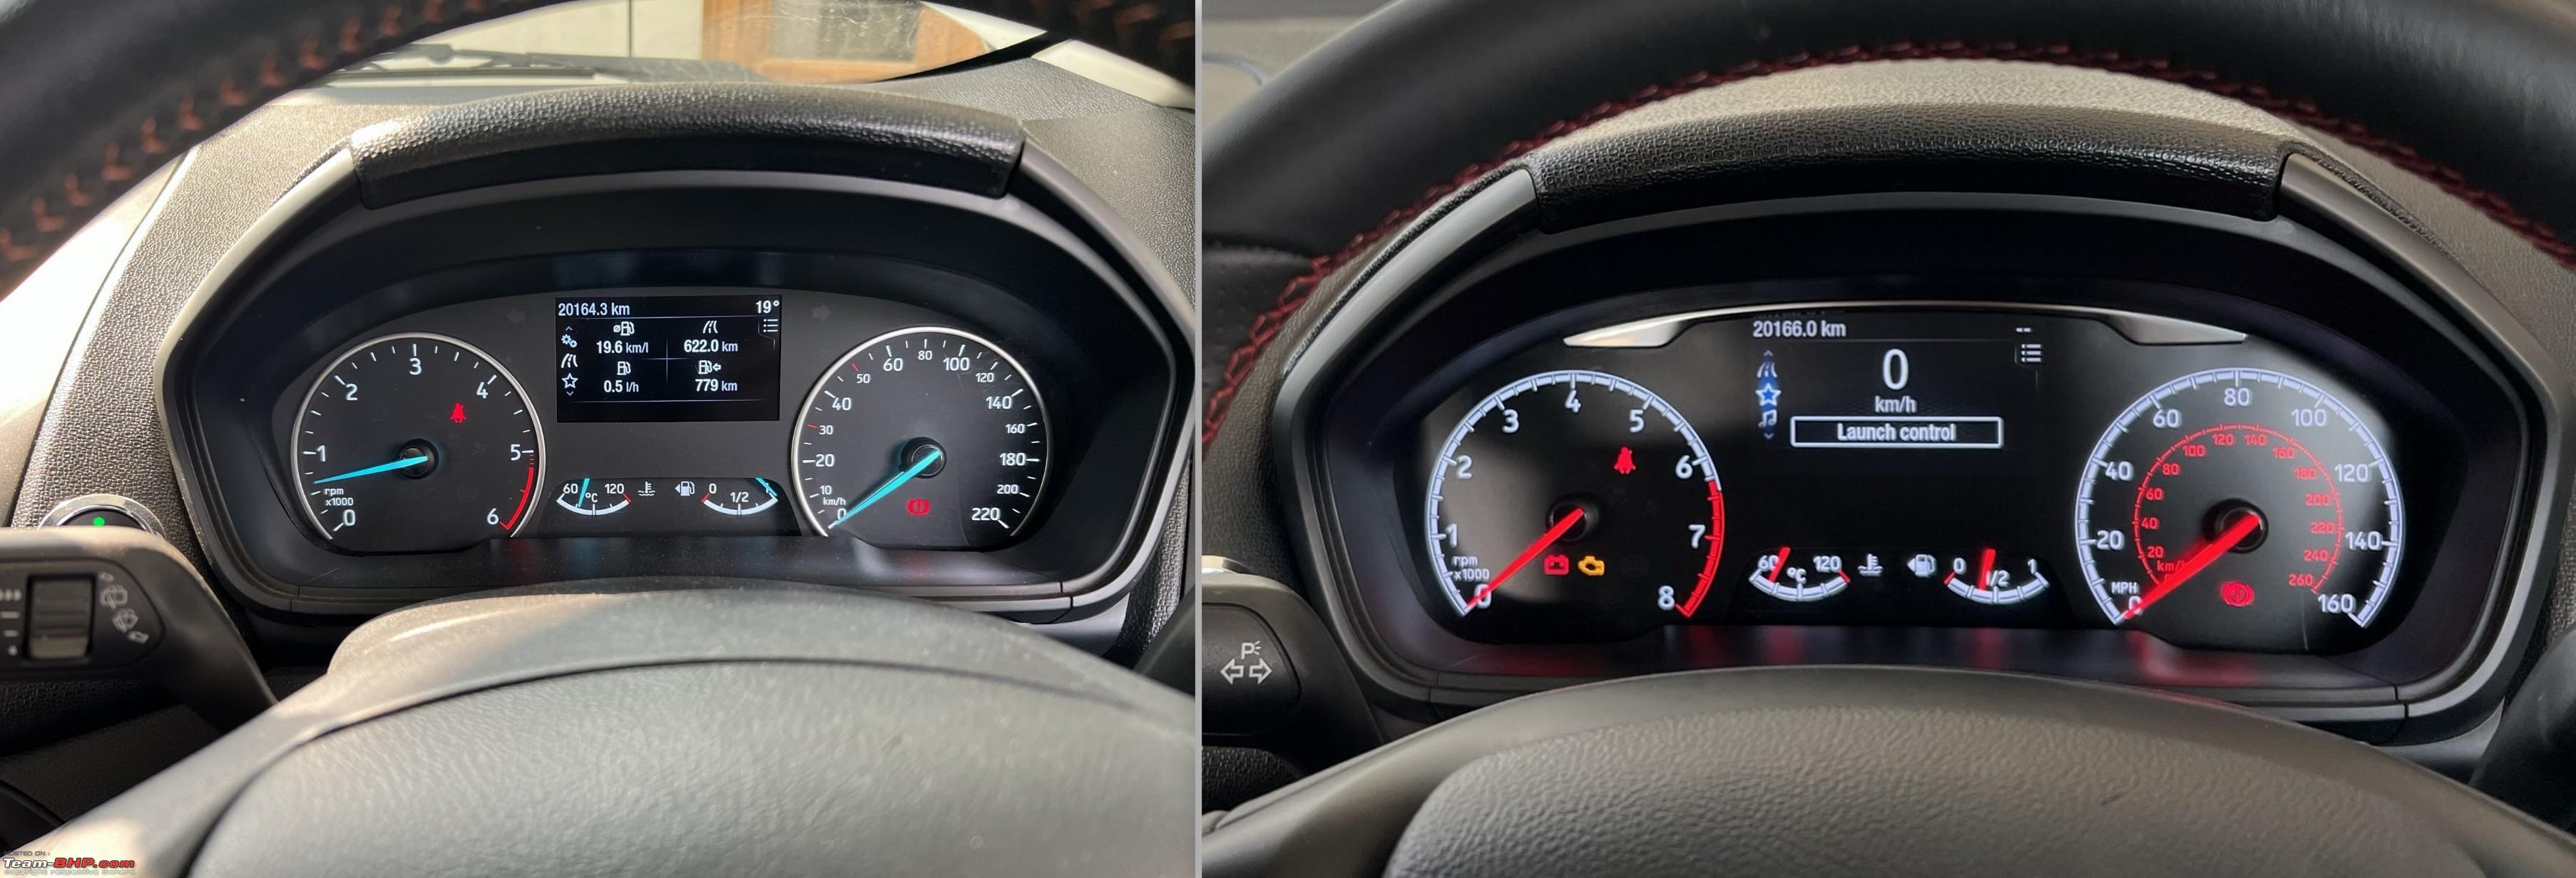 S variant Instrument Panel Cluster (IPC) comes with 4-inch Multi information display (MID) which was omitted in some of the lower variants. MID is monochrome/ black & white display in US and India while EU variants get a color MID. I never felt the need to replace the cluster initially. However, two factors changed my mind: 1. My opinion changed as soon as I looked at the gorgeous instrument cluster on the Fiesta 1.5 ST (colloquially also referred as FiST, not to be confused with 1.0 ST-line) of a colleague in UK. It was offered with a performance pack that has launch control and powered by a 1.5 Ecoboost pushing 200 bhp. On a side note, going through the engine technical specifications superficially indicates that the Naturally Aspirated 1.5L Dragon 3-pot petrol engine we got in India is same as the 1.5 Ecoboost minus the turbocharger. This makes the EcoSport an interesting project car then, ey? The fully digital IPC offered on the Kuga, Focus, Puma and 2022 Fiesta is even more tempting. However, owing to their less availability, asking price is 500 - 700 euros in the used car market which makes it seem not worth it. Fixing it into an EcoSport dash and adapting the plastic bezel trim will be another challenge.  2. I was looking to retrofit ACC which displays the distance graphics on the MID. Although Forscan shows ACC toggle in the EcoSport instrument cluster, I wasnt sure if Ford bothered to flash the graphics and menus for ACC in the firmware considering it was never offered on this car model. So, I decided to upgrade to an IPC from an EU Fiesta. The color ACC menus on the EU MIDs were also more pleasing. IPC ACC Menu  During my travels I bought a used IPC taken off from 15K miles driven Fiesta ST 1.5 for 70 pounds from Ebay UK. They generally sell for more than 100 pounds as the STs are fewer in number. Part number is: K1BT-10849-EBC. Please note that this a cluster taken from a petrol car. So, the RPM range is marked till 8000 and the red line is between 6250 8000 RPM as against max RPM of 6000 RPM and red line between 5250 RPM 6000 RPM on the Diesel EcoSport. The Launch Control option in the first picture does not work on the EcoSport as it requires ABS module support. So, I have disabled it and is no longer visible. Team-bhp member Naveen has already explained the install process in detail at https://www.team-bhp.com/forum/diy-d...e-variant.html My installation video I will explain things specific to the Fiesta cluster only. Fiesta cluster is not a direct replacement for the EcoSport as the front bezel shape and mount points are different. But the main base unit containing the electronics is the same. So, I decided to use the front fascia (glass part) from the current EcoSport cluster.  I removed the front fascia by removing the 6 screws on the base. Notice that the shape of the base unit is the same. Letters on the FiST unit are backlit while the EcoSports are visible all the time. Maximum caution is warranted while doing this to avoid accidentally moving the needles. In case you try to adjust the needle position, very likely you will damage the stepper motor. Stepper motors are not available separately at the service center and you will have to change the whole cluster. You can possibly get them from recyclers dealing with clusters. I accidentally damaged 1 motor while trying to check-out if the MID LCD on the EcoSport can be replaced with a color LCD. The experiment ended in failure as the graphic driver is likely different between the color and monochrome units. I had to get a replacement motor from Aliexpress https://www.aliexpress.com/item/4000684937395.html 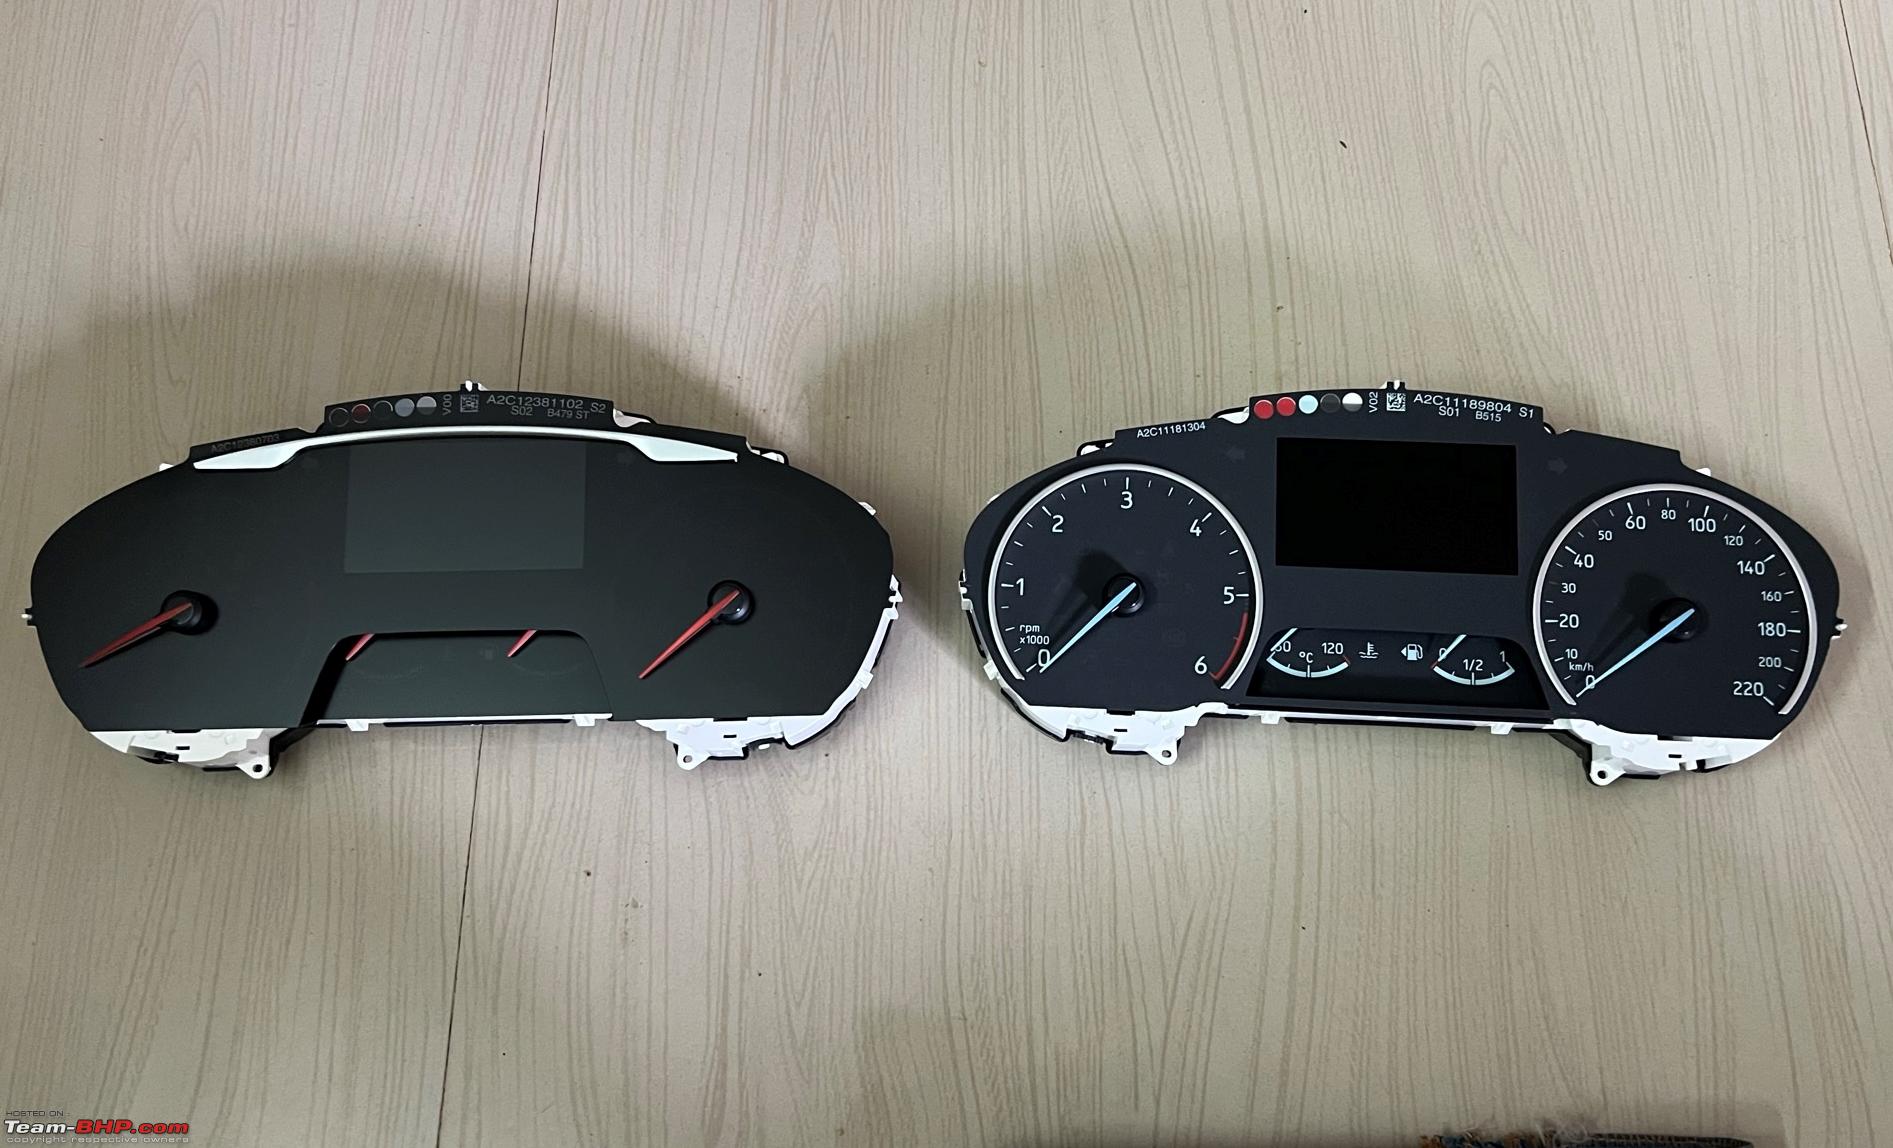 Minor cuts are required on the EcoSport fascia at the marked areas below. Otherwise, the plastic edges would go over the grooves and fascia wouldnt fit securely.  Once the fascia is fit, I installed the FiST cluster in the car and configured it by copying the asbuilt codes backed up from previous cluster and adjusted the Km reading using UCDS. |
|
| (30)
Thanks
|
| The following 30 BHPians Thank nightraven for this useful post: | ADI7YAK, adwaith, bamaboy, brownkaiser, Col Mehta, dailydriver, digitalnirvana, fluidicjoy, GTO, Harjot37, jithin23, Leoshashi, Prakritij, PraNeel, raiuday, Rajeevraj, Rambo-RS, Researcher, rohanjt96, saikishor, Samfromindia, sarfraz1997, skb1811, somspaple, swiftnfurious, tchsvy, The_Outsider!, vhharan1, VijayAnand1, ysjoy |
|
28th February 2022, 17:20
| #5 |
| BHPian | re: DIY: Juicing up the Ford EcoSport S with ICE, Front Park, ST-line cluster, steering wheel and ADAS Focus mk4 ST Flat-bottom Steering Retrofit 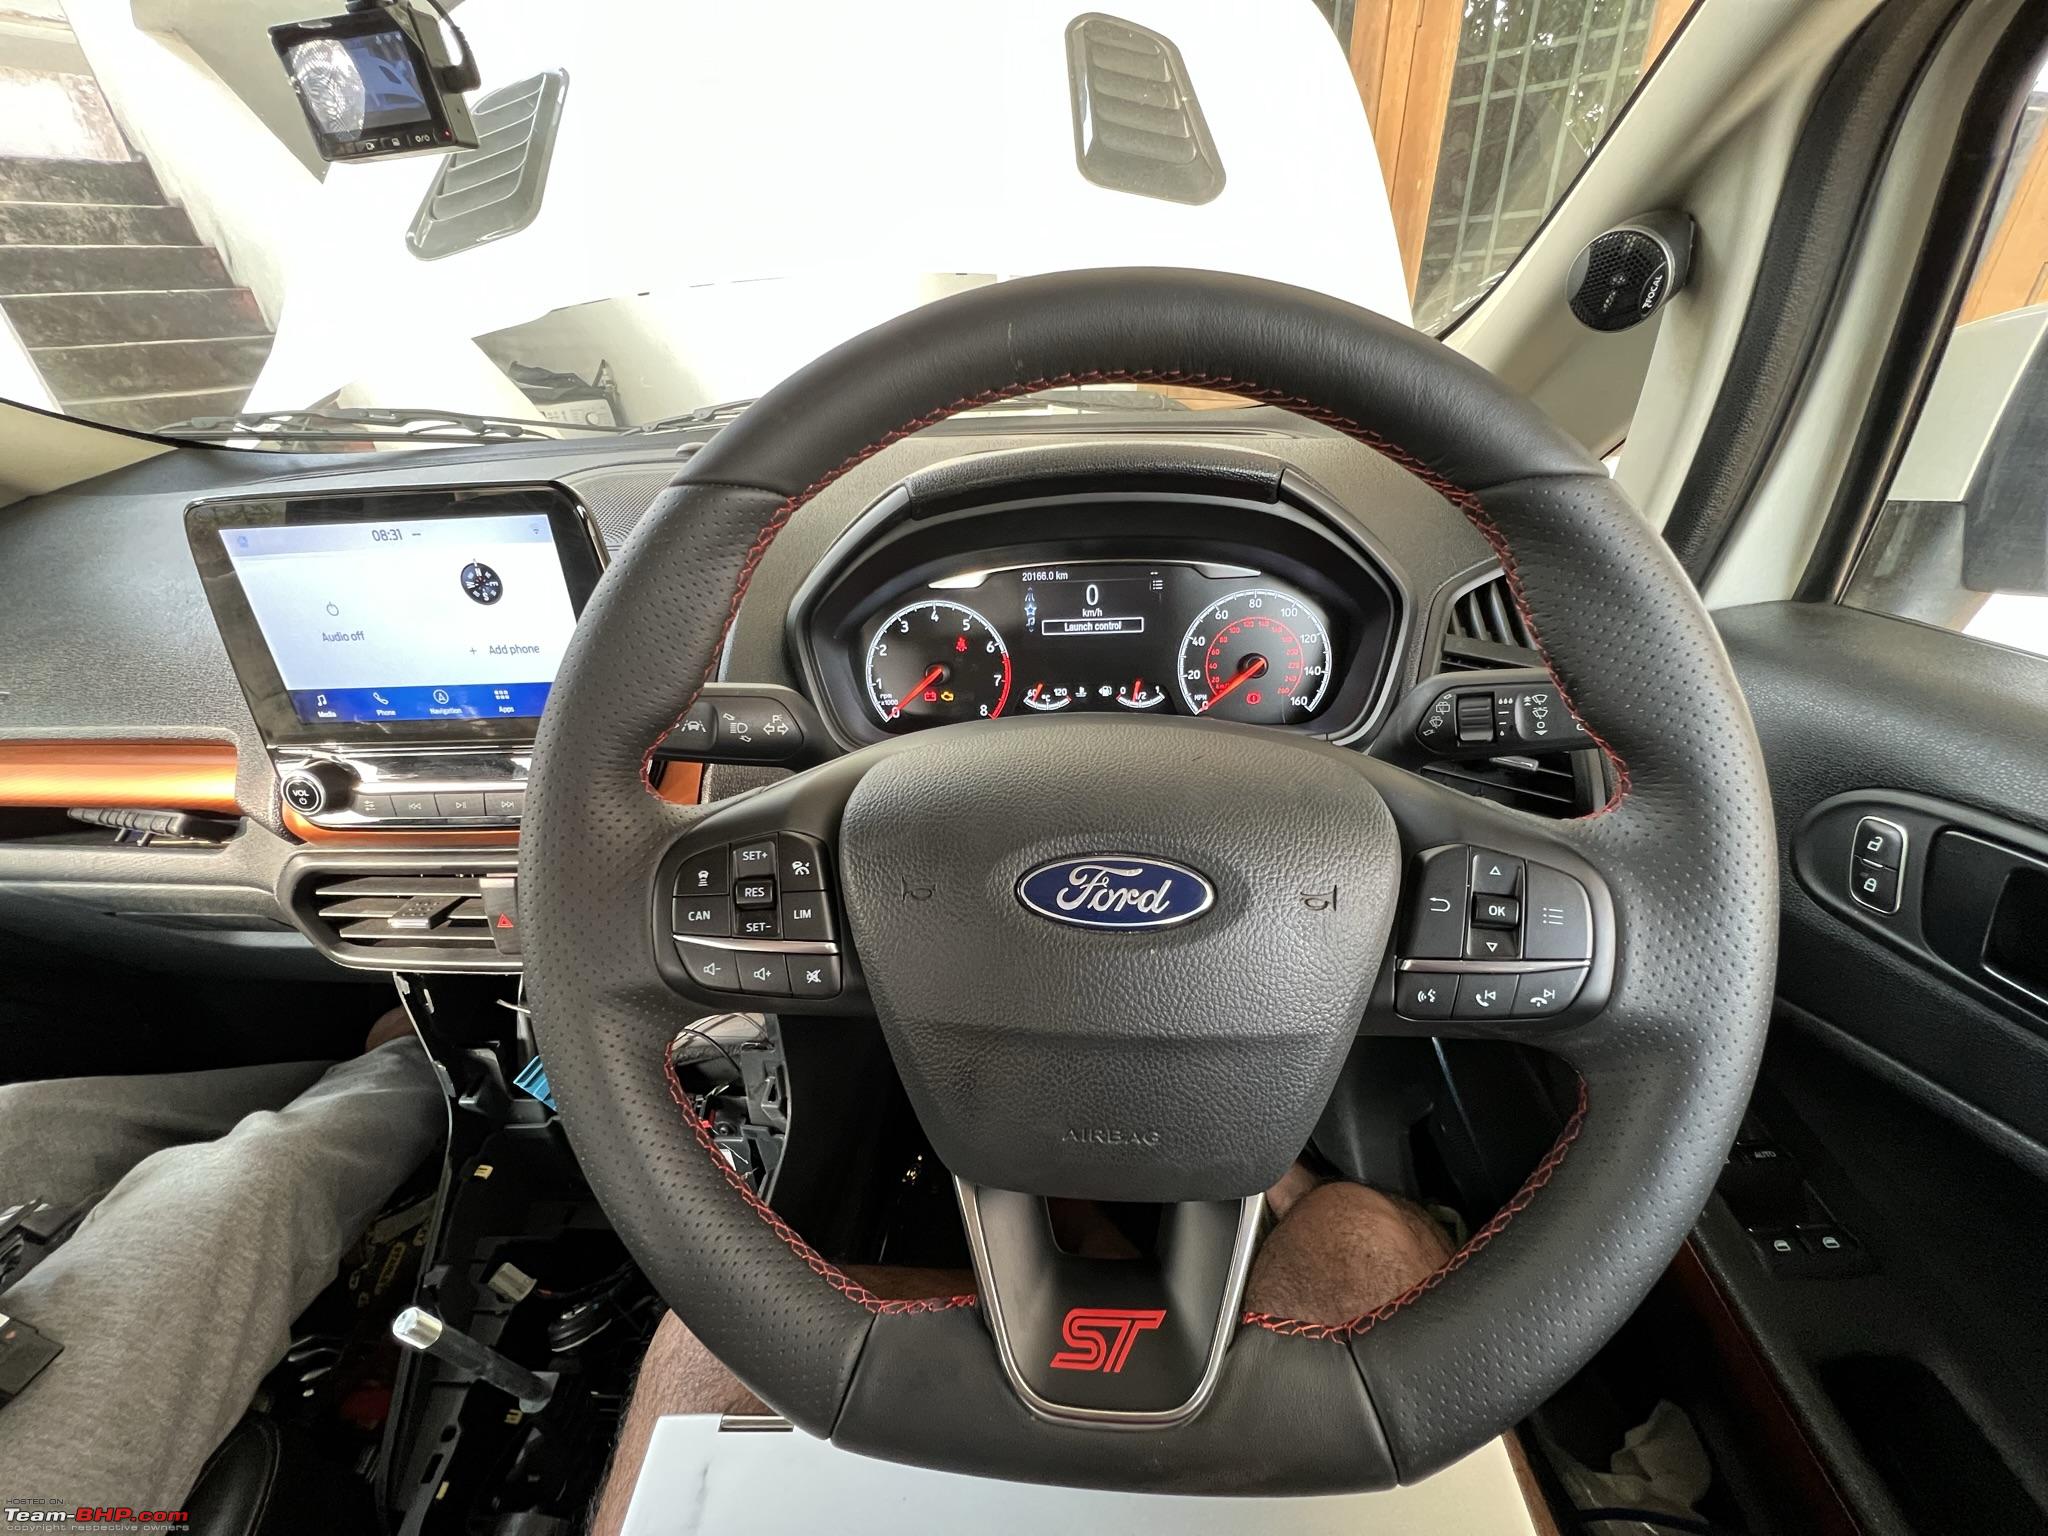 I was looking for ACC gap setting switch to fit on the EcoSport steering wheel as part of ACC retrofit. Since EcoSport never had ACC, there were no such switches. Some of you would be surprised to know that EcoSport and last gen Focus (mk3.5) share the same steering wheel. Hence, I looked in the Focus parts bin and bingo found one. Note that distance switch is not compulsory for ACC. You can set a default gap setting in the IPC or using Forscan and ACC would still work. However, the switch comes in handy if you want to change the gap between the vehicles on the go. One can continue using standard cruise control with this steering wheel as it has all necessary switches. 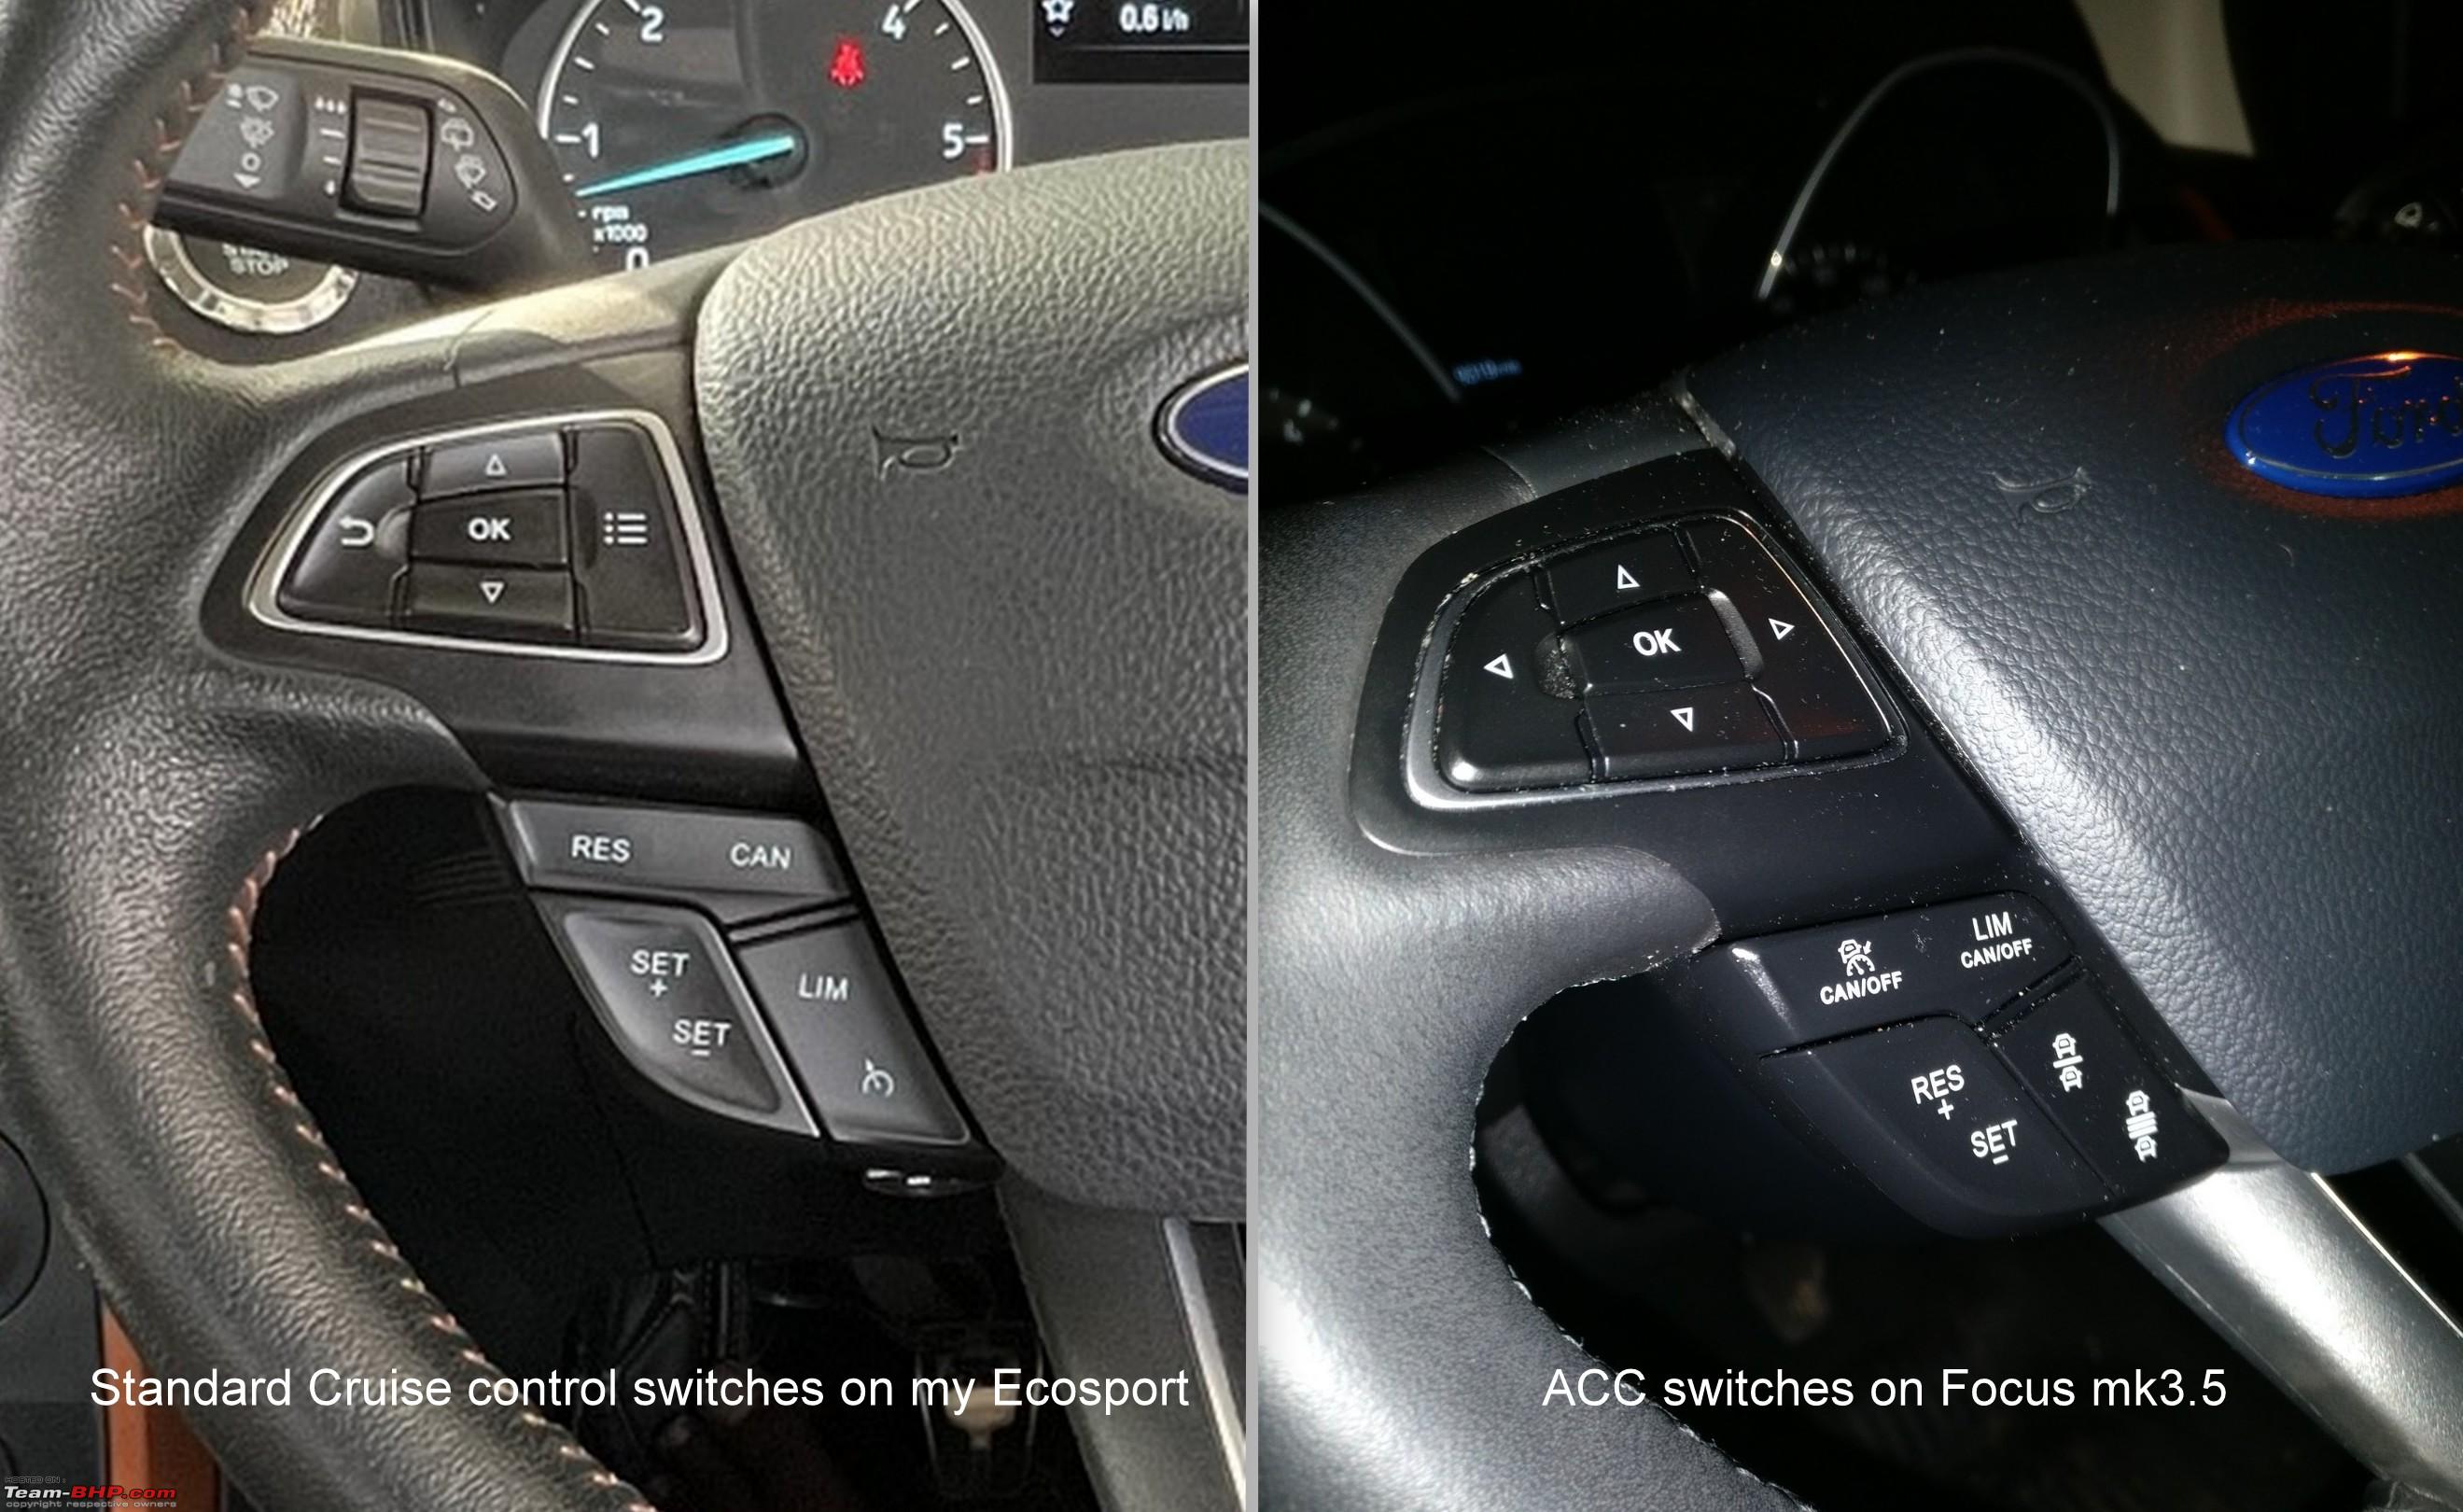 All my searches to find the ACC switch turned up empty. A new one from Ford was priced at 70 euros. It was then I thought why not install a steering wheel from a Fiesta mk8 or Focus mk4 with ACC? Having driven my colleagues FiST, my mind was made up. Both Fiesta 1.5 ST and Focus ST share the same steering wheel with one minor difference (In the Focus horn wires get a 2-pin plug, while in Fiesta and EcoSport they get crimp terminals). The ST steering wheel is feels bit more chunky and provides comfortable grip. I waited and eventually found a good deal for the Focus ST wheel on Ebay UK for 80 pounds. Not just that, it was a Heated Steering wheel which sell for considerably more than 150 pounds! Here is comparison of different steering wheels from Ford’s parts bin:  Since I got the steering from Focus, I cut the horn plug and put crimp terminals on the wires to connect to the horn pad contacts on the back of the airbag unit. 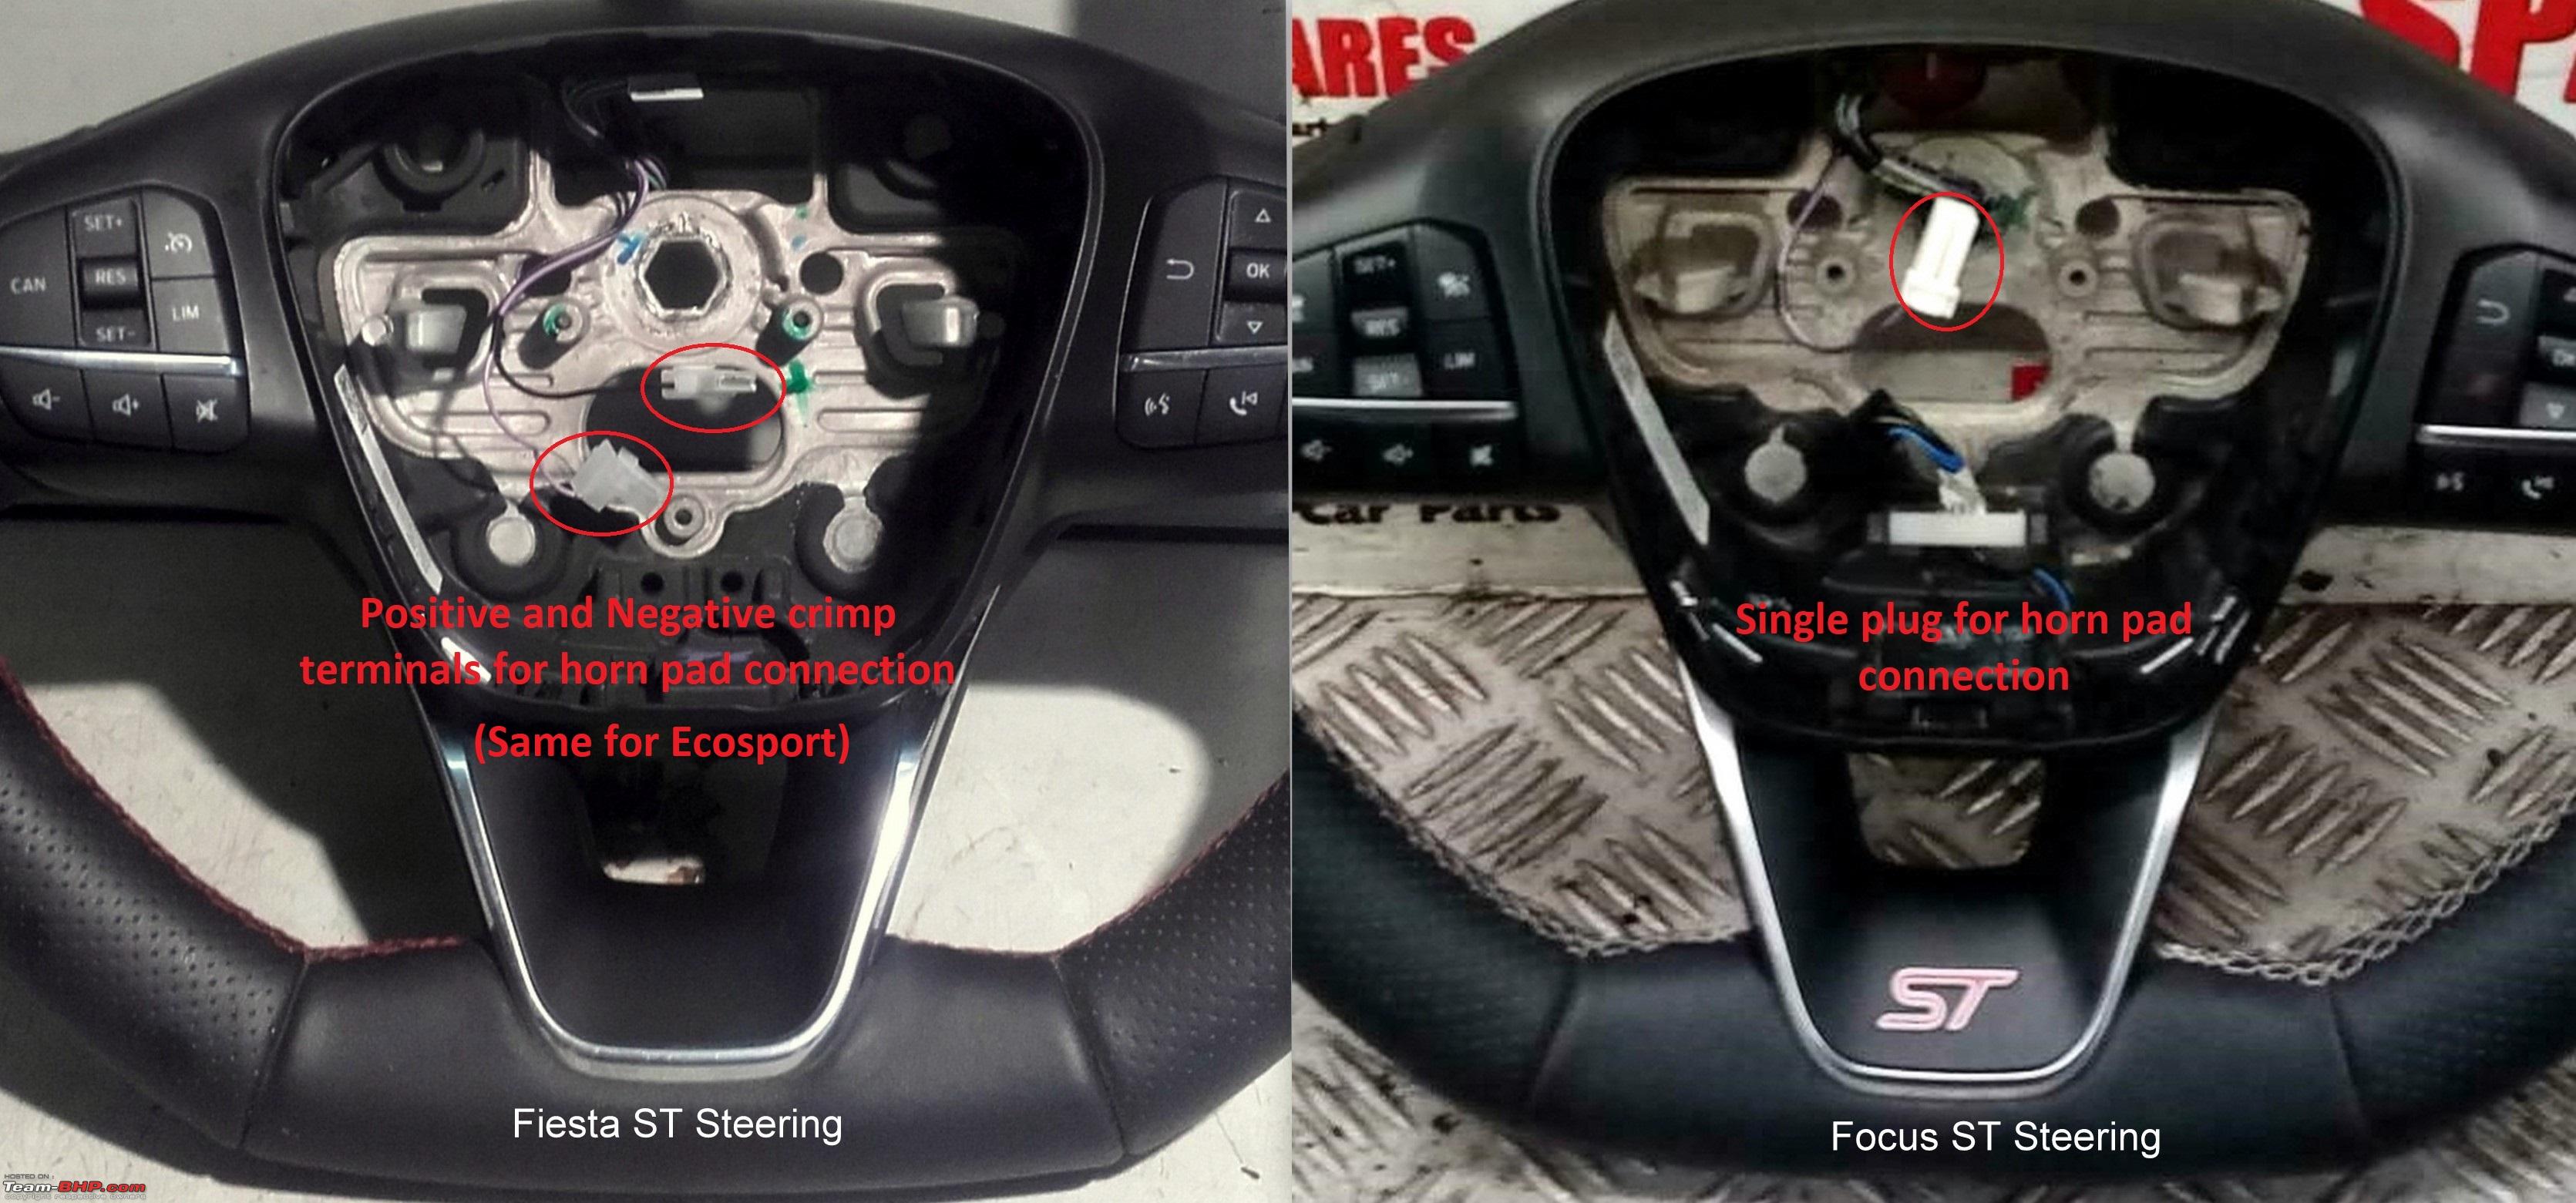 New SW has a sorely missed mute button which was not present on older SW 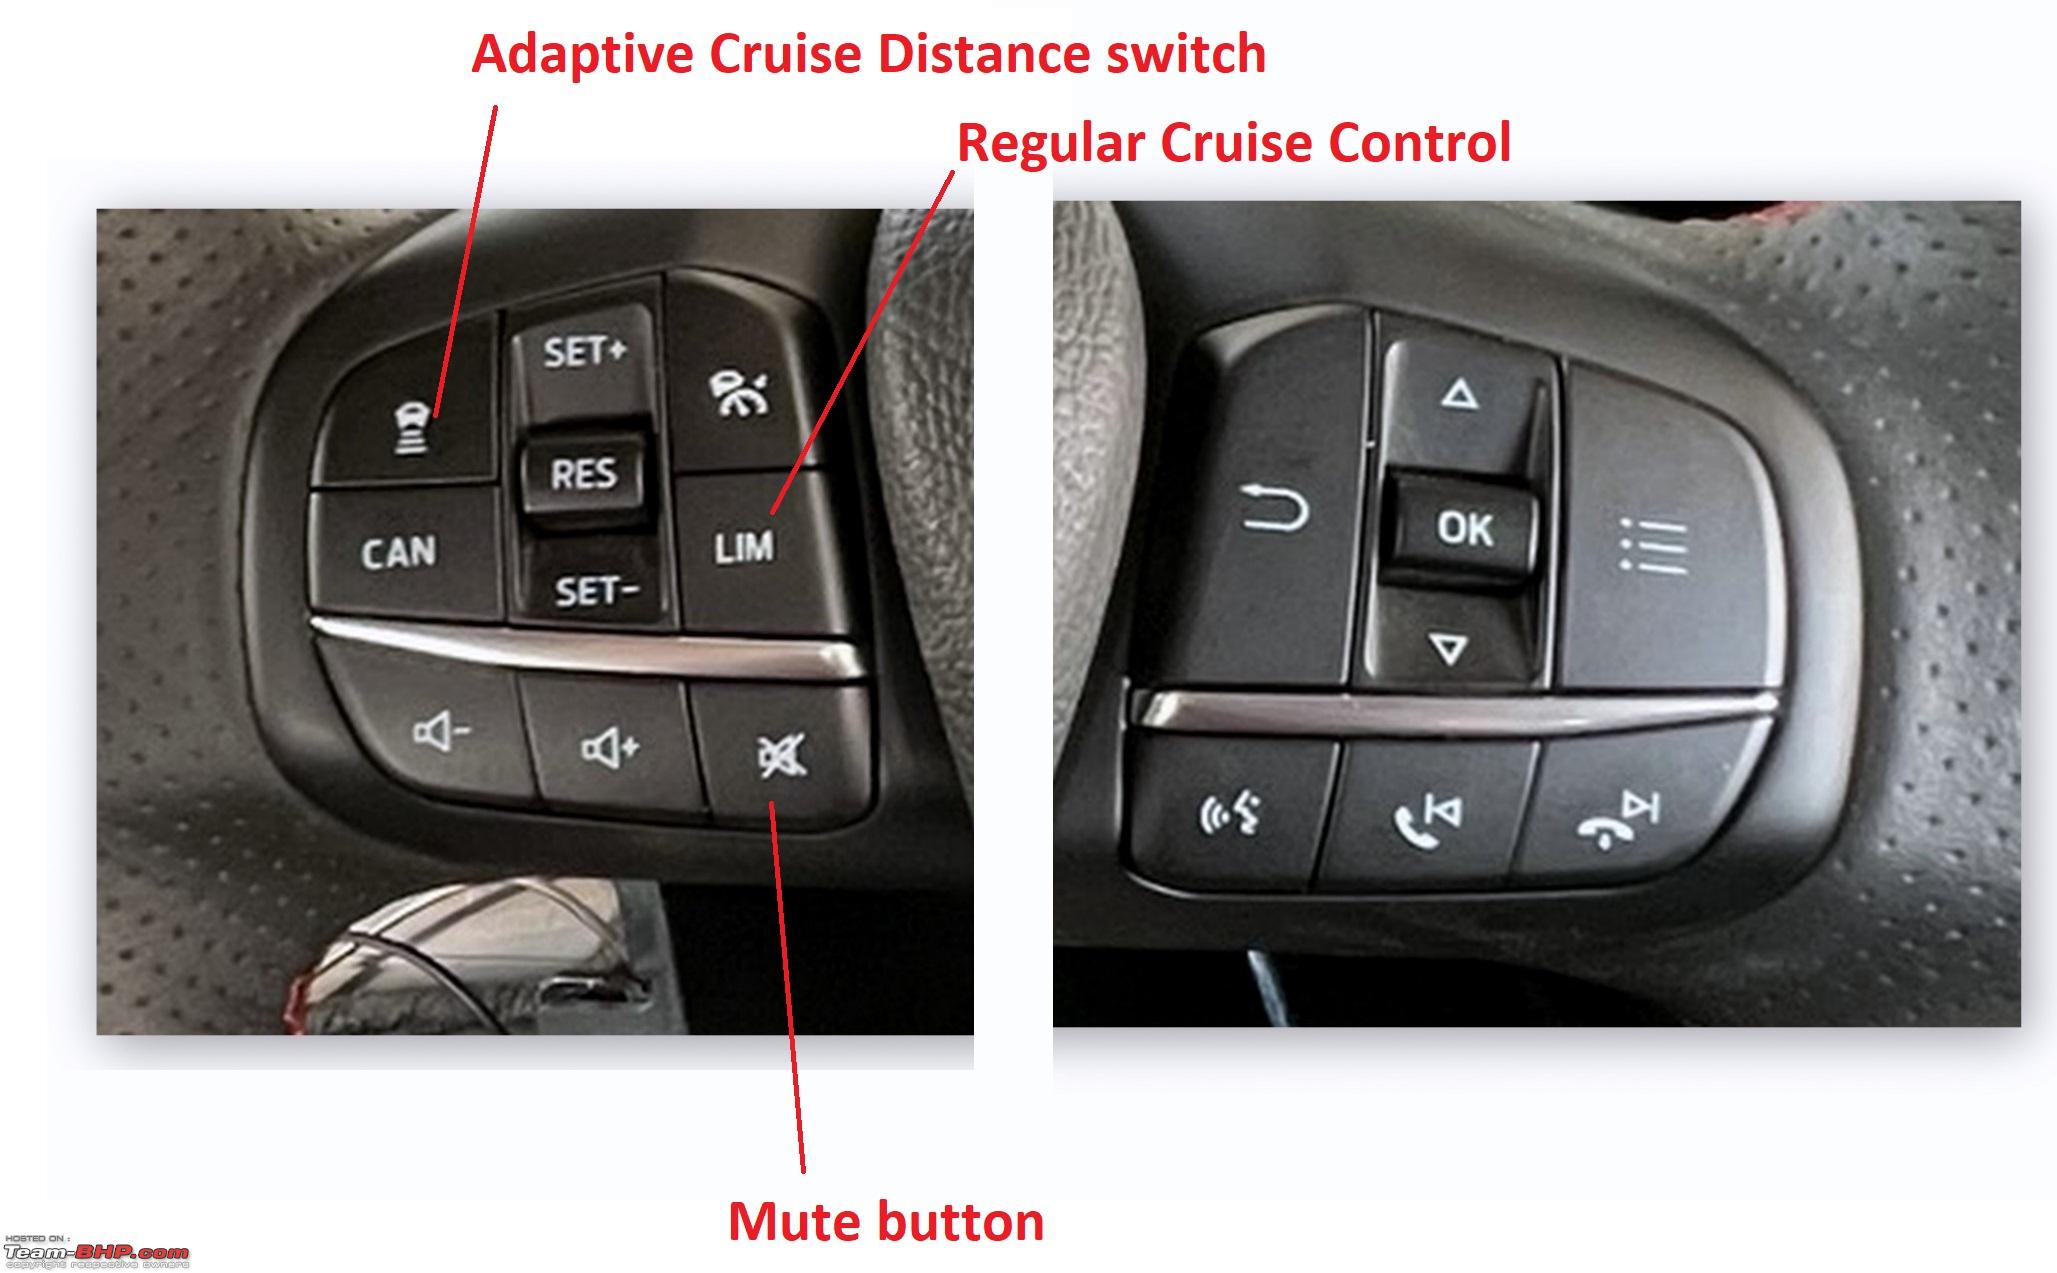 ST sticker on the SW - https://www.aliexpress.com/item/4001152613737.html Steering stalks and Steering Column Control Module (SCCM) Reason for changing the stalks and SCCM: 1. I intend to install ADAS feature such as Lane Departure Warning and Lane Keep Assist. For this I require a turn signal stalk with Lane assist ON/OFF switch. EcoSport shares the stalks with other siblings like Fiesta, Focus, Puma and Kuga. On the outside it should have been a simple swap with turn stalk from another sibling with LDW. However, we get turn signal stalk on Right hand side. Ford provides it on right side like us only in Australia, but I had no way of getting one from there. Every other EcoSport, Puma, Fiesta, Focus etc. have the stalk on the left side including in Right-hand drive market like UK.  2. New FoST steering has Heating Function. Living in the Southern Coastal part of India I had no use for this during regular day-to-day use. However, it would be handy during early hours and during trips to colder parts of the country. To enable this, I will require a new SCCM which has heater element connections as cars without heater function do not get SCCMs with heater connection even in international markets. Current EcoSport SCCM 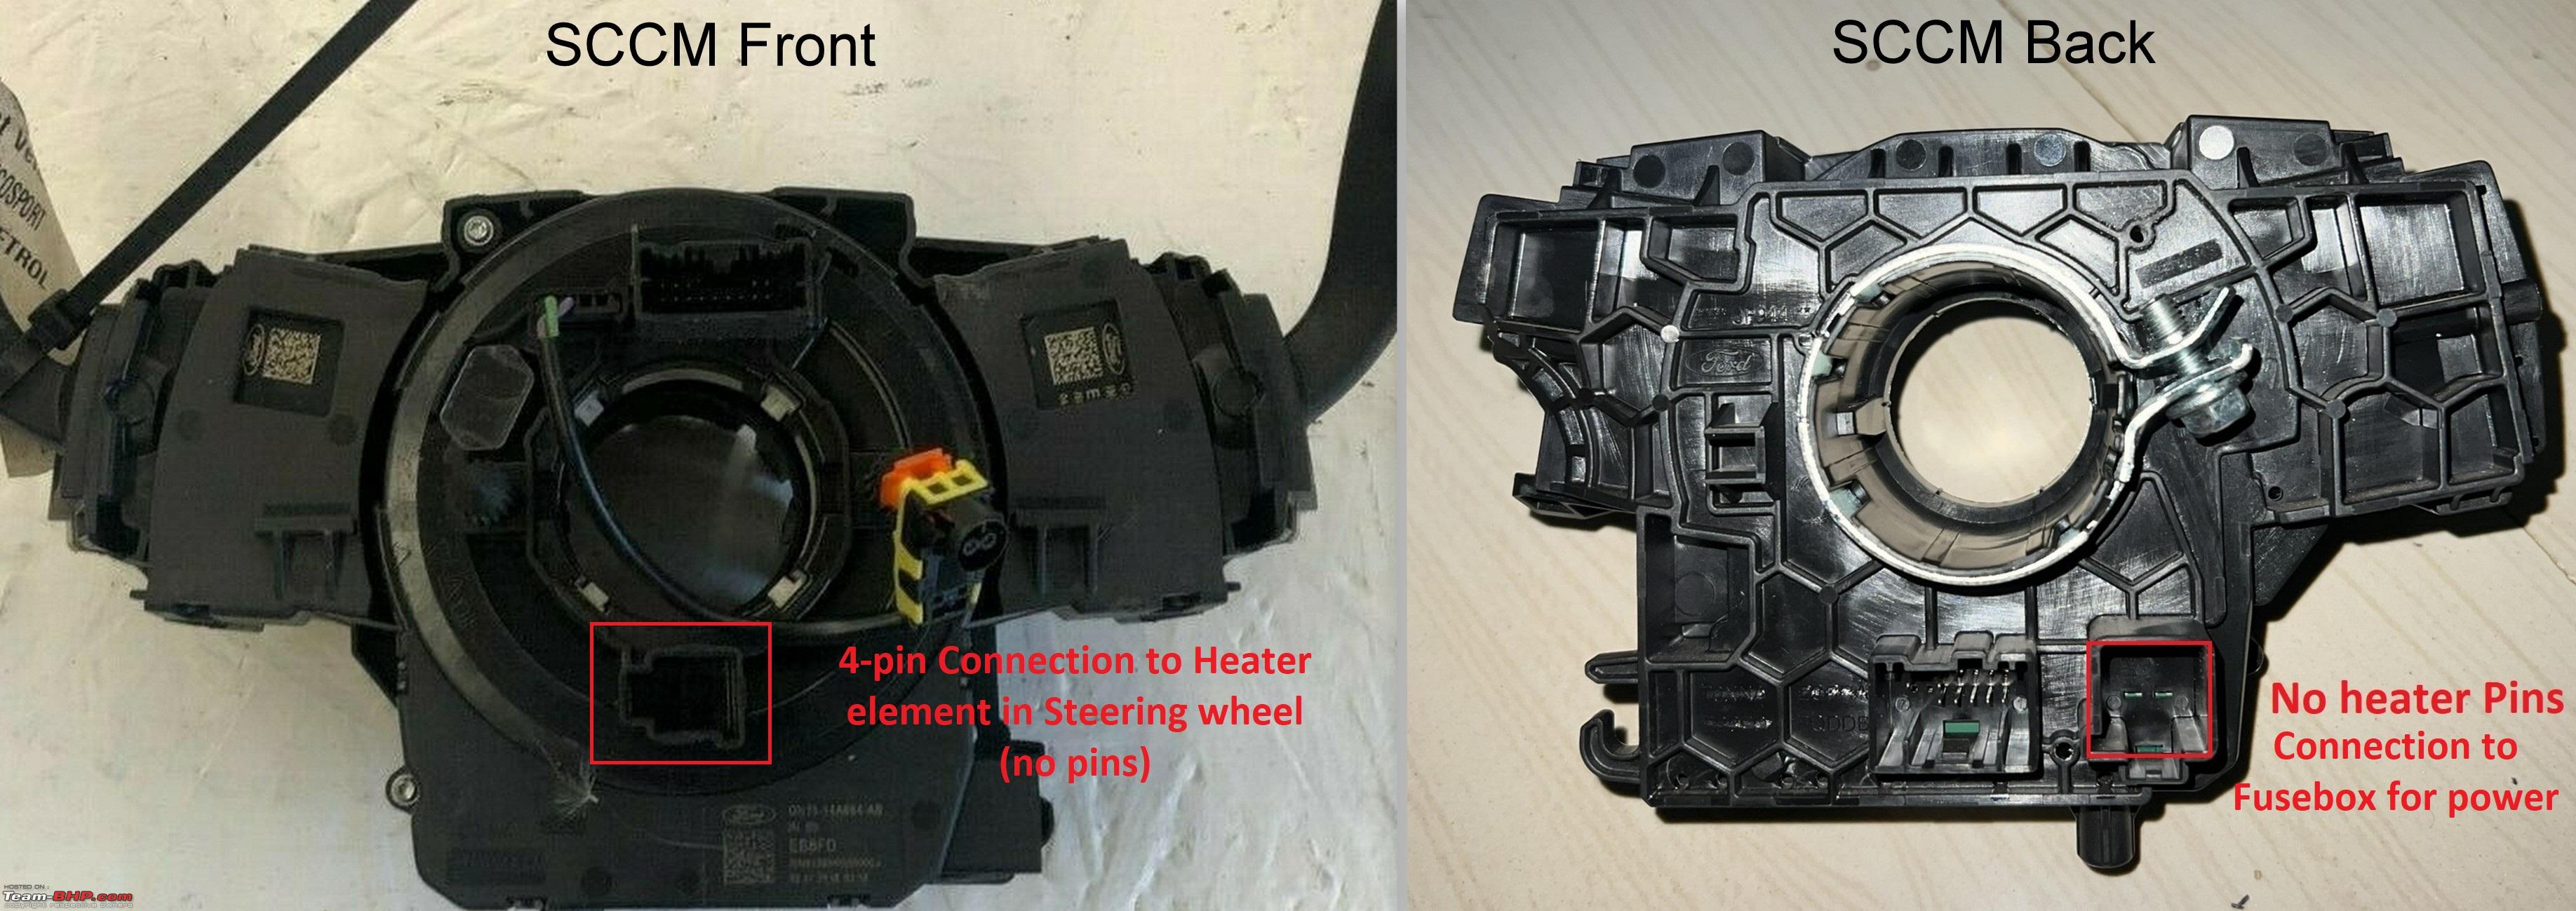 I got a SCCM set with stalks from a Fiesta mk8 that has heater connections on Ebay UK for 35 pounds and retrofitted it into EcoSport’s SCCM housing as described in Naveen’s post (https://www.team-bhp.com/forum/diy-d...e-variant.html). SCCM assembly is made of the clock spring (Part number: H1BT-14A664-AB) and the housing (Part number: H1BT-14B522-BE) To remove the plastic bits holding the SCCM PCB inside the housing it is easier if you drill (1-2 mm) at the 3 locations from behind until the plastic bits snap off. Use glue gun to hold the PCB in place after retrofitting into EcoSport housing. 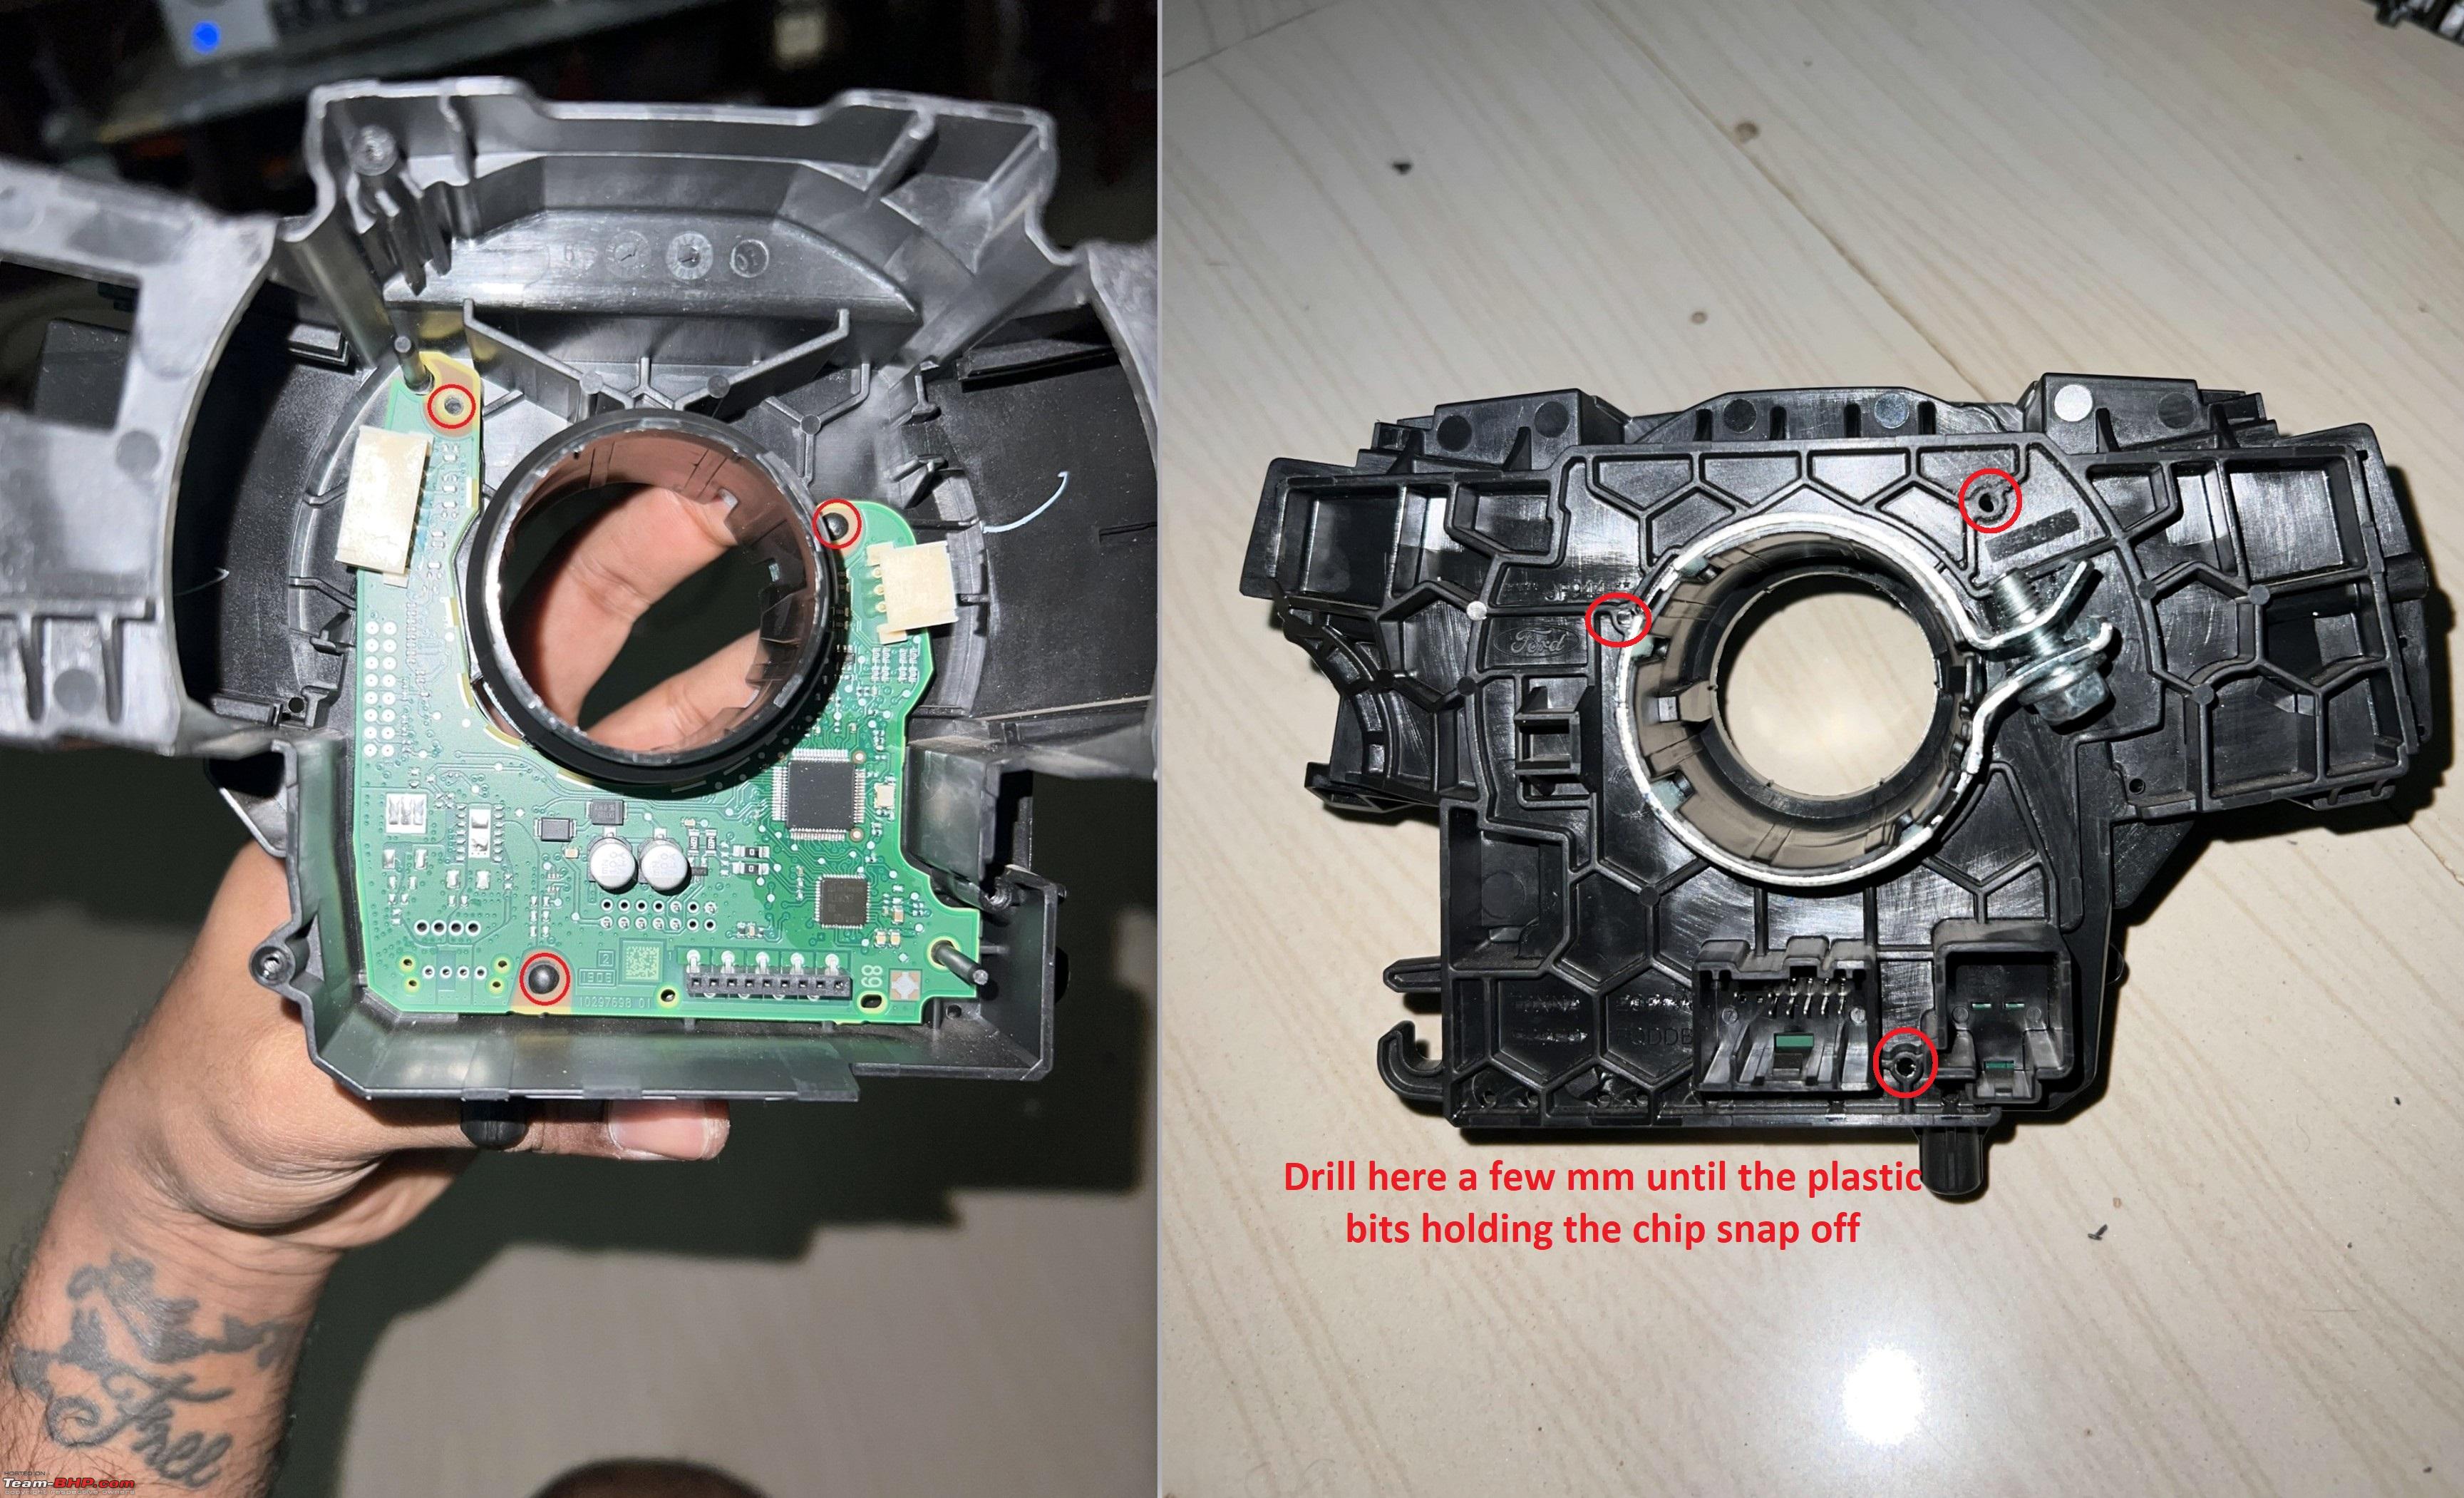 Few Installation pics: 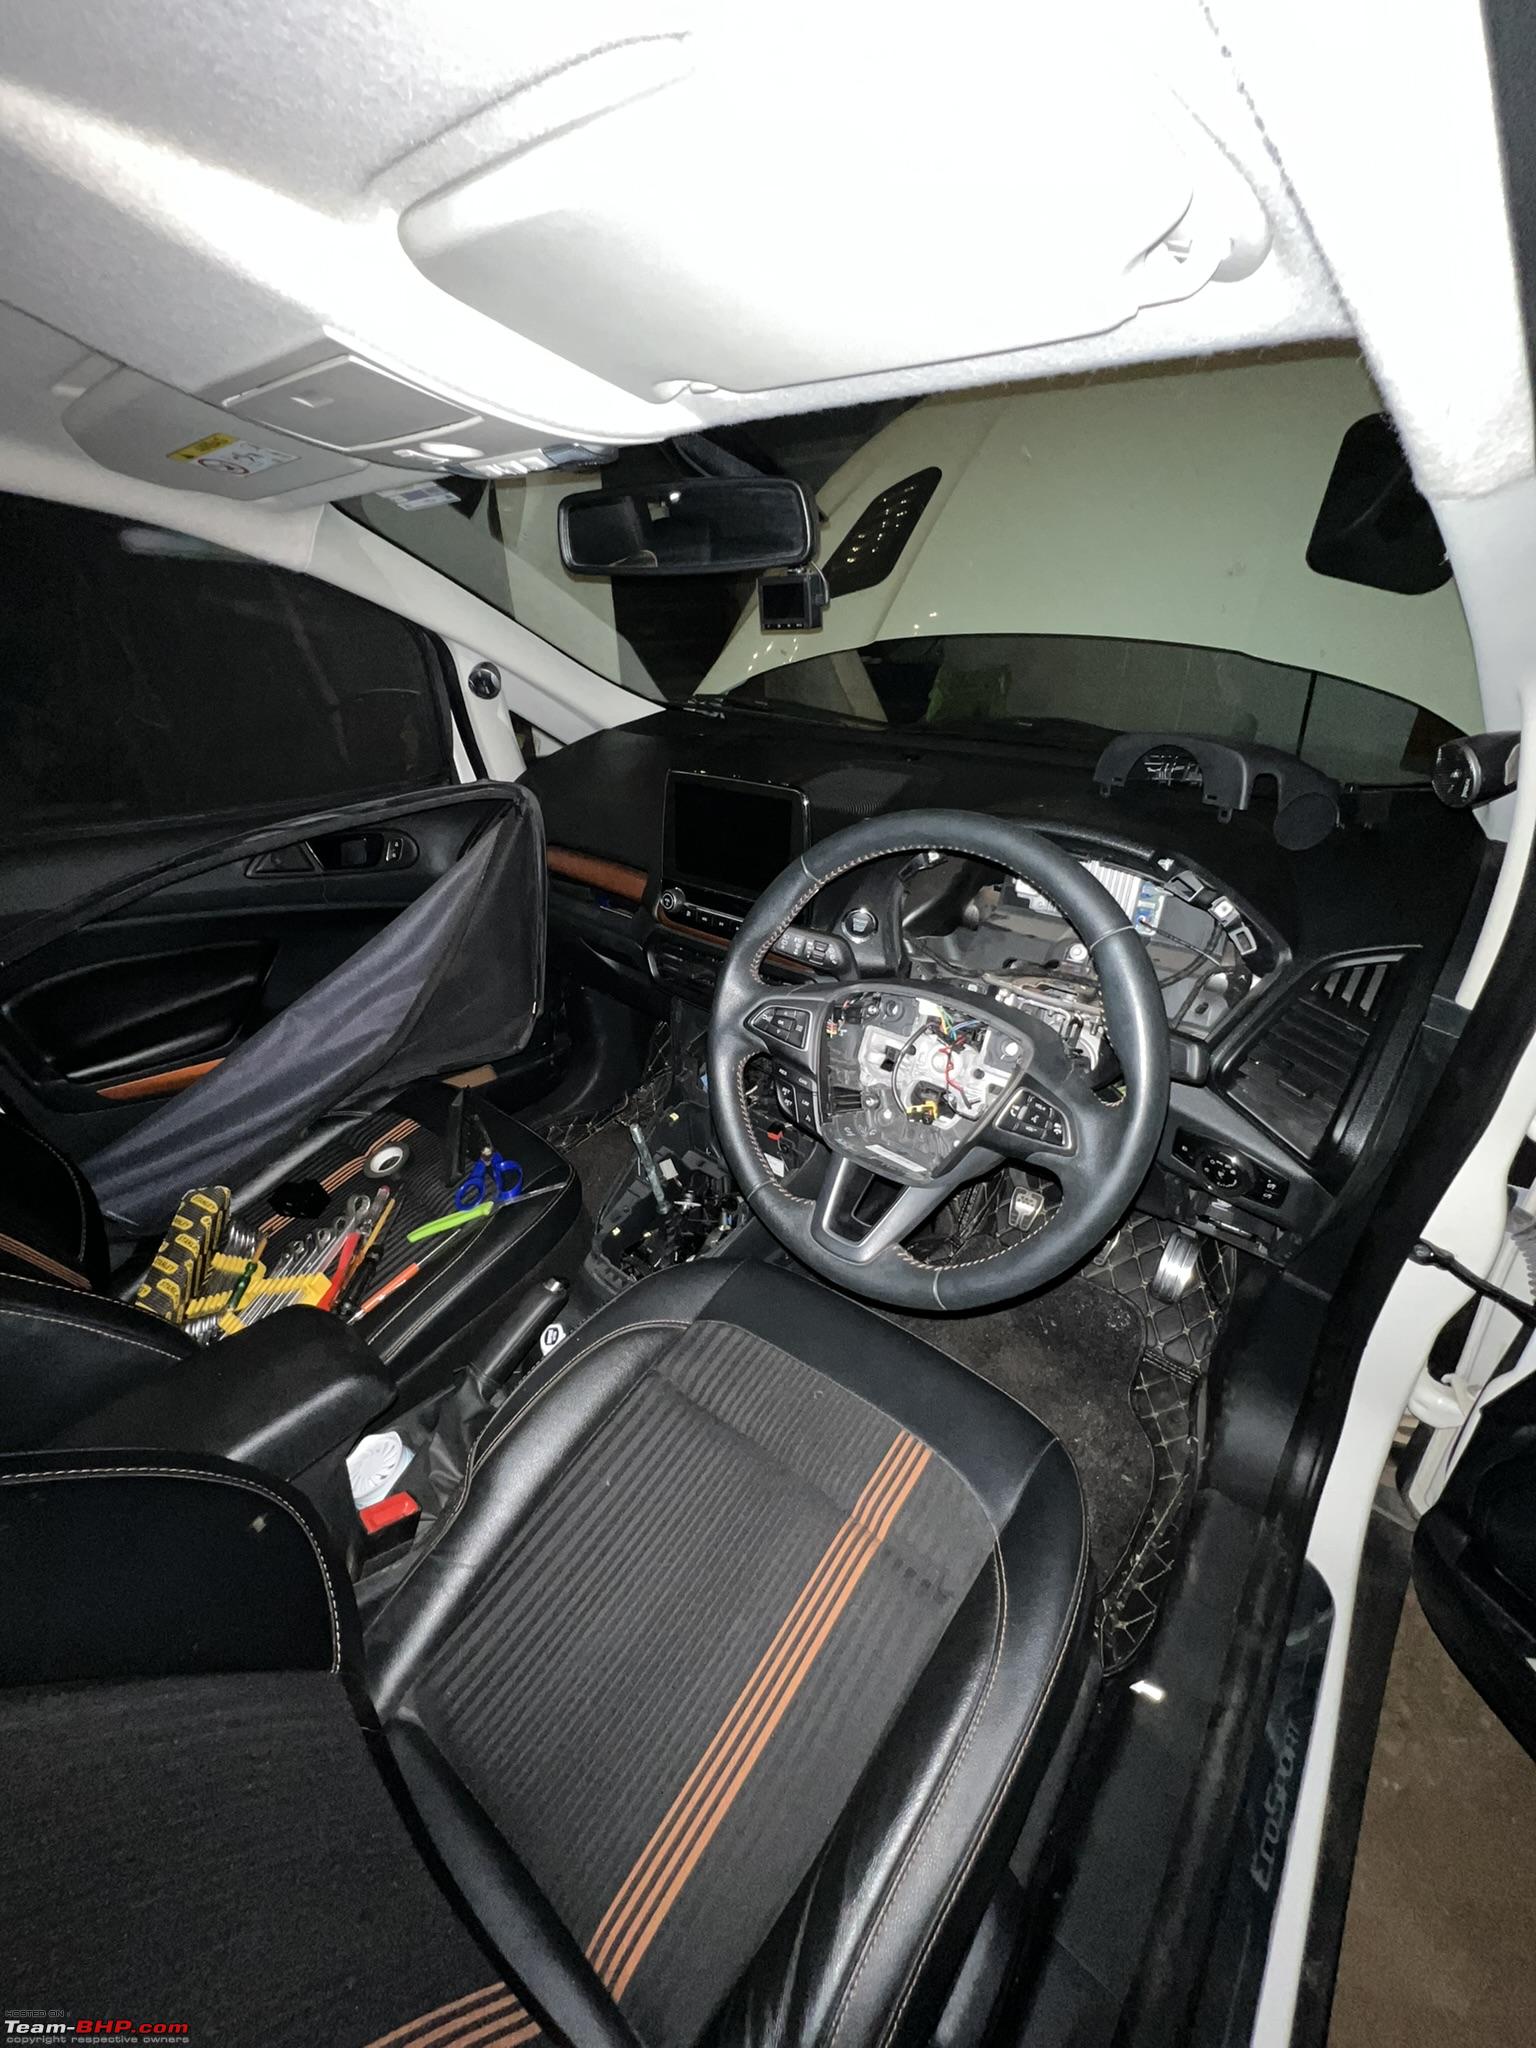 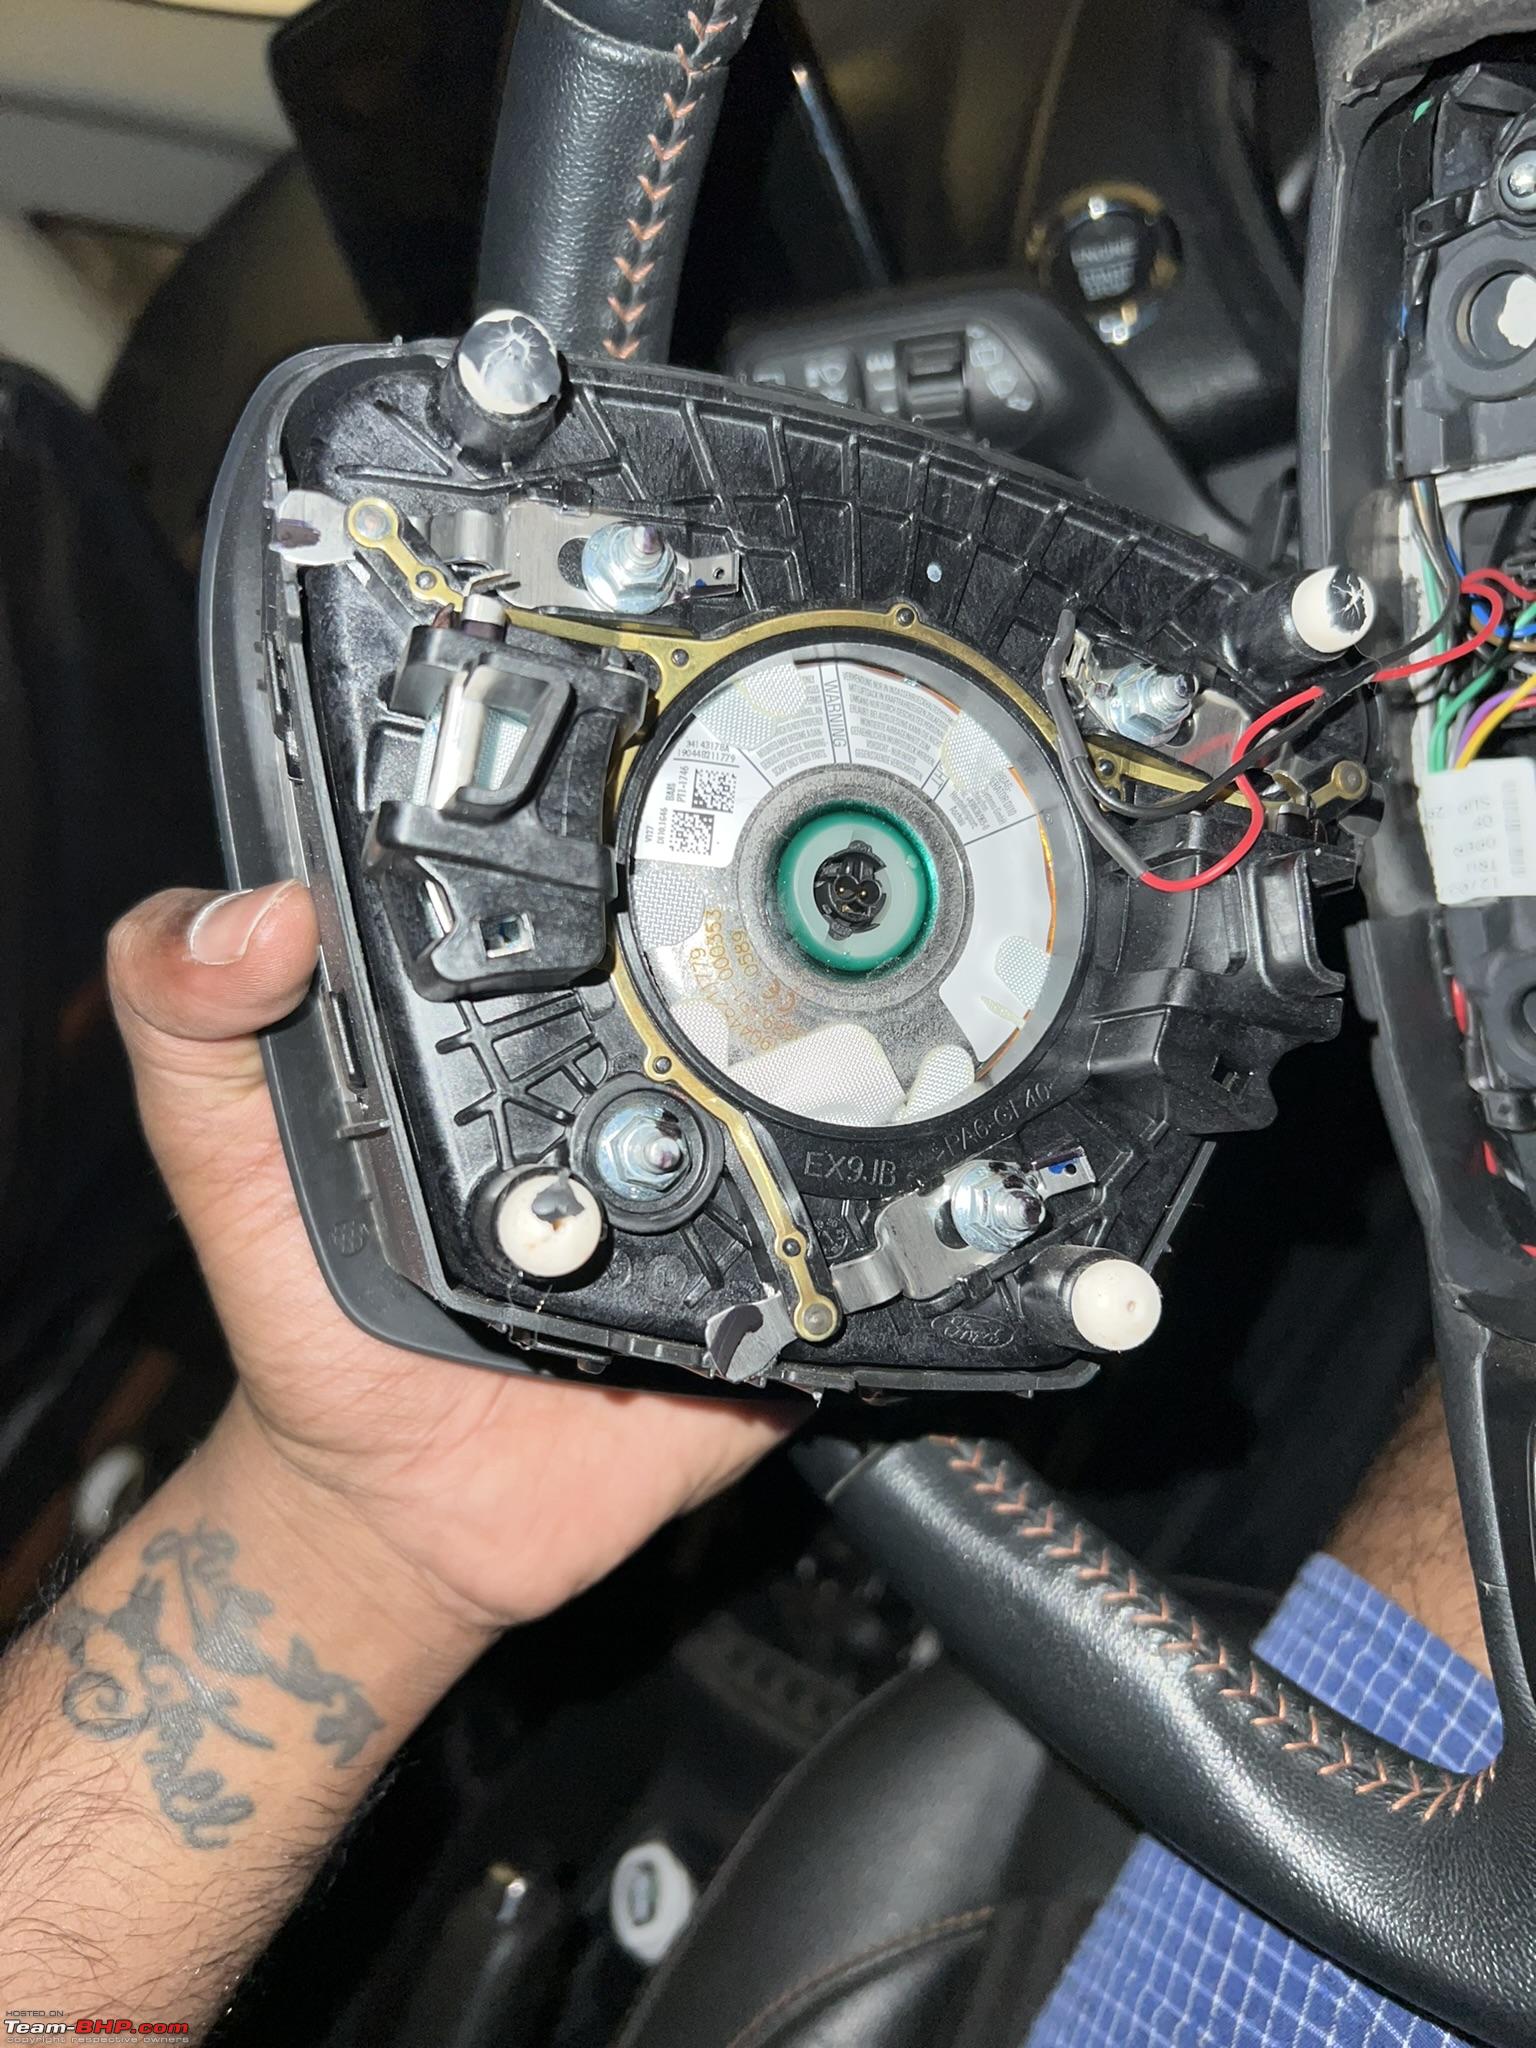  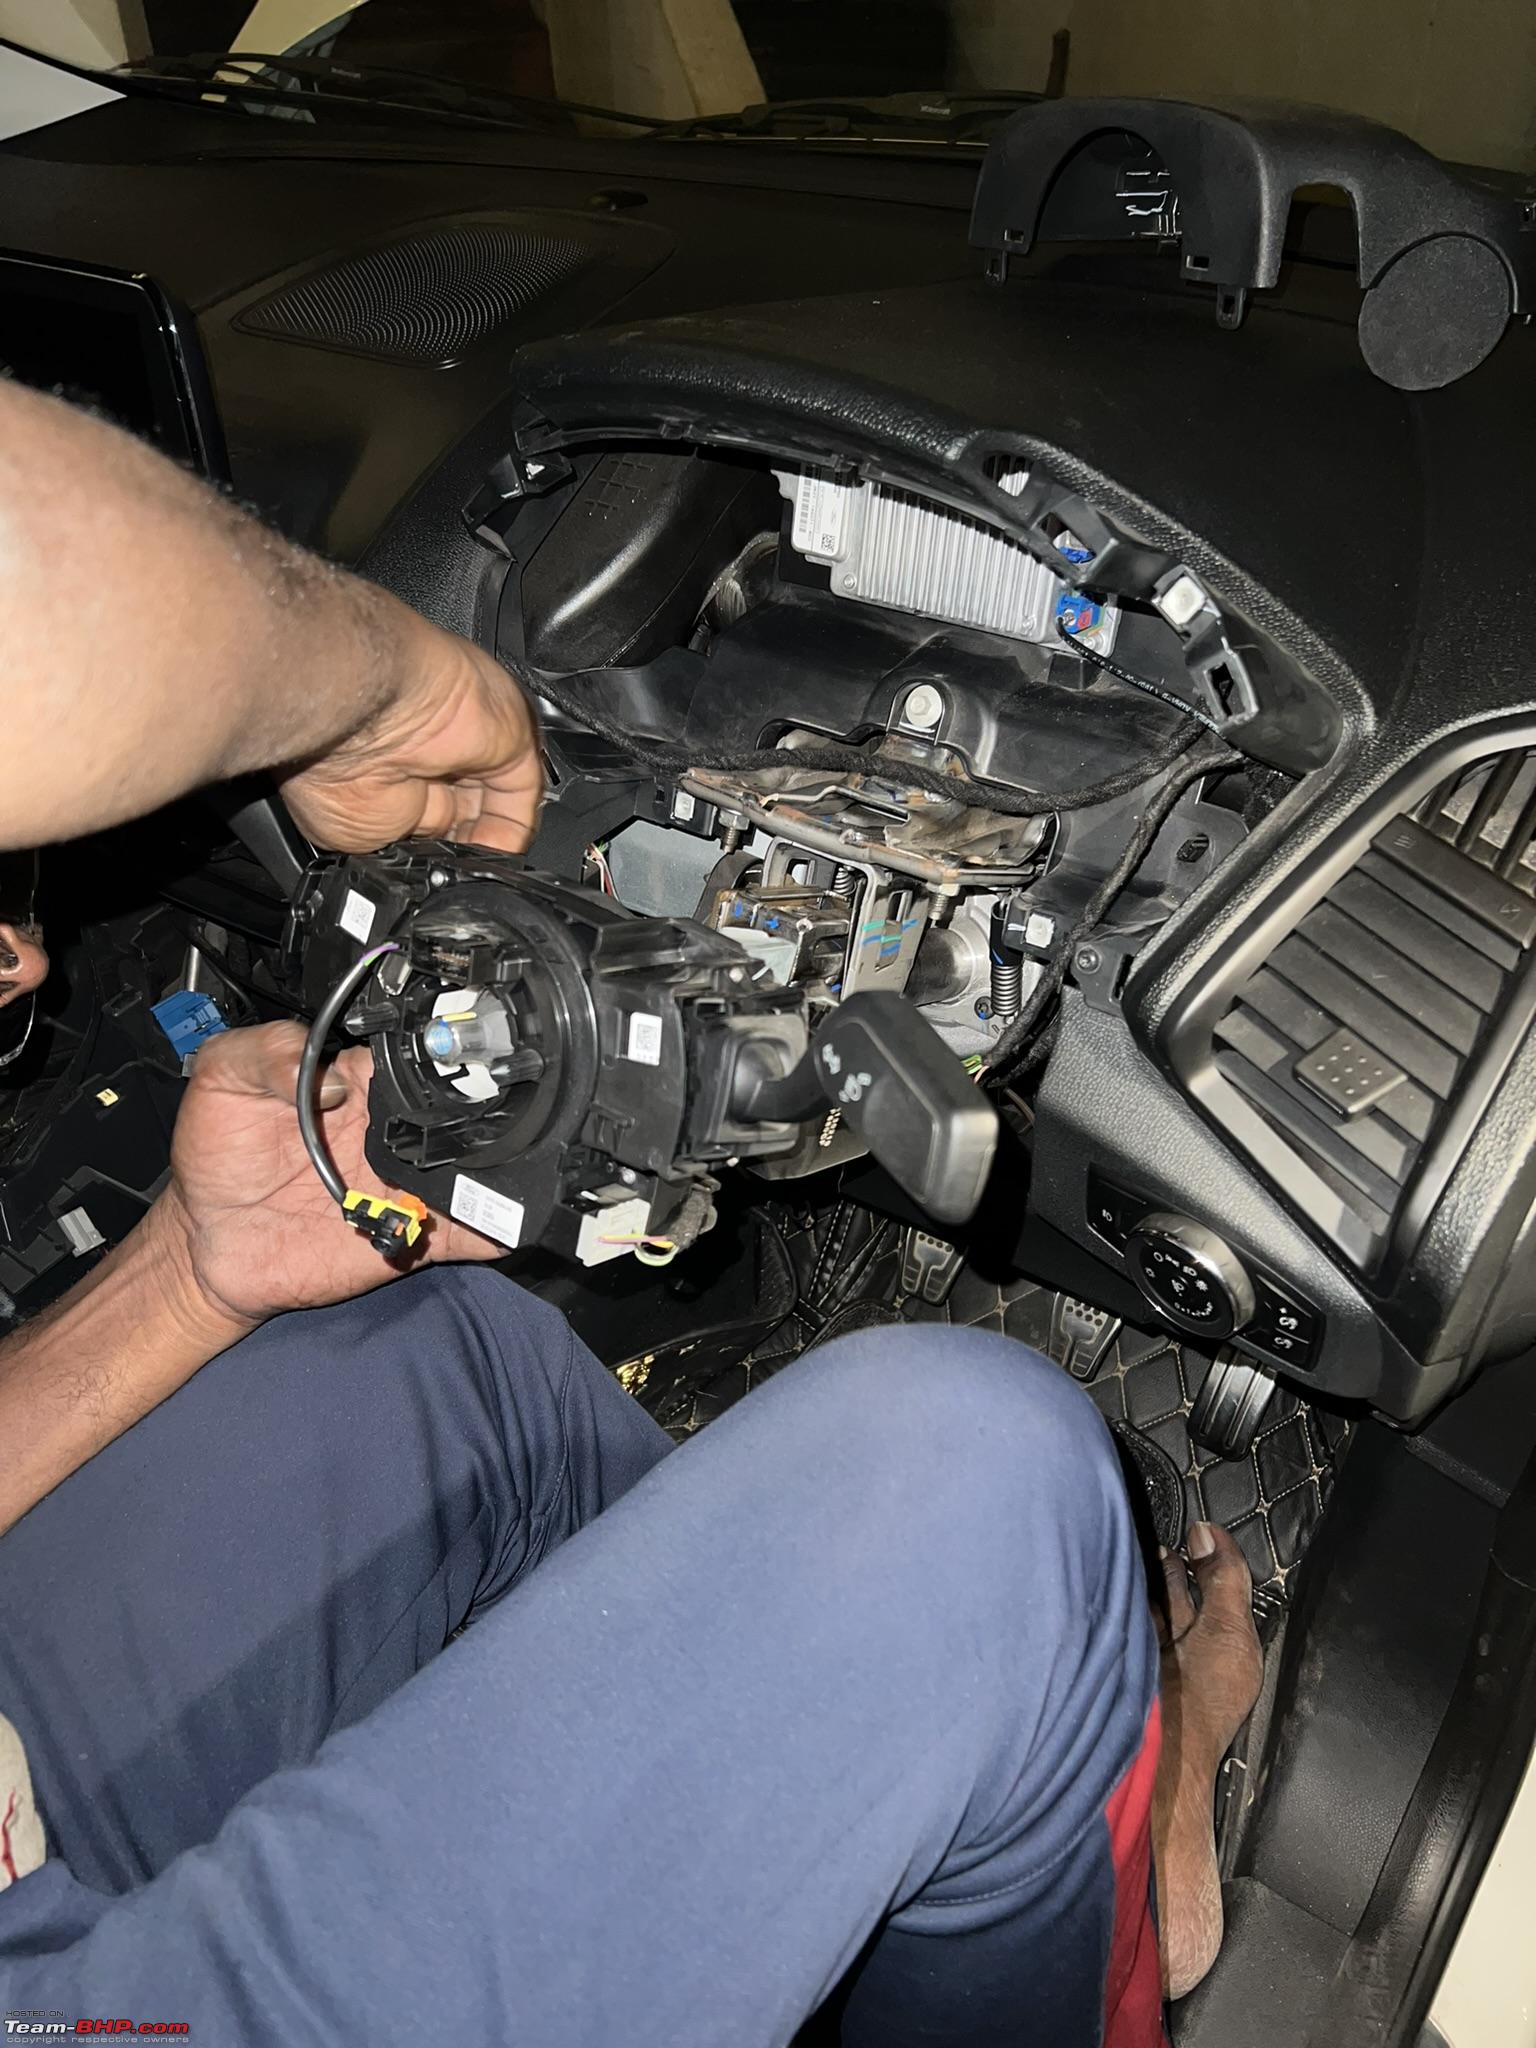 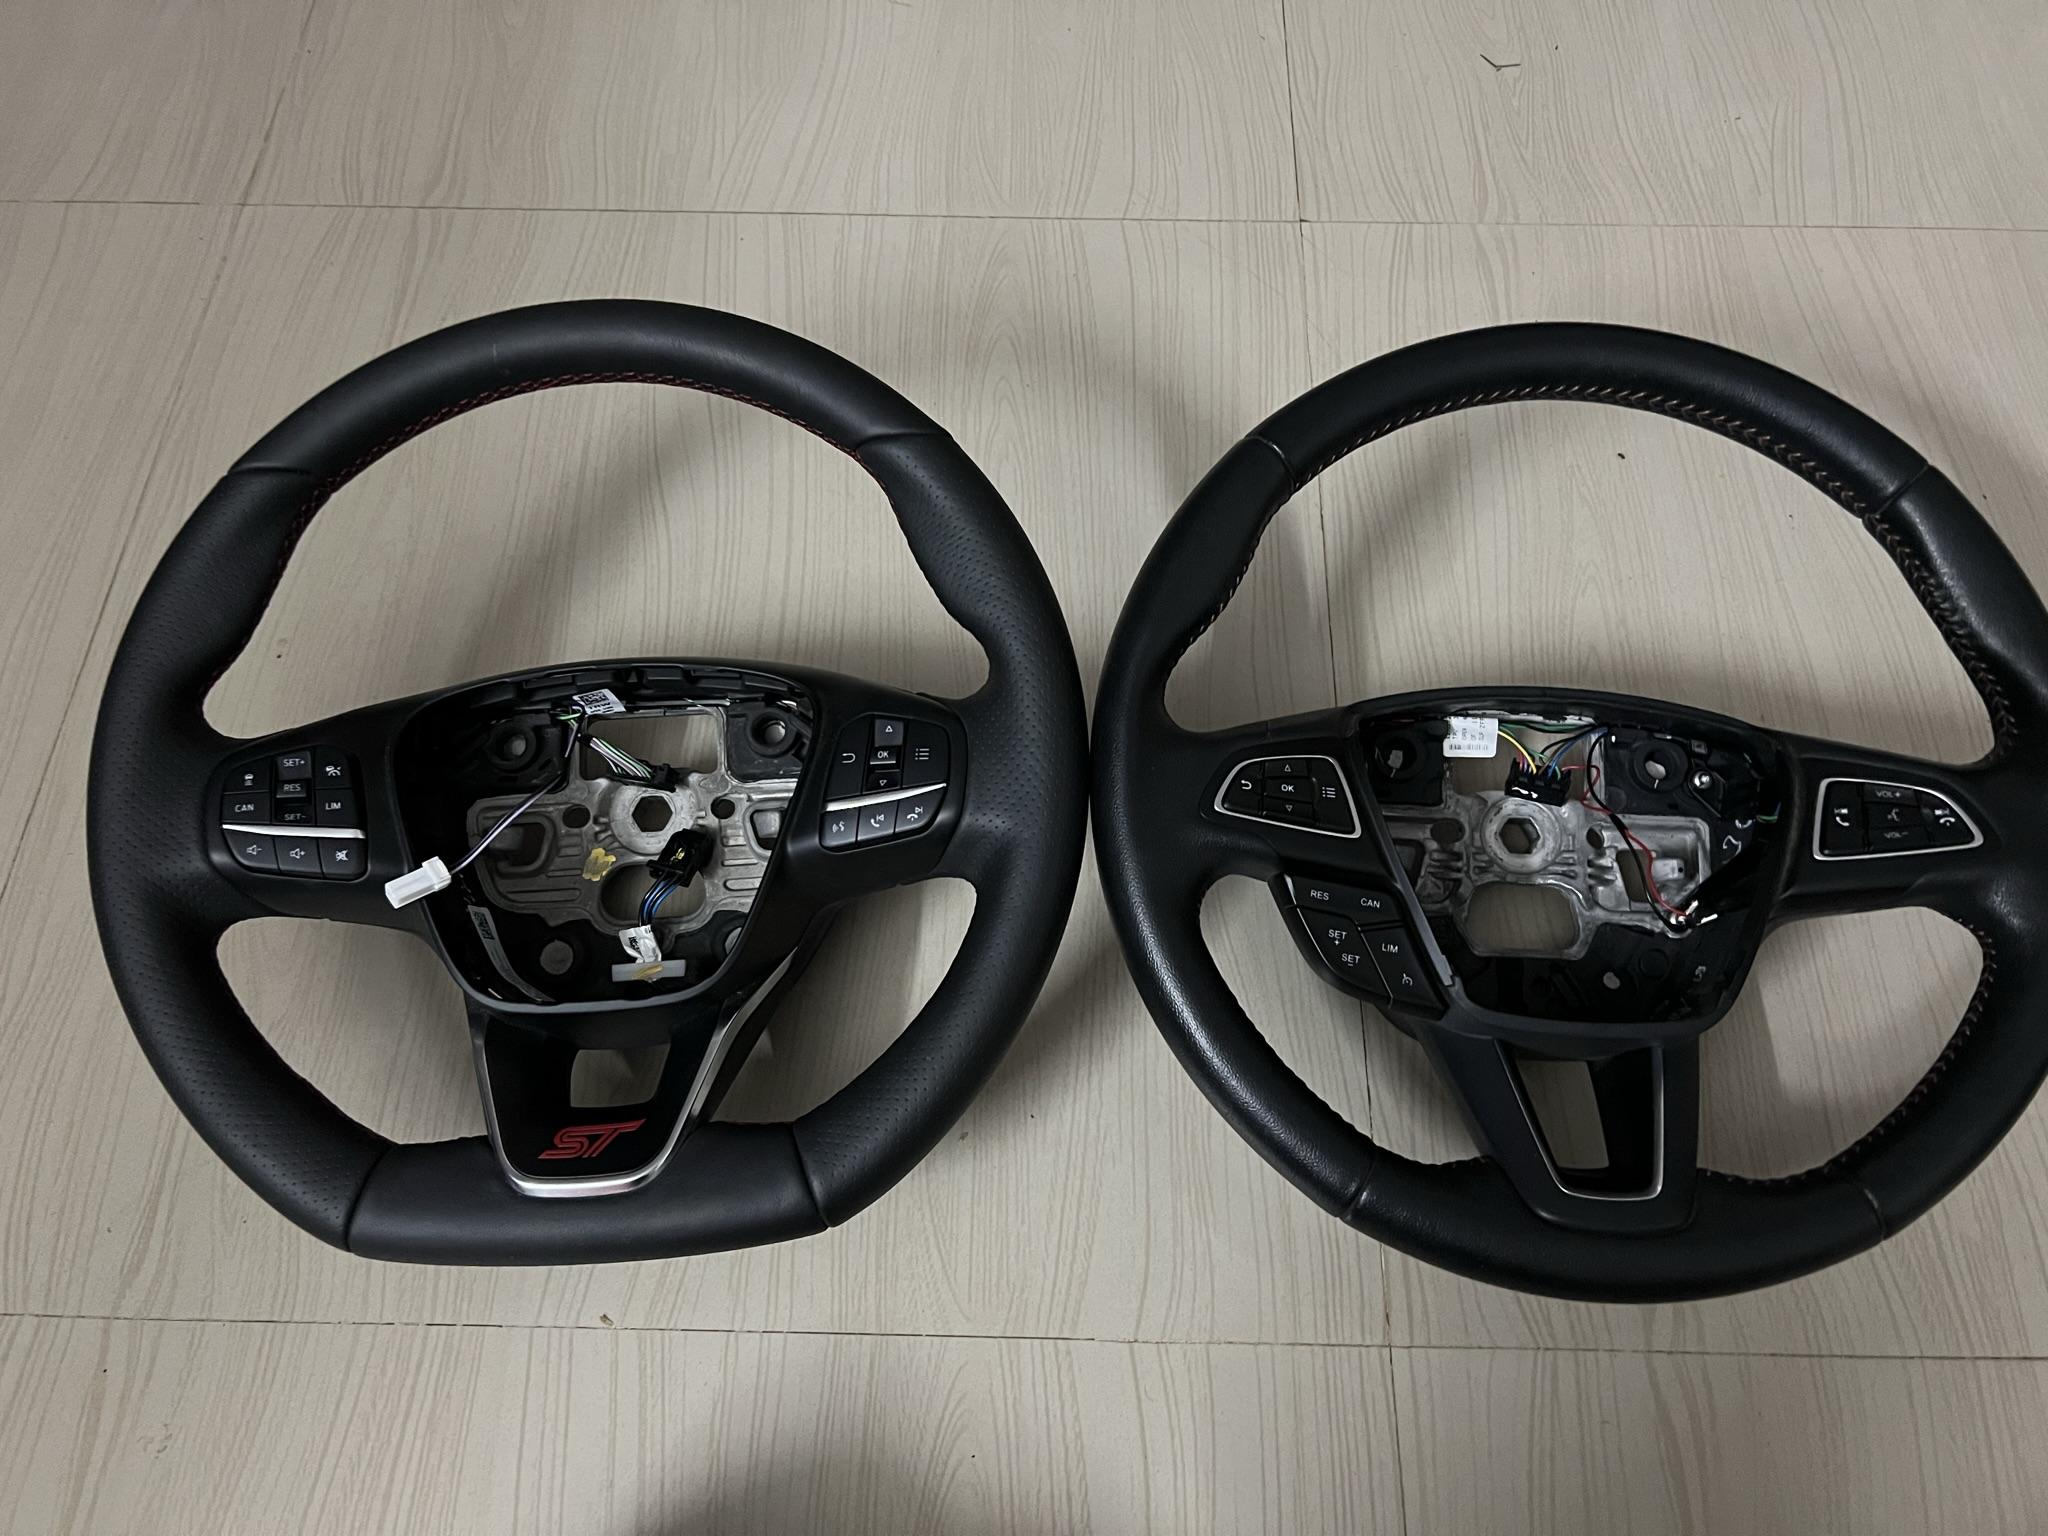 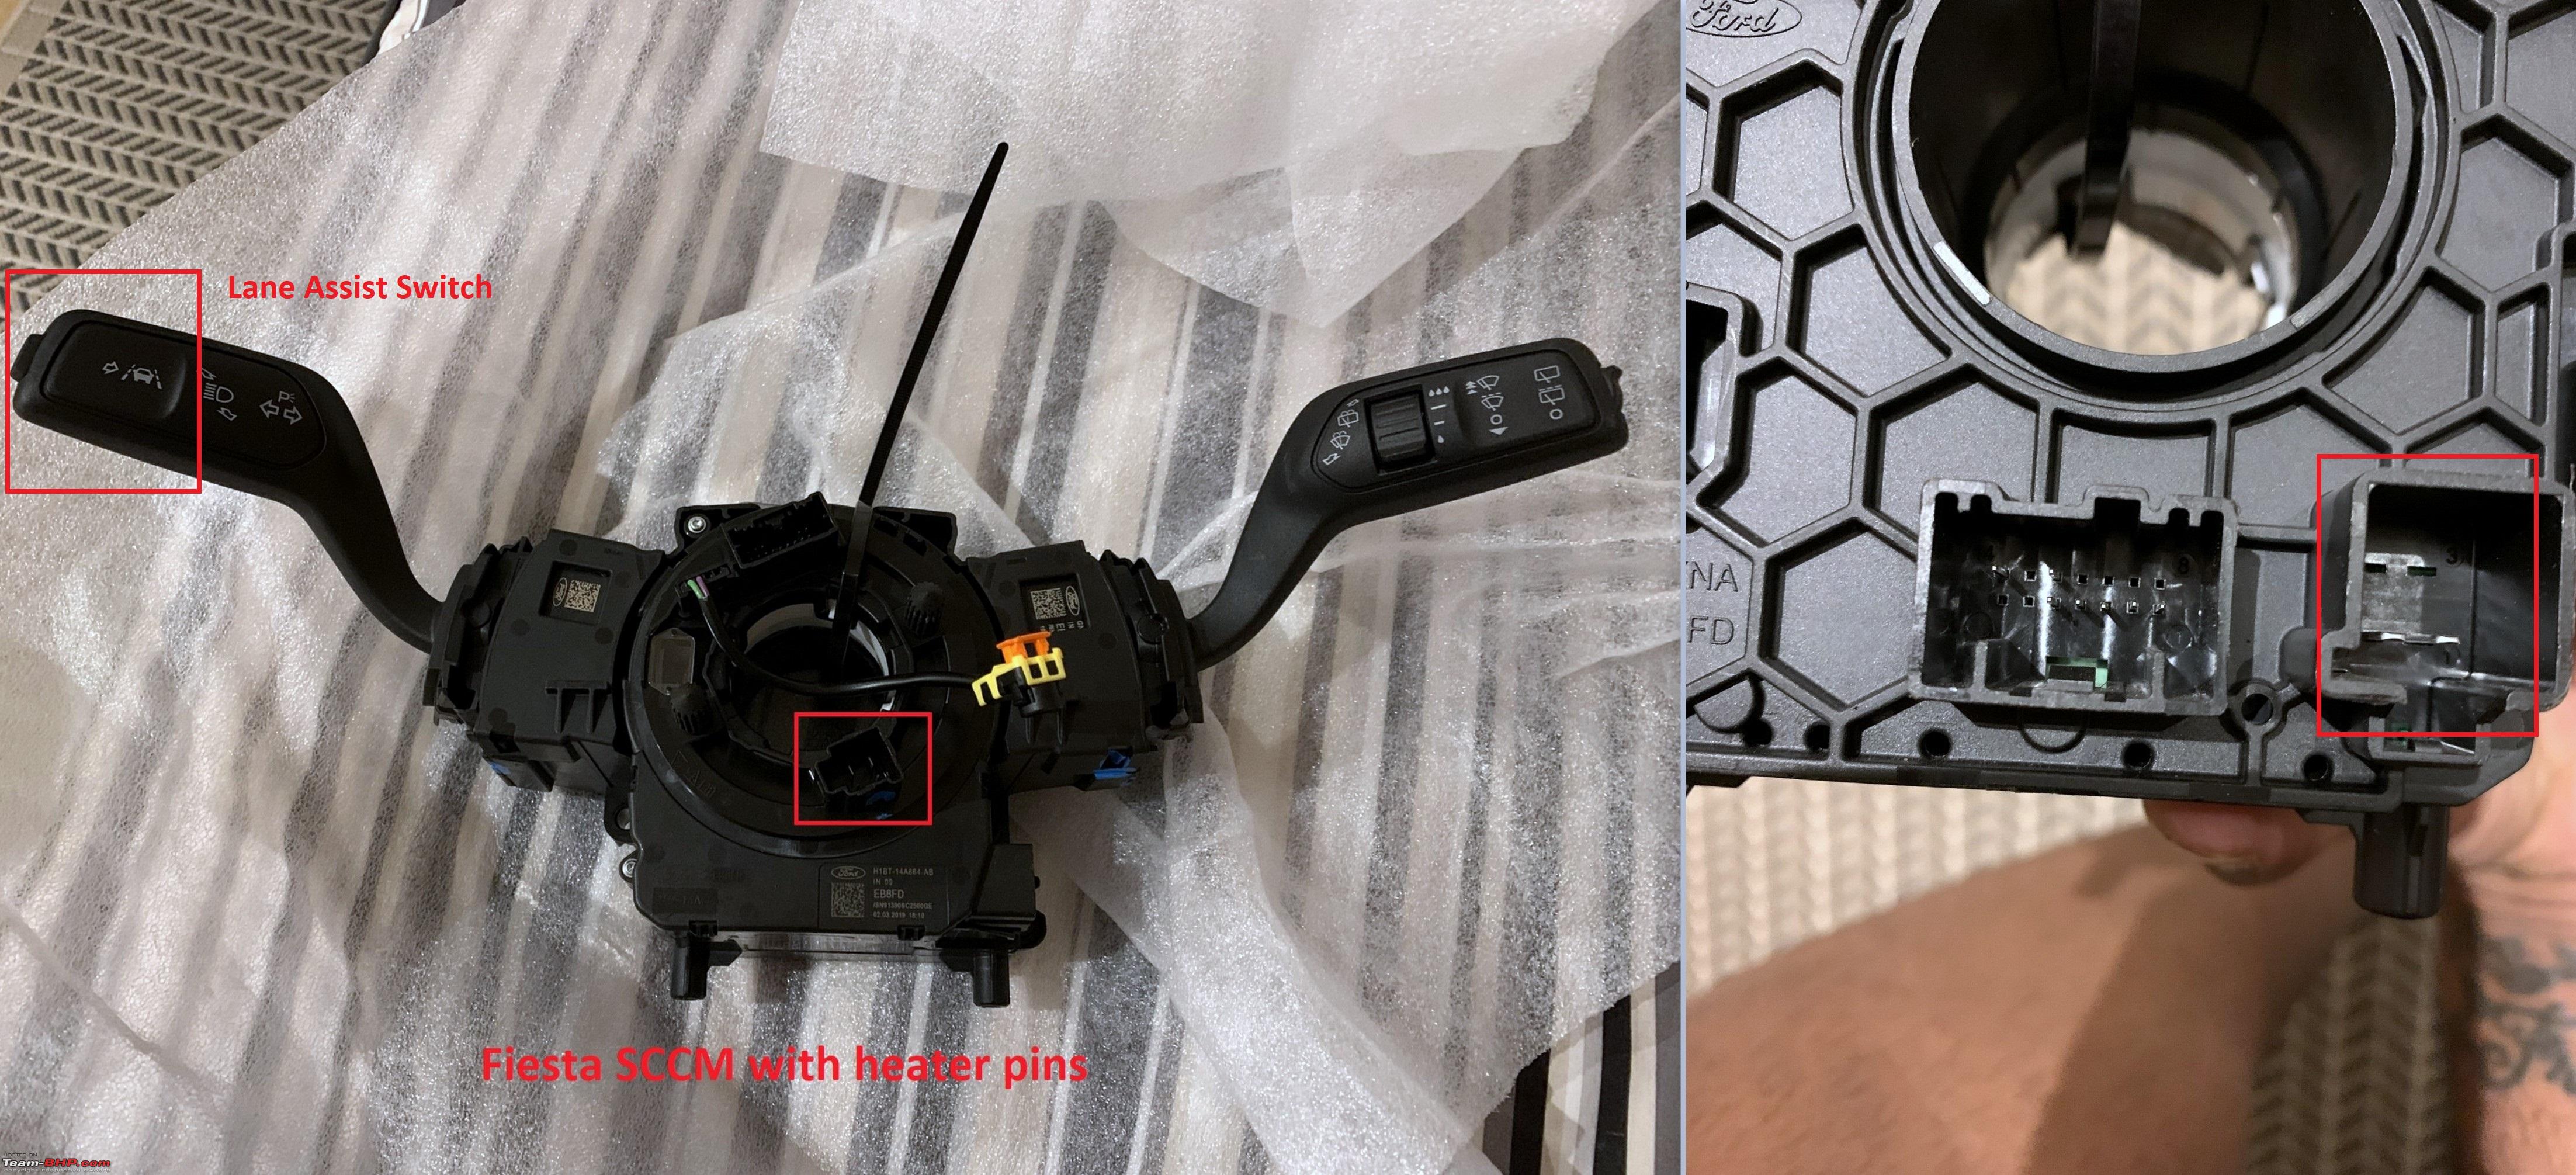 Global EcoSport HVAC Console 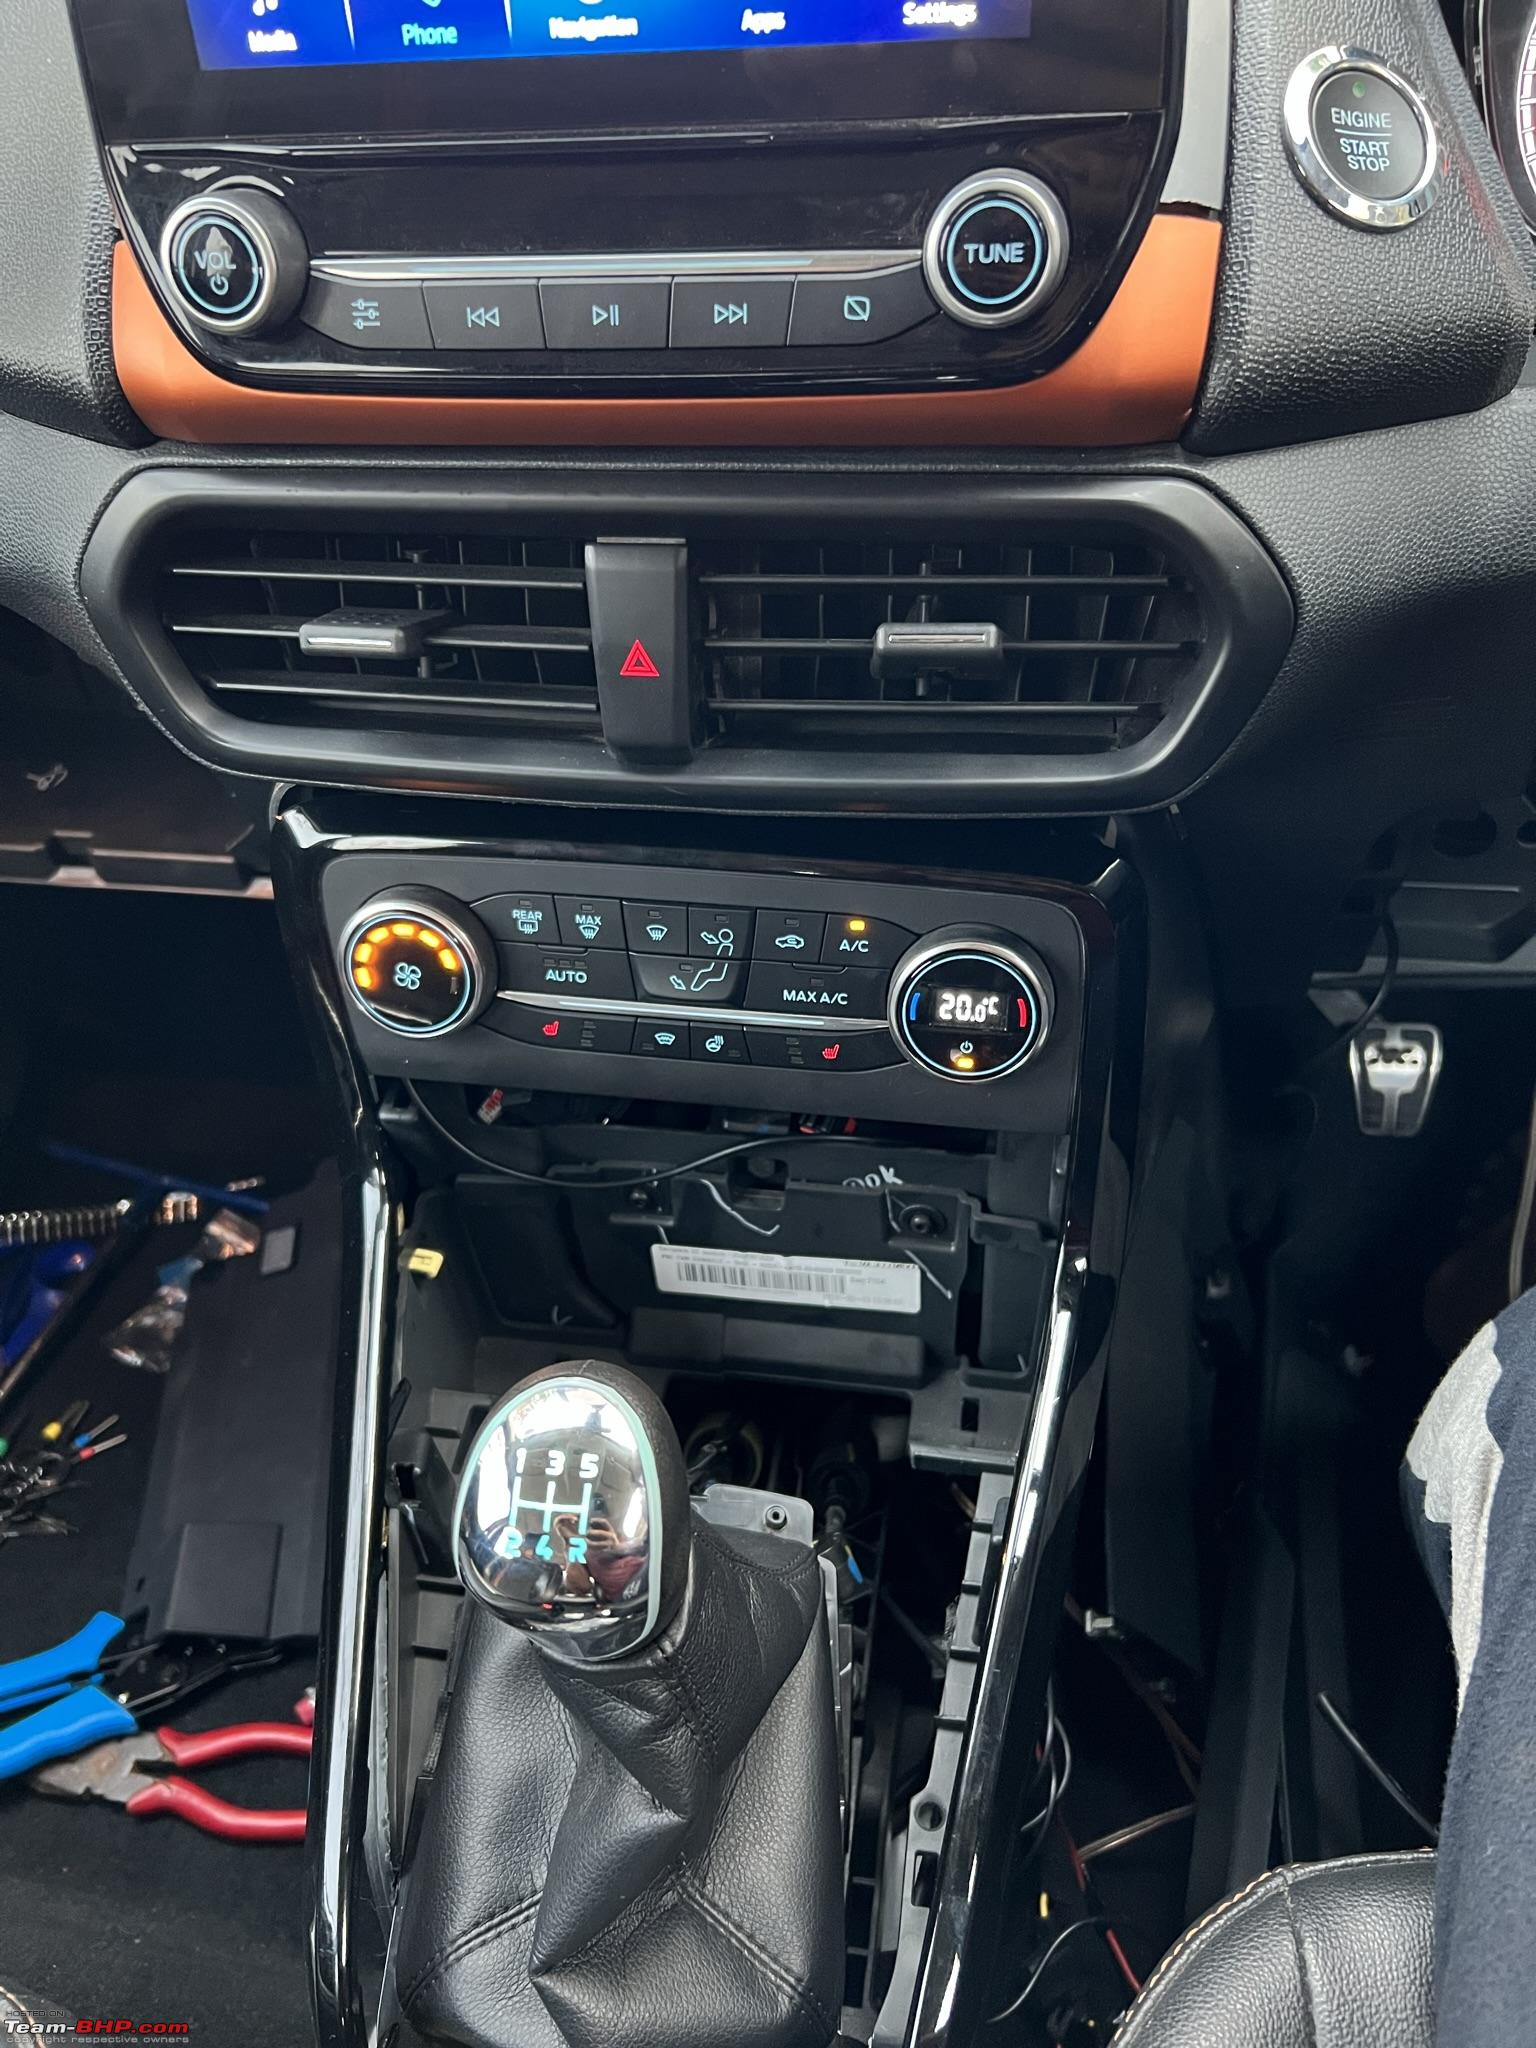 The heated steering wheel is controlled by a ON/OFF button present on the HVAC console. As an alternative one can also enable a soft button on the touch panel using Forscan without having to resort to changing the console panel. 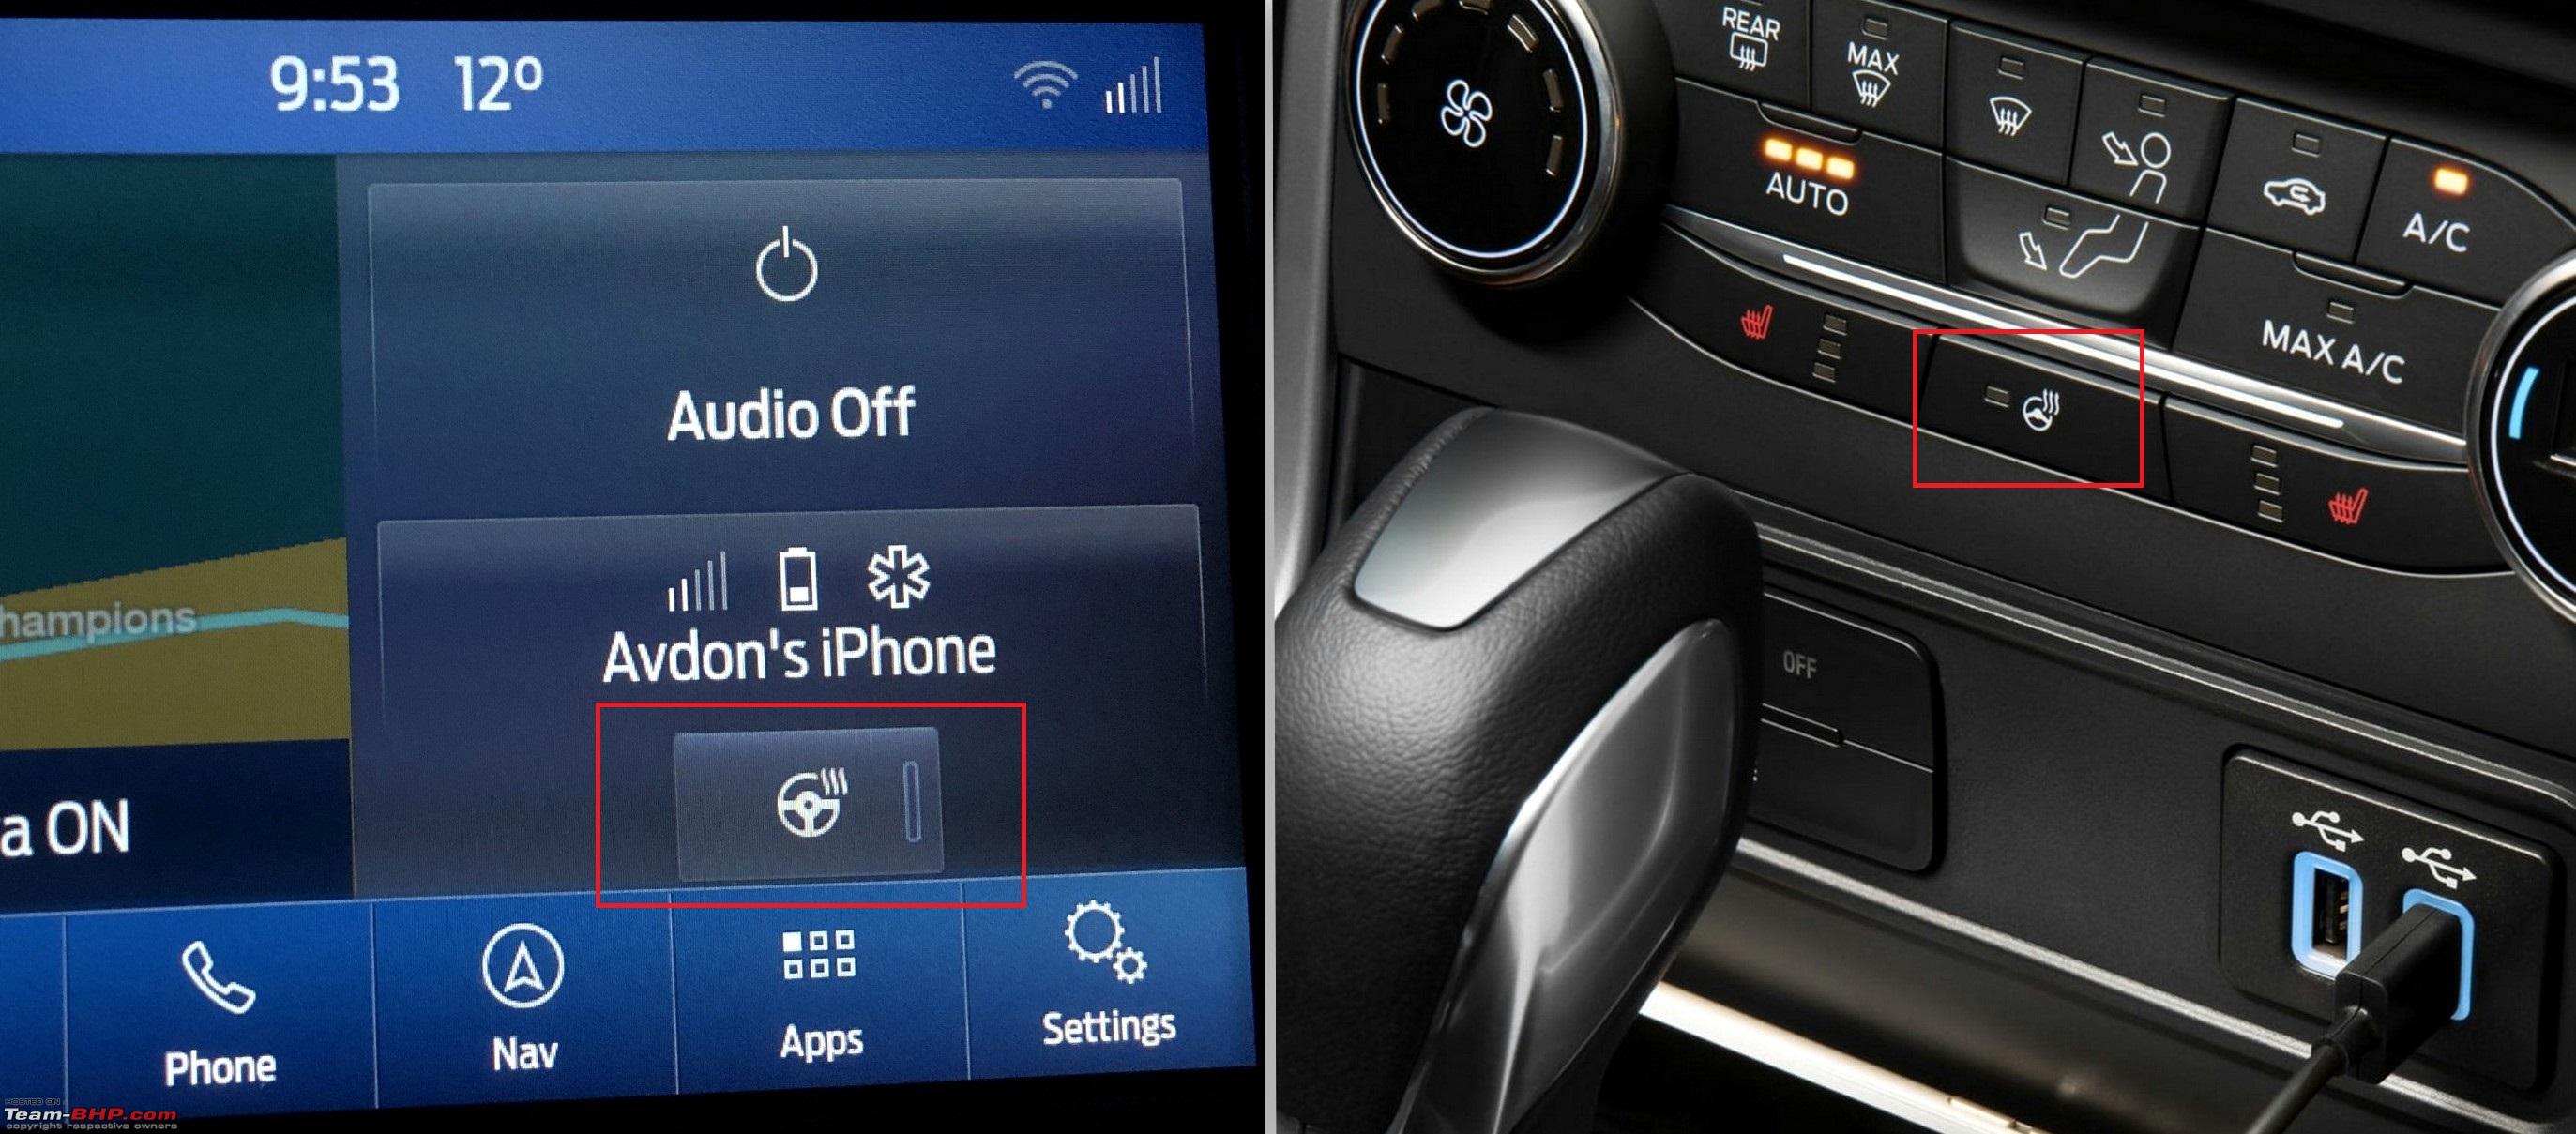 The HVAC panel that we get is offered only in developing markets like India and SA etc. as part of Ford’s cost-cutting. Even the US EcoSport manufactured here in India get the global console. I wanted the choice of a physical switch and loved the aircraft style switches while driving the Kuga and Fiesta. 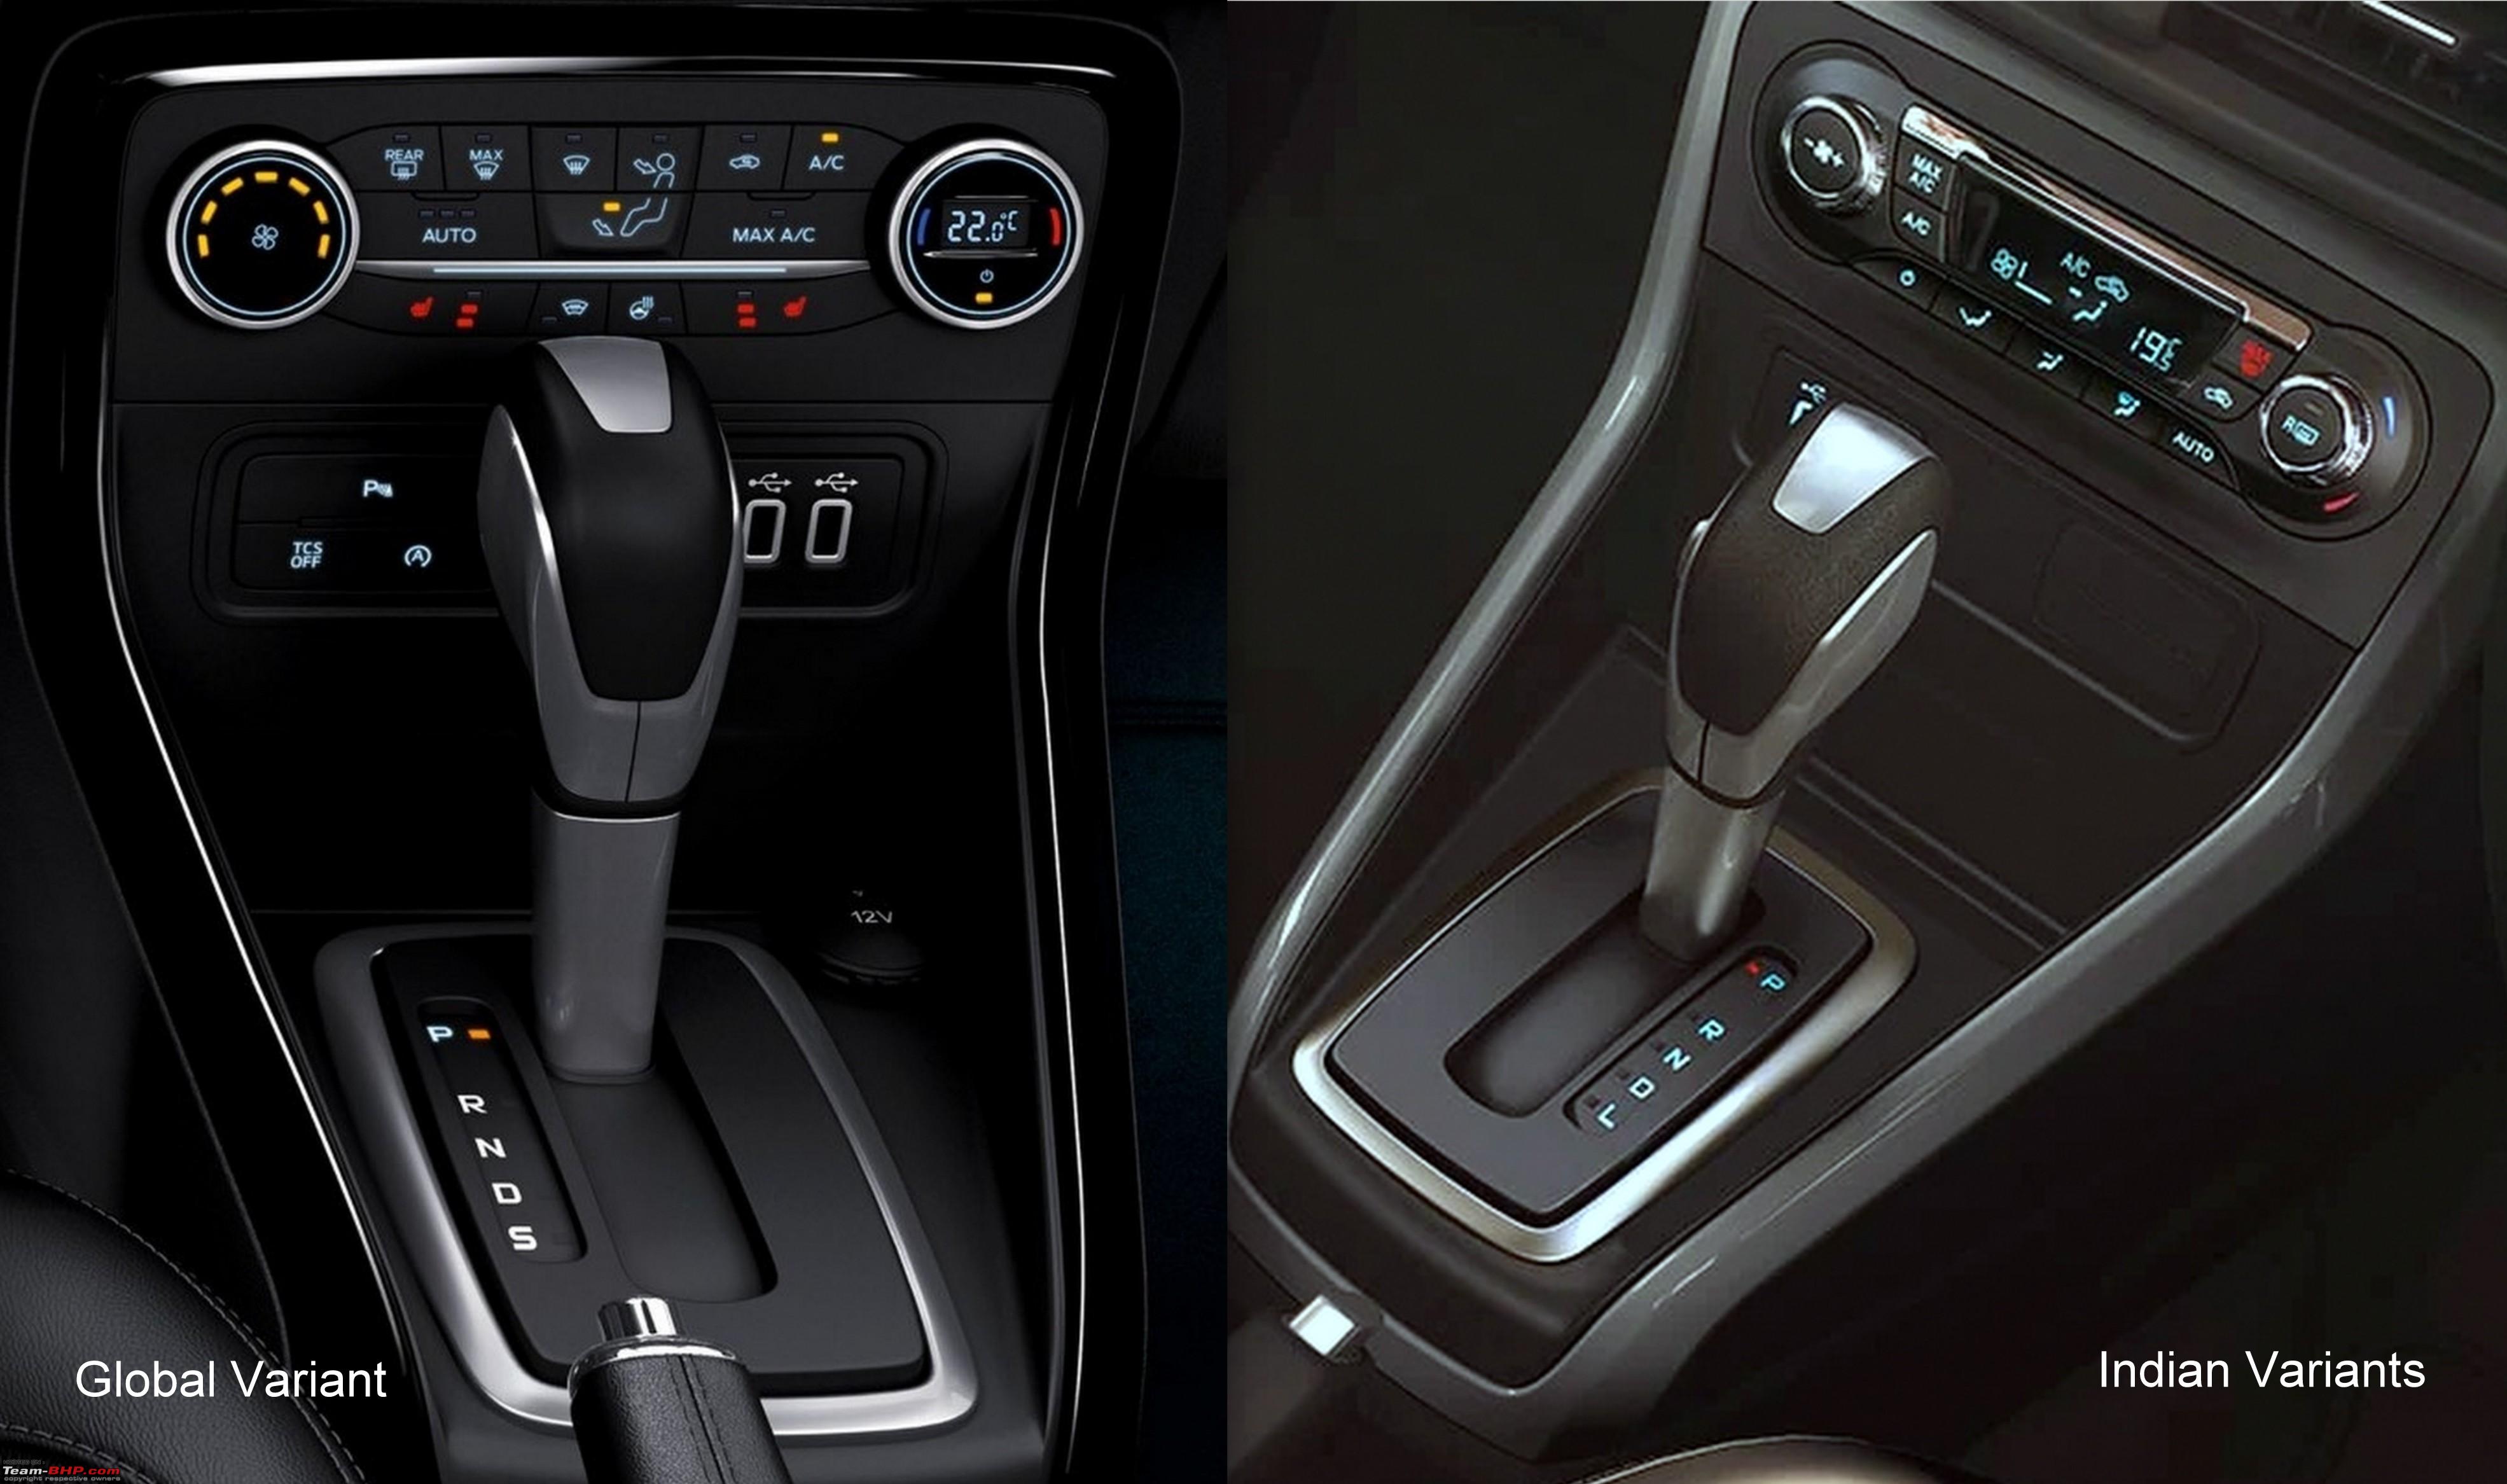 I got one on Ebay UK for 70 pounds. Part number: GN15-18C612-HJ. If you are looking to buy, then note that last two alphabets may change depending on presence/absence of seat heater, windshield heater buttons etc. This is an Automatic climate control panel (Manual climate looks similar but does not have a display so lookout carefully before you buy). Front Windshield heater and seat heating buttons obviously do not work as the hardware is not present in the car. You will need to buy the trim panel as well because the shape of the HVAC unit is different. However, the trim was in gloss black compared to orange in my car which I do not mind. Before buying the unit, I checked the wiring diagrams for Indian EcoSport on Ford service website. Connections were similar for both global and Indian variants as per the diagrams. To be on safer side I had dad open the existing console to check the connections. To my dismay one of the two plugs was completely different. 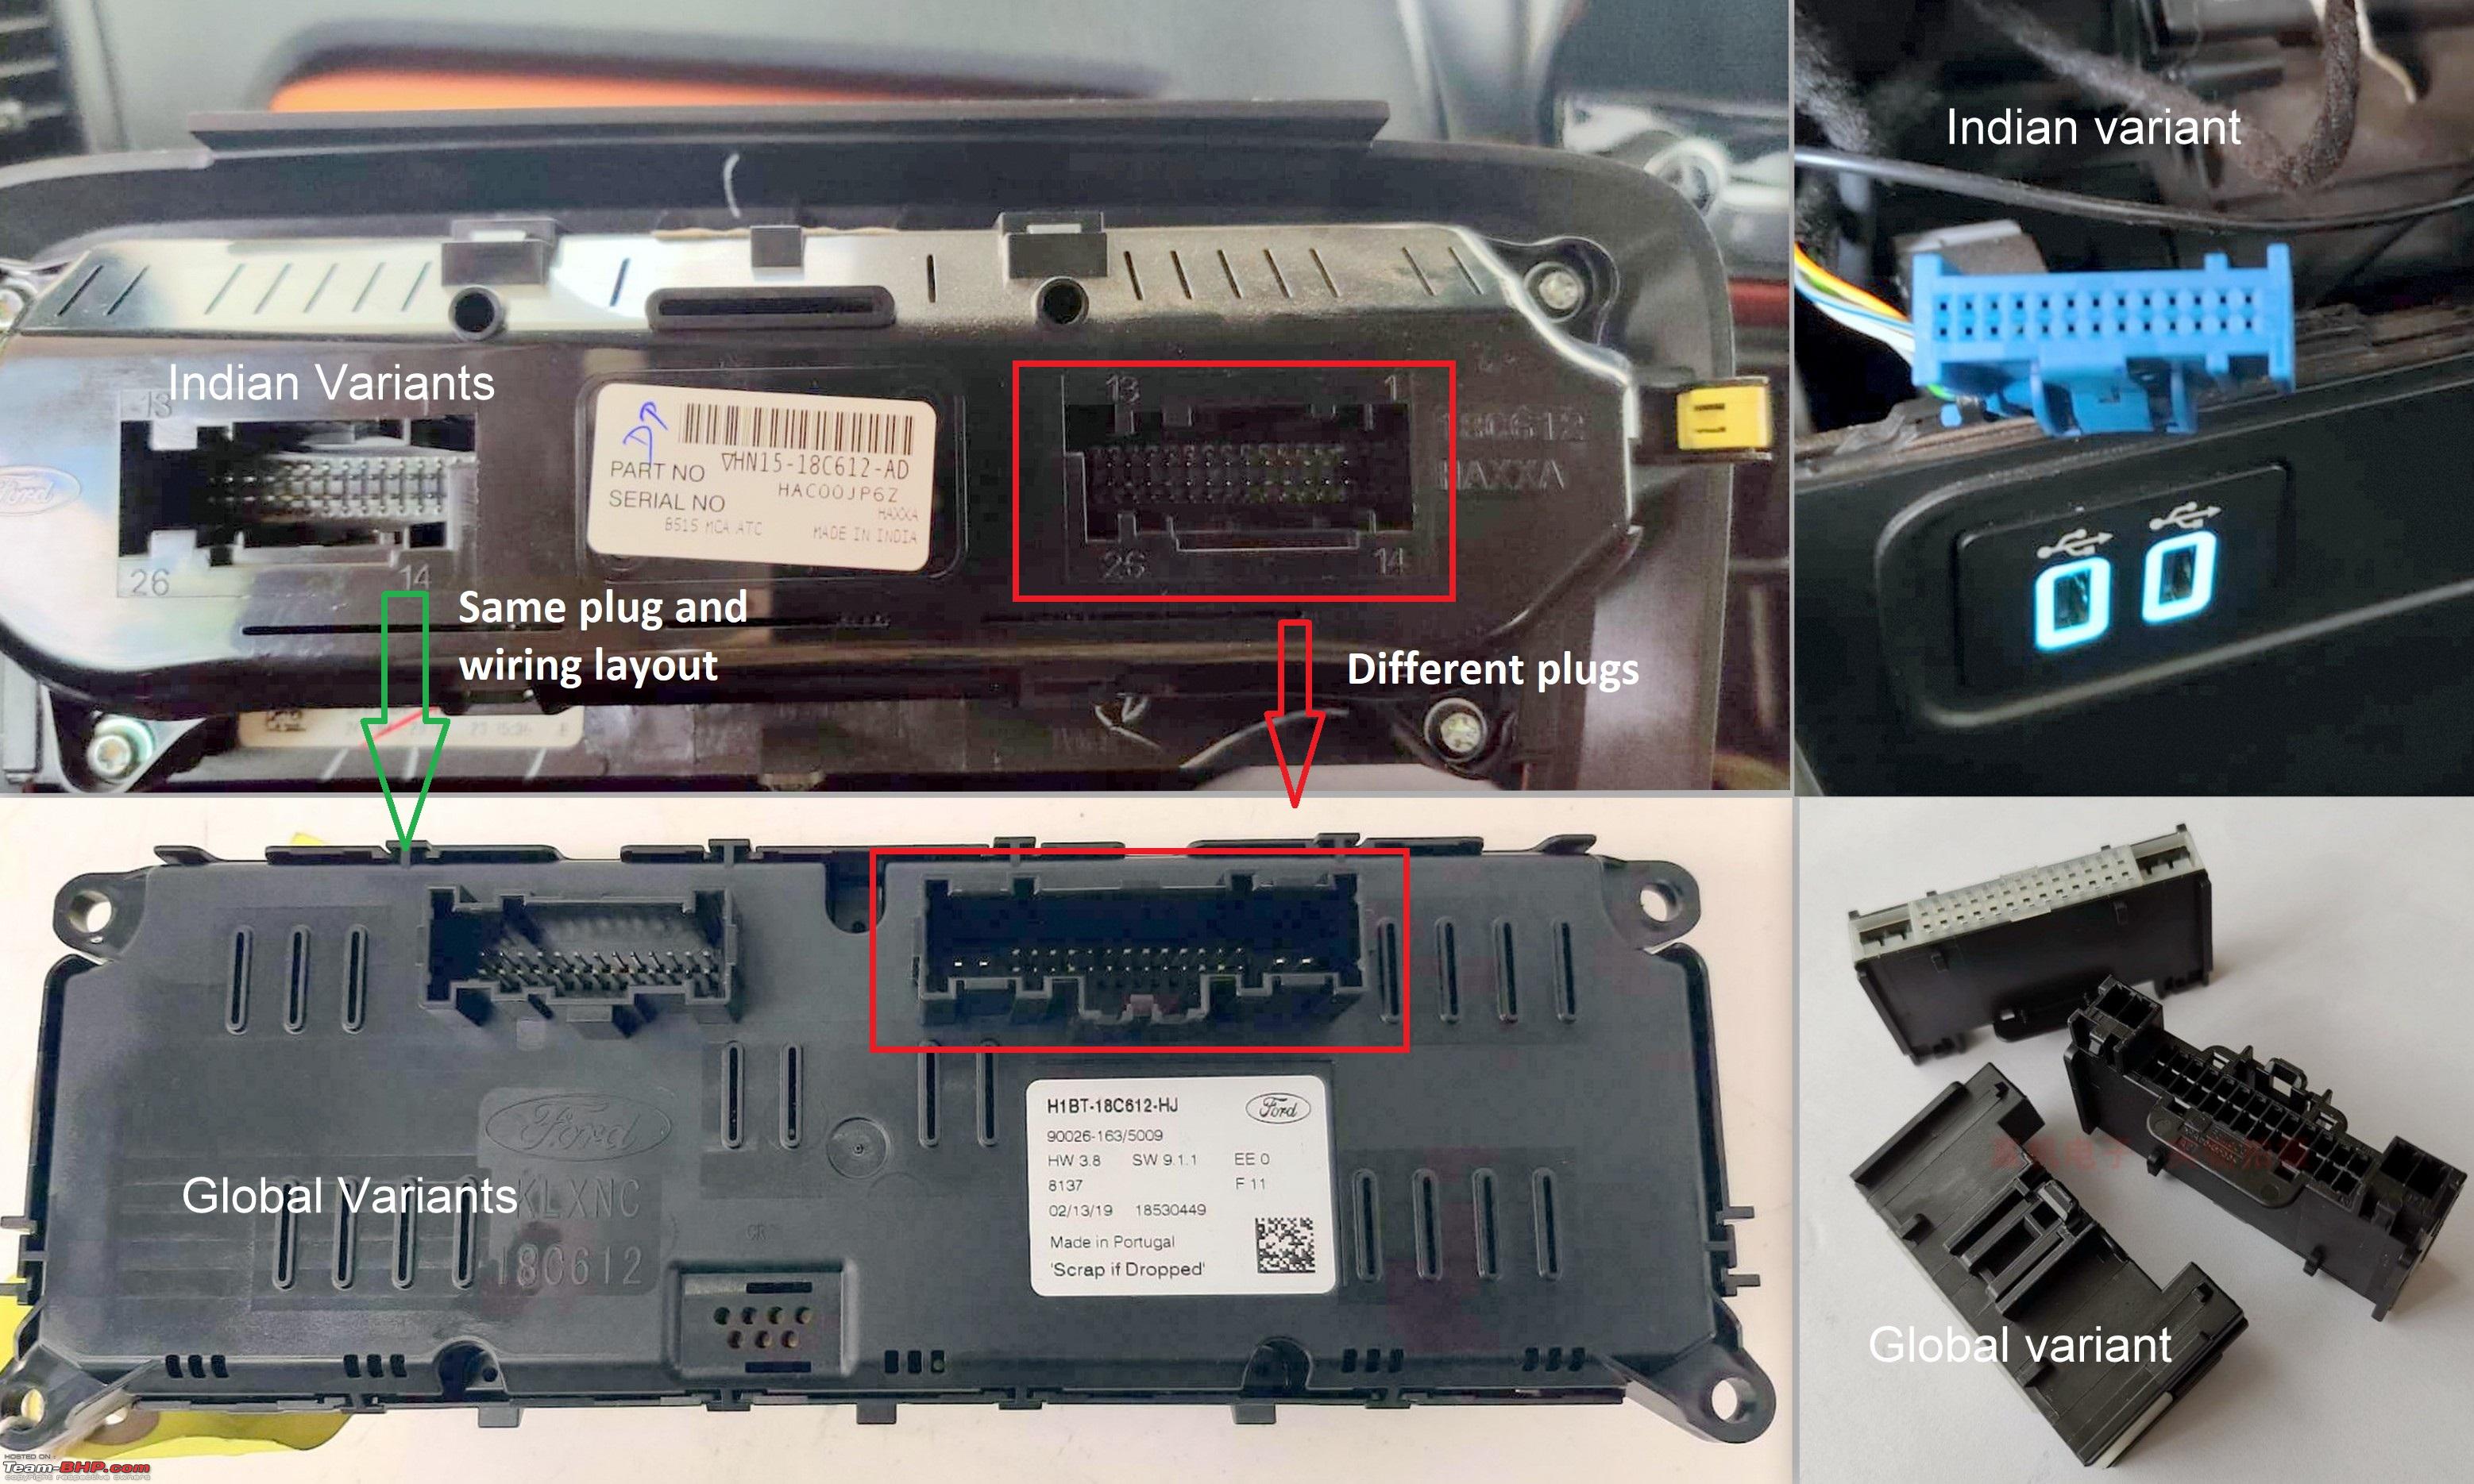 I summarized that due to cost-cutting ford must be using the HVAC panel from the Figo/Ka bin which turned out to be true (I never saw a Figo HVAC panel before). I downloaded the HVAC wiring diagrams for Figo and compared against the wiring in the Indian EcoSport. As expected, they matched and here is what I found – 1) One of the two harnesses which have same plugs is similar in both Indian and Global variants can be directly plugged in without any changes 2) The 2nd harness has same wiring layout, but the plugs are different. So, I made a custom harness by getting a male which plugs into existing female plug in the car and connect it to the female plug which is needed by the global panel. It is very helpful to have a crimping tool handy. Male plug which connects into the female harness – https://www.aliexpress.com/item/1005002931612491.html Female plug needed for global variants – https://www.aliexpress.com/item/1005003139592738.html HVAC wiring diagram for the Plug to be swapped - 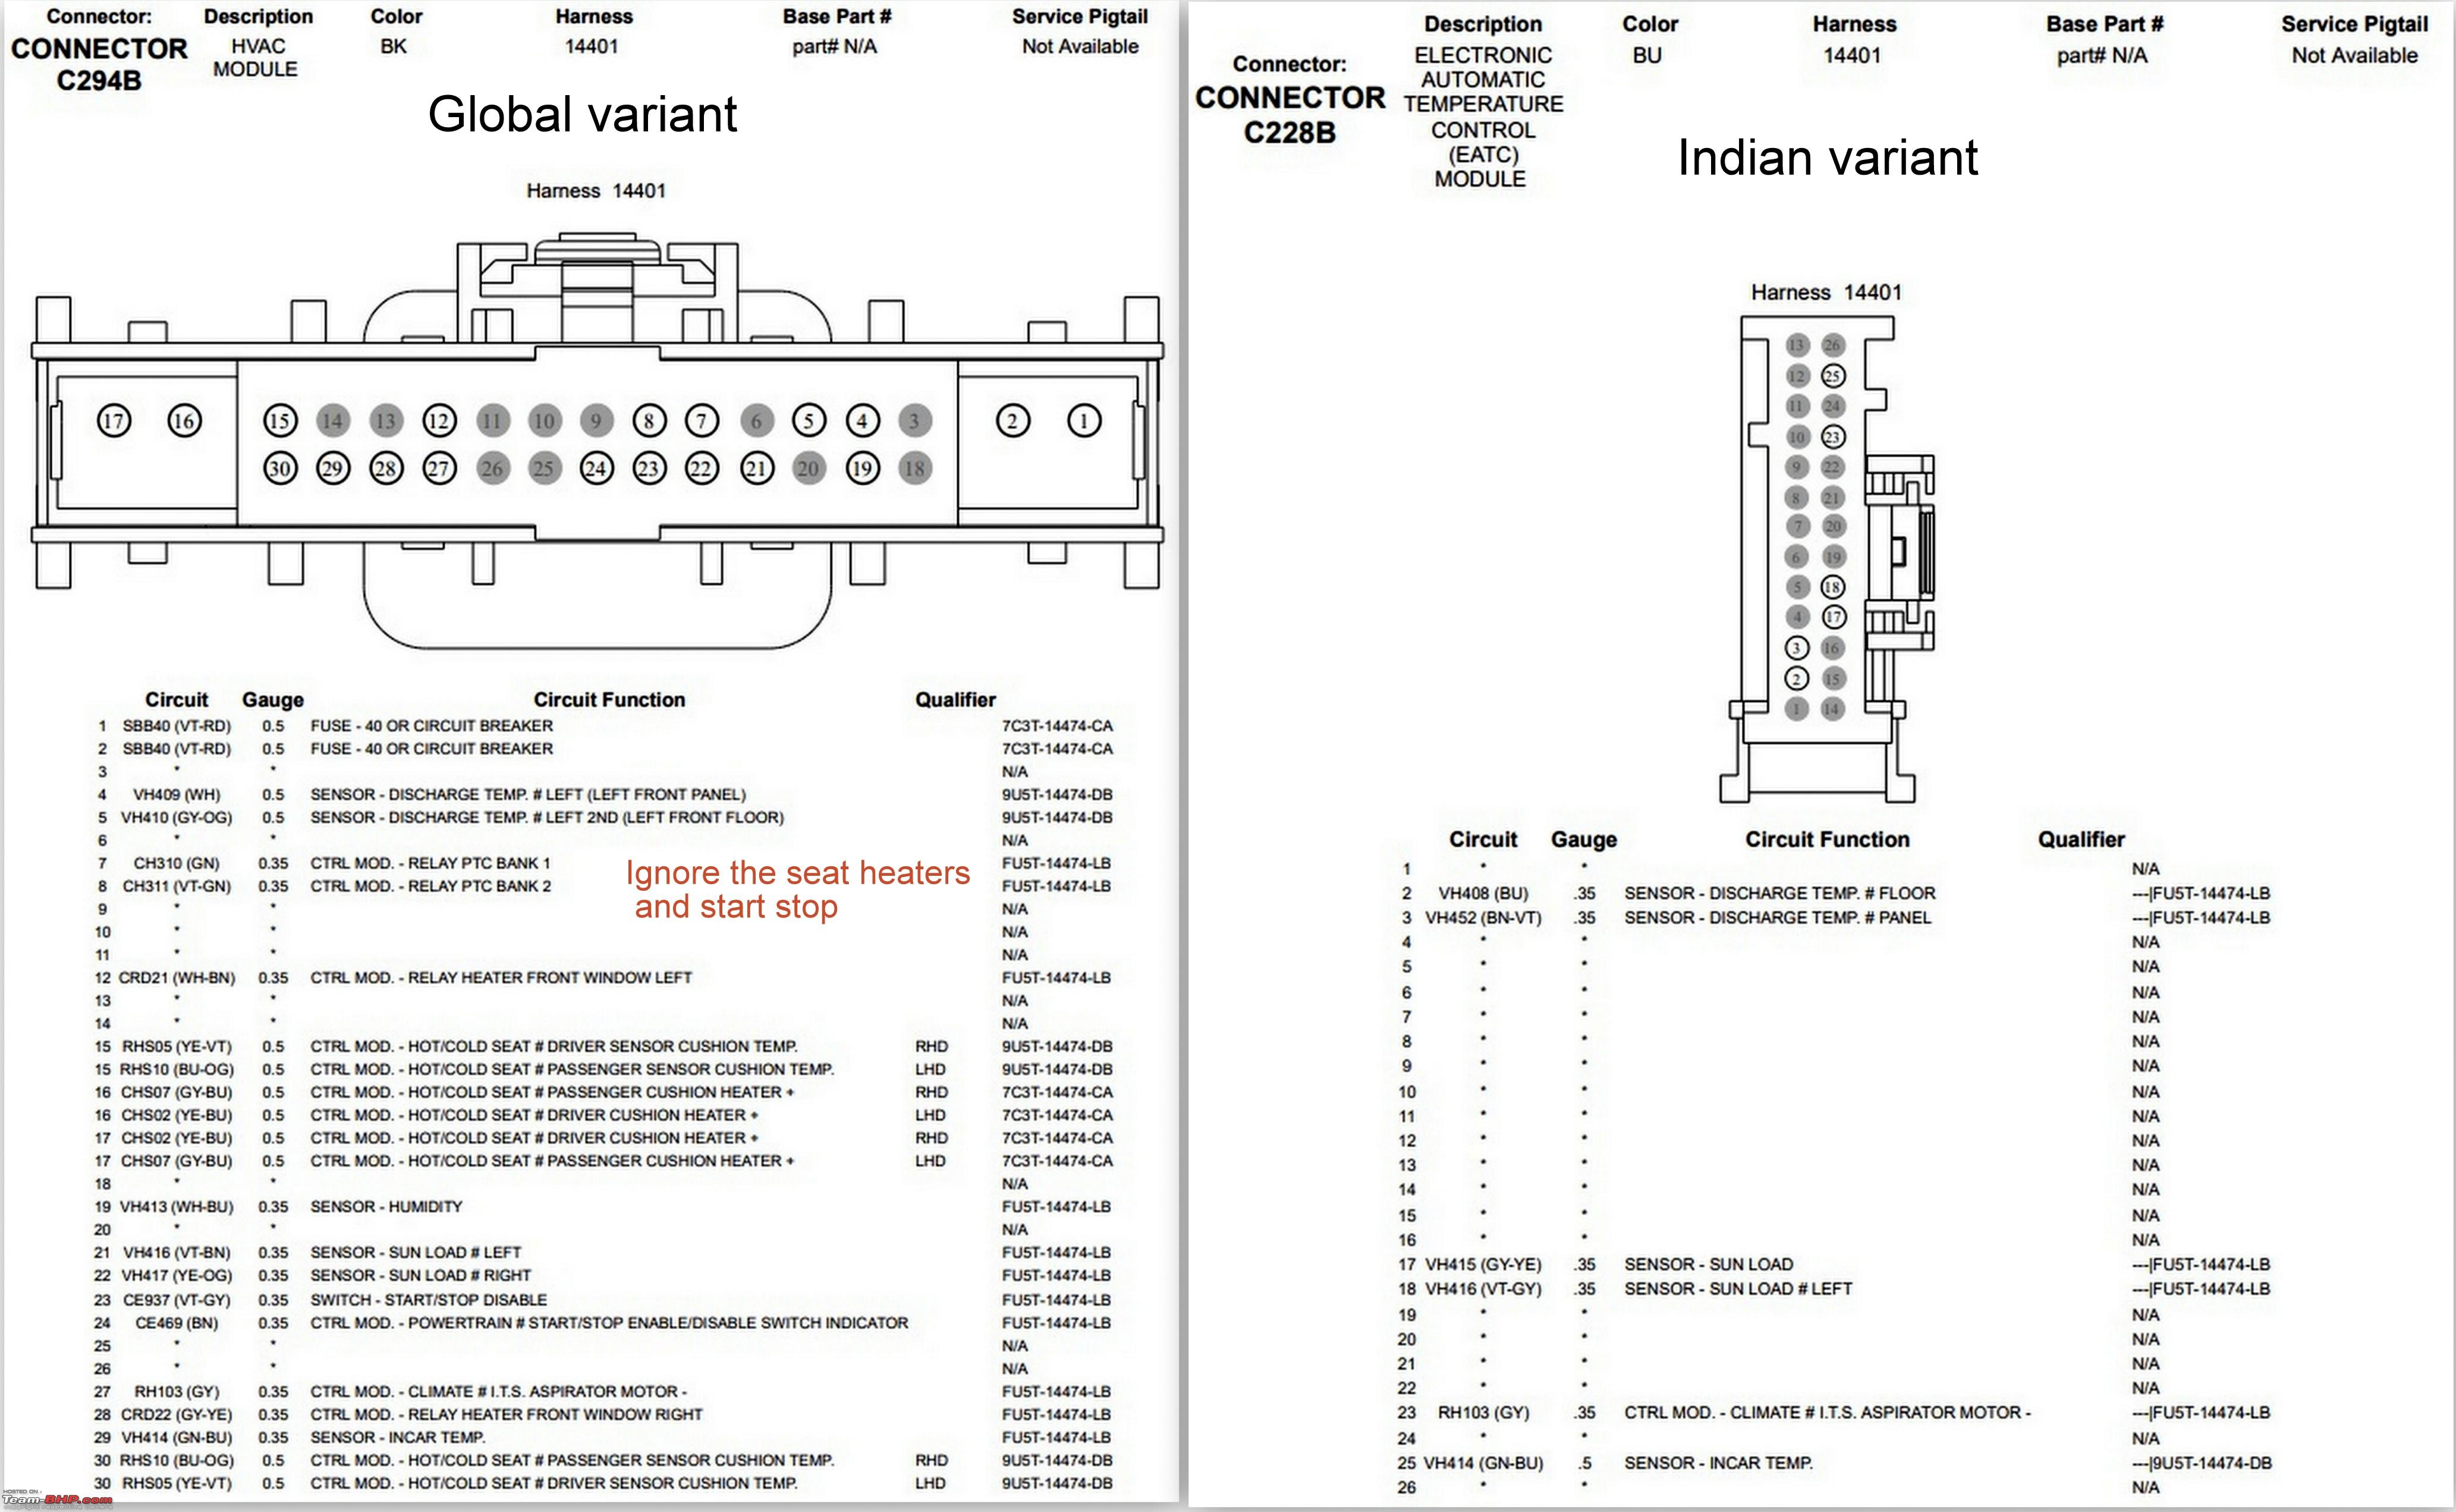 Few Installation pics (I was also installing the illuminated gear knob in parallel) 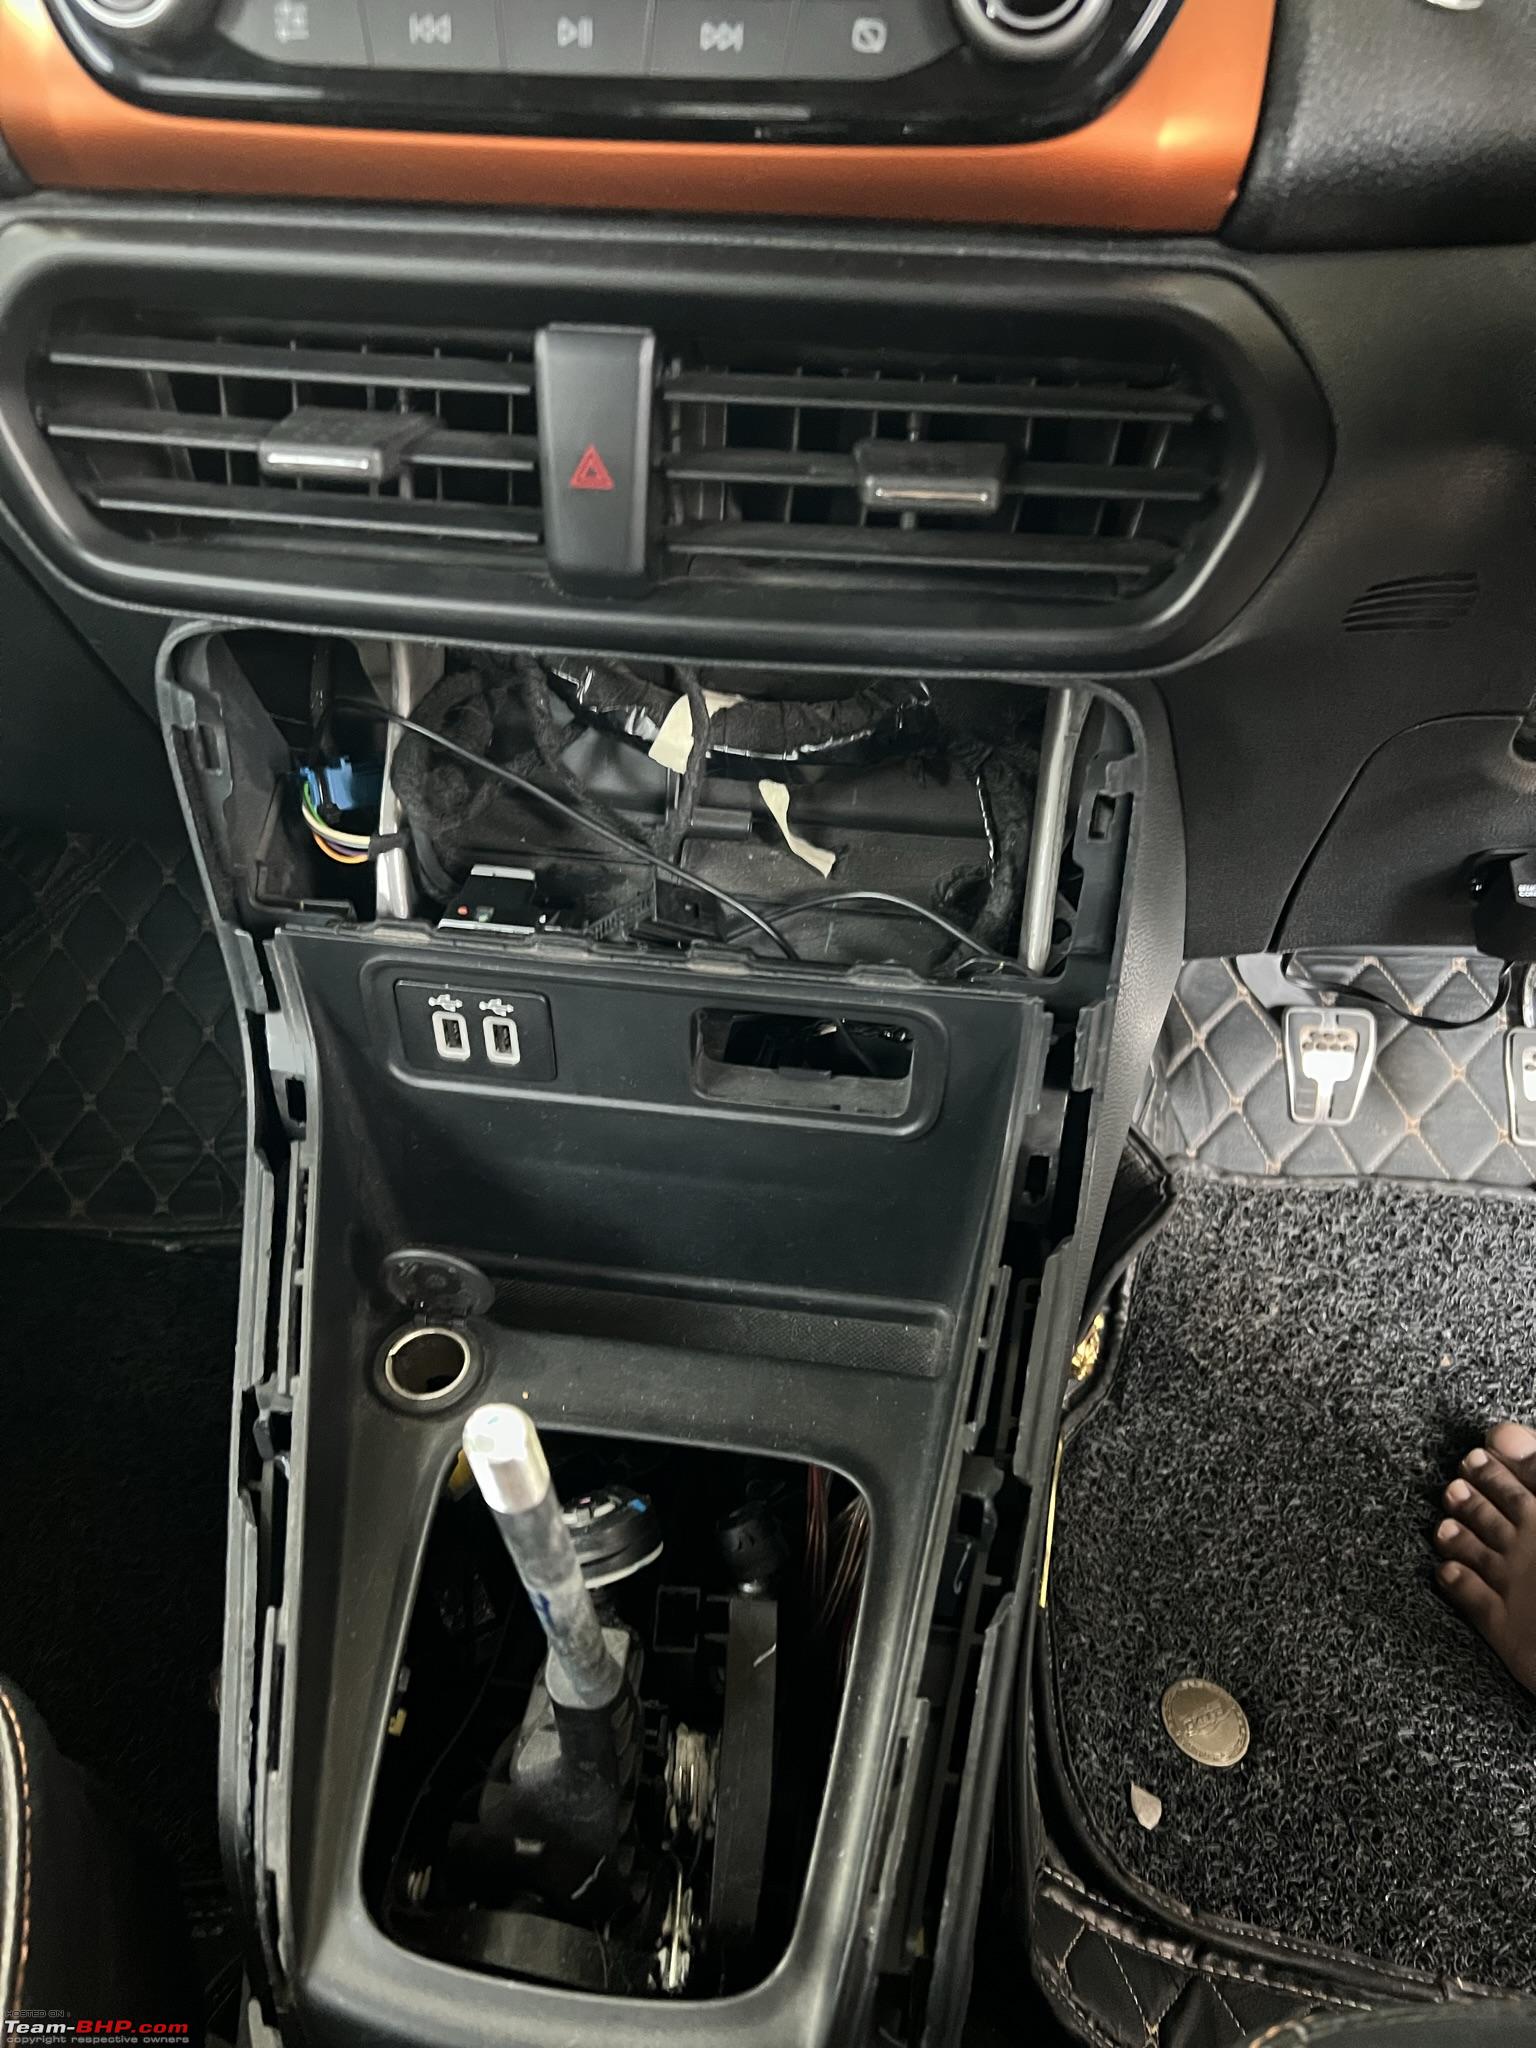  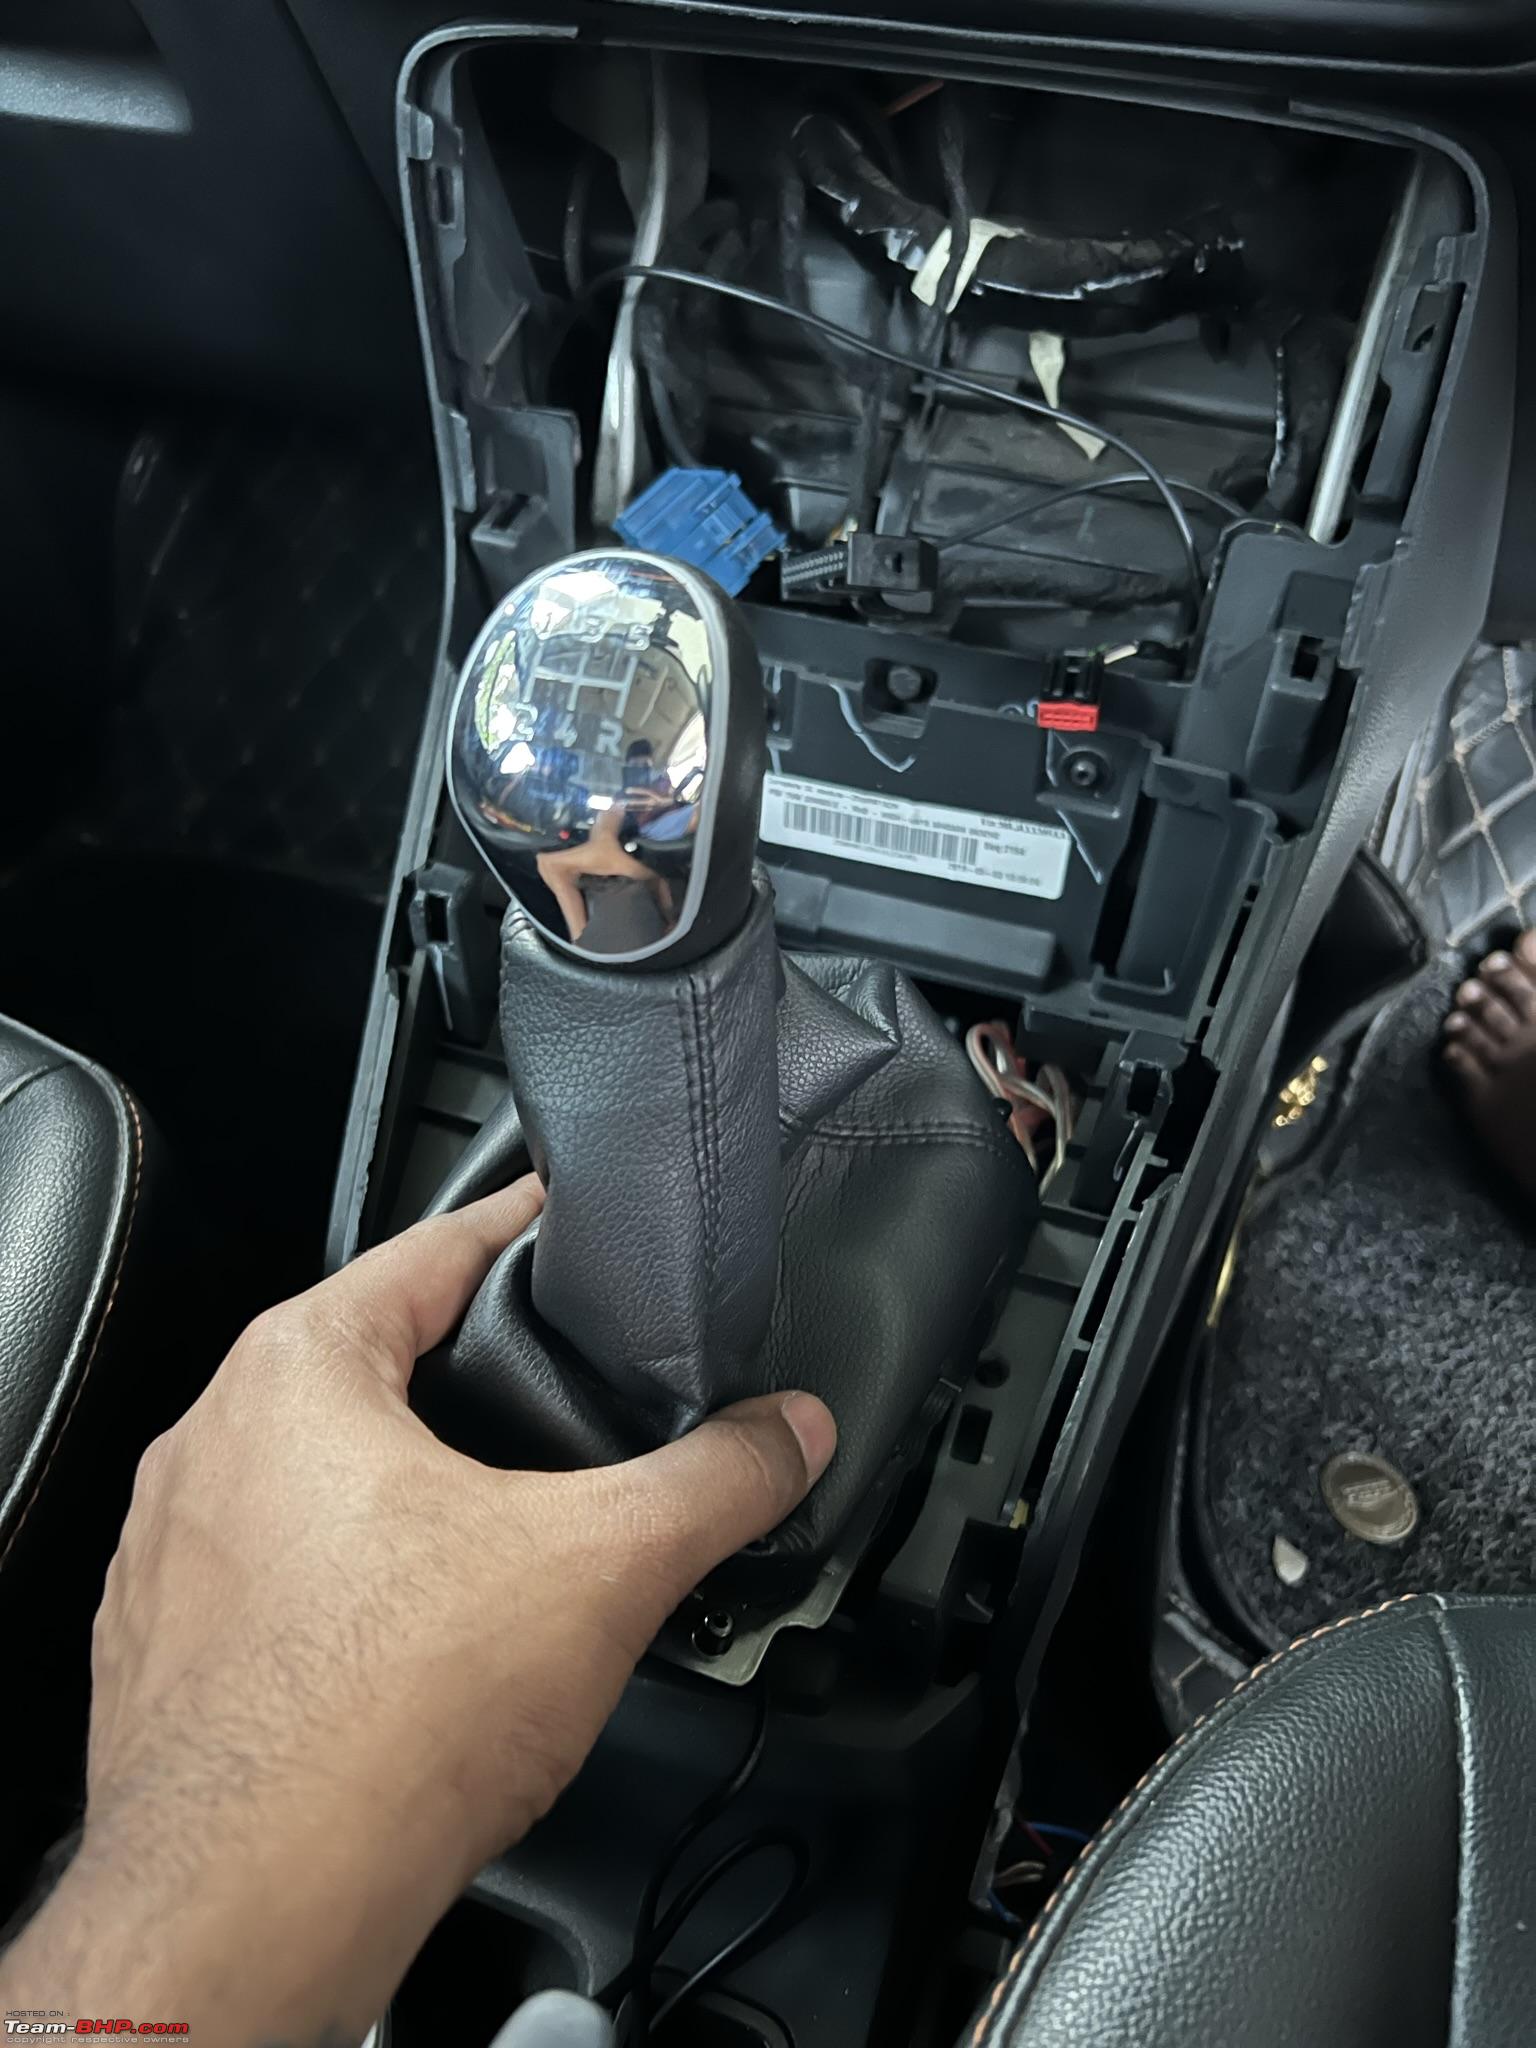 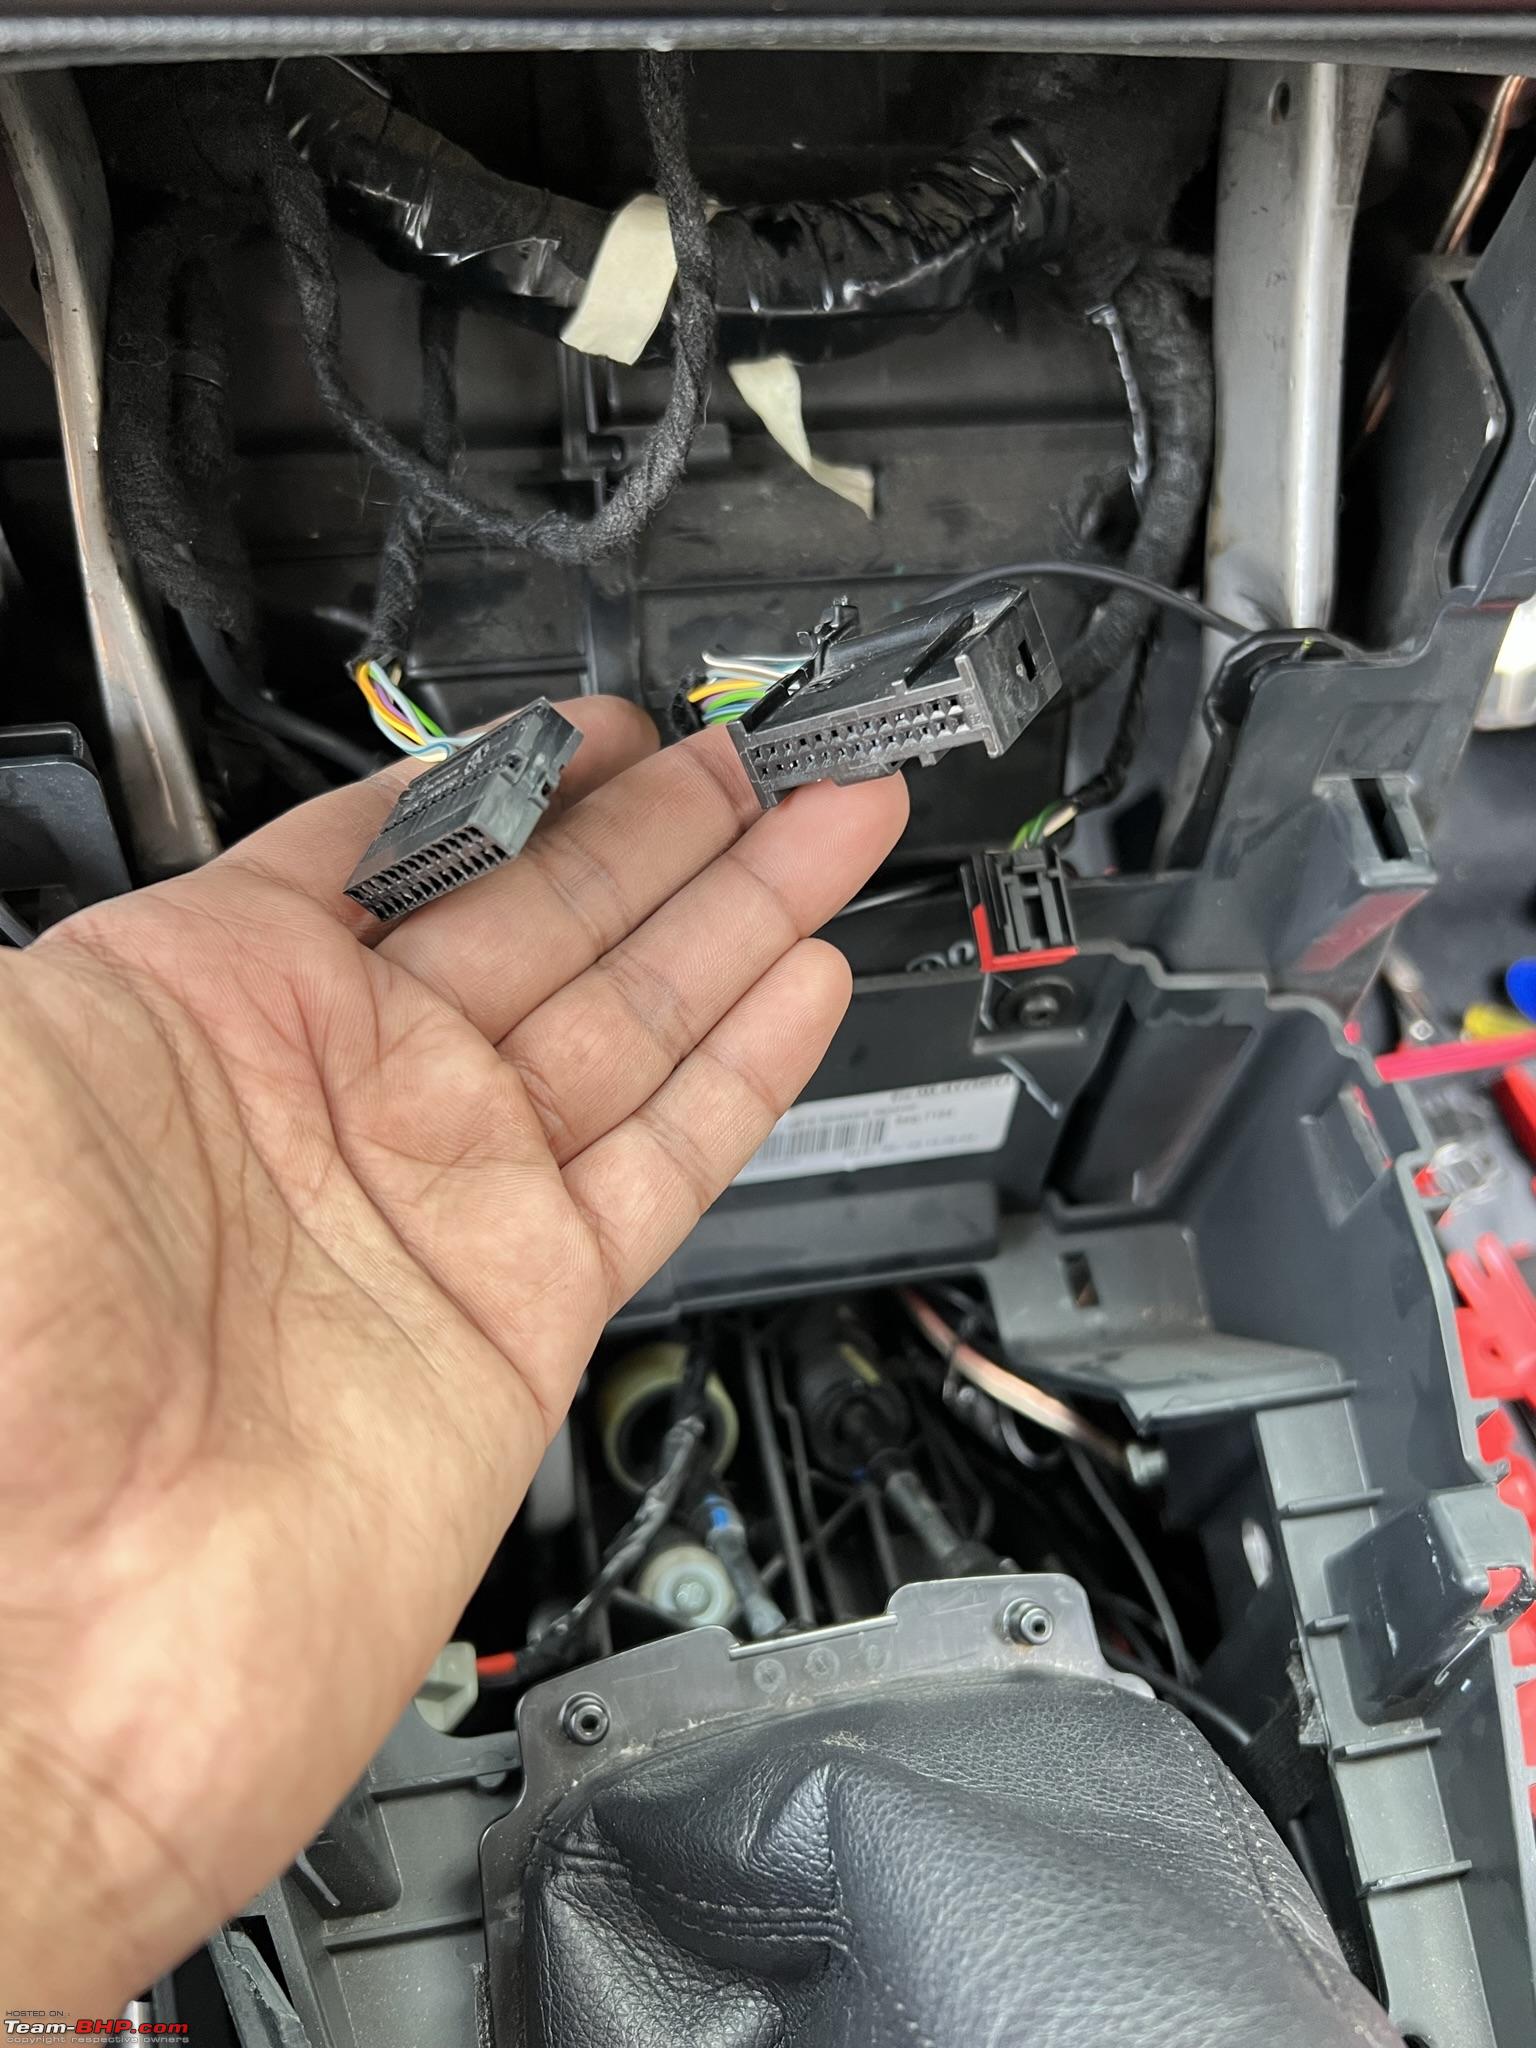 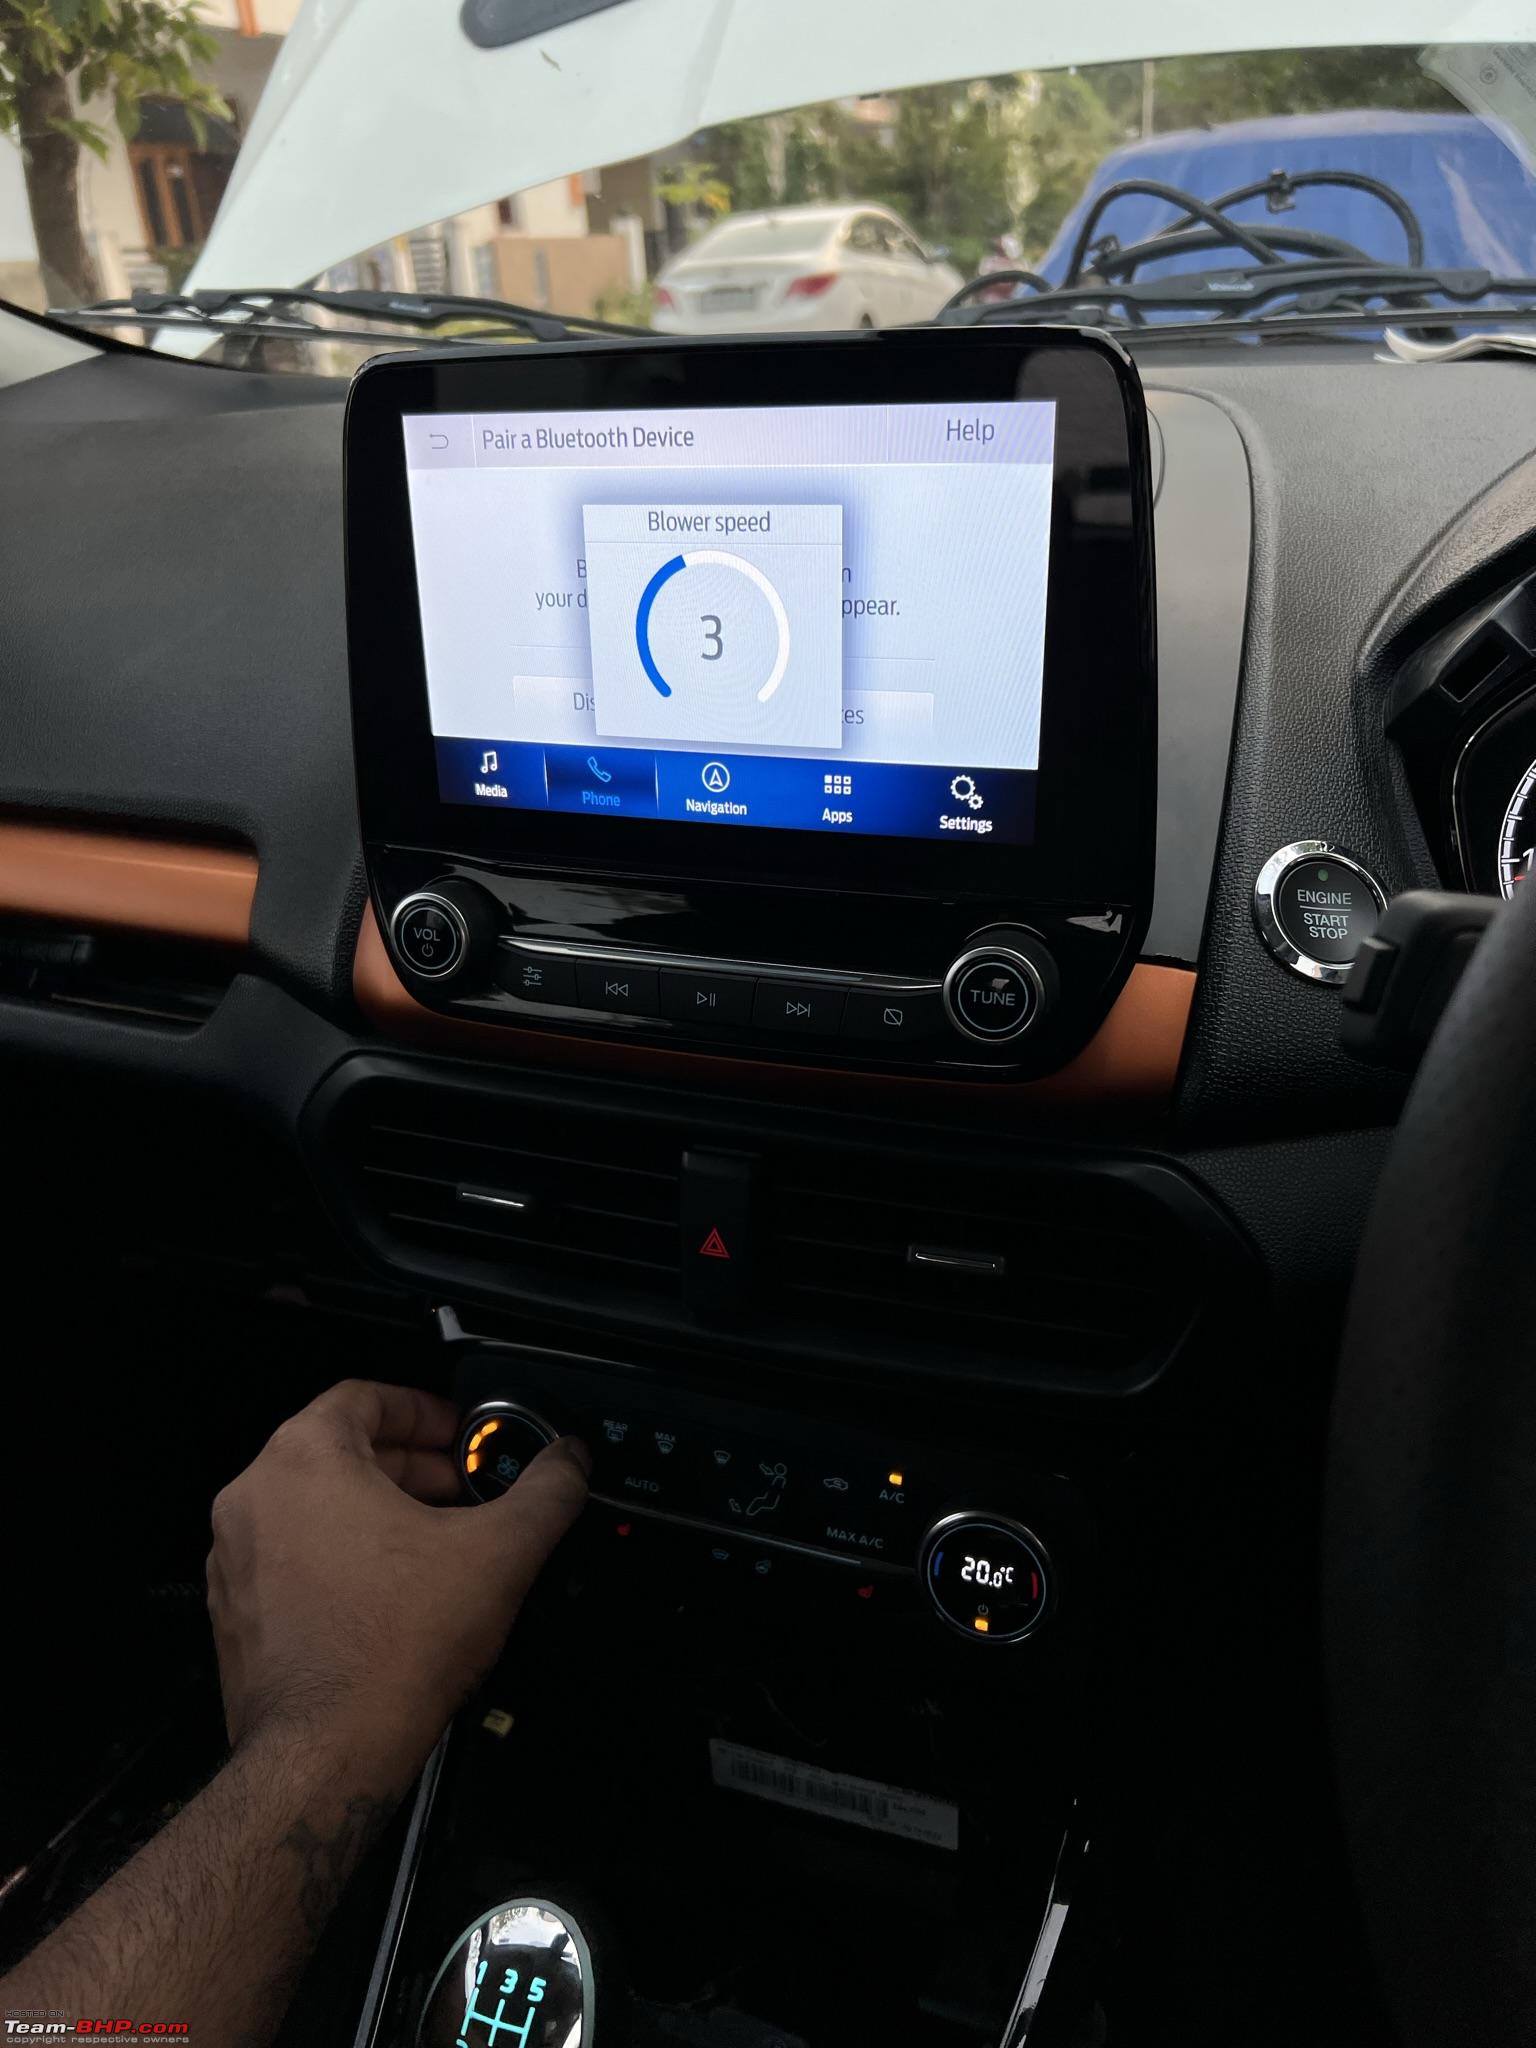 After installing the new panel, I copied the Asbuilt codes saved for old module into the new HVAC module. Last edited by nightraven : 28th February 2022 at 21:09. |
|
| (40)
Thanks
|
| The following 40 BHPians Thank nightraven for this useful post: | ADI7YAK, adwaith, ashpalio, AYP, bamaboy, brownkaiser, dailydriver, digitalnirvana, fiat_tarun, fluidicjoy, GTO, InControl, jithin23, Leoshashi, Lobogris, mp417, myavu, PearlJam, Potatopoco, Prakritij, PraNeel, raiuday, Rajeevraj, ramnaresh_2000, Ravi Parwan, Researcher, saikarthik, saikishor, sai_ace, Samfromindia, sarfraz1997, skb1811, somspaple, Sran, swiftnfurious, tchsvy, The_Outsider!, VijayAnand1, ysjoy, Yuvuz |
|
28th February 2022, 17:53
| #6 |
| BHPian | re: DIY: Juicing up the Ford EcoSport S with ICE, Front Park, ST-line cluster, steering wheel and ADAS Blind Spot Information System (BLIS) BLIS is one the optional Driver Assist features offered by all global auto-manufacturers past couple of years. The trend is catching up in India and Mahindra, MG and the Germans have started offering it in their recent cars. Ford has been offering BLIS with Cross-Traffic Alert (CTA) as part of their driver assistance pack as an accessory for an additional 600 pounds! (the pack includes front park sensors as well). BLIS in action: CTA in action (Note auto-braking is not enabled to ensure manual control): BLIS & CTA Technical description and inner working - https://drive.google.com/file/d/1I3J...ew?usp=sharing After-market BLIS systems are also available as well on AliExpress which are based on either ultrasonic technology (like parking sensors) or Millimeter wave radar (OEM BLIS). Since I was looking for integration, I did not go this route. Like all the mods before the same devilish thought came to my mind, “why not”  . However, when I looked around for used BLIS sensor mounts and sensors for the EcoSport there were none in the EU and UK. Looks like no one opted for it. The only 2 used brackets I could find were in the US selling along with the sensors for around 150 dollars per sensor which was taking my BLIS project to around $450 range including shipping which left me wondering if it is worth it. . However, when I looked around for used BLIS sensor mounts and sensors for the EcoSport there were none in the EU and UK. Looks like no one opted for it. The only 2 used brackets I could find were in the US selling along with the sensors for around 150 dollars per sensor which was taking my BLIS project to around $450 range including shipping which left me wondering if it is worth it. It was then I came across a seller selling new F150 BLIS modules for $45 each which was totally unbelievable as Ford sells EACH sensor for $500 (MRP) and even the used sensors were retailing at $100 – 150 each. The reviews for the seller looked promising and Ebay was providing buyer protection. So, I took the bite and ordered two modules to Germany which cost me a total of $110 with international shipping and customs. Of course, the part numbers for F150 and EcoSport were different, but the hardware model was same SRR-3B manufactured by Continental. They looked very similar with one minor difference – the plug is positioned downwards on the EcoSport while it faces backwards on the F-150. I was hoping to flash EcoSport BLIS firmware on the F150 without knowing for sure if it would actually work. I also didn’t know if there were mount holes provided on the rear body of the Indian variants. F-150 BLIS sensor 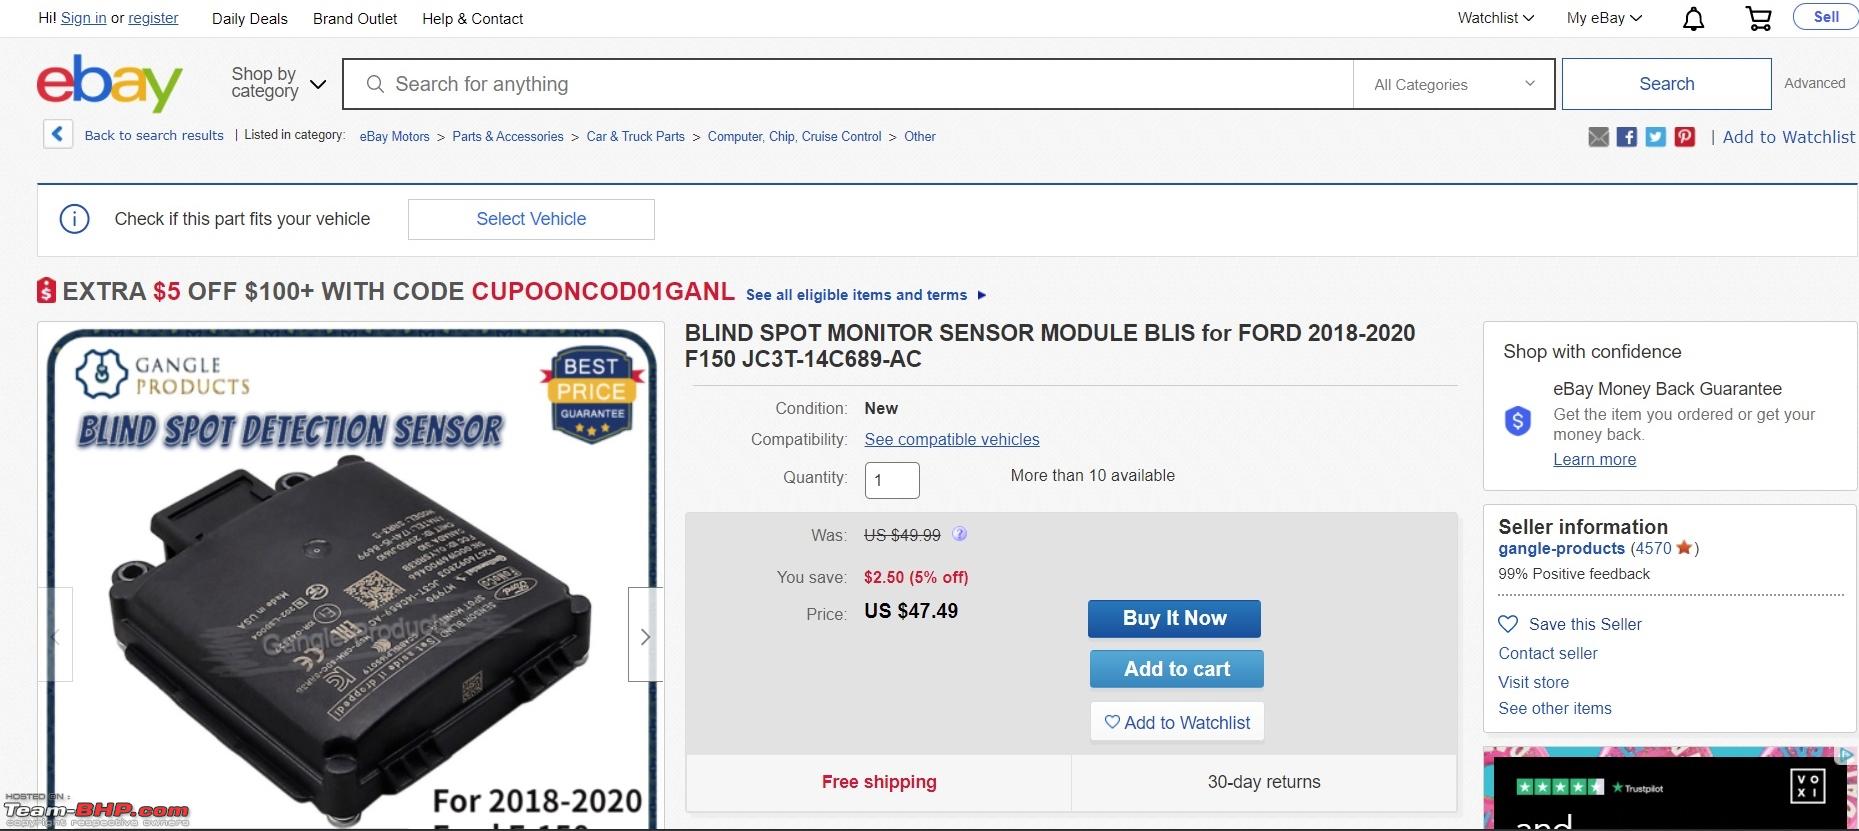 Part no for latest BLIS modules EcoSport: HP5Z-14C689-AF; F-150: JC3T-14C689-AC. Note that both left and right modules are same parts. 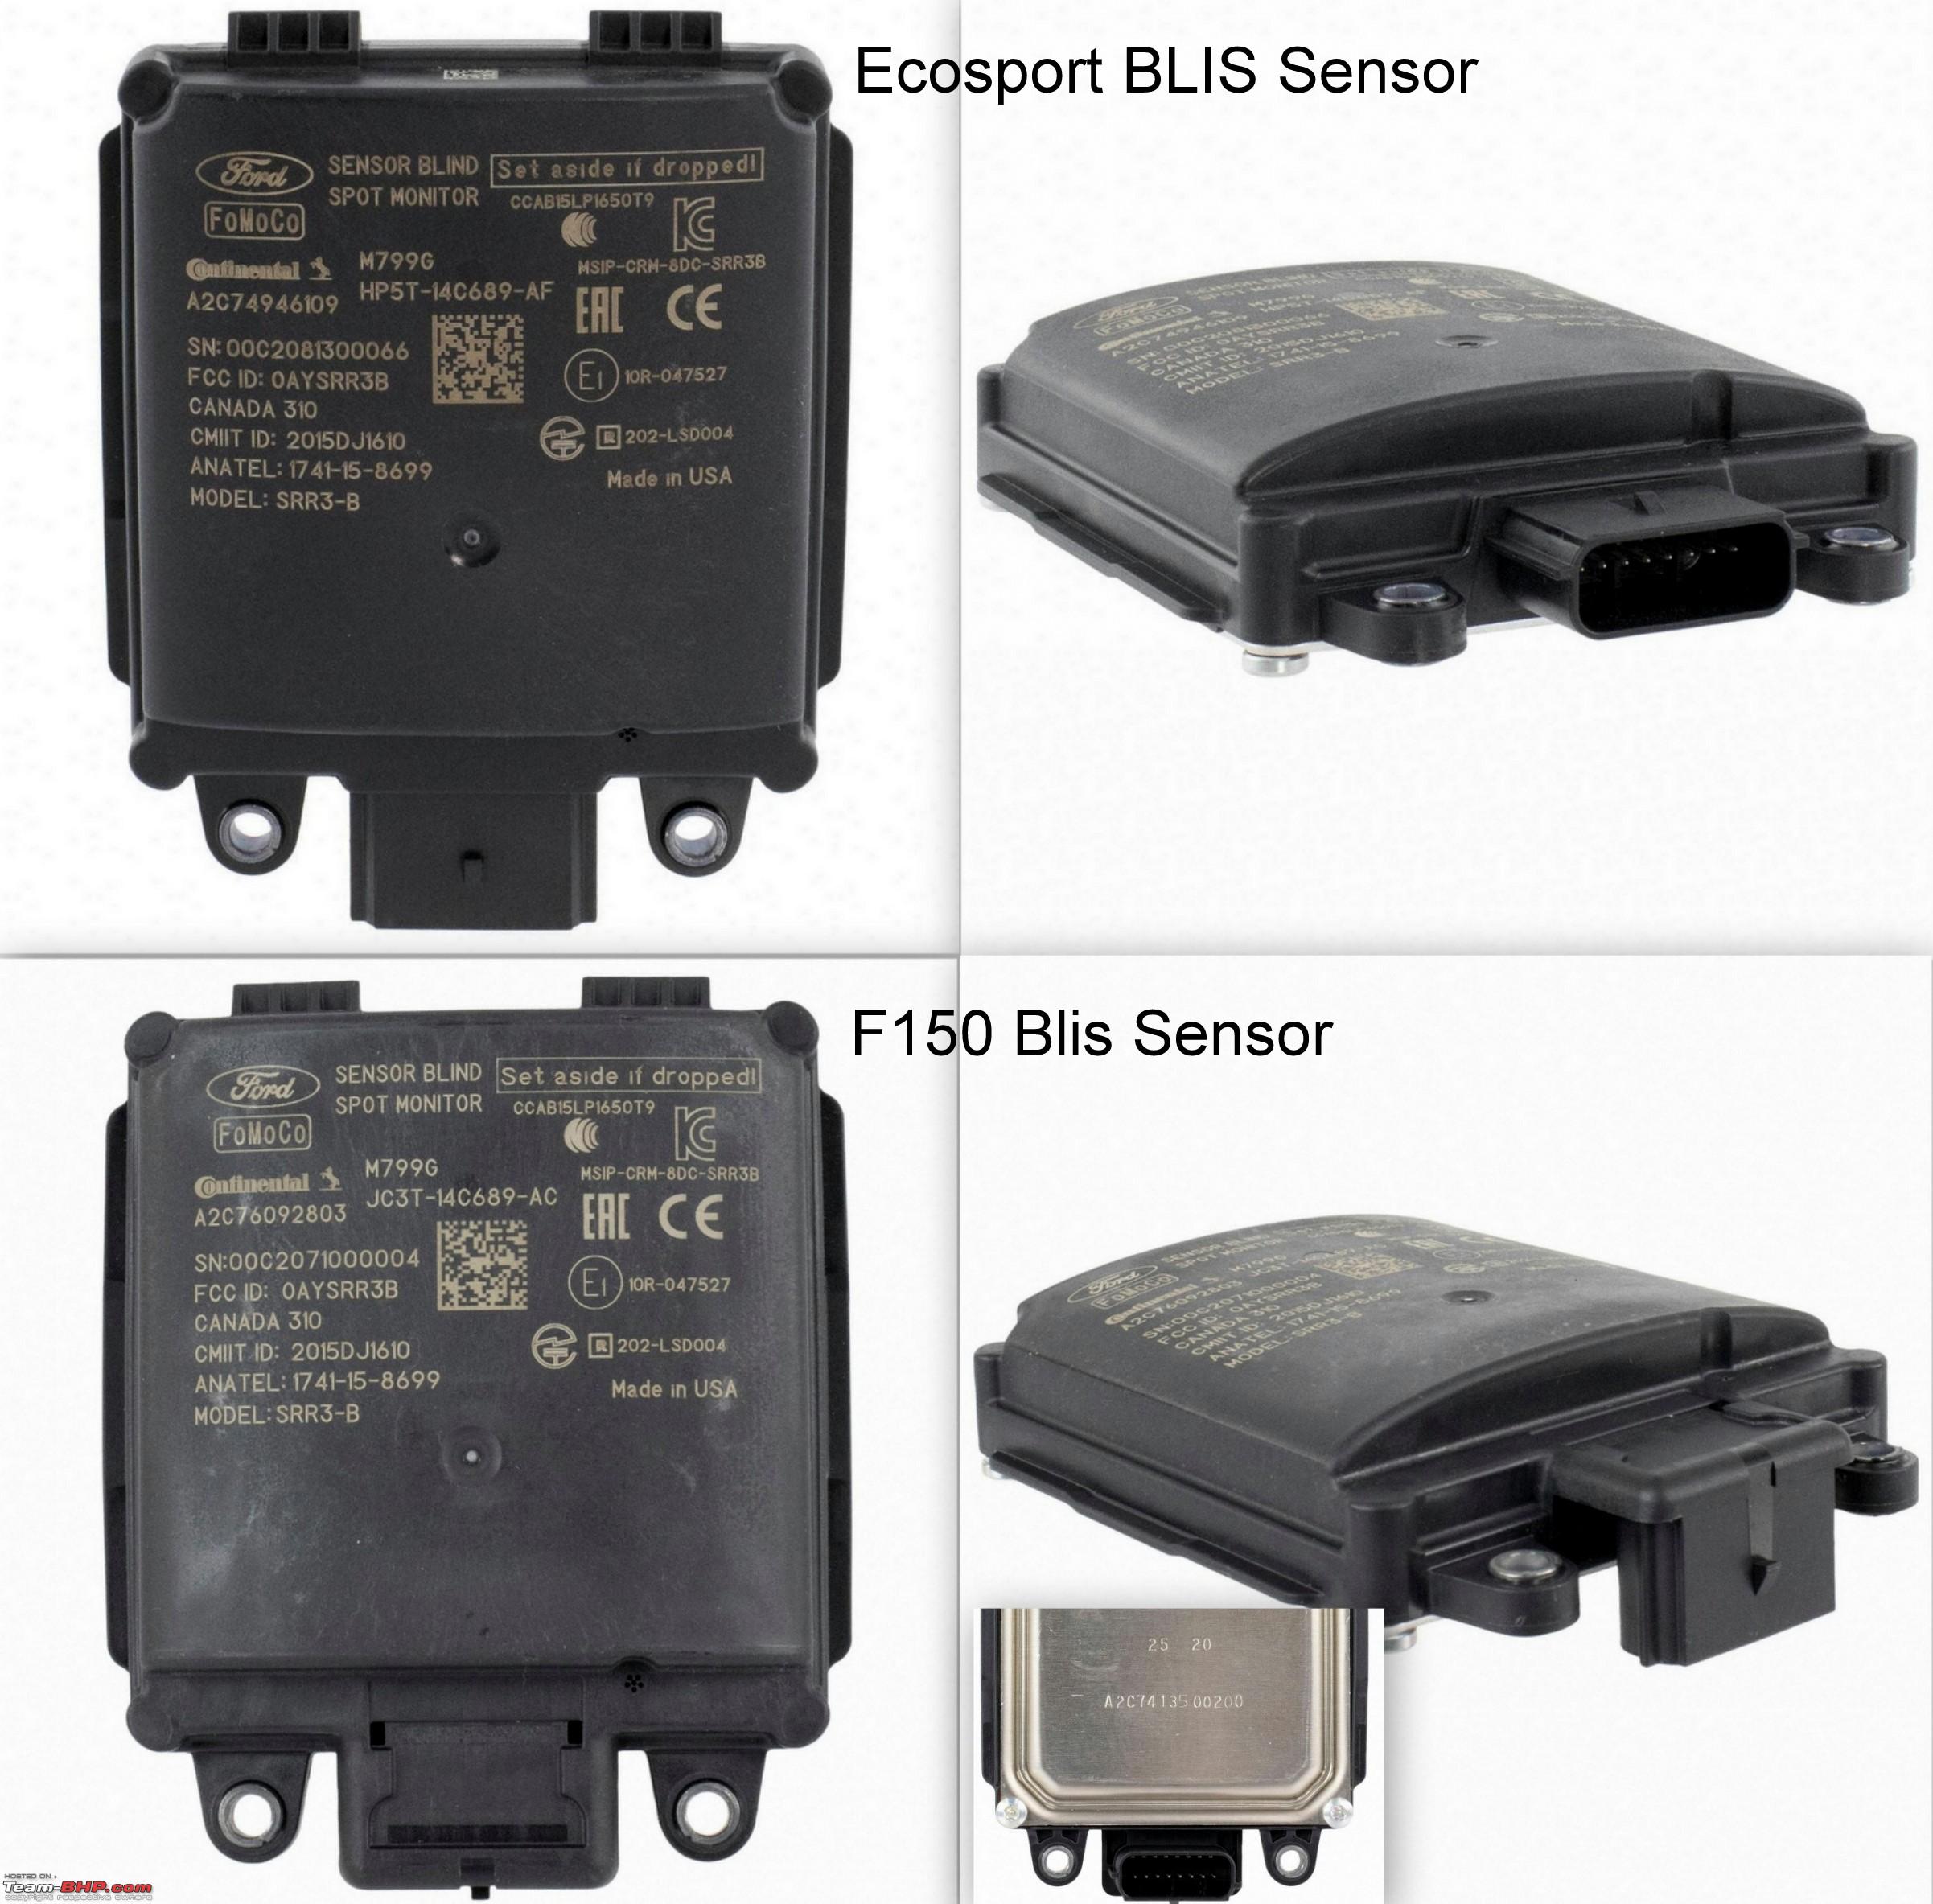 I ordered Left BLIS sensor bracket directly from Tascaparts.com and a used Right bracket ($37) from Ebay US to a friend, who re-shipped them to me. Left side bracket - GN1Z14D189B ($45)  Right side bracket - GN1Z14D189A ($45) 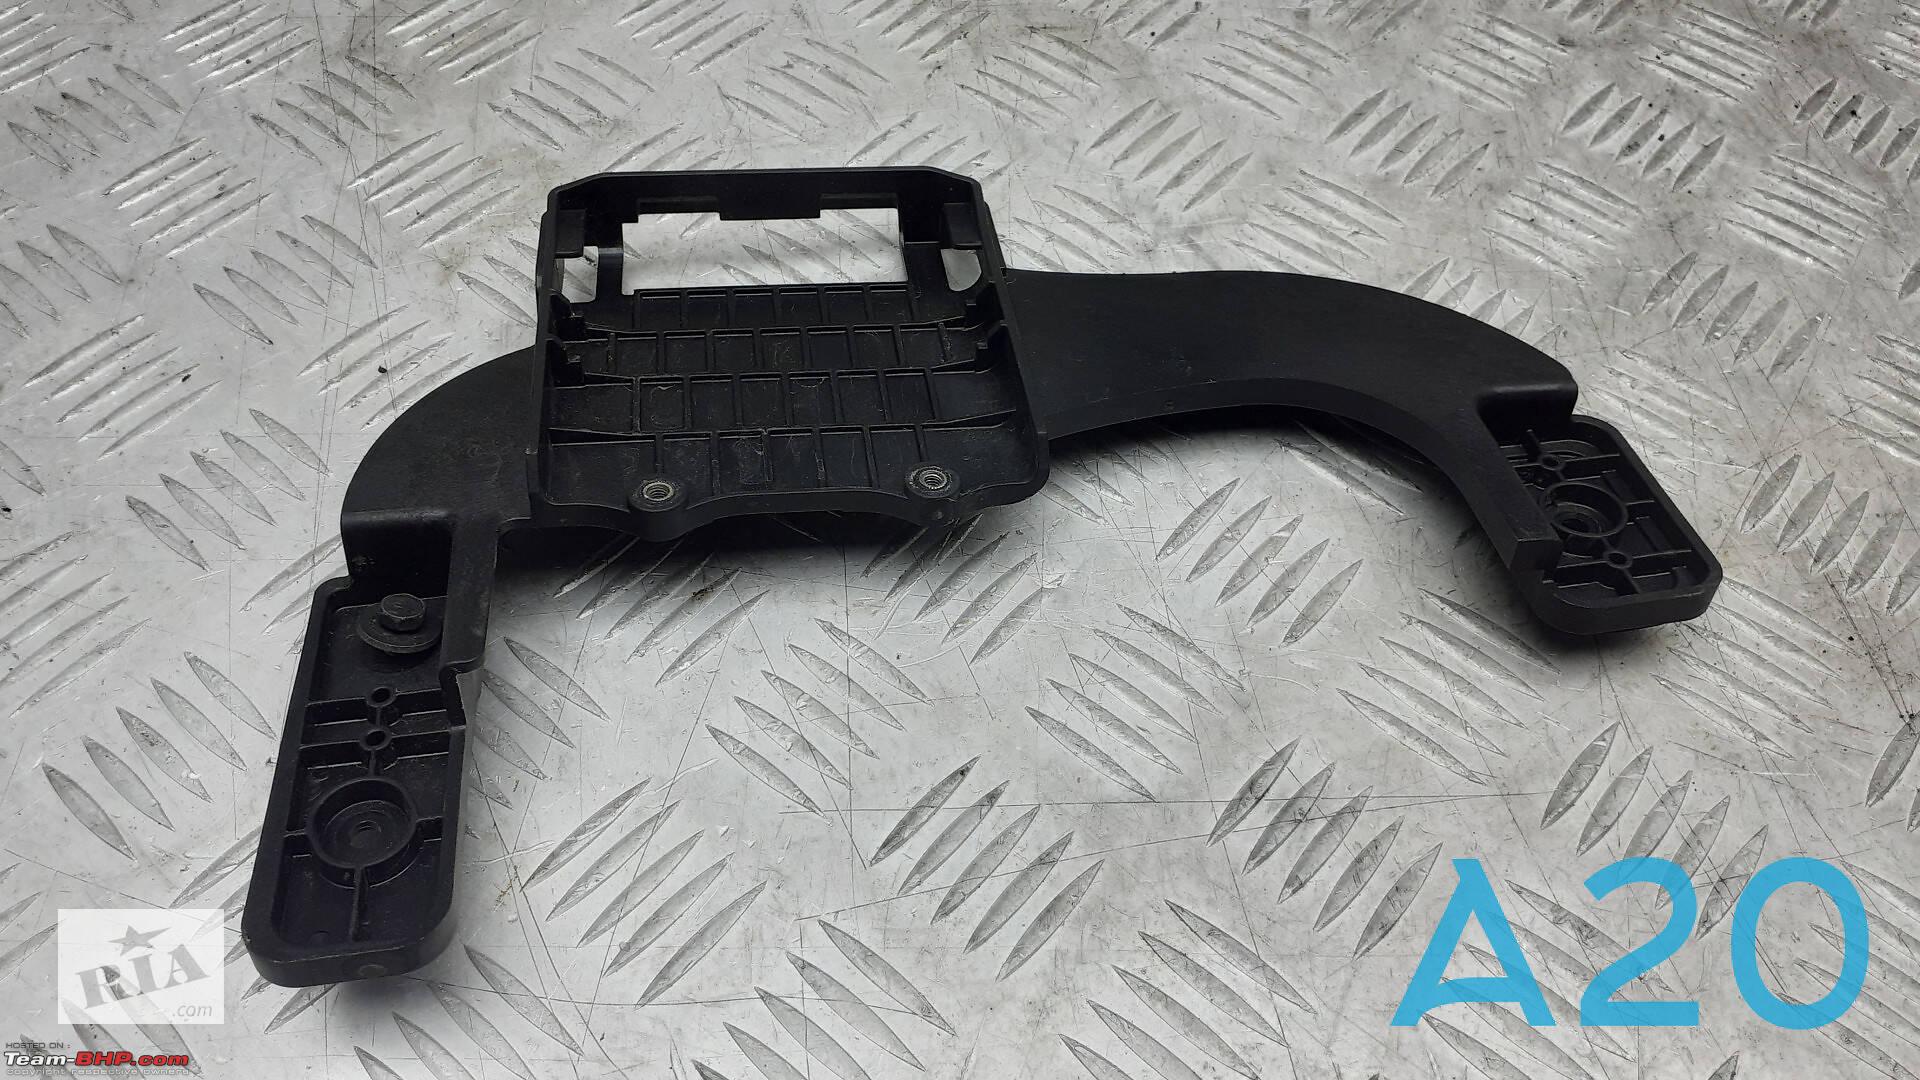 Wiring loom for BLIS sensors taken from a Fiesta - Part no: H1BT-14A411-AF (35 pounds) from Ebay UK. One can also make custom harness by buying the plugs at https://www.aliexpress.com/item/1005003954707108.html BLIS indicators are present on the OVRM mirrors for Ford cars while the VW family get it on the OVRM plastic housing. I was searching for OVRM mirrors with BLIS indicators for Ford cars and assumed that they must cost 20 dollars or less per piece. To my utter disbelief, each original mirror cost atleast 100 euros while the cheapest clone was priced at 45 euros, and I needed two mirrors. Part nos BLIS mirrors: DN1517K741H (left) DN1517K740H (Right) Factory BLIS indicator on the OVRM Mirror  I did not want to waste 100 euros on two mirrors which are likely to break and difficult to replace in India as my OVRM mirrors broke twice due to delinquent bikers. The jugaad brain suggested to install custom indicators inside the cabin. I liked the indicators on aftermarket BLIS systems on AliExpress and decided to install them. Note that the LEDs have to work on 12V. Few indicators on AliExpress work on 5V and are very likely to burn. Aftermarket indicators ($15) - https://www.aliexpress.com/item/4000670798272.html M4 X 12 Allen bolts (need 4) - https://www.amazon.in/gp/product/B08...?ie=UTF8&psc=1 Installation experience: 1. Removed the rear bumper for side parking sensors and BLIS install (pics in Front park sensor post). 2. I assembled the BLIS sensors into the brackets. Had to make minor cuts on the brackets for the connections as the F150 plugs were facing backwards. Right BLIS sensor 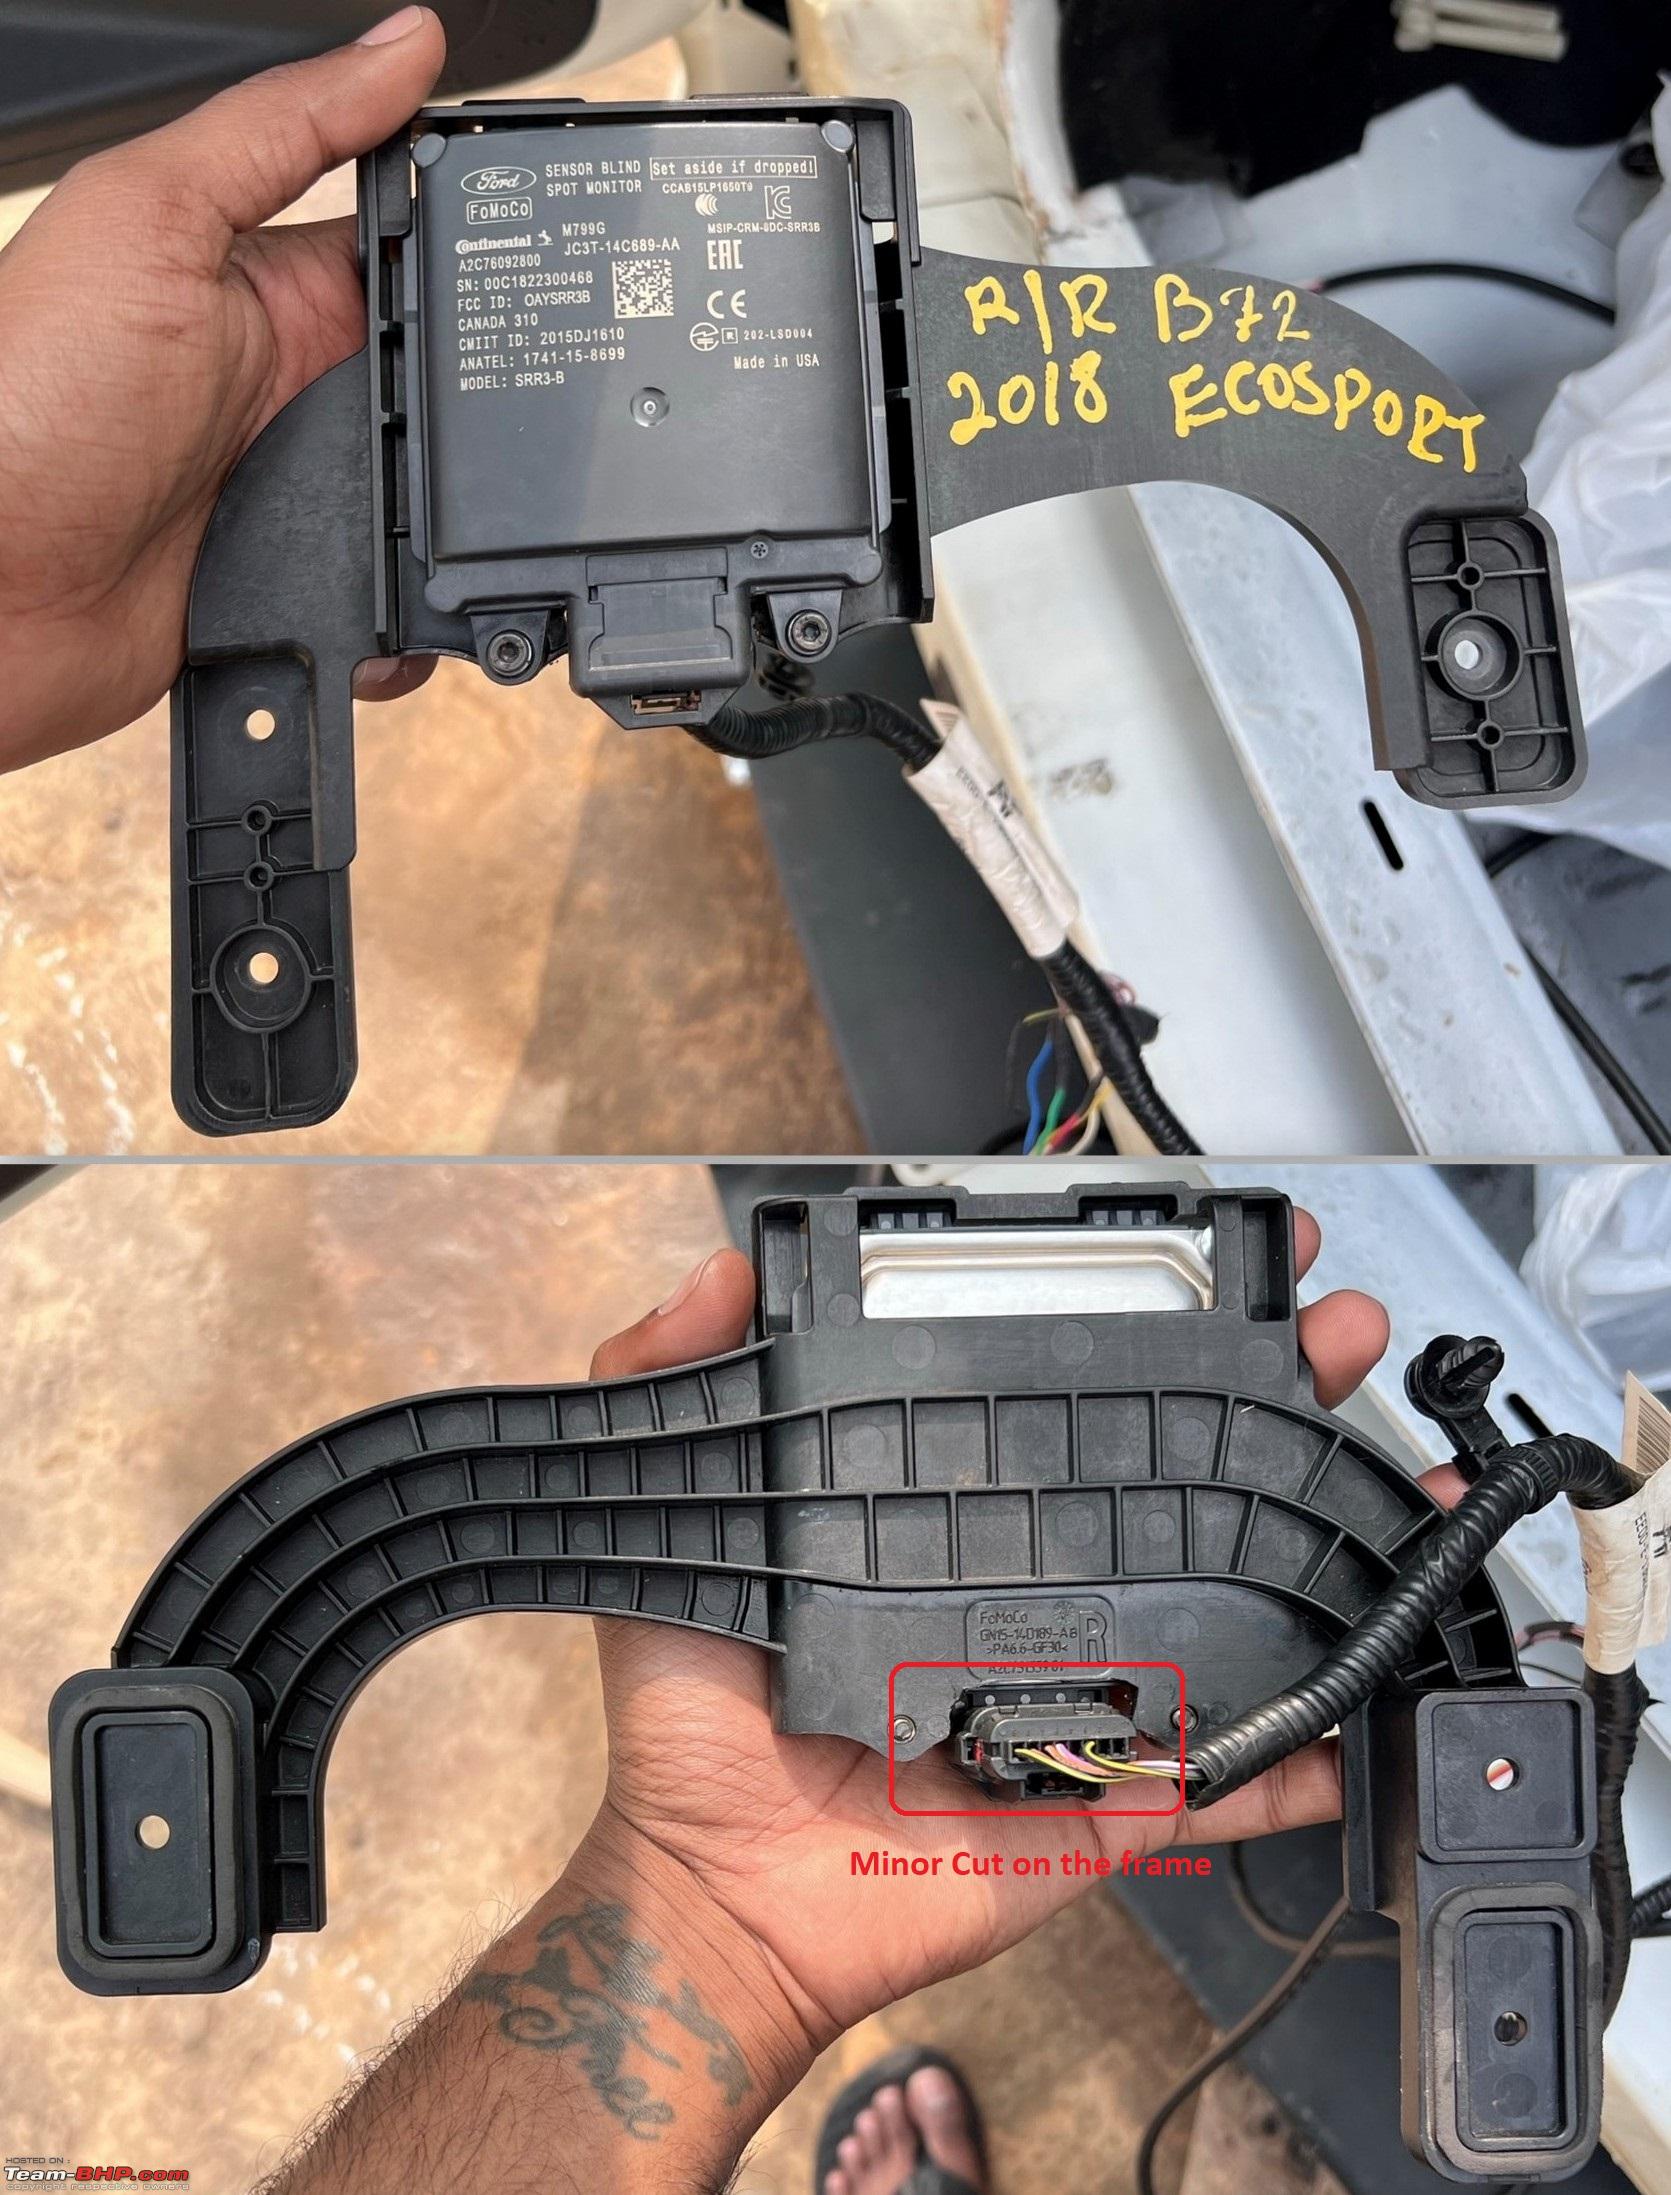 Left BLIS sensor  3. I was happy to find mount points on the rear body. Fixed the brackets on the mount points on both sides. Right side mounted 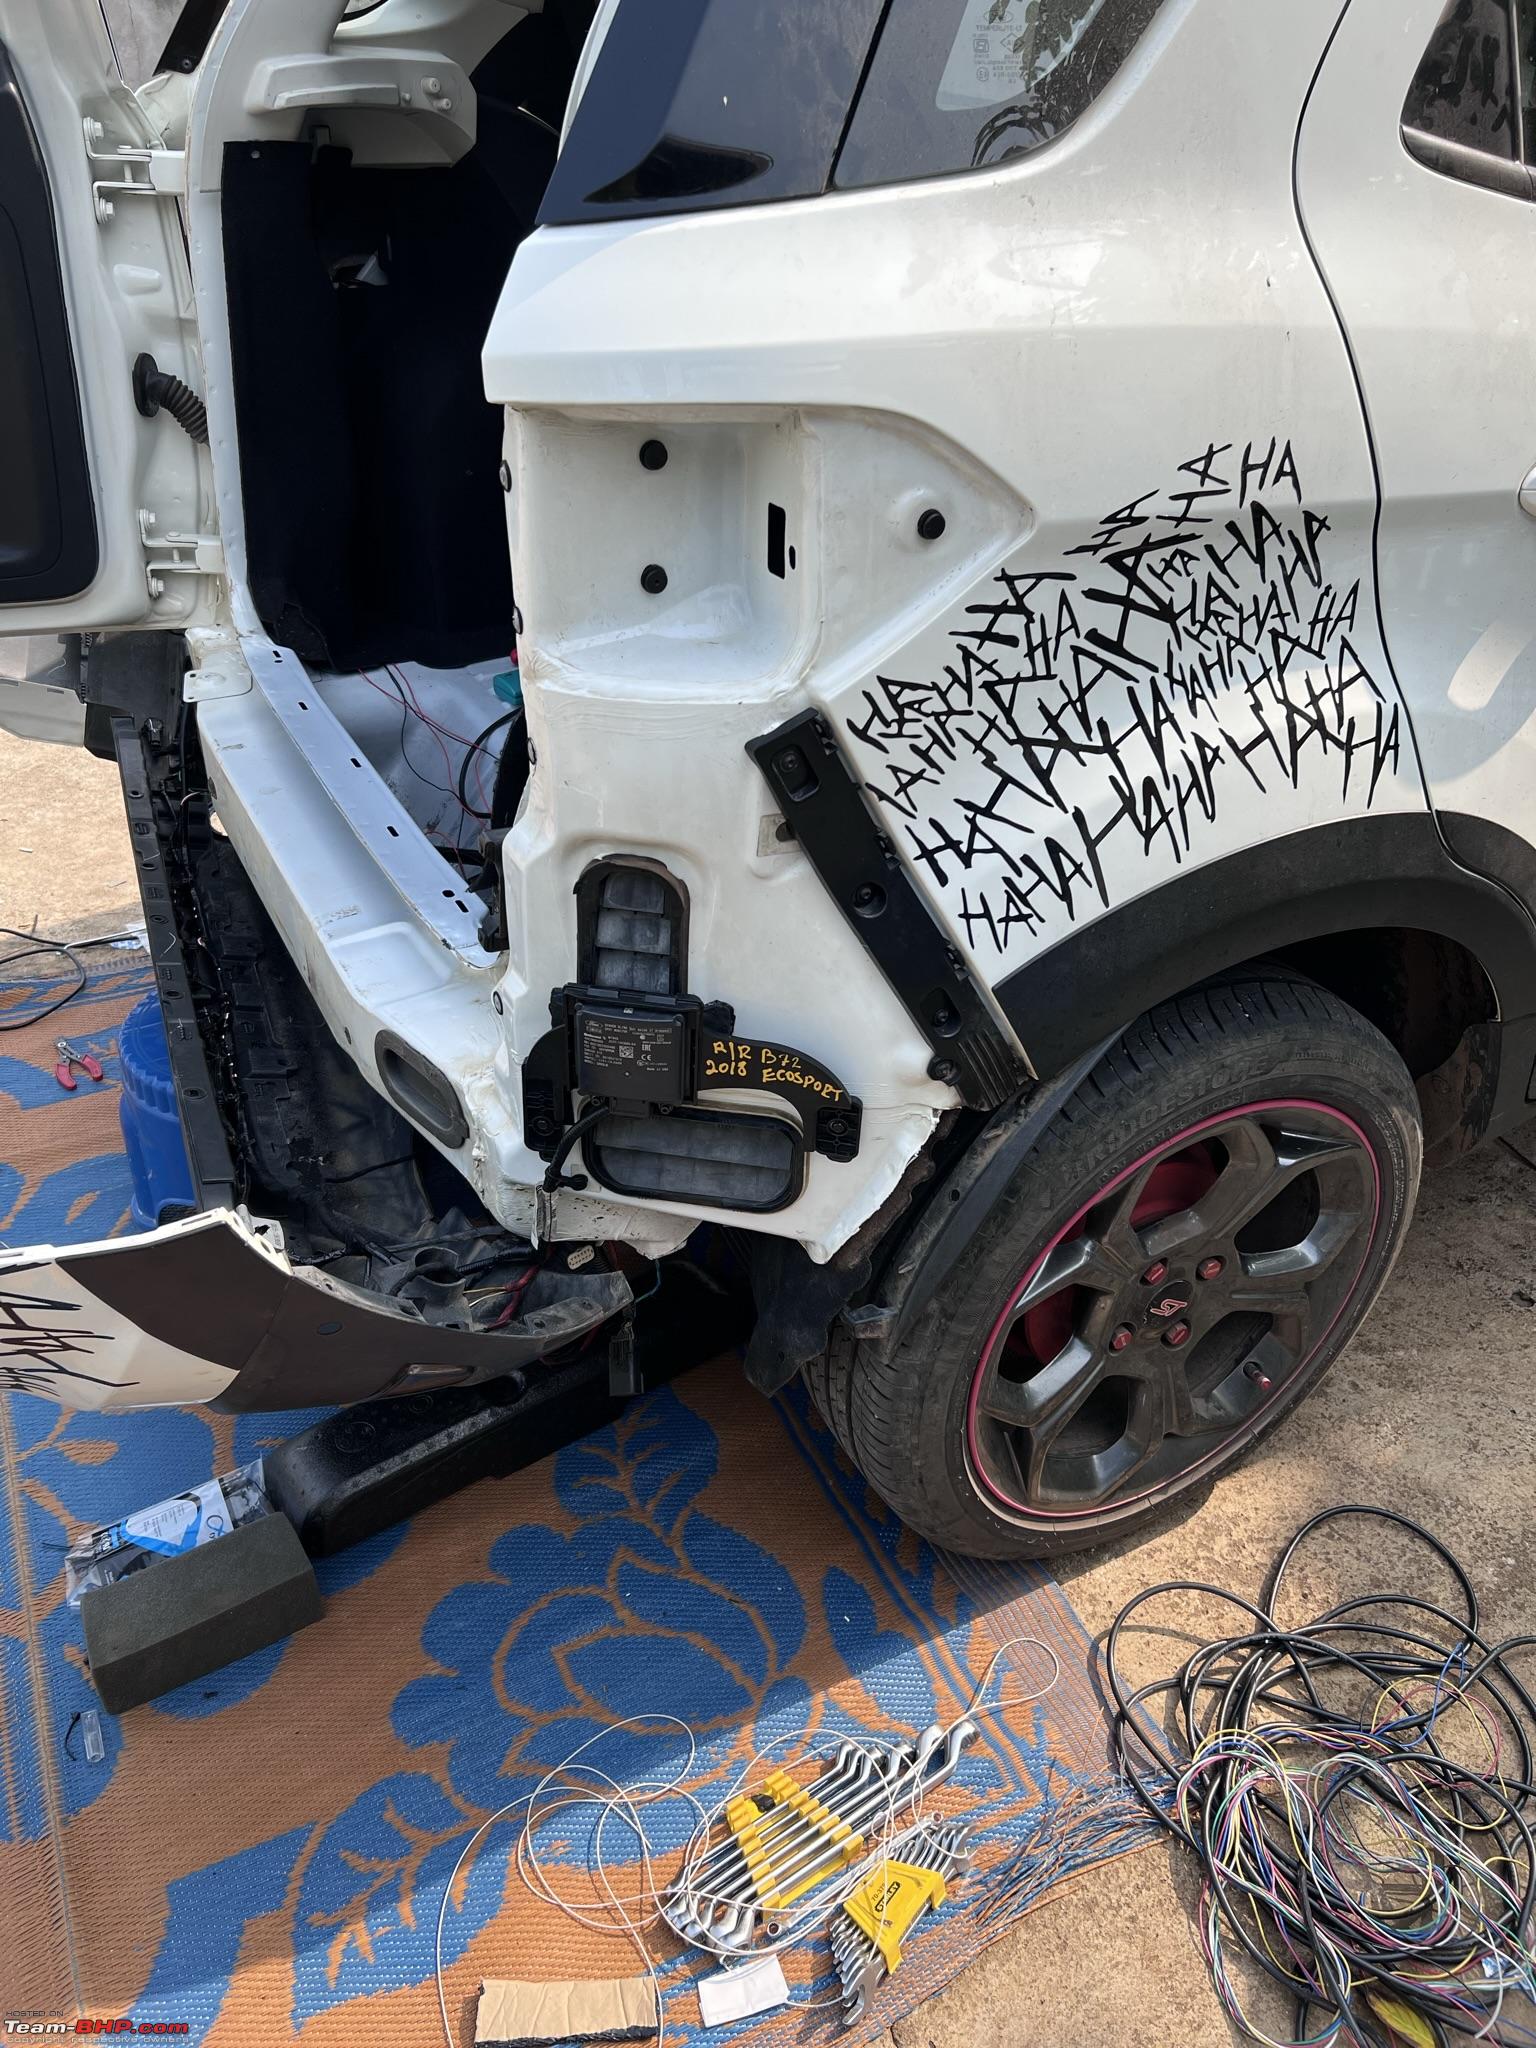 Left side mounted  4. Everything seemed to come along nicely. I thought the major installation part was done and started to fix the bumper. It was then the whole scenario flipped. The BLIS sensors were touching the plastic weld bracket holding the rear quarter panel to the bottom plastic cladding and the bumper wouldn’t fit at all.  Left side sensor touching the joint 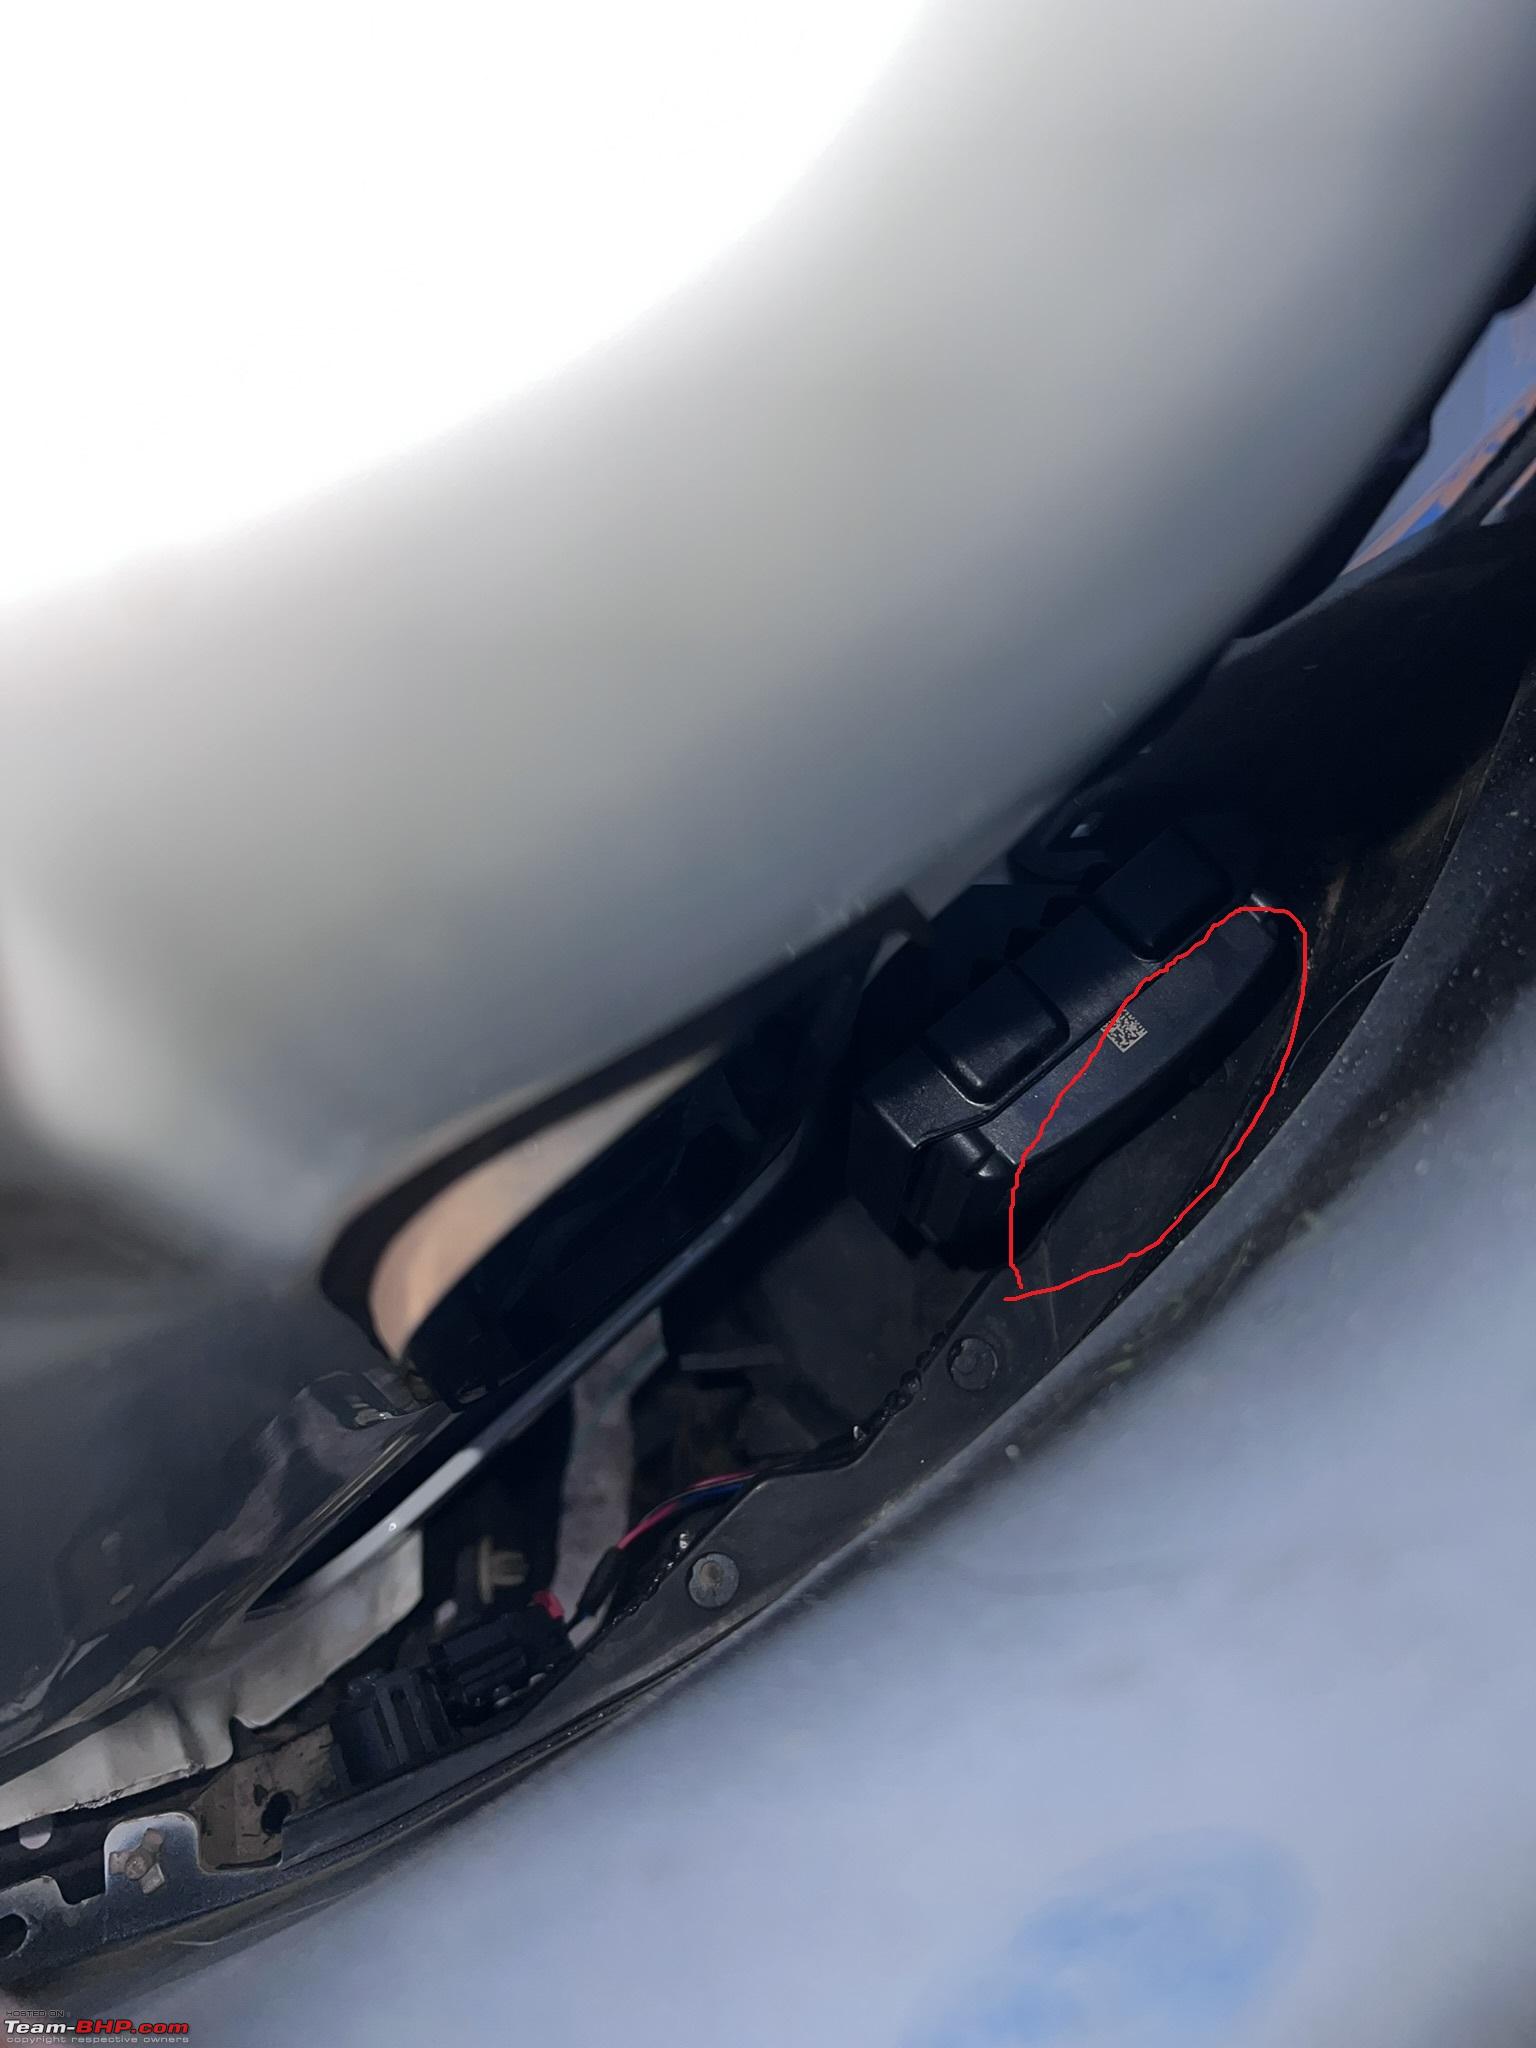 Right side sensor touching the joint 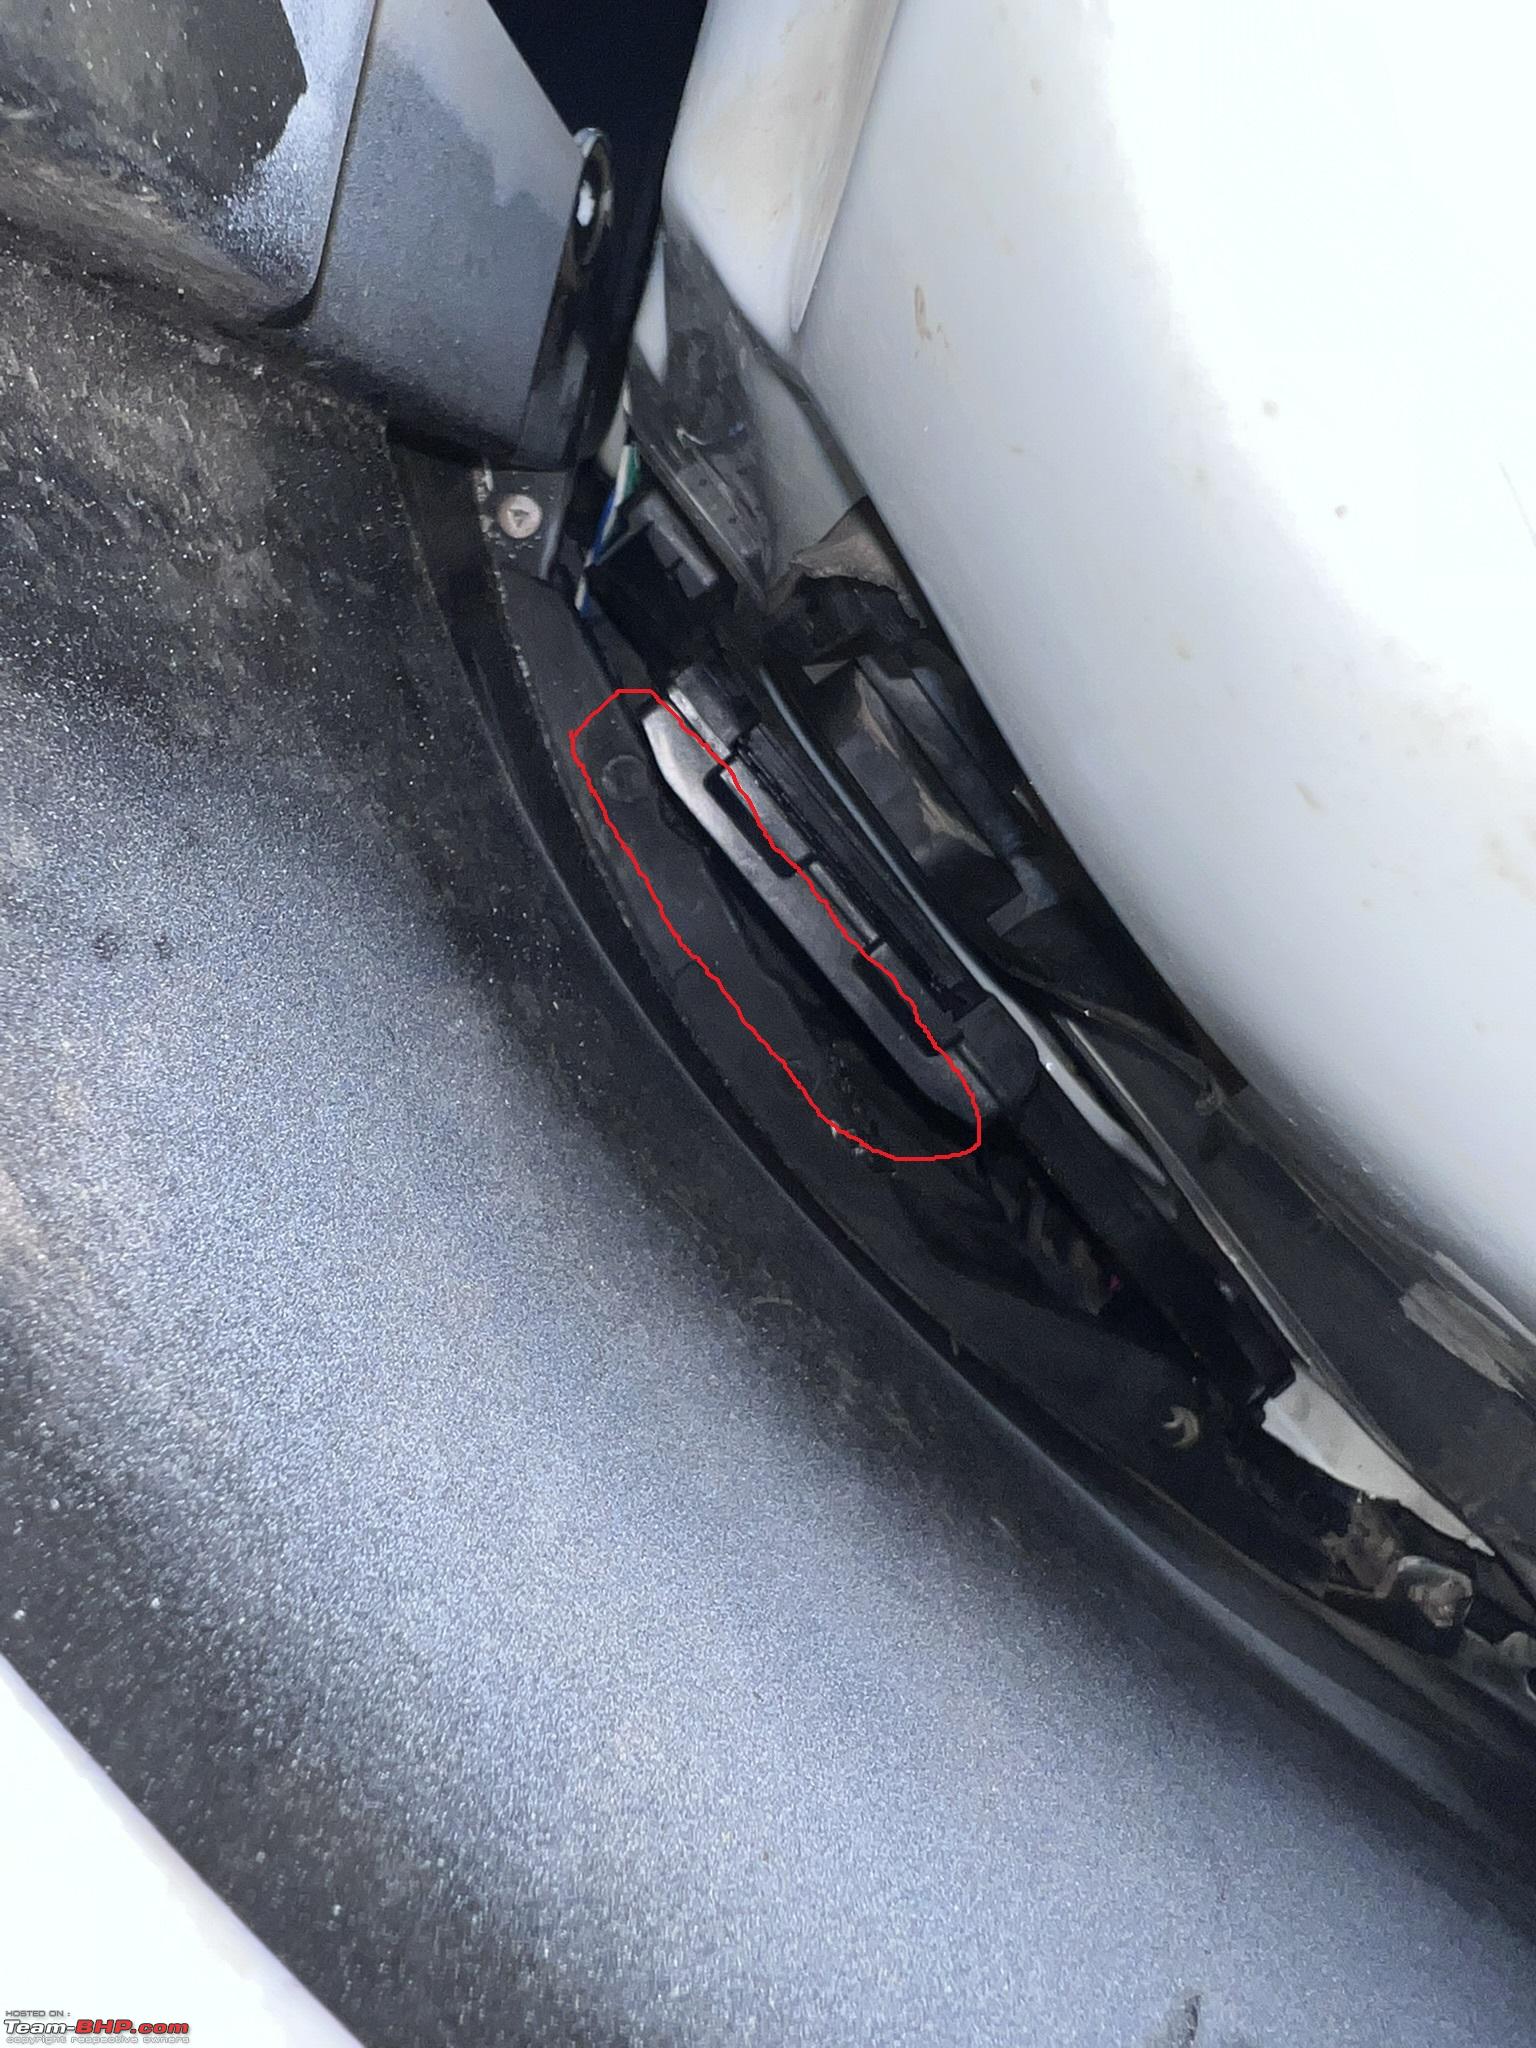 Joint area 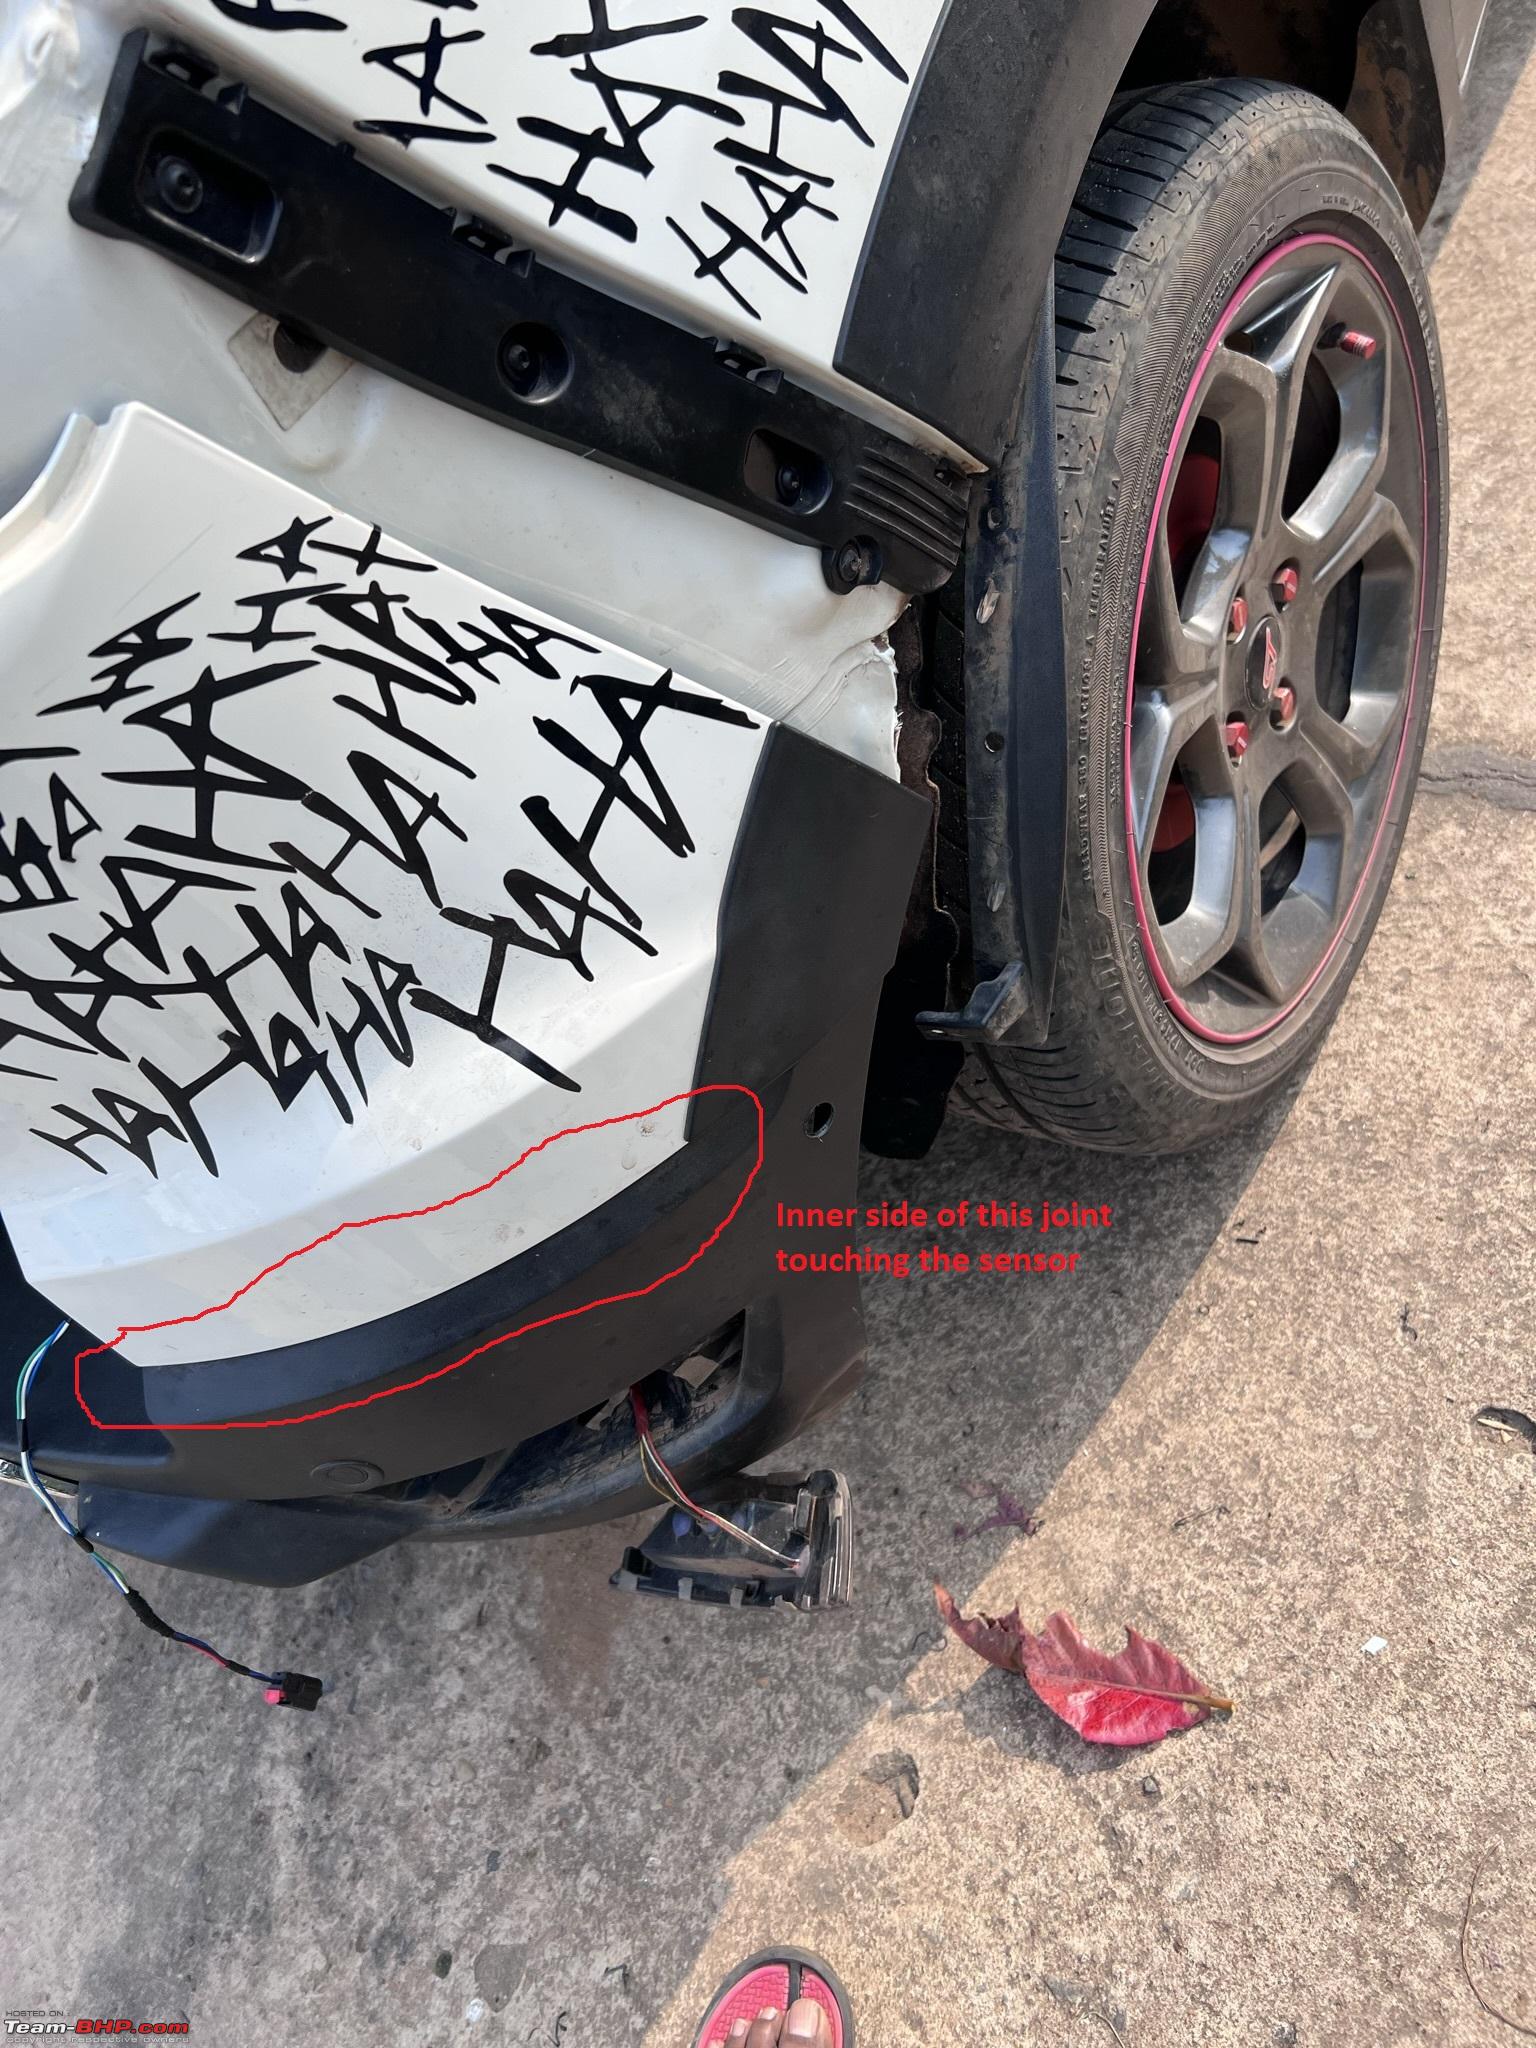 My guess is that the international variants have a different design that have space to accommodate the sensors such as the following ST-Line variant. A quick rear bumper comparison between the two models suggests the same. 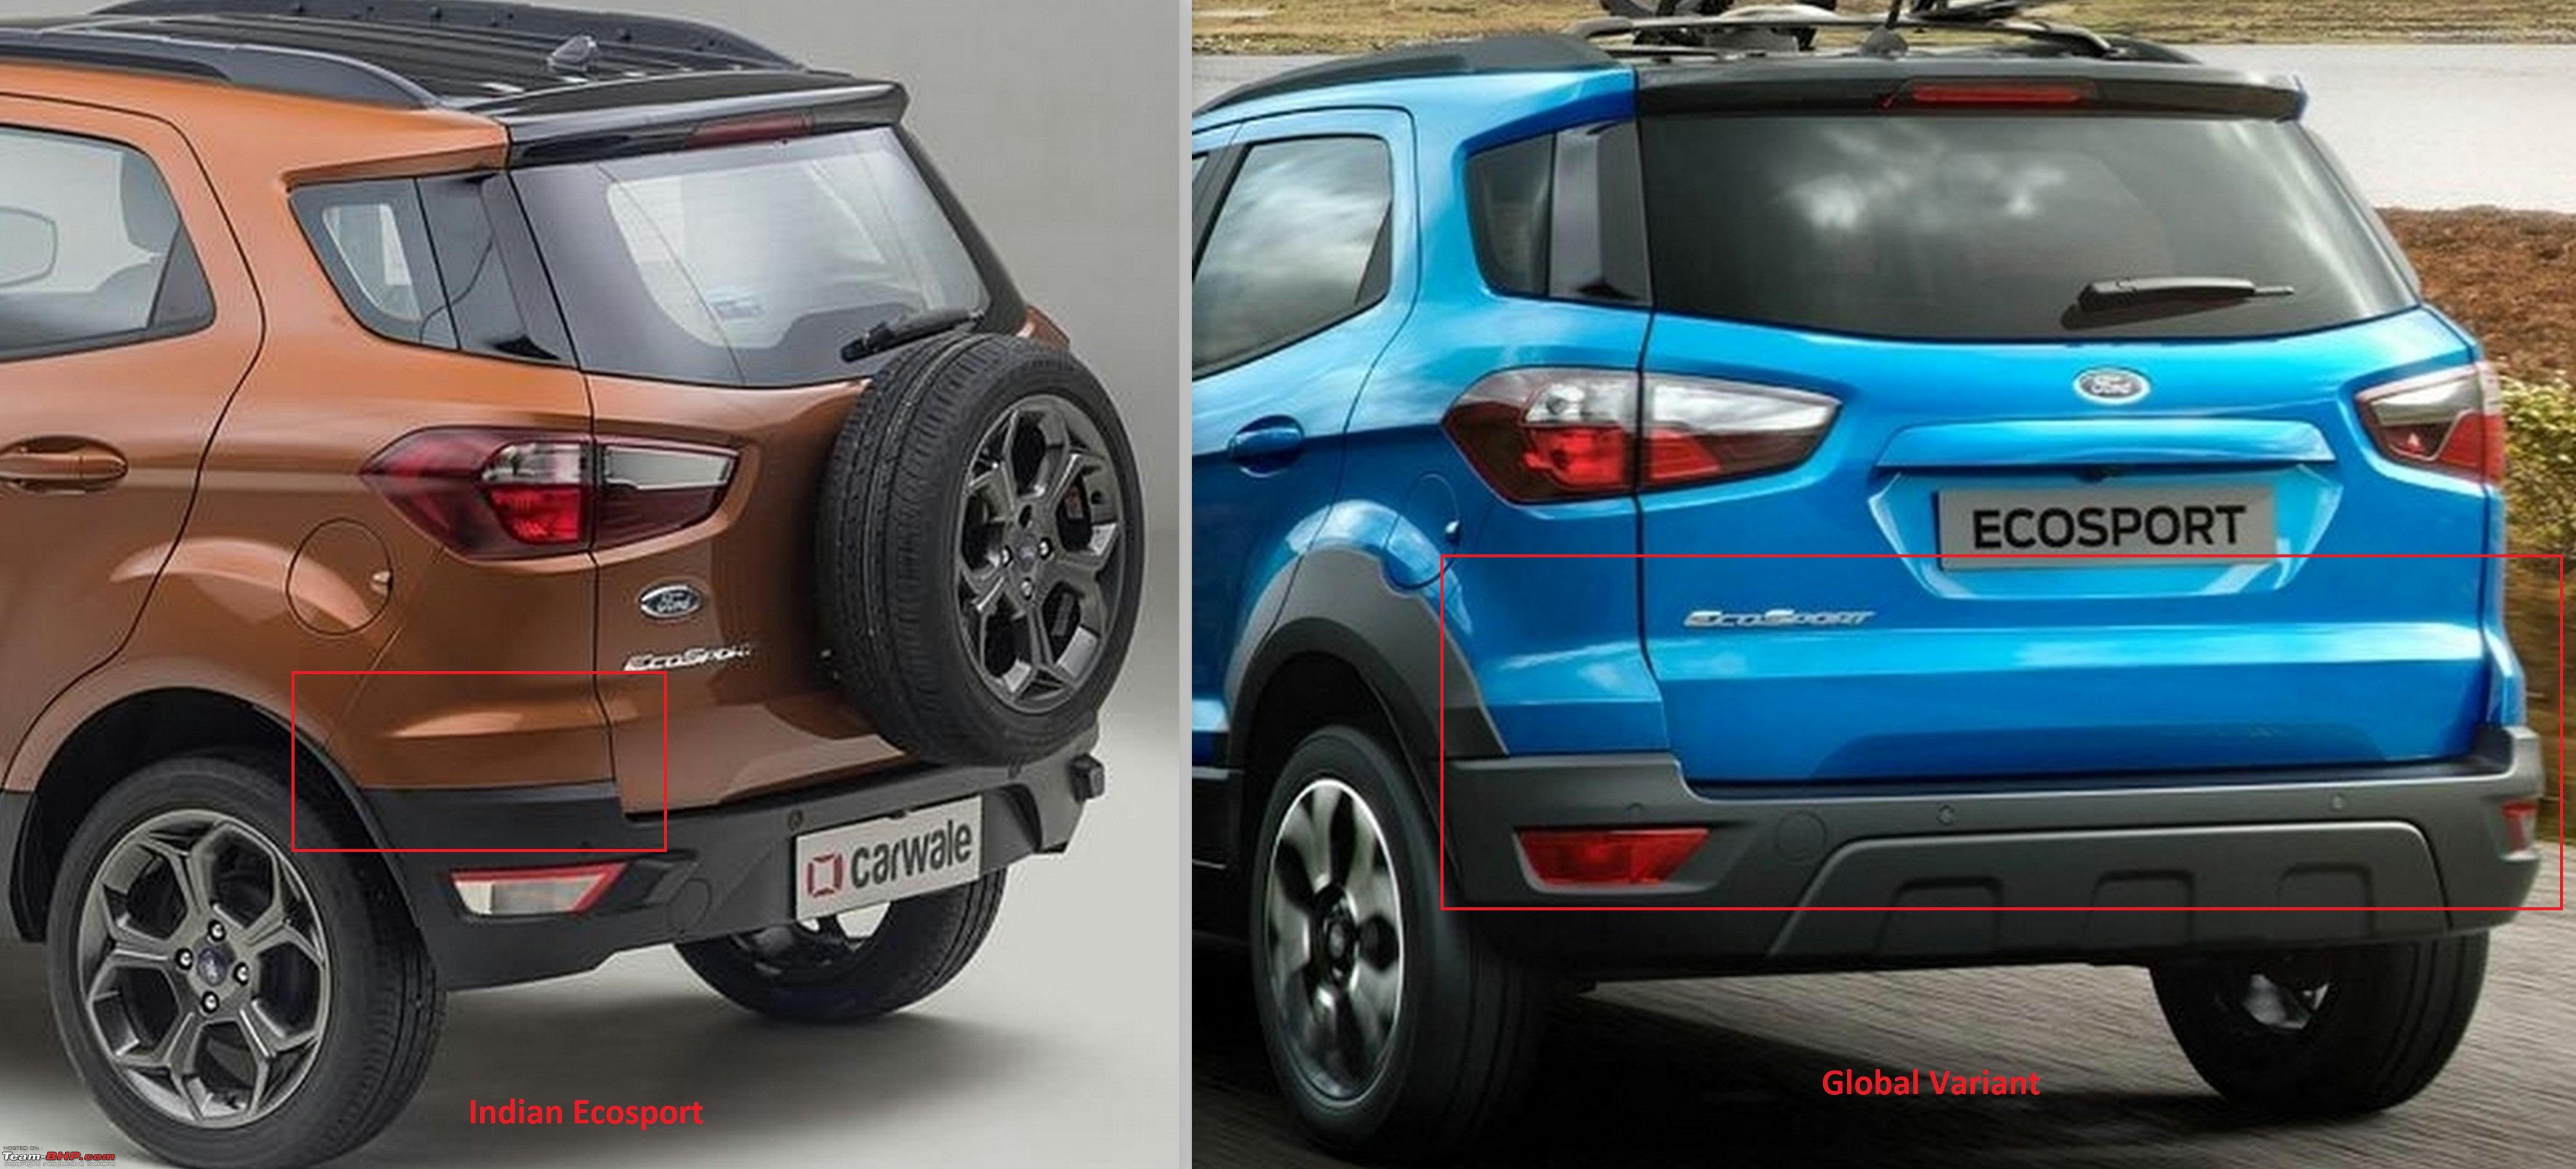 5. I then decided to fix the sensors at alternate locations facing out at the same OEM-fit angles and adjust the new positional data accordingly in the module configuration. New positions are little higher than the OEM location (~ 1/2 inch for right, ~ 2.5 inch left sensor). I had to drill into the body and fix the sensors at their new locations. After this the bumper fit snugly. New left location 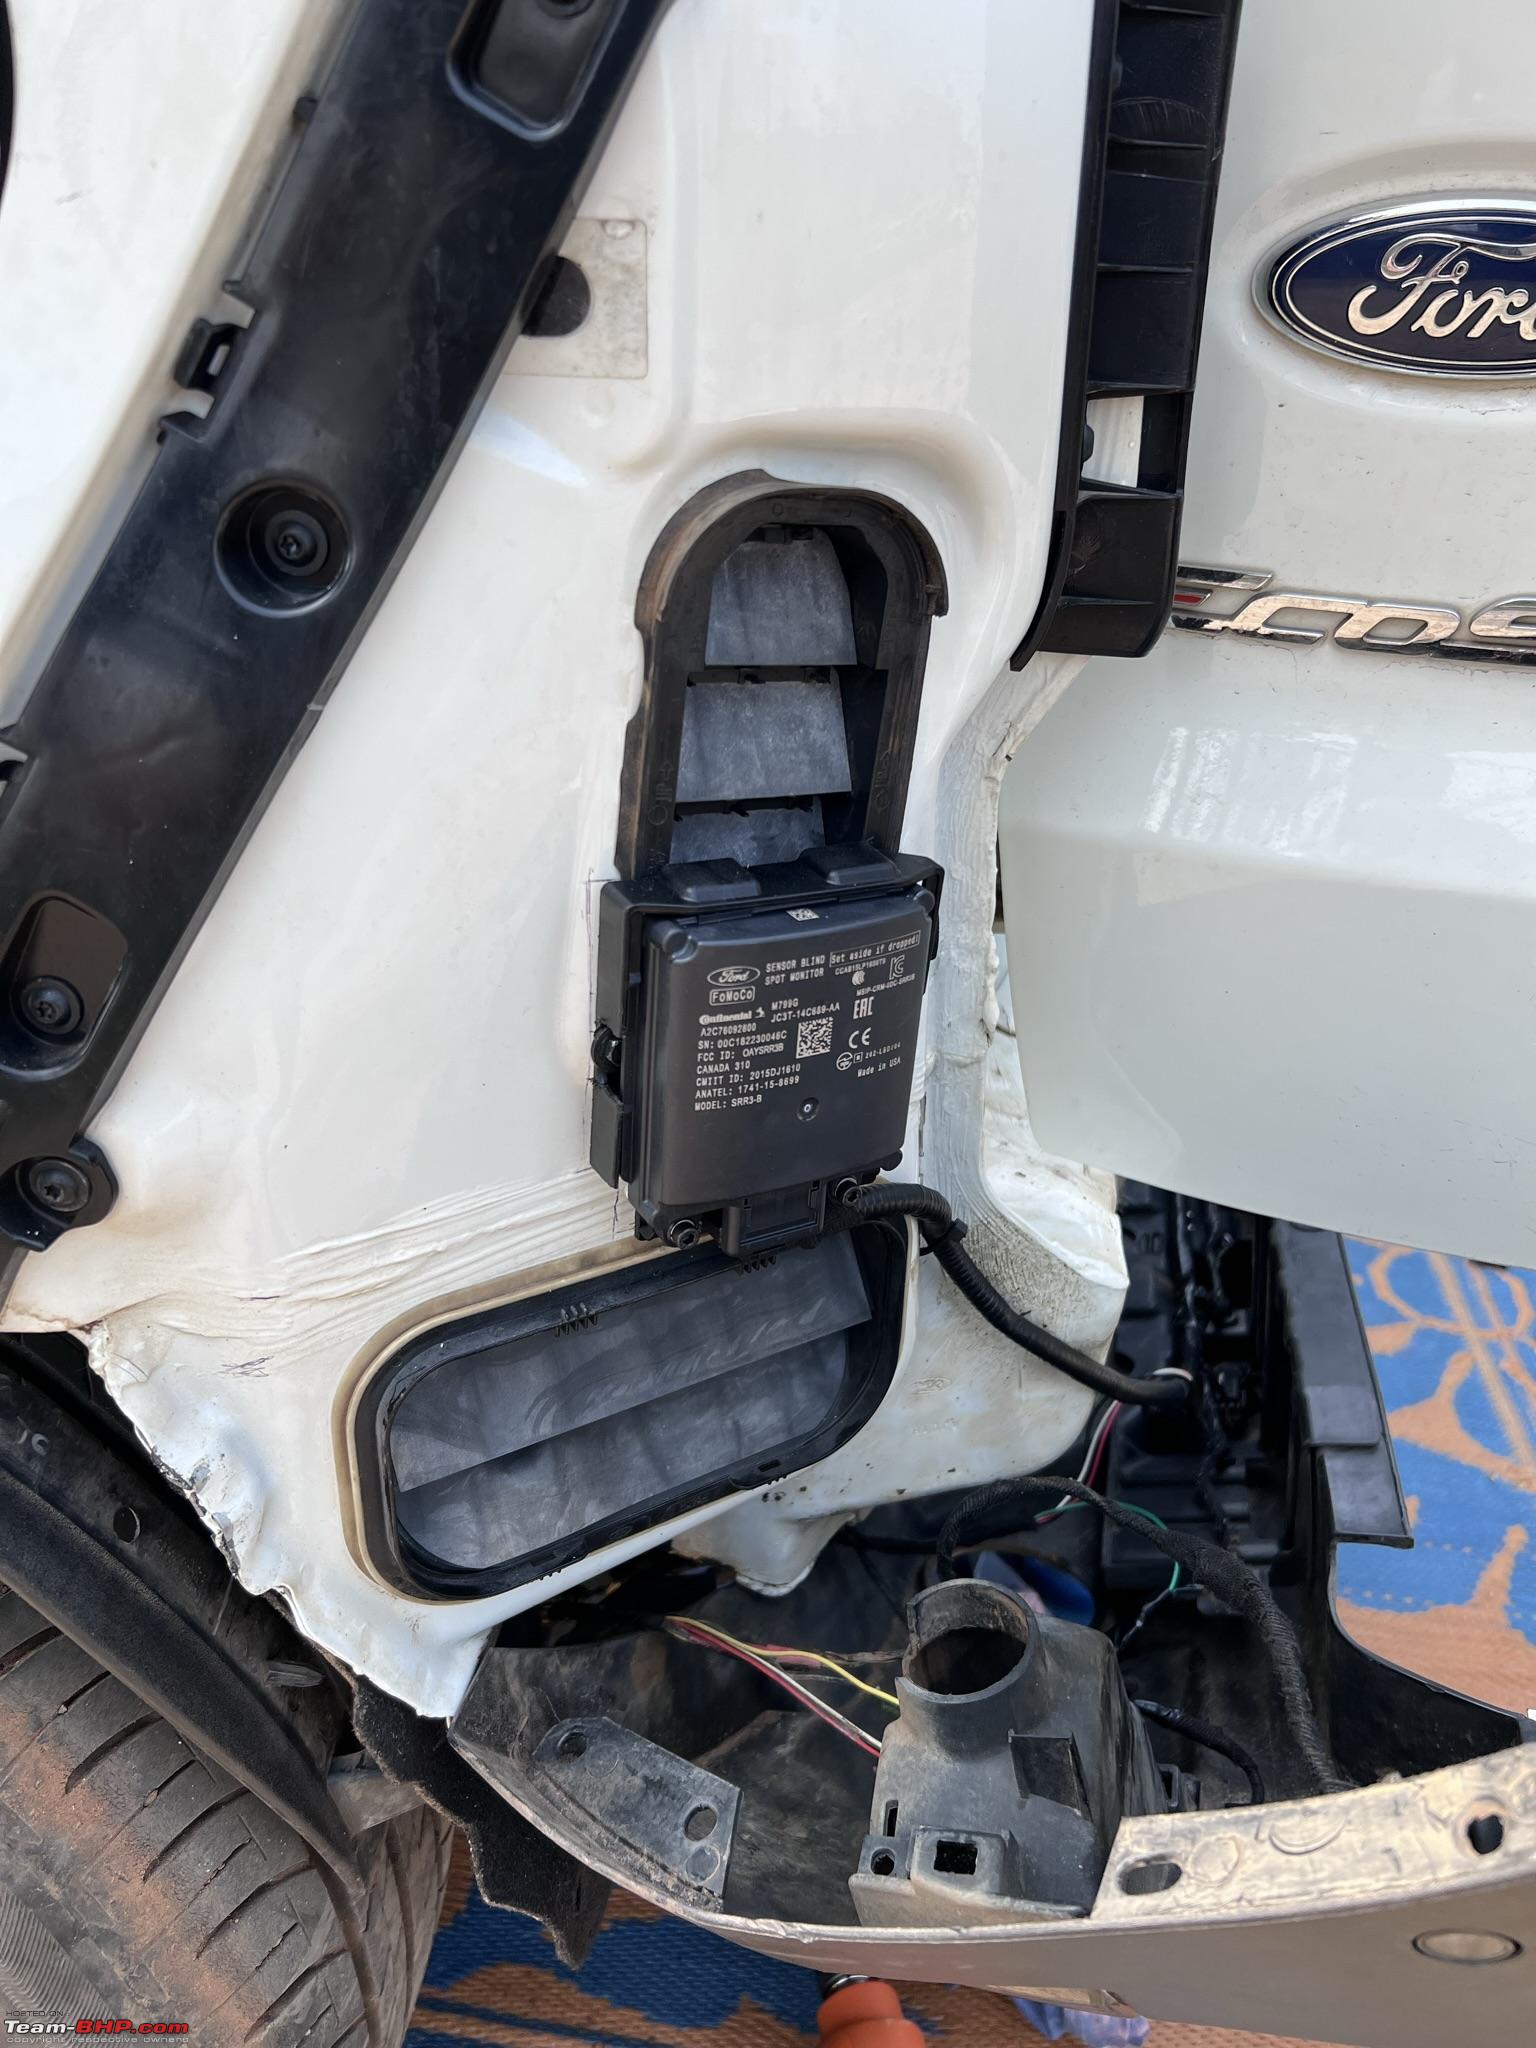 New right location  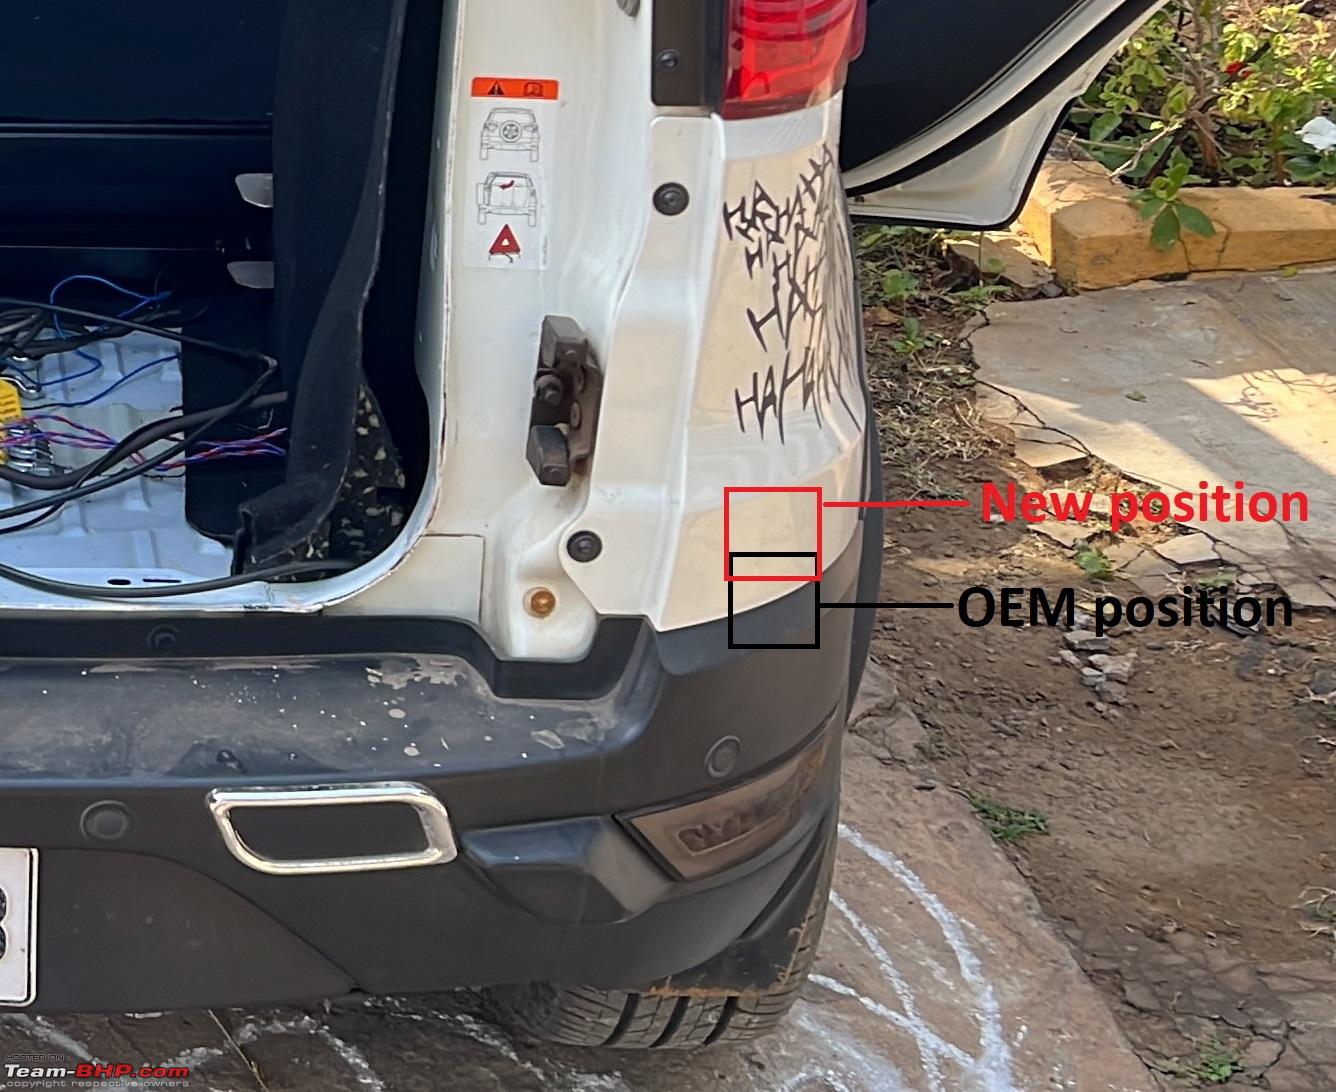 6. Opened the door pads and wired the indicator into the Door Control Units. As far as I know only S variants get DCUs for front Driver door (DDM) and Passenger door (PDM). BLIS sensors relay relevant information over CAN Bus and DCUs light up the indicators accordingly. For variants without DCUs, the indicators are directly wired to the BLIS modules. Driver side DCU/ Driver Door Module (DDM) 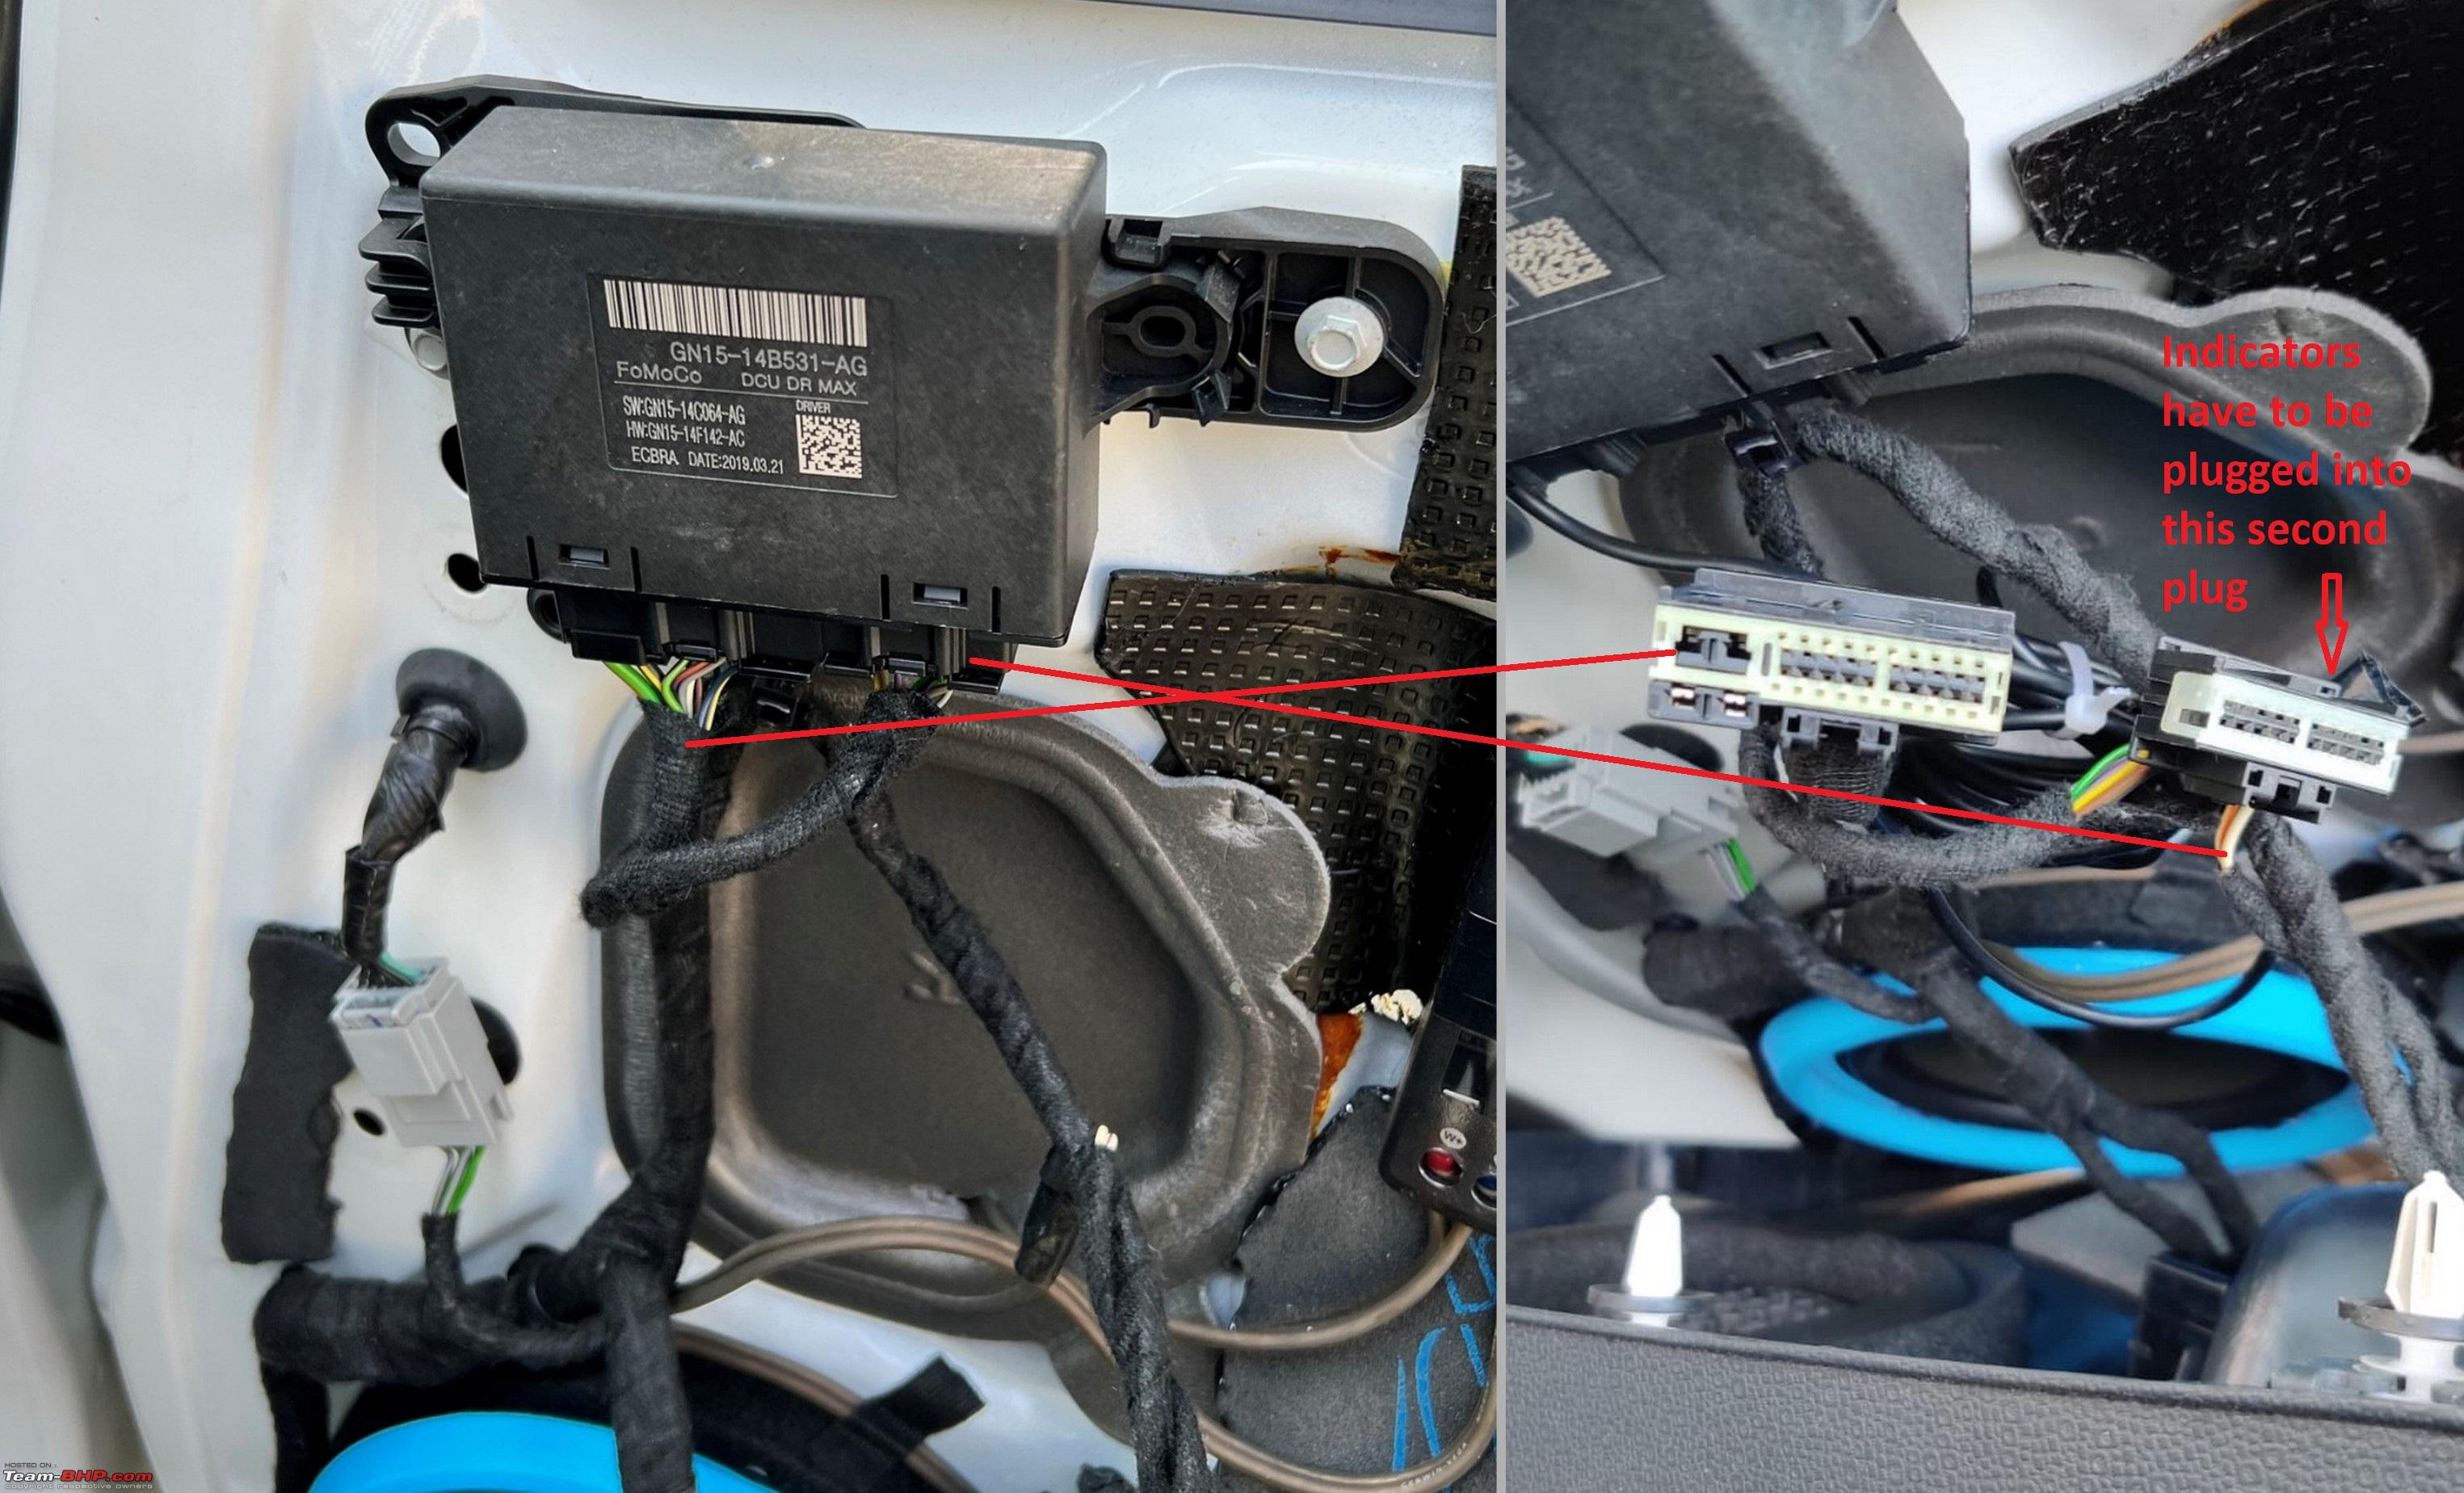 Door indicator 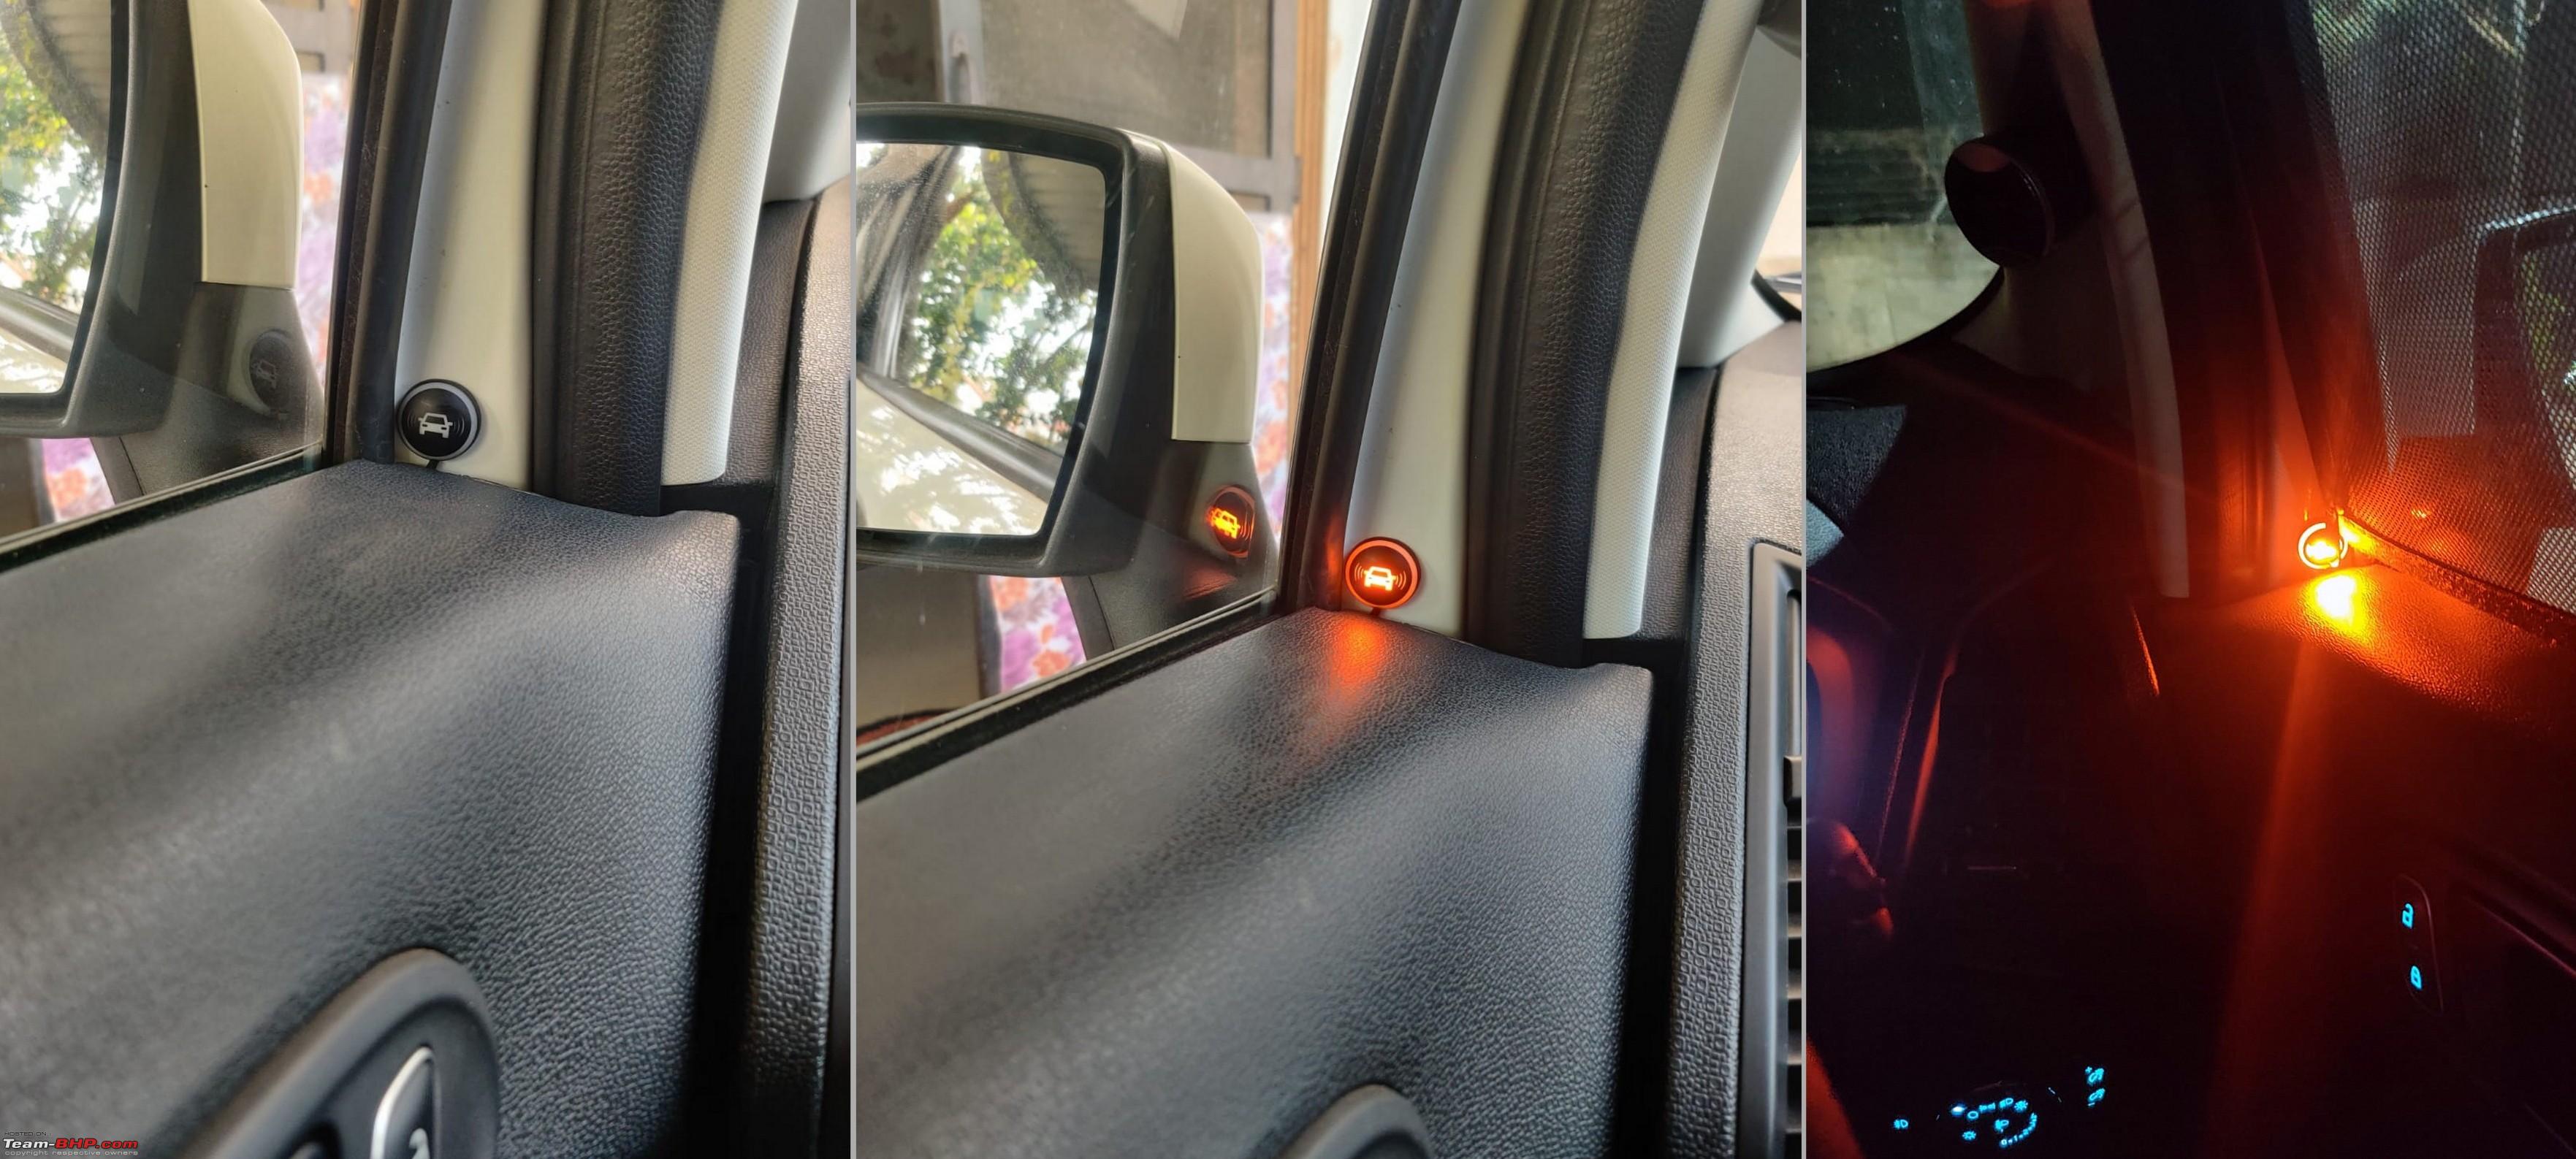 The low light photo is depicted too bright than actual. I flashed Ecosport BLIS firmware onto F150 modules and configured the settings in BLIS modules (SODL & SODR), IPC, DDM, PDM and APIM modules. 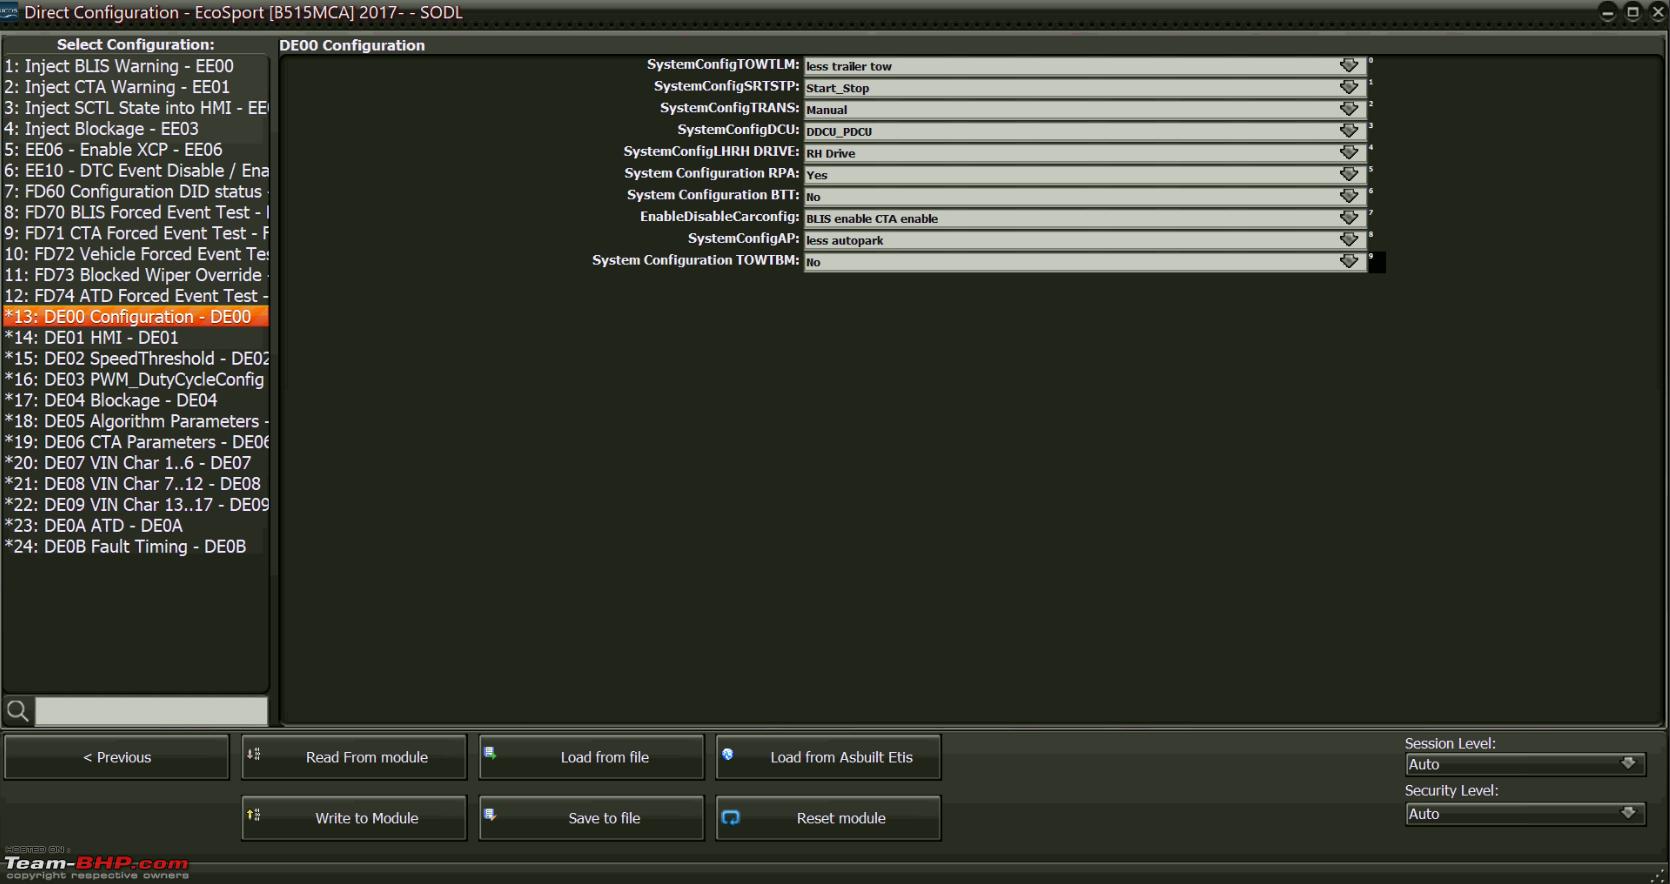 Wiring diagrams – 1. SODL  2. SODR 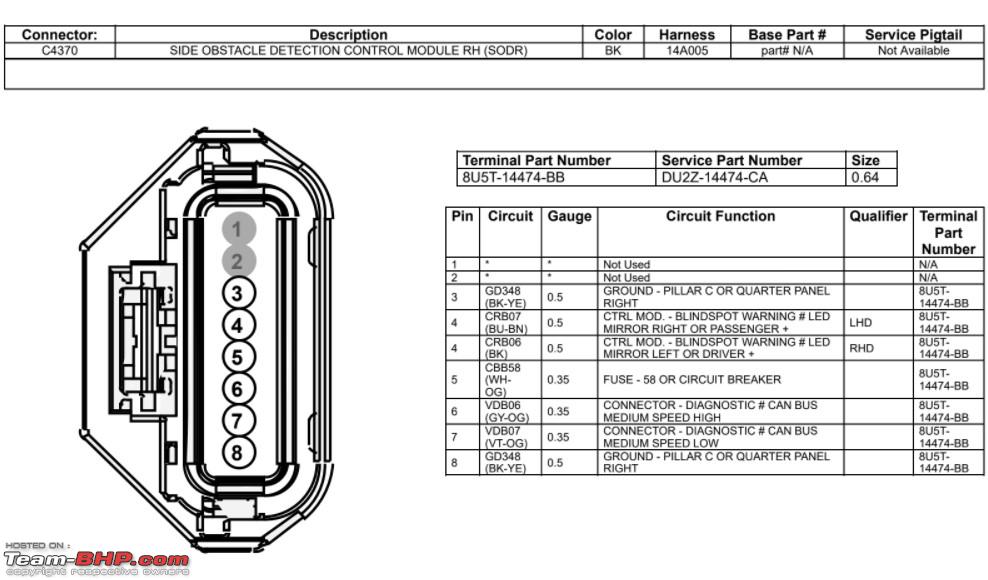 3. DDM PDM  Initially ran into trouble getting BLIS to work as the module were showing a DTC fault. I thought the sensors were faulty which would explain the cheap price. However, 3 weeks after that it dawned on me and upon rechecking I figured that I wired the indicators at the wrong pins on the DCUs. Dad corrected the pins and I remotely reset the modules, cleared DTCs. Now the system is working as intended  . Since I got them to work after I left, I do not have a working video. I will try to get a clear video of the system in action and update the post. . Since I got them to work after I left, I do not have a working video. I will try to get a clear video of the system in action and update the post.Last edited by nightraven : 28th February 2022 at 21:08. |
|
| (38)
Thanks
|
| The following 38 BHPians Thank nightraven for this useful post: | ADI7YAK, AdityaDeane, adwaith, AROO7, ashpalio, audioholic, brownkaiser, CEF_Beasts, dailydriver, digitalnirvana, fiat_tarun, fluidicjoy, GaryTSI, GTO, InControl, jithin23, lemedico, Leoshashi, Lobogris, nitinkbhaskar, PearlJam, Prakritij, PraNeel, raiuday, Rajeevraj, Researcher, saikarthik, saikishor, Samfromindia, sarfraz1997, sridhar-v, srikanthmadhava, swiftnfurious, tchsvy, The_Outsider!, vhharan1, ysjoy, Yuvuz |
|
28th February 2022, 18:35
| #7 |
| BHPian | re: DIY: Juicing up the Ford EcoSport S with ICE, Front Park, ST-line cluster, steering wheel and ADAS Front and side-parking sensors  Image of an EU EcoSport. Notice the 4 parking sensors on the front. This was top among the functional features that I wanted to retrofit and most demanding due to the sheer number of minor parts and wiring involved. This is offered only on EU EcoSport as an option. The system has 4 sensors on the front bumper which are activated at crawl speeds and beep as soon as an obstacle is detected like in stop-go traffic or parking spaces. They also provide coverage while reverse in engaged, working in tandem with the 4 sensors at the rear making it an 8-sensor system. One could also fit aftermarket sensors and a standalone display, but it isnt subtle and can never be integrated into the car like an OEM system. Video of a 12-channel flank guard Fiesta and other ford siblings including the Indian Endeavour Sport are offered with an auto-park option which have 12 sensors for the full-configuration (has parallel and perpendicular park features). The 12 sensors are divided into 6 at rear and 6 at front. From a hardware perspective, what differentiates this from the 8-sensor system offered in the EcoSport are the side parking sensors on either side at the front and the rear to determine obstacles parked in parallel to the car, thus providing a 360-degree coverage around the car. The side park sensors are highlighted in yellow while standard inner 4 sensors are highlighted in green.  Reviewing the software side of it, the active park assist system utilizes steering angle inputs, vehicle wheel rotation roll count, wheel direction, active park-assist sensor inputs, vehicle speed and transmission selection to calculate vehicle position and distance in relation to the parking space. The inputs are used by the Parking Aid Module (PAM) to command the steering system to assist with the steering wheel control to maneuver the vehicle into the parking space. Detailed read on inner workings of the system - https://drive.google.com/file/d/1YnH...ew?usp=sharing Video of auto-park in action A good driver can obviously park much faster and doesnt need such a system. But as I said at the start, these mods are my way of tinkering around to get my fix than to prove whether I am a good or a bad driver. I am not sure if coding required for auto-park support is present in the EcoSports Power Steering Control Module (PSCM) as UCDS does not show any options in the configuration, was never a feature offered on the EcoSport and the PSCM is not shared with its other siblings which restricted the option to flash firmware from other models due to incompatibility. However, there is still light at the end of the tunnel. Worst case, I can dumb down the unit to an 8-channel system or 12-channel system without the auto-park features like a standard EcoSport with front-park sensors. So here is what I set out to do install 6 park sensors at the front (4+2), add 2 side parking sensors at the rear and integrate all of them. Challenges and parts needed: 1. All ford cars with only rear park sensors have a rear parking aid module. This needs to be replaced with an active park-assist module to enable front-park sensors. The same module is also used for active-park features but with a different firmware. Standard rear PAM cannot be used for front-park sensors (verified by flashing other firmwares, UCDS settings etc.). The PAM is located in the boot on the right-side wall under the lining. PAM location 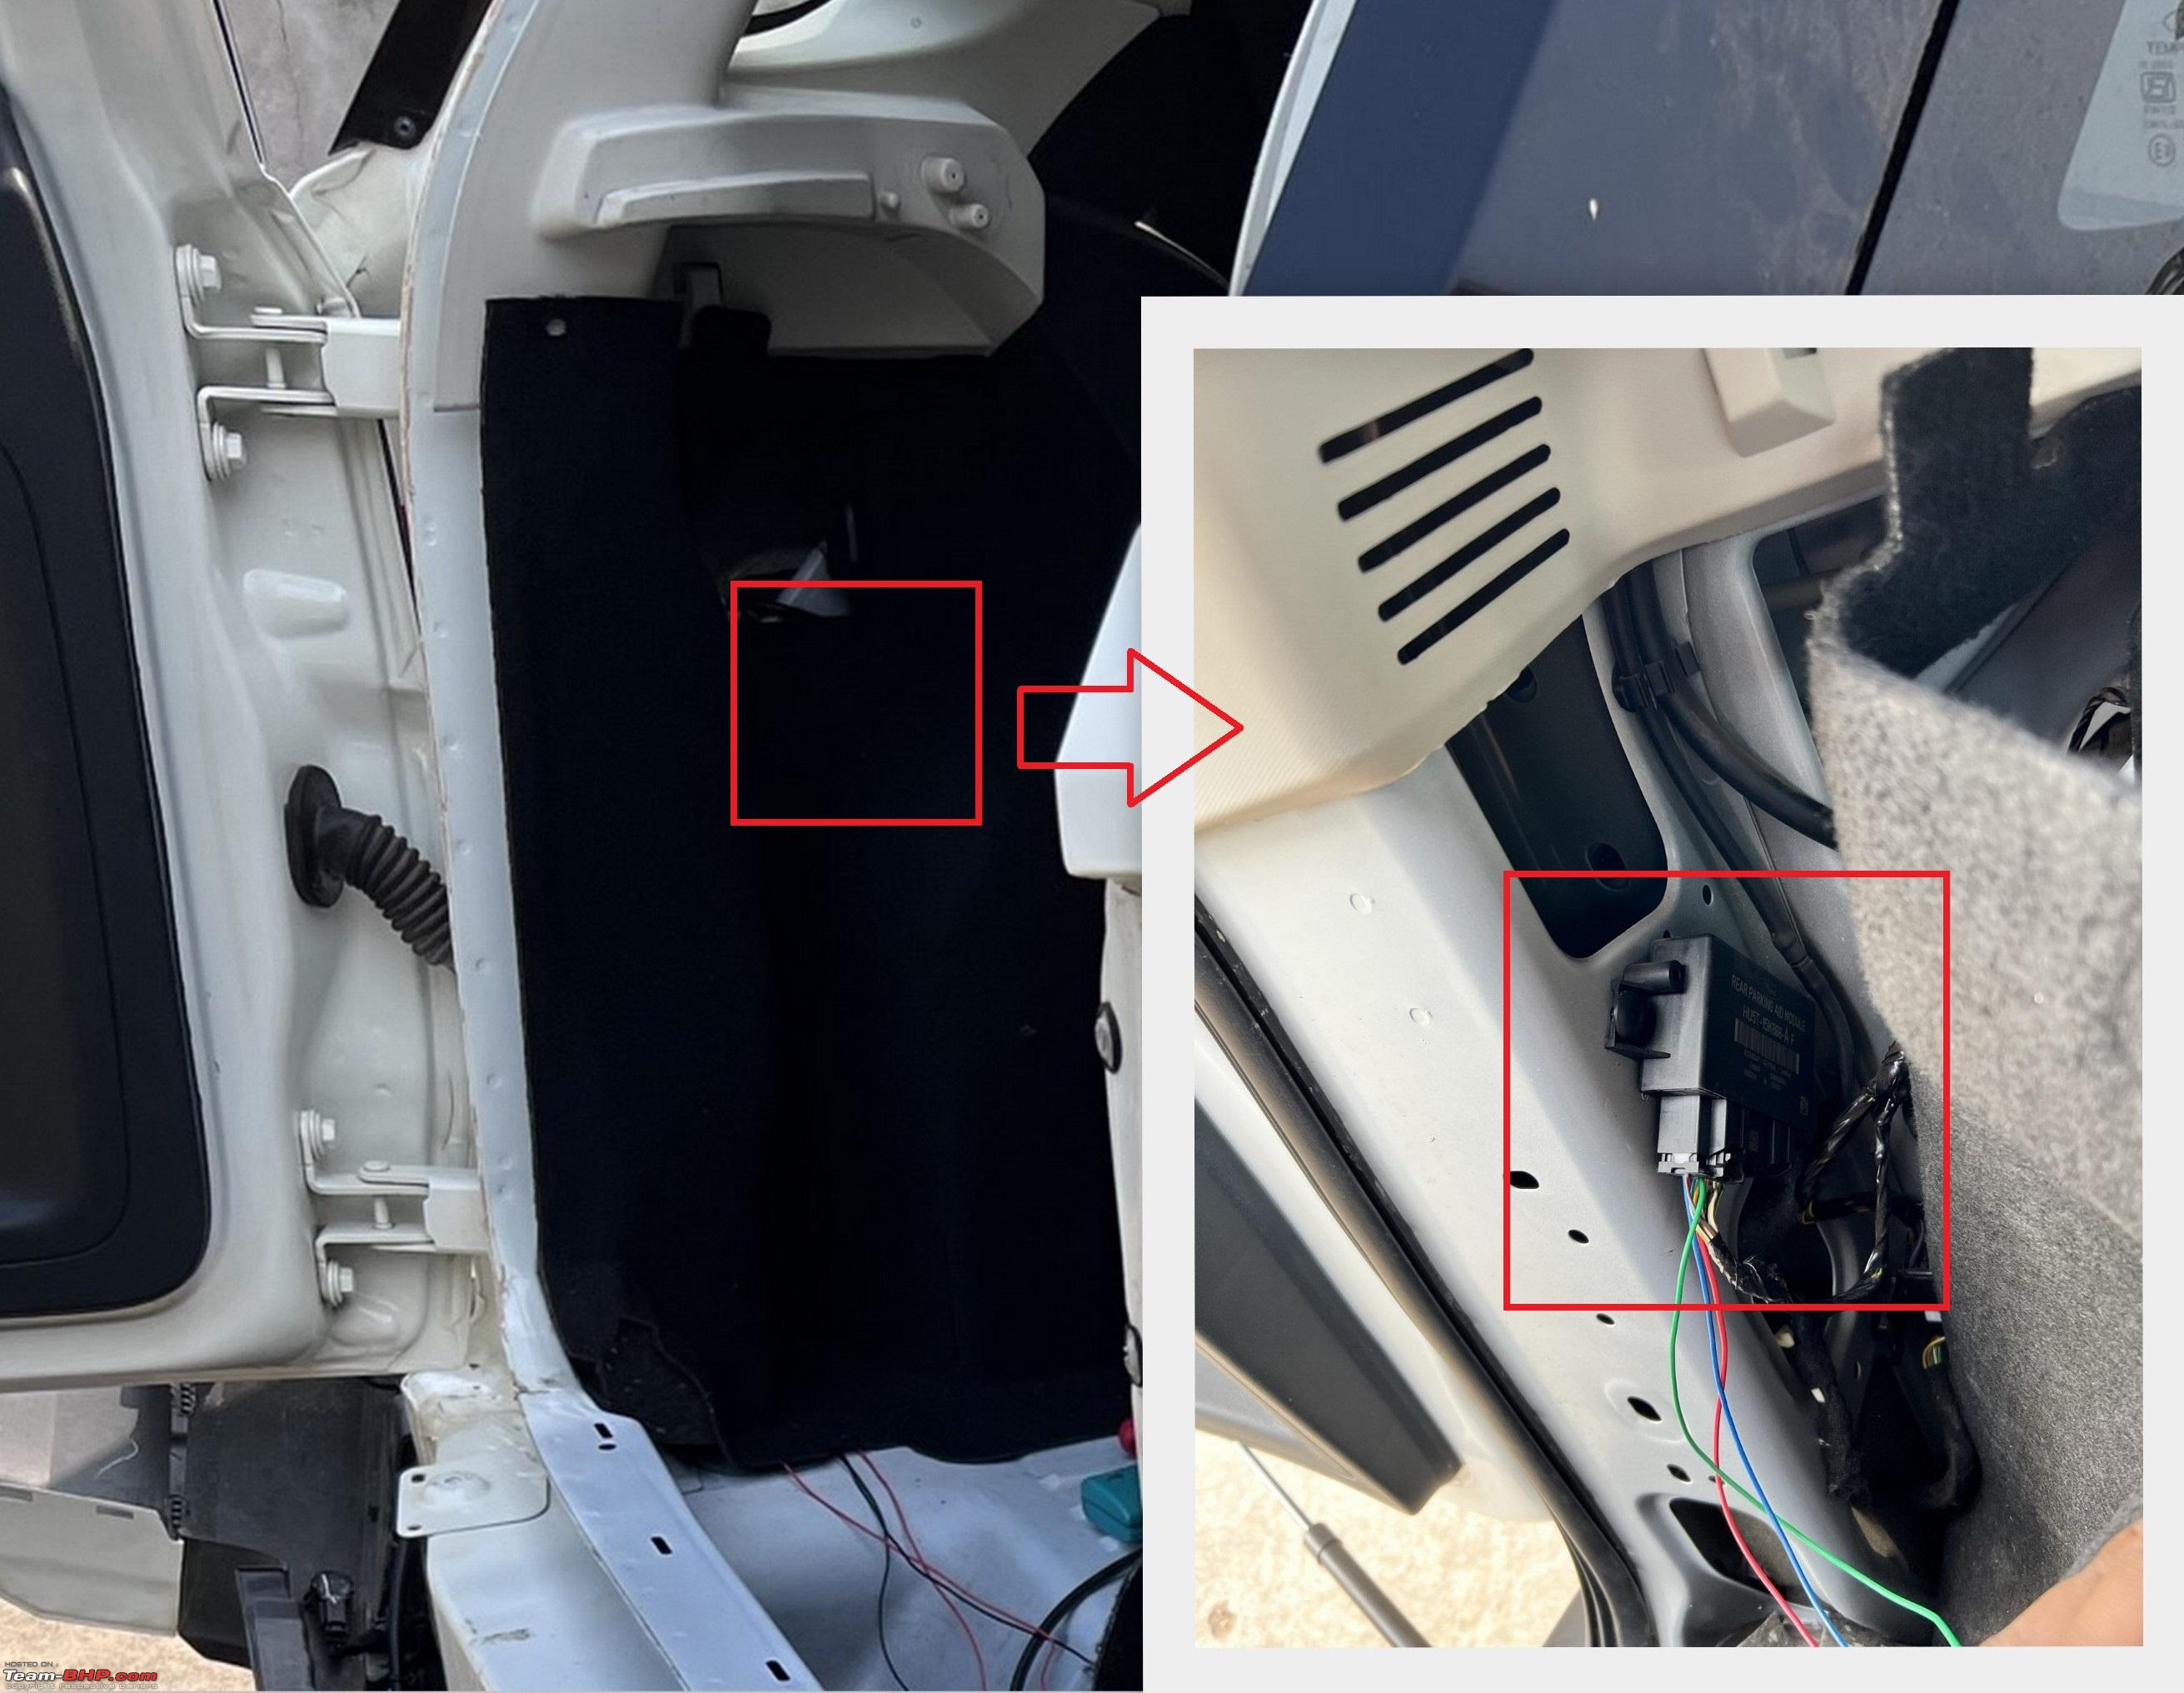 Rear PAM vs Active PAM  Bought an Active PAM for 40 pounds from Ebay UK. Part number: HU5T-15K866-CE. In CE, C indicates the hardware variant and E indicates the revision. You can buy any module with a different last letter as long as its preceded by HU5T-15K866-C, example HU5T-15K866-CH, HU5T-15K866-CG HU5T-15K866-CF etc. would be compatible with each other. Detailed Information on Ford parts number concept- https://forscan.org/forum/viewtopic.php?p=70008#p70008 2. Additional wiring a) Need to run a 4 meter 8-core cable from the boot to front bumper for the auto-parking sensor configuration (4 inner + 2 side park sensors). A 6-core cable is enough for the standard 4-sensor configuration. Each core must be 22 AWG or 24 AWG. Care must be taken that the cable is automotive grade or has enough shielding to protect against engine heat. I ran 8-core cable (bought locally at an electronics hardware store @ Rs. 150 per meter) through the rubber grommet near the driver door hinge similar to the power cable in the ICE install.3. Front-park sensors need a switch on the front console panel (under the HVAC). The switch can be used to Switch ON/OFF the front-park sensors as sometimes during stop-go traffic the constant Flank guard reminders may be irritating. S-variants get only Traction Control ON/OFF on this switch assembly. Lower variants I believe only get a blind. Got a switch for 15 euros on Ebay Germany. Part number GN15-13D734-GD.  The auto-start stop ON/OFF button is useless as we do not have that system in Indian Ford cars. Auto-park requires a button to engage auto-park. Wiring diagram indicates its a basic switch that shorts to the ground on pressing it which is same as the unused auto-start stop switch. So, I repurposed the auto-start stop switch to act as auto-park switch by plugging the required wiring to the switch pin. Auto-park switch on a Fiesta  4. Front parking sensors and harness/loom a) A 6-sensor harness (both front and rear can be re-used) taken off from an auto-park car is needed for 6 sensors. I got a good deal on front bumper wiring loom along with six sensors for 50 pounds on Ebay UK. Part no for the wiring harness/loom: H1BT-15K867-ABD5. Rear side-parking sensors (part no - FR3T-15K859-AAW) Required only for auto-park 2 pcs (10$)- https://www.aliexpress.com/item/4000469962690.html Park sensors plugs (10$) - https://www.aliexpress.com/item/4000231929261.html 6. Parking sensor brackets I wanted flush fitting of sensors like in VW cars. So got these and had to adapt them by making small cuts to fit the sensors. 4 pcs of side parking bracket (20 euros) - https://www.aliexpress.com/item/32971656879.html7. Male plug for connecting the 6/8 core cable to the sensor wiring loom https://www.aliexpress.com/item/4001365742178.html 8. JST pins and plug for central console - https://www.aliexpress.com/item/1005001441313487.html 9. Bi-directional ABS sensors on rear wheel hubs (required only for Auto-park) Part no H1BC-2C190-BD (bought at ford spares in Germany, 20 euros per sensor). Current rear ABS sensors are uni-directional. 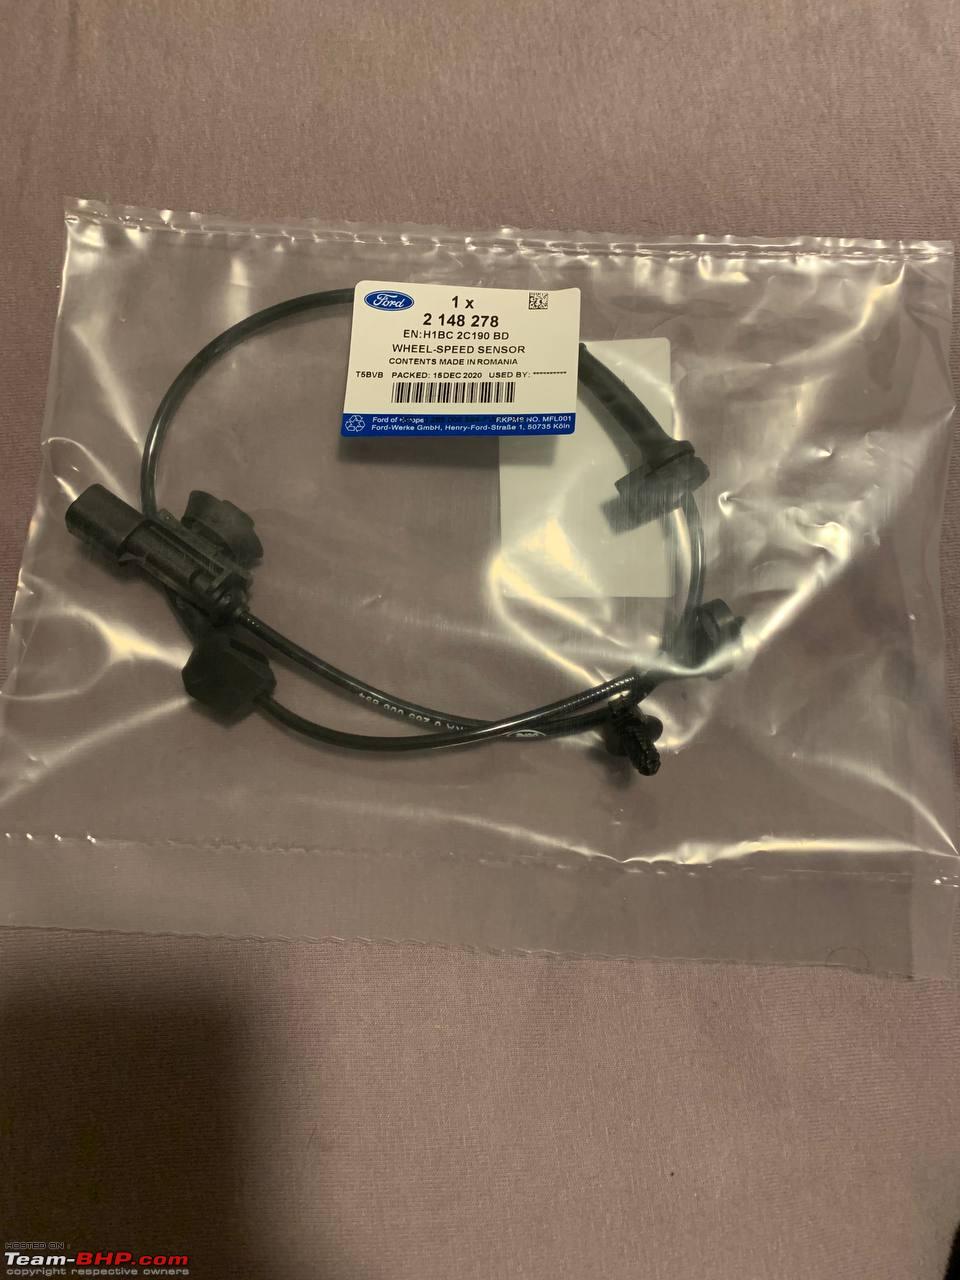 Installation and additional information: 1. The two rear side park sensors are same as the inner four sensors, made by Valeo and work at 29 dB. Front four inner sensors are also same as the rear six. But, the two front side park sensors are different and work at 31 dB (these units are coloured brown). 2. Existing rear parking wiring plugged into the PAM must be plugged into new PAM. 3 additional wires for the switch console and 2 additional wires (optional) for rear side parking sensors will have to be pinned into this plug. Front parking wiring will plug into the second plug. 3. Each parking sensor has 3 connections 1 Power, 2 Signal, 3 Ground. Power and Ground are common/shared by the sensors. For the rear side parking sensors, I wired the power and ground by splicing into the existing harness and carried the signal wire to the PAM. 4. Disassembled the front and rear bumpers, drilled holes of 19mm diameter using a cone drill at locations in the EU EcoSport, attached the sensor brackets using 3M industrial grade double sided tape (supplied with the brackets) on clean surfaces and made all the necessary wiring connections. 5. I configured the modules with UCDS and Forscan and tested 8-channel and 12-channel configurations with different firmwares and settings. Despite my best efforts, only 8 sensor configuration is working flawlessly (4 front + 4 rear) at the time I left the country. I will work on troubleshooting the 12-sensor configuration once I am back. Note: I have not tried auto-park as I did not fit in the required bi-directional ABS sensors due to time constraints. Wiring diagrams: https://drive.google.com/file/d/12Mk...ew?usp=sharing https://drive.google.com/file/d/1S4y...ew?usp=sharing Few installation pics: Changing the Switch assembly   Dad and brother disassembling the rear bumper 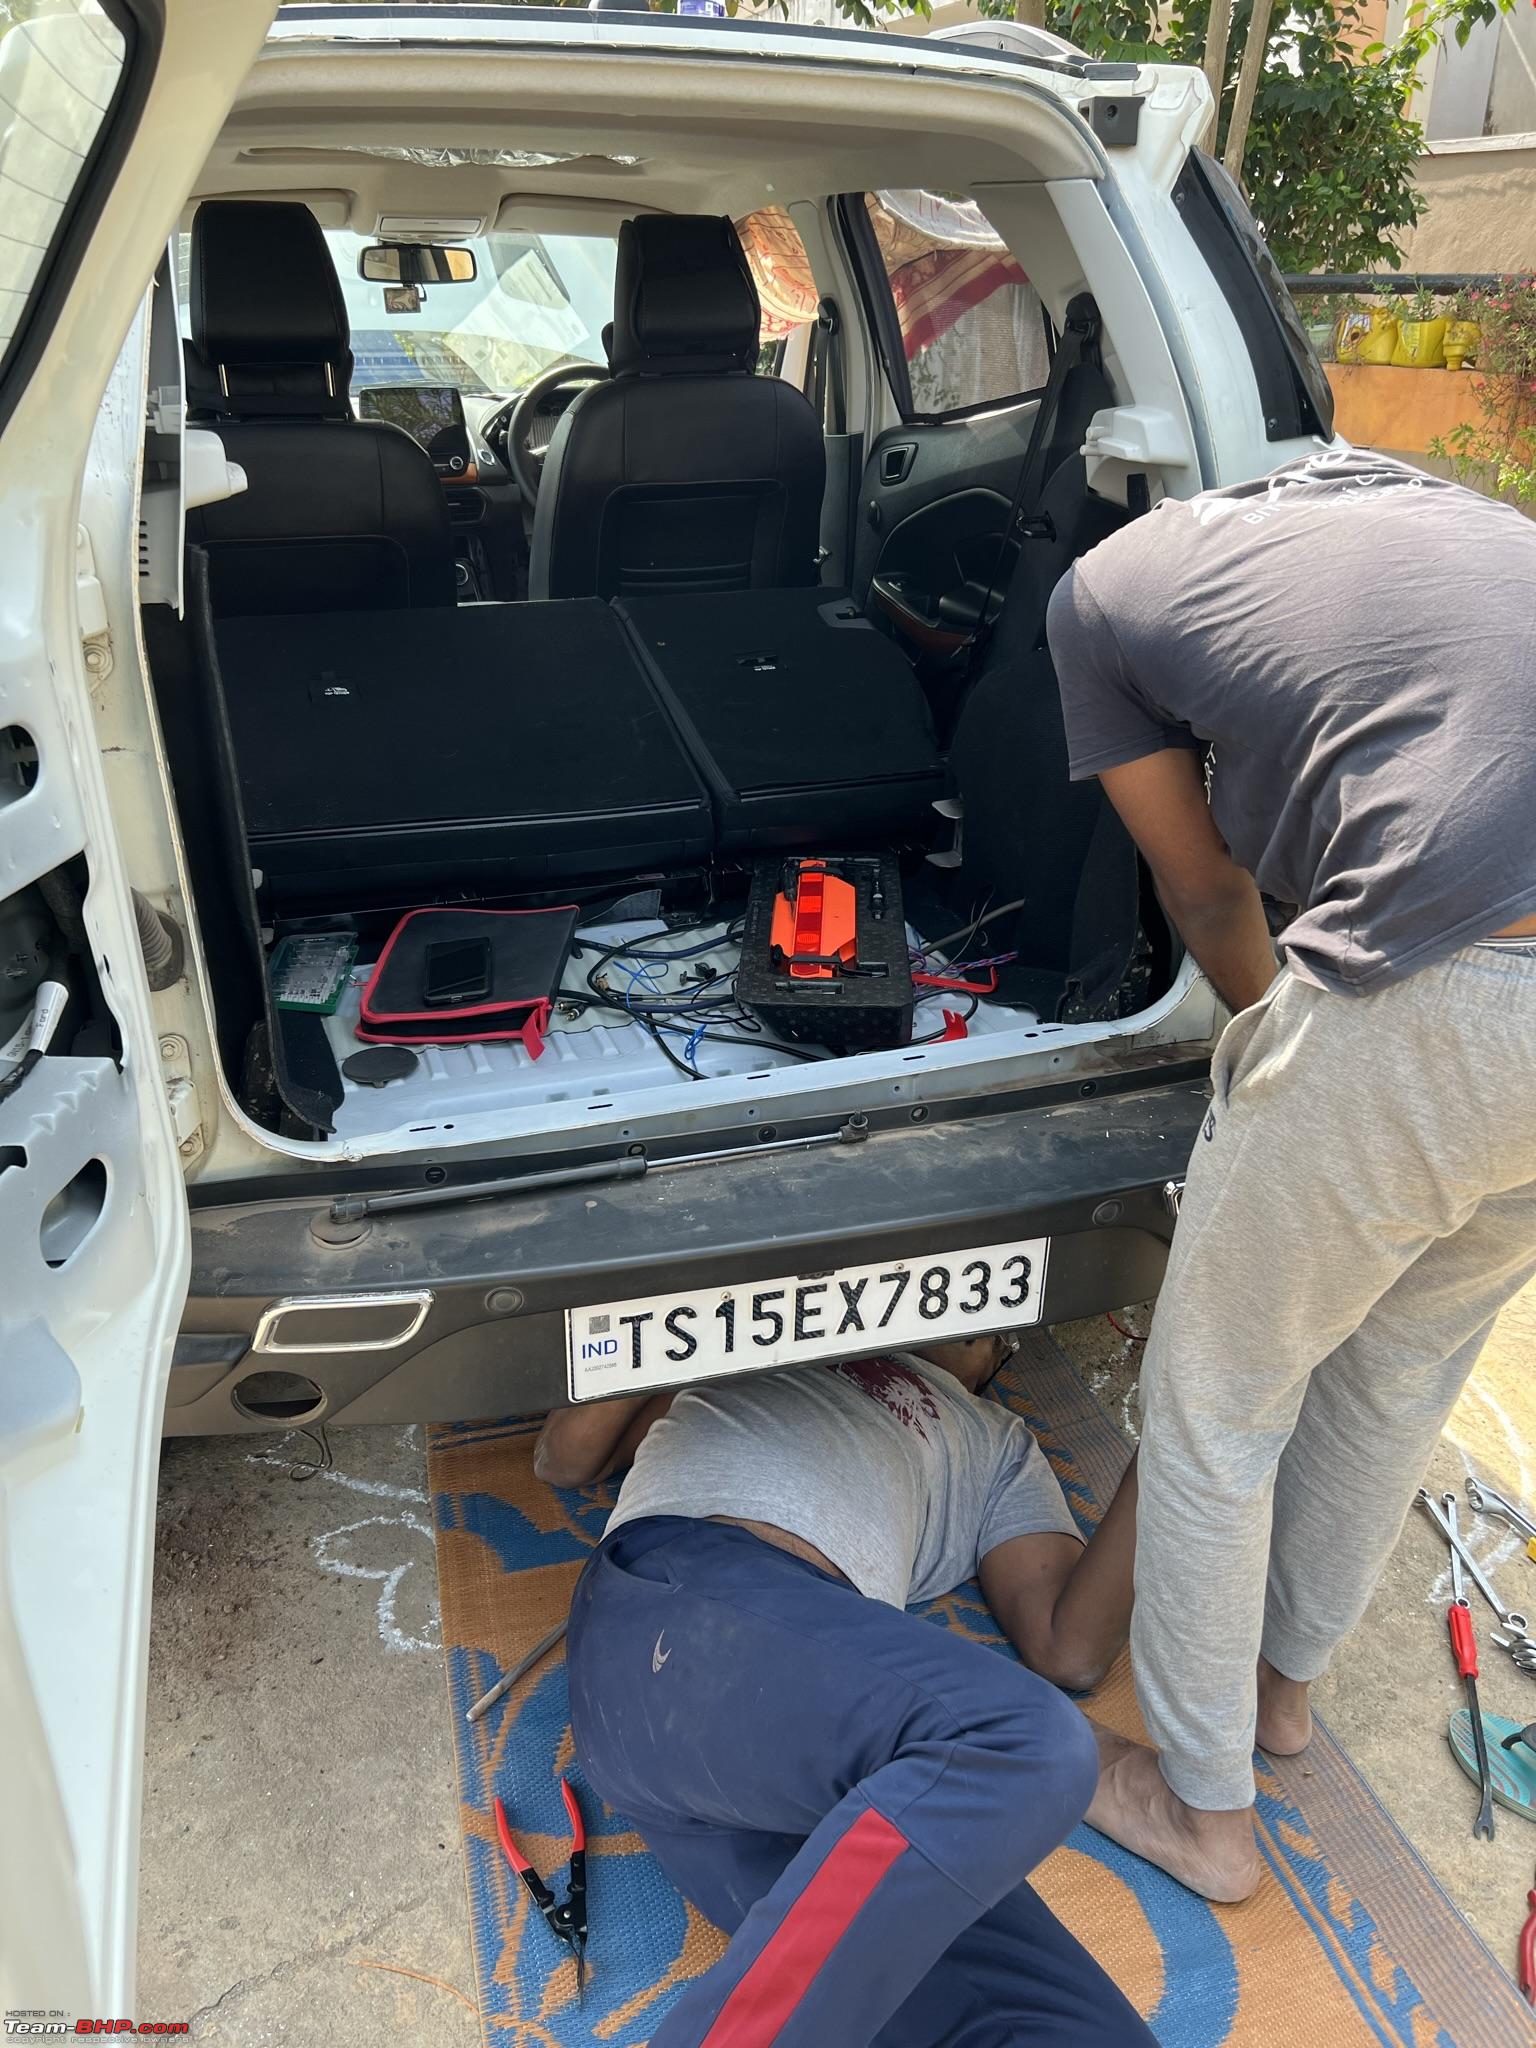 Dust build-up inner side of the rear bumper assembly 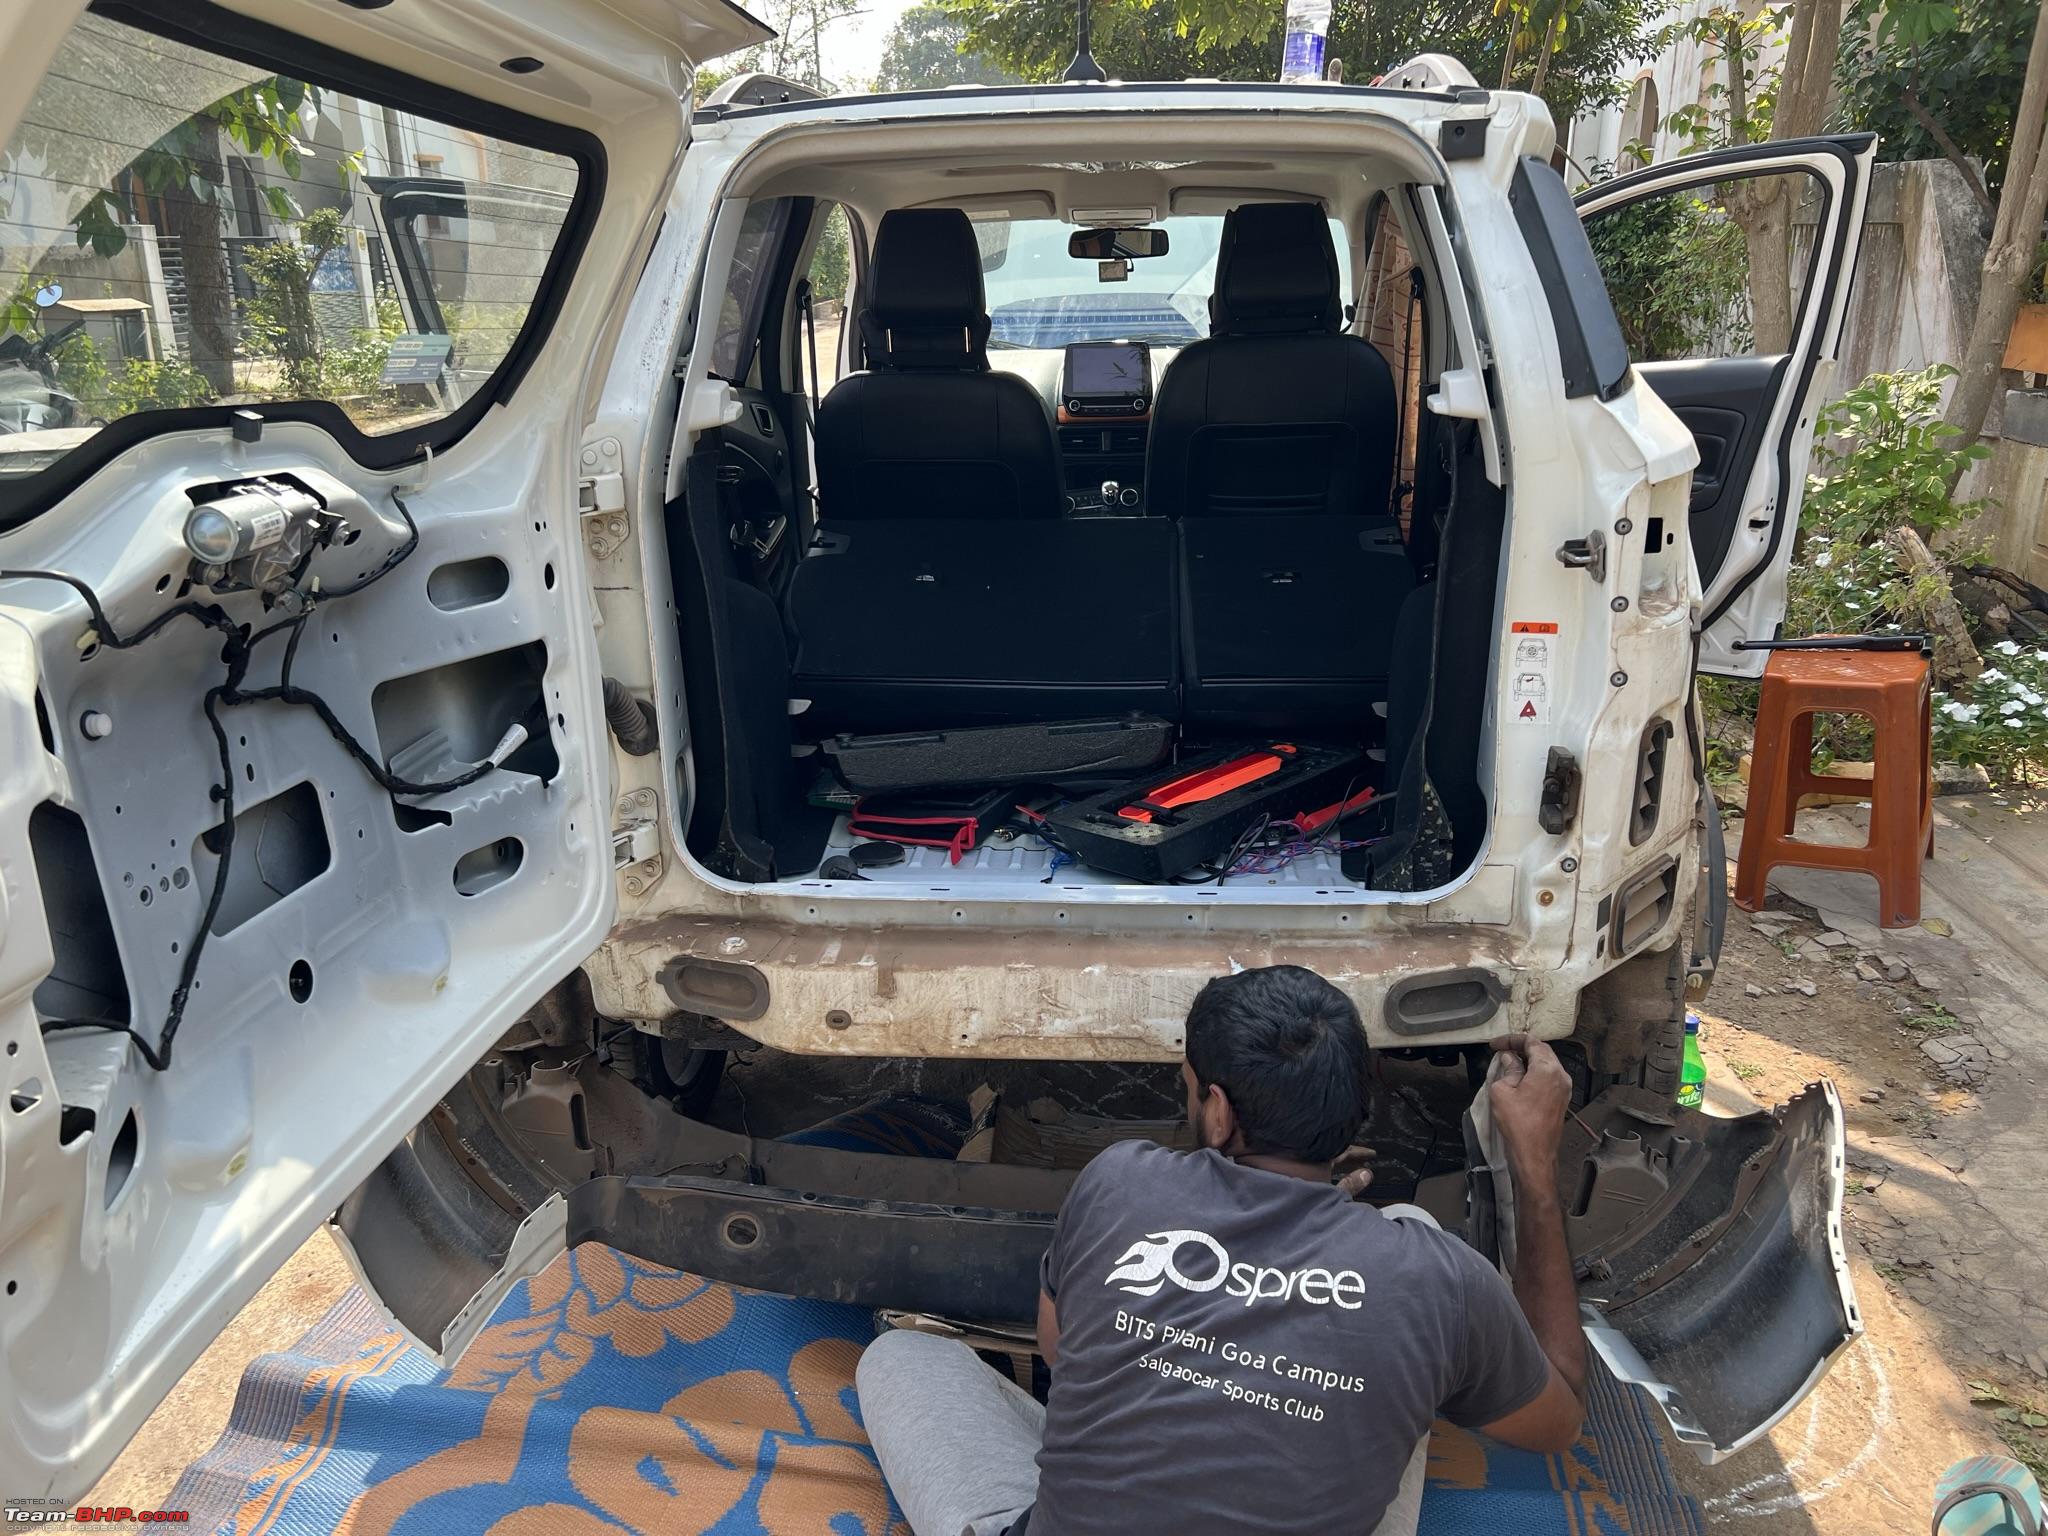 Rear side parking sensor hole 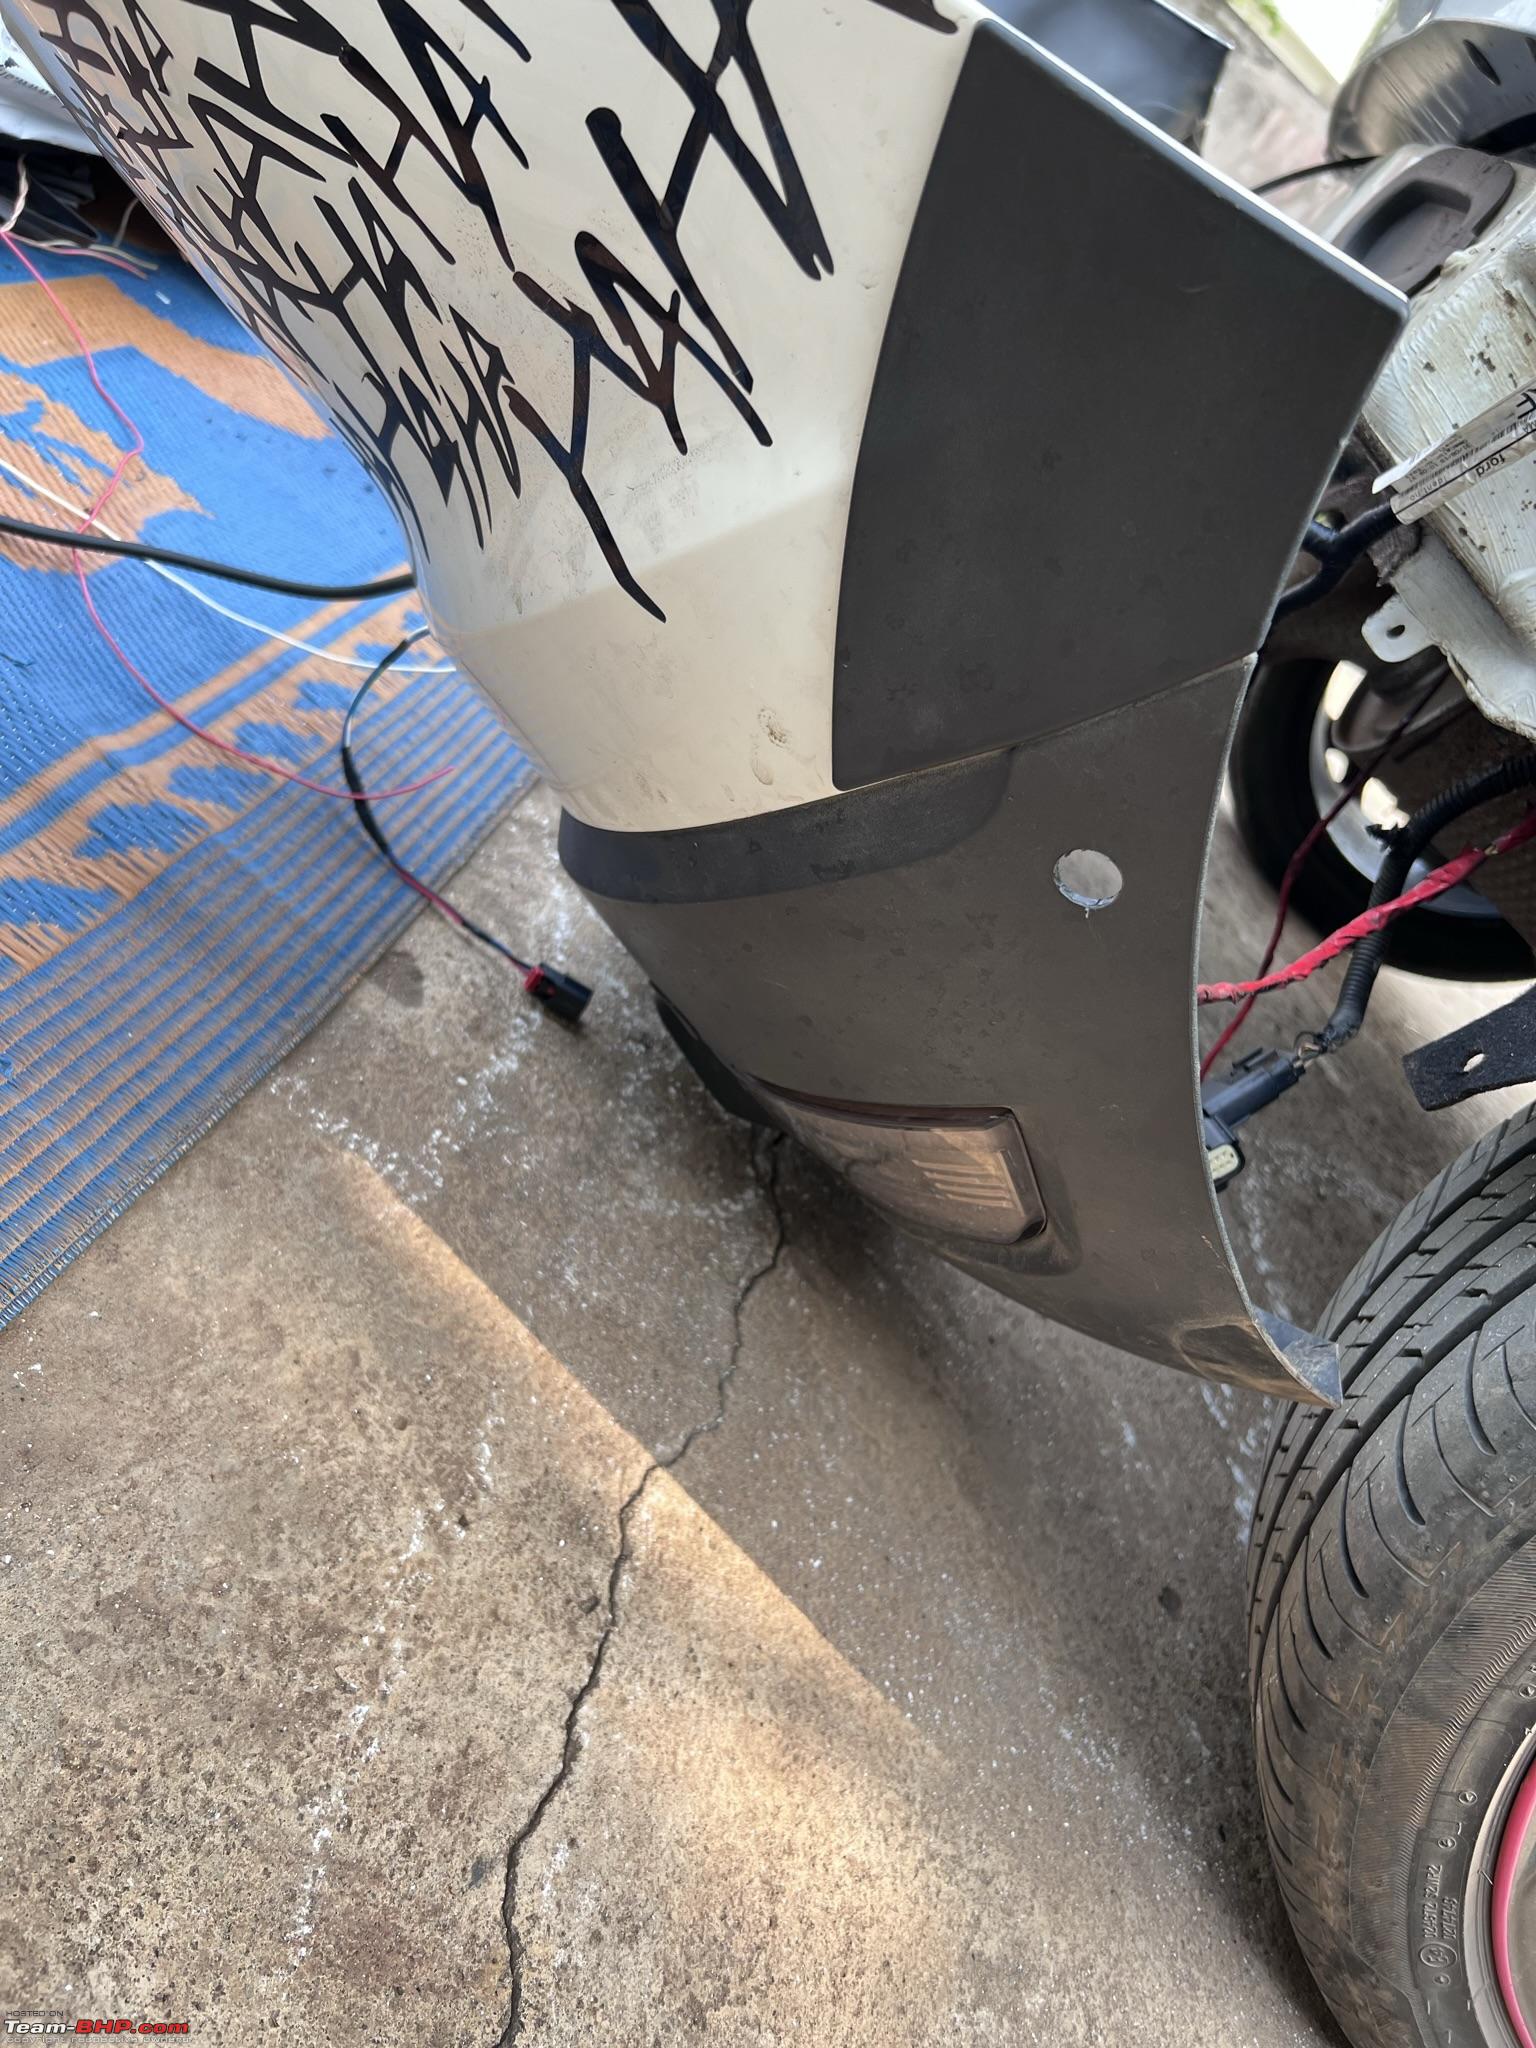 Front-parking 6-sensor harness 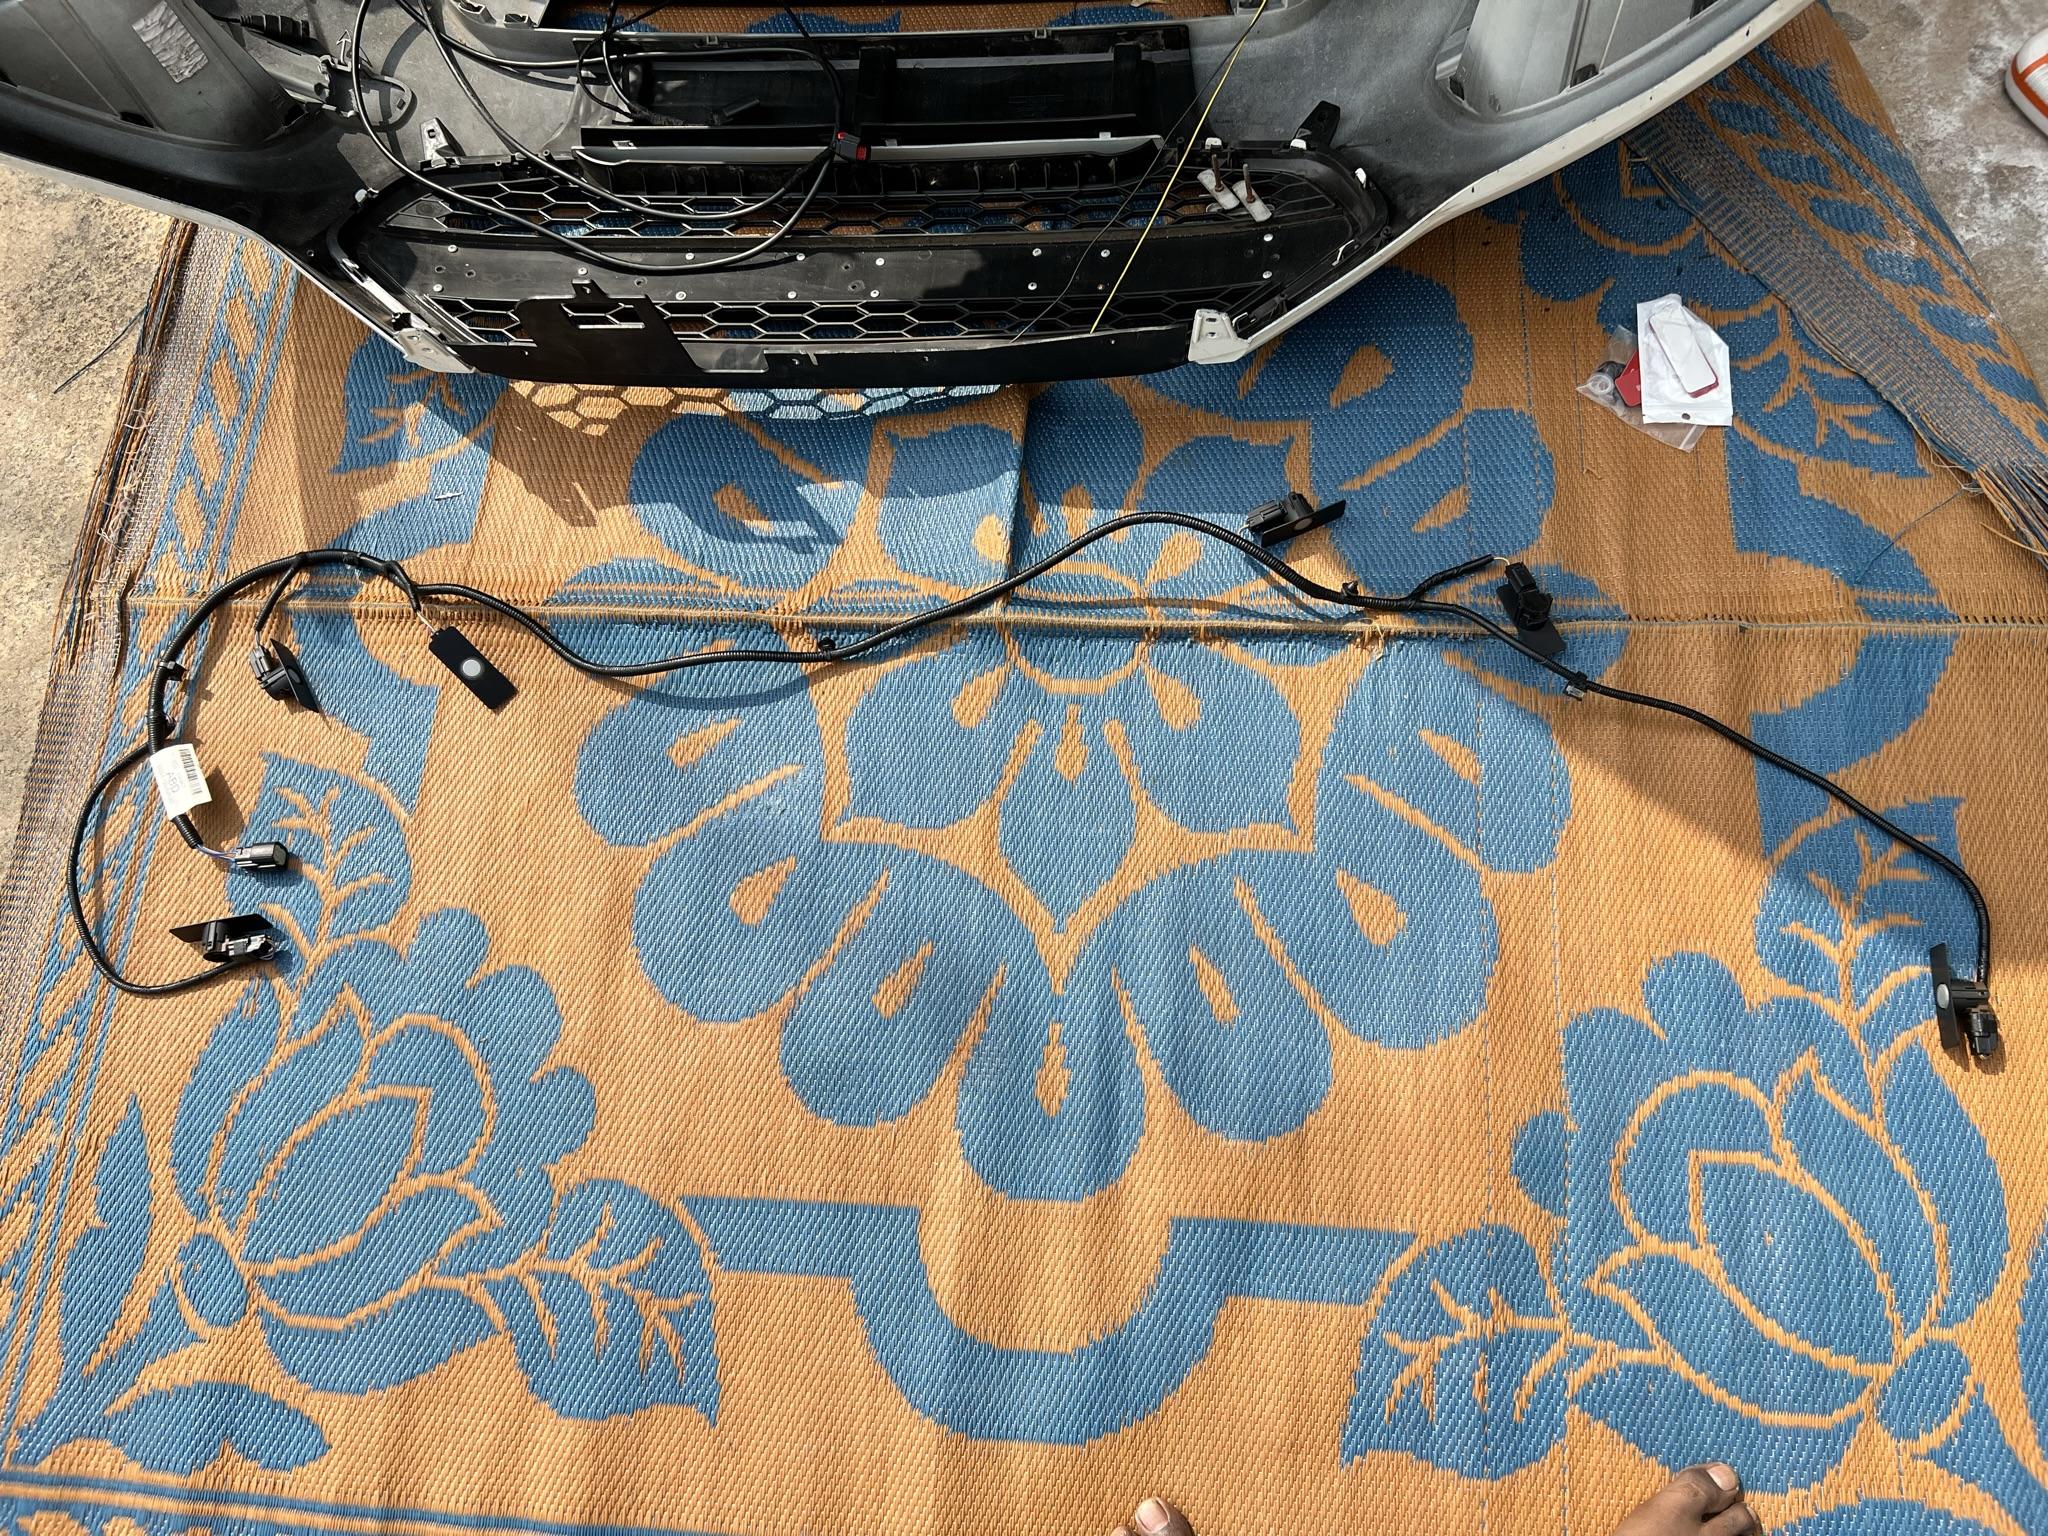 Front parking sensors installed  Final look of front bumper after installing parking sensors. I had to configure the Parking sensor configuration in the PAM, APIM, IPC and PCM modules. I will spray paint a thin layer of white and black as required on the sensors later. 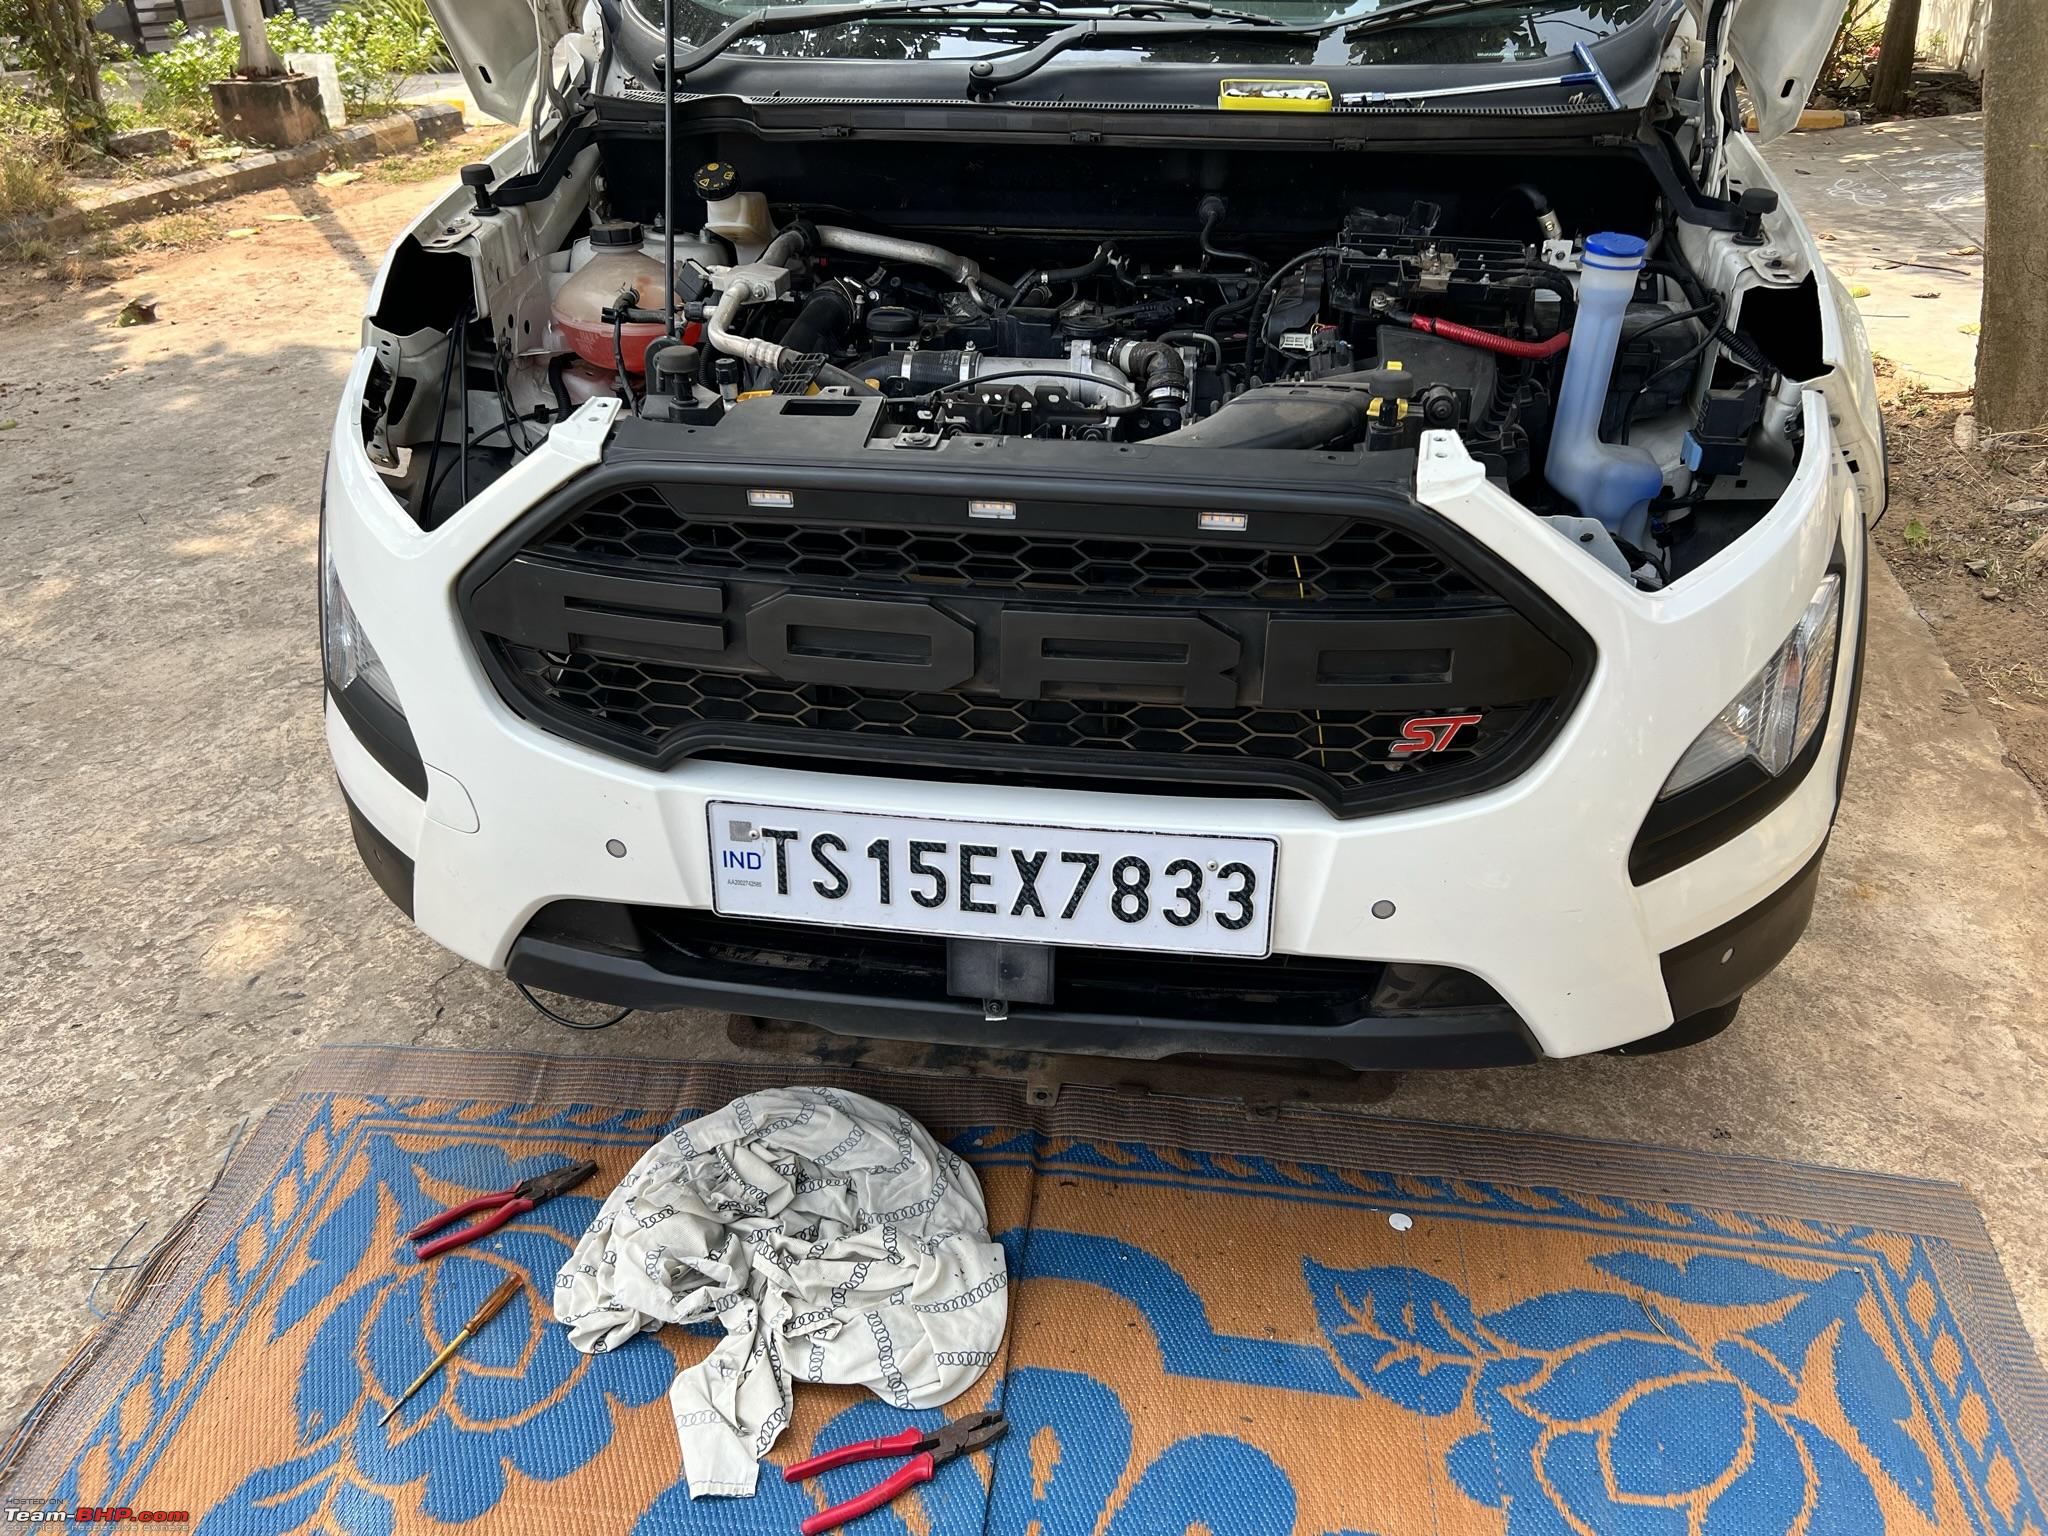  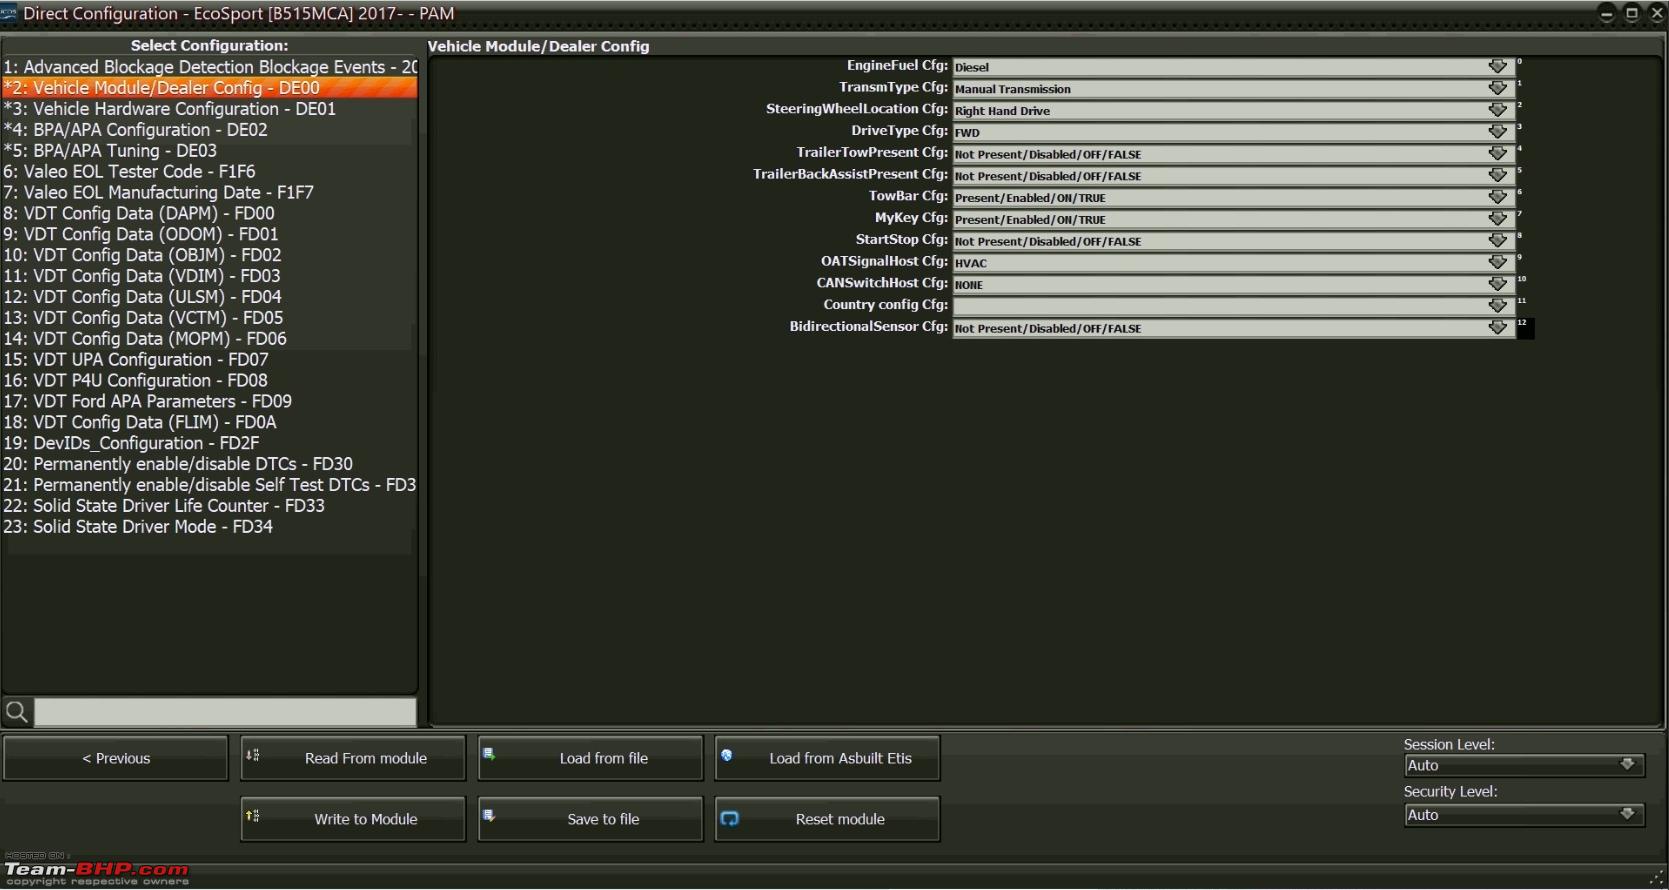  I could not take lot of pictures and videos during the front park sensors, BLIS installs as I was juggling other commitments and worked under a time crunch. I was able to complete the hardware install only two days before I left in Jan 2022. I had to configure them remotely via Anydesk. This journey has been an incredible learning experience for me and given a choice I would do it all over again. As a kid I always dreamed about working on my cars doing various mods and I cant believe that I am actually living my dream. This is just a start and there are more in the pipeline. I will be back sometime this year and have couple of mods in progress which I would like to complete. Future plans in the pipeline: 1. Complete ACC install I cant say for sure if it will work or not but I am fairly confident. I have the necessary parts from a Focus MK4 ( can also be taken from Fiesta mk8) a) ACC Radar for obstacle distance and velocity calculations b) IPMA camera (Image Processing Module A which does object recognition and classification based on AI training) c) IPMA mounting bracket d) Plastic trim panels that cover the bracket I have installed the wiring and mounted the radar in my car. You would have noticed it in the front park sensor install pics. IPMA camera and bracket install would have take a 3-4 days for removing the IVRM and existing bracket, sanding the existing frit primer, applying fresh primer, painting the bracket area on windshield glass and attaching the bracket and IVRM mount to the windshield with adhesive etc. I did not have enough time and hence could not complete this. ACC radar 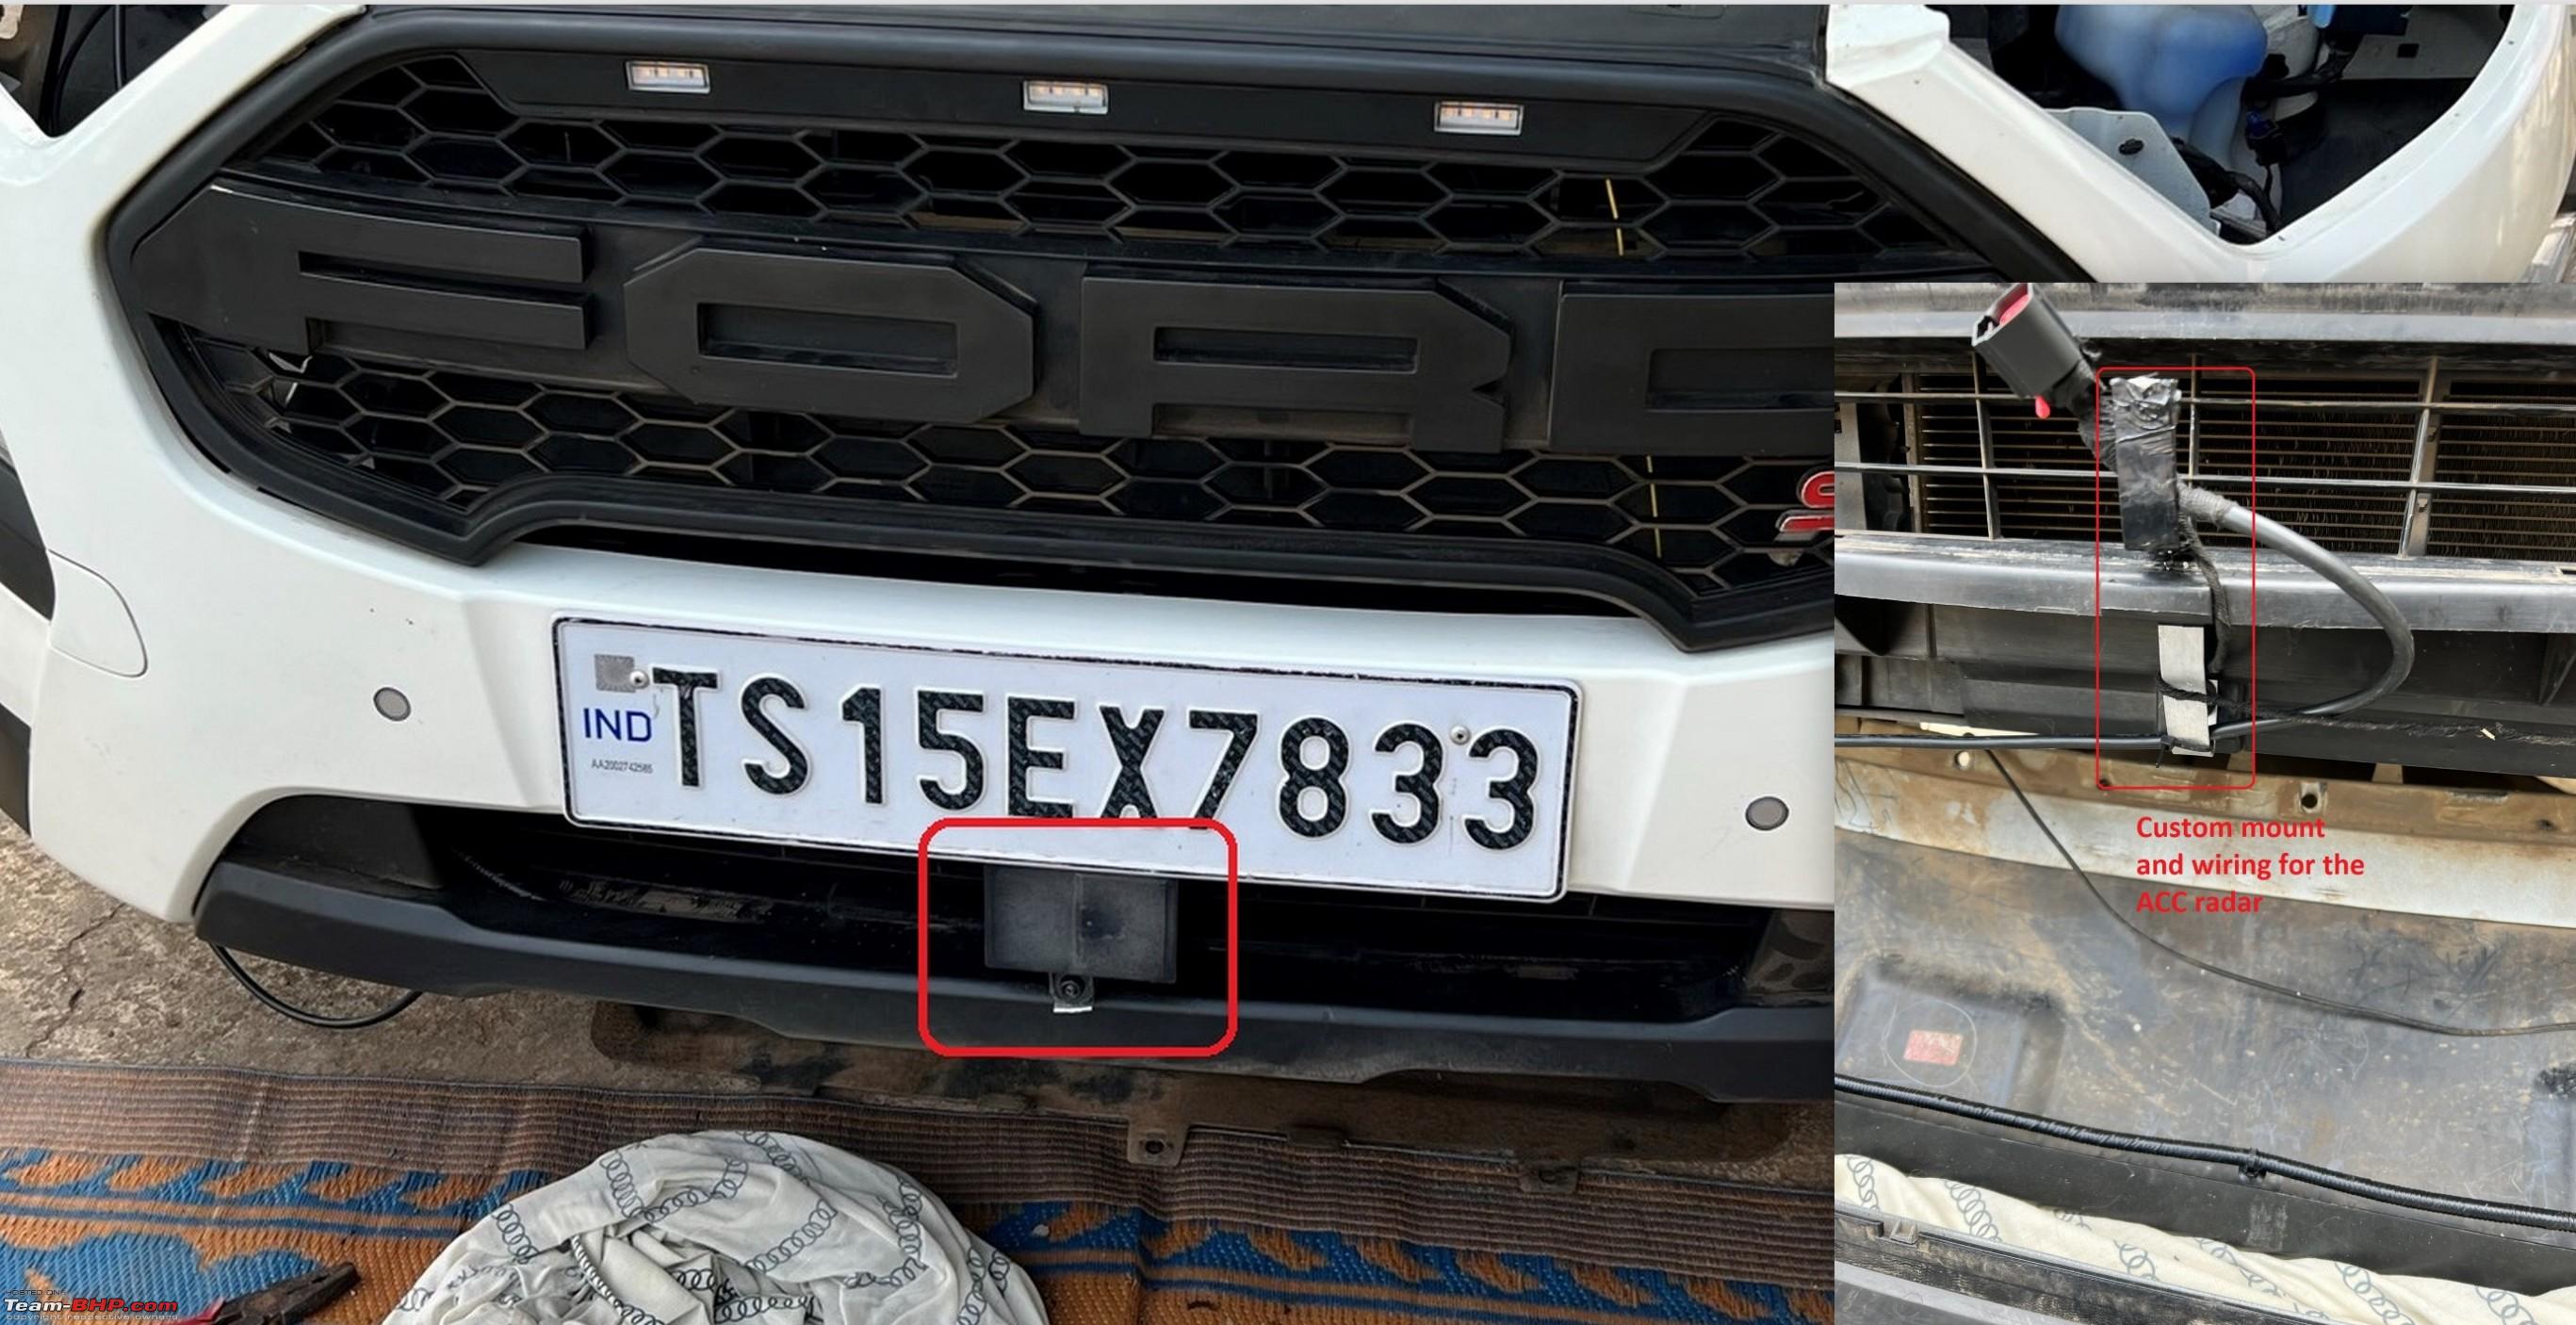 IPMA camera  Global EcoSport from 2020 also come with a Pre-Collision Assist, Traffic Sign Recognition features that are enabled by the IPMA camera. I hope to enable TSR, LKA, lDW and after intensive testing PCA once I fix the IPMA. 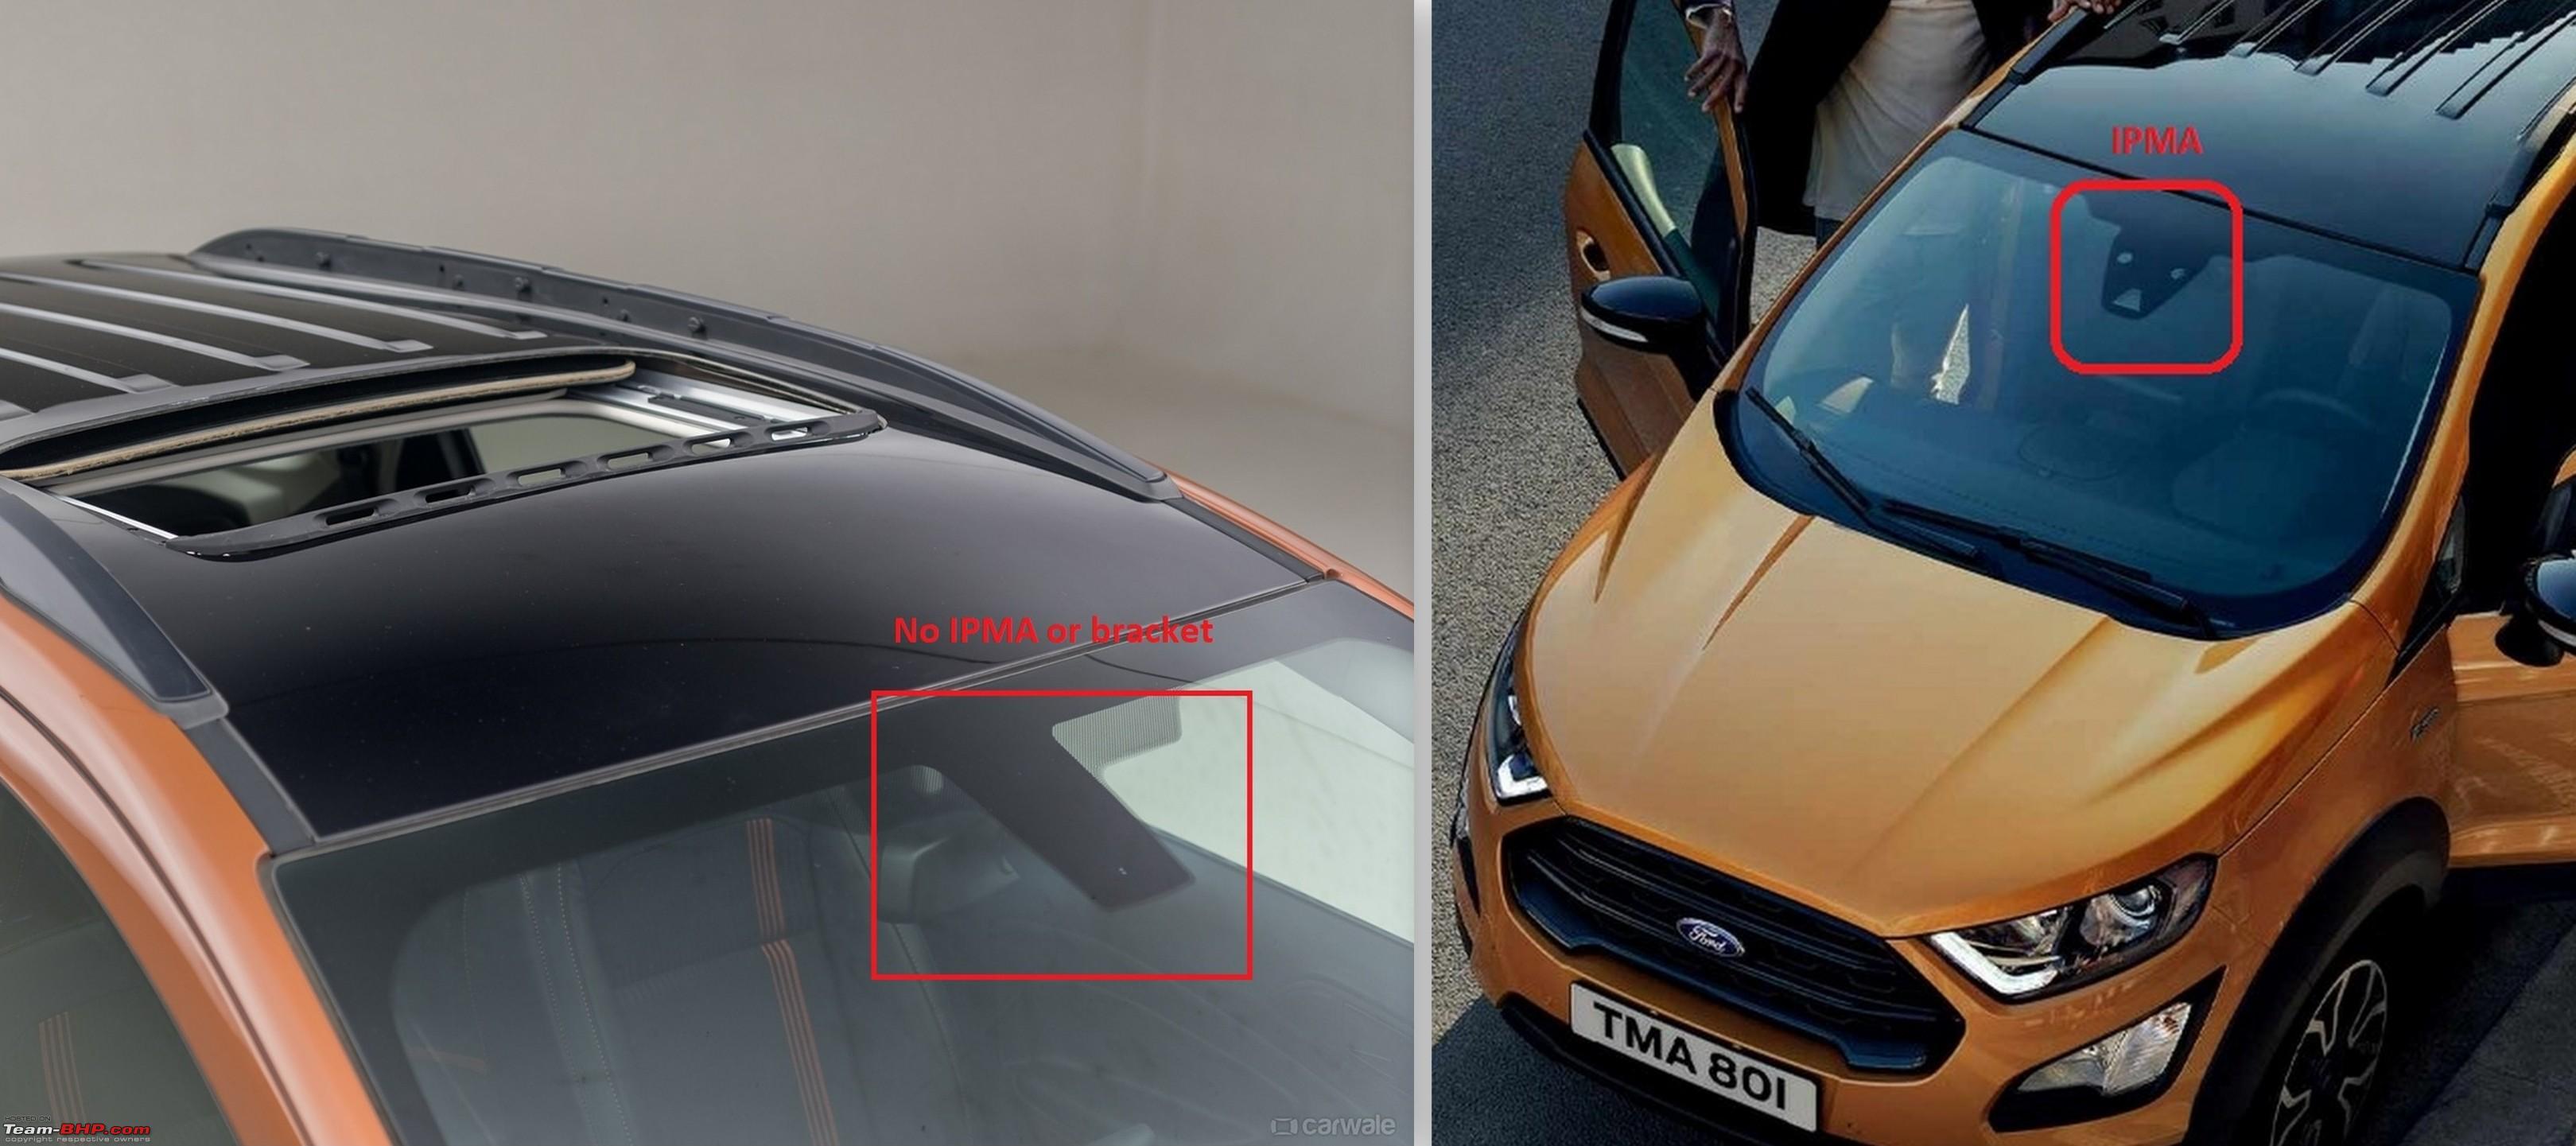 2. Install the Bi-directional ABS sensors and try to activate auto-park. If not, try to get a 360-degree flank guard view by activating the side parking sensors. 3. Rear disc brakes from US EcoSport with custom disc caliper mounts. I bought the calipers, discs, brake lines and parking brake cable this week. I need to fabricate custom mounts once I am back with the car.  4. Get the car remapped during my next visit to Hyderabad or Bangalore. 5. I got a second set of headlamps from a scrap dealer in Delhi. I was working on a custom headlamp set before I left. I replaced the stock low beam projector with a Bi-LED + Laser projectors (https://www.aliexpress.com/item/1005001889968976.html) and Spot-pattern LED projectors (https://www.aliexpress.com/item/1005002120605904.html) in the high beam reflectors. Both have red demon eyes. I have tested the set-up at home at night and they atleast 3 times as bright and throw is focused & far longer than current D5S Xenon+LED high beam setup. With the right alignment they should work well with lesser discomfort to oncoming traffic, and I dont intend to use high-beam unless absolutely required.  6. I am trying to figure out a way to replace the FGT on my car with a VGT. Focus mk3 with the same 1.5 TDCi engine had a VGT generating 120 PS. This was one of the primary reasons I have postponed remapping the car so far. Bigger FGT is a much easier option, but I want to keep the low end grunt and this seems like a fun exercise. My dream is to eventually turn it into a project car with the Haldex AWD offered in EU & USA, a MMT6 transmission and the 2.0 TDCi from a Kuga or Edge. Bonkers right  ! ! I made a list of things I will need. Need suggestions on best way to import used sub-frames, axles, engine etc. If someone can share their first-hand experiences on cargo shipping of car parts it will be helpful. Last edited by nightraven : 28th February 2022 at 18:42. |
|
| (99)
Thanks
|
| The following 99 BHPians Thank nightraven for this useful post: | ADI7YAK, AdityaDeane, adwaith, aeroamit, akhilesh, AlQuazi, ampere, anivy, AROO7, ArTigor, asbshyam, ashpalio, AYP, A_Abhiraam, blackwasp, brownkaiser, CarManMotorcycl, catchjyoti, CEF_Beasts, Col Mehta, dailydriver, dean5545, devilwearsprada, DicKy, digitalnirvana, fiat_tarun, fluidicjoy, GaryTSI, Gaur, giri1.8, govigov, GTO, Gurkeerat Singh, gururajrv, Harjot37, HSR21, HTC, Hulkbuster, InControl, jagzrk, jithin23, JReacher13, JustStarted, lemedico, Leoshashi, Lexcorp, mazda4life, MelvinPhilip, mp417, myavu, na_agrawal, neelkumar, NG_EV, nimishlalwani, nkdev89, PaddleShifter, PearlJam, ph03n!x, Pigcee, Prakritij, PraNeel, psispace, raiuday, Rajeevraj, Rambo-RS, ramnaresh_2000, Researcher, rkv_2401, rnkgrg, romil.shroff, ron82x3, Sahilrai166, saikarthik, saikishor, sainyamk95, sai_ace, Samfromindia, sarfraz1997, Shreyans_Jain, Shreyas Aterkar, skb1811, somspaple, spindoc, srikanthmadhava, SS4, StrikerK, swiftnfurious, Tanmay007, tchsvy, TechSavvy, The Rationalist, tp_dominator, vatsalsoni, vhharan1, VijayAnand1, Viraj.515, vredesbyrd, ysjoy, Yuvuz |
|
1st March 2022, 06:22
| #8 |
| Team-BHP Support  | Re: DIY: Juicing up the Ford EcoSport S with ICE, Front Park, ST line cluster, Steering wheel and AD Thread moved out from the Assembly Line. Thanks for sharing! |
|
| (4)
Thanks
|
| The following 4 BHPians Thank Aditya for this useful post: | digitalnirvana, GTO, nightraven, Researcher |
|
1st March 2022, 09:16
| #9 |
| BANNED Join Date: Jun 2021 Location: Banglore
Posts: 188
Thanked: 304 Times
| Re: DIY: Juicing up the Ford EcoSport S with ICE, Front Park, ST-line cluster, steering wheel and AD Oh my God, Your Ecosport is one of a kind I never thought this would be even possible, hats off to your dedication and research. Is installing seat covers going to make problems for the airbags in the seat? |
|
| (5)
Thanks
|
| The following 5 BHPians Thank Piyush Kanthak for this useful post: | A_Abhiraam, devilwearsprada, digitalnirvana, nightraven, ramnaresh_2000 |
|
1st March 2022, 09:32
| #10 |
| BHPian Join Date: Dec 2020 Location: TS07
Posts: 531
Thanked: 2,609 Times
| Re: DIY: Juicing up the Ford EcoSport S with ICE, Front Park, ST-line cluster, steering wheel and AD Damn, the amount of time and money spent into this vehicle  . Kudos to your effort and passion towards your vehicle. . Kudos to your effort and passion towards your vehicle.Those neon lights reminded me of cars from NFSMW. Also, TS15, I think we stay in the same locality. Would love to catch up if possible .After VAG cars, Ford cars come next in terms of aftermarket customisation. I feel sad for Ford stopping production of such beautiful cars in India. I guess India deserves cars like underpowered Baleno 1.2( remember export variants get the more powerful 1.5) and 3 cylinder NA Altroz. People will buy these happily instead of cars like Figo, Venti etc. Last edited by saikishor : 1st March 2022 at 09:37. |

| (1)
Thanks
|
| The following BHPian Thanks saikishor for this useful post: | ramnaresh_2000 |
|
1st March 2022, 09:41
| #11 |
| BHPian | Re: DIY: Juicing up the Ford EcoSport S with ICE, Front Park, ST-line cluster, steering wheel and AD Wow fantastic upgrades on the Ecosport. Here I am contemplating to change my cars headlights to LED or not, and I see people installing adaptive cruise control. I should say after reading through all the modifications I did feel a little bit uncomfortable. Maybe I was overwhelmed or maybe my OCD kicked in, not sure. The picture with all doors open and in black and white looks meanest. Shame that Ford left India (can't stop complaining about this, sorry). Off topic - Do you know any installers in Hyderabad who can install auto dimming IRVM in Compass? It would be a life saver addition to my car. |
|
| (2)
Thanks
|
| The following 2 BHPians Thank ramnaresh_2000 for this useful post: | nightraven, Piyush Kanthak |
| |
|
1st March 2022, 09:53
| #12 |
| Newbie Join Date: May 2020 Location: Hosur
Posts: 13
Thanked: 271 Times
| Re: DIY: Juicing up the Ford EcoSport S with ICE, Front Park, ST-line cluster, steering wheel and AD I really admire your work @nightraven Satya. I would say this is one of the best DIY in Team bhp. Very well explained and detailed information. I always wanted to try FRDS and now you have found the way to do it. Your post is really motivating and tempting me to start my DIY again. And of course, I really miss driving in autobahn. I drove Ford Galaxy and pushed it beyond 200kmph that was the amazing experience I ever had and got a ticket too  . .  And I agree on driving different cars in different countries will give you amazing and Exciting ideas for DIY. Keep up the great work and I love your confidence. Thank you so much for the wonderful post. |
|
| (7)
Thanks
|
| The following 7 BHPians Thank nkdev89 for this useful post: | AYP, digitalnirvana, InControl, jithin23, nightraven, ron82x3, VijayAnand1 |
|
1st March 2022, 10:01
| #13 |
| BHPian Join Date: Feb 2021 Location: BENGALURU
Posts: 45
Thanked: 220 Times
| Re: DIY: Juicing up the Ford EcoSport S with ICE, Front Park, ST-line cluster, steering wheel and AD Ford left India because of this guy. Someone stop him before he buys a VW/SKODA. |
|
| (45)
Thanks
|
| The following 45 BHPians Thank Karthik.thm for this useful post: | ADI7YAK, AlQuazi, ampere, AnkitAnimesh, Arreyosambha, Ashtoncastelino, Carmine_pepper, CoolFire, digitalnirvana, Doonite, drhoneycake, fluidicjoy, GaryTSI, GTO, Harjot37, headbanger, IamYogi, InControl, Jhinchak, jithin23, Kams_cars, karthikg87, krishnaprasadgg, na_agrawal, neel@makrand, NG_EV, nightraven, Night_Fury, Nikhil Beke, Piyush Kanthak, poised2drive, ramnaresh_2000, rnkgrg, RoboCop13, saitvsk23, sayyam.gaur58, shahadav, skb1811, The Rationalist, The_Outsider!, VijayAnand1, Vijin, Viju, vivekshiva, ysjoy |
|
1st March 2022, 11:15
| #14 |
| BHPian | Re: DIY: Juicing up the Ford EcoSport S with ICE, Front Park, ST-line cluster, steering wheel and AD Insane Updates Satya! and these mods as a DIY requires a lot of patience and dedication. You've pushed the limits for the EcoSport and yeah, Ford India never could realize the potential of its cars. FDRS opens up a ton of options for us to customize the car even further. I tried with FDRS used by FASS but there is no option to tweak any feature through the FDRS by FASS. Thanks for showing this up too. Can OBDLinkEX be used for FDRS as well? Congratulations with the mods and keep em coming. Hands down the best DIY I've ever come across! You're thread is tempting me to go all out with my EcoSport as well. Last edited by jithin23 : 1st March 2022 at 11:29. Reason: Added content |
|
| (3)
Thanks
|
| The following 3 BHPians Thank jithin23 for this useful post: | Ashtoncastelino, fluidicjoy, ramnaresh_2000 |
|