Team-BHP > Technical Stuff > DIY - Do it yourself
Register New Topics New Posts Top Thanked Team-BHP FAQ


Reply
  Search this Thread
156,771 views
Old 12th November 2020, 10:33   #256
Newbie
 
happy.camper's Avatar
 
Join Date: Sep 2020
Location: Coorg | Mysore
Posts: 17
Thanked: 78 Times
Re: DIY : Debadging your ride

Sharing a pic of my Debadged Freestyle.

DIY : Debadging your ride-freestyle-debadged-team-bhp.jpg
happy.camper is offline   (4) Thanks
Old 9th February 2021, 19:55   #257
BANNED
 
Join Date: Mar 2011
Location: hump city
Posts: 1,293
Thanked: 5,861 Times
Infractions: 0/1 (7)
Re: DIY : Debadging your ride

Tjet. Now a sleeper.
Attached Thumbnails
DIY : Debadging your ride-screenshot_20210209153828_photo-editor.jpg  

venkyhere is offline   (1) Thanks
Old 17th February 2021, 14:38   #258
BANNED
 
Join Date: Sep 2018
Location: Cochin
Posts: 1,062
Thanked: 2,062 Times
Re: DIY : Debadging your ride

De-badged my new ride, Skoda Rapid TSI MT Monte Carlo. As the car is one month old, it was very easy to remove the badges. Each letter is seperate, removed each one using a thread and washed with water. No residues remained after removing the badges.

DIY : Debadging your ride-img_20210217_140034__01.jpg

DIY : Debadging your ride-img_20210217_140010__01.jpg

Note: ignore the scratches on number plate, it is a gift from a cow.

Last edited by pavi : 17th February 2021 at 14:43.
pavi is offline   (4) Thanks
Old 21st March 2021, 17:31   #259
BHPian
 
Turbojc's Avatar
 
Join Date: Feb 2006
Location: Chennai
Posts: 425
Thanked: 1,481 Times
Re: DIY : Debadging your ride

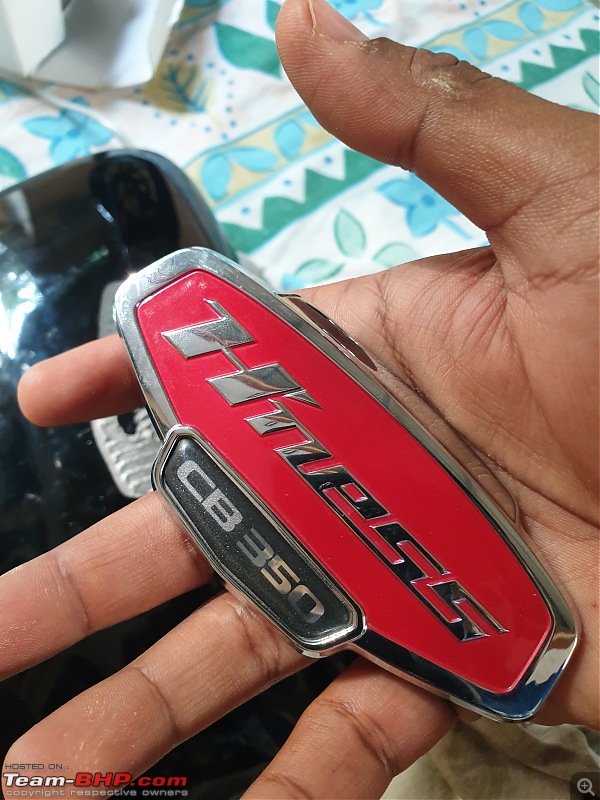
Hi everyone! I I recently debadged my Honda Highness CB350. Here's how I did it:

Materials/tools used:
Hair dryer
Dental floss
Microfiber cloth and cotton rags
Allen key to remove RH side panel
Time and patience

The process was pretty straightforward - I removed the side panels, applied heat on the inside, and worked my way through the adhesive underneath the badge with the dental floss. However, given that it's a relatively large emblem, there's a lot of adhesive to work with, and that takes a considerable amount of time.

It is easier to work with the side panels off the bike:
DIY : Debadging your ride-20210320_145705.jpg

I applied heat from the inside, rather than on the painted surface:
DIY : Debadging your ride-20210320_152423.jpg

The LH side panel, post flossing (not the dance move ) :
DIY : Debadging your ride-20210320_152359.jpg

One down, one more to go:
DIY : Debadging your ride-20210320_152251.jpg

This is what the inside of the badge looks like:
DIY : Debadging your ride-20210320_152249.jpg

Once the badge comes off, you'll be left with a large patch of adhesive to remove. The adhesive from the left-side panel came off quite easily, but the one on the right took me close to an hour of coaxing and cajoling with heat, soapy water, and cotton rags to get rid of. The entire process took two-and-a-half hours to finish.

Parts of the adhesive could be removed like a vinyl sticker, after applying a bit of heat:
DIY : Debadging your ride-20210320_152509.jpg

The bike, prior to debadging:
DIY : Debadging your ride-img_20210317_100243_2000101.jpeg

And here's what it looks like now:
DIY : Debadging your ride-20210320_19453103010101.jpeg

Cheers!

Last edited by Turbojc : 21st March 2021 at 17:58.
Turbojc is offline   (12) Thanks
Old 3rd January 2022, 18:06   #260
Senior - BHPian
 
TrackDay's Avatar
 
Join Date: Oct 2020
Location: Magic land
Posts: 1,056
Thanked: 4,414 Times
Re: DIY : Debadging your ride

Got the badges off my car couple of days back.

DIY : Debadging your ride-debadged.png

DIY : Debadging your ride-4-1-rear.png

DIY : Debadging your ride-debadged-1.png
TrackDay is offline   (1) Thanks
Reply

Most Viewed


Copyright ©2000 - 2024, Team-BHP.com
Proudly powered by E2E Networks