Team-BHP > Technical Stuff > DIY - Do it yourself
Register New Topics New Posts Top Thanked Team-BHP FAQ


Reply
  Search this Thread
119,873 views
Old 7th January 2009, 19:03   #61
Senior - BHPian
 
badboyscad's Avatar
 
Join Date: Feb 2007
Location: TN
Posts: 1,511
Thanked: 477 Times

Quote:
Originally Posted by Shakensoul View Post
@bbs- Which all screws needs to be removed to take out the console ? I guess Alto and Wagonr's design will be almost identical.
Sorry for the late reply, the car(alto) wasn't with me until now. i have marked the screws with red circles.


DIY-Blue LED Parking Lamp & Speedo Meter+Wire Mesh Grille & Underbody Neons for Alto-screw-alto.jpg

DIY-Blue LED Parking Lamp & Speedo Meter+Wire Mesh Grille & Underbody Neons for Alto-screw-2.jpg

Note: The screws near the headunit face upwards so they are not visible in the pic.
badboyscad is offline  
Old 7th January 2009, 19:19   #62
BHPian
 
Shakensoul's Avatar
 
Join Date: Apr 2007
Location: AS01
Posts: 498
Thanked: 241 Times

Thanks for the pictorial guide again.
Shakensoul is offline  
Old 23rd March 2009, 01:28   #63
Senior - BHPian
 
badboyscad's Avatar
 
Join Date: Feb 2007
Location: TN
Posts: 1,511
Thanked: 477 Times

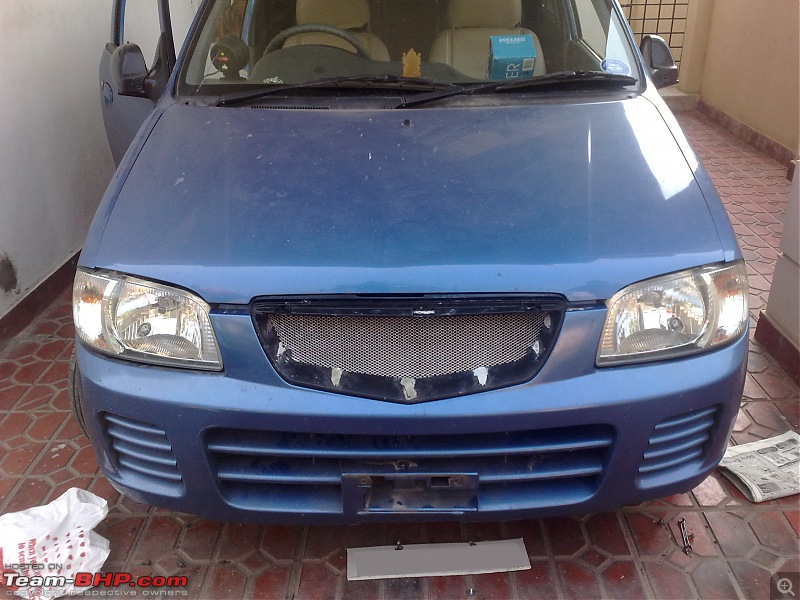
Inspired by shakensoul's DIY mesh grill project, i started a similar DIY on my alto. It is not yet fully completed, just did some preliminary testing this week. Will post more pics after completion(maybe by next weekend).

MGA stock grill (Rs: 335)
DIY-Blue LED Parking Lamp & Speedo Meter+Wire Mesh Grille & Underbody Neons for Alto-03032009726.jpg

center part cut:
DIY-Blue LED Parking Lamp & Speedo Meter+Wire Mesh Grille & Underbody Neons for Alto-03032009727.jpg

Aluminium mesh( Rs: 27 per square feet, 4 sq feet - Rs: 108)
DIY-Blue LED Parking Lamp & Speedo Meter+Wire Mesh Grille & Underbody Neons for Alto-17032009778.jpg

Mesh cut to fit grill
DIY-Blue LED Parking Lamp & Speedo Meter+Wire Mesh Grille & Underbody Neons for Alto-17032009779.jpg

DIY-Blue LED Parking Lamp & Speedo Meter+Wire Mesh Grille & Underbody Neons for Alto-17032009780.jpg

Mesh stuck to grill using Mseal wetset epoxy putty
DIY-Blue LED Parking Lamp & Speedo Meter+Wire Mesh Grille & Underbody Neons for Alto-17032009781.jpg

DIY-Blue LED Parking Lamp & Speedo Meter+Wire Mesh Grille & Underbody Neons for Alto-19032009782.jpg

DIY-Blue LED Parking Lamp & Speedo Meter+Wire Mesh Grille & Underbody Neons for Alto-19032009783.jpg

Excess putty sanded off to give a smooth and even look
DIY-Blue LED Parking Lamp & Speedo Meter+Wire Mesh Grille & Underbody Neons for Alto-19032009784.jpg

Off comes the bumper along with the grill
DIY-Blue LED Parking Lamp & Speedo Meter+Wire Mesh Grille & Underbody Neons for Alto-22032009786.jpg

The bumper
DIY-Blue LED Parking Lamp & Speedo Meter+Wire Mesh Grille & Underbody Neons for Alto-22032009787.jpg

Temporarily fitted unfinished mesh grill
DIY-Blue LED Parking Lamp & Speedo Meter+Wire Mesh Grille & Underbody Neons for Alto-22032009788.jpg
DIY-Blue LED Parking Lamp & Speedo Meter+Wire Mesh Grille & Underbody Neons for Alto-22032009789.jpg
DIY-Blue LED Parking Lamp & Speedo Meter+Wire Mesh Grille & Underbody Neons for Alto-22032009790.jpg

Will post more pics and detailed step by step process by next weekend.
badboyscad is offline  
Old 23rd March 2009, 01:33   #64
BHPian
 
white_vdi's Avatar
 
Join Date: Sep 2008
Location: new delhi
Posts: 857
Thanked: 38 Times

nice DIY bbs!!
waiting for the post-DIY pics and details. what color do you plan to paint the mesh?
i've been thinking of doing the same on my swift but havent been able to get time and motivation to go ahead with the job.

Last edited by white_vdi : 23rd March 2009 at 01:34.
white_vdi is offline  
Old 23rd March 2009, 15:55   #65
BHPian
 
gopinathann's Avatar
 
Join Date: Jun 2007
Location: Chennai
Posts: 765
Thanked: 20 Times

I am also planning to do for SX4, waiting for detailed pics.
gopinathann is offline  
Old 23rd March 2009, 17:05   #66
Senior - BHPian
 
thedreamcatcher's Avatar
 
Join Date: Mar 2009
Location: Dubai
Posts: 1,204
Thanked: 66 Times

Hey this is pretty neat. Though these led bulbs are available in many spares shops and on ebay as well. Been wanting to do this to my car for a long time but never really took time off to do this.
thedreamcatcher is offline  
Old 25th March 2009, 19:57   #67
BHPian
 
lobojames9's Avatar
 
Join Date: Oct 2008
Location: Bangalore
Posts: 120
Thanked: 77 Times

Hi BBS,

I'm Sorry. I know i'm not in the right thread to ask this question, but as i got my initial idea from this thread and could find no other similar thread for bikes i'm putting this question forward here.

I have a gladiator. I tried changing the lights in my speedometer and tachometer. I got one of the leds which are readily available for bikes in the market. Filed them and then installed them. But still light is not distrubuted propely across the instrument cluster. The light also seems to dim and nearly not be seen when i go under a street lamp. What can i do to counter this? Should i scrap these ready made bulbs and make my own led bulb. Will that give more brightness? And if i should how many leds should i use? Kindly help.Thankyou.
lobojames9 is offline  
Old 25th March 2009, 20:32   #68
Senior - BHPian
 
badboyscad's Avatar
 
Join Date: Feb 2007
Location: TN
Posts: 1,511
Thanked: 477 Times

@ lobojames: i have never tried this on bikes, but one my friend did fix some LEDs(5mm blue LEDs) on his rx135. The LEDs worked perfectly for a few days and suddenly one day all of them burned. I guess voltage fluctuation is a lot more in bikes( i maybe wrong), hence resulting in burnt LEDs.

I guess the readily available LEDs that you used were 10mm(big ones). Try using 5 mm flat LEDs(use a 470ohm or 520ohm per LED) for better light spread. Regarding your LEDs dimming under streetlamp(i guess you are talking about sodium vapour street lamp), yellow light dominates blue or white light, thats why the light from your LEDs seem to dim under street lamps).
badboyscad is offline  
Old 25th March 2009, 20:45   #69
BHPian
 
lobojames9's Avatar
 
Join Date: Oct 2008
Location: Bangalore
Posts: 120
Thanked: 77 Times

Quote:
I guess the readily available LEDs that you used were 10mm(big ones). Try using 5 mm flat LEDs(use a 470ohm or 520ohm per LED) for better light spread. Regarding your LEDs dimming under streetlamp(i guess you are talking about sodium vapour street lamp), yellow light dominates blue or white light, thats why the light from your LEDs seem to dim under street lamps).
Yes, they are the big ones. Ill try and get my hands on 5mm flat ones. Should i put one single led. Or putting three in a series better. I'm not sure but u should confirm. I'm thinking i'll either put two or three as then i can bend the leds just a bit to adjust light spread. What say? And yes, you are right i went under a sodium vapour lamp. Thanks a lot bbs.

Last edited by F50 : 25th March 2009 at 20:55.
lobojames9 is offline  
Old 25th March 2009, 20:55   #70
Senior - BHPian
 
badboyscad's Avatar
 
Join Date: Feb 2007
Location: TN
Posts: 1,511
Thanked: 477 Times

Quote:
Originally Posted by lobojames9 View Post
Yes, they are the big ones.. Ill try and get my hands on 5mm flat ones... Should i put one single led... Or puttin three in a series better... I'm not sure but u should comfirm.. I'm thinkin i'll either put two or three as then i can bend the leds jus a bit to adjust light spread. What say? N yes, you are right i went under a sodium vapour lamp... Thanks a lot bbs...
Since there is more voltage fluctuation, put 3 LEDs separately(each with its own 470 ohm resistor).
badboyscad is offline  
Old 25th March 2009, 21:14   #71
BHPian
 
lobojames9's Avatar
 
Join Date: Oct 2008
Location: Bangalore
Posts: 120
Thanked: 77 Times

Quote:
Originally Posted by badboyscad View Post
Since there is more voltage fluctuation, put 3 LEDs separately(each with its own 470 ohm resistor).
Okay. I shall do that. So that means when i place them in a holder i should get all the three led's legs to come out from the holder. And then plug it in right? Yes, i know i am asking a bit too many questions.. but i'm just making sure
lobojames9 is offline  
Old 25th March 2009, 21:27   #72
BHPian
 
white_vdi's Avatar
 
Join Date: Sep 2008
Location: new delhi
Posts: 857
Thanked: 38 Times

bbs we are waiting for final pics man! where are they?
white_vdi is offline  
Old 25th March 2009, 21:40   #73
Senior - BHPian
 
badboyscad's Avatar
 
Join Date: Feb 2007
Location: TN
Posts: 1,511
Thanked: 477 Times

Quote:
Originally Posted by white_vdi View Post
bbs we are waiting for final pics man! where are they?
The car will be with my bro on weekdays. I ll finish the DIY this weekend, if i get the correct spray paint and post pics with step by step details.
badboyscad is offline  
Old 26th March 2009, 14:45   #74
Senior - BHPian
 
thedreamcatcher's Avatar
 
Join Date: Mar 2009
Location: Dubai
Posts: 1,204
Thanked: 66 Times

Hey nice DIY for the mesh grill. Not sure but I think I should give it a try on my Accent
thedreamcatcher is offline  
Old 26th March 2009, 14:52   #75
BANNED
 
Join Date: Jan 2007
Location: NAMMA BENGALURU
Posts: 5,602
Thanked: 2,549 Times

Quote:
Originally Posted by badboyscad View Post
The car will be with my bro on weekdays. I ll finish the DIY this weekend, if i get the correct spray paint and post pics with step by step details.
Dude, i am your new fan

I am just applying your DIY on my 1972 VW Microbus Meter console, and also my tail lights and indicators.

Want to get the brake light setting like this ( a smilie) first round set of LED's glowing and once you brake, the eye and smile comes out.

How do i do it, need your guidance.
PAVAN KADAM is offline  
Reply

Most Viewed


Copyright ©2000 - 2024, Team-BHP.com
Proudly powered by E2E Networks