Team-BHP > Technical Stuff > DIY - Do it yourself
Register New Topics New Posts Top Thanked Team-BHP FAQ


Reply
  Search this Thread
110,125 views
Old 25th February 2009, 23:10   #91
Team-BHP Support
 
benbsb29's Avatar
 
Join Date: Nov 2006
Location: Brisbane
Posts: 9,968
Thanked: 13,223 Times

Quote:
Originally Posted by greenhorn View Post
PS: I recently had a chance to see the Prices of some LED lighting stuff, and the prices are 10x how much its costs to make these. Isnt DIY great
Well said, greenhorn. Amazing when you imagine the profit being made on such fancy stuff.

@Shreyasma : Good effort. How about some pics with the number plate light turned on in the night?
benbsb29 is offline  
Old 28th February 2009, 21:10   #92
Team-BHP Support
 
benbsb29's Avatar
 
Join Date: Nov 2006
Location: Brisbane
Posts: 9,968
Thanked: 13,223 Times
Boot lights too go the LED way!

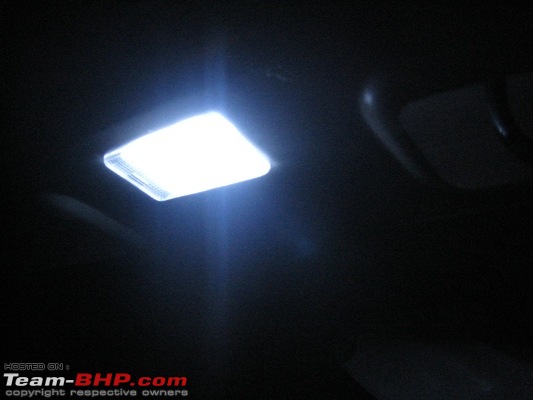
After much trials and flop shows, managed to convert the light in the boot to LED as well. This involved three parallel lines of 3 white LEDs and a resistor in series, bringing it to a total of 9 LEDs.

This mod was slightly more tricky as compared to the previous one for the cabin light as instead of a direct positive and negative terminal, there was a bulb holder to deal with. Since i wanted a circuit modification which was easily reversible, i didnt dare to yank out the wires leading to the bulb holder. For all my efforts, it didnt come out either.

The other option here would have been to cut the wires and then connect the LED circuit to it. Ruled out any cutting of wires, and so devised another crude approach yet again.

Inserted two wires to connect to each of the terminals in the holder and this was then connected using connectors to the LED circuit.

During the process, i managed to blow out the 10A fuse which controlled the circuit for the interior lights and the music player. After replacing the fuse with the spare, kept the fuse removed till i was done to avoid any shorting.

Here is the final result.

Benny's first DIY : LEDs on an Ikon-img_4283.jpg

Benny's first DIY : LEDs on an Ikon-img_4284.jpg

Benny's first DIY : LEDs on an Ikon-img_4285.jpg

Last edited by benbsb29 : 28th February 2009 at 21:11.
benbsb29 is offline  
Old 28th February 2009, 21:33   #93
BHPian
 
WAGON_R's Avatar
 
Join Date: Feb 2009
Location: MUMBAI
Posts: 60
Thanked: 0 Times

recently i had been to opera house. they had many types of led boards, direct fit in cabins and boots. but they were damn costly 250-450 Rs.
WAGON_R is offline  
Old 1st March 2009, 09:50   #94
BHPian
 
shreyasma's Avatar
 
Join Date: Jan 2007
Location: Bang!
Posts: 652
Thanked: 6 Times

Quote:
Originally Posted by WAGON_R View Post
recently i had been to opera house. they had many types of led boards, direct fit in cabins and boots. but they were damn costly 250-450 Rs.
Dude, 250-450 is still okay. People are charging 750-1200 for 1 light change here in bangalore
shreyasma is offline  
Old 1st March 2009, 10:07   #95
Distinguished - BHPian
 
condor's Avatar
 
Join Date: Jun 2006
Location: Speed-brkr City
Posts: 15,864
Thanked: 16,014 Times

@Benny, pls post a pic of the set-up - taken in day-light. That will give a better pic of how it actually is.

Guess it is time for me to start this one too - the Sumo can do with a set of these lights.
condor is online now  
Old 1st March 2009, 10:08   #96
Senior - BHPian
 
greenhorn's Avatar
 
Join Date: Apr 2007
Location: KL-01
Posts: 7,745
Thanked: 4,400 Times

hey benny, why not try making a DIY adaptor using a bit of PCB like i did for the numberplate lights
greenhorn is offline  
Old 1st March 2009, 13:02   #97
BHPian
 
shreyasma's Avatar
 
Join Date: Jan 2007
Location: Bang!
Posts: 652
Thanked: 6 Times
Project Fog!

First of all,
Mods, Can you please merge the LED threads into one so that all those DIYs are accessible in one thread.


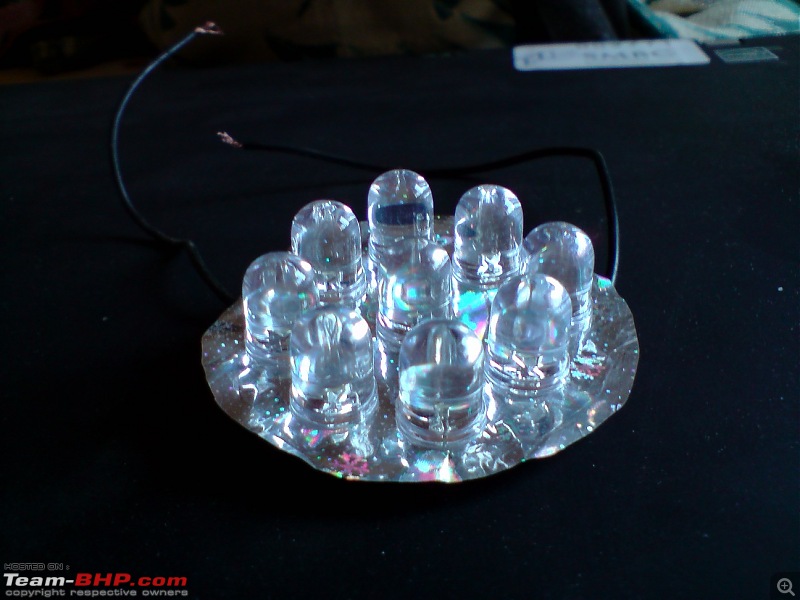
So, secondly, here are my LED driving lights. bought a new set of fogs for Rs 800 (Local brand) and dared to open them without a clue if the DIY will be a success or not. But yes, It was a success to some extent.

Further ideas are to buy 5mm LEDs and use more of them so that the brightness increases. Now due to the 10mm LEDs, i couldnt use more than 9.

The output of 9 LEDs together are almost same as the 55watts bulb provided.

Benny's first DIY : LEDs on an Ikon-1.jpg
Benny's first DIY : LEDs on an Ikon-2.jpg
Benny's first DIY : LEDs on an Ikon-3.jpg

If you are wondering whats the silverish paper below the LEDs, then its the gift wrapping paper! Put it there to use as a reflector.

The fogs are not adjusted properly. Will do it some time in the evening
Waiting for some darkness.

Benny's first DIY : LEDs on an Ikon-4.jpg
Benny's first DIY : LEDs on an Ikon-5.jpg

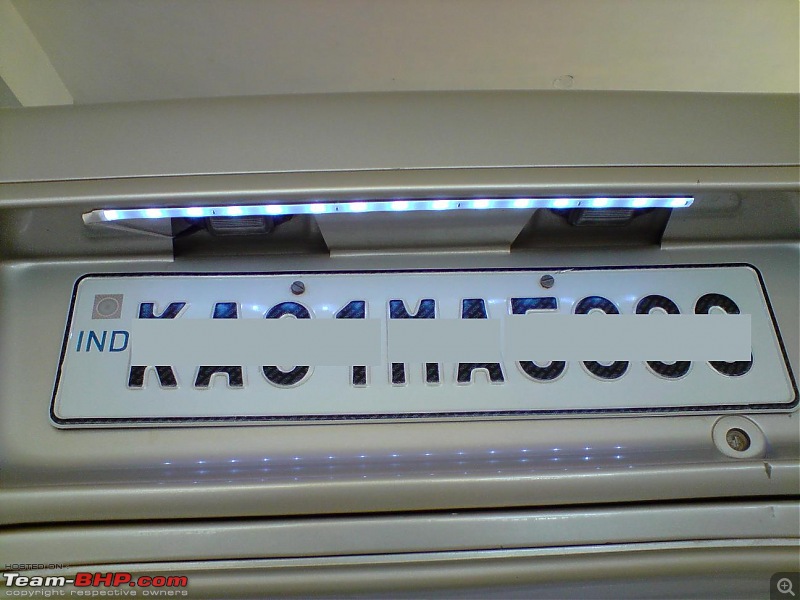
The rear number plate LED strip was not a DIY. This was readily available and I had not started my DIY when i bought it. I am posting just for you guys to get more ideas when you are doing it. These LED strips are being stuck at the bottom of the stock headlights to give the angel eyes look.

Benny's first DIY : LEDs on an Ikon-6.jpg

Will attach the night photos tonight
shreyasma is offline  
Old 1st March 2009, 13:55   #98
Senior - BHPian
 
greenhorn's Avatar
 
Join Date: Apr 2007
Location: KL-01
Posts: 7,745
Thanked: 4,400 Times

shreyas, would be better if you could post pics with bulbs in one fog lamp and LED's in the other , i mean, of how much they light up the road . I think the bulbs are better suited for the fogs. I'm planning to use the LED's as angel eyes for the fogs
greenhorn is offline  
Old 1st March 2009, 14:07   #99
BHPian
 
shreyasma's Avatar
 
Join Date: Jan 2007
Location: Bang!
Posts: 652
Thanked: 6 Times

Quote:
Originally Posted by greenhorn View Post
shreyas, would be better if you could post pics with bulbs in one fog lamp and LED's in the other , i mean, of how much they light up the road . I think the bulbs are better suited for the fogs. I'm planning to use the LED's as angel eyes for the fogs
Absolutely! i will use it like angel lights only. But surprisingly, it also illuminates the road like the normal bulbs.

I cant again remove the setup now as i sealed the glass after fixing the LED.
I am sure my friends will ask me to make one for them..i will host a pic with bulb in one and LEDs in one. Till then...please excuse.

I am using a 6 LED setup with 520 ohms resistors per LED and powering using a 9v battery at home as a torch. So, 9 LED with 12v is bright. Just hang on for the night shot, you will not be disappointed
shreyasma is offline  
Old 1st March 2009, 16:41   #100
Team-BHP Support
 
benbsb29's Avatar
 
Join Date: Nov 2006
Location: Brisbane
Posts: 9,968
Thanked: 13,223 Times

Quote:
Originally Posted by condor View Post
@Benny, pls post a pic of the set-up - taken in day-light. That will give a better pic of how it actually is.

Guess it is time for me to start this one too - the Sumo can do with a set of these lights.
Will surely do that. Although i am a little apprehensive about the quality of workmanship. Even before i touch the circuit, i need to remove the 10A fuse, so it doesnt go bust again. To improve the quality and robustness, will need to fabricate an adapter similar to what greenhorn used for his numberplate setup.

Quote:
Originally Posted by greenhorn View Post
hey benny, why not try making a DIY adaptor using a bit of PCB like i did for the numberplate lights
I really should have remembered how you had approached the task of dealing with the bulb holder! If its not a bother could you put up pics of both sides of the adapter which you made? Is it just two wires which are in a closed loop? Also, what wires are those?

Currently the setup which i made just has the two wires plugged into the holder, and is not exactly shorting-proof.

@Shreyasma : Looking forwad to pics of the setup with the 5mm LEDs.

Somewhat off-topic : I'm so smitten by LEDs i got myself a rechargable LED torch from JC Road for Rs.150/-. I'm sure i could have done it myself, but needed a robust frame for the torch. Ofcourse, i could have dismantled an old one, but nevertheless.

Last edited by benbsb29 : 1st March 2009 at 16:43.
benbsb29 is offline  
Old 1st March 2009, 18:27   #101
Senior - BHPian
 
greenhorn's Avatar
 
Join Date: Apr 2007
Location: KL-01
Posts: 7,745
Thanked: 4,400 Times

I'll be taking them out when I send my car in for service. cant trust those idiots at the dealership. they just might confiscate the LED's , and charge me for replacing them with regular bulbs !

I didnt use any special wire - those loop like thingies are there only on one side and are the leads of one of the LED's I snipped off

PS: shreyas, how much did the strip for the number plate cost you?

Last edited by greenhorn : 1st March 2009 at 18:29.
greenhorn is offline  
Old 1st March 2009, 22:19   #102
BHPian
 
shreyasma's Avatar
 
Join Date: Jan 2007
Location: Bang!
Posts: 652
Thanked: 6 Times

Quote:
Originally Posted by greenhorn View Post

PS: shreyas, how much did the strip for the number plate cost you?
Rs 500

The night shots are here. I will redo the fogs with 3mm or 5mm LEDs. I am 200% sure that I can achieve success. Till then I have my angel eyes
Attached Thumbnails
Benny's first DIY : LEDs on an Ikon-p010309_22.05.jpg  

Benny's first DIY : LEDs on an Ikon-p010309_22.0501.jpg  

Benny's first DIY : LEDs on an Ikon-p010309_22.06.jpg  

Benny's first DIY : LEDs on an Ikon-p010309_22.0602.jpg  


Last edited by shreyasma : 1st March 2009 at 22:21. Reason: Forgot to mask number plate
shreyasma is offline  
Old 1st March 2009, 22:29   #103
Senior - BHPian
 
jkdas's Avatar
 
Join Date: Sep 2005
Location: Thiruvananthapu
Posts: 9,687
Thanked: 1,492 Times

Time to start a TBHP accessory shop!
Shrey!
jkdas is offline  
Old 1st March 2009, 22:33   #104
BHPian
 
shreyasma's Avatar
 
Join Date: Jan 2007
Location: Bang!
Posts: 652
Thanked: 6 Times

This is not exactly LED thingy. I happened to open the brake light last weekend to clean. Got a good idea and this is the outcome of the idea.
Attached Thumbnails
Benny's first DIY : LEDs on an Ikon-p010309_22.27.jpg  

Benny's first DIY : LEDs on an Ikon-p010309_22.2801.jpg  

shreyasma is offline  
Old 1st March 2009, 22:40   #105
Senior - BHPian
 
badboyscad's Avatar
 
Join Date: Feb 2007
Location: TN
Posts: 1,511
Thanked: 477 Times

@shrey : That "caution" thingy is quite an idea. It looks good too.
badboyscad is offline  
Reply

Most Viewed


Copyright ©2000 - 2024, Team-BHP.com
Proudly powered by E2E Networks