Team-BHP > Technical Stuff > DIY - Do it yourself
Register New Topics New Posts Top Thanked Team-BHP FAQ


Reply
  Search this Thread
10,946 views
Old 16th January 2011, 19:07   #1
Senior - BHPian
 
Join Date: Sep 2006
Location: zxc
Posts: 3,393
Thanked: 726 Times
DIY! Sunday Usage! Front brake pad replacement.

The Car (Bakra) : '99 M800.

DIY Job : Front Brake Pad install

Tools and Stuff required:
Wrench, Tool kit (mainly No12), A screwdriver strong one (Taparia will do, I used this as I lend the special tool to a neighborhood mechanic and he lost it), Jack (hydraulic preferred), Jack Stand, Wheel wrench.

Skill level:
1. Very easy, a 10 minute job. But safety precaution is a must.

The Work (mere MASS owner friend ke peth pe lath)
My beloved 800 had crossed 17k kms since its engine overhaul. The front brake-pad is almost 21k kms. So what better way dirty your hand on a lousy cold Sunday.
Replacing the front brakepad is a very easy job. If you know how to change a tire you might as well want to take your skills level one step further and change the front pads. You don't need to bleed the brake lines while you replace the front disc, if your brakes were working properly prior. Its the rear drum that are bit problematic.
All you need is the right tools for the job. You don't even need a special tool that most MASS uses. You can do away with a strong screwdriver. The special tool mentioned is a front brake piston compressor.


Enjoy.
PS: Images are taken with a BB by one of my boys. So please don't mind the quality.

Jack up the car on a plain surface remove the wheel. Before that don't forget to pull the handbrake and put a stopper/brick/stone at the rear tyre.
DIY! Sunday Usage! Front brake pad replacement.-1-jackup.jpg

Remove the caliper bolt (below one) with a no.12 socket. Loosen the top bolt (do not remove).
DIY! Sunday Usage! Front brake pad replacement.-2-remove.jpg

Lift the caliper and remove the worn out pads with a flat head screwdriver.
by prying it sideways by using the disc/rotor as a leverage.
DIY! Sunday Usage! Front brake pad replacement.-3-lift-caliper.jpg


Check the difference between the new and old pads
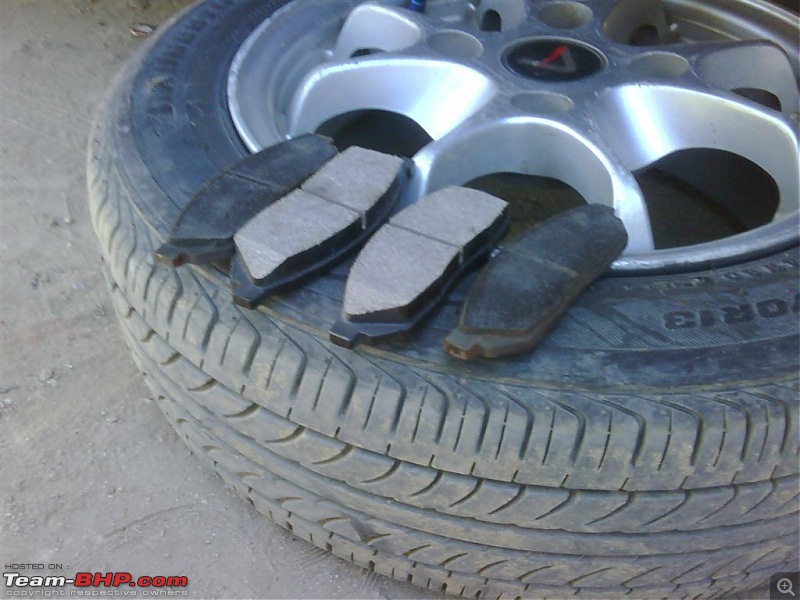
DIY! Sunday Usage! Front brake pad replacement.-4-difference.jpg

DIY! Sunday Usage! Front brake pad replacement.-4a-difference.jpg

Because the pads were worn and thin the piston is way too outwards.
DIY! Sunday Usage! Front brake pad replacement.-5-piston.jpg

Open the Brake Fluid reservoir bottle cap. This is important as if the lid is closed shut it will not let you contract the piston even if you have a build structure of Dabang Salman.
DIY! Sunday Usage! Front brake pad replacement.-6a-open-reservoir.jpg

DIY! Sunday Usage! Front brake pad replacement.-6b-open-reservoir.jpg

Refit the Caliper without the pads. And put a screw driver as shown below.
And with some effort push it inwards until the piston goes completely inside. Be careful as this process needs a bit of strength and if not done properly you may hurt yourself. If you have the special tool this process is much easier.
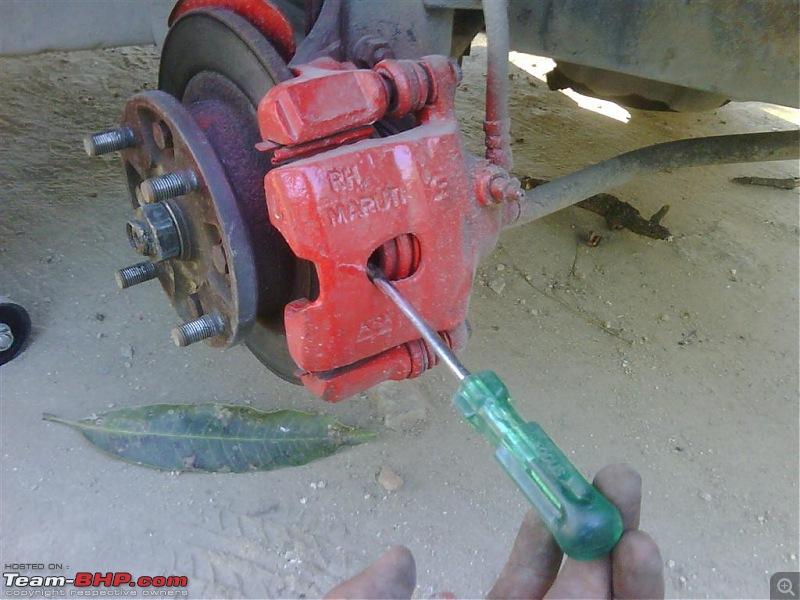
DIY! Sunday Usage! Front brake pad replacement.-7-contract-psiton.jpg

DIY! Sunday Usage! Front brake pad replacement.-7a-contract-psiton.jpg

Piston is completely contracted inwards.
DIY! Sunday Usage! Front brake pad replacement.-8-piston-inside.jpg

Install the brake pads and refit the caliper and tighten the two caliper bolts.
DIY! Sunday Usage! Front brake pad replacement.-10-installed.jpg

Disclaimer

team-bhp or me is not responsible if you are cheap like me and try this out and loose your limb or sight in the process.

Jack up the car on a plain hard surface, Use hand brake, if you have a jack stand its even better as if anyhow jack fails the car will not fall flat.

If brake line bleeding is a professional procedure, If in any case you need to do this, do it in supervision of an expert.

This procedure is for replacing front brake pads of m800, but the theory is almost same in every car that has disc.

As with all DIY, you should know exactly what you are doing.

Thanks for reading

Last edited by SirAlec : 16th January 2011 at 19:11.
SirAlec is offline  
Old 16th January 2011, 19:13   #2
Senior - BHPian
 
Join Date: Sep 2006
Location: zxc
Posts: 3,393
Thanked: 726 Times
Special Tool for brake replacement.

The following illustrations show how this tool works.

DIY! Sunday Usage! Front brake pad replacement.-brake-piston-tool2.jpg

Old worn out pad used as a leverage along with the special tool to push the piston inwards.
DIY! Sunday Usage! Front brake pad replacement.-brake-piston-tool1.jpg

A much better quality tool. Any help in finding this particular one.? Thanks
DIY! Sunday Usage! Front brake pad replacement.-brake-piston-tool.jpg

PS:
These images are taken off net and not captured by me.

Last edited by SirAlec : 16th January 2011 at 19:15.
SirAlec is offline  
Old 16th January 2011, 19:26   #3
Senior - BHPian
 
Mpower's Avatar
 
Join Date: Mar 2005
Location: Bangalore
Posts: 10,409
Thanked: 1,730 Times
Re: Special Tool for brake replacement.

Great job Sir Alec. What brand pads are these.

Ive always used a good ol C clamp to push the piston and it works just fine.

Another tip is to inspect the caliper boot for cuts or tears. Clean and lube the slider pins with grease.

Quote:
Originally Posted by SirAlec View Post
The following illustrations show how this tool works.
Mpower is offline  
Old 16th January 2011, 20:55   #4
Senior - BHPian
 
Join Date: Sep 2006
Location: zxc
Posts: 3,393
Thanked: 726 Times
Re: DIY! Sunday Usage! Front brake pad replacement.

TVS-Girling brake pads. MGP ones.
Yup C clamp will work just fine. But i have a small one.

Didn't wanted to make the thread lengthy and complicated. Hence left the greasing part.

Will post in near future the whole wheel servicing bit when i do it. (all four)

Last edited by SirAlec : 16th January 2011 at 20:57.
SirAlec is offline  
Old 17th January 2011, 13:10   #5
Senior - BHPian
 
thedreamcatcher's Avatar
 
Join Date: Mar 2009
Location: Dubai
Posts: 1,204
Thanked: 66 Times
Re: DIY! Sunday Usage! Front brake pad replacement.

Thanks for this Sir Alec. Very interesting and detailed indeed.

I have been intending to open up my front brakes for quite sometime now, as i feel they have worn out. Will try it this weekend. May PM you if i need assistance. This is for my Accent front discs
thedreamcatcher is offline  
Old 18th January 2011, 00:12   #6
BHPian
 
anky's Avatar
 
Join Date: Apr 2006
Location: Mumbai
Posts: 402
Thanked: 115 Times
One of the most useful threads

This thread other than the clean wagonr air filter thread is one of the most practical and useful threads , also please tell me which is the best brake pad for alto lxi 04 and m800 1997 . Thanks.
anky is offline  
Old 18th January 2011, 01:41   #7
Senior - BHPian
 
Join Date: Sep 2006
Location: zxc
Posts: 3,393
Thanked: 726 Times
Re: DIY! Sunday Usage! Front brake pad replacement.

Both KBX and TVS-Girling makes good brake pads.

I prefer TVS, though.
SirAlec is offline  
Old 18th January 2011, 12:59   #8
KMT
BHPian
 
Join Date: Jan 2005
Location: Coorg
Posts: 455
Thanked: 877 Times
Re: DIY! Sunday Usage! Front brake pad replacement.

SirAlec
Loved your disclaimer- it is a classic.
A useful post too, I have a question though, is there a risk of air getting in the line during this procedure?
Cheers
KMT
KMT is offline  
Old 18th January 2011, 13:52   #9
BHPian
 
narayanang76's Avatar
 
Join Date: Jan 2006
Location: KA 53/KL 9
Posts: 451
Thanked: 836 Times
Re: DIY! Sunday Usage! Front brake pad replacement.

SirAlec: Thanks for a detailed informative thread.

Recenttly on my NHC (Honda City ZX Variant) which is run 27K KM Honda guys suggested replacement of pads (Front only), did that but frankly I dont see / feel any difference to the effect on braking - no issues also observed. Took it back to Honda they did some inspection, told some cleaning done, but still the same (no differene) - no issues also.

From then I wanted to inspect the break pads (doudbtful if they changed the pads at the first place - even though they handed over the old pads after replacement). I wanted to do that myself - will refer to this thread while doing that.

I have 2 questions though:
1) Brake pads last this much only - 21K Km in your 800 & 25K Km in my Honda City (I remember reading some posts in TBHP forum brake pads living upto 40K Kms - that possible?). Is this a recommended practice of changing the pads every 20-25K Kms? I know the thickness of the pads a critical factor to consider in replacement.

2) Can you please eloberate on closing the brake fluid reservoir - is there anything to take care? Any air bubbles / airlock to avoid any future issues with this DIY?

Many thanks
narayanang76
narayanang76 is offline  
Old 18th January 2011, 21:33   #10
Senior - BHPian
 
Join Date: Sep 2006
Location: zxc
Posts: 3,393
Thanked: 726 Times
Re: DIY! Sunday Usage! Front brake pad replacement.

Quote:
Originally Posted by KMT View Post
SirAlec
Loved your disclaimer- it is a classic.
A useful post too, I have a question though, is there a risk of air getting in the line during this procedure?
Cheers
KMT
No! As you can see the circuit is completely closed while changing front pads.
Quote:
Originally Posted by narayanang76 View Post
SirAlec: Thanks for a detailed informative thread.

Recenttly on my NHC (Honda City ZX Variant) which is run 27K KM Honda guys suggested replacement of pads (Front only), did that but frankly I dont see / feel any difference to the effect on braking - no issues also observed. Took it back to Honda they did some inspection, told some cleaning done, but still the same (no differene) - no issues also.

From then I wanted to inspect the break pads (doudbtful if they changed the pads at the first place - even though they handed over the old pads after replacement). I wanted to do that myself - will refer to this thread while doing that.

I have 2 questions though:
1) Brake pads last this much only - 21K Km in your 800 & 25K Km in my Honda City (I remember reading some posts in TBHP forum brake pads living upto 40K Kms - that possible?). Is this a recommended practice of changing the pads every 20-25K Kms? I know the thickness of the pads a critical factor to consider in replacement.

2) Can you please eloberate on closing the brake fluid reservoir - is there anything to take care? Any air bubbles / airlock to avoid any future issues with this DIY?

Many thanks
narayanang76
Brake-pad, just like clutch is a consumable part. It depends upon the usage. We live in hills, brake usage is a lot, i mean a lot. My wifes's cars last less than 20k. So its a matter of how you use the car. If you wait till its completely worn out, then you have to change the rotor, which is an expensive part. Normally stick to the owner's manual service chart. They are best help for any layman. During these 27k kms did you go for the wheel servicing (all four). Also brake fluid flush is a must, as it looses its property after some time. I am sure your car is older than 2 years old. If the brakes were fine, and the fluid level at max level, there is no chance of getting air into the system if your from piston, master and slave cylinder are fine without any seal leakage. Hope this helps you.
SirAlec is offline  
Old 18th January 2011, 21:51   #11
Senior - BHPian
 
Mpower's Avatar
 
Join Date: Mar 2005
Location: Bangalore
Posts: 10,409
Thanked: 1,730 Times
Re: DIY! Sunday Usage! Front brake pad replacement.

Quote:
Originally Posted by narayanang76 View Post
Is this a recommended practice of changing the pads every 20-25K Kms? I know the thickness of the pads a critical factor to consider in replacement.
There's usually a window on top of the caliper which lets you look at pad thickness. If center groove is missing (worn thru) then you need a new pad.

Last edited by Mpower : 19th January 2011 at 00:53.
Mpower is offline  
Reply

Most Viewed


Copyright ©2000 - 2024, Team-BHP.com
Proudly powered by E2E Networks