Team-BHP > Shifting gears > Gadgets, Computers & Software
Register New Topics New Posts Top Thanked Team-BHP FAQ


Reply
  Search this Thread
42,345 views
Old 20th March 2019, 19:36   #31
BHPian
 
pratyush6's Avatar
 
Join Date: Jun 2013
Location: Toronto
Posts: 569
Thanked: 684 Times
Re: DIY: Laptop hardware upgrades

If you are looking for a DIY laptop, then look no further than the Thinkpad T430. It is a tinkerers dream. You can buy it off ebay or a second had shop for next to nothing and upgrade pretty much everything.
My rather new Dell gave up on me and I have done the same. I bought a decent looking T430 off ebay which had genuine Win 10 already installed for about 200 CAD.
I swapped the hard drive for an SSD and upgraded the RAM. Moved the hard drive to my Dvd bay (now it sits there an external drive). Nothing required as of now. It works even better than my corporate Thinkpad T470s.
pratyush6 is offline  
Old 25th March 2019, 11:20   #32
Senior - BHPian
 
rohan_iitr's Avatar
 
Join Date: Feb 2009
Location: Bangalore
Posts: 1,129
Thanked: 820 Times
Re: DIY: Laptop hardware upgrades

I have a 10 year old Dell Inspiron 1420, which I use very occasionally (mostly for internet browsing only).

I got inspired by this thread and feel like making few upgrades :
1. Upgrade HDD from 250GB to 1TB
2. Upgrade RAM from 2GB to 4GB

I am not really convinced with SSDs, at the current prices (approx 4 times that of HDD). In automotive terms, this would be like putting synthetic oil in a commuter hatchback.

Since the laptop is old, I am not too keen on spending much at the moment.

Can someone throw some light on my following doubts:
1. Will the cost difference be much if I go the DIY route vs getting it done at the computer market (SP road in Bangalore) ?
2. What could be the approximate cost of 1TB HDD and 4GB DDR2 RAM ?
3. Are DDR2 RAMs easily available ?
4. Is thermal paste re-application really necessary ? Will the repair shops in computer market have this ?
5. Is it better to clone the hard disk or go for a clean Windows install ?
6. Any other upgrade which will breathe a new life to the laptop (I have purchased a new battery recently) ?

Rohan
rohan_iitr is offline  
Old 25th March 2019, 12:34   #33
Senior - BHPian
 
Join Date: May 2006
Location: Bangalore
Posts: 1,133
Thanked: 1,891 Times

I would suggest you to just do a clean reinstall. DDR2 will be very expensive that too ig it is available in the first place and 2 GB additional wouldn't make much of a difference.

Thermal paste is easily available for Rs. 50 at any computer repair shop. It is also available on Amazon.

It is likely your laptop uses the older IDE interface for the hard drive. Today only SATA interface drives are easily available. Similar to the RAM this would also be costly if you get it.

IMHO just do a clean reinstall and keep it for light work. It's just not worth it to plonk money into such an old platform.
Traveler is offline  
Old 25th March 2019, 13:37   #34
Tgo
Senior - BHPian
 
Tgo's Avatar
 
Join Date: Apr 2011
Location: Calgary|Jaipur
Posts: 1,289
Thanked: 3,789 Times
Re: DIY: Laptop hardware upgrades

Quote:
Originally Posted by rohan_iitr View Post
I have a 10 year old Dell Inspiron 1420, which I use very occasionally (mostly for internet browsing only).

I got inspired by this thread and feel like making few upgrades :
1. Upgrade HDD from 250GB to 1TB
2. Upgrade RAM from 2GB to 4GB
Go step by step when dealing with such and old laptop.

I would firstly upgrade to SSD. No need for 1TB for a laptop used only for internet browsing. You'll also be amazed to know how cheap 120 GB SSD (other than Samsung) are. This alone will give a big boost to your aging computer since the old HDD would have quite a few bad sectors affecting its performance apart from the obvious benefits of an SSD over HDD. If your old HDD has bad sectors it is better to do a clean install of the OS rather than cloning. Run the disk check in full with "attempt to recover bad sectors" checked. If there were no unrecoverable sectors you can do a clone.

RAM upgrade can be done later if you feel the need.

Do it yourself. The PC shops will charge you and leave you with a constant suspicion - "Have they removed something from my perfectly functioning computer?"

Interesting idea I had while dismantling an old aging laptop. If you have a non-smart TV remove the laptop screen from the hinges (needs dismantling), connect it via HDMI/VGA to your TV (considering the TV has the inputs), get a wireless keyboard and mouse, make a DIY concealed wall mount for the laptop (preferably behind the TV) and you now have a smart TV. You can now connect a webcam for video calls, play movies via USB or DVD in any imaginable format, stream internet video (netflix/prime etc.), browse internet on a larger screen - possibilities are endless.
Tgo is offline  
Old 26th March 2019, 14:41   #35
Senior - BHPian
 
rohan_iitr's Avatar
 
Join Date: Feb 2009
Location: Bangalore
Posts: 1,129
Thanked: 820 Times
Re: DIY: Laptop hardware upgrades

Thanks for the responses !

As you have suggested, I will go step by step.

I have set a budget of 5k approx for the upgrade. When I checked the online prices, it seems that I may be able to get a 240GB SSD and 4GB RAM within this.

Surprisingly, DDR2 memories are still available, that too at reasonable prices.

Will do a clean OS install, as you have suggested.

Rohan
rohan_iitr is offline  
Old 2nd April 2019, 10:12   #36
Senior - BHPian
 
rohan_iitr's Avatar
 
Join Date: Feb 2009
Location: Bangalore
Posts: 1,129
Thanked: 820 Times
Re: DIY: Laptop hardware upgrades

I am trying to upgrade my 10 year old Dell Inspiron 1420 laptop.

I got inspired by this thread and decide to take a DIY approach.

So I ordered a SSD and DVD caddy online. When I tried to fix the caddy in the DVD slot, I faced a difficulty. The connector is not matching.

Please see the image below, the lower one is my DVD drive and the upper one is the DVD caddy.

Have I bought a wrong DVD caddy ? All the DVD caddies which I saw online have similar connector.

Please help on how to proceed.

Rohan
Attached Thumbnails
DIY: Laptop hardware upgrades-dvd-caddy-connector.jpg  

rohan_iitr is offline  
Old 2nd April 2019, 13:45   #37
Tgo
Senior - BHPian
 
Tgo's Avatar
 
Join Date: Apr 2011
Location: Calgary|Jaipur
Posts: 1,289
Thanked: 3,789 Times
Re: DIY: Laptop hardware upgrades

Quote:
Originally Posted by Tgo View Post
If you have a non-smart TV - possibilities are endless.
DIY: Laptop hardware upgrades-1.jpg
Tried this setup with a laptop I have been given for tinkering on. You lose the wireless antenna since it is looped through the screen. But that can be taken care of by a USB based wifi receiver, just hook up a wireless keyboard with a trackpad and your smart TV is ready. Work done on this laptop will be shared soon.
Quote:
Originally Posted by rohan_iitr View Post
Please see the image below, the lower one is my DVD drive and the upper one is the DVD caddy.
Don't worry about the caddy. Just replace it and get a refund.
The CD drive in your laptop has and old PATA (Parallel ATA) connector and the corresponding connector will be there on the motherboard.

Most caddys sold today (including the one you bought) have the SATA (Serial ATA) type connectors and they will not match the one on your motherboard.
You can get an external HDD enclosure and place your HDD in that and use it as a portable HDD.
Tgo is offline  
Old 2nd April 2019, 16:29   #38
Senior - BHPian
 
rohan_iitr's Avatar
 
Join Date: Feb 2009
Location: Bangalore
Posts: 1,129
Thanked: 820 Times
Re: DIY: Laptop hardware upgrades

Quote:
Originally Posted by Tgo View Post
Don't worry about the caddy. Just replace it and get a refund.
The CD drive in your laptop has and old PATA (Parallel ATA) connector and the corresponding connector will be there on the motherboard.

Most caddys sold today (including the one you bought) have the SATA (Serial ATA) type connectors and they will not match the one on your motherboard.
You can get an external HDD enclosure and place your HDD in that and use it as a portable HDD.
How to initiate a return on Amazon ? When I am trying to initiate a return on Amazon, it is asking the reason for return and then suggesting that they will ship me another piece of the same.

I tried searching for IDE Caddy, but it is not readily available.

Not sure how to proceed now. I am thinking of replacing my original HDD with SSD and then later mount the HDD in an IDE Caddy.

Rohan
rohan_iitr is offline  
Old 4th April 2019, 12:23   #39
Tgo
Senior - BHPian
 
Tgo's Avatar
 
Join Date: Apr 2011
Location: Calgary|Jaipur
Posts: 1,289
Thanked: 3,789 Times
Re: DIY: Laptop hardware upgrades

Quote:
Originally Posted by rohan_iitr View Post
How to initiate a return on Amazon ?
I cant help you there. You just have to be clear to them that your ordered the wrong thing. Request them to give you store credit which you can use later.

Quote:
I am thinking of replacing my original HDD with SSD and then later mount the HDD in an IDE Caddy.
Yes, focus on the SSD install first.
Tgo is offline  
Old 4th April 2019, 14:05   #40
BHPian
 
ksameer1234's Avatar
 
Join Date: Sep 2014
Location: Mumbai
Posts: 775
Thanked: 2,700 Times
Re: DIY: Laptop hardware upgrades

Quote:
Originally Posted by rohan_iitr View Post
I am thinking of replacing my original HDD with SSD and then later mount the HDD in an IDE Caddy.
Why not use a external hdd case and connect to laptop via USB? I did the same last year and since kept only the OS on SSD, it has quite a bit of free space to work with.
ksameer1234 is offline  
Old 6th April 2019, 22:39   #41
Tgo
Senior - BHPian
 
Tgo's Avatar
 
Join Date: Apr 2011
Location: Calgary|Jaipur
Posts: 1,289
Thanked: 3,789 Times
Re: DIY: Laptop hardware upgrades

Quote:
Originally Posted by Tgo View Post
Work done on this laptop will be shared soon.
Model: Acer Aspire V5-571

After backing up the data which was excruciatingly slow, I reset windows using the inbuilt feature.

DIY: Laptop hardware upgrades-reset.jpg

This lets you keep you files or you can choose to wipe all your files. I chose to wipe all my files since the first attempt left over a lot of folders in the start menu for previously installed programs which were not functioning after the reset. The reset gave a considerable boost to the performance of the PC. the 6 GB ram installed seemed adequate since it was not a daily use laptop anymore.

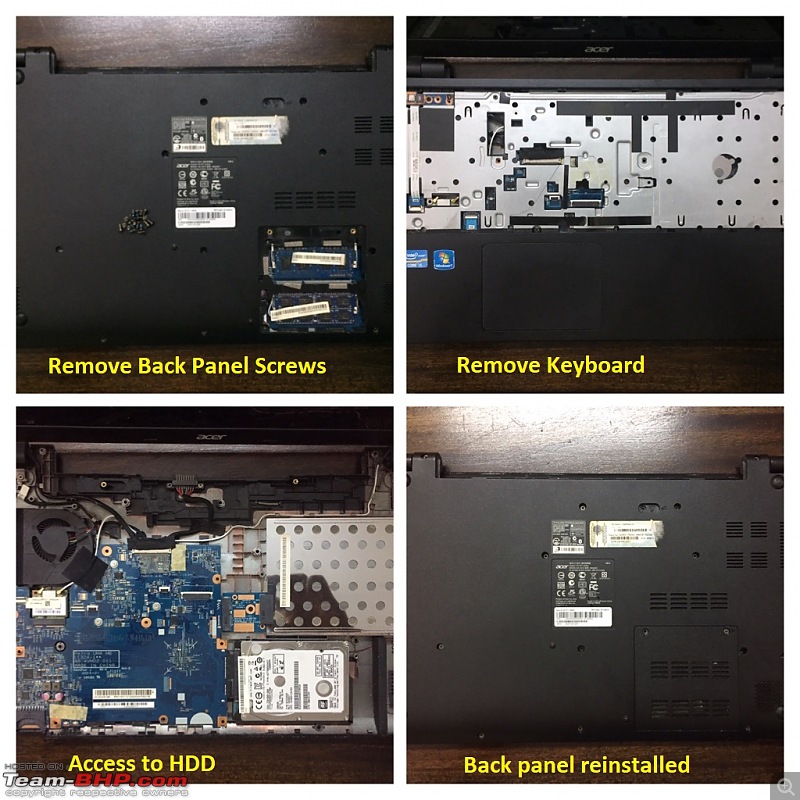
Went ahead with tearing it apart next to clean the fan. I found that one of the screws of the hinges was not holding the hinge in the back panel since its threaded insert which is supposed to be fused into the back panel plastic had come out. I had to super glue it back into its position making sure I don't fill the threaded part with glue.

DIY: Laptop hardware upgrades-misc.jpg

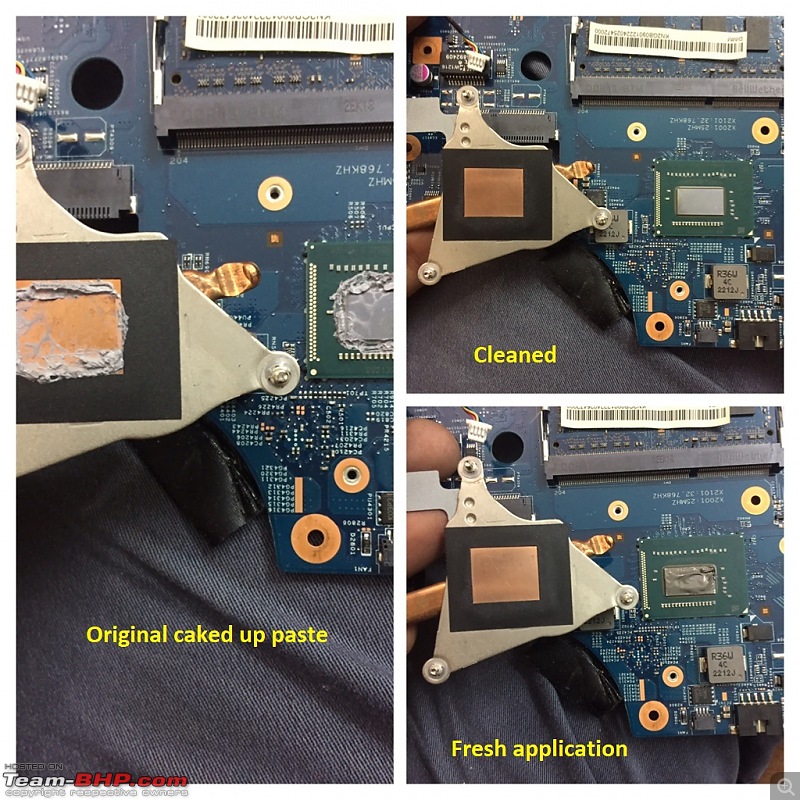
Next up was the reapplication of the thermal paste. This is not required in all laptops as in some cases the fan comes off without disturbing the factor installed paste. As a rule of thumb if you are breaking the conductive layer of paste by removing the heat sink from the processor you need to re-apply the thermal paste.

DIY: Laptop hardware upgrades-thermal-paste.jpg

I measured the thickness of the HDD and checked out its installation slot. It was just a foam lined pocket in the chassis. checked the connector type for the CD drive since I wanted to install the original HDD using a caddy. Decided to go for the WD Green 120GB SSD to make the primary drive for the OS and ordered the same.

DIY: Laptop hardware upgrades-ssd-access.jpg

Cloned the HDD to the SSD. with a fresh install, space on the SSD wasn't an issue since there was only 26 GB of data to clone which took 45 minutes. Swapped the HDD with the cloned SSD. Typing this post as the HDD is getting formatted. This PC laptop lives to see another 4 years at least.

Some things worth mentioning:
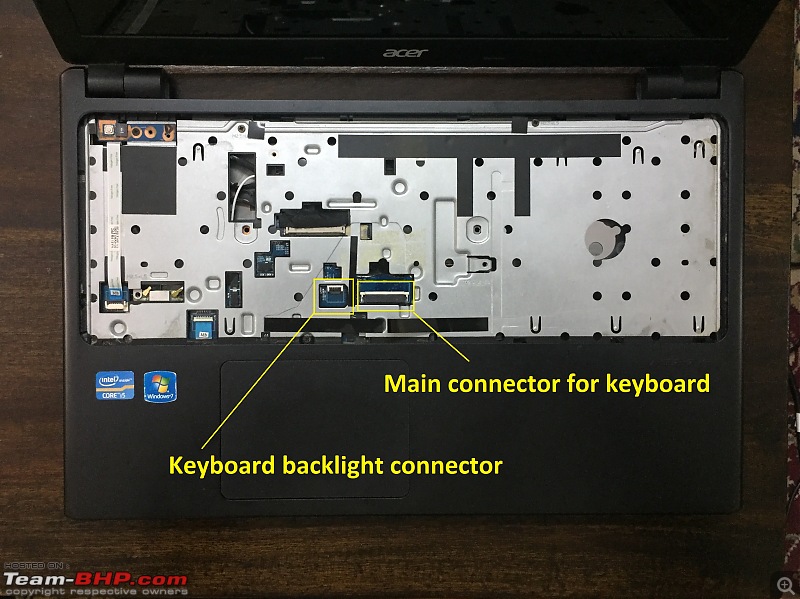
This laptop had seen a spill of some liquid on the keyboard. I guess the "computer wala" who worked on it opened the keyboard and sealed it back shut crooked (or maybe I'm spoiled by a ThinkPad keyboard). As a result, the shift key doesn't press fully at times since the key fouls with its cut-out on the panel. had thought of replacing the keyboard once the SSD swap is done. In the process I found out an interesting mod:

Backlit keyboard in a non backlit keyboard laptop. It is a mod that requires some soldering of components onto the motherboard (in some cases). So dropped the idea.

DIY: Laptop hardware upgrades-kb.jpg


Sharing my new favourite screw-driver kit. A generic 60pc kit available on amazon.

DIY: Laptop hardware upgrades-kit.jpg

I ordered the wrong caddy for the HDD. The one required for this laptop was the 9.5mm thick version instead of the 12.7mm thick one. Have ordered a replacement, which brings me to...
Quote:
Originally Posted by rohan_iitr View Post
How to initiate a return on Amazon ?
Return the item. They will say that they will replace it with exactly the same item. Accept that. Schedule pick-up of item that you want to return. They place an order for the replacement item. Cancel the replacement order for the item.

My pick-up is scheduled for tomorrow. Will update if I get a refund.
Tgo is offline  
Old 7th April 2019, 00:04   #42
BHPian
 
Join Date: Nov 2006
Location: Bombay
Posts: 77
Thanked: 43 Times
Re: DIY: Laptop hardware upgrades

While replacing cpu fans i have used arctic silver 5 thermal compound and found my laptops running cooler. Thinkpad x 201 and Thinkpad t410 bought used from ebay had their fans go kaput in a month but are working like a charm from last 3 years after replacement of cpu fans and application of silver arctic 5 thermal compound. It is also recommended to buy CPU fans from reliable sellers on ebay rather than aliexpress.

Last edited by spookey : 7th April 2019 at 00:07.
spookey is offline  
Old 8th April 2019, 14:48   #43
Tgo
Senior - BHPian
 
Tgo's Avatar
 
Join Date: Apr 2011
Location: Calgary|Jaipur
Posts: 1,289
Thanked: 3,789 Times
Re: DIY: Laptop hardware upgrades

Quote:
Originally Posted by Tgo View Post
Will update if I get a refund.
Apparently you can't return items for a refund now on Amazon. Pick-up was cancelled.

Quote:
Originally Posted by spookey View Post
Thinkpad x 201 and Thinkpad t410 bought used
That's great! Do you get reliable sources to buy from on eBay India? Please share details of how you go about it. Would like to go that route once for the X series at least.
Tgo is offline  
Old 8th April 2019, 15:46   #44
Newbie
 
Join Date: Apr 2012
Location: New Delhi
Posts: 21
Thanked: 15 Times
Re: DIY: Laptop hardware upgrades

Quote:
Originally Posted by Tgo View Post
That's great! Do you get reliable sources to buy from on eBay India? Please share details of how you go about it. Would like to go that route once for the X series at least.
I did, before ebay india was shut by flipkart. But by then, I had the seller's contact so I bought directly from him when I needed to.

This is their own site.

Also, you can call him to get the best deal.
5hadow is offline  
Old 8th April 2019, 17:07   #45
BHPian
 
bullet-tooth's Avatar
 
Join Date: Aug 2012
Location: Chennai
Posts: 78
Thanked: 25 Times
Re: DIY: Laptop hardware upgrades

I had to recently do the DIY process for my Dell Inspiron 7560. An improperly closed water bottle flooded my laptop bag and in the process my laptop too. I was able to disassemble the back panel and dry up the laptop however the HDD took a hit.

Checked with the Dell service center and the quote for a 500 GB SSD (Non familiar brand) was INR 12000+ GST, not including the additional service cost. Decided to go the DIY route and found the Seagate 500GB SSD available for INR8000 in Amazon. Got it delivered the next day and replaced the HDD with the SSD.

Since I had my OS backed up, reviving my laptop to its original state was a breeze. After the DIY upgrade to SSD, the laptop is just blazing fast, applications load much faster and boot times are less than 15 seconds. Overall happy with the upgrade.
Attached Thumbnails
DIY: Laptop hardware upgrades-img3232.jpg  

DIY: Laptop hardware upgrades-img3231.jpg  

DIY: Laptop hardware upgrades-70a3ae19933c4f7db75483d6938804b1.jpg  

DIY: Laptop hardware upgrades-5ad2c41eb70c4fa48046a4db8d42d076.jpg  


Last edited by bullet-tooth : 8th April 2019 at 17:08.
bullet-tooth is offline  
Reply

Most Viewed


Copyright ©2000 - 2024, Team-BHP.com
Proudly powered by E2E Networks