| |||||||

| Search Forums |
| Advanced Search |
| Go to Page... |
 |
| Search this Thread |  16,476 views |
 25th December 2020, 20:14
| #1 |
| Distinguished - BHPian  | DIY: Thermal repaste on a gaming laptop The following thread apart from being a DIY is also a lesson as to why some service centres shouldn't be trusted on the pretext of the product being in warranty. The first few paragraphs will shed light on the latter, while the following ones will focus on the DIY. Introduction I bought an Acer Nitro 5 back in July, 2020 from Amazon. For those interested, here are the specs:
Anyways, the laptop eventually came home and I was very satisfied with it. Though I had been warned about the thermal performance being strictly average, I really didn't mind considering the following points:
I also tweaked the processor power management settings a bit to sacrifice performance and reduce heat buildup by doing the following:
Following these steps, the temps dropped further and I found a sweet spot between performance and heat management. Playing Euro truck simulator on maxed out graphics saw temperatures sore to a max of only 70-75 degrees. All in all, I was mighty satisfied with my purchase. For an average joe, who had seen nothing more than intel core i3 notebooks with 4GB of RAM all his life, the Nitro 5 seemed to perform comparatively better* * - As I would find out later, I had barely scratched the surface 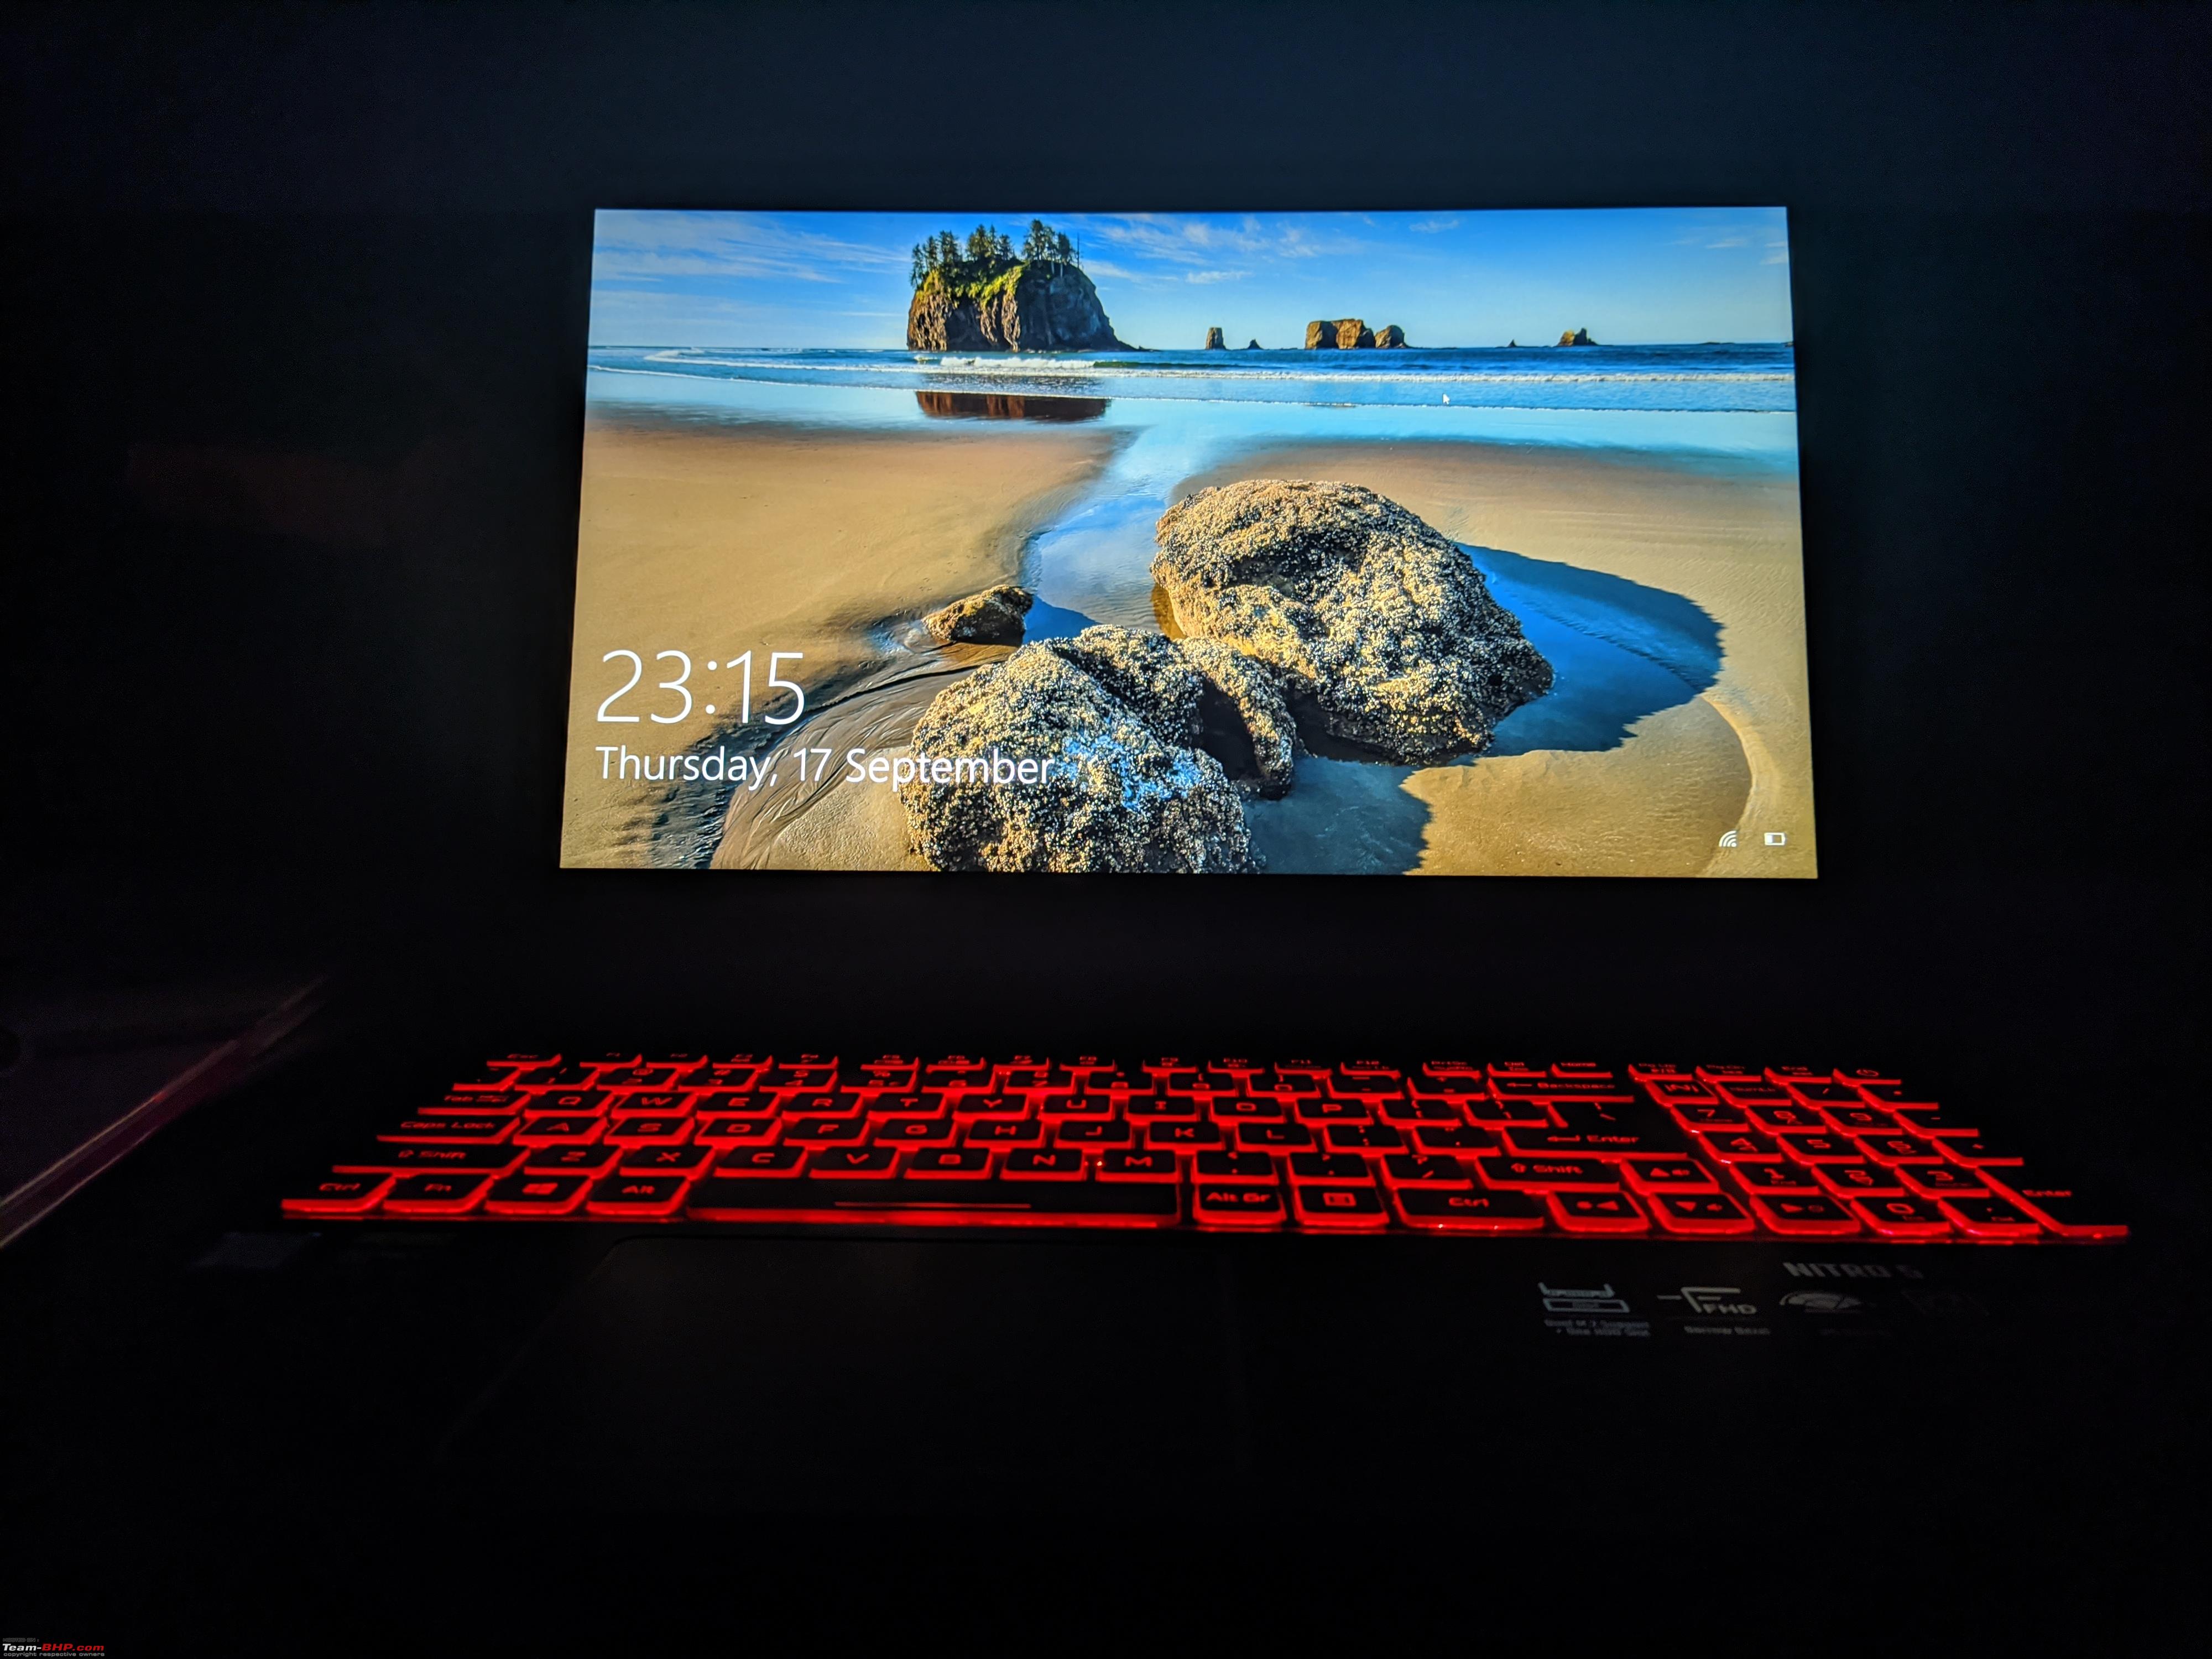 Last edited by vishy76 : 6th March 2021 at 16:31. |

|  (15)
Thanks (15)
Thanks
 |
| The following 15 BHPians Thank vishy76 for this useful post: | Amien, ashking101, deep_behera, evilmessiah, gauravanekar, GTO, InControl, lovetorque, ManneAtWheelz, PM - B, R2D2, Researcher, Samfromindia, The_Outsider!, vigsom |
| |
|
6th March 2021, 02:19
| #2 |
| Distinguished - BHPian | Re: DIY: Thermal repaste on a gaming laptop The HDD saga  As I mentioned before, my laptop came with a 1TB HDD from the factory. A 256GB SSD could be added for a sum of 5K, but I thought it was a steep price to pay for 256GB only. The issue started the day I bought the laptop. The HDD would make clicking noises which seemed louder than usual. Having owned two laptops:
I knew it was better to wait for a month and see if the noise subsided or get it checked otherwise. A month passed and surprisingly, the clicks went down considerably. I was quite sure by now that it was just me being overly paranoid and left it at that. Fast forward to November, and the noises resurfaced with two peculiar observations.
My limited research had revealed that the HDD used in my laptop was indeed the f(r)amed Seagate Baracuda 1TB. Notorious for being extremely noisy apart from failing in many cases. I decided I had nothing to lose by having the laptop shown to a service centre and getting the HDD diagnosed. In hindsight, this would end up being the biggest screw up I committed in a series of oversights. First Visit Off went the Nitro 5 to the nearest (and only) service centre. The staff took the laptop in and asked me what the issue was. I was very specific in pointing out that there are loud clicking noises and heat emanation from the bottom right of the laptop casing where the HDD is and absolutely no other problems. The same evening, I get a call saying an HDD test had been run (not that I hadn't tried this before) and the HDD had PASSED. Fan servicing (something I hadn't even demanded) had been carried out as the noise was coming from the fans. The laptop was back. I decided to make peace with the noises, and decided to continue using the laptop since there were no other performance issues in the least. I fired her up as usual, and started my daily chore of using MS Teams and Adobe Illustrator (Heavy gaming was seldom done as mentioned before). I distinctly remember walking out of my room to attend to an urgent task and 15 minutes later, I walked back in to see the Nitro sounding like a jet aircraft. Temps were now rising to 60-70 degrees celsius while using MS Teams. This wasn't obnoxiously high, but it was something I hadn't ever seen happening. On a normal day with high ambient temps, the Nitro would idle between 40-50 degrees with the fan at 1600-1800 rpm and spike to 55-57 degrees while running teams. I still decided to let this pass as a one off case and monitor temps for a week. The next week didn't show any improvements. The same issue existed. I had run a check on background processes and terminated a lot of them, but the Nitro would still not idle below 50. I called the service centre who informed me my laptop was anyways due for a "part replacement" pertaining to the cooling module. In what was the second screw up on my part in this whole series, I again agreed to what was said and turned the laptop in. Second Visit The cooling module was replaced straight off and the laptop handed back over to me, claiming all issues had been solved. However, it obviously wasn't the case. The high idle temps continued and sometimes started spiking to 70-80 degrees which had me really worried. It was then that I decided to do a clean windows install taking into account the fact that everything possible on the hardware front had been looked into. The only logical explanation to the high idle temps would be a virus or a trojan that was using up CPU excessively in the background. As luck would have it, my analysis was spot on, but by this time, the service centre's naive approach of replacing the cooling module directly had done more damage than I had imagined. I obviously had assumed they had done a good job of replacing the module but it was not to be. Third Visit The laptop was this time subjected to a fresh install of windows 10 by the service centre since I didn't have the time or patience left to do so. The laptop came back home and this time round, there was a drastic change in behaviour. The laptop started idling around 45-55 degrees which was not outstanding but acceptable. However, while loading the processor up for semi-intense to intense tasks, temps would spike to as high as 95 degrees with the fans triggered. The heat soaked laptop would also take its own sweet time to cool back down. Installing software had become a task, forget graphic intensive gaming or editing. A pic of the laptop with the back cover removed (courtesy the Acer forums). The large black portion with two fans and two tubes protruding out is the cooling module. The processor and GPU are located below as I will indicate in the pics to come later.  Last edited by vishy76 : 6th March 2021 at 15:51. |
|
| (13)
Thanks
|
| The following 13 BHPians Thank vishy76 for this useful post: | ashking101, DriverNo.420, evilmessiah, gauravanekar, GTO, InControl, lovetorque, ManneAtWheelz, R2D2, Researcher, The_Outsider!, Varun_HexaGuy, vigsom |
|
6th March 2021, 15:55
| #3 |
| Distinguished - BHPian | Re: DIY: Thermal repaste on a gaming laptop DIY As is obvious by now, my patience had reached its limits. 3 service centre visits for an issue that Acer themselves had created on a 4 month old laptop that was doing its job perfectly otherwise. I decided to take things into my own hands. Bought myself a 300 rupee screwdriver kit from Amazon, and armed with nothing but a glimmer of confidence that I could solve the issue, I went about opening the Nitro up. Getting the rear cover off is fairly simple. There are 11 philips head screws as illustrated by the image below. Once undone, gently start prying the lid away from the frame to undo the plastic clips. Gentle is the keyword here. One important thing to note here is that Acer have been complete morons and stuck a disposable sticker (saying warranty) to the hole encircled in blue below. This is specific to India and a handful of other markets. Lawfully, an average joe should be allowed to swap SSDs, HDDs and RAM chips but its obvious Acer believes its (un)skilled service centres can handle it far better.  Once the cover was off, I was a bit shocked at what I saw. I could clearly see traces of pink thermal putty oozing out of the ends of the cooling module. Now I don't expect a factory finish job at a local service centre, but the pink putty that had leaked onto the motherboard through the ends of the module did have a story to tell. I decided to go the whole hog and see what was wrong. I once again went ahead and undid the 9 screws holding the cooling module itself in place and what I saw was nothing short of a disaster. The cooling module itself is held by 9 screws and composed of two sections. The heat sink pipes which carry the heat away from the processor and GPU and dissipate it, and the fans which obviously supply the cool air required to get the heat moving. The heat sink section which sits on top of the GPU and CPU is held in place by 7 philips head screws as shown below:  The fan section is held in place by 2 philips head screws:  Once all these are undone and kept aside safely (they do have size variations beware), comes the tricky part of lifting the cooling module out. The module is still held in place by means of two cell sized magnets below the fans and thus pulling it off simply is not the solution. Secondly, there are two connectors that also attach to the CPU and GPU fans separately. These also need to be undone. As a precaution, simply lift the module and flip it over its back. Make sure you hold the fan and tubings together and pull it out, else you risk snapping the module into two pieces clean. Before all that, here's the sight that greeted me when I gently lifted the cooling module out and flipped it: 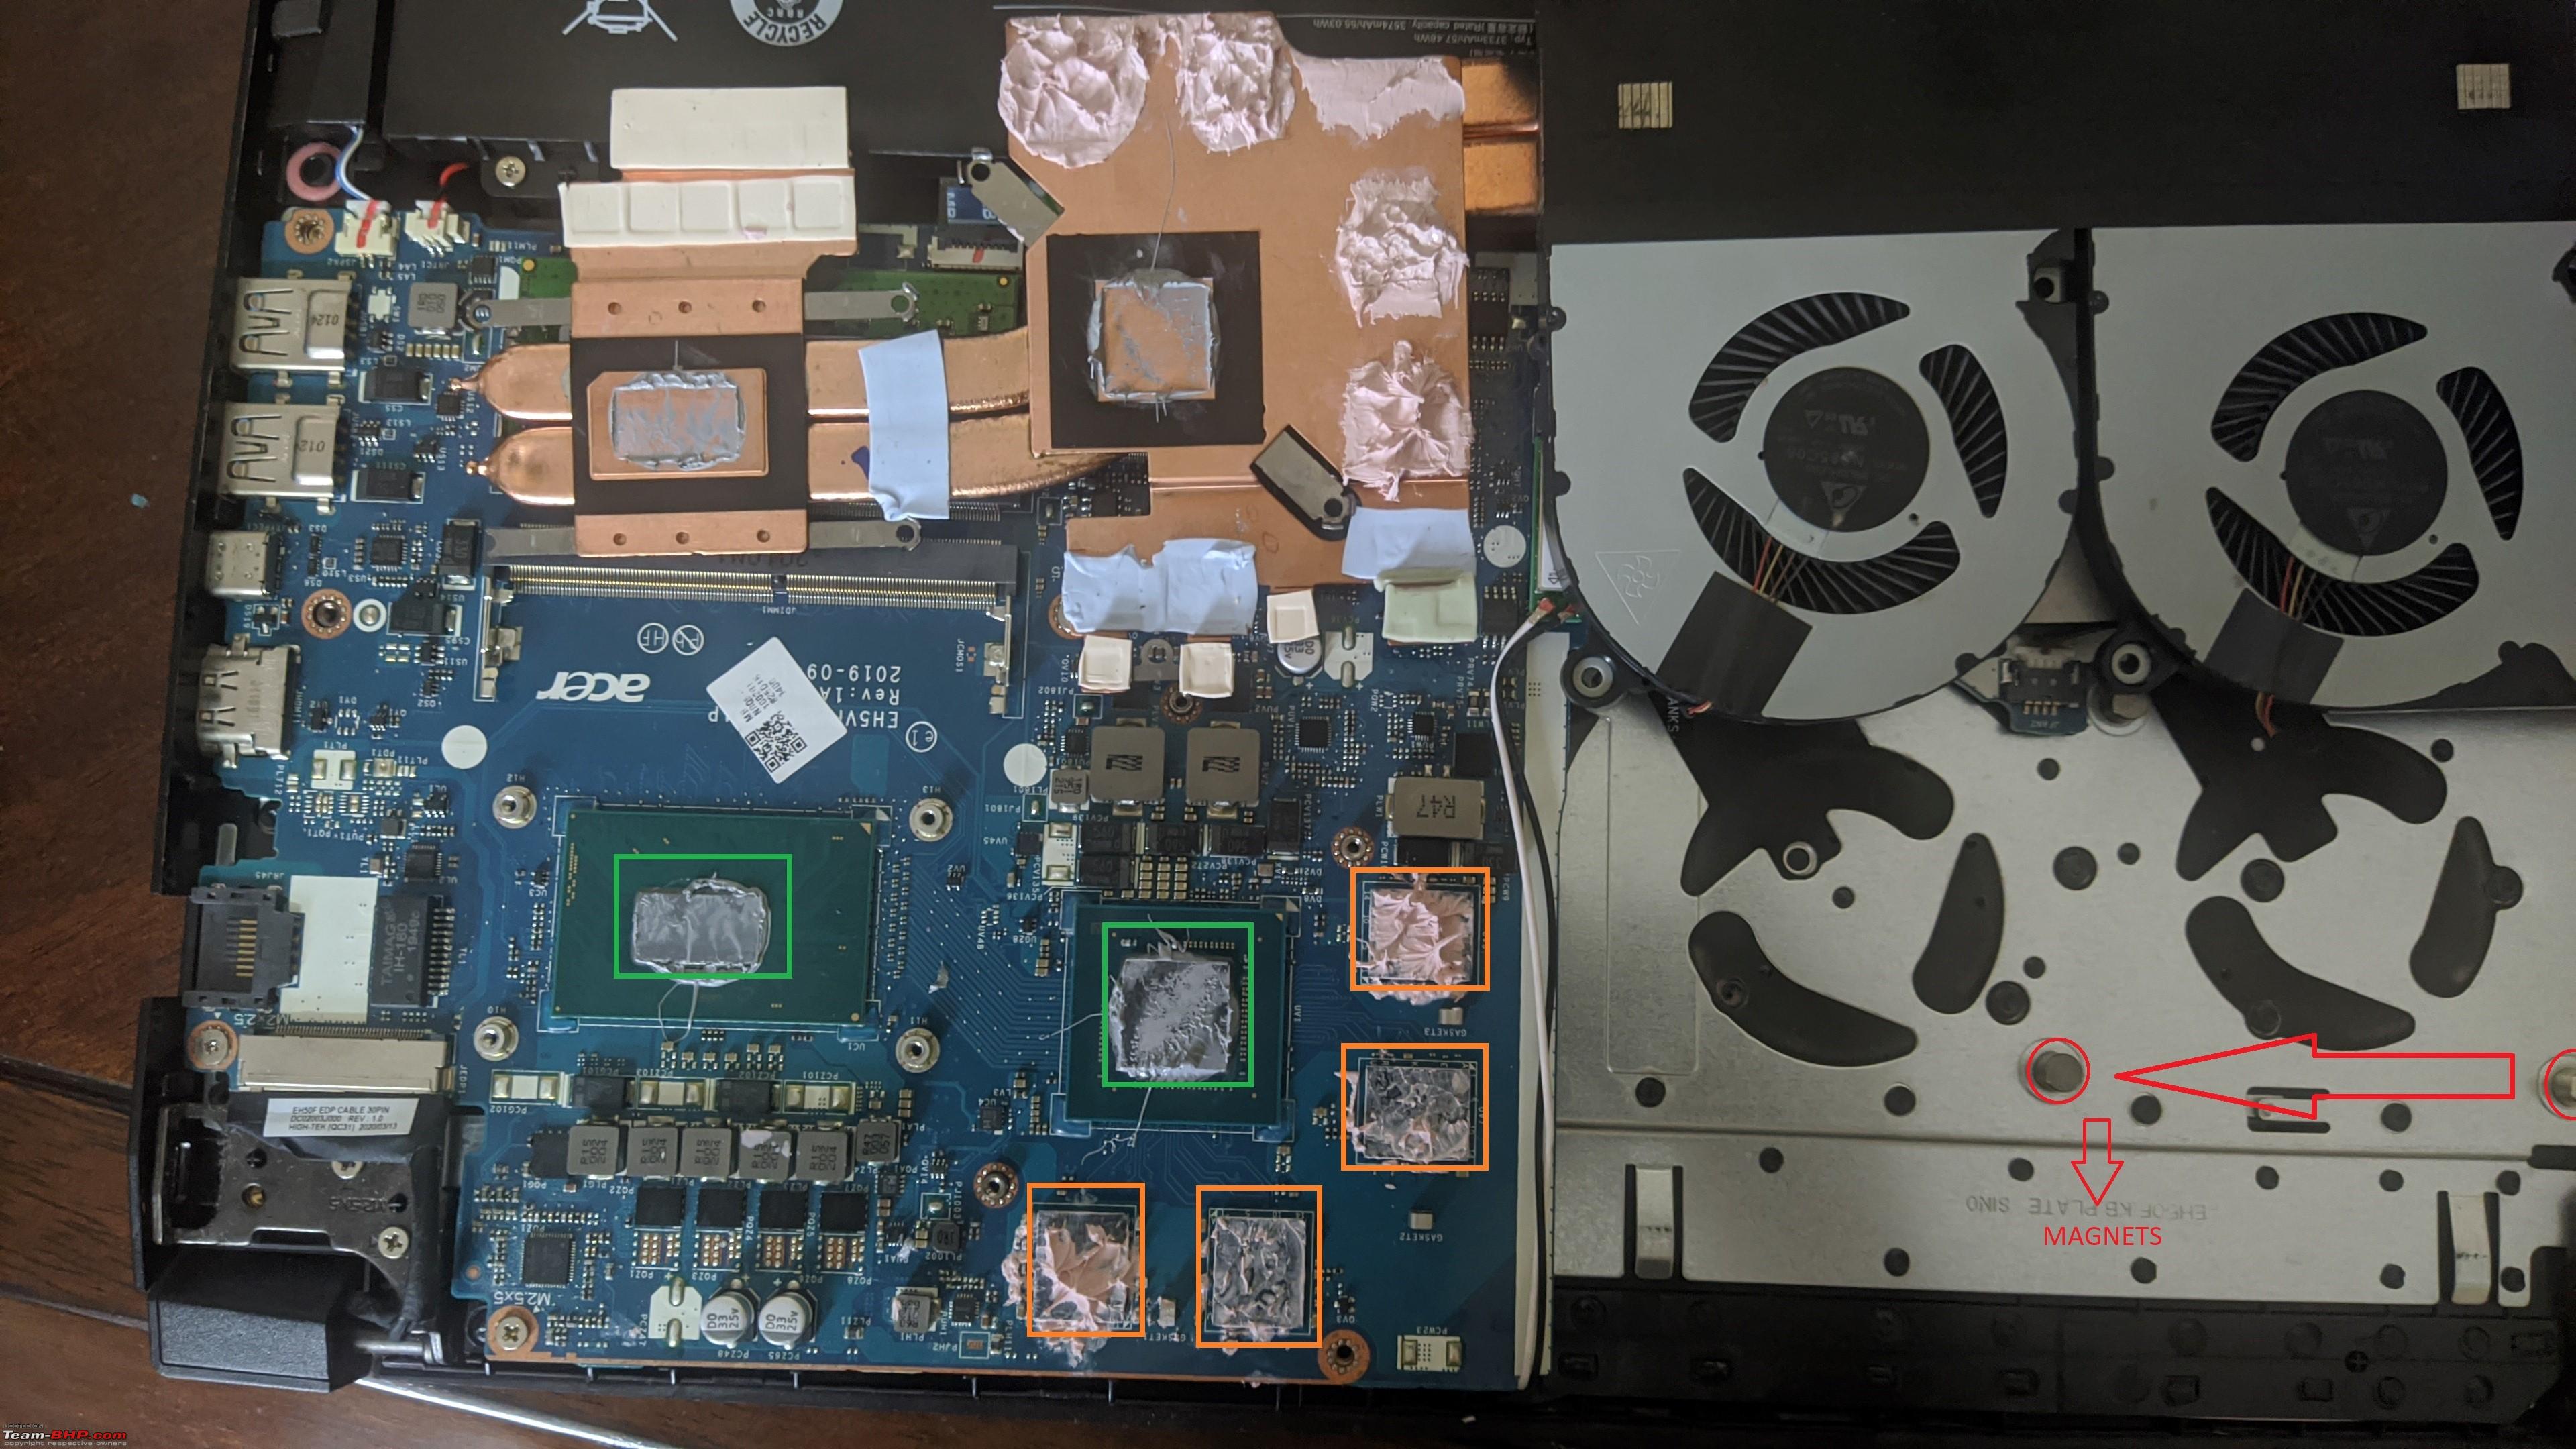 For ease of reference, I have marked the parts in colour codes and here's what they correspond to: - Marked in red connected by arrows are the two magnets holding the fan to the casing (one magnet is partially visible) - The four squares marked in orange are the GPU chips - The green rectangle and square are the CPU and GPU respectively There was clear excessive application of the pink paste on the 4 GPU chips first off. Secondly, though the CPU and GPU had been repasted a lot better, I could still see traces of the paste oozing towards the side. The motherboard components had a lot of pink paste stuck in them. I knew a complete repaste was needed at this point apart from cleaning this mess (an even bigger pain). I decided to do the repaste myself. As a precaution, the main battery and the CMOS connector both were unplugged as pictured below:   At this point, there are two ways of doing this: - Disconnect the fan modules and completely lift the cooling module out and keep it aside, then clean it thoroughly - Let the cooling module be flipped on its back as shown above and clean it along with the GPU and CPU, followed by a fresh repaste If a simple thermal repaste is all you want, the second option more than suffices. However, in my case, I knew the mess made on parts of the motherboard needed attention, so I went ahead and disconnected the two connectors pictured below and lifted the cooling module out:  The connector getting in the way (with black and red wires leading into it) is the power port connector for the charger into the motherboard. You will need to remove it in order to undo the second fan connector (both connectors have been highlighted in red) With all the disassembling done, I started the tedious job of cleaning all the mess. It took me 2-3 hours to clean out all of the old paste. I used tissue paper and a toothpick to reach smaller parts of the motherboard, however, in an ideal case, one should use the following: - A lint free cloth (so that the fibres don't get stuck to parts of the motherboard) - 90+% IPA (makes the job of stripping the old paste off a hell lot easier) - A toothpick though it should be used with utmost care and only if the motherboard has traces of the paste This is how things looked post cleaning. CPU:  GPU (the four black chips are the GPU RAM chips (1GB each)):  With all the cleaning done, I ordered the thermal paste required to do the job. I went with Arctic MX-4 Thermal paste on suggestions from S.M.  The paste would take a week to arrive at my doorstep. While I was at this, I considered the options I had to redo the GPU chips. The GPU chips sit lower than the CPU and GPU as can be seen and thus need: - Thick thermal putty as depicted in the images above to cover the gap and ensure proper mating with the heat sink OR - Thermal pads that essentially do the same jobAfter deliberating a bit, I decided to go ahead with thermal pads. Although these aren't what came from the factory, they are a lot easier to apply and ensure that I don't end up making the same screw up of applying excessive amounts that the service centre made with the thermal paste. I also decided to not touch the rest of the thermal pads on the motherboard ancillaries since they seemed to be in good nick. I thus ended up ordering the thermals pads from Amazon as well. For reference, the size I used was 15mm x 15mm x 1.5mm. These are made by a company called Buyyart. Not the best in the business, but do the job well enough. ADWITs are the best out there though you do need to cut them to size.  Post final cleanup and plugging the cooling module back in but still flipped on its back, here's how things looked:  Reassembly With the thermal pads and paste ready, and the motherboard along with the CPU,GPU and cooling module all cleaned of any old debris and paste, its time for reassembly. Start by placing the thermal pads on the GPU chips as shown below:  Now comes the tricky part of applying the paste on the CPU and the GPU. Unfortunately, I don't have images of the same with me, but there are several methods to apply the paste. I used the line method and the pea method (CPU and GPU respectively). As the name suggests, the line method includes application of the paste in the form of a line that stretches across the CPU and the pea method includes applying the paste in the form of a pea. I have tried to indicate the application roughly as shown below:  Post this, the cooling module needs to be put back into place. The pressure of the module on top will evenly spread the paste across the CPU and GPU. Ensure that you DO NOT move the module around too much or lift it once it touches the CPU and GPU. This will lead to air gaps being created and the basic purpose of the thermal paste (keeping the CPU and GPU in perfect contact with the heat sink to ensure optimum heat dissipation) will be defeated. With this done, the cooling module screws simply need to go back in. Make sure that all the screws are hand tightened. Finally, connect the battery and CMOS connections. Make sure that you align the connectors each and every time before forcing them into their slots. I obviously didn't and ended up bending the contact pins inside the battery and one of the fan connectors. Wasted 2 hours of my life getting them straight using a sewing needle. Finally, do a test fire up once. My laptop restarted 2-3 times before booting up perfectly (probably because I had disconnected the CMOS and battery for 2 weeks). Put the rear cover back on and screw it back in (again, hand tighten the screws to medium tightness). Set the time and date again. In my case, the Nitro idled at temps as low as 35-40 degrees post repaste. The fans would even shut off sometimes at idle. Under minor loads (MS teams, Chrome or even while installing software) temps never cross the 50-55 degree mark in most cases. The real difference was felt while gaming. Euro Truck simulator 2 on ultra graphics was played for 1.5-2 hours and the Nitro still didn't budge beyond the 60-65 degree barrier. That's a straight 10-15 degree drop even as compared to the factory paste. All in all, this DIY was well worth it. Last edited by vishy76 : 8th March 2021 at 01:39. |
|
| (36)
Thanks
|
| The following 36 BHPians Thank vishy76 for this useful post: | --gKrish--, Amien, ashking101, DevilzzzzOwn, DriverNo.420, evilmessiah, gauravanekar, GTO, ike, InControl, jeygani, keroo1099, lemedico, lovetorque, lxskllr, ManneAtWheelz, ph03n!x, PM - B, pu5han, Puneet.S, R2D2, Researcher, RoadAtlas, Rohan24, sai_ace, scorpio2107, Shome, Shreyans_Jain, Tgo, The_Outsider!, toiingg, Turbanator, Turbohead, Varun_HexaGuy, vigsom, wheelguy |
|
8th March 2021, 01:14
| #4 |
| Distinguished - BHPian | All's well that ends well? Well I would have loved to end this DIY on a good note and I genuinely thought I had. Temps were well in control, the laptop was working beautifully and I had started saving up for an SSD upgrade a year down the line. Unfortunately, on a wintery Friday afternoon, the Nitro 5 randomly froze while I was going about my college assesments. My initial reaction was that it could be a software bug, but after a restart, the same thing occurred again. I could also hear a very rhythmic clicking noise from the area where the HDD was supposed to be. I also noticed this issue occurring when I tried to access multiple files at once or ran software that did the same. I called the Acer Service centre (apart from lodging an official complaint) and gave him a piece of my mind. The laptop was taken in, and the next day I received a call saying it is indeed the HDD and I was right about it overheating and failing at times. The entire HDD was replaced under warranty without any questions being asked (thankfully, my DIY wasn't spotted). I was happy that I didn't have to shell out 7K again, but I was also fed up at the same time. The same Seagate Baracuda had come back with the laptop and I genuinely couldn't stand the sight of it anymore. I decided to upgrade to a full SSD setup and went for the following: - A 250GB Samsung Evo SATA SSD salvaged from an old laptop - A 500GB Kingston A2000 M2 NVME SSD   In total, this venture set me back by 4.8K. But, I had a laptop now that was as silent as it could get, booted up in less than 15 seconds and had lighting fast file transfer speeds. I have sworn to never go back to HDDs now. So there you have it folks. You can take this thread to be an amateur's experience of repasting a laptop, a mid life overhaul guide for your own laptop or even a random team BHP thread that you glance through on a busy Monday afternoon at the office but don't understand much of. Credits I would like to thank Bhpian Subhro Mallick for his constant support and assistance. The decision to go for thermal pads and the repaste itself along with the Kingston SSD was only thanks to him. Last edited by vishy76 : 8th March 2021 at 01:27. |
|
| (33)
Thanks
|
| The following 33 BHPians Thank vishy76 for this useful post: | Amien, arvind71181, ashking101, blackwasp, BoneCollector, dailydriver, Desmosedici, DriverNo.420, evilmessiah, gauravanekar, GTO, InControl, keroo1099, lovetorque, ManneAtWheelz, NirmalK, PM - B, pu5han, R2D2, Ravi Parwan, Researcher, Rohan24, sainyamk95, Samfromindia, scorpio2107, Shome, Shreyans_Jain, Tgo, The_Outsider!, Turbanator, Varun_HexaGuy, vigsom, wheelguy |
|
8th March 2021, 05:11
| #5 |
| Team-BHP Support  | Re: DIY: Thermal repaste on a gaming laptop Thread moved out from the Assembly Line. Thanks for sharing! |
|
| (3)
Thanks
|
| The following 3 BHPians Thank Aditya for this useful post: | GTO, Researcher, vishy76 |
|
8th March 2021, 12:15
| #6 |
| Distinguished - BHPian Join Date: Oct 2008 Location: Pune
Posts: 3,231
Thanked: 5,740 Times
| Re: DIY: Thermal repaste on a gaming laptop Good thread Vishy76 you did a perfect job as far as I can see. Been building HEDTs for myself and the family since the '90s and these DIYs are close to my heart. I use Arctic Silver thermal paste. It's a pain to run-in as it requires heat cycles of some 2-4 weeks to settle in but the results are really good. For cleaning off the old TIM i use Arctic Articlean thermal cleaner solution. It's very effective and recommended. But pure isopropyl alcohol will also do. I need to perform more or less the same DIY on my old Dell Inspiron with a Core i7 CPU. The heat sink fan is noisy and needs to be replaced. This one will get MX4 which I have in stock. I need to buy a good quality thermal pad too. Thanks for the suggestions on ADWIT. |
|
| (3)
Thanks
|
| The following 3 BHPians Thank R2D2 for this useful post: | Researcher, vishy76, wheelguy |
|
8th March 2021, 13:28
| #7 | |
| Distinguished - BHPian | Re: DIY: Thermal repaste on a gaming laptop Quote:
Yes, you are right about the Arctic silver thermal paste. A Nitro 5 forum member is constantly complaining that he's not getting the desired results after using it and I think that's purely down to the paste not being run-in correctly. I have used MX4 and am very satisfied with it. Wanted to use liquid metal for the next repaste but was advised against the same by Subhro (tacho9000) as it can short circuit components if it overflows even a bit and can damage copper heat sinks in the longer run. | |
|
| (2)
Thanks
|

| The following 2 BHPians Thank vishy76 for this useful post: | gauravanekar, R2D2 |
|
8th March 2021, 14:48
| #8 | |
| Distinguished - BHPian Join Date: Oct 2008 Location: Pune
Posts: 3,231
Thanked: 5,740 Times
| Re: DIY: Thermal repaste on a gaming laptop Quote:
A word of caution with articlean - it's non alcoholic and made of plant based extracts so it does not evaporate. Whenever you're using it make sure the CPU surface and it's surrounding areas are dry before attaching the heat sink. What I do is give a final wipe over with 99% isopropyl alcohol and check for any residue and dust before putting on the heat sink. Cheers! | |
|
| (2)
Thanks
|
| The following 2 BHPians Thank R2D2 for this useful post: | gauravanekar, vishy76 |
|
8th March 2021, 15:32
| #9 |
| BHPian Join Date: Nov 2008 Location: Bangalore
Posts: 914
Thanked: 4,076 Times
| Re: DIY: Thermal repaste on a gaming laptop Want another 10deg drop in CPU temp, with a few clicks? Click-baity title aside, if you have an Intel CPU, you can undervolt it by 50-150mV depending on your exact processor and end up with much better thermals and battery life. This is the first step that everyone must do, before resorting to re applying the thermal paste. Guide: https://www.ultrabookreview.com/3138...tlestop-guide/ |
|
| (4)
Thanks
|
| The following 4 BHPians Thank d3mon for this useful post: | gauravanekar, haria, Researcher, vishy76 |
|
8th March 2021, 15:47
| #10 | |
| Distinguished - BHPian | Re: DIY: Thermal repaste on a gaming laptop Quote:
There were wild temperature fluctuations while installing software where temps would rise to as high as 90-95 degrees and the laptop would remain heat soaked. This is why I decided to address the thermal paste first. | |
|
| (2)
Thanks
|
| The following 2 BHPians Thank vishy76 for this useful post: | gauravanekar, lovetorque |
|
9th March 2021, 11:49
| #11 | |
| BHPian Join Date: Apr 2013 Location: Dhaka, BD
Posts: 273
Thanked: 441 Times
| Re: DIY: Thermal repaste on a gaming laptop Quote:
 . I'll look at repasting once the laptop breaks in nicely. I always suggest undervolting + cooling pad + proper ventilation for new laptops as this solves 99% of your temp problems. . I'll look at repasting once the laptop breaks in nicely. I always suggest undervolting + cooling pad + proper ventilation for new laptops as this solves 99% of your temp problems. Good to hear about your ssd experience, there's no going back after you try a ssd  Saved your DIY as I believe my aspire also has the same cooling setup. Thanks for the guide again. | |
|
| (2)
Thanks
|
| The following 2 BHPians Thank createrkid for this useful post: | gauravanekar, vishy76 |
| |
|
9th March 2021, 12:08
| #12 |
| BHPian Join Date: May 2020 Location: Pune, KL10
Posts: 26
Thanked: 95 Times
| Re: DIY: Thermal repaste on a gaming laptop I have a personal project (LED fog lights) going on with thermal paste application as a process involved. Came across the above video during our studies. Hope this adds some value. Last edited by Sheel : 9th March 2021 at 12:29. Reason: Please capitalize where necessary. Thanks. |
|
| (3)
Thanks
|
| The following 3 BHPians Thank Leem for this useful post: | catkins, gauravanekar, vishy76 |
|
9th March 2021, 12:47
| #13 | ||
| Distinguished - BHPian | Re: DIY: Thermal repaste on a gaming laptop Quote:
 Quote:
| ||
|
| (2)
Thanks
|
| The following 2 BHPians Thank vishy76 for this useful post: | gauravanekar, Leem |
|
9th March 2021, 12:54
| #14 |
| Senior - BHPian Join Date: Jun 2008 Location: Kolkata
Posts: 1,476
Thanked: 1,207 Times
| Re: DIY: Thermal repaste on a gaming laptop Great thread. Have done the same on my Alienware 15 R3 - An absolute nightmare as motherboard removal is a requirement in this model. For next time you are feeling adventerous and want to take the next step |
|
| (2)
Thanks
|
| The following 2 BHPians Thank AbhiJ for this useful post: | gauravanekar, vishy76 |
|
9th March 2021, 19:16
| #15 | |
| BHPian Join Date: Mar 2020 Location: Sydney
Posts: 131
Thanked: 522 Times
| Re: DIY: Thermal repaste on a gaming laptop Quote:
 , it would heat upto 96c(thermal limit) within 30 seconds of doing anything processor intensive, including playing old games - even at just 1.2Ghz(with a heavy undervolt!). I thought the machine was done for, but new thermal paste + general service for Rs. 900 brought the cooling system back to top shape, and I've been running Folding@home on it for 2 years now. It can now boost up to it's rated speed of 2.9Ghz and stay there happily for days on end, pretty impressive results for such a small expense. , it would heat upto 96c(thermal limit) within 30 seconds of doing anything processor intensive, including playing old games - even at just 1.2Ghz(with a heavy undervolt!). I thought the machine was done for, but new thermal paste + general service for Rs. 900 brought the cooling system back to top shape, and I've been running Folding@home on it for 2 years now. It can now boost up to it's rated speed of 2.9Ghz and stay there happily for days on end, pretty impressive results for such a small expense. 55c for a hard drive is very, very high. I'm not surprised it failed as early as it did. I have a 2TB Seagate Barracuda in my desktop, and I try to never let the temperature cross 40c. SSDs can take the heat, and that's another reason they're preferable for portable applications. My laptop's SSD normally stays between 35-37c, but can touch 60c when I've left it on a table under direct sunlight! | |
|
| (1)
Thanks
|
| The following BHPian Thanks rkv_2401 for this useful post: | vishy76 |
|