Team-BHP > Team-BHP Reviews > Long-Term Ownership Reviews
Register New Topics New Posts Top Thanked Team-BHP FAQ


Reply
  Search this Thread
1,802,299 views
Old 27th August 2020, 23:53   #1141
Senior - BHPian
 
Join Date: Jul 2015
Location: Chennai
Posts: 1,363
Thanked: 5,735 Times
re: VW Polo GT TDI ownership log EDIT: 9 years and 178,000 km later...

Quote:
Originally Posted by Thad E Ginathom View Post
One question: what are the gloves you are using?
Those are regular gloves you find in any hardware store. Works well for handling greasy machines and sharp objects!If I'm not wrong it'll cost around ₹10-20 per pair.
Turbohead is online now   (2) Thanks
Old 30th August 2020, 01:11   #1142
Newbie
 
Join Date: Sep 2019
Location: Mysore
Posts: 20
Thanked: 6 Times
Re: VW Polo GT TDI ownership log EDIT: 6.5 years and 158,000 km up!

Quote:
Originally Posted by Gannu_1 View Post
[list][*]160,000 km up!

In case you’re wondering about the oil spilled on the inlet air duct and the surrounding areas in the first snap above, I used the electric blower to push the leftover oil from the oil filter opening and some oil splashed all over the engine bay. Bad idea really! Best to soak the leftover oil with a good cloth. I did that later and realised it. I did however use the blower on the oil filling port and it pushed some oil through the drain hole. This was an idea BHPian Leoshashi had used during his oil change service.

I second the cloth option to soak leftover oil. Not sure if this applies to the TDI bay, but for my 1.2 MPI, I need to cover up the alternator with some polyethylene sheet to avoid oil spillage on it when removing oil filter housing( learnt this from my Haynes manual)

As always, it’s a pleasure to see you take such good care of her via DIY
rnkaushal is offline   (1) Thanks
Old 12th September 2020, 13:36   #1143
Team-BHP Support
 
Gannu_1's Avatar
 
Join Date: Apr 2013
Location: Madras
Posts: 7,174
Thanked: 20,220 Times
re: VW Polo GT TDI ownership log EDIT: 9 years and 178,000 km later...

  • Quote:
    Originally Posted by Gannu_1 View Post
    Will update this thread once I get the reverse cam up and running.
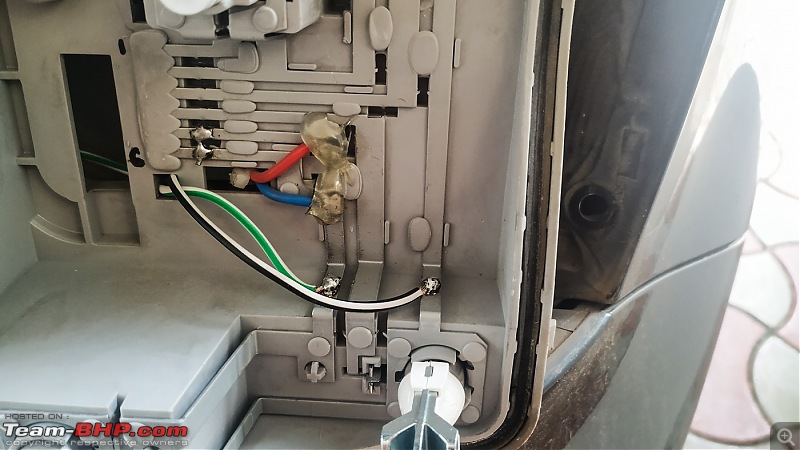
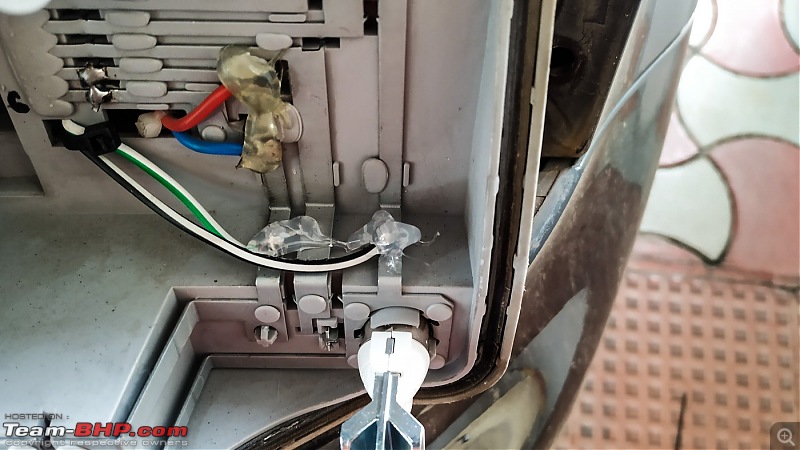
    Hooked up the rear view camera to the RCD 340 using the RCA to 10-pin adapter cable and powered the camera from the reverse light using a DIY delay timer circuit. Works beautifully although the image quality isn’t 4K or full HD types! It’s a cheap, aftermarket camera so we get what we pay for I suppose.

    The power connections to the camera were tapped from the reverse light in the RHD tail light’s terminals (since I have the Euro tail lights, the reverse lamp bulb is on the RHD light). Scrapped some portion on the flat strip for the solder to stick on to and covered it with some hot glue.

    VW Polo GT TDI ownership log EDIT: 9 years and 178,000 km later...-img_20200712_110910.jpg

    VW Polo GT TDI ownership log EDIT: 9 years and 178,000 km later...-img_20200712_112250.jpg

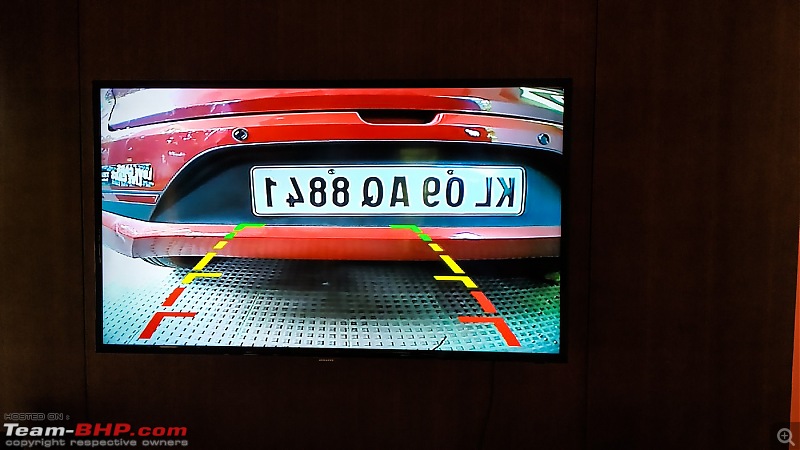
    Testing the output on the LCD TV using the RCA jack to check if things are in order:

    VW Polo GT TDI ownership log EDIT: 9 years and 178,000 km later...-img_20200712_114315.jpg

    So this part was done and the camera powers up and outputs the display just fine.

    Quote:
    Originally Posted by Gannu_1 View Post
    There’s a problem with aftermarket cameras connected to the RCD 330/340 systems. A delay timer is to be used to supply power to the camera for 8-10 seconds briefly after the user disengages the reverse gear to the forward gear and then switches to the reverse gear (which can happen when reversing or parking out of tight spots) or a black screen would appear.
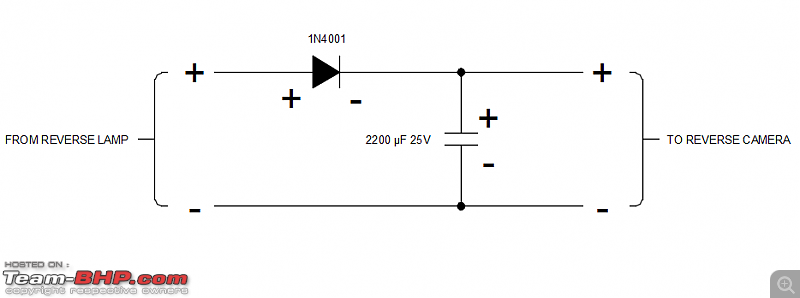
    Now comes the delay timer part. Aliexpress has delay timers for cheap but with the current situation, I wasn’t sure if the consignment would reach me so I searched the internet for some leads on making this delay timer and the Russian car blog Drive2 came to the rescue once again! The Russians I tell ya!

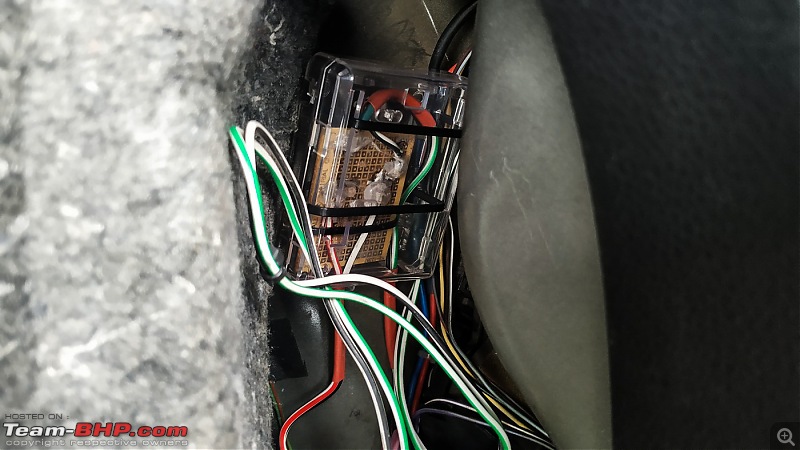
    Got a general purpose PCB, a 2200 uf 25V capacitor and a PN diode 1N4001 for reverse voltage protection. This is the simple circuit diagram:

    VW Polo GT TDI ownership log EDIT: 9 years and 178,000 km later...-wiring-diagram.png

    Assembled it as shown:

    VW Polo GT TDI ownership log EDIT: 9 years and 178,000 km later...-img_20200712_103252.jpg

    VW Polo GT TDI ownership log EDIT: 9 years and 178,000 km later...-img_20200712_103301.jpg

    I wanted to enclose it in a box or case while securing it inside the car. Got hold of a R-Pi acrylic case from Amazon (cost me Rs. 200):

    VW Polo GT TDI ownership log EDIT: 9 years and 178,000 km later...-img_20200910_104634.jpg

    There are cut-outs in the case meant for the different jacks on the R-Pi board. Used that for routing the cables:

    VW Polo GT TDI ownership log EDIT: 9 years and 178,000 km later...-img_20200910_104951.jpg

    VW Polo GT TDI ownership log EDIT: 9 years and 178,000 km later...-img_20200910_105004.jpg

    Secured the box behind the RHS tail light inside the boot liner:

    VW Polo GT TDI ownership log EDIT: 9 years and 178,000 km later...-img_20200910_105146.jpg

    VW Polo GT TDI ownership log EDIT: 9 years and 178,000 km later...-img_20200910_105710.jpg

    At the head unit side, connected the male RCA jack of the camera to the female RCA to 10-pin adapter cable:

    VW Polo GT TDI ownership log EDIT: 9 years and 178,000 km later...-img_20200910_105247.jpg

    And plugged it to the head unit. Using VCDS, I had to enable Bit 6 under Byte 3 in 56-Radio, Long Coding Helper.

    Output on the display:

    VW Polo GT TDI ownership log EDIT: 9 years and 178,000 km later...-img_20200910_105810.jpg

    And in the dark:

    VW Polo GT TDI ownership log EDIT: 9 years and 178,000 km later...-img_20200907_224843.jpg

    There’s an option to switch to the sensor view by pressing on the display and reverting to the camera display as well. A short clip which demonstrates it:


    I also noticed that opening the boot door disables the camera option and only shows the parking sensors’ view. Might be a safety feature?

    I owe my sincere thanks to BHPian antardaksh for all his inputs! If someone’s interested in getting the OEM camera with better display IQ and the boot release button, check out this link - Drive2. Ships from Russia at 42 Euros + shipping.

  • On the driver side floor mat, the area where we rest the heels wears out pretty soon. Happened with me with two sets of noodle mats I had before. I decided to place a piece of aluminium checkered plate on the mat to rest the heels. The kind you would usually see on the floors of buses. The size is close to that of an A4 sheet - just perfect to rest the heels on. Especially when I am on shipyard duty these days wearing the safety boots with hard soles!

    VW Polo GT TDI ownership log EDIT: 9 years and 178,000 km later...-img_20200912_091941.jpg

    VW Polo GT TDI ownership log EDIT: 9 years and 178,000 km later...-img_20200912_104727.jpg

    If you’ve noticed, most 3D mats come with a small piece of a rugged material at the area where the heels rest:

    VW Polo GT TDI ownership log EDIT: 9 years and 178,000 km later...-1.jpeg

    I'll be getting some hex socket countersunk screws and hex nuts to secure the plate to the OEM rubber mat.

  • After over 4 years of usage, the Jetta/Passat OEM mirror’s mount came off the windshield.

    VW Polo GT TDI ownership log EDIT: 9 years and 178,000 km later...-img_20200905_121447.jpg

    I am guessing this could have happened due to a mix of intense heat generated on the windshield and/or inadequate surface preparation on the windshield. I had wiped the area with IPA before sticking the mount; usually VW sells a primer paint for sticking mirror mounts which I had later sourced. Last week, I had noticed that the mirror was shaking unusually when the car passed through bad stretches in the shipyard. Upon touching the mirror’s base, I realised that it is wobbling and may come off any time! Luckily for me, it was a day before the weekend so I had some time to fix this.

    Removed the mount from the windshield and the plastic trims. The Bondtite epoxy glue had still stuck to the mount whereas the windshield area was clean. Not a speck of glue there! Took the mount home and used a chisel and hammer to remove the bonded glue. Prepared the surface using a 500 grit sandpaper and a file and, wiped the surface clean using IPA. This time, I decided to stick to the good ol’ M-Seal. The red and black variant, regular epoxy compound.

    VW Polo GT TDI ownership log EDIT: 9 years and 178,000 km later...-img_20200910_105327.jpg

    I had used this variant to secure the projector assemblies to the reflector shrouds during the projector retrofit DIY. Armed with all the required tools and the cleaned-up mount, I headed to the parking lot in the basement. Cleaned the windshield area around the stock mount using IPA and dried it using a microfiber towel. Mixed the epoxy compound in equal parts, made a fine thread-like shape by rolling it between the hands and gently applied it to both the sides of the mount. I also applied a tinge of Bondtite epoxy compound (the fast and clear variant which is my go-to epoxy glue for nearly everything!) on the corners just for the extra assurance! Stuck the mount to the windshield and some extra bits of the epoxy compound had squeezed out of the mount. Scraped it using a hobby knife and cleaned it. Applied some masking tape over the mount and let it cure. The time was 9 PM when I wrapped up the job.

    The next day at 6 PM i.e. after almost 21 hours of letting the compound cure, I returned to the basement, removed the masking tapes and the mount had set in. I had the DIY link opened on one of the tabs on my phone’s Opera browser to help me with securing the trims back - I was pretty sure I’d fumble and indeed I did - I did not know the orientation of the mirror’s harness covers. Figured it out and reassembled everything the way it was. The mirror was finally back in action. Until next time it falls off. I really like this large one from the Jetta/Passat over the newer ones they currently bundle with the highline variants which is a size smaller to my liking although the shape looks cool. There’s even another frameless variant which will have to be sourced from Russia. So that was it about the mirror. Thought of putting it down here for records and later references.

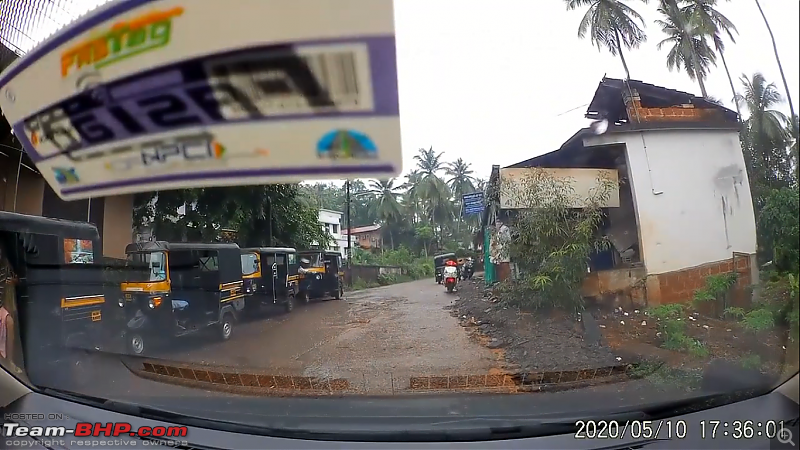
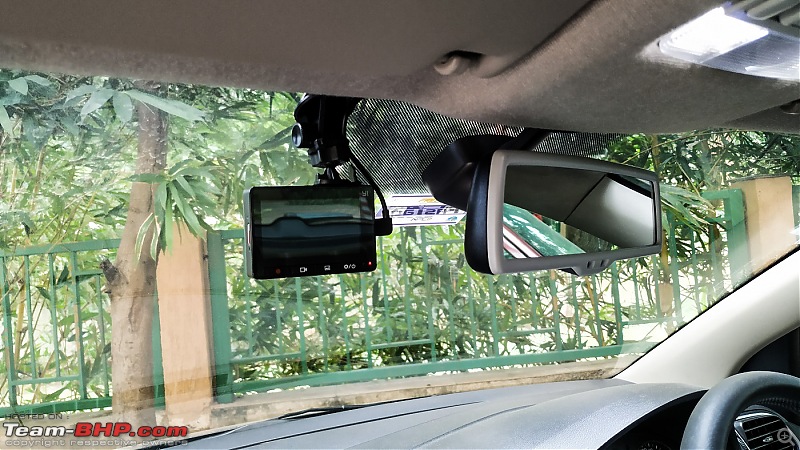
  • Since I had to rework on the mirror mount, I thought of relocating the dashcam to a newer position so the Fastag’s sticker doesn’t obscure the vision. As you can see from a snapshot of the dashcam’s clip, the Fastag’s location can get pretty annoying:

    VW Polo GT TDI ownership log EDIT: 9 years and 178,000 km later...-dashcam.png

    I took out the dashcam’s support and stuck it to the co-driver side using 3M’s Dual Lock tape which is essentially 3M’s variant of the inimitable Velcro.

    VW Polo GT TDI ownership log EDIT: 9 years and 178,000 km later...-img_20200905_122621.jpg

    The inter-locking however is miles ahead of the Velcro tape and the support does not move around.

    VW Polo GT TDI ownership log EDIT: 9 years and 178,000 km later...-img_20200912_125933.jpg

  • Parts for the front brake upgrade have slowly been trickling in from Boodmo.

    VW Polo GT TDI ownership log EDIT: 9 years and 178,000 km later...-img_20200912_122019.jpg

    The larger discs have been ordered but Boodmo is yet to ship them; almost a month due since the order was placed. I guess I’ll have to source the calipers and caliper brackets from Germany. The stock pads have plenty of life left so I am good for now.

  • It is also time to get her detailed. The last detailing session was over 3 years ago (link) from Guru's magical hands at Driveclean, Chennai. After experiencing his work and getting to know him, I know I don't have to search Google or Team-BHP's directory for another detailer. Once our first boat is dispatched to Vietnam and I am relieved of my shipyard duties, I'll drop her at his place.

Quote:
Originally Posted by Thad E Ginathom View Post
You didn't try to sell yourself anything like germ treatment or AC sterilization?
Heheh, that reminds me, I’ve got to clean the AC blower once. It has never been done till date! With all that dust, dirt and what not, I am sure there’s a whole new ecosystem in there!


Quote:
Originally Posted by Thad E Ginathom View Post
One question: what are the gloves you are using?
We get these cloth gloves from the shipyard Nick. I wash and use them as much as possible. Comes in handy all day especially since these aluminium shavings and burrs are so unlike the burrs from mild steel. For the service, it soaks the oil when handling the oil filter or while replacing the drain plug.

That’s it for now. Cheers guys!

Last edited by Gannu_1 : 12th September 2020 at 14:29.
Gannu_1 is offline   (14) Thanks
Old 12th September 2020, 19:02   #1144
Distinguished - BHPian
 
Thad E Ginathom's Avatar
 
Join Date: Jun 2007
Location: Chennai
Posts: 10,999
Thanked: 26,418 Times
re: VW Polo GT TDI ownership log EDIT: 9 years and 178,000 km later...

With your work experience, I expect you might have good knowledge of different adhesives, perhaps even have access to industrial stuff. Might superglue be good for the mirror?

Hmmm... answering self: heat causes it to release.
Thad E Ginathom is offline  
Old 21st September 2020, 12:31   #1145
BHPian
 
TheGearBox's Avatar
 
Join Date: Jun 2020
Location: ???
Posts: 273
Thanked: 576 Times
re: VW Polo GT TDI ownership log EDIT: 9 years and 178,000 km later...

I have a question regarding the GTI instrument cluster: How did you interface it with the car, since it has an analogue fuel gauge whereas the Indian Polo's stock cluster has a digital fuel gauge. Also, the stock cluster does not have an engine temperature gauge whereas the GTI does. Is it simply plug-and-play or is some additional coding or wiring required?
TheGearBox is offline  
Old 21st September 2020, 14:20   #1146
Team-BHP Support
 
Gannu_1's Avatar
 
Join Date: Apr 2013
Location: Madras
Posts: 7,174
Thanked: 20,220 Times
re: VW Polo GT TDI ownership log EDIT: 9 years and 178,000 km later...

Quote:
Originally Posted by TheGearBox View Post
I have a question regarding the GTI instrument cluster: How did you interface it with the car, since it has an analogue fuel gauge whereas the Indian Polo's stock cluster has a digital fuel gauge.
Analog or digital displays on the cluster doesn't matter. The fuel gauge sender outputs the info to the cluster and the cluster displays it. Fuel levels are calculated on the basis of resistance; higher the fuel in the tank, lesser the resistance and conversely, if the tank is empty, you'll get a high resistance reading. Since the GTI has the same tank capacity at 45L, I did not have to do any calibrations using VCDS. Since the Vento has a larger fuel tank, the fuel gauge may not accurately display the fuel level unless it is calibrated.

Quote:
Originally Posted by TheGearBox View Post
Also, the stock cluster does not have an engine temperature gauge whereas the GTI does.
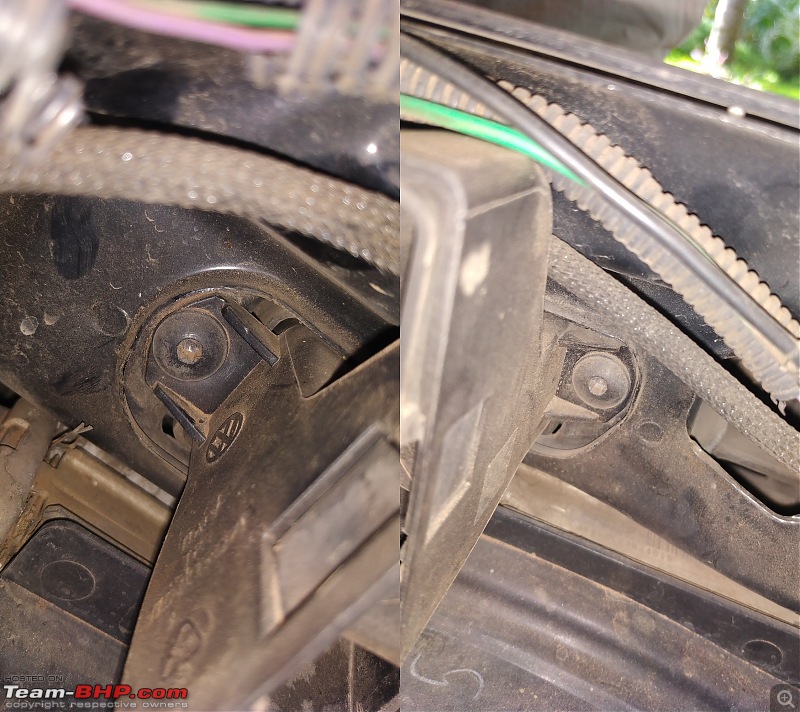
Correct but the coolant temperature is sensor is present in the circuit which monitors the temperature. In the pre-facelift cars with the red backlit MID, there was a high coolant temperature warning on the cluster but no coolant temperature info. In the facelift cars which came with the white backlit MID, there is a coolant temperature info on the MID if you cycle through the options.

VW Polo GT TDI ownership log EDIT: 9 years and 178,000 km later...-2.jpg

Quote:
Originally Posted by TheGearBox View Post
Is it simply plug-and-play or is some additional coding or wiring required?
Plug and play. Additional wiring was required for the pre-facelift cars since there was no coolant level sensor in the coolant expansion tank. The facelift cars have the level sensor.

VW Polo GT TDI ownership log EDIT: 9 years and 178,000 km later...-1.jpg
Gannu_1 is offline   (6) Thanks
Old 29th September 2020, 15:19   #1147
BHPian
 
TheGearBox's Avatar
 
Join Date: Jun 2020
Location: ???
Posts: 273
Thanked: 576 Times
re: VW Polo GT TDI ownership log EDIT: 9 years and 178,000 km later...

Quote:
Originally Posted by Gannu_1 View Post
In the pre-facelift cars with the red backlit MID, there was a high coolant temperature warning on the cluster but no coolant temperature info.
I see. I have a Polo 1.6 MPI (with the red MID) and I've (thankfully) never encountered this warning, so I had no idea about it.
TheGearBox is offline  
Old 1st October 2020, 15:12   #1148
BHPian
 
Join Date: Apr 2013
Location: Bangalore
Posts: 42
Thanked: 133 Times
re: VW Polo GT TDI ownership log EDIT: 9 years and 178,000 km later...

Hi Gannu_1, Loved reading your DIYs and must say it is very engaging and informative.
I own a 1.5 TDI and I have a quick doubt on the air guide channel upgrade. I have sourced the part fro Boodmo and was planning on a DIY for the same.

When I tried to look at the parts to unscrew and remove was a bit confused. Just getting the front grill solves to problem or I need to get the headlight top support plates and teh top plastice trim on the grill too?

Can you share a quick stepwise procedure to reach the guide channel?
tanaysn is offline  
Old 2nd October 2020, 12:35   #1149
Distinguished - BHPian
 
R2D2's Avatar
 
Join Date: Oct 2008
Location: Pune
Posts: 3,231
Thanked: 5,742 Times
re: VW Polo GT TDI ownership log EDIT: 9 years and 178,000 km later...

Quote:
Originally Posted by Gannu_1 View Post
Well, the good news is, the car’s new owner and the rightful heir has arrived!
Congrats to you and your wife Gannu_1 and may the child be blessed with a long and happy life. My wishes come 3 months late but hey I just saw this update now. This is one of those epic, reference ownership threads on TBHP that I savour reading. It's like a book and a great inspiration to any car owner not just a VW.

Congrats to you and your wife once again!

Last edited by R2D2 : 2nd October 2020 at 12:44. Reason: typo
R2D2 is offline   (2) Thanks
Old 3rd October 2020, 11:08   #1150
Team-BHP Support
 
Gannu_1's Avatar
 
Join Date: Apr 2013
Location: Madras
Posts: 7,174
Thanked: 20,220 Times
re: VW Polo GT TDI ownership log EDIT: 9 years and 178,000 km later...

Quote:
Originally Posted by tanaysn View Post
When I tried to look at the parts to unscrew and remove was a bit confused.

Just getting the front grill solves the problem or I need to get the headlight top support plates and the top plastic trim on the grill too?
The air guide channel is located inside a trim, held in place by 2 Torx screws:

VW Polo GT TDI ownership log EDIT: 9 years and 178,000 km later...-img_20201002_093904.jpg

VW Polo GT TDI ownership log EDIT: 9 years and 178,000 km later...-img_20201002_093844.jpg

Remove the 2 screws (the torx screwdriver is given in the OEM tool kit), undo out the air guide channel from the trim and disconnect the intake hose by hand. Place the new air guide channel inside the trim and connect the intake hose. That's all.

There's no need to remove the front grill or headlight top mounts or anything else.

Quote:
Originally Posted by R2D2 View Post
Congrats to you and your wife Gannu_1 and may the child be blessed with a long and happy life.
Thank you so much for the wishes and blessings R2D2!

God and other circumstances willing (aging, parts and maintenance, NGT's ruling etc), I would love to hold on to the car as much as possible and see him grow up with her.
Gannu_1 is offline   (4) Thanks
Old 3rd October 2020, 12:19   #1151
Distinguished - BHPian
 
Join Date: Apr 2007
Location: Pune
Posts: 3,054
Thanked: 3,313 Times
re: VW Polo GT TDI ownership log EDIT: 9 years and 178,000 km later...

Awesome Gannu!

I really admire your DIY attitude and skill and the preparedness. Also good to see the car clocking 1 lakh miles!

Yes, this car will be Junior's best friend forever

Cheers!
anandpadhye is offline   (1) Thanks
Old 5th October 2020, 10:49   #1152
BHPian
 
Join Date: Apr 2013
Location: Bangalore
Posts: 42
Thanked: 133 Times
re: VW Polo GT TDI ownership log EDIT: 9 years and 178,000 km later...

Quote:
Originally Posted by Gannu_1 View Post

There's no need to remove the front grill or headlight top mounts or anything else.
Wow, that seems to be easy. I some how missed the 2 Trox screws . Thanks a lot for your help Gannu_1.
Can't wait for the weekend to start the upgrade
tanaysn is offline  
Old 22nd November 2020, 21:41   #1153
Team-BHP Support
 
Gannu_1's Avatar
 
Join Date: Apr 2013
Location: Madras
Posts: 7,174
Thanked: 20,220 Times

Hey guys! Been a very busy couple of months.

Some updates:
  • The car completed 7 years of ownership on 7th October 2020. Since I have been deputed at our shipyard here at Kattupalli, I did the customary puja at the Vinayagar temple located inside the company’s housing complex, along with a colleague-friend Sidharth. Woke up early, gave her a nice wash-and-wax and did the puja.

    VW Polo GT TDI ownership log EDIT: 9 years and 178,000 km later...-img_20201007_074753.jpg

    VW Polo GT TDI ownership log EDIT: 9 years and 178,000 km later...-img_20201007_075002.jpg

    VW Polo GT TDI ownership log EDIT: 9 years and 178,000 km later...-img_20201007_075138.jpg

    Looking back, what an amazing 7 years of ownership this has been! She has been a faithful partner all these years - fuss-free, no squeaks, creaks or rattling, the paint, plastic trims and rubber parts have been aging well, no rusting on the bodywork, no leaks, no unforeseen parts failure and a nominal cost of ownership (I do the basic oil change services on my own after sourcing the parts). *knocks wood* What do I sorely miss in this car today? An AT gearbox. How long do I intend to keep her? As long as I can with a hope that the regular upkeep doesn’t become expensive!

  • The odo’s crossed 165,000 km as I type this:

    VW Polo GT TDI ownership log EDIT: 9 years and 178,000 km later...-img0476.jpg

    She’s gradually making up for all the idling during the lockdown. Other than the commutes to and inside the shipyard, I made a few trips to Palakkad to visit my folks. It was interesting and different compared to the previous trips since I had carried food, tea, plates, paper cups, handwash, water for washing etc. along and used to park the car adjacent to a toll booth for a quick meal or tea:

    VW Polo GT TDI ownership log EDIT: 9 years and 178,000 km later...-img_20201004_133422.jpg

    The cupholder at the rear of the armrest was put to use too which is otherwise closed shut:

    VW Polo GT TDI ownership log EDIT: 9 years and 178,000 km later...-img_20201004_133845.jpg

  • The routine wheel balancing, alignment and rotation was done from a Lal tyres outlet located close to my apartment.

    VW Polo GT TDI ownership log EDIT: 9 years and 178,000 km later...-img_20200912_155137.jpg

    GMaps - Location


    They charged Rs. 1200 for the job which is reasonable. The place was a bit crowded around the time I had visited during a Saturday afternoon and we were out in a little less than 3 hours. The young proprietor also said they have 2 free check-ups for the alignment correction within 3 months of this billing date which is a nice thing; I might go there once I am relieved from my yard duties. They also deal with alloy wheels and the usual car tyre brands. For those who’re wondering, their WB and WA equipment is from John Bean.

  • Since I’ve been deputed at the shipyard since the last 2+ months, I park the car at the lots located close to the ships getting painted and outfitted. The last ship of our Coast Guard OPVs, was getting her final coat of paint out in the open on a nice and bright, sunny day and the paint particles from the spray paint travelled in the air and settled on the vehicles parked there. These were very fine particles, that cannot be seen from afar but can easily be felt when you rub your hand over the panels or even the windshields and glass. It was everywhere! I got really annoyed. I only realised this when I turned on the front wiper and instead of a clean sweep, I hear rubbing noises! I was wondering what could be done (something DIY) other than dropping her at the detailers place.

    I decided to try my luck using a cheap clay bar and some lube. Amazon delivers to even the remotest of places and I ordered the HSR clay bar from Amazon (link, Rs 249 for a 100 g bar) and some dishwashing soap diluted in a bottle, since I had no access to car shampoos or wash-and-wax solutions. I tried the front windshield first and shockingly, the piece of moulded clay bar took away ALL the paint particles. COMPLETELY! I was totally surprised. I honestly did not expect this trick to work in the first place and was so glad it worked. That morning, I did the front windshield completely and clayed the complete car, for the first time, totally by myself, panel by panel on the successive mornings followed by a quick wax session later. I woke up early around 6, quickly freshened up and went to the open parking lot to clean her up. That’s when the Coast Guard ship-staff doing their routine morning workout and training, would notice me applying some kinda ‘soap’ all over the car over the last few days and think I am crazy!

    No snaps or videos for this unfortunately. But if any of you ends up face a similar predicament, please do try claying before attempting to do anything else.

  • The rear right wheel’s centre cap fell off somewhere thanks to the potholed roads here.

    VW Polo GT TDI ownership log EDIT: 9 years and 178,000 km later...-img_20201103_160706.jpg

    I checked Boodmo for the price of 1 cap and was shocked to see this:

    VW Polo GT TDI ownership log EDIT: 9 years and 178,000 km later...-boodmo.png

    Rs. 750 for a single cap! Aliexpress retails a set of 4 non-OEM caps for less than this price inclusive of shipping. I’ll place an order later once I am back to the city. I wish Amazon India had these.

  • The Polo’s spare wheel located in the boot is secured in place with a long bolt with a plastic turn-cap on the head. Most cars have it this way.

    Last month, a good friend and colleague - Nikhil’s Punto had a flat tyre at our shipyard and he wanted to replace it with the spare wheel. Unfortunately, the bolt refused to budge! Not even by an mm! The thread had got rusted completely and it got stuck with the nut. He had in fact never used the spare wheel ever. We tried spraying WD40 - no luck, used a hex. socket attached to a wrench - the cap started spinning over the head, used a prybar to dislodge the plastic cap - nada and we gave up! He decided to take it to the service centre and let them handle it. That’s when it struck me - maybe I should take a look at the spare wheel on my car and grease the exposed threads of the bolt and nut to prevent them from getting rusted. I did that right away.

    Here are the reference snaps of the spare wheel setup from my in-law’s Punto:

    VW Polo GT TDI ownership log EDIT: 9 years and 178,000 km later...-img_20201002_125012.jpg

  • The insurance for the year 2020-21 was renewed with United India for a premium of Rs. 13,082. The IDV was Rs. 360,855 and the NCB capped at 50% was at Rs. 2778.

  • The PUC certificate was renewed with a 1 year validity during a recent drive to Palakkad. One less thing to worry for another year.


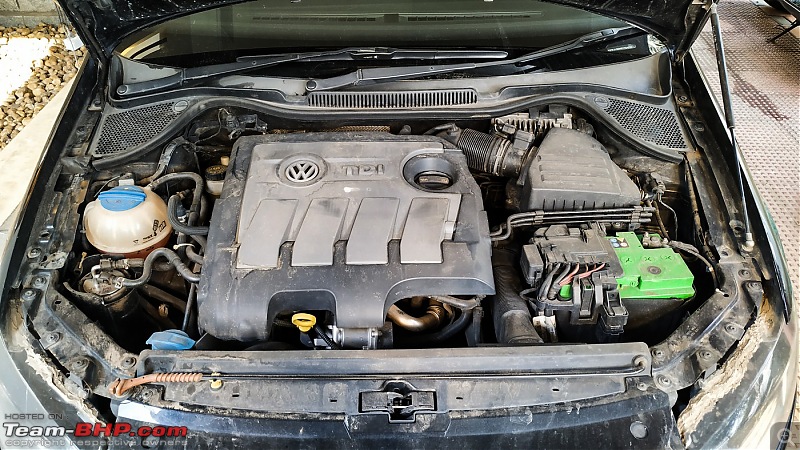
  • The engine bay was not cleaned in ages! I cleaned it during the customary wash session during last Dussehra. Used a garden hose to wash down the engine bay followed by a degreaser (Mr Muscle) + dishwash liquid application along with a hand brush. The end result was pleasing but I did not apply a dresser to the plastic parts as it tends to attract more dust judging by my past experience so I just left it at that. It’ll look shiny and glossy though and some folks love that.

    Before:

    VW Polo GT TDI ownership log EDIT: 9 years and 178,000 km later...-img_20201025_084330.jpg

    After:

    VW Polo GT TDI ownership log EDIT: 9 years and 178,000 km later...-img_20201025_104921.jpg

  • Quote:
    Originally Posted by Gannu_1 View Post
    Focal IC165 VW speakers:

    These 6.5” coaxial speakers from Focal are a straight swap on most VW cars. The good part is we don’t need those extra spacer rings when installing these units and the stock connectors plug into the speakers without any modifications (usually the other speakers come with bare terminals).
    What a bummer! The rear-left Focal coaxial speaker gave up and I never realised it for a long time. A speaker becoming defective is a first for me. I used to play around with speakers ever since I was a small kid and used to connect all sorts of speakers to the stereo system, have fried a few cheap ones by turning up the volume and seeing the smoke from the coil but with genuine usage, this was a first. After reading up reviews, extensive discussions with Paragbhai who had gotten a set of JBL GTO609C components recently for his Ertiga and had only good things to say about it, I bought one during the recent Amazon sale for Rs. 5700. I decided to swap the Focal coaxials on the front doors with these JBL components and replace the defective one from the rear left door using one of the spare coaxials.

    VW Polo GT TDI ownership log EDIT: 9 years and 178,000 km later...-img_20201024_094515.jpg

    VW Polo GT TDI ownership log EDIT: 9 years and 178,000 km later...-img_20201024_094552.jpg

    There was some work involved however - the Focals were riveted to the doors and had to be drilled through the rivets to remove these speakers, the stock speaker connector had to be cut for connecting the terminals to the crossover, new terminals had to be crimped to the crossover, tweeter and midbass connections, spacer rings had to be mounted for the midbass. This was definitely not DIY work as it would take a LOT of time. I was headed home during an extended weekend so decided to get the work done at a neighbourhood accessory dealer instead. I loaded all the required tools, consumables and the new JBL set into the car before the drive.

    There was one thing I had to fabricate - the spacer rings. Since these 6.5” midbass units come with a large magnet that protrudes out, a spacer was a must. In the accessory market, most spacers are fabricated out of MDF or wood and are not treated for water which would rot over time after absorbing water and moisture (all the water that seeps in through the gap between the door card and the glass) and the spacers would give up eventually. Have a look at these from the internet:

    VW Polo GT TDI ownership log EDIT: 9 years and 178,000 km later...-1.jpg

    I was searching for some alternate material - plastic, neoprene (rubber), nylon etc. After some weird brainstorming, I decided to pick up a heavy-duty chopping board from a kitchenware shop - the kind used in restaurant kitchens. It is made out of PP (polypropylene). Water-proof, strong, corrosion resistant, impact resistant and machinable. The downside? Cost and SQ takes a dip because apparently plastic spacers make the bass muddy. I would eventually find that out. I picked up a 1/2” chopping board and went straight to a switchboard fabricator; you know the older switchboard setup which requires a laminated plastic board that holds the switches and sockets.

    VW Polo GT TDI ownership log EDIT: 9 years and 178,000 km later...-img_20201024_114750.jpg

    VW Polo GT TDI ownership log EDIT: 9 years and 178,000 km later...-img_20201024_120849.jpg

    I had carried the midbass unit’s plastic template from the JBL bundle and the fabricator used it to cut 2 rings from the chopping board.

    VW Polo GT TDI ownership log EDIT: 9 years and 178,000 km later...-img_20201024_130549.jpg

    The midbass unit flush fit perfectly with the fabricated rings. I was worried if screws would hold on to this material and would not keep spinning infinitely. I would find that out too eventually.

    I drove to the accessory shop with all the necessary stuff and they got to work as soon as they had their lunch. I knew this would take some time. The door card was removed, the older Focal unit was drilled out from the rivets (this was quite a task as the drill bit would sometimes slip over the head of the rivets), the crossover unit was installed, cable ends were crimped with lugs (the accessory guys were curious I did all the homework and carried everything in the car!), the freshly fabricated spacer rings were installed and guess what? The rings securely held on to the sheet metal of the doors without the screws spinning infinitely! Cheers to this material. They were even curious as to how I found out about this material, chopping board etc. What do they say? Necessity is the mother of invention?

    VW Polo GT TDI ownership log EDIT: 9 years and 178,000 km later...-img_20201024_160009.jpg

    VW Polo GT TDI ownership log EDIT: 9 years and 178,000 km later...-img_20201024_170637.jpg

    VW Polo GT TDI ownership log EDIT: 9 years and 178,000 km later...-img_20201024_172904.jpg

    Anyhoo, the midbass units were tightly secured to these spacers, the tweeter units installed to the door’s sail panels (this does look aftermarket as we couldn’t flush-fit the tweeters), terminals crimped and connected to the crossovers, test audio played to check everything is alright and the door card trims were closed. At the end of this, I had a heavy paper weight with me - the defective Focal speaker.

    The sound quality of the new component setup was noticeably better than the Focal coaxials I had. The tweeters were very bright but the bass was a lot tighter. And all this without an amp and driven by the HU directly! At this point, I really regretted importing 2 pairs of Focals all the way from France paying almost twice the price for a set when I could have got better SQ for a lot cheaper, locally, with faster shipping and a 1-year warranty! So much for retaining a near OEM setup.

    The kaput Focal coaxial speaker aka paperweight:

    VW Polo GT TDI ownership log EDIT: 9 years and 178,000 km later...-img_20201024_174041.jpg

    The steel plate above the magnet felt warm to touch. The coil surely had some issues. I dumped it in the cupboard for now.

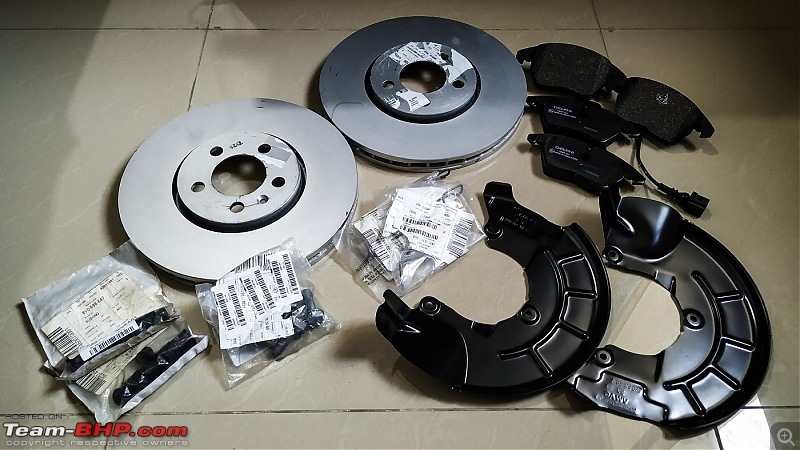
  • Here’s how the BBK (big brake kit) setup’s shaping up:

    VW Polo GT TDI ownership log EDIT: 9 years and 178,000 km later...-img_20201101_103916.jpg

    Every part was handpicked although the performance of the Delphi pads have to be assessed; it has got good reviews in the Europe and Russia though. Just the caliper (L & R) and caliper brackets remain to be bought (waiting for a friend to settle down in Germany before I place the order). This was also the first time, I held a rotor in my hand and my goodness, this thing weighs in at 7+ kg! When my good friend and BHPian Chintu sent the consignment from Navsari, he said the package weighed in at nearly 15 kg. I thought he must be joking!

    VW Polo GT TDI ownership log EDIT: 9 years and 178,000 km later...-img_20201101_104021_2.jpg

    I am so glad the stock rotors have served me for this long! She’s on her second set of brake pads after the stock set was replaced during the 75k service. I am sure the new set will last much longer! More details on the BBK setup when they are installed including the part numbers, pricing and pics of individual parts and the installation process. On my threads, there will be no mysteries or please PM me nonsense.

  • The fuel cap’s tether broke when a fuel attendant opened the cap to fill the fuel. Understandable since this tether material was destined to fail one day after all these years.

    VW Polo GT TDI ownership log EDIT: 9 years and 178,000 km later...-img_0443.jpg

    I’ve got to fix it one of these days after I am back at my office from the shipyard.

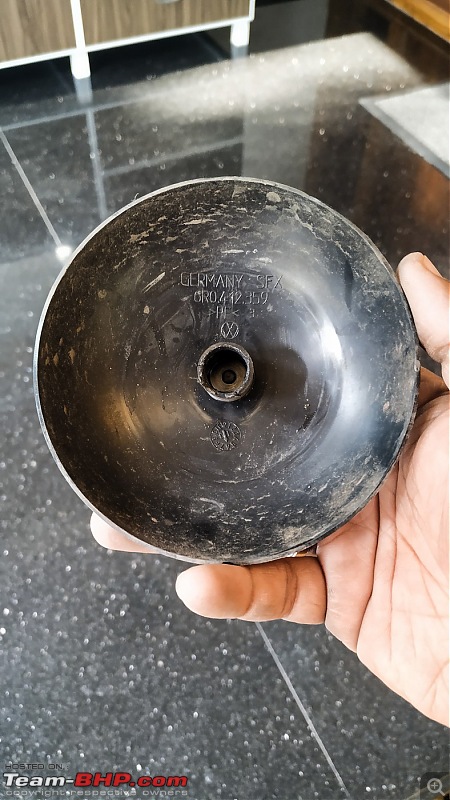
  • The front struts’ caps had a broken thread which meant they wouldn’t secure tightly to the struts.

    VW Polo GT TDI ownership log EDIT: 9 years and 178,000 km later...-img_20201025_083613.jpg

    It was available for cheap on Boodmo (link) and in stock. Rs 350 shipped for a pair. Ordered them right away and got it delivered in 2 days flat. But get this, no threads inside!

    VW Polo GT TDI ownership log EDIT: 9 years and 178,000 km later...-replacement-cap.jpg

    Part number - 6R0 412 359

  • Off-lately I’ve been experiencing, slotting into the 3rd gear from the 2nd requires an extra push and sometimes it goes smoothly. The gear selector mechanism may have to be replaced which costs Rs. 5000 and thereabouts (boodmo). I’ll get this done along with the BBK upgrade once I get the calipers and brackets.

  • The NE monsoons are in full swing and there was a cloudburst early in the morning. Some of the areas with poor drainage had water logging to a good 1/2 feet. In a moment of stupidity, I waded through the water at a good 30-35 km speed which resulted in those waves and the number plate which was riveted to the front bumper came off! It was hanging by just 1 rivet. Surely some bad physics must be at play. I’ve experienced a similar incident during the media drive of the Grand i10 Nios when the car driven by the other media team, went through a small pool of water (albeit a good distance) and the number plate got bent.

    VW Polo GT TDI ownership log EDIT: 9 years and 178,000 km later...-img20201002wa0022.jpg

    Anyways, I removed the number plate and quickly pinged Dilip Cherian, the proprietor of Speedex plates for a plate. He had it delivered to my friend for Rs. 300. Same design as before but no holes or rivets for mounting! This time, we used Sikaflex 221 baby!

    VW Polo GT TDI ownership log EDIT: 9 years and 178,000 km later...-img_20201101_100048.jpg

    A polyurethane based sealant meant for a wide variety of applications, we extensively use this (and the 291 variant) in the ships we build here. Once cured, it can only be removed mechanically; it is that hard. More details here for those who’re interested. Applied it after wearing a latex glove, spread it all over the plate, stuck it on the bumper, used masking tape and left it for curing overnight. The number plate stuck to the bumper perfectly and without any screws or rivets, it looks clean.


  • Turtle wax’s products are officially sold in India now and DIY and enthusiast detailers are all praise for their VFM products. I wanted to get a spray-on wax, something other than Meguiars and decided to get a bottle from Amazon (link); got it for Rs. 792.

    VW Polo GT TDI ownership log EDIT: 9 years and 178,000 km later...-img0512.jpg

    After a wash, I applied it on the panels (3-4 sprays on a panel max) and used a thick microfiber towel to buff it off. The results were pretty good; my car has plenty of swirls right now so that’s going to take a detailer to correct.

    VW Polo GT TDI ownership log EDIT: 9 years and 178,000 km later...-img_20201007_074233.jpg

    VW Polo GT TDI ownership log EDIT: 9 years and 178,000 km later...-img_20201007_083502.jpg

    VW Polo GT TDI ownership log EDIT: 9 years and 178,000 km later...-img_20201007_083512.jpg

    But it rained a few days later and the water beading was really nice!

    VW Polo GT TDI ownership log EDIT: 9 years and 178,000 km later...-img_20201010_080426.jpg

    VW Polo GT TDI ownership log EDIT: 9 years and 178,000 km later...-img_20201010_083533.jpg

  • Just like the good ol’ days back in Feb-May 2018, she continues to do transportation duties efficiently (in this case, the protective sheets from the stores to the boat):

    VW Polo GT TDI ownership log EDIT: 9 years and 178,000 km later...-img_20201104_181520.jpg

That’s all for now. Cheers, drive safe and stay safe!

Last edited by Gannu_1 : 22nd November 2020 at 22:00.
Gannu_1 is offline   (93) Thanks
Old 1st December 2020, 12:35   #1154
BHPian
 
Join Date: Mar 2018
Location: Bengaluru
Posts: 184
Thanked: 561 Times
re: VW Polo GT TDI ownership log EDIT: 9 years and 178,000 km later...

Quote:
Originally Posted by Gannu_1 View Post

Attachment 2084094

Attachment 2084095

Attachment 2084096

But it rained a few days later and the water beading was really nice!

Attachment 2084097
Looking at these images, no one can ever say this car was designed 11 years ago!
Man the VWs sure age well. The car exudes pure class!

Congratulations on the beautiful 7years. May you have 7years more of blissful ownership.
arijitkanrar is offline   (2) Thanks
Old 1st December 2020, 13:08   #1155
Sen
BHPian
 
Sen's Avatar
 
Join Date: May 2020
Location: BLR | HYD
Posts: 331
Thanked: 506 Times
re: VW Polo GT TDI ownership log EDIT: 9 years and 178,000 km later...

The DIY spirit and your excellently maintained Polo is an inspiration to me, Gannu. Thanks for sharing.
Sen is offline   (2) Thanks
Reply

Most Viewed


Copyright ©2000 - 2024, Team-BHP.com
Proudly powered by E2E Networks