| |||||||

 |
| Search this Thread |  351,165 views |
 26th March 2020, 15:10
| #151 | |
| Team-BHP Support  Join Date: Aug 2009 Location: Bangalore
Posts: 8,830
Thanked: 12,251 Times
| Re: GT'ing around in my VW Polo TSI. UPDATE: Make the GT great again! Cobra springs, SS catback exha Quote:
Yes, you assume correctly. It is for the entire car, including the front windshield. I did not bother verifying the site or data sheet. I just went ahead with the install as it was quite reasonably priced and the Manager at Felicity was using the same film for his car. EDIT: moderator Vidyut Vid6639 has done some digging and has submitted this (Front windscreen sunfilm?) post. You may want to refer it before taking a decision. Last edited by Vid6639 : 26th March 2020 at 16:08. | |

|  ()
Thanks ()
Thanks
 |

| |
|
29th April 2020, 16:51
| #152 |
| BHPian Join Date: Oct 2011 Location: Mumbai
Posts: 670
Thanked: 1,025 Times
| Re: GT'ing around in my VW Polo TSI. UPDATE: Make the GT great again! Cobra springs, SS catback exha Hi Suhaas, First of all, let me just say that your ownership thread is amazingly enjoyable. I can see how much you love your car and driving, hats off, sir! Now, I'm convinced that I want to lower my Vento TSI. I was already going to get a Bilstein B6 dampers for it, but those would increase its ride height, wouldn't they? So, do you think a set of Cobra springs like yours would help offset that and lower the car down from its stock ride height a little? Also, what are your general thoughts on the Bilstein B6+Cobra set up for the Vento TSI? |
|
| (1)
Thanks
|
| The following BHPian Thanks DeKay for this useful post: | suhaas307 |
|
1st May 2020, 13:35
| #153 | |
| Team-BHP Support Join Date: Aug 2009 Location: Bangalore
Posts: 8,830
Thanked: 12,251 Times
| Re: GT'ing around in my VW Polo TSI. UPDATE: Make the GT great again! Cobra springs, SS catback exha Quote:
Sorry, completely missed this post, not sure how. Thank you for your kind words!  The thing you need to remember about lowering springs is that they are designed with the limited function and intent of dropping the car's ride height only. Now they normally work on stock dampers or stock replacement sport dampers like the Bilstein B6, but lowering springs perform best when pared with shortened dampers/struts. Bilstein B8 is similar to the B6 but with a shortened piston and hence, works better with a shorter spring. The life of a stock-replacement sport / OEM damper is somewhat reduced when you use them together with lowering springs. Especially if the drop is a substantial one. However, 25-30 mm drops won't have that much of a negative effect on stock replacement dampers though, as the drop is negligible, i.e. 1-1.5 inches at the most. So you can get lowering springs on OEM sport dampers. But why would you, when there are dampers specifically tailored to be used with lowering springs? Other than what Bilstein offers (B8), there are other shortened dampers available from other brands. Koni makes sport-yellow shocks that even have adjustable damping. ST by KW also sell sport dampers. Apparently word on the street is Cobra is also working on something similar. So if you'd be interested in the perfect sport suspension setup, you must pair your lowering springs with shortened sport dampers for the best setup. I may consider one of these options in the future, to pair with my lowering springs. EDIT: Presently, I am running Sachs Super Touring dampers that are slightly taller than stock dampers. The lowering springs have cleaned up the ride height by dropping it by a few inches. Lowering springs would work the same way on the B6 too, but the B6 is a bit firmer than the Sachs so you can expect it to be quite a bit firmer than the stock setup or even stock OEM dampers+Cobra lowering springs. Member LizardKing is currently running B6 dampers + Cobra springs on his Polo GT TSI. Do drop him a PM for his feedback on the setup. Do remember though, that the Vento would probably ride a little better on the same setup because of its longer wheelbase. These things do make a difference! Last edited by suhaas307 : 1st May 2020 at 14:37. | |
|
| (3)
Thanks
|
| The following 3 BHPians Thank suhaas307 for this useful post: | 2himanshu, DeKay, zArk |
|
21st May 2020, 01:57
| #154 |
| Team-BHP Support Join Date: Aug 2009 Location: Bangalore
Posts: 8,830
Thanked: 12,251 Times
| Re: GT'ing around in my VW Polo TSI. UPDATE: Make the GT great again! Cobra springs, SS catback exha UPDATE: Disclaimer: This is a 15 minute read, maybe 20. It could also be 5 if you skim through the rambling and look at just the photographs. But I am not a photographer, and I was stupid enough not to illustrate this experience with nifty photographs. Therefore, I have taken some time out to document this experience with words instead. March last year was when I’d begun my quest for more power. An updated K&N 57-S Airbox and a Code6 flash tune was all I could do at the time. But later in the year, my desire for more power drew me towards various avenues. Should I go the JBS Hybrid Turbo route? Should I consider an engine swap? I wasn’t sure. And then the official distributor for Garrett announced that they would be bringing to the country certain turbo upgrades for specific cars, and the Polo 1.2 TSI was one of them. Overjoyed by the news, I got in touch with the official distributor for Garrett to discuss this further. He had confirmed that Garrett was in fact doing this, since the regulatory body for the INRC has now lifted the ban on turbocharging rally cars, providing an opportunity for a company like Garrett to make inroads. However, all the excitement fizzled away when word got out that Volkswagen would discontinue the EA 111 1.2 4-cyl TSI motor and replace it with the EA 211 1.0 3-cyl TSI motor, temporarily halting development of the turbo upgrade. So, with the doors closed on the turbo upgrade, and an engine swap out of the question at the moment, I’ve had to explore the only option left in order to satiate my craving for more power: Cat-less downpipe! Now, I fully understand the consequences of deleting the catcon. I will be polluting the atmosphere by spewing out far more harmful gasses than I should, for what is essentially a small power bump. And I completely agreed with this outlook until I weighed the pros and cons i.e. I almost never use my car for the purpose of commuting. This is a toy that I tinker with. Sure, you could call it a daily driver of sorts, but I do not depend on it for A to B transport. In fact, I only use the local buses and the metro to get around in Bangalore and if there is a dire emergency, I could take my wife’s Celerio to work. With my low running, I figured I wouldn’t be doing the sort of damage expected from a cat-deleted car and hence, made my peace with it. But before I get on with the install, a little background is required: Ever since I began tinkering with my car, I had wanted to do something about the exhaust. Something that could potentially enhance the performance and maybe improve the exhaust note in the process. Back in March 2019, immediately after the suspension overhaul and Stage 1 flash tune from Code6, I began making enquiries with various people and started digging up old threads on the Forum. I perused more than a few RaceConcepts Motorsport threads (and had even seen a car first hand, that had borne the brunt of RaceConcept’s incredibly poor workmanship) to know where not to take my business. Code6’s full exhaust setup was not exactly accessible monetarily at the time, and Blackworks quoted an eye watering Rs. 25,000/- plus GST for fabricating and installing the downpipe. When I consulted Azaan, he vociferously discouraged me from going cat-less due to an unpleasant personal experience. So, I was put off from getting a downpipe. Meanwhile, I’d stumbled upon ProRace Customs who quoted an unreal 22.5K for a non-resonated catback setup and 30k for the same with a cat-less downpipe setup. However, a close look at the relevant post would reveal that I wasn’t happy with their work. Yes, I had initially liked the sound, but the exhaust was plagued with problems right from the start. For example, the piping would come in contact with the heatshield above it and at times the axle below it. Also, the exhaust note would get a touch harsh with uncharacteristic whooshing. And then there was this strange and unsettling smell of something burning especially after a spirited drive. Not to mention, I was not happy with the bumper cut-out that was done to accommodate the tips and I’d definitely made the mistake of asking them to clean up the rear bumper and the minor scratches with a spot of paint, as the end result was orange peel! I had to do something about it, but more on this later. Of course, these are rectifiable issues and Joanathan promised to address them. It was big of him to recognise them as problems that required to be addressed. However, speaking to Juvitta was a different story. He brushed aside all my concerns without addressing them, despite me communicating to him clearly that these issues need addressing. He outright dismissed my thermal expansion concerns even though he noticed it himself. The burning smell according to him were the tyres(!), and the turbulent sound coming through was solely due to the exhaust tips, apparently. This did leave a bad taste in the mouth, but I was persistent and stayed in touch with Joanathan as he remained transparent with me, understood my concerns correctly and displayed the willingness to address them. However, I don’t want to be dismissive of ProRace, as they appear to have done some good work on certain customer cars. In short, if you are on a budget, ProRace is not a bad option for what it costs. Perhaps I may have gotten unlucky? So earlier this year, I had decided that I should go cat-less much to Azaan’s dismay. Naturally, ProRace got the call. I was not sure of getting the downpipe done at ProRace, but I was pretty certain that I’d get a resonator installed to keep the noise levels acceptable. However, two scheduled appointments with ProRace were deferred though, due to unfortunate circumstances. This is when Blackworks came into the picture. DBHPian Nikhilb2008 had good things to say about Blackworks, as did Dr. Naren. While Nikhil’s Civic is a far more serious project, Naren’s S-Cross had its cat deleted and a downpipe installed - a walk in the park for the uninitiated, but a far more delicate exercise to undertake for even Blackworks. After all, we are talking about a part of the exhaust that is directly bolted onto the turbo and is positioned rather uncomfortably close to the alternator. Several people have been to VW seeking repairs to their alternators because of ill constructed downpipes. Restoring the stock exhaust: Speaking to Venkat, I’d mentioned that I would be looking to get a resonator fitted by ProRace before I drop into his workshop for the downpipe, and he said that as long as the flanges match and the measurements line up with stock, he is fine with it. I had mentioned to Venkat that I need to first rectify the issues I have with the catback exhaust, and then I’d candidly told him that I am unhappy with the setup. Venkat then asked if my stock exhaust is still intact and suggested that I go back to the stock exhaust, thereby solving the problems that have plagued me in one bat-swing. Initially, I was taken aback by the suggestion, but after a lot of prodding and poking Venkat reluctantly told me that I would be better off with the stock setup. After all, nothing matches clean and smooth factory bends that are NOT oversized straight pipes, perforated mufflers packed with glass-wool. He was right! He also mentioned that the stock exhaust’s 1.75” dia-piping was ideal for the TSI, and anything larger would be potentially detrimental to performance. He went on to explain that even on larger cars such as the Octavia vRS, the downpipe which measures 3” in dia eventually tapers to a smaller 2.5” end pipe and this is necessary for quicker evacuation of exhaust gasses. And then it struck me.. There is a reason why Supersprint charges 1000 Euro for a Polo’s full exhaust system. There is a reason why Remus charges 500 Euro for an axle-back setup. And all this before duties and shipping. The level of research and development that is invested into making of these systems warrants the price at least to an extent. These companies spend countless man-hours and large sums of money, perfecting the setups for each car. They use tried and tested methods to arrive at results and leave no stone unturned to make the best exhaust systems for cars. When I noticed the same level of passion and commitment from Venkat, in the way he explained the methods he will be using to obtain desirable results, particularly the introduction of inert gasses into the (TIG) welding processes in order to achieve clean welds, and the fact that he would take 3 days to prepare and perfect the part, and a full day for installation, I did not have the heart to negotiate the costs involved, and in fact believed that the 25 grand spent on this exercise is completely worth it. Anyway, down to brass tacks.. Day One: Venkat was kind enough to offer to restore my stock exhaust for a fee. After finding a buyer for the ProRace catback exhaust, I brought the car to his workshop on the 18th of March with the stock exhaust stuffed into my car. After an hours’ drive to Blackworks, I’d met with Venkat who immediately got to work by pulling out the stock exhaust from my car, putting the car on the ramp and removing the ProRace catback exhaust which was then promptly handed over to its new owner. When I had received the stock exhaust back from ProRace, I was shocked to find it chopped into two (possibly for transport and storage) and right in the middle of a bend. Thankfully, we found a work around and decided to use flanges to connect the pieces together, Since I wasn’t willing to lose the exhaust note completely, I’d asked Venkat if we could delete the resonator, to which Venkat nodded and further suggested that he could add flanges to both the resonator as well as the delete-pipe – thereby allowing me the flexibility to swap the pipe back to the resonator whenever I’d like it quieter. This made the resonator delete a reversible bolt-on job. Venkat then proceeded to remove the resonator and tacked flanges to the ends of the resonator as well as on the 2” 304 stainless steel pipe that sits in its place. Once that was done, we proceeded to one of his trusted welders who carried out the job of welding the flanges together.  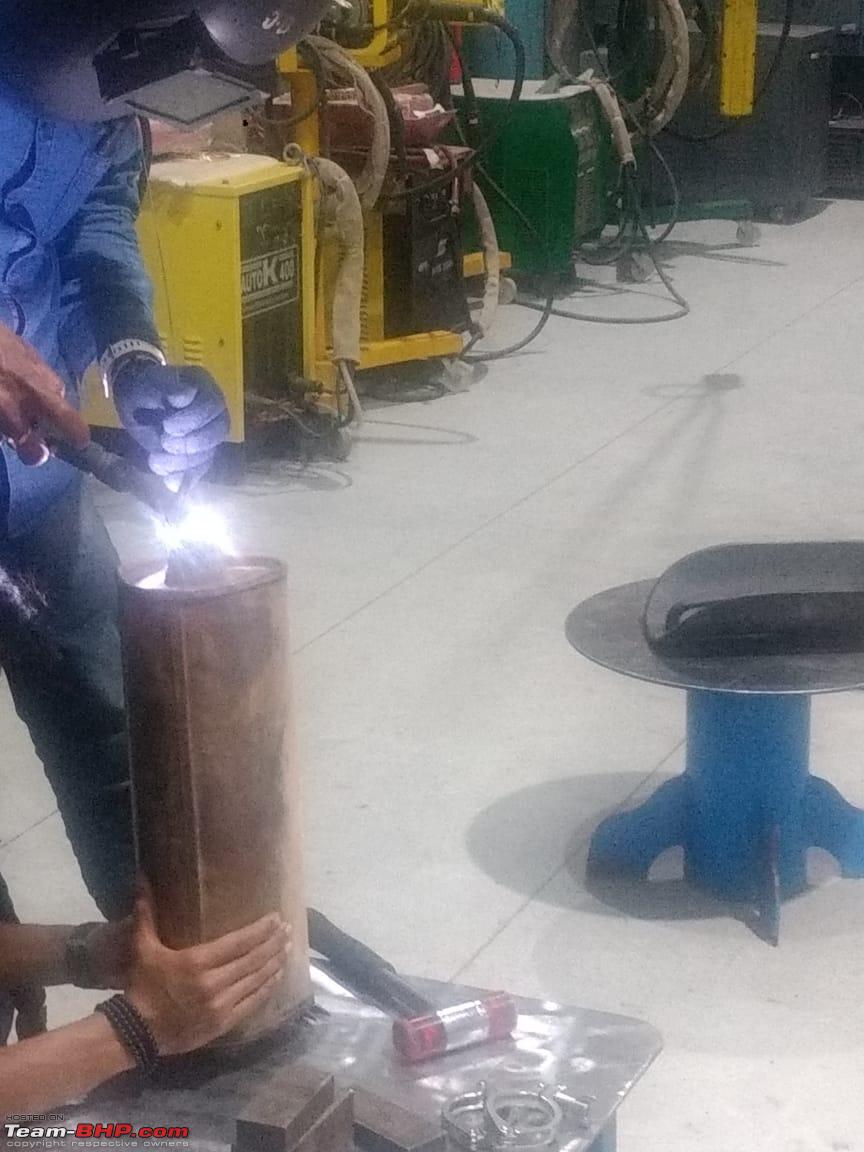 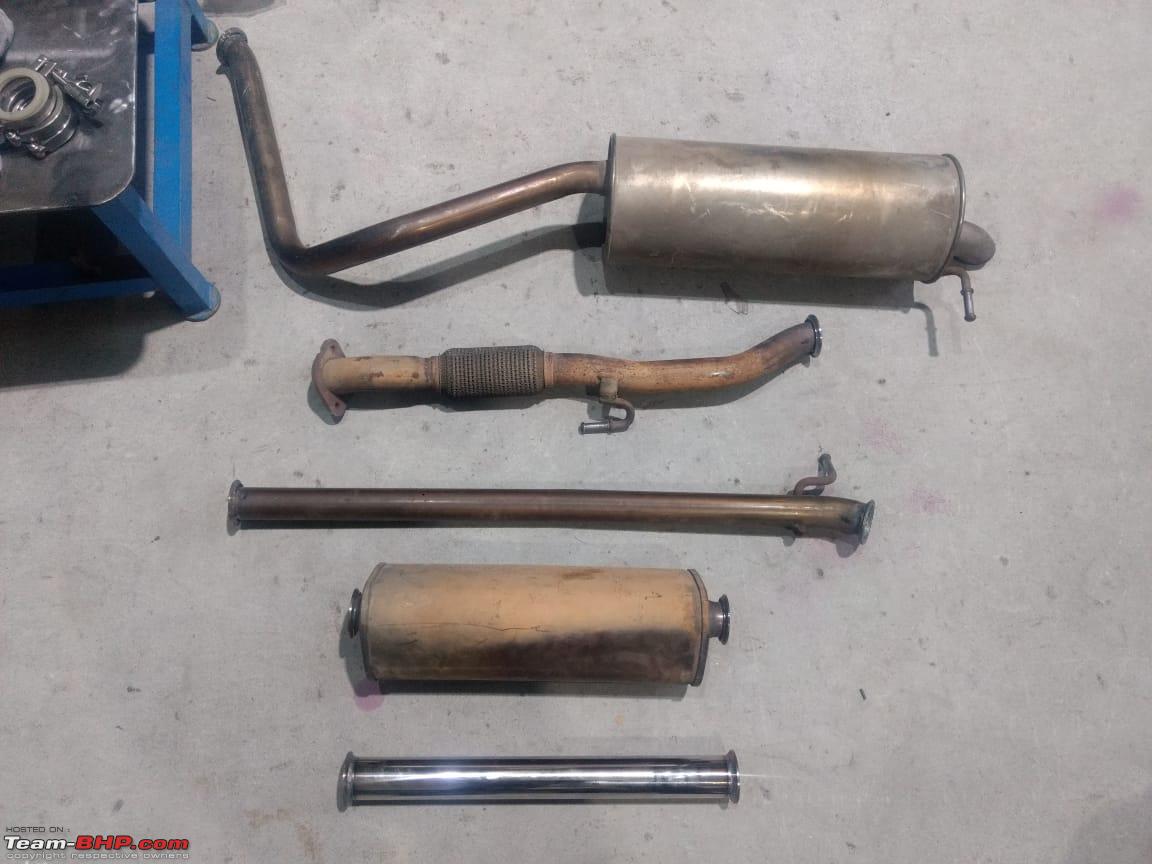 A picture of the salvaged stock exhaustalong with the 2" resonator delete pipe. An hour later, we headed back to Blackworks to get the exhaust attached to the car. Venkat and his assistant quickly began to reassemble the parts together and agonized over the fitment for quite a while before the car was ready. 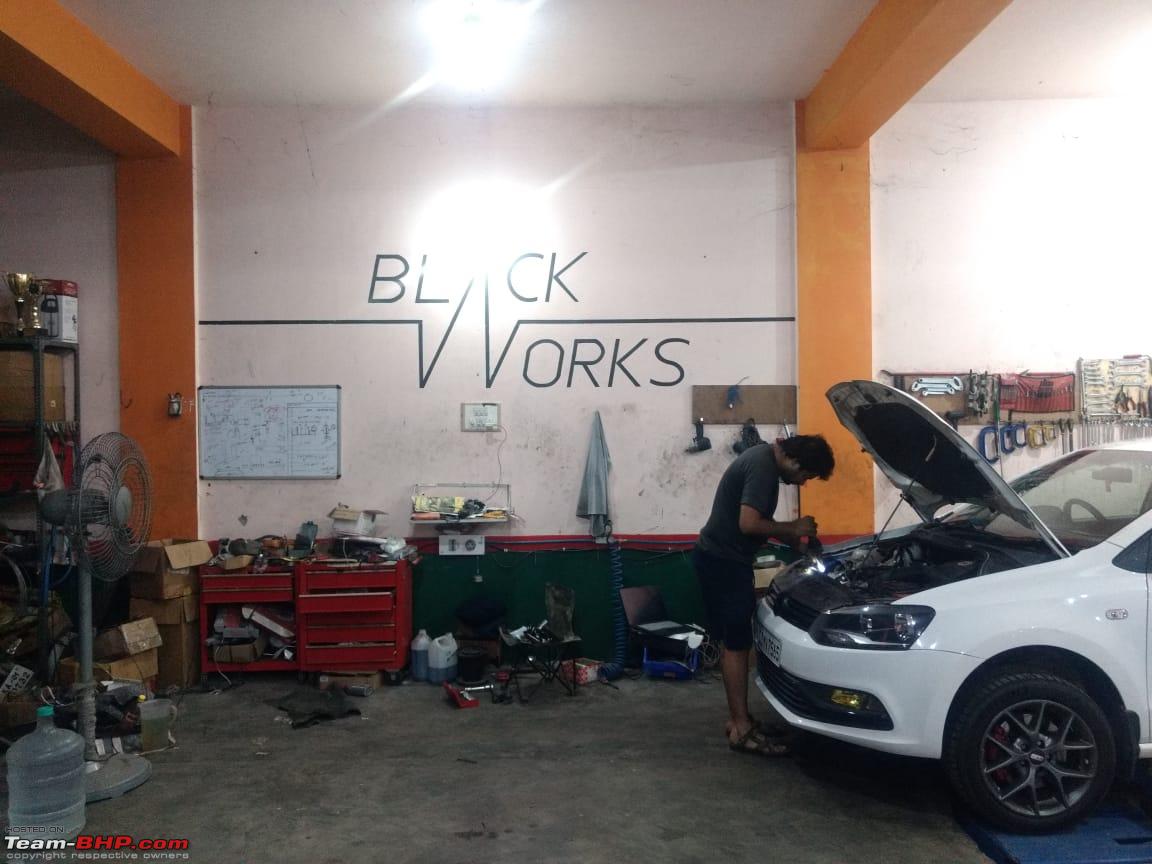 We were keen to try out the stock setup now with the resonator delete and fired it up only to find that it was eerily quiet again. To be honest, you’d be hard pressed to tell the difference. There is the odd muted pop on the overrun, and a very mild rasp accompanied by a slightly coarse resonance along with vibrations if you listen keenly on a quiet narrow road. The crackles and farts on gearshifts have disappeared. But on the bright side, so has the mild drone, and the annoying clanging of the oversized pipe against the heatshield. 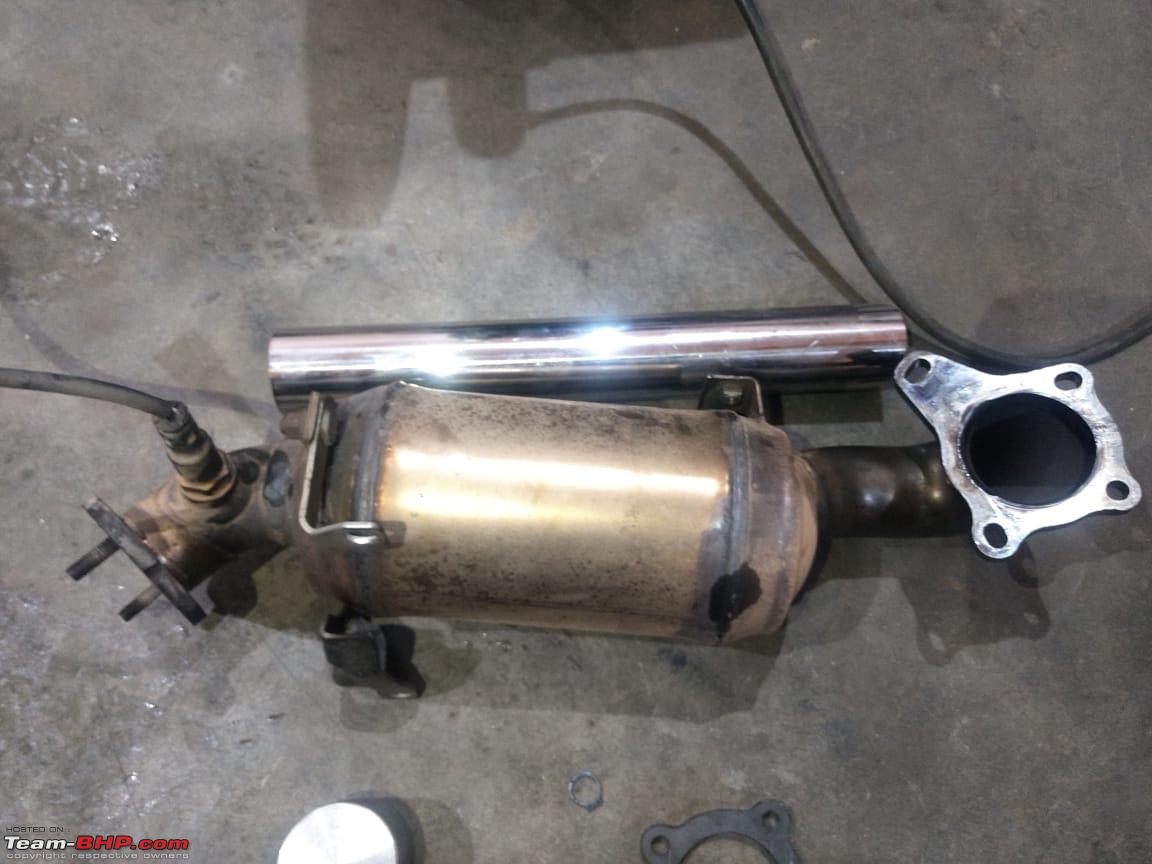 Venkat used some of his time to study the stock catalytic converter and began to illustrate some of his ideas using scales and designs. He also got to work on the jig for the downpipe. 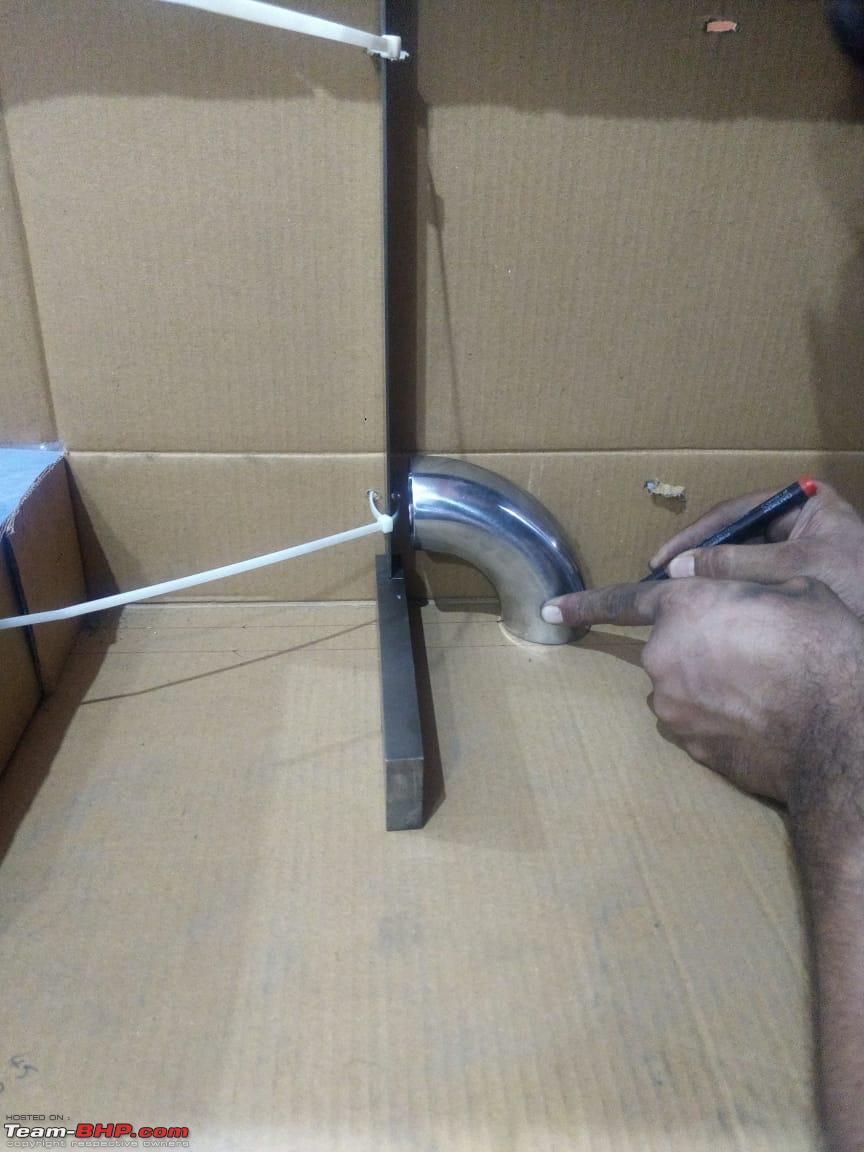 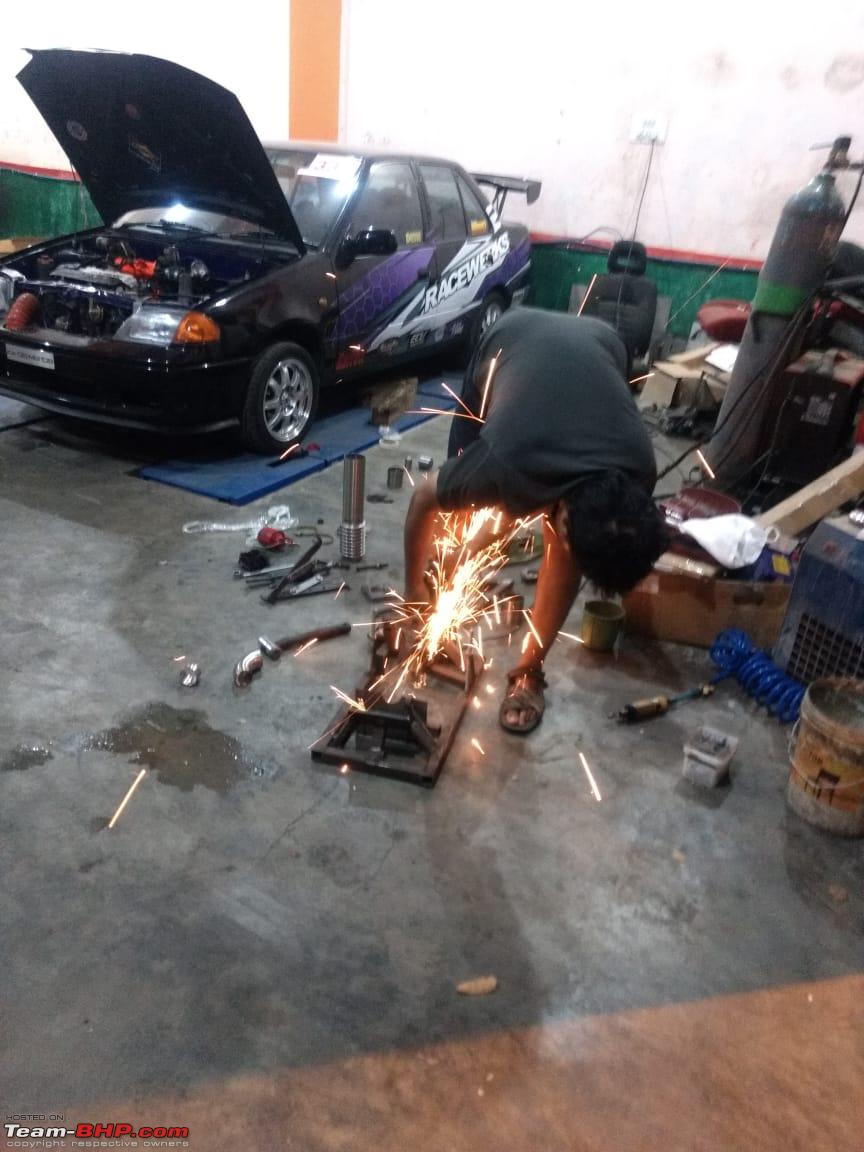 Since a major chunk of the work was completed, we arranged to proceed with the remaining work on a later scheduled date. Day Two: Day two, (a week later), involved pulling out the catalytic converter, examining the part and carefully studying the engine bay. A whole day’s work ensued, with Venkat and Chandru fabricating a jig and making further revisions to it. We also took the car to the NICE Corridor to get some baseline figures on the existing map and modifications done on the car. We strapped the V-Box on the car and managed to record a 11 second time on the 0-100 km/h sprint. This was a little strange and disconcerting, as the Code6 Stage-1 remap did make the car feel faster, but the 0-100 runs were telling us a different story. Now, I am aware of the various circumstances that would have some effects on timed-runs, and in my defence, I have to say that there were quite a few factors that resulted in a timed-run not so different from a stock car: - The heavy big-brake kit on the front axle increasing un-sprung weight. - Higher than usual ambient temps – the cluster was displaying 37-38 degrees during the runs. - Poor quality fuel (we could rule this out, as I have tanked-up only at one Shell bunk consistently and the car has been on a Proctane diet for about a year now.) - The fact that we are nearly 1 km above sea level. - Tyre pressure not at its ideal level, perhaps? - A boot full of crap that I should have left behind at the workshop. - The fact that I am in my nervous 90s  After the NICE Corridor run, we got back to the workshop and continued studying the car’s engine bay. Venkat whipped up a few drawings and put together a few pipes and bends lying around in the workshop to create a mock downpipe, in order to get an understanding of the angles we will have to play with. 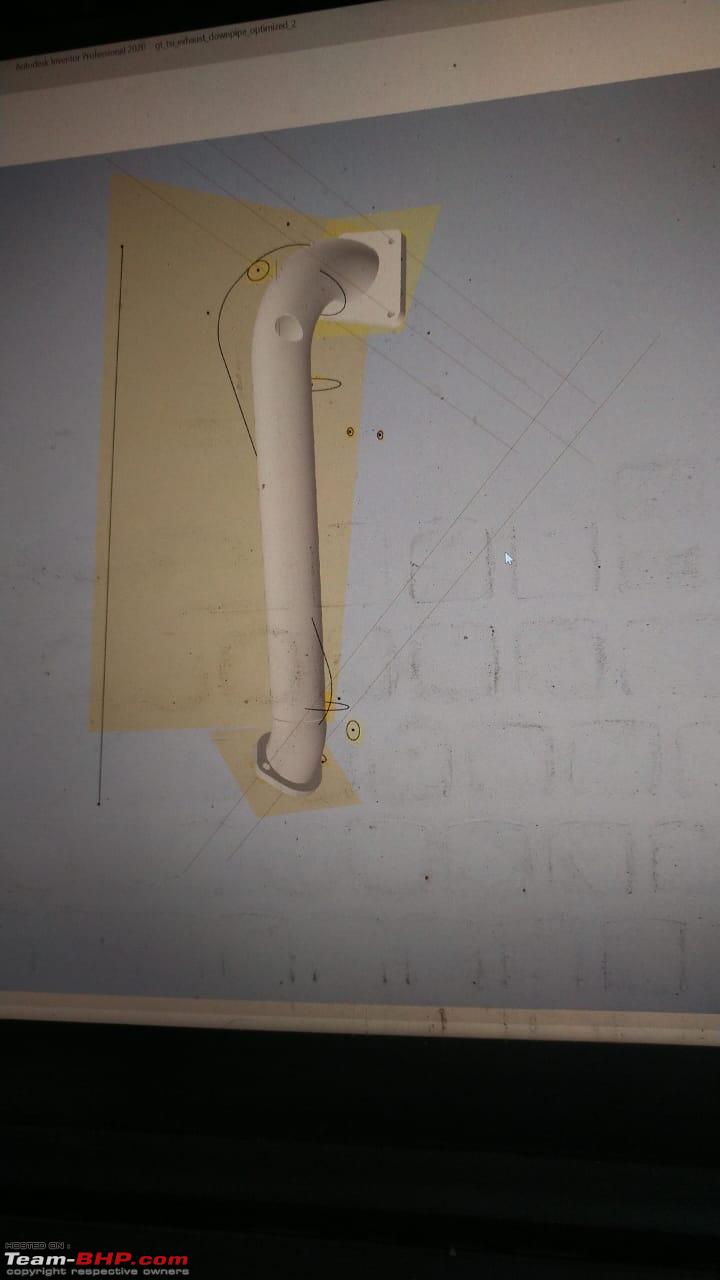  After thoroughly inspecting the engine bay, we arrived at the conclusion that Volkswagen did everything they possibly could to ensure that anyone working on this engine would have to deal with deliberately engineered roadblocks, making it harder for the engineer/tuner to work on the car. For instance, removing the heatshield around the catalytic converter - for the purpose of cat-con access - required us to remove the oil-feeder lines, the windshield washer reservoir and bracket, and the coolant reservoir pipes. Fitting the heatshield back on was a nightmare in itself. After the recon session, Venkat then came up with a preliminary design, and one of our primary concerns was the position of the alternator - and its uncomfortably close proximity to the cat-con / heatshield. To tackle this, a cheat cut could be a solution. But is it a good one? A cheat cut or a cheated bend is any cut around a tube that results in a cross section that is not perfectly circular. Joining cheated bends will result in steps at the joint and also a kink in the centerline, thus creating turbulent spots, ergo turbulent flow. A fair number of aftermarket (local) downpipes incorporate cheated bends thereby creating turbulent spots, with the flow of the gasses not being smooth and consequently creating a turbulent atmosphere for the exhaust gasses to flow – the last thing you need for a sensitive component such as a downpipe. (You can tell when a downpipe is engineered with a cheated bend, when the parts of the bend develop concentrated heat spots – something that can be noticed by strong blueing or purpling concentrated in a spot. A well-constructed downpipe would normally exhibit an even colour pattern all across the bend and on the rest of the pipe also.) 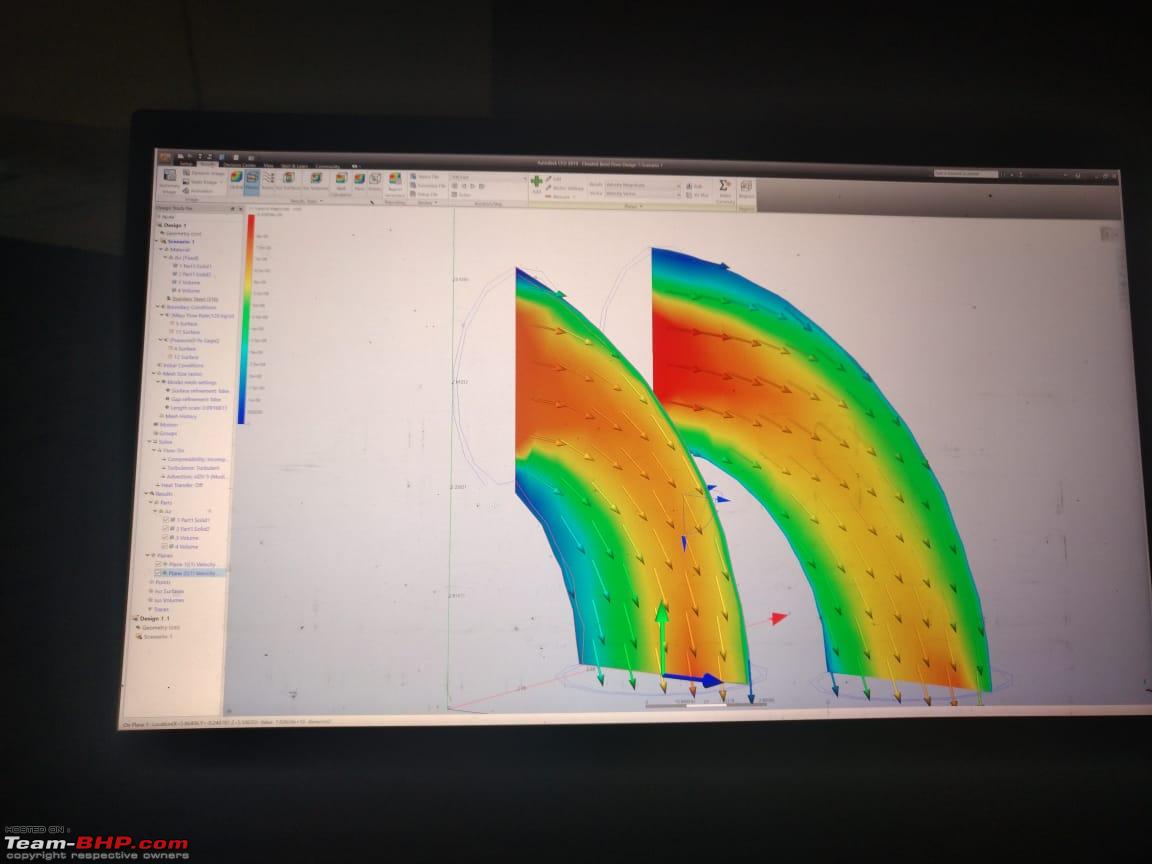 This illustration clearly explains how smooth flow is disrupted by a cheated bend (on the left) and the gasses are forced onto the outer surface of the bend. A few more illustrations on cheated bends vis a vis clean bends that facilitate smooth flow of gasses: 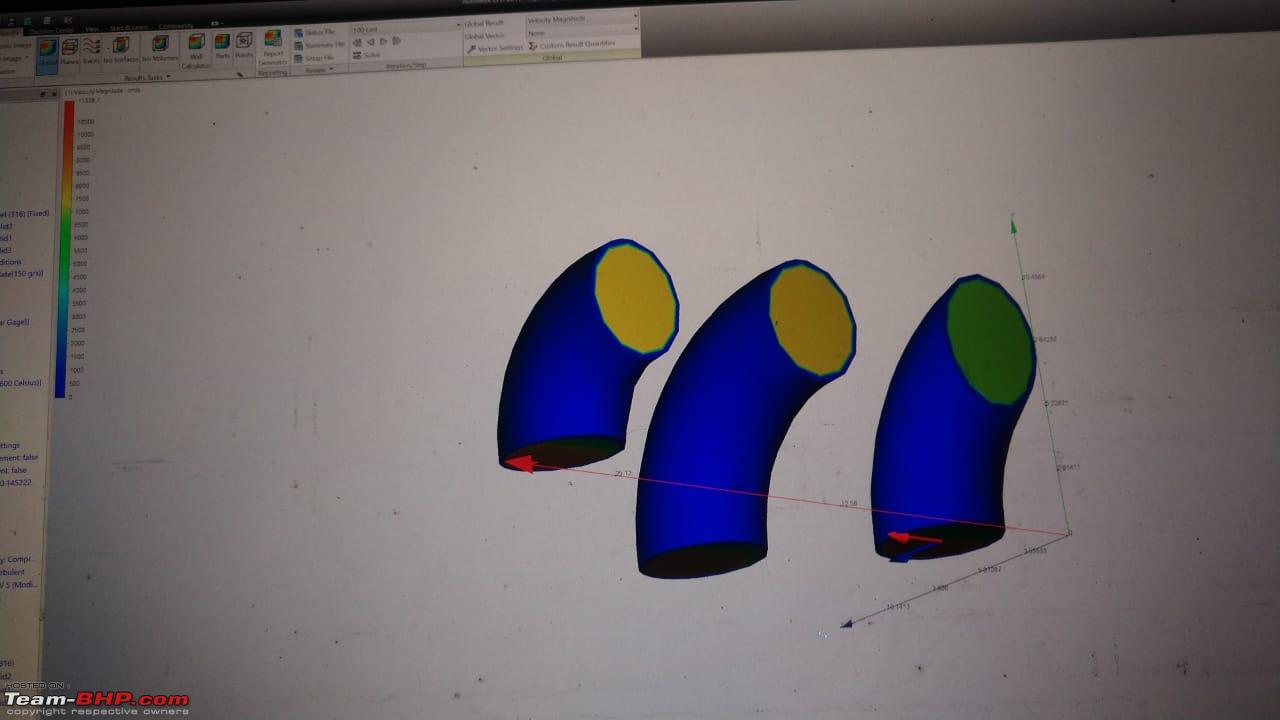   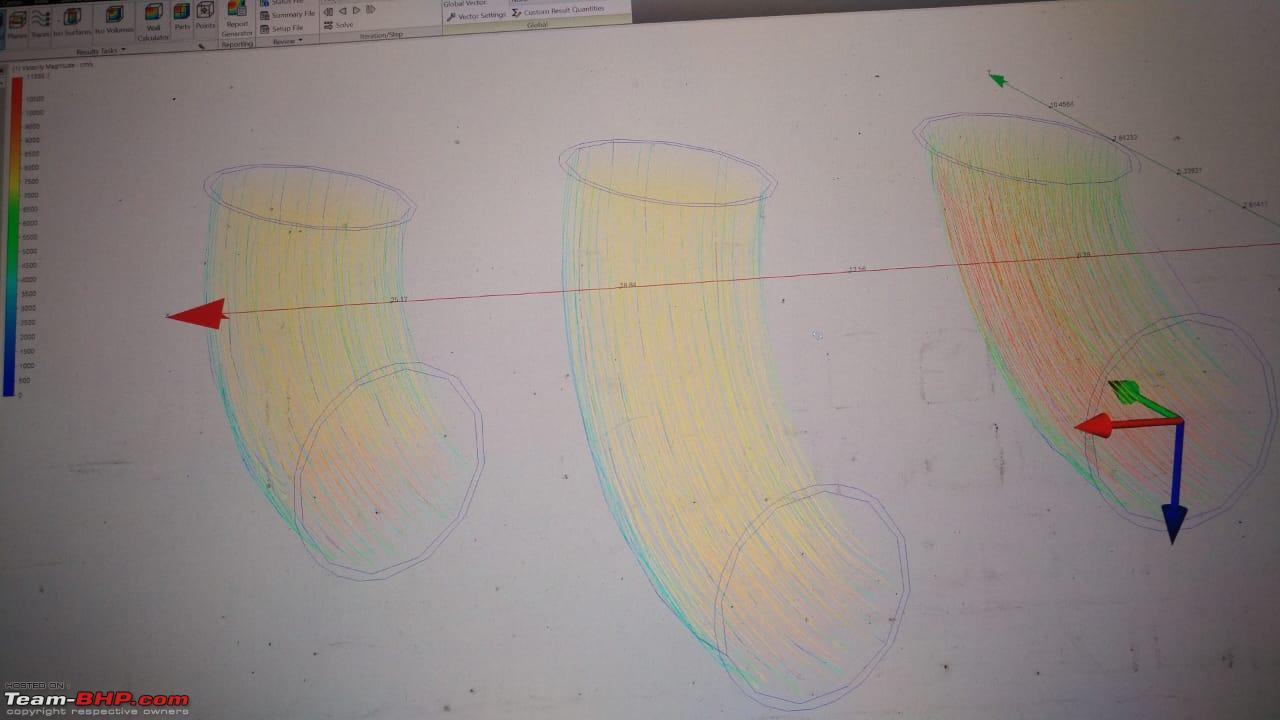 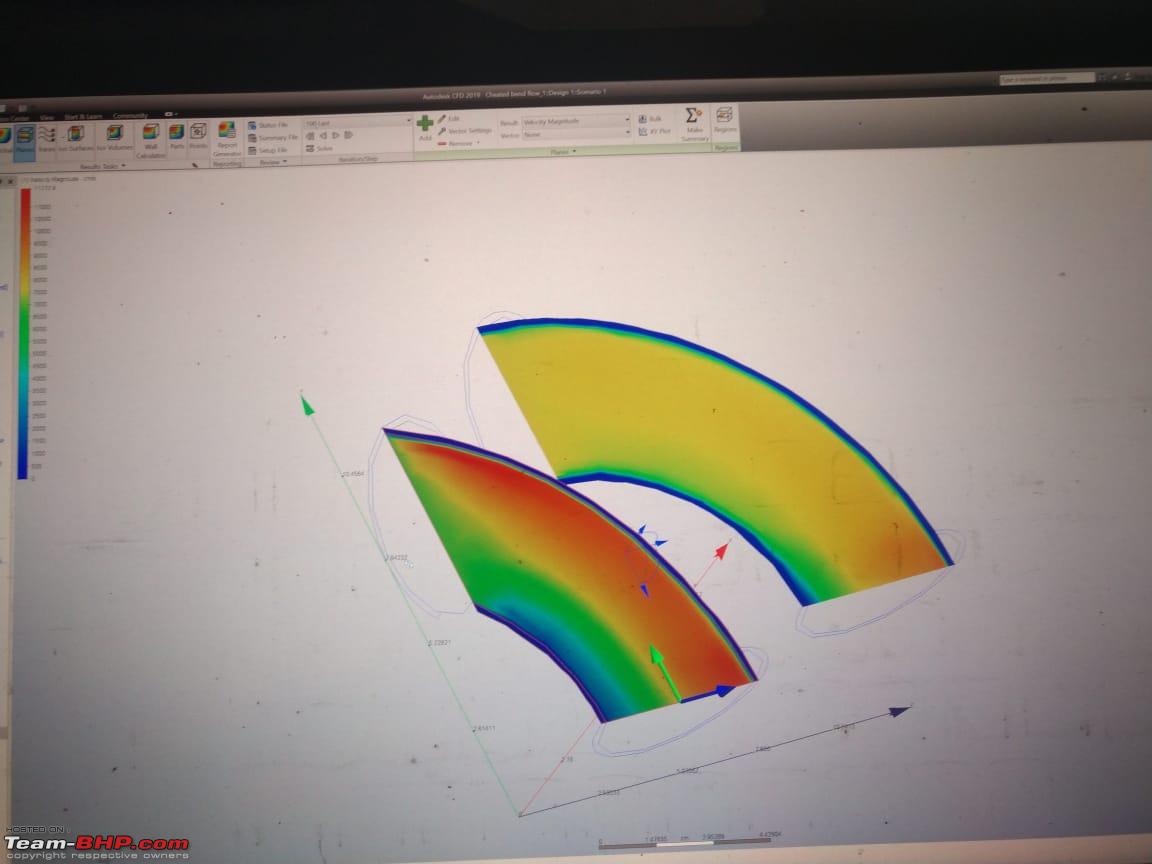 If you notice the top half of the cat-con - basically the pipe that connects to the turbine housing, it is sort of in the shape of a question-mark. 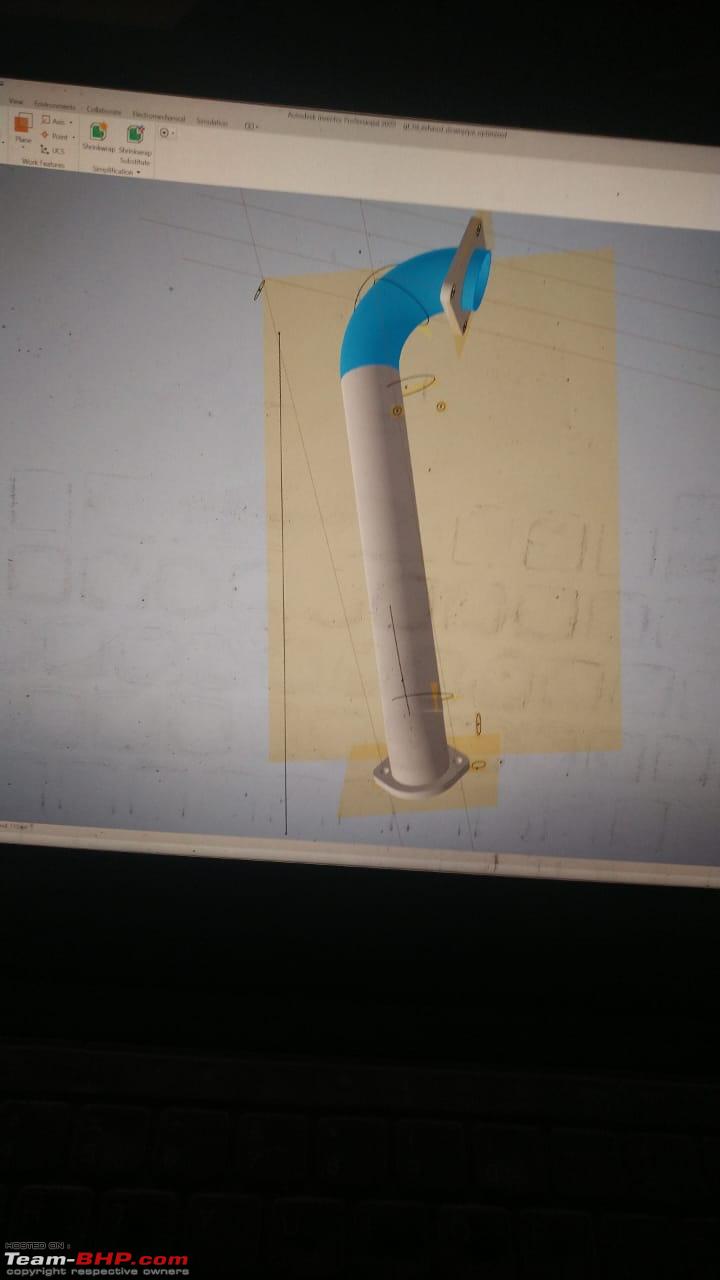 This shape is required to ensure the flow of exhaust gasses is smooth. A well engineered downpipe for this application should ideally utilize two properly cut bends together to replicate this shape – where the centerline of one merges smoothly with the other. By doing this, a cheat cut can be avoided, and you can achieve ample clearance between the pipe and the alternator. With respect to the material used for the downpipe, Venkat opted for 316L grade of stainless steel.  Visibly, it looks far superior to the regular 304 type stainless steel that is often used to construct downpipes. The advantage is that 316L has properties that make it better resistant to corrosion and particularly, saline content in the atmosphere, making it the ideal material to use for coastal applications. (NOTE: There's a bend at the start, a straight piece of pipe and a bend at the end. We realized that the longer radius, smoother bends at the beginning - while good for flow - would melt the alternator and not play well with the heat shield, so Venkat tried his best to source tighter radius 316L bends, but could not find any due to the lockdown. However, the flanges, straight section, O2 bungs and final bend are all 316L and so is the welding filler. Venkat mentioned that he isn’t satisfied with the material used for the first bend and offered to redo the bend with 316L once the material is available) Retaining the factory heatshield was a suggestion floated by Venkat. He opined that the factory heatshield would do a great job in keeping the heat at bay. Initially I was a bit sceptical about this, but Venkat quickly put it to rest by explaining that the downpipe would not benefit from a heat wrapping material as such wraps would simply crumble over time and may result in further complications such as a fried o2 sensor. After having obtained all the intel he’d required, Venkat put the pieces back together and sent me on my way. That night, the Central Government called for a nationwide lockdown due to the spread of COVID-19 pandemic, thus deferring the downpipe upgrade by almost two months! Day Three: Day three was a day in May, when the MHA Guidelines relaxed certain restrictions and allowed garages and workshops to resume operations. I hopped into the car and drove straight to Blackworks and no time was wasted in getting the car on the ramp and removing the cat-con. Meanwhile, Venkat got busy with his laptop and tuning tool to obtain a reading of the Stage-1 ECU tune so that it could be worked on by our tuner in Delhi whilst we put finishing touches on the downpipe and install it.  NOTE: And before anyone asks, yes we took all the necessary and prescribed precautions in the wake of the pandemic. Besides, Venkat has been practicing social distancing way before it was cool! (Sorry Venkat, I couldn’t resist )The long break allowed Venkat the time to further tweak the downpipe’s design, allowing an additional 1-inch clearance from the alternator – something that was playing on my mind for a while, as way too many cat-less GT TSIs visit the VW workshop for alternator repairs/replacements. Venkat and Chandru began fine-tuning the design of the brackets that would hold the pipe in its place in the engine bay. An example of the lengths Blackworks have gone to achieve near-perfect results: 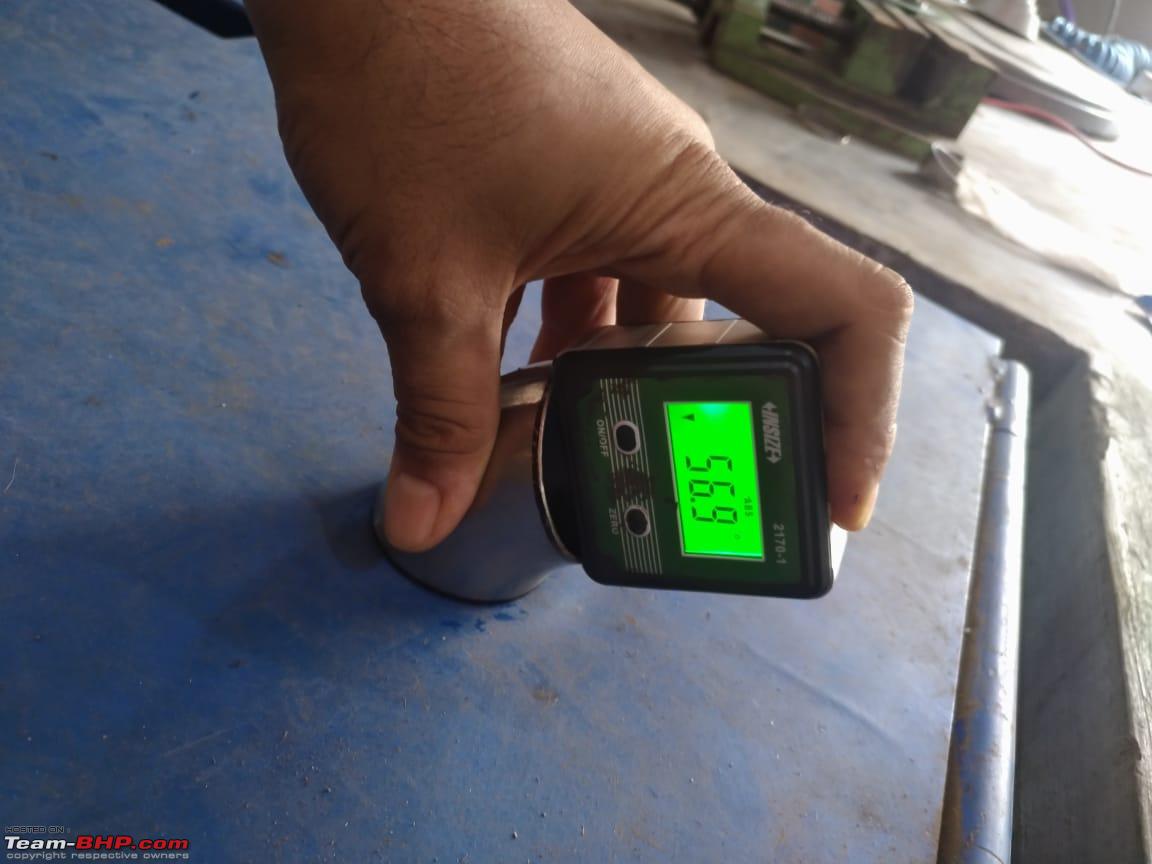  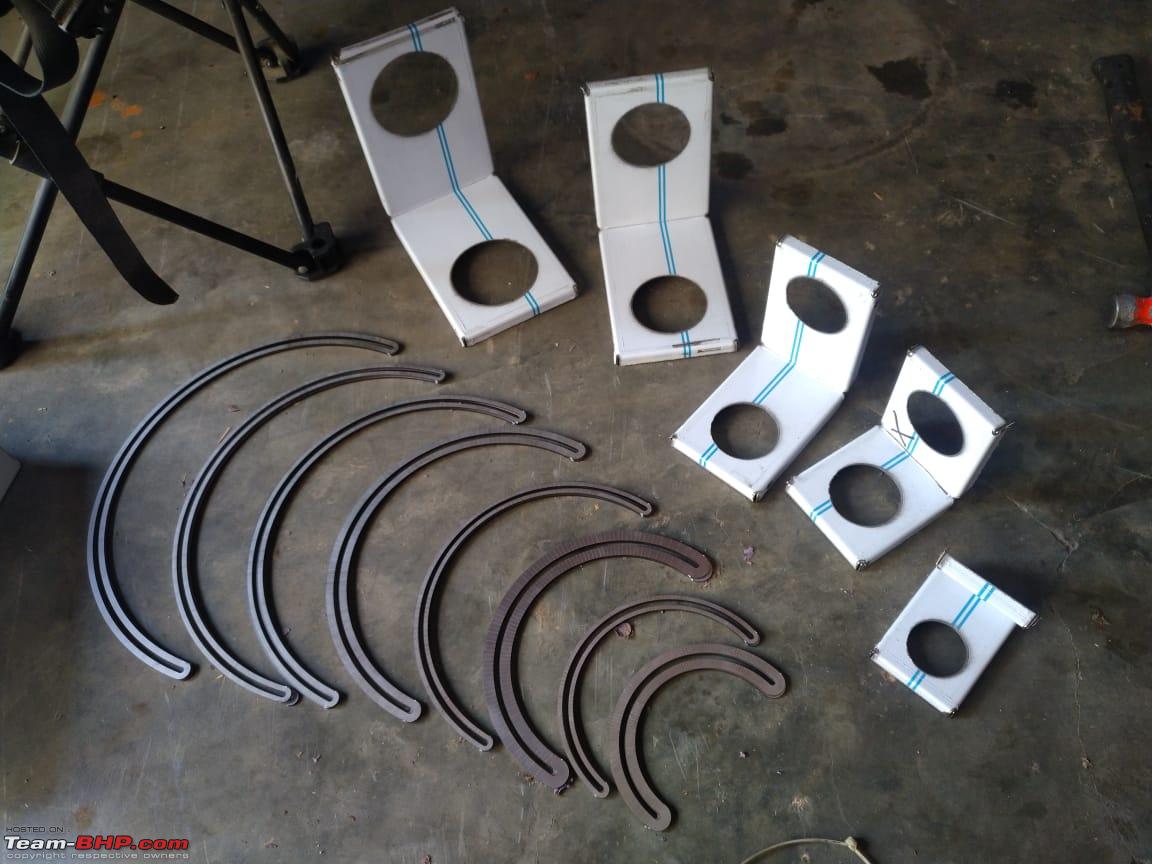 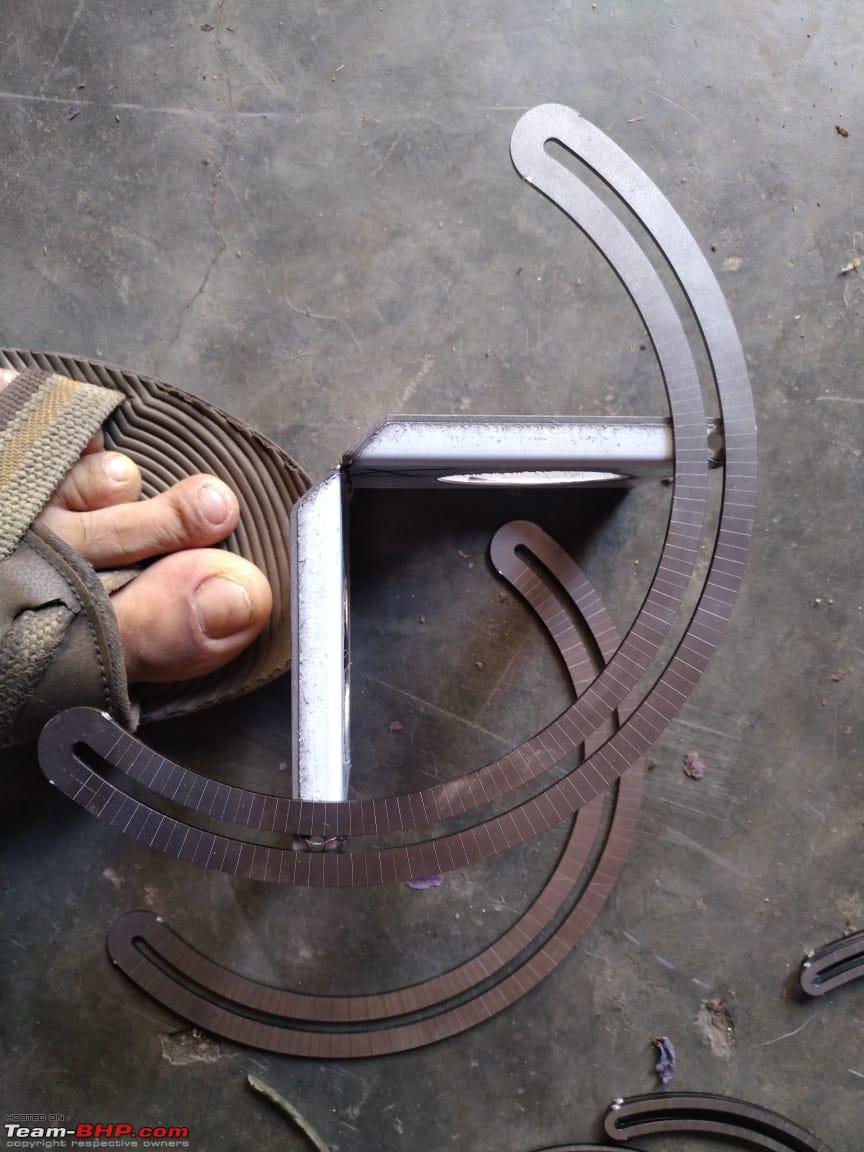 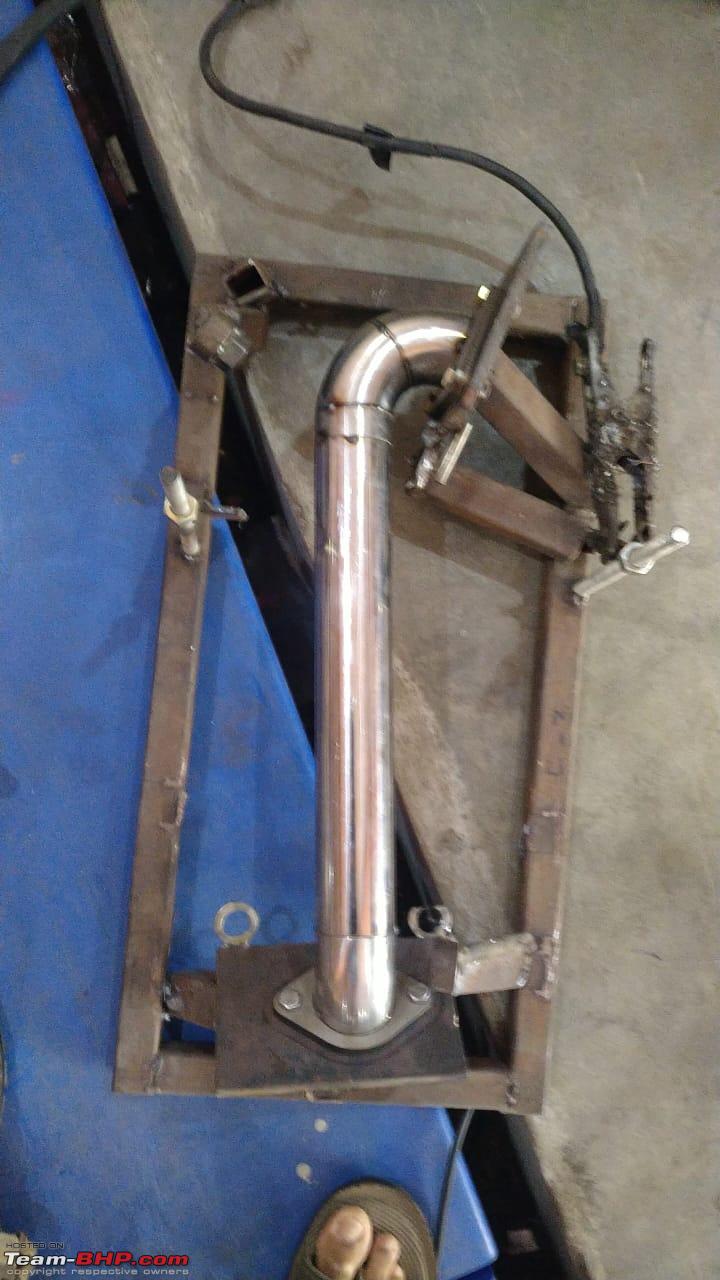  The pipes and flanges tacked on and sitting in the jig awaiting the welder's. With that done, we headed to Venkat’s trusted welder who insists on going the extra mile to eliminate weld oxidization on the insides of the pipes – a phenomenon that occurs when heated metal reacts with air in the atmosphere resulting in the formation of deposits inside the pipe at the seams, thus creating a turbulent atmosphere for gasses to flow and eventually lead to corrosion. 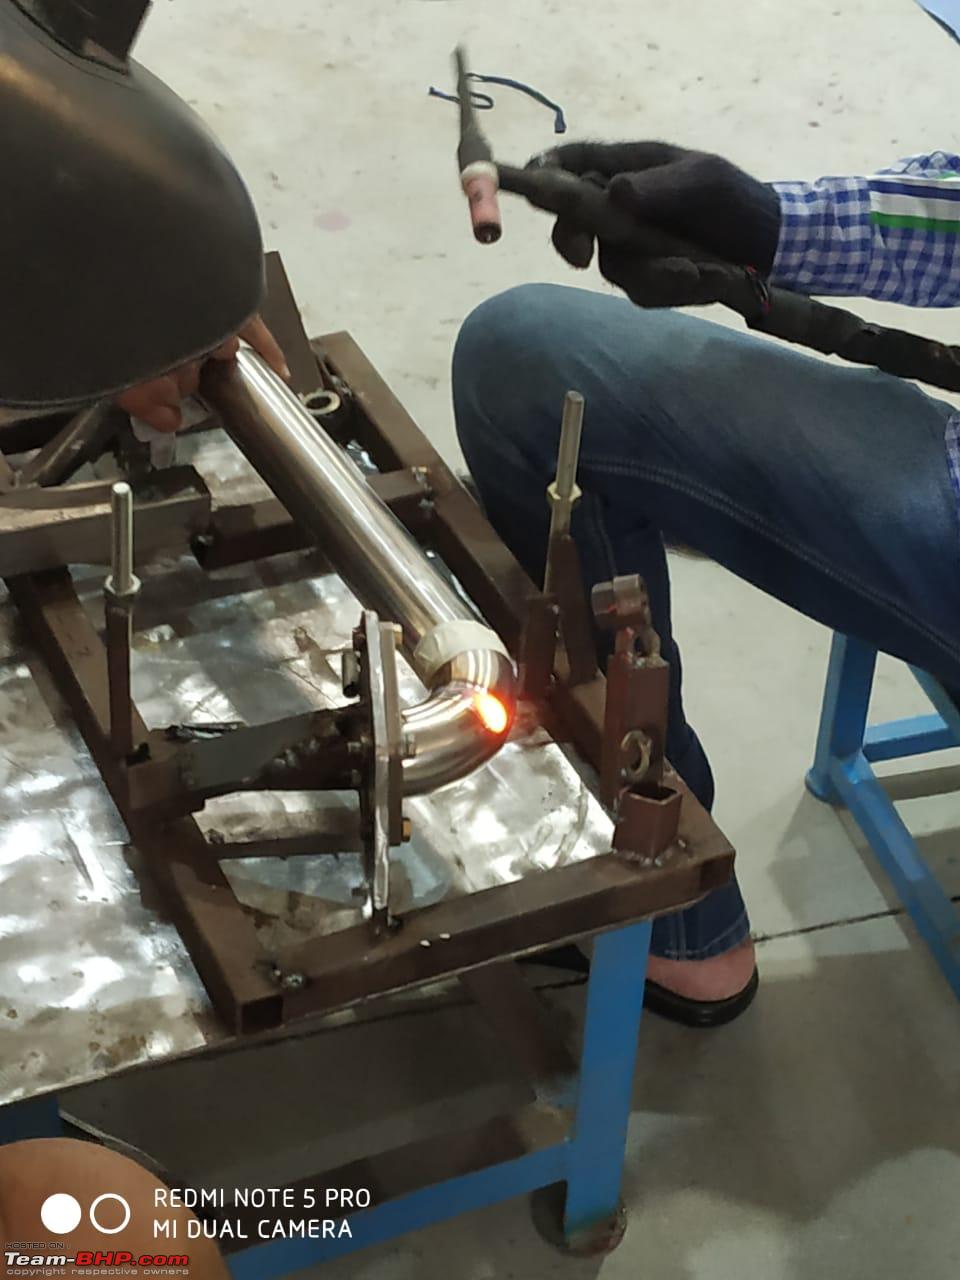 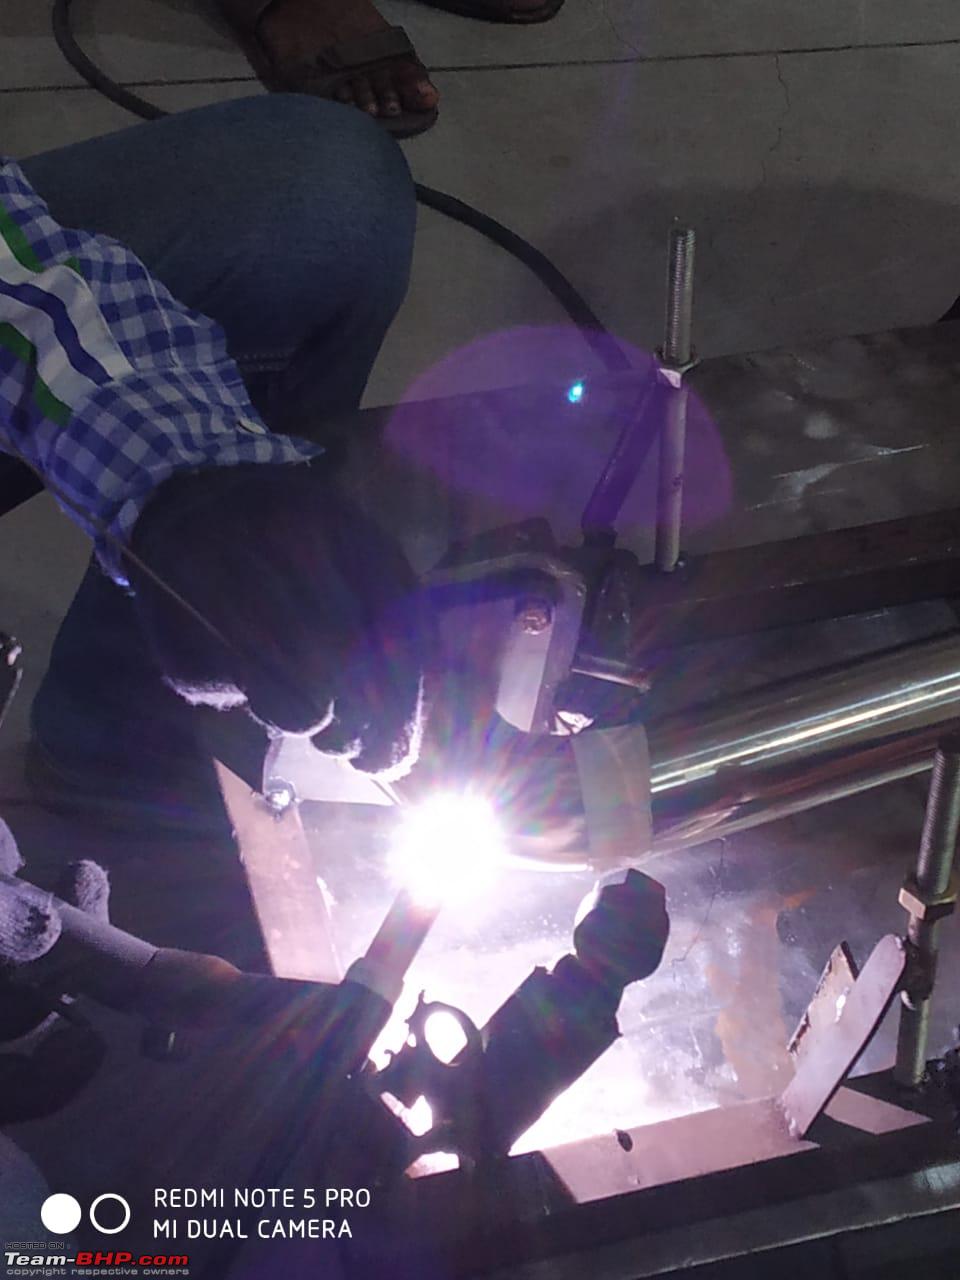 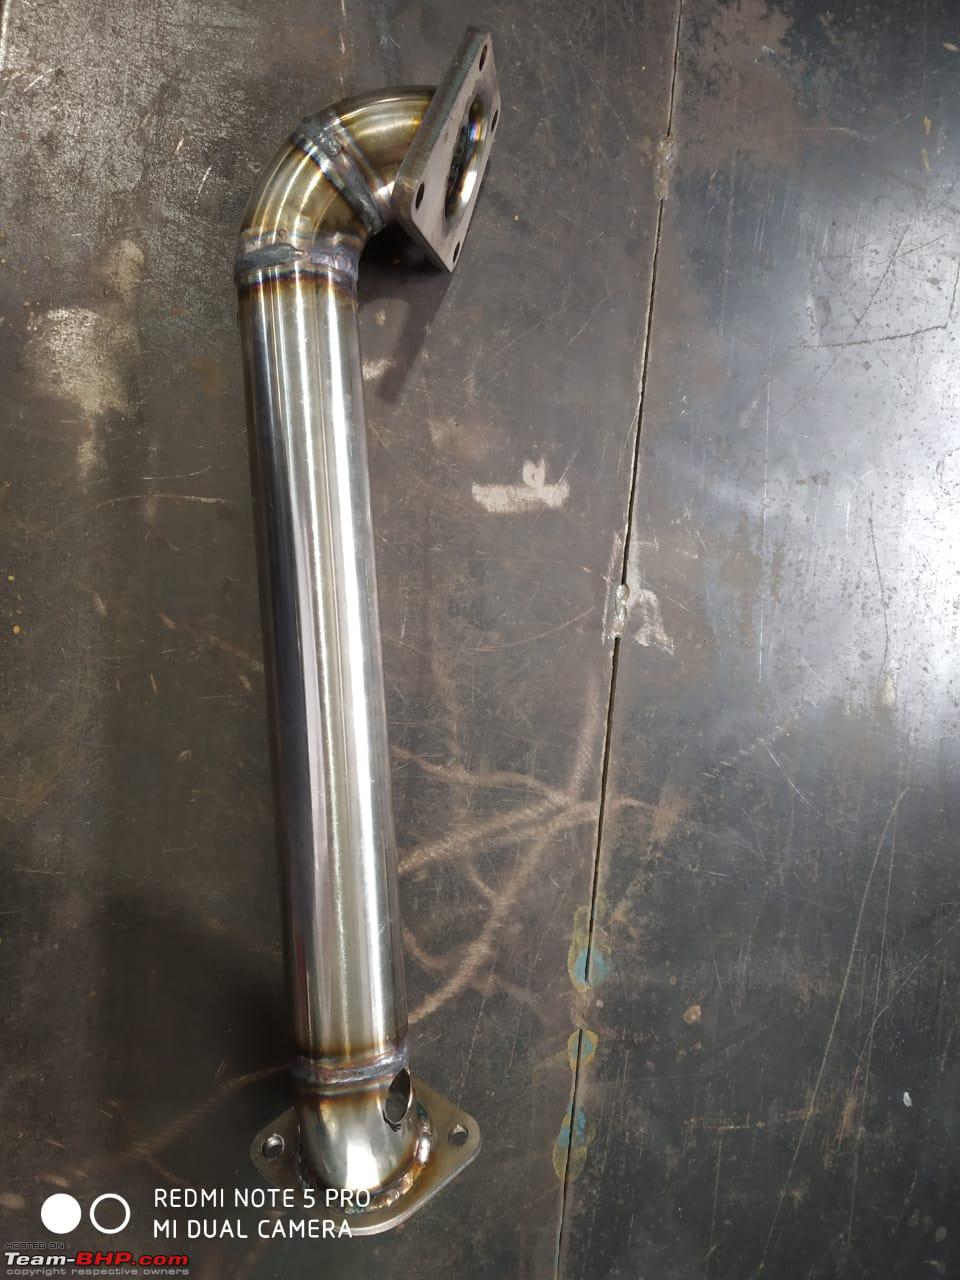 Downpipe 80% done with its bends in place.  Strapped on and awaiting surgery - mounting brackets and bungs for the o2 sensors. 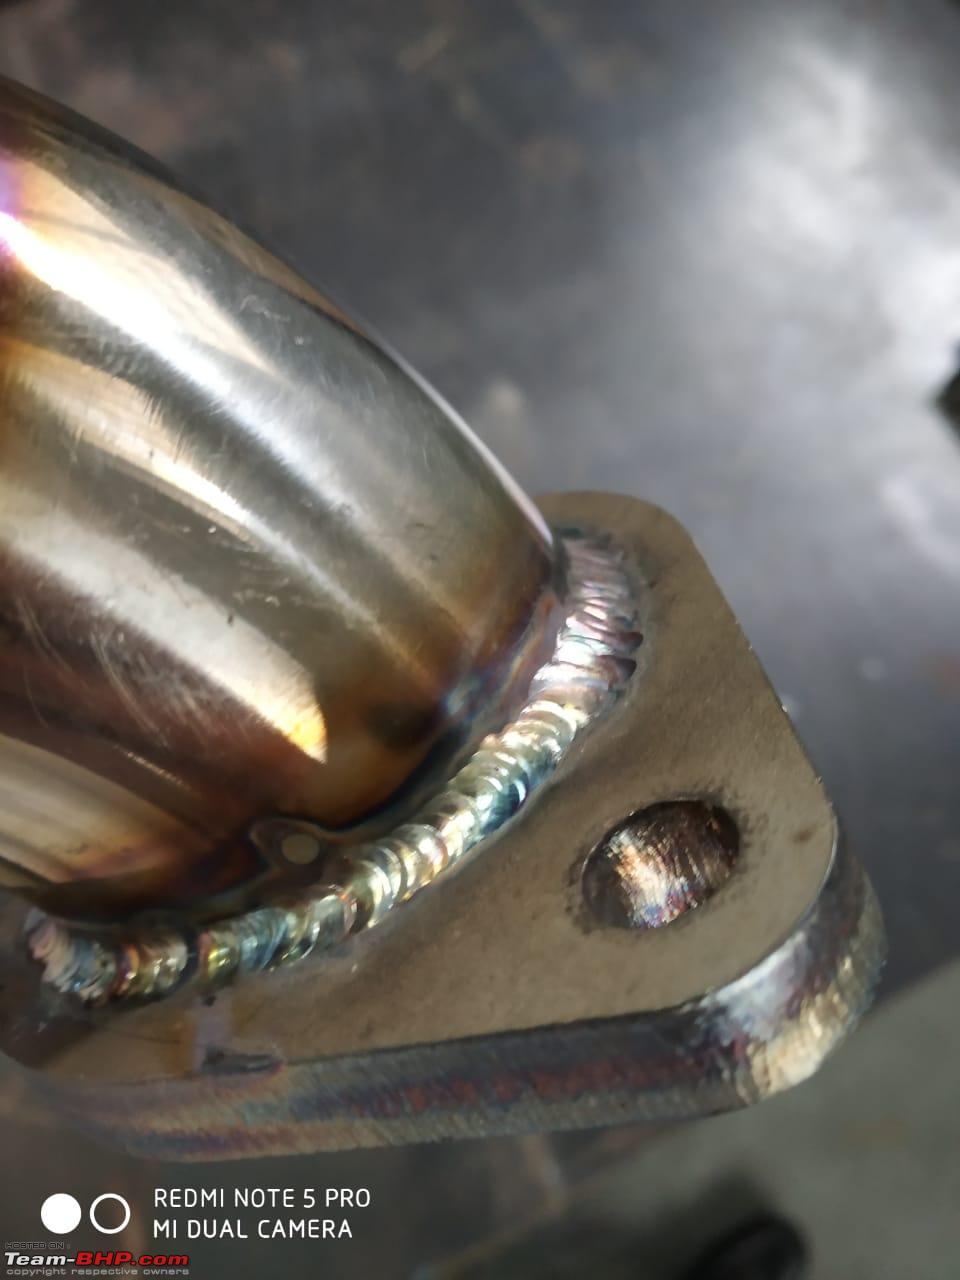 Just look at them welds! Once the downpipe was ready, we headed back to Blackworks where Venkat and Chandru proceeded to install the downpipe. Unfortunately, as it was late and with the curfew in place, my anxiousness got the better of me and I had forgotten to take pictures after this point – thus miserably failing to document the change in colour of the downpipe after several runs spanning over days. I have to say though, that I had been eagerly waiting to not only experience the difference the downpipe makes in terms of performance, but also the difference we could expect in the sound, given that I had reverted to the stock exhaust and deleted the resonator. After installing the downpipe, I cranked the car to life after a whole day of being stuck on the ramp, and instantly we could tell a difference in the sound. The exhaust note itself was more or less stock, but there was a prominent bass-filled sound coming from the engine and a distinct rasp from the underside. We pulled out of the workshop and made our way to the main road. We could hear the exhaust pop slightly when off throttle. The pop was also accompanied by a strange rattle in the exhaust – something we attributed to the resonator-delete. The moment we got onto a straight bit of road, we floored it and the car lunged forward with a sense of urgency I had not experienced in this car! A few more pulls later, and we were grinning from ear to ear! The rattle from the exhaust was prominent under partial and committed throttle, but the note was flat as it normally would be on a stock end can. The downpipe however was certainly making its presence felt. We could hear a cacophony of sounds – a slight whistle from the turbo, the wastegate doing its thing, the odd pop from the exhaust as well. It was delightful, but I could have done without the coarse rattle and vibrations coming through as a result of the resonator delete. A lesson: Kids, don’t delete the resonator, it really polishes off the exhaust note and cleans up the sound! Satisfied with the work, I drove back to my flat and eagerly looked forward to the next day. Last edited by suhaas307 : 28th May 2020 at 11:34. |
|
| (22)
Thanks
|
| The following 22 BHPians Thank suhaas307 for this useful post: | abhinav.s, ArjunPadmakumar, BigBrad, digitalnirvana, Dr.Naren, Gannu_1, GaryTSI, GTO, iliketurtles, keroo1099, krishnaprasadgg, neil.jericho, Nikhilb2008, Rehaan, Researcher, Santoshbhat, Simat, Surprise, The_Outsider!, Varun_HexaGuy, vb-saan, venkyhere |
|
21st May 2020, 02:12
| #155 |
| Team-BHP Support Join Date: Aug 2009 Location: Bangalore
Posts: 8,830
Thanked: 12,251 Times
| Re: GT'ing around in my VW Polo TSI. UPDATE: Make the GT great again! Cobra springs, SS catback exha Day Four, Five and Six: And thus, ensued the following days of bloopers, gaffes, frustration and eventual gratification and contentment. Although I was satisfied with my experience at Code6, the fact that we could not record 0-100 time any better than the stock numbers led me to experiment with other maps and tuners. I had a hard time picking the right tuner for the job. Fellow member Dr. Naren strongly suggested I give Wolf Moto a try. It was around this time that Pete’s had killer offers on their V3 ECU maps for the GT TSI, but one of the conditions was that the car is expected to run the stock map before being brought to Pete’s workshop in Bangalore for the flash. As I did not have the stock file with me, I had to look elsewhere. Venkat had initially suggested I go back to Code6 and indicate my requirements to Sajan. But I had also decided to get a TCU tune a.k.a. a DSG remap. I had done some reading on these maps and have found that TVS Engineering gives you the best tried-and-tested Stage 2 DSG map for the DQ-200. But the map was an eye-watering 45k. I simply wasn’t prepared to spend that kind of money and began to look elsewhere. Venkat then suggested I speak to Akshay Luke Titus from Delhi based GT Tunerz – the official dealer for Quantum Tuning. Quantum Tuning is a UK based tuning firm that in in the business of ECU + TCU remapping and enjoy presence all over the World. Stage 2 TCU map: During the lockdown and the days leading up to the installation of the downpipe, I had several discussions with Akshay and communicated my requirements. We discussed the idea of preparing a custom tailored map which incorporated burbles on the overrun – something that I had specifically requested for, and the map would be then applied by Venkat using his master tool. On the day after the downpipe installation was done, I drove to Blackworks and Venkat immediately got round to applying the TCU Map first – a process that took approximately 15-20 minutes. Quantum’s Stage 2 TCU was also tailored to my requirements while retaining most of the characteristics of the base TCU map. Akshay candidly mentioned that the TCU map proposed to be flashed on my car is about 90% of TVS Engineering’s Stage 2 Map. All I know now is - this is how the gearbox ought to have been mapped from the factory! The improvements were apparent almost immediately. Allow me to summarise my experiences of Quantum’s Stage 2 TCU map: - In D, the gearbox shifts are super snappy, smooth and seamless now that it is simply uncanny! The gearbox shifting to 2nd, 3rd and 4th is something you would notice in a stock TSI DSG equipped car if you are even a remotely keen observer. But with Quantum’s Stage 2 map applied, the shifts are almost impossible to decipher! - The hesitation between gears has disappeared! On the stock map, you would definitely notice a slight hesitation between shifts, but that is now a thing of the past! - Kickdown in D comes a touch sooner now and requires less aggressive throttle application. WOT in D, while cruising in 5th or 6th, and it drops to 2nd in the blink of an eye. - The shift-points in D are definitely delayed a touch. The gearbox no longer shifts at 2000 RPM in 2nd and 3rd like it would on the stock map. I have noticed that it now shifts up at around 2,400 RPM. - On the stock map, the gearbox upshifts at every chance it gets. Not after the new map was applied! I haven’t seen 7th gear unless I get the car up to 80+ km and feather it. However on the stock map, I have often seen the car puttering on in 7th at speeds as low as 65 km. - In S Mode, the shifts appear to be snappier and more aggressive than before, as the engine quickly gets into the meat of the powerband in the next gear. The hesitation between gears has definitely been eliminated. - In M mode, particularly with the paddles in operation, the gearbox feels eager and aggressive, with almost no hesitation or any delay between shifts. The shifts now feel properly quick! After a couple of short bursts, we decided to give it the beans from a standstill, and the car managed to reach the ton in just over 10 seconds on the V-Box. Not a bad result from the car with a basic Stage-1 Code6 map, as we had later learned. Stage 2 ECU map: With the TCU map out of the way, we plugged in the master tool again and flashed the custom Quantum Tuning Stage 2 map. The car felt quick, but the difference was not night and day. The burbles were apparent for a good second or two on the overrun. But by and large, the map felt smooth under hard acceleration and on the open road. On the timed runs, we managed to achieve times in the range of 10.7 to 13, due to a myriad of reasons which I shall get to shortly. But the moment we got off the NICE Corridor and into lockdown/curfew induced traffic at 6 pm, we noticed a certain jerkiness and uncharacteristic lunging in 3rd and 4th gears when about 10% throttle was applied, or when the throttle was suddenly closed. This was apparent only in traffic-like conditions. We reported this to Akshay, who immediately got into fact finding mode and requested us to provide him with data logs via VCDS. Unfortunately, we ran out of time on day four, and without a VCDS cable (shameful that I still haven’t got myself one of these yet), we could not provide Akshay with the logs he had requested for. The next day, Venkat and Chandru began putting the heatshield back onto the car, at which point he noticed that the intake duct behind the grille could be more effective and decided to come up with a solution on the spot. Air intake channel / trumpet / duct hack: Most Polo GT TSI and TDI owners are aware of the fact that Volkswagen, post 2013-14, began deleting the intake duct behind the front grille by fitting a piece that was plugged from the grille-side, forcing the pipe to draw air from within the engine bay. Most Polo GT TSI and TDI owners who have tuned their cars, have also gotten fitted what is commonly referred to as the “Euro spec air channel guide”. This part replaced the plugged dummy piece and opened the intake pipe to the grille, allowing the pipe to now draw air from the front of the car instead of from the engine bay. 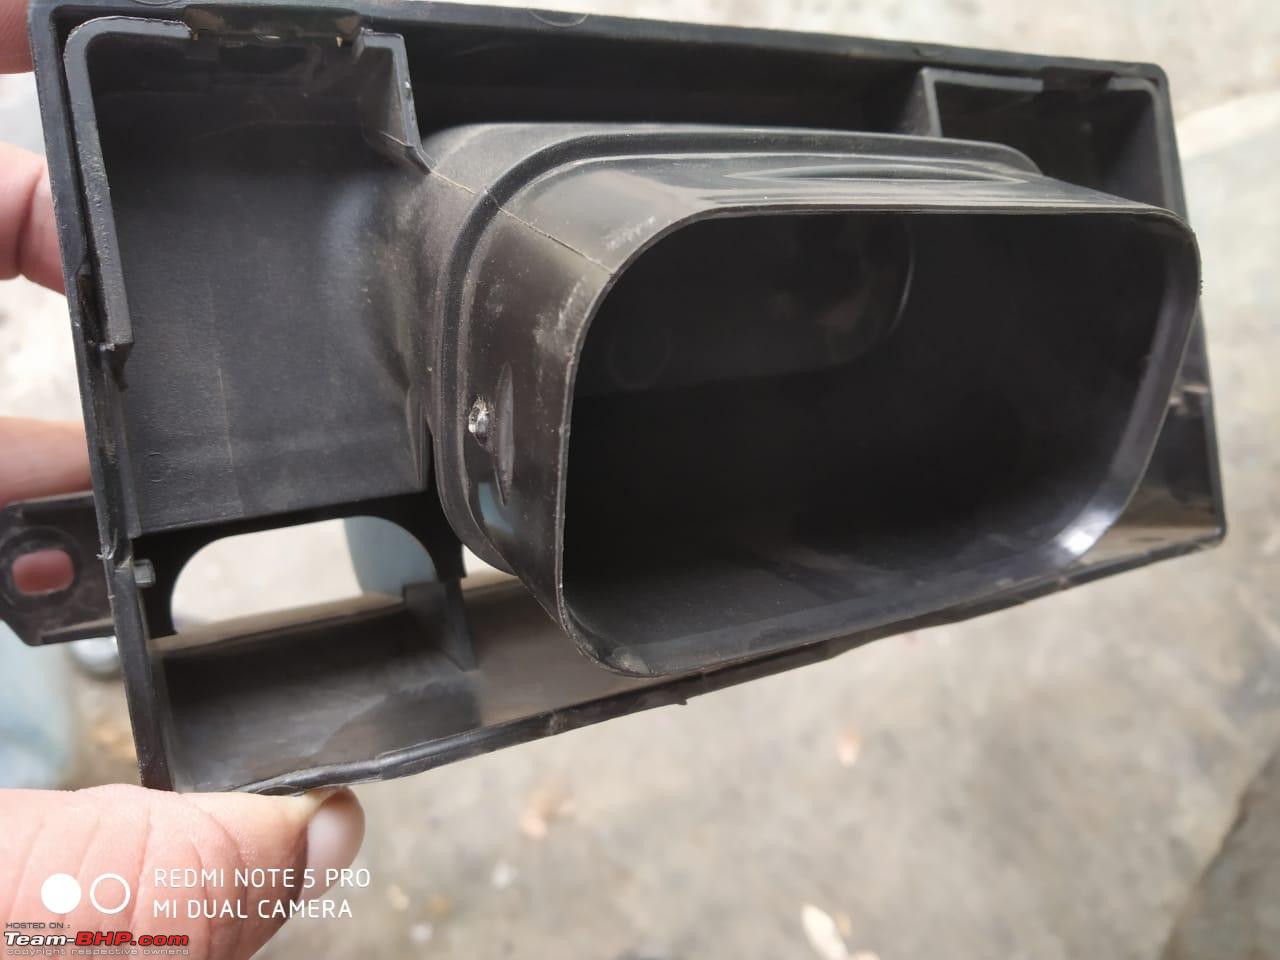 However, Venkat noticed that the Euro Duct channel thing was still open to the engine bay, thereby defeating the purpose of drawing cool air solely from the front of the car.  It took Venkat and Chandru about 1 hour from idea to execution / completion, and the results looked promising: 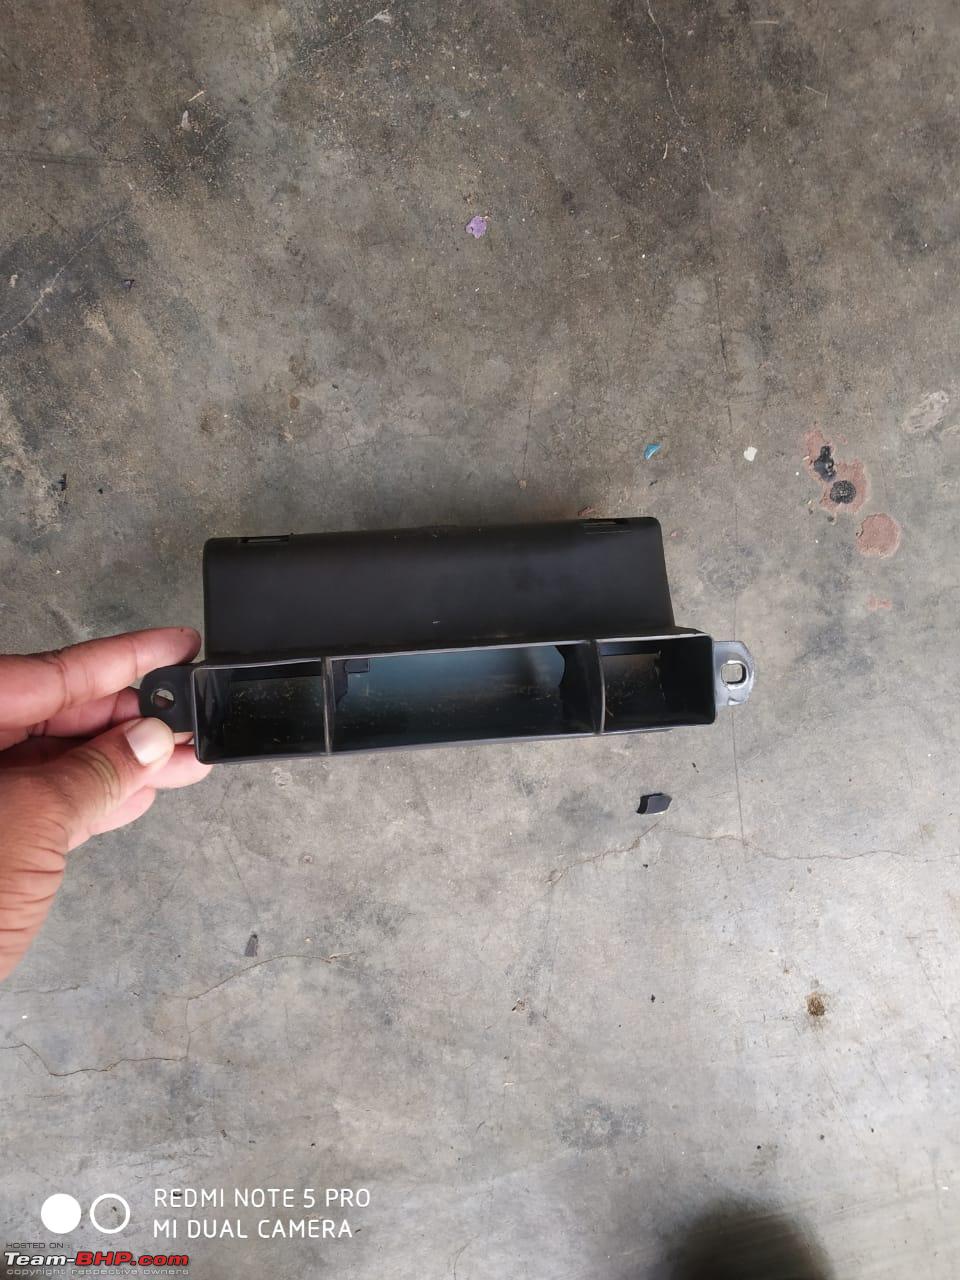  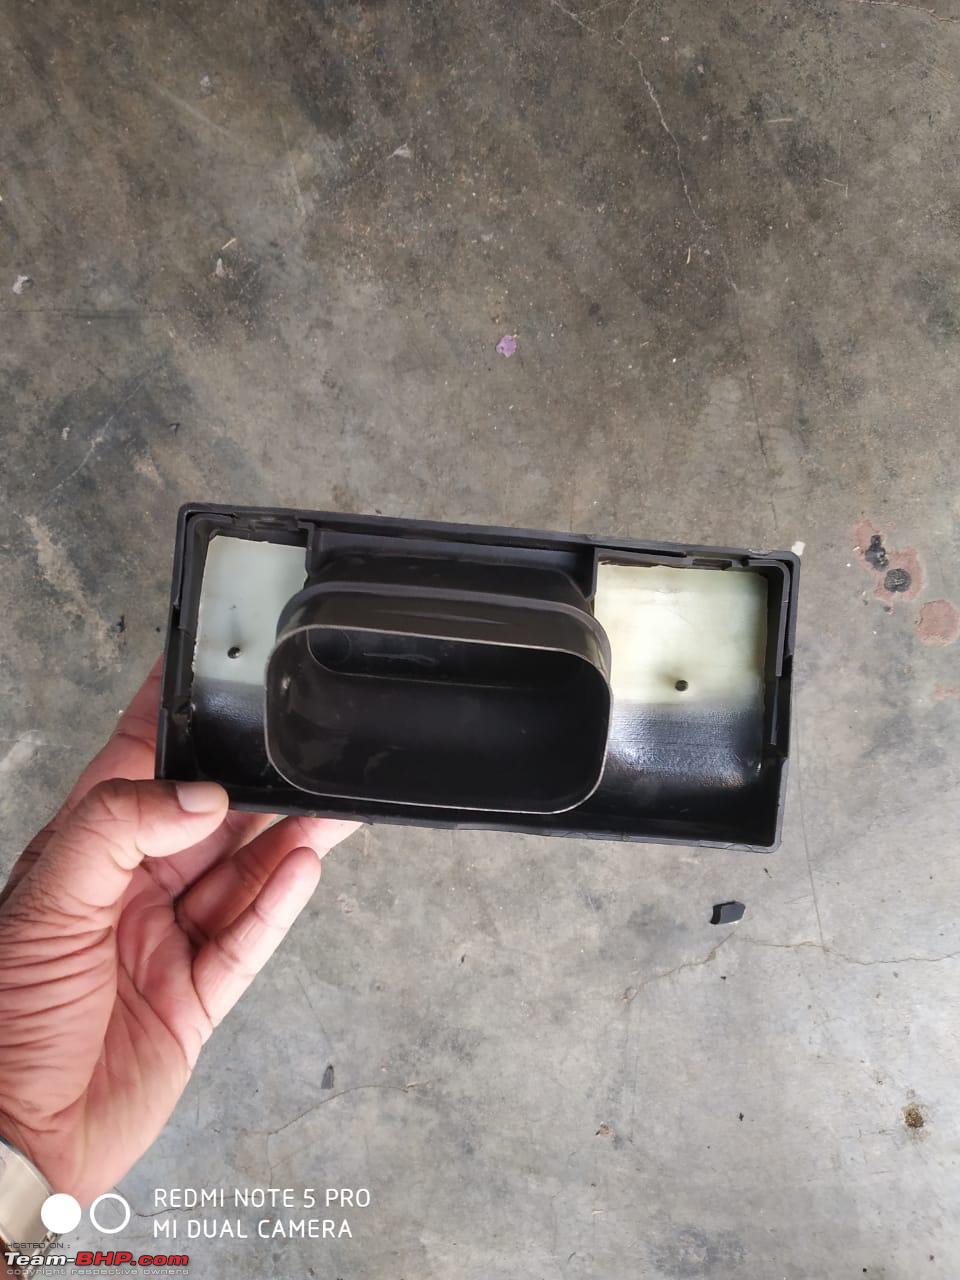 A piece of plastic was used from an old plastic coolant can and fashioned into a flap that was screwed onto the intake duct, between the duct itself and the trumpet intake pipe, essentially blocking off the bottom of the duct that was open to the engine bay, thus creating a true cold ram-air feed from the grille and into the airbox. 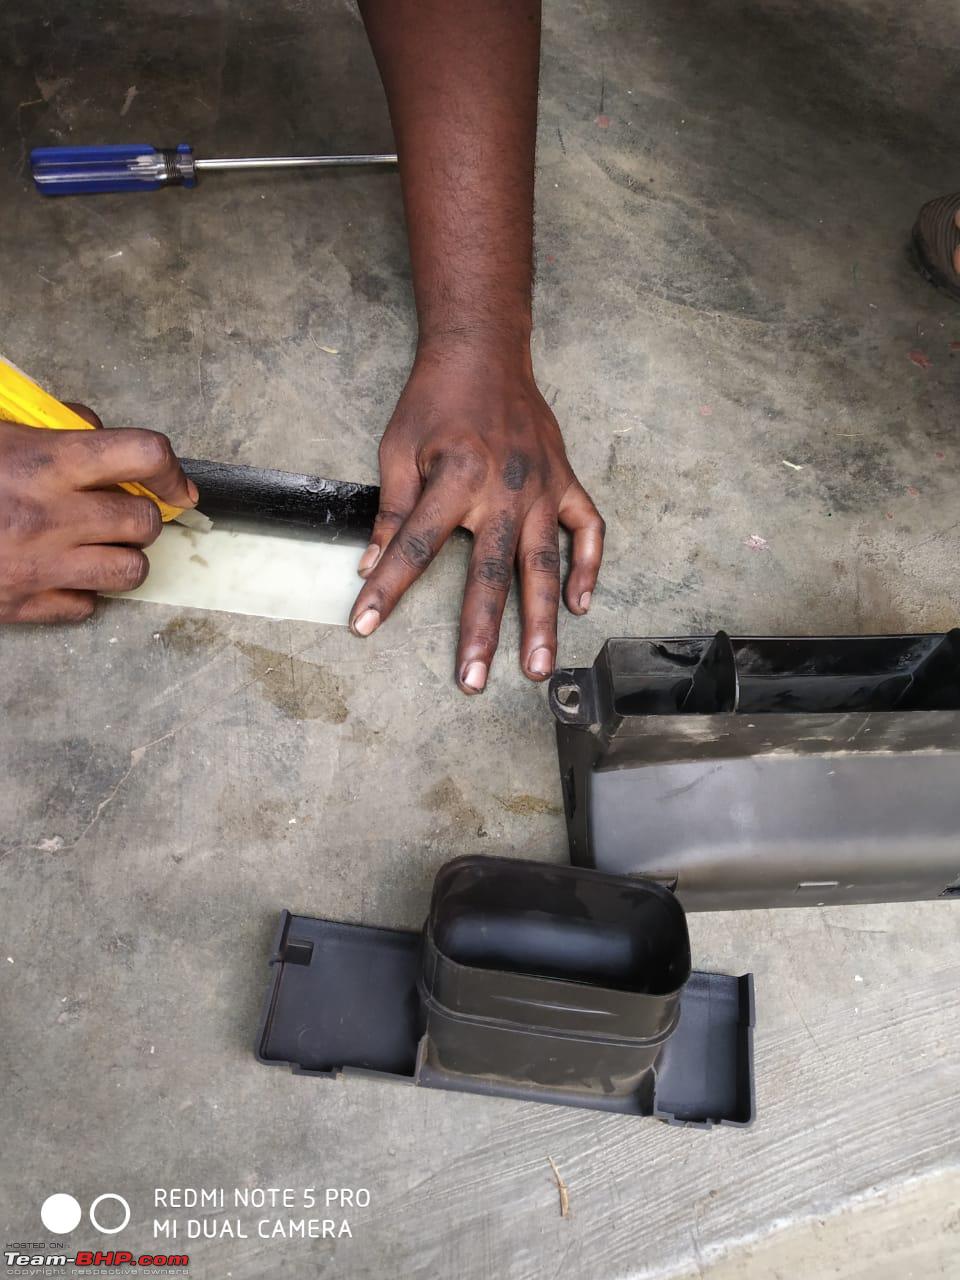  The plastic coolant can that was sacrificed for this noble cause. 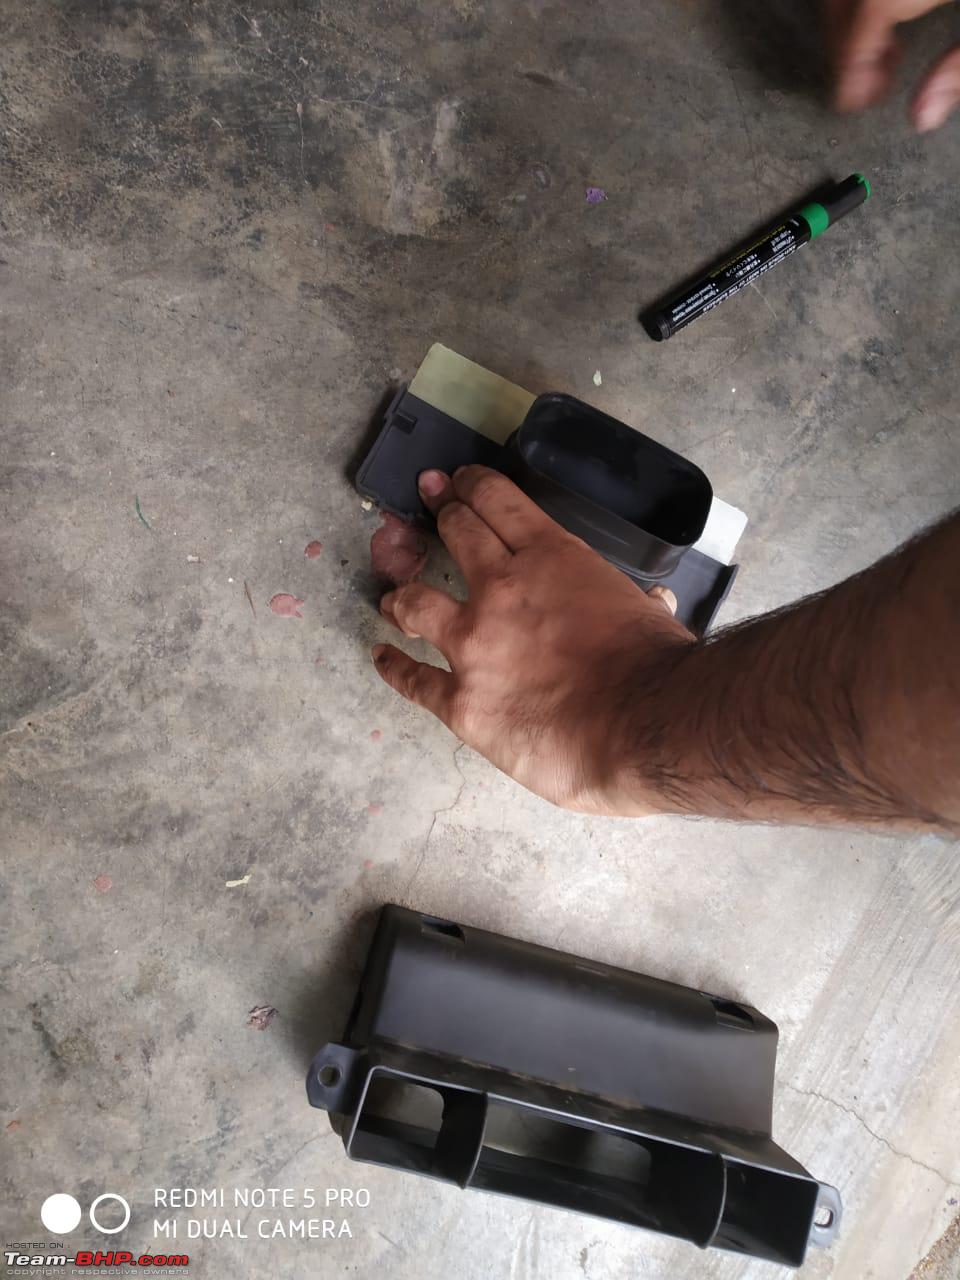 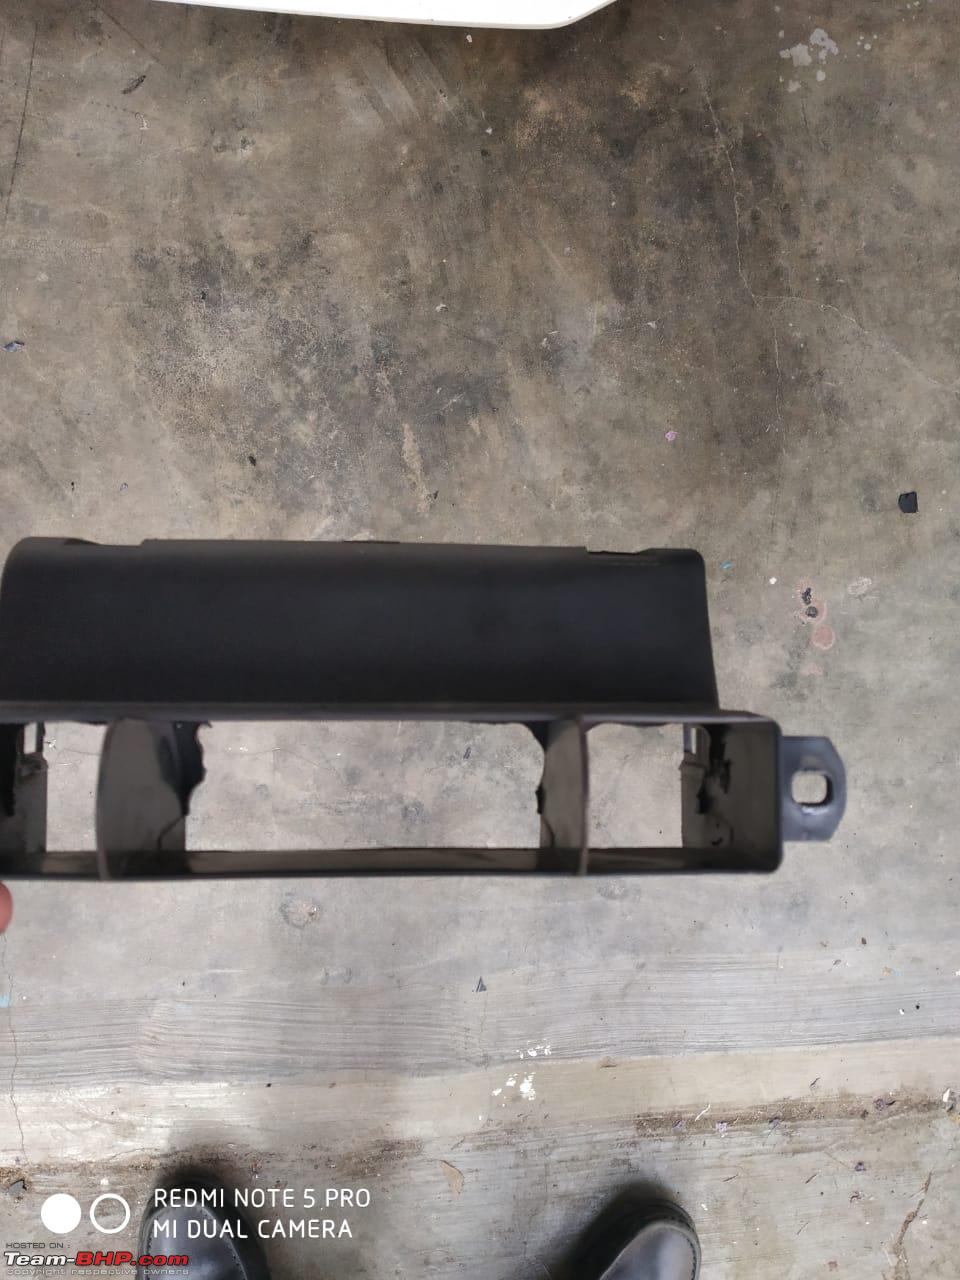 The mouth of the duct was hand-trimmed to further widen the intake, allowing it to scoop-in more air into the duct and intake pipe. Ingenious! Although Venkat said that it could be further improved if we revisit the entire design. After the ingenious intake hack was executed, we drove straight to Yajur’s, a nice chap who incidentally is the chief representative of E-Tuners Motorsport India. He had the VCDS cable that we needed to record the logs for Akshay to study. We also decided to use the road below the Airport Road flyover – perhaps the only pristine 400 meter-long stretch of tarmac that exists in the city. Unfortunately, we ran into laptop troubles and could only manage a few unhelpful logs before the laptop croaked. We sent the logs to Akshay, who, upon receiving the data, informed us that the logs were not as helpful as he would have liked, and recommended we do WOT pulls in 4th gear or 5th, from the lowest point in the RPM possible all the way till redline. This was tricky, as WOT in 4th would result in the gearbox kicking down to 2nd, so I had to wait for the kickdown from 4th to 2nd and then quickly use the paddles to shift to 4th while keeping the right foot flat on the floor till the car was doing around 5000k on the rev-counter. The next day, we were able to record the logs Akshay had requested for, but there were some inconsistencies in the logs recorded. Nonetheless, the logs were used to identify possible chinks in the map, and said chinks were communicated to Akshay who was constantly available for us throughout the day. Akshay eventually diagnosed the issue and found that the engine was knocking intermittently. But what was more alarming than that was the high IATs – not something that is uncommon on this car. I suppose I may have picked the wrong time of the year to tune the engine and run it hard to record logs. That said, the constant runs, logging and map-tweaking gave me the opportunity to learn a great deal about this engine. The EA 111 1.2 TSI, despite being one of the best small capacity turbocharged engines for the last 6 years, is not without its limitations. In fact, it is nothing but an old 1.2 block, with a revised head, 8-valve SOHC and a tiny turbo slapped on, as I have come to learn. Even VW themselves were aware of the limitations and went back to the drawing board. A few years later, in 2015, they unveiled its replacement – a brand new 1.2 TSI code named EA 211 now equipped with DOHC, 16 valves, forged internals, etc. Unfortunately, we did not get this engine and VW persisted with the old EA 111 1.2 TSI for the Indian market, for reasons best known to them. Most people who are familiar with the EA 111 1.2 TSI would know that it is entirely pointless revving it beyond 4000 RPM – there’s absolutely nothing in the top of the rev range. It is also not as refined as a 4-cylinder should be. The motor is also extremely unreliable if tuned to its limits, and no self-respecting tuner from the western markets would touch this engine with a barge pole. But the biggest imitation of this car remains its woefully inadequate cooling system. As documented in several threads here, the Polo does not use a traditional intercooler and relies on the existing coolant and its pump to keep the motor running cool. I am not going to get into the details as I already feel I have rambled on far too long on this thread. But anecdotal evidence would help make my point here. The first run we did at around 6 pm was on an uphill incline, and the 0-100 time we managed on this run was the best we could do – 10.2 seconds. You would imagine by now the dejection I faced for not being able to achieve my sub-10 second time, but I was happy nonetheless. Why? Because every single run after the initial 10-second run resulted in times above 11 seconds. The car was suffering from heat-soak, clearly. The IATs were high and if you factor in the circumstances – uphill incline, 1 km above sea level, a boot full of crap I ought to have unloaded at the workshop, and the additional unsprung weight on the front axle – sub-10 second times are easily achievable. But the important thing to note was the massive difference in shove that was apparent in the mid-range. Between 2.5k RPM and 4k RPM, this car hustles! If it weren’t for the weak top end and the unreliable gearbox that prevented me from executing full-bore launches and upshifts at 4.5K RPM at WOT, we could easily achieve a time of 9 seconds or lower! Eventually, we settled on the tried-and-tested Quantum Stage 2 ECU map without the burbles, since creating the burbles on the overrun requires further advances in timing, consequently causing the car to jerk ever so slightly in 3rd and 4th gears - on slight throttle applications or sudden throttle closures. Akshay too recommended against it, in the interest of reliability and drivability. 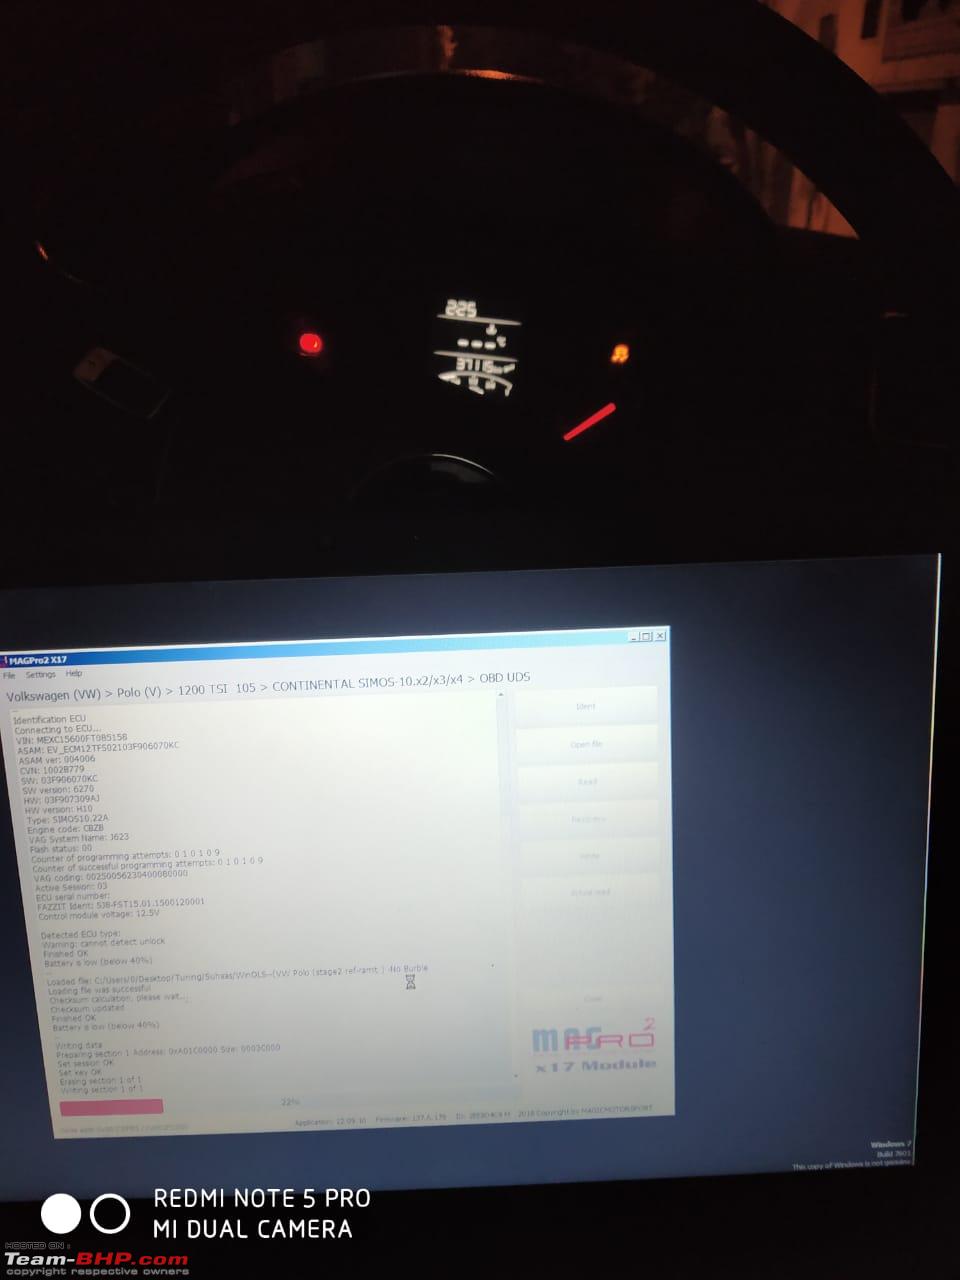 I have to say, in the end I was quite pleased with the results. A fantastic downpipe and a great tune to go with it! After having had unpleasant experiences, I am pleased to report that I now have a properly sorted car that is quick and plenty fun to drive! Special thanks to Venkat from Blackworks and Akshay from GT Tunerz, as they left no stone unturned to ensure the job at hand was executed flawlessly! However.. Going back to the stock exhaust system has left a huge gaping cut-out in my rear bumper that requires to be filled. And with the stock exhaust + resonator back in their places, the exhaust is extremely quiet. I have been looking for a stock GTI muffler and have put the word out for the same. Should anyone chance upon an example for a decent sum, please let me know. I would highly appreciate it. EDIT: I should also mention at this point that until my car receives the official "project car" status, I won't be looking to execute any major hardware modifications going forward. At the moment, Venkat and I are looking to resolve some of the issues that limit this car's abilities, for example the high IATs and the woefully inadequate cooling system VW has deployed on this engine. If anyone has any ideas or solutions, please feel free to share it here or in PMs. Last edited by suhaas307 : 23rd May 2020 at 03:17. Reason: Para phrasing |
|
| (36)
Thanks
|
| The following 36 BHPians Thank suhaas307 for this useful post: | abhinav.s, ArjunPadmakumar, Arun Venugopal, Avikbrio, BigBrad, dealer, digitalnirvana, Dr.Naren, Eddy, evil_grin, Gannu_1, GaryTSI, graaja, iliketurtles, keroo1099, krishnaprasadgg, Mi2un, mrpitt, neil.jericho, Nikhilb2008, Philip.Mathew, Rehaan, Researcher, Santoshbhat, Shreyans_Jain, Simat, Surprise, Tassem, TheLizardKing, The_Outsider!, Varun_HexaGuy, vb-saan, venkyhere, vignesh.cv, Viraat13, VivekCherian |
|
21st May 2020, 10:50
| #156 |
| Distinguished - BHPian  | Re: GT'ing around in my VW Polo TSI. UPDATE: Blackworks catless downpipe & Quantum Stage 2 ECU+TCU m Thanks for the detailed posts. The decat downpipe is very well made and lot of effort has gone into it. Brilliant execution by Blackworks as always  I have seen many tuners claim big numbers for this car by just remap. I know for a fact it's all just marketing and the engine is not really mod friendly. I won't be surprised if the Blackworks downpipe made more gains than any remap in your car .Happy to read about Quantum DSG map. I used to always recommend TVS DSG maps. I am sure Quantum will have more competitive pricing and if they can deliver 90 percent of what TVS does..that's a great deal!! Do test the car once with higher octane fuel like Speed 97 or Power 99. |
|
| (3)
Thanks
|
| The following 3 BHPians Thank Dr.Naren for this useful post: | avishar, evil_grin, suhaas307 |
|
22nd May 2020, 13:59
| #157 |
| BHPian Join Date: Apr 2019 Location: Chennai
Posts: 57
Thanked: 387 Times
| Re: GT'ing around in my VW Polo TSI. UPDATE: Blackworks catless downpipe & Quantum Stage 2 ECU+TCU m Great upgrades and looks like you have hit a wall as far as performance is concerned. I never knew so much goes into making of a downpipe. I will be doing a DSG tune soon but will retain the stage 1 map from Petes. Last edited by sharan1988 : 22nd May 2020 at 14:13. |
|
| (1)
Thanks
|
| The following BHPian Thanks sharan1988 for this useful post: | suhaas307 |
|
22nd May 2020, 20:49
| #158 |
| Senior - BHPian Join Date: Apr 2008 Location: Bangalore
Posts: 2,774
Thanked: 1,271 Times
| Re: GT'ing around in my VW Polo TSI. UPDATE: Blackworks catless downpipe & Quantum Stage 2 ECU+TCU m Superbly drafted updates Suhaas!! Thanks for taking time out to pen down the updates. It was a very good read specially during the lockdown. Your car is really an institution for learning!! (guess it is a thread title of another Vento owner too). The painstaking efforts you take to make sure there is perfection in the mods along with the quest for power is commendable. For new TSI owners (mine is the 1.2 TSI from Sept. last year) like me, it definitely teaches us where to dip our feet into and what not to go after when we read your updates to the car. Special mention to Venkat and Blackworks for the amount of thought they put into a downpipe fabrication to make sure it is perfect and reliable. Wonderful team of people he has and hats off to him for his efforts in achieving flawless execution. To summarize, I would certainly enlist your guidance and help to modify my car and even I, just like you would take it one step at a time hence you will hear a lot more from me in near future!!  |
|
| (2)
Thanks
|
| The following 2 BHPians Thank abhinav.s for this useful post: | adityan27, suhaas307 |
|
23rd May 2020, 01:28
| #159 | ||||
| BHPian | Re: GT'ing around in my VW Polo TSI. UPDATE: Make the GT great again! Cobra springs, SS catback exha Suhaas man, your thread is going to end up causing a lot of drained wallets!!! I'm reading this a day later than promised, but as always, I have a lot of questions! Quote:
Quote:
Quote:
Quote:
Also, despite all the photos you have posted, we need more photos of the install in place! That will help visualise all the effort put in to the design and fabrication of the downpipe. I've not really stepped into the world of exhaust jobs, and your exhaustive (pardon the pun) write up has gone a long way to improve my understanding of it, so thank you. As always, wish you many happy miles. | ||||
|
| (4)
Thanks
|
| The following 4 BHPians Thank Viraat13 for this useful post: | digitalnirvana, suhaas307, vishy76, viXit |
|
23rd May 2020, 03:02
| #160 | ||||||||||
| Team-BHP Support Join Date: Aug 2009 Location: Bangalore
Posts: 8,830
Thanked: 12,251 Times
| Re: GT'ing around in my VW Polo TSI. UPDATE: Make the GT great again! Cobra springs, SS catback exha Quote:
It's true, for all the talk about how the GT TSI is a mod friendly car, it's the exact opposite! Let me start with: 1) The inadequate cooling system 2) The old 8v SOHC tech. 3) Restrictive ECU (probably a good thing if you think about it )..and then mention the more obvious ones: 4) The ticking time bomb that is the DSG *all fingers and toes crossed* making it a) impossible to shift up at 4.5k RPM when WOT, and b) do full bore launches using launch control, for the fear of leaving behind the gearbox in parts.. or as a whole. 5) Small capacity high strung 1.2 turbo which does make the car feel restrained at times on the highways. I plan on giving Power 99 a try for my next fill. Quote:
Neither did I! I honestly imagined it to be something as simple as a couple of pipes just welded on together - screwed onto the exhaust turbine housing at one end, and to the rest of the exhaust at the other. This experience has been a real eye opener for me, not just with respect to the detailed learning on exhaust systems but generally on just how all these components jive together as a unit, while under extreme load from external circumstances and influences, all thanks to Venkat and Akshay who patiently walked me through the nuances. Quote:
Incidentally, the thread on the Vento - an institution for learning - is by Sharan aka sharan1988 right above your post! You are most welcome to drop me a PM anytime. By the way, Venkat's team is just him and his assistant, Chandru. Oh, and then there's Joe who is locked-down in Kerala, at the moment. Quote:
Quote:
Unfortunately, I goofed up big time by not taking photographs of the transition between the regular colour of stainless steel, to a nice golden bronze after a couple of hard runs and a long day of driving, and eventually a nice evenly spread blue all around the surface - not focused in one spot. Quote:
Quote:
Quote:
Plan A: A used GTI muffler - since the piping to the GTI muffler is too large and won't work with this car, I shall use just the back box, that way I get the twin pipes - the factory Polo GTI look and the restrained yet sporty exhaust note. Plan B: Install a Borla ProXS end can on the stock piping, in place of the stock back box, using flanges on all edges to ensure the modification is reversible, and retain the tips I had on the old exhaust, or maybe even get something new. I plan on retaining the resonator Plan-B, just to see if I can achieve an even smoother exhaust note. Being far less restrictive than a traditional back box, it may help in cancelling put some of the resonance and harshness without stifling performance too much - being a straight pipe and all. If I don't find the GTI back box for a reasonable price, I may have to settle for the Borla ProXS muffler. Quote:
Quote:
As I have learned recently, there is a lot more to it than what meets the eye! Last edited by suhaas307 : 23rd May 2020 at 03:30. | ||||||||||
|
| (4)
Thanks
|
| The following 4 BHPians Thank suhaas307 for this useful post: | abhinav.s, Avikbrio, digitalnirvana, Viraat13 |
|
23rd May 2020, 03:23
| #161 | ||
| BHPian | Re: GT'ing around in my VW Polo TSI. UPDATE: Make the GT great again! Cobra springs, SS catback exha Quote:
 Quote:
EDIT: I’ve heard that Borla on a 1.6 NA Engine, it’s pretty neutral sounding. Not too loud, and just lets you know that something is there. Last edited by Viraat13 : 23rd May 2020 at 03:24. | ||
|
| (1)
Thanks
|
| The following BHPian Thanks Viraat13 for this useful post: | suhaas307 |
| |
|
23rd May 2020, 03:53
| #162 | |||
| Team-BHP Support Join Date: Aug 2009 Location: Bangalore
Posts: 8,830
Thanked: 12,251 Times
| Re: GT'ing around in my VW Polo TSI. UPDATE: Make the GT great again! Cobra springs, SS catback exha Quote:
Unsolicited advice: If you are considering performance mods, I would say - skip Stage 1 and go straight to Stage 2 (or Stage 1.5 or whatever it is). Basically, just get a downpipe and a tune to go with it. You will probably get more tangible performance gains from a downpipe and a map optimised for it, rather than from a basic performance flash and a drop in filter. The TCU tune however is a no-brainer in my opinion. Quote:
Do tell me more about this exhaust guy who makes a reasonable copy? How is the muffler constructed? Does it have all the channels, perforations, pathways and chambers - being the contents of a factory made muffler, or would it be a perforated straight pipe packed with glass wool? Quote:
Last edited by suhaas307 : 23rd May 2020 at 10:07. | |||
|
| (3)
Thanks
|
| The following 3 BHPians Thank suhaas307 for this useful post: | abhinav.s, digitalnirvana, Santoshbhat |
|
23rd May 2020, 04:34
| #163 | ||
| BHPian | Re: GT'ing around in my VW Polo TSI. UPDATE: Make the GT great again! Cobra springs, SS catback exha Quote:
Either way, 15-18K km of pure city traffic every year isn't the best thing, which is why I feel my options are limited. Quote:
Honestly, I haven't got a clue about the insides. It'll probably be glass wool, but I can call and check. Have you considered a valvetronic system? It seems to be the best of both worlds, loud when you want it to be and (nearly) stock the rest of the time. | ||
|
| (2)
Thanks
|
| The following 2 BHPians Thank Viraat13 for this useful post: | suhaas307, Varun_HexaGuy |
|
28th May 2020, 11:29
| #164 | ||
| Team-BHP Support Join Date: Aug 2009 Location: Bangalore
Posts: 8,830
Thanked: 12,251 Times
| Re: GT'ing around in my VW Polo TSI. UPDATE: Make the GT great again! Cobra springs, SS catback exha Quote:
Quote:
__________________________________________________ ___ UPDATE: Post downpipe and Stage 2 ECU + TCU maps, the car has been doing quite well. I hadn’t racked up huge miles thanks to the pandemic, but I had done enough driving to understand the difference it has made. However, the one thing that bothered us was the high IATs. We had put the car through some hard WOT runs and 0-100 timed runs, and in between these runs the car was sitting at traffic lights. Naturally, the car was heat-soaking to the point that it was losing power when poked and prodded. And every subsequent run after the 1st one resulted in times that were a good 1-2 seconds slower than the previous run. Over the weekend, I got hold of the car’s SSP and immediately forwarded it to Venkat, who spent some time studying it. That night, he dropped me a message and asked me to take some time off on Monday and swing by the workshop, as he had the bandwidth to physically study the engine. Monday morning arrived and I found myself at Blackworks again, and Venkat found himself pouring into the engine bay, again, with a flashlight in one hand and my phone (with the SSP pulled up on the screen) in the other. It took him exactly 30 minutes to figure out what’s what. And then he said, “give me about one and a half hours, and I will sort this out for you!” I was sceptical initially, but eventually agreed. The moment I gave him the green signal, he began fiddling with the hoses and pipes, pulling out one hose and fitting it elsewhere, plugging a pipe or two, and then introducing an all new and different hose that was completely alien to this engine up to that point. So, what was going on? Members on the forum have gone to great lengths to explain the nuances of the GT TSI’s coolant setup, so here are the highlights: Unlike many other turbocharged cars, the 1.2 TSI utilizes a cooling system that is, in theory, a very efficient setup. There is a primary radiator that is used to cool the head, the block, the throttle body, etc. The coolant that is used to cool these components is pumped through circuit No. 1 by a mechanical water pump. And then you have another radiator that is responsible for cooling the turbocharger and the charged air. The coolant for the turbo and the charged air is pumped through circuit No. 2 by an electric water pump. To understand this better, you may have to refer to the picture below: 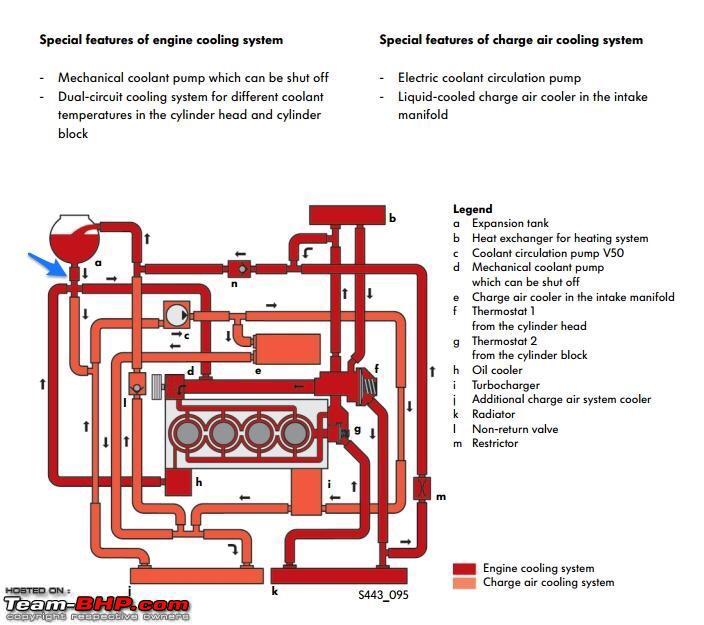 The “outstanding” feature of this system is – at some point in the setup, the circuits are intertwined with each other, and both circuits eventually utilize the same coolant that is stored in one reservoir. At the outset, it does seem quite efficient in theory, doesn’t it? In practice however, it is quite the opposite. Especially in our gruelling summers and horrible stop-start traffic conditions. At some point in the circuit-loop, the coolant-line that is routed to cool the charged air gets increasingly hotter than it should, and the reason for that is heat-soak. The location of the turbo and the exhaust manifold is not doing these coolant-lines any favours, and in fact warms-up the engine bay to such an extent that the charged air is consequently hotter than it ought to be. Cool air is dense and better for combustion. Hot air is not dense and therefore, not good for combustion. If the intake manifold is fed with hot air, the end result is going to be an under-performing engine. It took Venkat about an hour of reading and another hour or so of poking around the engine bay to figure out how to re-organize the coolant lines and that is exactly what was done. In essence, the coolant line that was routed to cool the turbocharger, was re-routed in such a way that it now utilizes the primary radiator for its coolant. Additionally, it now relies on the mechanical water pump to send coolant through its lines. Meanwhile, the coolant line for the charged air - that had once shared its line with the turbo’s – no longer does and is separated from it altogether! A new auxiliary reservoir was introduced into the engine bay, behind the heat-exchanger, and was looped along with the circuit for the charged air. This, in effect, ensured that the coolant line for the charged air, that was once bundled along with the circuit for the turbo coolant-line, is now a completely independent loop that is no longer subjected to the kind of heat that it always was. Here is a sneak-peak of the engine bay, post-hack: 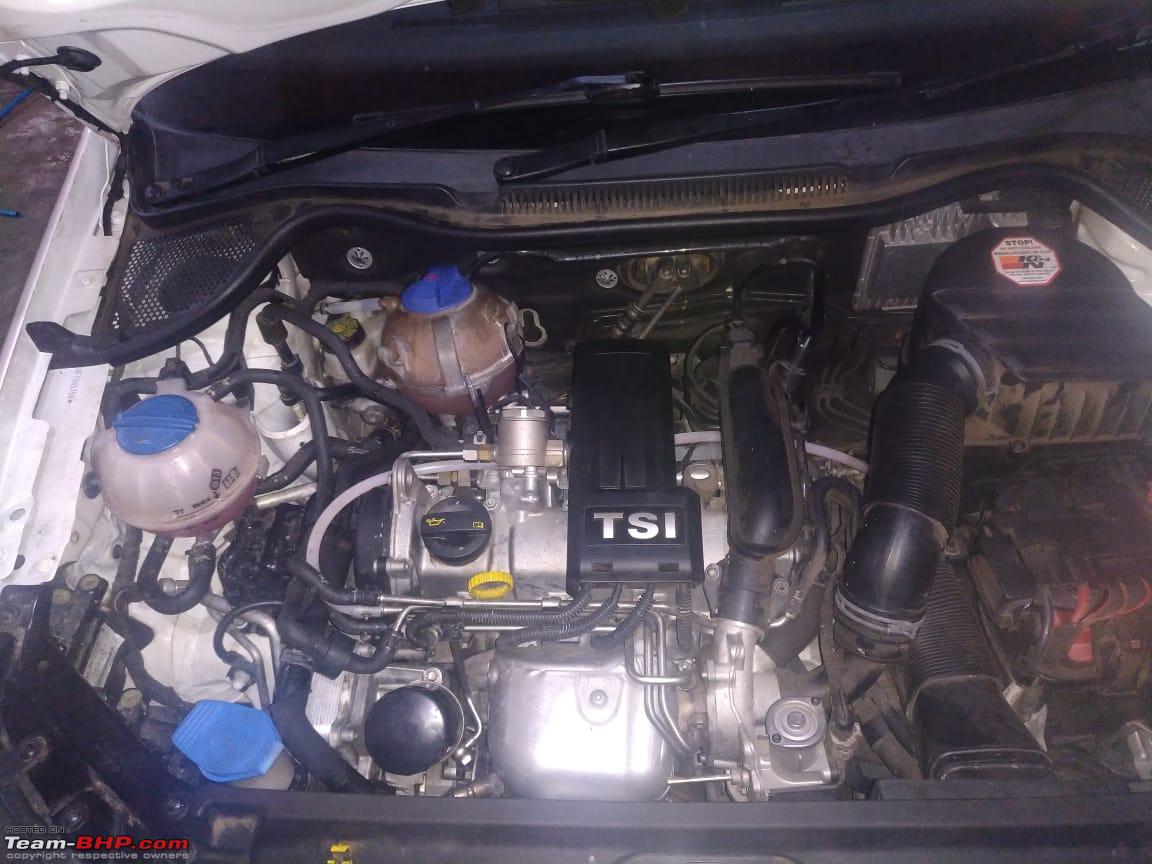 This hack is not breaking news in the world of engineering and in tuning circles – it’s usually referred to as a divorced coolant-circuit system. In this case, I have taken the liberty (much to Venkat’s dismay) of christening it – “Blackworks Engineering Double-Divorced Coolant-Circuit” – cringeworthy but I hope it catches on! Key points to consider: 1) No pipes were spliced, and no hoses were cut - making this an entirely reversible experiment. 2) For some connections to work and to ensure that the circuit remains a closed loop, scraps were used from the workshop. Yes, I am not kidding, old hoses, lines and literally scraps were used to close the loop! The auxiliary reservoir, for example, is a coolant tank from an old Octavia that was found lying round in the workshop. Venkat gave it a good ol’ scrub with shampoo and toothbrush, and let it soak in a bucket of shampoo water for 20 minutes before it was pressed into service! It now sits behind the heat-exchanger, in front of the bulkhead/firewall and held together, albeit temporarily, by a series of zip-ties of all things! 3) Now that the electric water pump is servicing just one line i.e. the coolant line for the charged air, and is no longer responsible for pumping coolant through the circuit to cool the turbo, the load on the electric water pump has reduced considerably. By doing this, we have potentially extended the life of the electric water pump! Seasoned chaps on th forum would know that the water-pump is one of the car's weak-links. 4) As usual, I arrived at the workshop completely unprepared and without my “camera phone”, so I could not take detailed pictures of the exercise. In fact, this was in essence an experiment! We studied the car with the intention to understand and examine the possibilities – not to execute the idea! Hence, the usage of scrap parts to complete the puzzle! Eager to understand the difference this hack has made to the engine, Venkat grabbed his laptop, VCDS cable and hooked up the V-Box as we pulled out of the workshop. Two minutes later on the main road, I squeezed the throttle and the car responded in a way that was completely alien to me up until that moment! Never have I catapulted past slow moving traffic in my car the way I did that day.. and it was 35 degrees ambient at 4.00 in the noon! The feeling was akin to a chain smoker growing a new pair of lungs and suddenly being able to do a 100-meter dash faster than the seasoned sprinters! The 3 kilometre journey from Blackworks to the NICE Corridor was one of the most memorable short bursts I have had in my car. I chuckled like a high-on-hormones teenager that afternoon, the whole way to NICE Road. It felt like the car developed this new ability to pull away from traffic. Mid-range punch power delivery in the meat of the power-band is so strong now that it feels not just explosive but also sustained all the way till about 4.5k RPM! And when we got onto the NICE Corridor, we registered a time of 10.1 seconds from 0-100 on an uphill incline. We then decided to do another run, and this was again on a slight uphill incline. Normally, the car by now would have heat-soaked to oblivion, and we would have recorded a 11 or 12 second 0-100 time. But no! The V-Box gave us a 0-100 reading of 9.8 seconds! The whole while, we had the VCDS cable plugged in and logs were recorded. During and immediately after the WOT runs, the IATs climbed from the early 40s and on occasion would creep into the early 50s. But the moment I closed the throttle and settled into a ‘coast’, the IATs would fall back to the early 40s. Here is a screen grab of the IATs recorded during our WOT runs before the divorced-coolant hack:  Notice that it’s consistently in the mid-to-high 70s and it would take an absolute age to come down to sane levels. And here’s a screen grab immediately after our third WOT run after the hack was executed:  It may be in the early 50s, but this was almost immediately after I closed the throttle, post WOT run. The engine was under serious load when this was captured, but the drop in IAT is a massive 25 degrees Celsius. And here is another screen grab indicating a further fall in IATs as we coasted to a stop: 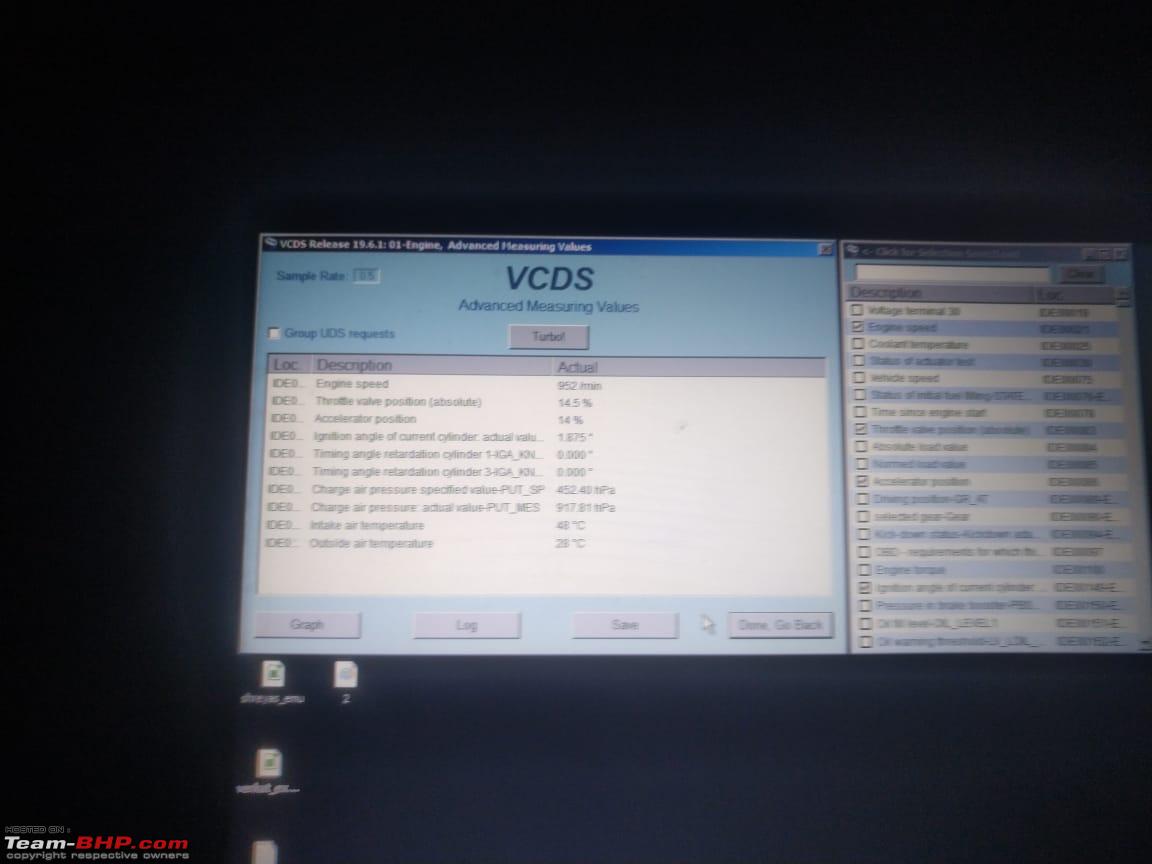 1st Run (0-100 km/h): 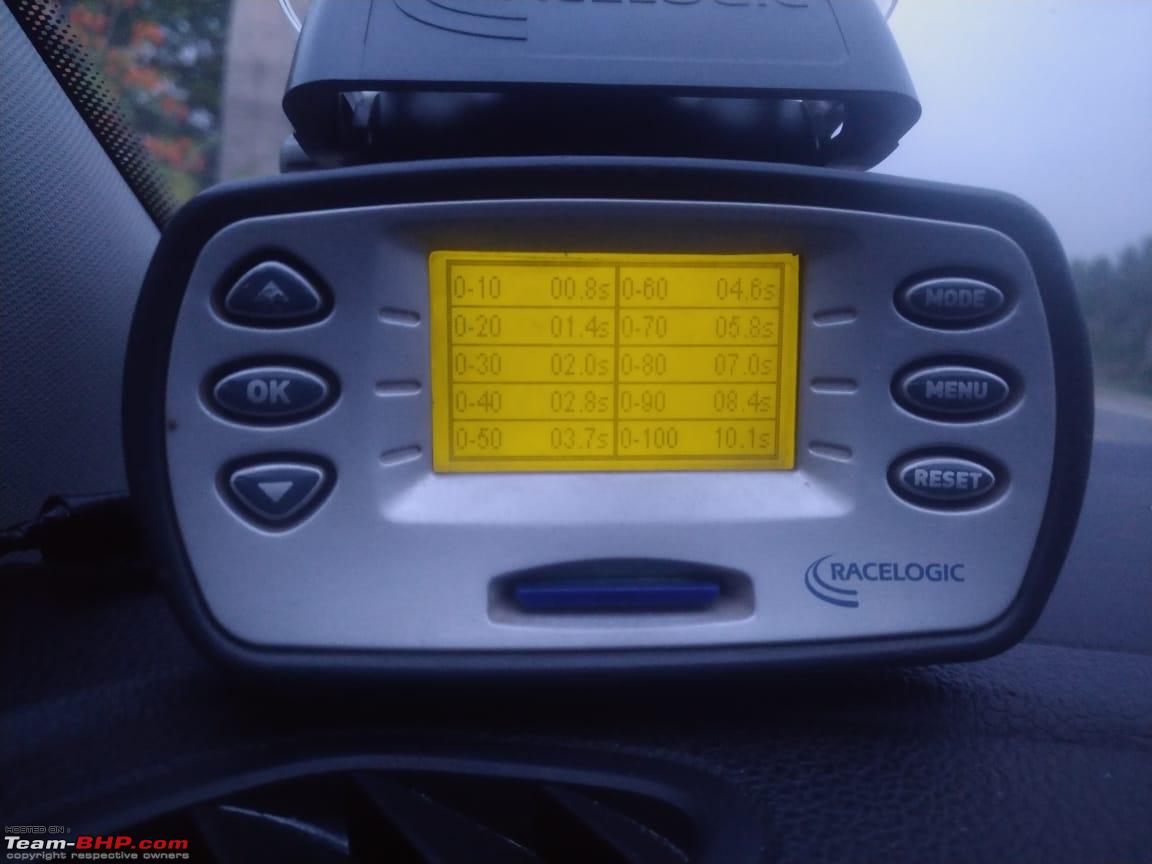 2nd Run (0-100 km/h):  I am sure we can manage even better times with lower ambient temps and if the runs were done on better/more levelled surfaces! This establishes a few things. One – the new divorced circuit is working! The coolant lines are no longer subjected to the insane heat-soak as it was before. The IATs now rise under load and fall when the load is no longer exerted. This is solely due to the fact that fresh coolant is now being fed through a new independent line that exclusively cools the charged air. Two – in view of the IATs falling, especially when the turbo is not subjected to load (closed throttle), the car recovers from the WOT run much quicker and the car can now perform consistently and in a sustained manner.  MO POWAH BABEH! My take-aways from this experiment: 1) You do not need to spend top-dollar to get good results. Big fancy tuning firms, bolt on parts and sacks of money can only go so far in giving you gains. Before you spend your good money on shiny things, do consider solutions such as this one. Cost-effective and elegant! #govocalforlocal! 2) Identifying the chinks in the armour and reinforcing them, is what is needed. Before trying to upgrade the turbo or install additional intercoolers, find solutions to the existing problems, instead of compounding the problem, inadvertently, by springing for shiny new parts. More often than not, resolving existing problems will result in far greater gains! 3) The engineers at Volkswagen are not stupid. They knew exactly what they were doing when they engineered this motor. They may have left something on the table for the enthusiasts, but the real reason for this compromised system is – cost! Every penny counts! Ever heard of the American Airline olive from the 1980s, that saved the airline company $100,000 a year by just deleting one olive from every salad that was served to each passenger on the airline? 4) With this new hack, we can now explore the option of further tweaking the ECU and maybe running an aggressive map! I may even want a map that is optimized for 97-99 octane fuel. A dyno run is on the cards very soon! 5) Venkat is a certified nutjob! I am yet to come across someone so fastidious and clued-in. Even Azaan was impressed! It must be said though, that we are not going to keep this car running on scrap parts from the workshop. This was, after all, just an experiment. Now that we are sure it works, Venkat has proposed to fabricate a tank for the auxiliary coolant reservoir and we won’t be using the old Octavia coolant reservoir going forward. I have also ordered new hoses and clamps that we will use in place of the scrap parts. When we begin the exercise of re-engineering this hack, I will be sure to take detailed pictures for the benefit of this amazing community. The parts, in total, are working out to around 6-7k. Additionally, G13 coolant for the auxiliary reservoir is around 380 bucks at your friendly neighbourhood Shell petrol bunk. Labour is around 3-4k. Burning through your tank of fuel in a week – priceless! Urrmm, actually, that was another 3.5k. But I can now say, hand to heart, that this is the best money I have ever spent on my car! Stay tuned for more updates. Last edited by suhaas307 : 28th May 2020 at 23:46. | ||
|
| (53)
Thanks
|
| The following 53 BHPians Thank suhaas307 for this useful post: | 2himanshu, abhinav.s, ArjunPadmakumar, audioholic, BigBrad, blackwasp, d3mon, dealer, DeKay, digitalnirvana, Dr.Naren, frankmehta, Gannu_1, GaryTSI, graaja, GrandTourer, GTO, iliketurtles, Jaguar, jomson13, Karthik.guru, keroo1099, Keynote, Klub Class, Leoshashi, megazoid, n:CorE, Naman_Ferrari, neil.jericho, Night_Fury, paragsachania, Rehaan, Researcher, revv_maniac, rkv_2401, samaspire, Samfromindia, Sen, shibujp, Shreyans_Jain, svsantosh, swiftnfurious, tanaysn, Tassem, TheLizardKing, udainxs, Ultim8, Varun_HexaGuy, Viraat13, vishy76, VivekCherian, viXit, wheelguy |
|
28th May 2020, 12:20
| #165 | |
| BHPian | Re: GT'ing around in my VW Polo TSI. UPDATE: Make the GT great again! Cobra springs, SS catback exha Quote:
10/10 again for you man. Great research and insight, along with the data to back it up.  This neatly summarises the endless discussions on WhatsApp. Looking forward to your thoughts on this set up after some usage. One thing I'd like to point out, the cooling system is pressurised; now I'm not sure if the circuit running on the electric pump needs that pressure, but that's one thing to check before you start using a fabricated coolant bottle. Also another minor additional mod that you can consider: secondary low coolant warning. I'd done some reading about this a while ago, let me know if you want me to dig that out and send it to you. Last edited by ajmat : 28th May 2020 at 23:31. Reason: typo | |
|
| (11)
Thanks
|
| The following 11 BHPians Thank Viraat13 for this useful post: | digitalnirvana, GaryTSI, Keynote, Rehaan, Researcher, samaspire, suhaas307, swiftnfurious, TheLizardKing, Varun_HexaGuy, vinay5795 |
|