Team-BHP > Technical Stuff > DIY - Do it yourself


Reply
  Search this Thread
71,941 views
Old 28th June 2014, 12:42   #1
Team-BHP Support
 
Gannu_1's Avatar
 
Join Date: Apr 2013
Location: Madras
Posts: 7,173
Thanked: 20,211 Times
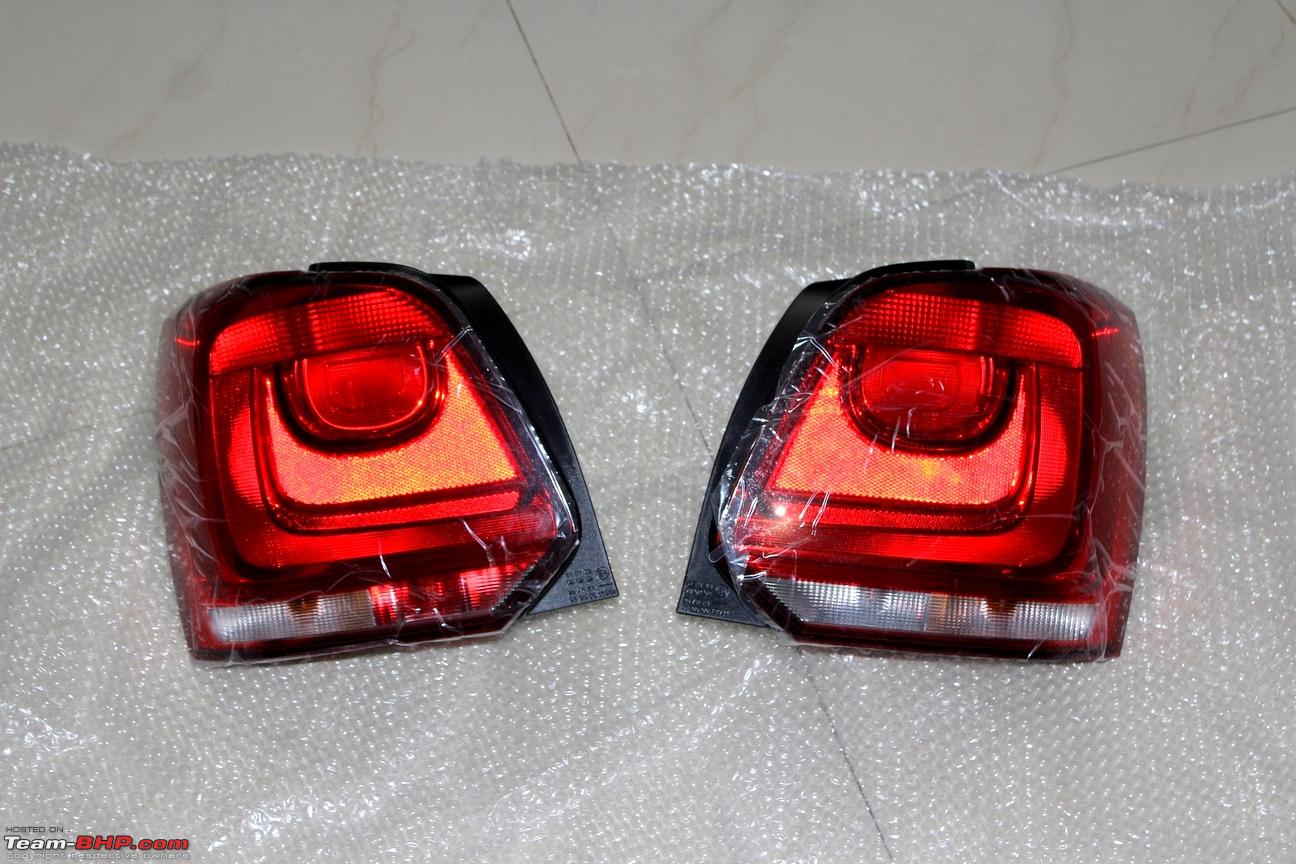
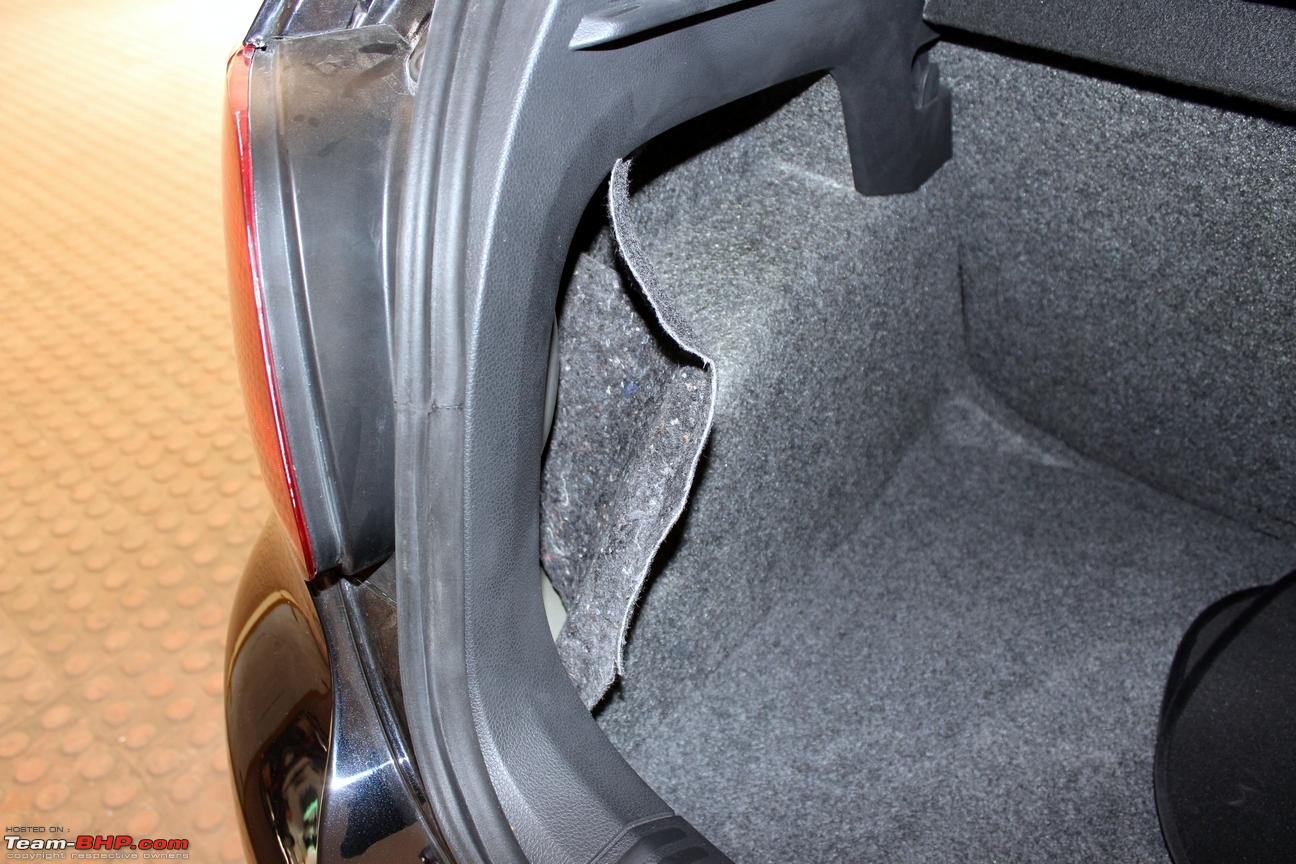
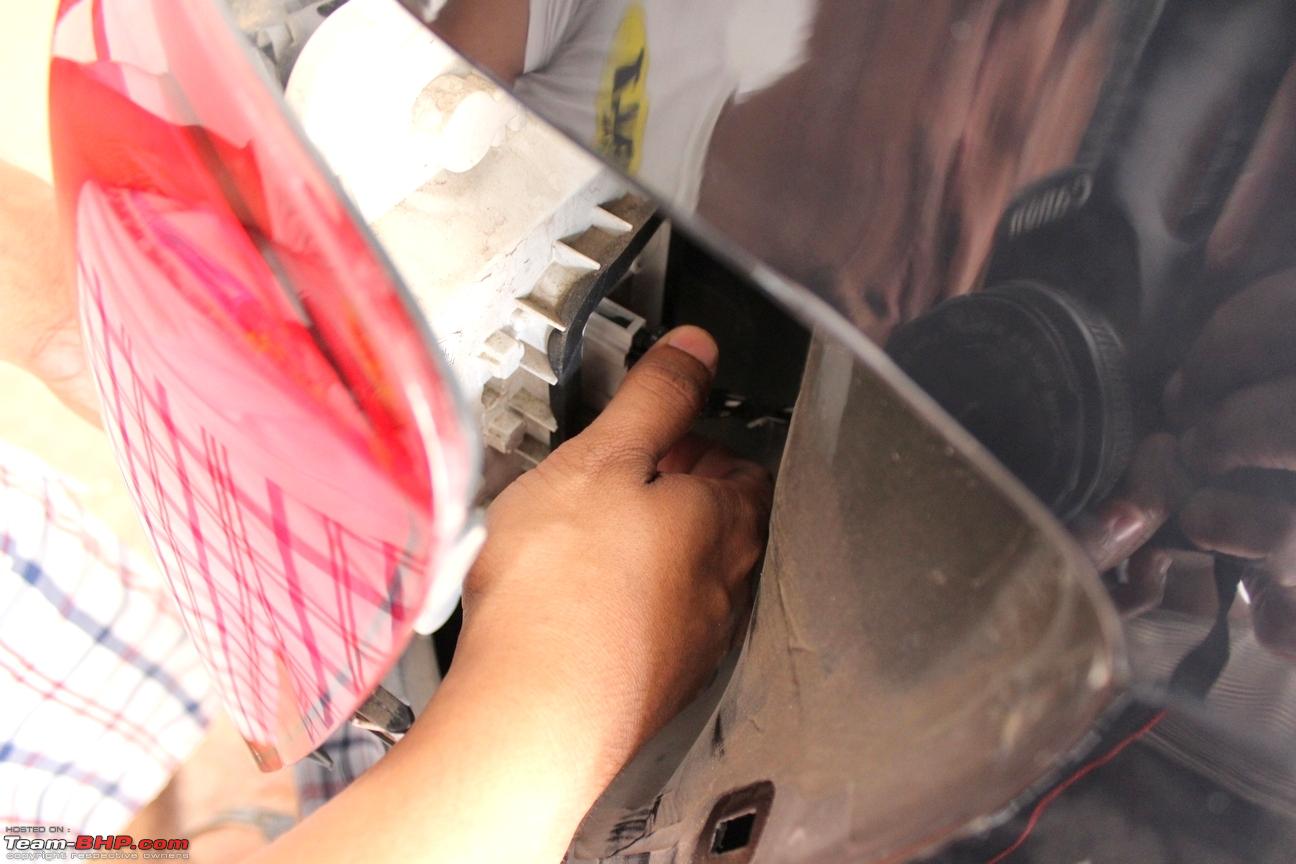
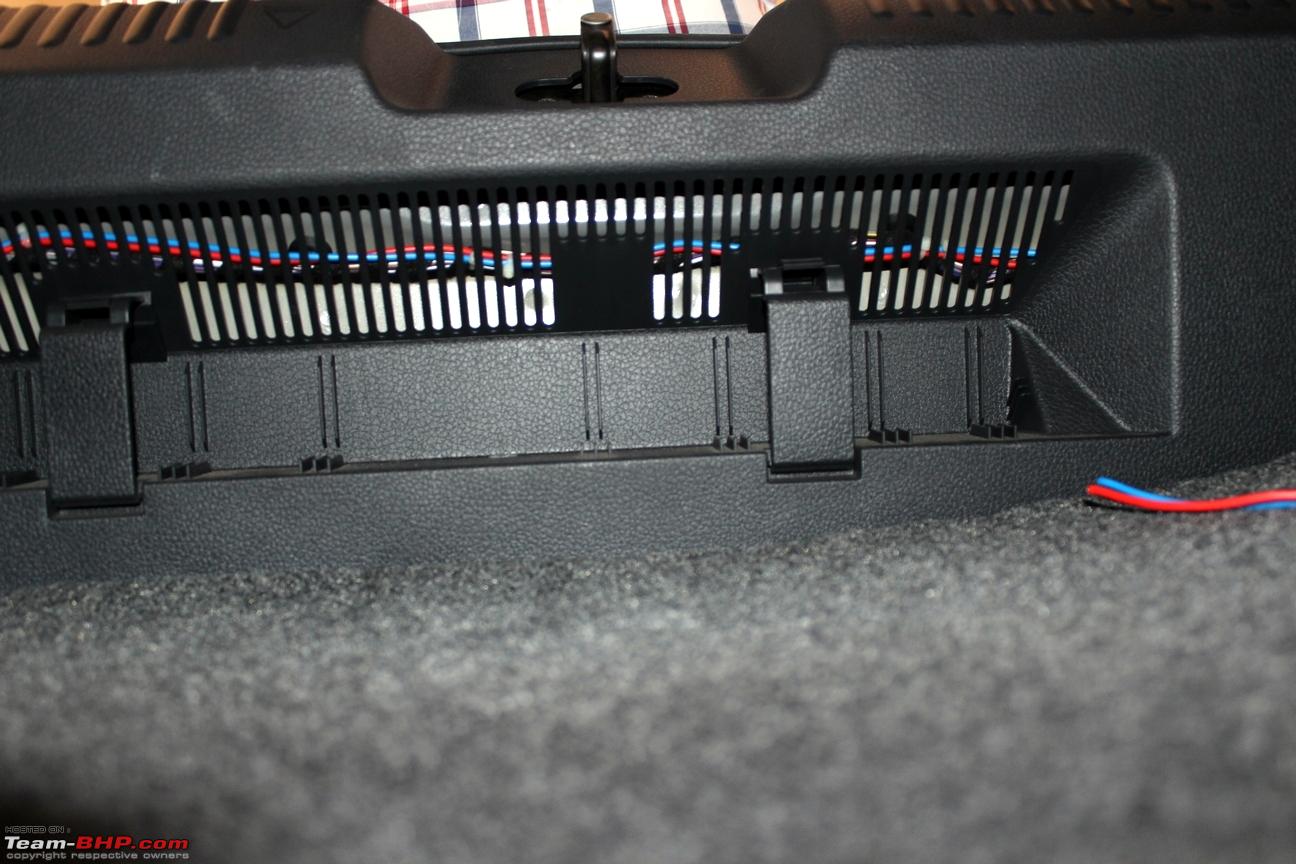
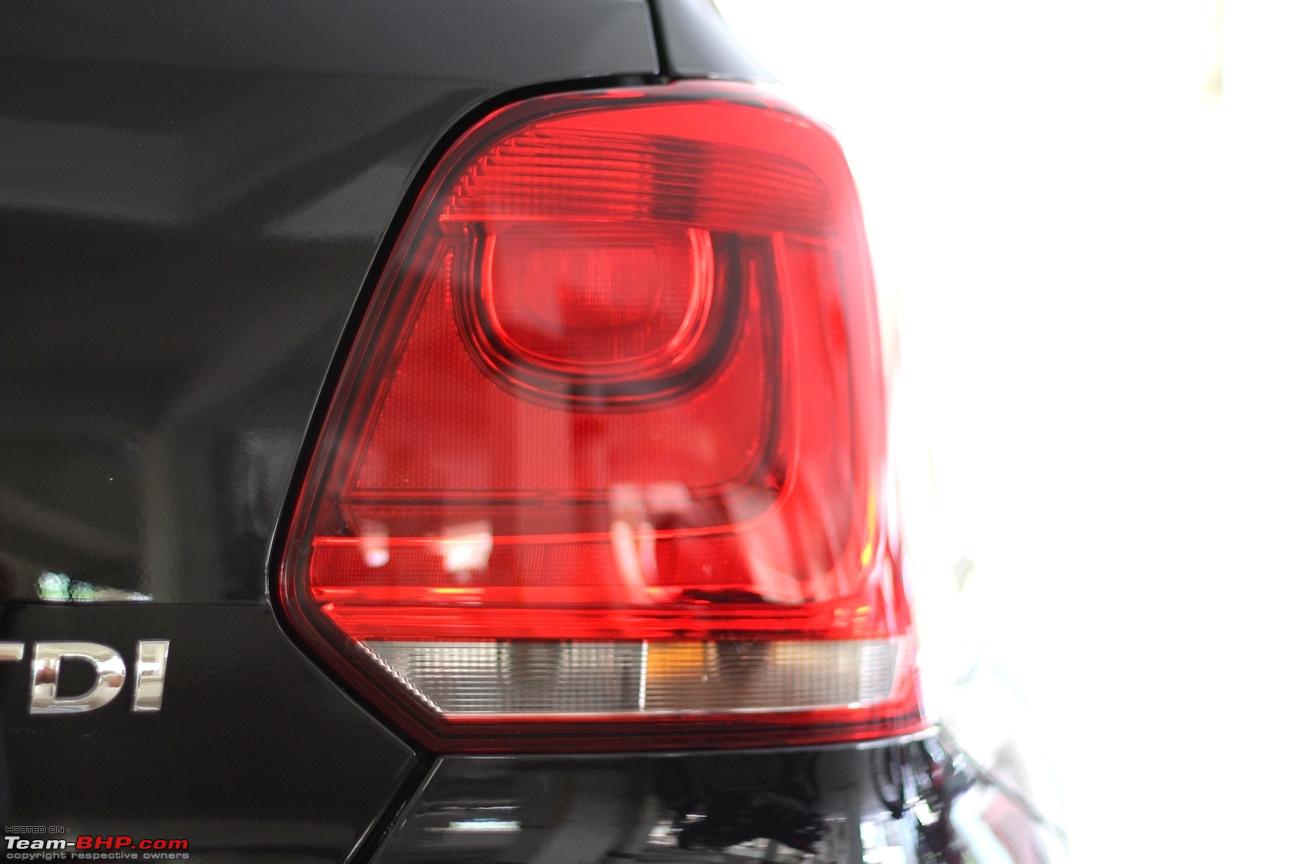
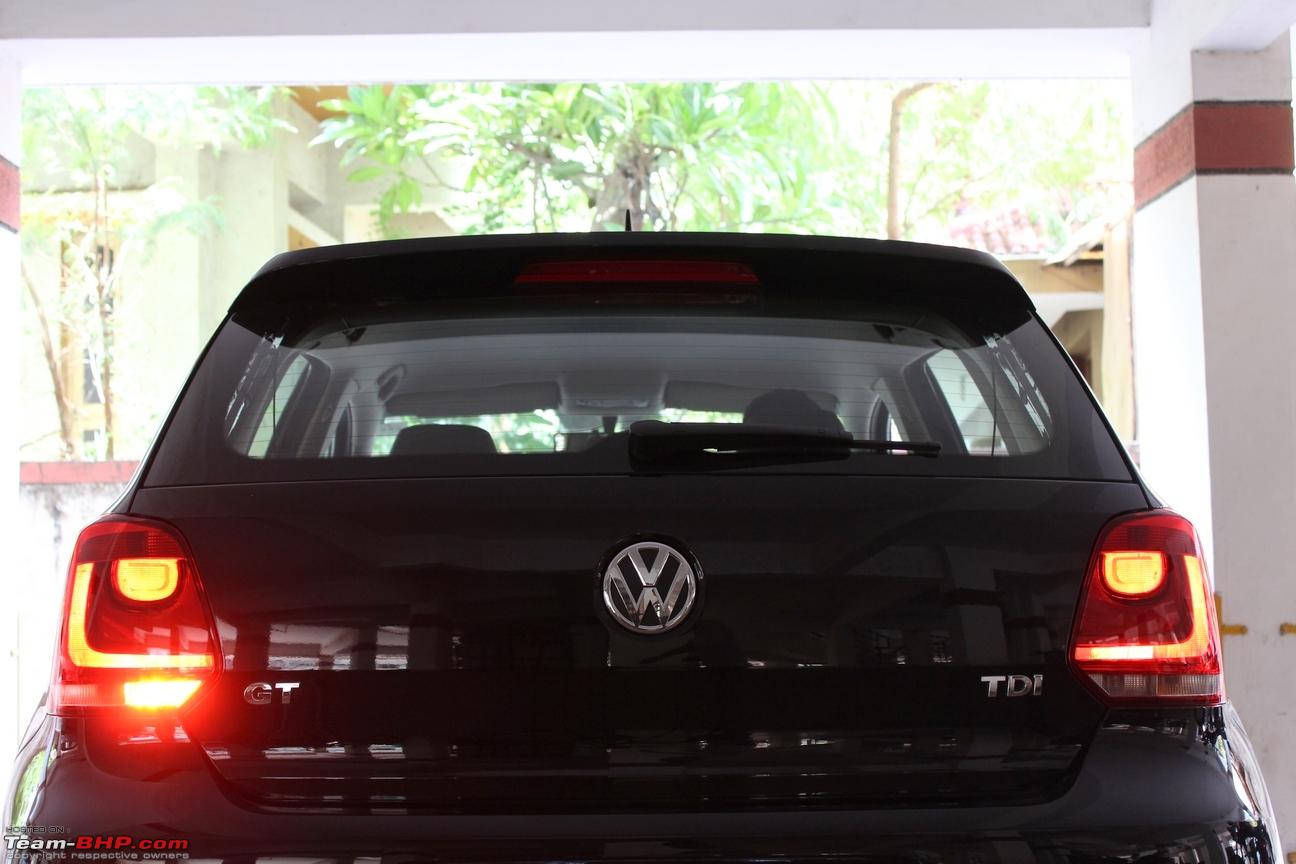
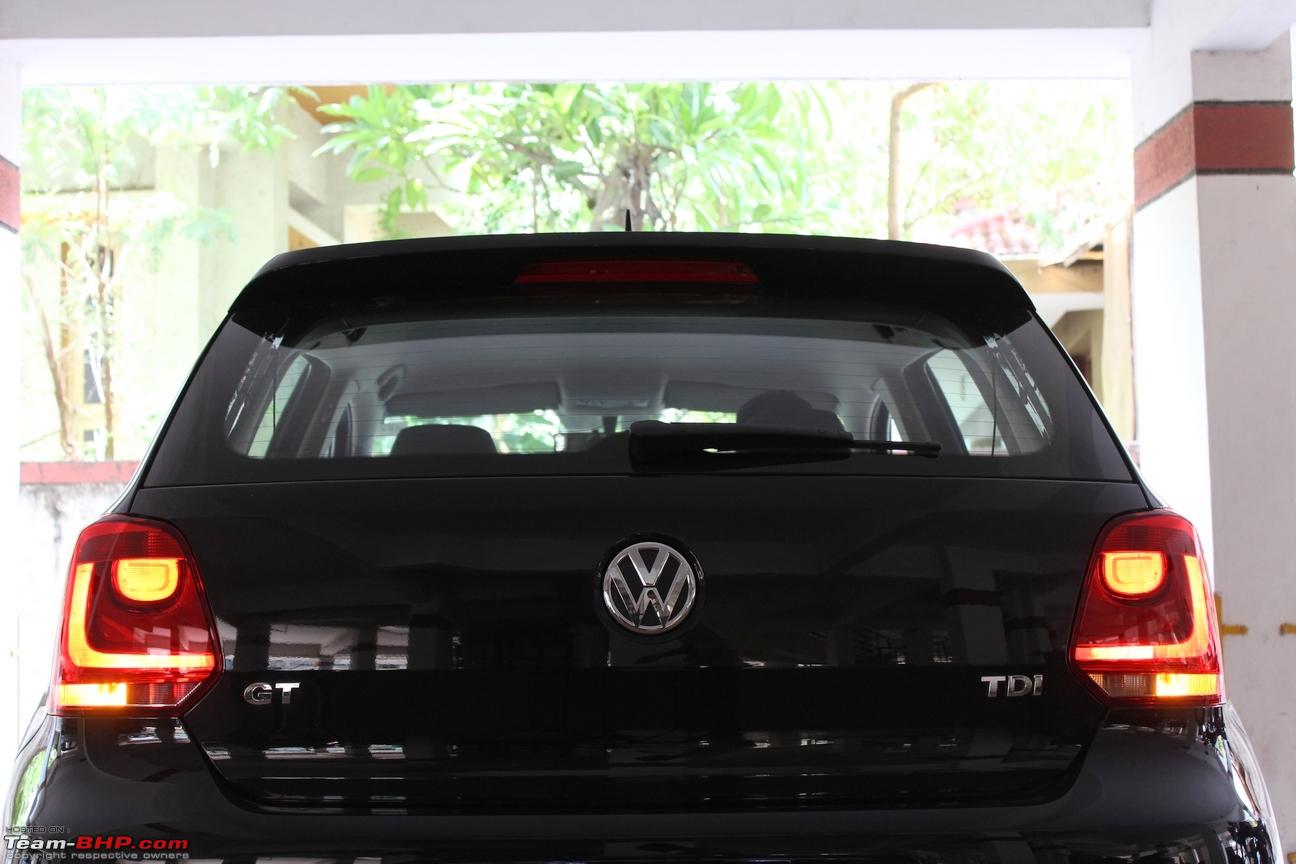
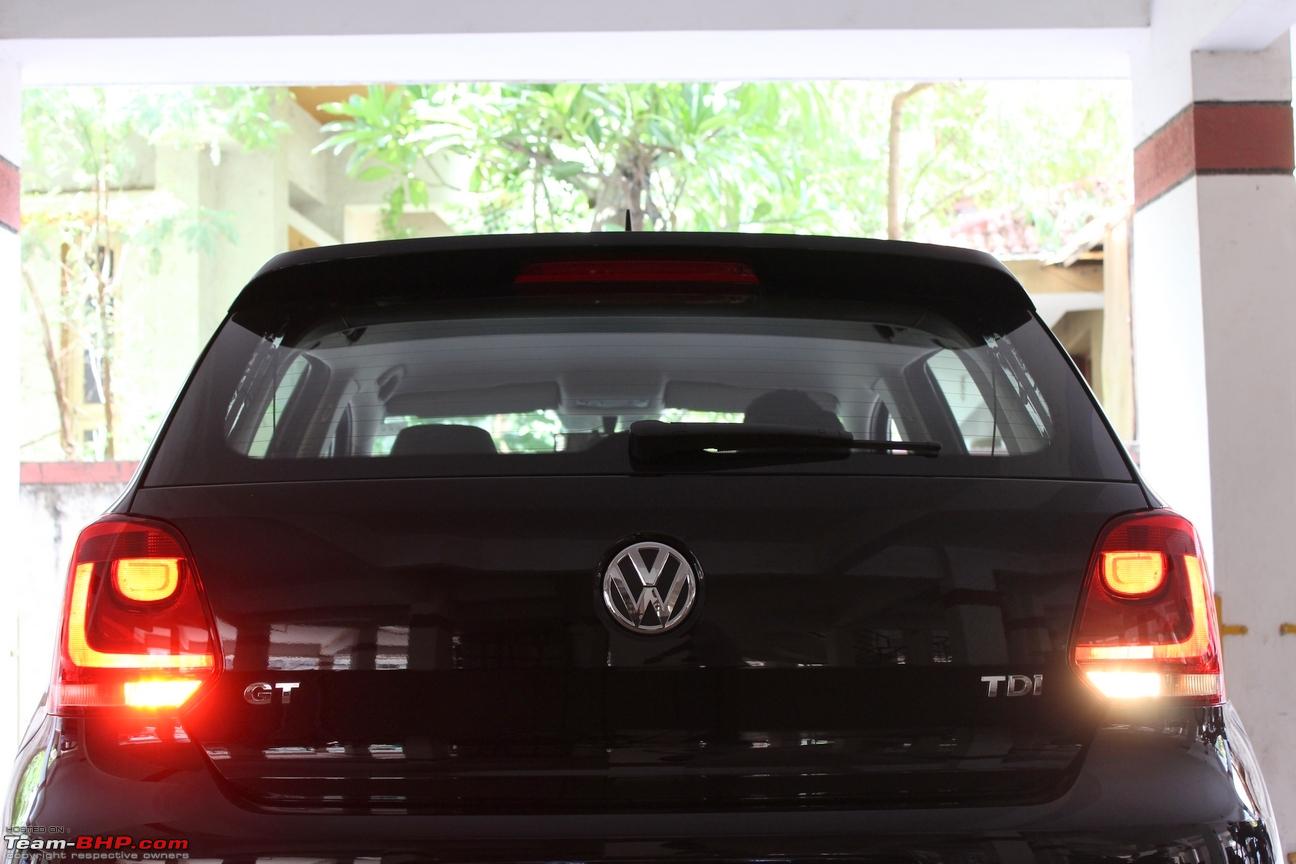
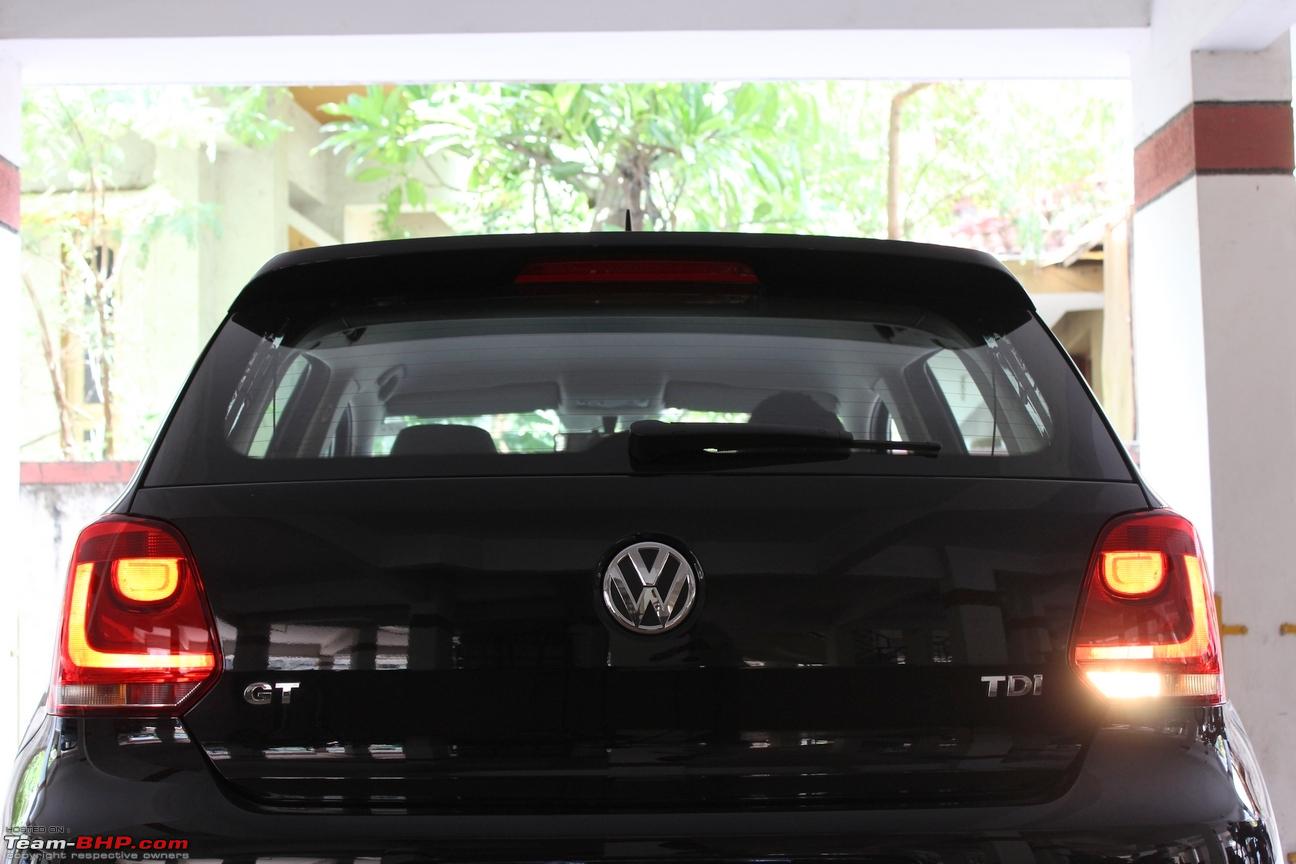
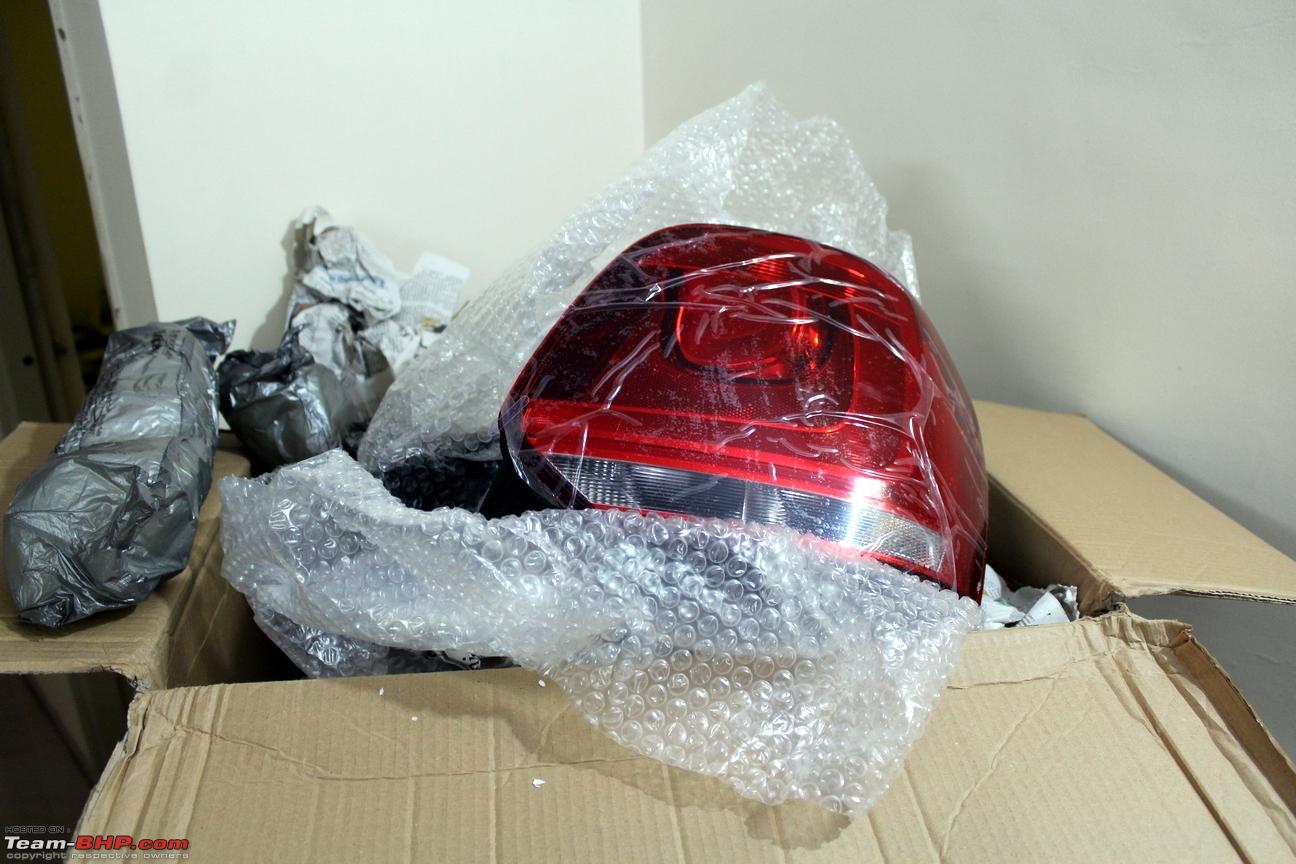
VW Polo DIY: Euro-spec Tail lamps

I happened to swap the stock tail lights on my Polo with the Euro-spec ones few days back. It was not a straight swap as I had thought it to be so penned down a guide when I had some free time.

Looking at these DIY threads, you would probably be wondering why is it that I draft a thread every time I change a nut or a bolt in the car. It may be of some help to others who are planning to take up these DIYs and they can plan themselves with all the necessary parts and tools. Besides, you could save yourself a trip to the garage on a lazy weekend, the plastics wouldn’t break off that easily and the happiness and satisfaction one could derive at the end of a successful DIY is immense! We would also have a repository of such DIYs in our forum.


I have detailed the procedure as much as I can with snaps and steps but please free to ask if you have any queries.

Moving on, these are the tail lights we have on the Indian models:

VW Polo DIY: Euro-spec Tail lamps-img_8498.jpg

VW Polo DIY: Euro-spec Tail lamps-img_8506.jpg

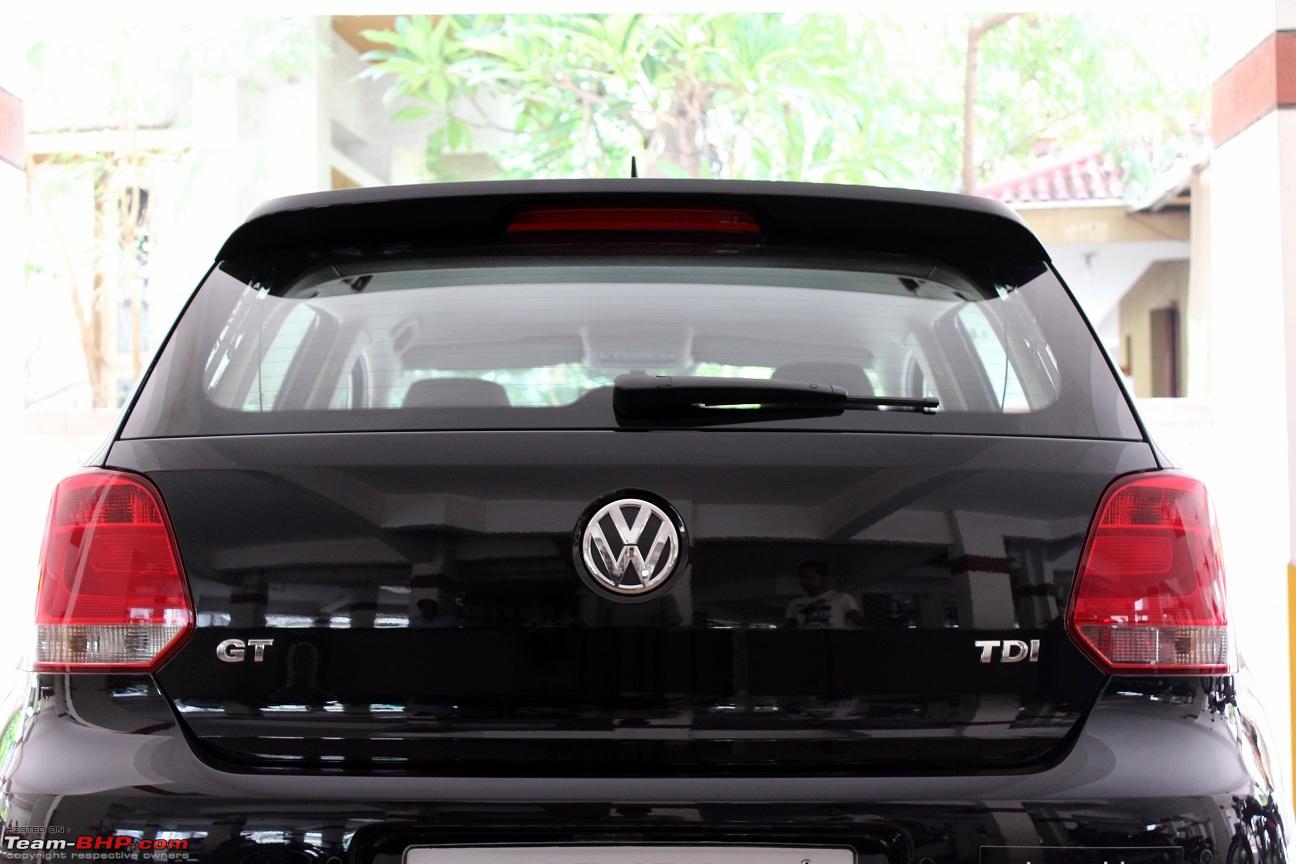
And these are the ones we have on the Eu-spec Polo:

VW Polo DIY: Euro-spec Tail lamps-img_8570.jpg

VW Polo DIY: Euro-spec Tail lamps-img_8572.jpg

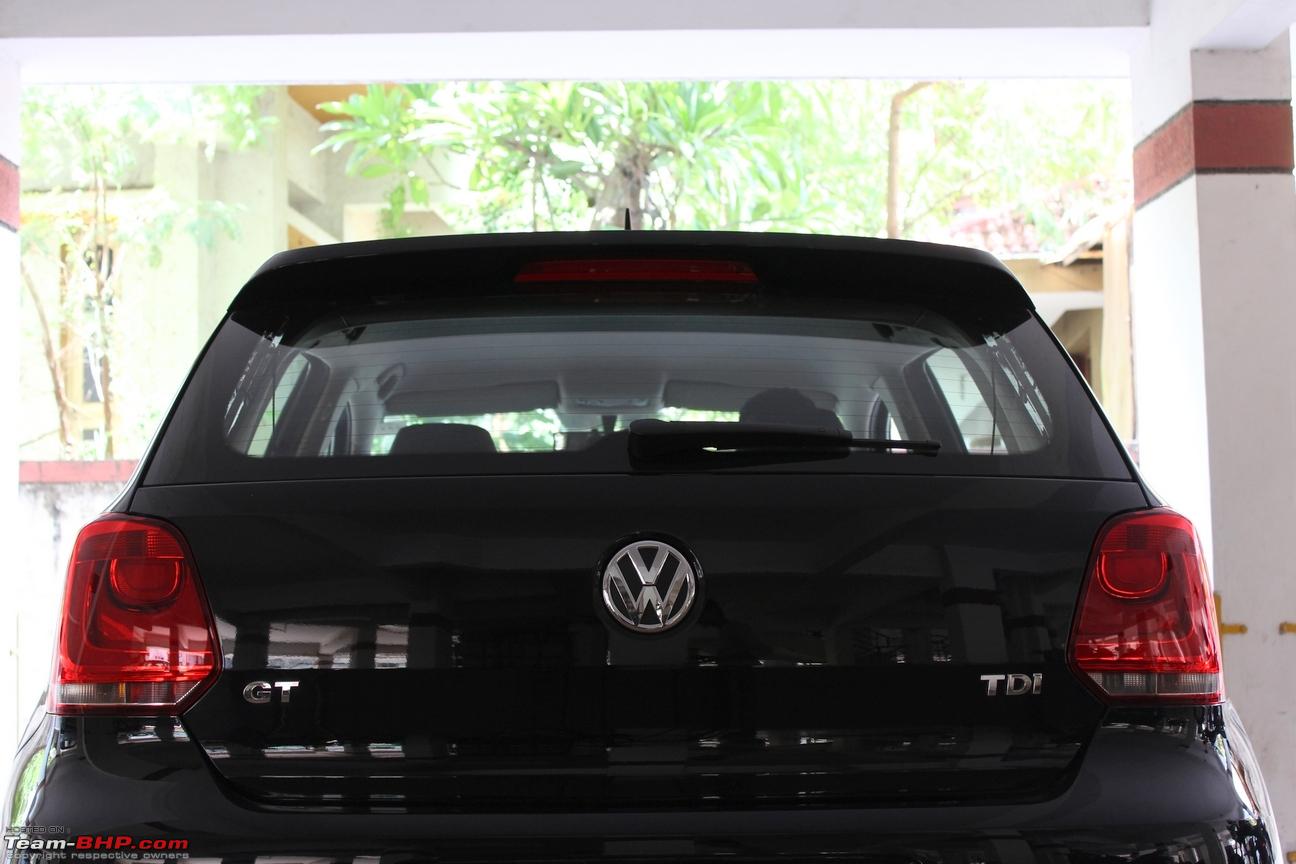
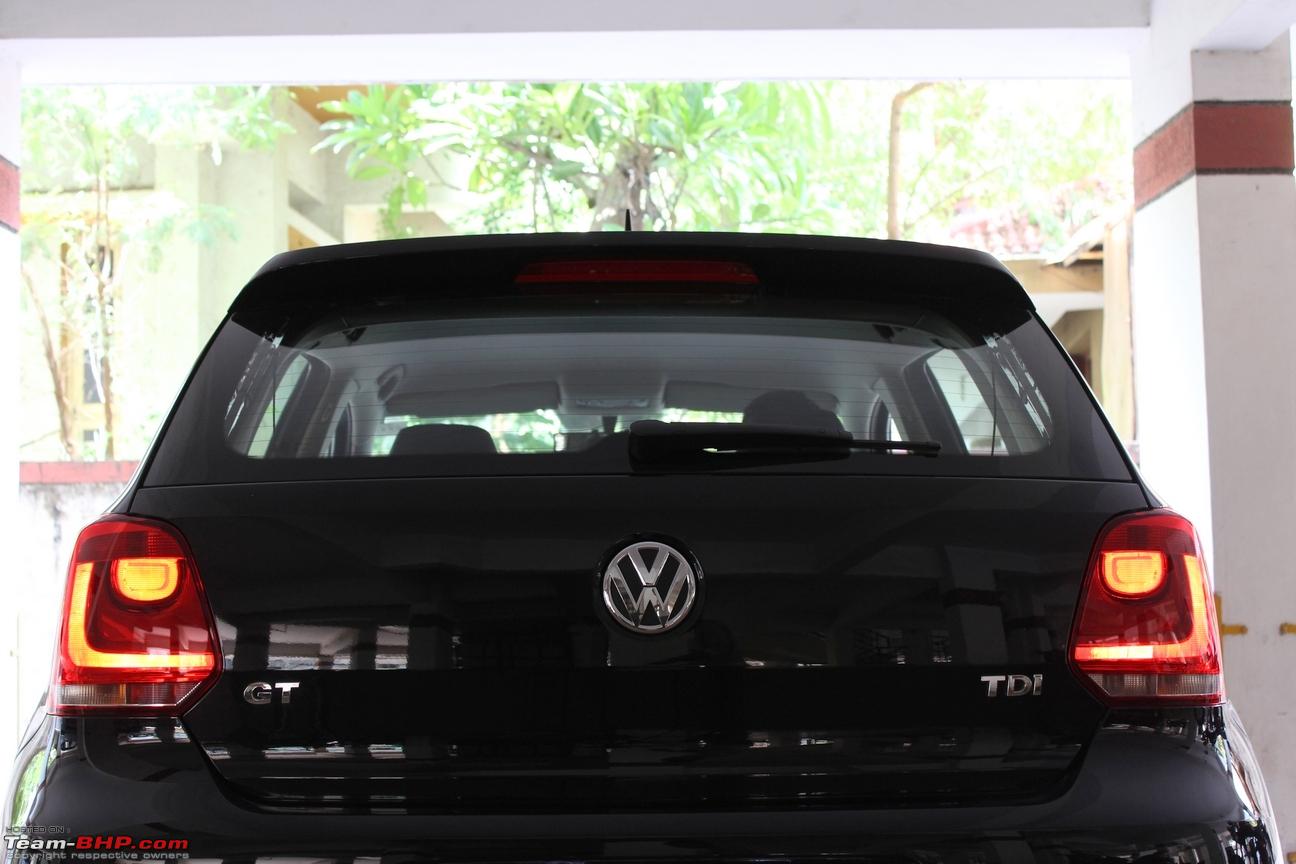
I wonder what is the kind of cost cutting achieved with such a change in the design!

Btw the 2014 international facelift comes with a new design:

VW Polo DIY: Euro-spec Tail lamps-volkswagenpolofaceliftfamilydetailedingenevalivephotos_8.jpg

VW Polo DIY: Euro-spec Tail lamps-cssyrz7.jpg

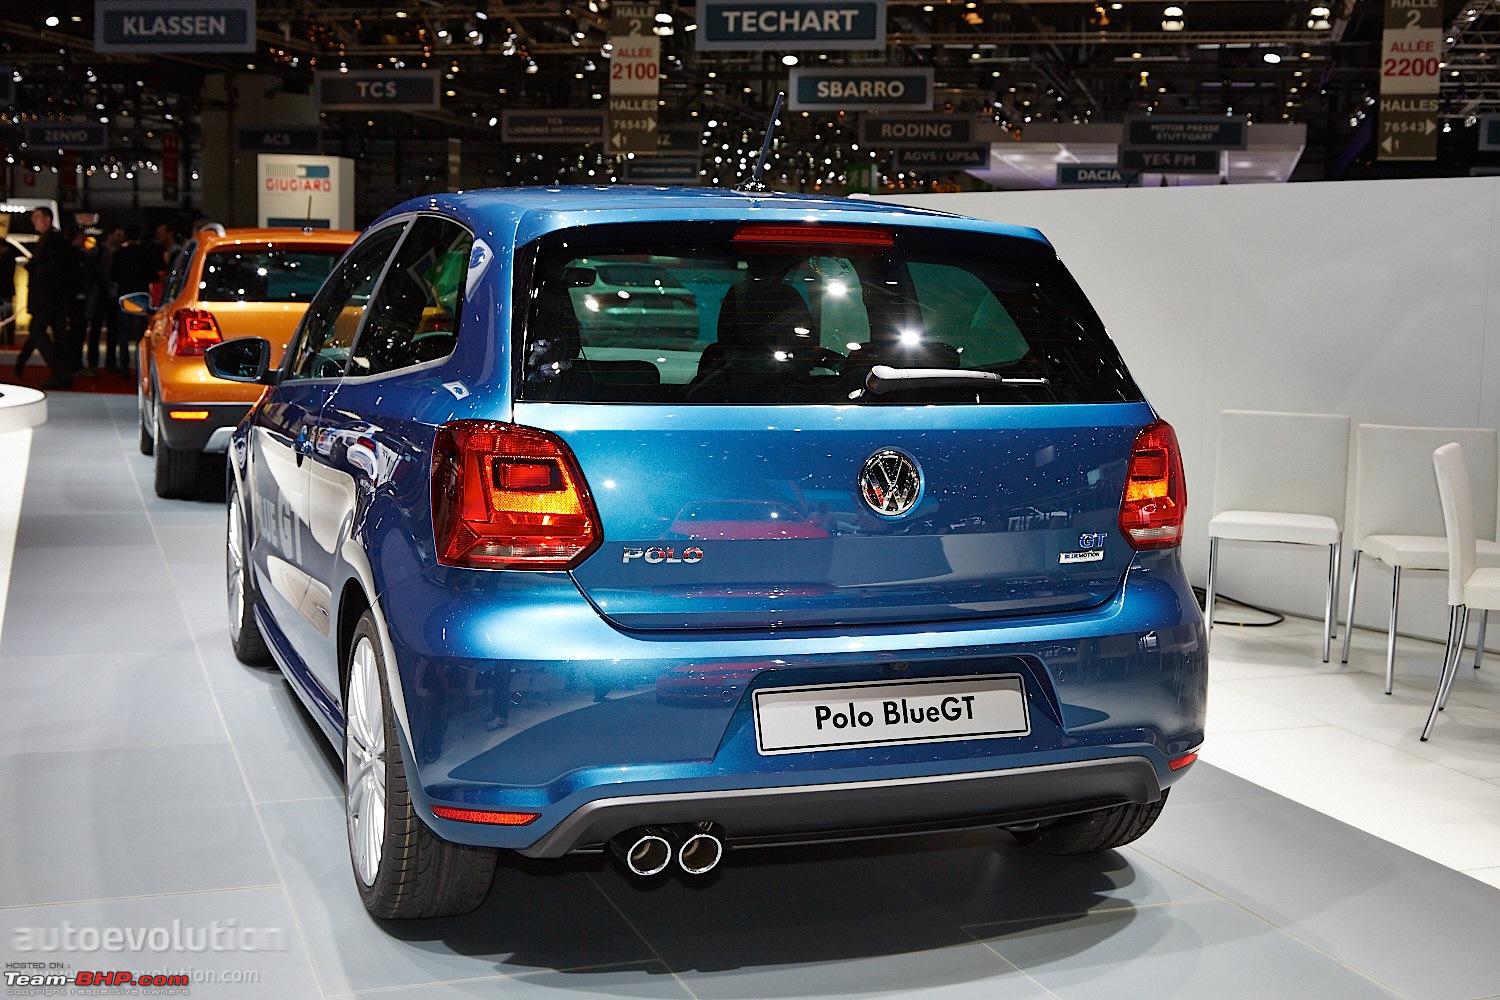
Not sure if these would be featured on the Indian facelifted models but chances are slim going by the test mules that have been spotted so far.
  • Warranty Concerns:

    Absolutely NONE! The stock cable looms or connectors are left completely unharmed - no cutting or splicing. We are only modifying the tail lamps. The stock lamps may be preserved as a backup along with the spring loaded wing nuts.

  • Challenges:

    There are a couple of issues that need to be addressed. We knew of the first one but not the second that took us by surprise!

    1. The reverse and fog lights are going to be swapped.

    • On the Indian models:

      VW Polo DIY: Euro-spec Tail lamps-img_8509.jpg

      Reverse light - LHS
      Rear fog light - RHS.

    • On the Euro-spec models:

      VW Polo DIY: Euro-spec Tail lamps-img_8580.jpg

      Reverse light - RHS
      Rear fog light - LHS.

    Even the connectors on the stock wiring looms are different! But nothing that a bit of soldering wouldn’t resolve. This would ensure that while reversing, the white bulb glows and not the red one intended for the rear fog.

    2. The stock spring loaded M8 wing nuts used for securing the stock tail lights cannot be used for the Euro-spec models.

    This is the stock wing nut/securing element:

    VW Polo DIY: Euro-spec Tail lamps-img_8602.jpg

    This one cannot be used to secure the Euro tail lamps since the length of the stock screw is short and the internal threading inside the plastic enclosure of the Euro-spec tail lamp is much deeper.

    There are 2 workarounds to resolve this:

    • This one is simple, cheap and works well. Use an M8 hex. head bolt of length 80 mm (preferably of SS304 material), an M8 hex. nut and an M8 plain washer to secure the lamp to the car’s structure. This pdf will make it clear:

      Securing Assy.pdf

      I am currently using this method to secure the tail lamp until the spring loaded wing nuts which have been ordered arrive. There are absolutely no issues with this setup - no wobbling or vibrations. The lamp is fixed securely.

      OR

    • Get a pair of OEM spring loaded wing nuts used in the models abroad. Part number is 1K8945300. I have currently installed the lamps using the stainless steel bolt-nut assy. and have ordered the OEM wing nuts which would later be swapped once they arrive.

Last edited by Gannu_1 : 24th July 2021 at 22:20. Reason: Added YouTube link.
Gannu_1 is offline   (15) Thanks
Old 28th June 2014, 12:44   #2
Team-BHP Support
 
Gannu_1's Avatar
 
Join Date: Apr 2013
Location: Madras
Posts: 7,173
Thanked: 20,211 Times
re: VW Polo DIY: Euro-spec Tail lamps

  • Parts Required:

    1. Pair of tail lights:

    VW Polo DIY: Euro-spec Tail lamps-img_8358.jpg

    Part numbers - 6R0945095AF (LHS), 6R0945096AF (RHS).

    The lamps were sourced from eBay Germany and the shopping experience has been detailed towards the end of the post.

    2. 20 SWG cable:

    VW Polo DIY: Euro-spec Tail lamps-img_8473.jpg

    Quantity - 5 m. 2 different colors would be advisable to distinguish the fog and reverse light cables.

    3. a. A pair of spring loaded wing nuts:

    Part number - 1K8945300.

    OR

    3. b. Custom wing nut assembly:
    • Hex. head bolt M8 x L80, SS304 - 2 Nos.
    • Hex. nut M8, SS304 -2 Nos.
    • Plain washer M8, SS304 - 2 Nos.

    4. Luster terminals:

    VW Polo DIY: Euro-spec Tail lamps-img_8613.jpg

    Quantity - 2 Nos. of 4 x 4.

  • Tools Required:

    1. Shears:

    VW Polo DIY: Euro-spec Tail lamps-img_8458.jpg

    To cut the flat metal strips on the tail lights.

    2. Soldering iron

    3. Solder (flux cored solder would be advisable)

    4. Flux

    5. Wire stripper

    6. Slotted screwdriver

    7. Insulation tape

    8. Hobby knife

    9. Cable ties (4")

    10. Glue gun with a glue stick

  • Anatomy:

    From the innards, these are the bulbs housed inside the lamp:

    Name:  polomk51608.png
Views: 34901
Size:  138.7 KB

    3 - Brake light bulb - P21W

    4 - Tail light bulb - W5W

    5 - Turn signal bulb - PY21W

    7 - Fog lamp/reversing bulb - H21W/P21W

    Bulb no. 7 is the catch here. This bulb is on the LHS tail lamp for the Euro-spec models and on the RHS one for the Indian models. So a cable has to be run from the RHS wiring loom to the LHS to turn on this bulb.

  • Wiring scheme:

    The male connector on the lights are numbered from 1 to 6 on the inside:

    VW Polo DIY: Euro-spec Tail lamps-img_8399.jpg
    • LHS:

      1 - Fog
      2 - Dummy (unused)
      3 - Turn signal
      4 - Brake
      5 - GND
      6 - Tail

    • RHS:

      1 - Tail
      2 - GND
      3 - Brake
      4 - Turn signal
      5 - Reverse
      6 - Dummy (unused)

      The female connector on the wiring loom is also numbered from 1 to 6:

      VW Polo DIY: Euro-spec Tail lamps-img_8540.jpg

    • LHS:

      1 - Reverse
      2 - Empty
      3 - Turn signal
      4 - Brake
      5 - GND
      6 - Tail

    • RHS:

      1 - Tail
      2 - GND
      3 - Brake
      4 - Turn signal
      5 - Empty
      6 - Fog

Last edited by Gannu_1 : 18th November 2015 at 10:37.
Gannu_1 is offline   (9) Thanks
Old 28th June 2014, 12:48   #3
Team-BHP Support
 
Gannu_1's Avatar
 
Join Date: Apr 2013
Location: Madras
Posts: 7,173
Thanked: 20,211 Times
re: VW Polo DIY: Euro-spec Tail lamps

  • Procedure:

    Before proceeding to the car, it would be wise to finish off the soldering part on the lights and prepare the cables from home.

    1. Wiring adjustments on the lamps:

    Release the 4 tabs to remove the bulb holder from the lamp cluster:

    VW Polo DIY: Euro-spec Tail lamps-img_8379.jpg
    • LHS:

      Using the shears, break the 2 leads of the metal strip from terminal 1 that goes to the fog lamp bulb:

      VW Polo DIY: Euro-spec Tail lamps-img_8461.jpg

      VW Polo DIY: Euro-spec Tail lamps-img_8469.jpg

      Solder 2 cables (approx. 200 mm length) as shown:

      VW Polo DIY: Euro-spec Tail lamps-img_8478.jpg

      Short terminals 1 & 2:

      VW Polo DIY: Euro-spec Tail lamps-img_8479.jpg

      These cables need to be led outside the bulb holder through the adjacent hole. Use a couple of zip ties to hold them together.

      Use the glue gun to pour some hot glue atop the soldered joints. This would ensure that the joints do not come off and is secured properly. Replace the holder into the cluster.

    • RHS:

      Using the diagonal cutter, break the 2 leads of the metal strip from terminal 5 that goes to the fog lamp bulb:

      VW Polo DIY: Euro-spec Tail lamps-img_8382_1.jpg

      VW Polo DIY: Euro-spec Tail lamps-img_8448.jpg

      Solder 2 cables (approx. 150 mm length) as shown:

      VW Polo DIY: Euro-spec Tail lamps-img_8483.jpg

      Short terminals 5 & 6:

      VW Polo DIY: Euro-spec Tail lamps-img_8484.jpg

      Lead these cables outside the bulb holder through the hole.

      Use the glue gun to pour some hot glue atop the soldered joints. Replace the holder into the cluster.

    • Cut the 20 SWG cables into 2 parts of 2m length, tie them using cable ties or insulation tape:

      VW Polo DIY: Euro-spec Tail lamps-img_8488.jpg

      Keep the cable ends ready - stripped and twisted.

      We are done here. Time to head to the parking lot. Carry all the necessary tools and parts along.

    2. Park the car in a well-lit area, turn off the ignition and any electric consumers and remove the key. Open the boot lid.

    3. Notice that the boot lining has an inconspicuous cutout provided at the corner:

    VW Polo DIY: Euro-spec Tail lamps-img_8514.jpg

    VW Polo DIY: Euro-spec Tail lamps-img_8515.jpg

    Pull out the lining and a white plastic spring-loaded wingnut is visible along with the tail lamp’s cable loom and connector:

    VW Polo DIY: Euro-spec Tail lamps-img_8520.jpg

    3. Unscrew the wingnut:

    VW Polo DIY: Euro-spec Tail lamps-img_8521.jpg

    If it is hard to unscrew the wingnut through this cutout in the lining, just pull out the lining a bit:

    VW Polo DIY: Euro-spec Tail lamps-img_8529.jpg

    Do not worry, this wouldn’t leave any crease on the lining once it is replaced back.

    4. Once the wingnut is unscrewed, the lamp would continue to remain in its slot. Give it a slight push (dhakka) to dismantle it from the slot.

    VW Polo DIY: Euro-spec Tail lamps-img_8523.jpg

    Once the lamp is off the slot, unplug the connector:

    VW Polo DIY: Euro-spec Tail lamps-img_8525.jpg

    5. Release the 2 tabs of the boot trim/lock carrier cover:

    VW Polo DIY: Euro-spec Tail lamps-img_8539.jpg
    (Image was clicked after the cables were inserted and the trim was replaced back.)

    Prey open the boot trim:

    VW Polo DIY: Euro-spec Tail lamps-img_8531.jpg

    It is held firmly so some force may be required.

    Once the boot trim is off, insert the cable pair through the boot lining, lead it from LHS to RHS and attach it to the existing wiring loom using some cable ties:

    VW Polo DIY: Euro-spec Tail lamps-img_8535.jpg

    Replace the boot trim back. There is a small slot in the centre where the protruded plastic piece of the trim goes into so insert this piece into the slot and then firmly attach the trim back in place.

    6. Insert the light into the slot and connect the cables using the luster terminals observing color code:

    VW Polo DIY: Euro-spec Tail lamps-img_8542.jpg

    Apply some insulation tape to seal the screws from any unwanted contacts:

    VW Polo DIY: Euro-spec Tail lamps-img_8546.jpg

    7. Plug the connectors to the lights and replace the tail light into the slot.

    8. Screw the wing nut assembly. Insert the hex. nut into the bolt first and then the plain washer:

    VW Polo DIY: Euro-spec Tail lamps-img_8545.jpg

    Gently insert the bolt through the hole in the car's structure and begin screwing the bolt by hand. Once the bolt has completely been screwed, tighten the nut. Use a spanner to tighten the last bits but do not over-tighten it and damage the internal threading in the tail lamp enclosure! Please exercise caution. The bolt is made of stainless steel and the internal threading is of ABS plastic!

    In my case, this is only going to be a temporary workaround until the spring loaded wing nuts arrive.

    9. Repeat the steps 6, 7 & 8 for the other side.

    10. We are done! Test the tail lamps. It might be a good idea to ask your friend to check the lights while while you are on the driver's seat to test the lights.

    Test the lights for the brake lights, reverse, fog and the indicators.

Last edited by Gannu_1 : 1st July 2014 at 08:31.
Gannu_1 is offline   (11) Thanks
Old 29th June 2014, 22:59   #4
Team-BHP Support
 
Gannu_1's Avatar
 
Join Date: Apr 2013
Location: Madras
Posts: 7,173
Thanked: 20,211 Times
re: VW Polo DIY: Euro-spec Tail lamps

  • Results:

    VW Polo DIY: Euro-spec Tail lamps-img_8590.jpg

    VW Polo DIY: Euro-spec Tail lamps-img_8570.jpg

    Tail lights ON:
    VW Polo DIY: Euro-spec Tail lamps-img_8572.jpg

    Fog light:
    VW Polo DIY: Euro-spec Tail lamps-img_8574.jpg

    Hazard lights:
    VW Polo DIY: Euro-spec Tail lamps-img_8578.jpg

    Fog and reverse lights
    VW Polo DIY: Euro-spec Tail lamps-img_8580.jpg

    Reverse light:
    VW Polo DIY: Euro-spec Tail lamps-img_8581.jpg

  • Shopping Experience:

    The tail lamps were sourced from eBay Germany and a dealer who deals with OEM VAG components happened to stock the pair.

    Links - LHS, RHS.

    International shipping was available through DHL Paket International (which is not DHL!). I contacted the dealer through eBay’s messaging system (converted the message in English to German using Google Translate but he was conversant with English) and asked them for a combined rate of shipping for a pair. He agreed to ship the pair of lights for 35 Euros (approx. Rs. 2870). Purchased a pair and made the payment using my credit card via PayPal. The payment went through successfully and PayPal generated an invoice:

    VW Polo DIY: Euro-spec Tail lamps-123.png

    The lights were shipped on 10th June and it was in transit for close to 3 days before it showed up on Indian shores as per the tracking details. I was flummoxed to see that the tracking number provided by the dealer never worked on the DHL’s website. Then it struck me that this was not the usual DHL but another service so upon further digging, I was able to use the DHL Paket International’s tracking system which showed this detail:

    Name:  DHL.PNG
Views: 30455
Size:  65.6 KB

    The IPS tracking website also showed the corresponding updates:

    VW Polo DIY: Euro-spec Tail lamps-ips-tracking.png

    The shipment was handed over to India Post who would value the customs duties to be levied on the shipment and then forward the consignment to me. The consignment landed at the Mumbai Foreign Post Office and was transferred to Ahmedabad Sub Foreign Post Office for the valuation of customs. A few days later, Ahmedabad SFPO forwarded the shipment to the local PO at Surat (Navyug College). I had to pick up the consignment since India Post refused to deliver it at home citing that the box is heavy and big. By God’s grace, no customs duties were levied so this turned out to be a kickass deal! 13k for a pair of OEM tail lights, made in the Czech Republic and sourced all the way from Germany!

    The box measured 600 mm x 400 mm x 360 mm and weighed less than 4 kg:

    VW Polo DIY: Euro-spec Tail lamps-img_8343.jpg

    The lights were enclosed in a bubble wrap, nicely stuffed inside the box filled with foam peanuts and Instapak cushions:

    VW Polo DIY: Euro-spec Tail lamps-img_8349.jpg

    VW Polo DIY: Euro-spec Tail lamps-img_8350.jpg

    VW Polo DIY: Euro-spec Tail lamps-img_8352.jpg

    VW Polo DIY: Euro-spec Tail lamps-img_8362.jpg

    Bullet proof packaging! Would have probably survived all the tossing and throwing by the aircraft cargo handling guys.

  • DIY Experience:

    This was a good experience. Any DIY comes with its share of issues especially when we are attempting in for the first time. I had read up on this mod ever since Robi had attempted it on his TSI and he had mentioned that the fog and reverse lights were going to be swapped vis-à-vis the stock lamps so some wiring changes were involved. As soon as I got the lights, opened them up and figured out the terminals with the help of the metal traces going towards each bulb. And on one evening, I decided to open up one of the stock tail lights only to be taken aback by the wing nut which fell short in length and wouldn’t fit the Euro tail lamps. Instantly searched for the part number on partsbase.org and ordered the correct replacements from eBay US (I have a good friend there). We began thinking of alternatives in the meantime and devised a temporary securing arrangement (jugaad as they say) with the help of a stainless steel bolt, nut and washer.

    This wasn’t the best part however. We connected the wires, fixed the lamps, secured them using bolts/nuts and turned them on only to find out that the reverse and fog lights wouldn’t turn on. We knew something was amiss. Was it a fused bulb? A disconnected wire somewhere? A bad solder? Damn this sucks! 
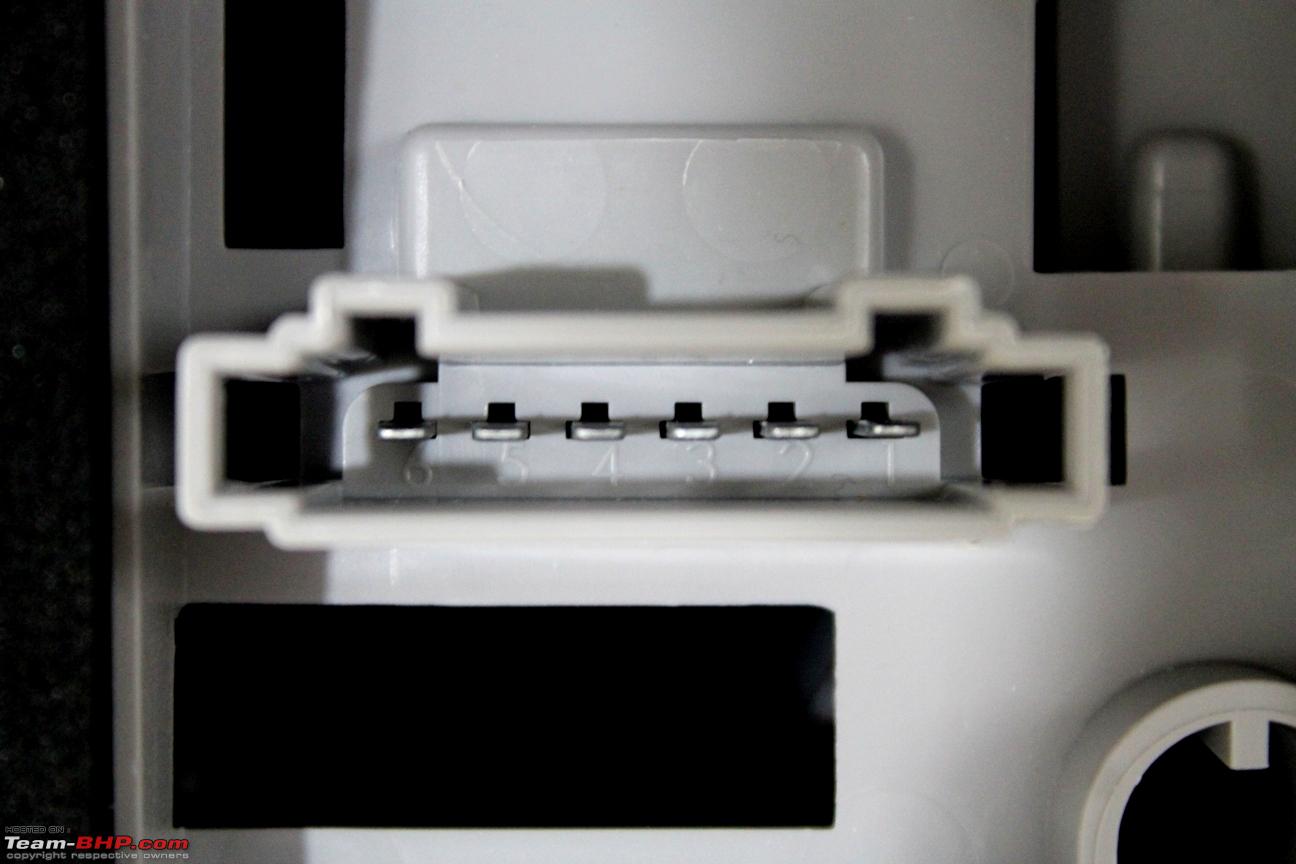
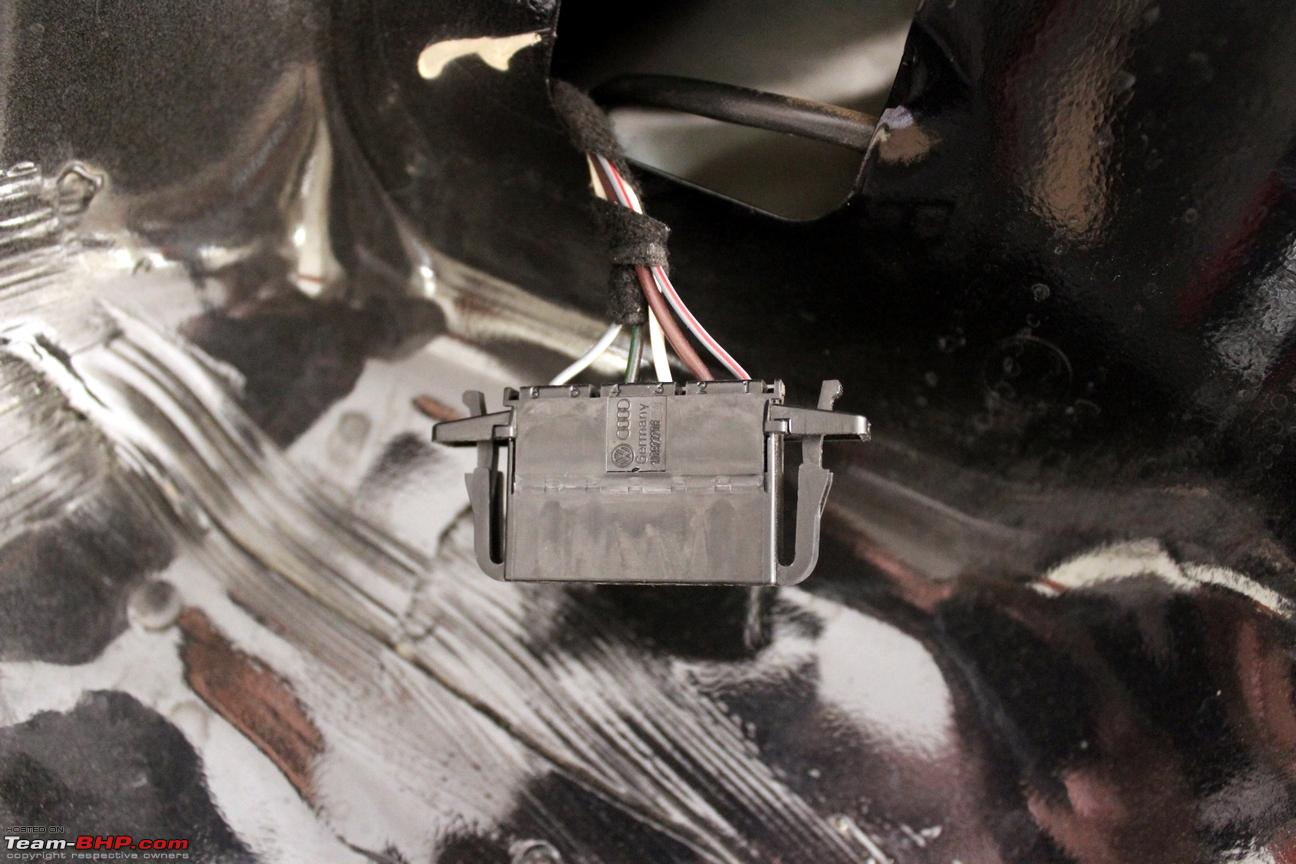
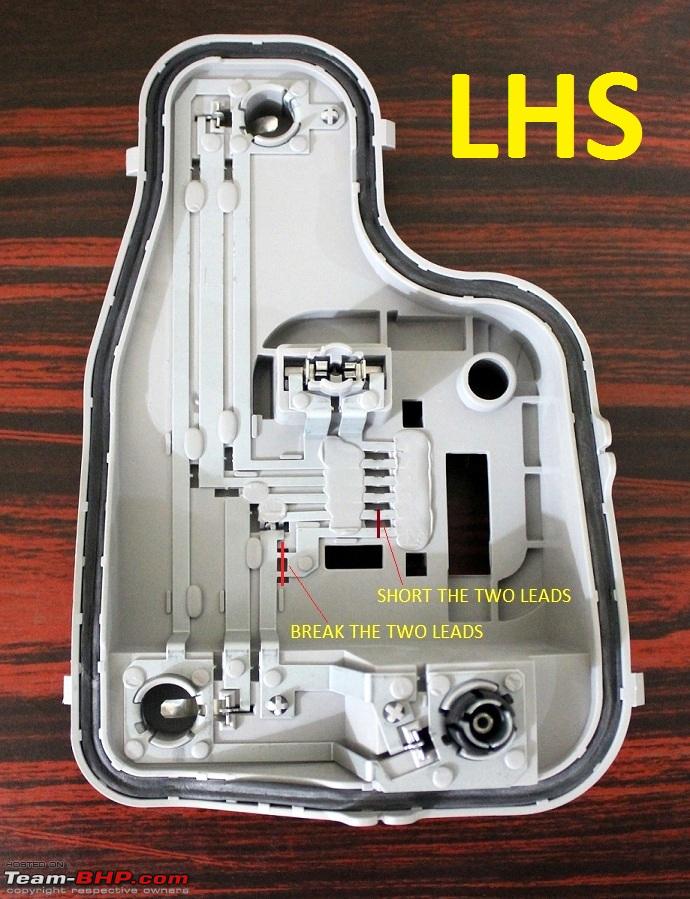
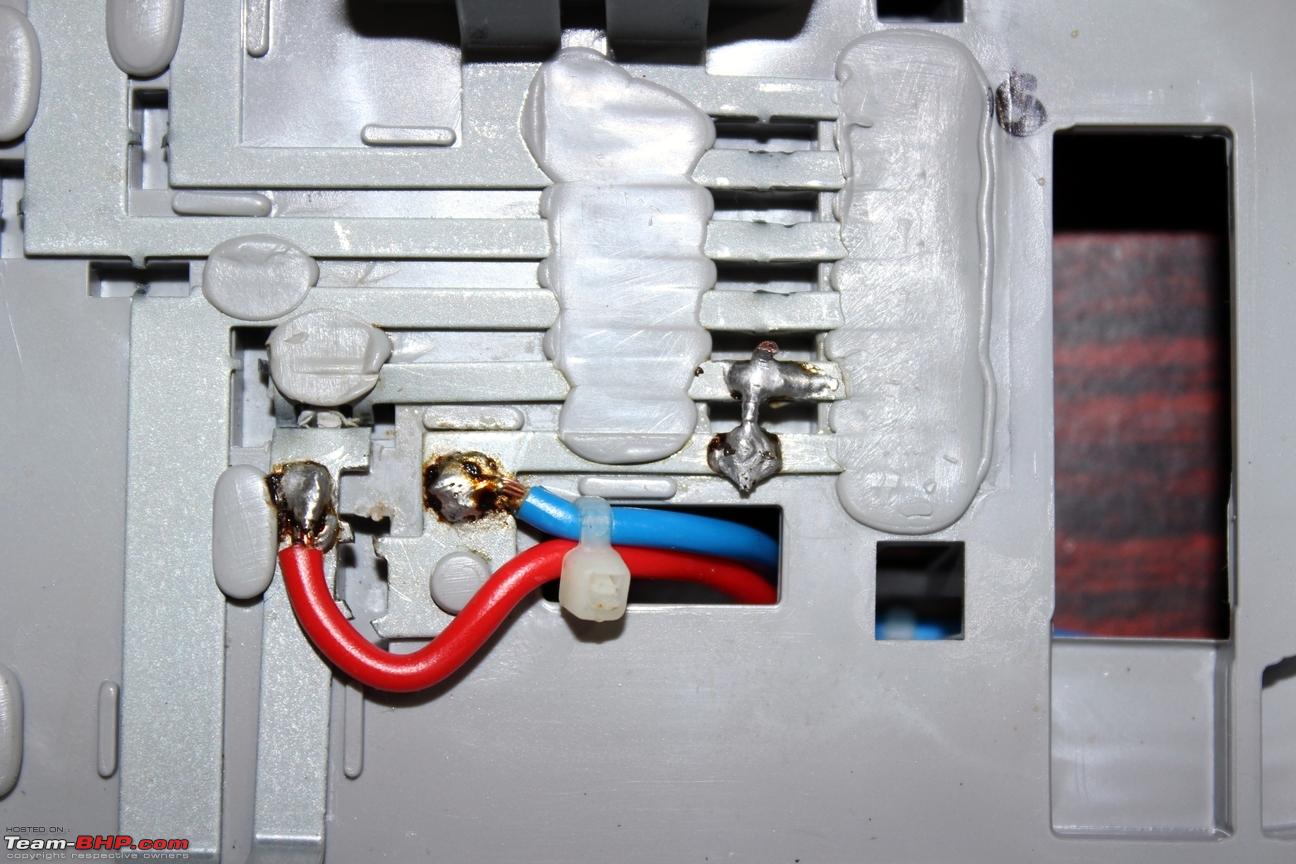
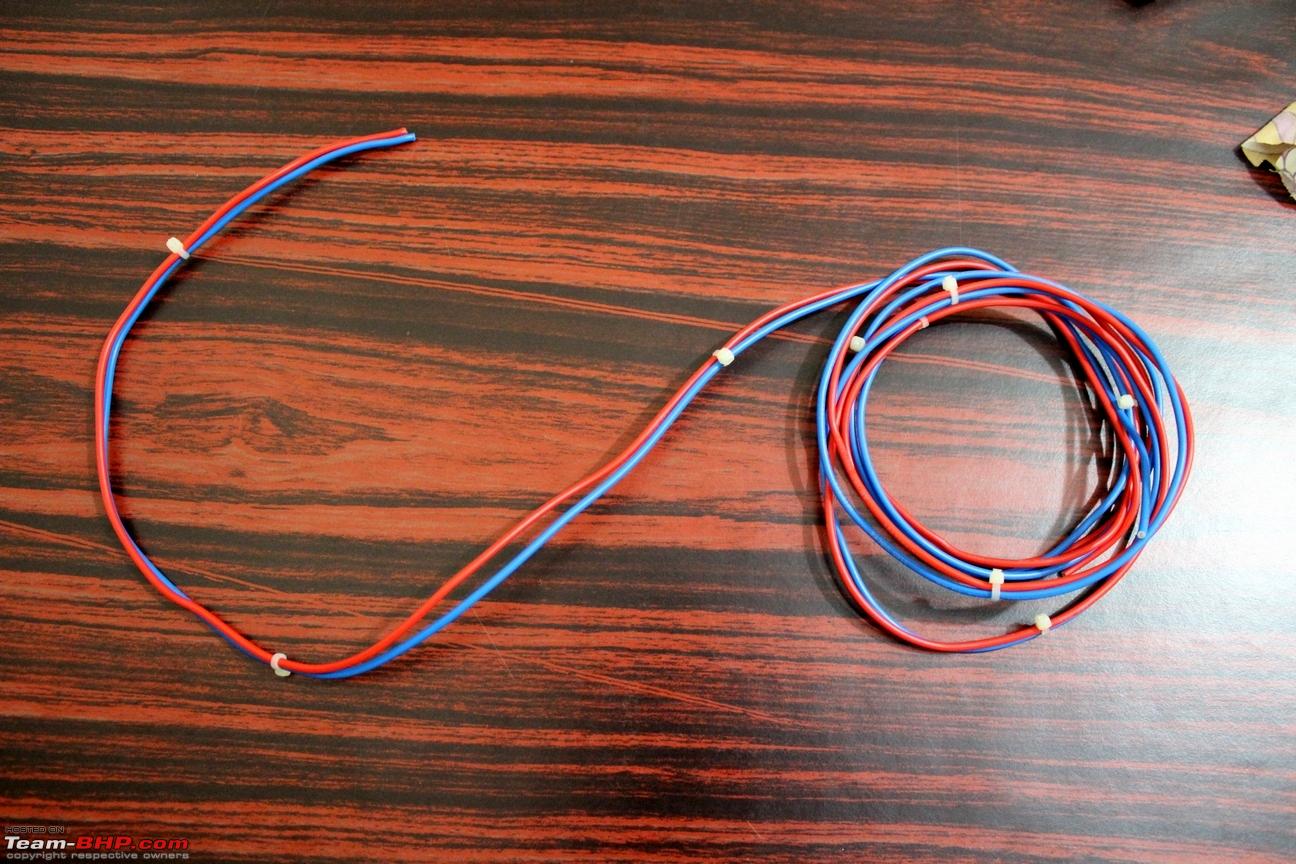
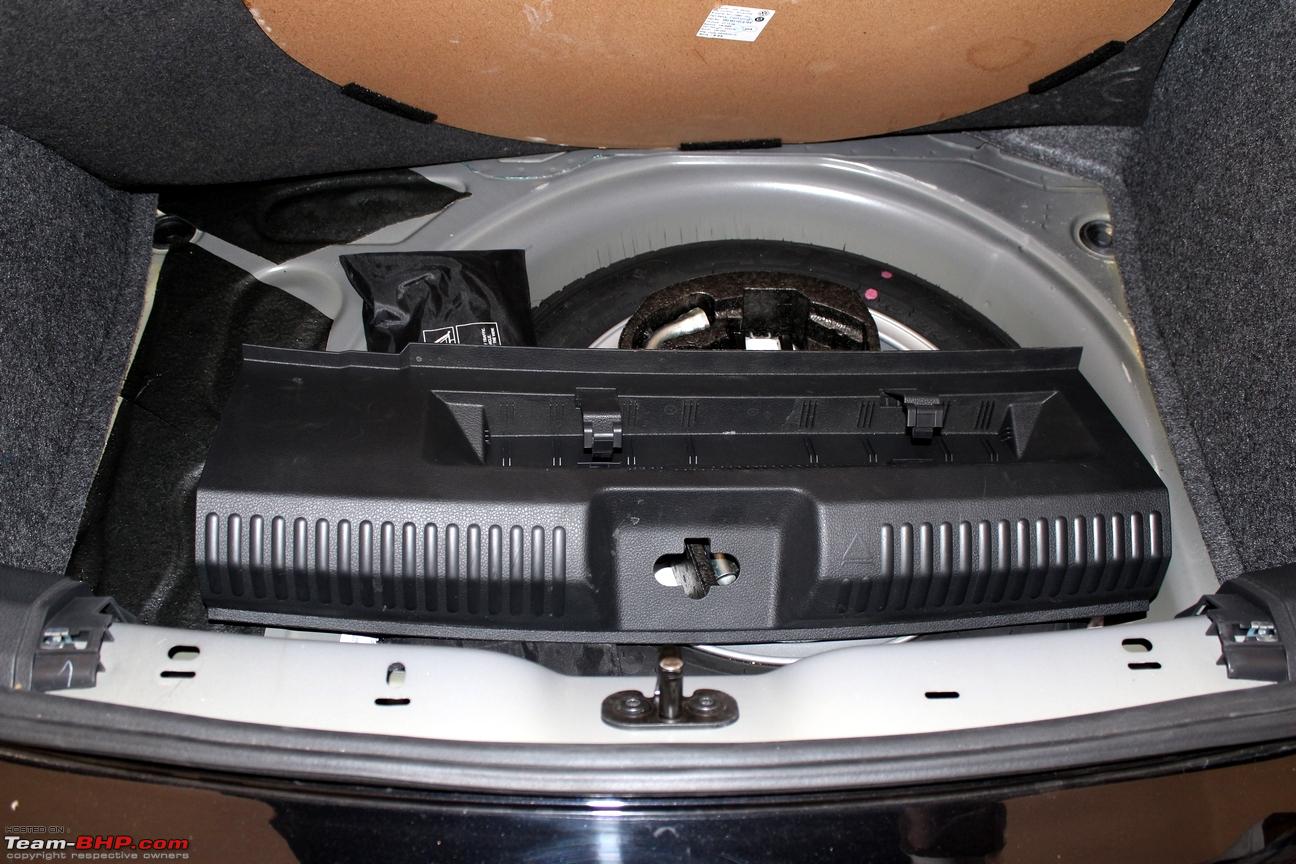
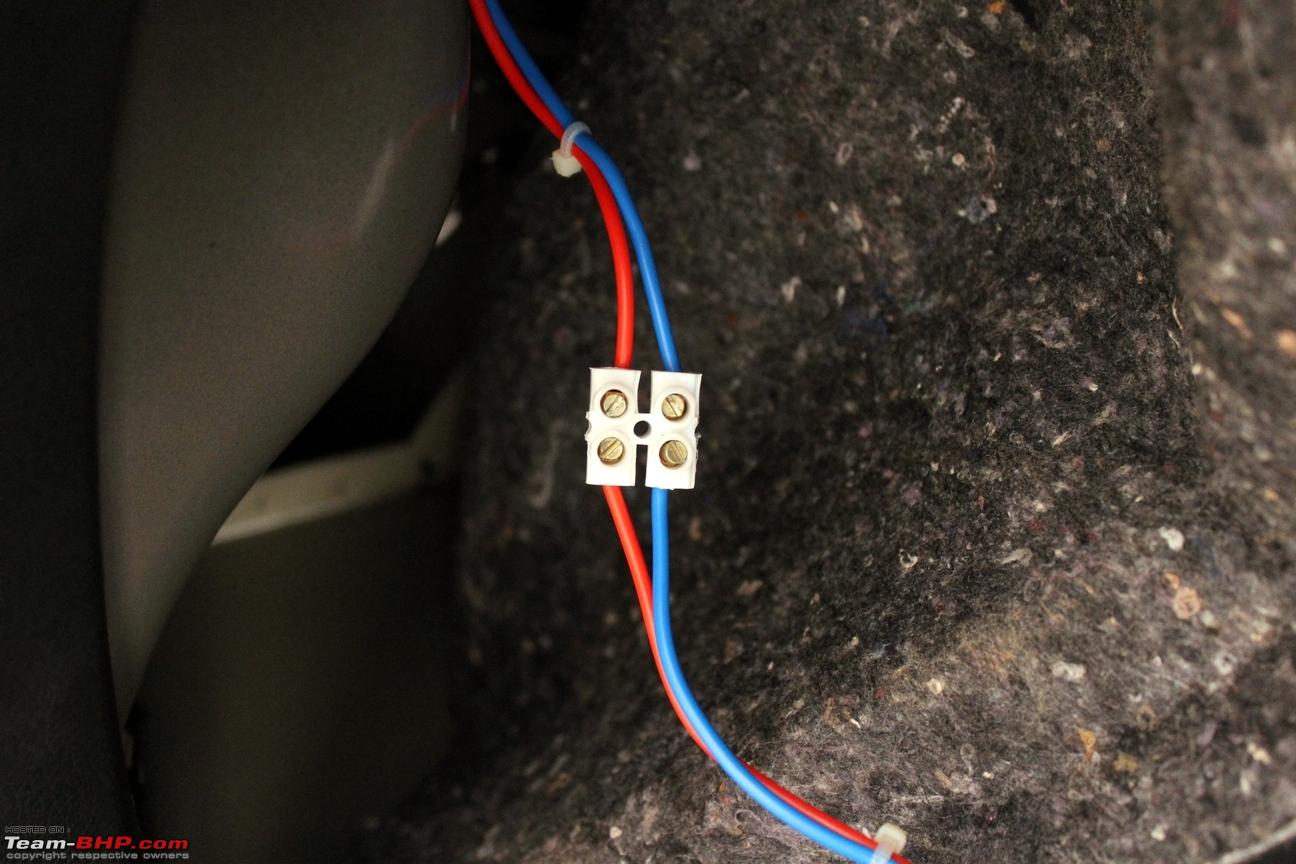
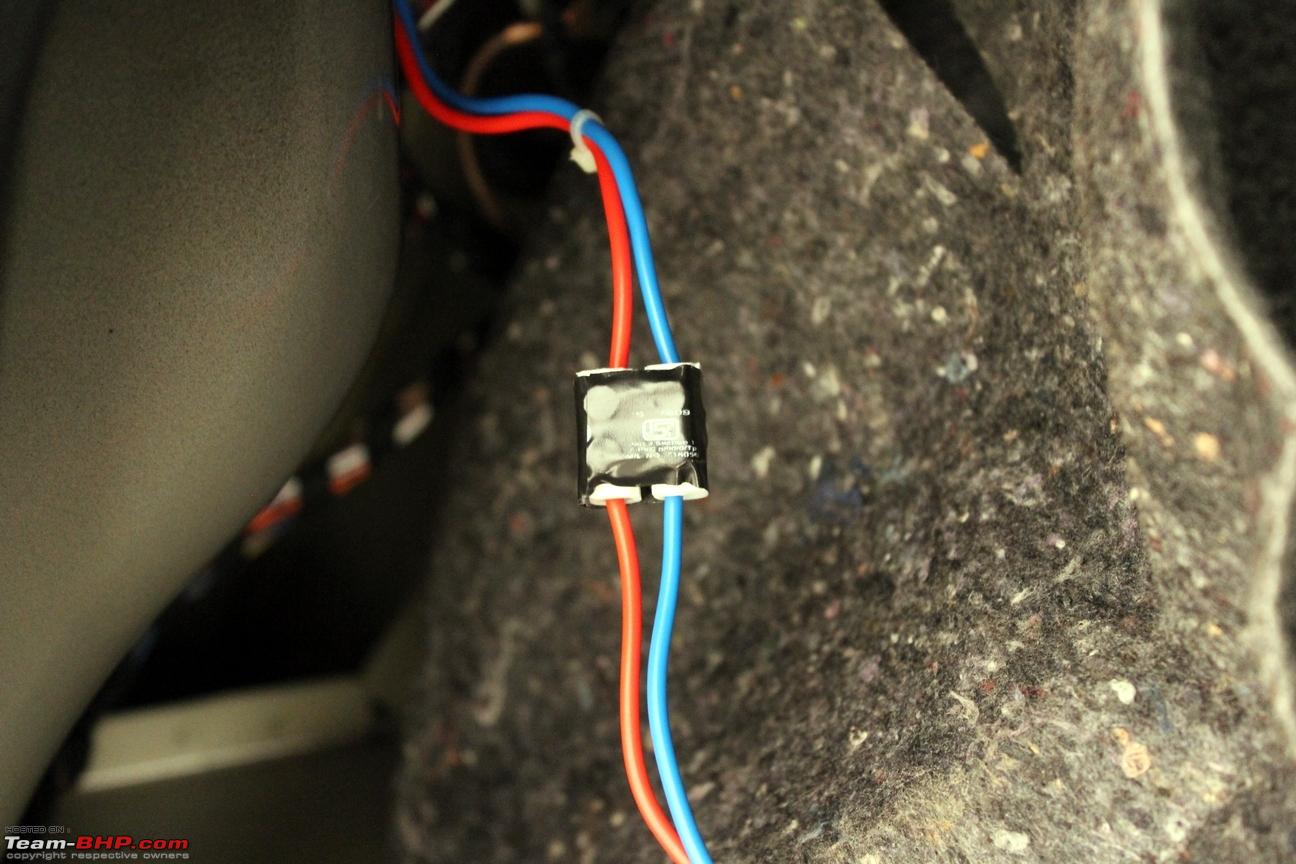
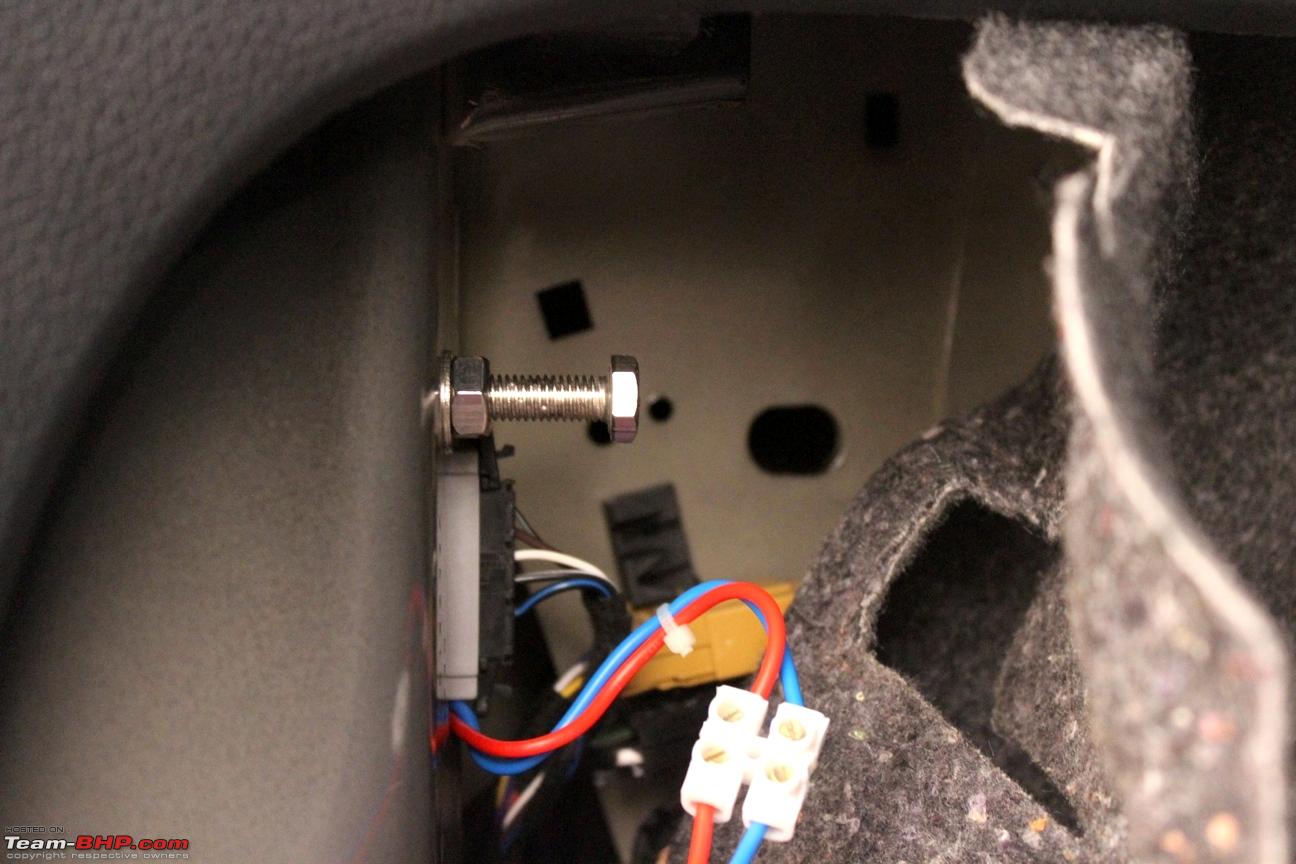
We thought we might have to undo everything now! Disconnected the cables, removed the lamps from their sockets once again and the connector on the wiring loom suddenly caught my eye. Turns out the connector had one terminal changed compared to the Euro connectors. Then, I opened up the Indian tail lamp to see how the metal traces were and turns out, the two terminals were shorted!
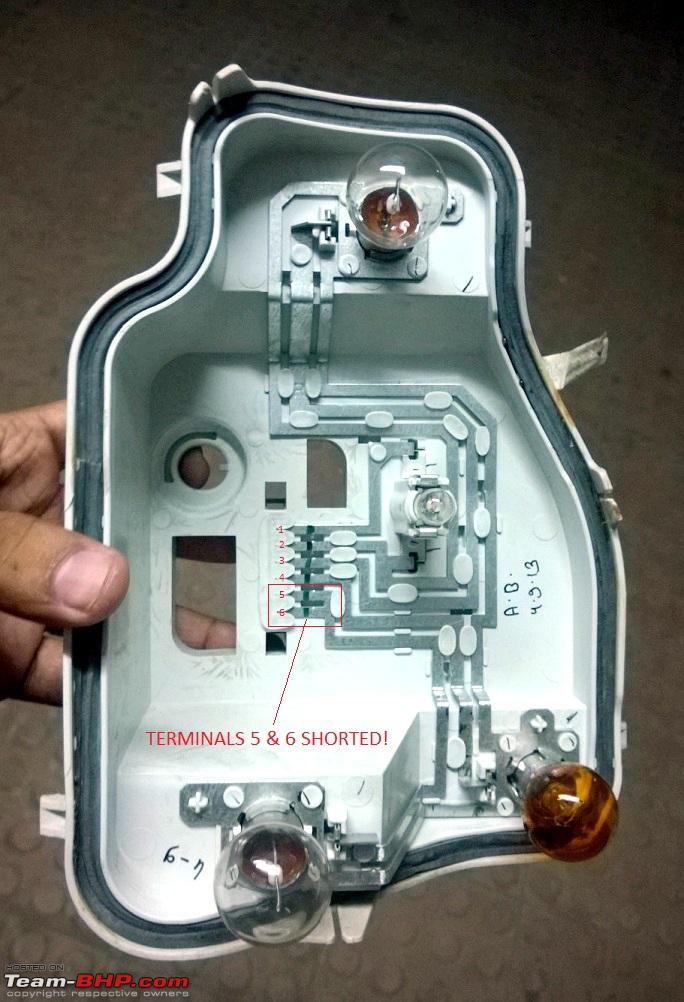
    This is what I meant:

    VW Polo DIY: Euro-spec Tail lamps-wp_20140627_23_53_32_pro.jpg

    Bingo! Took out both the Euro tail lamps, removed all the bulbs, safely stowed them at both the corners of the boot and went back home to do some soldering. Shorted them and the issue was sorted out. The reverse and fog lights turned on without a fuss. Of course, an experienced aftermarket garage would know all these if they have attempted it before but not otherwise. I couldn’t find any information on this elsewhere on the web either.

Anyways, that would be all. My heartfelt thanks to Moorthy (my ever helpful roomie who lends his helping hands for all the DIY work), Ajay (my good friend and colleague who helped me out with the fasteners), the eBay dealer (for the prompt communication, excellent packaging and the nominal shipping charges) and lastly the community for all the encouragement and support.

Please let me know if you have any queries!

PS: Images of the 2014 Polo facelift and the tail light parts were sourced from Google Images and PartsBase.org respectively. All images are copyrighted and property of their respective owners.

Last edited by Gannu_1 : 1st July 2014 at 08:32.
Gannu_1 is offline   (38) Thanks
Old 1st July 2014, 19:22   #5
Team-BHP Support
 
Vid6639's Avatar
 
Join Date: Jul 2006
Location: Bangalore
Posts: 17,724
Thanked: 43,452 Times
re: VW Polo DIY: Euro-spec Tail lamps

Moderator's note: Thread moved from Assembly Line section to Modifications & Accessories.

Thanks for Sharing!
Vid6639 is offline   (2) Thanks
Old 1st July 2014, 20:56   #6
Distinguished - BHPian
 
paragsachania's Avatar
 
Join Date: Nov 2007
Location: Belur/Bangalore
Posts: 7,148
Thanked: 27,139 Times
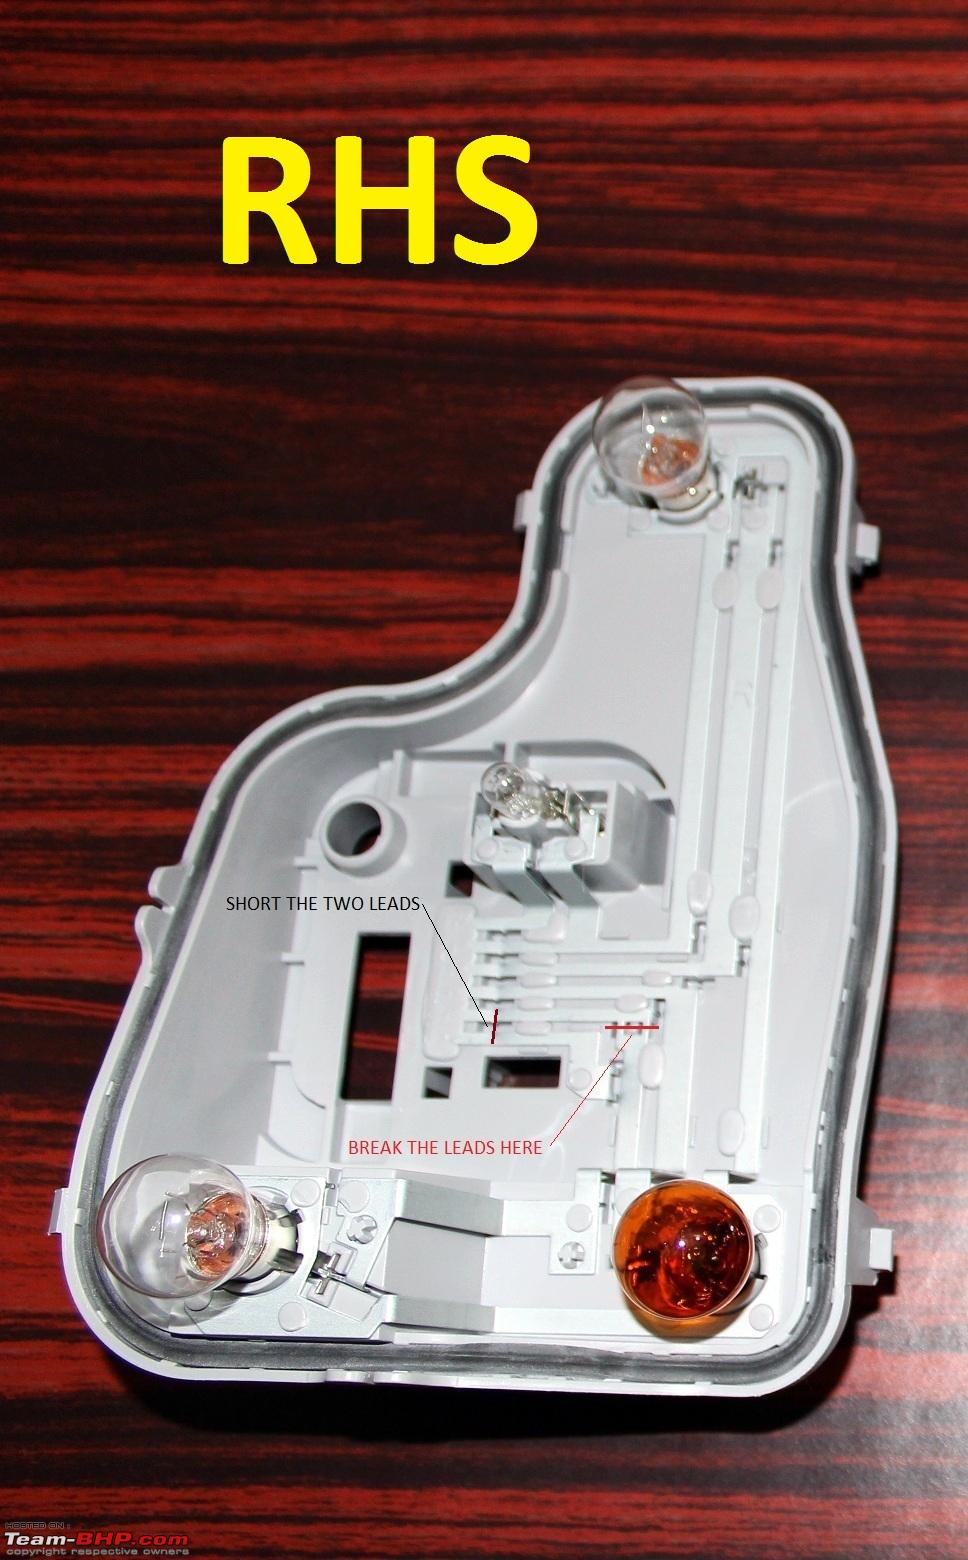
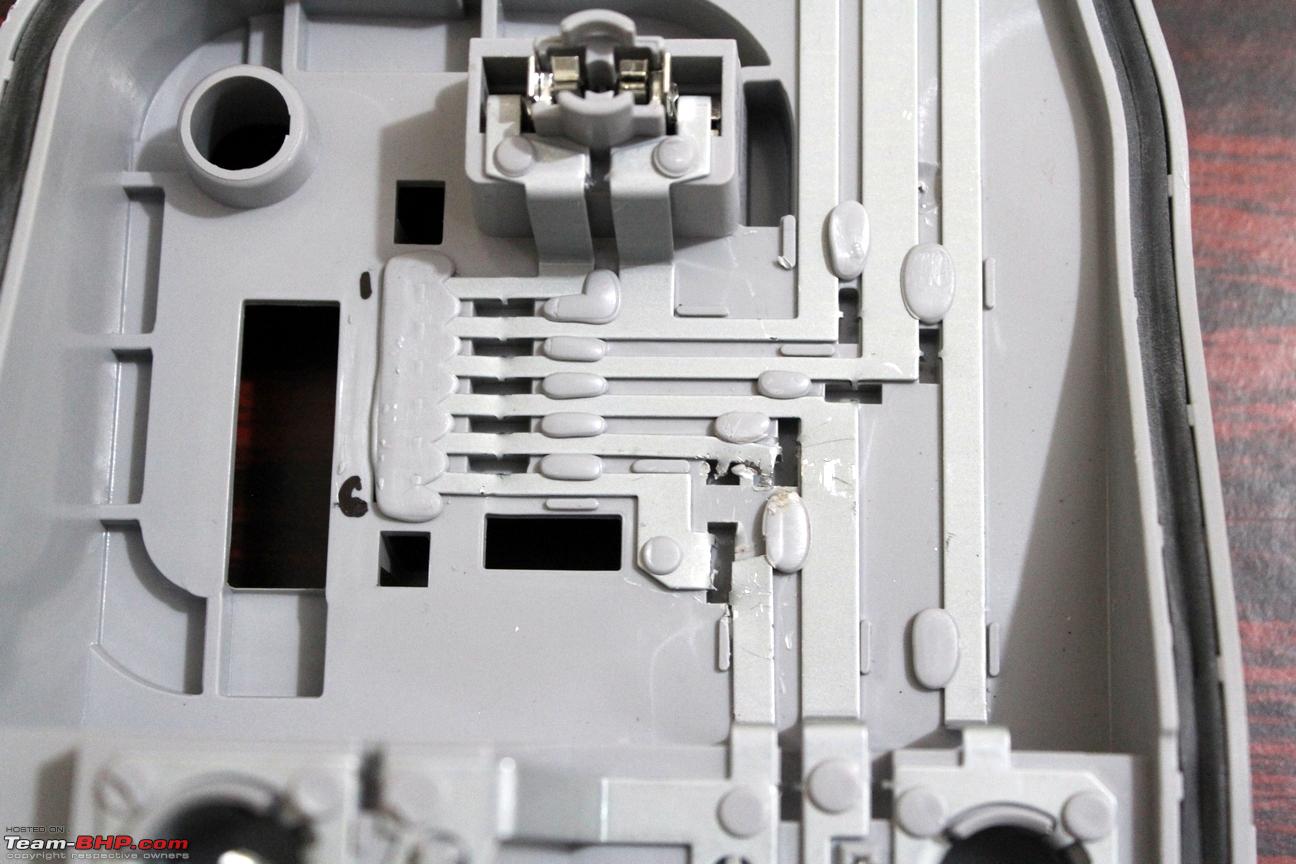
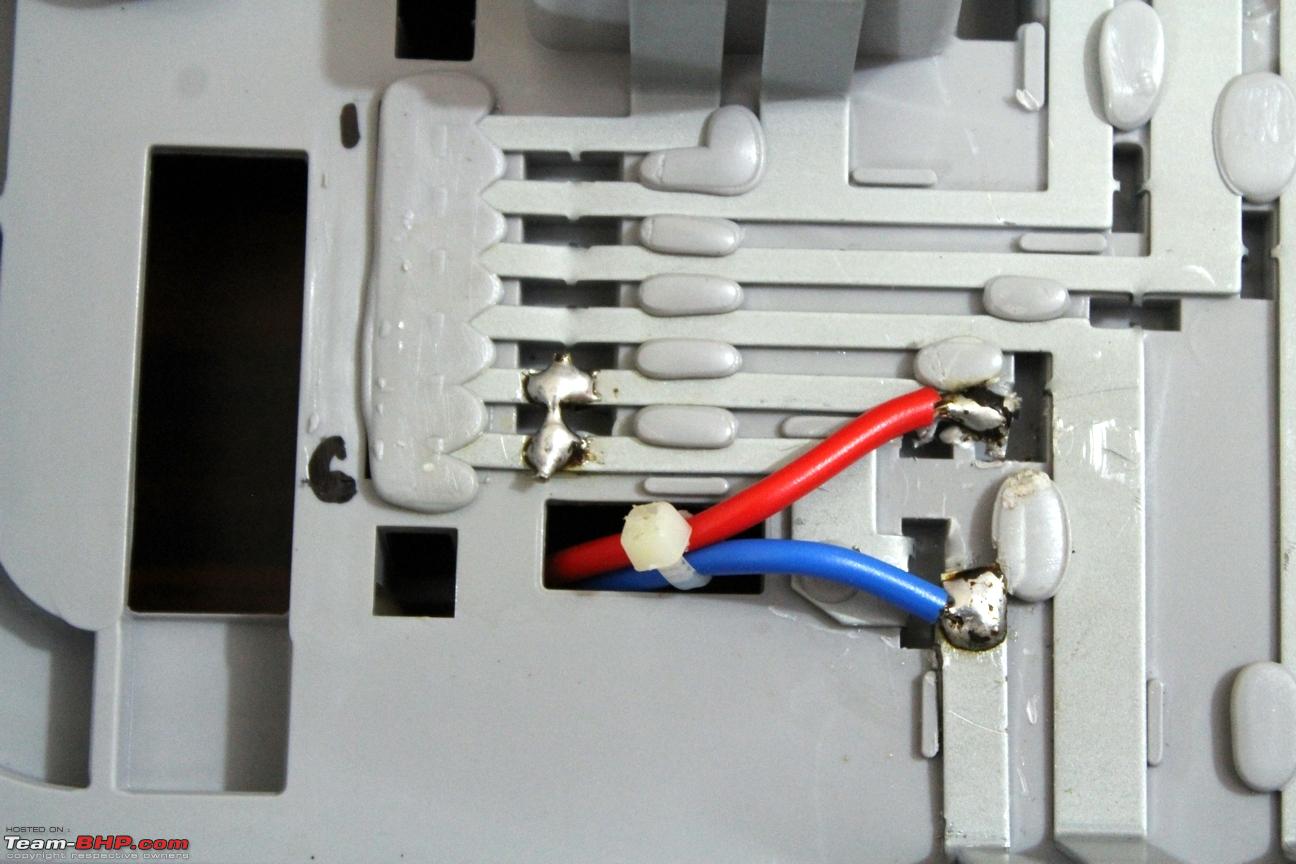
re: VW Polo DIY: Euro-spec Tail lamps

Another clean DIY to your list of projects for the Polo there!

Can the lights be swapped?
This is the biggest challenge when it comes to different models/variants sold within and Internationally. I am sure you would have done good amount of research on this before attempting to buy one for this DIY. The wing nut length and thread was indeed a challenge and you managed it quite well. At times even when the dimensions match, the holes to secure these units on the car's body may not!

Cutting the contact lines and soldering according to meet the requirements:
This again is not an easy one unless you sit at ease, spend good amount of time, listen to some beeps from that Multimeter to ascertain that you have the right contacts to glow or blow that bulb(s). The contact lines are delicate and a little amount of forced handling and it can prove totally useless.

A parts catalog is your biggest DIY messiah:
Not just the part numbers alone but this would give you a complete breakdown and representation of how things assemble themselves to eventually form into a single unit. You have been just perfect when it comes to the sourcing the right parts (That too when you don't have these available in India off the shelf easily for VW cars)

Rest of everything is as good as your earlier DIYs. Thanks once again for this lovely execution!

Last edited by paragsachania : 1st July 2014 at 20:58.
paragsachania is offline   (4) Thanks
Old 2nd July 2014, 05:16   #7
BHPian
 
Join Date: Sep 2013
Location: Hyderabad
Posts: 993
Thanked: 479 Times
re: VW Polo DIY: Euro-spec Tail lamps

There goes another masterpiece. Just love the way you work and explain those details with Pics.

That's really a clean job and I suppose you are mastering the art of DYI.
JoseVijay is offline   (1) Thanks
Old 2nd July 2014, 15:41   #8
Team-BHP Support
 
Gannu_1's Avatar
 
Join Date: Apr 2013
Location: Madras
Posts: 7,173
Thanked: 20,211 Times
Re: VW Polo DIY: Euro-spec Tail lamps

Quote:
Originally Posted by paragsachania View Post
Another clean DIY to your list of projects for the Polo there!
Parag bhai, thank you for the kind words as always. And mighty congrats on being honored with the Distinguished BHPian’s status. Well deserved IMO.

Quote:
Originally Posted by paragsachania View Post
This is the biggest challenge when it comes to different models/variants sold within and Internationally. I am sure you would have done good amount of research on this before attempting to buy one for this DIY.
Robi was among the first few members on the forum who had swapped the tail lights on his TSI and he had mentioned that there were issues with the reverse/fog lights being swapped. Upon further digging and Google searching, there was no concrete information on what actually had to be done with the cables/connectors. Absolutely no information on the non-usability of the stock fasteners anywhere! I wanted that this information be available somewhere online so anyone who’s interested in doing this swap can have all the information upfront.

Quote:
Originally Posted by paragsachania View Post
This again is not an easy one unless you sit at ease, spend good amount of time, listen to some beeps from that Multimeter to ascertain that you have the right contacts to glow or blow that bulb(s). The contact lines are delicate and a little amount of forced handling and it can prove totally useless.
Tell me about it! It was 10:30 PM last Friday night, I was browsing in front of the laptop and Moorthy (my roomie) was busy watching some WC match. My curiosity got the better of me, took a torch and went to the apartment’s parking lot with him to dismantle the stock lamp. Dismantled both the lamps and brought them home to check the innards. We figured out the terminals and it was then that we noticed that the stock fasteners wouldn’t fit the new tail lamps. At 11 PM in the night!

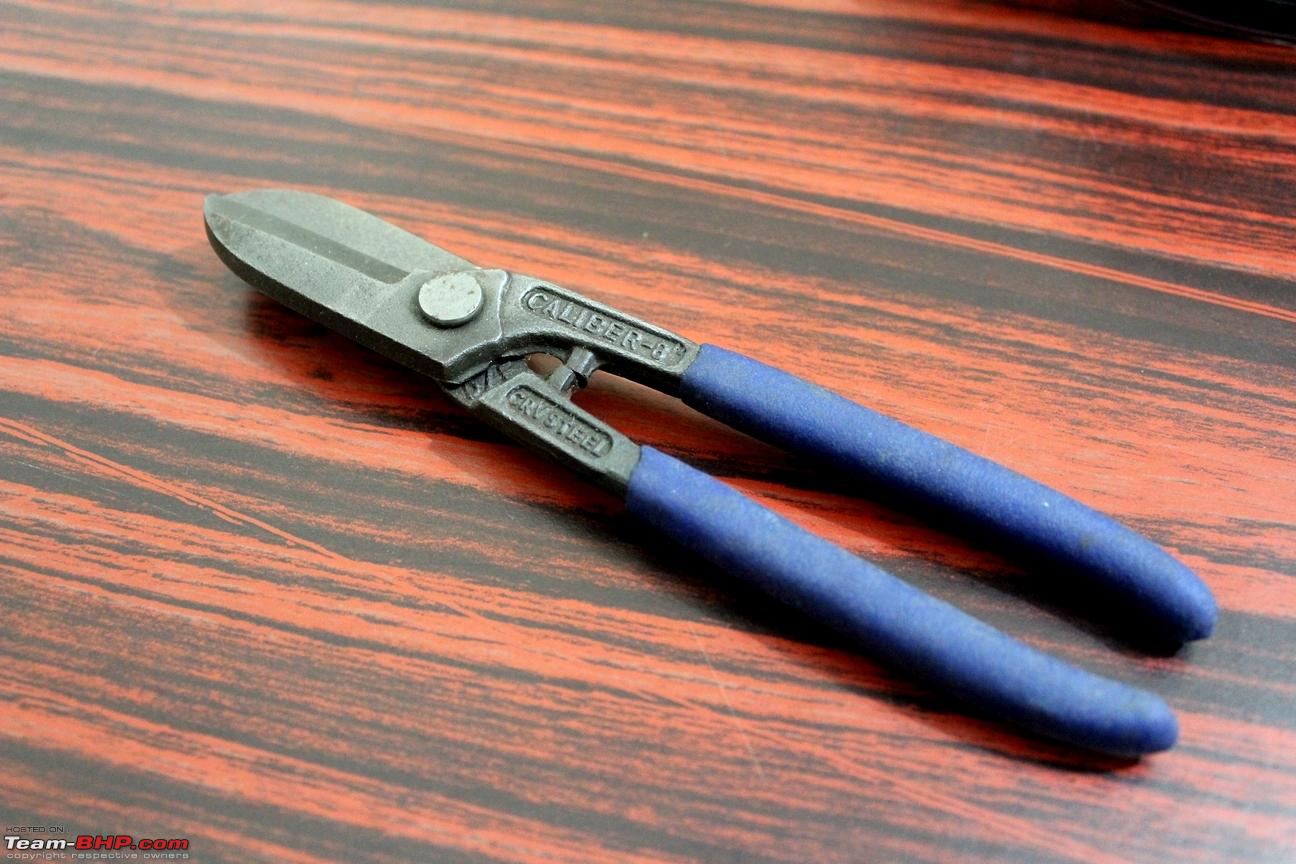
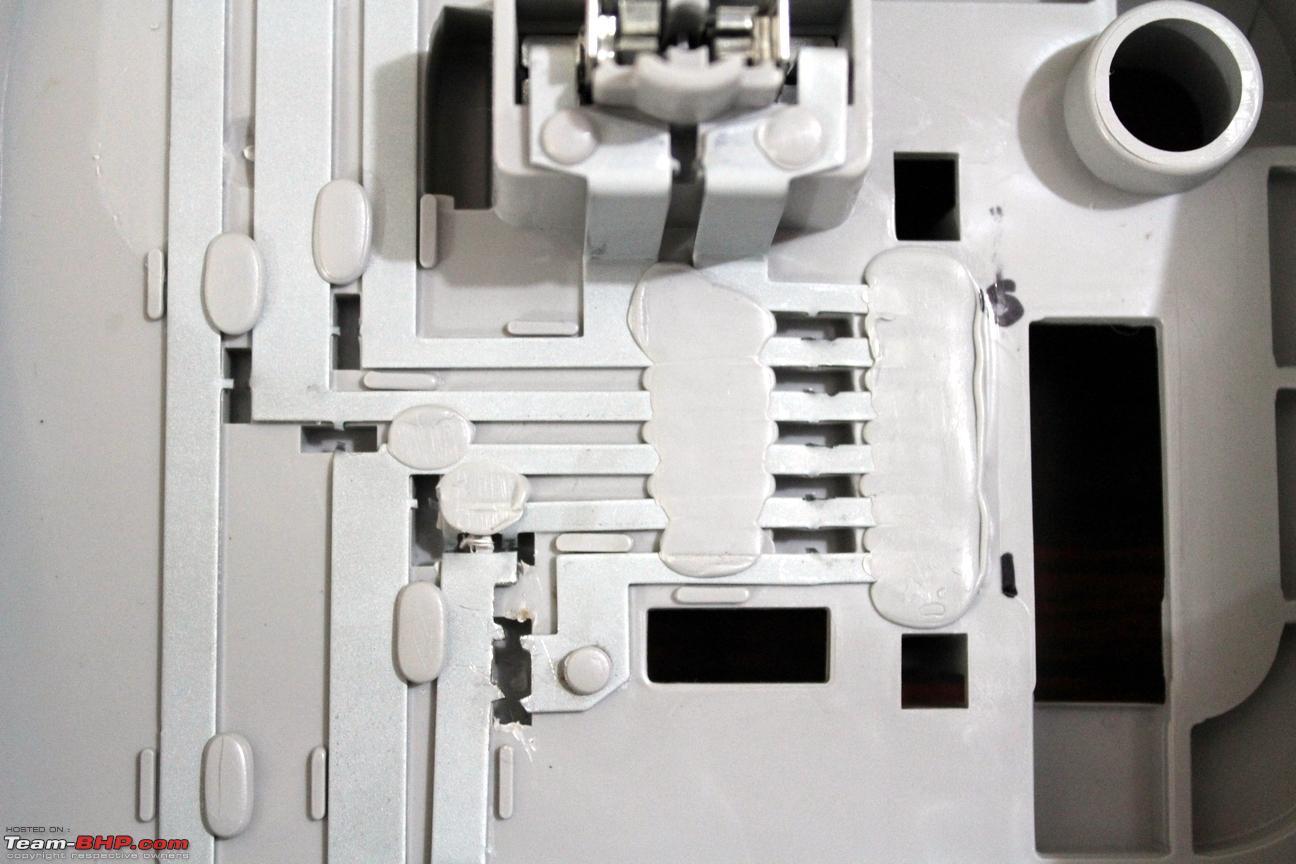
Cutting the metal strips was harder than I had thought. Luckily I had the right shearing tool for this job in my tool box. This shear is used to open tin cans but can cut through thicker sheets as well. I have a habit of buying tools of all kinds. Lugged a whole bunch of tools from my hometown (Palakkad) when I was posted here! Next in my list is a good bench vice for securing the jobs while working.

Quote:
Originally Posted by paragsachania View Post
A parts catalog is your biggest DIY messiah:
Not just the part numbers alone but this would give you a complete breakdown and representation of how things assemble themselves to eventually form into a single unit.
The PartsBase catalog (link) and VW Workshop Manuals (link) are two very helpful resources. A downloadable user’s manual in .pdf like Skoda’s manuals would have been the icing on the cake but I refer to the Rapid’s manual now since some of the parts are identical.

2 more DIYs are in the pipeline - swapping the front grill and replacing the instrument cluster (later this month; programming and immobiliser coding will be done by the aftermarket garage).

Quote:
Originally Posted by JoseVijay View Post
There goes another masterpiece. Just love the way you work and explain those details with Pics.
Thank you Jose!

Last edited by Gannu_1 : 2nd July 2014 at 15:54. Reason: Adding partsbase and workshop manuals' links
Gannu_1 is offline   (1) Thanks
Old 2nd July 2014, 16:58   #9
BHPian
 
Y@SH's Avatar
 
Join Date: Sep 2011
Location: Mumbai
Posts: 454
Thanked: 909 Times
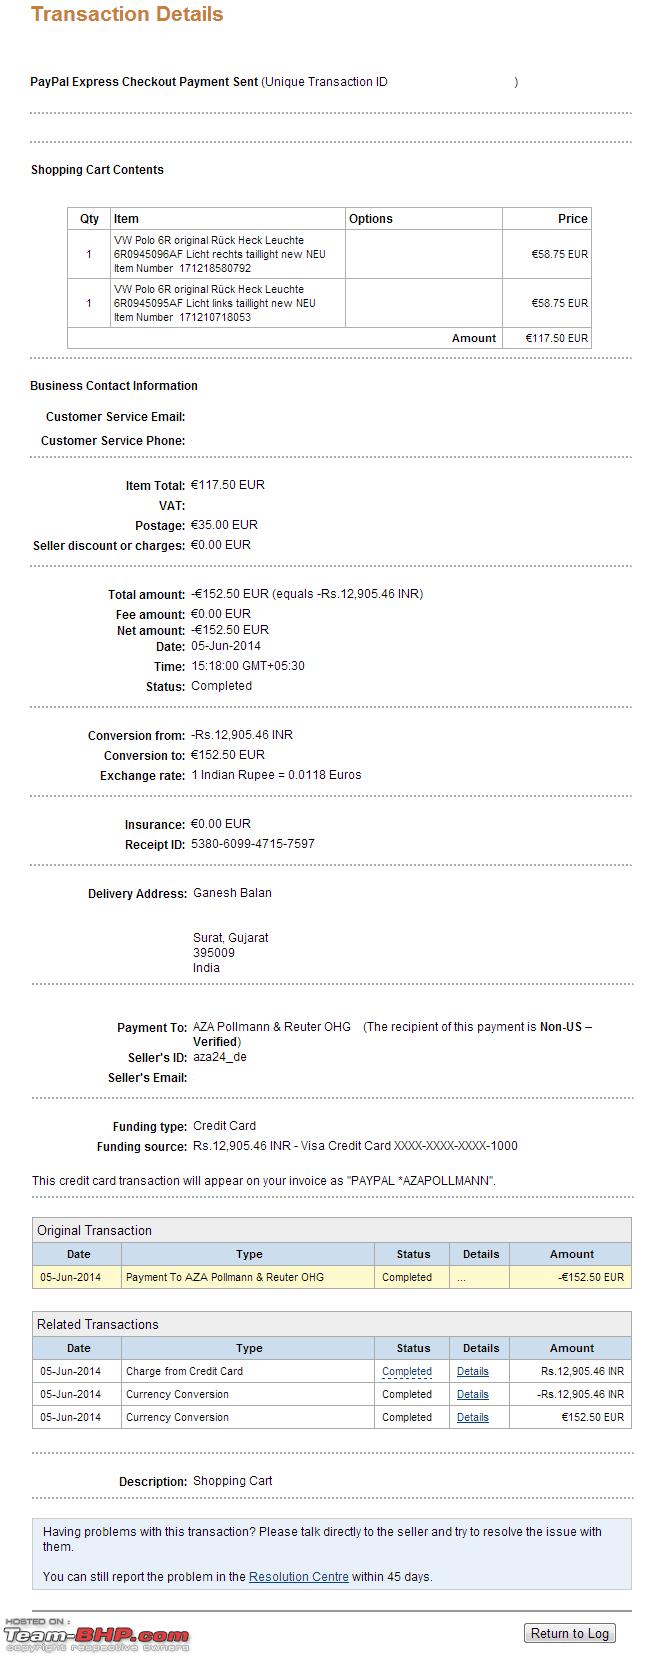
Re: VW Polo DIY: Euro-spec Tail lamps

This is a great DIY. Your attention to mention every step is superb

One QUESTION. I was trying to source an AMI cable for my Audi from Ebay USA, and the seller does ship to India. However due to some RBI Law I wasn't allowed to make a purchase in dollars and had to ask my friend in the States to order them for me.

Didn't your credit card company prevent the transaction from happening? I tried from HDFC MasterCard CC and Visa Debit card. Both didnt work for me. I cant make any purchases in foreign currency online. However both cards worked abroad for paying in foreign currency

Last edited by Y@SH : 2nd July 2014 at 17:00.
Y@SH is offline   (1) Thanks
Old 2nd July 2014, 19:08   #10
Distinguished - BHPian
 
hemanth.anand's Avatar
 
Join Date: Jan 2010
Location: Bengaluru
Posts: 3,274
Thanked: 14,700 Times

Nice and detailed explanation of the DIY.
I wish I could write one like this for my Punto's tail lamp change to the one from from Abarth Punto.
Although it was not a DIY, I forgot to take pictures during the lamp change exercise.

Luckily for me, reverse and fog lamps are not part of the tail lamp module.
For me, the problem was the connector shape. UK and indian connector shapes are same. I confirmed this and confidently ordered the lamps. But the lamps that I ordered came from Latvia and the connectors were different. Some wiring with splicing of the insulation sorted that issue.

My car's MID shows an error because of a resitance change,thanks to te LEDs in the new module. Have you faced something like that in the polo?
hemanth.anand is offline   (1) Thanks
Old 2nd July 2014, 20:41   #11
Team-BHP Support
 
Gannu_1's Avatar
 
Join Date: Apr 2013
Location: Madras
Posts: 7,173
Thanked: 20,211 Times
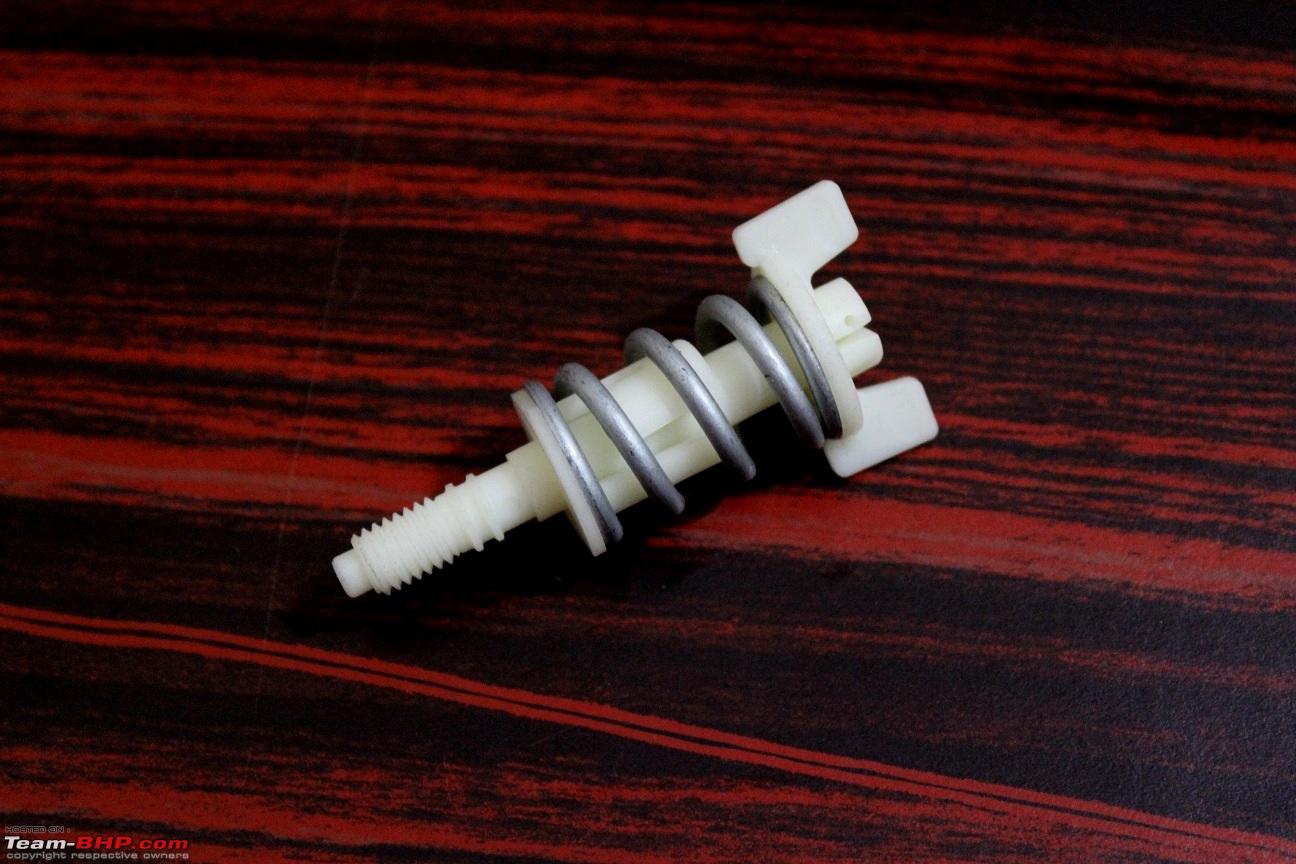
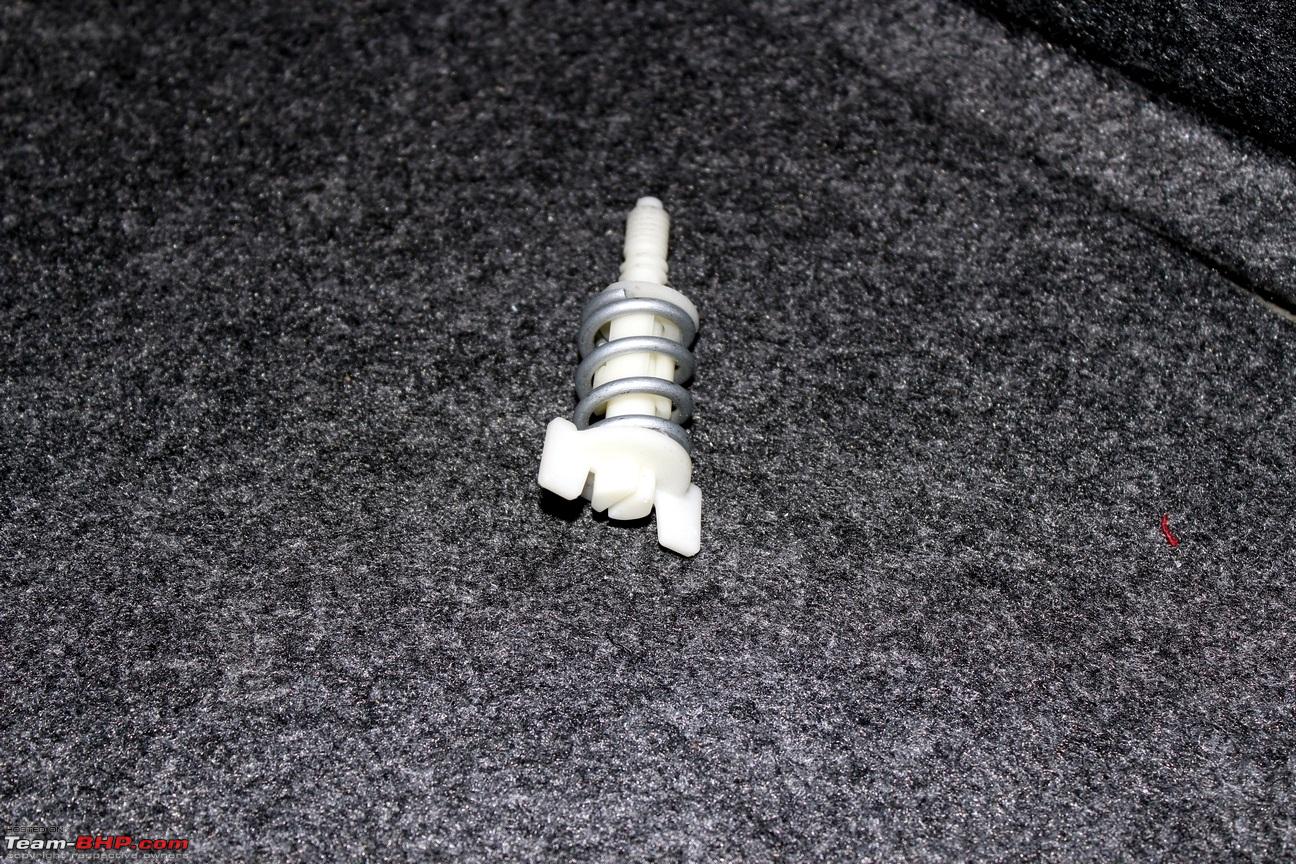
Re: VW Polo DIY: Euro-spec Tail lamps

The glue gun came in today. Applied some molten glue atop the soldered joints to prevent them from coming off:

VW Polo DIY: Euro-spec Tail lamps-img_8623.jpg

VW Polo DIY: Euro-spec Tail lamps-img_8624.jpg

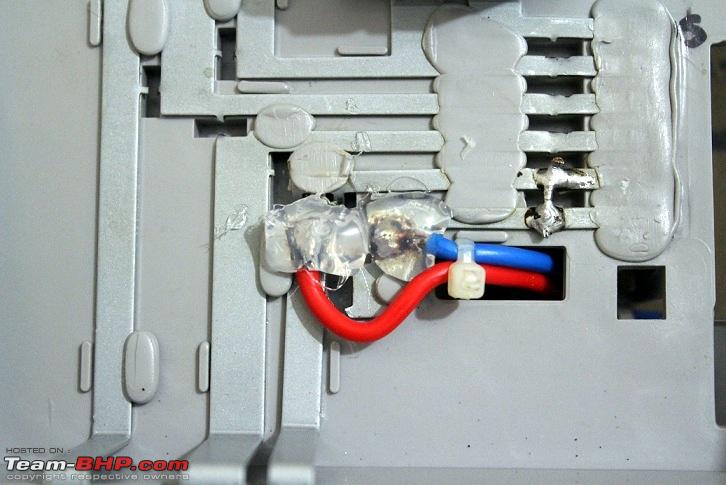
Just the spring loaded wing nuts remain.

Quote:
Originally Posted by Y@SH View Post
Didn't your credit card company prevent the transaction from happening?
Nope. No issues with PayPal here. The transaction went through smoothly. I believe you might have been asked to do the payment via PayPal? If it did not work, try calling up your bank and inquire.

Quote:
Originally Posted by hemanth.anand View Post
My car's MID shows an error because of a resitance change,thanks to te LEDs in the new module. Have you faced something like that in the polo?
The new tail lamps have the same bulbs inside as apparent from the images posted and not LEDs so the MID did not throw up any errors.

To get rid of the errors in your case, you have two options - use CANBUS error free LEDs or add a resistor (5W, resistance based on the power draw of the actual bulb) to each LED in parallel so that it draws the same power as that of the stock bulb and the CANBUS is tricked to believe that it is an LED there. There are several DIY threads on this - please search.

For eg. Bimmerforums - LED Error Free on the cheap DIY, Audizine - DIY: Error-Free Rear License Plate LED Lights the Easy Way for B7 A4
Gannu_1 is offline   (2) Thanks
Old 2nd July 2014, 20:42   #12
Distinguished - BHPian
 
robimahanta's Avatar
 
Join Date: Aug 2009
Location: BLR/GAU
Posts: 833
Thanked: 6,492 Times

Superb stuff Gannu. The amount of work and time you have put into these DIY threads is really commendable.
I actually never realised that this much work in involved in the lamp swap. The installer who fixed it in my car did the work in a jiffy and there was not any connector issue. The reverse/fog swap was the only thing he did.
robimahanta is offline   (1) Thanks
Old 2nd July 2014, 21:26   #13
BHPian
 
Join Date: Dec 2012
Location: New Delhi
Posts: 261
Thanked: 153 Times
Re: VW Polo DIY: Euro-spec Tail lamps

Quote:
Originally Posted by Gannu_1 View Post
  • ...
  • 7 - Fog lamp/reversing bulb - H21W/P21W

    Bulb no. 7 is the catch here. This bulb is on the LHS tail lamp for the Euro-spec models and on the RHS one for the Indian models. So a cable has to be run from the RHS wiring loom to the LHS to turn on this bulb.
...
With due regards, wouldn't it have been better to simply swap the fog and reversing bulbs? The fog light position is not different without a reason, the Europeans drive on the other side. What is the configuration in the Polos that are sold in UK, Australia and Japan?

Last edited by fighterace : 2nd July 2014 at 21:27. Reason: too long quote
fighterace is offline  
Old 2nd July 2014, 21:36   #14
Team-BHP Support
 
Gannu_1's Avatar
 
Join Date: Apr 2013
Location: Madras
Posts: 7,173
Thanked: 20,211 Times
Re: VW Polo DIY: Euro-spec Tail lamps

Quote:
Originally Posted by fighterace View Post
With due regards, wouldn't it have been better to simply swap the fog and reversing bulbs?
No because:

1. The reverse and fog bulbs are different (P21W/H21W) and cannot be swapped. Their sockets are different.

2. The acrylic enclosure around the fog lamp area has a red shade. Even if the bulbs could be swapped, it would still emit a red light outside. Please look at the snaps - this is very clear.

Quote:
Originally Posted by fighterace View Post
What is the configuration in the Polos that are sold in UK, Australia and Japan?
No idea.
Gannu_1 is offline   (1) Thanks
Old 2nd July 2014, 21:48   #15
Distinguished - BHPian
 
hemanth.anand's Avatar
 
Join Date: Jan 2010
Location: Bengaluru
Posts: 3,274
Thanked: 14,700 Times
Re: VW Polo DIY: Euro-spec Tail lamps

Quote:
Originally Posted by fighterace View Post
With due regards, wouldn't it have been better to simply swap the fog and reversing bulbs? The fog light position is not different without a reason, the Europeans drive on the other side. What is the configuration in the Polos that are sold in UK, Australia and Japan?
You are right. But the outside glass is also coloured. The fog lamp side is coloured red and the reverse lamp side is clear. So just swapping of the lights won't suffice and you cannot change the outside coloured glass.

Obviously the fog and reverse lamps in the countries you mentioned would match that of India's. But as I read Gannu_1 has purchased from Europe so he has faced this problem and it was a surprise for him. Had he known this before, I'm sure he would've imported it from the countries you have mentioned and he wouldn't have faced this issue.

Edit: saw that Gannu_1 has already answered. Sorry Gannu_1 for hijacking your thread

Last edited by hemanth.anand : 2nd July 2014 at 21:49.
hemanth.anand is offline   (1) Thanks
Reply

Most Viewed
Thread Tools Search this Thread
Search this Thread:

Advanced Search

Copyright ©2000 - 2024, Team-BHP.com
Proudly powered by E2E Networks