| |||||||

| Search Forums |
| Advanced Search |
| Go to Page... |
 |
| Search this Thread |  195,996 views |
 28th September 2016, 16:39
| #76 |
| BHPian Join Date: Mar 2016 Location: Bangalore
Posts: 120
Thanked: 214 Times
| Re: Project ST: Ford Fiesta 1.6 Duratec What is the method used for rust removal? And at what stage would the panel be considered "past it"? Did you consider replacing the doors or other panels? The reason I ask is my Fiesta is afflicted with a similar problem of rusting at the doors. I showed the car to a reputable body work specialist in Bengaluru (Trend Automobiles) and they suggested it would be better to go for replacement doors as the cost would be around the same (~15K). Looking at the pictures you have shared the rust damage at the doors seems much more in yours than mine. Hence the question. |

|  ()
Thanks ()
Thanks
 |
| |
|
29th September 2016, 13:37
| #77 | |
| BHPian Join Date: Sep 2010 Location: Mumbai
Posts: 285
Thanked: 1,243 Times
| Re: Project ST: Ford Fiesta 1.6 Duratec Almost anything can be restored. Heck, there is a story of a B29 bomber laying in the open in Greenland for more than 45 years before they tried to restore it (sadly after restoration the aircraft caught fire and was totally gutted). The big question is always what is the cost and effort required. You have pointed out that the rust damage to my car's doors seem to be more than yours. As I have mentioned in the post, amount of rust inside the doors actually took us by surprise. What was estimated to be a week's job became a month's job. The restoration process is slow and quite painful. For this reason most workshops today are not willing to go through this painful process. For them the job turn around time is a major factor in their profitability. So the people at Trend Automobiles are not wrong in recommending to you that you get the doors changed instead of trying to restore them. They must have factored in that this job would take 'x' number of days to complete the job, which was just not viable for them. Therefore, they recommended that the doors be replaced. The restoration required some drastic surgery. Where rust was only surface contact deep, it was ground out and removed. Where the rust was deep into the metal, the area affected by the rust and some metal surrounding it was cut out. Vikram arranged for a scrap Mercedes E220 which served as the source for metal to use for rebuilding of affected area. Metal from the Mercedes E220 was arc welded and then painstakingly contoured to the required shape. The process of contouring is what takes the maximum time and skill. We did consider replacing the doors, however, Vikram's was of the view that the money could be better spent somewhere else in the project and he was of the strong opinion that he could make them as good as new. All of this was done with a rider "I will do it for you, but if anyone else were to bring in a car in such a state I ask him to change the doors right away". I guess that answers the question  . . Quote:
| |
|
| (5)
Thanks
|

| The following 5 BHPians Thank PratikPatel for this useful post: | digitalnirvana, frankmehta, Leoshashi, NiXTriX2004, theexperthand |
|
30th September 2016, 20:17
| #78 | ||
| BHPian Join Date: Sep 2013 Location: KA-53 / KL-08
Posts: 187
Thanked: 154 Times
| Re: Project ST: Ford Fiesta 1.6 Duratec Quote:
Trend Automobiles are quite famous now and hence a lot busy now thanks to Tbhp For your job I would recommend you to pay a visit to the New Fortune Motors (sorry, they don't seem to have a web page). I have seen them do quite exceptional jobs on painting and seems to be hardworking. Speak to them and check out if they could do without having the need to replace your doors. http://www.justdial.com/Bangalore/NE...802-K7X7_BZDET By the way I could see that you own a Fiesta 1.6S, what's the color if you do not mind? And which part of Bangalore you from? I myself have an aquarius 1.6S and I stay just 1km away from the above shop, so if You planning to come down we could indeed catchup! Note: You would be quite surprised to see the rides lying around in this silent workshop. Quote:
Your post will indeed be a reference sheet for most of my future needs  | ||
|
| (2)
Thanks
|
| The following 2 BHPians Thank unni246 for this useful post: | frankmehta, PratikPatel |
|
2nd October 2016, 14:44
| #79 | |
| BHPian Join Date: Mar 2016 Location: Bangalore
Posts: 120
Thanked: 214 Times
| Quote:
| |
|
| ()
Thanks
|
|
3rd October 2016, 14:00
| #80 | |
| BHPian Join Date: Sep 2013 Location: KA-53 / KL-08
Posts: 187
Thanked: 154 Times
| Re: Project ST: Ford Fiesta 1.6 Duratec Quote:
 Can you PM me your number, will get in touch? Last edited by unni246 : 3rd October 2016 at 14:00. Reason: incorrect year | |
|
| ()
Thanks
|
|
7th October 2016, 14:21
| #81 |
| BHPian Join Date: Sep 2010 Location: Mumbai
Posts: 285
Thanked: 1,243 Times
| Momo Revenge Wheels Momo Revenge Wheels Having finished the painting and bodywork it was time to give the car a new set of shoes. The car came with a set of 14-inch regular wheels and I was keen to upgrade to a set of alloys and a large wheel size. Another reason to upgrade the wheels was the larger disc and brake system that we had installed in the front. Due to the larger disc and caliper, the clearance between the 14-inch regular wheel and the break system was very tight. We need to upgrade to alloys to allow for greater clearance. We decided to put in 15-inch wheels and our first choice would have been BBS forged wheels. I have installed Marchesini forged aluminum wheels on my Ninja 300 and my experience with these has been superb. The wheels allowed us to shed 8 kgs (front and back combined) from rotating mass and made the bike that much more responsive. Therefore, based on my experience with the Marchesinis I was keen of getting forged wheels for the car. Unfortunately, 15-inch forged wheels are not available easily. While 16-inch wheels were available, we had doubts about the weight of the wheels. The added size of the wheel was likely to nullify any weight gains that forged wheels would offer. After a long and frustrating search we ran out of time and started looking more contemporary cast wheels available in the market. Cast wheels come with a weight penalty vis-à-vis regular wheels and going a size up exuberates the problem. But then we thought as Ford offers 15-inch cast wheels, we should be all right with them for the time being. However, the long-term goal will be to find suitable 15-inch forged wheels and we will continue to look for them. After taking a look at a number of cast wheels available in the market, I narrowed down my choice to Momos Revenge wheel, for no other reason than that they look great and of very good quality. As with all new wheels and tires, they were balanced, installed and aligned. The end result is a very nice set of shoes for the car, worthy of its looks.  Stock wheels. As temporary solution, the front wheels are 15-inch as the larger break system was causing clearance issues.  Momo Revenge in their boxes.  Checking the clearances between the braking system and wheels.  Wheel and tyre installed. Plenty of clearance between the brakes and wheels.  We selected Falken tyres.  Car being readied for wheel alignment.    |
|
| (16)
Thanks
|
| The following 16 BHPians Thank PratikPatel for this useful post: | blackwasp, Blow Horn Ok, deetjohn, digitalnirvana, frankmehta, HappyWheels, JoseVijay, Karthik1100, NiXTriX2004, Rehaan, S2!!!, searchingheaven, suhaas307, swiftnfurious, tharian, theexperthand |
|
7th October 2016, 14:45
| #82 |
| BHPian | Re: Project ST: Ford Fiesta 1.6 Duratec The wheels do look hot and they have indeed transformed the look and stance. After the paint and wheels, the car does look fresh and amazing just to compliment the way it would drive after so much of detailed mechanical upgrades it went through. Any specific reasons for sticking to falken tyres apart from michlien's, conti's and Yoko's? How much they cost for that size and how is the grip? Any planned upgrades for interiors and infotainment? Last edited by Blow Horn Ok : 7th October 2016 at 14:47. |
|
| ()
Thanks
|
|
10th October 2016, 12:11
| #83 | |
| BHPian Join Date: Sep 2010 Location: Mumbai
Posts: 285
Thanked: 1,243 Times
| Re: Project ST: Ford Fiesta 1.6 Duratec Quote:
In summation would say; Falken is a highly underestimated tyre which is real value of money. Currently, the car has JVC head unit with Kicker components in front and back and front twitters and a Kicker sub woofer along with Kenwood amplifiers for the components and sub woofer respectively. So its a decent system and I am in no hurry to replace it. When I do it will be a step above and will include a navigation system. Also as of now the seats are covered with Stanley leather. For the interiors we have a list of things planned which include my 'must have obsession' Recaro seats and seat belts. | |
|
| (2)
Thanks
|
| The following 2 BHPians Thank PratikPatel for this useful post: | Rehaan, theexperthand |
|
25th October 2016, 12:08
| #84 |
| BHPian Join Date: Sep 2010 Location: Mumbai
Posts: 285
Thanked: 1,243 Times
| WeaponX XFactor Plasma Ignition Booster WeaponX XFactor Plasma Ignition Booster A number of companies offer products that provide increase in the voltage to the ignition coil for higher output spark events. The theory behind this is that a higher output spark event will create a faster and a more complete burn of the air fuel charge leading to better performance from the I.C. engine. At least that is the theory. In some cases where electrical systems are badly designed the products show much improvement. However, with the advent of electronic engine management, there was a need for more stable and accurate electrical outputs. This need has led to systems that have now been suitably upgraded. The upgrades have taken these systems to a level where most of the time such after market products provides very mediocre or no improvements at all. Hence, such products have started receiving a bad reputation of being useless waste of money products. This certainly does not mean that there are no further improvements to be found in modern day ignition systems. However, a different approach is required and WeaponX has gone about doing just that. I will try to keep the explanation as plain and simple as possible. Do not want this to go into the realms of hardcore engineering. When a heavy load such as an ignition system is connected to a battery, in variably a small voltage drop occurs. The end result of this small voltage drop is an overall loss of energy which while seeming to be of very little consequence has the potential to degrade performance by as much as 10 to 15%. Typically, when the ignition coil is powered up, a drop in the input power to the ignition coil from the battery happens. A typical ignition coil power up time is incredibly brief at 1 millisecond long. In such scenario there is fairly significant loss of input power to the ignition coil. In addition to the above problem, most production systems, even though they have been upgrade for the electronics, have relatively poor regulation capabilities of input power due to this drop in battery voltage. This is due to high resistance in the battery/ alternator system and its somewhat crimped ability to provide instantaneous power to all the sub systems. The side effect all of the above is the production of ringing/ oscillation frequencies in the circuit that is commonly known as interference energy. When the ignition coil discharges high voltage, it creates a push which tends to overcome input energy and pushes these interference energies back up into the input systems. The stock systems have limitations in handling these transient high voltages and oscillating energies. They are more commonly referred to as high frequency EMI or RFI interferences. These interference spikes happen every time the ignition coil fires. In a wasted spark system like the one present in the Ford Fiesta, a single coil will fires off as many as 800 times second. Multiply that 800 times by 4 (cylinders) and you have a total of 3,200 spikes a second! These become a significant point of power loss, as all these spikes are lost as interference energy. Now it does not seem to be of little consequence, does it? WeaponX has focused on these problems in developing their products. The ignition booster provides a regulated steady state voltage, which is controlled within millivolts tolerances. This stable input allows for a higher voltage to be applied to the coil during the charge cycle, thus allowing for a hotter spark. The booster also contains very low ESR capacitors that allow for extremely fast discharge rates. This allows the booster to supply high bursts of electricity while the rest of the electrical cannot keep pace with the demand. Meaning that the ignition system will get all its energy needs at all times. A stable ignition coil input voltage mean higher output voltage (the slight dip in the input voltage mentioned in the start). The more energy that is supplied to the coils, the hotter the spark. This improves overall engine efficiency noticeably. Energy Renewal System The WeaponX Ignition booster has the ability to monitor the input power, it determines if the power in the system is meant to be within the system or not. If the booster determines that the input power is not proper for the system, it will effectively analyze the input stream and dumps the interference energy back into the battery while at the same time controlling the voltage and providing stable power to the ignition coil. EMI and RFI energy is wasted energy. WeaponX has created a clever system to use this wasted energy (produced 3,200 times a second). The system simply and effectively takes these energies and restores them to the battery much like a hybrid car does with its braking system. What this effectively does is that the energy that is recovered is the energy that the alternator does not need to work to produce. It is a well know fact that the more energy that you demand from the alternator, the more parasitic resistance is created and this puts more demand on the car engine power to run alternator. The Booster The booster is quite unique in size. It is small enough to fit in your pam and is the size of a matchbox. It is quite simple to install and requires very little cutting and splicing. The fitting of the booster took us just 10 minutes and works flawlessly. There is a noticeable difference in the running, which has become smooth and responsive. The ignition booster can work with any stock ignition system, however for best results using the booster along with replacement WeaponX ignition coils is highly recommended. Specifications
 The smallest and lightest of its type.  10 minutes to install. Will work with OEM stock system. 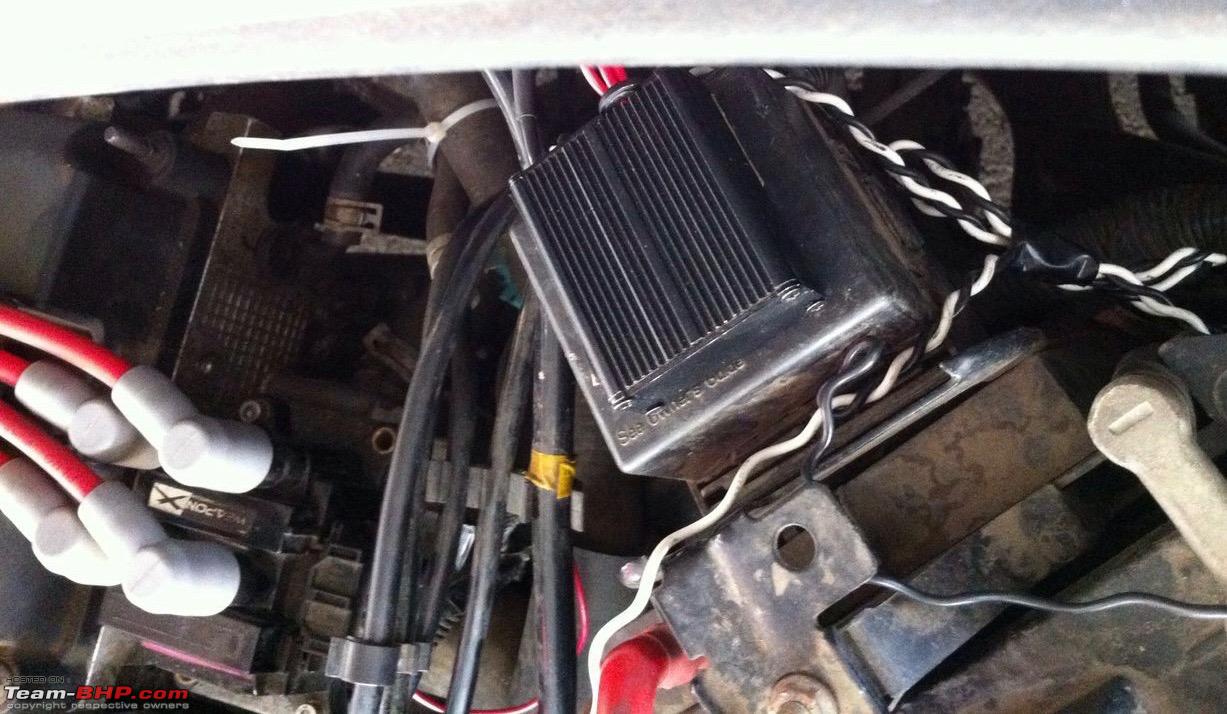 Small and light enough to be mounted anywhere in the engine bay. Electronics rated for operations in 160 degrees celsius environment. (WeaponX is official supplier to NASA for precision ignition components for rocket engines) |
|
| (16)
Thanks
|
| The following 16 BHPians Thank PratikPatel for this useful post: | akshay380, Catalyst_delhi, deetjohn, digitalnirvana, frankmehta, JoseVijay, kutlee, neil.jericho, NiXTriX2004, Rehaan, S2!!!, suhaas307, swiftnfurious, Teesh@BHP, tharian, theexperthand |
|
8th November 2016, 09:19
| #86 |
| BHPian Join Date: Sep 2010 Location: Mumbai
Posts: 285
Thanked: 1,243 Times
| Re: Project ST: Ford Fiesta 1.6 Duratec 10 days time. Waiting for parts. Will do a dyno run after that. |
|
| (4)
Thanks
|
| The following 4 BHPians Thank PratikPatel for this useful post: | akshay380, digitalnirvana, Rehaan, Rohit_Quad |
| |
|
22nd November 2016, 16:01
| #87 |
| BHPian Join Date: Sep 2010 Location: Mumbai
Posts: 285
Thanked: 1,243 Times
| ECU Rewrite & Fuel Maps ECU Rewrite & Fuel Maps After having installed the full exhaust system we ran the car for about 5,000 kms to test the build. While the build has worked flawlessly we did observe some anomalies that need to be corrected for the long-term health of the engine. While the engine pulls cleanly from 1000 rpm, it has developed a prominent flat spot between 3,000 and 3,500 rpm. We also felt that post 3,500 rpm while the ECU (PCM as Ford calls it) with stock fuel maps does an admirable job, the car was running lean and not making the power the build had the potential to make. The exhaust was also popping and crackling at low rpms, which again pointed to lean fuel burn. Fueling is the key to the kingdom of performance. This parameter is the keystone that holds together all the stones of the arch, which is the gateway to performance. For all the hardware that you install from high flow heads, high performance cams, free flow exhausts, high compression pistons, etc., none of them will be worth anything if the fueling is not sorted out for the build. Stock cars have a number of considerations that are contradictory in nature. The car must make reasonable amount of power, while at the same time get the maximum fuel efficiency and should meet the emission norms as per law. For a long time it was generally accepted that in a naturally aspirated engine a air fuel ratio (AFR) of 12.5:1 or 13.5:1 was good compromise for all 3 parameters. Then governments started tightening the screws on the emissions and with fuel prices going up, there was increasing demand from more fuel efficiency. This led to introduction of ECUs and fuel injections to meet these demands. As ECUs and fuel injection can control fuel metering quite precisely and accurately, air/fuel ratios started moving towards 14:1 to 14.7:1. In the past few years, air/fuel ratios have moved further towards 16.2:1 to 17.6:1 for maximum fuel efficiency. According to Bosch (one of world’s leader in fuel systems), modern cars today make power at 12.5:1 to 14.0:1 ratios, maximum fuel economy at 16.2:1 to 17.6:1 ratios and load transitions at 11.1:1 to 12.5:1 ratios. Thus, a normal road going car with a well-tuned engine has constantly varying air/fuel ratios. There is no one ratio that gives everything, for example in the case of emissions, the higher ratios lead to more oxides of nitrogen and lower ratios lead to more hydrocarbon and carbon monoxide emissions. Therefore, while in theory the ratios look good, a compromise of all variables is required to make a modern street legal car. It is generally accepted fact that for high loads a naturally aspirated engine should run an air/fuel ratio range of about 12:1 to 13:1. However in the real world of applications there is more to creating of fuel maps than just adhering to air/fuel ratios. There is a bit of black art involved in it and knowledge and skills of application are not so openly shared by all. Over here I would like to speak about my experiences in tuning bikes. I have seen and experienced a lot of aftermarket products for fueling bikes. Big names like Dynojet and Bazzaz offer piggyback and replacement ECUs for fuel tuning. It has been my experience that while the hardware of these after market units is great; the biggest shortfall is in the fuel maps available. These companies have a library of fuel maps, which in theory can be download based on your setup and installed on the bike. I call these types of fuels maps as ‘canned’ maps (for want of a better word). Like canned food, these may do a passable job of feeding you but are not doing a great job. It is my estimate that such canned fuel maps can only do a 60 to 70% job. They do not allow you to get the maximum out of your build. For 90% and above results the build needs to be fine tuned on a dyno. This is an undisputed fact. People may argue about the great results that they have got by using canned maps, but the fact will remain that if the same build was dyno tuned it would give results that will be better by an order of multitudes. It will also be pointed out that there are self-tuning applications available. These self-tuning applications are nothing but crude dyno simulators where based on readings obtained on a wide band sensor, recommendation of a fuel correction as per the programed algorithm is arrived at. However, even these applications cannot match a good dyno test and tune. However, a good dyno is only one half of the story. The other half of the story is the person who has the knowledge to use the data to create a map that will get the maximum out of a build who is as important or even more important than the dyno. Thus, you require a good dyno with an experienced and knowledgeable tuner to get the maximum results. Unfortunately, you will keep searching for these combinations locally till the cows come home. My experiences with local solutions have been less than stellar to put it diplomatically (catch me after couple of glasses of good scotch to hear the more colourful version). My first 4 stroke bike project was a Yamaha R15. I bought a whole lot of hardware from a very famous Bangalore based gentleman (I do not want to get into a mud slinging match) and did the build on my own as learning process. Needless to say the build was incomplete without proper fueling. At that time the gentleman offered me an aftermarket Race Dynamics Powertronic RR ECU unit with fully programmable parameters. The deal was that the ECU along with specially created fuel maps would cure the fueling problems that afflicted the build. To make the long story short the fuel maps provided never work as they should have and I did not receive the support I should have to solve the issues. The maps were extremely rich and the ignition timing was all over the place. The bike would reverse crank due to faulty values in the ignition table, while the extremely rich fuel maps would foul the sparkplug every 500 kms. After constant follow up for non-existent support, I finally started playing around with the fuel map values. This pin the donkey’s tail game was more of miss than hit and after numerous frustrating attempts I finally gave up on the whole build and reverted the bike to stock condition. What this whole experience taught me was that to do the job right I needed a dyno and a knowledgeable person, which unfortunately is not available here. On my next bike, a Ninja 300, when I started planning the project, the first thing that I looked for was a solution for the fueling requirements. I knew there was nothing available in India that would meet my requirements. Thus I started looking abroad for a solution. As the bike cannot be taken abroad for dyno testing, I would have to settle for knowledgeable person who would create a fuel map specifically for my build and local running conditions. My search took me to Area P and Kerry Bryant. Kerry Bryant has dyno tuned over 400 Ninja 250/300 and is considered one of the leading authorities for the bike. He did his apprenticeship under Heido ‘Pop’ Yoshimura. After discussing my requirements with him at length, all the relevant information was sent across to Area P for creating of custom map. This included build configuration, fuel octane, weather information, average barometric pressures, etc. I received the fuel controller with the fuel maps preloaded. I was also assured that I would get lifetime free support for any further maps I required as my build evolved. I simply installed the fuel controller more than 2 years back and have not touched it since then. The result of the install; the most prefect fuel map that I could have expected without taking the bike to Area P for dyno testing and tuning. The maps work flawlessly and performance is sublime. What this highlighted for me was that a knowledgeable tuner and map creator is worth his weight in gold. Here is a case where on one hand I did not get proper fuel maps from just 1,500 kms in the same country and then on the other side of the coin I have a near perfect fuel map that was sent to me from half way across the world and did not require any rejig. Before starting with the car project I discussed the fueling requirements with Vikram. As Vikram had first hand experienced the Area P fuel maps, he knew what I was talking about. He assured me that he had the sources to create custom maps. Therefore, after running the car for 5,000 kms we collated all the build data, flow bench data, weather and barometric data and forwarded it to a tuning house in U.K. for creation of the maps. We received 3 maps from the tuning house. They recommended that we try the maps in sequence to know the one that is the best fit. They also indicated which map according to their experience would be the best fit. We decided to use the map identified by them as best fit as change over only if required. The maps were loaded through a special OBD tool and software. The ECU was accessed through the OBD port. Once the software had done the requisite handshakes and protocol negotiations, communication was established with the ECU. After navigating through immobilizer codes and reaching the fuel maps table, the custom maps were loaded. The stock setup has the rev limiter set at 6,500 rpm. The custom maps have an increased rev ceiling of 8,000 rpm. Unfortunately, the stock tachometer has an indicated max rpm of 7,000 rpm. We will need to replace the stock tachometer with a good quality aftermarket in dash tachometer. The whole process of installing the fuel maps took about 2 hours. The car has since run 1,000 kms. The custom fuel map is almost perfect for the build. The flat spot between 3,000 and 3,500 rpm is gone. The engine pulls with urgency from 1,000 rpm. Once it hit 3,000 rpm it gets a second life (as if someone is giving is push from the rear) and pulls well past 7,000 rpm with the needle bouncing off at end. There is remarkable difference between the stock and custom fuel map’s performance. All in all we are quite happy with the way the car is performing and consider the whole effort worthwhile.  Power On to start the process.   Attached to OBD port.  Start the process. Last edited by PratikPatel : 22nd November 2016 at 16:17. |
|
| (19)
Thanks
|
| The following 19 BHPians Thank PratikPatel for this useful post: | akshay380, Catalyst_delhi, digitalnirvana, dracul, HappyWheels, JoseVijay, kutlee, motorpsycho, NiXTriX2004, Rehaan, S2!!!, skandyhere, somspaple, suhaas307, swiftnfurious, Teesh@BHP, tharian, theexperthand, vaasu |
|
12th December 2016, 07:37
| #89 |
| BHPian Join Date: Dec 2016 Location: Mumbai
Posts: 32
Thanked: 120 Times
| Sir, reading your blog is a enriching experience, a big thank you for the details and knowledge shared. Especially like that you are keeping the exteriors stock, pity the poor souls who will wonder what just happened when your steed disappears into the distance ☺ I have a Fiesta 1.6S myself who is getting long in the teeth, I hope someday to follow in your footsteps. |
|
| ()
Thanks
|
|
3rd January 2017, 14:14
| #90 |
| BHPian Join Date: Sep 2010 Location: Mumbai
Posts: 285
Thanked: 1,243 Times
| Autometer Fuel, Oil & Volt gauges Autometer Fuel, Oil & Volt gauges The inevitable ‘scope creep’ finally raised its head. While Vikram was working on fuel pressure regulator, he remarked that he needed an accurate fuel pressure meter to check the fuel pressure (his old one had conked off). This discussion started a nagging thought in my mind about additional gauges that I needed to install in the car. The thought was always there at the back of the mind, but now it had become a nagging and persistent thought that would not go away no matter how much I tried to put it back in the box it came out from. Therefore, I sat down with Vikram to discuss the issue and look at what options were available. Vikram pointed me to Autometer and asked me to look no further. Till Vikram pointed me in the direction of Autometer, I had no idea what it was all about. Going through their website one is struck by the bewildering number of options available, there are options for all kinds of applications. Autometer is one of the biggest aftermarket gauge maker and is also arguably one of the best. Broadly, Autometer gauges are available with 3 different types of meter movements. Autometer calls them “Aircore”, “Mechanical” and “Digital Stepper Motor”. The “Aircore” is also called the Short Sweep Electrical gauge. This meter is identified by its usage of limited percentage of the dial (90 degrees). The meter has an error rate of +/- 5% at full deflection. The “Mechanical” is called the Full Sweep Mechanical gauge. These types of gauges take their measurements directly instead of working on a voltage variance as the Aircore meters do. For example, an oil gauge will have a physical oil line running up to the back of the gauge. While such meters are good for racing they are not desirable for street applications as fluids pass through the firewall into the cabin. These meters are also bulky in nature. The movement on these meters almost the entire dial. They have an error margin of 2% and do not require electricity to run. The final type of meter is the Digital Stepper Motor. These are Autometer’s top of the line gauges. They offer highly accurate measurements. They also quite expensive. Autometer claims to use these meters in NASCAR racing. In fact it claims; “There is, quite simply, not a more accurate and durable instrument solution available from any manufacturer, at any price”. Now, that is some claim that they staked at. Autometer also claims that the gauges are made in-house and not in some plant in China. As mentioned earlier Autometer has huge number of options available. In fact, it has what it calls ‘factory match’ series wherein the meters fascia and typo style matches the original factory gauges. It also offers a signature series for Ford, GM and Chevy. However, these cost extra and difference in amount was enough to allow me to buy a universal mount for the money. After going through all the options and thinking very carefully about my choices, I selected the “GT” series with real carbon fiber dial and white LED backlights and pointer. I also selected the Digital Stepper Motor option. I opted for Oil Pressure, Fuel Pressure and Voltage gauges. The gauges come with all the mounting hardware, wiring harness, pressure transducers and adapters. I also ordered a 3-gauge universal mounting dash top box along with the gauges. Installation of the gauges is pretty straight forward though it is a little labour intensive. For oil gauge, Vikram ordered an addition oil sandwich plate. Once the gauges were mounted, the results of the look and feel were way beyond our expectations. The universal mounting box fits in so well that it looks like it was made for the Fiesta.  Fuel Pressure Meter.   Sides of the box.  Volt Meter  Oil Pressure Meter  3-gauge Universal Mounting Box   Inside the boxes: the mounting hardware, wiring harness, pressure transducers and adapters.  Oil Sandwich Plate.  Wiring and baseplate mounting.  Connecting the gauges.  Installing the gauges in the universal box.  Neat and tidy setup.    Looks custom made for the car.    P.S. I know the photo quality leaves a lot to be desired. We will do a professional type shoot after Stage I is completed. |
|
| (13)
Thanks
|
| The following 13 BHPians Thank PratikPatel for this useful post: | blackwasp, digitalnirvana, frankmehta, funkykar, petrolhead_neel, Rehaan, S2!!!, somspaple, suhaas307, swiftnfurious, Teesh@BHP, theexperthand, Viju |
|