| |||||||

| Search Forums |
| Advanced Search |
| Go to Page... |
 |
| Search this Thread |  196,187 views |
 7th June 2017, 15:51
| #106 |
| BHPian Join Date: Sep 2010 Location: Mumbai
Posts: 285
Thanked: 1,243 Times
| Re: Project ST: Ford Fiesta 1.6 Duratec Just wanted to give a heads up to people who have been following this thread. The lack of updates is not for want of work to be done on the car. In fact a lot of the parts have come in and we are ready for the installation. Unfortunately, I have suffered a bad bike crash which has left me with a broken femur in the left leg, a broken radius in the left hand and multiple breaks in the right hand radius and ulna. I was extremely lucky that I had all my riding gear on or else it could have been even fatal if not life changing injuries. I am recovering well now. Doctors have said 3 months, but hopefully I should be ok in couple of months. Will start working on the car once again after I been given ok by the doctors. |

|  (6)
Thanks (6)
Thanks
 |
| The following 6 BHPians Thank PratikPatel for this useful post: | abhinav.s, digitalnirvana, giri1.8, S2!!!, theexperthand, varunswnt |
| |
|
7th June 2017, 17:00
| #108 | |
| Senior - BHPian Join Date: Feb 2005 Location: Melbourne
Posts: 4,377
Thanked: 5,105 Times
| Re: Project ST: Ford Fiesta 1.6 Duratec Quote:
| |
|
| ()
Thanks
|

|
7th June 2017, 19:16
| #109 |
| BHPian Join Date: Jan 2015 Location: Mumbai
Posts: 44
Thanked: 32 Times
| Re: Project ST: Ford Fiesta 1.6 Duratec Hi! came across your posts today. Firstly, hope you get well soon. Secondly, read your thread, and my mouth started watering! I own a Fiesta 1.6SXI (2011 model) , but not badged as Classic. I do have ABS and dual Airbags. I have covered just 28,000km till date. (since I use other cars as commuters) and I drive this one only for pleasure. So with ABS , I am pretty happy with my brakes as they are. Alloys are OEM and I replaced the OEM tyres at just 25,000km since I was a bit worried at slight cracks on the sidewalls. I replaced them with Yokohama Earth1s and these are better then the originals, and use nitrogen only with these tyres. Your mods are very technical, and time consuming. Living in Mumbai, I will have to find a garage/mechanic who can do something along these lines. I am tempted to play safe, and just do minor jobs like free flow exhaust, better spark plugs etc, since I am more worried on the long term reliability of highly technical mods. on the car. But I do hope that the work you are doing on your car will encourage other enthusiasts do some mods on their cars as well. Incidently my car also has some rust on the window sills. Would it be possible to share the approx. costs you have incurred so far?? Anyways I will be following your thread regularly from now on. All the best. |
|
| (1)
Thanks
|
| The following BHPian Thanks SanjayDalal for this useful post: | Akib Khan |
|
8th June 2017, 19:29
| #110 | |
| BHPian Join Date: Feb 2015 Location: Mumbai
Posts: 27
Thanked: 28 Times
| Re: Project ST: Ford Fiesta 1.6 Duratec Quote:
Waiting for the next set of upgrades. | |
|
| ()
Thanks
|
|
10th June 2017, 15:27
| #111 |
| BHPian Join Date: Mar 2013 Location: Cochin
Posts: 34
Thanked: 5 Times
| Re: Project ST: Ford Fiesta 1.6 Duratec Very sad to hear about the accident. It was a blessing thing that you had all the riding gear on. Take rest and get well soon Pratik. |
|
| ()
Thanks
|
|
28th June 2017, 03:15
| #112 |
| BHPian Join Date: Dec 2015 Location: Bangalore
Posts: 245
Thanked: 232 Times
| Re: Project ST: Ford Fiesta 1.6 Duratec Get well soon! Glad that you're okay. Been following this thread and was eagerly waiting for the next round of mods. Guess we'll have to wait longer, eh. Ride safe, sir!  |
|
| ()
Thanks
|
|
3rd November 2017, 16:05
| #113 |
| BHPian Join Date: Sep 2010 Location: Mumbai
Posts: 285
Thanked: 1,243 Times
| Rear Brake Overhaul Rear Brake Overhaul Its been 6 months since my bike crash and I have recovered about 80% with a few complications still remaining. The long road to recovery has not been linear and has its twists and turns, however, thats a story for another day. We have finally got down to working on the car to finish up the few pending things before we start Phase 2 of the modifications. Therefore, the next few posts will detail these along with one significant change where we revised a previously done modification to improve performance. Due to the extent of my injuries my first priority was rehabilitation and therefore the working on the car went to the bottom of the list. Hence, the car was stationary for about 2 months. As the car was stationary it developed a problem. The left rear brake seized up and the car would not move. Just before my bike crash I had discussed with Vikram about overhauling the rear brakes as I could noticeably feel the rear brakes catching when I released the handbrake and put the car into motion. Vikram was immediately called asked to pickup the car and start working on it. When the rear brakes were opened up we found the brake shoes were almost worn out and there was deep scoring in the drums. The left wheel cylinder assembly was completely seized and the right one was also well along the way to meeting the same fate. Therefore, it was decided that we would replace the complete assemblies. Vikram procured the drums, wheel cylinder assemblies and break shoes from Ford. The assembly was straightforward without any complications. The wheel cylinder assemblies and brake shoes are of TVS Girling make.  Left rear Drum  Seized Wheel Cylinder Assembly   New Brake Shoes & Wheel Cylinder Assembly   |
|
| (6)
Thanks
|
| The following 6 BHPians Thank PratikPatel for this useful post: | dailydriver, dracul, S2!!!, tharian, theexperthand, Viju |
|
6th November 2017, 14:35
| #114 |
| BHPian Join Date: Sep 2010 Location: Mumbai
Posts: 285
Thanked: 1,243 Times
| Oil Sludge & Oil Slump Cleaning Oil Sludge & Oil Slump Cleaning After 7 years of running and having clocked 50,000 kms, Vikram felt it was time open up the belly pan and clean the same. I was a bit skeptical as the car has always had its regular oil changes, in fact, always about 500 to 1000 kms before the recommended service intervals. While I was very particular about what make and quality of oil that was used in my bikes, I have never really bothered about what oil was put in as long as it was done at regular intervals and done by the Ford service center. Other than that, my wife jealously guarded the car, I was not allowed to even change a nut or bolt that was not OEM. Since the car was for my wife, it was more important that it should be good working condition and should not break down anytime soon. Therefore, I would only get into arguments with her about sending the car for regular servicing (she would resist giving the car up for even a day). Vikram explained why he felt the need to open up the oil sump. As my wifes driving pattern and driving habits involved very short trips and frequent stop and go driving, he was of the opinion that no matter how good the oil and how frequent the oil changes were, creation of oil sludge was inevitable. Oil sludge is created when oil chemically breaks down and collects on engine parts. This usually happens when the oil does not reach optimum operating temperatures and does not circulate enough; both outcomes of very short drives that my wife takes daily. The other reason is that the oil has not been changed frequently enough. Todays multi-grade oils are complex chemical concoctions. They contain detergents, anti-oxidants, dispersants, anti-foaming agents and anti-friction agents. Each of these performs a very specific task. For example, dispersant agents grab dust, dirt, debris and suspends them in oil while keeping them away from metal parts to prevent damage to the engine parts. Anti-foaming agents prevent air from working into the oil and weakening its sheer strength and lubricating ability. As engine oil breaks down, it looses these vital additives, which in turn fills the oil up with oxidation materials and contaminants. The continuous cycle of exposure to heat, pressure and elements in the engine stretches the oils ability to protect and lubricate. It inevitably leads to point where the oil polymerises into a gel, which either sits in the crankcase or sticks to whichever metal surface it gets carried to. Extreme or for that matter even reasonable amount oil sludge can be dangerous as the same can collect vital areas of the oil circulation system which in turn can lead to reduced oil lubrication and even catastrophic engine failures. Even if it does not, the sludge changes the viscosity of the oil as it a part of oil itself, thereby hampering and reducing the flow and pressure through the entire system. In addition to lubricating and protecting all the moving parts of the engine, oil has the important function of cooling the engine by removing heat away from vital engine parts. Oil sludge is a good heat insulator, which prevents the oil from removing heat, which in turn puts a lot of stress on the cooling system and engine parts. This has significant impact on engine performance and engine life. When we opened the oil sump I was a bit surprised to see the amount of sludge buildup. It was a bit of revelation. There was significant sludge build up and it had formed hard varnish like coating in the oil sump. Vikram tried to remove the sludge by using break oil and other solvents. However, it was really stubborn and hard coated. Therefore, it was decided to get the belly pan professionally cleaned through a hot chemical bath treatment. When we got the belly pan back from the chemical bath it was surgical clean and as good as new. The belly pan was put back on the engine with fresh gasket. Fresh oil was filled into the engine and the engine was warmed up to operating temperatures. We then dumped a can of Wurth Engine Flush and Cleaner in to the engine. The engine was then left to run for 30 minutes. Oil and engine flush were then drained out, a fresh oil filter was fitted and Mobil 1 Racing 0W40 oil was filled in. Before cleaning of the oil sump, oil pressure was 50 psi, after the cleaning and flushing, it now shows 60 psi.  Oil Sludge after 50,000 kms and 7 years.   Belly Pan after Hot Chemical Bath.  |
|
| (9)
Thanks
|
| The following 9 BHPians Thank PratikPatel for this useful post: | digitalnirvana, HappyWheels, Leoshashi, Rohan24, S2!!!, suhaas307, tharian, theexperthand, Viju |
|
10th November 2017, 16:26
| #115 |
| BHPian Join Date: Sep 2010 Location: Mumbai
Posts: 285
Thanked: 1,243 Times
| Fuel Pressure Meter Fuel Pressure Meter In one of our previous post we had detailed the installation of Autometer meters on the car. While the oil pressure gauge and the voltmeter were operational and the fuel pressure gauge was left pending as we ran into couple of issues. The fuel rail on the Ford Fiesta is a bit of an odd boy. The fuel rail is made up of long fiberglass reinforced plastic. While the adaption of the plastic fuel rails is becoming increasingly common due to the benefits offered, the one of Ford Fiesta throws a few curve balls into equation. Plastic fuel rails offer the benefits of lower weight and offer better service life through enhanced corrosion/oxidation resistance qualities of plastic. The challenge for many years was creating a injection molded fuel rail which could offer acute angles for the nozzles while mounting on the inlet manifold. Most of these problems have been solved leading to increase adaption of plastic fuel rails. The Ford Fiesta fuel rail is the design of the fuel rail, which integrates the fuel pressure regulator onto the rail as part of the fuel rail. While many fuel rails do the same, these rails have a screw on fuel pressure regulator, which once removed, the hole can plugged when you want to use an aftermarket adjustable fuel pressure regulator. The problem with Fiesta’s pressure regulator is that removing it creates a big open space on the fuel rail, which is difficult to plug. Hence, the delay in installing the fuel pressure regulator. However, we have over come this and other problems and a post on the installation of pressure regulator will follow shortly. Before installing the fuel pressure regulator it was imperative to know what is the actual pressure across the rev range. Hence, making the fuel pressure gauge operational was a priority. The problem that we faced was that fuel rail does not have any threading on the inlet side. Ford has made use of Teflon hoses for the fuel line inside the engine bay. Cutting the hose was not an option as without proper cutting tools we could very spoil the hose leading to a very expensive replacement. Therefore, the issue at hand was; how do we mount the pressure transducer? Vikram fabricated an adapter that would sit between the fuel rail and the hose. The pressure transducer was mounted on top of the adapter. Ultimately, it turned out to be a neat and clean installation.     |
|
| (6)
Thanks
|
| The following 6 BHPians Thank PratikPatel for this useful post: | blackwasp, dracul, petrolhead_neel, S2!!!, suhaas307, tharian |
|
24th March 2018, 14:46
| #116 |
| BHPian Join Date: Mar 2013 Location: Cochin
Posts: 34
Thanked: 5 Times
| Re: Project ST: Ford Fiesta 1.6 Duratec Hello Pratik, Eagerly waiting for your updates Have you completed the dyno runs yet, after these mods? |
|
| ()
Thanks
|
| |
|
27th March 2018, 17:20
| #117 |
| BHPian Join Date: Sep 2010 Location: Mumbai
Posts: 285
Thanked: 1,243 Times
| S. S. Headers S. S. Headers I have now covered over 20,000 kms after initial set of changes were made. After the initial euphoria over the power gains and changes made, we settled down to do a more balanced analysis of the gains vs. changes made. While there is a power increase it is nowhere near what such changes should generate. We estimate that the power gains are within the teens and not the thirties and forties that cars in Fast Ford and Performance Ford claim with similar changes. There was no way that I was going accept that this all that we could get out of these changes. We were definitely missing something and the same needed to be addressed. While I am not expecting the same figures as the cars in those magazines, I most certainly wanted to in the ballpark at the very least. Therefore, we relooked at all the changes to see what can be improved upon and where the bottlenecks were. After a through analysis we identified the headers as the main culprit for the bottleneck. In a naturally aspirated engine, primary headers and exhaust wave tuning have major roles to play in getting the maximum out of the engine. While the headers were fabricated with standard formulas for cylinder volume, cross section area, primary tube length and pipe CFM, the fact remains that these formulas are not absolute and are just a starting point. Once these formulas give us the initial starting point, a lot of legwork is required. Pipes of different lengths and sizes in increments and decrements to the values provided by the formulas need to be installed and Dyno tested to find the best combination of pipes for generation of maximum power. Such an undertaking requires considerable investment in resources and man-hours along with a handy Dyno to test the changes. The other problem with headers which not many people consider, but has major implications on performance is the way these headers are fabricated. The most common type of pipe bending is Crush Bending wherein a press or a ram is used with a radius die and backing shoes to bend the pipe. As the tube is drawn across the radius die the outside of the tube bend is stretched, while the inside of the bend is contracted. This leaves a slight depression along the inside of the bend. Another type of bending is called Wrinkle Bending. In this process, heat is applied to the area to bend until the pipe is red hot. The pipe is then forced along the die, which forces the inside of the pipe bend to collapse in to a series of accordion shape wrinkles. Both these bending techniques cause distortion in the bends, which have significant effect on flow, exhaust wave and sound. The answer to the above stated problem is in Mandrel Bending. Mandrel can provide a virtually uninterrupted bend, which is free of kinks, creases and distortion. This type of process involves a series of balls secured together with a flexible cable. These balls are inserted inside the pipe to provide support from inside during the bending process. The series of balls are able to flex and follow the bending radius while supporting the inside walls of the pipe. In addition to the mandrel process, a wiper die is used to achieve a super smooth inside bend while retaining the original diameter of the pipe. As is apparent from the above description, Mandrel-bending equipment is not so common. It is expensive and the expertise is not readily available. Thus if you want the perfect headers you will need to invest time and money to get that perfect finish. The above analysis put us in a dilemma. How do we get the perfect headers to reach our power goals? After much research, we approached a very famous tuning house in U.K. We explained our problem and asked for their help. A lengthy discussion took place between us, wherein; we discussed the complete engine setup and what our goals were. The tuning house informed us that they worked with similar setups and engine builds wherein they regularly get power gains in the thirties and forties and saw no reason why our build could not do the same. They could give us the perfect header and primary pipes setup that we were looking for. Lengthy discussions took place on exactly what the header and primary pipes would be like and how they were going to fabricate them. We were categorically warned that these headers and primary pipe would not be a direct fit in the engine bay. These pipes would be of significantly different length and size from the originals ones. Therefore, mounting these was going to be a challenge. The length and size were in real essence tuned length with exhaust wave tuning an important factor of the whole equation. Therefore cutting and chopping the exhaust and re-wielding were not option at all. The pipes will need to be fitted as is without any modifications to them. All else would need to work around these pipes. The headers were ordered and money was paid for the same. What was promised in 15 day took 2 months to come. However, the results were worth the wait and the money spent. At least from looks and craftsmanship point of view. We will need to wait till the pipe were mounted and a dyno run was done to find out if the whole effort had be worthwhile. When we unpacked the headers we were surprised by the size and length of the headers. They are a full half inch larger in diameter (which is considerable) than our calculations and were considerably longer that we though was possible. These dimensions were not even in the same ballpark. Their different dimensions and finish of the mandrel bending left us stunt. It hit us then that to reach and achieve these dimension would have required us to put in literally the man hours that ran into 3 figures along with dyno runs that would have made us bankrupt.  Tuned Length Headers with Primary Pipes fabricated using Mandrel Bending. 1st Attempt at Installation For the first attempt at installation we lifted the car on car hoist and removed our fabricated headers. As you can see from the photo when we put the headers side by side the difference could not have been more apparent. We immediately ran into problems with the installation. Due to the length of the headers they could not be routed the way the OEM or our fabricated header had been mounted. The OEM routing takes the exhaust from inside of the chassis cross member beam. However, due to the length of the new headers, it is impossible to take the same route. Thus the whole engine would need to be removed to install the headers. We decided to call it a day and attempt the same at more opportune time.  Our pipes look crude & unfinished compared to the SS Headers.  Note the huge difference in diameter and lengths of the pipes. 2nd Attempt at Installation For the second attempt at installation we move the engine from its foundations and installed the headers. Due to the length of the headers the routing of the same was now from the outside of the cross member beam. However, we ran into another obstacle during installation. While headers fitted properly, they were touch the cross member with zero clearance as can been seen in the photo. Thus, we once again decided to call it a day and come up with the solution for the same.  The chassis cross member beam that is causing clearance problems. Note the cavity behind the beam where the original exhaust was routed through. We will now need to route the exhaust over the beam. 3rd Attempt at Installation For the third attempt at installation decided to lower the engine by half an inch to enable the headers to have enough clearance from the chassis cross member. While we succeeded in lowering the engine and getting the clearance, we had not accounted for the stock engine torque rod. When the stock engine torque rod is installed it pulls the engine back to its original position, thereby making the headers touch the cross member beam once again. What was required was a engine torque rod which was at least 1 inch longer than the stock torque rod. As the same is not available, we have decided to fabricate one on VMC machine. We will now attempt to install the headers after we have custom engine torque rod ready. We will post a lot more photos of the installation once its complete. |
|
| (10)
Thanks
|
| The following 10 BHPians Thank PratikPatel for this useful post: | digitalnirvana, E = mc², man_of_steel, motorpsycho, neil.jericho, Rohan24, S2!!!, Shubhendra, tharian, vaish9925 |
|
1st February 2019, 15:47
| #118 |
| BHPian Join Date: Sep 2010 Location: Mumbai
Posts: 285
Thanked: 1,243 Times
| Momo Steering Momo Steering Its been quite sometime since I have updated this thread. Personal and professional commitments took their toll in the currency of time which left very little personal me time for the past 18 months. While professional commitments have always had a way of taking up the me time, it was my sons admission in Engineering that was emotionally taxing and draining. My son got his admission in Mechanical Engineering in the University of Texas, Arlington. Hence, he becomes the fourth generation of our family to continue with tradition of becoming Engineers and Doctors. Like his granddad he wants to do his Masters in Automobile. We are hopeful that he will do it from UM, Dearborn, Michigan. It warms my heart that my son and I have a common passion in Cars and Automobiles just as I had with my dad. I do hope it will be as soul enriching an experience for him as it was for me with my dad. Now that he has finally settled and there are no immediate commitments it was finally time to do something about the car. As I wanted to take it slow and build the momentum, I thought that the installation of the Momo steering would be a good place to start. I thought it would be couple of hours job and would be easy. Oh Boy!  We underestimated the whole thing. What was supposed to be purely cosmetic and ergonomic part had an engineering challenge of its own. We underestimated the whole thing. What was supposed to be purely cosmetic and ergonomic part had an engineering challenge of its own.We started by removing the stock steering and started the search for the requisite adapter for Momo steering. The search for an adapter that would fit the steering on the Fiesta turned out to be a fruitless one. What was available was an adaptor that was compatible to the Maruti Esteem. This adaptor would entail replacing the Fiestas OEM steering column rod with one from Maruti Esteem. While I was very hesitant in replacing such a critical component, Vikram was confident that it would workout well. Hence, our first attempt was to install the Maruti Esteem steering column rod with the cast aluminum adapter that was available in the market. While installing the steering and tightening the bolts the adapter cracked under pressure of the bolts. A second adapter was procured and again it cracked under pressure. Vikram and I immediately decided to junk the whole thing and look for a better solution. There was couple of other problems with the installation. By installing the Maruti Esteem adapter/steering column rod combination we would loose functionality of self-cancelling of the turn indicator stack switch. While driving the signal indicator will need to be turned to off position every time one used it. Also there would a problem with the horn. The horn would not work around the full 360 degrees turn of the steering. It would only work in certain positions when the steering was turned. Neither of these compromises was acceptable nor desirable. I told Vikram I wanted a solution that kept these features intact along with OEM steering column else we could drop the whole thing. Vikram asked for a few days to find a proper adapter or another solution. After a frustrating fortnight of searching for the adapter we came to the conclusion that there was nothing readily available in the market that would meet our needs. The only option was to design an solution that meet our needs. Vikram decided to procure an old Fiesta steering wheel. He decided to cut out the center adapter of the steering wheel. After cutting the center adapter it was mounted on a lathe machine to machine and acquire perfectly round adapter. When we tried it for the first time, we immediately ran into trouble. While the steering wheel is a cast aluminum frame, the center adapter has a mild steel insert inside the center plate to reinforce and strengthen the mounting bracket. When the cutting tool encountered the steel insert it destroyed the tool and the adapter, as the speed of the lathe was too high while machining. So it was back to square one.  Stock Steering from which the centre adapter was machined and removed. Vikram once again procured another steering wheel. We redid the process, this time with much more caution while machining the center adapter. Once the center adapter was machined to the right size, it was time to create a spacer of the right height and size that would be mated to the machined adapter creating a custom built steering adapter for the Momo steering. Vikram machined the spacer out of a solid billet of 6061 T6 aluminum. The aluminum spacer and the adapter were mated installed. As we had retained the adapter piece from the OEM steering wheel it was now possible to ensure full functionality of the turn indicator stack and horn. The end result is a steering wheel looks and feels amazing. It does not look like shabby add on that one gets to see on many cars.  The machined centre adapter with the signal light cancelling ring.  Centre adapter mounted onto the steering column.  Aluminum 6061 T6 machined spacer.  The spacer fits like a glove.   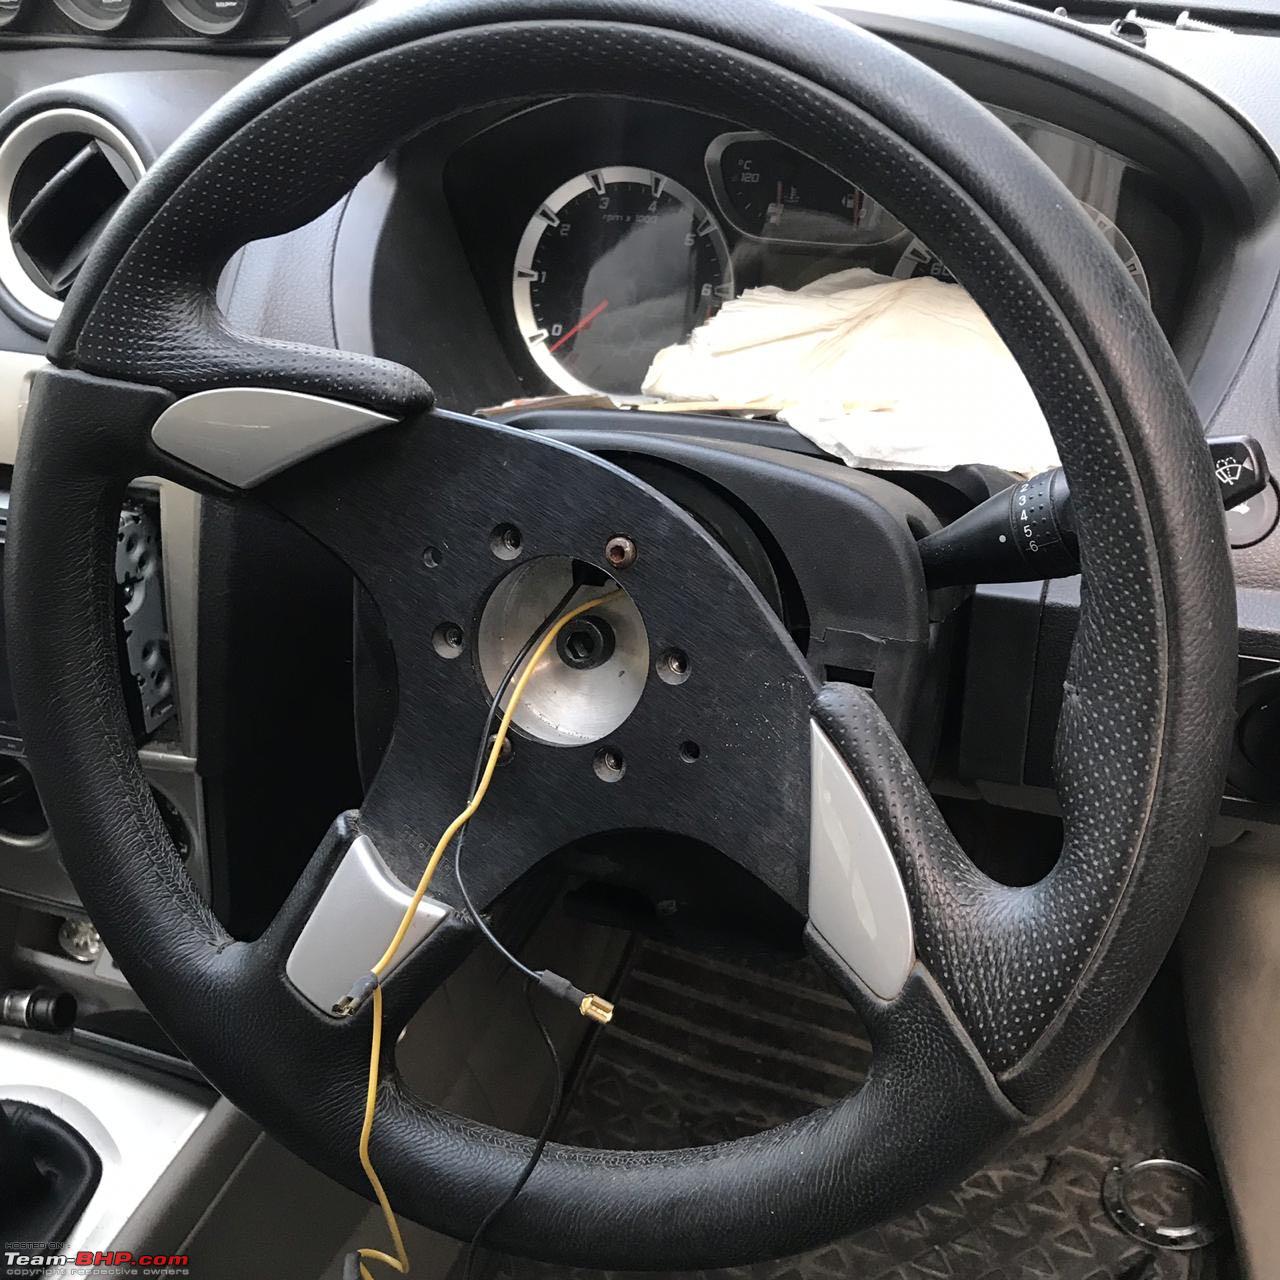 Fit is a good as OEM. No unattractive spaces.   Final fitting. |
|
| (7)
Thanks
|
| The following 7 BHPians Thank PratikPatel for this useful post: | digitalnirvana, petrolhead_neel, tharian, vaish9925, vishy76, VivekCherian, VWAllstar |
|
1st February 2019, 16:47
| #119 |
| Senior - BHPian | Re: Project ST: Ford Fiesta 1.6 Duratec Quite interested to know about the header installation and the effect of the bigger pipes, if installed. Thanks for the update and congrats to your son  |

| ()
Thanks
|
|
4th February 2019, 13:58
| #120 | |
| BHPian Join Date: Sep 2010 Location: Mumbai
Posts: 285
Thanked: 1,243 Times
| Re: Project ST: Ford Fiesta 1.6 Duratec We have sorted out the header installation. Now its time to fabricate a new mid pipe as the old one will not work. The dimensions are completely different. Also the Magnaflow pre muffler and muffler will need to be replaced. We will be installing a Remus muffler. Expect the work to be finished in couple of weeks. Quote:
| |
|
| (1)
Thanks
|
| The following BHPian Thanks PratikPatel for this useful post: | tharian |
|