Team-BHP > Modifications & Accessories
Register New Topics New Posts Top Thanked Team-BHP FAQ


Reply
  Search this Thread
831,759 views
Old 23rd September 2018, 19:23   #76
BHPian
 
superutp's Avatar
 
Join Date: Dec 2011
Location: Mumbai
Posts: 507
Thanked: 297 Times
Comprehensive guide to LED Headlight upgrades

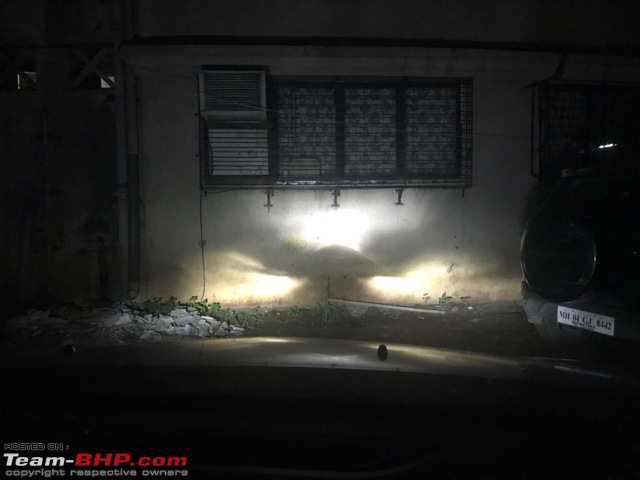
Got the type with the small shield and am totally disgusted with the beam pattern
Low beam
Comprehensive guide to LED Headlight upgrades-imageuploadedbyteambhp1537710722.282555.jpg
Bulb type
Comprehensive guide to LED Headlight upgrades-imageuploadedbyteambhp1537710735.058418.jpg
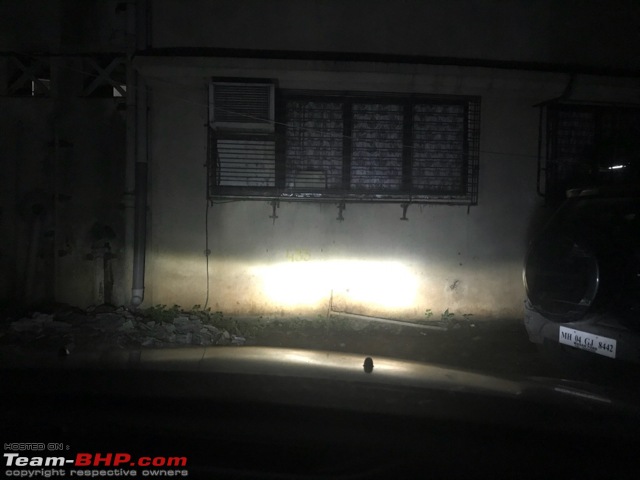
High better(maybe better?)
Comprehensive guide to LED Headlight upgrades-imageuploadedbyteambhp1537710791.248127.jpg
Tried adjusting but the beams are way off in low beam atleast
Seems I am back to square one!
superutp is offline  
Old 25th September 2018, 14:43   #77
Team-BHP Support
 
Vid6639's Avatar
 
Join Date: Jul 2006
Location: Bangalore
Posts: 17,728
Thanked: 43,463 Times
Re: Comprehensive guide to LED Headlight upgrades

Quote:
Originally Posted by superutp View Post
Got the type with the small shield and am totally disgusted with the beam pattern
Low beam
Attachment 1801358
Bulb type
Attachment 1801359
High better(maybe better?)
Attachment 1801360
Tried adjusting but the beams are way off in low beam atleast
Seems I am back to square one!
Can you send me a pic of the headlight bulb inside the reflector. I think the angle is misaligned.
Vid6639 is offline  
Old 26th September 2018, 09:32   #78
BANNED
 
Join Date: Dec 2007
Location: Gurugram
Posts: 7,969
Thanked: 4,788 Times
Re: Comprehensive guide to LED Headlight upgrades

I was thinking about upgrading the headlights on my Brio, but gave up as the additional power pack was required. Now we have built in power packs. How are they.

Also, some suggestions/sources/prices for the new packs. Brio uses standard H4. Also, how are the colour temperatures.
sgiitk is offline  
Old 26th September 2018, 10:04   #79
Senior - BHPian
 
hserus's Avatar
 
Join Date: Sep 2014
Location: Chennai
Posts: 4,954
Thanked: 9,158 Times
Re: Comprehensive guide to LED Headlight upgrades

Quote:
Originally Posted by sgiitk View Post
I was thinking about upgrading the headlights on my Brio, but gave up as the additional power pack was required. Now we have built in power packs. How are they.

Also, some suggestions/sources/prices for the new packs. Brio uses standard H4. Also, how are the colour temperatures.
Sir, for most of the off the shelf LEDs available from China, you shouldn't need extra power packs or relays, as they are brighter for the same wattage as the stock bulbs. Please check two or three posts back for the supplier I used on Aliexpress, CN Sunnylight. I didn't have to install any relays for their bulbs.
hserus is offline  
Old 26th September 2018, 10:18   #80
BHPian
 
scorpian's Avatar
 
Join Date: Jun 2008
Location: GOA
Posts: 824
Thanked: 1,186 Times
Re: Comprehensive guide to LED Headlight upgrades

@Superutp
Frankly i have not seen a beam pattern like the one you shared in the first pic. something seems really off, either the bulb has not seated properly or is misaligned.
Please click some pics of the led in the headlamp, also what manufacturer is this, could you share some pics or link of the product. I am very curious to understand why the beam is like that.
scorpian is offline  
Old 27th September 2018, 09:48   #81
BHPian
 
scorpian's Avatar
 
Join Date: Jun 2008
Location: GOA
Posts: 824
Thanked: 1,186 Times
Re: Comprehensive guide to LED Headlight upgrades

Please try reversing the led.The shield should be on lower side and not on top side.
I just got my package yesterday and initially i mounted them with the shield on top and it was giving a weird light pattern, I then reversed with the shield being on lower side and that drastically improved the throw and light distribution.
scorpian is offline  
Old 28th September 2018, 00:21   #82
Senior - BHPian
 
supertinu's Avatar
 
Join Date: Aug 2010
Location: Bangalore
Posts: 1,160
Thanked: 1,165 Times
Re: Comprehensive guide to LED Headlight upgrades

Quote:
Originally Posted by superutp View Post
Got the type with the small shield and am totally disgusted with the beam pattern
Low beam
Attachment 1801358
Bulb type
Attachment 1801359
High better(maybe better?)
Attachment 1801360
Tried adjusting but the beams are way off in low beam atleast
Seems I am back to square one!
Something is wrong in your orientation cause the light design looks fine and the throw is really weird. When properly oriented the shields should be letting going only upwards in the reflector, check that once or take a pic of the lights inside the housing from front. that will also help give an idea.

Quote:
Originally Posted by sgiitk View Post
I was thinking about upgrading the headlights on my Brio, but gave up as the additional power pack was required. Now we have built in power packs. How are they.

Also, some suggestions/sources/prices for the new packs. Brio uses standard H4. Also, how are the colour temperatures.
Yes sir, integrated design are easily available but usually tad bigger in size cause of the increased area needed. You need to figure how much does the Brio dust cover will allow. In my view having separate power supply is also fine since it just fits inside the headlight housing and the overall light is bit smaller which allows dust caps to close.

Last edited by supertinu : 28th September 2018 at 00:23.
supertinu is offline  
Old 28th September 2018, 11:26   #83
BHPian
 
superutp's Avatar
 
Join Date: Dec 2011
Location: Mumbai
Posts: 507
Thanked: 297 Times
Re: Comprehensive guide to LED Headlight upgrades

Quote:
Originally Posted by Vid6639 View Post
Can you send me a pic of the headlight bulb inside the reflector. I think the angle is misaligned.
Quote:
Originally Posted by scorpian View Post
@Superutp
Frankly i have not seen a beam pattern like the one you shared in the first pic. something seems really off, either the bulb has not seated properly or is misaligned.
Please click some pics of the led in the headlamp, also what manufacturer is this, could you share some pics or link of the product. I am very curious to understand why the beam is like that.
Quote:
Originally Posted by supertinu View Post
Something is wrong in your orientation cause the light design looks fine and the throw is really weird. When properly oriented the shields should be letting going only upwards in the reflector, check that once or take a pic of the lights inside the housing from front. that will also help give an idea.
.
Will take and share the photo in the reflector though its difficult to take as the headlight by default has a glare shield which blocks the view.
The link of the product is as follows: https://www.aliexpress.com/store/pro...250f449c4dHtYr

One thing to notice is that the shield in the bulb is on both sides unlike a normal halogen bulb. Maybe this is messing up the pattern.
I have tried adjusting the bulb, another pattern is as follows:
Low Beam
Comprehensive guide to LED Headlight upgrades-low-beam.jpg
High Beam
Comprehensive guide to LED Headlight upgrades-high-beam.jpg

I will also try adjusting it further this weekend and report back
superutp is offline  
Old 28th September 2018, 11:33   #84
Team-BHP Support
 
Vid6639's Avatar
 
Join Date: Jul 2006
Location: Bangalore
Posts: 17,728
Thanked: 43,463 Times
Re: Comprehensive guide to LED Headlight upgrades

Quote:
Originally Posted by superutp View Post

One thing to notice is that the shield in the bulb is on both sides unlike a normal halogen bulb. Maybe this is messing up the pattern.
I have tried adjusting the bulb, another pattern is as follows:
The shield has to be on both sides. Looking at these pics I can almost tell you what is wrong.

The stock halogen bulb sits at an angle in the Cruze. The reflector is designed such that the bulb is tilted.

Secondly the cruze has a shield over the bulb inside the reflector. This will greatly mess up the pattern.

What you need to do is take few pics of the headlight reflector from outside with stock bulb and LED.

What I want to see is how the bulb is placed inside the reflector.

Also check if the headlight bulb has an adjustable base to change the angle.
Vid6639 is offline  
Old 28th September 2018, 18:26   #85
BANNED
 
Join Date: Dec 2007
Location: Gurugram
Posts: 7,969
Thanked: 4,788 Times
Re: Comprehensive guide to LED Headlight upgrades

Quote:
Originally Posted by hserus View Post
Sir, for most of the off the shelf LEDs available from China, you shouldn't need extra power packs or relays, as they are brighter for the same wattage as the stock bulbs. Please check two or three posts back for the supplier I used on Aliexpress, CN Sunnylight. I didn't have to install any relays for their bulbs.
@HSerus; There seem to be a lot of units with heat sinks on the back, so external packs are not required.

I can take it for granted that the output will be higher. So what remains is the colour temperature. No Bluish I suoopse. I will check out CN Sunnylight.
sgiitk is offline  
Old 28th September 2018, 19:15   #86
Senior - BHPian
 
hserus's Avatar
 
Join Date: Sep 2014
Location: Chennai
Posts: 4,954
Thanked: 9,158 Times
Re: Comprehensive guide to LED Headlight upgrades

Quote:
Originally Posted by sgiitk View Post
@HSerus; There seem to be a lot of units with heat sinks on the back, so external packs are not required.

I can take it for granted that the output will be higher. So what remains is the colour temperature. No Bluish I suoopse. I will check out CN Sunnylight.
4300 Kelvin is plain yellow light. Don't go above 5400 K white, it gets way too bright.
Attached Thumbnails
Comprehensive guide to LED Headlight upgrades-1image.jpg  

Comprehensive guide to LED Headlight upgrades-1image.jpg  

hserus is offline   (2) Thanks
Old 28th September 2018, 19:48   #87
Distinguished - BHPian
 
Behemoth's Avatar
 
Join Date: Jul 2011
Location: Gurgaon
Posts: 2,109
Thanked: 5,867 Times

Quote:
Originally Posted by hserus View Post
4300 Kelvin is plain yellow light. Don't go above 5400 K white, it gets way too bright.
4000k -4300K is called Neutral white and is the best colour temperature for headlights. Higher colour temperature look bluish and hamper visibility. Most OE HID headlights in cars are 4500K while OE LED headlights are around 5500k. I personally don't like the 5500k led headlights and prefer the 4300K CCT. Also higher CCT bulbs have higher UV component and are more damaging to reflector and plastic headlight lenses. In terms of cost to manufacture the salts required to make 4300k lamps are higher cost than 5500k lamps. The difference is Ceramic discharge metal halide vs standard Metal Halide technology (In HID bulbs).

Last edited by Behemoth : 28th September 2018 at 19:50.
Behemoth is offline   (2) Thanks
Old 29th September 2018, 18:55   #88
BHPian
 
superutp's Avatar
 
Join Date: Dec 2011
Location: Mumbai
Posts: 507
Thanked: 297 Times
Comprehensive guide to LED Headlight upgrades

Quote:
Originally Posted by Vid6639 View Post
The shield has to be on both sides. Looking at these pics I can almost tell you what is wrong.


The stock halogen bulb sits at an angle in the Cruze. The reflector is designed such that the bulb is tilted.


Secondly the cruze has a shield over the bulb inside the reflector. This will greatly mess up the pattern.


What you need to do is take few pics of the headlight reflector from outside with stock bulb and LED.


What I want to see is how the bulb is placed inside the reflector.


Also check if the headlight bulb has an adjustable base to change the angle.

Wasnt able to switch the halogens and take photos but was able to adjust the beams to a slightly better pattern i guess
Low beam
Comprehensive guide to LED Headlight upgrades-imageuploadedbyteambhp1538227397.772273.jpg
High beam
Comprehensive guide to LED Headlight upgrades-imageuploadedbyteambhp1538227409.258874.jpg

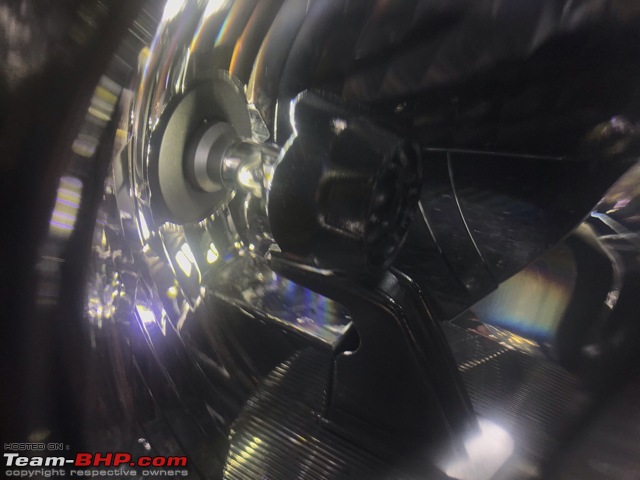
The bulbs are perpendicular to the reflector
Left headlamp
Comprehensive guide to LED Headlight upgrades-imageuploadedbyteambhp1538227451.949663.jpg
Right headlamp
Comprehensive guide to LED Headlight upgrades-imageuploadedbyteambhp1538227474.028699.jpg
There are adjustment screws on the headlamp one for left right movement and the other for up/down

At the current state the beams perform farely ok in low and better in high

Last edited by superutp : 29th September 2018 at 19:00.
superutp is offline   (1) Thanks
Old 29th September 2018, 20:52   #89
BHPian
 
vivekgk's Avatar
 
Join Date: Sep 2007
Location: Trivandrum
Posts: 984
Thanked: 1,986 Times
Re: Comprehensive guide to LED Headlight upgrades

Quote:
Originally Posted by superutp View Post
Will take and share the photo in the reflector though its difficult to take as the headlight by default has a glare shield which blocks the view.
The link of the product is as follows: https://www.aliexpress.com/store/pro...250f449c4dHtYr

One thing to notice is that the shield in the bulb is on both sides unlike a normal halogen bulb. Maybe this is messing up the pattern.
I have tried adjusting the bulb, another pattern is as follows:
Low Beam
Attachment 1802901
High Beam
Attachment 1802902

I will also try adjusting it further this weekend and report back
After looking at your pictures of the beam pattern, I am pretty sure that you have put in the bulbs upside down. For making the low beam in an H4 headlamp, the upper front half of the reflector has to be illuminated. The shield below the LEDs make sure that the light to the bottom half of the reflector is cut off, which appears as a clear cutoff line. The high beam is created by the rear part of the reflector, and both halves receive light as there is no shield on the high beam. So the low beam should be lower and the high beam should be higher.

Comprehensive guide to LED Headlight upgrades-1538232442picsay.jpg Comprehensive guide to LED Headlight upgrades-1538232923picsay.jpg
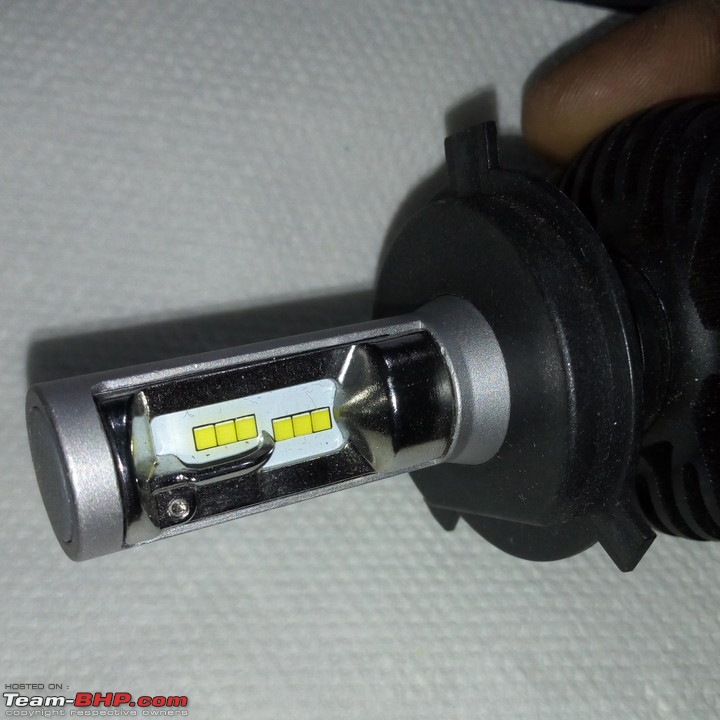
This is a typical H4 LED bulb with CSP/Luxeon/Lumiled/Flip LED chips. Note the shield for the forward set low beam, and the lack of shield for the high beam. Also note the two studs near the behind, just in front of the red sealing ring.

Comprehensive guide to LED Headlight upgrades-1538232503picsay.jpg Comprehensive guide to LED Headlight upgrades-1538232779picsay.jpg
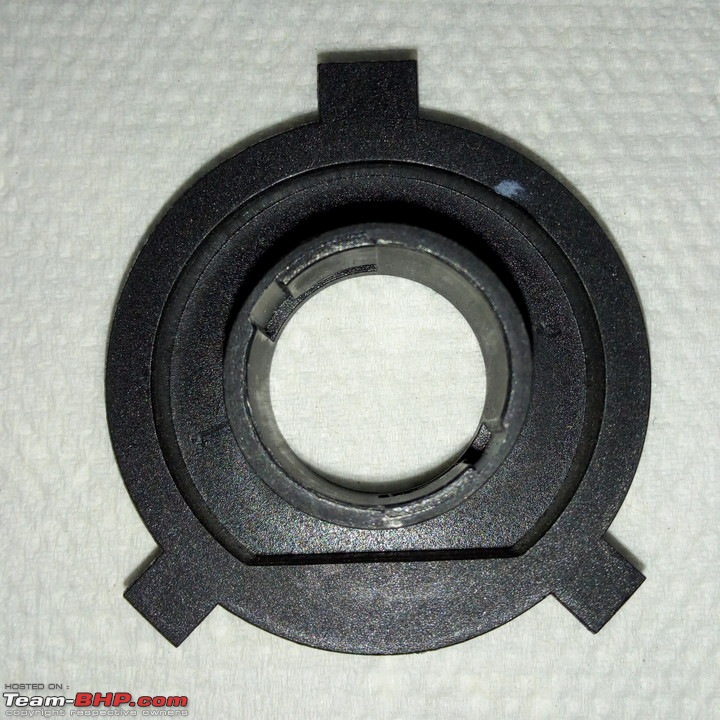
This is the detachable mount for the bulb that clips on to the holder. It is made of metal or plastic.

Note the two notches inside. After clipping this holder in the H4 reflector, you slide the LED bulb through and then rotate it to lock it in place.This holds the bulb securely at the right angle. In older bulbs like this one, the studs and notches are the same size, and located diagonally to each other.

Also note the three plastic locator bits that locate the mount inside the holder. The single bit always goes on top, and the two bits are always at the bottom. Also note that the bottom edge of the inner ring is flat. This is to ensure that the holder cannot be mounted incorrectly.

Since the holder is mounted first and the bulb inserted into it afterwards, it is possible to mount it upside down, as shown below.
Comprehensive guide to LED Headlight upgrades-1538232689picsay.jpg

This arrangement will give a weird beam pattern, as it illuminates the upper front part of the reflector when low beam is on, but the high beam will be unaffected. This is the pattern you are seeing now.

The pic below shows how the bulb should appear when mounted correctly.

Comprehensive guide to LED Headlight upgrades-1538232629picsay.jpg

Note the position of the shield, and the position of the plastic locator bits.

Hope this makes it clear.

All these bad Pics taken on my cheap and cheerful infinix Note 4 cellphone.

Update: I've just received my order of 4300K LED bulbs from HLXG. Will be posting my review soon!!
Attached Thumbnails
Comprehensive guide to LED Headlight upgrades-htb1ozzkruusbunjssplq6ze8pxam.jpg  


Last edited by vivekgk : 29th September 2018 at 21:06. Reason: Just saw he corrected his issue. Hope this helps out someone else!!
vivekgk is offline   (1) Thanks
Old 29th September 2018, 22:54   #90
Team-BHP Support
 
Vid6639's Avatar
 
Join Date: Jul 2006
Location: Bangalore
Posts: 17,728
Thanked: 43,463 Times
Re: Comprehensive guide to LED Headlight upgrades

Quote:
Originally Posted by vivekgk View Post
After looking at your pictures of the beam pattern, I am pretty sure that you have put in the bulbs upside down. For making the low beam in an H4 headlamp, the upper front half of the reflector has to be illuminated. The shield below the LEDs make sure that the light to the bottom half of the reflector is cut off, which appears as a clear cutoff line. The high beam is created by the rear part of the reflector, and both halves receive light as there is no shield on the high beam. So the low beam should be lower and the high beam should be higher.
Vivek, I don't think they are upside down. If you see the beam pattern in the pic it has a clear cut off and the light is below the cut off in low beam.

IF it was upside down it won't be the case.

I think the problem is that shield / cup that is blocking the LED.

If there's a way to get rid of that it will be fine. With LED you don't really need the shield/cup.
Vid6639 is offline   (2) Thanks
Reply

Most Viewed


Copyright ©2000 - 2024, Team-BHP.com
Proudly powered by E2E Networks