| |||||||

 |
| Search this Thread |  35,632 views |
 30th November 2014, 15:12
| #1 |
| BHPian Join Date: Sep 2009 Location: Trivandrum
Posts: 931
Thanked: 1,214 Times
| DIY: Royal Enfield Bullet - Ignition key assembly cleaning / replacing Hello Friends and experts. I recently came across some problems with my Royal Enfield Standard UCE 350, which was at last traced to the Ignition key assembly and the whole problem was resolved on the replacement of the same. So I thought I would share the whole experience so that others who might be in darkness due to the very same problem can identify and rectify it easily. I am not a great story teller, so please bear with me and also my apologies for the picture quality which is out of my Nokia Express Music  Symptoms On start up 1. Neutral light won't light up on twisting the key. 2. Neutral light going blank if any of the electricals are turned on. 3. No movement of the amp meter 4. The motorcycle won't start On road 1. Mis-fires and spitting back through carburetor 2. Engine dies when the blinkers are turned on (In worse conditions, even the activation of the brake light switch will cause the motorcycle to die) The motorcycle won't start unless you wiggle the keys a couple of times. If you have any of these symptoms, then it may be the time to clean or replace the ignition switch assembly. Causes In my case, I think it was due to the riding in heavy downpours. The symptoms aggravates after the rides in the rain. Temporary solutions tried 1. Spraying the key slot with Zorrik 88 contact cleaner 2. Blasting the key slot with hot air from the vacuum cleaner The reason why the above methods won't work is that the ignition key is equipped with a drain system which prevents the contact cleaner or the hot air from reaching the dirty contacts. Replacement options There are two options available for replacement of ignition switch assembly  1. Part number 147962/A -Common key set This one contains the ignition switch assembly with all the locks in your bullet. It costs around Rs.800/- and is the favorite of the service centers and the spare parts shops. Part number 597130 - Ignition switch assembly with key If you are OK with riding around with two keys, one for the ignition and the other for all the other locks, then this one is for you. The cost is around Rs.200/. Compatibility issues with Bullets prior to 2012 The old part number of ignition switch assembly was 147954/A and the new one is 597130. So where does the difference come - The size of the connector  The mechanics and parts dealers advise you to splice and join the wires for installing the new type of ignition switch assembly to Bullets prior to 2012. While there is no problem in the said method, it would be much better to solder the old harness to the new ignition switch, believe me it is easier than you think and neat too (I am sure that you won't want to ride around with four taped wires bundled up behind the headlight of your bullet). You can do it yourself if you have access to a soldering iron or you can seek the help of a local radio repair shop. So why this thread now I have been living with this problem for over 3 years now trying on temporary solutions. After replacing the new ignition switch, I took apart the old ignition switch and found it too simple to dismantle and clean So I don't want any fellow Bulleteers to ride around suffering (if they have the problem of dirty ignition switch) from hiccups from their machines in the middle of the road, when the solution at hand is simple. Don't try the temporary solutions I had posted earlier on as the problems boomerang within a few days. Open up and clean the ignition switches. If you apply your mind, it is an easy job, but hey you have to be careful as well as you are dealing with the electrical wiring of your motorcycle.So how to do it Before working on the electricals of your Bullet, always disconnect the leads from your battery. Disconnect the negative lead first and then the positive one. Tuck away the lead securely so that they won't contact the terminals by accident. 1.Now trace the wire loom that runs down from the ignition switch assembly and disconnect the connector. (Remember that the connector will be a large rectangle type on in the old Bullets and a small square type in the new ones). 2. After disconnecting the connector, using a 28" spanner, remove the plastic locking nut which holds the ignition assembly to the head light casquette, push down and take out the ignition switch. Special care may be taken not to exert excessive force on other wires during the dismantling process. Don't tug at the wires if they are knotted. Gently un-clutter them. So now you have the ignition switch assembly in your hands and now you make take the thing to your well lit room and be comfortable under a fan. How to open the ignition switch assembly The whole assembly is kept together by means of locking tabs positioned at 12 O' clock, 8 O' clock and 4 O' clock of the cylinder.   Gently push down on the tabs (just like you uncouple a connector) and take out the bottom plate (I don't know the exact name of the parts) with the wire and connector.   After taking out the bottom plate the inside of the ignition assembly will look like the following  Now gently tip the cylinder upside down and take out the switch assembly with the copper bridges / connectors.  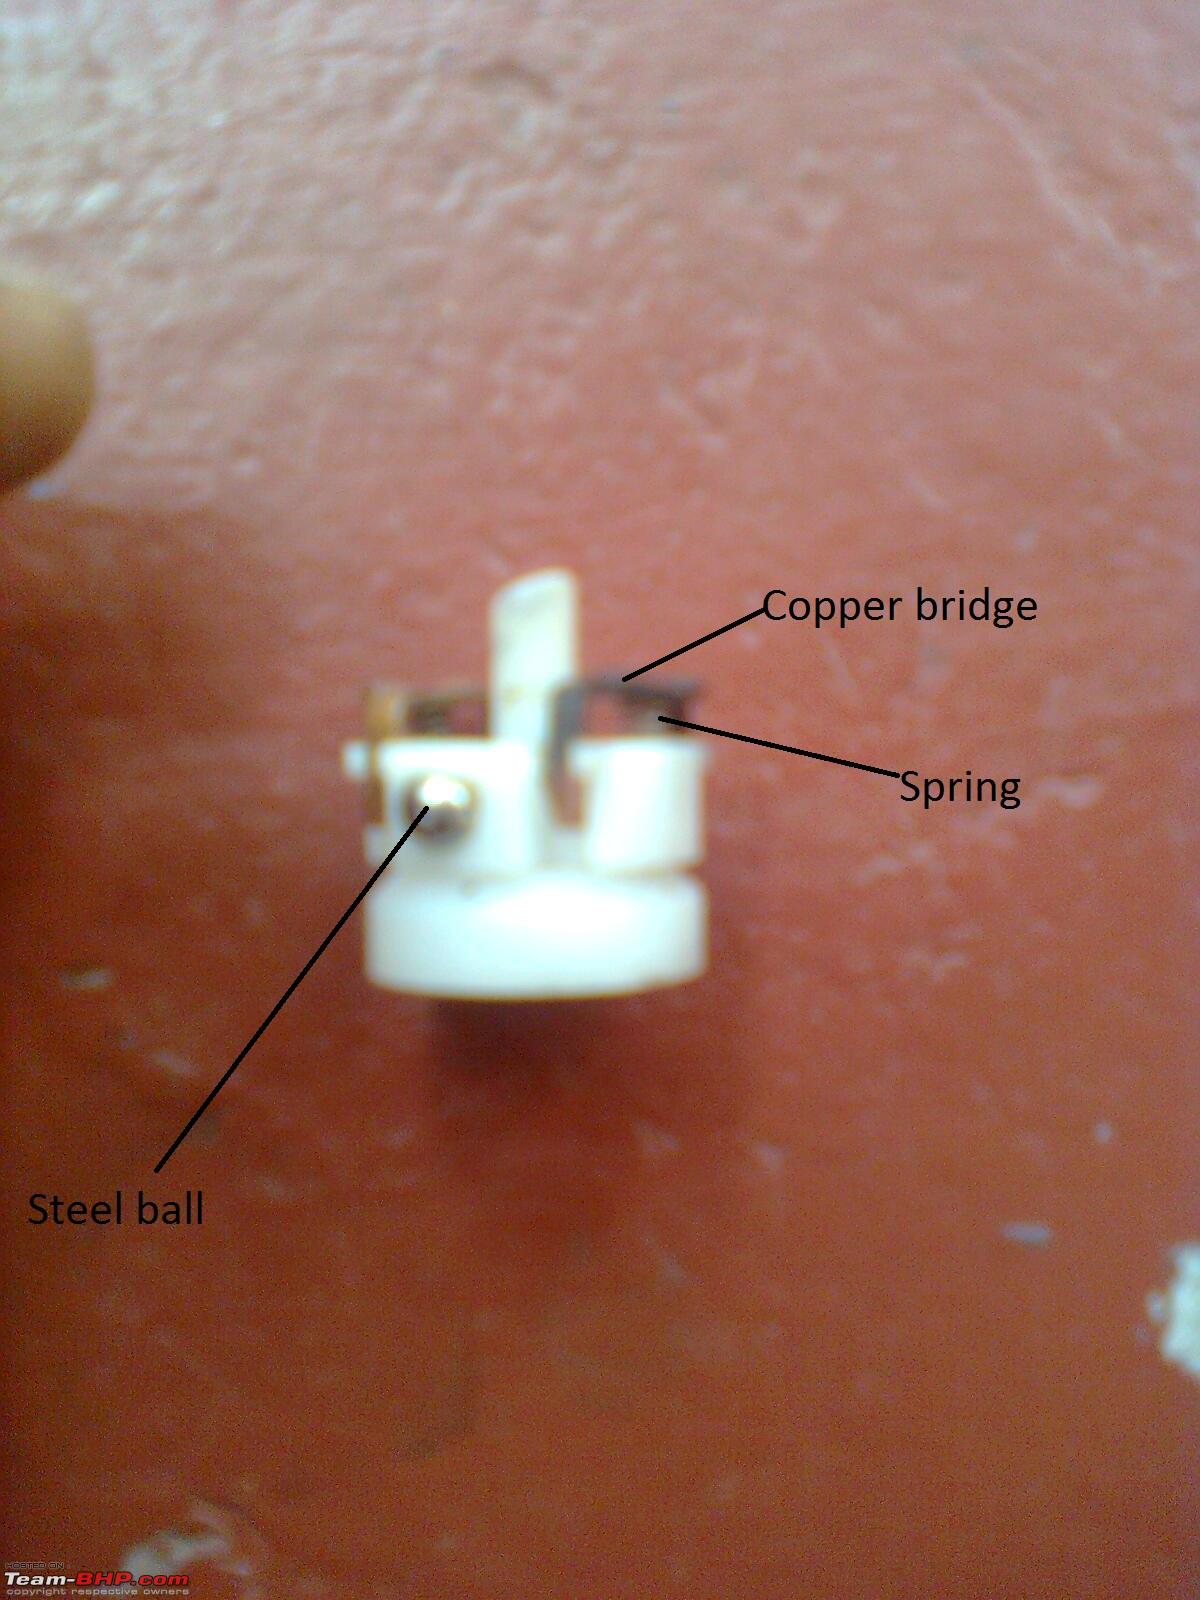   You don't have to worry about the springs or the steel balls as they are locked in position and won't leave your premises as long as you are gentle with them  Now with the switch assembly removed you can see the recess of the key slot.  I didn't try to dismantle further as there was not need for it. Just clean the inside of the cylinder with Zorrik 88 and blow dry. For the moment, there is nothing more to be done with the cylinder, so we can keep it aside. Cleaning the contacts If you feel that there is enough contact patches left in the bottom plate, gently scrape the contacts clean with a grit paper and assemble it back. We will talk about the re assembly in detail further down as improper reassembly would cause malfunctioning to the ignition key assembly. I found the contact in the base plate worn out severely and what now Time to replace the ignition switch. If the connector in the new ignition switch matches to what you have in your Bullet, just go ahead and plug it in (you are one lucky guy :-) ) For all those less lucky ones including myself There are four wires in the ignition switch assembly (Don't ask me where they are leading to - I don't know) Here are the pictures of the four wires and their corresponding positions in the base plate  I have kept the wires trimmed in my old bottom plate for future reference 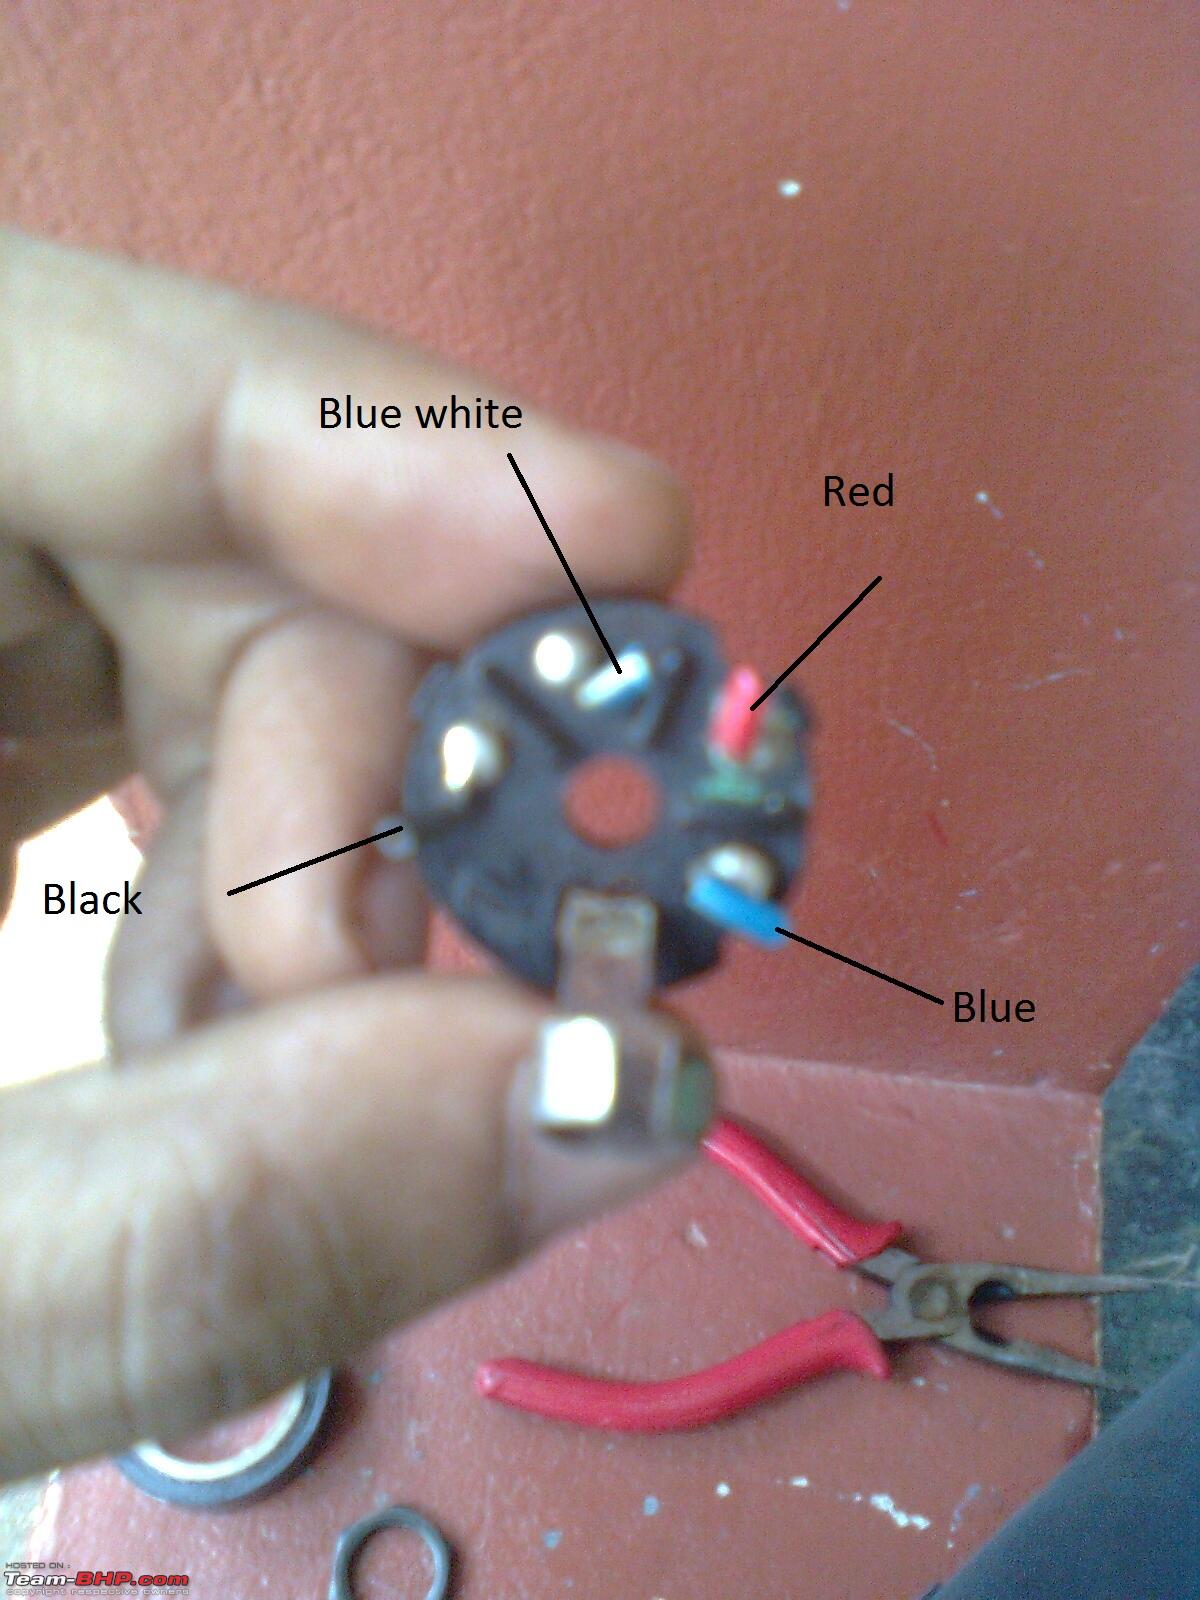 Now with a soldering iron carefully de-solder the new wiring loom from the new ignition switch assembly and solder back your motorcycles wiring loom with the big connector on to the new ignition switch assembly. Be sure not to transfer too much heat from the soldering iron tip to the switch assembly which will cause the wires and plastic parts to melt. After soldering it, be sure to pull the protective sleeve over the wires and lock the wire holder over the sleeve using mild force with pliers. 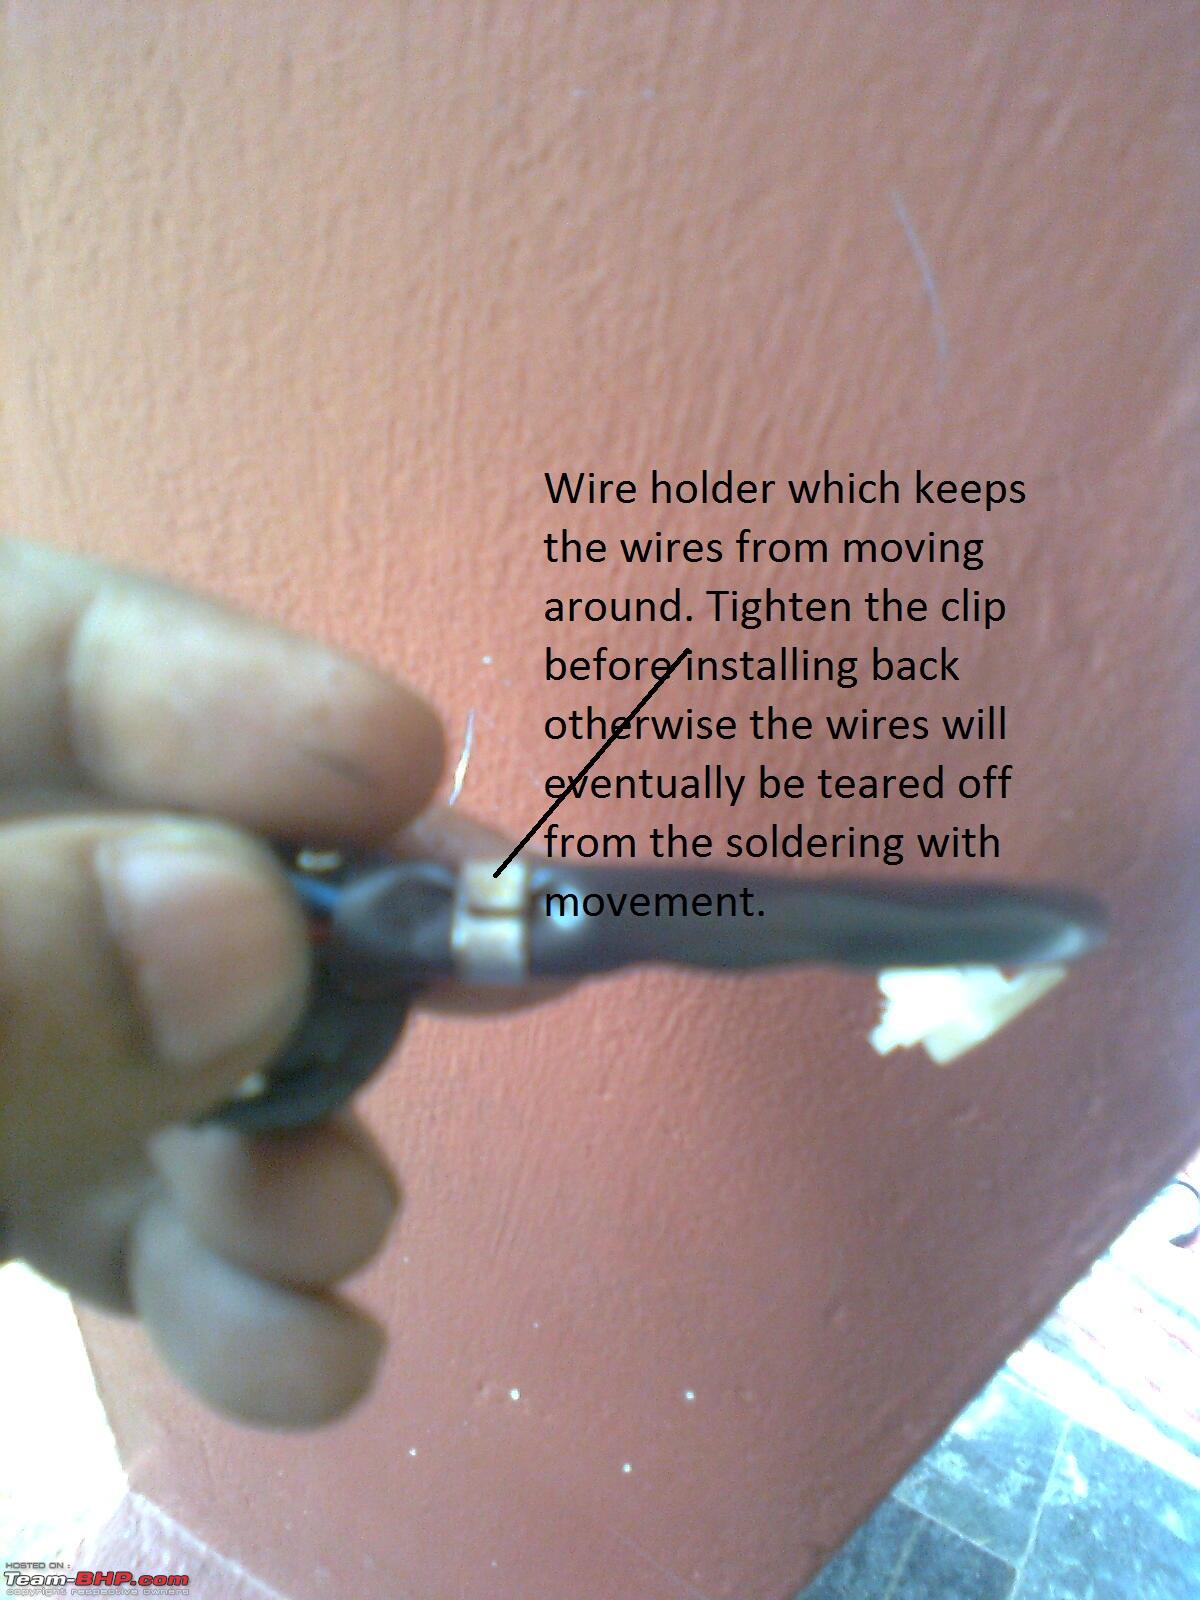 You may also try it from the connector end, i.e swapping the old connector to the new switch assembly or you may simply splice and join the wires, in which case sufficient precautions are to be taken that the wires are properly joined and insulated and also that they don't get disconnected from the wires moving around in the casquette. Re-assembly Insert the bridge / connector assembly into the cylinder and push it into position. You only need to position the key slot tab in the cylinder into the recess in the connector assembly. Now comes the important part You can see that there is a flat position in the cylinder lock grooves  With the key slot facing the floor and the flat position of the cylinder facing to the right side, align the bottom plate with the blue white wire at 12 O'clock, the red wire at 2 O'clock , the blue wire at 5 O'clock and the black wire at 10 O'Clock. Now you will see that all the three tabs are aligned with the slot in the cylinder. Now gently push and lock the assembly. Reconnecting the ignition switch assembly to the motorcycle Insert the ignition switch assembly from beneath the caskette into the slot provided and hold the assembly in place with the plastic hexagonal nut. Carefully route the wiring loom so that it doesn't get pinched when the steering is moved lock to lock and insert the connector into the female pin. Connect the positive wire back to the battery and at last the negative lead. Turn on the ignition and first of all try all the electricals, the blinkers, the horn etc and if the fuse in the machine is not giving in, start the machine and idle for several minutes. Check for signs of heat in the ignition switch which may point out to improper soldering causing arching. If you find all is well, then take your Bullet out for a ride and enjoy the machine. Disclaimer 1.I don't know the original part names inside the ignition switch assembly. I have used names simply for identification. 2. The ignition switch assembly in picture has been taken out from my 2011 Royal Enfield Standard 350 UCE motorcycle and the whole ignition switch may be different in other models. 3. Improper dismantling and re assembly of the ignition switch may cause damage to your motorcycle and may even carry the risk of a fire in your wiring loom. 4. Do the work at your own risk, marking each part as you dis assemble, preferably taking photographs and do the work only if you are comfortable with the whole procedure. Thanks for bearing such a long post. If this helps at least one person, then I am a happy man. regards adrian Last edited by adrian : 1st December 2014 at 13:22. |

|  (11)
Thanks (11)
Thanks
 |
| The following 11 BHPians Thank adrian for this useful post: | Aditya, amit_purohit20, ArizonaJim, bj96, Full_Minchingu, Gordon, GTO, iron, mobius 1, SuperSlick, tharian |
| |
|
1st December 2014, 15:08
| #2 |
| Team-BHP Support  | Re: DIY: Royal Enfield Bullet - Ignition key assembly cleaning / replacing Thread moved from the Assembly Line to Motorbikes. Thanks for sharing! |
|
| (1)
Thanks
|
| The following BHPian Thanks GTO for this useful post: | adrian |
|
1st December 2014, 17:26
| #3 |
| BHPian Join Date: Sep 2008 Location: Chandigarh
Posts: 57
Thanked: 26 Times
| Re: DIY: Royal Enfield Bullet - Ignition key assembly cleaning / replacing Thanks a lot for your effort and sharing ! Bookmarked this for future reference. We need more of Bullet DIYs on the forum for Newbie Bulleteers like me.  Much Appreciated !  |
|
| (1)
Thanks
|
| The following BHPian Thanks mobius 1 for this useful post: | adrian |
|
11th January 2015, 11:18
| #4 |
| BHPian Join Date: Sep 2009 Location: Trivandrum
Posts: 931
Thanked: 1,214 Times
| Re: DIY: Royal Enfield Bullet - Ignition key assembly cleaning / replacing Some clear pictures of the parts      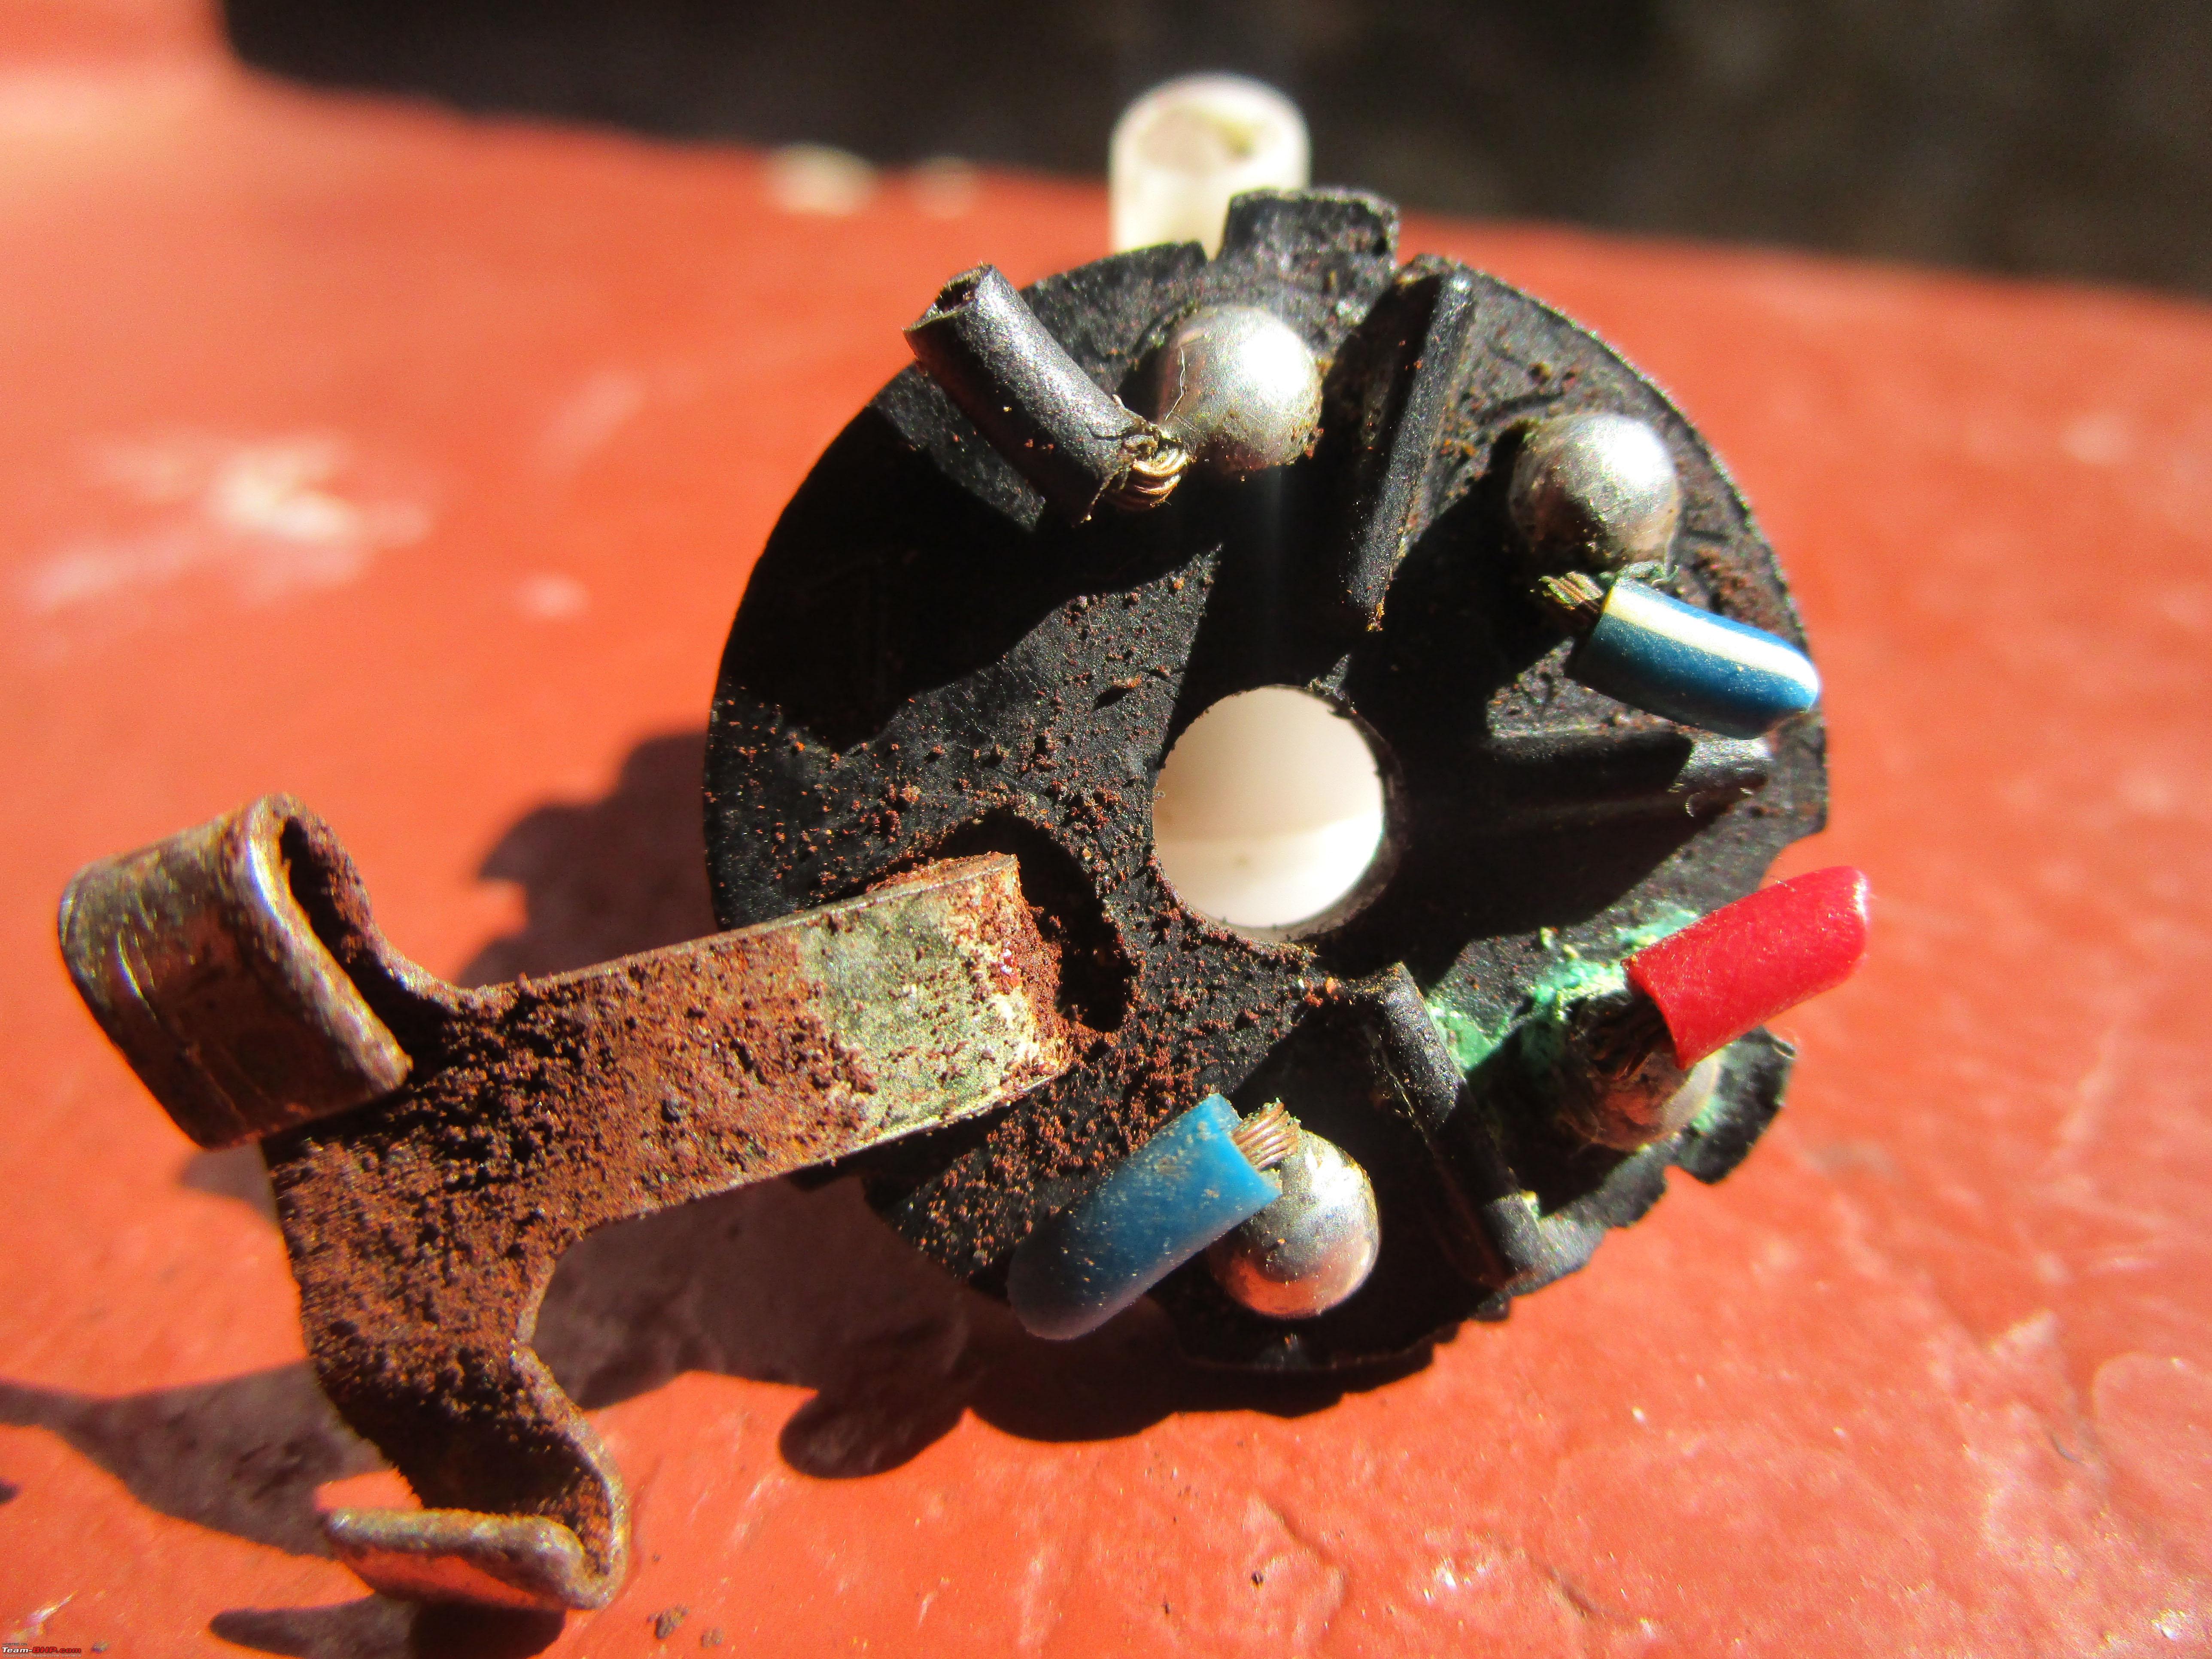  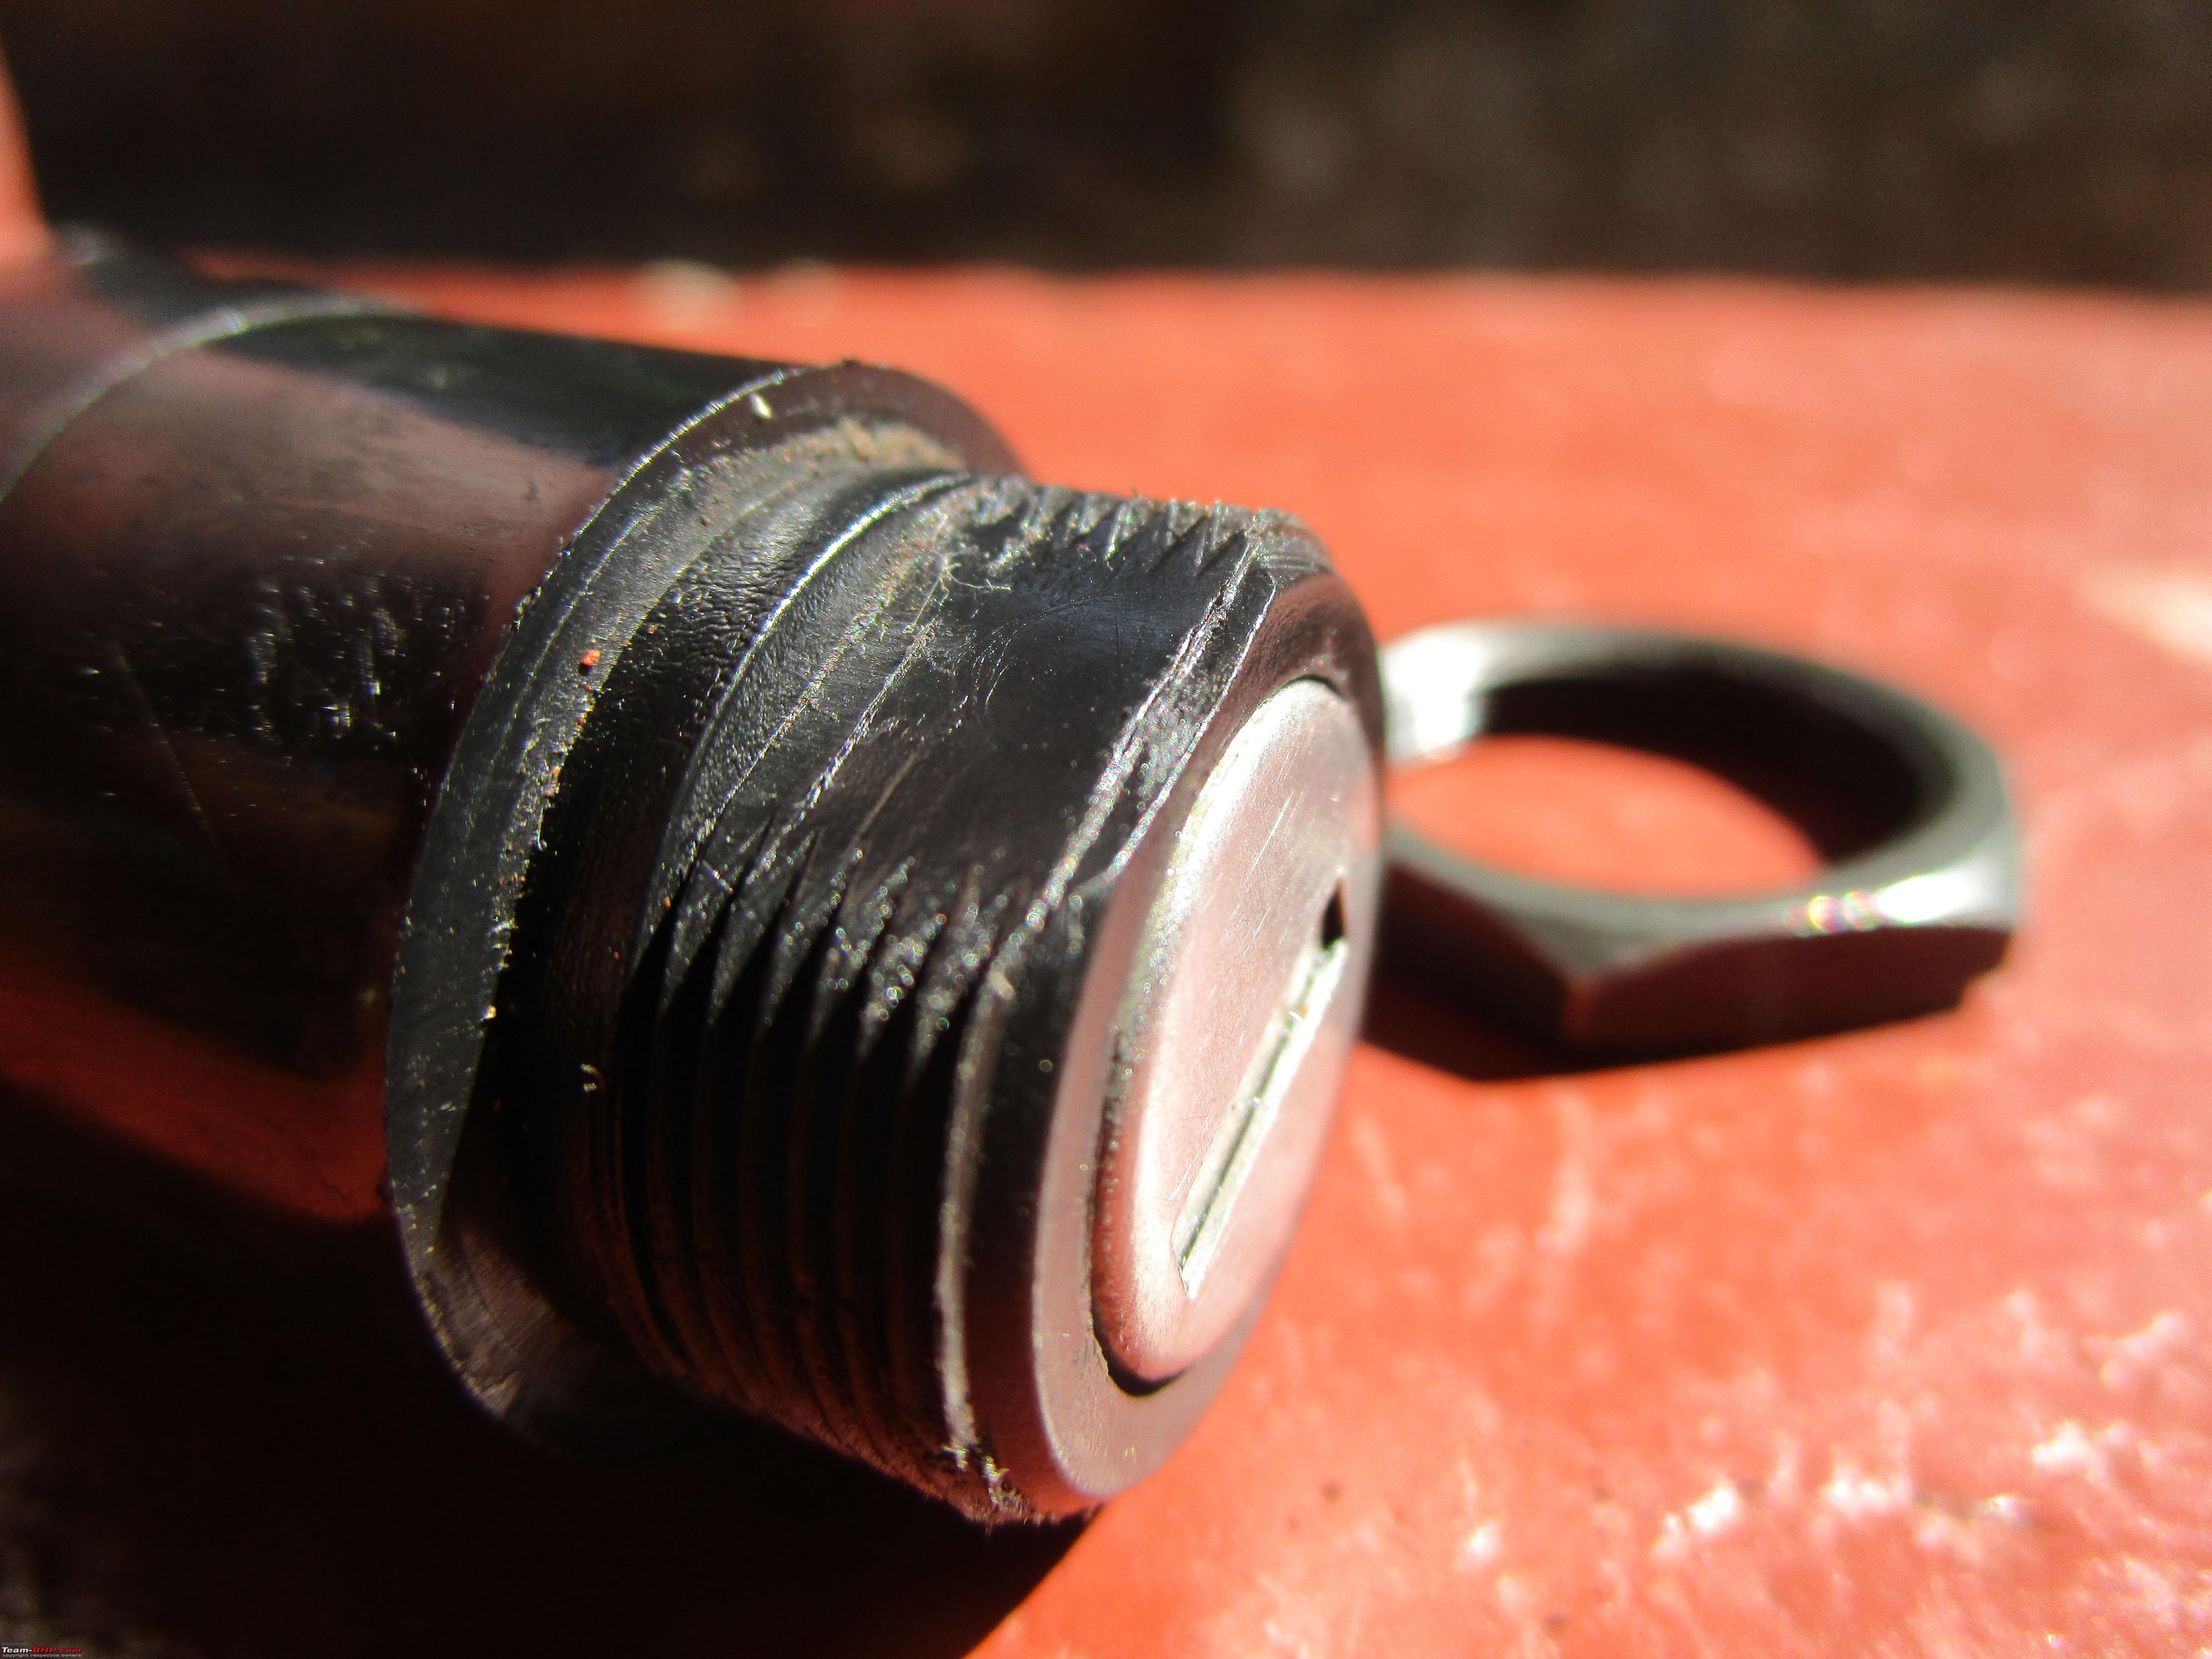   regards adrian |
|
| (5)
Thanks
|
| The following 5 BHPians Thank adrian for this useful post: | ArizonaJim, Gordon, iron, tharian, TS09SRITOG |
|