Team-BHP
(
https://www.team-bhp.com/forum/)
-
Motorbikes
(
https://www.team-bhp.com/forum/motorbikes/)
Self start motors fail once in a while and one of the common failure is worn out carbon brushes which conduct the electric power from battery to the motor armature coil. On frequent usage those carbon brushes tend to wear, resulting in improper / insufficient contact between the brush and the armature coil.
People charge around 350~600 INR to service the 2 wheeler starter motor (replacing the carbon brushes) and some greedy & lazy mechanics replace the worn out starter motor with brand new one costing between 1000~2000 INR. Follow the below easy steps, you could get the work done with less than 150 INR and 15~20 mins time.
Below is the reference of Bajaj Pulsar 150 UG3 (same procedure is applicable for most of the other brands / bikes except for the one which comes with soldered terminals)
Tools Required:
- 8 mm Spanner
- 10 mm Spanner
- Phillips Screw driver
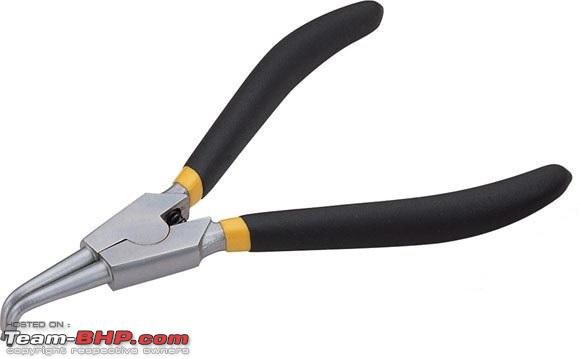
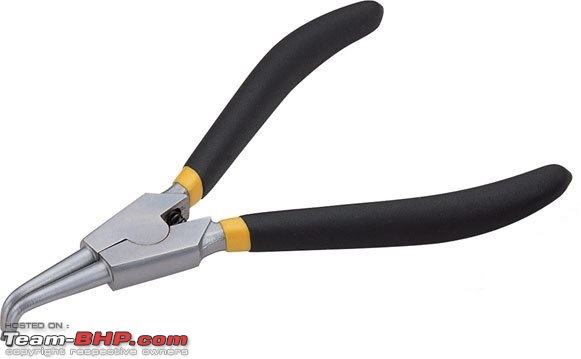
- Cir-clip removal pliers (External hole type) - Optional
- Emery paper
- Grease
- Brush Kit (Bike specific)
Procedure
- Remove the starter motor from the bike
- Clean the outer surface for dust / oil spill
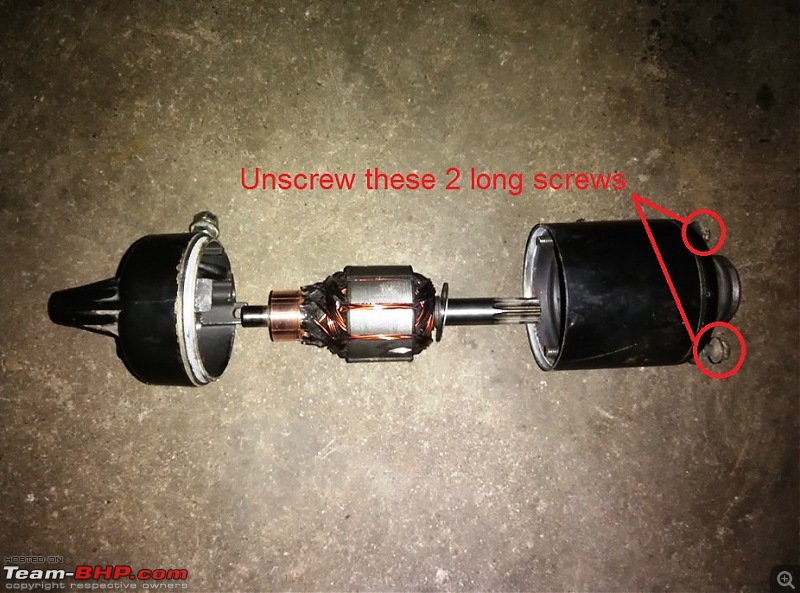
- Unscrew these 2 long bolts with 8 mm spanner and pull the bottom cup to dismantle the starter assemble (Gently tap the motor shaft for easy removal)
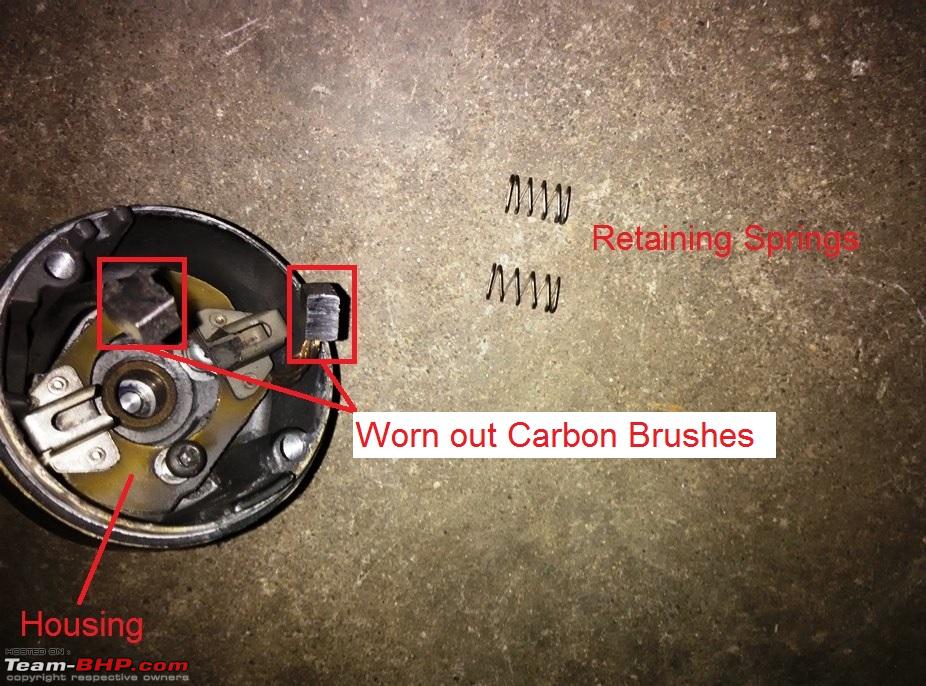
- These are the worn out carbon brushes and the retaining springs
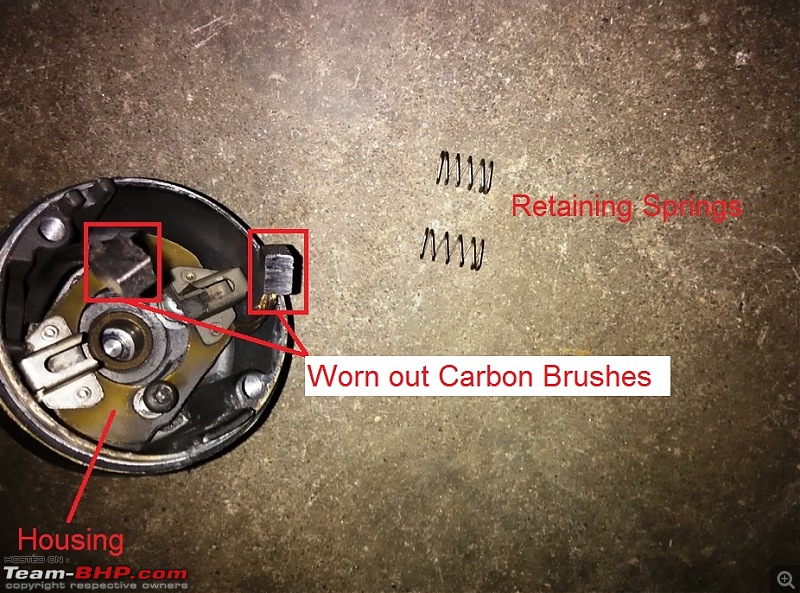
- Remove the housing / base plate with Phillips head screw driver
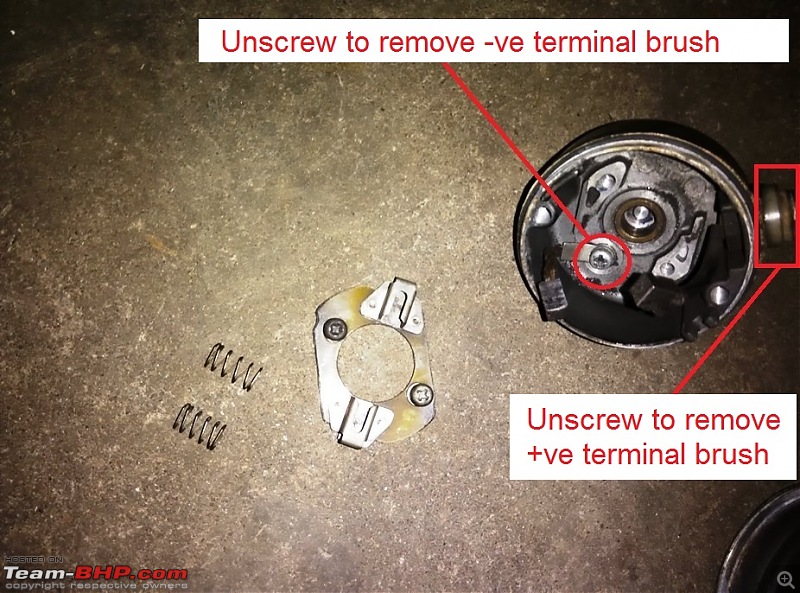
- Remove the -ve terminal brush with Phillips head screw driver and the +ve terminal brush with 10 mm spanner
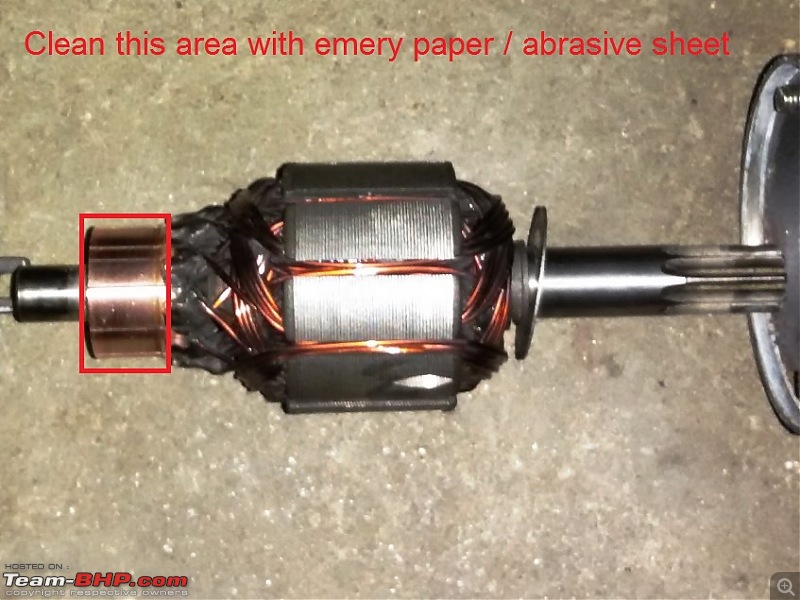
- Clean the Armature contact area with emery paper (take care not to shave-off the base metal, clean only the dirt deposition) This snap was taken after cleaning
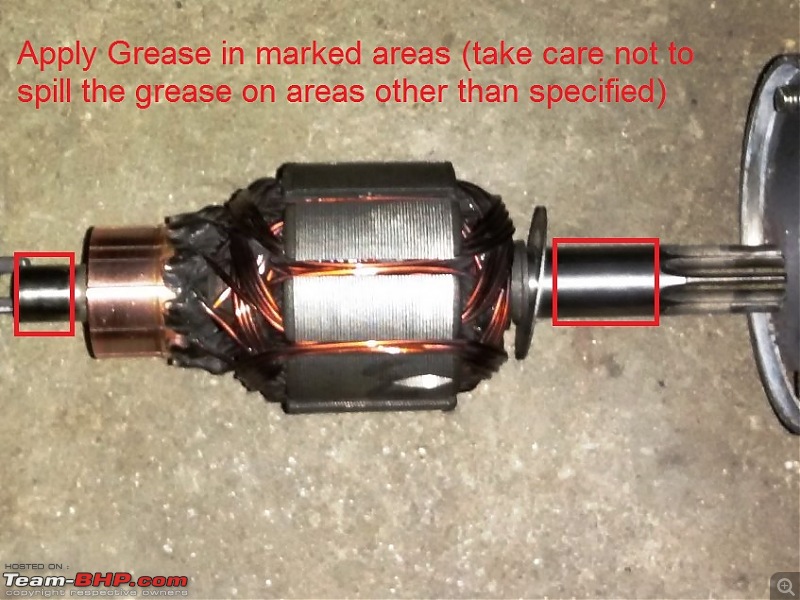
- Apply grease over the marked area
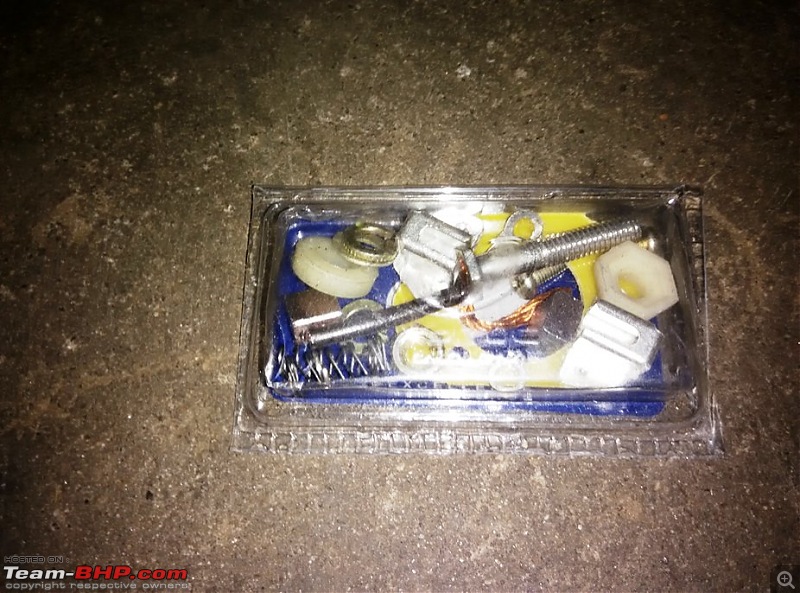
- Open the Brush replacement kit
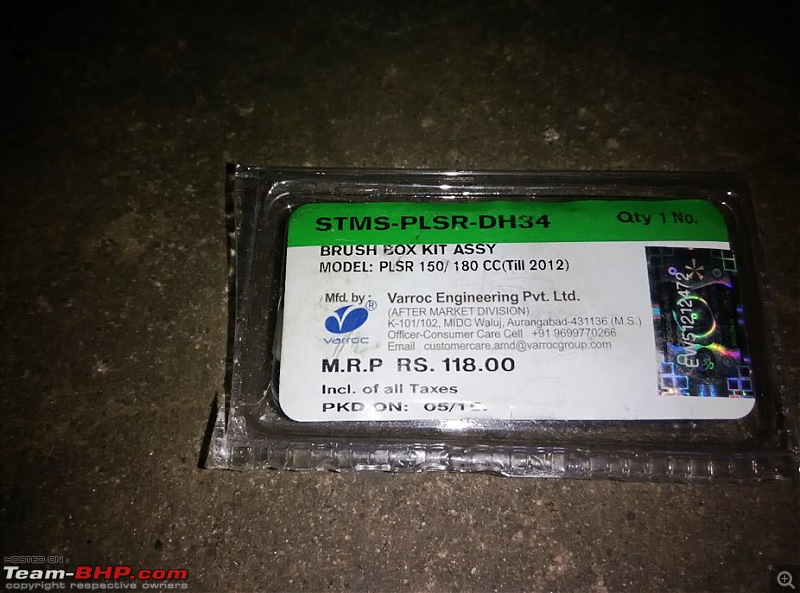
Kit comes with
* Carbon Brushes
* Housing / Back plate
* Retaining Springs
* All necessary fasteners
- Follow the reverse procedure to assemble the starter motor.
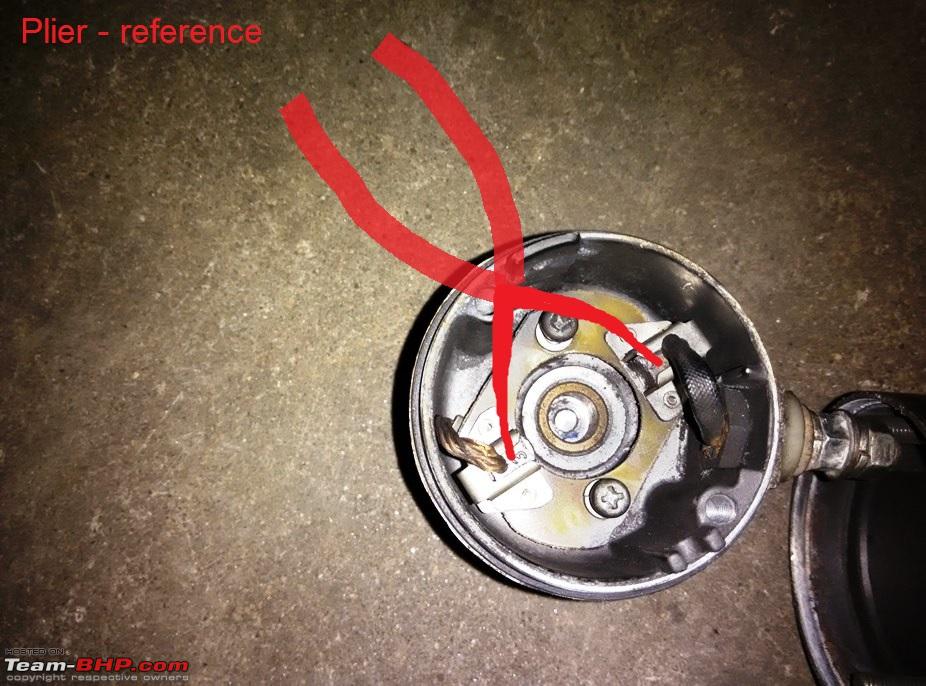
- Use Cir-clip removal plier to hold the brush in position (against the spring load) while inserting the armature (I could not take the snap of this step)

- Confirm the free rotation of motor shaft before fixing back to the vehicle.
Total Cost : 110 INR
Time Consumed : 15 mins
Fitted back the starter motor on the bike and it works like a charm :)
Disclaimer:
I'm not good at electrical parts / systems. If there is any correction in the above mentioned procedure or the terms used, kindly excuse me and feel free to correct the same.
Note from Support - Thread moved to the public forum. Thank you for sharing.
Forgot to mention, Brush kit is available for all bikes from Bajaj & Hero. Last time I replaced the brushes for a Hero Honda Hunk starter motor.
TVS Pep starter motor comes with soldered brushes, replacement of the same may require a little more skill & additional equipment.
Oh wow. This is such a lovely DIY.
Thanks a lot for sharing. I am sure a lot of riders are gonna love this.
Quote:
Originally Posted by bblost
(Post 3824232)
Oh wow. This is such a lovely DIY.
Thanks a lot for sharing. I am sure a lot of riders are gonna love this.
|
Thanks for the appreciation and the pleasure is mine if someone is getting benefited with my post. Thanks to the boring weekends and the fellow bikers (my friends) who trust me in trying out these DIYs on their bikes :).
Thanks for sharing the DIY. No doubt that it will be beneficial to the riders out there.
Starter motors are one among the list that a rider fears to touch (as a DIY) and the first step is to get over the fear to disassemble a particular part. Way to go:thumbs up
regards adrian
Thanks a ton for simplifying the process. Definitely a thread I'm saving. Somehow among the trillion issues with my Tbird, the starter motor hasn't been one (yet), but my friend's Electra 5S had a lot of issues with the starter motor and his mechanic never seemed to fix it permanently. Eventually he got fed up and had it removed and stuck with the kickstarter. Got to run this by him.
Quote:
Originally Posted by adrian
(Post 3824420)
Thanks for sharing the DIY. No doubt that it will be beneficial to the riders out there.
|
Quote:
Originally Posted by Tushar
(Post 3824695)
Thanks a ton for simplifying the process. Definitely a thread I'm saving.
|
Thank you guys.
Quote:
Originally Posted by Tushar
(Post 3824695)
my friend's Electra 5S had a lot of issues with the starter motor and his mechanic never seemed to fix it permanently. Eventually he got fed up and had it removed and stuck with the kickstarter. Got to run this by him.
|
Enfield starter motor construction is similar to Pulsar motor, except for 4 brush construction. Also the springs were little different.
Thanks for this very useful DIY. Like I said before, its gives to such joy to see the fruit of your work on the machine you love so much.
You can also clean the terminals, along with this.
Thanks again!
Even the pic made by you to depict the plier is DIY, really liked it ! Clearly genuine DIY, thanks for sharing !
Spike
Quote:
Originally Posted by Mr.Boss
(Post 3823444)
|
Thanks for the wonderful simple DIY. May I know what type of grease did you apply in the locations that you mentioned ?
Quote:
Originally Posted by prithm
(Post 3828777)
Thanks for the wonderful simple DIY. May I know what type of grease did you apply in the locations that you mentioned ?
|
I used general Automotive grease (Lithium based) Used it in couple of bikes and they are working without any issues for past 2 years.
Quote:
Originally Posted by Mr.Boss
(Post 3824227)
Forgot to mention, Brush kit is available for all bikes from Bajaj & Hero. Last time I replaced the brushes for a Hero Honda Hunk starter motor.
TVS Pep starter motor comes with soldered brushes, replacement of the same may require a little more skill & additional equipment.
|
I need to replace carbon bushes of my Honda Unicorn and after opening the motor, I did some search and found this post. Where can I get good quality carbon bushes? Not sure if Honda sells them or there is a reliable online store I can buy from.
Quote:
Originally Posted by sanjeevgpc
(Post 5218445)
Where can I get good quality carbon bushes? Not sure if Honda sells them or there is a reliable online store I can buy from.
|
I don't know if Honda is selling these parts, but after market parts are easily available with 2 wheeler spare parts sellers.
| All times are GMT +5.5. The time now is 10:27. | |