Note : This is not a DIY to casually clean your fuel pump. DO NOT TOUCH YOUR FUEL PUMP IF YOU DONT HAVE ANY ISSUES WITH IT. The pump comes as an almost sealed unit. It goes in with press on locks, which are not meant to be opened again once its assembled. This should be tried only as a last resort, when a pump replacement is almost sure. In short, try this only if you have nothing to loose if you break the pump or if the cleanup fails.
What you will need :
1) Allen key set to remove the tank and pump.
2) A roll of Kitchen wipe tissue paper.
3) Screw driver flat head, one long and one small.
4) Precision screw driver, flat head.
5) WD40 - 100 / 200 ml can or carburetor cleaner.
6) Surf or any other detergent.
7) A sunny day.
8) A lot of patience and good luck.
9) If possible, get a bottle of ABBRO fuel injector cleaner.
My 2011 July Yamaha R15 v1.0 was showing a lot of signs of what I initially thought was ageing, but turned out to be of a dying fuel pump. The common signs include:
1) Hesitation to start in the morning or after a few days of being kept idle.
2) Reduced pick up and power, you will notice the drop in pickup.
3) Vibrations while accelerating as well as missing while idling.
4) Hesitation in picking up revs.
Adding to this, Yamaha's notorious 2008 fuel pump issue (R125, R25,R6) cropped up.
1) Bike would not start after being kept in sun for sometime.
2) Bike turns off and wont start if the engine heats up in traffic, in turn heating up the fuel tank.
Managed for few months by using the bike only for office commute (Morning and evening rides only). But recently, the issue got so bad that the pump would not work even in the morning or evenings. All pointed out to a dying fuel pump.
I was in for one of the biggest shocks in my life when I went to Yamaha service center to check on the fuel pump replacement. They had the fuel pump in stock and with a lot of cool, said that replacing the pump would cost only 11000 INR for me. (10250 for the pump, 500 installation charges and 250 for cleaning the tank and fuel lines)
Returned home with a broken heart. Without replacing the pump, I cannot use the bike or even sell it. Checked with my better half for approval, and she was okay with shelling out 11 k for the pump, provided that the showrooms guarantees that the issue will be resolved completely by replacing the pump. Made up my mind and heart to spend 10% of the cost of the bike on the fuel pump!
As a last resort, decided to open up the pump and check what is wrong. Had nothing to loose if the fix goes wrong also.
The heart surgery. Stage 1: Removing the tank
1) Remove the tank from the bike using Allen keys (Two screws in front and two at the back). Keep all the screws safe.
2) There are three connections to the tank, the overflow pipe, the power supply and the fuel line.
3) Release the Lock on the overflow pipe and pull the hose out.
4) Press on the locks for the power line and pull the connector out.
5) Remove the fuel line lock and carefully pull the line from the pump. A little petrol may flow out from the line as well as pump. Just make sure you are in an open area and your engine is not hot.
6) Do not tilt the tank as some fuel may overflow.
7) Keep a mat on the floor (I used a bathroom mat) and place the tank upside down on the mat so that you are able to see the pump.
8) Cover the big hole in your bike with a clean cloth or plastic cover. Cover the fuel line well with cello tape to ensure no dust goes into the line.
Stage 2: Removing the fuel pump.
1) Once you have kept the tank upside down, take picture of how the pump is installed to help you put it back.
2) The pump is fixed to the tank using six Allen keys, and they may not come off without a fight. Spray a bit of WD 40 on the nuts and leave them for a few minutes and try loosening the nuts.
3) Once you remove the nuts, place them inside tissue paper. Do not let any dust on the nuts.
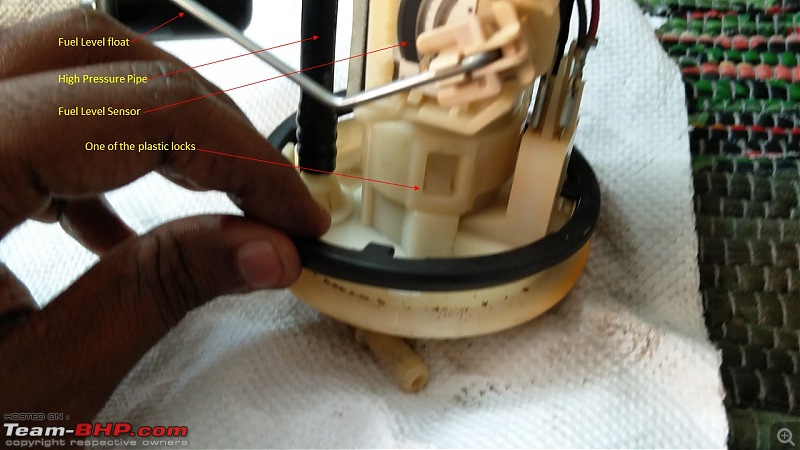
4) Carefully pull out the pump, its a little bit heavy. Remember that there is a float for the fuel level sensor stretching into the tank. Ensure you dont disturb it much.
5) There is a rubber seal between the pump and the tank. Observe how it is placed and how its locked in position.
6) Seal the big hole in the tank with wide cello tape to prevent petrol in the tank from evaporating.
7) Place the tank in a safe place, away from sunlight, and other heat sources.
Stage 3 : Preparing the pump.
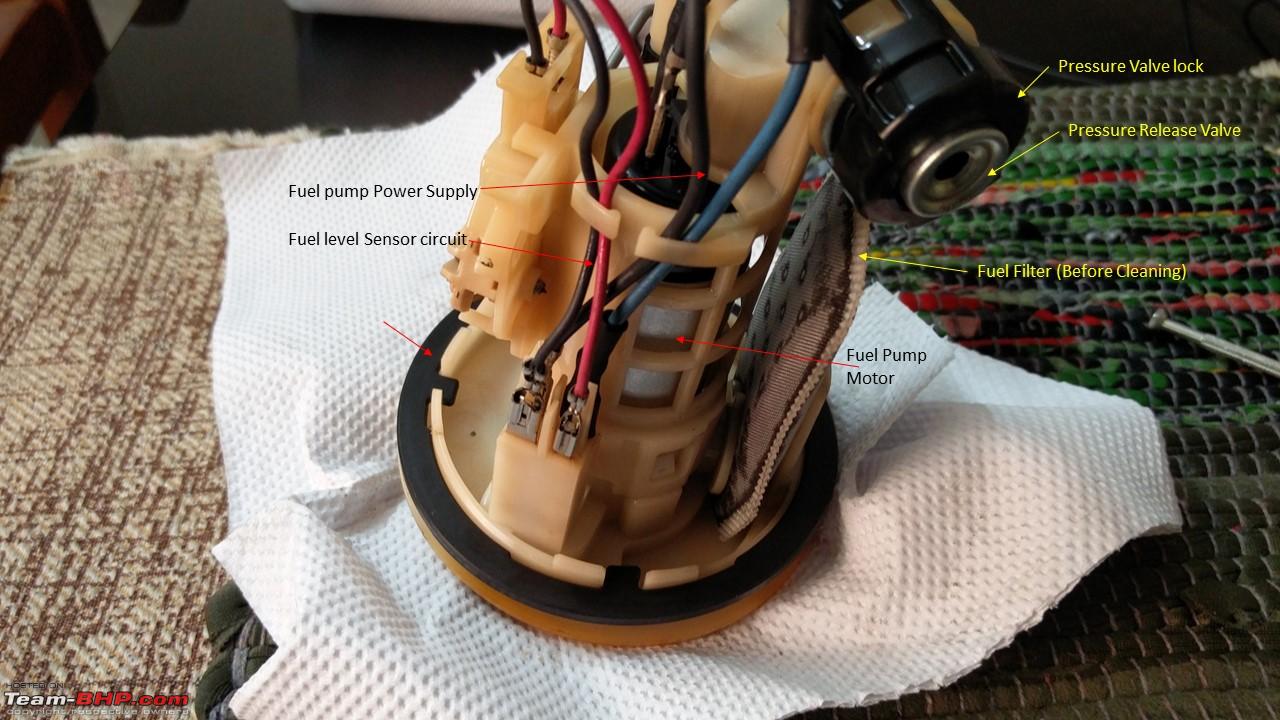
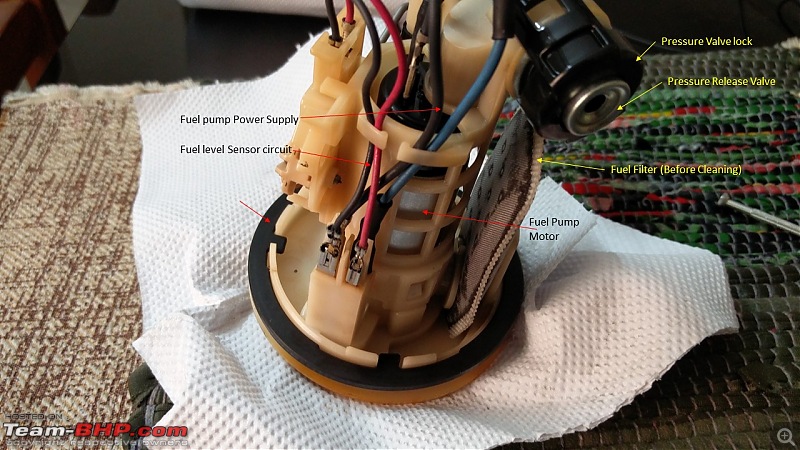
1) Ensure you are in a well ventilated area and preferably have another person to help out. Take pictures of the pump from all possible angles to help you in the re assembly.
2) There are four wires in the pump, connecting the connector to the pump and the fuel level sensor. Note which wire goes where.
3) All the wires have press locks. Press on them and release the wires from leads. Keep them safe.
4) Inspect the condition of the plastic of the pump. If the area near the press locks are more of a brown, colour, there is a large amount of chance that they will break. A less brownish color would mean a little bit more stronger plastic.
Note: The fuel level sensor is a very delicate resistance strip with mechanical contacts. Be very careful while handling the pump to not disturb this or damage this.
 Stage 4: Disassembly
This is the most difficult part. 90% of the success depends on if you are able to pry open the press locks and disassemble the pump.
Note : There is a hard black hose connecting the top of the pump to the pump outlet. This is the high pressure fuel pipe. This flexes a little bit to let you open the pump. DO NOT TRY TO PULL THE PIPE OUT OF ANY END. IT WILL DAMAGE THE PIPE. If its damaged, your pump is gone.
1) Remove the black lock holding the pressure release valve. Once the lock is removed, pull out the valve using hands. Do not use pliers to pull it out.
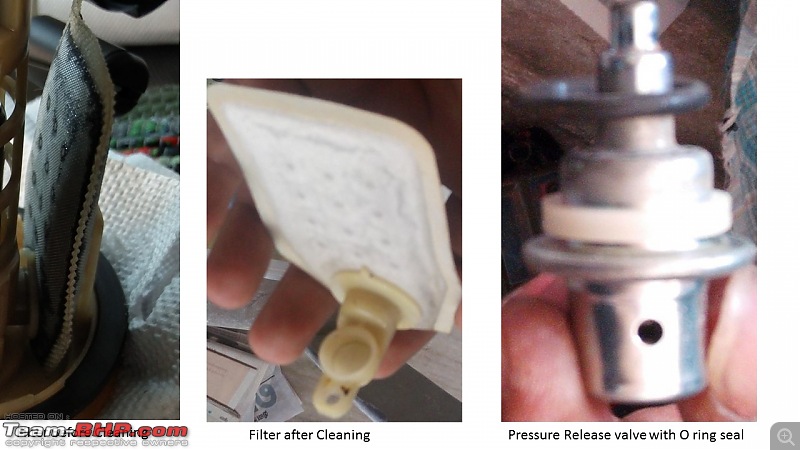
2) There is a small plastic spacer, a large black rubber O ring, and a smaller rubber O ring in the washer. Be careful not to loose any of these. Keep the O rings and spacer safe, wrapped inside tissue paper to avoid dust.
4) Inspect the space where the valve was. Spray WD40 into the space and let in sit for a while and then clean out the oily residue with tissue paper.
5) Spray WD40 into the locks. and let it sink in for a while.
6) Pray to god, and get the screw drivers. Try to find a small gap in the lock with the precision flat head screw driver. Put the screw driver in and pry open enough space to insert a small flat head screw driver.
7) Once you have the flat screw driver in, try to pry open one of the locks. If you succeed, use the longer screw driver to pry open other locks. There is no procedure to do this. Use your judgment as well as feedback from the locks. Do not separate the lower and top halves completely by removing an end from the high pressure fuel line.
8) Once you open all the locks, and is able to separate the top and bottom halves, twist the lower and upper parts to let you slide out the actual pump. The pump should slide out easily along with the filter.
9) Twist the upper and lower halves to their actual position without locking the halves. Store the plastic case in a clean place.
Stage 4 : Separating the pump and filter.
1) There is a push down metal ring type seal connecting the filter to the pump. Pull it out using the precision screw driver. Keep it safe as its tiny and easy to loose.
2) Once you have the filter separated from the pump, get on with cleaning. Keep the pump in a piece of tissue paper. Shake out the excess petrol inside the pump.
Stage 5: Cleaning the filter and pressure valve
1) Spray WD40 generously on the filter. Let it sit for a while.
2) Press gently on the filter with both hands, watch the black tar like residue flow out. Spray more WD 40 and squeeze all the tar like stuff out of the filter. Repeat until you see an almost white filter.
3) Take the pressure valve, spray WD 40 generously to the valve. Let it sit for a while. Afterwards, spray more WD 40 and shake out the dust and other debris from the valve.
4) Soak the filter and pressure valve in a small mug with surf. This will help further with the cleaning.
 Stage 6 : Cleaning the pump motor.
The pump is a roller vane disc type flow through fuel pump, which works on very tight tolerances. Even a small layer of the same tar like material in the rollers is going to make a whole world difference. You cannot open the actual pump as its a sealed unit. You can only clean it.
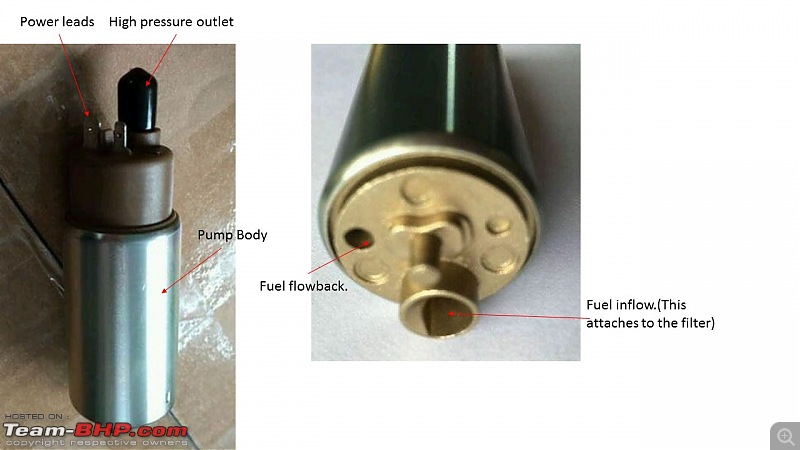
There are three openings in the pump. The inlet at the bottom, a small flow back hole at the bottom, and the high pressure outlet at the top. The high pressure outlet at the top has probably an outlet valve to maintain fuel pressure by preventing fuel flow back. So there is no point in using the outlet for cleaning. In my case the pump was totally stuck when I took it apart for cleaning.
Note : If you have carburetor cleaner available, it will definitely do a better job in cleaning the pump instead of WD 40, I had WD 40, so using it.
1) Hold the pump upside down, with the inlet facing up. Spray WD 40 in short bursts through this, while covering the smaller outlet with a finger. Spray in small bursts so that the WD 40 has time to seep in. Continue till the inlet starts to overflow. Keep the pump with the inlet facing up and allow the WD 40 to seep in.
2) Get the battery out of your bike and keep it near by.
3) Take the fuel pump, hold it with the inlet facing up and shake it so that the WD 40 flows out. Check for any residue that flows out. In my case a thick tar like residue started to flow out with every shake.
4) Re spray WD 40 and repeat the shaking and cleaning till you see no more thick tar like residue.
5) After the initial cleaning, connect the wires from the pump to the motor. +ve and -ve terminals are marked on the pump.
6) Connect the pump to the bike battery leads and check if the pump works. Do not run the pump dry for more that 15 secs, as there is no liquid flowing through for cooling.
7) If the pump primes or works, spray WD10 via the inlet and keep the pump working. Check for drops flowing out of the outlet. If the pump does not prim, repeat step 3 until the pump starts up.
8) Reverse the connection, its a DC motor, will work . Keep spraying WD 40. Do not run in reverse polarity for more that 15 secs. Keep spraying WD40 and running the motor in short bursts with the battery until the sound of the motor turns into a good mechanical sound rather than a whine.
9) Once satisfied, drop the motor in to surf in a mug. this will help with the cleaning. Let the filter and motor stay in the surf solution of 1-2 hours.
 Stage 7: Drying out everything.
1) Take the pump and filer out of the surf solution. Wash them in plain water until no surf is left
2) Leave the pump and filter in open sunlight for 1-2 hours to dry out completely. You can also use a hair drier if available.
3) Spray WD 40 all over the filter and pump and shake out the excess WD 40 from the pump. WD40 repels water!
Stage 8 : The reassembly:
Ensure everything is dried out properly, and does not have any water. Keep the components in sunlight for 2-3 hours and then spray WD 40 on them to repel any water left in them.
1) Attach the filter back to the pump. Seal it back in place with the metal O ring.
2) Take the plastic pump holder, twist it so that you can slide the pump back in.
3) Ensure that the pump is inserted properly to the outlet and the filter is aligned properly. Check everything once more, Press down the top and bottom halves and let the locks fall in place.
4) Put on the spacer, large O ring and the smaller O ring to the pressure valve. Ensure that the valve holder is clean and does not have any dust. Slide the valve into the seating and lock it in place with the black plastic lock.
5) Check the wire connectors for any signs of rust / clogs. Polish them with a fine grade sand paper if needed. Connect the wires for the motor and the fuel level sensor and lock them in properly.
6) Check against the initial images of the pump and make sure that everything matches or is in the same place.
Stage 9 : The reinstallation.
1) After checking the pictures of the tank and pump alignment before removing the pump, insert the rubber washer to the pump and lock it in place using the provided groves.
2) Reinstall the pump back in the tank in the same position as earlier and put the metal ring over the pump to secure it.
3) Do not tighten any one nut for the pump. Tighten opposite nuts one by one a little by little to avoid any kind of warping to the seal. Tight all the screws. Do no over tight them.
4) Take the tank to the bike, and connect the overflow pipe, power line and the fuel lines to the tank. Ensure that all the locks are put in place.
5) Screw down the tank to the bike. Do not start the bike immediately. Check for any fuel leaks or fuel smell. Ensure that you have around half a tank or more fuel in the tank.
6) Let the tank sit for a while, to let the fuel seep in to the pump.
7) Keep the bike in an open area, pray to all the gods you wish.
8) Switch on the ignition, and carefully listen for the pump prime. If you are hearing any abnormal sounds, abort and recheck everything. If you hear the crisp mechanical sound of the pump priming, switch off your key, and turn it on back for a few more times to ensure that the pump is fine and also to build enough pressure in the fuel line.
9) Ensure that the bike is in neutral and press the starter. You may notice that the idle speed may not stable and there may be a lot of missing / stalling. This could be expected. But should go away within a few minutes. If you feel anything abnormal or anything out of ordinary, stop the bike and check everything immediately.
10) After the cleanup, run the bike with injector cleaner added to petrol for a few 100 kms.
Its been almost six months since I cleaned out my pump. For me, I had some issues with the engine for the first few minutes like stalling, missing etc, but things smoothed out in about 2-3 mins.
Impressions after the cleanup:
First of all, I had given up on my pump and was about to shell out 11k for the replacement. The pump working itself was a big sigh of relief for me. Saved my bike and 11 k INR. Everything else that I got are jus bonuses for me.
1) Pump is normal, no starting issues. Can start the bike even after keeping it in sun for long time
2) No stalling while engine is hot.
3) Pickup of the bike has increased a lot, almost double that what I had towards the end. Acceleration is amazing, better than I have ever experienced in my bike.
4) Acceleration is a butter smooth, engine runs smoothly, no missing and no vibrations now.
5) Engine picks up RPMs very easily, did a 100+ kmph run easily on private expressway.
Other Observations :
1) Prior to the cleanup, I was getting amazing mileage, something closer to 50+kmpl, primarily cos the engine was starved of fuel by the dying pump. This has came down and settled to something around 35-40 kmpl.
2) Earlier the engine used to be a lot cooler, the radiator fans used to kick in only if I stay in traffic for long times. Now the engine seems to get heated up much more faster, maybe due to more fuel getting burnt.
3) The pressure release valve appears to be working much more smoothly now. Earlier the bike used to make very loud whining noises when the tank gets heated up. Now the noise is not that much.


 26th August 2016, 12:15

 (24)
Thanks
(24)
Thanks