Team-BHP
(
https://www.team-bhp.com/forum/)
-
Motorbikes
(
https://www.team-bhp.com/forum/motorbikes/)
This is a pretty straight forward and self explanatory add-on, the reason this post exists is to educate interested parties about choosing the right type of cyclocomputer and installation method that worked for me which hopefully would work for the rest as well.
Requirements:- Cyclocomputer*.
- Zip Tie (6 Nos.).
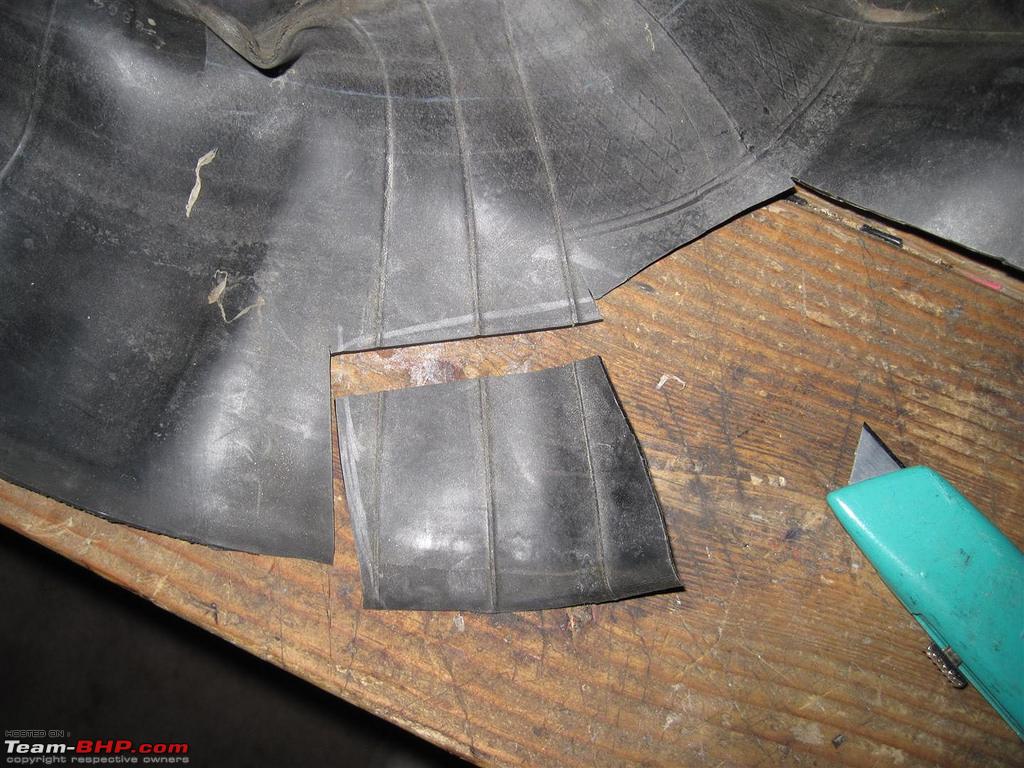
- Rubber Strips**
*While choosing the cyclocomputer make sure that you choose a model that comes with a long magnet which ideally clicks onto the spoke rather than stud types which are screwed on the spoke, recommending against the latter as they do not tend to stay in place at high speeds and cannot be reinforced with zip ties.

**An old tire tube is what I used, it is used to space the receiver so that it picks up pulses from the magnet fixed on the spoke.
 Installation:
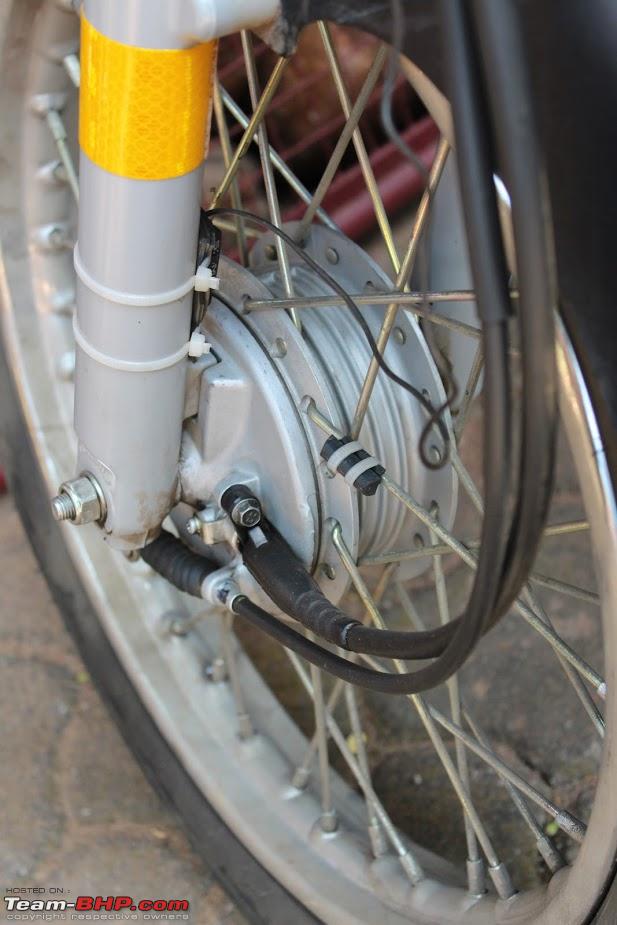
1. We will start with the magnet, it would be obvious by now that the magnet would not click onto your spoke due to motorcycle spokes being thicker, so you would have to improvise, with the help of nose pliers force the magnet onto your spoke and zip tie it on both ends before releasing the pliers, this would ensure that the magnet stays in place for good.

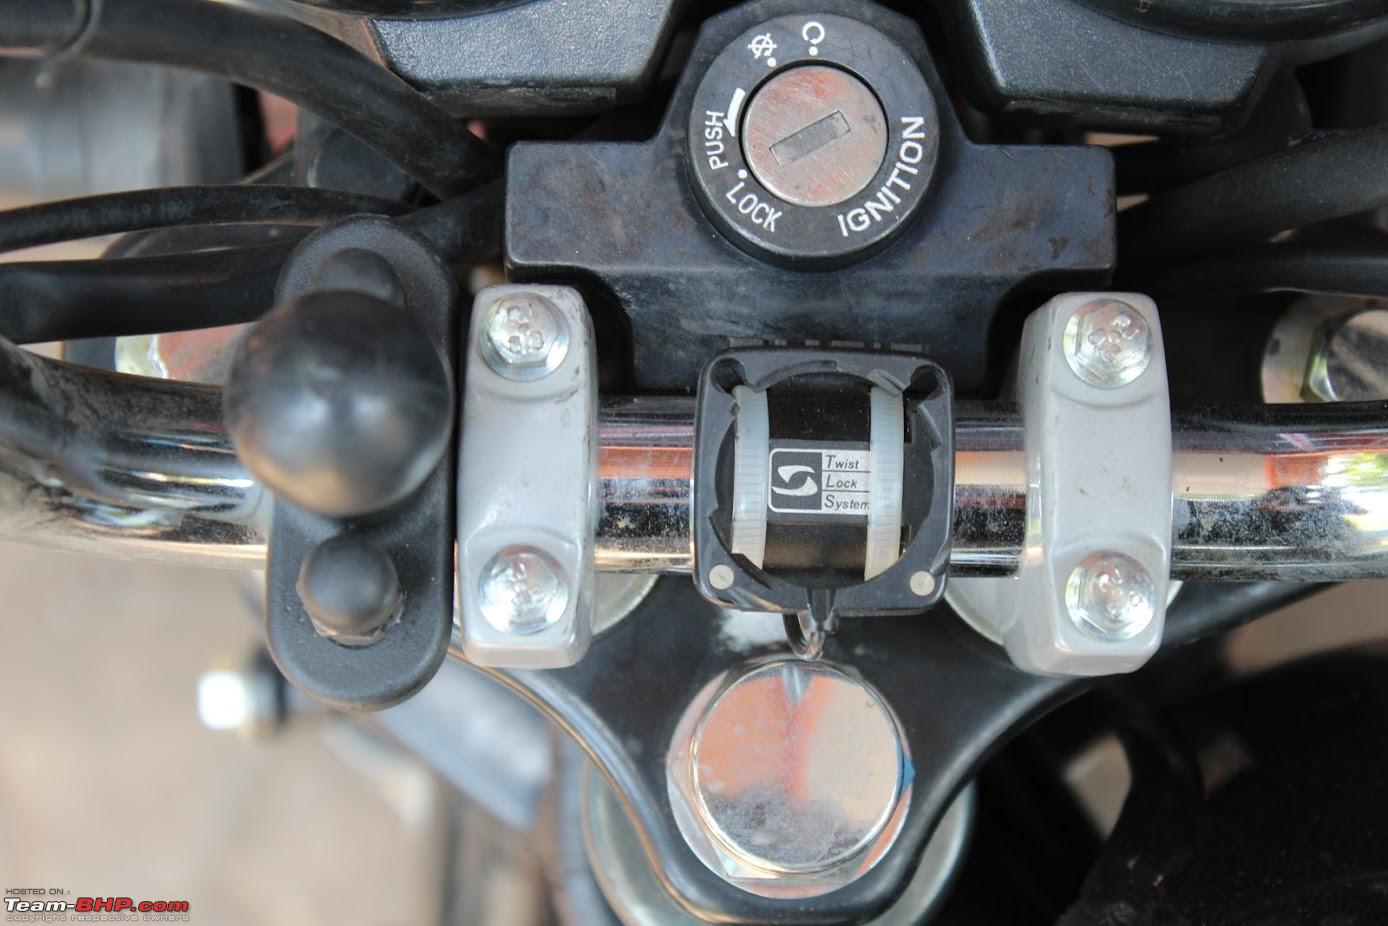
2. Next obvious thing is the mount, fix the display unit mount on your handle bar and secure it in place using two zip ties.

Then route the wire so that it doesn't interfere or gets disturbed by the handle bar movement, I would urge you to take advantage of the speedometer cable routing points.

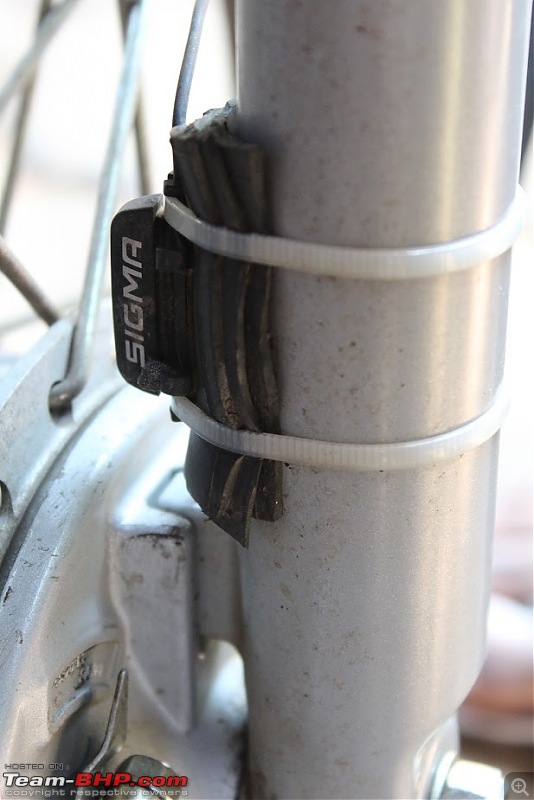
Once done you are left with attaching the receiver end to the motorcycles fork leg, for that make sure that the distance between the receiver and magnet is preferably around 0.5 inches at best, if not then you can use rubber spacers to get to a suitable setting, and once finalized, secure the receiver using two zip ties.
The procedure for installing a wireless cyclocomputer is similar except for the wire routing part.
3. Now all your have to do is attach the display unit which clicks into place using a twist lock mechanism where you slot it into the mount and then turn twist it clockwise so that it locks into place.

The first time you fire up the display unit you would automatically enter the settings mode or you can just manually enter it by pressing and holding the 'Set' button for a few seconds, most of the settings is commonsense and the only part which is a bit tricky is setting the 'Wheel size' which the below video from Sigma will help you figure out:
SIGMA SPORT // Bike Computers // Calculate wheelsize (EN) User Experience:
I've been using this setup for a while now and have covered over 9000 km's a major chunk covered during my Golden Quadrilateral run where I covered 7600+km's in 13 days, the cyclocomputer performed brilliantly and provided relevant statistics such as;
1. Distance Covered.
2. Time Taken.
3. Top Speed.
4. Average Speed.
5. Temperature.
6. Time! lol:
It does come with a few more features that I didn't bother to explore as I was content with the information provided.
Hope this post has fulfilled its purpose and please feel free to post queries and suggestions for the benefit of everyone. :)
Beautiful DIY.
Are there 2 trip meters as well like in cars? This is a good add-on specially for older bikes that have no trip meter too.
Awesome! Thanks for creating this informative thread, this would definitely be helpful for me (and ofcourse for many others).
I too had the same doubt as the magnet would fit in to motorcycle's spoke or not, as they are thicker than the bicycle's spoke. Your explanation clears my doubt.clap:
One final question before I purchase this product, how about riding in rains? is this water resistant ?
Thanks,
-Badri
Nice one. I used used a Sigma on my RX during mid 2000 while in Bangalore. Once the tyre circumference is correctly measured and entered the speed logged on the sigma and the Bushnell speed gun were pretty close. It would store the max speeds also. I was introduced to sigma by my cousin who was using it on is RD.
On my RX5Speed the magnet, a small round one, was glued to the hub and the pickup was glued on to the fork.
This can be used in car also to get accurate speed readings next best alternative to a GPS, but accuracy depends on accurate measurement of the wheels. I have read about people using it on propshaft but never tried to understand the math behind it. Max speed it would measure is 300kPH.
Quote:
Originally Posted by deep_bang
(Post 4362438)
Beautiful DIY.
Are there 2 trip meters as well like in cars? This is a good add-on specially for older bikes that have no trip meter too.
|
The model that I have i.e Sigma BC 12.12 comes with only one trip meter, I manage with it by resetting its odometer as well before a ride and resetting the trip meter alone from point to point after taking a snap of the reading, this enables me to document the distance from point to point and also document the total distance covered.
Mine is a Bajaj CT100B which still doesn't come with a trip meter in 2018, same goes for all 100cc budget motorcycles, even certain Royal Enfield's aren't equipped with trip meters in 2018, this would definitely help riders of such motorcycles especially since most of them still do not sport a fuel gauge as determining next refill with just the help of the motorcycles odometer can get tricky after the first couple of times. :deadhorse
Quote:
Originally Posted by Full_Minchingu
(Post 4362560)
Awesome! Thanks for creating this informative thread, this would definitely be helpful for me (and ofcourse for many others).
I too had the same doubt as the magnet would fit in to motorcycle's spoke or not, as they are thicker than the bicycle's spoke. Your explanation clears my doubt.clap:
One final question before I purchase this product, how about riding in rains? is this water resistant ?
Thanks,
-Badri
|
Amazon India says its 'Waterproof' whereas Amazon UK says its 'Watertight', I guess the safe assumption to make is that its 'Water Resistant' for sure, after all paying a premium of 4k for a cyclocomputer should at least make it all weather friendly. stupid:
Personally mine has survived the Kerala Monsoons so I wouldn't worry about water damaging it. clap:
Quote:
Originally Posted by Sankar
(Post 4362570)
Nice one. I used used a Sigma on my RX during mid 2000 while in Bangalore. Once the tyre circumference is correctly measured and entered the speed logged on the sigma and the Bushnell speed gun were pretty close. It would store the max speeds also. I was introduced to sigma by my cousin who was using it on is RD.
On my RX5Speed the magnet, a small round one, was glued to the hub and the pickup was glued on to the fork.
This can be used in car also to get accurate speed readings next best alternative to a GPS, but accuracy depends on accurate measurement of the wheels. I have read about people using it on propshaft but never tried to understand the math behind it. Max speed it would measure is 300kPH.
|
Hi Sankar,
First off, I'm a huge fan! Your ZMA thread inspired me to opt for a VM28(4 stroke variant, brand new for 1.3k) on my ZMA when the stock carburetor started acting up. Though I did eventually end up getting a new carburetor for 5.5k, during my short stint with the VM28 I got to learn a lot about jetting by trial and error and also the impact of TPS on ride quality. clap:
As for gluing, which glue did you use? A friend went ahead and bought a Btwin for his Royal Enfield Bullet 500 and we are unable to get the magnet fixed to the spoke due to it being the stud type, if gluing is reliable then we would be glad to give it a shot.
Their website quotes max speed to be 199 kmph which I'm fine with as I ride a Bajaj CT100B, my max was 100+ kmph on the cyclocomputer when the speedo indicated 115+ kmph while riding from Kolhapur to Krishnagiri which was the highest ever done on the motorcycle to date! lol:
As for mounting on the Prop shaft I believe is to negate the impact the weight of the magnet would have on wheel balancing. Reason to feel so was a senior more experienced enthusiast pointing out that I might face ride quality issues due to mounting my magnet as seen in the pic, but I didn't bother much about it since I've mounted the same as close to the hub as possible without interfering in the cyclocomputers working, and I've not felt any noticeable difference in ride quality so far.
Quote:
Originally Posted by ashwinprakas
(Post 4362591)
Hi Sankar,
First off, I'm a huge fan! Your ZMA thread inspired me to opt for a VM28(4 stroke variant, brand new for 1.3k) on my ZMA when the stock carburetor started acting up. Though I did eventually end up getting a new carburetor for 5.5k, during my short stint with the VM28 I got to learn a lot about jetting by trial and error and also the impact of TPS on ride quality. clap:
As for gluing, which glue did you use? A friend went ahead and bought a Btwin for his Royal Enfield Bullet 500 and we are unable to get the magnet fixed to the spoke due to it being the stud type, if gluing is reliable then we would be glad to give it a shot.
Their website quotes max speed to be 199 kmph which I'm fine with as I ride a Bajaj CT100B, my max was 100+ kmph on the cyclocomputer when the speedo indicated 115+ kmph while riding from Kolhapur to Krishnagiri which was the highest ever done on the motorcycle to date! lol:
As for mounting on the Prop shaft I believe is to negate the impact the weight of the magnet would have on wheel balancing. Reason to feel so was a senior more experienced enthusiast pointing out that I might face ride quality issues due to mounting my magnet as seen in the pic, but I didn't bother much about it since I've mounted the same as close to the hub as possible without interfering in the cyclocomputers working, and I've not felt any noticeable difference in ride quality so far.
|
Thanks I am happy that the karizma thread was helpful, I got the TM jeted almost perfectly after a lot of hard work but then the crash happened and that was the end of biking. So I could not enjoy it to the fullest. Well its OK :)
No you wouldn't feel anything with regard to balancing with the magnet, we have clocked the meter on the RX (can't mention speed here, tbhp policy) with the magnet on the hub and did not experience any shake or wobbles.
I think I used araldite only because I could not get anything better during those times and have used araldite for almost everything. Roughen up the surface before you stick it. But if I were to do it now in this age I wouldn't worry about gluing, instead I would use the 3M VHB tape (the one that comes with primer) cut to size. That tape is super strong and will hold the lightweight magnet even in adverse weather conditions. You don't have to use the magnet that came with the kit, instead buy a small round/disc magnet and use it.
https://www.amazon.in/PLAYAUTOMA-Nic...dp/B073TK8VFJ/
I used one like in the link above, but not neodymium.
I am sure that the one I used was rated to 300KpH and that was one of the reasons why we used Sigma as other bike computers were rated for lower speeds not suitable for motorcycles. Probably that was a different model, it was Sigma for sure.
God damn it! lol: And why didn't I think of this for my speedo kaput yesteryear motorcycle. Good one, Ashwin Prakash. And BTW, if possible do post your GQ T-Log here in the forum, looking forward to that experience.
Cheers!
VJ
Quote:
Originally Posted by ashwinprakas
(Post 4362415)
This is a pretty straight forward and self explanatory add-on, the reason this post exists is to educate interested parties about choosing the right type of cyclocomputer and installation method that worked for me which hopefully would work for the rest as well.
|
Awesome DIY! Simple yet effective.
Perfect for some of the old bikes without the information readout. A decent price for the device as well. Was checking the amazon link for the product and was surprised to see some functions (other than the ones you mentioned earlier) on the amazon page - Comparison of current speed to avg. speed and Fuel consumption (
link here).
Curious about the Fuel consumption mentioned in the description. But post some digging, found out that it basically shows how much fuel you would save for the distance you cycled. You will have to configure the fuel consumption in the system and you will get the fuel consumption in litres which is good enough for calculation. So, that's a good news as well.
The speed comparison is also a good option to monitor your riding style.
Quote:
Originally Posted by VijayAnand1
(Post 4362852)
God damn it! lol: And why didn't I think of this for my speedo kaput yesteryear motorcycle. Good one, Ashwin Prakash. And BTW, if possible do post your GQ T-Log here in the forum, looking forward to that experience.
Cheers!
VJ
|
Should give it a shot, if you're skeptical then you could try going for the 'Sunding' cyclocomputer which is available for as low as 250/-, though personally you wouldn't need to change the battery as the battery would mostly outlast the unit. lol:
Working on the travelogue! :thumbs up
Quote:
Originally Posted by Omkar
(Post 4363064)
Awesome DIY! Simple yet effective.
Perfect for some of the old bikes without the information readout. A decent price for the device as well. Was checking the amazon link for the product and was surprised to see some functions (other than the ones you mentioned earlier) on the amazon page - Comparison of current speed to avg. speed and Fuel consumption ( link here).
Curious about the Fuel consumption mentioned in the description. But post some digging, found out that it basically shows how much fuel you would save for the distance you cycled. You will have to configure the fuel consumption in the system and you will get the fuel consumption in litres which is good enough for calculation. So, that's a good news as well.
The speed comparison is also a good option to monitor your riding style.
|
Didn't really think about the 'Fuel Consumption' feature, after going through your comment I guess I could configure it so that it would give me an estimate with which I could plan my next refill since the Bajaj CT100B doesn't come with a fuel gauge. Wonderful! clap:
Quote:
Originally Posted by ashwinprakas
(Post 4362415)
This is a pretty straight forward and self explanatory add-on, the reason this post exists is to educate interested parties about choosing the right type of cyclocomputer and installation method that worked for me which hopefully would work for the rest as well.
|
Dear Sir,
Decathlon is selling a similar product for use in bicycles and it costs around thousand rupees only. However, it’s usability in motor cycles is not known.
Quote:
Originally Posted by smuniswami
(Post 4363491)
Dear Sir,
Decathlon is selling a similar product for use in bicycles and it costs around thousand rupees only. However, its usability in motor cycles is not known.
|
Yeah they are. Compatibility would more or less be the same. And going by Sankar's experience of using a suitable magnet from Amazon and sticking with Araldite would work, though it would be best to confirm whether the same is water resistant.
| All times are GMT +5.5. The time now is 19:10. | |