| |||||||

| Search Forums |
| Advanced Search |
| Go to Page... |
 |
| Search this Thread |  63,346 views |
 13th July 2019, 14:17
| #31 |
| BHPian Join Date: Sep 2006 Location: trivandrum
Posts: 314
Thanked: 616 Times
| Re: When you can't afford that Tiger, you build one! My (Modified) Mahindra Mojo Transformed the looks very nicely. Since it is a custom made fairing, I would recommend making a couple more to keep as spares, especially of the beak. The attachments for the beak were looking a little flimsy. |

|  ()
Thanks ()
Thanks
 |
| |
|
13th July 2019, 18:40
| #32 |
| BHPian Join Date: Jul 2017 Location: Hyderabad
Posts: 64
Thanked: 74 Times
| Re: When you can't afford that Tiger, you build one! My (Modified) Mahindra Mojo Awesome thread. Admire your passion and attention to detail. |
|
| ()
Thanks
|
|
14th July 2019, 19:11
| #33 | |
| BHPian Join Date: Jul 2016 Location: London
Posts: 134
Thanked: 600 Times
| Re: When you can't afford that Tiger, you build one! My (Modified) Mahindra Mojo Quote:
 | |
|
| (1)
Thanks
|

| The following BHPian Thanks Rob UK for this useful post: | neil.jericho |
|
29th August 2019, 10:55
| #34 |
| BHPian Join Date: Mar 2019 Location: Pune, Bangalore
Posts: 107
Thanked: 634 Times
| Re: When you can't afford that Tiger, you build one! My (Modified) Mahindra Mojo The Windshield Saga I have finally installed a windshield to the front. As much as I tried to accommodate an adjustable design, there was simply no way to do this without upsetting the final look. None of the windshields readily available complemented the Mojo while providing sufficient buffeting from the high speed wind blast. I toyed with the option of designing a windshield, getting it cut in acrylic and mounting on the front mask with adjustable clamps. However, due to time constrains, the idea of adjustability was dropped in place of the quickest and cheapest solution. Naturally, the first source of inspiration were fellow Mojo owners from across the country. One of the first options was the Honda NC 750 touring windscreen. A member from the Kolkata Tribe had installed the same on his bike using custom clamps which were drilled to the head at one end and attached to the handlebar at the other.  The tall and wide NC 750 windshield looked quite at home on the Mojo Although this product worked perfectly with the stock setup, for my raised headlight, this would have been an overkill. So the decision was made to let this one pass. Coimbatore based accessories provider, Lluvia.in had a design for the Mojo too. This came complete with the adjustable mounting brackets as well as manufacturer warranty. The steep price notwithstanding, this option too had to be abandoned since the brackets were to be bolted to the handlebar for sufficient rigidity.  The Lluvia windscreen and clamps. Since these attached to the handlebar, it wouldn't work with my fixed headlight setup. The Pulsar AS 200 windshield was by far the simplest solution to the windblast problem. It was easily available, simple to install and provided sufficient buffeting up to the chest with the stock setup. With my raised headlight position, this was the perfect size to let the air pass just above the helmet without compromising too much on visibility.  The Pulsar AS 200 windshield on a fellow Pune tribe member's bike A couple of holes would have to be drilled on the head to allow mounting of this shield. There was also the option of replacing the stock screen and somehow adjusting this in place. While I was still contemplating on how to install the AS 200 screen, I came across the one on the Suzuki Burgman 125 and on a limb, went and bought it.  The large windshield would be more useful on the Mojo than the Burgman - PC MotorBeam The windshield had to be cut to shape to keep it more upright. I also got holes drilled on the side of the headlight mask for mounting.  View from the front with the Burgman windshield cut to shape and installed.  The cockpit view turned out to be a lot more appealing!  I have since covered around a 1000km with the windshield. Windblast upto speeds of 110 kmph is well shielded especially the chest and neck. However, at higher speeds a lot of wind buffeting is felt on the shoulders and at the top of the helmet. I can live with this for now, especially since this whole exercise has cost me less than Rs. 500 (inclusive of the windshield).  Other Updates - I haven't ridden much over the monsoon except the daily office commutes and an odd ride to Mumbai. The bike is long due a thorough service. The front tyre, brake pads, coolant, brake fluids, the chain sprocket and rear monoshock are just some of the jobs that have been piling up. Since the ASC is in the heart of the city, I can only get it done during weekends when I am free. Attaching some pics of some rides to Lohagad and Mulshi over the past month.  Somewhere off Dehu road.  All set for a quick run to Mumbai!  The top view.  Enroute Mulshi - A close up of the windshield and fairing. The fairings have been holding up beautifully. I have found a marginal drop in top speed which could be attributed to the extra aerodynamic drag. Other variables could also be the worn out front tyre and sprocket. Once a full service is done, these additional factors will be nullified. I will then try arrive at some numbers for the effect on speed. |
|
| (7)
Thanks
|
| The following 7 BHPians Thank AlQuazi for this useful post: | gunin, moralfibre, neil.jericho, Roy.S, shyamg28, sukiwa, tchsvy |
|
29th August 2019, 11:57
| #35 |
| Senior - BHPian Join Date: Oct 2008 Location: Pune
Posts: 1,931
Thanked: 3,825 Times
| Re: When you can't afford that Tiger, you build one! My (Modified) Mahindra Mojo Wow man, you are really passionate about your bike! In current setup, it looks like a grown-up rooster with a mane!  Finding a modifier in Pune who works on anything other than bullet is quite a task. Your patience is really admirable. Hope the bike serves you well. Clearly a raised headlamp with comfortable riding position is your preference. For your next bike, you may want to consider BMW baby GS as it already comes with these attributes. |
|
| (2)
Thanks
|
| The following 2 BHPians Thank ani_meher for this useful post: | amit_purohit20, neil.jericho |
|
4th October 2019, 13:00
| #36 |
| BANNED | Re: When you can't afford that Tiger, you build one! My (Modified) Mahindra Mojo I liked the one in black colour, it was sorted out at least the front forks with raised height if I am not wrong. Seen many in Bangalore roads and most of the riders seems confused same as the bike and loaded it with thick and heavy locally procured protection rods, aux lights, luggage system etc and already heavy bike for 300 cc became even more heavier, I somehow don't like my baby gs for it's power delivery, but seen Mojo struggling to keep pace with baby gs. |
|
| ()
Thanks
|
|
14th February 2020, 00:41
| #37 |
| BHPian Join Date: Mar 2019 Location: Pune, Bangalore
Posts: 107
Thanked: 634 Times
| Re: When you can't afford that Tiger, you build one! My (Modified) Mahindra Mojo A long long list of happenings and updates is going to follow in the subsequent posts. I have been pretty caught up with work lately which is why it has been a long time since I updated the thread. That, combined with the fact that my personal PC has been out of order for the better part of some months now meant I could only browse the forum on mobile. So while things kept happening, I was unable to update them here. In my last post, I had mentioned that the bike was due for a major service. I had been pushing it back for quite some time since it was chugging along pretty well with just the regular oil changes. Although I usually prefer hanging around while the bike is attended to, this time the list of tasks was just too long to finish within a day. Also, the fact that the service center was located a good 30 km away meant and I couldn't just pop in any time during the middle of the day and check on the vehicle. So I had to drop the bike off and collect it back a day or two later once the work was completed. Anywho, with the odo inching closer to 25000 km and a good 3 years since purchase, I thought it would be best to get the following tasks attended to along with the regular service. I was still running the stock Pirellis Diablo Rosso IIs up front. Needless to say, they were on their last legs at this point and did not inspire confidence on any kind of surface. This was something else that needed attention ASAP. A few days before I decided to drop the bike in, on my morning commute to office, I could not spot some gravel on the road as I exited a circle. I was carrying good speed out of the turn which meant both the front and rear brakes were required to shed speed. The moment I pulled the front brake lever in though, the balded out pirellis gave away under me and I suffered a slow motion fall to the right. Fortunately, the crash guards took the well. I too escaped with just a minor bruise to the shin and decent sized hole on my favourite pair of jeans. The spool on the crash guard's right sheared off owing to the impact. The handlebar too slightly bent to the right. Fortunately though, neither the radiator cowls nor the fairings suffered any scratches. The Sahyadri crash guards stick out quite a bit from the sides by design. This wide coverage helped avoid damages to any of the (more expensive) plastic components.  The Diablo Rosso's after having covered 23xxx kms. Notice the bent spool in the back ground. The mismatch between crash guard and radiator cowl's spacing on the right and left is also visible. The entire guard shifted a couple of mm to the left on impact. Had I proactively changed the front to the Timsun 833's I had been eyeing for over a month, I would have gotten away unscathed with probably just a heart in the mouth moment. Lesson learnt - ALWAYS, ALWAYS replace your tyres before they bring you down. Not two days later, as I was returning back to Pune from Lonavala post sunset, I failed to spot a nasty pothole just before the Kamshet ghat. We were two up on the bike and cruising at around 80 kmph. The front rim stood no chance and suffered a nasty crack!  The visible bend. There was also a small crack extending halway along the width of the rim. We found a puncture shop nearby. Neither he or I had the right sized allen key to open up the front axle. He allowed us to park the bike in his premises and hitch a ride back. We returned the next day with the right tools. The puncture fellow inserted a tube which served as a temporary workaround till the rim was changed.  Just hanging by while the tube jugaad rim gets sorted. The very next day, I dropped the bike off at the ASC.My lethargy had struck twice in two days already. I was not willing to chance my luck a third time! I now had two more items to add to the list of jobs at the ASC. Neither of these parts were in stock and only arrived 3 weeks later! In the interim, the bike lay collecting dust at the ASC! While it was there though, the ASC personnel coordinated with the insurance surveyor without my physical presence being required. Some good finally came off the ordeal! The final hit to the pocket? The insurance company did cover 70% of the costs for the rim and handlebar. The final amount I ended up shelling was Rs. 10900 inclusive of all the labor. While the list of items is large, most of it is anyways done during the 25000 km service. The only non-wear and tear part I had to pay extra for (not including the costs of the rim and handlebar since the same were paid by the insurance company) was the monoshock . Had my bike been under extended warranty, it too would have been covered under it.  [/ATTACH] [/ATTACH]Comparison of the old and new air filter. It was last changed at 16000 km. This was its condition after another 8000 km of use.  The fuel pump filter comparison. This, after only 10000 kms of use. This is despite only filling at Shell unless on a ride 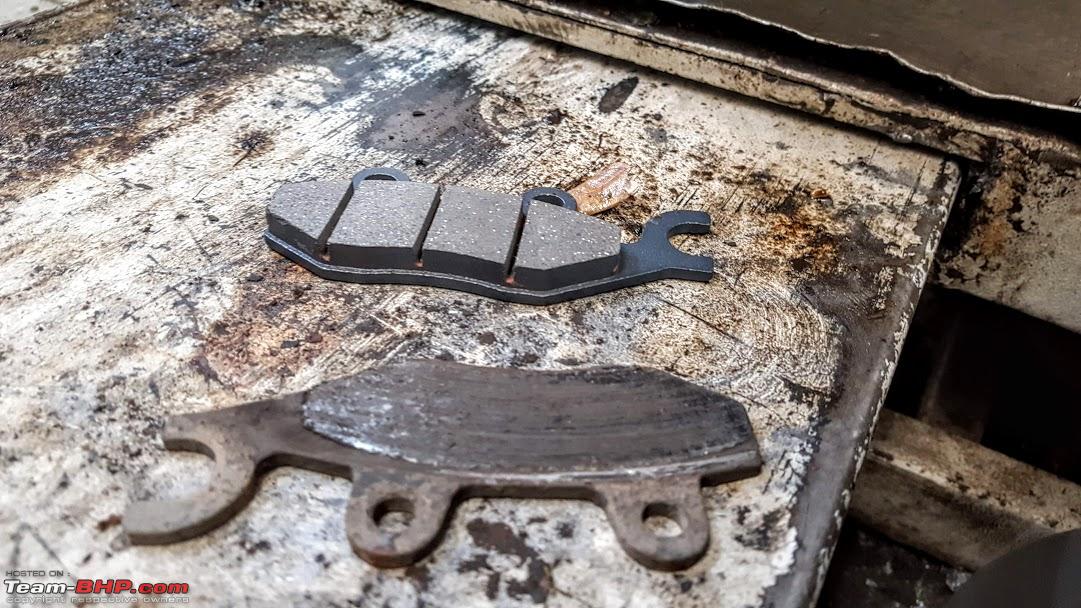 The rear break pads were pretty much completely wiped out in 8000 kms. The overall quality of service has always been good. As I had mentioned earlier, Ganesh Bhau, the mechanic who works on the Mojo is amongst the best in the business and ensures the bikes are up and running within no time. My only beef is with the time spares take to arrive at the ASC. 3 weeks for parts to arrive is just ridiculous! I was later told that the delay was due to some payment rift between the ASC and Mahindra. I have since been assured that parts should be available within a few days once the order is placed. |
|
| (8)
Thanks
|
| The following 8 BHPians Thank AlQuazi for this useful post: | amrutmhatre90, gunin, Latheesh, neil.jericho, Red Liner, shyamg28, tchsvy, timuseravan |
|
25th February 2020, 02:07
| #38 |
| BHPian Join Date: Mar 2019 Location: Pune, Bangalore
Posts: 107
Thanked: 634 Times
| Re: When you can't afford that Tiger, you build one! My (Modified) Mahindra Mojo I had been looking for new job opportunities for quite some time. Around September, a couple of months into the job hunt, I landed a great opportunity within Pune. The very next day, I promptly put in my papers. My last day was scheduled for the 25th of October. I was to report at the new organisation on the 4th of November. This meant a good 10 days off coinciding with the Diwali holidays. Moreover, a distant cousin's wedding was scheduled during the same period in Bangalore. All this could only mean one thing! ROAD TRIP!! The Nikah and reception were scheduled on the 27th and 29th respectively in Bangalore. I intended to start from Pune on Saturday the 26th, and reach Bangalore the same day. The next couple of days would be preoccupied with the wedding activities post which I would have 2-3 days before I would head back to Pune. I also thought it best to return a day early and ensure all the necessary paperwork was in order for joining. This extra day would also come in handy if any last minute changes or disruptions were to take place. There was not too much to do in terms of preparing the bike. I had had it serviced a fortnight ago. However, the one task at hand that was an absolute must before the trip, was changing the front tyre. As the dates approached closer, the knowledge transfer and handover activities would take up most of my time and it seemed impossible to visit the tyre dealer before the trip started. Fortunately, by Thursday, two days before I was to start, the handover activities were completed and I was able to make it to the tyre dealer's all in good time. The choice of tyre had been decided in advance. My inclination was towards an on-off road tyre. Given that even the best roads we encounter have all sorts of surpirses stored, a tyre that would handle the gravel and broken sections well while maintaining sufficient grip on tarmac was preferred. The earlier inclination was towards the Timsun 659A which is more street biased with the occasional off roading possibility. However, fellow riders in the Mojo Tribe were all praises for the Timsun 822 too. This tyre with its block pattern can handle broken roads and trails well (think 50-50 for onroad-off road usage compared to the 659A's 70-30). It also provides sufficiently grip on tarmac thanks to its medium compund construction.  The Timsun 659A was the first choice of tyre. The rubber is medium compound and the thread pattern allows for mild off roading, something which is advantageous over our perpetually broken roads. Having already suffered a bent rim once, I was inclined towards tyres with stronger sidewalls. Here too, the Timsuns fit the bill perfectly with their bias ply construction. The Mojo isn't a corner craver thanks to its low ground clearance meaning any type of radials are an overkill for it anyway. Prabhat Tyres in Shivajinagar is the official Timsun dealer in Pune. I had confirmed beforehand that the 822 was in stock. After a simple half hour procedure, the Mojo was ready to get started!  The stock Pirelli Diablo Rosso II after over 23000 km on it.  And the Timsun 822 that replaced it. The block pattern allows for good off road traction while the medium compound rubber grips well on tarmac. Next day, I completed my handover and bid adieu with mixed feelings. This had been my first job and I had learnt a lot about corporate life, built lasting friendships and been allowed to upskill and excel in my chosen domain! I didn't dwell much on it as I had to figure out a luggage solution for the next day. A colleague's Gods Triton saddle bags had been borrowed in advance. However, at 55L each, these bags were humongous! My stuff could all fit into one of these making the other unnecessary. I decided to strap it over the back seat and top rack with bungee cords. For the items I would need on the road (water bottle, chain lube, documents etc.), I had a backpack which too would be strapped to the pillion seat with the rain cover on. The plan was to start off early by 5-5:30 AM. This way, I would beat the mad traffic till the shirwal toll that is a common feature every weekend. With this being the start of the week long annual exodus, the situation was bound to be worse. However, last minute errands meant packing started post midnight and I could only hit the sack at 2 AM! So much for the early start!  I was up by 6 in the morning. The luggage was strapped, the chain lubed (on hindsight, should have finished this part the previous evening), tyre pressures were given a final once over and off we set! Start time from Wakad? 7:30 AM! Boy, was I gonna run into some traffic!  All set for the marathon run! The tank had been filled a day or two ago and I had barely covered 50 km since. The full tank range I generally get is around 500 kms. Since fuel is cheaper across the border, the decision was made to fill up only once I had crossed over into Karnataka. In line with my expectations, it was slow moving till the Shirwal toll booth. The line of vehicle extended a good half a kilometer before the toll gates. Despite having two fewer wheels, it took around 20 minutes to get past the booths! I was starving by now but most breakfast places were filled with vehicles in the parking lots. Since a lot of time had been lost owing to the many diversions and traffic, a pack of biscuits washed down with water sufficed and I decided to halt for a proper breakfast later. The weather was perfect!. Overcast skies, intermittant drizzles, the perfect road and a very capable machine! What more could one ask for!  The Satara Ghat especially was a treat to ride on thanks to the good tarmac and enticing weather! The good roads after Satara meant that the speed remained above the triple digit mark for most parts. After a good two hours of continuous riding, I finally stopped for breakfast at 10:15 AM on the outskirts of Kolhapur.  Picture perfect scenery!  Breakfast, 250km and 3 hours since start. A filling breakfast of Poha and some very good tea later, we hit the road again. The stretch between Kolhapur to Belgaum is a traveller's delight! Constant speeds of 100-120 km/h had me at the outskirts of Belgaum by noon. A quick stop for fuel followed. I also took the opportunity to hydrate myself and lube the chain, a hilariously futile exercise when you're alone and don't have a centre stand! I had made good progress till now. Hubli was crossed in another hour. The next 200 km till Chitradurga were going to be comparatively slower because of the road widening work.  Some close ups..  And some wide angled shots with the majestic wind farms in the background. The picture was clicked just after Hubli! I had plans of meeting up with a school friend for a late lunch at Davangere. Except the occasional photo or loo breaks, I hadn't stopped anywhere which had me at the outskirts of Davangere by 3:20 PM. What was supposed to be a short 10 minute catch-up, extended to two whole hours of reliving childhood shenanigans! It was 5:30 PM by the time I hit the highway again. The earlier plan had been to reach Chitradurga before sunset so as to minimise riding in the WIP roads in bad light. Alas, it was not to be! The 50 odd km till Chitradurga had to be covered in the dark. Post Chitradurga, it was back to triple digit speeds again. The next 200 odd kms were covered in 2 hours flat with one more fuel break! Flying through the wide 6 lane carriageway with the traffic even more sparse and the wind much cooler was the highlight of the day! Although I was at the Nelamangala toll by 9 PM, it took an additional half an hour to cover the 15 odd km to my destination in RT Nagar. Namma uru's notorious traffic had struck again! Some things just never change! The journey had taken 14 hours with 9-10 hours of actual riding. The engine had been on the boil at 6-7000 rpm all day! I had tanked up twice and gotten roughly 450km from each tank full. This translated to a fuel efficiency of 25.xx km/l The throttle, for the most parts had been pinned at 80-90% of WOT. Yet, at the end of a marathon 850 kms, neither the bike, nor the rider showed any signs of fatigue! The Timsun 822 up front had performed brilliantly! On multiple instances, I would go off the road to beat traffic. While the street biased Ceat Rad X1 at the rear would move all over the place, the front remained anchored and soldiered on without drama. The grip was impressive on tarmac too. Braking distances had reduced multifold and the tyre grip held up even in gravel. The choice of tyre had validated itself within the first 1000 km! A quick shower later, I joined in with the festivities. Maybe it was the adrenaline, or the wedding vibes, but when I finally hit the sack at 1 AM, I was not as tired as someone who'd been on the road for 14 straight hours ought to be! No sore bum, no stiff back or numb hands! A marathon run such as this really makes one admire the people who'd built this #UltimateTouringMachine! The next three days passed in a blur with the wedding and what not. The first thing to do was get the bike washed though. 850 kms of mostly wet roads had left the bike more brown than red. A thorough diesel wash later, it was back to looking brand spanking new!  Going in all dirty..  For a thorough thorough cleaning The wedding, and what followed after it was nothing short of a cullinary overdose! With either friends or family, I would end up at my favourite places to eat to reacquaint my taste buds with what I'd been missing since shifting bases to Pune. In no particular order -  The beautifully laid out stage..  Some outstanding decor at the entrance..  The legend-wait for it - dary Al Faham Chicken  Waffles!!  Onesta's delicious thin crust pizzas,  Desserts,  And drinks!  And daily visits to the quintessential Lassi Shop  I also hit this milestone somewhere on the way.. The week flew by rapidly. Within no time, the binge fest ended and it was time to head back. For the return leg, I decided to break midway. This would be my fifth sojourn with the NH4 and it had become less exciting now. This time around, the intention was to go at a liesurely pace, maybe even visit the Chitradurga Fort enroute and make it to Belgaum where I would meet some of my ex-colleagues for dinner. A week of binging and sleeping in had caused havoc with my sleep cycle though. On Saturday, the day of the trip) I woke up lethargically late and could only set off from Bangalore by noon. The Chitradurga Fort would have to wait for the next trip.  Despite it being midday, the ample cloud cover meant the ride wasn't very tiring.  The ever so beautiful NH4! I had crossed Davangere by 4 PM, chanced upon a beautiful sunset just around Hubli and reached Belgaum by 8:30 PM.  Sunflowers and the setting sun! I had taken around 9 hours to cover the 500 odd km till Belgaum. The speeds maintained this time around were just around the triple digit mark. There had been ample breaks for food and prayer with the weather being favourable for the most part. All in all, a relaxed day of riding. My colleagues had suggested Tumkur Thatte Idli as the central location to catch up for breakfast the next morning. After a good 2 hours of banter and what was arguably the best thatte idli and puri bhaji I had had in a long time, I said my goodbyes and hit the road again. The target was to enter Pune before 4 PM. This being the end of a week long hiatus, a lot of returning traffic would pile up at the entrance to the city. It was something that I wanted to avoid at all costs. Despite a 10 PM start from Belgaum, I made good time with only a fuel and some hydration breaks in between. The ride was uneventful and it was 2 PM as I entered my apartment parking marking the end of a relaxing 10 day break. During the return leg, I had maintained constant speeds of 90-100 km/h. The tank was filled at Shell, Mekhri Circle and lasted a whopping 587 km till Nippani to give a fuel efficiency of 31.5 km/l. Once tanked up at Nippani, I was able to reach Pune with 4 bars of fuel (out of 10) still remaining.  587 km on a full tank. Not too bad, eh? On hindsight, I could have done much more. Maybe hit one of the popular hill stations while in Bangalore. But this trip was always an excuse to unwind, spend time with family and relive some of the college days' nostalgia with friends. The agenda had been good food and better company. To that end, it perfectly served its purpose and had been exactly what the doctor had ordered. |
|
| (13)
Thanks
|
| The following 13 BHPians Thank AlQuazi for this useful post: | CarManMotorcycl, CrAzY dRiVeR, deepfreak15, Grease_Monkey, gunin, keroo1099, neil.jericho, Red Liner, sukiwa, tchsvy, timuseravan, vaasu, vishy76 |
|
1st March 2020, 02:50
| #39 |
| BHPian | Re: When you can't afford that Tiger, you build one! My (Modified) Mahindra Mojo Hi all, I am looking for the stock twin headlight with bulb and wiring, in a working condition for a mod. If someone has removed this and don't want it, please message me. "Give away" or at a cost. I can pick it up! Location: Bengaluru. Thanks! |
|
| ()
Thanks
|
|
1st March 2020, 17:17
| #40 | |
| BHPian Join Date: Mar 2019 Location: Pune, Bangalore
Posts: 107
Thanked: 634 Times
| Re: When you can't afford that Tiger, you build one! My (Modified) Mahindra Mojo Quote:
Can you drop me a PM with your contact number? I will reach out to the tribe and see if there are any leads. I am unable to PM users yet. | |
|
| (1)
Thanks
|
| The following BHPian Thanks AlQuazi for this useful post: | rich_heart |
|
8th March 2020, 14:11
| #41 | |
| BHPian | Re: When you can't afford that Tiger, you build one! My (Modified) Mahindra Mojo Quote:
Thanks a lot buddy! I got hold of the full unit, except the bulbs and connectors. The guy who gave it away mentioned that the throw of the reflectors is not good and hence replaced with single round one. And of course it is much lighter. I don't have a Mojo but I hope it won't be too of topic if I share pics here after I get the unit fitted to my TBTS. Can anyone share what is the stock bulb brand, model and rating? I would have to buy them. Maybe I will directly go for LED ones, if they are better. I will also have to buy connectors to split from single cable of TBTS to the twin lights. | |
|
| (1)
Thanks
|
| The following BHPian Thanks rich_heart for this useful post: | AlQuazi |
| |
|
9th March 2020, 08:45
| #42 | |
| BHPian Join Date: Mar 2019 Location: Pune, Bangalore
Posts: 107
Thanked: 634 Times
| Re: When you can't afford that Tiger, you build one! My (Modified) Mahindra Mojo Quote:
Any H4 branded bulb or LED will fit the headlight. Of course, you will have to purchase a pair. The stock ones are 35W each. I am currently using H4 xhp50 LEDs with a 4300k (warm white) color temperature. Like I mentioned earlier, most LEDs have very good spread on the low beam. However, the high beam becomes next to useless, lighting up the trees and stars more than the road. A good pair of spot beam AUX lights will do a better job of lighting the farther points on the road. Please keep posting the progress of your work. I am very curious to know the outcome of this Mojo head on a TBTS experiment. Attaching a few owners' creations who'd tried the stock lights sans the plastic look on their bikes.  Instagram Handle - @rahul_ravi_  Fellow owner from the Mumbai Tribe | |
|
| (4)
Thanks
|
| The following 4 BHPians Thank AlQuazi for this useful post: | neil.jericho, rich_heart, tchsvy, timuseravan |
|
10th March 2020, 22:59
| #43 |
| BHPian Join Date: Mar 2019 Location: Pune, Bangalore
Posts: 107
Thanked: 634 Times
| Re: When you can't afford that Tiger, you build one! My (Modified) Mahindra Mojo The yearly anniversary ride of the Pune and Mumbai Tribes usually happens in October. However, this year, for various reasons the event kept getting postponed and finally happened on the 4th & 5th of January at MyBhumi Resorts, Junnar. The meetup point for the Mumbai tribe was kalamboli McDonalds while the Pune tribe met up at Nashik Phata at 6 AM. Both groups reached the venue by 11 AM. The first half of the day was spent catching up and getting to know everyone. After lunch, a bunch of us chose the afternoon siesta while the others decided on an impromptu plan to visit the Pimpalgao Joge Dam some 10 km away. Eventually though, the whole group was convinced to join in!  Ready! Set! And Goooooo!!  All lined up and waiting for the go-ahead.  Drone shot! (Albeit a poor quality one) Everyone was back at the resort by sunset. After a quick tea and snacks session, the Bonfire was lit and the stories started flowing. The highlight was two of the Pune tribesmen who had covered a 7 day, 5000 km road trip across the southern states. With the temperatures dropping close to single digits, the bonfire and dinner that followed were done with quickly. The next day, a team from Mahindra Two Wheelers attended the event. They conducted an interactive session on basic maintenance, troubleshooting and DIYs for the vehicle. A team of mechanics was also available to diagnose any of the issues members would be having. All in all, a fun get together. The venue was nothing to write home about. But the company sure made up for that. As always, no two Mojos were the same. It would be safe to say that this is among the most creative bunch of owners out there. Attaching pictures of some of the outstanding bikes.  Camo wrapped tank and headlight cluster..  Round headlamp and RE Himalayan visor treatment..  The same treatment, this time with beaks!  With that HUGE crash guard and custom silencer shrouds, this one's all set for the apocalypse!  Bug eyed weirdo!  Sporting the beak..  This baby, christened Raftar, is at 1.5 Lac km on the odo and counting!  The #FakeTiger too received it's fair share of attention,  and pictures!  Mojo 101 - What to do and what not to do!  The group! A photo session followed and by 11 AM, it was time to leave. The two tribes headed their separate ways. On entering Pune, the tribe bid goodbyes at Nashik Phata. Most of us were home by 4 PM. |
|
| (12)
Thanks
|
| The following 12 BHPians Thank AlQuazi for this useful post: | digitalnirvana, gunin, mh09ad5578, neil.jericho, Red Liner, Roy.S, shyamg28, somspaple, sukiwa, tchsvy, timuseravan, vishy76 |
|
14th June 2020, 18:41
| #44 |
| BHPian Join Date: Mar 2019 Location: Pune, Bangalore
Posts: 107
Thanked: 634 Times
| Re: When you can't afford that Tiger, you build one! My (Modified) Mahindra Mojo The posts that follow are quite long and have been a long time coming. These are general servicing updates that were done in March. However, owing to a deadly mix of commitments and procrastination, updating these on the thread remained last on the list of things to do. Consistency has never quite been my forte!  On with the updates then. The months leading upto March were quite busy. This mean that besides the daily commute and occasional weekend breakfast runs, there was not much riding happening. Nevertheless, by the beginning of March, the odo had hit the 30k figure and some preventive maintenance and upgrades were on the cards.  30000 kms of happiness The first order of the day was a front forks overhaul. The suspension had lost some of it's plushness over time but had otherwise not failed anytime. However, I still felt this was a good time to have the oil and seals replaced. The other point to cater to, were the front brakes. I have always found the stock braking setup of the XT version quite underwhelming and had gotten the chance to try out the new ABS equipped Mojo too. The difference between the two setups was night and day! The ABS was perfectly tuned and the lever provided excellent feedback. The new bike would drop anchor with just two fingers! There were two ways to go about upgrading the brakes, a change of master cylinder or sintered brake pads. The front master cylinder for the ABS version was provided by ByBre while the ABS unit came from continental. A number of owners had swapped the stock JJuan master cylinders at the front with those of the non-ABS Duke 200 (made by ByBre again) and had positive reviews for the same. Others still, had opted for the sintered pads upgrade. The KTM master cylinder retailed for less than Rs. 1000. I decided to try out the swap and check the improvements for myself. If the braking was still inadequate, I would upgrade the pads. KTM Baner had the part in stock. So I purchased the same and made my way to the Mahindra ASC, Solum Automobiles in Swargate.  At this price, the KTM Master Cylinder was significantly cheaper than the stock JJuan and outperformed it too.  The unboxed master cylinder. The top part of the clamp (which also included the thread for mounting the mirror) was not included in the box.  This clamp is shared with multiple Bajaj models and was thus an easy find.  Part Number for reference. There were no other bikes to be attended to when I made it to the ASC so we immediately got to work. The forks were first attended to followed by the master cylinder. The bike was put on the paddock stand. Since the front wheel has to be removed to remove the forks, it was lifted off the ground by placing the jack below the engine cowl.  The headlamp cluster was first removed.  This was followed by the removal of the mud guard and front wheel. The forks could now be removed by loosening the respective bolts of the top and bottom triple clamps. The forks were attended to one by one. The left one was first removed, completely serviced and re installed followed by the right fork.  This bolt, at the top triple clamp, was first loosened.  The three bolts on the bottom triple clamp were then loosened. Once loosened sufficiently, a flat screw driver is wedged in the space so as to loosen the clamp around the fork. This allows the fork to slide down out of the clamps.  The left fork - ready to be disassembled.  The nut on the top was then loosened. Once the nut was loosened completely, the outer tube was free to slide downwards. Hence, immediately after the nut was loosened, the fork was tilted and the oil emptied into a container. Once all the oil had been drained, the top nut had to be separated from the damper (inner silver colored tube).  The damper was first locked from rotation using a spanner. The nut at the top was then loosened by rotating counter-clockwise.  The damper with the top nut removed. A lot of crud had gotten deposited at the top.  Once the outer tube and damper were separated, the damper was turned upside down to empty any residual oil from it. The fork oil had turned a dark brown. This was because some amount of dust/dirt had made its way past the seals which quite surprising since there had been no visible oil leaks. Although the seals had not been damaged in any way, it was best to replace them with the oil itself.  Crud deposited at the top of the outer tube. The tube was then flipped over to remove the oil seal  The clip holding it to the tube had to be removed first, following which, the oil seal came right off. The mechanic confirmed that the seal had hardened with time although I could not notice any discernible difference. Before installing the new seals, the outer tube was cleaned thoroughly.  The tube was given a good soapy wipe down,  Followed by a high pressure wash.  Pressurized air blast to remove all traces of water, and,  A wipedown with a micro fiber cloth The new seals could now be installed. A special tool was used to slide them in place. This tool had placed over the damper. The seal and clip were then placed in position and the damper placed inside the golden outer tube in the direction of installation. The outer tube was then pushed in quickly till its bottom came in contact with the tool which in turn seatet the seal perfectly in place. Once seated, the damper was removed from the outer tube and the tool was separated from it.  The old and new seals, the clip and the special tool.  Installing the seal. With the tool in place, the seal gets perfectly seated in one swift motion.  The perfectly seated oil seal  The damper was given a wipe over with the micro fiber cloth.  The top nut too, was bathed in wurth/WD40 to remove all grime.  The damper was then placed through the tube and the top nut tightened in place.  Measured quantity of fresh oil was then added into the forks.  The top nut was then tightened.  And the fork given some heavy manual sqeezes to ensure everything is alright. |
|
| (6)
Thanks
|
| The following 6 BHPians Thank AlQuazi for this useful post: | digitalnirvana, gunin, neil.jericho, Red Liner, Roy.S, somspaple |
|
14th June 2020, 19:45
| #45 |
| BHPian Join Date: Mar 2019 Location: Pune, Bangalore
Posts: 107
Thanked: 634 Times
| Re: When you can't afford that Tiger, you build one! My (Modified) Mahindra Mojo The posts had to be split since the maximum images limit was reached. With the left fork serviced it was the turn of the other side. This fork was first re-attached to the triple clamps. The right fork was then removed and the same procedure followed to service it. The oil in the right fork had gone from clear to milky white. Strangely though, unlike the other fork, there were no crud deposits in it.  Oil color had changed from clear to milky white due to loss in viscosity with time.  Difference in color of the oil from the two forks. Whereas, oil from one fork had turned dark brown with deposits, the other side was much clearer. The same procedure of emptying the oil, giving the components a thorough cleaning and reassembly with new seals and oil was then followed. The right side fork was then re-attached along with the front wheel and all other associated components. The master cylinder was then attended to. The old master cylinder was first removed. Fresh Dot 4 fluid was poured into the new cylinder which was then attached and bled to remove air bubbles.  Fresh oil poured into the new ByBre master cylinder.  Dot 4 Brake Fluid used by the SVC My phone lost charge around this point so I was unable to click pictures for a detailed step by step bleeding procedure. For thouse interested in a detailed look at the master cylinder overhaul and bleeding process, bhpian saket77's thread (DIY: Complete Master Cylinder & Caliper Rebuild And Reverse Bleeding Motorcycle Brakes) is a good point of reference to understanding the procedure amongst others. With both the tasks done, a quick test ride followed. The suspension had returned to it's stock plushness! I could now fly over all sorts of road undulations again. A suspension overhaul at the 3 year mark irrespective of whether the seals have failed or not is definitely recommended! The Bybre master cylinder was also a marked improvement over the earlier JJuans. The front was more repsonsive to lever inputs. The effort required to stop was also considerably lesser. However, the braking is still quite linear and not quite the 'squeeze-it-and-it-drops-anchor' reponse I had mentally benchmarked for myself after trying the ABS Mojo. The linear feel isn't such a bad thing since a hyper responsive front brake sans ABS is a sure shot way of loosing traction and hitting the dirt. For fellow Mojo owners looking to upgrade their brakes, I would recommend trying out the ByBre master cylinder from either the non-ABS KTM Duke 200 or the ABS Mojo before looking at pad upgrades. The improvement for the given cost investment is better compared to the option of sintered pads, especially since the latter always cause faster wearing of the brake discs. The fork seals costed Rs. 418 while the fork oil was another Rs. 300 (inclusive GST) with another Rs. 700 for labour. The master cylinder replacement costed another Rs. 350 inclusive of labour and brake fluid. With these smaller bits out of the way the mojo is poised for another year of trouble-free ownership. Unfortunately the bike has remained parked for most parts of the last few months owing to the lockdown. Let us just hope COVID situation in Maharshtra is brought under control quickly and all of us are able to hit some semblance of normalcy at the earliest. Last edited by AlQuazi : 14th June 2020 at 19:49. Reason: Spell check. |
|
| (6)
Thanks
|
| The following 6 BHPians Thank AlQuazi for this useful post: | CarManMotorcycl, digitalnirvana, neil.jericho, rakesh_r, sagarpadaki, somspaple |
|