| |||||||

| Search Forums |
| Advanced Search |
| Go to Page... |
 |
| Search this Thread |  15,028 views |
 16th October 2019, 17:46
| #1 |
| BANNED Join Date: Nov 2016 Location: Kollam
Posts: 2,018
Thanked: 6,636 Times
| DIY: Assembling your motorcycle clutch! So a few weeks prior I had rebuilt my clutch but due to messy hands I didn't bother with taking enough pictures, though you can see a few if you look up my (Bajaj CT100B - Utilitarianism Redefined!)ownership thread. Anyhow, I did managed to take a few snaps of the thing being re-assembled, so here goes. The Clutch comprises of the following parts; 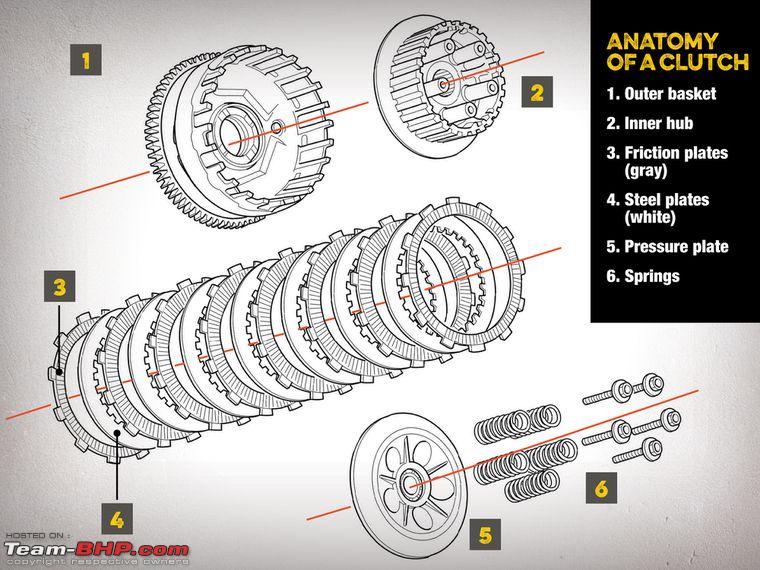 Now most manuals online including the one above for some reason misses to mention the Judder Springs, so here goes;  Now we get to business! Step 1: Make sure you have all the parts required to assemble a clutch and that they've been properly oiled(preferably Friction Plates dipped in oil overnight), also doesn't hurt to confirm with your workshop manual that all components are within their usable limit;  Step 2: Install the Judder Springs(see orientation from the shop manual extract shown earlier), followed by the unusually small looking Friction Plate; 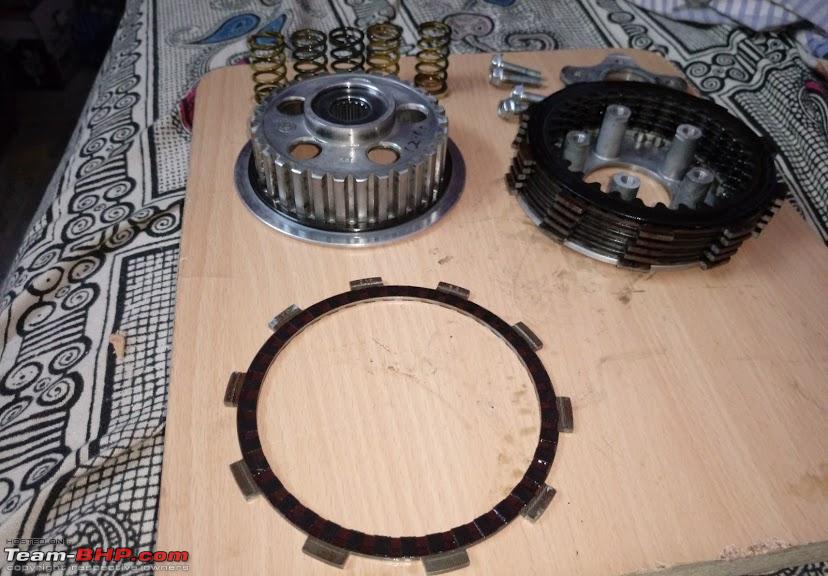 The Springs sit snug within the small plate like this; 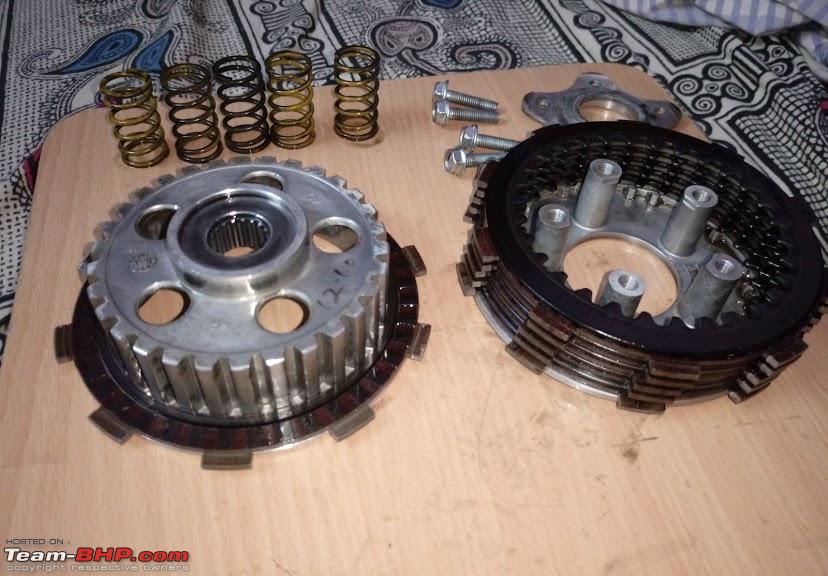 Step 3: Install a Steel Plate followed by a Friction Plate, one by one, the last plate you'll deal with with obviously be a Friction Plate; 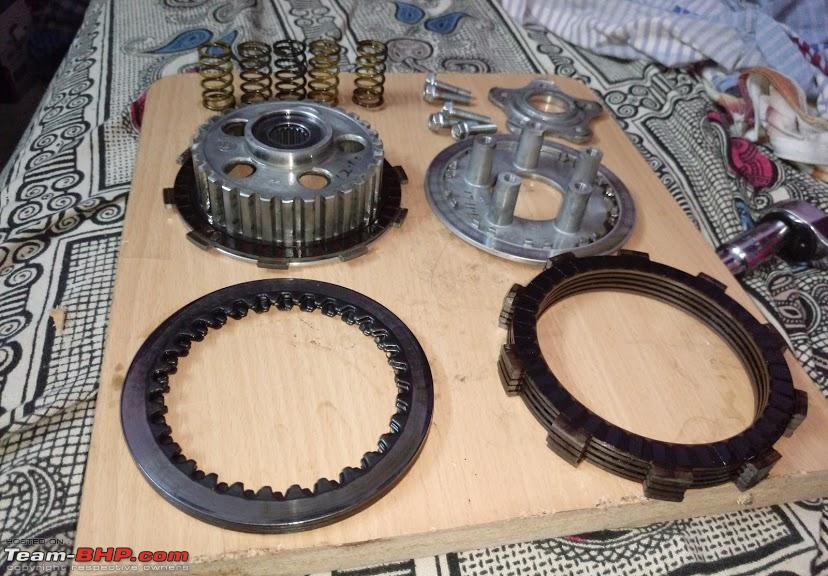 After your done with the Steel Plates and the Friction Plates make sure to install the Pressure Plate, ensuring that the groves on it slot perfectly in place. Now carefully turn the assembly over ensuring that the Pressure Plate doesn't slip out of the groves. Using two regular spacer's for 10mm bolts install two of the springs and bolts, like this; 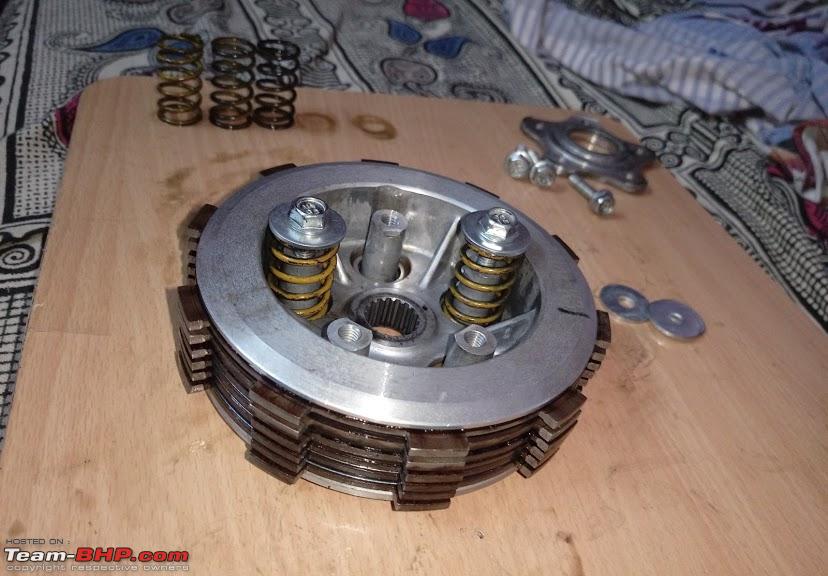 This is done so that there's enough slack for the friction plates to be realigned while inserting the assembly into the clutch basket but at the same time there is enough pressure to ensure that the Pressure Plate doesn't sit misaligned. Step 4: Once the assembly is seated within the clutch basket(for illustration purposes my clutch is still in my bedroom  ) you could remove the spacer's and install all the springs and then install the center piece; ) you could remove the spacer's and install all the springs and then install the center piece;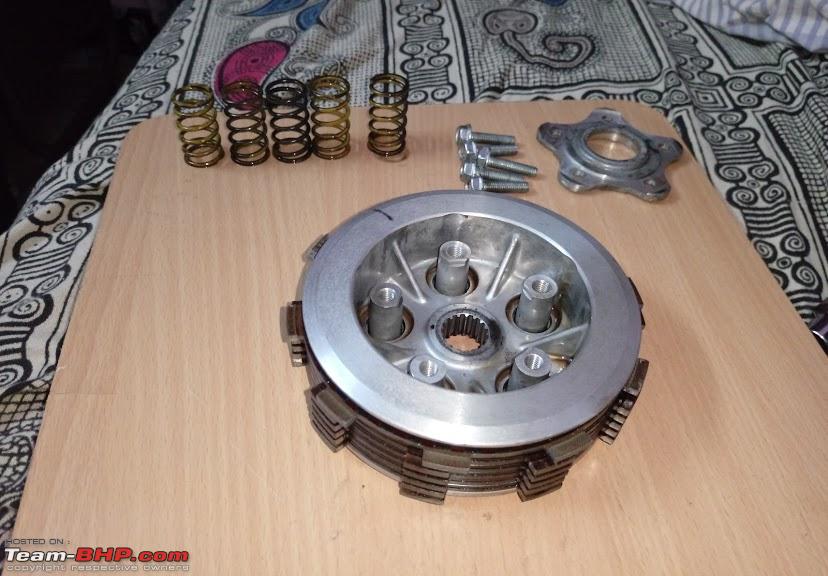 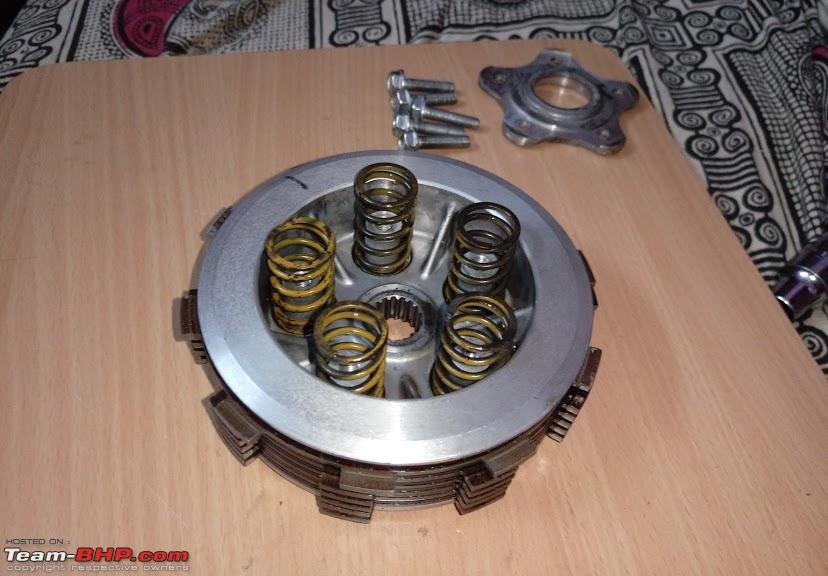  Step 5: Do note that the Center piece is made of aluminum and can crack at the slightest sneeze. 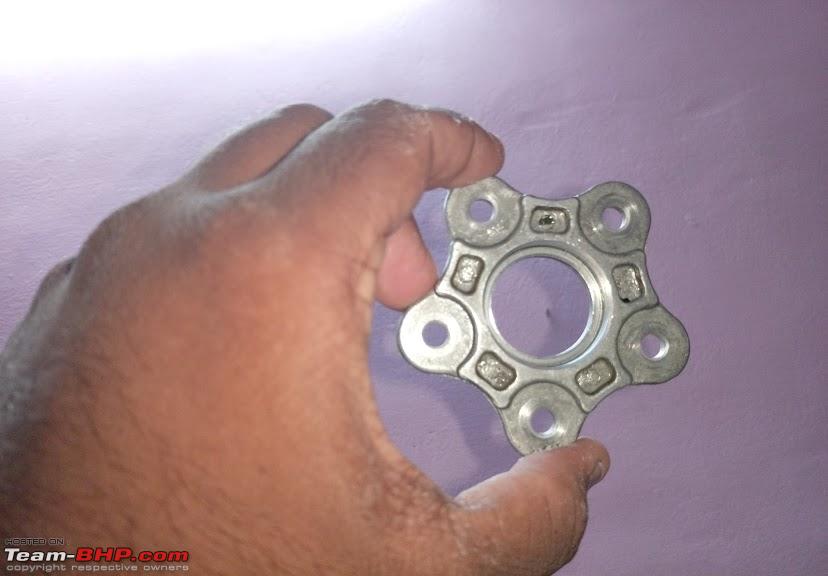 So commonsense dictates that they should be sequentially torqued evenly in a Criss-Cross pattern, and you're done!; 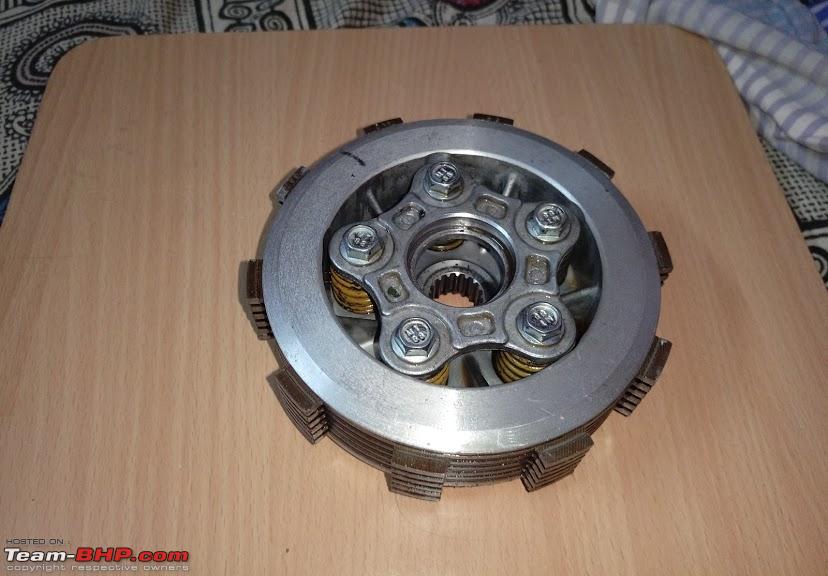 Here's a snap of how things'd look inside the motorcycle, do note that the clutch release bearing is inserted in the below photo: 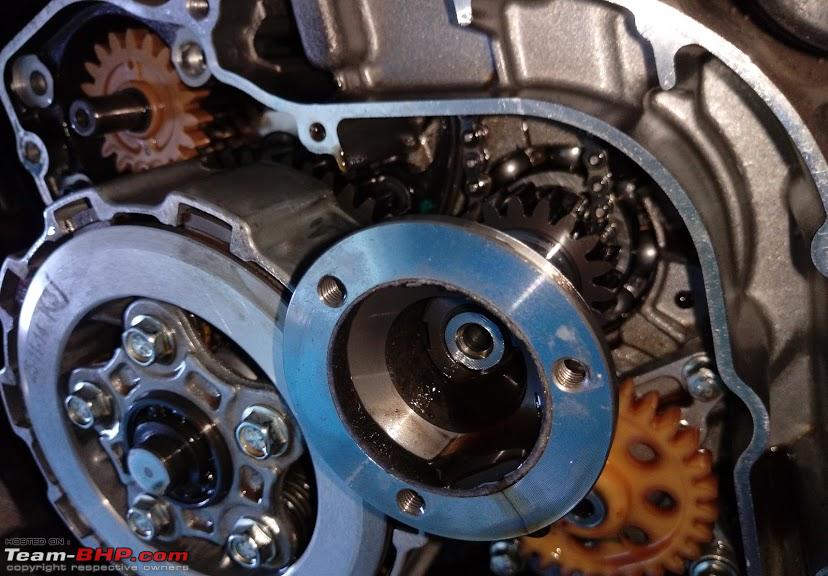 Here's a closer snap of the clutch nut with the release bearing removed; 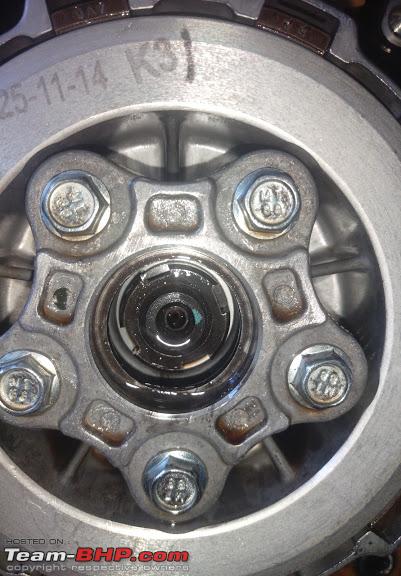 Extra Pointers Here's a snap of the clutch nut tool, remember that the clutch nut is reverse thread, same tool is used to undo the centrifugal filter rotor, though that one is regular thread, do make sure not to mix them up; 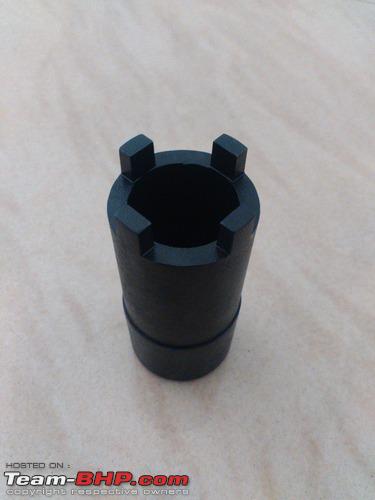 A clutch holder gets the job done easy, cause chances are you'd be replacing a used up clutch and putting the bike in gear and using the rear brake to hold the basket in place would most probably not work as the clutch would start slipping under load; 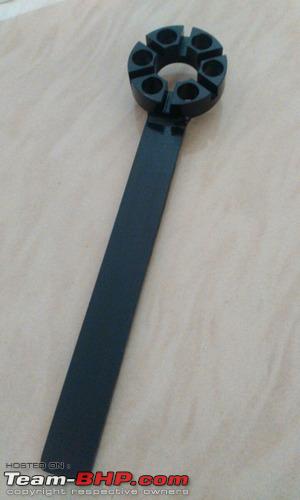 But since mines a Pulsar, I locked the clutch basket using the scissor gear holder for convenience; 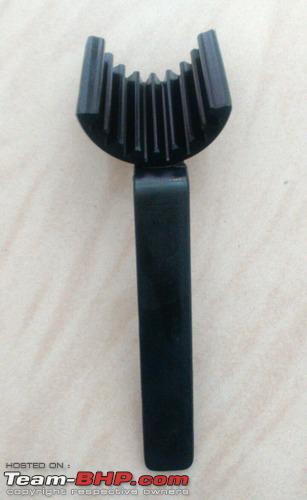 An old biker's tip would be to wrap a 5 Rupee coin in a piece of cloth and jam it between the primary and clutch basket, though not recommended. As for taking the clutch cover off, I'd advise that you look around the case for support tabs, the manufacturer intentionally leaves them so that the clutch cover can be leveraged off, though make sure to not do anything that'd scar the aluminum. A rubber mallet would help as well in the event you're not able to spot any of the tabs. So that's all folks! Happy DIY'ing! Regards, A.P. Last edited by ashwinprakas : 16th October 2019 at 18:06. |

|  (47)
Thanks (47)
Thanks
 |
| The following 47 BHPians Thank ashwinprakas for this useful post: | 2himanshu, adrian, alpha1, AlphaKilo, aniketbapat, ArizonaJim, ashwanth, ask_017, BigBrad, bj96, cogWheel, comfortablynumb, deepfreak15, Deepsp, DevilzzzzOwn, ganeshb, gauravanekar, greenhorn, GTO, GutsyGibbon, ilangop, InControl, Jaggu, Jeroen, kaustubh_vaze, Leoshashi, Manoj2268, Maverick0986, paragsachania, PM - B, PraNeel, R.G, Red Liner, Reinhard, Roy.S, sai_ace, Simat, srvm, sukiwa, Tgo, tharian, theexperthand, Thermodynamics, The_Outsider!, vaasu, VijayAnand1, zavegur |
| |
|
16th October 2019, 21:26
| #2 |
| BHPian Join Date: Apr 2014 Location: Bangalore
Posts: 536
Thanked: 3,007 Times
| re: DIY: Assembling your motorcycle clutch! Amazing! You should start consulting on this kind of maintenance for big bikes. Could give some service centers a run for their money. |
|
| (3)
Thanks
|
| The following 3 BHPians Thank deepfreak15 for this useful post: | 2himanshu, ashwinprakas, BigBrad |
|
17th October 2019, 09:32
| #3 |
| BHPian Join Date: Dec 2005 Location: bang
Posts: 878
Thanked: 3,117 Times
| re: DIY: Assembling your motorcycle clutch! Hi Ashwin, Is there a recommended tightening torque value to be set while tightening the clutch plate retaining bolts ( 4x off )?. In my honda ( you know it right), the clutch plate bolts got loosened while riding and the bike lost the clutch. Consequently, it lost the kick lever action too. Last edited by srini1785 : 17th October 2019 at 09:44. |
|
| (1)
Thanks
|
| The following BHPian Thanks srini1785 for this useful post: | ashwinprakas |
|
17th October 2019, 16:38
| #4 |
| Senior - BHPian Join Date: Oct 2013 Location: Stickn' Around
Posts: 1,066
Thanked: 2,825 Times
| Re: DIY: Assembling your motorcycle clutch! You should probably, share this in xBhp too, probably that's where most Pulsar maniacs hang out. Nonetheless, a good job. Cheers! VJ |
|
| (2)
Thanks
|
| The following 2 BHPians Thank VijayAnand1 for this useful post: | ashwanth, ashwinprakas |
|
17th October 2019, 18:13
| #5 | |||
| BANNED Join Date: Nov 2016 Location: Kollam
Posts: 2,018
Thanked: 6,636 Times
| Re: DIY: Assembling your motorcycle clutch! Quote:
 Fact be told, the bigger the bike the easier it is to work on. A few of the senior members on TeamBhp who own big bikes and work on them can vouch for it, though I doubt they would take the effort to make a thread considering the lay of the land as maintaining warranty status is critical for the rest. From where I see the sheer number of support material(its media as in DVD's for some manufacturers!) for these big machines alone would really make us wonder whether these Indian offerings should even be worth the hassle to save some pennies as in most cases everyone except for factory trained mechanics are going in blind and learn things as we go along, which is far from ideal IMHO. The only upside of working on such pre-historic machines is that they stay true to keeping things simple, even the Pulsar's with their scissor gear which though is a thing of nightmares for the roadside mechanic is in reality merely a pre-loaded sprocket that is designed to avoid lash, uncommon but again simple to grasp. Ánd as far as the basics goes, DAN'S ONLINE MOTORCYCLE REPAIR COURSE is by far the best source(rather Gold Mine!) of consolidated information available online, and its FREE!. Quote:
Quote:
I'm quite surprised that the kicker is linked to the clutch on a Honda, due to the off-road pedigree I presumed it would be otherwise, if it gives you any solace the kicker on my CT100B is hooked up the same way. Last edited by ashwinprakas : 17th October 2019 at 18:23. | |||
|
| (4)
Thanks
|

| The following 4 BHPians Thank ashwinprakas for this useful post: | deepfreak15, JagMan, rakesh_r, Red Liner |
|
18th October 2019, 01:43
| #6 | |||
| BHPian Join Date: Jun 2008 Location: Chennai
Posts: 61
Thanked: 25 Times
| Re: DIY: Assembling your motorcycle clutch! Quote:
1. Neat, and thank you !2. Judder spring info is from Honda Common Service Manual 1995 Ed? 3. Where did you get the special tools? Quote:
+1. Even though shop manuals are there, practical aspects are discussed only on forums like these and is always an inspiration for novices like me. Quote:
For NS, they recommended Loctite 243 + 1.2 kgf-m in the Bajaj training video, but the mechanic used a "clutch centering tool" to first completely compress the lifter plate and prevent it from breaking. Suzuki recommends 'snug fit' for GS150R and 0.51 kgf-m (almost nothing!) for Gixxer 155. In Honda manuals, it is usually 1.1-1.2 kgf-m for these bolts. Bajaj and Suzuki use 5 or 6 bolts, so the load is reduced (?). P.S. 'Like' of Xbhp = 'Thanks' of TBhp . | |||
|
| (1)
Thanks
|
| The following BHPian Thanks ashwanth for this useful post: | ashwinprakas |
|
18th October 2019, 08:25
| #7 | |
| Distinguished - BHPian  Join Date: Aug 2006 Location: Bangalore
Posts: 5,209
Thanked: 18,044 Times
| Re: DIY: Assembling your motorcycle clutch! Quote:
As someone who has done some kind of DIY on an import one owns, i will tell you why many refrain beyond a point. 1. Replacement parts are extremely expensive 2. They are not available off the shelf 3. They take a month or two to reach your hands if not sold by aftermarket suppliers in India. 4. Therefore, god help you if you over torque and break something in the guise of DIY 5. Because then, your bike is standing in your public parking lot with the innards completely open, waiting for parts for a month or more. So you see, unlike abroad where you can walk in somewhere and buy the part cheap or just order online with one day delivery, that doesn't work here. And lastly, yes, some of us are so focused on not breaking anything (see 1-5 again) that the last thing on our minds is to take photos or a video for a DIY report  The other issue is mental fear. See, almost every guy who owns an import has not owned AND worked on his own cheaper bikes and then graduated (very normal abroad, its like schooling at home, or should i say tooling at home (fooling even? Alright i will stop). So when you land up with an import, the obvious thing to do is to do what you always did since you turned 18. Book an appointment with the service center  | |
|
| (2)
Thanks
|
| The following 2 BHPians Thank Red Liner for this useful post: | ashwinprakas, bj96 |
|
18th October 2019, 10:15
| #8 |
| Distinguished - BHPian | Re: DIY: Assembling your motorcycle clutch! Excellent post, very well explained. Would love to see some more DIY jobs shown like this. Jeroen |
|
| (1)
Thanks
|
| The following BHPian Thanks Jeroen for this useful post: | ashwinprakas |
|
18th October 2019, 12:46
| #9 | ||||||||
| BANNED Join Date: Nov 2016 Location: Kollam
Posts: 2,018
Thanked: 6,636 Times
| Re: DIY: Assembling your motorcycle clutch! Quote:
Quote:
Quote:
; Quote:
If you can afford a Royal Enfield then look no further than a Cast Iron or at most an AVL, my preference leaning towards AVL's as I believe them to be superior to the CI and UCE's, though any purist out there would hunt me down for making that statement. If you'd rather perfer buying a new motorcycle then go for the CT100(Kawasaki Origin Block, there's also a Self Start variant with Bajaj Block) eyes closed. Even though they've managed to introduce SAI to mix, a few minutes of tinkering and you can easily scrap it, other than that this is literally(to my knowledge) the only motorcycle available in the current market that has the CDI powered directly from the stator i.e would keep running even post apocalypse! I believe only the CB Points predates this setup and they've been out of production for more than a decade. But do hurry! As the Kawasaki block would definitely not make it to BS6 territory, unless Bajaj has some tricks up their sleeves. Quote:
In fact so much information that it'd make serial jugaad'ists like myself envious.  Quote:
Still being a teenager when I got my first motorcycle I used to be scolded for even going as far as taking the seat off and I too did stick to ASC for a bit but after I realized the quality of workmanship I simply couldn't let my motorcycle be worked on by someone that I did not trust. Even a year or two back when I was still a minion of the corporate's, due to lack of time I handed my motorcycle over to the ASC for a front end OH for which they charged me over 4k(Less than 1k for consumables, rest for labor) and still managed to mess up my fork outer tube(Read 1.5k for replacement parts alone, yet to replace). So to sum it up I go back to the following quote with a little addition of my own; "It takes more love to share the saddle than the bed, and even more so to share the wrench!" Quote:
If all goes well I have a few more DIY Job's planned for the motorcycle, one thing unique about the Pulsar is that it sports a dry stator which is uncommon on motorcycle this side of the globe, so I presume I will have an easier time clicking pictures when simultaneously working on the motorcycle. And it goes without saying, I do envy your man-cave and hope to work up to something similar in the years to come. Cheers, A.P. | ||||||||
|
| (3)
Thanks
|
| The following 3 BHPians Thank ashwinprakas for this useful post: | ashwanth, bj96, Jaggu |
|
22nd October 2019, 10:36
| #10 | ||
| BHPian Join Date: Dec 2005 Location: bang
Posts: 878
Thanked: 3,117 Times
| Re: DIY: Assembling your motorcycle clutch! Quote:
I have in the past suspected the threads and bought me a new clutch set and have no better results. Here's how the clutch side of the CD185 looks like. Pretty much a standard pulsar or CBZ type. I have since tightened the bolts as much as i can and have put the side covers on. As you can see from the pictures of the side cover which i have marked, the nuts came clean off before breaking a part of the pusher rod mechanism ( donno where that part went). It was a near catastrophic failure but somehow held through. I am pretty sure that even before this event i tightened the bolts pretty hard for snug fit. Quote:
I noticed a pronounced play between the main crankshaft drive gear and the clutch gear. Is that normal in a bike?. | ||
|
| (2)
Thanks
|
| The following 2 BHPians Thank srini1785 for this useful post: | adrian, ashwinprakas |
|
22nd October 2019, 20:34
| #11 | |
| BHPian Join Date: Sep 2009 Location: Trivandrum
Posts: 932
Thanked: 1,215 Times
| Re: DIY: Assembling your motorcycle clutch! Quote:
https://www.tryloctite.in/products/t...rs/loctite-242 You should always use a medium strength thread locker while reassembling the engine sprocket nut as it is known to loose up and damage the clutch casing. | |
|
| (2)
Thanks
|
| The following 2 BHPians Thank adrian for this useful post: | ashwinprakas, srini1785 |
| |
|
22nd October 2019, 23:08
| #12 | |||
| BANNED Join Date: Nov 2016 Location: Kollam
Posts: 2,018
Thanked: 6,636 Times
| Re: DIY: Assembling your motorcycle clutch! Quote:
Quote:
On a Primary Driver Kick Starter, the kicker turns the primary drive via the clutch basket, in effect enabling it to bypass the transmission completely. 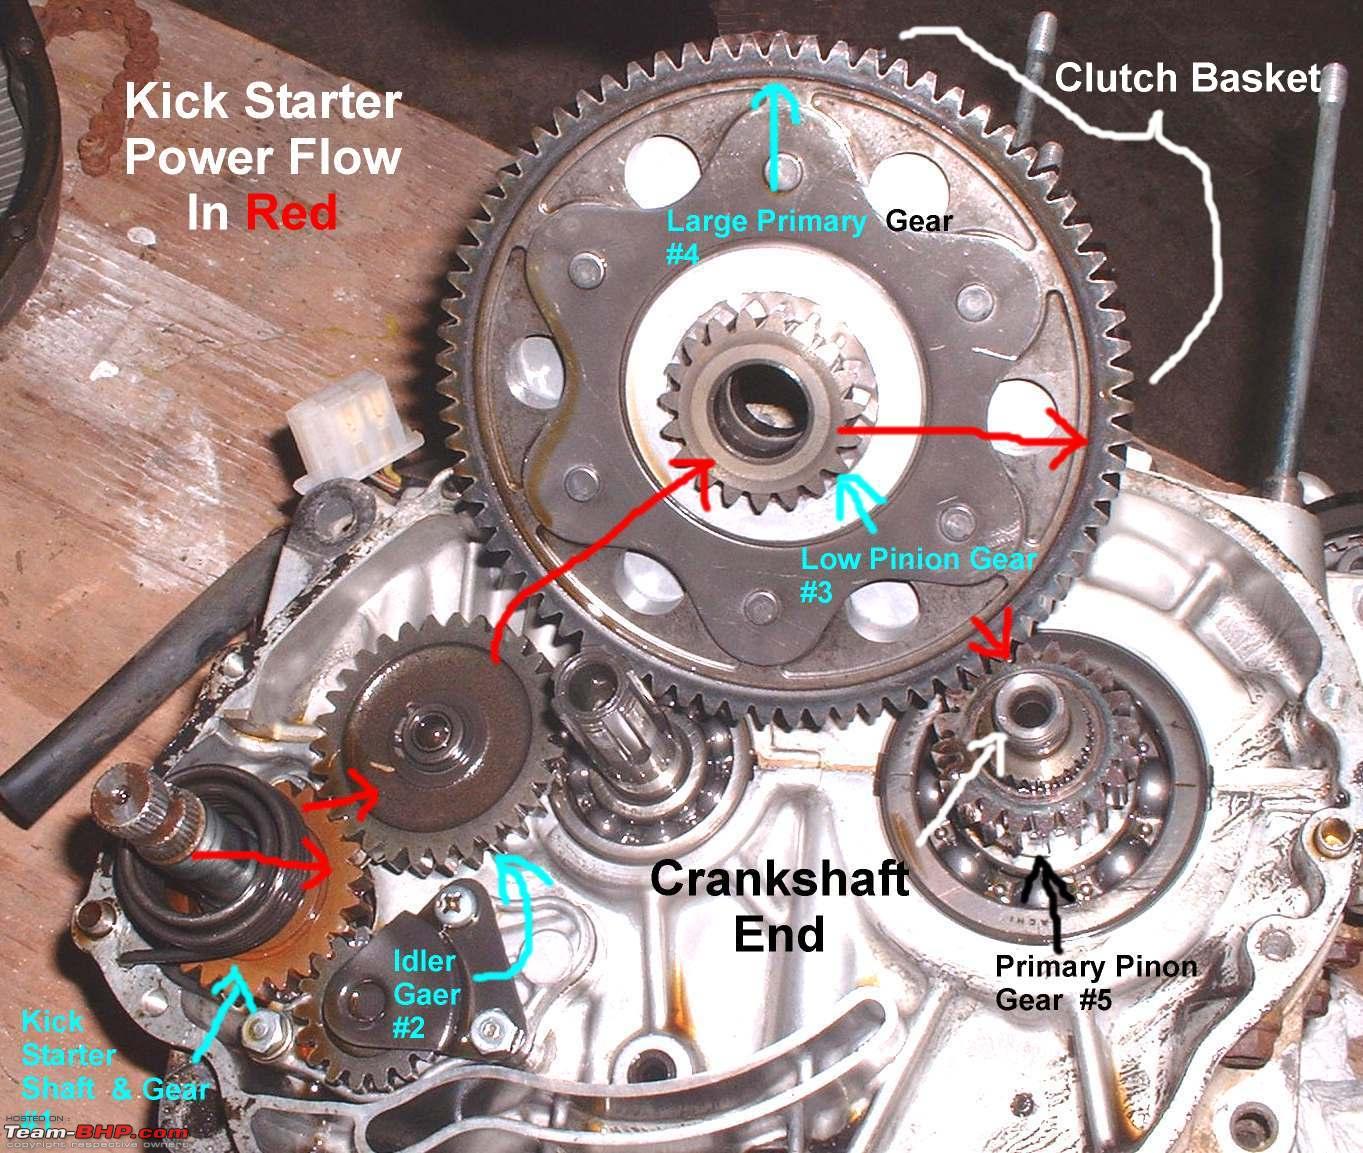 I have used such motorcycles but I do not exactly recall the motorcycle so a bit of Googling and I found that the Fiero and Pulsar had the setup. Though as far as ownership goes the CT100B is literally my first kick-only motorcycle, hence the surprise as the first time I figured that out what when stuck on an uphill trail where the motor stalled on me. Quote:
If at all play would be there then my first suspicion would be the clutch basket dampers, but I have a feeling you would've already inspected those. Do keep us posted. Regards, A.P. | |||
|
| (2)
Thanks
|
| The following 2 BHPians Thank ashwinprakas for this useful post: | Roy.S, srini1785 |
|
23rd October 2019, 09:52
| #13 | |||
| BHPian Join Date: Dec 2005 Location: bang
Posts: 878
Thanked: 3,117 Times
| Re: DIY: Assembling your motorcycle clutch! Quote:
Quote:
Quote:
The play is not on the clutch bolts ( sprockets??) . Its rather on the complete clutch assembly and the main drive pinion. By that i mean the play between the main drive gear ( from the crank shaft, Primary pinion gear #5) and the clutch gear ( outer gear , Large primary gear #4 ). I will try to make a video over the week end and post. Last edited by srini1785 : 23rd October 2019 at 10:13. | |||
|
| (1)
Thanks
|
| The following BHPian Thanks srini1785 for this useful post: | ashwinprakas |
|
23rd October 2019, 21:16
| #14 | |||
| BANNED Join Date: Nov 2016 Location: Kollam
Posts: 2,018
Thanked: 6,636 Times
| Re: DIY: Assembling your motorcycle clutch! Quote:
Quote:
 Though its not mine, this block has way more than twice the mileage mine has clocked, its a friends block that was rebuilt from scratch recently, not definitely due to wear and tear but due to his professional curiosity as he is a company(car) trained mechanic by profession. But I did ask a fellow enthusiast who owns a UG3 Pulsar 180 and it has a primary drive kicker as expected; 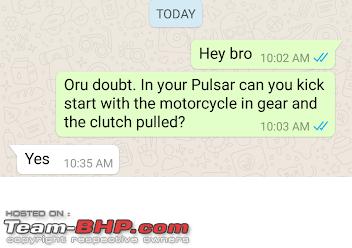 Quote:
The play I was referring to is caused by the following dampers wearing down;  To access them the hub has to be disassembled(done at lathe), not the recommended means of getting the job done as a complete hub replacement is the most ideal way of doing it. Anyhow if these dampers wear down then there would be substantial play of the clutch hub. Last edited by ashwinprakas : 23rd October 2019 at 21:19. | |||
|
| (1)
Thanks
|
| The following BHPian Thanks ashwinprakas for this useful post: | srini1785 |
|
28th October 2019, 19:56
| #15 | |
| BHPian Join Date: Dec 2013 Location: Mumbai
Posts: 764
Thanked: 1,014 Times
| Re: DIY: Assembling your motorcycle clutch! Quote:
The funny thing is, if assembly is done without knowledge of these markings, you would still end up fitting the thing and the bike would run too. But performance, reliability and longevity could have vast differences from what it should be. Some example of problems can be like: 1) less than normal pickup and/or juddering and vibration even though clutch is new 2) premature and rapid wear out of the plates(sometimes as fast as within 500kms or less, or one month) 3) clutch failure I can't give a whole list of which bikes have these markings on the components but I have seen premature clutch failure due to incorrect assembly in some bikes like older models of Pulsar 150/180, Pulsar135(now discontinued), HH Karizma. Sometimes it takes a while to notice something is not right. Just my two cents. | |
|
| ()
Thanks
|
|