Team-BHP
(
https://www.team-bhp.com/forum/)
-
Motorbikes
(
https://www.team-bhp.com/forum/motorbikes/)
I've also made a video of it here for those who want to watch it but I've included every step on this thread too.
https://www.youtube.com/watch?v=AJzbEQ7h3Wk&t=144s
Let's dive straight into the DIY shall we. These are the things that you will need for this DIY.
1) 1 Liter measuring Jar
2) Ratchet Handle with 10 mm socket
3) 65mm oil filter wrench removal cap
4) 10 inch extension rod + 10 inch L rod
5) 5mm allen Key from tool kit
6) Regular Star screw driver
7) Regular Flat screw driver
8) 8mm Allen Key
9) 4T 3000 Motul Mineral Engine Oil 15W 50 - 1.7 Liters needed
10) Oil Filter
11) Drain Bolt Washer
12) 2x Push Button plastic clips
13) Funnel
14) Rear Paddock Stand
1 Step : Remove the Front Protective Guard
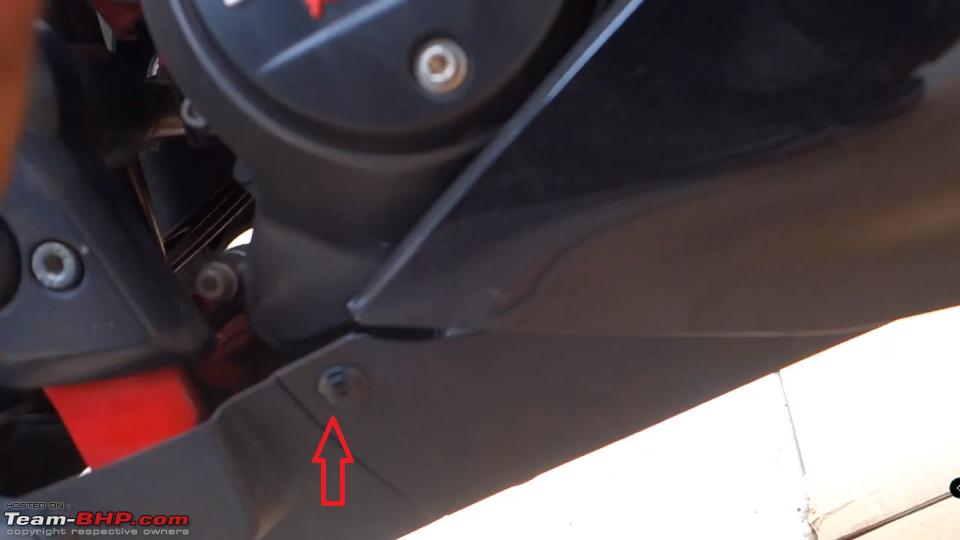
There is a protective guard just behind the front tyre as shown in the picture below. You need to remove it with the help of the 5mm allen key provided in the tool kit. Just rotate the screws in the anti-clockwise direction. Once the screws are off, just tug the guard slowly upward and it should come out easily.
Please note, this also allows you access to the oil filter.
 2nd Step : Remove Under Belly Pan
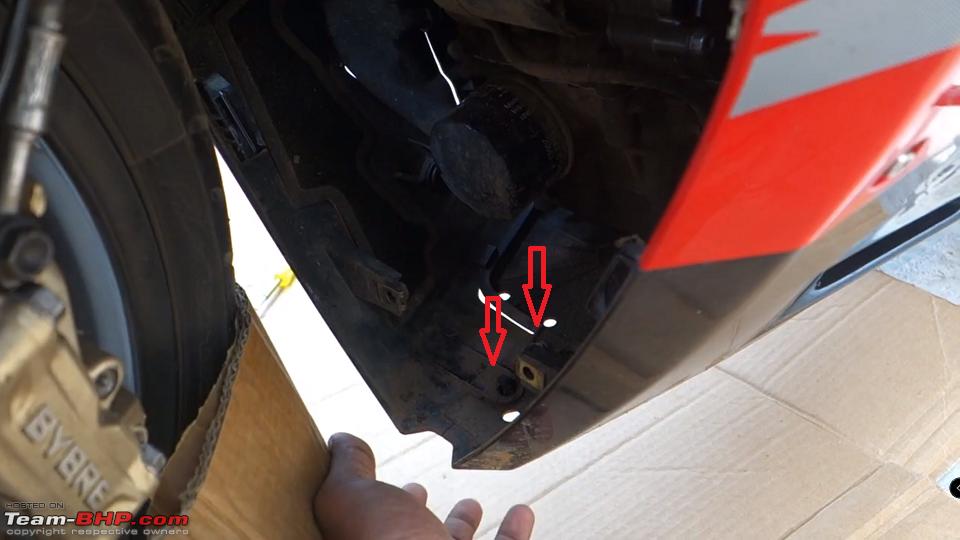
With the help of the flat screw driver, remove the 2 plastic push buttons that you see in the picture below. You can remove it without breaking it if you are a little careful. But even if you do break it, just make sure to order those to in advance before you start this DIY.
Next remove the 2 x 10mm bolts which are under the belly pan with the help of the ratchet handle and 10mm socket. Again rotate it in the anti-clockwise direction.

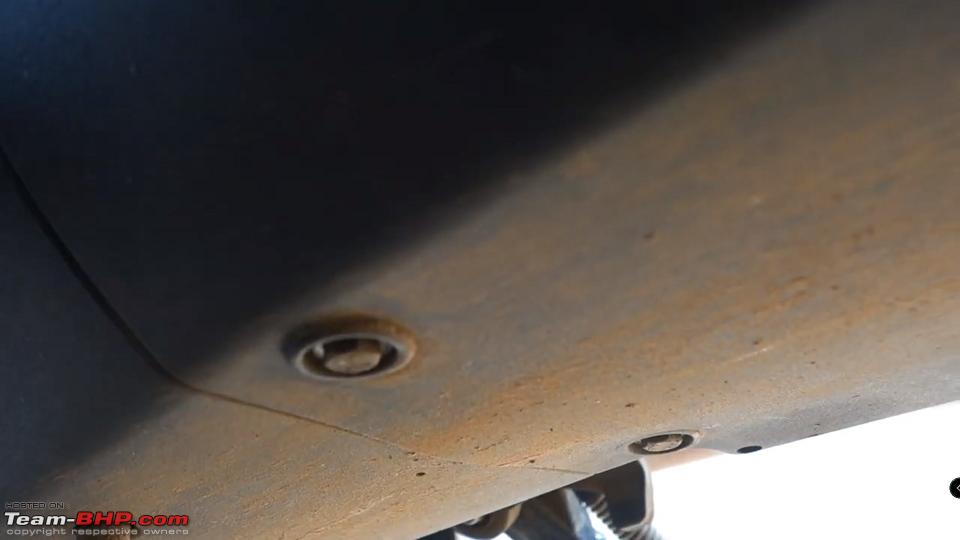
Next remove the 2 x star screws that are on either lower sides of the belly pan

Now just slide the belly pan towards the left and it should just slide out.
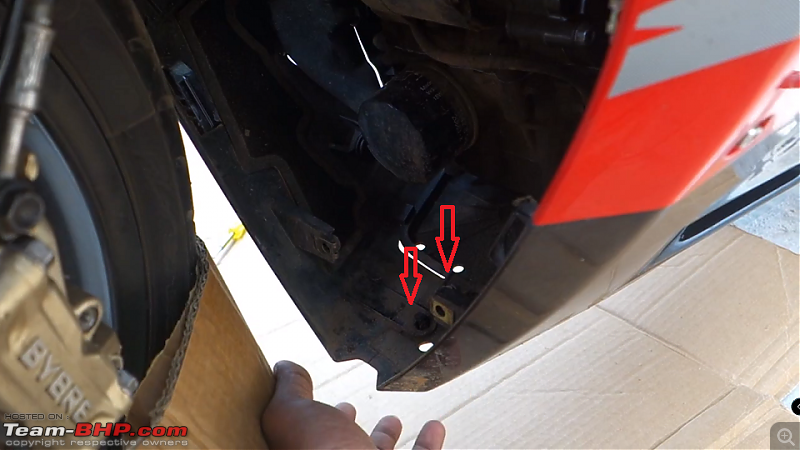
3rd Step : Drain Engine Oil
Once you remove the belly pan, the oil drain bolt gets exposed. Now use the 8mm Allen key to remove the drain bolt by rotating it in the anti-clockwise direction.
Don't forget to place an empty container below to capture the old oil. It will gush a bit further away and I did mess up my floors.
 4th Step : Remove the Oil Filter
To remove the old oil filter you need to connect the 10 Inch straight + L-Rod together with the 65mm Oil filter wrench cap as shown in the pic below.
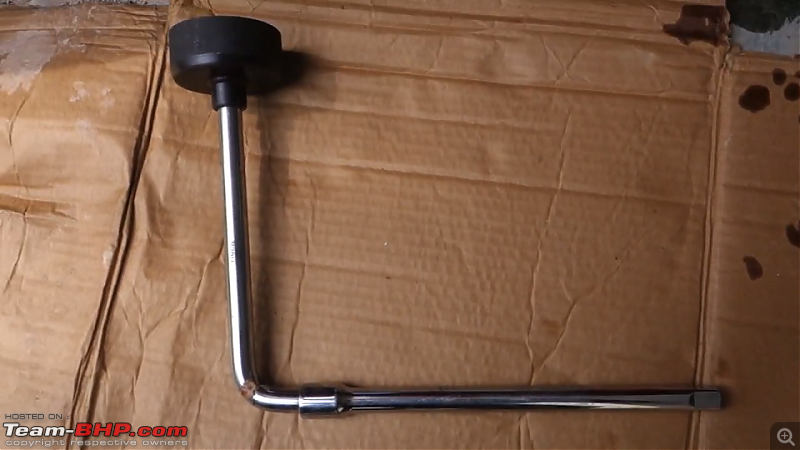
Use this to hold the Oil filter and rotate it in the anti-clockwise direction to loosen it. Again you need to place a container below the oil filter as some oil will leak from it too.
5th Step : Fit the new Oil filter
Before you fit the new oil filter into your bike you need to lubricate the rubber gasket on the filter with some new oil. Then just rotate it with your hand in the clockwise direction. Don't over tighten it !
 6th Step : Screw the oil drain bolt back
Take the new drain bolt washer, lubricate it with some new oil.
Clean the oil drain bolt thoroughly with some clean cloth. Place the washer on the drain bolt and tighten it back in clock wise direction with the 8mm Allen Key. Again remember not to over tighten.
 7th Step : Fill New Engine Oil
Remove the engine oil cap in anti-clockwise direction and with the help of a funnel , fill her up with the new engine oil.
With the help of a measuring jar, fill up 1.7 liters of engine oil.
8th Step : Check for Leaks and Engine oil level
All you have to do is inspect for any leaks from the oil drain bolt side and the oil filter side. If everything is good. Just start up your bike. Let it idle for a while. Turn it off and check the engine oil level. it should be between the max and min level.
That's it, so simple ! Hope you guy's enjoy doing this DIY. Cheers.
Quote:
Originally Posted by stanjohn123
(Post 4716806)
I've also made a video of it here for those who want to watch it but I've included every step on this thread too.
|
Saw the YouTube video. Great idea about using the 65mm rachet head to remove the filter from the body.
Also great that you gave a list of all the tools & spares that will be required for doing the job.
Two stupid questions from me.
1. When you drain the oil and remove the filter, why did you not flush the oil sump. I have seen mechanics drain the oil and add maybe 100-200 ml of oil and give the bike a good shake to clean out the engine sump, drain that flushing oil and then intake fresh oil.
2. Why did you not fill fresh oil into the new filter before fitting it back.
This takes care of air pockets in the filter unit.
Great DIY by the way.
Quote:
Originally Posted by Ithaca
(Post 4716869)
Saw the YouTube video. Great idea about using the 65mm rachet head to remove the filter from the body.
Also great that you gave a list of all the tools & spares that will be required for doing the job.
Two stupid questions from me.
1. When you drain the oil and remove the filter, why did you not flush the oil sump. I have seen mechanics drain the oil and add maybe 100-200 ml of oil and give the bike a good shake to clean out the engine sump, drain that flushing oil and then intake fresh oil.
2. Why did you not fill fresh oil into the new filter before fitting it back.
This takes care of air pockets in the filter unit.
Great DIY by the way.
|
Regarding the 6.5mm ratchet size I can't change the audio now, but I corrected that error with subtitles.
1. I really don't think it's necessary as I change my oil like every 5-7k km. But you could do that too if you needed.
2. Hmm I never did this with any of my oil change DIY's, even in my car's. I'm not sure about the air pockets and if this will create any issues but so far, no issues for me.
Rewriting as battery ran dry the first time. :D
Kudos! Presentation is eons ahead compared to the sea of Desi DIY's.
Now the Millon Dollar Question: Have manufacturers stopped providing basic maintenance guidelines in the owners manual?
If so I'm pretty sure it's their way of sumbliminaly wiring first time motorcyclists to depend on ASC's even for basic maintenance rituals.
A tip to torque the oil drain bolt which ideally has a torque spec of around 25nm would be to tighten as hard as you can only using your fingers, no forming a fist and using your body weight, this ensures that the drain bolt is snug as well as ensures that you don't by error ruin the threads on the aluminum casing.
A thumb rule practice would be to fill oil depending on the oil level indicator or dipstick.
As for flushing with oil, I have gone through several service manuals and not one has suggested the same, simply doesn't make sense as well considering one of the oils function aside lubrication is to keep suspend particles and keep the motor clean.
That's all from my end. Keep up the good work.
Cheers,
A.P.
Quote:
Originally Posted by ashwinprakas
(Post 4716897)
Rewriting as battery ran dry the first time. :D
Kudos! Presentation is eons ahead compared to the sea of Desi DIY's.
Now the Millon Dollar Question: Have manufacturers stopped providing basic maintenance guidelines in the owners manual?
If so I'm pretty sure it's their way of sumbliminaly wiring first time motorcyclists to depend on ASC's even for basic maintenance rituals.
A tip to torque the oil drain bolt which ideally has a torque spec of around 25nm would be to tighten as hard as you can only using your fingers, no forming a fist and using your body weight, this ensures that the drain bolt is snug as well as ensures that you don't by error ruin the threads on the aluminum casing.
A thumb rule practice would be to fill oil depending on the oil level indicator or dipstick.
As for flushing with oil, I have gone through several service manuals and not one has suggested the same, simply doesn't make sense as well considering one of the oils function aside lubrication is to keep suspend particles and keep the motor clean.
That's all from my end. Keep up the good work.
Cheers,
A.P.
|
Thanks for the compliment.
No, the manual does not have guidelines on how to do these basic maintenance these day's. I don't think they were available a few years back also.
If ASC is competent and someone whom you trust, no problem in giving our vehicles to them.
The issue for me is, I live in a village, so access to service center is impossible. I know there are a few RR 310 customers like me. So for them this DIY is very useful. Also I simply love doing such DIY's, you get a great sense of satisfaction working on your own vehicles.
Quote:
Originally Posted by stanjohn123
(Post 4716996)
No, the manual does not have guidelines on how to do these basic maintenance these day's. I don't think they were available a few years back also.
|
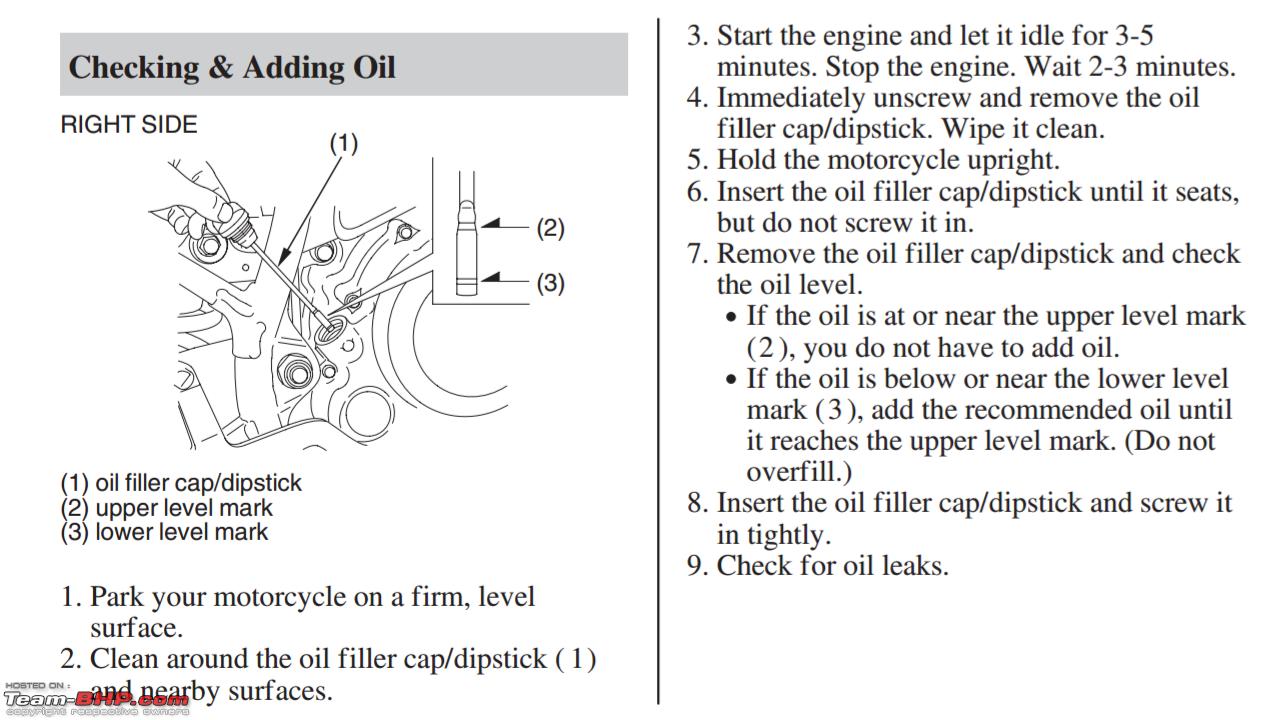
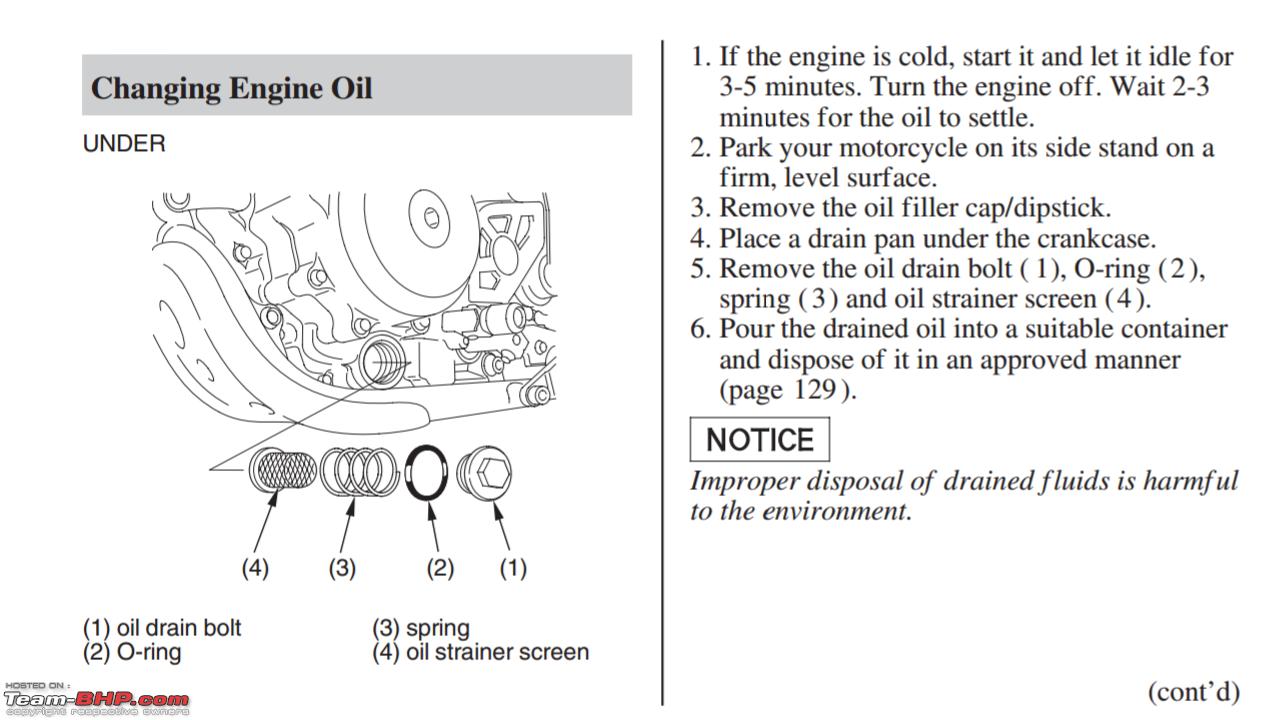
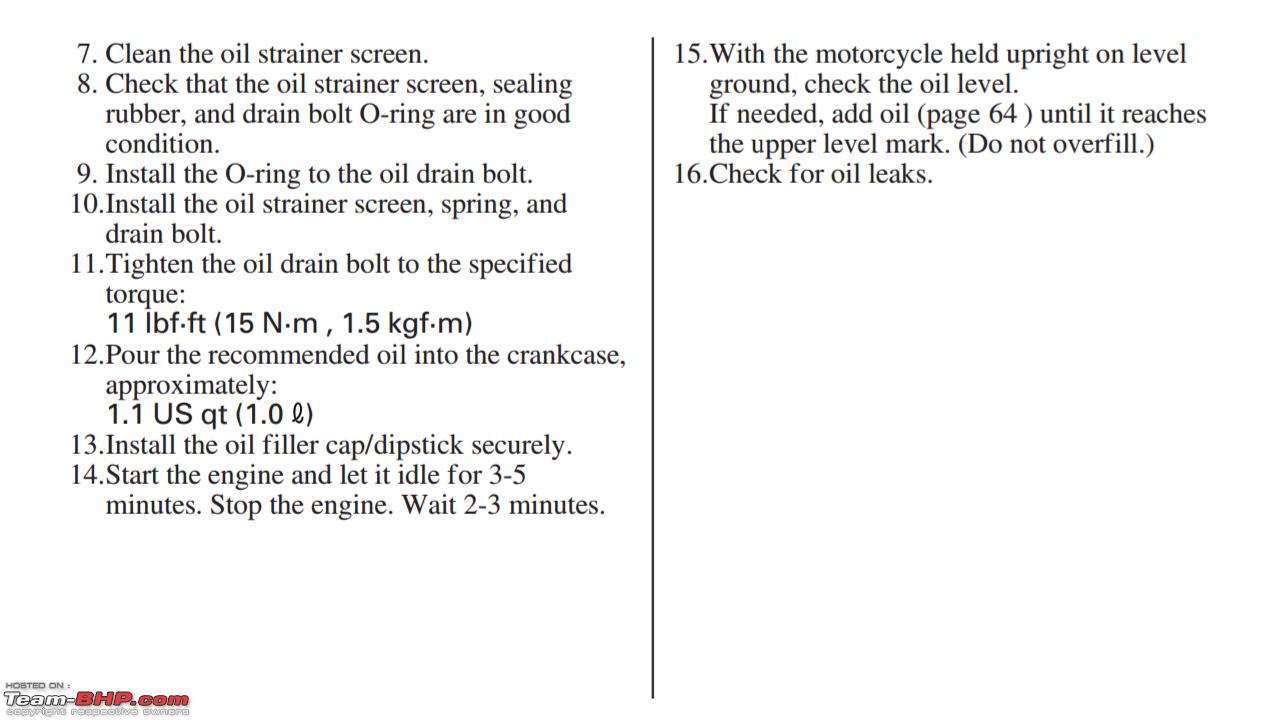
Times change, this is the digital copy of the Honda CRF230's owners manual;


Got an even older Bajaj Sunny manual in front of me, that's so detailed that it'd put a modern day service manual to shame. :D
Quote:
If ASC is competent and someone whom you trust, no problem in giving our vehicles to them.
The issue for me is, I live in a village, so access to service center is impossible. I know there are a few RR 310 customers like me. So for them this DIY is very useful. Also I simply love doing such DIY's, you get a great sense of satisfaction working on your own vehicles.
|
Amen for the sense of satisfaction.
As for trust, well, the longer you'd be pinning the throttle at WOT and the farther you intend to go from home, the less you start trusting other people with your motorcycle.
Hope to see more DIY's of the 310.
Cheers,
A.P.
Quote:
Originally Posted by stanjohn123
(Post 4716877)
1. I really don't think it's necessary as I change my oil like every 5-7k km.
But you could do that too if you needed.
2. Hmm I never did this with any of my oil change DIY's, even in my car's. I'm not sure about the air pockets and if this will create any issues but so far, no issues for me.
|
Most marine engineers will tell you that we do the draining & flushing of our engine sumps during oil changes. Specifically for air compressors and other smaller engines.
And we also fill up new oil into the oil filters before fixing them to avoid air pockets.
May not be applicable for cars or bikes since the quantity of oil required is less in comparison.
Quote:
Originally Posted by Ithaca
(Post 4717275)
Most marine engineers will tell you that we do the draining & flushing of our engine sumps during oil changes. Specifically for air compressors and other smaller engines.
And we also fill up new oil into the oil filters before fixing them to avoid air pockets.
May not be applicable for cars or bikes since the quantity of oil required is less in comparison.
|
I agree with filling the oil filter. its called priming the filter.
Flushing the oil sump is not necessary for such frequent changes. For sure if you encounter sludge in the sump, not other wise.
Still flushing with new engine oil is eons better than using some flush specific product which will probably do more harm than good.
What did you do with the dirty oil ? Did you find a local place where you can recycle ?
Great job, well done and nicely written up and even video!
Just a few comments: Maybe you did, but I did not see it mentioned, you really should drain the oil while it is still at operating, or near, temperature. It will flow easier, so more old oil comes out and takes along any debris.
As other suggested, filling the filter with oil, prior to installation is good practice.
Jeroen
Quote:
Originally Posted by vinmechanic
(Post 4718857)
What did you do with the dirty oil ? Did you find a local place where you can recycle ?
|
I gave it to my friendly neighborhood garage. I think they sell it off to someone else.
Quote:
Originally Posted by Jeroen
(Post 4743459)
Great job, well done and nicely written up and even video!
Just a few comments: Maybe you did, but I did not see it mentioned, you really should drain the oil while it is still at operating, or near, temperature. It will flow easier, so more old oil comes out and takes along any debris.
As other suggested, filling the filter with oil, prior to installation is good practice.
Jeroen
|
Yeah sure, I'll keep that in mind next time.:thumbs up
| All times are GMT +5.5. The time now is 21:40. | |