Team-BHP > Motorbikes
Register New Topics New Posts Top Thanked Team-BHP FAQ


Reply
  Search this Thread
26,137 views
Old 28th May 2020, 12:53   #1
BHPian
 
Join Date: Mar 2016
Location: Pune
Posts: 239
Thanked: 563 Times
Partial restoration of my 1996 Yamaha RXG 135 - A lockdown project!

Background

My uncle got himself a 1996 make, Yamaha RXG back in 1999. It traveled with him across the country (he is in the armed forces) and was later passed on to me in 2009 as my first bike . I was in final year of engineering at that time and vividly remember the change from riding an Activa to riding an RX!
The bike had done close to 34k kms when I got it and it needed some engine work (as told by the first mechanic I took it to) and a routine service. Looking back in hindsight, I'm pretty sure I was swindled big time by this mechanic (first bike, didn't know jack about its maintenance) but he did a decent job with it.
This is how it looked when I got it -

Partial restoration of my 1996 Yamaha RXG 135 - A lockdown project!-stock-2.jpg

Although the RX served me really well, it came with its fair share of issues: The electricals were pretty bad, it used to leak oil all over the place and it had its fair share of niggles during the early years of ownership. There was never a problem with its performance though - I would love riding it to work and would keep looking for excuses to drop out of my car pool. In 2012 I got myself a Yamaha SZ-R and this replaced the RX and became the daily workhorse. The RX was limited to weekend joyrides and an office commute every once in a while.

Here's a picture of the other Yamaha, the SZ-R, taken on the day of delivery. I had this one for close to 4 years and 33k kms.
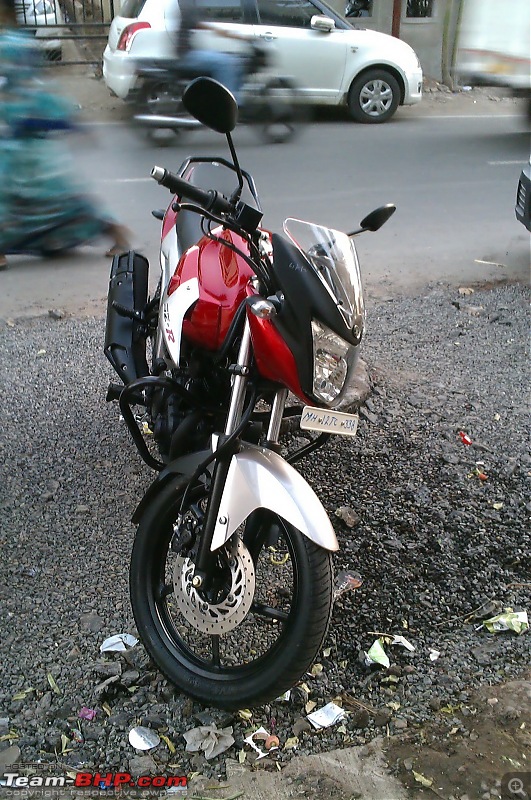
Partial restoration of my 1996 Yamaha RXG 135 - A lockdown project!-szr.jpg

Unforeseen start to the restoration

In 2015 I had to move to Mumbai for a year and hence I passed on the RX to my cousin. That turned out to be a mistake since he ran it without 2T oil and seized the piston
So 2016 saw another round of engine work - new piston, cylinder block ( a new one wasn't available, my mechanic found a second hand one which was in a good shape). New clutch and brake levers, new cables, silencer decarb etc. and the bike was back to its former self. I remember how happy I was to hear the sound when I went to pick up the bike.

The bike has been running perfectly fine since then. Age and rust were catching up to the tank and the rear mudguard so I got them replaced. The new mudguard turned out to be worse than the old one, for starters it was much thinner and it started rusting within a year of installation. Side panels too were replaced since their holding brackets were broken. I made the mistake of replacing the lettering along with the side panels - that is how the RXG became the RX 135! I should have retained the RXG lettering since spares for these are not easy to come by.

Lockdown plans

I have been considering a full restoration for quite some time now but the prices that I have been quoted (50k for the complete restoration) have prevented me from taking the plunge. The covid-19 induced lockdown and the accompanying boredom made me take up this project. I planned to strip the bike down to the extent possible, clean and paint the frame, clean and polish the chrome parts and put it all back together.

This is how the bike looked in April before the start of my project.
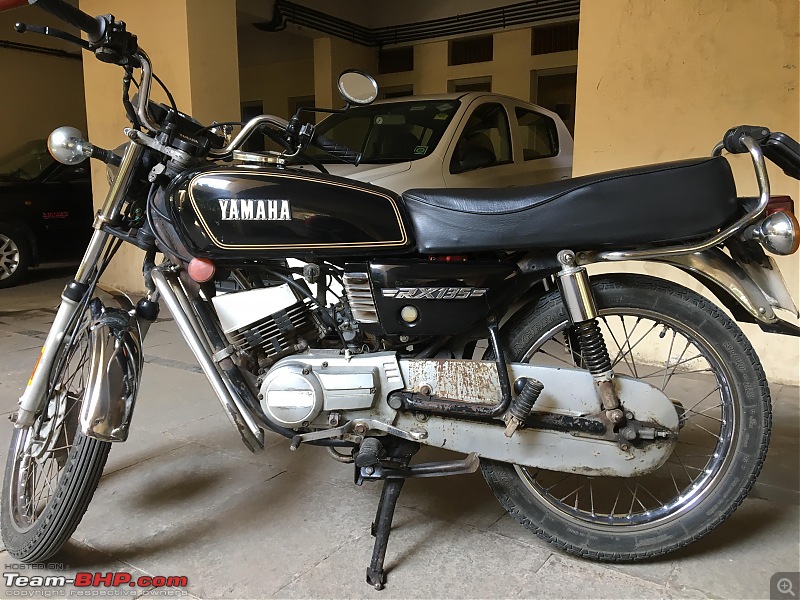
Partial restoration of my 1996 Yamaha RXG 135 - A lockdown project!-pre-rx.jpg

I had never done anything like this before but I did watch a lot of youtube videos and the job did not seem to be that complicated.
I decided to keep a note of the order in which I removed the parts and also noted down the size of the fasteners. This was done to ensure that I would not mix them up during re-assembly.

Dis-assembly

Getting the fuel transferred out of the tank.

Partial restoration of my 1996 Yamaha RXG 135 - A lockdown project!-petrol.jpg

With the tank, side panels and the seat off.
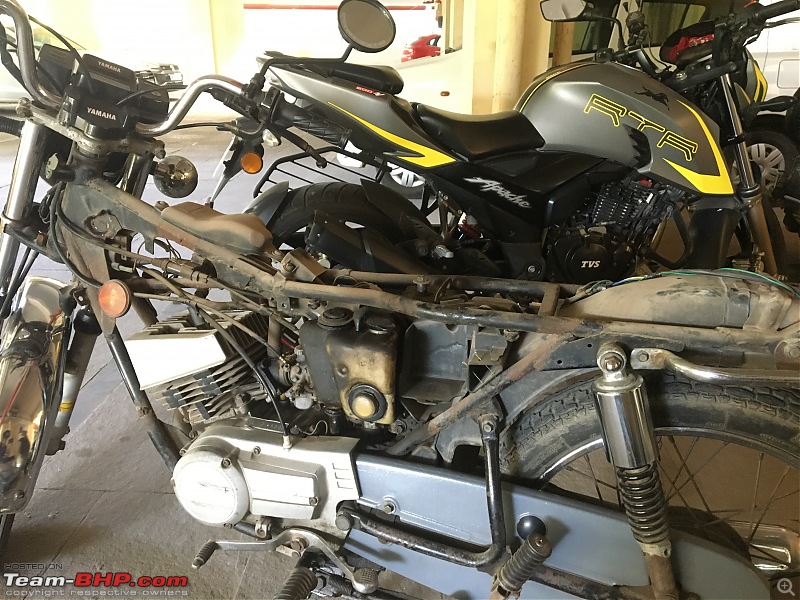
Partial restoration of my 1996 Yamaha RXG 135 - A lockdown project!-img_5529.jpg

Partial restoration of my 1996 Yamaha RXG 135 - A lockdown project!-img_5533.jpg

Partial restoration of my 1996 Yamaha RXG 135 - A lockdown project!-img_5537.jpg

Close up of the resonator.

Partial restoration of my 1996 Yamaha RXG 135 - A lockdown project!-img_5540.jpg

Removed the shock absorbers (which turned out to be a mistake, more on that later)

Partial restoration of my 1996 Yamaha RXG 135 - A lockdown project!-img_5543.jpg

Oil tank and chain covers off

Partial restoration of my 1996 Yamaha RXG 135 - A lockdown project!-img_5546.jpg

Parts transported to the balcony at the end of the session (Excuse the car tyre please)

Partial restoration of my 1996 Yamaha RXG 135 - A lockdown project!-img_5579.jpg

Notes taken during dis-assembly

Partial restoration of my 1996 Yamaha RXG 135 - A lockdown project!-note-1.jpg

Partial restoration of my 1996 Yamaha RXG 135 - A lockdown project!-img_5692.jpg

Remember how I said that removing the rear shock absorbers was a mistake; In a moment of brilliance, I decided to take the bike off its main stand while holding onto the frame with my right hand. With the shock absorbers removed, there was nothing to prevent the frame from coming crashing down onto the wheel. Unfortunately for me, my fingers happened to be in the way.

This is what it led to -

Partial restoration of my 1996 Yamaha RXG 135 - A lockdown project!-injury.jpg

The finger injury prevented any further dis-assembly so the exhaust, air box and front end remained as it is. I utilized the recovery time to clean the parts that were already dis-assembled.

Cleaning & Polishing

The bathroom sink was put into good use:
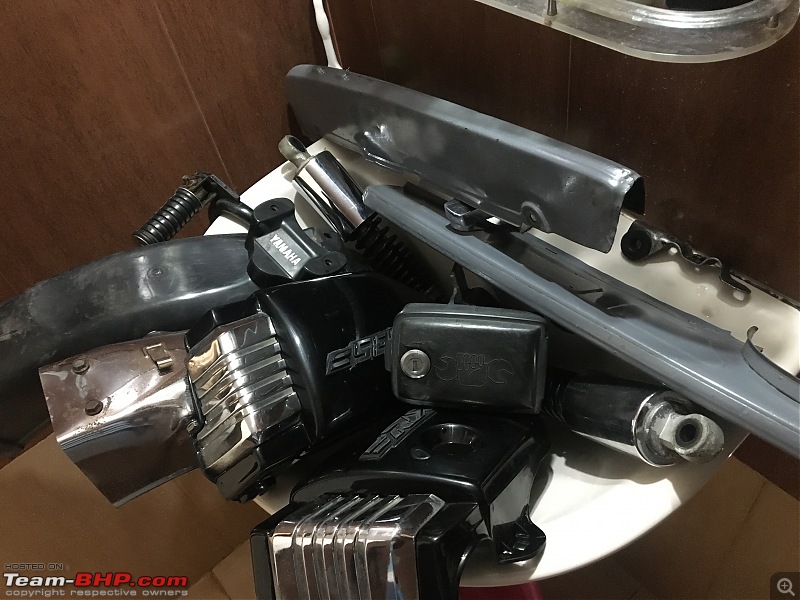
Partial restoration of my 1996 Yamaha RXG 135 - A lockdown project!-img_5587.jpg

The oil tank was covered in years of muck and grime!

Partial restoration of my 1996 Yamaha RXG 135 - A lockdown project!-img_5585.jpg

This took some effort but the end result was worth it.

Partial restoration of my 1996 Yamaha RXG 135 - A lockdown project!-img_5588.jpg

Soap water, Autosol polish and lots of elbow grease led to this

Partial restoration of my 1996 Yamaha RXG 135 - A lockdown project!-img_5593.jpg

Wheels and exhaust were cleaned. Did not put too much effort into the wheels since I plan to get them professionally restored later on.

Partial restoration of my 1996 Yamaha RXG 135 - A lockdown project!-img_5729.jpg

Gave the stipped down bike a good wash.

Partial restoration of my 1996 Yamaha RXG 135 - A lockdown project!-img_5616.jpg

Rust on the frame

Partial restoration of my 1996 Yamaha RXG 135 - A lockdown project!-img_5621.jpg

Partial restoration of my 1996 Yamaha RXG 135 - A lockdown project!-img_5622.jpg

Partial restoration of my 1996 Yamaha RXG 135 - A lockdown project!-img_5623.jpg

Partial restoration of my 1996 Yamaha RXG 135 - A lockdown project!-img_5696.jpg

I decided to leave the front forks untouched. Saw a few videos about how they are to be dis-assembled but couldn't muster up the courage to do it. This was the state in which I decided to proceed with the painting.

Partial restoration of my 1996 Yamaha RXG 135 - A lockdown project!-img_5666.jpg

Painting

I needed to buy supplies for painting and was stuck due to lockdown # 1. Sometime around end April was when shops were allowed to open and I was able to buy the required things for painting. I did some research and zeroed in on a zinc phosphate based primer from asian paints. The smallest can that I could find was also too much for my requirement hence I decided not to dilute it while applying.
Paint used was gloss black spray paint.
Also found a can of chrome paint, the can itself looked too bling but I decided to give it a try.

Decided to give the primer a trial run.

Partial restoration of my 1996 Yamaha RXG 135 - A lockdown project!-img_5698.jpg

A very hurriedly done masking job. I was too eager to start with the painting.

Partial restoration of my 1996 Yamaha RXG 135 - A lockdown project!-img_5700.jpg

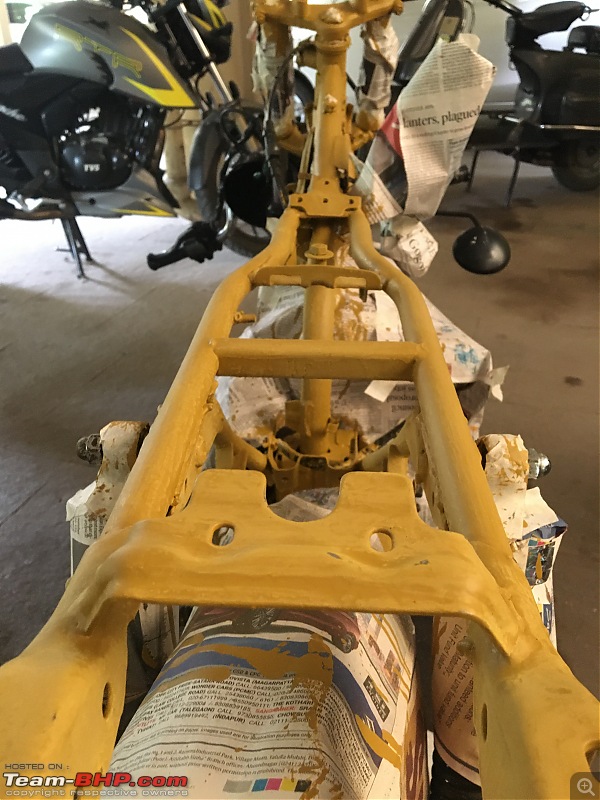
Primer coat done. I ended up applying three coats of primer.

Partial restoration of my 1996 Yamaha RXG 135 - A lockdown project!-img_5704.jpg

Partial restoration of my 1996 Yamaha RXG 135 - A lockdown project!-img_5718.jpg

The underside of the seat and the mud guards too got a coat of primer.

Partial restoration of my 1996 Yamaha RXG 135 - A lockdown project!-img_5726.jpg

I did not take any pictures of the actual painting. The spray cans made it very easy to paint and it took less than 15 minutes for a single coat. I applied three coats in total.

Last edited by jomson13 : 21st November 2020 at 12:57.
jomson13 is online now   (21) Thanks
Old 20th November 2020, 16:29   #2
BHPian
 
Join Date: Mar 2016
Location: Pune
Posts: 239
Thanked: 563 Times
re: Partial restoration of my 1996 Yamaha RXG 135 - A lockdown project!

Post Painting

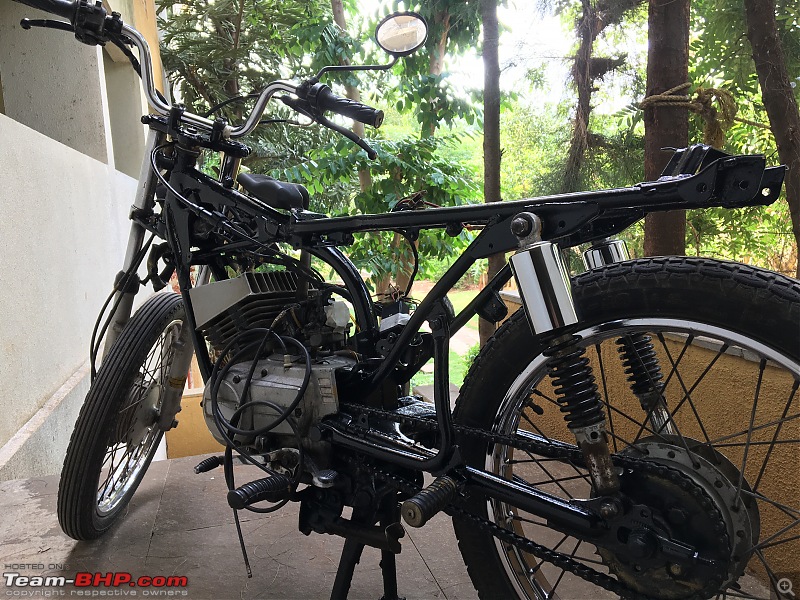
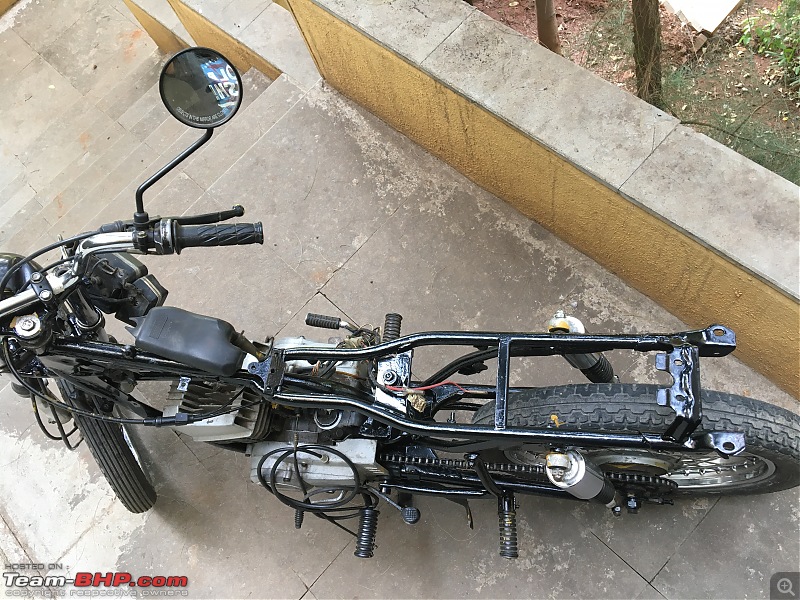
This is what the frame looked like after three coats of paint. I was quite pleased with the quality and finish of the paint

Partial restoration of my 1996 Yamaha RXG 135 - A lockdown project!-img_5731.jpg

Partial restoration of my 1996 Yamaha RXG 135 - A lockdown project!-img_5732.jpg

Partial restoration of my 1996 Yamaha RXG 135 - A lockdown project!-img_5733.jpg

Experiment with chrome paint

Was not successful! Although the part in the picture looks quite shiny, in reality it fades quite rapidly. Moreover, I tried to polish it with Brasso metal polish and that led to a greyish film forming over the paint. In the end I had to scrape off the paint completely.

Partial restoration of my 1996 Yamaha RXG 135 - A lockdown project!-img_5740.jpg

No issues with the headlight reflector and the ring used to hold the glass and the dome together. The chrome paint was used on the inside surfaces of both these parts and the finish came out quite well.

Partial restoration of my 1996 Yamaha RXG 135 - A lockdown project!-img_5747.jpg

These are nuts that hold the top of the rear suspension. Quite shiny after the paint but faded away during re assembly

Partial restoration of my 1996 Yamaha RXG 135 - A lockdown project!-img_5753.jpg

These came out quite well. Used black oil paint for the background and chrome paint for the letters. Masking the background was quite a tedious task!

Partial restoration of my 1996 Yamaha RXG 135 - A lockdown project!-img_5757.jpg

Material used in the painting process:

Zinc phosphate based primer - 1 tin
Gloss black spray paint - 4 cans
Chrome spray paint - 1 can
WD 40 - 2 cans
Sand paper, masking tape etc.

Re assembly

This was rather uneventful.
The notes that I had kept during the dis-assembly proved extremely helpful and I was able to put everything back pretty quickly.
In the end I was left with four washers and it took me a day to figure out that they belong to the rear suspension mounts.

I had apprehensions about riding the bike for the first time after re-assembly since this was the first time that I had taken apart a bike to this extent. Even people who watched me work in the parking and my friends would ask me the same question - whether I would be able to put everything back together and whether the bike would be safe to ride. All these apprehensions were cleared during the first test ride. I did show it to my usual mechanic just to be certain - his only comment was about the way I had routed the choke and throttle cables next to the tank instead of running them parallel to the frame under the tank.

Concluding thoughts

I started taking the bike apart on the 9th of April and finished putting it back together on the 19th of May. I was quite slow since my primary objective was to pass time during the lockdown! My injury and shop timings during the lockdown caused a bit of a delay.
On the cost front, I would not have spent more than 5k. Almost all of this was spent on paint and related material.
Although this was a lot of effort, I enjoyed working on the bike and the end result was much better than what I was expecting.

I intend to keep working on the bike as and when time permits.
The following is a list of pending activities:

1. Making the bike road legal - The RC expired in 2011. Approached one agent, he said that it would be too difficult. Need to try with some more people
2. Wheel restoration - Will get this done professionally since I don't have the tools nor the skill set to do this.
3. Wiring and switchgear - The bike is still on stock wiring and switches.
4. New tires
5. New rear suspension
6. Headlight upgrade
7. Chain and sprocket set

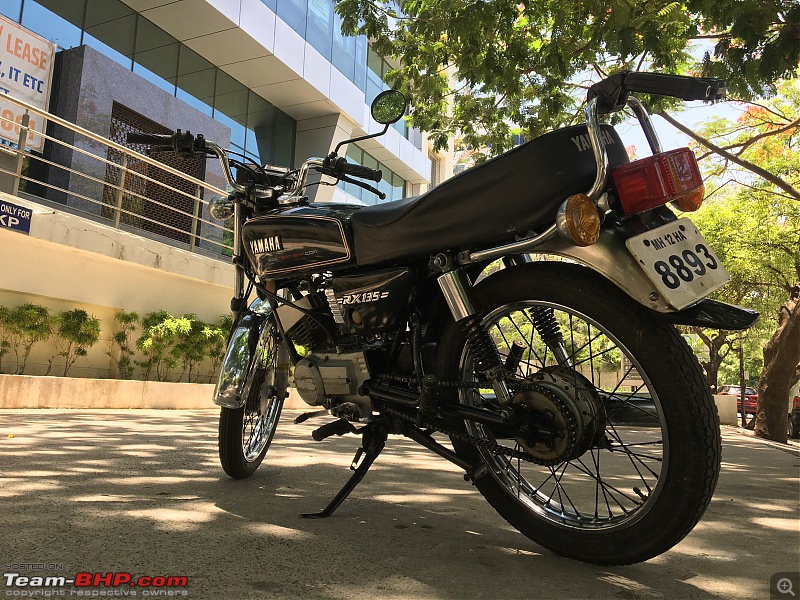
Leaving you with some pictures of the bike in its finished condition.
Thoughts, comments and suggestions are most welcome, Cheers!

Partial restoration of my 1996 Yamaha RXG 135 - A lockdown project!-img_5763.jpg

Partial restoration of my 1996 Yamaha RXG 135 - A lockdown project!-img_5767.jpg

Partial restoration of my 1996 Yamaha RXG 135 - A lockdown project!-img_5769.jpg

Partial restoration of my 1996 Yamaha RXG 135 - A lockdown project!-img_5775.jpg

Partial restoration of my 1996 Yamaha RXG 135 - A lockdown project!-img_5779.jpg

Partial restoration of my 1996 Yamaha RXG 135 - A lockdown project!-img_5780.jpg

Partial restoration of my 1996 Yamaha RXG 135 - A lockdown project!-hwpe3817.jpg

Last edited by jomson13 : 21st November 2020 at 12:49.
jomson13 is online now   (37) Thanks
Old 22nd November 2020, 12:01   #3
Team-BHP Support
 
Join Date: Feb 2004
Location: Mumbai
Posts: 17,827
Thanked: 77,000 Times
re: Partial restoration of my 1996 Yamaha RXG 135 - A lockdown project!

Thread moved out from the Assembly Line. Thanks for sharing!
Aditya is offline   (2) Thanks
Old 22nd November 2020, 12:22   #4
BHPian
 
WhiteSierra's Avatar
 
Join Date: Jul 2020
Location: Hyderabad
Posts: 429
Thanked: 2,249 Times
re: Partial restoration of my 1996 Yamaha RXG 135 - A lockdown project!

Amazing restoration work! I've been a fan of Yamaha RX series ever since I was a kid. My uncle used to own one and I really loved it, especially that exhaust note, the attention you get on road, the pick up, and the round indicators like Jalebis

Yamaha RX 100, 135 , RXG, RD 350 , Suzuki Shogun , Suzuki Samurai, Hero Honda CBZ, Bajaj Pulsar 180 (round headlights) were all legends of their times and youth used to go crazy over them. My cousins and their friends (8-10 years older to me) used to ride these vehicles , and I used to sit behind them on these vehicles and used to experience the thrill of real biking.


I see lot of value appreciation for these vehicles these days on OLX, Quickr and used bikes market, these vehicles have that cult following status and craze in Indian motorcycle scene.
WhiteSierra is online now   (1) Thanks
Old 22nd November 2020, 12:27   #5
Senior - BHPian
 
ebonho's Avatar
 
Join Date: Feb 2010
Location: Pune
Posts: 6,390
Thanked: 9,967 Times
re: Partial restoration of my 1996 Yamaha RXG 135 - A lockdown project!

Quote:
Originally Posted by jomson13 View Post
Post Painting
Congratulations on a lovely stock looking black Yam. Our favourite.

I especially like the fact that you have not been experimentative with parts from other bikes for the headlight or fork or front mudguard etc. and simply reused all the original parts.

That's how our bodies age too. And that's what's really treasured in genuine restorations.

Cheers, Doc
ebonho is online now   (3) Thanks
Old 22nd November 2020, 19:11   #6
BHPian
 
nitrogary's Avatar
 
Join Date: Feb 2009
Location: Pune
Posts: 248
Thanked: 916 Times
re: Partial restoration of my 1996 Yamaha RXG 135 - A lockdown project!

Hats off to you Jomson for your perseverance! I recollect happily discussing with you while the work was happening. One has to appreciate Yamaha for their simplicity of design. I have enjoyed my time with my Yamahas (RX135 5 speed and the RD350) which I had for 12 years.
Wish you many happy years and miles with the bike..
nitrogary is offline   (2) Thanks
Old 23rd November 2020, 08:37   #7
BHPian
 
spgv's Avatar
 
Join Date: Jun 2016
Location: Mumbai
Posts: 92
Thanked: 99 Times
Re: Partial restoration of my 1996 Yamaha RXG 135 - A lockdown project!

Congratulations, must give such pleasure restoring her yourself, great to see such love for the RXG. Back in 1999, i had the exact same colour as your pre restoration RXG, she was full of fun and energy.
I remeber taking off the front suspension as they where bent and needed repair on a hydraulic press, its straightforward and simple. With what you have already achieved, i can say front forks wont be a problem.
spgv is offline   (1) Thanks
Old 23rd November 2020, 09:30   #8
BHPian
 
Join Date: Dec 2005
Location: bang
Posts: 878
Thanked: 3,117 Times
Re: Partial restoration of my 1996 Yamaha RXG 135 - A lockdown project!

Great. Hope this serves you well in the future. With the rising demand for RX series, it would do you well to preserve it. Run it on pre mix only for some 1000kms after re boring. I would not trust the pump much. All the best.
srini1785 is online now   (1) Thanks
Old 23rd November 2020, 10:14   #9
BHPian
 
Join Date: Oct 2020
Location: KA04,OD02,OD05
Posts: 68
Thanked: 148 Times
Re: Partial restoration of my 1996 Yamaha RXG 135 - A lockdown project!

Quote:
Originally Posted by jomson13 View Post
Post Painting

Leaving you with some pictures of the bike in its finished condition.
Thoughts, comments and suggestions are most welcome, Cheers!
Well my friend Jommy, this is no less than open heart surgery on a bike! You seem to have resurrected it back to life.

Wish you many good miles with your bike. Drive safely!
4WheelPilot is offline   (1) Thanks
Old 23rd November 2020, 10:27   #10
BHPian
 
CarBot's Avatar
 
Join Date: Jun 2019
Location: Concord, NC
Posts: 90
Thanked: 287 Times
Re: Partial restoration of my 1996 Yamaha RXG 135 - A lockdown project!

Very nice restoration, I like your DIY primer and chassis painting. Below is the pic of my RX135. I have sourced and made my RX mechanically sound. I was planning to get the exhaust chromed, my mechanic said it would cost around Rs.1500. Will try out painting chassis myself. RX135 on my side panel has faded out. @jomson13 Can you tell me what chrome paint were you talking about ?
Attached Thumbnails
Partial restoration of my 1996 Yamaha RXG 135 - A lockdown project!-img_1407.jpg  

CarBot is offline   (5) Thanks
Old 23rd November 2020, 10:39   #11
BHPian
 
Join Date: Mar 2019
Location: UP78/UP16
Posts: 62
Thanked: 98 Times
Re: Partial restoration of my 1996 Yamaha RXG 135 - A lockdown project!

What a lovely bike! Having done something similar to my RX135 during the lockdown I know how it feels to fix your own bike, that feeling is priceless and builds a bond between the rider and the bike.

I also try to click as many photos as possible of my bike so that when I grow old there would be a lot of stories to tell.

But don't you worry I am not gonna highjack your thread. GODSPEED!!!
utkarshshukla92 is offline   (1) Thanks
Old 23rd November 2020, 11:23   #12
Senior - BHPian
 
SnS_12's Avatar
 
Join Date: Jun 2014
Location: Bombay
Posts: 1,268
Thanked: 8,700 Times
Re: Partial restoration of my 1996 Yamaha RXG 135 - A lockdown project!

Nice to see you’re still holding on to your RXG and you actually opened it up and did a mini restoration.

I also have a 1999 RX 135, which I had bought used in 2004. I still remember the test ride I took on this bike before riding it and the low down torque compared to the RX 100 actually took me by surprise and the distinct exhaust note of the RX 135.

Your cousin running the bike without 2T oil was the worst thing to do for a two stroke, but saddly this is something that can happen to the best of us and its a learning exercise. I have seized my OE piston after i had ported the block and the fuel mixture was lean and it happened near Vapi (Gujarat) while I was riding from Mumbai. The second time I seized it when I thought the oil tank was full and was actually near empty. But with these experiences I always look out for white smoke when I start the bike and periodically keep checking by looking at the rear view mirror to see if the oil pump is doing its job.

Also, a couple of issues with adding oil to the fuel tank directly.

A) Can never get the ratio right as the amount of fuel added is not always the same.
B) The bike tends to run lean and you need to get and upsize on the main jet to avoid the risk of seizing the engine.
C) These bikes today are rarely used on a daily basis and with oil being mixed with fuel and kept for a long period will just deteriorate the oil quality.

Hence, using the oil pump and maintaining it well is the best approach. Lot of mechanics who fiddle with the oil pump tend to set the flow higher which leads to a cloud of smoke every time you gun it and loss of power. So if you set it the company spec and the pump has no leakages it would do its job as designed to do and will not need any maintenance for a long time. I have ridden my RX for over 1.5 lac kms on the OE pump and still running fine. Also, my RD 200 has its oil pump working as desired.

Also, I hope you retained your OE block when your mechanic changed it to a used block after the piston was seized. Unless it was running on a 4th oversized piston you could have just rebored it to the next size and used it or otherwise the block can be still used by getting it sleeved and use it with the stock size piston. A new block piston set can cost you anywhere between 15 to 20k if you can find one and these used one are also worth keeping as they can be reused in the future when the need arises.
SnS_12 is offline   (2) Thanks
Old 23rd November 2020, 11:35   #13
Newbie
 
Join Date: Jun 2011
Location: Mumbai
Posts: 15
Thanked: 11 Times
Re: Partial restoration of my 1996 Yamaha RXG 135 - A lockdown project!

Congratulations. Having walked this road with my own Rx135 many years back, I know the sense of satisfaction this gives. Guess you will be getting the rims and fork tubes polished too. Cant go wrong with the legendary Rx. These bikes are for keeps!
Petroleus is offline   (1) Thanks
Old 23rd November 2020, 11:38   #14
BHPian
 
Govardhansupra's Avatar
 
Join Date: Jun 2020
Location: Thrissur
Posts: 127
Thanked: 289 Times
Re: Partial restoration of my 1996 Yamaha RXG 135 - A lockdown project!

Lovely!
It's a good feeling when something you have removed and re-assembled works properly.
Here is my question: What is the difference between and RX100/RX135 and an RXG? I couldn't figure out any difference based on the looks.

Last edited by Govardhansupra : 23rd November 2020 at 11:40. Reason: Adding one more word
Govardhansupra is offline   (1) Thanks
Old 23rd November 2020, 18:52   #15
BHPian
 
Join Date: Dec 2005
Location: Chennai
Posts: 89
Thanked: 63 Times
Re: Partial restoration of my 1996 Yamaha RXG 135 - A lockdown project!

Quote:
Originally Posted by Govardhansupra View Post
Lovely!
It's a good feeling when something you have removed and re-assembled works properly.
Here is my question: What is the difference between and RX100/RX135 and an RXG? I couldn't figure out any difference based on the looks.
The rxg differed from the rx100 in Port configuration (two strokers use ports on the cylinder walls for intake/exhaust vs valves on cylinder head for 4 strokers) and gear ratios perhaps, in addition to higher displacement.

Rx135 was released in light of stricter emission norms with a catalytic converter and a different Port configuration once again and changes to gearing. It came in 5 speed and later 4 speed variants. People just used parts like cylinders and what not interchangeably though.

No real difference in looks aside from paint and stickering.
JagMan is offline   (2) Thanks
Reply

Most Viewed


Copyright ©2000 - 2024, Team-BHP.com
Proudly powered by E2E Networks