Team-BHP > Vintage Cars & Classics in India > Post-War


Reply
  Search this Thread
1,050,299 views
Old 28th September 2015, 21:41   #1201
BHPian
 
autocrat's Avatar
 
Join Date: Oct 2011
Location: Bangalore
Posts: 716
Thanked: 731 Times
Re: The FIAT 1100/Premier Padmini Technical Information thread

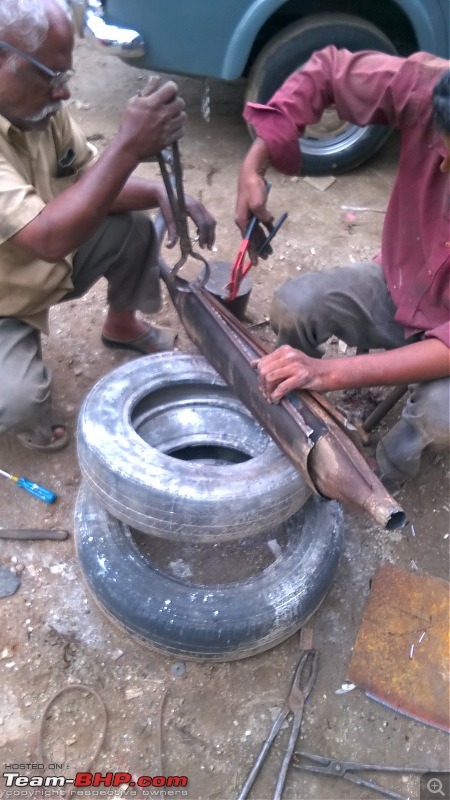
Gas welding done on the muffler at the same workshop where the car was serviced for the last 23 years:

The FIAT 1100/Premier Padmini Technical Information thread-wp_20150928_17_22_47_pro.jpg

The FIAT 1100/Premier Padmini Technical Information thread-wp_20150928_17_35_19_pro.jpg

The differential oil level was slightly low, and topped up. Not as low as I feared.

Gear box oil level also ok.

The radiator has sprung a leak. The radiator drain plug key has loosened. I fiddled with it until the leak was minimal. I was able to make it to the FCB meet. I am carrying 2L water with me from yesterday to be on safer side. After 20 km, about 100~150 ml water is needed for top up. The water leaks only when the engine heats up and pressure builds - no leakage in cold condition.

Right front shock absorber upper bush had completely disintegrated, causing metal-to-metal contact resulting in THUD THUD sounds. Only these bushes (2 nos butting each other) were replaced. The mechanic also told me not to touch anything unless there is a need. Very old school guy who believes in keeping things original.

Without the thud-thud and hissing sounds, the car not only sounds better, but also runs better.

Next weekend will be reserved for tappet setting, and carpeting the front cabin floor.

PS: It feels good when the car gets better - ever so incrementally.
Attached Thumbnails
The FIAT 1100/Premier Padmini Technical Information thread-wp_20150928_002.jpg  


Last edited by autocrat : 28th September 2015 at 21:46. Reason: Added PS
autocrat is offline   (4) Thanks
Old 29th September 2015, 10:18   #1202
Distinguished - BHPian
 
Join Date: Jul 2007
Location: MUMBAI
Posts: 3,060
Thanked: 5,353 Times
Re: The FIAT 1100/Premier Padmini Technical Information thread

Quote:
Originally Posted by autocrat View Post
The radiator has sprung a leak. The radiator drain plug key has loosened.
Dear Gowtham - I had told you to knock off the radiator drain plug and solder a brass piece in its place! Please remove the radiator, take it to an old school friendly neighbourhood radiatorwallah and get it done immediately. I know that the drain plug does not work, if you apply more pressure on the tee handle, the whole thing will come out of the solder. Set the tappets and the timing, then enjoy the quantum improvement that you will get in performance. There are two ways of noticing this smooth and silent surge of power, one is that the engine will continue to idle to as low as 375rpm (you will love it slowly ticking over) and the other is that the car will be drivable and tractable at extremely low speed (almost walking pace) in third gear. Then, it will also accelerate, without having to change to second gear. During these phases, the exhaust note must be crisp and clear, as the muffler is original, it should work even after re-welding, lets see. Once you attain this level of performance, then changeover to the S1 exhaust system with the expansion chamber, then you will see yourself quietly smiling, as you look at yourself in the rear view mirror! .

"Picture abhi baaki hai, mere dost!"

Best regards,

Behram Dhabhar
DHABHAR.BEHRAM is offline   (3) Thanks
Old 29th September 2015, 10:30   #1203
BHPian
 
autocrat's Avatar
 
Join Date: Oct 2011
Location: Bangalore
Posts: 716
Thanked: 731 Times
Re: The FIAT 1100/Premier Padmini Technical Information thread

Quote:
Originally Posted by DHABHAR.BEHRAM View Post
Dear Gowtham
"Picture abhi baaki hai, mere dost!"

Best regards,

Behram Dhabhar


Dear Sir, I will get the radiator job done on priority as its almost impossible to enjoy the drive when burdened with the thought of losing water and spoiling the engine. I am planning the tappet setting work for Saturday early morning on cold engine. I don't have a torque wrench, what should be the approach when I am tightening the locking bolts by hand? Will quarter turn post contact be sufficient?

Warm regards
Goutham
autocrat is offline  
Old 29th September 2015, 13:57   #1204
Distinguished - BHPian
 
Join Date: Jul 2007
Location: MUMBAI
Posts: 3,060
Thanked: 5,353 Times
Re: The FIAT 1100/Premier Padmini Technical Information thread

Quote:
Originally Posted by autocrat View Post
I am planning the tappet setting work on a cold engine. I don't have a torque wrench, what should be the approach when I am tightening the locking bolts by hand? Will quarter turn post contact be sufficient? Warm regards, Goutham
Dear Gowtham - the thread size of the tappets is M8*81.0 and not the regular M8*1.25. This is to enable fine adjustment. As you do not have a torque wrench, "full tight by hand" with a 13mm size open ended spanner should be sufficient. If you use a ring spanner, hold it midway to limit the torque. Remember that the nuts are thin, do not apply excessive torque. I presume you would have read the tappet setting sequence, if in doubt, ask!

Best regards,

Behram Dhabhar
DHABHAR.BEHRAM is offline   (2) Thanks
Old 29th September 2015, 14:19   #1205
BHPian
 
autocrat's Avatar
 
Join Date: Oct 2011
Location: Bangalore
Posts: 716
Thanked: 731 Times
Re: The FIAT 1100/Premier Padmini Technical Information thread

Quote:
Originally Posted by DHABHAR.BEHRAM View Post
Dear Gowtham - the thread size of the tappets is M8*81.0 and not the regular M8*1.25. This is to enable fine adjustment. As you do not have a torque wrench, "full tight by hand" with a 13mm size open ended spanner should be sufficient. If you use a ring spanner, hold it midway to limit the torque. Remember that the nuts are thin, do not apply excessive torque. I presume you would have read the tappet setting sequence, if in doubt, ask!

Best regards,

Behram Dhabhar
Yes sir, I have read, the rule of 9 I presume?
autocrat is offline  
Old 29th September 2015, 15:20   #1206
Distinguished - BHPian
 
Join Date: Jul 2007
Location: MUMBAI
Posts: 3,060
Thanked: 5,353 Times
Re: The FIAT 1100/Premier Padmini Technical Information thread

Quote:
Originally Posted by autocrat View Post
Yes sir, I have read, the rule of 9 I presume?
Dear Gowtham - correct! When I come to Bangalore or when you come to Dharwad, I'll show you how to set the tappets with the engine running! .

Best regards,

Behram Dhabhar
DHABHAR.BEHRAM is offline   (2) Thanks
Old 29th September 2015, 17:24   #1207
BHPian
 
autocrat's Avatar
 
Join Date: Oct 2011
Location: Bangalore
Posts: 716
Thanked: 731 Times
Re: The FIAT 1100/Premier Padmini Technical Information thread

Quote:
Originally Posted by DHABHAR.BEHRAM View Post
Dear Gowtham - correct! When I come to Bangalore or when you come to Dharwad, I'll show you how to set the tappets with the engine running! .

Best regards,

Behram Dhabhar
Yes sir! Look forward to meeting you soon
autocrat is offline  
Old 29th September 2015, 21:42   #1208
BHPian
 
Drkannant's Avatar
 
Join Date: Feb 2013
Location: coimbatore
Posts: 215
Thanked: 292 Times
Re: The FIAT 1100/Premier Padmini Technical Information thread

Quote:
Originally Posted by DHABHAR.BEHRAM View Post
Dear Gowtham - correct! When I come to Bangalore or when you come to Dharwad, I'll show you how to set the tappets with the engine running! .

Best regards,

Behram Dhabhar
Sorry sir

Could you please explain what is this " tappet & setting" ?

Sorry if I may sound stupid !
Drkannant is offline  
Old 30th September 2015, 11:24   #1209
Distinguished - BHPian
 
Join Date: Jul 2007
Location: MUMBAI
Posts: 3,060
Thanked: 5,353 Times
Re: The FIAT 1100/Premier Padmini Technical Information thread

Quote:
Originally Posted by Drkannant View Post
Could you please explain what is this "tappet setting"?
Dear Dr.Kannan - the answer is as follows:

The engine does not run on fuel, it runs on a correctly metered mixture of fuel and air. The mechanism by which this mixture of fuel and air enters and leaves the engine is called "valve train" (for your understanding, this is something like the "bicuspid and tricuspid valves" of the heart, as the application is very similar). The valves themselves are some sort of discs which move up and down to open or close the passage. It is required to open and close the passages at the exact time to make the engine work properly, in technical terms, this is known as "scavenging". In order to ensure this, provide for full valve closure and also to take care of changes in tolerances as the engine operating temperature increases after start, a small amount of air clearance is provided in the valve train. The part in which this "fuse" is built-in is called "tappet", so the word "tappet setting" evolves. In the Fiat1100, this small air clearance is about one tenth of a millimeter when the engine is dead cold, this clearance increases by design to around a quarter of a millimetre when the engine is at its normal operating temperature. The exact method by which this clearance is achieved is called "tappet setting". The exact process is given on page 1 post 1 of this thread.

All this may sound terribly complicated but in reality it is very simple. That is the beauty of the Fiat1100, you can actually do and learn! .

Best regards,

Behram Dhabhar
DHABHAR.BEHRAM is offline   (3) Thanks
Old 3rd October 2015, 11:08   #1210
BHPian
 
boeuff's Avatar
 
Join Date: Mar 2008
Location: Blr
Posts: 180
Thanked: 97 Times
Re: The FIAT 1100/Premier Padmini Technical Information thread

Quote:
Originally Posted by boeuff View Post
Here is the post # 955, will install the electronic pump per this.

http://www.team-bhp.com/forum/post-w...ml#post2818202
Installed the fuel pump today, wired it to run all the time. Working nicely.
Attached Thumbnails
The FIAT 1100/Premier Padmini Technical Information thread-wp_20151003_002.jpg  

boeuff is offline   (2) Thanks
Old 3rd October 2015, 16:59   #1211
BHPian
 
boeuff's Avatar
 
Join Date: Mar 2008
Location: Blr
Posts: 180
Thanked: 97 Times
Re: The FIAT 1100/Premier Padmini Technical Information thread

Quote:
Originally Posted by DHABHAR.BEHRAM View Post
As you have masked the ball joint, I cannot see whether it is original or not, the original one has a spring clip holding it in position, now the ball joint and clip are extremely rare to find. The aftermarket ones have two cross holes in which two split pins are mounted, they are complete nonsense, if you have the aftermarket one you must remove it and throw it out because it will never work properly.

Best regards,

Behram Dhabhar
Example of the accelerator pedal ball joint and spring clip from my car
Attached Thumbnails
The FIAT 1100/Premier Padmini Technical Information thread-wp_20151003_004.jpg  

boeuff is offline   (1) Thanks
Old 4th October 2015, 17:13   #1212
BHPian
 
boeuff's Avatar
 
Join Date: Mar 2008
Location: Blr
Posts: 180
Thanked: 97 Times
Re: The FIAT 1100/Premier Padmini Technical Information thread

Found this period looking AM radio, hope to fit it to my padmini underneath the front parcel shelf in the middle, are there any factory locations for installing it?
Attached Thumbnails
The FIAT 1100/Premier Padmini Technical Information thread-image.jpg  


Last edited by boeuff : 4th October 2015 at 17:18.
boeuff is offline  
Old 5th October 2015, 10:08   #1213
BHPian
 
autocrat's Avatar
 
Join Date: Oct 2011
Location: Bangalore
Posts: 716
Thanked: 731 Times
Re: The FIAT 1100/Premier Padmini Technical Information thread

Quote:
Originally Posted by boeuff View Post
Found this period looking AM radio, hope to fit it to my padmini underneath the front parcel shelf in the middle, are there any factory locations for installing it?
The radio seems to be from an old american car! If you fit it on the parcel shelf, it will sag a little, as in my car.

Tappet setting on my car is getting postponed for one or other reason, this time as the portico had to be clear to move some material. I got the packing and silicone gasket maker, and I will do it on one of the mornings. Will keep you all posted.

I took a pic of accelerator pedal on my car, its original with spring clip as seen in Boeuff's car:
The FIAT 1100/Premier Padmini Technical Information thread-wp_20151004_16_17_06_pro.jpg

After mild rubbing to remove some distemper spatter and waxing:
The FIAT 1100/Premier Padmini Technical Information thread-photomagic137.jpg

Want to get a set of conical PP wheel caps. So many small materials define the character of a car. They are visually functional if not mechanically

Also looking for a sunshade - if someone has a spare / knows where I can find one, please help!

Last edited by autocrat : 5th October 2015 at 10:13. Reason: Additional content.
autocrat is offline   (2) Thanks
Old 5th October 2015, 10:56   #1214
Distinguished - BHPian
 
Join Date: Jul 2007
Location: MUMBAI
Posts: 3,060
Thanked: 5,353 Times
Re: The FIAT 1100/Premier Padmini Technical Information thread

Dear Boeuff and Gowtham - the accelerator ball and spring fulcrum joints in both your cars are original. They must be connected to a floor mounted pedal, designed to fit inclined away from the car center line by 9 degrees. Just clean the fulcrum with WD40 and then apply some oil to ensure that the joint does not run dry, to prevent wear. Dear Boeuff, you have not mounted the fuel pump positively, please do so. Fitting with plastic ties only is very dangerous. Use one of the three M5*0.8mm size studs which are now available to you (as you have removed the cover) to mount one of the legs of the fuel pump. Take a small metal strip, drill two holes in it at required distance to fix the other leg to another of the three studs. The fuel filter need not remain vertical. The fuel lines must be fully pressed into the connections. It is necessary to change the small plastic pipe going underfloor, as it becomes hard and brittle after some use and then it invariably leaks. To do this, you will need access to its other end which is pressed into the rear end of the long metal pipe. Loosen the fuel tank mounting straps a little by loosening the two nuts underfloor, pull the tank down slightly and pull on the small plastic pipe to bring the rear end of the long single piece main fuel line inside the opening. Then tighten the fuel tank. Then replace the small plastic pipe. You need not run the electronic fuel pump all the time, you can put a switch somewhere in the dashboard to actuate it when you want it to work, the mechanical fuel pump will work normally and suck fuel through the electronic fuel pump even when it is not electrically connected. Alternatively, you can choose to keep it on all the time, nothing will happen if your needle valve is perfect, but if the needle valve is a little iffy, you will get carburettor overflow due to continuous line pressure.

Best regards,

Behram Dhabhar
DHABHAR.BEHRAM is offline   (3) Thanks
Old 5th October 2015, 15:46   #1215
BHPian
 
boeuff's Avatar
 
Join Date: Mar 2008
Location: Blr
Posts: 180
Thanked: 97 Times
Re: The FIAT 1100/Premier Padmini Technical Information thread

Quote:
Originally Posted by DHABHAR.BEHRAM View Post
Dear Boeuff and Gowtham - the accelerator ball and spring fulcrum joints in both your cars are original. They must be connected to a floor mounted pedal, designed to fit inclined away from the car center line by 9 degrees. Just clean the fulcrum with WD40 and then apply some oil to ensure that the joint does not run dry, to prevent wear. Dear Boeuff, you have not mounted the fuel pump positively, please do so. Fitting with plastic ties only is very dangerous. Use one of the three M5*0.8mm size studs which are now available to you (as you have removed the cover) to mount one of the legs of the fuel pump. Take a small metal strip, drill two holes in it at required distance to fix the other leg to another of the three studs. The fuel filter need not remain vertical. The fuel lines must be fully pressed into the connections. It is necessary to change the small plastic pipe going underfloor, as it becomes hard and brittle after some use and then it invariably leaks. To do this, you will need access to its other end which is pressed into the rear end of the long metal pipe. Loosen the fuel tank mounting straps a little by loosening the two nuts underfloor, pull the tank down slightly and pull on the small plastic pipe to bring the rear end of the long single piece main fuel line inside the opening. Then tighten the fuel tank. Then replace the small plastic pipe. You need not run the electronic fuel pump all the time, you can put a switch somewhere in the dashboard to actuate it when you want it to work, the mechanical fuel pump will work normally and suck fuel through the electronic fuel pump even when it is not electrically connected. Alternatively, you can choose to keep it on all the time, nothing will happen if your needle valve is perfect, but if the needle valve is a little iffy, you will get carburettor overflow due to continuous line pressure.

Best regards,

Behram Dhabhar
Dear Behram Dhabar,
Thanks for your valid points, I will fix all points as suggested.
I realized that the mounting will have to be positive via the rubber insulated legs to prevent resonant vibration when air enters and the pump becomes noisy.
I also agree that it will be extra pressure on the float valve, so will fix the switch to control it.
Thanks
boeuff is offline   (2) Thanks
Reply

Most Viewed
Thread Tools Search this Thread
Search this Thread:

Advanced Search

Copyright ©2000 - 2024, Team-BHP.com
Proudly powered by E2E Networks