Team-BHP > Vintage Cars & Classics in India > Post-War
Register New Topics New Posts Top Thanked Team-BHP FAQ


Reply
  Search this Thread
1,053,333 views
Old 28th October 2015, 12:19   #1276
Senior - BHPian
 
manishalive's Avatar
 
Join Date: Apr 2009
Location: Bangalore
Posts: 2,514
Thanked: 1,079 Times

Quote:
Originally Posted by autocrat View Post
Dwell Angle meter on the way

I have done some reading on how to use the meter. I am still not sure how to adjust the point gap. Should I remove the distributor from the car? If the rotor position changes when the distributor is removed, it will change the timing, so how to make sure the timing is not affected?

Behram Sir please help!

Warm Regards,
Goutham
Bro install a Sensor and be done with the point setting once for all. Then there are systems available that give you adaptive dwell also. But this has to be DIY thing.
manishalive is offline   (1) Thanks
Old 28th October 2015, 12:53   #1277
Distinguished - BHPian
 
Join Date: Jul 2007
Location: MUMBAI
Posts: 3,060
Thanked: 5,353 Times
Re: The FIAT 1100/Premier Padmini Technical Information thread

Quote:
Originally Posted by manishalive View Post
On the air filter will this fit and do the job, I think K&N is very good.
Dear Manish - the Fiat 1100D filter cartridge drawing calls for sealing lips on the top and bottom faces of the cartridge. These lips are necessary, because they are not there in the main body by design. They prevent air leakage past the top and bottom of the cartridge when the top cover is tightened. These lips are missing in the photograph that you have posted. For comparison, see the OE approved Maruti 800 filter cartridge made by Purolator. This cartridge does not have the sealing lips because the design does not call for them. In this design, they are attached to the main body. In absence of the sealing lips, the air cleaner cartridge will filter nothing because air will just leak past, so all unfiltered air will go inside the engine and you will not realize it also. With all due regard for all aftermarket things (including brand names), if you discuss this with the "concerned people", you will be told "not to worry". If you take this advice on face value (because ignorance is bliss), one day your engine will "go"! I have had numerous such discussions with numerous such people, incognito of course! My favorite part here is tires! Oh my God, this calls for two smilies! .

Dear Gowtham - you don't have to remove the distributor to set the dwell angle. Remove the cap by snapping the two spring clips out. You will see the contact breaker. Slightly loosen the screw holding the negative contact breaker to the distributor base plate. Insert the lip of the screwdriver between the V slot and its edge to move the negative contact breaker about its fulcrum. Remember, less dwell angle means more contact breaker gap and vice-versa. Adjust to 60 degrees as required. Then reset the ignition timing to 10 degrees BTDC.
DHABHAR.BEHRAM is offline   (2) Thanks
Old 28th October 2015, 14:57   #1278
Senior - BHPian
 
manishalive's Avatar
 
Join Date: Apr 2009
Location: Bangalore
Posts: 2,514
Thanked: 1,079 Times
Re: The FIAT 1100/Premier Padmini Technical Information thread

Quote:
Originally Posted by DHABHAR.BEHRAM View Post
the Fiat 1100D filter cartridge drawing calls for sealing lips on the top and bottom faces of the cartridge.
Wow never looked at that. Yes yes this do not have that sealing lip. We do need to be mindful of this. By the way do NOS filters by Elofic are available at some places. Are they equally good.
manishalive is offline  
Old 29th October 2015, 11:04   #1279
Distinguished - BHPian
 
Join Date: Jul 2007
Location: MUMBAI
Posts: 3,060
Thanked: 5,353 Times
Re: The FIAT 1100/Premier Padmini Technical Information thread

Quote:
Originally Posted by manishalive View Post
Wow never looked at that. Yes yes this do not have that sealing lip. We do need to be mindful of this.
Dear Manish - thanks for understanding. Please be very careful of such products and hastily taken decisions to order the products without even seeing them. Also, if I may mention, whether the distributor has a mechanically movable contact breaker or a non-contact type CDI, finally it is the spark at the spark plug which makes the engine go. You require 25000 volts, period. have to look at the performance and the reliability of the end result. The production system is extremely reliable. From Mumbai, I have driven to Himachal Pradesh in the north and Kerala in the south in my Padmini when there were no expressways. I have very regularly covered 1000 kms per day. If you follow sensible result oriented steps, the car will work properly with full reliability.

Dear Jaikishan - my reply to your PM is as follows. Sorry for time delay:

Your PM: "I own a Padmini is S1 Executive, 1995 Model. I have been facing this problem since some time now. After running 8-9 kms, there is some missing and the car slows down. Even though I push the accelerator, the car doesn’t move and gradually it stops. I found that the coil had heated up very much. I got a cold water bottle from a nearby shop and poured this cold water continuously on the coil. We waited for 15 minutes and restarted the car. It seems to be a coil fault, but this is a new coil that I have replaced recently. Is this actually the coil fault? Should we check for any other possible electrical fault? Could there be any problem with the Distributor? It is a new set. I kindly request your advice to rectify this problem permanently".

My reply: Simple. There are multiple causes. Let the car stop. When it does, open the fuel line at the carburettor inlet and check by cranking the engine if petrol is coming from the fuel pump. If no, it may be a simple case of fuel percolation. The Padmini has a horizontal fuel tank so the suction head is not very high, but under some ambient conditions, the system is prone to percolation. If petrol comes out of the pipe, open the carburettor and check whether the petrol actually goes inside the float chamber. There is a small gauze filter just before the float chamber, see if it is clean. Also see if the main jet is clean, a dirty main jet causes havoc. Also check the outlet from the fuel tank itself. If there is major rust inside the fuel tank, you will have this symptom. As far as the ignition system is concerned, I have explained multiple times, if everything is as per design specifications, your car will work properly.

Most probable cause seems to be the fuel tank rust. Run the car on a jerry can, if it runs properly, you know what is wrong. Simple! .

Best regards,

Behram Dhabhar
DHABHAR.BEHRAM is offline   (2) Thanks
Old 29th October 2015, 12:10   #1280
BHPian
 
autocrat's Avatar
 
Join Date: Oct 2011
Location: Bangalore
Posts: 716
Thanked: 732 Times
Re: The FIAT 1100/Premier Padmini Technical Information thread

Quote:
Originally Posted by DHABHAR.BEHRAM View Post
Dear Gowtham - you don't have to remove the distributor to set the dwell angle. Remove the cap by snapping the two spring clips out. You will see the contact breaker. Slightly loosen the screw holding the negative contact breaker to the distributor base plate. Insert the lip of the screwdriver between the V slot and its edge to move the negative contact breaker about its fulcrum. Remember, less dwell angle means more contact breaker gap and vice-versa. Adjust to 60 degrees as required. Then reset the ignition timing to 10 degrees BTDC.
Dear Sir,

Thanks a lot for guiding me on the Dwell Angle and timing yesterday, for the benefit of the Fiatians, I am posting the details here:

1) Dwell meter set to zero (make sure there is no parallax error)
The FIAT 1100/Premier Padmini Technical Information thread-1dwellzero.jpg

2) Clip the black wire from the meter to car body (ground), and connect the Ignition coil terminal to red wire (the terminal which has wire connected to distributor).

The same setup works for both dwell and rpm measurement.

3) Read the engine RPM:
The FIAT 1100/Premier Padmini Technical Information thread-3dwelltacho.jpg

The RPM (idling stabilized after engine warmed up) was 680~700. Adjusted the volume control screw on the carburettor. Turning in = leaner mixture.

4) Read dwell angle:
The FIAT 1100/Premier Padmini Technical Information thread-2dwelldwellangle.jpg

The dwell angle was around 59 degrees (indicating that the point gap was marginally higher than ideal). However I did not make any adjustment yesterday as it was within tolerance.

Pending work:
1) Fix radiator leak - urgent and important
2) Fix brake cylinder leak - important
3) Fix petrol leak near tank (will be taken care of when the electric fuel pump is fitted)
4) Differential oil leak: Happening on pinion gear oil seal - not urgent, but I will replace drain plug washer and refill with new HP Gear Drive 90 EP oil. The suspected SAE140 oil inside is thinner, leak may reduce once 90 EP oil is filled.
5) Gear box oil leak: From drain plug, need to replace washer, and refill with new HP Gear Drive 90 EP oil.

autocrat is offline   (5) Thanks
Old 29th October 2015, 13:38   #1281
Distinguished - BHPian
 
Join Date: Jul 2007
Location: MUMBAI
Posts: 3,060
Thanked: 5,353 Times
Re: The FIAT 1100/Premier Padmini Technical Information thread

Quote:
Originally Posted by autocrat View Post
Differential oil leak, happening on pinion gear oil seal, not urgent but I will replace drain plug washer and refill with new HP Gear Drive 90 EP oil. The suspected SAE140 oil inside is thinner, leak may reduce once 90 EP oil is filled.
Dear Gowtham - transmission and rear axle filler plugs and drain plugs for Padmini application do not have washers, as they have taper threads conforming to EEC and JIS, by design. JIS permits minor wetness, but droplets must not form. "Many people don't know this, and waste everybody's time. If the breather is proper, this will be achieved". I learnt this from my Japanese teacher Yoshikazu Shirahishi San, who was the Chief Vehicle Evaluation Engineer of Nissan Motor Company Ltd, Minato-ku, Tokyo, Japan. The sentence in inverted commas is his, word-by-word, line-by-line. . Now you know why Japan is Japan. There, people think, then they work also!

Best regards,

Behram Dhabhar
DHABHAR.BEHRAM is offline   (1) Thanks
Old 29th October 2015, 14:35   #1282
BHPian
 
autocrat's Avatar
 
Join Date: Oct 2011
Location: Bangalore
Posts: 716
Thanked: 732 Times
Re: The FIAT 1100/Premier Padmini Technical Information thread

Quote:
Originally Posted by DHABHAR.BEHRAM View Post
Dear Gowtham - transmission and rear axle filler plugs and drain plugs for Padmini application do not have washers, as they have taper threads conforming to EEC and JIS, by design. JIS permits minor wetness, but droplets must not form. "Many people don't know this, and waste everybody's time. If the breather is proper, this will be achieved". I learnt this from my Japanese teacher Yoshikazu Shirahishi San, who was the Chief Vehicle Evaluation Engineer of Nissan Motor Company Ltd, Minato-ku, Tokyo, Japan. The sentence in inverted commas is his, word-by-word, line-by-line. . Now you know why Japan is Japan. There, people think, then they work also!

Best regards,

Behram Dhabhar
Sir, If the plugs have taper threads, then is the leakage due to thread damage? Is it okay to use Teflon tape to arrest this leakage?

Also, are the filler and drain plugs interchangeable? If so, I can use the best sealing plugs on the drain ports.

About Japanese, I have an interesting story

I remember one incident when I was working in for a hydraulics cylinder manufacturer. We had made some sample cylinders and the Japanese client sent one Mr. Suzuki for inspection. The old gentleman took a long, detailed look at our product, of which we were very proud, as it met all functional requirements. He kept noting down every minute detail and after all the tests (which were successful), he failed the product. Reason: The outer surface had small nicks and dents that happened during handling of tubes.

When we pointed out that these were not going to cause functional issues, he asked us to show him the drawing. He asked us to show where on the drawing, was it mentioned that dents were needed.

His point of view simply amazed us "In the approved drawing there are no dents on surface, because I don't need it. Why are you giving me something I don't need?

They really look for perfection in everything they do. They helped us improve our product quality by leaps.
autocrat is offline  
Old 30th October 2015, 23:36   #1283
BHPian
 
autocrat's Avatar
 
Join Date: Oct 2011
Location: Bangalore
Posts: 716
Thanked: 732 Times
Re: The FIAT 1100/Premier Padmini Technical Information thread

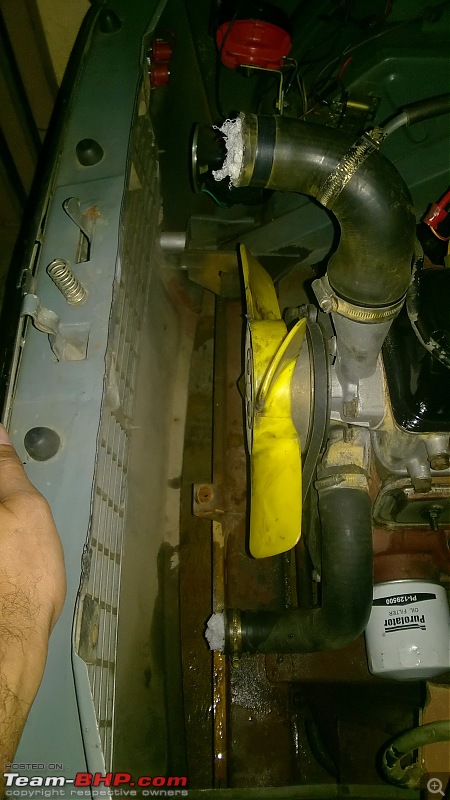
Radiator leakage increased, and Behram sir advised me not to take risk, so I decided to get the radiator out. I could see 2 bolts at the top but wasn't sure about mountings at the bottom. I wish I had those mirrors used by security guards at malls to see the underside of the car.

Called up Arun from FCC and took inputs to get the radiator off. After removing the 2 mounting bolts on top and nut at bottom, removed the 6 nuts holding the side shields, loosened the hose clamps, worked the hoses loose and pulled out the radiator.

I really don't know how many leaks are there - the upper and lower tanks are stained green at many places.

The FIAT 1100/Premier Padmini Technical Information thread-wp_20151030_002.jpg

The FIAT 1100/Premier Padmini Technical Information thread-wp_20151030_003.jpg

Plugged the hoses with cotton waste to prevent any insect / rodent entry.
The FIAT 1100/Premier Padmini Technical Information thread-wp_20151030_004.jpg

Looking fwd to get those leaks fixed so that the car is back on the road.
autocrat is offline   (1) Thanks
Old 31st October 2015, 10:49   #1284
Distinguished - BHPian
 
Join Date: Jul 2007
Location: MUMBAI
Posts: 3,060
Thanked: 5,353 Times
Re: The FIAT 1100/Premier Padmini Technical Information thread

Quote:
Originally Posted by autocrat View Post
Radiator leakage increased, so I decided to get the radiator out. I could see 2 bolts at the top but wasn't sure about mountings at the bottom. I wish I had those mirrors used by security guards at malls to see the underside of the car.
Dear Gowtham - what yaar! You are supposed to sleep below the car and see with your eyes! You guys have become too hi-tech, come down to earth!

Repairing the radiator is quite a straightforward job, go to the friendly neighbourhood radiatorwallah, sit with him and get it done, don't leave the radiator with him, he will not do properly. Ensure absolutely no leakage. Remember to throw the radiator drain plug out and permanently close the hole with a soldered brass piece. Tell him to clean the hose connecting pipes and the radiator neck which interfaces with the cap with "acid" (whatever that is). After everything is done, wash the outside and the core with plenty of water and refit. See the condition of the radiator mounting cup washers and rubbers, replace only if required, generally OE parts are not available and these don't really deteriorate. Use the metallic spacers inside the assemblies, these are NVH related parts. Fit brand new reinforced hose pipes. Cut the extra length off to ensure no kinks or bad fitment. See the top hose in your car, it is kinked because it is longer in length and nobody bothered to see this and do it properly. For clips, the first choice is to use wire clips conforming to JIS. Take the cue from the Maruti 800, there the size is a little smaller, here it is 1.5 inches, buy the correct size, they are not easily available so buy out the whole stock when you see them. Clean the radiator cap with plenty of water, push the pressure valve spring and gently pull the vacuum valve spring to ensure that there is nothing stuck in between and then use it. Very important, after assembling the radiator, without starting the engine, fill the radiator with tap water, there is no need to spend money on coolant. Then open the cylinder block drain plug which is situated behind the distributor and let all the water drain out from the block. You will see that brown water will come out. Do this thing 3 or 4 times till clean water comes out and then close the drain plug. I know that you had replaced the water, but do it again, you lose nothing by doing it again. Set the fan belt tension if it is less, the span between the alternator and the water pump must move inwards by around 12mm when pushed, holding it between the thumb and two fingers of the left hand. I have got this force written down somewhere, I'll find out and tell you. If you do all this properly, you will do this only once, period! It will last forever.

Everything must be done very professionally, like a work of art. This car allows you to work like this. .

Best regards,

Behram Dhabhar
DHABHAR.BEHRAM is offline   (5) Thanks
Old 1st November 2015, 08:09   #1285
BHPian
 
autocrat's Avatar
 
Join Date: Oct 2011
Location: Bangalore
Posts: 716
Thanked: 732 Times
Re: The FIAT 1100/Premier Padmini Technical Information thread

Quote:
Originally Posted by DHABHAR.BEHRAM View Post
Dear Gowtham - what yaar! You are supposed to sleep below the car and see with your eyes! You guys have become too hi-tech, come down to earth!
True that Sir! There is a tendency these days, with our generation people, to look for easy way out. I am learning, through this car, what I need to change in myself. Giving up is not an option.

Quote:
Originally Posted by DHABHAR.BEHRAM View Post
Repairing the radiator is quite a straightforward job, go to the friendly neighbourhood radiatorwallah, sit with him and get it done, don't leave the radiator with him, he will not do properly. Ensure absolutely no leakage. Remember to throw the radiator drain plug out and permanently close the hole with a soldered brass piece.
The drain plug was removed, and as advised, a brass plate was put in place.

Quote:
Originally Posted by DHABHAR.BEHRAM View Post
See the condition of the radiator mounting cup washers and rubbers, replace only if required, generally OE parts are not available and these don't really deteriorate. Use the metallic spacers inside the assemblies, these are NVH related parts.
Sir, the rubber washers on the top are in good shape, the one at the bottom seems to have some wear, may be due to weight of the radiator and water. The re-assembly was uneventful, but I lost a spring washer and M10 nut, that is used to fix the side shields on radiator side, so will put a new one there.

Quote:
Originally Posted by DHABHAR.BEHRAM View Post
Fit brand new reinforced hose pipes. Cut the extra length off to ensure no kinks or bad fitment. See the top hose in your car, it is kinked because it is longer in length and nobody bothered to see this and do it properly. For clips, the first choice is to use wire clips conforming to JIS. Take the cue from the Maruti 800, there the size is a little smaller, here it is 1.5 inches, buy the correct size, they are not easily available so buy out the whole stock when you see them.
Quote:
Originally Posted by DHABHAR.BEHRAM View Post
Clean the radiator cap with plenty of water, push the pressure valve spring and gently pull the vacuum valve spring to ensure that there is nothing stuck in between and then use it. Very important, after assembling the radiator, without starting the engine, fill the radiator with tap water, there is no need to spend money on coolant. Then open the cylinder block drain plug which is situated behind the distributor and let all the water drain out from the block. You will see that brown water will come out. Do this thing 3 or 4 times till clean water comes out and then close the drain plug. I know that you had replaced the water, but do it again, you lose nothing by doing it again. Set the fan belt tension if it is less, the span between the alternator and the water pump must move inwards by around 12mm when pushed, holding it between the thumb and two fingers of the left hand. I have got this force written down somewhere, I'll find out and tell you. If you do all this properly, you will do this only once, period! It will last forever.

Everything must be done very professionally, like a work of art. This car allows you to work like this. .

Best regards,

Behram Dhabhar
Done

I assembled everything and took the car for a drive last evening, and everything was ok. However, this morning, I saw a small puddle formed under the car radiator and upon touching, the radiator bottom tank was wet. The leak seems to be worse than before, as it never leaked in static condition before. I have to redo radiator repair again. EDIT: Want to do a long drive in this car asap. Hope to address these issues soon and get going.

New hose clamps and hoses:
Attached Thumbnails
The FIAT 1100/Premier Padmini Technical Information thread-wp_20151101_07_42_24_pro.jpg  

The FIAT 1100/Premier Padmini Technical Information thread-wp_20151101_07_44_09_pro.jpg  


Last edited by autocrat : 1st November 2015 at 08:18.
autocrat is offline   (1) Thanks
Old 1st November 2015, 10:50   #1286
BHPian
 
autocrat's Avatar
 
Join Date: Oct 2011
Location: Bangalore
Posts: 716
Thanked: 732 Times
Re: The FIAT 1100/Premier Padmini Technical Information thread

Timed the engine now, Behram Sir confirmed cylinder 1 or 4 can be used for timing - I used cylinder 1, the earlier timing was retarded and I turned the distributor to right once and the engine stalled. I rotated the cap until I found the timing mark coinciding with the TDC mark, and tightened the distributor in that position. Lot of water being thrown out from engine now

Also, I was so lost in watching the timing mark with the light that I ended up getting a couple of electric shocks. Quite painful. If anyone is attempting this, wear rubber work gloves on right hand, and use the left hand to trigger timing light.
autocrat is offline  
Old 1st November 2015, 20:57   #1287
BHPian
 
autocrat's Avatar
 
Join Date: Oct 2011
Location: Bangalore
Posts: 716
Thanked: 732 Times
Re: The FIAT 1100/Premier Padmini Technical Information thread

Took the car for a spin. The timing advance has transformed the car. The cold idling is smoother, the warm idle is stable, the acceleration is crisp and engine revs more freely and pick up is effortless.

I look forward to getting the radiator fixed asap.

The rear right tyre developed a bulge and is bouncing on the the road once i cross 20 kmph.

Last edited by autocrat : 1st November 2015 at 21:00.
autocrat is offline   (3) Thanks
Old 2nd November 2015, 14:28   #1288
Distinguished - BHPian
 
Join Date: Jul 2007
Location: MUMBAI
Posts: 3,060
Thanked: 5,353 Times
Re: The FIAT 1100/Premier Padmini Technical Information thread

Quote:
Originally Posted by autocrat View Post
Timed the engine now, I rotated the cap until I found the timing mark coinciding with the TDC mark, and tightened the distributor in that position.
Dear Gowtham - your quote above - "I rotated the cap until I found the timing mark coinciding with the TDC mark, and tightened the distributor in that position", are baba, how many times to tell you that you should align the mark that corresponds to 10 degrees BTDC, not actual TDC. Please do it again. It must be done perfectly only, no compromise. Also put the correct original Solex main jet.

Best regards,

Behram Dhabhar
DHABHAR.BEHRAM is offline   (1) Thanks
Old 3rd November 2015, 00:28   #1289
BHPian
 
autocrat's Avatar
 
Join Date: Oct 2011
Location: Bangalore
Posts: 716
Thanked: 732 Times
Re: The FIAT 1100/Premier Padmini Technical Information thread

Quote:
Originally Posted by DHABHAR.BEHRAM View Post
Dear Gowtham - your quote above - "I rotated the cap until I found the timing mark coinciding with the TDC mark, and tightened the distributor in that position", are baba, how many times to tell you that you should align the mark that corresponds to 10 degrees BTDC, not actual TDC. Please do it again. It must be done perfectly only, no compromise. Also put the correct original Solex main jet.

Best regards,

Behram Dhabhar
Sir, apologies for the confusion, indeed the yellow mark made on the 10deg BTDC, was aligned with timing mark. I reconfirmed the timing today just to be sure, and its as per the spec.

Changed the carb jet to 102 from 97.5
The FIAT 1100/Premier Padmini Technical Information thread-wp_20151102_002.jpg
The pick up and torque is awesome!

Last edited by autocrat : 3rd November 2015 at 00:29.
autocrat is offline  
Old 3rd November 2015, 13:36   #1290
Distinguished - BHPian
 
Join Date: Jul 2007
Location: MUMBAI
Posts: 3,060
Thanked: 5,353 Times
Re: The FIAT 1100/Premier Padmini Technical Information thread

Quote:
Originally Posted by autocrat View Post
Changed the carburettor jet to 102 from 97.5. The pick up and torque is awesome!
Dear Gowtham - now the real game will start! . Now do as follows:

Now that you have put everything to specification, run the car continuously and spiritedly fast for at least 200 kms (more is better) on good but slightly winding roads where you will need to use 3rd gear sometimes to maintain good speed. The last 50 or so kilometres of this stretch must be done really fast (without being rash) as compared to the initial 150 kms. Stop after completing this circuit and take the photograph of the ID of the exhaust tail pipe, immediately after stopping, within one minute. Come back by the same route and repeat with another photograph. What is important is the color of the ID of the tail pipe. This result will determine where you are in the performance bar and whether any further attention to the finest nuances of what we call "engine tune-up" is still required or not.

Do this and let me know. .

Best regards,

Behram Dhabhar
DHABHAR.BEHRAM is offline   (1) Thanks
Reply

Most Viewed


Copyright ©2000 - 2024, Team-BHP.com
Proudly powered by E2E Networks