Team-BHP > Vintage Cars & Classics in India > Post-War
Register New Topics New Posts Top Thanked Team-BHP FAQ


Reply
  Search this Thread
400,031 views
Old 3rd November 2008, 21:10   #31
Distinguished - BHPian
 
Stanher's Avatar
 
Join Date: Aug 2006
Location: Hyderabad, AP
Posts: 6,491
Thanked: 2,087 Times

Well, is after much searching that I finally dug this thread out of the archives! Time to clear the cobwebs out here, much like the ones on my lambretta, which is yet to see daylight again.

The denter to whom I'd given the bike is delaying too much on the project, mostly claiming that he has other bikes on his hands, he has to get them ready before the festival etc. etc.!

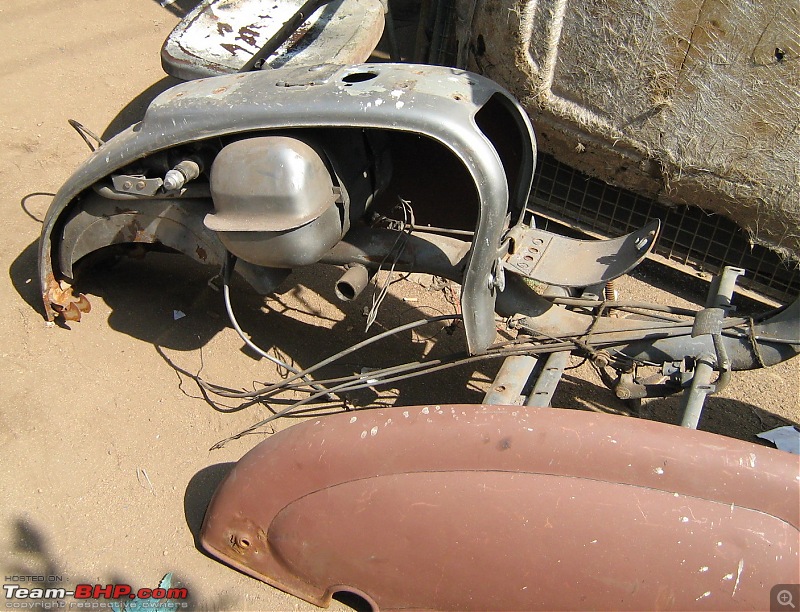
As of now, this is the most I can report on the 'progress'. The engine has been taken out over the weekend and is now with Rashid Mody who is going to open it up and show me what needs to be done on that while the bodywork "goes on".

Lambretta scooters - Restoration & Maintenance-img_1675.jpg

Lambretta scooters - Restoration & Maintenance-img_1678.jpg

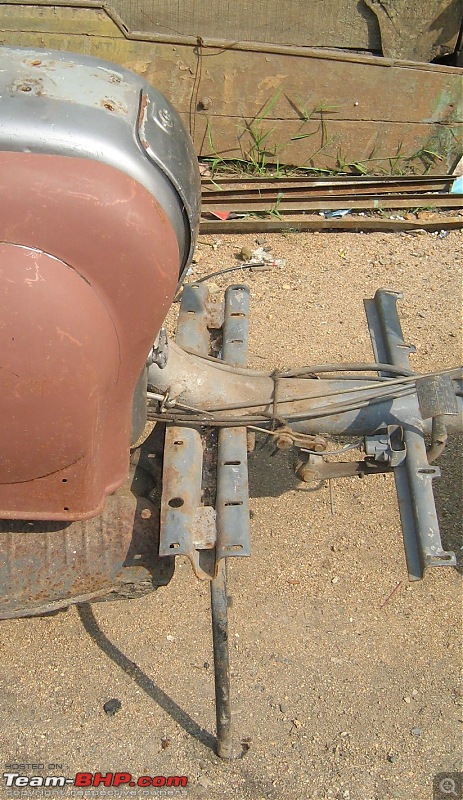
Also he pointed out to the denter this bend on the centre legshield support, which also supports the centrestand. The guy said he'll fix it, but havent been able to go check on him after that.

Lambretta scooters - Restoration & Maintenance-img_1654.jpg

Lambretta scooters - Restoration & Maintenance-img_1655.jpg
Stanher is offline  
Old 8th November 2008, 00:39   #32
Distinguished - BHPian
 
Stanher's Avatar
 
Join Date: Aug 2006
Location: Hyderabad, AP
Posts: 6,491
Thanked: 2,087 Times

Well, finally a small bit of progress on the scoot-

Engine after being separated from the scooter was brought by Mr. Modi to his home in his Maruti van last weekend.
Here it is, with some of his "valuables!"

Lambretta scooters - Restoration & Maintenance-img_1767.jpg

He wasnt feeling too well plus I feel his age is catching up with him so he needed my help to pull out the thing from the van when I went to him 3 days later.

Lambretta scooters - Restoration & Maintenance-img_1768.jpg

Then begins the gradual dismantling, starting with the rear wheel- this was real hard to open, as a couple of the retaining bolt nuts were jammed and it took quite some time and effort, requiring more than 1 spanner to open them!

Lambretta scooters - Restoration & Maintenance-img_1769.jpg

Next came off the rear shock.

Now that the rear wheel was off, we decided to open the rim up and give it for painting. However, this proved all the more difficult as the inner tyre/tube was stuck like glue to the inner rim due to all the accumulated rust, most likely with the madras climate it had earlier been in!

Lambretta scooters - Restoration & Maintenance-img_1770.jpg

'took a fair amount of tapping with a chisel and hammer, then with me jumping all around the rim on the tyre to get it unstuck and then Mr. Modi suggested poruing water between the rim and tyre and then tapping the rim out. After what seemed like an eternity it finally broke free!

Lambretta scooters - Restoration & Maintenance-img_1771.jpg

Both halves of the rim appeared quite corroded on the inside. Luckily I have 2 brand new rims made by SIL, courtesy of sidman, which I was told I can put for the scooter instead!

More later on the engine. And also to follow up on the so-far pending bodywork.

Last edited by Stanher : 8th November 2008 at 00:50.
Stanher is offline  
Old 13th November 2008, 14:54   #33
Distinguished - BHPian
 
Stanher's Avatar
 
Join Date: Aug 2006
Location: Hyderabad, AP
Posts: 6,491
Thanked: 2,087 Times

OK, engine bore's finally been opened up at Mr.Modi's. According to him, the big end is worn out and the piston needs to be replaced with a sleeved one. Plus he said the oil seals may need replacement, if I have any news ones with me, he'll open up the rest of the assembly.

Lambretta scooters - Restoration & Maintenance-img_1801.jpg

Lambretta scooters - Restoration & Maintenance-img_1803.jpg

Also the silencer muffler needs to be replaced.
Stanher is offline  
Old 30th November 2008, 22:29   #34
BHPian
 
Sidman's Avatar
 
Join Date: May 2008
Location: Bangalore
Posts: 416
Thanked: 28 Times

Sorry for the long absence. There was nothing to report, as we are still getting sporadic rains, and I've been tied up with work. Waiting for the weather to dry out before painting the scoot. Stanher, congrats on the Companion! You should get an honorary degree in restoring Standard cars and Lambretta scooters! Also, can we have pics of what a worn-out big end looks like? And also, a pic of a sleeved piston, as opposed to the regular one?
Even a few welds can't fix the muffler? Must be really bad shape. Here, the original style muffler is not available. You get one which my mechanic says will make the scoot sound like an autorickshaw. It has no internal
filter (this looks like a small mesh fitted at the outlet end of the muffler). It seems the internal filter dampens the sound further. Let us know if you get a good muffler chamber. Also, keep us posted about what work you do on your cylinder (new piston, etc). Specially interested in the decarbonizing of the cylinder.
And which Lambretta are we seeing in the pics? Is it the 60 or 61 undergoing resto?
Sidman is offline  
Old 1st December 2008, 10:44   #35
Distinguished - BHPian
 
Stanher's Avatar
 
Join Date: Aug 2006
Location: Hyderabad, AP
Posts: 6,491
Thanked: 2,087 Times

Quote:
Originally Posted by Sidman View Post
Stanher, congrats on the Companion! You should get an honorary degree in restoring Standard cars and Lambretta scooters! Also, can we have pics of what a worn-out big end looks like? And also, a pic of a sleeved piston, as opposed to the regular one?
Thanks!
Sure I'll take pics. of those. Incidentally last week Mr.Modi had fired the denter, because of whom the whole thing is taking so long! He said he'll be done with his work by today- let's see!

Quote:
Even a few welds can't fix the muffler? Must be really bad shape. Here, the original style muffler is not available. You get one which my mechanic says will make the scoot sound like an autorickshaw. It has no internal filter (this looks like a small mesh fitted at the outlet end of the muffler).
Yes I do know that, which is why I'm not going for any of the new/repros.

Ive actually got a Lamby, which is quite complete and I plan to use for parts (considering that I got it cheap!)
But unfortunately, when I tried to take off its muffler last week, I found that its been welded on one side to the bend-pipe, a common alteration done on these to cut the cost and time in replacing the silencer clamp or so!
So Mr.Modi suggested we rectify the old muffler itself and fit it.

However, I am replacing the drum and flywheel with the better ones that you'd sent me (thanks for these!)

Lambretta scooters - Restoration & Maintenance-img_1810.jpg

Quote:
And which Lambretta are we seeing in the pics? Is it the 60 or 61 undergoing resto?
Its the '60 one of course- I thought I'd mentioned it in the beginning itself?
Stanher is offline  
Old 1st December 2008, 17:34   #36
BHPian
 
Sidman's Avatar
 
Join Date: May 2008
Location: Bangalore
Posts: 416
Thanked: 28 Times

Quote:
Originally Posted by Stanher View Post
However, I am replacing the drum and flywheel with the better ones that you'd sent me (thanks for these!)
Its the '60 one of course- I thought I'd mentioned it in the beginning itself?
Yes, you mentioned it, so I went back to the first post about the scoot. Am glad that the load of parts I scored for you is coming in handy! Still have your front hub with me! I was also offered a Lamby as a parts vehicle, need to check if it's still there. Keep the news coming.
Sidman is offline  
Old 6th December 2008, 23:38   #37
BHPian
 
Join Date: Nov 2008
Location: BANGALORE
Posts: 399
Thanked: 77 Times

My dad has a 1960 Lambretta Li 150, the scooter is with us since 1970. Now it needs a new cylinder and piston as the existing one rebored earlier. Can any one tell me where I can get a good stuff in Mumbai or Pune?
gaddiwale is offline  
Old 7th December 2008, 22:30   #38
BHPian
 
Sidman's Avatar
 
Join Date: May 2008
Location: Bangalore
Posts: 416
Thanked: 28 Times

Quote:
Originally Posted by gaddiwale View Post
My dad has a 1960 Lambretta Li 150, the scooter is with us since 1970. Now it needs a new cylinder and piston as the existing one rebored earlier. Can any one tell me where I can get a good stuff in Mumbai or Pune?
Not sure where you can get these parts in Mumbai, you could ask Karl about availability in Pune. But do post some photos of your Lambretta for the rest of us!
Sidman is offline  
Old 7th December 2008, 23:42   #39
BHPian
 
Join Date: Nov 2008
Location: BANGALORE
Posts: 399
Thanked: 77 Times

Quote:
Originally Posted by Sidman View Post
Not sure where you can get these parts in Mumbai, you could ask Karl about availability in Pune. But do post some photos of your Lambretta for the rest of us!
Thanks Sidman for reply. The Lambretta is there in my native place at West Bengal. I'll upload the photographs shortly. I came across one shop at Sion Koliwada, Lucky Scooters, who has pistons for Li 150, but I'm not sure about the quality of the metal. Can anyone help me to find out a decent cylinder block and a piston for 1960 Lambretta Li 150.
gaddiwale is offline  
Old 11th December 2008, 23:39   #40
BHPian
 
TuffRyder's Avatar
 
Join Date: Jul 2008
Location: Bangalore
Posts: 494
Thanked: 27 Times

Stanher: Are those badges that you had posted earlier available? Im looking out for the ones that go on the side sheild and also the grill like thing that goes below the rear seat.
TuffRyder is offline  
Old 12th December 2008, 00:12   #41
Distinguished - BHPian
 
Stanher's Avatar
 
Join Date: Aug 2006
Location: Hyderabad, AP
Posts: 6,491
Thanked: 2,087 Times

Quote:
Originally Posted by TuffRyder View Post
Stanher: Are those badges that you had posted earlier available? Im looking out for the ones that go on the side sheild and also the grill like thing that goes below the rear seat.
I guess I do have another set available right now. 'may have a spare grille also. I'll pm you in any case.
Stanher is offline  
Old 12th December 2008, 03:51   #42
BHPian
 
TuffRyder's Avatar
 
Join Date: Jul 2008
Location: Bangalore
Posts: 494
Thanked: 27 Times

Quote:
Originally Posted by Stanher View Post
I guess I do have another set available right now. 'may have a spare grille also. I'll pm you in any case.
Thank you that would be of great help. cheers:
TuffRyder is offline  
Old 13th December 2008, 21:56   #43
BHPian
 
Sidman's Avatar
 
Join Date: May 2008
Location: Bangalore
Posts: 416
Thanked: 28 Times

The owner of the workshop where I plan to get my scooter repainted took a look at it today, and explained to me the repainting process followed for these kind of jobs. The approach we will be taking is:
1. Before completely dismantling the bike, an expert tinkering guy will do some inital tinkering.
2. Bike is dismantled, further denting/tinkering work is done if required.
3. All layers of paint scraped from every painted part.
4. All holes which hold screws/bolts will be welded shut, for redrilling to the precise diameter at a later stage. This is so that all the screws/bolts fit perfectly.
5. Minor tinkering, if required. We might need to smooth out the welds that seal the screw/bolt holes. All parts will be examined for any bends/cracks/metal fatigue, and fixed appropriately.
6. Parts go in for what they call "3 in 1 treatment". This is essentially to remove rust and other contaminants on the metal. It invloves dipping the parts in hydrochloric acid bath...enough to kill rust, but will not harm the metal.
7. Parts are dried out, so that we get a mild "Phosphoric coating" on them. This is an added deterrent to rust formation.
8. We might do powder coating at this stage, not yet decided.
9. Screw/bolt holes will be redrilled to precise diameter.
10. Primer coat applied and sanded to satin finish.
11. Paint coats go on. Will be using PPG paint, two-tone combo of White/Blue. The blue is known as Azzurro Flaminia / Flaminia Blue.
12. After drying, lacquer (clear coat?) layer is applied. This protects the paint itself.
13. Reassemble the scooter with all the new parts I've been collecting...tyres, rubber parts, brake & clutch pads, timing chain, etc

While the scooter is in knocked-down state, we will be doing the following:
1. Checking the fork for any bends. The workshop has an expert guy who can fix fork bends.
2. Thorough cleaning of the engine.
3. Decarbing the cylinder to remove the carbon residue. Piston, etc will be checked for wear. Worn out parts will be replaced.
4. Muffler will be opened up and cleaned.
5. Reconditioning of seats.
6. Buffing and chroming for parts that require it. Will be chromeplating the centre-stand and kick pedal.

Will keep you posted on the resto. For those of you who haven't seen the scoot in it's present condition, here you go:
Attached Thumbnails
Lambretta scooters - Restoration & Maintenance-dsc00167.jpg  


Last edited by Sidman : 13th December 2008 at 21:59.
Sidman is offline  
Old 14th December 2008, 23:02   #44
Newbie
 
Join Date: Jan 2008
Location: Hubli
Posts: 6
Thanked: 0 Times

Quote:
Originally Posted by Sidman View Post
The major work has not yet begun. Have been busy with other things. Hope to kick things off during October.
Hey Sid,

Barbara Maam, has been the source from whom, i have learnt a few lessons about life. They have been the pillars on my life and survival. One of the them is to be positive.

I am positive that she will return to perfect health.

Our Family will definetly pray for her .

The accident happened just the way you imagine it to be.

Went through the entire restoration thread. I have just this to say. I am so glad the scooter has gone to you.

Your decision not to ask Dad.... Thank you. Thats very, very decent of you. You see, its my guess that, Dad sees it as a point where age caught up with him. Getting clipped from behind was the unthinkable for somene who rode as fast and well as he did. Its after that fall that he cut back on his riding.

I remember the times when he used to fly on that Lamby. I used to be the pillon, scared but thrilled too. .

Be positive Sid, she will be fine.

Takecare,

Regards,
Christy
antochristy is offline  
Old 16th December 2008, 13:41   #45
BHPian
 
Join Date: Jul 2008
Location: DELHI
Posts: 297
Thanked: 154 Times
Painting Process

Quote:
Originally Posted by Sidman View Post
The owner of the workshop where I plan to get my scooter repainted took a look at it today, and explained to me the repainting process followed for these kind of jobs. The approach we will be taking is:
6. Parts go in for what they call "3 in 1 treatment". This is essentially to remove rust and other contaminants on the metal. It invloves dipping the parts in hydrochloric acid bath...enough to kill rust, but will not harm the metal.
7. Parts are dried out, so that we get a mild "Phosphoric coating" on them. This is an added deterrent to rust formation.
8. We might do powder coating at this stage, not yet decided.
10. Primer coat applied and sanded to satin finish.
11. Paint coats go on. Will be using PPG paint, two-tone combo of White/Blue. The blue is known as Azzurro Flaminia / Flaminia Blue.
12. After drying, lacquer (clear coat?) layer is applied. This protects the paint itself.
While the scooter is in knocked-down state, we will be doing the following:
1. Checking the fork for any bends. The workshop has an expert guy who can fix fork bends.:
Hey Sidman,

Couple of things.

First - whoever told you that dipping the metal parts in Hydrochloric Acid will not ham the metal doesn't have his chemistry right. And nor will drying the metal post HCL Bath give a phosphoate coating - disastrous process - don't even try it. How do you plan to remove the acid from the substrate post the Acid Bath? You will perhaps wash the bare metal - this will immediately form rust again!

Also if you plan to powder coat then you can't paint. And if you plan to put a 2k process that is you want to clear coat the paint then go in for a 2k base coat instead of using a 1k color and coating it with clear coat - use the correct chemistry between the substrates and top coats to get a lasting durable finish.

Also post the primer you must use the surfacer. Use a porous ppg putty to fill in any dents and then do not apply any degreaser - spray the surfacer.

Also - how does your guy figure out a bend in the fork? If there is a bend of a few mm it wouldn't be visible - does he have a measuring jig? Can you send pics of the measuring jig? To straighten out the only way will be to heat the fork which will take away its structural integrity because you will not be able to anneal / temper the fork the way it is done in the factory. Recommendation - Dont do it or the damage will be irreversible.

If you need step by step guidance on painting in detail let me know.

Check out my Lambretta restoration thread - you know it!

Cheers!
SA7VA5 is offline  
Reply

Most Viewed


Copyright ©2000 - 2024, Team-BHP.com
Proudly powered by E2E Networks