Team-BHP > Vintage Cars & Classics in India > Post-War


Reply
  Search this Thread
145,978 views
Old 19th April 2010, 22:49   #91
Distinguished - BHPian
 
anjan_c2007's Avatar
 
Join Date: Jul 2008
Location: India
Posts: 8,241
Thanked: 20,198 Times

The Vintage and Classic Car run covering a distance of 20 kms yesterday 18/04/2010 (starting at 5.30 pm) in the sweltering Nagpur heat was well conducted and my car completed the run but not flawlessly again. I had bought a new electronic fuel pump and had fitted the new one just beside the old one.So it had twin fuel pumps.But the old one initially connected to the fuel line started getting heated after covering five to six kms.the trial run with the new one was not too encouraging too on Sunday morning and hence I had decided to hang on to the old one. I had to stop the car and moisten the foam piece that I had wrapped around the fuel pump.
After the rally I was advised by an expert to relocate the fuel pump at a lower height. Presently it is mounted on the rear boot just above the fuel tank and near the fuel filler pipe.Relocating it at a lower height will mean that it will draw petrol from the outlet at the top of the tank by suction and will only have to pump the fuel to the carburettor.Now it is having to pump fuel to its height and then send it to the carburettor.
anjan_c2007 is online now  
Old 20th April 2010, 09:58   #92
Distinguished - BHPian
 
Join Date: Jul 2007
Location: MUMBAI
Posts: 3,060
Thanked: 5,344 Times

Dear Anjan - please follow my instructions on electronic fuel pump location and plumbing, otherwise your car will not work properly.

Best regards,

Behram Dhabhar
DHABHAR.BEHRAM is offline   (1) Thanks
Old 20th April 2010, 22:24   #93
Distinguished - BHPian
 
anjan_c2007's Avatar
 
Join Date: Jul 2008
Location: India
Posts: 8,241
Thanked: 20,198 Times

Quote:
Originally Posted by DHABHAR.BEHRAM View Post
Dear Anjan - please follow my instructions on electronic fuel pump location and plumbing, otherwise your car will not work properly.

Best regards,

Behram Dhabhar
Thanks Dhabhar for the reminder. Wish I had followed them earlier. Now I am going to take a printout and work it out.
As one of Murphy's law proclaims "When all else fails read the instructions."
anjan_c2007 is online now  
Old 21st April 2010, 17:11   #94
Distinguished - BHPian
 
Join Date: Jul 2007
Location: MUMBAI
Posts: 3,060
Thanked: 5,344 Times

Dear Anjan - please post some photographs of the fuel tank in the dicky, including the tank fuel outlet pipe position. I will then tell you exactly how to position the electronic fuel pump. The pump must be "UCAL FACET" only. I see a plastic fuel filter hanging just below the carburettor inlet connector of your car's SU carburettor. Please remove it and throw it out. Any big volume such as this in the engine compartment makes the fuel remain inside it for a relatively long time and is an open invitation to percolation / vapour lock.

Best regards,

Behram Dhabhar
DHABHAR.BEHRAM is offline   (1) Thanks
Old 21st April 2010, 20:03   #95
Distinguished - BHPian
 
anjan_c2007's Avatar
 
Join Date: Jul 2008
Location: India
Posts: 8,241
Thanked: 20,198 Times

Quote:
Originally Posted by DHABHAR.BEHRAM View Post
Dear Anjan - please post some photographs of the fuel tank in the dicky, including the tank fuel outlet pipe position. I will then tell you exactly how to position the electronic fuel pump. The pump must be "UCAL FACET" only. I see a plastic fuel filter hanging just below the carburettor inlet connector of your car's SU carburettor. Please remove it and throw it out. Any big volume such as this in the engine compartment makes the fuel remain inside it for a relatively long time and is an open invitation to percolation / vapour lock.

Best regards,

Behram Dhabhar
Thanks Behram for your prompt response. I will post the pictures this weekend. the fuel filter from the engine bay is no more. I have placed it ( a new one) between the tank and the fuel pump in the luggage boot.
anjan_c2007 is online now  
Old 21st April 2010, 20:50   #96
Distinguished - BHPian
 
anjan_c2007's Avatar
 
Join Date: Jul 2008
Location: India
Posts: 8,241
Thanked: 20,198 Times

Quote:
Originally Posted by anjan_c2007 View Post
The link is here for anyone interested to read and take advantage of what Dhabhar has to say about electronic fuel pump fitment:
http://www.team-bhp.com/forum/4x4-ve...rricane-9.html
The exact link is on page 11 here:
http://www.team-bhp.com/forum/4x4-ve...ricane-11.html
anjan_c2007 is online now  
Old 22nd April 2010, 19:10   #97
Distinguished - BHPian
 
anjan_c2007's Avatar
 
Join Date: Jul 2008
Location: India
Posts: 8,241
Thanked: 20,198 Times

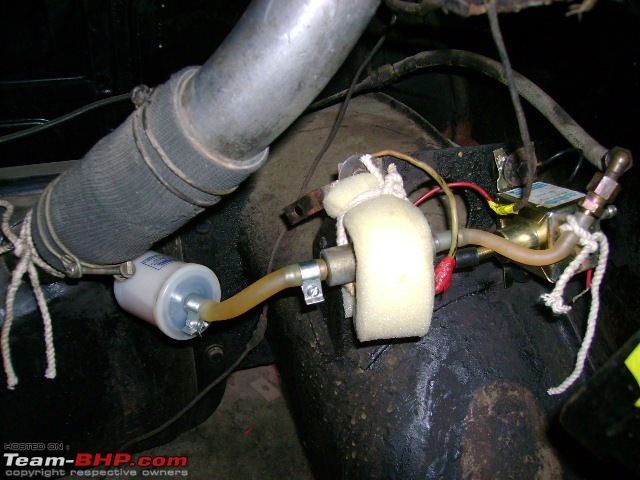
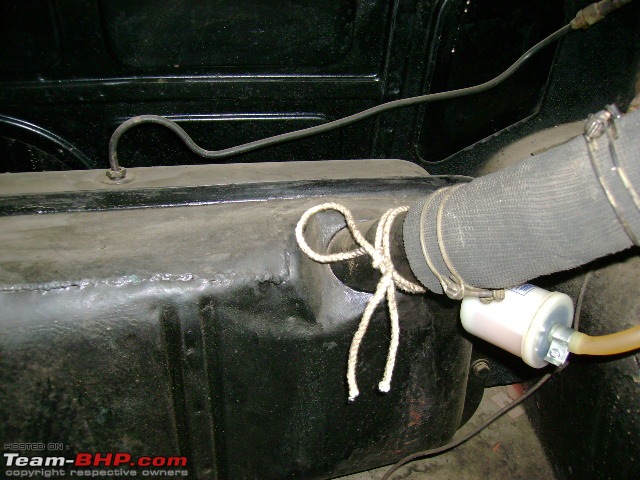
Behram, the picture was taken today wherein two fuel pumps are seen. The old one to the left is covered by foam and connected to supply line.The inlet is from the left side of the old fuel pump and the outlet is from the right side. The new fuel pump is to its right. The fuel tank outlet pipe is also seen in the first picture emerging from the top of the fuel tank.
My Lady Love in Black (1955 Landmaster)-dsc05201.jpg

My Lady Love in Black (1955 Landmaster)-dsc05202.jpg

My Lady Love in Black (1955 Landmaster)-dsc05203.jpg

Last edited by anjan_c2007 : 22nd April 2010 at 19:12.
anjan_c2007 is online now  
Old 22nd April 2010, 22:59   #98
Distinguished - BHPian
 
Join Date: Jul 2007
Location: MUMBAI
Posts: 3,060
Thanked: 5,344 Times

Dear Anjan - There is no need for any foam / cloth piece on the electronic fuel pump. Even if it is there, nothing will happen even if it is made wet. Whoever has done the connections has not appreciated what I have instructed (I hope it's not you).

Please make the tee connectors as I have indicated in my procedure. I will save your photographs in my laptop, mark the changes required and repost them for your needful by tomorrow. Please understand my instructions completely and confirm, otherwise if you have specific doubts, please ask.

Please confirm to me that the electronic fuel pump is UCAL FACET make only. Other pumps do not work properly as the flow characteristics are not controlled.

Best regards,

Behram Dhabhar
DHABHAR.BEHRAM is offline  
Old 23rd April 2010, 19:38   #99
Distinguished - BHPian
 
anjan_c2007's Avatar
 
Join Date: Jul 2008
Location: India
Posts: 8,241
Thanked: 20,198 Times

Quote:
Originally Posted by DHABHAR.BEHRAM View Post
Dear Anjan - There is no need for any foam / cloth piece on the electronic fuel pump. Even if it is there, nothing will happen even if it is made wet. Whoever has done the connections has not appreciated what I have instructed (I hope it's not you).

Please make the tee connectors as I have indicated in my procedure. I will save your photographs in my laptop, mark the changes required and repost them for your needful by tomorrow. Please understand my instructions completely and confirm, otherwise if you have specific doubts, please ask.

Please confirm to me that the electronic fuel pump is UCAL FACET make only. Other pumps do not work properly as the flow characteristics are not controlled.

Best regards,

Behram Dhabhar
Thanks Behram waiting for your pictures. I got a printout of the write-up posted by you in the CJ3B thread.Will take suitable steps and then let you know.I am getting an UCal Facet fuel pump.
anjan_c2007 is online now  
Old 6th May 2010, 19:17   #100
Distinguished - BHPian
 
anjan_c2007's Avatar
 
Join Date: Jul 2008
Location: India
Posts: 8,241
Thanked: 20,198 Times

Meanwhile I got a UCAL fuel pump and the dealer gladly exchanged the unbranded one charging me the price difference only saying he had then told me to only go for the UCAL and nothing else.
Now I intend to get the fuel pump fitted this weekend.
anjan_c2007 is online now  
Old 27th June 2010, 19:15   #101
Distinguished - BHPian
 
anjan_c2007's Avatar
 
Join Date: Jul 2008
Location: India
Posts: 8,241
Thanked: 20,198 Times

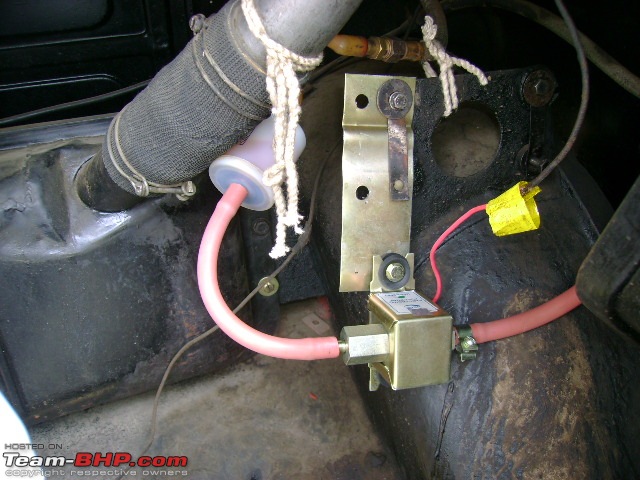
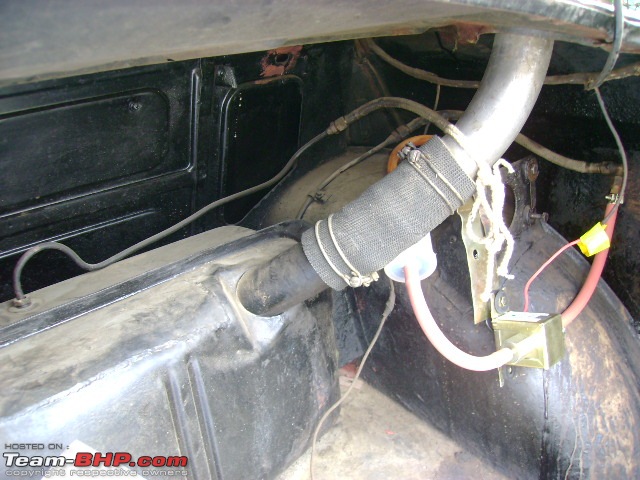
Lastly, I got fitted the UCAL fuel pump for a trouble free fuel supply. The fuel filter is now located near the fuel pump. This UCAL pump is now fitted at a lower height so that the siphon principle gets applied to draw fuel from the tank.The pump has to exert itself to now pump fuel to the carburettor only.The earlier fitment was at a height, where the original electric Lucas pump was located (still with me as a spare in working condition).So the old pump had to lift the fuel from the tank and further lift it a bit and then send it to the tank.This new one's effort has been reduced a bit.
My Lady Love in Black (1955 Landmaster)-dsc05493.jpg
My Lady Love in Black (1955 Landmaster)-dsc05494.jpg
My Lady Love in Black (1955 Landmaster)-dsc05495.jpg
Name:  DSC05498.JPG
Views: 977
Size:  131.8 KB
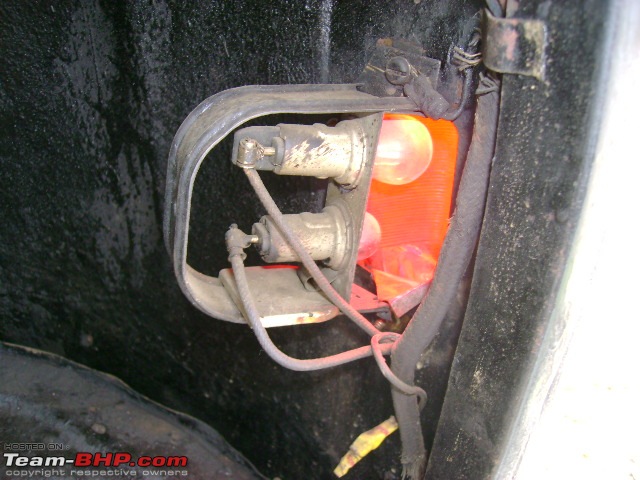
The interior of the tail light is like this. The bulbs can be replaced without opening anything.But these have to be cleaned constantly as they get dusty.
My Lady Love in Black (1955 Landmaster)-dsc05496.jpg
anjan_c2007 is online now  
Old 27th June 2010, 20:32   #102
BHPian
 
adheesh's Avatar
 
Join Date: May 2007
Location: Bombay
Posts: 526
Thanked: 53 Times

Quote:
Originally Posted by anjan_c2007 View Post
Lastly, I got fitted the UCAL fuel pump for a trouble free fuel supply. The fuel filter is now located near the fuel pump. This UCAL pump is now fitted at a lower height so that the siphon principle gets applied to draw fuel from the tank.The pump has to exert itself to now pump fuel to the carburettor only.The earlier fitment was at a height, where the original electric Lucas pump was located (still with me as a spare in working condition).So the old pump had to lift the fuel from the tank and further lift it a bit and then send it to the tank.This new one's effort has been reduced a bit.The interior of the tail light is like this. The bulbs can be replaced without opening anything.But these have to be cleaned constantly as they get dusty.
Attachment 376007
Please take care of the insulation tape on the fuel pump wire. Ideally it should have a sleeve over it since petrol and sparks (if the wire touches the body) would be very dangerous. Also try to mount both the points of the fuelpump on the bracket fabricated out of the fuel filter holder since the fuelpump when in operation causes constant vibrations which will make it come loose after sometime again causing a safety issue.

Ideally the electronic fuel pump must be parallel to the fuel tank and above it with one end about 20 degrees higher than the other (this can be done by putting a radiator mounting bush below just one mount) to avoid cavitation. Also, all the hoses must be secured with hose clips for safety reasons.

Hope this helps.
Regards,
Adheesh Parelkar
adheesh is offline   (1) Thanks
Old 27th June 2010, 22:13   #103
Distinguished - BHPian
 
anjan_c2007's Avatar
 
Join Date: Jul 2008
Location: India
Posts: 8,241
Thanked: 20,198 Times

Quote:
Originally Posted by adheesh View Post
Please take care of the insulation tape on the fuel pump wire. Ideally it should have a sleeve over it since petrol and sparks (if the wire touches the body) would be very dangerous. Also try to mount both the points of the fuelpump on the bracket fabricated out of the fuel filter holder since the fuelpump when in operation causes constant vibrations which will make it come loose after sometime again causing a safety issue.

Ideally the electronic fuel pump must be parallel to the fuel tank and above it with one end about 20 degrees higher than the other (this can be done by putting a radiator mounting bush below just one mount) to avoid cavitation. Also, all the hoses must be secured with hose clips for safety reasons.

Hope this helps.
Regards,
Adheesh Parelkar
Thanks Adheesh will take care with your valuable suggestions.
anjan_c2007 is online now  
Old 10th July 2010, 20:51   #104
Distinguished - BHPian
 
anjan_c2007's Avatar
 
Join Date: Jul 2008
Location: India
Posts: 8,241
Thanked: 20,198 Times

Sadly the 2 plus month old UCAL fuel pump conked off. My car was grounded for some days.So finally had the mechanic diagnose the problem. He preferred to refit the old fuel pump (the Contessa one) and the car is again fit'n fine.
I went to the dealer with the UCAL under warranty and he tested the same and got convinced that its conked off.So as is usual he said he will send it to the company and wait for their feedback.
He however did not have another UCAL pump (new) for me to buy.I bought another electronic pump (unbranded) to keep as spare however.
The point is that even a well known company like UCAL makes pumps that last not more than a few months..
And as I had said the old OE electric LUCAS fuel pump is still with me but that is not very reliable to use.
anjan_c2007 is online now  
Old 11th July 2010, 19:47   #105
Distinguished - BHPian
 
anjan_c2007's Avatar
 
Join Date: Jul 2008
Location: India
Posts: 8,241
Thanked: 20,198 Times

The wiper-body junction was facilitating entry of droplets of water into the drivers cabin.Had got them sealed from outside earlier. The right side was more leaky but has now become faultless.However the left one was still erring and so gave a good M seal wet from its inside (from within the driver's cabin). Will have to wait and watch the effect. The open glovebox on the dashboard used to get wet with raindrops- the apt song would be "raindrops keep falling (not) on my head (but through the car dash)" by B.J. Thomas (1969). I have kept a small tin to accommodate the water (if any) and lets see the results!

My Lady Love in Black (1955 Landmaster)-dsc05564.jpg

My Lady Love in Black (1955 Landmaster)-dsc05565.jpg
The two hydro- junctions
My Lady Love in Black (1955 Landmaster)-dsc05566.jpg
The dash clock has stopped.
anjan_c2007 is online now  
Reply

Most Viewed
Thread Tools Search this Thread
Search this Thread:

Advanced Search

Copyright ©2000 - 2024, Team-BHP.com
Proudly powered by E2E Networks