Team-BHP > Vintage Cars & Classics in India > Post-War
Register New Topics New Posts Top Thanked Team-BHP FAQ


Reply
  Search this Thread
328,450 views
Old 22nd February 2010, 23:23   #46
Senior - BHPian
 
the mole's Avatar
 
Join Date: Nov 2006
Location: Mumbai
Posts: 2,189
Thanked: 825 Times

Here is a link to a Ponton which was restored last year belonging to my friend (the cream one)
http://www.team-bhp.com/forum/vintag...ml#post1248355

PS: my Rover is next to it. BTW was WBF14 present for the statesman rally in 2005?

Last edited by the mole : 22nd February 2010 at 23:25.
the mole is offline  
Old 22nd February 2010, 23:45   #47
BHPian
 
mbz180's Avatar
 
Join Date: Jan 2010
Location: Kolkata
Posts: 893
Thanked: 1,023 Times

Actually I don't have the slightest idea or memory if WBF 14 was pesent in the 2005 Kolkata Statesman, that's because I took part in my 180a, and didn't take any pics that year. But I'm sure it was entered in the rally (whichever year it may be) after it was restored, because most cars that are restored by Mr. Sanjay Ghosh make it to the rally atleast once before they migrate.
mbz180 is offline  
Old 5th April 2010, 16:28   #48
Senior - BHPian
 
the mole's Avatar
 
Join Date: Nov 2006
Location: Mumbai
Posts: 2,189
Thanked: 825 Times

So Prithvi what is the development on the car? is the bodywork done? How about the engine?
the mole is offline  
Old 6th April 2010, 00:04   #49
BHPian
 
mbz180's Avatar
 
Join Date: Jan 2010
Location: Kolkata
Posts: 893
Thanked: 1,023 Times

Quote:
Originally Posted by the mole View Post
So Prithvi what is the development on the car? is the bodywork done? How about the engine?


Amol,


There was some delay in getting the remaining suspension parts hence suspension assembly was stopped for a while. But things will be back on track as most of the parts will be coming by the end of this week. Also, the water pump was dismantled since the bearing need to be replaced and unfortunately, none of the NOS parts that I have seemed to fit since it appears that at some point in time of the cars life, the water pumps innards were modified! But Bumpu is going to fabricate these parts, as he thinks we should keep the modified water pump, after all only the innards were modified. Also going crazy looking for rubber "O" rings for the diff and prop shaft; either they are too big or too small, but should get them soon. Other than that most of the suspension parts have been painted and will be put together when the rest of the parts arrive. Work has been so busy for me that I haven't been able to see my car in a months time, but I'm hoping I'll get a chance this Saturday. Body work will start after the suspension is assembled.

Regards
Prithvi
mbz180 is offline  
Old 27th April 2010, 19:14   #50
BHPian
 
mbz180's Avatar
 
Join Date: Jan 2010
Location: Kolkata
Posts: 893
Thanked: 1,023 Times

Hello Everyone,


My apologies for not updating the restoration in a long time, but that is because I didn't get any time to go to Bumpu Sircar's workshop and see the progress on my car due to work and travel. I finally managed to take a day off from work and saw the progress so far, of which I am attaching a few pics. Basically, the major suspension parts were all cleaned of their gunk thoroughly, prime and painted with the correct epoxy semi-gloss black and I must say the finish is good.

Apart from that the differential has been re-assembled. Also got the pending suspension parts which need to be replaced which include NOS front coil springs which are of the harder type (the parts number on these springs are mentioned in the workshop manual as being harder springs for "sportier driving"), king pin set, steering knuckle set, propeller shaft bearing aluminum bracket and differential "O" ring set.

The only other parts for the drive-train now required are a couple of hollow and one solid universal joint, for which I have been quoted a very high price though they are the NOS Lubro Germany make or something. Looking for a more reasonably priced option.

Bumpu has managed to get NOS ATE rear wheel cylinders, though the ones for the front seem very hard to get, so if any one has any sources in India for ATE front wheel cylinders for pontons, please let me know (4 required). Bumpu has also got new bearings for the propeller shaft and water pump and I had given him the old wiring harness and fuse box which he will study and make a completely new wiring harness with cloth braiding for the electricals.

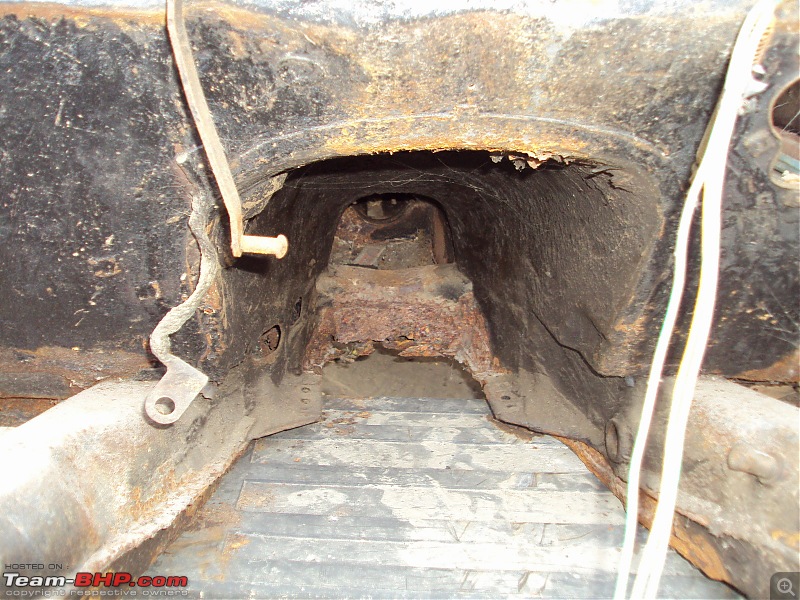
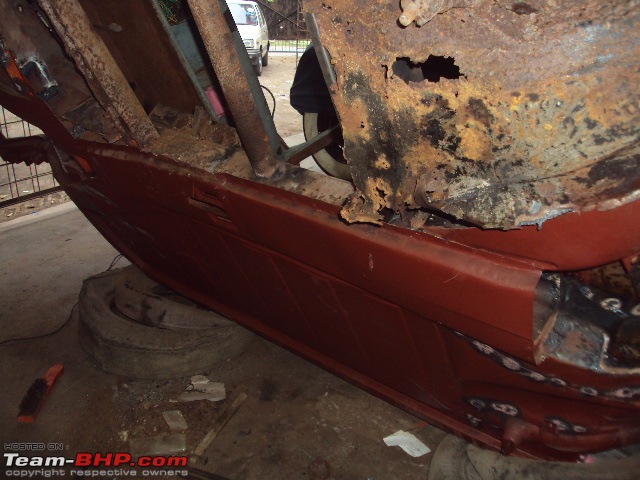
Body work is also about to start, and from the looks of it, it's going to take a lot of effort and time to get the under carriage sorted out, since it has major rusting and corrosion, as shown in one of the pics. I was horrified to see the main cross member over the transmission tunnel so badly corroded but Bumpu assures me that his team is more than capable of taking care of this and also says that once the under body work is completed, none of the original rigidity of the monocoque frame will be compromised. For this under body work the plan is to turn the car on it's side and work on it!

Regards
mbz180


Suspension Arms
My 1958 Mercedes-Benz Type 180a Ponton-arms_1.jpg

Re-asembled Differential
My 1958 Mercedes-Benz Type 180a Ponton-diff_1.jpg

Miscelleneous Drive train parts
My 1958 Mercedes-Benz Type 180a Ponton-part_1.jpg

Rear Coil Springs
My 1958 Mercedes-Benz Type 180a Ponton-rearsprings_1.jpg

Engine sub-frame
My 1958 Mercedes-Benz Type 180a Ponton-subframe_1.jpg

Engine sub-frame
My 1958 Mercedes-Benz Type 180a Ponton-subframe_2.jpg

Terrible under-body corrosion
My 1958 Mercedes-Benz Type 180a Ponton-body_1.jpg
mbz180 is offline  
Old 11th September 2010, 21:16   #51
BHPian
 
mbz180's Avatar
 
Join Date: Jan 2010
Location: Kolkata
Posts: 893
Thanked: 1,023 Times

Hi everyone, after a long gap I am posting some pics which show the state of the under carriage. There is terrible rot and the car has been kept inside the covered area of the workshop just in time. Work on the body is progressing, and will cotinue after tilting the car on its side so that the body mech has access to the under belly of the car. Needless to say, I was mortified when I saw the full extent of the years of neglect that the car faced, prior to my dad buying it.

Last edited by mbz180 : 11th September 2010 at 21:33. Reason: attachments failed to upload
mbz180 is offline  
Old 11th September 2010, 21:47   #52
BHPian
 
mbz180's Avatar
 
Join Date: Jan 2010
Location: Kolkata
Posts: 893
Thanked: 1,023 Times

Oops. Here are the pics.
Attached Thumbnails
My 1958 Mercedes-Benz Type 180a Ponton-front_1.jpg  

My 1958 Mercedes-Benz Type 180a Ponton-front_2.jpg  

My 1958 Mercedes-Benz Type 180a Ponton-frontunder_1.jpg  

My 1958 Mercedes-Benz Type 180a Ponton-frontunder_2.jpg  

My 1958 Mercedes-Benz Type 180a Ponton-middleunder_2.jpg  

My 1958 Mercedes-Benz Type 180a Ponton-middleunder_3.jpg  

My 1958 Mercedes-Benz Type 180a Ponton-rear_3.jpg  

My 1958 Mercedes-Benz Type 180a Ponton-rearunder_2.jpg  

My 1958 Mercedes-Benz Type 180a Ponton-scraping_3.jpg  

My 1958 Mercedes-Benz Type 180a Ponton-rearunder_1.jpg  

mbz180 is offline  
Old 21st October 2010, 14:38   #53
BHPian
 
mbz180's Avatar
 
Join Date: Jan 2010
Location: Kolkata
Posts: 893
Thanked: 1,023 Times

Hi Everyone,


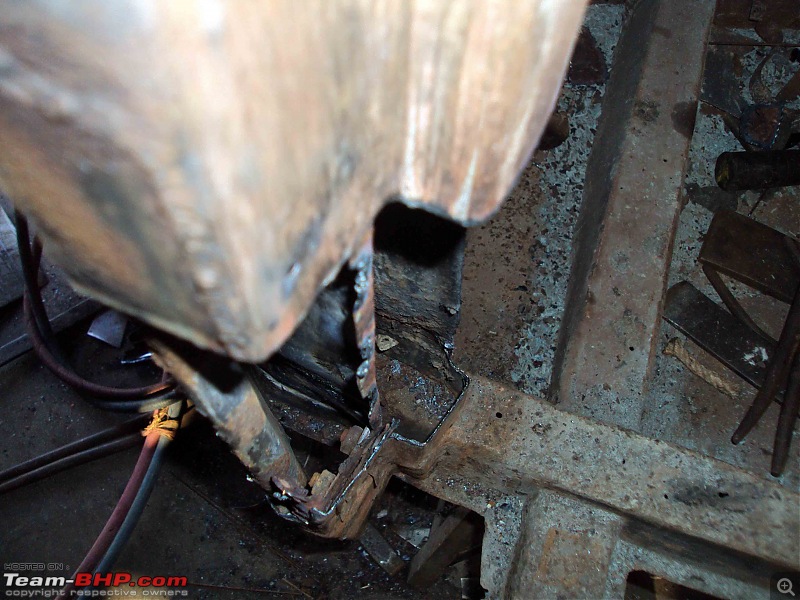
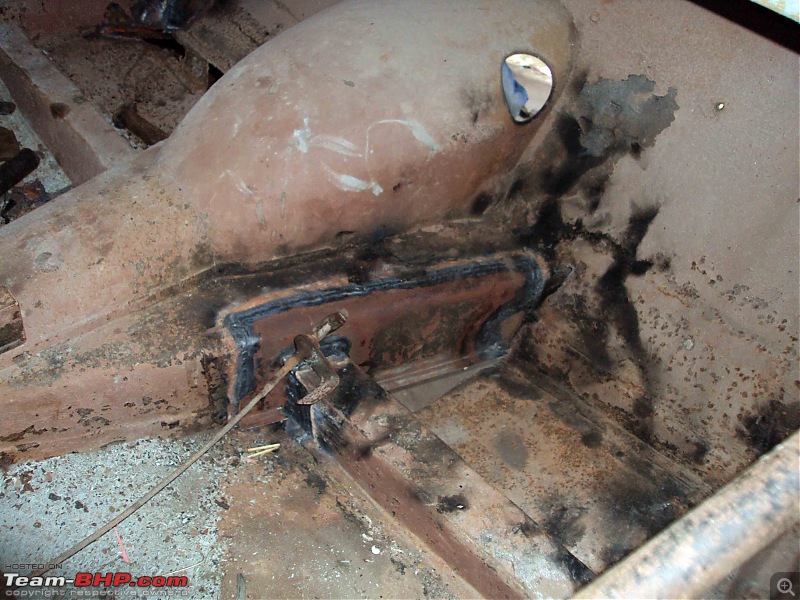
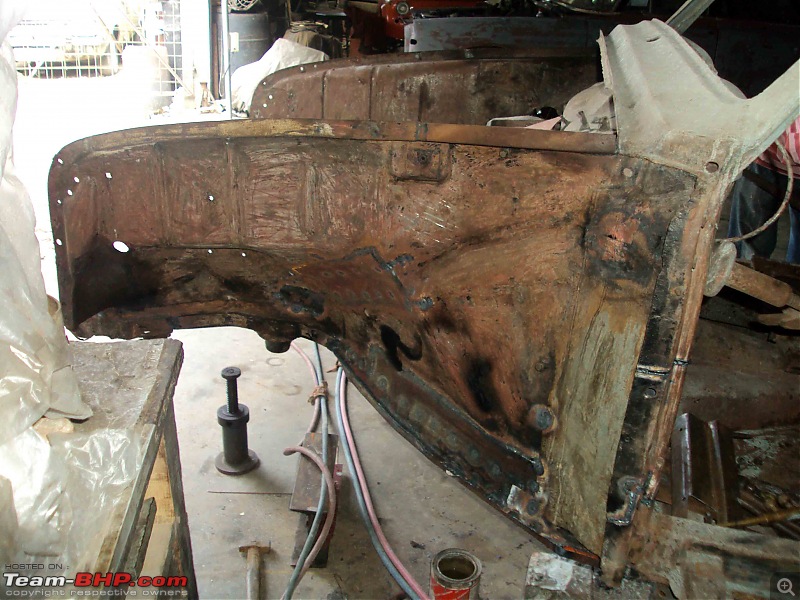
Work on the undercarriage is progressing, and I am told that the car should be on its side tomorrow for the rest of the work. Quality of work is very good, but slow as there is a lot, and I really mean a lot, of rot in very hard to get places. The work on the front section of the frame is more or less done as the following photos show.

Front door pillar reveals rot inside
My 1958 Mercedes-Benz Type 180a Ponton-doorpillar_2.jpg

My 1958 Mercedes-Benz Type 180a Ponton-frontdoorpillar_1.jpg

Gearbox cross replaced
My 1958 Mercedes-Benz Type 180a Ponton-geartunnel_3.jpg

My 1958 Mercedes-Benz Type 180a Ponton-gearhup_1.jpg

Inner fender
My 1958 Mercedes-Benz Type 180a Ponton-leftinnerfender_1.jpg

Front section from underneath
My 1958 Mercedes-Benz Type 180a Ponton-rightunder_1.jpg

My 1958 Mercedes-Benz Type 180a Ponton-undercoting_1.jpg

Protective coating for inner skin of all panels for chassis
My 1958 Mercedes-Benz Type 180a Ponton-tunel_1.jpg

My 1958 Mercedes-Benz Type 180a Ponton-leftunder1.jpg
Attached Thumbnails
My 1958 Mercedes-Benz Type 180a Ponton-upperleftchassis_1.jpg  

mbz180 is offline  
Old 26th October 2010, 14:29   #54
BHPian
 
mbz180's Avatar
 
Join Date: Jan 2010
Location: Kolkata
Posts: 893
Thanked: 1,023 Times

Made another visit to the restorer's place last Saturday. Here are some pics highlighting the frame areas which will be replaced. Progress is good, and as you can see, the car is finally on it's side! After the upper side is done then the car will be raised on the other side to enable easy access to the corroded areas. The red highlight in the first photo shows the parts of the chassis that have already been replaced. White highlight in 3rd pic shows the areas still to be done.

Regards
mbz180
Attached Thumbnails
My 1958 Mercedes-Benz Type 180a Ponton-undermod_1.jpg  

My 1958 Mercedes-Benz Type 180a Ponton-undermod_2.jpg  

My 1958 Mercedes-Benz Type 180a Ponton-undermod_3.jpg  

My 1958 Mercedes-Benz Type 180a Ponton-mb180restoration-007.jpg  

My 1958 Mercedes-Benz Type 180a Ponton-mb180restoration-008.jpg  

My 1958 Mercedes-Benz Type 180a Ponton-mb180restoration-010.jpg  


Last edited by mbz180 : 26th October 2010 at 14:43. Reason: Adding text and pictures
mbz180 is offline  
Old 31st October 2010, 21:24   #55
BHPian
 
mbz180's Avatar
 
Join Date: Jan 2010
Location: Kolkata
Posts: 893
Thanked: 1,023 Times

Made another trip to the restorer's workshop today. Progressing nicely, though by the looks of it, around 80% of the previous undercarriage and frame sections will need to be replaced. Was also discussing with the restorer an effective way to combat moisture being trapped inside the frame sections as they are supposed to be closed. Views from members will be much appreciated.
Stumbled upon some NOS Mercedes tools and had to pick them up; pictured are a Hex Nut spanner for the fuel tank/diff/gearbox drain plugs and the other is a special tool for valve and tappet adjustment.


Regards
mbz180
Attached Thumbnails
My 1958 Mercedes-Benz Type 180a Ponton-mb180restoration31.10.10-003.jpg  

My 1958 Mercedes-Benz Type 180a Ponton-mb180restoration31.10.10-005.jpg  

My 1958 Mercedes-Benz Type 180a Ponton-mb180restoration31.10.10-008.jpg  

My 1958 Mercedes-Benz Type 180a Ponton-mb180restoration31.10.10-022.jpg  

My 1958 Mercedes-Benz Type 180a Ponton-topview.jpg  

My 1958 Mercedes-Benz Type 180a Ponton-mb180restoration31.10.10-027.jpg  

mbz180 is offline  
Old 7th November 2010, 20:04   #56
BHPian
 
mbz180's Avatar
 
Join Date: Jan 2010
Location: Kolkata
Posts: 893
Thanked: 1,023 Times

Hello everyone,

Made a visit to the workshop today and am happy with the way the metal work is progressing. The body mechanic has been dedicated to my car exclusively and the thoroughness of his work shows through nicely in these pictures.

Regards
Attached Thumbnails
My 1958 Mercedes-Benz Type 180a Ponton-brace.jpg  

My 1958 Mercedes-Benz Type 180a Ponton-front-chasis.jpg  

My 1958 Mercedes-Benz Type 180a Ponton-frontchasis_1.jpg  

My 1958 Mercedes-Benz Type 180a Ponton-frontfloor.jpg  

My 1958 Mercedes-Benz Type 180a Ponton-mid.jpg  

My 1958 Mercedes-Benz Type 180a Ponton-rear.jpg  

My 1958 Mercedes-Benz Type 180a Ponton-rearseat.jpg  

My 1958 Mercedes-Benz Type 180a Ponton-tunnel.jpg  

mbz180 is offline  
Old 8th November 2010, 10:45   #57
Senior - BHPian
 
the mole's Avatar
 
Join Date: Nov 2006
Location: Mumbai
Posts: 2,189
Thanked: 825 Times

Hi Prithvi, Wow you have one tough task, but I have seen worse. The cream car pictured previously had even worse rusting but look how she turned out. A scan from some of the material I have in my collection.
Attached Thumbnails
My 1958 Mercedes-Benz Type 180a Ponton-147.jpg  

the mole is offline  
Old 8th November 2010, 17:14   #58
BHPian
 
mbz180's Avatar
 
Join Date: Jan 2010
Location: Kolkata
Posts: 893
Thanked: 1,023 Times

Quote:
Originally Posted by the mole View Post
Hi Prithvi, Wow you have one tough task, but I have seen worse. The cream car pictured previously had even worse rusting but look how she turned out. A scan from some of the material I have in my collection.
Hi Amol,

Thanks for the great scan. Anymore photos of the chassis and drive train that may be of help for the body work? I'm somewhat comforted by the thought of your friend's white ponton looking so pristine despite being in worse condition than mine


Regards
Prithvi
mbz180 is offline  
Old 22nd November 2010, 18:13   #59
BHPian
 
mbz180's Avatar
 
Join Date: Jan 2010
Location: Kolkata
Posts: 893
Thanked: 1,023 Times

Hello all,

Latest pictures of the tin work on my car. One side completed; other side and trunk yet to be done. Progress is now good and I'm told that the other side will be done by coming Saturday. Please let me know your views and comments on the work.


Regards
Prithvi

My 1958 Mercedes-Benz Type 180a Ponton-front_1.jpg
My 1958 Mercedes-Benz Type 180a Ponton-frontsec.jpg
My 1958 Mercedes-Benz Type 180a Ponton-back_1.jpg
My 1958 Mercedes-Benz Type 180a Ponton-mid.jpg
My 1958 Mercedes-Benz Type 180a Ponton-side.jpg

Light at the end of the tunnel!
My 1958 Mercedes-Benz Type 180a Ponton-propshaft.jpg
Attached Thumbnails
My 1958 Mercedes-Benz Type 180a Ponton-mid_1.jpg  


Last edited by mbz180 : 22nd November 2010 at 18:16. Reason: SPELLING ERROR
mbz180 is offline  
Old 1st December 2010, 00:09   #60
Senior - BHPian
 
avishar's Avatar
 
Join Date: Oct 2008
Location: kolkata/bangalore,india
Posts: 2,901
Thanked: 4,143 Times

Hi mbz180,the restoration is coming along very well.The quality of restoration is brilliant.Just a few pictures back the underside was deplorable!

What about the ATE front cylinders?Its been sourced?

By the way there is very good website about the pontons,i guess you know about it already but still posting it here
Mercedes-Benz Pontons (1953-1962) © www.mbzponton.org
avishar is offline  
Reply

Most Viewed


Copyright ©2000 - 2024, Team-BHP.com
Proudly powered by E2E Networks