Team-BHP > Shifting gears
Register New Topics New Posts Top Thanked Team-BHP FAQ


Reply
  Search this Thread
87,657 views
Old 4th February 2020, 12:57   #76
Senior - BHPian
 
ariesonu's Avatar
 
Join Date: Mar 2010
Location: Bombay
Posts: 1,343
Thanked: 2,417 Times
Re: The Woodworking Thread

Reviving thread with another completed project.

Background: I became daddy to a little angel in March 2019. Come November, the little one has learnt to crawl & is all over the house.
Post 8 of this thread chronicles the open shoe rack that I had built earlier. Open shoe rack was enough for both of us, but now the little one would crawl to the shoe rack, pull out the shoes & slippers & as she progressed to teething, we caught her chewing on her Mom's slippers.
During the same time our neighbours were renovating their house. After the renovation, lots of plywood & laminates pieces of different shapes, lengths & thickness were left behind.
Hence came up the project to build a proper shoe rack cabinet.
The cabinet is built on wheels & will be placed outside the main door. I LOVE anything on FOUR wheels

Sheepishly admitting that it took me two months to build this shoe-rack as most work was done over weekends & from the time stolen, when my little one was asleep. Again I had to be careful as power tools could/would wake her up.
You will also see her contribution below.

My 10'x4' balcony is my workshop
The Woodworking Thread-img_20191130_163231.jpg
The Woodworking Thread-img_20191130_165619.jpg
The Woodworking Thread-img_20191130_172014.jpg

Backboarding
The Woodworking Thread-img_20191205_115238.jpg

Shelved
The Woodworking Thread-img_20191226_144725.jpg
The Woodworking Thread-img_20191226_144745.jpg

Doors are made of 6MM ply-with edges reinforced with scrap plywood sections.
The Woodworking Thread-img_20191229_130440.jpg

Tyred
The Woodworking Thread-img_20200117_135402.jpg

Raw completed doors
The Woodworking Thread-img_20200117_135410.jpg

Door inner section is painted in white.
The Woodworking Thread-img_20200126_115403.jpg

Veneer on sides of cabinet
The Woodworking Thread-img_20200126_120334.jpg

Stain used for colouring the veneer
The Woodworking Thread-img_20200126_120533.jpg

My daughter's contribution to staining
The Woodworking Thread-img_20200126_121831.jpg

Final touches
Shelves: Top side (on which shoes will be placed) is laminated from leftover pieces of laminates, hence if you look closely you can see many small white laminate sections making one shelf top.
The Woodworking Thread-img_20200203_151954.jpg
The Woodworking Thread-img_20200203_154019.jpg

The new cabinet replacing the old one in background (under the aquarium)
You can see my wifey arraging shoes to be shifted here.
The Woodworking Thread-img_20200203_171116.jpg
The Woodworking Thread-img_20200203_171200.jpg
The Woodworking Thread-img_20200203_171218.jpg

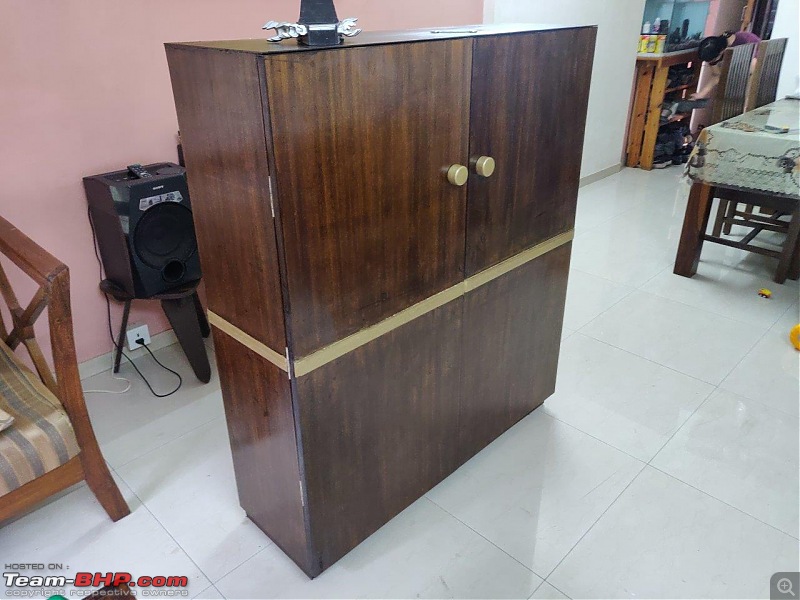
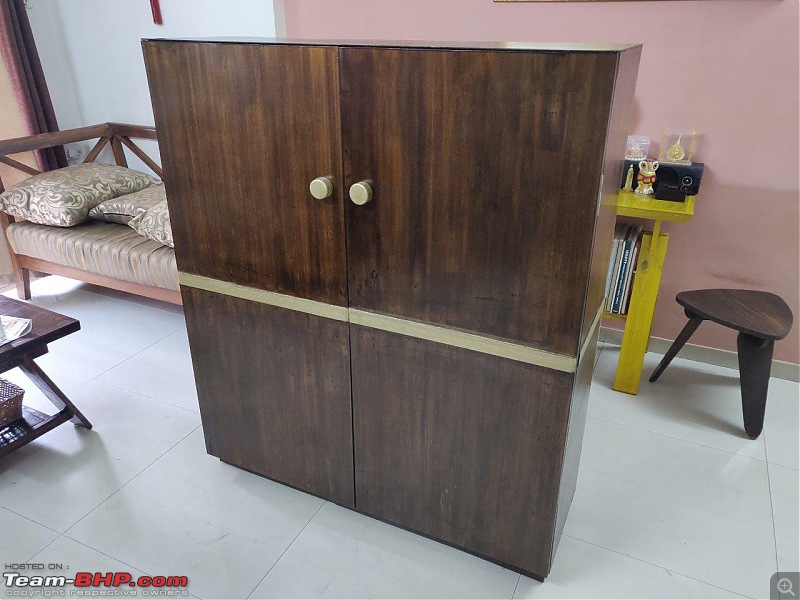
Finally the cabinet is complete.
The Woodworking Thread-img_20200203_171254.jpg

Would appreciate your feedback.
Regards-SS

Last edited by ariesonu : 4th February 2020 at 13:01. Reason: Captioning photos
ariesonu is offline   (21) Thanks
Old 22nd July 2020, 23:55   #77
Senior - BHPian
 
pjbiju's Avatar
 
Join Date: Apr 2006
Location: Pune
Posts: 1,357
Thanked: 1,092 Times
Re: The Woodworking Thread

Quote:
Originally Posted by ariesonu View Post
Reviving thread with another completed project.
...
My 10'x4' balcony is my workshop
..
Doors are made of 6MM ply-with edges reinforced with scrap plywood sections.
...
Final touches
Shelves: Top side (on which shoes will be placed) is laminated from leftover pieces of laminates, hence if you look closely you can see many small white laminate sections making one shelf top.
...
Visited this thread after a long time. Nice work buddy. There is nothing like making something useful out of leftover plywood. Most of it would have ended up as scrap.

6 mm plywood for the door makes good sense with the reinforcement along the borders. And with the veneer it must be 10mm. Doors really do not need to be that strong and heavy.

I would have made just one change. I would have laminated the topmost shelf with multiple laminates instead of the bottom shelf since it would be less noticeable if it was done on the topmost shelf. You can always redo it when you get hold of another piece of laminate.

I am surprised how you have managed to do so much on your smallish balcony.
pjbiju is offline   (2) Thanks
Old 23rd July 2020, 01:46   #78
BHPian
 
diyguy's Avatar
 
Join Date: Jun 2009
Location: Chennai
Posts: 517
Thanked: 578 Times

Quote:
Originally Posted by ariesonu View Post
Would appreciate your feedback.
Amazing considering you minimized use of power tools. I recommend you attach your cabinet to the wall to prevent it from toppling, considering it looks tall and you have a baby that will grab doors to stand.

I need to learn to finish like you. I have been wanting to make doors for a recessed archway in my rental home for which i had made shelves (no paint or mica) and didnt proceed with the doors as i have not learnt how to polish and smoothen plywood.
diyguy is offline  
Old 23rd July 2020, 05:11   #79
BHPian
 
GutsyGibbon's Avatar
 
Join Date: Mar 2008
Location: Southern Calif.
Posts: 755
Thanked: 4,541 Times
Re: The Woodworking Thread

Good to see woodworking enthusiasts here. Here are a couple of my recent projects.

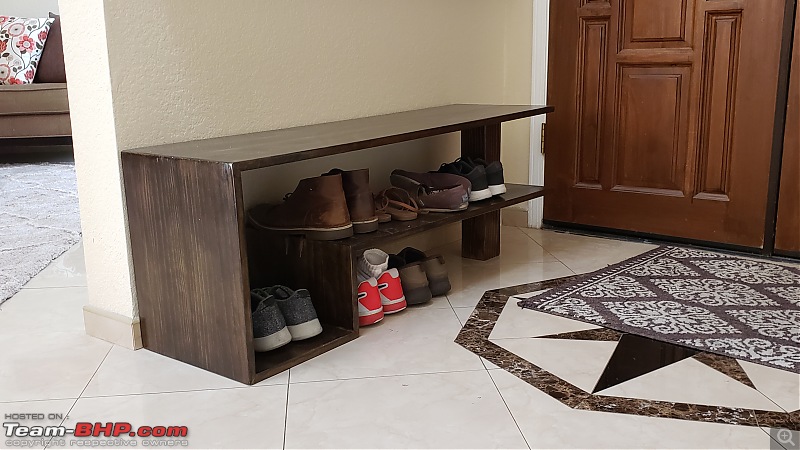
This one is a place by the door to sit and wear shoes, also a temporary storage area for a few frequently used shoes. Made from prime pine, stained walnut.
The Woodworking Thread-shoerack.jpg

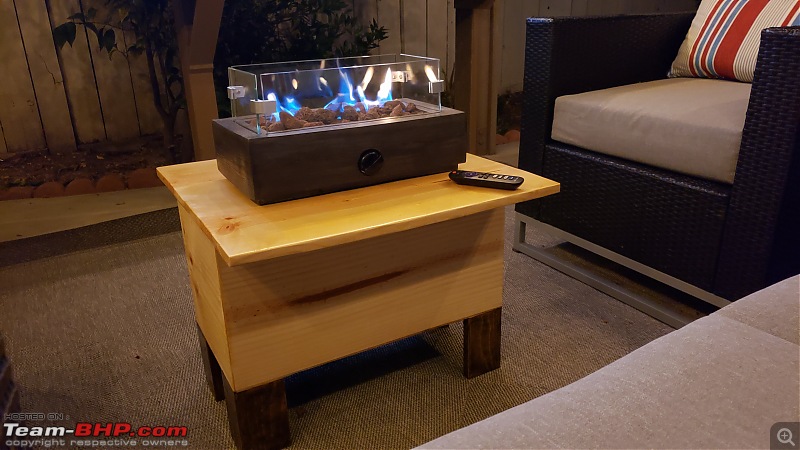
A table for a small gas burning fire place. The table also holds the gas tank. Made from inexpensive whitewood.
The Woodworking Thread-fireplace.jpg

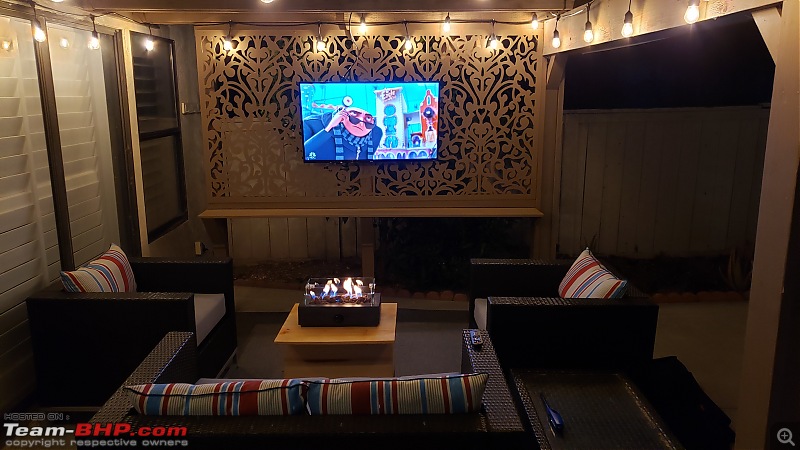
The outdoor patio was one of the biggest projects I have done. Lots of planning and research to protect stuff (electricals) from rain, & sun. Made from pressure treated lumber and Douglas fir
The Woodworking Thread-patio.jpg

This is my current project. I have been working on this one every day. It is a self watering planter. The ropes/cords in the PVC pipe slowly water the soil by the way of capillary effect. I have the planters in place, now I need to plant some greens. Cilantro, Basil, Mint/Pudina, may be some palak. Made from common whitewood. I should have used cedar, but it started off more as an experiment. Now, its gone too far.
The Woodworking Thread-planter.jpg
The Woodworking Thread-planter1.jpg

Last edited by GutsyGibbon : 23rd July 2020 at 05:20.
GutsyGibbon is offline   (13) Thanks
Old 23rd July 2020, 14:35   #80
Senior - BHPian
 
ariesonu's Avatar
 
Join Date: Mar 2010
Location: Bombay
Posts: 1,343
Thanked: 2,417 Times
Re: The Woodworking Thread

Let me start with thanking for appreciation.

Quote:
Originally Posted by pjbiju View Post
Visited this thread after a long time. Nice work buddy. There is nothing like making something useful out of leftover plywood. Most of it would have ended up as scrap.
I would have made just one change. I would have laminated the topmost shelf with multiple laminates instead of the bottom shelf since it would be less noticeable if it was done on the topmost shelf. You can always redo it when you get hold of another piece of laminate.
I am surprised how you have managed to do so much on your smallish balcony.
I did topmost shelf as it is the most visible when we open the rack.
The bottom most shelf is NOT laminated (I ran out of donated laminates). It is also the one that used everyday/frequently. As you can simply slip the footwear straightaway from your feet.
Thanks & encouragement inspires to do something more.

Quote:
Originally Posted by diyguy View Post
Amazing considering you minimized use of power tools. I recommend you attach your cabinet to the wall to prevent it from toppling, considering it looks tall and you have a baby that will grab doors to stand.
I need to learn to finish like you. I have been wanting to make doors for a recessed archway in my rental home for which i had made shelves (no paint or mica) and didnt proceed with the doors as i have not learnt how to polish and smoothen plywood.
The cabinet is outside the main door but yes it is still FAST SNAP bolted to the wall. We cannot make unnecessary holes on that wall as it has LIFT tunnel on other side. The snap-twist can be undone in single twist and move the racks for cleaning underneath.

Do share photos of what you have done so far & let us share ideas.

Quote:
Originally Posted by GutsyGibbon View Post
Good to see woodworking enthusiasts here. Here are a couple of my recent projects.
A table for a small gas burning fire place. The table also holds the gas tank. Made from inexpensive whitewood.
The outdoor patio was one of the biggest projects I have done. Lots of planning and research to protect stuff (electricals) from rain, & sun. Made from pressure treated lumber and Douglas fir
Attachment 2033459
This is my current project. I have been working on this one every day. It is a self watering planter.
I had read your post on DIY thread about Patio build & Man, it is amazing. RESPECT.

I love that fireplace table & would love to build one like that. I will probably use PALLET wood.

The vertical garden is amazing, I hope that you have put plastic in those wooden pots before putting soil. I was recently reading about gardening & the writer had said that we do not kill house plants by under-watering but by over-watering.
I use lots of egg shells & left over of vegetables as manure. I simply cut/crush them in an old 20 litre paint drum & pour soil over it (50:50-kitchen garbage & soil) spray water over it & leave it there in sun. After about 40 days, the organic soil+manure is ready. Sometimes it attracts those garbage flies (small one) but overall, the soil is enriched.
I however once ended up burning my rose bushes by overuse of organic manure. In last 2 years, I have had to make manure thrice only and once it was a disaster.

Regards-Sonu

Last edited by ariesonu : 23rd July 2020 at 14:38. Reason: Grammar
ariesonu is offline   (5) Thanks
Old 23rd July 2020, 17:26   #81
BHPian
 
GutsyGibbon's Avatar
 
Join Date: Mar 2008
Location: Southern Calif.
Posts: 755
Thanked: 4,541 Times
Re: The Woodworking Thread

Quote:
Originally Posted by ariesonu View Post
I had read your post on DIY thread about Patio build & Man, it is amazing. RESPECT.

I love that fireplace table & would love to build one like that. I will probably use PALLET wood.

The vertical garden is amazing, I hope that you have put plastic in those wooden pots before putting soil. I was recently reading about gardening & the writer had said that we do not kill house plants by under-watering but by over-watering.
Thanks, appreciate your compliments.

Yes, I have clear plastic stapled to the interior wood surface of the planter. I also have 2 coats of natural linseed oil to repel water from the wood.

I like composting as well. I have built a compost tumbler, and these planter boxes are waiting for what is cooking in the tumbler. It has been 3 weeks, hopefully I will have some black gold.

The Woodworking Thread-20200606_184808.jpg
GutsyGibbon is offline   (6) Thanks
Old 24th July 2020, 04:30   #82
BHPian
 
GutsyGibbon's Avatar
 
Join Date: Mar 2008
Location: Southern Calif.
Posts: 755
Thanked: 4,541 Times
Re: The Woodworking Thread

Quote:
Originally Posted by ariesonu View Post
I did topmost shelf as it is the most visible when we open the rack.
The bottom most shelf is NOT laminated (I ran out of donated laminates). Sonu
Sonu,
I went back and looked at some of the pictures posted earlier on this thread. Considering the tools you have they are beyond amazing. RESPECT! I started off woodworking with power tools, so I feel envious of people with true traditional skills.

Adding another pic of a project I did after the Covid lockdown - to work from home. I did all of this in a few weekends. 2 crates, a corner shelf and an art piece (to keep the wife happy). I don't think I could have done this with hand tools in years
The Woodworking Thread-wfh.jpg
GutsyGibbon is offline   (12) Thanks
Old 20th August 2020, 22:20   #83
BHPian
 
GutsyGibbon's Avatar
 
Join Date: Mar 2008
Location: Southern Calif.
Posts: 755
Thanked: 4,541 Times
Re: The Woodworking Thread

My cadence of washing clothes never matched with my wife. So, I got another laundry basket. Now, she was not happy with how the bathroom looked with two large baskets in the corner, then an old rackety ironing board next to it. All this only meant a new project for me. I tried to solve for all the needs and ended up with this. A tilt out laundry hamper (for him and her) and a kick out ironing board. All built out of inexpensive white wood, birch plywood, stained dark walnut, plus a clear coat of poly.
The Woodworking Thread-hamper.jpg
GutsyGibbon is offline   (17) Thanks
Old 27th August 2020, 15:31   #84
Team-BHP Support
 
Rehaan's Avatar
 
Join Date: Feb 2004
Location: Bombay
Posts: 24,046
Thanked: 34,074 Times
Re: The Woodworking Thread

Quote:
Originally Posted by GutsyGibbon View Post
I tried to solve for all the needs and ended up with this.
That's cool!

Any fire concerns with having a wooden ironing board?
Rehaan is offline   (1) Thanks
Old 27th August 2020, 21:49   #85
BHPian
 
GutsyGibbon's Avatar
 
Join Date: Mar 2008
Location: Southern Calif.
Posts: 755
Thanked: 4,541 Times
Re: The Woodworking Thread

Quote:
Originally Posted by Rehaan View Post
That's cool!
Any fire concerns with having a wooden ironing board?
The wood is cut after tracing the shape of a standard store bought ironing board. So the cloth iron board covers fit very well on it. With the cover on, it is like ironing on any wooden table. I did not take a picture with the cover on as the cover looks old and worn. I have coated the wood with polyurethane so that any moisture from the steam iron does not get into the wood and cause warping.

Last edited by GutsyGibbon : 27th August 2020 at 21:50.
GutsyGibbon is offline   (3) Thanks
Old 13th September 2020, 20:34   #86
BANNED
 
Join Date: Mar 2010
Location: Hyderabad
Posts: 491
Thanked: 589 Times
Re: The Woodworking Thread

Hello fellow bhpians,

I am looking for advice on the products I need to finish the wooden top I am getting from ikea. The link to product is here. I would be using this as a table top for my OWH computer/gaming setup.

I am looking to stain it to darker shade may be (mahogany I guess?) given that I have a bed in the same room with dark finish. I am also looking to varnish it to make it water proof.

I am looking for advice on what products (in Indian market) I should be looking at.

Things that I know from couple of youtube videos are.

1. Sandpaper (80grit, 180 grit and may be one 240grit or something).
2. Stain (water based probably?). What would be cost of this. What the reasonably priced quality brands should I look for. How much quantity? The side of the board is roughly around 2.5ft x 5.5 ft.
3. PU Varnish (water based?). What would be the cost. How much quantity for applying 4 to 5 coats. Any reasonably priced quality brand as suggestions?
4. Do I need any thinner?
5. Do I need anything else? I think I need one brush for PU varnish.

Thanks in advance.
ottocycle is offline  
Old 18th September 2020, 05:39   #87
BHPian
 
mohit's Avatar
 
Join Date: Sep 2004
Location: Toronto / Kurukshetra
Posts: 677
Thanked: 168 Times
Re: The Woodworking Thread

Quote:
Originally Posted by GutsyGibbon View Post
I like composting as well. I have built a compost tumbler, and these planter boxes are waiting for what is cooking in the tumbler. It has been 3 weeks, hopefully I will have some black gold.

Attachment 2033581
Pointers on this please! Is it a fixed one or can you spin it? I need one and DIY would be ideal!
mohit is offline  
Old 18th September 2020, 10:29   #88
BHPian
 
GutsyGibbon's Avatar
 
Join Date: Mar 2008
Location: Southern Calif.
Posts: 755
Thanked: 4,541 Times
Re: The Woodworking Thread

Quote:
Originally Posted by mohit View Post
Pointers on this please! Is it a fixed one or can you spin it? I need one and DIY would be ideal!
The drum is sitting on small plastic casters/wheels. Yes, it spins on it. Inside the drum I cut a 4" pvc pipe in half and screwed both halves on the walls of the drum. This way, the compost mixes well when the drum is spun. The plastic drum is a food grade drum that was used to ship vegetable oil, or fish oil. The wood is inexpensive framing lumber.
Quote:
Originally Posted by ottocycle View Post
Hello fellow bhpians,

I am looking for advice on the products I need to finish the wooden top I am getting from ikea. The link to product is
At RS 7k or $100 isn't it too expensive? I used to go to saw mill in the 80s and buy directly. Just glue the hard wood panels and plane them with hand plane.

Last edited by GutsyGibbon : 18th September 2020 at 10:33.
GutsyGibbon is offline   (1) Thanks
Old 20th September 2020, 19:40   #89
Senior - BHPian
 
pjbiju's Avatar
 
Join Date: Apr 2006
Location: Pune
Posts: 1,357
Thanked: 1,092 Times
Re: The Woodworking Thread

Quote:
Originally Posted by ottocycle View Post
Hello fellow bhpians,

I am looking for advice on the products I need to finish the wooden top I am getting from ikea. The link to product is here. I would be using this as a table top for my OWH computer/gaming setup.

I am looking to stain it to darker shade may be (mahogany I guess?) given that I have a bed in the same room with dark finish. I am also looking to varnish it to make it water proof.

I am looking for advice on what products (in Indian market) I should be looking at.

Things that I know from couple of Youtube videos are.

1. Sandpaper (80grit, 180 grit and may be one 240grit or something).
2. Stain (water based probably?). What would be cost of this. What the reasonably priced quality brands should I look for. How much quantity? The side of the board is roughly around 2.5ft x 5.5 ft.
3. PU Varnish (water based?). What would be the cost. How much quantity for applying 4 to 5 coats. Any reasonably priced quality brand as suggestions?
4. Do I need any thinner?
5. Do I need anything else? I think I need one brush for PU varnish.

Thanks in advance.
  1. Since you are buying a finished product with an oil finish (as given on the Ikeas site), get 80 grit and also a higher grit like 400 or something. Not sure how much the oil finish would have penetrated for you to remove it and then stain it. You will have to try on a small patch on the udnerside of the table first.
  2. You get color powder in 100gm/200gm packet etc. Most of these color powders are very cheap like Rs. 100 or less for 100 gm pkt. You have to mix that with some plain polish or spirit and apply it with a cloth. You can mix and match the colors to get a shade you want. You can also get Asian Paints stainer that are solvent based. They come in small bottles. Not sure of the cost now.
  3. You can get finishes by Asian Paints or MRF etc. from any good paint shop. You can try getting more information from Asian Paints or MRF Paints (woodcoat) web sites.
pjbiju is offline  
Old 4th October 2020, 10:26   #90
BHPian
 
GutsyGibbon's Avatar
 
Join Date: Mar 2008
Location: Southern Calif.
Posts: 755
Thanked: 4,541 Times
Re: The Woodworking Thread

I just completed building a new walk-in closet. I created a gif of the build process.
Name:  20201003_185225.gif
Views: 508
Size:  1.15 MB

All done, walnut trims and LED lighting
The Woodworking Thread-img20201003wa0004.jpg
GutsyGibbon is offline   (9) Thanks
Reply

Most Viewed

Copyright ©2000 - 2024, Team-BHP.com
Proudly powered by E2E Networks