Team-BHP > Shifting gears > Et Cetera
Register New Topics New Posts Top Thanked Team-BHP FAQ


Reply
  Search this Thread
1,304,192 views
Old 4th August 2008, 22:54   #631
BHPian
 
Join Date: Oct 2005
Location: chennai
Posts: 827
Thanked: 383 Times

Quote:
Originally Posted by rippergeo View Post
I tried this method. it does wonders for the colours in the sky, but the foreground gets darkened. is it because the exposure was insufficient?
Ripper, did you try the entire work flow that rudraji suggested? because when you work on the particular layer, you just concentrate on your sky/highlights and just don't bother about the shadow area.

Am i right rudraji?

regards
tifosi.
tifosikrishna is offline  
Old 5th August 2008, 06:26   #632
rippergeo
 
Posts: n/a

I applied only the quoted part. am I supposed to combine both A & B?
 
Old 5th August 2008, 06:32   #633
Team-BHP Support
 
Rudra Sen's Avatar
 
Join Date: Apr 2004
Location: Bangalore
Posts: 11,590
Thanked: 6,532 Times

Quote:
Originally Posted by rippergeo View Post
am I supposed to combine both A & B?
Yes, you're. Let me see if I can post a visual work flow demo.
Rudra Sen is offline  
Old 5th August 2008, 10:04   #634
Team-BHP Support
 
benbsb29's Avatar
 
Join Date: Nov 2006
Location: Brisbane
Posts: 9,968
Thanked: 13,218 Times

Rudra ji, i am looking forward to the visual demo, and so will many others.
benbsb29 is offline  
Old 5th August 2008, 14:51   #635
Team-BHP Support
 
Rudra Sen's Avatar
 
Join Date: Apr 2004
Location: Bangalore
Posts: 11,590
Thanked: 6,532 Times

I’m trying to put up a visual demo. Please keep this in mind that not all car shot can be processed in this manner.
Lighting/shape of the car/colour of the car will eventually determine your processing procedure.

However, this process will cover most of the outdoor shooting situation.

Work in layers. That’s the key of exploiting Photoshop.
Please remember that more you add layers, more you make the final file size heavy.
Use layers judiciously. Fine colour correction is possible with 16bit mode.

If your primary objective is posting on the net then it’s not really that important.

RAW FILES HAVE BETTER LATITUDE TO HANDLE FINE COLOUR CORRECTION.

There is no real short cut for Photoshop. You need to work through to get the desired result.

Sample car here is from MAG. Note: that this is an extremely rough example.

Shot with CANON EOS 1Ds Mark II with 70-200mm 2.8 EF/IS lens. Focal length used 200mm. ISO 50. Shutter speed 4 seconds. Aperture f29. Remote release RS-80N3 was used to avoid any sort of vibration. Manfrotto 058 tripod with 029 head.

Processing software:
CANON DIGITAL PROFESSIONAL
Photoshop CS2

Hardware:
APPLE POWERPC G5 QUAD with 30 inches studio display.

Processed file from CANON DIGITAL PROFESSIONAL was 95mb. 16bit RGB.
Two different TIFF files were generated from the base RAW file.

Photoshop conversion CMYK, 16bit was 126.8mb. Scratch (disk) size was 566mb.

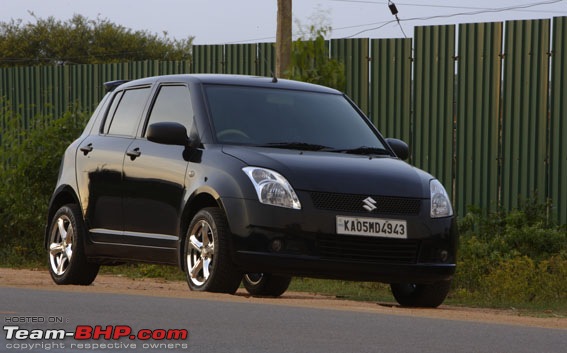
First processed TIFF from CANON DIGITAL PROFESSIONAL with normal tone/colours and sharpness. This is your base file in Photoshop.

The Auto-Image thread-d1.jpg

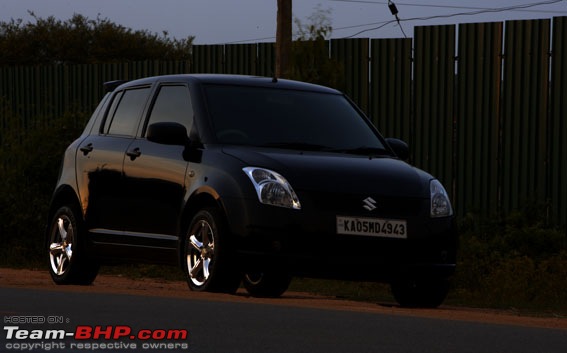
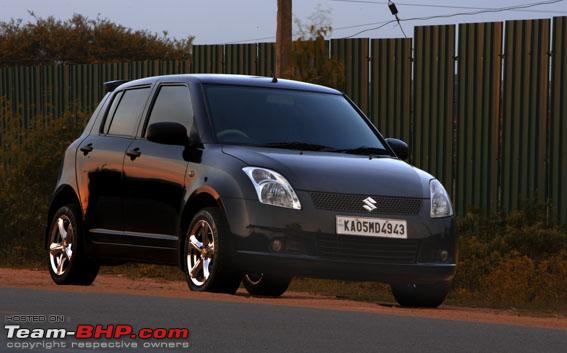
Second processed TIFF from CANON DIGITAL PROFESSIONAL.
Processed on linear mode for higher contrast tonal range. Note those sunset colour lines on the body panel. Note those headlamps tonal depth. Note alloys fluid chrome gloss. Rest, are gone dark. Open this file and copy. Paste it as layer one.

The Auto-Image thread-d2.jpg

Draw a path (with pen tool) for the car. THIS STEP IS A MUST. YOU CANNOT HAVE PRECISE SELECTION WITH ANY OTHER TOOL.

The Auto-Image thread-path.jpg

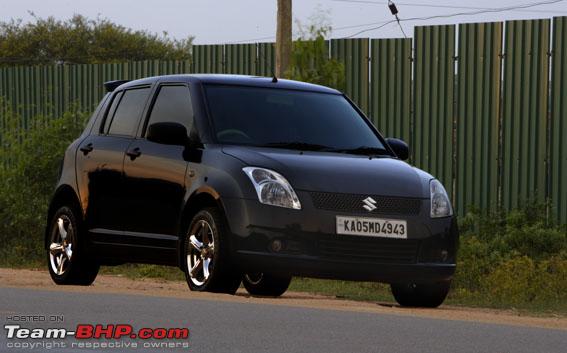
Select path and copy just the car from base layer. Paste. This will be your layer three. So, it’s sitting above layer two. Pull it down and bring it above base layer. Name it as TONE 1. You need to work on the overall tone for the car. Apple-m or control-m for curve tool. Up or down will depend on your choice. Here it was down to get more depth on the existing base layer car.
Select path again to copy the car from layer one. Paste it above layer TONE 1 as TONE 2. Switch off TONE 2 buy clicking the eye icon sitting next to it. Click on TONE 1 and add a mask box. Mask box is a gray box with white circle sitting below your layer palate. Select brush and its size. Watch the colour palate on toolbox. It should be black and white. Black should be sitting on top. Select opacity from brush control panel box. Keep it at 20% (hit 2 on keyboard). Start brushing off those too dark areas from TONE 1. Now you’ll see a well exposed with right tonal range on the entire car.

The Auto-Image thread-depth.jpg

Select TONE 2. Bring back the eye icon and click on the layer. Add a mask box. Start brushing off those too dark areas. HERE YOU NEED TO APPLY YOUR OWN ESTHETICS AND JUDGEMENT.

Name:  depth2.jpg
Views: 756
Size:  83.8 KB

Select path again and go to layer two. Once selected, hit delete key. Now you have an image without a car in it. Drag it down and place it above base layer. Select opacity from layer box top. Select opacity according to your preference.

The Auto-Image thread-carout.jpg

Merge or flatten layers. You can now play a little with curve tool and exposure tool. AS I DID.

The Auto-Image thread-final.jpg

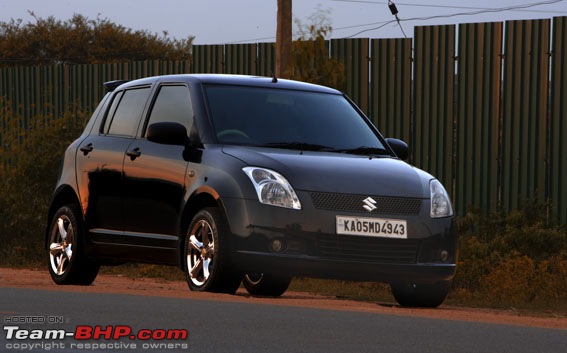
SO, THERE YOU GO. REMEMBER EVERY SINGLE AUTOMOBILE/BIKE ADD GOES THROUGH THIS KIND OF TRAUMA. ONLY DEGREE VARIES.
Rudra Sen is offline  
Old 5th August 2008, 17:29   #636
Senior - BHPian
 
Rahulkool's Avatar
 
Join Date: Oct 2007
Location: Chennai
Posts: 1,386
Thanked: 1,416 Times

taken this one while going to mahabs this sunday ..... done a lot of photochopping
Camera used Canon S3 IS


PS: what a coincidence i have done same this what Rudra ji has said in the above post ..... was thinking of experimenting with this from long time

Last edited by Rahulkool : 5th August 2008 at 17:38.
Rahulkool is offline  
Old 5th August 2008, 18:17   #637
NIP
Senior - BHPian
 
NIP's Avatar
 
Join Date: Jun 2006
Location: Bangalore
Posts: 1,180
Thanked: 152 Times

rudra...that was very helpful. thanks for sharing !!

rahulkool...nice job.
NIP is offline  
Old 5th August 2008, 20:23   #638
Senior - BHPian
 
jkdas's Avatar
 
Join Date: Sep 2005
Location: Thiruvananthapu
Posts: 9,687
Thanked: 1,492 Times

Sirji! thats a lot of info about PS job!

For some reason I hate doing PS job. Can someone help me out with these?
Attached Thumbnails
The Auto-Image thread-dscf7648-medium.jpg  

The Auto-Image thread-dscf7611-medium.jpg  

jkdas is offline  
Old 5th August 2008, 23:06   #639
Senior - BHPian
 
Rahulkool's Avatar
 
Join Date: Oct 2007
Location: Chennai
Posts: 1,386
Thanked: 1,416 Times

Thanks NIP

here is something which i did in 10 mins ..... well i overdid it a little and it needs more time + better pic + better person at photoshop
Attached Thumbnails
The Auto-Image thread-safari.jpg  

Rahulkool is offline  
Old 6th August 2008, 10:12   #640
BHPian
 
mansidea's Avatar
 
Join Date: Mar 2007
Location: Bangalore
Posts: 238
Thanked: 4 Times

Rahul, taking off that electric post popping out of the safari's rear - was a good idea. It changed the mood of the pic.
mansidea is offline  
Old 6th August 2008, 22:56   #641
Senior - BHPian
 
Rahulkool's Avatar
 
Join Date: Oct 2007
Location: Chennai
Posts: 1,386
Thanked: 1,416 Times

here is another one from me ....

now someone tell me what is different from normal palio :P

Rahulkool is offline  
Old 6th August 2008, 23:00   #642
Team-BHP Support
 
Akshay1234's Avatar
 
Join Date: Dec 2006
Location: Mumbai
Posts: 10,265
Thanked: 12,317 Times

the extra grill..
Akshay1234 is offline  
Old 7th August 2008, 07:24   #643
rippergeo
 
Posts: n/a

Thanks rudra! I've bookmarked this page for reference. still working on the stuff you've said. have got a lot of doubts, but will try and figure them out for some more time before I come back here with them.
 
Old 7th August 2008, 11:02   #644
Senior - BHPian
 
Rahulkool's Avatar
 
Join Date: Oct 2007
Location: Chennai
Posts: 1,386
Thanked: 1,416 Times

Quote:
Originally Posted by akshay1234 View Post
the extra grill..
what extra grill ?? :-/ ......
Rahulkool is offline  
Old 7th August 2008, 12:37   #645
BANNED
 
Join Date: Nov 2004
Location: Bangalore / Madras
Posts: 1,982
Thanked: 31 Times

The Fedders Lloyd touch is missing.

Edit: Sorry, guess the 1.6 has a better front grill. Is the number plate position different?

Last edited by hrag : 7th August 2008 at 12:40.
hrag is offline  
Reply

Most Viewed


Copyright ©2000 - 2024, Team-BHP.com
Proudly powered by E2E Networks